
Uni Rider - Kids tricycle Valco Baby - Free user manual and instructions
Find the device manual for free Uni Rider Valco Baby in PDF.


| Product Type | Ride-On Board for Strollers |
| Brand | Valco Baby |
| Model | Uni Rider |
| Suitable Age | 15 months and older |
| Maximum Weight Capacity | 25 kg (55 lbs) |
| Attachment Method | Strap-on connector to rear axle or tube (up to 45 mm diameter) |
| Height Adjustment | 6 positions, 12-24 cm above ground |
| Wheel Type | Single wheel |
| Seat | Yes, with adjustable handlebar |
| Footrest | Integrated |
| Materials | High strength plastic and steel |
| Cleaning | Wipe with warm soapy water; lubricate moving parts |
| Maintenance | Regular lubrication, check for dirt/gravel |
| Safety | Not for jogging, running, or skating |
| Certification | AS 2088:2022, AS/NZS ISO 8124 |
| Included Items | Connector console, seat support, wheels, handle bar, seat, M6/M8 nuts, tools |
| Compatibility | Most strollers with rigid rear axle or tube up to 45mm |
| Usage | For transporting a second child |
Frequently Asked Questions - Uni Rider Valco Baby
User questions about Uni Rider Valco Baby
0 question about this device. Answer the ones you know or ask your own.
Ask a new question about this device
Download the instructions for your Kids tricycle in PDF format for free! Find your manual Uni Rider - Valco Baby and take your electronic device back in hand. On this page are published all the documents necessary for the use of your device. Uni Rider by Valco Baby.
USER MANUAL Uni Rider Valco Baby
natural_image
Line drawing of a baby car seat with wheels and adjustable arm (no text or symbols)Important - Keep these instructions for future reference
Thank you for purchasing a quality valcobaby product. Please read and follow the instructions outlined in this guide carefully. Familiarise yourself with the construction and safety features. Be sure that you understand all the warnings and safety guidelines before use.
Important: Please read the following instructions carefully before assembling this product. Keep these instructions for future reference. Familiarise yourself with the warnings and guidelines.
DISCLAIMER: Due to our policy of continuous product development, this product is constantly evolving. It is possible that some features or procedures outlined here have changed since this document was written. If you are unsure of any procedure shown here, please contact us via email at info@valiantbrands.com.au to obtain the most up to date information before use. Include the batch number and model number, which can be found on a sticker on the frame.
All pictures and diagrams herein are provided for illustration purposes only. Actual product, colour or fabric may vary valcobaby reserves the right to modify or alter any specification or colour without notice or obligation to modify any product previously purchased
IMPORTANT WARNING: Always refer to the Warnings page when you see this symbol
THIS PRODUCT IS NOT SUITABLE FOR RUNNING OR SKATING
The Uni Rider enables you to transport your second child comfortably and quickly when they are feeling tired. It can be attached to the axle, rear bar or folding plate of most of prams, strollers and buggies.
- The Uni Rider is built for children aged upwards of 15 months and with a body weight of up to 25 kg. - The Uni Rider is developed for prams, strollers and folding buggies with a rigid rear axle or tube with a diameter of up to 45mm tube. It may not be suitable for some models without applicable rear construction or in cases where the brake function is hindered.
Please consult your specialist dealer before making your purchase.
PARTS
natural_image
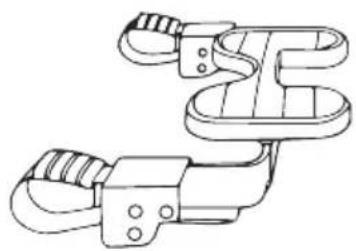
Technical line drawing of a mechanical clamp or bracket assembly (no text or symbols)1x Conector console with footrest set

natural_image
Simple line drawing of a bent pipe or lever with a vertical rod inserted (no text or symbols)1x Seat support with M6 Screw and Nut

natural_image
Simple line drawing of a wheel with a candle and a handle (no text or symbols)1x Wheels
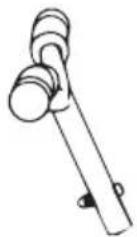
1x Handle bar with M6 Screw and Nut

natural_image
Line drawing of a car seat with visible ribs and seat cover (no text or symbols)1x Seat

2x M8 Nut and Washer

2x Tools
ASSEMBLY INSTRUCTIONS
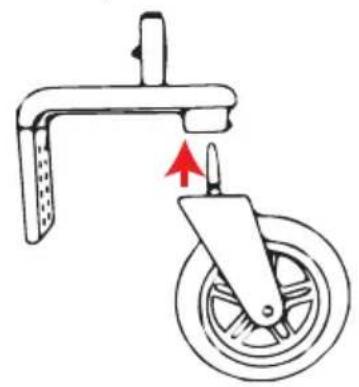
- Insert the wheel pin into the housing of the seat support until it clicks into the housing as illustrated. Ensure the wheel is securely locked in place.
natural_image
Diagram of a bicycle steering wheel with a lever and wheelbase, showing no text or symbols- To remove, press the button to remove the wheel as illustrated.

natural_image
Diagram of a bicycle steering wheel with red arrows indicating motion direction (no text or symbols)-
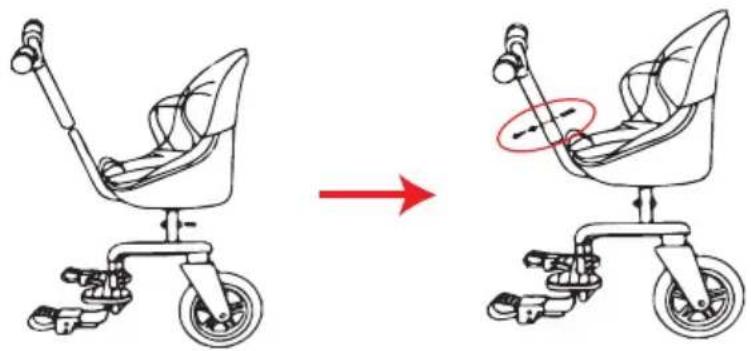
Secure the connector console with the seat support using the the M8 Nut and washer. Choose a connection height so that your Uni Rider is assembled with the seat platform as parallel as possible to the ground.
-
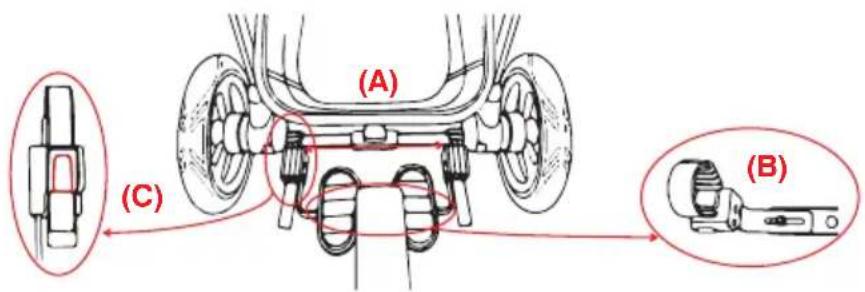
There are 6 potential heights ranging from 12-24 cm above the ground (A). Make sure M8 Nut is tightly fastened (B).

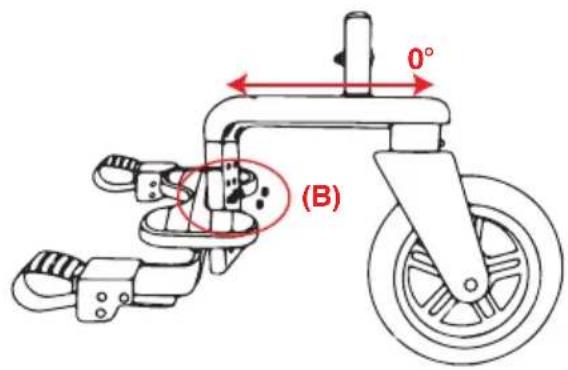
- Insert the seat tube into the seat support and so that the securing holes in each line up (C). Insert the M6 screw though both supports and secure with the corresponding nut.

- Insert the handle bar over the seat tube so that the holes line up. Insert the corresponding screw and secure with the corresponding nut.
natural_image
Illustration of a two-step car shift exercise showing the change from a stroller to a bicycle seat (no text or symbols present)CONNECT TO THE PRAM/STROLLER/TROLLEY/BUGGY
- Attach the 2x connector housings of the Uni Rider onto the rear wheel axle or horizontal frame tube of the stroller.
(i) Wrap each flexible strap over and around the rear axle or tube.
(ii) Feed the end of the strap into and through the slot in the bottom of each connector console housing.
(iii) Pull each strap through the housing and leave it loosely connected on the tube.
With both nuts loosened, adjust the width of the connector console (picture A) to the maximum width it can go. Fasten each nut tightly to fix the width (picture B).
-
Tighten the connector strap on the rear axle/tube by pulling it as far as it can go. You can use pliers for this to apply the necessary force
-
To release the strap and remove the Uni rider from the stroller, press the button on the underside of the connector (C) and pull the strap from the housing until it is fully removed.

IMPORTANT WARNING: THE UNI RIDER MUST BE ASSEMBLED SO THAT THE BOARD IS AS PARALLEL TO THE GROUND AS POSSIBLE. FAILURE TO DO SO MAY RESULT IN SERIOUS INJURY.
IMPORTANT WARNING: THE FIXING CONNECTOR LOOPS MUST BE TIGHTENED VERY TIGHTLY TO THE FRAME OF THE STROLLER/BUGGY, THEY MUST NOT BE ABLE TO MOVE OR ROTATE! THE RIDER CAN TIP OVER IF IT IS ATTACHED TOO LOOSELY!
WARNING
- USE THE UNI RIDER ONLY IF THERE IS A SECOND CHILD IN THE PRAM AND THE PUSHING HANDLES OF THE PRAM ARE HELD TIGHTLY WITH BOTH HANDS BY AN ADULT.
- THE UNI RIDER IS NOT A TOY. NEVER LEAVE YOUR CHILD UNATTENDED.
- THE UNI RIDER MUST NOT BE USED IF YOU GO JOGGING WITH THE PRAM.
- THE UNI RIDER IS DESIGNED FOR CHILDREN UP TO 15 MONTHS AND UP TO A MAXIMUM WEIGHT OF 25 KG.
- IN ORDER TO GUARANTEE THE SAFETY AND FUNCTIONALITY OF THE DEVICE, AVOID ANY OVERLOADING AND UNDER NO CIRCUMSTANCES USE IT FOR TRANSPORTING OTHER ITEMS.
- DO NOT USE THE UNI RIDER UNTIL YOUR CHILD CAN WALK INDEPENDENTLY AND WITHOUT HELP.
- ALLOW YOUR CHILD TO ALIGHT FROM THE RIDER BEFORE REACHING PAVEMENTS EDGES, STAIRS, STEEP PATHS TIGHT CORNERS, AS WELL WHEN MANEUVERING BACKWARDS.
- THERE MAY BE TYPES OF PRAMS/STROLLERS FOR WHICH THE UNI RIDER IS NOT SUITABLE AS THE CONNECTOR CANNOT BE ATTACHED FIRMLY TO THE FRAME CONSTRUCTION. CONSULT YOUR SPECIALIST DEALER BEFORE MAKING YOUR PURCHASE.
- BEFORE STARTING OUT ON EACH JOURNEY, CHECK UNI RIDER AND PRAM ARE CORRECTLY CONNECTED TO ONE ANOTHER.
- FROM TIME TO TIME, CHECK THAT ALL SCREWS AND MOUNTINGS OF THE UNI RIDER ARE SITTING FIRMLY AND THAT ALL PARTS OF THE FRAME ARE SECURE.
- NO ALTERATIONS OR MODIFICATIONS CAN BE MADE TO THE UNI RIDER OR PRAM. THIS WOULD VOID THE WARRANTY AND COMPROMISE YOUR CHILD'S SAFETY.
- IN THE EVENT OF ANY POSSIBLE DAMAGE TO THE DEVICE, ONLY ORIGINAL REPLACEMENTS PARTS OF THE MANUFACTURER MUST BE USED.
- THE UNI RIDER IS NOT SUITABLE FOR USE ON SNOW OR SOFT SURFACES.
- CLEAN THE RIDER AND THE WHEEL FROM TIME TO TIME WITH WARM SOAPY WATER.
- PLEASE KEEP THE PLASTIC PACKING AWAY FROM CHILDREN OR DISPOSE OF IT AS THERE IS A RISK OF SUFFOCATION.
- KEEP THE INSTRUCTION MANUAL CAREFULLY FOR ANY POSSIBLE SUBSEQUENT USERS.
- APART FROM THIS, ADHERE PRECISELY TO THE INSTRUCTIONS OF YOUR PRAM MANUFACTURER.
MAINTENANCE
● LUBRICATE ALL MOVING PARTS INCLUDING THE WHEEL REGULARLY WITH AN OIL BASED LUBRICANT.
- CHECK THAT NO DIRT OR GRAVEL IS STUCK IN THE WHEEL, SUSPENSION, OR MOVING PARTS BEFORE USE.
- WHEN THE UNI RIDERHAS BEEN USED IN RAINY WEATHER, ALL PARTS SHOULD BE WIPED DRY AFTER USE.
- WHEN CLEANING, USE WARM WATER AND A DRY CLOTH. ALL PARTS SHOULD BE LUBRICATED AGAIN AFTER CLEANING.
IF PROPER MAINTENANCE IS NOT DONE, THE UNI RIDER MAY NOT PERFORM PROPERLY AND PROBLEMS MAY OCCUR. READ THE INSTRUCTION MANUAL CAREFULLY BEFORE USING THE UNI RIDER AND SAVE FOR FUTURE REFERENCE. YOUR CHILDS SAFETY MIGHT BE IN JEOPARDY IF THESE INSTRUCTIONS ARE NOT FOLLOWED.
THIS RIDE-ON BOARD IS TESTED WITH COMPACT FOLD STROLLERS, UMBRELLA FOLD STROLLERS, 3 WHEEL STROLLERS, FLAT 4 WHEEL STROLLERS AND SIDE BY SIDE STROLLERS. THIS RIDE-ON BOARD IS APPROVED ACCORDING TO AS 2088:2022 AND AS/NZS ISO 8124.
valcobaby
valcobaby.com.au


- Important: Please read the following instructions carefully before assembling this product. Keep these instructions for future reference. Familiarise yourself with the warnings and guidelines.
- IMPORTANT WARNING: Always refer to the Warnings page when you see this symbol
- THIS PRODUCT IS NOT SUITABLE FOR RUNNING OR SKATING
- PARTS
- ASSEMBLY INSTRUCTIONS
- CONNECT TO THE PRAM/STROLLER/TROLLEY/BUGGY
- WARNING
- MAINTENANCE
- valcobaby
Brand : Valco Baby
Model : Uni Rider
Category : Kids tricycle