SolidKVM SK05 - Uncategorized Rocstor - Free user manual and instructions
Find the device manual for free SolidKVM SK05 Rocstor in PDF.


| Product Type | 2-Port DisplayPort 1.4 KVM Switch with USB 3.0 |
| Model | SolidKVM SK05 |
| Brand | Rocstor |
| Video Resolution | Up to 3840x2160@60Hz (4K), also supports 4096x2160@60Hz |
| HDMI Support | HDMI 2.0, 18Gbps bandwidth, HDCP 2.2/1.4, HDR |
| DisplayPort Support | DP 1.4, 32.4Gbps bandwidth, HDR, 48-bit deep color |
| USB Ports (to PCs) | 2 x USB 3.0-B (female) |
| USB Ports (Peripherals) | 2 x USB 3.0-A (front panel), 2 x USB 2.0-A (back panel) |
| Audio Ports | MIC In (3.5mm), Stereo Out (3.5mm) – one set front, one set back |
| Control Methods | Front panel buttons, IR remote (with extender), hotkeys |
| Power Supply | External DC 5V, 12W max |
| Dimensions (LxWxH) | 178 x 75 x 26 mm (7 x 2.9 x 1 in) |
| Net Weight | 372.8 g (0.82 lbs) |
| Material | Metal |
| Operating Temperature | 0°C to 45°C (32°F to 113°F) |
| Storage Temperature | -10°C to 80°C (14°F to 176°F) |
| ESD Protection | ±8kV (air-gap) and ±4kV (contact discharge) |
| Certifications | FCC, CE |
| Warranty | 3 Years Limited |
| Package Contents | Main unit, 5V/3A power adapter, IR remote, IR extender, 2x USB 3.0-B to A cables, user manual |
| Special Functions | Mouse traversal, USB-B detection switching, automatic switching (adjustable interval), hotkeys |
| Safety Notes | Keep ventilated; avoid water and prolonged skin contact when powered |
| Cleaning | Use a dry cloth; disconnect power before cleaning |
Frequently Asked Questions - SolidKVM SK05 Rocstor
User questions about SolidKVM SK05 Rocstor
0 question about this device. Answer the ones you know or ask your own.
Ask a new question about this device
Download the instructions for your Uncategorized in PDF format for free! Find your manual SolidKVM SK05 - Rocstor and take your electronic device back in hand. On this page are published all the documents necessary for the use of your device. SolidKVM SK05 by Rocstor.
USER MANUAL SolidKVM SK05 Rocstor
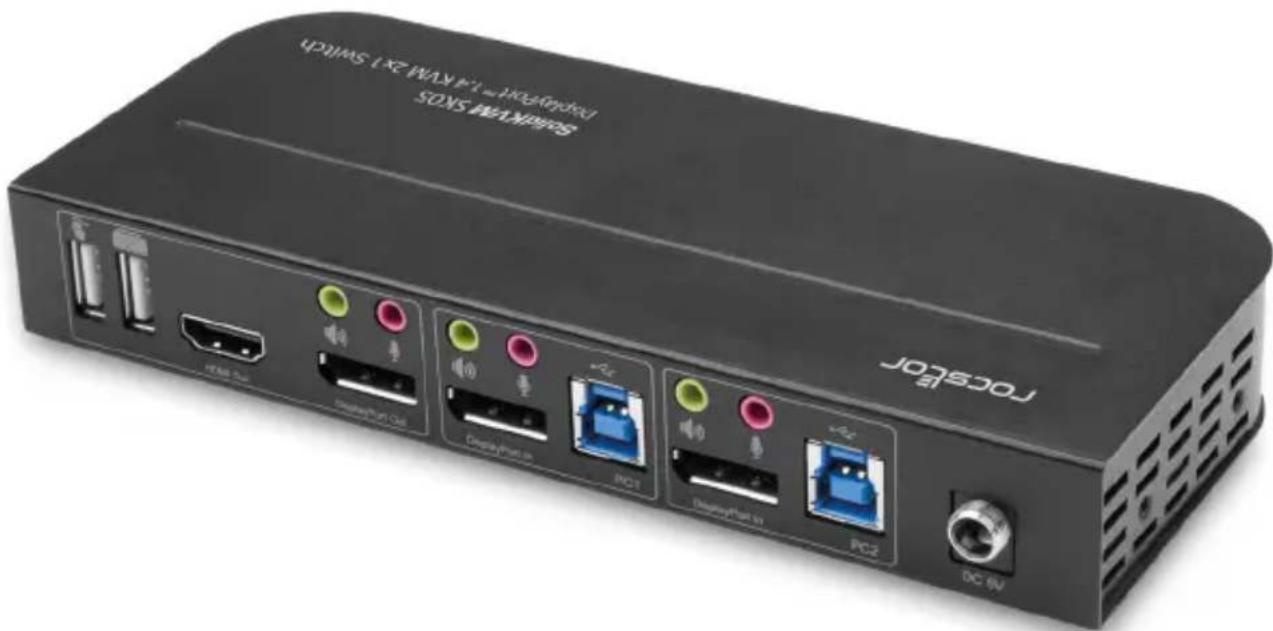
SolidKVM SK05 DisplayPort 1.4 and USB 3.0 2×1 KVM Switch
User Manual
Y10A326-B1
Important Safety Notice
WARNING: Please follow these safety instructions. Failure to do so may result damages or injury. It is normal that the SolidKVM SK05 unit becomes very warm during use.
Please note that:
Continuous contact with warm surfaces for extended time may cause discomfort or injury. In order to reduce the possibility of overheating or heat-related injuries, always allow needed ventilation around the SolidKVM SK05 unit and use care when handling it. Avoid instances where your skin is in extended contact with the hub when plugged into the host computer. It is not recommended to sleep with the adapter when plugged into a host computer. Avoid placing the hub adapter under a pillow, blanket, or your body when connected to a host computer. If you have a medical condition that affects your ability to detect heat against the body, extra care should be used. Never use the adapter in locations with water, such as a sink, bathtub, or shower stall. Never connect or disconnect the adapter with wet hands.
Introduction
Rocstor introduces a high-performance DP-KVM switcher designed to route high-definition video (in multiple resolutions up to 4kx2k@60Hz) and audio from various sources to display units. This DP-KVM switcher offers both key-press switching and intelligent functionality, along with hot-pluggable capabilities.
Package Contents
Before utilizing this unit, kindly inspect the packaging to ensure the following items are included:
- Main Unit x1
• 5V/3A Power Adapter x1 - IR Remote Control x1
- IR Extender x1
• USB 3.0-B Male to USB 3.0-A Male Cable x2 - User Manual x1
- Ear Hanger Bracket x2 (Optional)
Features
• Supports resolution up to 4Kx2K@60Hz
• Supports RGB 4:4:4/ YCbCr 4:4:4/ YCbCr 4:2:2/ YCbCr 4:2:0
• Supports KVM function
• Supports a display(Either DP or HDMI) and a set of Keyboard and Mouse to control two PCs with DP ports
- DisplayPort:
Supports 8.1Gbps per channel (32.4Gbps all channels) bandwidth
Supports 16bit per channel (48bit all channels) deep color
Supports HDR
Note: Theoretically, DP resolution can be up to 8K, it is to be verified on DP1.4 Graphic cards and 8K DP display
• HDMI:
Supports 6Gbps per channel (18Gbps all channels) bandwidth
Supports 12bit per channel (36bit all channels) deep color
Supports HDCP 2.2/1.4
Supports HDR
• Supports infrared remote control function
• Supports for switching LED indications
• Supports Windows 2000/XP/Vista/Win7/Win8/Win10/Linux/Apple Mac OS
Panel Description (Front Panel)
Front Panel
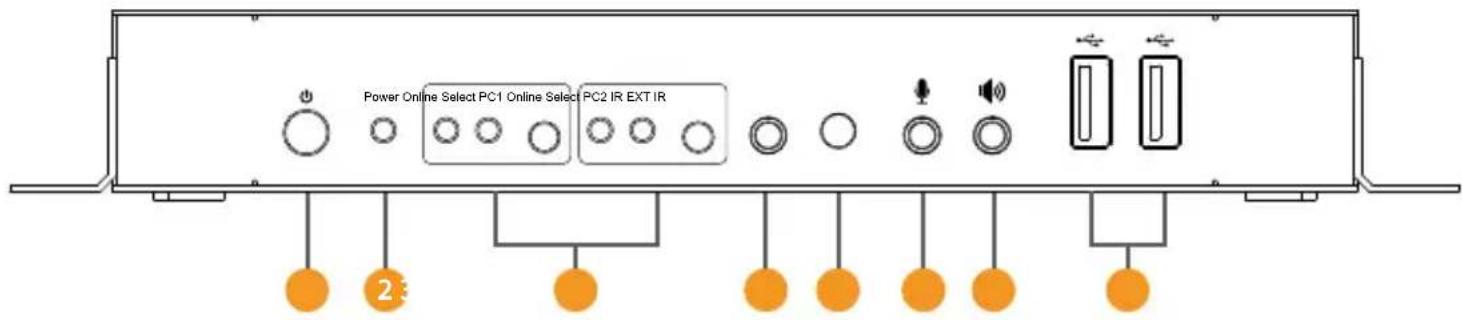
1 Power Button: Press to turn on/off the unit.
2 Power Indicator: The LED will light up once the DC/5V is provided and the unit is turned on.
3 Input Selection: When PC1/PC2 is selected, the corresponding "Select" lights up to indicate input selection("Select" LEDs flash in a loop under automatic switching mode). "Online" LED lights up when the corresponding USB-B port is connected.
4 IR EXT: Connect IR Extender to this port for IR signal reception from the remote control.
5 IR: For IR signal reception from the remote control.
6 ↓ 3.5mm MIC input port.
7 3.5mm stereo output port.
USB 3.0 ports, mainly used for connecting to printers, scanners, U-disk, etc.
Panel Description (Back Panel)
Back Panel

9 Output ports:
Connect ⚙ to a mouse or a keyboard.
Connect 📄 to a keyboard or a mouse.
Connect 🔵 to an amplifier.
Connect ↓ to a MIC.
Connect "HDMI Out" to HDMI display.
Connect "DisplayPort Out" to DP display.
10 PC1 input ports: Respectively connect to DisplayPort, USB, MIC, stereo ports of PC1.
11 C2 input ports: Respectively connect to DisplayPort, USB, MIC, stereo ports of PC2.
12 DC 5V: Plug the 5V DC power supply into the unit.
Specifications
| Connectors | |
| Console Connectors | USB 2.0-A x2 (Back) |
| DisplayPort Female x1 (Back) | |
| HDMI Female x1 (Back) | |
| 3.5mm Stereo Jack x2 (Green, 1 Front, 1 Back) | |
| 3.5mm Stereo Jack x2 (Pink, 1 Front, 1 Back) | |
| KVM Connectors USB 3.0-B x2 (Back) | |
| USB HUB Connectors USB 3.0-A x2 (Front) | |
| Resolution | |
| Max Resolution | 3840x2160@60Hz |
| 4096x2160@60Hz | |
| Operating Frequency | |
| HDMI Bandwidth | 18G |
| DisplayPort Bandwidth 32.4G | |
| Mechanical | |
| Material | Metal |
| Size (L-W-H) | 7x2.9x1in - (178x75x26mm) |
| Weight (Net) | 13lbs - (372.8g) |
| Warranty | |
| 3 YearsLimited Warranty | |
| Environmental | |
| Operating Temperature | 0°C to 45°C (32°F to 113°F) |
| Operating Humidity | 10% to 85% RH (no condensation) |
| Storage Temperature | -10°C to 80°C (14°F to 176°F) |
| Storage Humidity | 5% to 90 % RH (no condensation) |
| Power Requirement | |
| External Power Supply DC 5V | |
| 12WPower Consumption (Max) | |
| ±8kV (air-gap discharge) & ±4kV (contact discharge)ESD Protection | |
| Regulatory Approvals | |
| Certifications FCC, CE | |
| Power Supply FCC, CE | |
| Accessories | |
| User Manual English Version | |
Operation
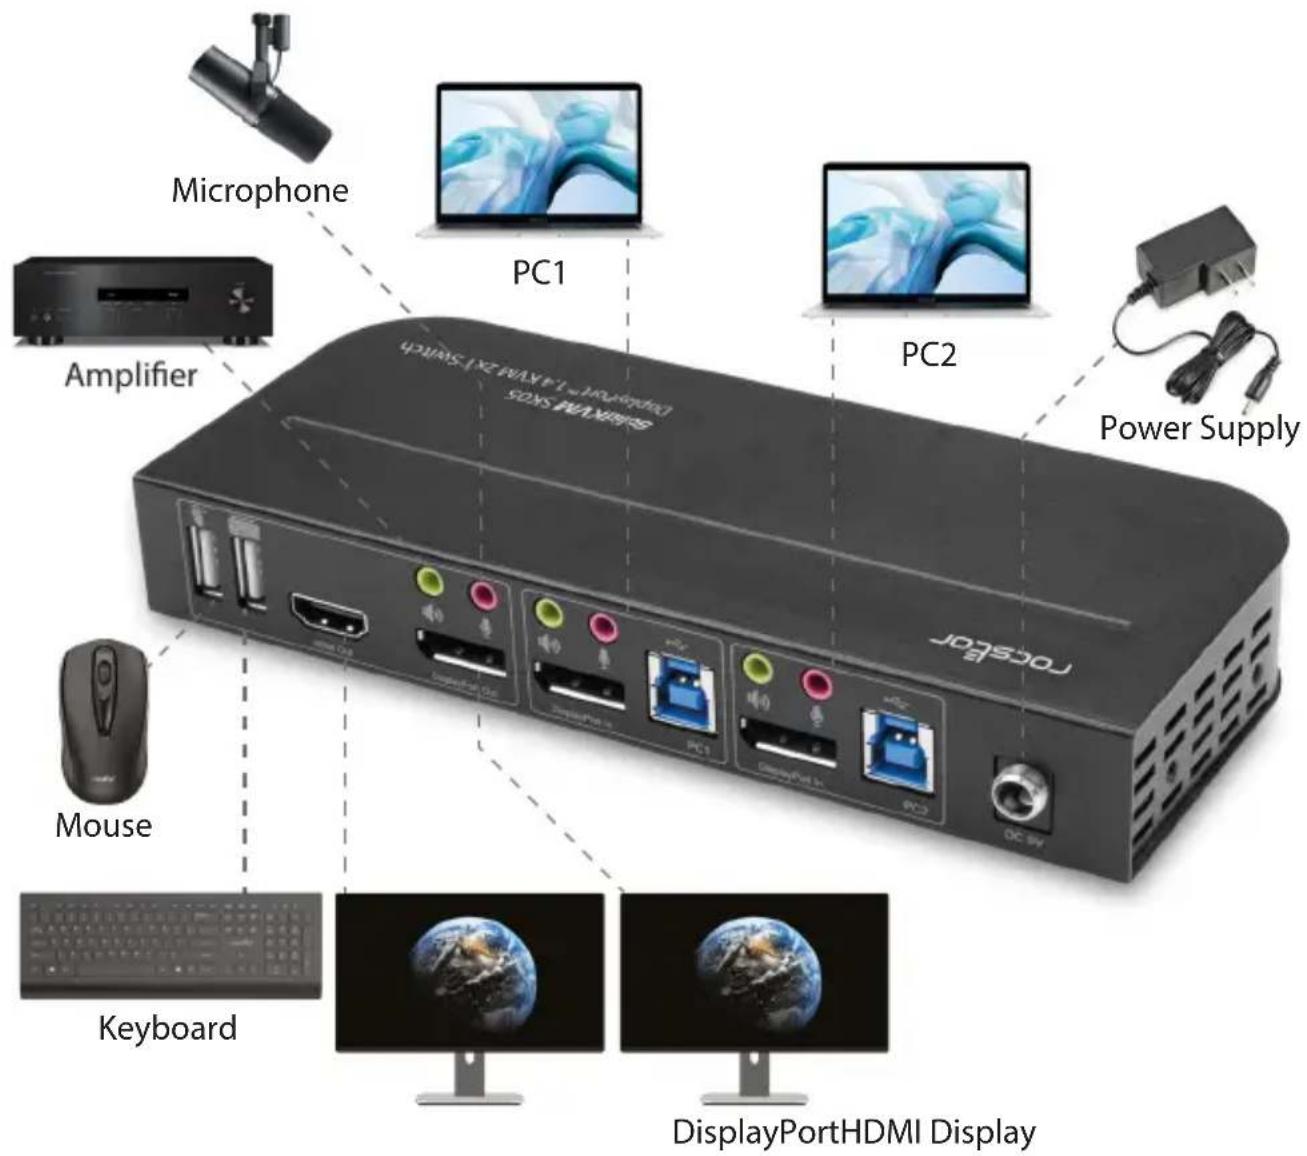
1) Begin by establishing connections between the Host Computers and the SolidKVM SK05 Switch. Utilize USB cables to connect the Host Computers to the KVM Switch USB-B ports. Subsequently, interlink the MIC and stereo ports of the Host Computers with the corresponding ports located above the "DisplayPort In" of the KVM Switch using 3.5mm audio cables. Conclude this step by connecting the Host Computers to the "DisplayPort In" ports of the KVM Switch using DisplayPort cables.
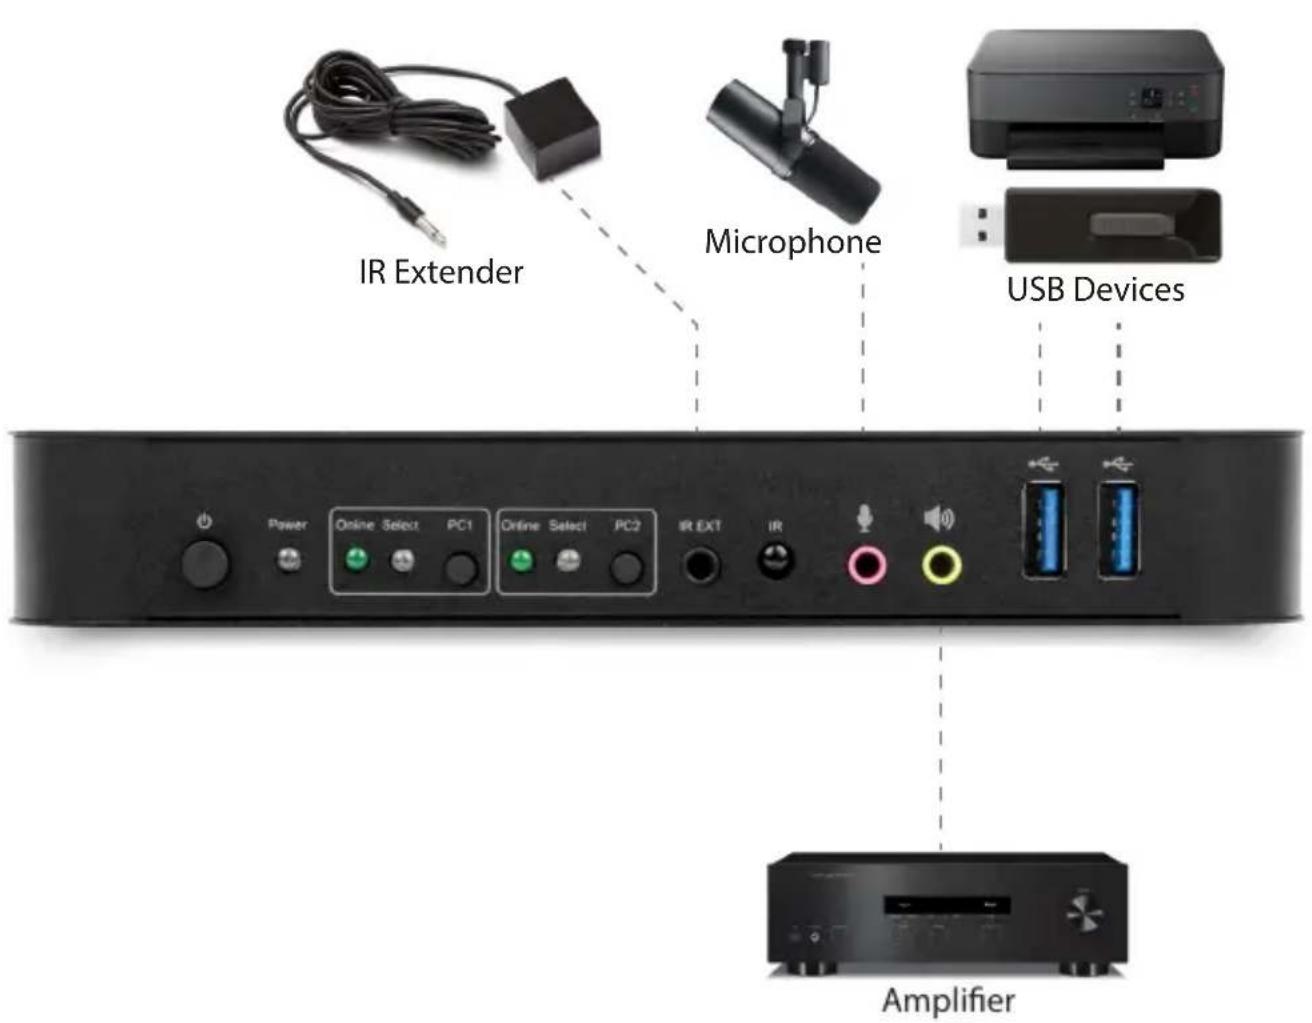
2) Proceed to connect peripheral devices. Attach the keyboard and mouse to the USB-A ports located on the KVM Switch back panel. Next, connect microphones and amplifiers to either the MIC and stereo ports on the front panel or above the "DisplayPort Out" of the KVM Switch using 3.5mm audio cables. For display connectivity, opt to link a display to the "DisplayPort Out" of the KVM Switch utilizing a DisplayPort cable with a maximum length of 2 meters. Alternatively, connect a display to the KVM Switch "HDMI Out" via an HDMI cable. Note: Video output will automatically switch to the connected port. In the event that both "DisplayPort Out" and "HDMI Out" are connected, video output will prioritize DisplayPort.
3) Power on the KVM Switch by supplying it with DC 5V and pressing the power button. Upon activation, the "Power" indicator will light up, confirming that power is operational. Ensure that the USB-B ports are connected properly, and the "Online" indicators will light up. The "Select" indicator will light up to denote the currently selected Host Computers.
4) Utilize the buttons located on the Switch front panel to select the input source. Upon selection, the corresponding "Select" indicator will light up, and the display will showcase the corresponding image. Subsequently, the selected Host Computers can be controlled using a keyboard and mouse.
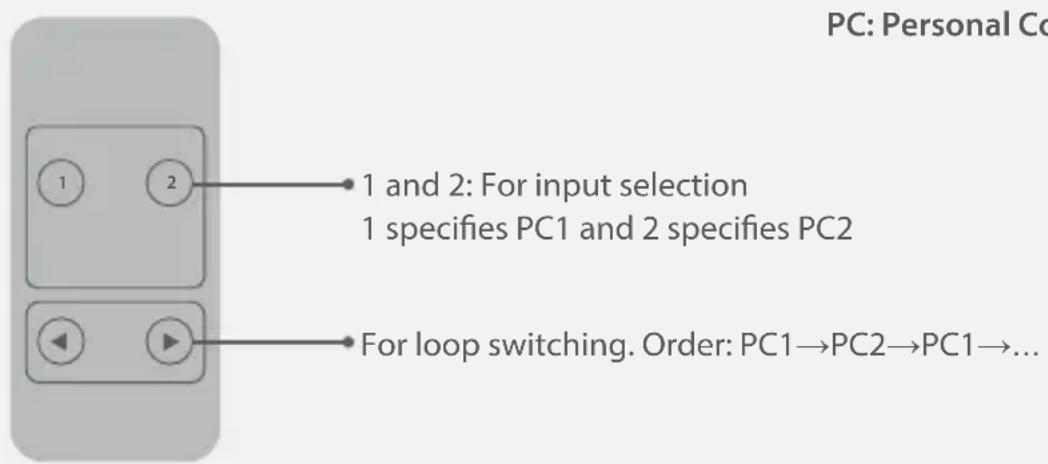
5) The remote control functionality mirrors the manual buttons, facilitating input selection and control with equal efficiency and precision.
6) For external function, connect printer/scanner/U-disk to the USB-A ports on the Switch front panel.
Special Function Operation
1) Mouse Traversal Function:
Place the mouse on the far right side of the display and continue to slide to the right for 2 seconds, the Switch automatically switches to the next port. Switching order is: PC1→PC2→PC1→...;
2) USB-B detection switching function:
When the KVM Switch detects that a PC is connected to the USB-B port of the Switch, it immediately switches to this PC and the corresponding "Online" and "Select" indicators light up. For instance, if PC1 is already connected and PC2 is subsequently connected to the KVM Switch via the USB-B port, it swiftly switches to PC2.
2 When the current selected PC is powered off or the USB cable is dialed out, the KVM Switch automatically switches to the next PC with the power on and the USB port connected.
3) Hotkey function (It doesn't work on functional keyboard and only the 2 USB-A ports on the back panel can get access to this function.)
| Number | Hotkey Combination Function Description | |
| 1 | Scroll Lock++Scroll Lock +→or↓1 | Switch to the next port |
| 2 | Scroll Lock++ Scroll Lock +←or↑ | Switch to the previous port |
| 3 | Scroll Lock++ Scroll Lock +[N] | Switch to PC N |
| 4 | Scroll Lock++ Scroll Lock +S | Automatic switching function(Default: 15 seconds) |
| 5 | Scroll Lock++ Scroll Lock +I+[N]+[Enter] | Set the automatic switching interval (5~999 seconds) |
| 6 | Scroll Lock++ Scroll Lock +B+[1/0] | Buzzer on/off (Default: on) |
| 7 | Scroll Lock++ Scroll Lock +F+L+A+S+H+[Enter] | All resume hotkey default mode |
Note: Hotkeys are not case-sensitive; Buzzer sounds when switching between PC1 and PC2.
Connection Diagram (Front Panel)
Connection Diagram (Back Panel)
Contact Information
Corporate Headquarters
12979 Arroyo Ave
San Fernando, CA 91340 - USA
Office: +1 (818) 727-7000
Email: info@rocstor.com
Technical Support / Sales Info / RMA
Hours: 9:00 am - 5:00 pm PST
Mon - Fri (excluding holidays)
Tell: +1 (818) 727-7000 (DOM/INTL)
Email: support@rocstor.com
Corporate, Government and Academic Customers
Our Corporate Sales Team's goal is to help our U.S.A. and Canadian customers find a storage solution that best serves their needs. We will help you determine your best purchasing options. For more information please contact the appropriate department below or call us at +1 (818) 727-7000.
General Sales Information: sales@rocstor.com
Corporate sales information: corporate_sales@rocstor.com
Educational sales information: academic_sales@rocstor.com
Federal, State & Local government sales information: government_sales@rocstor.com
Resellers/Business Development/OEM Partners
All Channel National and International Resellers, VARs, Consultants...
Contact Rocstor Channel Sales:
Call: +1 (818) 727-7000
Email: reseller_info@rocstor.com
Disclaimer
©2024 Rocstor, Inc. All rights reserved. Rocstor is registered trademark of Rocstor, Inc. Apple ^® , the Apple logo, Mac ^® , MacBook ^® , MacBook Pro ^® , MacBook Air ^® , iPad ^® , iPad Air ^® , iPad mini ^® , iPad Air ^® , iPhone ^® , MacOS ^® are registered trademarks of Apple, Inc. Google ^® and Chromebook ^™ are registered trademarks of Google, LLC. Microsoft ^® is registered trademarks of Microsoft corporation. AI other product names and logos mentioned herein may be trademarks of their respective companies. Thunderbolt is a trademark of Intel Corporation or its subsidiaries. USB Type-C ^® and USB-C ^® are registered trademark of USB Implementers Forum. The terms HDMI, HDMI High-Definition Multimedia Interface, HDMI Trade dress and the HDMI Logos are trademarks or registered trademarks of HDMI Licensing Administrator, Inc. Feature and specification are subject to change without notice. All trademarks and registered trademarks are the property of their respective. All rights reserved.
- SolidKVM SK05 DisplayPort 1.4 and USB 3.0 2×1 KVM Switch
- Important Safety Notice
- Please note that:
- Introduction
- Package Contents
- Features
- Panel Description (Front Panel)
- Front Panel
- Panel Description (Back Panel)
- Output ports:
- Operation
- Special Function Operation
- 1) Mouse Traversal Function:
- 2) USB-B detection switching function:
- Connection Diagram (Front Panel)
- Connection Diagram (Back Panel)
- Contact Information
- Corporate Headquarters
- Technical Support / Sales Info / RMA
- Corporate, Government and Academic Customers
- Resellers/Business Development/OEM Partners
- Disclaimer
Brand : Rocstor
Model : SolidKVM SK05
Category : Uncategorized