
EW-7476RPC - Wi-Fi repeater Renkforce - Free user manual and instructions
Find the device manual for free EW-7476RPC Renkforce in PDF.


| Product Type | AC1200 Gigabit Dual-Band Wi-Fi Repeater |
| Model Number | EW-7476RPC |
| Wireless Standards | IEEE 802.11b/g/n/a/ac |
| Frequency Bands | 2.4 GHz & 5 GHz |
| Maximum Wireless Speed | Up to 300 Mbps (2.4 GHz) + 867 Mbps (5 GHz) |
| Operating Modes | Wi-Fi Extender, Wi-Fi Bridge (Adapter), Access Point |
| WPS Support | Yes, hardware button and PIN method |
| Cross Band Technology | Yes, to maintain router speed |
| Green Mode | Yes, reduces Wi-Fi power by 50% |
| Sleep Mode | Yes, disables Wi-Fi and LEDs |
| Wireless Scheduling | Yes, configurable on/off times |
| Guest Network | Yes, separate SSID (not in Access Point mode) |
| LAN Port | 1 x 10/100/1000 Mbps Gigabit Ethernet (RJ45) |
| Power Supply | AC 100-240 V, 50/60 Hz (direct plug) |
| Power Consumption | Typical <6W |
| Dimensions (approx.) | 110 x 68 x 35 mm |
| Weight (approx.) | 150 g |
| LED Indicators | Signal (2.4 GHz & 5 GHz), Cross Band, Power, WPS, LAN |
| Management | Web browser interface (http://renkforce.setup) |
| Security | WEP, WPA, WPA2 (AES/TKIP), WPA-RADIUS, 802.1x |
| Package Contents | EW-7476RPC, CD with QIG & manual, Quick Installation Guide, Access key card, RJ45 cable |
| Safety | Indoor use only; keep away from heat, moisture, and children under 3 |
| Reparability | No user-serviceable parts; contact dealer for issues |
Frequently Asked Questions - EW-7476RPC Renkforce
User questions about EW-7476RPC Renkforce
0 question about this device. Answer the ones you know or ask your own.
Ask a new question about this device
Download the instructions for your Wi-Fi repeater in PDF format for free! Find your manual EW-7476RPC - Renkforce and take your electronic device back in hand. On this page are published all the documents necessary for the use of your device. EW-7476RPC by Renkforce.
USER MANUAL EW-7476RPC Renkforce
natural_image
Abstract geometric star-like pattern with five petal-like shapes and central dots (no text or symbols)renkforce
User Manual
AC1200 Gigabit Dual- Band Wi-Fi Repeater
Item No. EW-7476RPC
CONTENTS
I. Product Information....1
I-1. Package Contents....1
I-2. System Requirements ....1
I-3. LED Status....2
I-4. Switch....3
I-5. WPS Setup 4
I-6. WPS Button with Wireless Scheduling....4
I-7. Reset to Factory Default Settings ....5
I-8. Safety Information ....6
II. Installation 7
II-1. Wi-Fi Extender Mode 11
II-2. Access Point Mode....18
II-3. Wi-Fi Bridge Mode 22
III. Browser Based Configuration Interface 28
III-1. Login....28
III-2. Save Settings....30
III-3. Main Menu....31
III-3-1. Status ....31
III-3-2. Setup Wizard 32
III-3-3. LAN....33
III-3-4. 2.4GHz Wireless & 5GHz Wireless....34
III-3-4-1. Basic 34
IV-1. Configuring your IP address ....57
IV-1-1. How to check that your computer uses a dynamic IP address ....58
IV-1-1-1. Windows 7....58
IV-1-1-2. Windows 8.1 & 10....61
IV-1-1-3. Mac OS....64
IV-1-2. How to modify the IP address of your computer....66
IV-1-2-1. Windows 7....66
IV-1-2-2. Windows 8.1 & 10 ....70
IV-1-2-3. Mac 73
IV-2. Connecting to a Wi-Fi network....75
IV-3. Troubleshooting....77
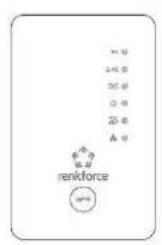
I-1. Package Contents

natural_image
Simple illustration of a CD or DVD disc (no text or symbols)
natural_image
Line drawing of a coiled hose with two connectors (no text or symbols)- EW-7476RPC
- CD with multi-language QIG & user manual
- Quick installation guide (QIG)
- Access key card
- RJ45 cable
I-2. System Requirements
- Wi-Fi extender/Wi-Fi bridge mode: Existing 2.4GHz and/or 5GHz wireless network
- Access point mode: Cable/DSL modem router
- Computer with 802.11/b/g/n/a/ac Wi-Fi adapter, and web browser for software configuration (Internet Explorer, Google Chrome, Firefox, Opera or Safari latest version)
- Smartphone setup: iOS 6 or Android 4.x and above
I-3. LED Status

All LEDs are disabled in green mode. The best signal strength is 60 - 80% since above 80% is likely too close to your router for the extender to be effective.
| LED | Color | Status | Description |
| Signal 5GHz | Blue | On | Excellent location. Signal strength: 60 - 80% |
| Slow Flashing | Good location. Signal strength: 40 - 60% & 80 - 100% | ||
| Quick Flashing | Poor location. Signal strength: Below 40% | ||
| Off | No signal detected. | ||
| Signal 2.4GHz | Blue | On | Excellent location. Signal strength: 60 - 80% |
| Slow Flashing | Good location. Signal strength: 40 - 60% & 80 - 100% | ||
| Quick Flashing | Poor location. Signal strength: Below 40% | ||
| Off | No signal detected. | ||
| Cross Band | Green | On | Cross band enabled. |
| Off | Cross band disabled. | ||
| Power | Green | On | Extender is on. |
| Flashing | Resetting to factory default settings, or system is booting up. | ||
| Off | Extender is off. | ||
| WPS | Green | On | WPS connection established (LED will remain on for 30 seconds to indicate a successful connection). |
| Flashing | WPS in progress (waiting for another WPS device). | ||
| Off | No WPS in progress. | ||
| LAN | Green | On | LAN port connected. |
| Flashing | LAN activity (transferring or receiving data). | ||
| Off | LAN port not connected. |
I-4. Switch
The EW-7476RPC includes a hardware switch on the underside of the device which can switch between normal, green mode and sleep mode as shown in the table below. "Wi-Fi power" refers to the strength of the extender's wireless radio signal (Tx).
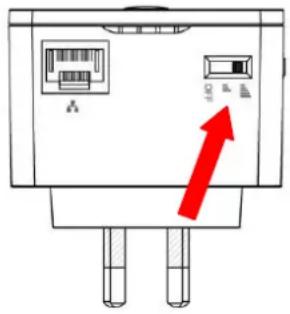
If you are using the extender in a small or medium sized space, you may not need the full power of the wireless radio. Try it, and determine if you still have sufficient Wi-Fi coverage using green mode. If so, you can save some energy.
| Mode | Switch Position | Description |
| Normal | Top | 100% Wi-Fi power |
| Green Mode | Middle | 50% Wi-Fi power |
| Sleep Mode | Bottom | Wi-Fi & LEDs off |

Tx power can also be adjusted using the web-based U.I. (Administration → Wireless). Set the switch to "Normal" before adjusting the Tx value in the web-based U.I.
I-5. WPS Setup
If your wireless router/access point supports WPS (Wi-Fi Protected Setup) then you can use this method to setup your wireless extender.
- Press the WPS button on your wireless router/access point to activate its WPS.

Please check the instructions for your wireless router/access point for how long you need to hold down its WPS button.
-
Within two minutes, press and hold the WPS button on the wireless extender for two seconds. The extender's green WPS LED should flash to indicate that WPS is in progress.
-
The devices will establish a connection. The extender's green WPS LED should display on for 30 seconds to indicate a successful connection.
I-6. WPS Button with Wireless Scheduling
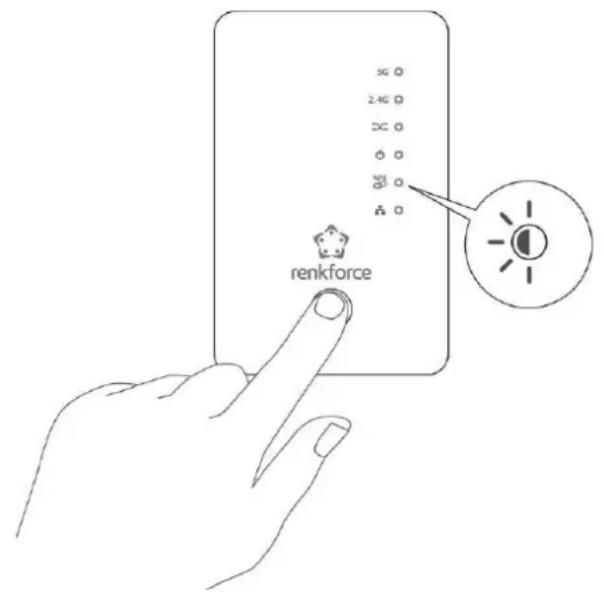
When a wireless schedule is in operation so that 2.4GHz is active and 5GHz is off, the WPS button's primary function is to activate the 5GHz network.
Press the WPS button once to activate/wake the 5GHz network.
Following this, the WPS button functions normally as described above in WPS Setup.
I-7. Reset to Factory Default Settings
If you experience problems with your extender or if you want to change the extender to a different operating mode, you can reset the device back to its factory settings. This resets all settings back to default.
-
Press and hold the WPS button for at least 10 seconds and release when the green power LED is flashing.
-
Wait for the extender to restart. The extender is ready for setup when the green power LED displays on.

I-8. Safety Informaon
In order to ensure the safe operation of the device and its users, please read and act in accordance with the following safety instructions.
- The device is designed for indoor use only; do not place it outdoors.
- Do not place the device in or near hot/humid places, such as a kitchen or bathroom.
- Do not pull any connected cable with force; carefully disconnect it from the EW-7476RPC.
- Handle the device with care. Accidental damage will void the warranty of the device.
- The device contains small parts which are a danger to small children under 3 years old. Please keep the device out of reach of children.
- Do not place the device on paper, cloth, or other flammable materials. The device may become hot during use.
- There are no user-serviceable parts inside the device. If you experience problems with the device, please contact your dealer of purchase and ask for help.
- The device is an electrical device and as such, if it becomes wet for any reason, do not attempt to touch it without switching the power supply off. Contact an experienced electrical technician for further help.
- If you smell burning or see smoke coming from the EW-7476RPC then unplug the device immediately, as far as it is safely possible to do so. Call your dealer of purchase for help.
The EW-7476RPC has three different operating modes:
| Wi-Fi Extender | The device connects wirelessly to your existing network and repeats the wireless signal.Location: The best location for your extender is roughly in the middle between your existing wireless router/access point and the dead zone. The extender needs to receive a good Wi-Fi signal from your router/access point. |
| Wi-Fi Bridge (Wi-Fi Adapter) | The device connects to an Ethernet device such as a games console or smart TV via Ethernet cable and provides wireless Internet access for that device.Location: Within Wi-Fi coverage, close to your wired network device. |
| Wi-Fi Access Point | The device connects to an existing router via Ethernet cable and provides wireless Internet access for your network devices.Location: Connected to your router via Ethernet cable. |
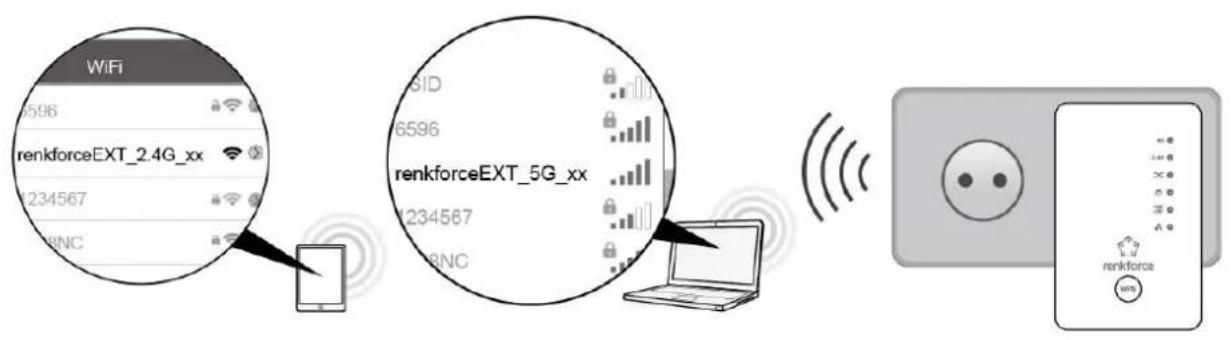
- Plug the EW-7476RPC into a power socket.

- The green power LED will flash while the extender is starting up. The device is ready when the green power LED displays on.

- Use a Wi-Fi device to connect to the SSID renkforceEXT_2.4G_** or renkforceEXT_5G_**. The last two ** characters are unique according to your device.

If you are using a computer, please disconnect any Ethernet cables.
- Open a web browser and if you do not automatically arrive at the "Get Started" screen shown below, enter the URL http://renkforce.setup and click "Get Started" to begin the setup process.


renkforce
Smart AC1200 Dual-Band Wi-Fi Access Point
EW-7476RPC
English

natural_image
White wireless device with indicator lights and ports, no visible text or symbols on bodyGet Started

If you cannot access http://renkforce.setup, please make sure your computer is set to use a dynamic IP address. For more information please refer to Appendix.
- To use a different operating mode, click "Change to a Different Mode". Or select "Yes, I need a Range Extender" to continue setup as a Wi-Fi extender.

renkforce
Wi-Fi Extender
The default mode of this product is Wi-Fi extender mode. It connects to your existing network and extends the wireless signal range.

flowchart
graph LR
    A["Smartphone"] --> B["Desktop"]
    C["Mobile Device"] --> D["Server"]
    E["Wi-Fi"] --> F["Desktop"]
    G["Router"] --> H["Existing Router"]
    H --> I["xDSL/Cable Modem"]
    I --> J["Internet"]
CHANGE TO A DIFFERENT MODE
YES, I NEED A Wi-Fi EXTENDER
- Follow the on-screen instructions for your selected mode to complete setup. You can configure the product for 2.4 GHz and/or 5GHz Wi-Fi. Refer to the appropriate chapter for each mode below if you need more help.
- For more advanced configurations, use the browser based configuration interface at http://renkforce.setup
II-1. Wi-Fi Extender Mode
- Please ensure your EW-7476RPC is within Wi-Fi range of your existing wireless router. Click "Next" to continue.

- Select whether to use the 5GHz wireless frequency, 2.4GHz wireless frequency or both. If you are not sure, select both and then click "Next".

- Select whether to enable Cross Band technology. This can help to maintain your router's maximum speed capacity as the Wi-Fi signal is extended.

- Select the Wi-Fi network name (SSID) which you wish to connect to for the specified frequency and click "Next" to continue.

If the Wi-Fi network you wish to connect to does not appear, try clicking "Refresh".
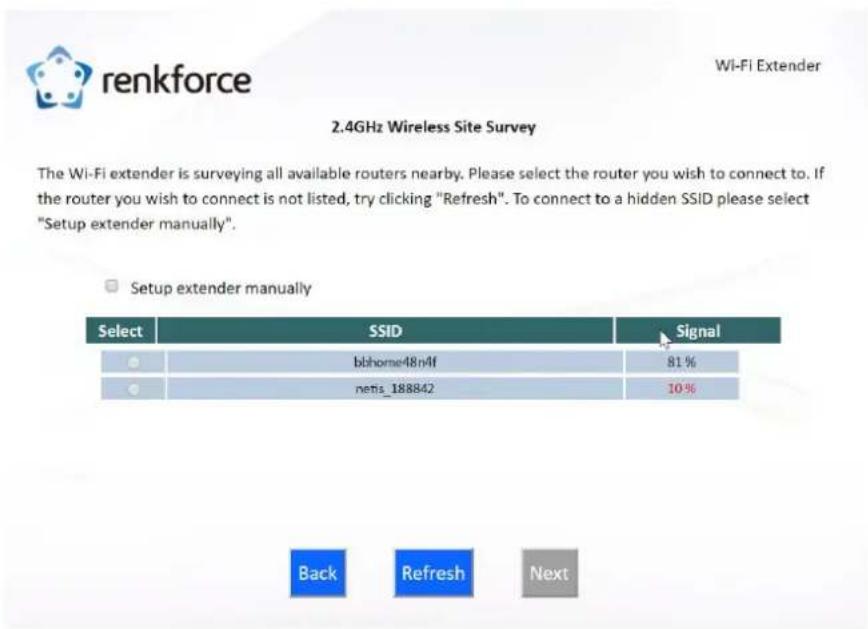

To connect to a hidden SSID, check the "Setup extender manually" box and enter the details manually on the next page, as shown below.

renkforce
Wi-Fi Extender
2.4GHz Wireless Site Survey
Please set a new Wi-Fi network name (SSID) for the Wi-Fi extender if you wish, and set the security key for your existing wireless network if required.


- Enter your existing wireless network's security key/password in the "Security Key" field and click "Next" to continue.

Device SSID will be the SSID of your extender's Wi-Fi. If using cross-band technology this will be 5GHz Wi-Fi for your router's 2.4GHz signal and vice versa.

renkforce
Wi-Fi Extender
2.4GHz Wireless Site Survey
Please set a new Wi-Fi network name (SSID) for the Wi-Fi extender if you wish, and set the security key for your existing wireless network if required.


- Wait a moment while the EW-7476RPC tests the wireless connection and hit next.

pie
| Category | Value | | -------------------- | ----- | | Testing wireless connection | 22% | | Wi-Fi Extender | 0% | | Renkforce | 0% |- Select "Obtain an IP address automatically" or "Use the following IP address" for your EW-7476RPC. If you are using a static IP, enter the IP address, subnet mask and default gateway. Click "Next" to proceed to the next step.
"Obtain an IP address automatically" is the recommended setting for most users. The IP address will be displayed in brackets.

renkforce
Wi-Fi Extender
Connection test complete. Please click "Next" when you are ready to continue.
- Obtain an IP address automatically (IP : 192.168.0.11)
Use the following IP address
| IP address: | 192 | .168 | .9 | .2 |
| Subnet Mask: | 255 | .255 | .255 | .0 |
| Default gateway: | 0 | .0 | .0 | .0 |
| DNS: | 0 | .0 | .0 | .0 |


- If you selected to use both 2.4GHz and 5GHz wireless frequencies in step 2, then repeat steps 4 – 7 for the 5GHz wireless frequency.

renkforce
Wi-Fi Extender
2.4GHz Wireless Site Survey
The Wi-Fi extender is surveying all available routers nearby. Please select the router you wish to connect to. If the router you wish to connect is not listed, try clicking "Refresh". To connect to a hidden SSID please select "Setup extender manually".
Setup extender manually
| Select | SSID | Signal |
| bbhome48n4f | 81 % | |
| netis_188842 | 10 % |

- A summary of your configuration will be displayed, as shown below. Check that all of the details are correct and then click "Next" to proceed.

The device will use the same wireless password/security key as the existing wireless network.

renkforce
Wi-Fi Extender
Configuration is complete. It is recommended that you backup your settings, please click "Backup this configuration" to do so. Then click "Next" when you are ready to continue.
(5 GHz) Wi-Fi network name :
Wi-Fi password :
bbhome48n4f_5EX

Backup this configuration
Back
Next


If you wish to backup the EW-7476RPC's settings, click "Backup this configuration" to save your current configuration to a .txt file.
- Please wait a moment until the EW-7476RPC is ready.

renkforce
Wi-Fi Extender
Applying your settings, please wait.
5%


- A final congratulations screen will indicate that setup is complete. You can now connect to the device's new SSID(s) which are shown on the screen then close the browser window.
Congratulation!
You have successfully completed setup. Please connect to the device's new Wi-Fi network name (SSID) listed below. For advanced settings, please access http://renkforce.setup from your computer's web browser.
(5 GHz) Wi-Fi network name :
Wi-Fi password :
bbhome48n4f_5EX

- The EW-7476RPC is working and ready for use. Refer to V-2. Connecting to a Wi-Fi network if you require more guidance.
II-2. Access Point Mode
- Select "Access Point" from the top menu and click "Next".

renkforce
Access Point
Wi-Fi Bridge
You have selected Access Point Mode.
The product connects to your router via Ethernet cable and provides Internet access for your computers, smartphones, tablets and any other network devices.

flowchart
graph LR
    A["Mobile Device"] --> B["Switch"]
    B --> C["Existing Wire Router"]
    C --> D["xDSL/Cable Modem"]
    D --> E["Internet"]
Back
Next
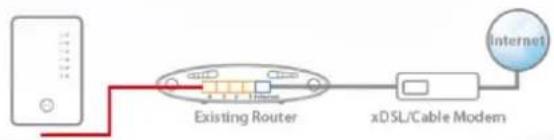
- Connect the network port of your EW-7476RPC to the LAN port of your existing router using an Ethernet cable, then click "Next".

renkforce
Access Point
flowchart
graph LR
    A["Device"] -->|Red Line| B["Existing Router"]
    B --> C["xDSL/Cable Modem"]
    C --> D["Internet"]
Please connect one end of an Ethernet cable to your existing router and connect the other end to the Ethernet port on the bottom of access point.
Back
Next
- Select whether to use the 5GHz wireless frequency, 2.4GHz wireless frequency or both. If you are not sure, select both.

- Select "Obtain an IP address automatically" or "Use the following IP address" for your EW-7476RPC. If you are using a static IP, enter the IP address, subnet mask and default gateway. Click "Next" to proceed to the next step.


"Obtain an IP address automatically" is the recommended setting for most users. For more guidance on static IP addresses, please refer to V-1. Configuring your IP address.
- Enter a name and password for your 2.4GHz & 5GHz wireless networks, then click "Next" to continue.
![renkforce Access Point Please set your Wi-Fi network name (SSID) and Wi-Fi password. Wi-Fi network name (2.4GHz): renkforce_2.4G_82FCFE Wi-Fi password (WPA2-AES): [at least 8 characters] Back Next](/content/2026/05/912027/images/af40d8fcbaddf07a22bdab2e8fc3f01123bce80394361cf227638a632fcabf5e.jpg)
- A summary of your configuration will be displayed, as shown below. Check that all of the details are correct and then click "Next" to proceed.


If you wish to backup the device's settings, click "Backup this configuration" to save your current configuration to a .txt file.
- Please wait a moment until the EW-7476RPC is ready.

pie
| Setting | Percentage (%) | | :--- | :--- | | Applying your settings, please wait. | 4 |- A final congratulations screen will indicate that setup is complete. You can now connect to the device's new SSID(s) which are shown on the screen then close the browser window.

- The EW-7476RPC is working and ready for use. Refer to V-2. Connecting to a Wi-Fi network if you require more guidance.
II-3. Wi-Fi Bridge Mode
- Select "Wireless Bridge" from the top menu and click "Next".

renkforce
Access Point
Wi-Fi Bridge
You have selected Wi-Fi Bridge Mode.
The product connects to a network device via Ethernet cable and acts as a wireless receiver, allowing the network device to join your Wi-Fi network.

flowchart
graph LR
    A["Smart TV"] --> B["Existing Wire Router"]
    B --> C["xDSL/Cable Modem"]
    C --> D["Internet"]
Back
Next
- Please ensure your EW-7476RPC is within Wi-Fi range of your existing wireless router. Click "Next" to continue.

renkforce
Wi-Fi Bridge

This setup wizard will assist you to setup a wireless connection between the Wi-Fi bridge and your existing router. Please ensure the Wi-Fi bridge is within the coverage range of your existing wireless network.
Back
Next
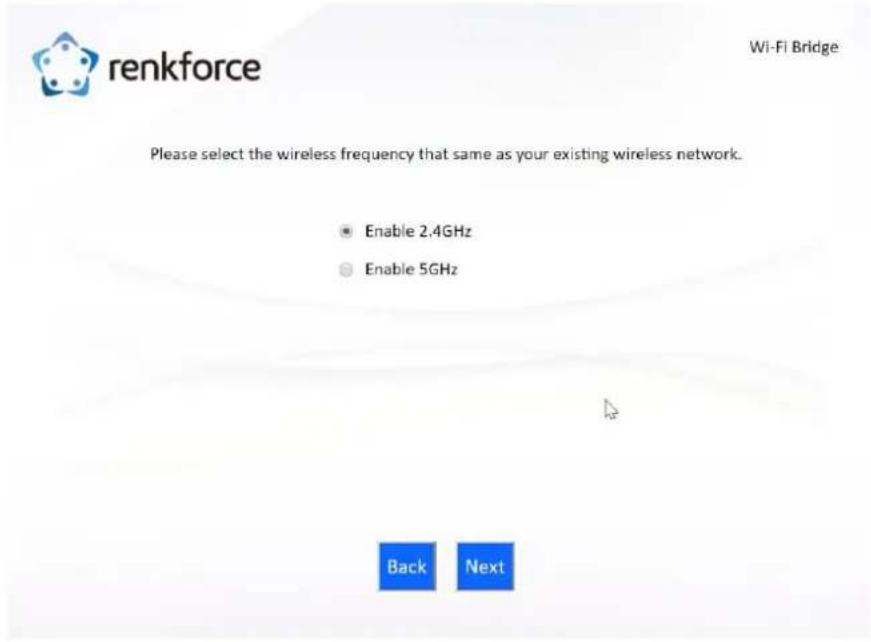
- Select the frequency (2.4GHz or 5GHz) of your existing wireless network.

In wireless bridge mode, the EW-7476RPC can only connect to one wireless network/frequency i.e. 2.4GHz or 5GHz.
- Select the Wi-Fi network name (SSID) which you wish to connect to and click "Next" to continue.

If the Wi-Fi network you wish to connect to does not appear, try clicking "Refresh".
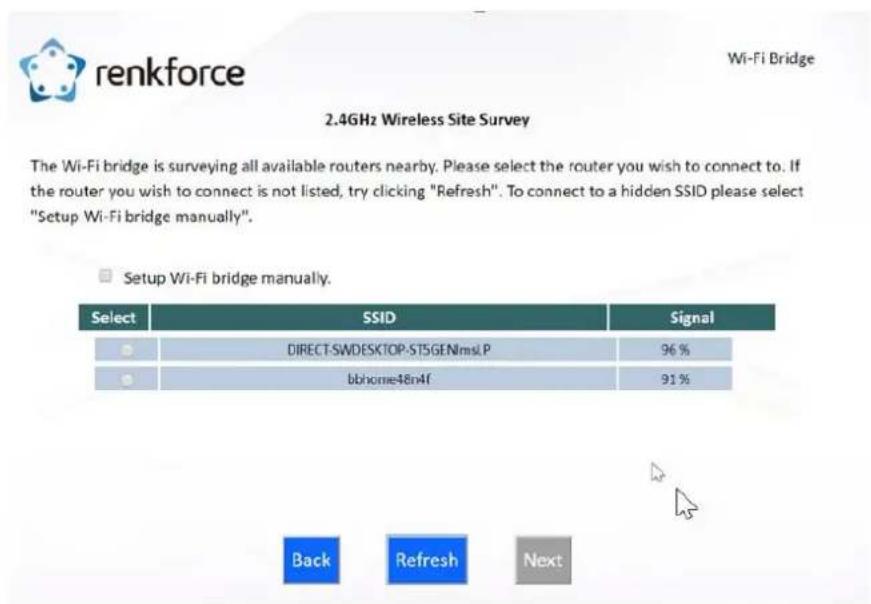

To connect to a hidden SSID, check the "Setup extender manually" box and enter the details manually on the next page, as shown below.

- Enter your existing wireless network's security key/password in the "Security Key" field and click "Next" to continue.

-
Wait a moment while the EW-7476RPC tests the wireless connection.
-
Select "Obtain an IP address automatically" or "Use the following IP address" for your EW-7476RPC. If you are using a static IP, enter the IP address, subnet mask and default gateway. Click "Next" to proceed to the next step.
"Obtain an IP address automatically" is the recommended setting for most users. The IP address will be displayed in brackets.
- A summary of your configuration will be displayed, as shown below. Check that all of the details are correct and then click "Next" to proceed.
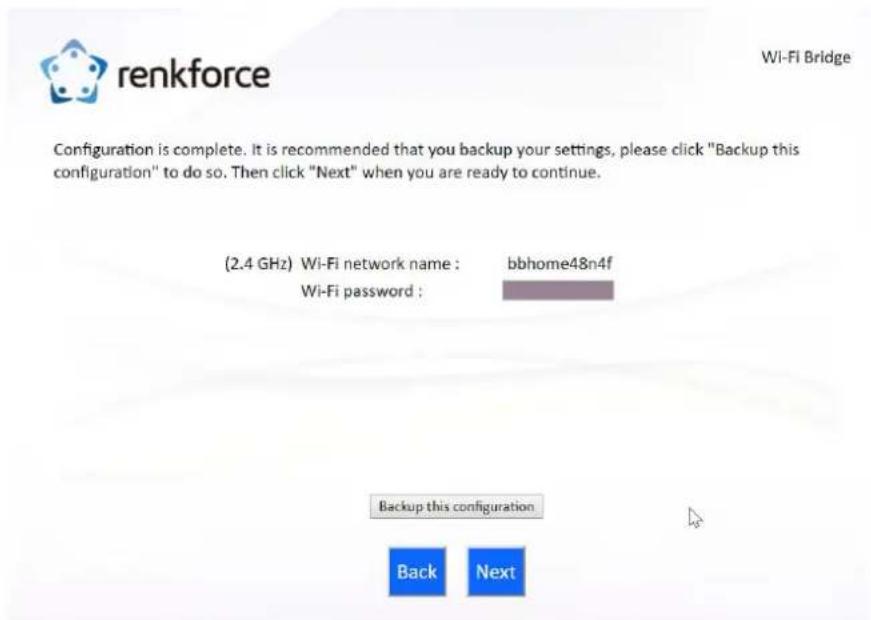

If you wish to backup the EW-7476RPC's settings, click "Backup this configuration" to save your current configuration to a .txt file.
- Please wait a moment until the EW-7476RPC is ready.
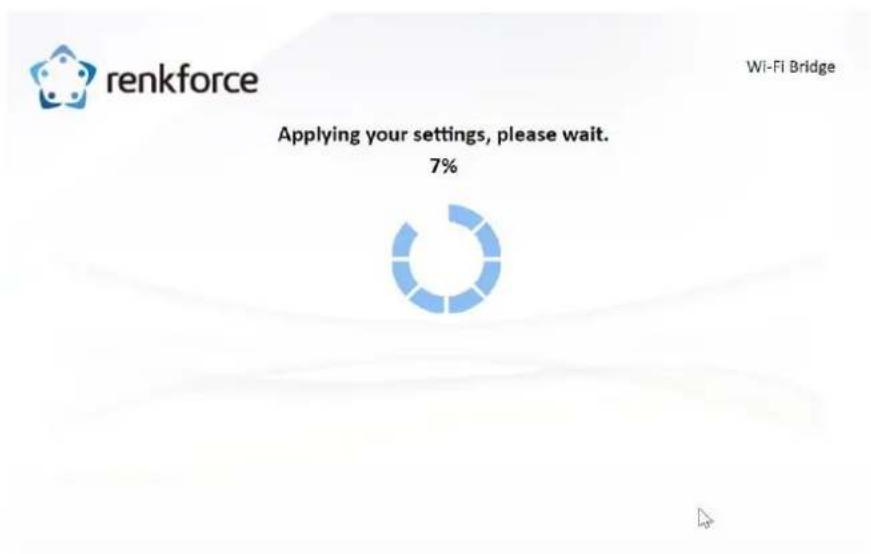
pie
| Setting | Percentage (%) | | :--- | :--- | | Applying your settings, please wait. | 7 |- A final congratulations screen will indicate that setup is complete. Please close the browser window.

renkforce
Wi-Fi Bridge
Congratulations!
You have successfully completed setup. Please connect your wired devices to the Ethernet ports on the bottom of Wi-Fi bridge. For advanced settings, please access http://renkforce.setup from your computer's web browser.
(2.4 GHz) Wi-Fi network name :
bbhome48n4f
Wi-Fi password :

- The EW-7476RPC is working and ready for use. You can now connect the EW-7476RPC to your network device using an Ethernet cable and connect to your network as usual.
After you have setup the EW-7476RPC as detailed in II. Installation or the included Quick Installation Guide, you can use the browser based configuration interface to configure advanced settings.

Please ensure that your computer is set to use a dynamic IP address. Refer to V-1. Configuring your IP address for more information.
III-1. Login
- To access the browser based configuration interface enter http://renkforce.setup into the URL bar of a browser on a network device connected to the same Wi-Fi network as the EW-7476RPC.

You will be prompted for a username and password. The default username is "admin" and the default password is "1234".
- You will arrive at the "Status and Information" screen. Use the menu down the left side to navigate.

renkforce
Access Point
English

Status
▶ Setup Wizard
▶ LAN
▶ 2.4GHz Wireless
▶ 5GHz Wireless
▶ Advanced
▶ Administration

System Status
System
Model Wi-Fi Extender
Current Time 2017/6/29 15:34:08
Hardware Version Rev. A
Firmware Version 1.00b
LAN
IP Address 192.168.201.169
Subnet Mask 255.255.255.0
Default Gateway 192.168.201.1
MAC Address 74:da:38:82:fc:fe
2.4GHz Wireless
Mode Access Point
SSID renkforce_2.4G_82FCF E
Channel Number 2
Security WPA2 (AES)
MAC Address 74:da:38:82:fc:fe
5GHz Wireless (Disable)
Mode Access Point
SSID renkforceEXT_5G_ff
Channel Number Auto
Security Disable
MAC Address 74:da:38:82:fc:ff
III-2. Save Settings
- After you configure any settings, click the "Save Settings" button at the bottom of the screen to save your changes.


The device needs to restart in order to bring any changes into effect.
- Then, click "Click here to restart" in order to restart the device and bring the changes into effect.
Settings have been saved. Please click here to restart the device and bring the new settings into effect.
- To make several changes at once, use the "Save Settings" button after each change and then click "click here to restart" after your final change. Only one restart is necessary as long as each change is saved with the "Save Settings" button.

After you click "click here to restart", all saved changes will come into effect.
III-3. Main Menu
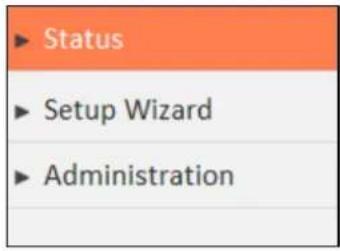
The main menu displays different options depending on your device's operating mode. Please refer to the following chapters for guidance on each mode.
Wi-Fi Extender

Access Point
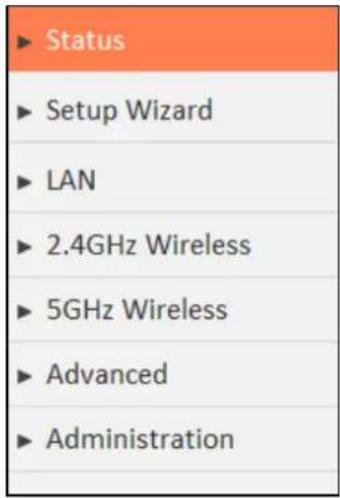
Wi-Fi Bridge
III-3-1. Status
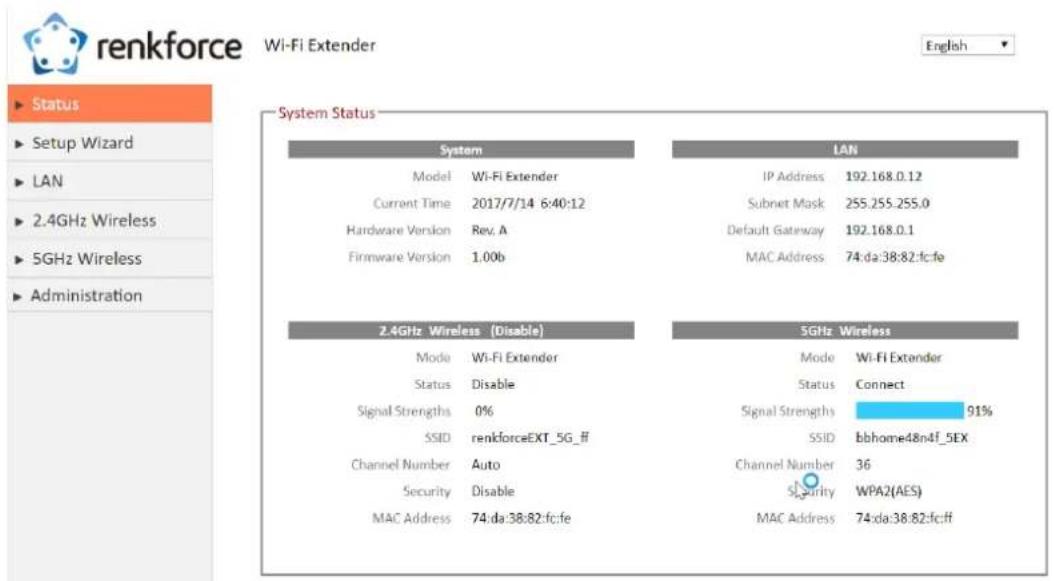
The "Status" page displays basic system information about the device, arranged into categories.

Screenshots displayed are examples. The information shown on your screen will vary depending on your configuration.
III-3-2. Setup Wizard

You can run the setup wizard again to reconfigure the basic settings of the device, or you can run a wizard to help you
switch the device to a different operating mode. Select "Setup Wizard" or "Switch to Router/Access Point/Range Extender/Wireless Bridge/WISP mode" and then click "Run Wizard" to begin.
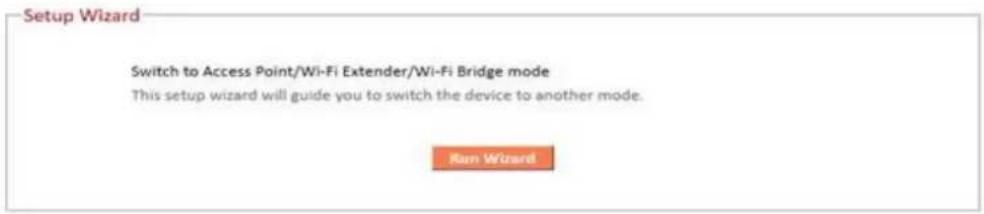
| Switch to Access Point/ Wi-Fi Extender/ Wi-Fi Bridge mode | This wizard will help you to switch the device to a different operating mode: Access Point mode, Wi-Fi extender mode, Wi-Fi bridge mode (see below). |
Switch to Access Point/ Wi-Fi Extender/ Wi-Fi Bridge mode:
- Follow the on-screen instructions to back up your current settings and then reset the device back to its factory default settings.
- After the device has reset you will see the screen below. Close your browser and open it again.
Reset to Default
You have successfully reset the device to factory defaults. Please close the browser and open it again. This device will start running the setup wizard for you to switch the mode.
- Follow the on-screen wizard to setup your device in a different mode. Refer to II. Installation Step 3 onwards for help if needed.

If you don't see the "Get Started" screen, try reconnecting to the renkforceEXT.setup **SSID and go to http://renkforce.setup in a web browser.
III-3-3. LAN

You can configure your Local Area Network (LAN) on this page. Set the device to automatically obtain an IP address from your router or assign an IP address manually.

You can access the browser based configuration interface using the device's IP address instead of using the URL http://renkforce.setup.
LAN IP

Obtain an IP address automatically

Use the following IP address
IP Address
192.168.2.1
Subnet Mask
255.255.255.0
Default Gateway Address
DNS Address


| IP Address | Specify the IP address here. This IP address will be assigned to the EW-7476RPC and will replace the default IP address. |
| Subnet Mask | Specify a subnet mask. The default value is 255.255.255.0 |
| Default Gateway Address | Enter a default gateway address. |
| DNS Address | Enter a DNS address. |
III-3-4. 2.4GHz Wireless & 5GHz Wireless

The "2.4GHz Wireless" & "5GHz Wireless" menu allows you to configure SSID and security settings for your Wi-Fi network along with a guest Wi-Fi network. WPS, access control (in access point mode) and scheduling functions can also be managed from here.

In Access Point mode, the "Guest" feature in the menu is replaced by "Access Control".
III-3-4-1. Basic
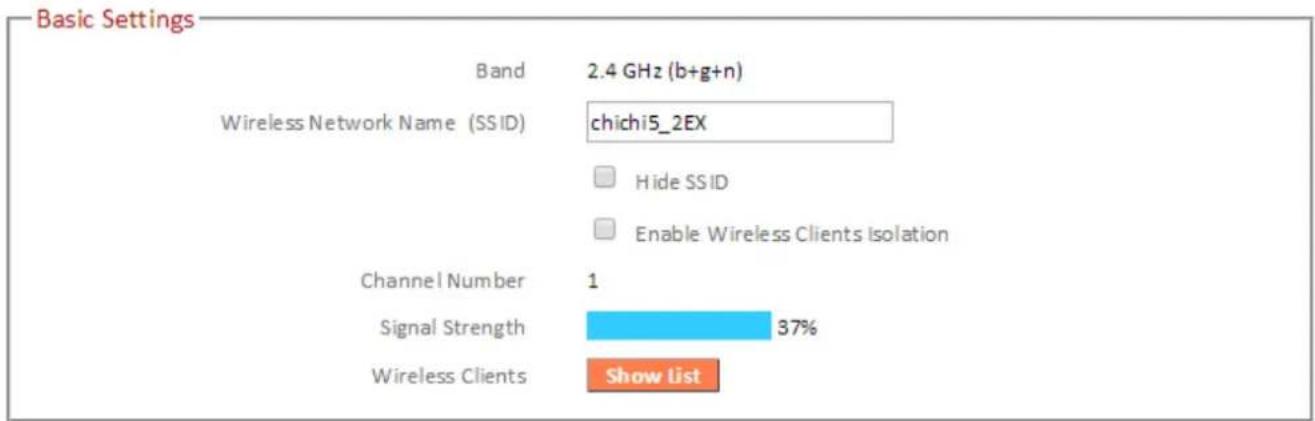
The "Basic" screen displays settings for your primary 2.4GHz or 5GHz Wi-Fi network.
bar
Basic Settings | Category | Value | |---|---| | Band | 2.4 GHz (b+g+n) | | Wireless Network Name (SSID) | chichi5_2EX | | | Hide SSID | | | Enable Wireless Clients Isolation | | Channel Number | 1 | | Signal Strength | 37% | | Wireless Clients | Show List || Band | Displays the wireless standard used for the EW-7476RPC's “2.4GHz (B+G+N)” means that 802.11b, 802.11g, and 802.11n wireless clients can connect to the EW-7476RPC. |
| Wireless Network Name (SSID) | This is the name of your Wi-Fi network for identification, also sometimes referred to as “SSID”. The SSID can consist of any combination of up to 32 alphanumerical characters. |
| Hide SSID | Enable or disable hide SSID. When disabled, the SSID will be visible to clients as an available Wi-Fi network. When enabled, the SSID will not be visible as an available Wi-Fi network to clients – clients must manually enter the SSID in order to connect. A hidden (disabled) SSID is typically more secure than a visible (enabled) SSID. |
| Enable Wireless Clients Isolation | Check the box to enable wireless clients isolation. This prevents wireless clients connected to the EW-7476RPC from communicating with each other and improves security. Typically, this function is useful for corporate environments or public hot spots and can prevent brute force attacks on clients' usernames and passwords. |
| Channel Number | Select a wireless radio channel or use the default “Auto” setting from the drop-down menu. |
| Signal Strength | Displays the signal strength from your router to your extender. |
| Wireless Clients | Click “Show List” to display a new window showing information about wireless clients. Please disable any pop-up blockers if you have difficulty using this function. |
Wireless Security:
Wireless Security
Encryption WPA2(AES)
Encryption Key 020586mu
Access Point Mode:

Select an encryption type from the drop-down menu:

"WPA Pre-shared Key" is the recommended and most secure encryption type.

Encryption is disabled and no password/key is required to connect to the EW-7476RPC.

Disabling wireless encryption is not recommended. When disabled, anybody within range can connect to your device's SSID.
| Enable 802.1xAuthentication | Check the box to enable the 802.1x authentication. A RADIUS server is required to perform 802.1x authentication: enter the RADIUS server's information in the relevant fields (below). |
Enable 802.1x Authentication
RADIUS Server IP address
RADIUS Server Port
RADIUS Server Password
1812
III-3-4-1-2. WEP
WEP (Wired Equivalent Privacy) is a basic encryption type. For a higher level of security consider using WPA encryption.
Wireless Security
Encryption
WEP
Key Length
64-bit
Key Format
Hex (10 characters)
Encryption Key
●●●●●●●●●
√ Hide

Enable 802.1x Authentication
| Key Length | Select 64-bit or 128-bit. 128-bit is more secure than 64-bit. |
| Key Format | Choose from “ASCII” (any alphanumeric character 0-9, a-z and A-Z) or “Hex” (any characters from 0-9, a-f and A-F). |
| Encryption Key | Enter your encryption key/password according to the format you selected above. A complex, hard-to-guess key is recommended. Check the “Hide” box to hide your password from being displayed on-screen. |
| Enable 802.1x Authentication | Check the box to enable the 802.1x authentication. A RADIUS server is required to perform 802.1x authentication: enter the RADIUS server's information in the relevant fields (below). |

Enable 802.1x Authentication
RADIUS Server IP address
RADIUS Server Port
RADIUS Server Password
1812
III-3-4-1-3. WPA Pre-Shared Key
WPA pre-shared key is the recommended and most secure encryption type.
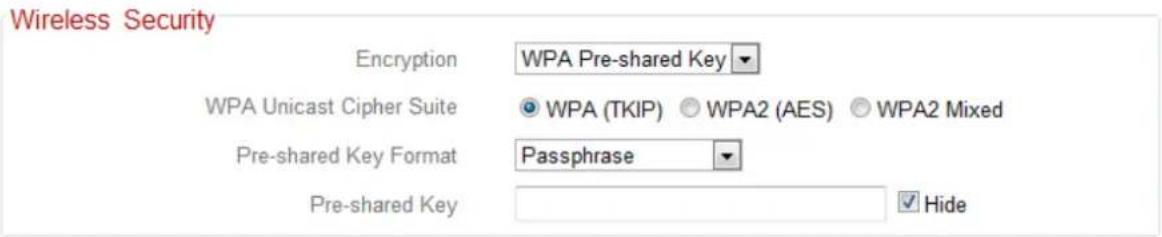
| WPA Unicast Cipher Suite | Select from WPA (TKIP), WPA2 (AES) or WPA2 Mixed. WPA2 (AES) is safer than WPA (TKIP), but not supported by all wireless clients. Please make sure your wireless client supports your selection. WPA2 (AES) is recommended followed by WPA2 Mixed if your client does not support WPA2 (AES). |
| Pre-shared Key Format | Choose from “Passphrase” (8-63 alphanumeric characters) or “Hex” (up to 64 characters from 0-9, a-f and A-F). |
| Pre-shared Key | Please enter a key according to the format you selected above. A complex, hard-to-guess key is recommended. Check the “Hide” box to hide your password from being displayed on-screen. |
WPA RADIUS is a combination of WPA encryption and RADIUS user authentication. If you have a RADIUS authentication server, you can authenticate the identity of every wireless client against a user database.
Wireless Security
Encryption
WPA RADIUS

WPA Unicast Cipher Suite
WPA (TKIP)
© WPA2 (AES)
WPA2 Mixed
RADIUS Server IP address
RADIUS Server Port
1812
RADIUS Server Password
| WPA Unicast Cipher Suite | Select from WPA (TKIP), WPA2 (AES) or WPA2 Mixed. WPA2 (AES) is safer than WPA (TKIP), but not supported by all wireless clients. Please make sure your wireless client supports your selection. WPA2 (AES) is recommended followed by WPA2 Mixed if your client does not support WPA2 (AES). |
| RADIUS Server IP address | Input the IP address of the RADIUS authentication server here. |
| RADIUS Server Port | Input the port number of the RADIUS authentication server here. The default value is 1812. |
| RADIUS Server Password | Input the password of the RADIUS authentication server here. |
III-3-4-2. Guest
You can setup an additional "Guest" Wi-Fi network so guest users can enjoy Wi-Fi connectivity without accessing your primary SSID. The "Guest" screen displays settings for your guest Wi-Fi network.

The guest network is separate from your primary network. The settings for your primary network can be found in the "Basic" menu.

Not available in access point mode
Basic Settings

Enable Guest SSID
Guest Wireless Name


Hide SSID

Enable Wireless Clients Isolation
Band
2.4 GHz (b+g+n)
Channel Number
1 (Same as main SSID)
Wireless Security
Encryption
Disable

| Enable Guest SSID | Check/unchecked the box to enable/disable the guest Wi-Fi network. |
| Wireless Guest Name | Enter a reference/ID name for your guest wireless network. |
| Hide SSID | Enable or disable hide SSID. When disabled, the SSID will be visible to clients as an available Wi-Fi network. When enabled, the SSID will not be visible as an available Wi-Fi network to clients – clients must manually enter the SSID in order to connect. A hidden (disabled) SSID is typically more secure than a visible (enabled) SSID. |
| Enable Wireless Clients Isolation | Check the box to enable wireless clients isolation. This prevents wireless clients connected to the EW-7476RPC from communicating with each other and improves security. Typically, this function is usefulfor corporate environments or public hot spots and can prevent brute force attacks on clients' usernames and passwords. |
| Band | Displays the wireless standard used for the EW-7476RPC's frequency band:2.4GHz (B+G+N): Allows 802.11b, 802.11g, and 802.11n wireless clients to connect to the EW-7476RPC. |
| Channel Number | Channel number for the guest network is the same as the main SSID and cannot be adjusted independently. |
| Encryption | Please refer to III-3-4-1. Basic: Wireless Security for details about security settings. |
III-3-4-3. WPS
Wi-Fi Protected Setup is a simple way to establish connections between WPS compatible devices. WPS can be activated on compatible devices by pushing a WPS button on the device or from within the device's firmware/configuration interface. When WPS is activated in the correct manner and at the correct time for two compatible devices, they will automatically connect. PIN code WPS includes the use of a PIN code between the two devices for verification.
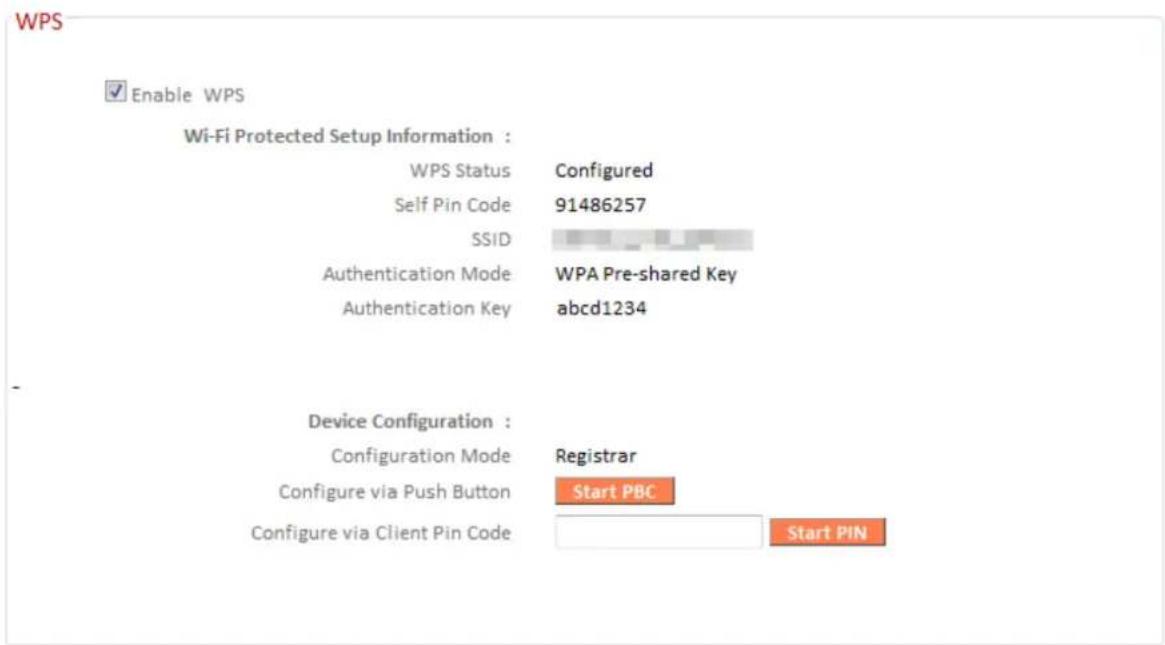
| Enable WPS | Check/unchecked this box to enable/disable WPS. |
| WPS Status | Displays “Configured” or “unConfigured” depending on whether WPS and SSID/security settings for the device have been configured or not, either manually or using the WPS button. |
| Self PIN Code | Displays the WPS PIN code of the device. |
| SSID | Displays the SSID of the device. |
| Authentication Mode | Displays the wireless security authentication mode of the device. |
| Authentication Key | Displays the wireless security authentication key. |
| Configuration Mode | The configuration mode of the device’s WPS setting is displayed here. “Registrar” means the device acts as an access point for a wireless client to connect to and the wireless client(s) will follow the device’s wireless |
| settings. | |
| Configure via Push Button | Click “Start PBC” (Push-Button Configuration) to activate WPS on the access point. WPS will be active for 2 minutes. |
| Configure via Client PIN Code | Enter the wireless client’s PIN code here and click “Start PIN” to activate PIN code WPS. Refer to your wireless client’s documentation if you are unsure of its PIN code. |
III-3-4-4. Access Control

Access Point mode only
Access Control is a security feature that can help to prevent unauthorized users from connecting to your wireless router.
This function allows you to define a list of network devices permitted to connect to the EW-7476RPC. Devices are each identified by their unique MAC address. If a device which is not on the list of permitted MAC addresses attempts to connect to the EW-7476RPC, it will be denied.
To enable this function, check the box labeled "Enable Wireless Access Control".

| Client PC | Select a PC name from the drop-down list and click “>>” to add enter it into the blank field to the right.Click “Refresh’ in the drop-down menu to refresh the list of available MAC addresses. If the address you wish to add is not listed, enter it manually. |
| MAC Address | Enter a MAC address of computer or network device manually without dashes or colons e.g. for MAC address ‘aa-bb-cc-dd-ee-ff’ enter ‘aabbccddeeff’. |
| Comment | Enter a comment for reference/identification consisting of up to 16 alphanumerical characters. |
| Add | Click “Add” to add the MAC address to the MAC address filtering table. |
MAC address entries will be listed in the table. Select an entry using the "Select" checkbox.
| Delete Selected/Delete All | Delete selected or all entries from the table. |
III-3-4-5. Schedule

When Cross-Band is enabled, wireless scheduling is reversed according to frequency. Your 2.4GHz schedule will apply to your extender's 5GHz network and vice-versa.
The schedule feature allows you to automate the wireless radio to switch off at specified times. Multiple schedules can be configured. Check/uncheck the box "Enable Wireless Off Schedule" to enable/disable the wireless off scheduling function.

The EW-7476RPC must have time & date settings initially set to use scheduling.
- Wireless Schedule
Enable Wireless Off Schedule
Every Day

Add
| Start Time | End Time | Select |
| Sunday - 23:30 | Monday - 07:30 | |
| Monday - 23:30 | Tuesday - 07:30 | |
| Tuesday - 23:30 | Wednesday - 07:30 | |
| Wednesday - 23:30 | Thursday - 07:30 | |
| Thursday - 23:30 | Friday - 07:30 | |
| Friday - 23:30 | Saturday - 07:30 | |
| Saturday - 23:30 | Sunday - 07:30 |
Delete Selected
Delete All
Save Settings
Settings have been saved. Please click here to restart the device and bring the new settings into effect.

Wireless scheduling can save energy and increase the security of your network.
- Use the dropdown to select which day(s) to include in the schedule. Check "Every Day" as a shortcut for an every day schedule.
- Specify a start and end time (hour and minute) for the wireless off schedule using the drop-down menu.
| Add | Add the schedule to the table of active schedules. |
| Delete Selected/Delete All | Delete selected or all entries from the table of active schedules. |
When a wireless schedule is in operation so that 2.4GHz is active and 5GHz is off, the WPS button's primary function is to activate the 5GHz network.
Press the WPS button once to activate/wake the 5GHz network.
Following this, the WPS button functions normally as described above in WPS Setup.
III-3-5. Advanced

Advanced features of the EW-7476RPC can be configured from the "Advanced" menu.
III-3-5-1. 2.4GHz Wireless
These settings are for experienced users only. Please do not change any of the values on this page unless you are already familiar with these functions.
2.4GHz Wireless
Wireless Module
Enable
Fragment Threshold
2346
(256-2346)
RTS Threshold
2347
(0-2347)
Beacon Interval
100
(20-1024 ms)
DTIM Period
3
(1-10)
Data Rate
Auto

N Data Rate
Auto

Channel Width

Auto 20/40 MHZ

20 MHz
Preamble Type

Short Preamble

ong Preamble
CTS Protect

Auto

Always

None
Tx Power
100%
Save Settings
| Fragment Threshold | Set the Fragment threshold of the wireless radio. The default value is 2346. |
| RTS Threshold | Set the RTS threshold of the wireless radio. The default value is 2347. |
| Beacon Interval | Set the beacon interval of the wireless radio. The default value is 100. |
| DTIM Period | Set the DTIM period of wireless radio. The default value is 3. |
| Data Rate | Set the wireless data transfer rate. The default is set to Auto. |
| N Data Rate | Set the data rate of 802.11n. The default is set to Auto. |
| Channel Width | Select wireless channel width (bandwidth used by wireless signals from the device) – the recommended value is Auto 20/40MHz. |
| Preamble Type | Set the wireless radio preamble type. The default value is “Short Preamble”. |
| CTS Protect | Enabling this setting will reduce the chance of radio signal collisions between 802.11b and 802.11g wireless access points. It’s recommended to set this option to “Auto”. |
| Tx Power | Set the power output of the wireless radio. You may not require 100% output power. Setting a lower power output can enhance security since potentially malicious/unknown users in distant areas will not be able to access your signal. |
Tx power works in conjunction with the switch on the side of the device. The switch is the primary setting and the Tx power value here will be a percentage of the slide switch setting. E.G If the slide switch is set to Green Mode (25%) and Tx power to 75%, the overall output will be 75% of 25%.

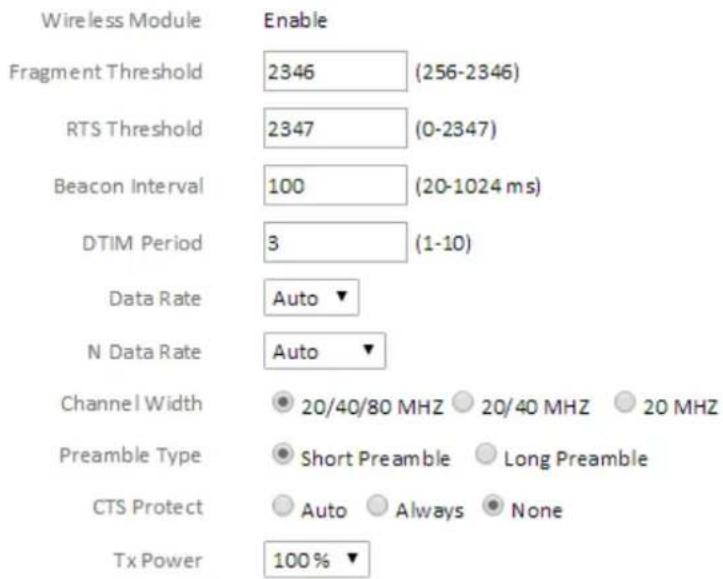
III-3-5-2. 5GHz Wireless
These settings are for experienced users only. Please do not change any of the values on this page unless you are already familiar with these functions.
5GHz Wireless
Save Settings
| Fragment Threshold | Set the Fragment threshold of the wireless radio. The default value is 2346. |
| RTS Threshold | Set the RTS threshold of the wireless radio. The default value is 2347. |
| Beacon Interval | Set the beacon interval of the wireless radio. The default value is 100. |
| DTIM Period | Set the DTIM period of wireless radio. The default value is 3. |
| Data Rate | Set the wireless data transfer rate. The default is set to Auto. |
| N Data Rate | Set the data rate of 802.11n. The default is set to Auto. |
| Channel Width | Select wireless channel width (bandwidth used by wireless signals from the device) – the recommended value is 20/40/80MHz. |
| Preamble Type | Set the wireless radio preamble type. The default value is “Short Preamble”. |
| CTS Protect | Enabling this setting will reduce the chance of radio signal collisions between 802.11b and 802.11g wireless access points. It’s recommended to set this option to “Auto”. |
| Tx Power | Set the power output of the wireless radio. You may not require 100% output power. Setting a lower power output can enhance security since potentially malicious/unknown users in distant areas will not be able to access your signal. |

Tx power works in conjunction with the switch on the side of the device. The switch is the primary setting and the Tx power value here will be a percentage of the slide switch setting. E.G If the slide switch is set to Green Mode (25%) and Tx power to 75%, the overall output will be 75% of 25%.
III-3-6. Administration

Various administrative functions can be accessed from the "Administration" menu.
III-3-6-1. Wireless

Range extender mode only
You can adjust the level of wireless output power as a percentage. Depending on the size of your location and required coverage, you may not require 100% output power. Reducing the output power can enhance security since your Wi-Fi signal will not extend to potential malicious/unknown users in distant areas.

Tx power can also be adjusted using the switch on the side of the device. Refer to I-4. Switch.
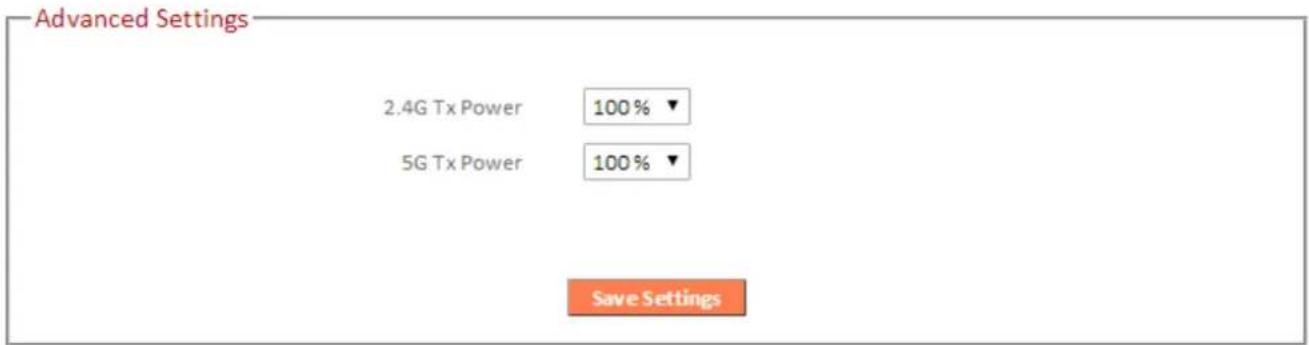
| 2.4G Tx Power | Adjust the Wi-Fi output power for the 2.4GHz frequency. |
| 5G Tx Power | Adjust the Wi-Fi output power for the 5GHz frequency. |
III-3-6-2. Time Zone
Time Zone
Set Time Zone
(GMT)Greenwich Mean Time: Dublin, Edinburgh, Lisbon, London
Time Server Address
pool.ntp.org

Daylight Savings
Enable Function
January 1 To January 1
Save Settings
| Set Time Zone | Select the time zone of your country or region. |
| Time Server Address | The travel router supports NTP (Network Time Protocol) for automatic time and date setup. Input the host name of the IP server manually. |
| Daylight Saving | If your country/region uses daylight saving time, please check the “Enable Function” box, and select the start and end date. |
III-3-6-3. Password
You can change the password used to login to the browser-based configuration interface here. It is advised to do so for security purposes.

Please make a note of the new password. In the event that you forget the password and are unable to login to the browser based configuration interface, see I-6. Reset to factory default settings for how to reset the device.
Password
Current Password
New Password
Confirmed Password

natural_image
Three horizontal white rectangular bars with no text or symbolsApply
| Current Password | Enter your current password. |
| New Password | Enter your new password. |
| Confirmed Password | Confirm your new password. |
III-3-6-4. Backup/Restore
Backup / Restore
Backup Settings
Save
Restore Settings
Choose File
No file chosen
Upload
Restore to Factory Default
Debug Logs
Reset
Save
| Backup Settings | Click “Save” to save the current settings on your computer as config.bin file. |
| Restore Settings | Click “Browse” to find a previously saved config.bin file and then click “Upload” to replace your current settings. |
| Restore to Factory Default | Click “Reset” to restore settings to the factory default. A pop-up window will appear and ask you to confirm and enter your log in details. Enter your username and password and click “Ok”. See below for more information. |
| Debug Logs | Click to save a log file of wireless information to your computer as a .txt file. |
III-3-6-5. Restart
In the event that the router malfunctions or is not responding, then it is recommended that you restart the device.
Restart
In the event that the system stops responding correctly or stops functioning, you can perform a system restart. Your settings will not be changed. To restart, click on the APPLY button below. You will be asked to confirm your decision. The restart will be complete when the power LED light stops blinking.
Apply
IV-1. Configuring your IP address
For first time access to the URL http://renkforce.setup please ensure your computer is set to use a dynamic IP address. This means your computer can obtain an IP address automatically from a DHCP server. You can check if your computer is set to use a dynamic IP address by following VII-1-1. How to check that your computer uses a dynamic IP address.
Static IP users can also temporarily modify your computer's IP address to be in the same IP address subnet e.g. 192.168.9.x (x = 3 - 254) as the EW-7476RPC in order to access http://renkforce.setup.

The EW-7476RPC's default IP address is 192.168.9.2.
The procedure for modifying your IP address varies across different operating systems; please follow the guide appropriate for your operating system in IIV-1-2. How to modify the IP address of your computer.

Static IP users please make a note of your static IP before you change it.
You can assign a new IP address to the device which is within the subnet of your network during setup or using the browser based configuration interface, so that you can access the URL http://renkforce.setup in future without modifying your IP address.

Please remember to change your IP address back to its original value after the device is properly configured.
IV-1-1. How to check that your computer uses a dynamic IP address
Please follow the instructions appropriate for your operating system.
IV-1-1-1. Windows 7
- Click the "Start" button (it should be located in the lower-left corner of your computer), then click "Control Panel".

- Under "Network and Internet" click "View network status and tasks".
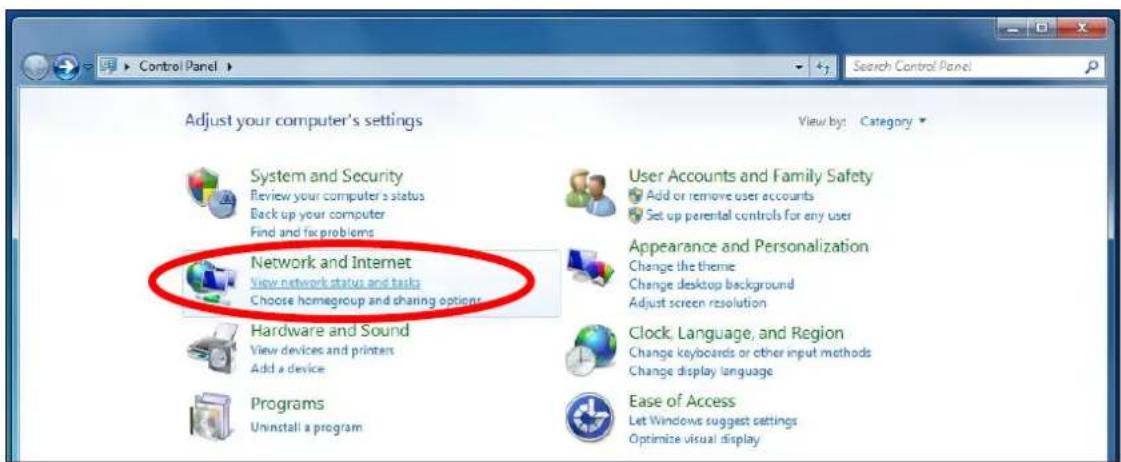
3. Click "Local Area Connection".
View your basic network information and set up connections

flowchart
graph LR
    A["TS-WIN7 (This computer)"] --> B["Home network"]
    B --> C["Internet"]
    D["Home network"] --> E["Access type: No Internet access"]
    D --> F["HomeGroup: Ready to create"]
    D --> G["Connections: Local Area Connection"]
4. Click "Properties".

- Select "Internet Protocol Version 4 (TCP/IPv4) and then click "Properties".

- Select "Obtain an IP address automatically" and "Obtain DNS server address automatically" should be selected.

IV-1-1-2. Windows 8.1 & 10
- In desktop mode, click the File Explorer icon in the bottom left of the screen, as shown below.

natural_image
Close-up of white daisies against a blue sky, no text or symbols visible on the daisies or background.- Right click "Network" and then select "Properties".

- In the window that opens, select "Change adapter settings" from the left side.
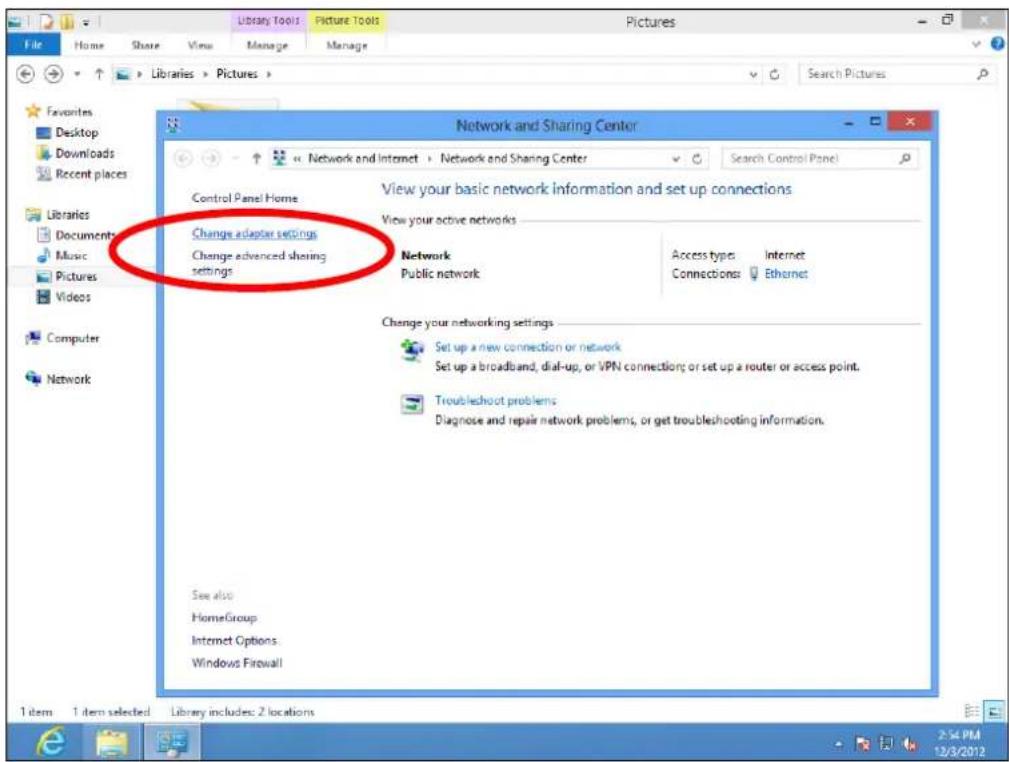
- Choose your connection and right click, then select "Properties".
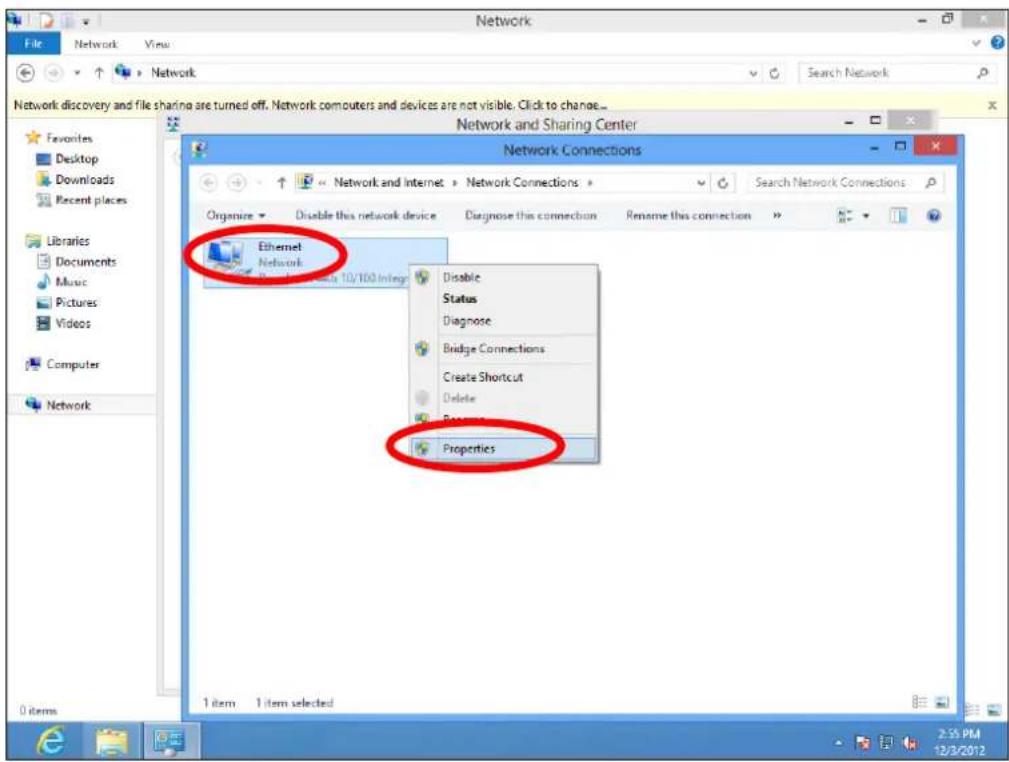
- Select "Internet Protocol Version 4 (TCP/IPv4) and then click "Properties".

- Select "Obtain an IP address automatically" and "Obtain DNS server address automatically" should be selected.

IV-1-1-3. Mac OS
- Have your Macintosh computer operate as usual, and click on "System Preferences".

- In System Preferences, click on "Network".

- Click on "Wi-Fi" in the left panel and then click "Advanced" in the lower right corner.

- Select "TCP/IP" from the top menu and "Using DHCP" in the drop down menu labeled "Configure IPv4" should be selected.

IV-1-2. How to modify the IP address of your computer
Please follow the instructions appropriate for your operating system. In the following examples we use the IP address 192.168.9.20 though you can use any IP address in the range 192.168.9.x (x = 3 - 254) in order to access iQ Setup/browser based configuration interface.

Please make a note of your static IP before you change it.
IV-1-2-1. Windows 7
- Click the "Start" button (it should be located in the lower-left corner of your computer), then click "Control Panel".
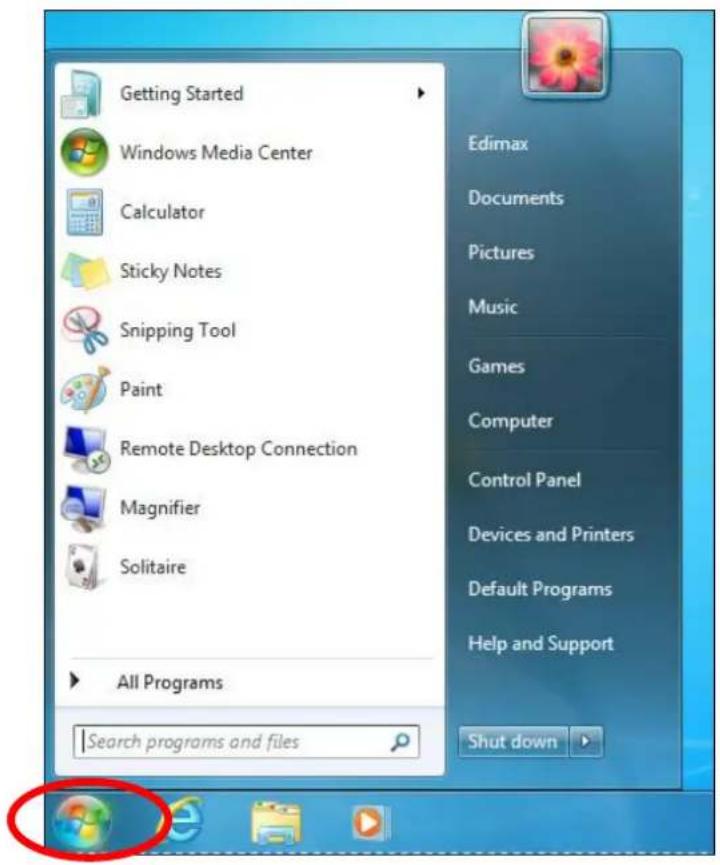
- Under "Network and Internet" click "View network status and tasks".

3. Click "Local Area Connection".

4. Click "Properties".

- Select "Internet Protocol Version 4 (TCP/IPv4) and then click "Properties".

- Select "Use the following IP address", then input the following values:

Your existing static IP address will be displayed in the "IP address" field before you replace it. Please make a note of this IP address, subnet mask, default gateway and DNS server addresses.
IP address: 192.168.9.20
Subnet Mask: 255.255.255.0
Click 'OK' when finished.

IV-1-2-2. Windows 8.1 & 10
- In desktop mode, click the File Explorer icon in the bottom left of the screen, as shown below.

natural_image
Close-up of white daisies against a blue sky, no text or symbols visible on the daisies or background.- Right click "Network" and then select "Properties".

- In the window that opens, select "Change adapter settings" from the left side.
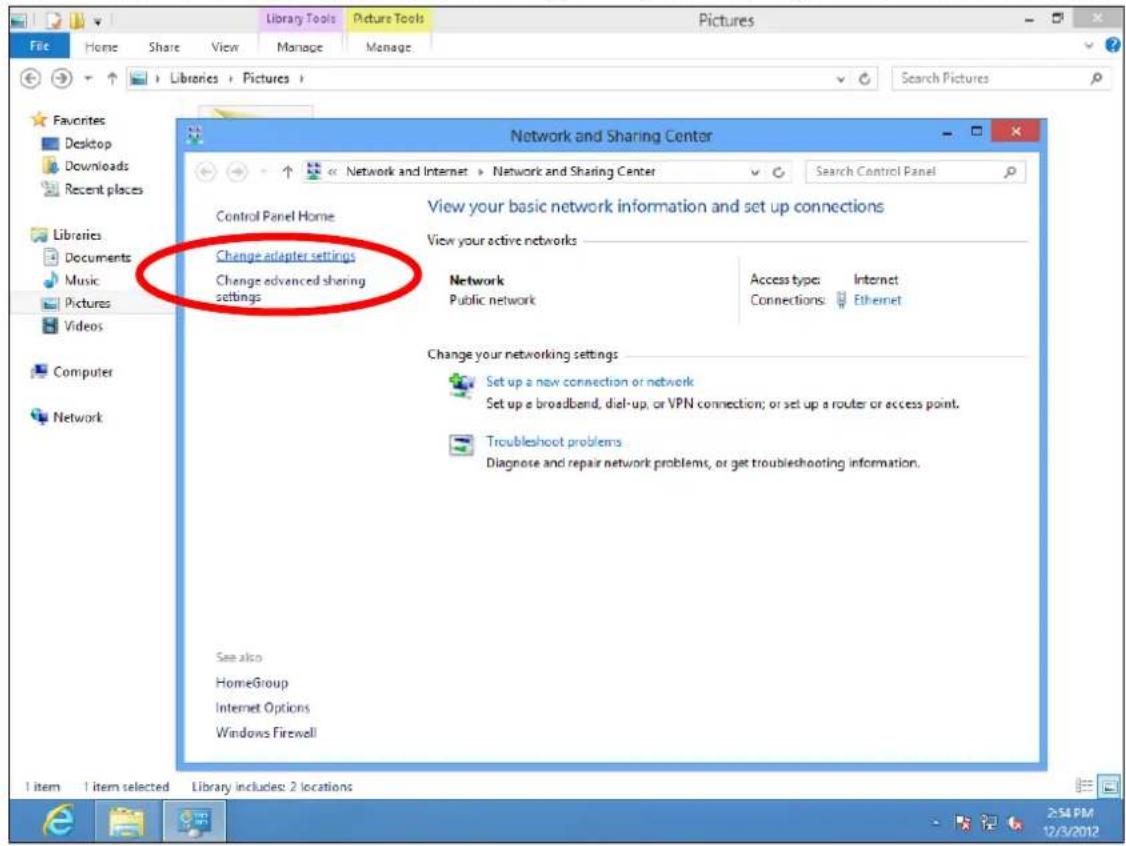
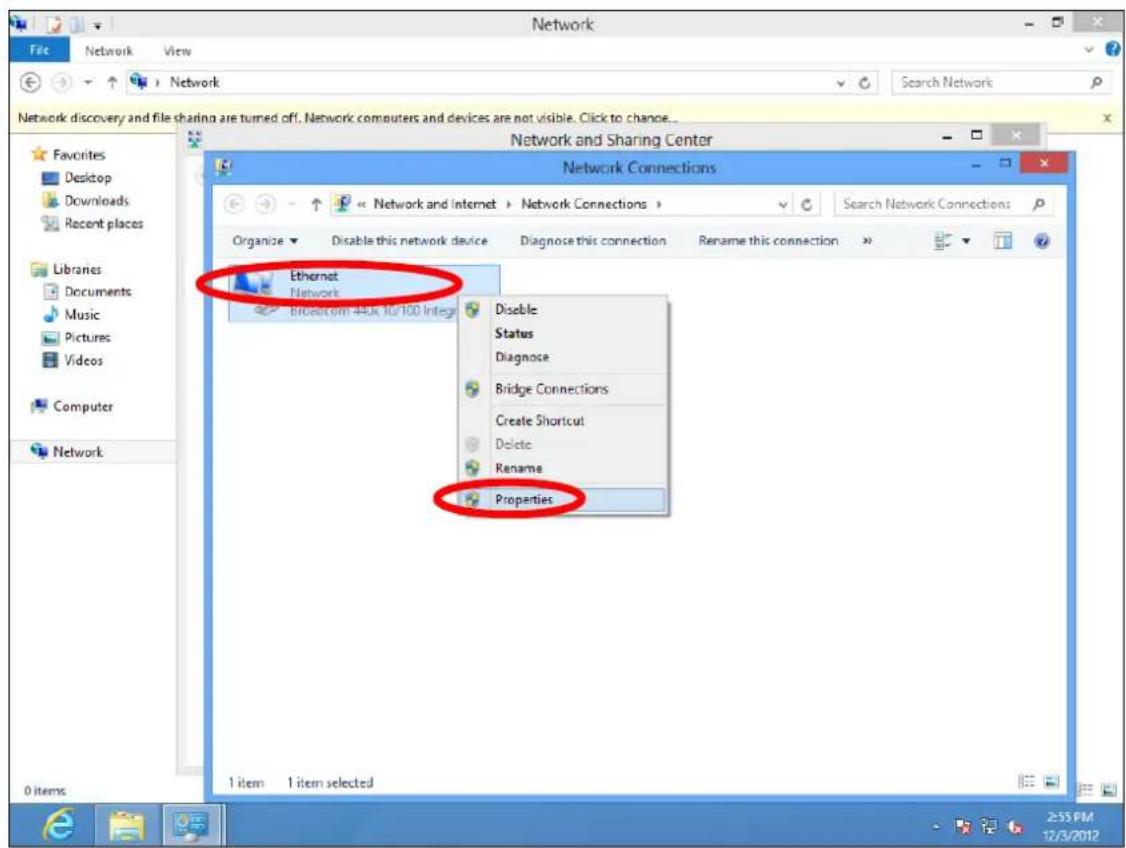
- Choose your connection and right click, then select "Properties".
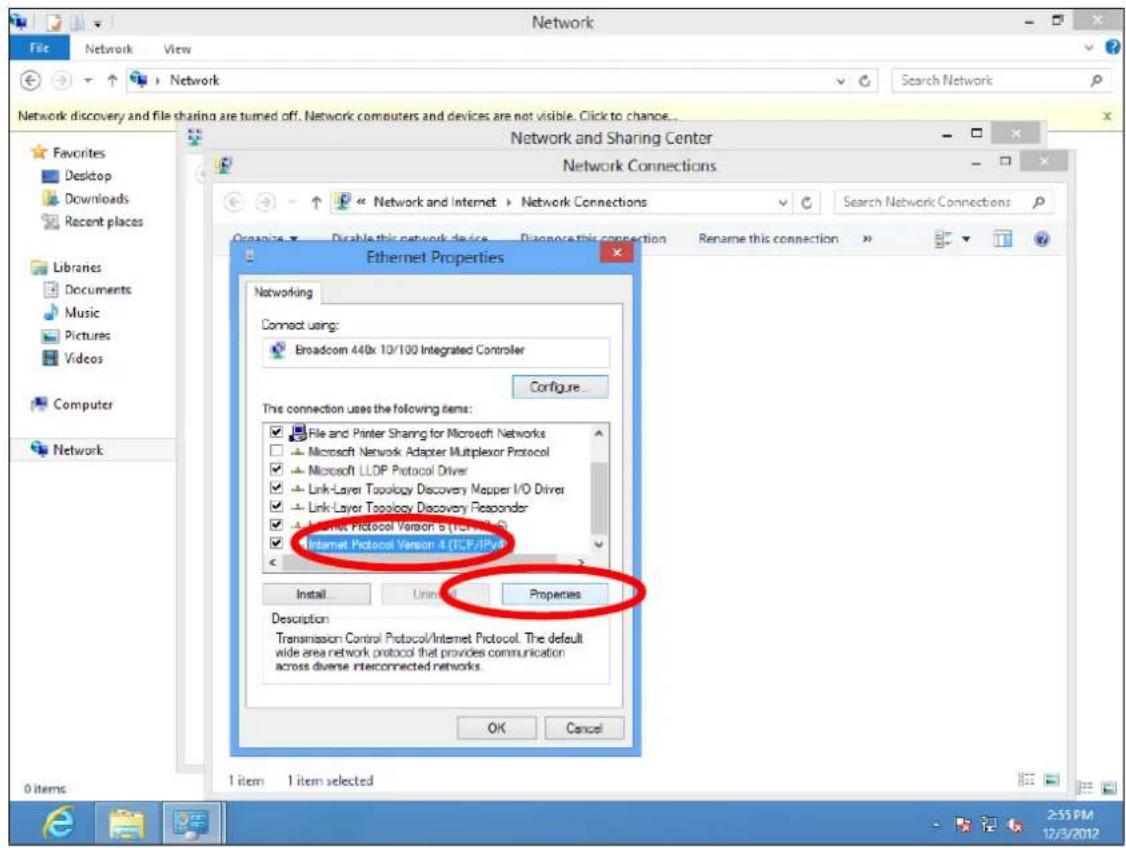
- Select "Internet Protocol Version 4 (TCP/IPv4) and then click "Properties".
- Select "Use the following IP address", then input the following values:

Your existing static IP address will be displayed in the "IP address" field before you replace it. Please make a note of this IP address, subnet mask, default gateway and DNS server addresses.
IP address: 192.168.9.20
Subnet Mask: 255.255.255.0
Click 'OK' when finished.
IV-1-2-3. Mac
- Have your Macintosh computer operate as usual, and click on "System Preferences"

- In System Preferences, click on "Network".

- Click on "Wi-Fi" in the left panel and then click "Advanced" in the lower right corner.
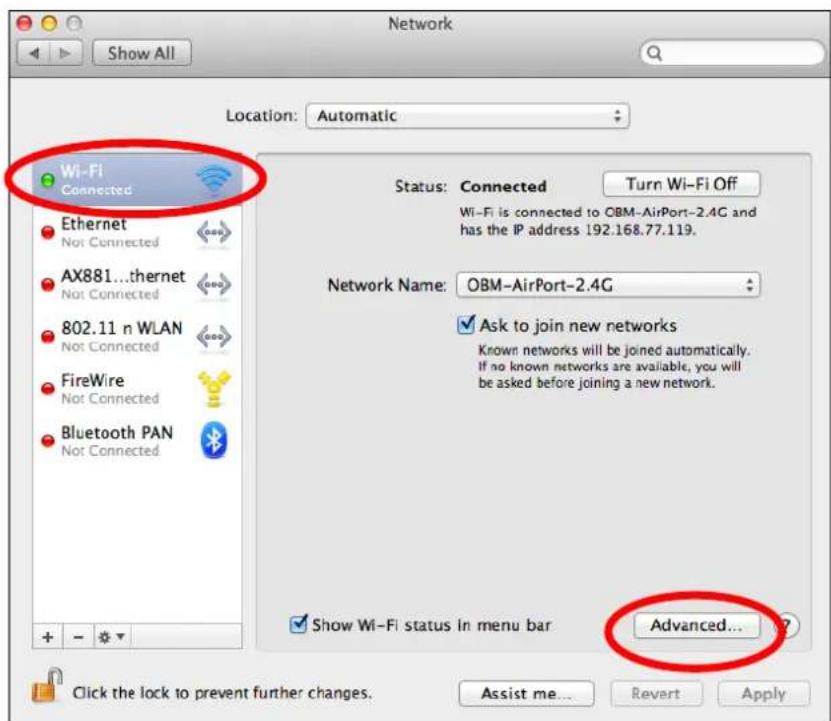
- Select "TCP/IP" from the top menu and select "Manually" from the drop down menu labeled "Configure IPv4", then click "OK".


Your existing static IP address will be displayed in the "IP address" field before you replace it. Please make a note of this IP address, subnet mask, default gateway and DNS server addresses.
- In the "IPv4 Address" and "Subnet Mask" field enter IP address 192.168.9.20 and subnet mask 255.255.255.0. Click on "OK".

- Click "Apply" to save the changes.

IV-2. Connecting to a Wi-Fi network
For help connecting to your device's renkforce.setup SSID for initial setup, or to connect to your device's new Wi-Fi network (SSID) after setup is complete, follow the guide below:

Below is an example of how to connect using Windows Vista – the process may vary slightly for other versions of Windows.
- Click the network icon (icon, window, or screen) in the system tray and select "Connect to a network".

- Search for the SSID of your EW-7478RPC and then click "Connect". If you set a password for your network, you will then be prompted to enter it.

- After correctly entering your password, you will be successfully connected to the EW-7476RPC's wireless network.

IV-3. Troubleshooting
If you are experiencing problems with your wireless extender, please refer to this troubleshooting guide before contacting your dealer of purchase for help.
| Scenario | Solution |
| I can’t log onto the browser-based configuration interface. | a. Please check that the extender is correctly inserted into a power socket and check the LEDs on the front panel. If the extender is initializing after being switched off or restarted, wait for 2 minutes and try again.b. Make sure you are using the full, correct URL: http://renkforce.setupc. If you are using a MAC or IP address filter, try to connect the wireless extender using a different computer.d. Set your computer to obtain an IP address automatically (DHCP), and see if your computer can obtain an IP address.e. Ensure that all other Wi-Fi/Ethernet adapters are disabled or disconnected.f. Password is case-sensitive. Make sure the “Caps Lock” light is not illuminated.g. b. If you do not know your password, restore the device to factory settings. |
| I can’t establish a connection to my wireless extender. | a. If encryption is enabled, please re-check WEP or WPA passphrase settings on your wireless client. The password is case-sensitive. Make sure the “Caps Lock” light is not illuminated.b. Try moving closer to the wireless extender.c. Switch off the extender and switch it back on after 10 seconds.d. Please check that the extender is correctly inserted into a power socket and check the LEDs on the front panel. |
| File downloads are very slow or frequently interrupted. | a. Reset the wireless extenderb. Try again later. Your local network may be experiencing technical difficulties or very high usage.c. Change channel number. |
| The wireless extender is extremely hot. | a. It is normal for the wireless extender to heat up during frequent use. If you can safely place your hand on the wireless extender, the temperature of the device is at a normal level.b. If you smell burning or see smoke coming from wireless extender then disconnect the extender immediately, as faras it is safely possible to do so. Call your dealer of purchase for help. |
| My network device can’t access the Internet. | a. Ensure that your broadband router is fully functional.b. Switch off both your network device and wireless extender and switch back on again.c. Ensure that the wireless extender is powered on (check the PWR LED).d. On the browser based configuration interface home page, check “Status” under “Wireless Configuration”. It should be “Connected” – if it is “Disconnected” then this means the wireless extender is not connected to your router/access point. |
| My wireless extender has a poor signal from my access point/router. | The best location to place the Wi-Fi extender is one which is an open space, roughly in the middle between your router and the Wi-Fi dead zone, and where the Wi-Fi extender LED displays “Excellent” signal strength.a. Keep the extender away from other radio devices such as microwaves or wireless telephones.b. Do not put the extender in the corner of a room or under/nearby metal.c. It is recommended to plug the extender directly into a wall socket.d. Ensure there are as few obstacles as possible between the extender and the access point/router. |
| Can I use the same SSID as my current gateway router for my Wi-Fi extender? | Yes, but it is not recommended as it will be difficult to distinguish between two SSIDs with the same name. |
COPYRIGHT
Copyright © Edimax Technology Co., Ltd. all rights reserved. No part of this publication may be reproduced, transmitted, transcribed, stored in a retrieval system, or translated into any language or computer language, in any form or by any means, electronic, mechanical, magnetic, optical, chemical, manual or otherwise, without the prior written permission from Edimax Technology Co., Ltd.
Edimax Technology Co., Ltd. makes no representations or warranties, either expressed or implied, with respect to the contents hereof and specifically disclaims any warranties, merchantability, or fitness for any particular purpose. Any software described in this manual is sold or licensed as is. Should the programs prove defective following their purchase, the buyer (and not this company, its distributor, or its dealer) assumes the entire cost of all necessary servicing, repair, and any incidental or consequential damages resulting from any defect in the software. Edimax Technology Co., Ltd. reserves the right to revise this publication and to make changes from time to time in the contents hereof without the obligation to notify any person of such revision or changes.
The product you have purchased and the setup screen may appear slightly different from those shown in this QIG. The software and specifications are subject to change without notice. Please visit our website www.edimax.com for updates. All brand and product names mentioned in this manual are trademarks and/or registered trademarks of their respective holders.
Federal Communication Commission Interference Statement
This equipment has been tested and found to comply with the limits for a Class B digital device, pursuant to Part 15 of FCC Rules. These limits are designed to provide reasonable protection against harmful interference in a residential installation. This equipment generates, uses, and can radiate radio frequency energy and, if not installed and used in accordance with the instructions, may cause harmful interference to radio communications. However, there is no guarantee that interference will not occur in a particular installation. If this equipment does cause harmful interference to radio or television reception, which can be determined by turning the equipment off and on, the user is encouraged to try to correct the interference by one or more of the following measures:
- Reorient or relocate the receiving antenna.
- Increase the separation between the equipment and receiver.
- Connect the equipment into an outlet on a circuit different from that to which the receiver is connected.
- Consult the dealer or an experienced radio technician for help.
FCC Caution
This device and its antenna must not be co-located or operating in conjunction with any other antenna or transmitter. This device complies with Part 15 of the FCC Rules.
Operation is subject to the following two conditions: (1) this device may not cause harmful interference, and (2) this device must accept any interference received, including interference that may cause undesired operation. Any changes or modifications not expressly approved by the party responsible for compliance could void the authority to operate equipment.
Federal Communications Commission (FCC) Radiation Exposure Statement
This equipment complies with FCC radiation exposure set forth for an uncontrolled environment. In order to avoid the possibility of exceeding the FCC radio frequency exposure limits, human proximity to the antenna shall not be less than 2.5cm (1 inch) during normal operation.
Federal Communications Commission (FCC) RF Exposure Requirements
SAR compliance has been established in the laptop computer(s) configurations with PCMCIA slot on the side near the center, as tested in the application for certification, and can be used in laptop computer(s) with substantially similar physical dimensions, construction, and electrical and RF characteristics. Use in other devices such as PDAs or lap pads is not authorized. This transmitter is restricted for use with the specific antenna tested in the application for certification. The antenna(s) used for this transmitter must not be co-located or operating in conjunction with any other antenna or transmitter.
RED Compliance Statement
Compliance with 2014/53/EU Radio Equipment Directive (RED)
In accordance with Article 10.8(a) and 10.8(b) of the RED, the following table provides information on the frequency bands used and the maximum RF transmit power of the product for sale in the EU:
| Frequency Range (MHz) | Max. Transmit Power (dBm) EIRP |
| 2412 ~ 2472 | 19.43 dBm |
| 5180 ~ 5240 | 22.64dBm |
A simplified DoC shall be provided as follows: Article 10(9)
Hereby, Edimax Technology Co., Ltd. declares that the radio equipment type AC1200 Dual-Band Wireless LAN Repeater is in compliance with Directive 2014/53/EU The full text of the EU declaration of conformity is available at the following internet address: http://www.edimax.com/edimax/global/
Safety
This equipment is designed with the utmost care for the safety of those who install and use it. However, special attention must be paid to the dangers of electric shock and static electricity when working with electrical equipment. All guidelines of this and of the computer manufacture must therefore be allowed at all times to ensure the safe use of the equipment.
EU Countries Intended for Use
The ETSI version of this device is intended for home and office use in Austria, Belgium, Bulgaria, Cyprus, Czech, Denmark, Estonia, Finland, France, Germany, Greece, Hungary, Ireland, Italy, Latvia, Lithuania, Luxembourg, Malta, Netherlands, Poland, Portugal, Romania, Slovakia, Slovenia, Spain, Sweden, Turkey, and United Kingdom. The ETSI version of this device is also authorized for use in EFTA member states: Iceland, Liechtenstein, Norway, and Switzerland.
EU Countries Not Intended for Use None
EU Declaration of Conformity
English: This equipment is in compliance with the essential requirements and other relevant provisions of Directive 2014/53/EU, 2014/35/EU.
Français: Cet équipement est conforme aux exigences essentielles et autres dispositions de la directive 2014/53/EU, 2014/35/EU.
Čeština: Toto zaženje v souladu se základmíni po žadavky a ostatmíni p ríslušnými ustanovení mi sm ěrnic 2014/53/EU, 2014/35/EU.
Polski: Urządzenie jest zgodne z ogólnymi wymaganiami oraz szczególnymi warunkami określonymi Dyrektywą UE 2014/53/EU, 2014/35/EU.
Român ă: Acest echipament este în conformitate cu cerințele esențiale și alte prevederi relevante ale Directivei 2014/53/UE, 2014/35/UE.
Русский: Это оборудование соответствует основным требованиям и положениям Директивы 2014/53/EU, 2014/35/EU.
Magyar: Ez a berendezés megfelel az alapvető kö vetelményeknek és más vonatkozó irányelveknek (2014/53/EU, 2014/35/EU).
Türkçe: Bu cihaz 2014/53/EU, 2014/35/EU direktifleri zorunlu istekler ve diğer hükümlerle ile uyumludur.
Українська: Обладнання відповідає вимогам і умовам директиви 2014/53/EU, 2014/35/EU.
Slovenčina: Toto zariadenie spíňa základné požiadavky a dálšie príslušné ustanovenia smerní c 2014/53/EU, 2014/35/EU.
Deutsch: Dieses Gerät erfüllt die Voraussetzungen gemäß den Richtlinien 2014/53/EU, 2014/35/EU.
Español: El presente equipo cumple los requisitos esenciales de la Directiva 2014/53/EU, 2014/35/EU.
Italiano: Questo apparecchio è conforme ai requisiti essenziali e alle altre disposizioni applicabili della Direttiva 2014/53/EU, 2014/35/UE.
Nederlands: Dit apparaat voldoet aan de essentiële eisen en andere van toepassing zijnde bepalingen van richtlijn 2014/53/EU, 2014/35/EU.
Português: Este equipamento cumpre os requesitos essenciais da Directiva 2014/53/EU, 2014/35/EU.
Norsk: Dette utstyret er i samsvar med de viktigste kravene og andre relevante regler i Direktiv 2014/53/EU, 2014/35/EU.
Svenska: Denna utrustning är i ö verensstä mmelse med de väsentliga kraven och ö vriga relevanta bestä mmelser i direktiv 2014/53/EU, 2014/35/EU.
Dansk: Dette udstyr er i overensstemmelse med de væ sentligste krav og andre relevante forordninger i direktiv 2014/53/EU, 2014/35/EU.
suomen kieli: Tä mä laite täyttä ä direktiivien 2014/53/EU, 2014/35/EU. oleelliset vaatimukset ja muut asiaankuuluvat mää rä ykset.


WEEE Directive & Product Disposal

At the end of its serviceable life, this product should not be treated as household or general waste. It should be handed over to the applicable collection point for the recycling of electrical and electronic equipment, or returned to the supplier for disposal.
Declaration of Conformity
We, Edimax Technology Co., Ltd., declare under our sole responsibility, that the equipment described below complies with the requirements of the European R&TTE directives.
Equipment: AC1200 Dual-Band Wireless LAN Repeater
Model No.: EW-7476RPC
The following European standards for essential requirements have been followed:
Directives 2014/53/EU
Spectrum : EN 300 328 V2.1.1 (2016-11)
EN 301 893 V2.1.1 (2017-05)
EMC : EN 301 489-1 V2.2.0 (2017-03)
Edimax Technology Europe B.V. a company of :
Fijenhof 2, Edimax Technology Co., Ltd.
5652 AE Eindhoven, No. 278, Xinhu 1st Rd.,
The Netherlands Neihu Dist., Taipei City,
Signature: Taiwan
Printed Name: Vivian Ma
Title: Director
Edimax Technology Europe B.V.

Date of Signature: Aug., 2017
Signature:

Printed Name: Albert Chang
Title: Director
Edimax Technology Co., Ltd.
Notice According to GNU General Public License Version 2
This product includes software that is subject to the GNU General Public License version 2. The program is free software and distributed without any warranty of the author. We offer, valid for at least three years, to give you, for a charge no more than the costs of physically performing source distribution, a complete machine-readable copy of the corresponding source code.
Version 2, June 1991
Copyright (C) 1989, 1991 Free Software Foundation, Inc. 51 Franklin Street, Fifth Floor, Boston, MA 02110-1301, USA Everyone is permitted to copy and distribute verbatim copies of this license document, but changing it is not allowed.
Preamble
The licenses for most software are designed to take away your freedom to share and change it. By contrast, the GNU General Public License is intended to guarantee your freedom to share and change free software--to make sure the software is free for all its users. This General Public License applies to most of the Free Software Foundation's software and to any other program whose authors commit to using it. (Some other Free Software Foundation software is covered by the GNU Lesser General Public License instead.) You can apply it to your programs, too.
When we speak of free software, we are referring to freedom, not price. Our General Public Licenses are designed to make sure that you have the freedom to distribute copies of free software (and charge for this service if you wish), that you receive source code or can get it if you want it, that you can change the software or use pieces of it in new free programs; and that you know you can do these things.
To protect your rights, we need to make restrictions that forbid anyone to deny you these rights or to ask you to surrender the rights. These restrictions translate to certain responsibilities for you if you distribute copies of the software, or if you modify it.
For example, if you distribute copies of such a program, whether gratis or for a fee, you must give the recipients all the rights that you have. You must make sure that they, too, receive or can get the source code. And you must show them these terms so they know their rights.
We protect your rights with two steps: (1) copyright the software, and (2) offer you this license which gives you legal permission to copy, distribute and/or modify the software.
Also, for each author's protection and ours, we want to make certain that everyone understands that there is no warranty for this free software. If the software is modified by someone else and passed on, we want its recipients to know that what they have is not the original, so that any problems introduced by others will not reflect on the original authors' reputations.
Finally, any free program is threatened constantly by software patents. We wish to avoid the danger that redistributors of a free program will individually obtain patent licenses, in effect making the program proprietary. To prevent this, we have made it clear that any patent must be licensed for everyone's free use or not licensed at all.
The precise terms and conditions for copying, distribution and modification follow.
TERMS AND CONDITIONS FOR COPYING, DISTRIBUTION AND MODIFICATION
- This License applies to any program or other work which contains a notice placed by the copyright holder saying it may be distributed under the terms of this General Public License. The “Program”, below, refers to any such program or work, and a “work based on the Program” means either the Program or any derivative work under copyright law: that is to say, a work containing the Program or a portion of it, either verbatim or with modifications and/or translated into another language. (Hereinafter, translation is included without limitation in the term “modification”.) Each licensee is addressed as “you”.
Activities other than copying, distribution and modification are not covered by this License; they are outside its scope. The act of running the Program is not restricted, and the output from the Program is covered only if its contents constitute a work based on the Program (independent of having been made by running the Program). Whether that is true depends on what the Program does.
- You may copy and distribute verbatim copies of the Program's source code as you receive it, in any medium, provided that you conspicuously and appropriately publish on each copy an appropriate copyright notice and disclaimer of warranty; keep intact all the notices that refer to this License and to the absence of any warranty; and give any other recipients of the Program a copy of this License along with the Program.
You may charge a fee for the physical act of transferring a copy, and you may at your option offer warranty protection in exchange for a fee.
- You may modify your copy or copies of the Program or any portion of it, thus forming a work based on the Program, and copy and distribute such modifications or work under the terms of Section 1 above, provided that you also meet all of these conditions:
a) You must cause the modified files to carry prominent notices stating that you changed the files and the date of any change.
b) You must cause any work that you distribute or publish, that in whole or in part contains or is derived from the Program or any part thereof, to be licensed as a whole at no charge to all third parties under the terms of this License.
c) If the modified program normally reads commands interactively when run, you must cause it, when started running for such interactive use in the most ordinary way, to print or display an announcement including an appropriate copyright notice and a notice that there is no warranty (or else, saying that you provide a warranty) and that users may redistribute the program under these conditions, and telling the user how to view a copy of this License. (Exception: if the Program itself is interactive but does not normally print such an announcement, your work based on the Program is not required to print an announcement.)
These requirements apply to the modified work as a whole. If identifiable sections of that work are not derived from the Program, and can be reasonably considered independent and separate works in themselves, then this License, and its terms, do not apply to those sections when you distribute them as separate works. But when you distribute the same sections as part of a whole which is a work based on the Program, the distribution of the whole must be on the terms of this License, whose permissions for other licensees extend to the entire whole, and thus to each and every part regardless of who wrote it.
Thus, it is not the intent of this section to claim rights or contest your rights to work written entirely by you; rather, the intent is to exercise the right to control the distribution of derivative or collective works based on the Program.
In addition, mere aggregation of another work not based on the Program with the Program (or with a work based on the Program) on a volume of a storage or distribution medium does not bring the other work under the scope of this License.
- You may copy and distribute the Program (or a work based on it, under Section 2) in object code or executable form under the terms of Sections 1 and 2 above provided that you also do one of the following:
a) Accompany it with the complete corresponding machine-readable source code, which must be distributed under the terms of Sections 1 and 2 above on a medium customarily used for software interchange; or,
b) Accompany it with a written offer, valid for at least three years, to give any third party, for a charge no more than your cost of physically performing source distribution, a complete machine-readable copy of the corresponding source code,
to be distributed under the terms of Sections 1 and 2 above on a medium customarily used for software interchange; or,
c) Accompany it with the information you received as to the offer to distribute corresponding source code. (This alternative is allowed only for noncommercial distribution and only if you received the program in object code or executable form with such an offer, in accord with Subsection b above.)
The source code for a work means the preferred form of the work for making modifications to it. For an executable work, complete source code means all the source code for all modules it contains, plus any associated interface definition files, plus the scripts used to control compilation and installation of the executable. However, as a special exception, the source code distributed need not include anything that is normally distributed (in either source or binary form) with the major components (compiler, kernel, and so on) of the operating system on which the executable runs, unless that component itself accompanies the executable.
If distribution of executable or object code is made by offering access to copy from a designated place, then offering equivalent access to copy the source code from the same place counts as distribution of the source code, even though third parties are not compelled to copy the source along with the object code.
-
You may not copy, modify, sublicense, or distribute the Program except as expressly provided under this License. Any attempt otherwise to copy, modify, sublicense or distribute the Program is void, and will automatically terminate your rights under this License. However, parties who have received copies, or rights, from you under this License will not have their licenses terminated so long as such parties remain in full compliance.
-
You are not required to accept this License, since you have not signed it. However, nothing else grants you permission to modify or distribute the Program or its derivative works. These actions are prohibited by law if you do not accept this License. Therefore, by modifying or distributing the Program (or any work based on the Program), you indicate your acceptance of this License to do so, and all its terms and conditions for copying, distributing or modifying the Program or works based on it.
-
Each time you redistribute the Program (or any work based on the Program), the recipient automatically receives a license from the original licensor to copy, distribute or modify the Program subject to these terms and conditions. You may not impose any further restrictions on the recipients' exercise of the rights granted herein. You are not responsible for enforcing compliance by third parties to this License.
-
If, as a consequence of a court judgment or allegation of patent infringement or for any other reason (not limited to patent issues), conditions are imposed on you (whether by court order, agreement or otherwise) that contradict the conditions of this License, they do not excuse you from the conditions of this License. If you cannot distribute so as to satisfy simultaneously your obligations under this License and any other pertinent obligations, then as a consequence you may not distribute the Program at all. For example, if a patent license would not permit royalty-free redistribution of the Program by all those who receive copies directly or indirectly through you, then the only way you could satisfy both it and this License would be to refrain entirely from distribution of the Program.
If any portion of this section is held invalid or unenforceable under any particular circumstance, the balance of the section is intended to apply and the section as a whole is intended to apply in other circumstances.
It is not the purpose of this section to induce you to infringe any patents or other property right claims or to contest validity of any such claims; this section has the sole purpose of protecting the integrity of the free software distribution system, which is implemented by public license practices. Many people have made generous contributions to the wide range of software distributed through that system in reliance on consistent application of that system; it is up to the author/donor to decide if he or she is willing to distribute software through any other system and a licensee cannot impose that choice.
This section is intended to make thoroughly clear what is believed to be a consequence of the rest of this License.
- If the distribution and/or use of the Program is restricted in certain countries either by patents or by copyrighted interfaces, the original copyright holder who places the Program under this License may add an explicit geographical distribution limitation excluding those countries, so that distribution is permitted only in or among countries not thus excluded. In such case, this License incorporates the limitation as if written in the body of this License.
- The Free Software Foundation may publish revised and/or new versions of the General Public License from time to time. Such new versions will be similar in spirit to the present version, but may differ in detail to address new problems or concerns.
Each version is given a distinguishing version number. If the Program specifies a version number of this License which applies to it and “any later version”, you have the option of following the terms and conditions either of that version or of any later version published by the Free Software Foundation. If the Program does not specify a version number of this License, you may choose any version ever published by the Free Software Foundation.
- If you wish to incorporate parts of the Program into other free programs whose distribution conditions are different, write to the author to ask for permission. For software which is copyrighted by the Free Software Foundation, write to the Free Software Foundation; we sometimes make exceptions for this. Our decision will be guided by the two goals of preserving the free status of all derivatives of our free software and of promoting the sharing and reuse of software generally.
NO WARRANTY
- BECAUSE THE PROGRAM IS LICENSED FREE OF CHARGE, THERE IS NO WARRANTY FOR THE PROGRAM, TO THE EXTENT PERMITTED BY APPLICABLE LAW. EXCEPT WHEN OTHERWISE STATED IN WRITING THE COPYRIGHT HOLDERS AND/OR OTHER PARTIES PROVIDE THE PROGRAM "AS IS" WITHOUT WARRANTY OF ANY KIND, EITHER EXPRESSED OR IMPLIED, INCLUDING, BUT NOT LIMITED TO, THE IMPLIED WARRANTIES OF MERCHANTABILITY AND FITNESS FOR A PARTICULAR PURPOSE. THE ENTIRE RISK AS TO THE QUALITY AND PERFORMANCE OF THE PROGRAM IS WITH YOU SHOULD THE PROGRAM PROVE DEFECTIVE, YOU ASSUME THE COST OF ALL NECESSARY SERVICING, REPAIR OR CORRECTION.
- IN NO EVENT UNLESS REQUIRED BY APPLICABLE LAW OR AGREED TO IN WRITING WILL ANY COPYRIGHT HOLDER, OR ANY OTHER PARTY WHO MAY MODIFY AND/OR REDISTRIBUTE THE PROGRAM AS PERMITTED ABOVE, BE LIABLE TO YOU FOR DAMAGES, INCLUDING ANY GENERAL, SPECIAL, INCIDENTAL OR CONSEQUENTIAL DAMAGES ARISING OUT OF THE USE OR INABILITY TO USE THE PROGRAM (INCLUDING BUT NOT LIMITED TO LOSS OF DATA OR DATA BEING RENDERED INACCURATE OR LOSSES SUSTAINED BY YOU OR THIRD PARTIES OR A FAILURE OF THE PROGRAM TO OPERATE WITH ANY OTHER PROGRAMS), EVEN IF SUCH HOLDER OR OTHER PARTY HAS BEEN ADVISED OF THE POSSIBILITY OF SUCH DAMAGES.


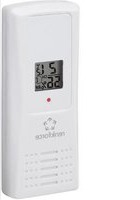

- renkforce
- CONTENTS
- Product Information....1
- Installation 7
- Browser Based Configuration Interface 28
- I-1. Package Contents
- I-2. System Requirements
- I-3. LED Status
- I-4. Switch
- I-5. WPS Setup
- I-6. WPS Button with Wireless Scheduling
- I-7. Reset to Factory Default Settings
- I-8. Safety Informaon
- II-1. Wi-Fi Extender Mode
- 2.4GHz Wireless Site Survey
- Congratulation!
- II-2. Access Point Mode
- II-3. Wi-Fi Bridge Mode
- Congratulations!
- III-1. Login
- Status
- System Status
- System
- LAN
- 2.4GHz Wireless
- 5GHz Wireless (Disable)
- III-2. Save Settings
- III-3. Main Menu
- Wi-Fi Extender
- Access Point
- Wi-Fi Bridge
- III-3-1. Status
- III-3-2. Setup Wizard
- Switch to Access Point/ Wi-Fi Extender/ Wi-Fi Bridge mode:
- III-3-3. LAN
- LAN IP
- III-3-4. 2.4GHz Wireless & 5GHz Wireless
- III-3-4-1. Basic
- Wireless Security:
- Access Point Mode:
- III-3-4-1-2. WEP
- III-3-4-1-3. WPA Pre-Shared Key
- Wireless Security
- III-3-4-2. Guest
- Not available in access point mode
- Basic Settings
- III-3-4-3. WPS
- III-3-4-4. Access Control
- Access Point mode only
- III-3-4-5. Schedule
- - Wireless Schedule
- III-3-5. Advanced
- III-3-5-1. 2.4GHz Wireless
- III-3-5-2. 5GHz Wireless
- 5GHz Wireless
- III-3-6. Administration
- III-3-6-1. Wireless
- Range extender mode only
- III-3-6-2. Time Zone
- Time Zone
- III-3-6-3. Password
- Password
- III-3-6-4. Backup/Restore
- III-3-6-5. Restart
- Restart
- IV-1. Configuring your IP address
- IV-1-1. How to check that your computer uses a dynamic IP address
- IV-1-1-1. Windows 7
- Click "Local Area Connection".
- Click "Properties".
- IV-1-1-2. Windows 8.1 & 10
- IV-1-1-3. Mac OS
- IV-1-2. How to modify the IP address of your computer
- IV-1-2-1. Windows 7
- IV-1-2-2. Windows 8.1 & 10
- IV-1-2-3. Mac
- IV-2. Connecting to a Wi-Fi network
- IV-3. Troubleshooting
- COPYRIGHT
- Federal Communication Commission Interference Statement
- FCC Caution
- RED Compliance Statement
- Safety
- EU Countries Intended for Use
- EU Declaration of Conformity
- WEEE Directive & Product Disposal
- Declaration of Conformity
- Directives 2014/53/EU
- Notice According to GNU General Public License Version 2
- Preamble
- NO WARRANTY
Brand : Renkforce
Model : EW-7476RPC
Category : Wi-Fi repeater