
PWHPD M11 82 N - Tumble dryer PRIVILEG - Free user manual and instructions
Find the device manual for free PWHPD M11 82 N PRIVILEG in PDF.


| Product Type | Tumble Dryer (Condenser) |
| Brand | Privileg |
| Model | PWHPD M11 82 N |
| Maximum Capacity | 8 kg (Eco programme) |
| Energy Efficiency Class | A++ (typical) |
| Power Consumption Off-Mode | 0.42 W |
| Power Consumption Left-On Mode | 2.00 W |
| Annual Energy Consumption | Based on 160 drying cycles: approx 304 kWh (Eco 8kg) |
| Drying Programmes | Eco, Cotton, Mixed, Synthetics, Mini synthetics, Delicates, Wool, Refresh, Jeans, Shirts, Duvet, Baby, Sport, Smart iron, Xpress 45' |
| Options | Dryness level, Timed drying, Start delay, Mute, Cycle end, Key lock, Crease care, Light dry, Push & Go |
| Water Tank Capacity | Approx 4.5 L |
| Dimensions (H x W x D) | 85 x 60 x 60 cm (approx) |
| Weight | Approx 45 kg |
| Power Supply | 220-240 V, 50 Hz |
| Filter Types | Door filter, Bottom filter |
| Door Filter Cleaning | After each cycle |
| Bottom Filter Cleaning | When indicator lights or after each cycle |
| Key Lock Feature | Yes, holds for 3 seconds |
| Mute Function | Yes, holds for 3 seconds |
| Prolonged Buzzer (Cycle End) | Selectable option |
| Crease Care | Up to 10 hours after cycle |
| Spare Parts Availability | Via website parts-selfservice.europeanappliances.com |
| Manual Access | Free PDF download on notice-facile.com |
Frequently Asked Questions - PWHPD M11 82 N PRIVILEG
User questions about PWHPD M11 82 N PRIVILEG
0 question about this device. Answer the ones you know or ask your own.
Ask a new question about this device
Download the instructions for your Tumble dryer in PDF format for free! Find your manual PWHPD M11 82 N - PRIVILEG and take your electronic device back in hand. On this page are published all the documents necessary for the use of your device. PWHPD M11 82 N by PRIVILEG.
USER MANUAL PWHPD M11 82 N PRIVILEG
PLEASE SCAN THE QR CODE ON YOUR APPLIANCE IN ORDER TO REACH MORE INFORMATION.
CONTROL PANEL
1 ON/OFF button (hold for Reset)
2 Programme selection knob
3 Start/Pause
4 Push & Go
Options buttons\*
5 Dryness level
6 Start delay
7 Timed drying
8 Cycle end
9 Light drying (hold for Key Lock)
10 Crease care (hold for Mute)
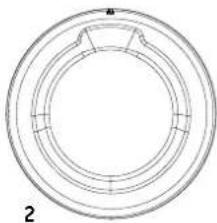
natural_image
Technical line drawing of a circular mechanical component with internal features (no text or symbols)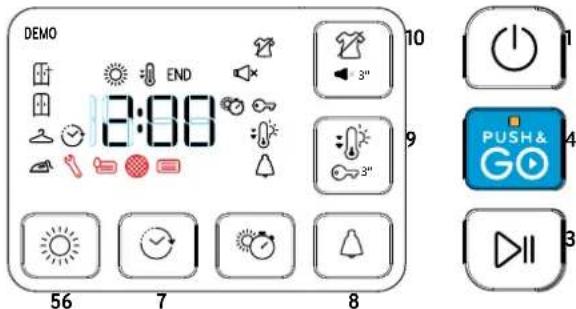
*Note: some models may have the wording in full instead of the icons.
INDICATORS
Dryness level: dry - Hang dry - Cupboard dry -
Cycle phase: Dry - Cool tumble - END End of cycle
Empty water tank - Clean door filter - Clean bottom filter
Refer to Troubleshooting section: Failure call After-sales Service
Extra dry
FIRST TIME USE
Make sure that the water tank is correctly inserted. Make sure that the drain hose on the back of the dryer is properly fixed, either to the dryers's water tank or to the domestic sewage system.
The dryer must be installed in a room with a temperature ranging between 5°C and 35°C to ensure proper operation. Before you use your dryer ensure that it has been in a upright position for at least 6 hours.
DAILY USE
Doing this will keep your machine working at its BEST:
- remember to empty your water tank after each drying cycle.
- remember to clean your filters after each drying cycle.
Refer to the Care & Maintenance section.
- Plug the dryer into the power supply socket.
-
Open the door and load garments; always refer to instructions on clothing labels and the max loads indicated in the programme section. Empty pockets. Make sure garments do not get caught between the door and/or the door filter. Do not load items that are dripping wet. Do not tumble dry large, very bulky items. For optimal drying result, garments should be loaded one by one.
-
Close the door.
-
Press the "On/Off" button.
-
Select the most suitable programme for the type of fabric in that load.
-
Select the options, if necessary.
-
Press the "Start/Pause" button to begin drying.
-
At the end of the drying cycle, a buzzer will beep. An indicator on the control panel signals the end of the cycle. Turn the machine off by pressing the "On/Off" button, open the door and pull the clothing immediately out to prevent the formation of creases on laundry.
If the machine is not switched off manually, after about a quarter of an hour from the end of the cycle, the appliance turns off automatically to save energy.
Note that some programme/option accords with "Crease Care" system. This means that for some hours, after the end of the drying cycle, the drum rotates at regular intervals to prevent the formation of creases.
Note that some models perform a final cool tumble phase, for this reason the fabrics may not feel hot.
In case of power failure, it is necessary to press the "Start/Pause" button to restart the cycle.
PUSH & GO
This function serves to start a cycle, after machine switching on, without enabling any further button an/or knob (the programme PUSH & GO will be deactivated instead).
It is always necessary to follow the points 1, 2, and 3 concerning the daily use.
To start the cycle PUSH & GO, keep the button pressed. The light on signals that the cycle is started. The cycle is suitable for cotton and synthetic textiles. Max. load 4 kg. (Cycle duration 120') If the door is opened during the cycle, to restart it, close the door and press the button START/PAUSE. This programme does not allow to set other options.
Opening the door during the cycle
The tumble dryer door can be opened at any time during the cycle to check progress and remove any garments already dry. However, since opening the door can extend the drying time, the recommendation is to keep the door closed throughout the cycle process to save time and energy.
After closing the door, press the "Start/Pause" button within 15 minutes to resume the machine operation.
CARE LABEL
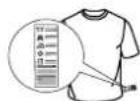
Always check the care labels, especially when placing garments in the tumble dryer for the first time. Below are the most commonly used symbols:
☐ May be tumble dried.
Do not tumble dry.
Tumble dry – high heat.
Tumble dry – low heat.
PROGRAMMES
The duration of these programs will depend on the size of the load, types of textiles, the spin speed used in your washer and any extra options selected. In machines equipped with display, the duration of the cycles is shown on the control panel. The remaining time is constantly checked and adjusted during the drying cycle to show the best possible estimate.
Option to use - If all your loads on Automatic Cycles are consistently less dry or more dry than you would like, you may increase or decrease the dryness level using the specific option.

Eco kg Max\*
This is the most efficient programme in terms of energy consumption and is suitable for drying normal wet cotton laundry. The values on the Energy Label are based on this programme.
NOTE: For optimal energy efficiency this cycle by default is set up to "Cupboard Dry" level. For a higher dryness level we suggest using the Cotton cycle.

Cotton kg Max\*
Cycle suitable for drying all types of cotton, ready to be placed in the cupboard.

Mixed kg 4
This programme is ideal for drying cotton and synthetic fabrics together.

Synthetics kg 4
For drying laundry made of synthetic fibres.

Mini synthetics kg 2
Eco-drying of small laundry loads.

Delicates
kg 2
For drying delicate laundry requiring a gentle treatment.

Wool kg 1
Programme for drying wool clothing. It is advisable to turn the garments inside out before drying. Leave to dry naturally the heaviest edges that are still damp.

Refresh
A short programme suitable for refreshing fibres and garments by means of fresh air. Do not use with garments that are still wet. It can be used on with any load size but is more effective with small loads. The cycle duration is about 20 minutes.

Jeans kg 3
For drying cotton jeans-wear and garments made of robust cotton, like denim, such as trousers and jackets.

Shirts kg 3
This is a programme for Shirts made from cotton or cotton blend/synthetics.

Duvet
Programme intended to dry bulky garments, as single duvet.

Baby
kg 2
A programme intended to dry garments and linen of newborn babies (cotton and chenille), as well as delicate garments. Do not dry garments having plastic covering.

Sport
kg 4
For drying sports garments made of synthetics or cotton blends.

Smart iron
This cycle relaxes fibres, thus making ironing and folding easier. Suitable for small load of damp or dry cotton and cotton blend fabrics. Not for wet items.

Xpress 45' kg 1
45 This is a quick timed programme, ideal for drying garments spun at high speed in the washing machine, e.g. the shirts used in a working week.
OPTIONS
These buttons allow you to personalise the selected programme according to personal requirements.
Not all options are available for all programmes. Some options may be incompatible with ones you have previously set; if so, you will be alerted by the buzzer and/or blinking indicators. If the option is available, the option indicator will stay on. The programme may retain some options selected in previous drying cycles.

Dryness level
Press the related button several times to obtain a different level of residual moisture on garments. An indicator signals the level being selected.
Iron Dry: very delicate drying. Items will be more easily ironed immediately after the cycle.
Hanger dry: a level intended for delicate garments ready to be hanged.
Cupboard dry: the garments are ready to be folded and put away.
Extra dry: used for garments to be worn at the end of the cycle.

Timed drying
This option is to manually set the drying time. Press the corresponding button to set the required time for drying. An indicator on the control panel signals the time being selected.

Start delay
This option is for delaying the start of the cycle. Press the corresponding button several times to find the required delay. Once the max time is reached, the option is reset by pressing the button again. An indicator on the control panel signals the time being selected. After pressing the "Start/Pause" button, the machine signals the time remaining to the start of the cycle. If the door is opened, press the "Start/Pause" button once the door has been closed.

Mute
This option turns off all sounds of control panel. Only warnings remain active.
- to activate the option, keep the button pressed until the indicator goes on.
- to disable the option, keep the button pressed until the indicator goes off.

Cycle end
This option activates a prolonged buzzer at the end of the cycle. Enable it if you are not sure to hear the normal sound at the end of the cycle. This option remains in memory if selected in the previous drying.

Key lock
This option makes all machine controls inaccessible, except the button On/Off. When the machine is on:
- to activate the option, keep the button pressed until the indicator goes on.
- to disable the option, keep the button pressed until the indicator goes off.
This option remains in memory if selected in the previous drying.

Crease care
This option add a crease treatment at the end of the cycle by means of a periodic rotation of the drum (duration up to 10 hours). It is particularly suitable when it is not possible to remove the laundry as soon as the drying ends. If this option is used together with the Start Delay, the crease treatment is added also in the Start Delay phase. This option remains in memory if selected in the previous drying.

Light dry
Enables a more gentle treatment of the laundry by reducing the drying temperature.
CLEANING AND MAINTENANCE
WARNING: unplug the dryer during the cleaning and maintenance procedures.
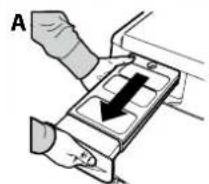
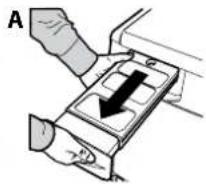
Emptying the water tank after each cycle (see Fig. A).
Pull the container out of the dryer and empty it into a sink or other suitable drain, then place it back properly. Do not use the dryer without having inserted the container back in place.
Cleaning the filters
Take out the filters and clean them by removing the lint from their surfaces with your hand or a cloth or using a vacuum cleaner, then put them back in place. The lint should be thrown in the garbage bin and not washed through the drain in order to avoid spreading microplastics in the used water system.
Do not use the dryer without having reinserted the filter in place.
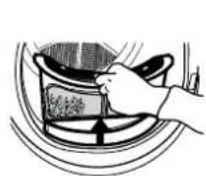
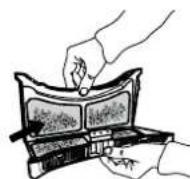
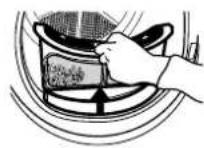
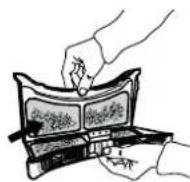
Cleaning the door filter after each cycle (see Fig. B).
Remove the door filter as described below:
-
Open the door and pull the filter upwards.
-
Open the filter and remove the lint from all its parts. Replace the filter correctly making sure it is fully seated.
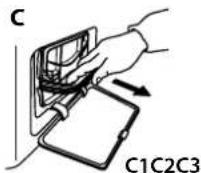
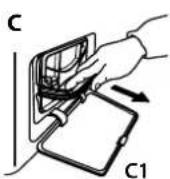
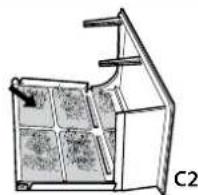
Cleaning the bottom filter when the relevant indicator turns on (see Fig. C).
NOTE: however, it is advisable to clean this filter after each cycle to optimise drying performance.
Remove the bottom filter as described below:
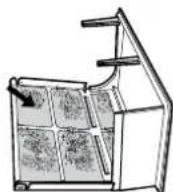
C1. Open the bottom cover; take the handle and pull the filter out.
C2. Open the rear side of the filter and remove the lint from the inner surface of the mesh.
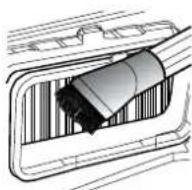
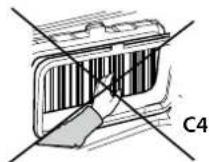
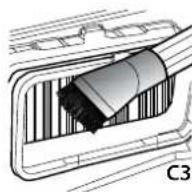
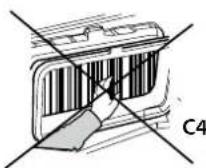
C3/C4. Check the bottom filter chamber every month. If you see residual lint accumulated on the metal fins, clean it with a vacuum cleaner, using a nozzle with a brush.
It's crucial to do vertical movements, you may destroy the component if you try to clean it in horizontal direction. Avoid the direct contact of the hand with the fins - risk of cut.
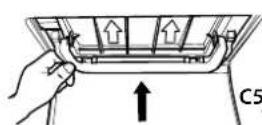
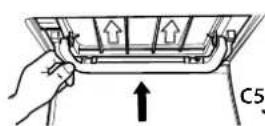
C5. Close the rear side of the filter and place it back by checking it is perfectly integrated into its seat, then lower the filter handle.
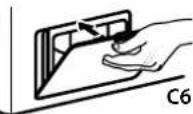
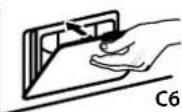
C6. Close the bottom cover.
Make sure the air intake is free.
The filters are essential parts for drying. They are intended to collect the lint formed during the drying process. In case of clogged filters, the air flow inside the dryer would be seriously affected: the drying times would be longer, the energy consumption would increase and the dryer could be damaged. If these procedures are not carried out properly, the dryer may not start.
NOTE: After cleaning the filters the relevant indicator remains on; this is normal, it will disappear when you start a new drying cycle.
Cleaning the tumble dryer
- The external metal, plastic and rubber parts can be cleaned with a damp cloth.
- Clean the front air intake grille regularly (every 6 months) with a vacuum cleaner to remove any lint, fluff or dust deposits. Furthermore, remove any lint deposits from the filters area, using a vacuum cleaner every so often.
- Do not use solvents or abrasives.
TRANSPORT AND HANDLING
Never lift the dryer by holding it at the worktop.
- Unplug the dryer.
- Remove the water from the water tank completely.
- Make sure that door and water tank are properly closed.
- If the drain hose is connected to your drainage system, re-connect it to the back of the dryer (see "Installation" section in the Safety Instruction guide).
| Power consumption | |||
| off-mode (Po) - Watts 0.42 | |||
| left-on mode (PI) - Watts 2.00 | |||
| Programmes Kg kWh Minutes | |||
| Eco* | 8 1.9 | 5 194 | |
| Eco | 4 1.0 | 6 135 | |
| Synthetics 4 0.73 95 | |||
| * This is the reference programme for the energy label and suitable to dry normal wet cotton laundry. This is the most efficient programme in terms of energy consumption for drying wet cotton laundry (Standard/Default starting configuration). | |||
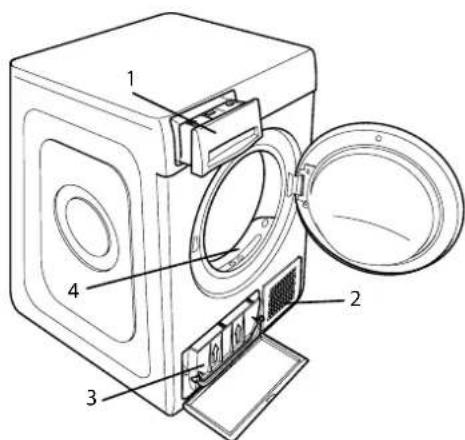
PRODUCT DESCRIPTION
- Water Tank
- Air Intake
- Bottom filter
- Door filter
B
TROUBLESHOOTING
EN
Before contacting the After-sales Service, refer to the table below. Often the malfunctions are minor and can be solved in few minutes.
| Malfunction | Possible cause | Solution |
| The drying times are very long. | An appropriate maintenance was not carried out. | Refer to the Cleaning & Maintenance section and perform the operations described. |
| The garments are too wet. | Carry out a washing cycle with higher spin speed to remove as much water as possible. | |
| Room temperature. | The drying time may be longer if the room temperature falls outside the 14–30°C range. | |
| The programme, the time and/or the drying level set are not suitable for the type and the amount of load inserted into the dryer. | Refer to Programmes and Options sections to find the programme and options most suitable for the type of load. | |
| The dryer may be overloaded. | Refer to the Programmes section to check the max load for each programme. | |
| The tumble dryer does not turn on. | The "On/Off" button was not pressed. | Press the "On/Off" button. |
| The plug is not inserted into the socket. | Insert the plug into the socket. | |
| The socket is faulty. | Try to plug another appliance in the same socket. Do not use connecting electrical devices to the socket, such as adapters or extensions. | |
| A power failure occurred. | Wait for the power supply to be restored and switch the fuse on again if necessary. | |
| The tumble dryer does not start. | The door has not been closed properly. | Close the door. |
| A time delay was set to the start of the cycle. | For machines equipped with this function: wait for the set delay to end or switch the machine off to reset it. Refer to the Options section. | |
| The "Start/Pause" button was not pressed. Press the "Start/Pause" button. | ||
| The Key Lock function was enabled (for machines equipped with this option). | If Key Lock was selected, disable it. Switching the machine off will not disable this option. Refer to the Options section. | |
| Garments are wet at cycle completion. | Small load. | The automatic programme has not sensed the required final moisture so that the dryer completes the programme and stops. If this happens simply select an additional short period of drying or select Extra Dry option if available. |
| Large loads or heavier fabrics. | Dryness levels can be modified to the specific dryness desired. Extra Dry is recommended for ready to wear items. | |
| The drying cycle was paused and then not reactivated within 15 minutes, causing the machine to shut down. | The drying cycle has to be set up once more and restarted. | |
| A power failure might have occurred, causing the machine to shut down. | The drying cycle has to be set up once more and restarted. |
Lights on or flashing
| Water tank | The water tank is full. Empty the water tank. Refer to the Cleaning & Maintenance section. | |
| Door fi Iter | Failure of the air flow necessary for machine operation. | Clean the door fi Iter and check whether air intake is free. Carrying out these operations improperly may cause damages. Refer to Cleaning & Maintenance section. |
| Bottom fi Iter* | The bottom fi Iter requires cleaning. Clean the bottom fi Iter. Refer to Cleaning & Maintenance section. | |
| The presence of wrench symbol signals a malfunction. The | machine sensors detected a failure. | Switch the dryer off and unplug it. Open the door immediately and pull laundry out, to allow the heat to dissipate. Wait for about 15 minutes. Reconnect the dryer to the power supply, load the laundry and restart the drying cycle. If the problem still occurs, contact the After-Sales Service Centre and communicate the letters and digits fl ashing on the display.For instance: F3 and E2. |
*Note: some models are auto-cleaning and not equipped with bottom filter. Please refer to the Cleaning & Maintenance section.
Policies, standard documentation, ordering of spare parts and additional product information can be found by:
• Using QR code in your appliance
- Visiting our website www.privileg.de and parts-selfservice.europeanappliances.com
- Alternatively, contact our After-sales Service (See phone number in the warranty booklet). When contacting our After-sales Service, please state the codes provided on your product's identification plate.
BITTE SCANNEN SIE DEN QR-CODE AUF IHREM GERÄT, UM DETAILLIERTERE INFORMATIONEN ZU ERHALTEN.
BEDIENTAFEL
natural_image
Technical line drawing of a circular mechanical component with internal channels and a central slot (no text or symbols)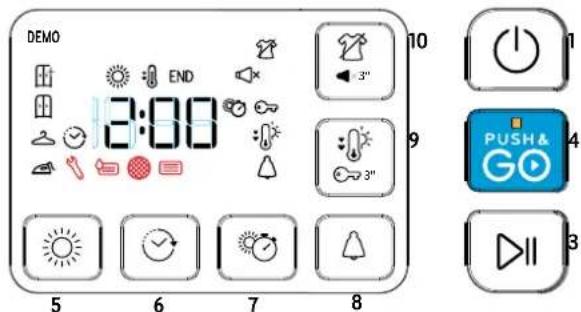
B
- PLEASE SCAN THE QR CODE ON YOUR APPLIANCE IN ORDER TO REACH MORE INFORMATION.
- CONTROL PANEL
- Options buttons\*
- INDICATORS
- FIRST TIME USE
- DAILY USE
- Refer to the Care & Maintenance section.
- PUSH & GO
- Opening the door during the cycle
- CARE LABEL
- PROGRAMMES
- Eco kg Max\*
- Cotton kg Max\*
- Mixed kg 4
- Synthetics kg 4
- Mini synthetics kg 2
- Delicates
- kg 2
- Wool kg 1
- Refresh
- Jeans kg 3
- Shirts kg 3
- Duvet
- Baby
- Sport
- kg 4
- Smart iron
- Xpress 45' kg 1
- OPTIONS
- Dryness level
- Timed drying
- Start delay
- Mute
- Cycle end
- Key lock
- Crease care
- Light dry
- CLEANING AND MAINTENANCE
- TRANSPORT AND HANDLING
- PRODUCT DESCRIPTION
- TROUBLESHOOTING
- EN
- BITTE SCANNEN SIE DEN QR-CODE AUF IHREM GERÄT, UM DETAILLIERTERE INFORMATIONEN ZU ERHALTEN.
- BEDIENTAFEL
Brand : PRIVILEG
Model : PWHPD M11 82 N
Category : Tumble dryer