
107B-USB-HDMI - Network card / adapter StarTech.com - Free user manual and instructions
Find the device manual for free 107B-USB-HDMI StarTech.com in PDF.


| Product Type | USB to HDMI Adapter |
| Host Interface | USB 3.0 (backward compatible with USB 2.0) |
| Video Output | HDMI (female) |
| Max Resolution | 1920x1080p (1080p) at 60Hz |
| Supported Graphics Modes | Extend, mirror, primary display |
| Audio Support | Yes, HDMI pass-through |
| HDCP Support | Yes |
| Operating Systems Supported | Windows 7/8/10/11, macOS 10.10+, Linux (with UVC driver) |
| Dimensions (LxWxH) | 2.2 x 1.0 x 0.5 in (56 x 25 x 12 mm) |
| Weight | 1.1 oz (30 g) |
| Power Supply | Bus-powered via USB |
| Power Consumption | Max 2.5W |
| Operating Temperature | 32°F to 104°F (0°C to 40°C) |
| Storage Temperature | -4°F to 140°F (-20°C to 60°C) |
| Humidity Range | 5% to 85% RH (non-condensing) |
| Maintenance & Cleaning | Wipe with a soft, dry cloth. Do not use liquids or solvents. |
| Safety Instructions | Avoid static discharge; keep away from moisture. Use only with properly grounded USB ports. |
| Spare Parts & Repairability | No user-serviceable parts. Adapter is not repairable; contact manufacturer for replacement. |
| General Information | Plug-and-play installation with most operating systems. Compatible with HDMI monitors, projectors, and TVs. |
Frequently Asked Questions - 107B-USB-HDMI StarTech.com
User questions about 107B-USB-HDMI StarTech.com
0 question about this device. Answer the ones you know or ask your own.
Ask a new question about this device
Download the instructions for your Network card / adapter in PDF format for free! Find your manual 107B-USB-HDMI - StarTech.com and take your electronic device back in hand. On this page are published all the documents necessary for the use of your device. 107B-USB-HDMI by StarTech.com.
USER MANUAL 107B-USB-HDMI StarTech.com
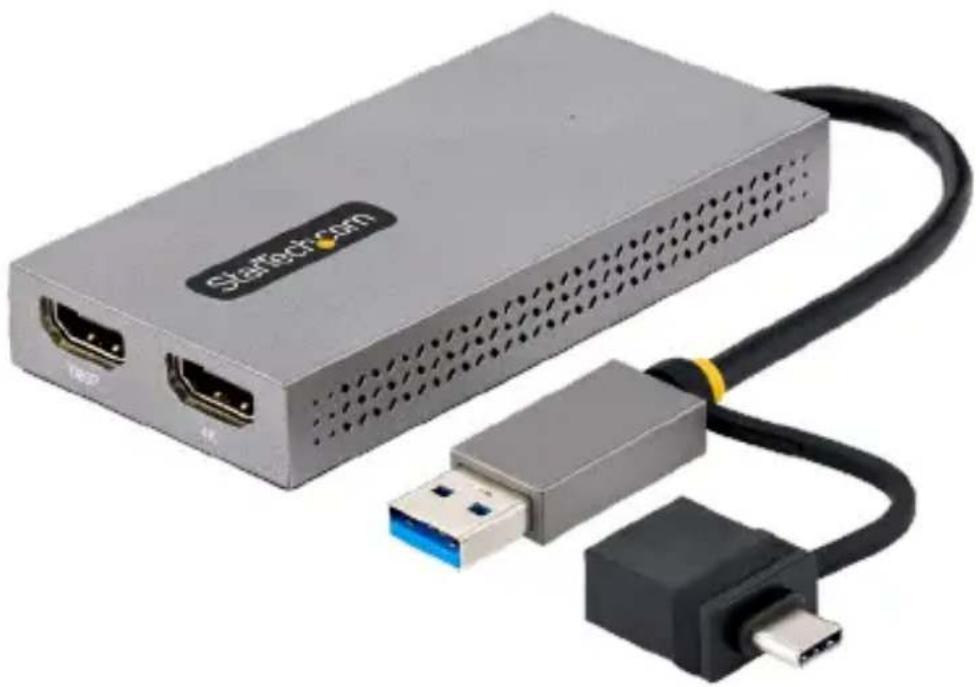
USB 3.0 to Dual HDMI Adapter -4K 30Hz/1080p 60Hz
Full-Product Manual 107B-USB-HDMI
natural_image
Exterior view of a StarTech.com networking device with USB and port labels (no readable text beyond branding)Actual products may vary from photos
Table of Contents
Requirements 2
Package Contents....2
Product Diagram....3
Windows Installation....4
Hardware Installation ....5
Software Installation....6
macOS Installation....11
Software Installation for macOS 10.15 and Up....11
Software Installation for macOS 10.10 to 10.14....17
Hardware Installation 20
Windows Operation 22
Display Configuration....22
Audio Configuration 43
Windows Troubleshooting......45
macOS Operation....51
Display Configuration....51
InstantView Application Operation....68
Audio Configuration 83
macOS Troubleshooting......85
Compliance Statements....91
Safety Statements....92
To view manuals, videos, drivers, downloads, technical drawings, and more visit www.StarTech.com/support
Requirements
• USB Enabled Host Computer
- a USB 5Gbps (or faster) is recommended
- Up to 2x HDMI Display Devices
Package Contents
• USB-A/USB-C to Dual HDMI Adapter x1
- Quick-Start Guide x1
For the latest drivers/software, technical specifications, and declarations of conformance, please visit: www.StarTech.com/107B-USB-HDMI
To view manuals, videos, drivers, downloads, technical drawings, and more visit www.StarTech.com/support
Product Diagram
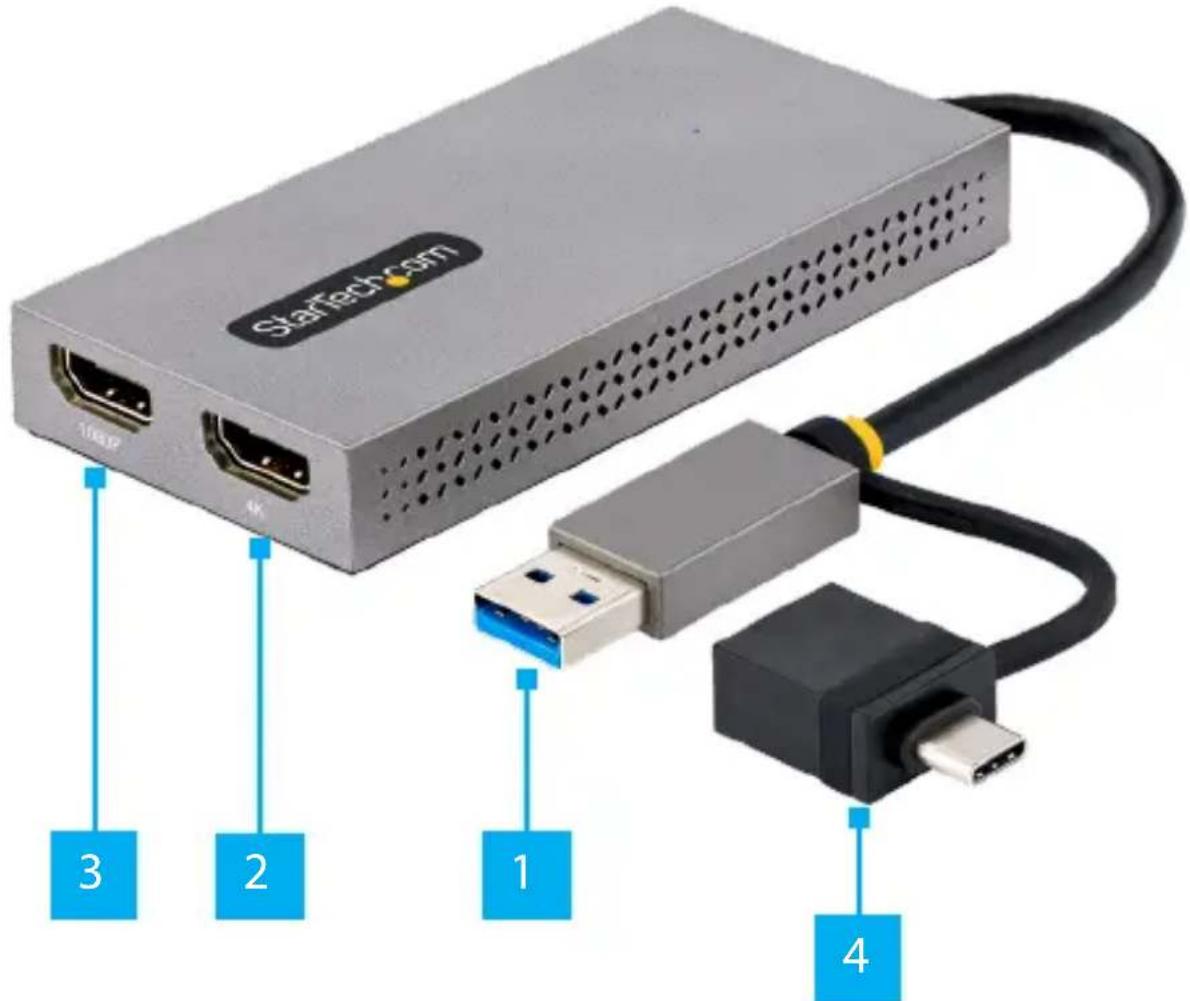
| Component Function | ||
| 1 | Built-In USB Host Cable (USB-A) | Connect to a USB Port on a Host ComputerUSB 5Gbps |
| 2 | Video Output Port (HDMI) | Connect to an HDMI Display4K (3840×2160) 30Hz Resolution |
| 3 | Video Output Port (HDMI) | Connect to an HDMI Display1080p (1920x1200) 60Hz Resolution |
| 4 | Tethered USB-A to USB-C Adapter | Connect to the Built-In USB-C Host Cable and to a USB-C Port on a Host ComputerUSB 5Gbps |
To view manuals, videos, drivers, downloads, technical drawings, and more visit www.StarTech.com/support
Windows Installation
IMPORTANT PRE-INSTALLATION STEPS FOR AUTO DRIVER OR MANUAL SETUP
- Driver installation for the USB Display Adapter may be automatic on Host Computers running Windows 10 and up. Before connecting the USB Display Adapter to the Host Computer, please take the following steps to optimize the Host Computer for automatic driver installation:
- Make sure any outstanding Windows updates are installed to ensure the Host Computer is running the most up-to-date version of Windows.
- Ensure that the Host Computer has an active Internet connection.
- Verify that the active user account has administrator privileges.
- This Manual provides two methods for driver installation: Automatic Driver Installation and Manual Driver Installation. If the Automatic Driver Installation fails please disconnect the USB Display Adapter from the Host Computer, and follow the steps for Manual Driver Installation.
Hardware Installation
- (Optional) Connect the Tethered USB-A to USB-C Adapter to the Built-In USB-A Host Cable.
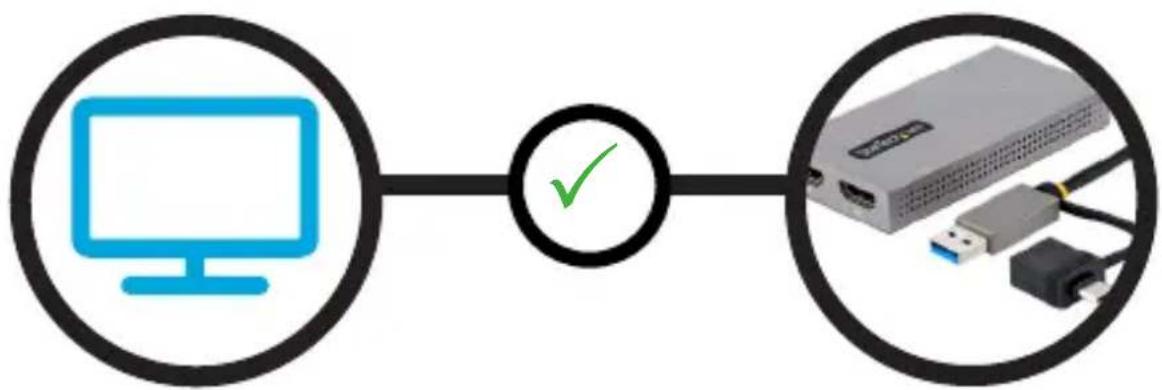
- Connect the Display Device(s) to the Video Output Ports on the USB Display Adapter, using the required cables (sold separately).
flowchart
graph LR
    A["Computer monitor"] --> B{Checkmark}
    B --> C["USB Cable"]
    style A fill:#fff,stroke:#000
    style C fill:#fff,stroke:#000
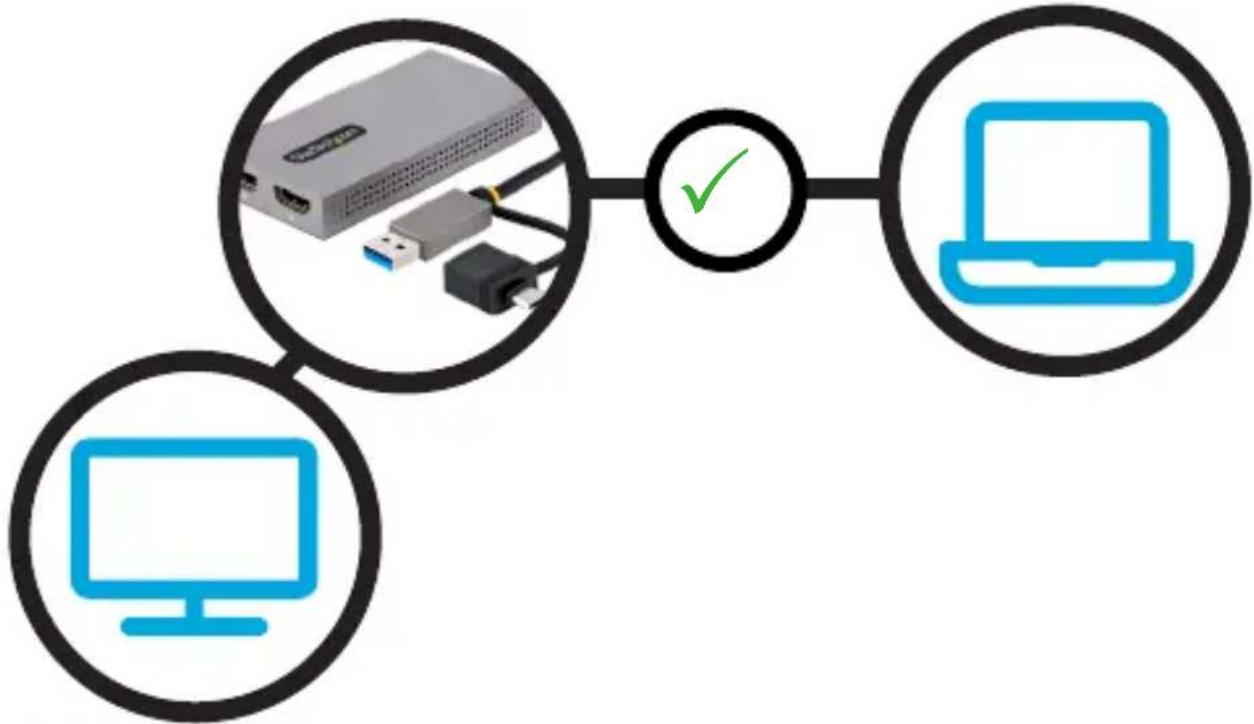
- Connect the Built-In USB Cable on the USB Display Adapter to an available USB Port on the Host Computer.
flowchart
graph TD
    A["Server"] --> B["Laptop"]
    C["Monitor"] --> B
    B -->|✓| A
To view manuals, videos, drivers, downloads, technical drawings, and more visit www.StarTech.com/support
Software Installation
Automatic Driver Installation
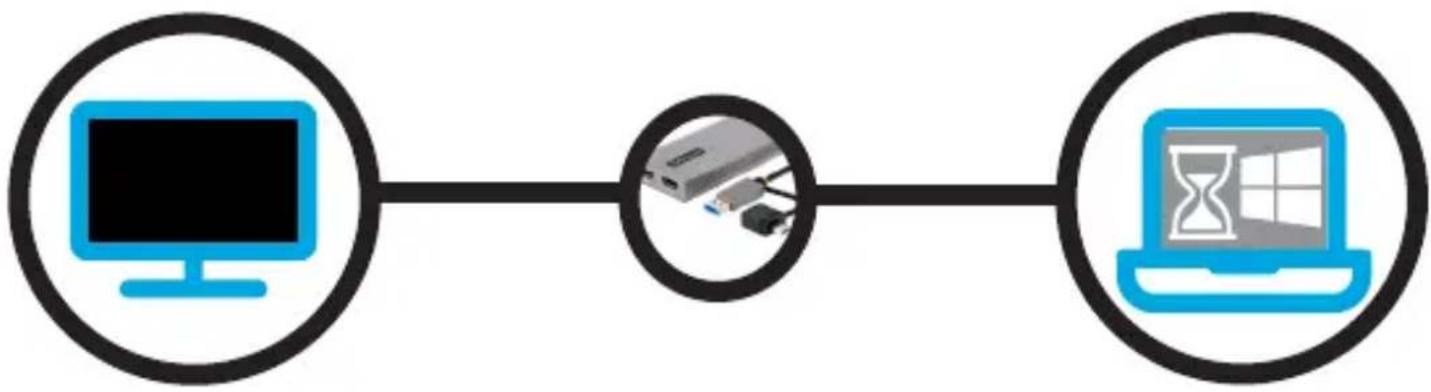
- Once the USB Display Adapter has been connected to the Host Computer, Windows will attempt to download and install the drivers automatically.
flowchart
graph LR
    A["Computer monitor"] --> B["Printer"]
    B --> C["Laptop with hourglass icon"]
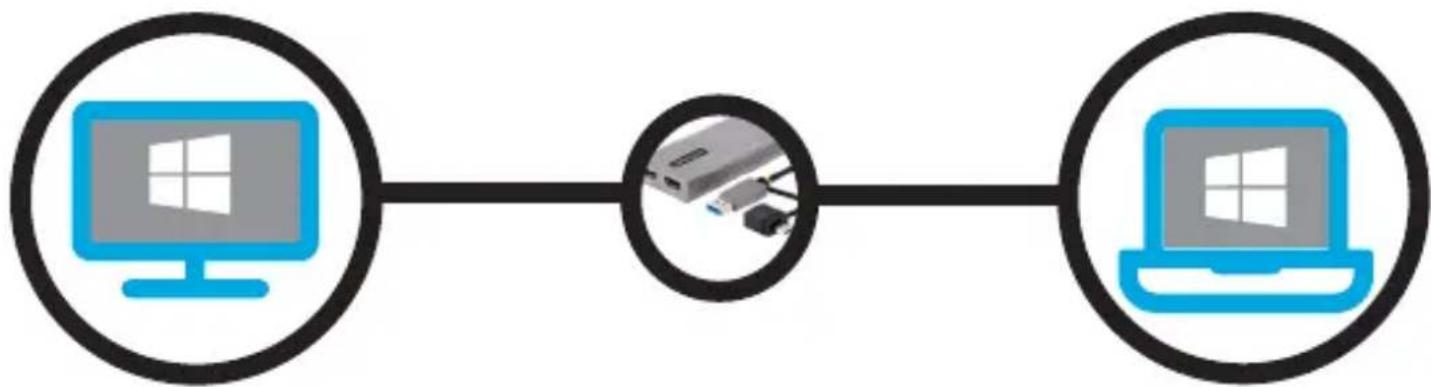
- Installation may take several seconds to complete. During the installation process the connected Display Device(s) might flicker, this is normal. Once the installation has completed, the Windows desktop will appear on the connected Display Device(s).
flowchart
graph LR
    A["Computer"] --> B["Laptop"]
    style A fill:#99ccff,stroke:#333
    style B fill:#66ccff,stroke:#333
To view manuals, videos, drivers, downloads, technical drawings, and more visit www.StarTech.com/support
Manual Driver Installation
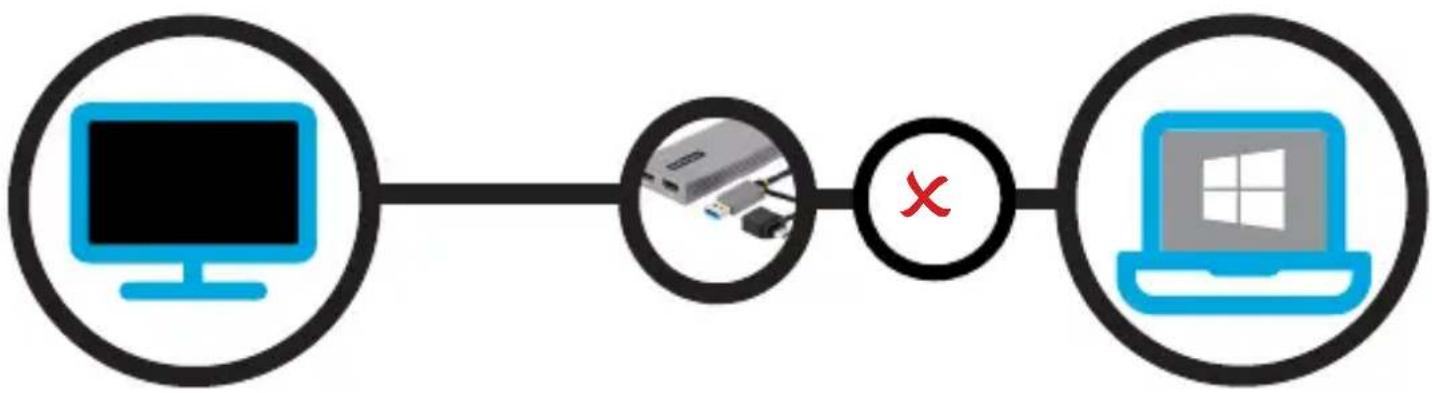
If after 3 minutes the Windows desktop does not appear on the connected Display Device(s), it's likely that Windows has failed to automatically install the Driver, and it will be necessary to follow the below steps for Manual Driver Installation:
- Disconnect the USB Display Adapter from the Host Computer.
flowchart
graph LR
    A["Computer"] --> B["Router"]
    B --> C["Laptop"]
    style A fill:#000,stroke:#fff,color:#fff
    style B fill:#fff,stroke:#000
    style C fill:#000,stroke:#fff,color:#fff
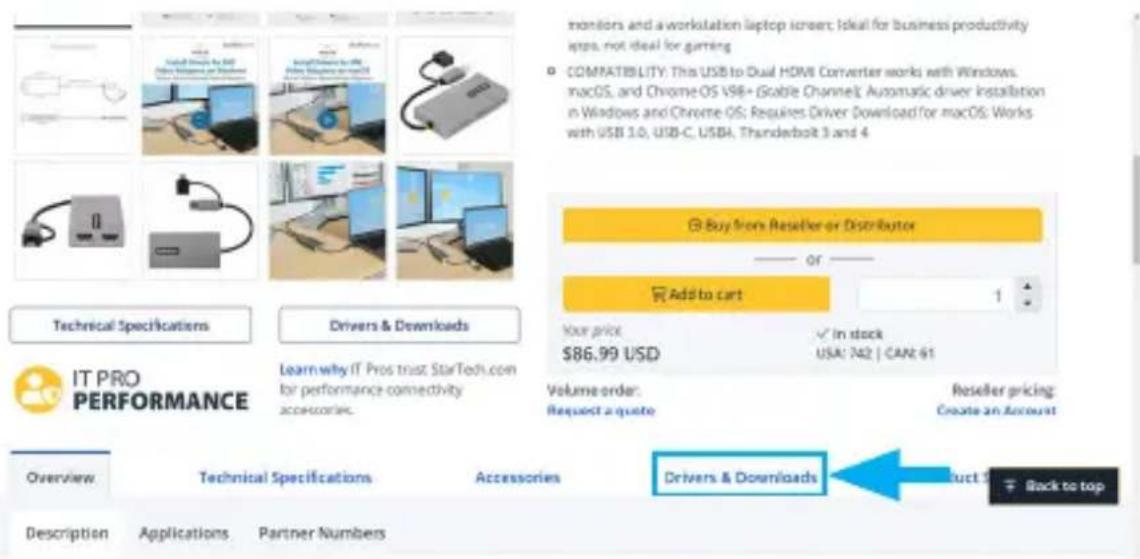
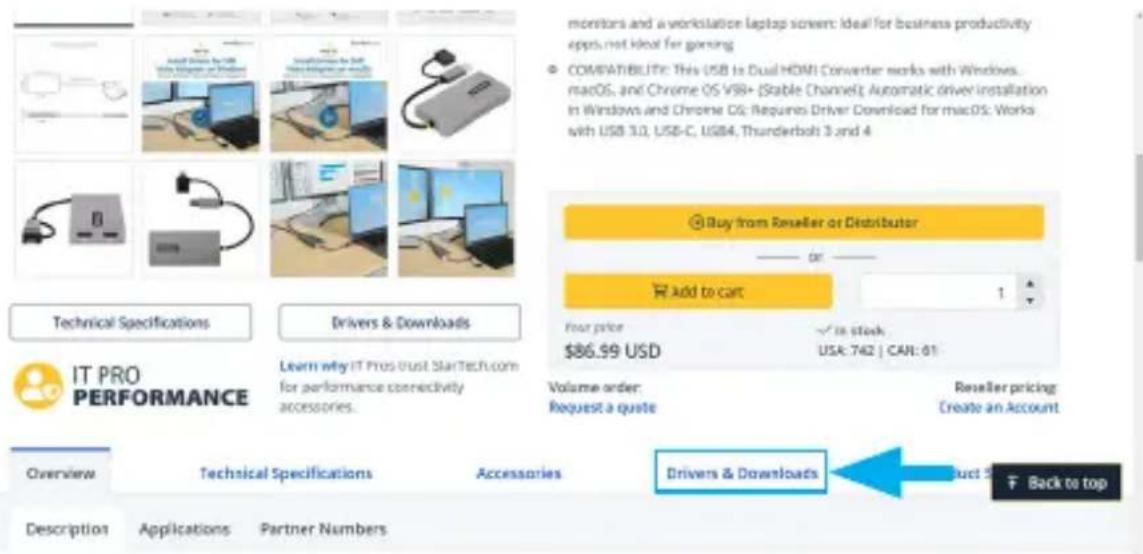
- Navigate to www.StarTech.com/107B-USB-HDMI and click the Drivers/Downloads tab on the Product Page.
To view manuals, videos, drivers, downloads, technical drawings, and more visit www.StarTech.com/support
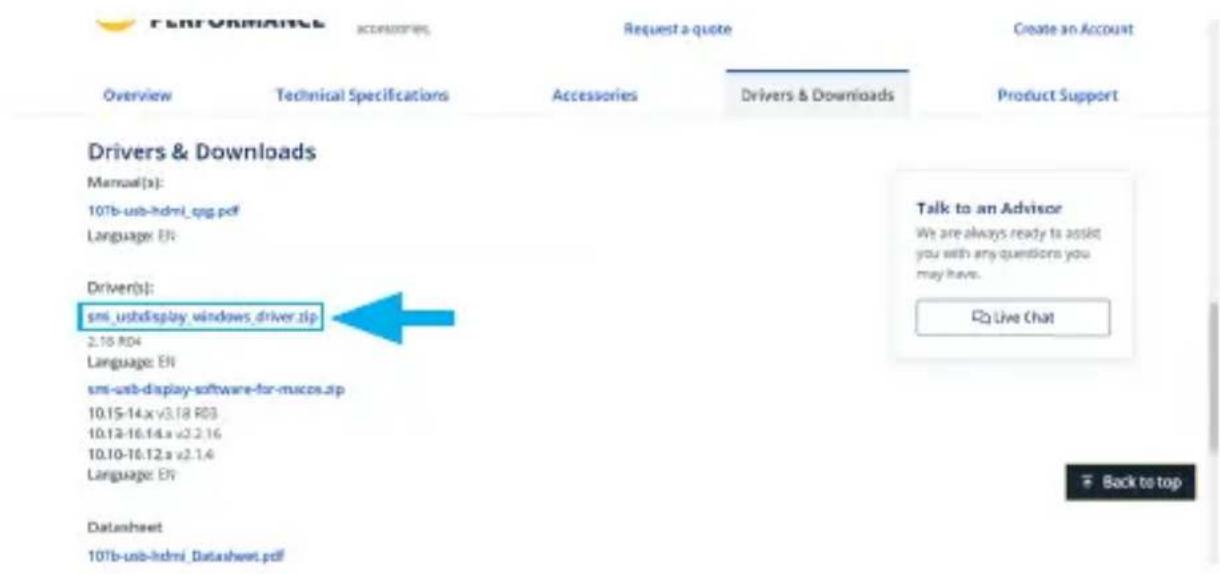
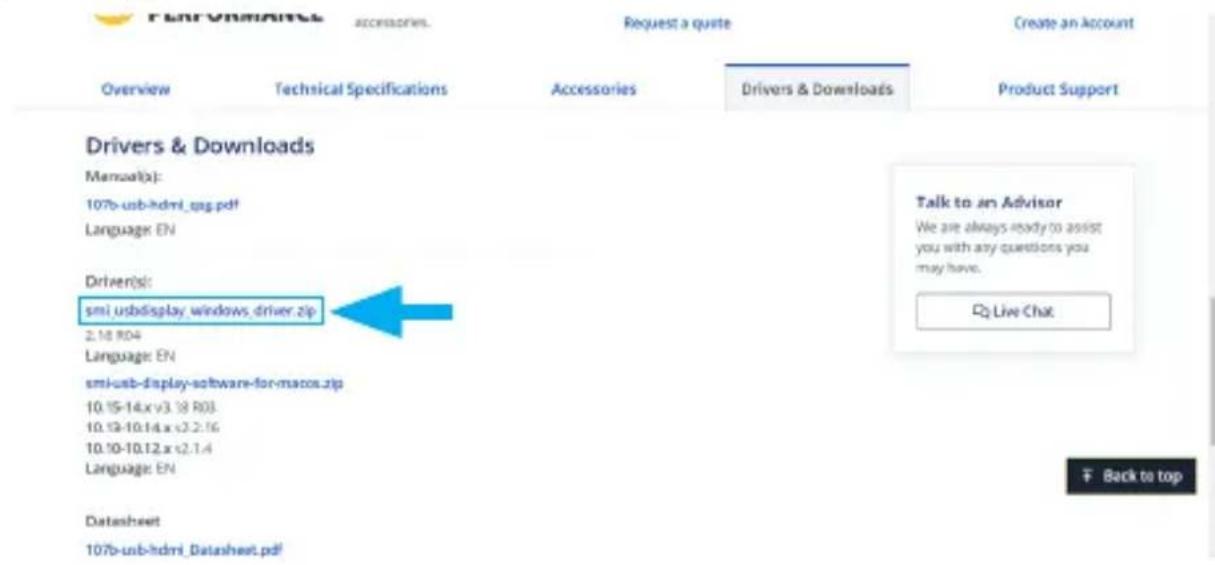
- Under Driver(s), download the smi_usbdisplay_windows_driver.zip driver package.
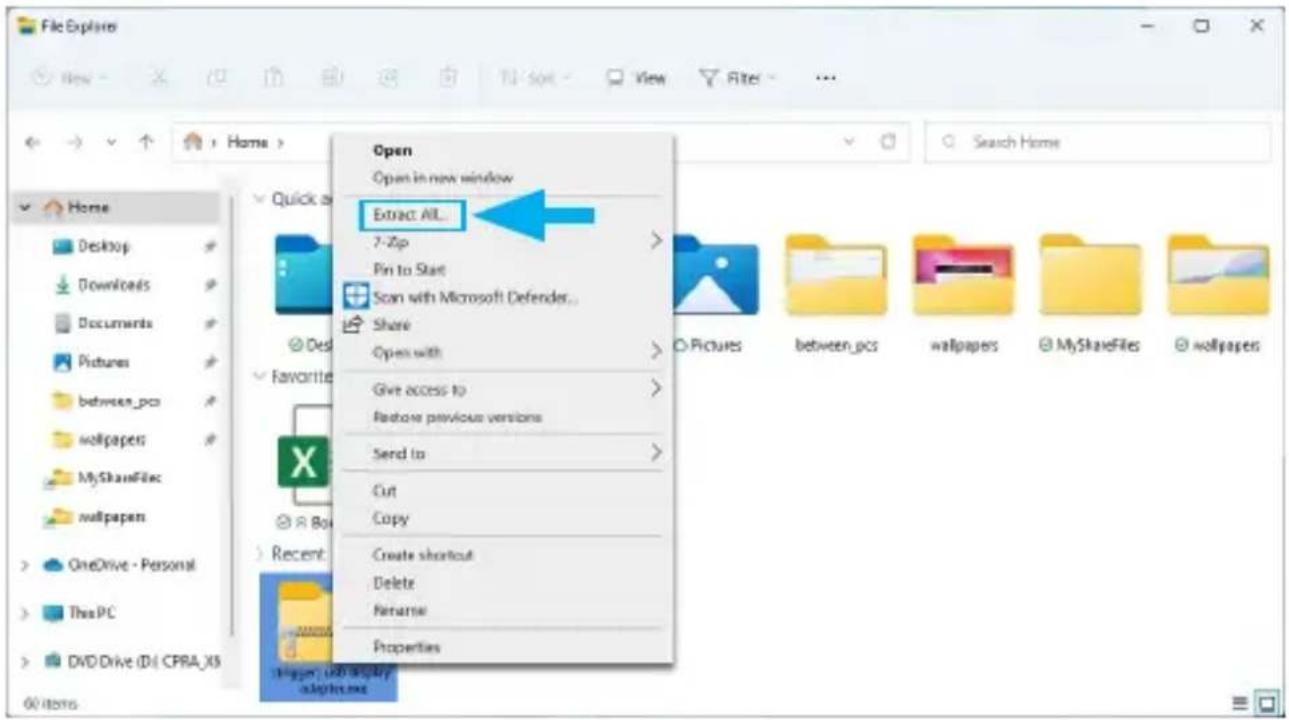
- Right-click the zip folder that was downloaded and select Extract All, then follow the on-screen instructions.
To view manuals, videos, drivers, downloads, technical drawings, and more visit www.StarTech.com/support
- Open the Windows folder from the list of extracted files, then right-click the SMIUSBDisplaySW(.exe) file and select Run as Administrator.
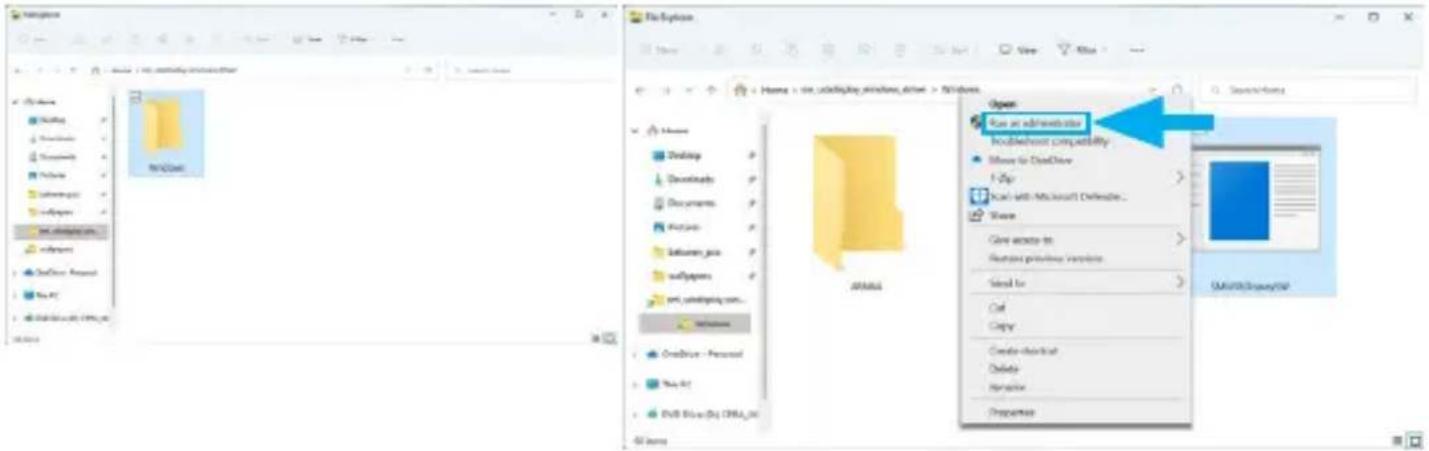
Note: If the Run as Administrator option is not available, it's likely that the installation file is attempting to be ran from within the zipped file. Please extract the files using the instructions in Step 5.
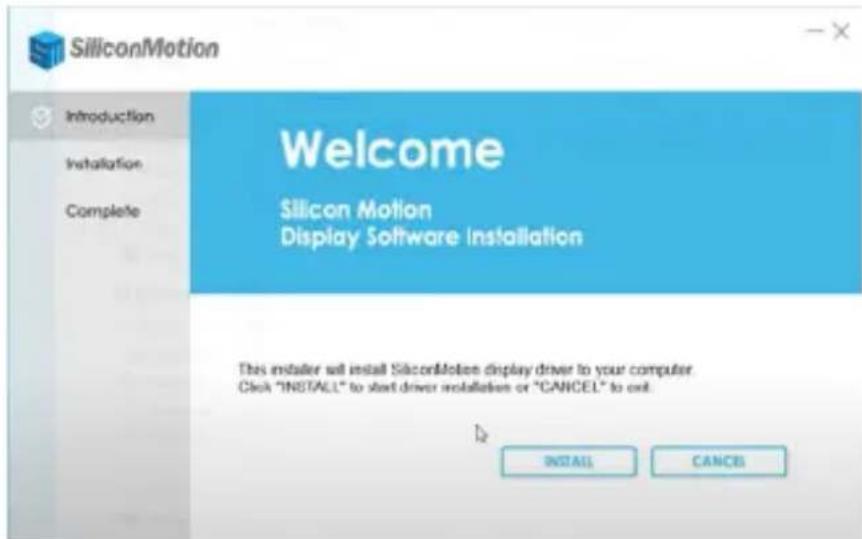
- Follow the on-screen prompts to install the device drivers and restart the computer when prompted.
To view manuals, videos, drivers, downloads, technical drawings, and more visit www.StarTech.com/support
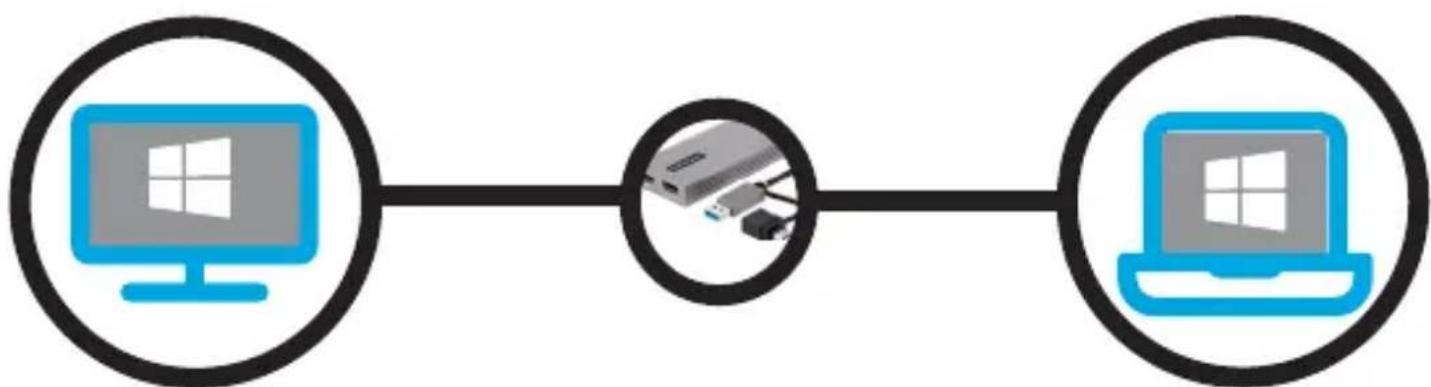
- Once Windows has restarted, connect the Built-In USB Host Port on the USB Display Adapter to an available USB Port on the Host Computer.
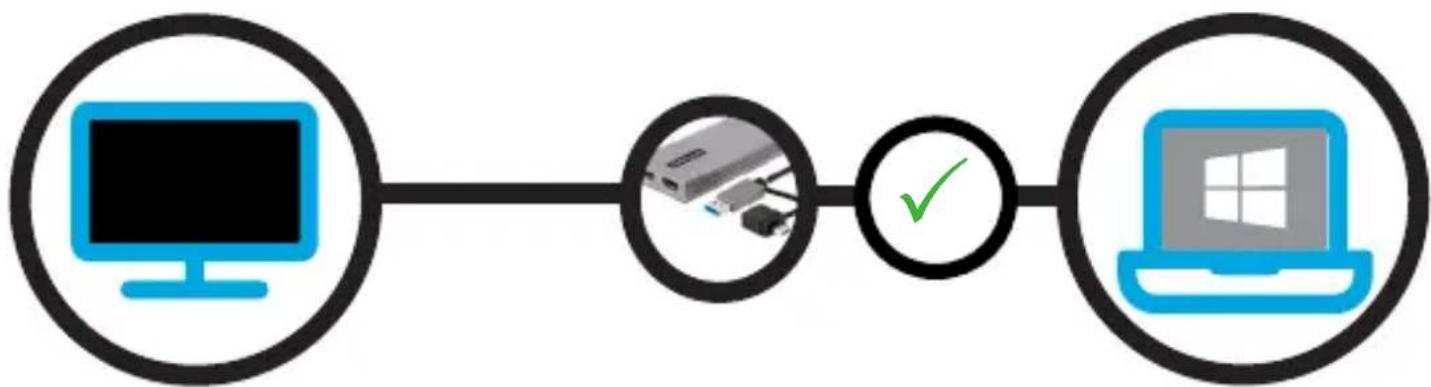
- Installation may take several seconds to complete. During the installation process the connected Display Device(s) might flicker, this is normal. Once the installation has completed, the Windows desktop will appear on the connected Display Device(s).
flowchart
graph LR
    A["Computer"] --> B["Laptop"]
    style A fill:#99ccff,stroke:#333
    style B fill:#66ccff,stroke:#333
To view manuals, videos, drivers, downloads, technical drawings, and more visit www.StarTech.com/support
macOS Installation
Software Installation for macOS 10.15 and Up (InstantView Display Application Installation)
- Navigate to www.StarTech.com/107B-USB-HDMI and click the Drivers/Downloads tab on the Product Page.
- Under Driver(s), download the smi-usb-display-software-for-macOS.zip software package.
To view manuals, videos, drivers, downloads, technical drawings, and more visit www.StarTech.com/support
- Double-click the zip folder that you downloaded, macOS will unzip the folder using Archive Utility.
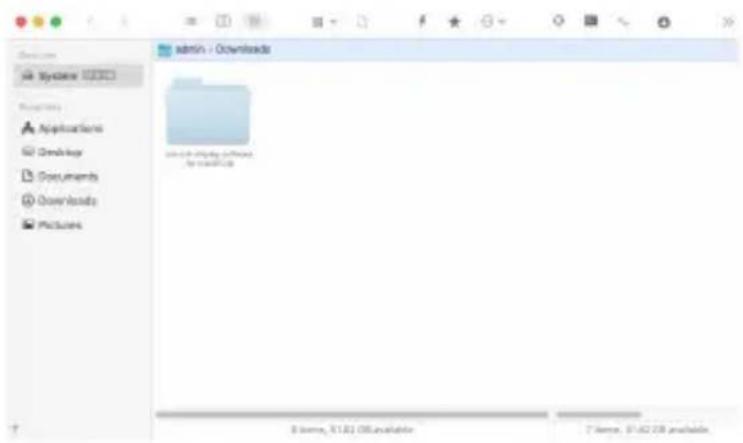
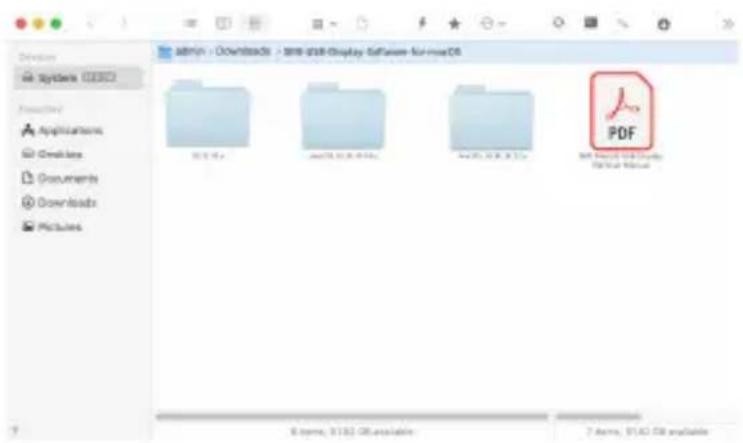
- In the list of extracted folders, select the folder that corresponds to your version of macOS.
To view manuals, videos, drivers, downloads, technical drawings, and more visit www.StarTech.com/support
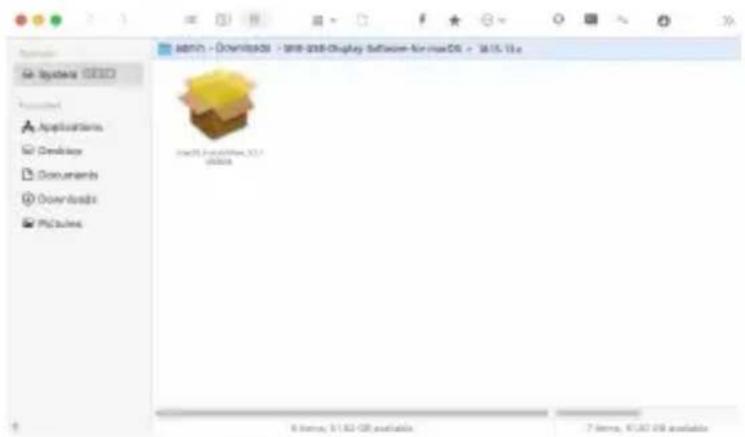
- Double-click the macOS_InstantView_V...(.dmg) installation package.
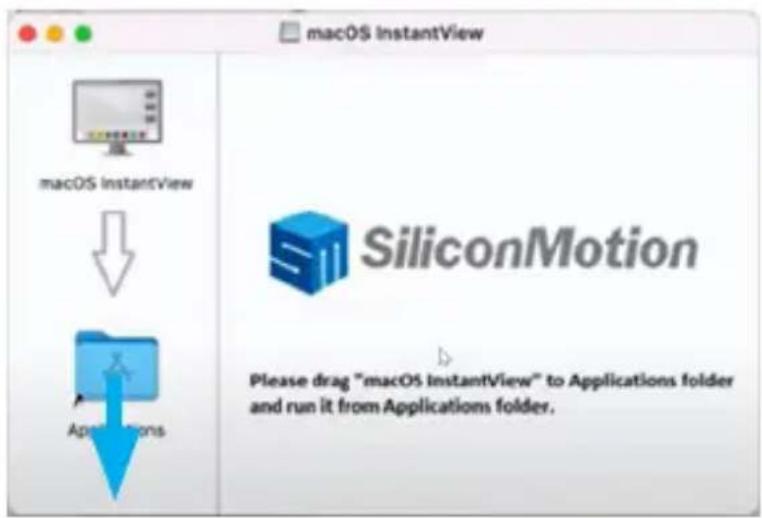
- Drag the macOS InstantView icon to the Application folder.
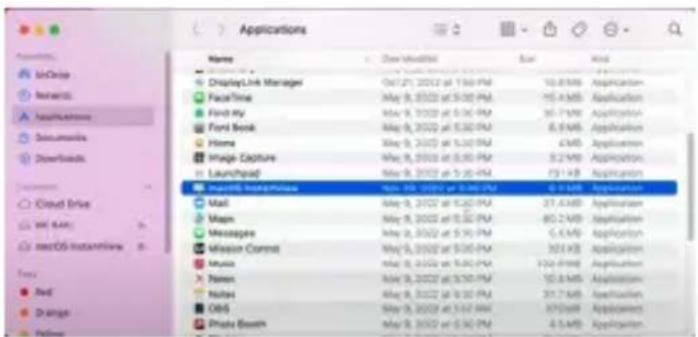
- Click on the Finder menu in the top-left corner of the screen and select Applications, then launch macOS InstantView.
To view manuals, videos, drivers, downloads, technical drawings, and more visit www.StarTech.com/support
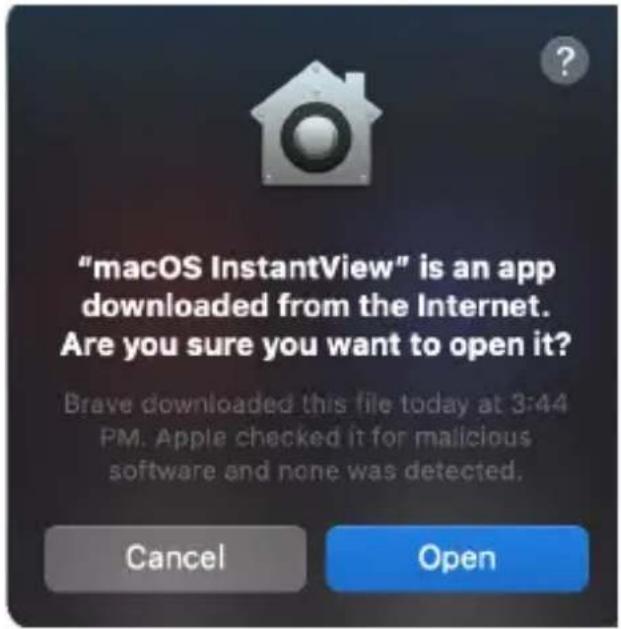
- You may receive an alert asking if you're sure you want to open the application. If this alert appears click Open.
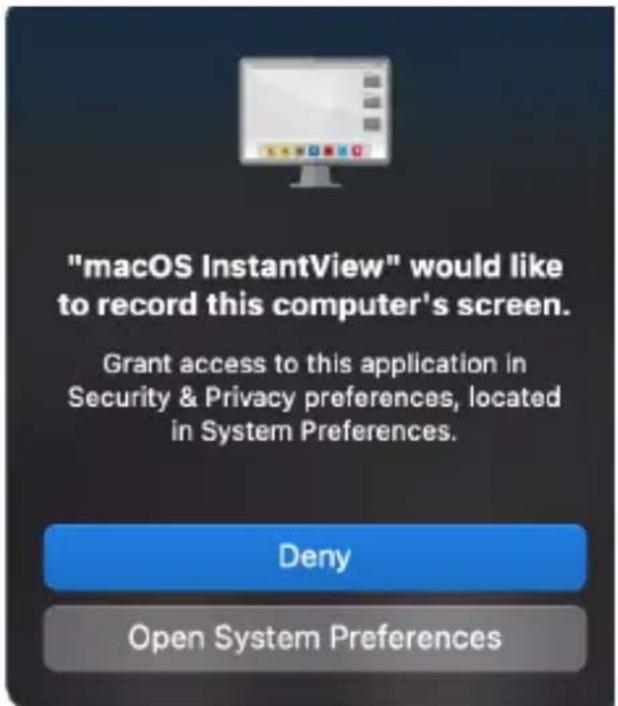
- You may receive an alert asking if you'd like to grant access to this application Security & Privacy preferences. If this alert appears click Open System Preferences.
To view manuals, videos, drivers, downloads, technical drawings, and more visit www.StarTech.com/support
- In the Screen Recording window, click the slider to allow macOS InstantView.
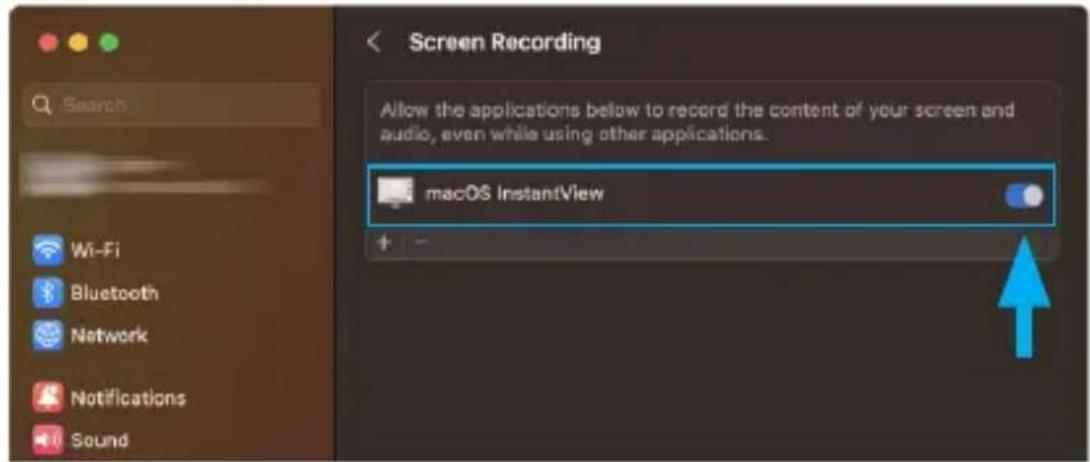
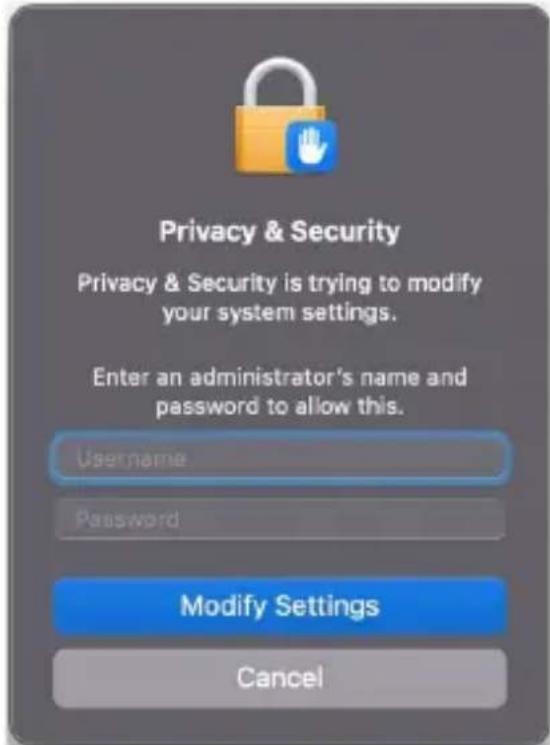
- Enter the Username and password for your Mac and click Modify Settings.
To view manuals, videos, drivers, downloads, technical drawings, and more visit www.StarTech.com/support
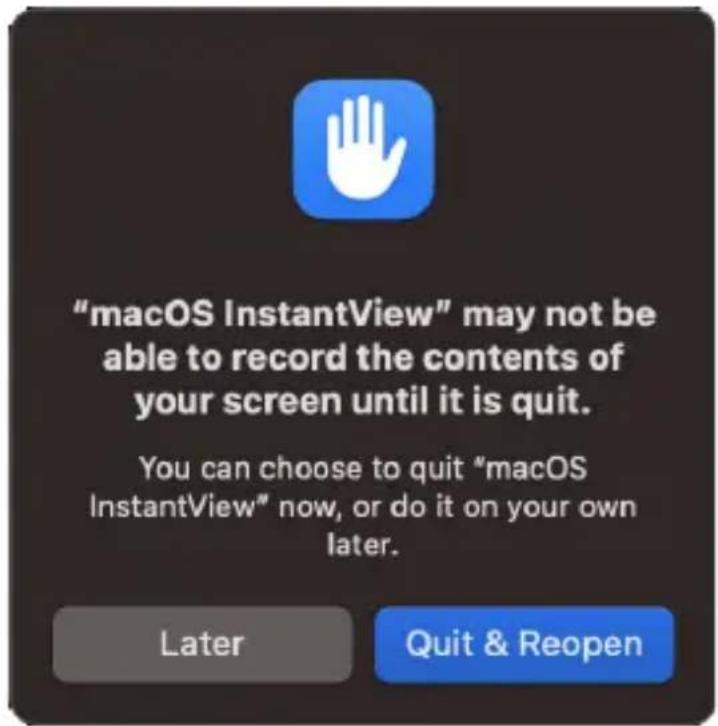
- You will receive an alert stating that InstantView may not be able to record the contents of your screen until it is quit, click Quit & Reopen to complete the installation.
To view manuals, videos, drivers, downloads, technical drawings, and more visit www.StarTech.com/support
Software Installation for macOS 10.10 to 10.14
(Legacy Display Driver Installation)
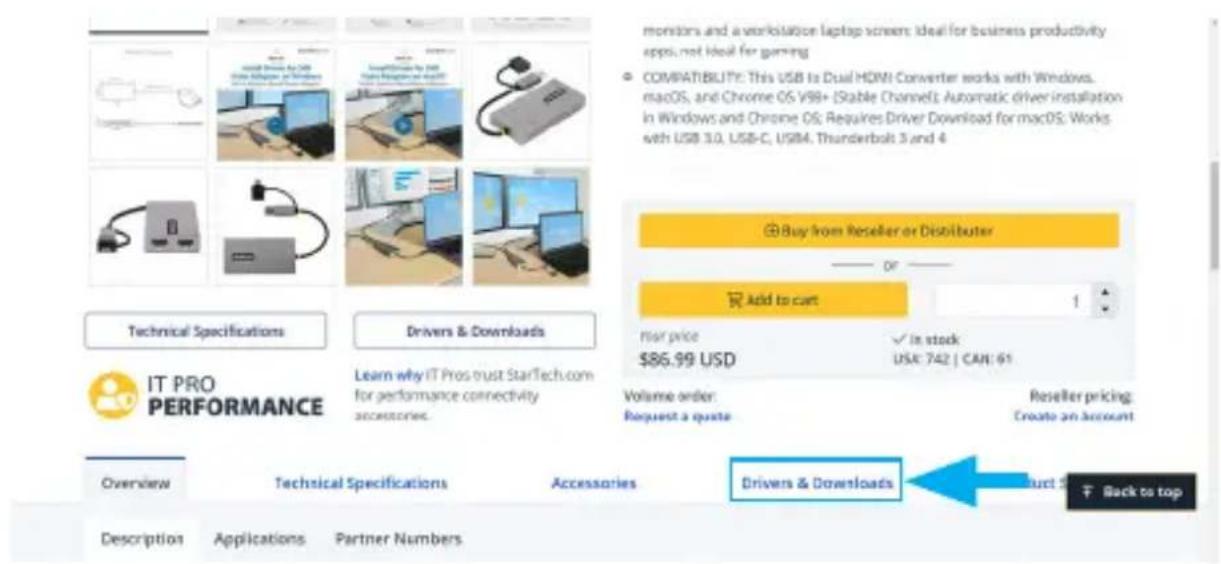
- Navigate to www.StarTech.com/107B-USB-HDMI and click the Drivers/Downloads tab on the Product Page.
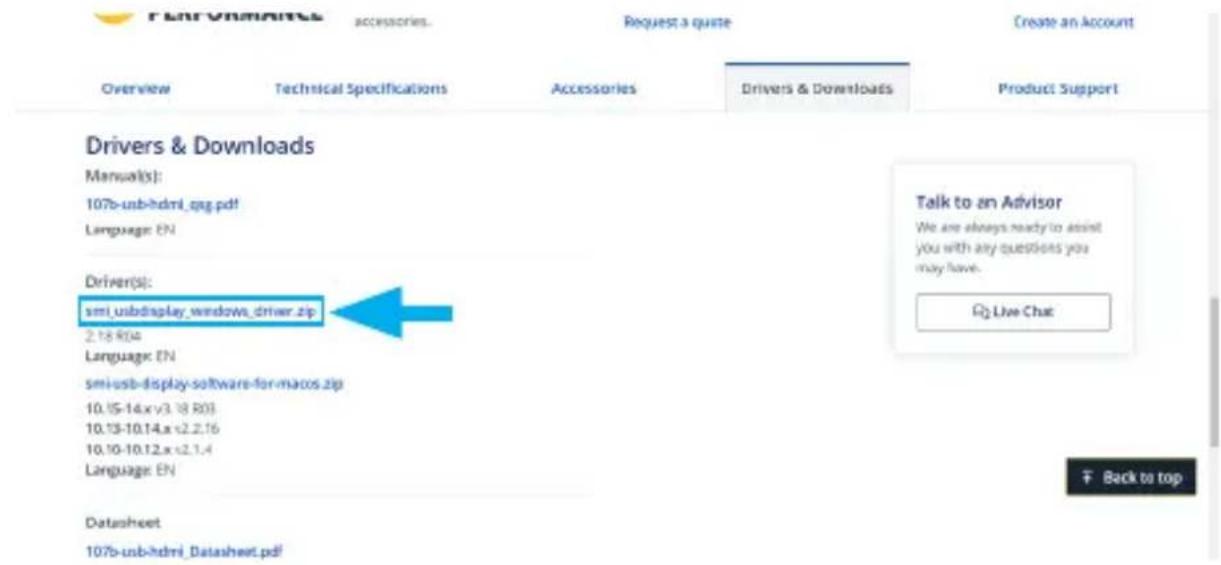
- Under Driver(s), download the smi-usb-display-software-for-macOS.zip software package.
To view manuals, videos, drivers, downloads, technical drawings, and more visit www.StarTech.com/support
- Double-click the zip folder that you downloaded, macOS will unzip the folder using Archive Utility.
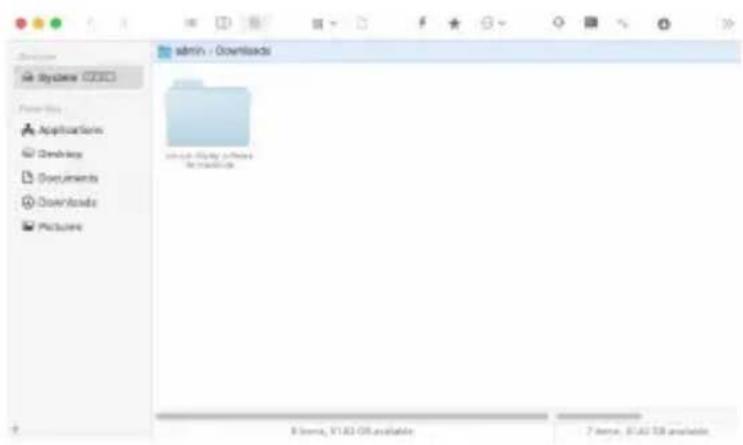
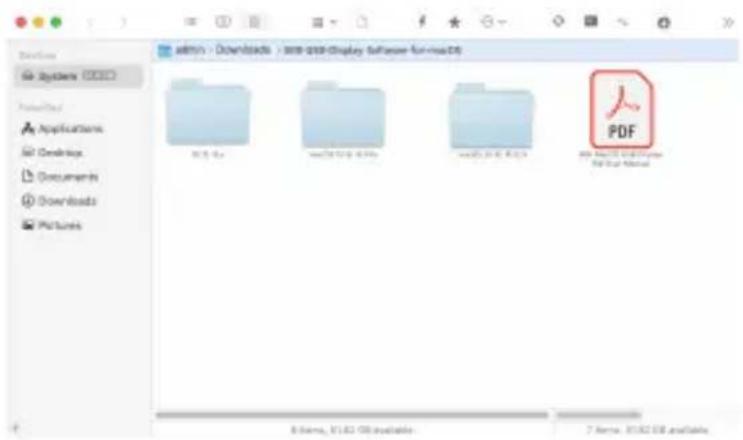
- In the list of extracted folders, select the folder that corresponds to your version of macOS.
To view manuals, videos, drivers, downloads, technical drawings, and more visit www.StarTech.com/support
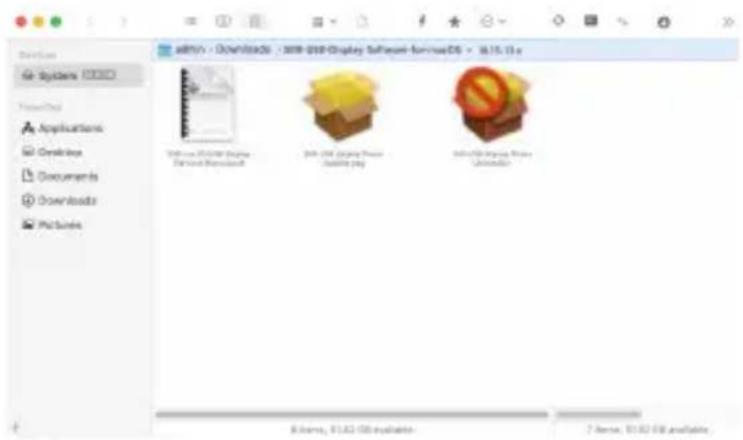
- Double-click the SMI USB Display Software-for-macOS-v.. (.dmg) installation package.
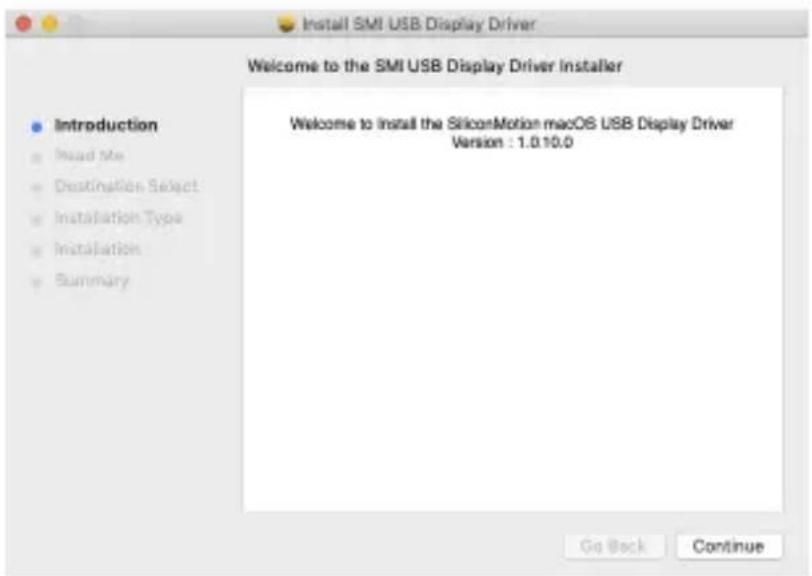
- Follow the on-screen prompts to install the device drivers and restart the computer when prompted.
- Once macOS has restarted, the software installation is completed.
To view manuals, videos, drivers, downloads, technical drawings, and more visit www.StarTech.com/support
Hardware Installation
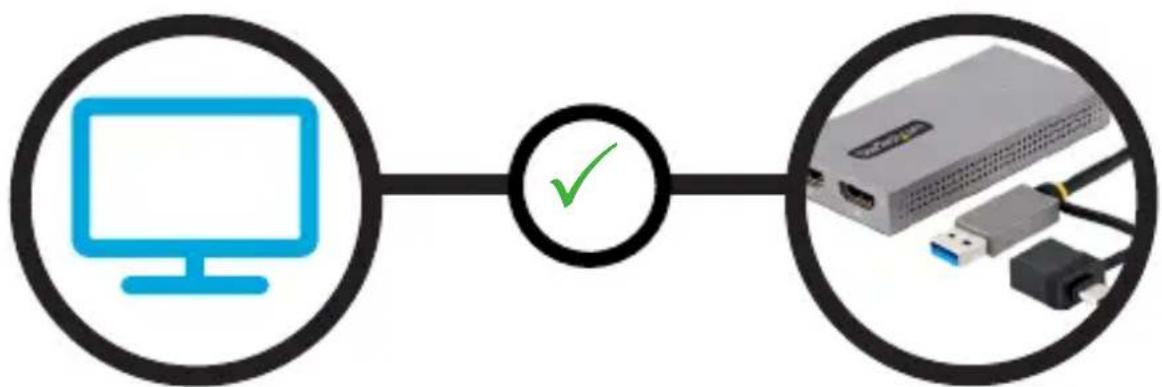
- (Optional) Connect the tethered USB-A to USB-C Adapter to the Built-In USB-A Host Cable.
- Connect the Display Device(s) to the Video Output Ports on the USB Display Adapter, using the required cables (sold separately).
flowchart
graph LR
    A["Computer monitor"] --> B{Checkmark}
    B --> C["USB Cable with USB port"]
    style A fill:#fff,stroke:#000
    style C fill:#fff,stroke:#000
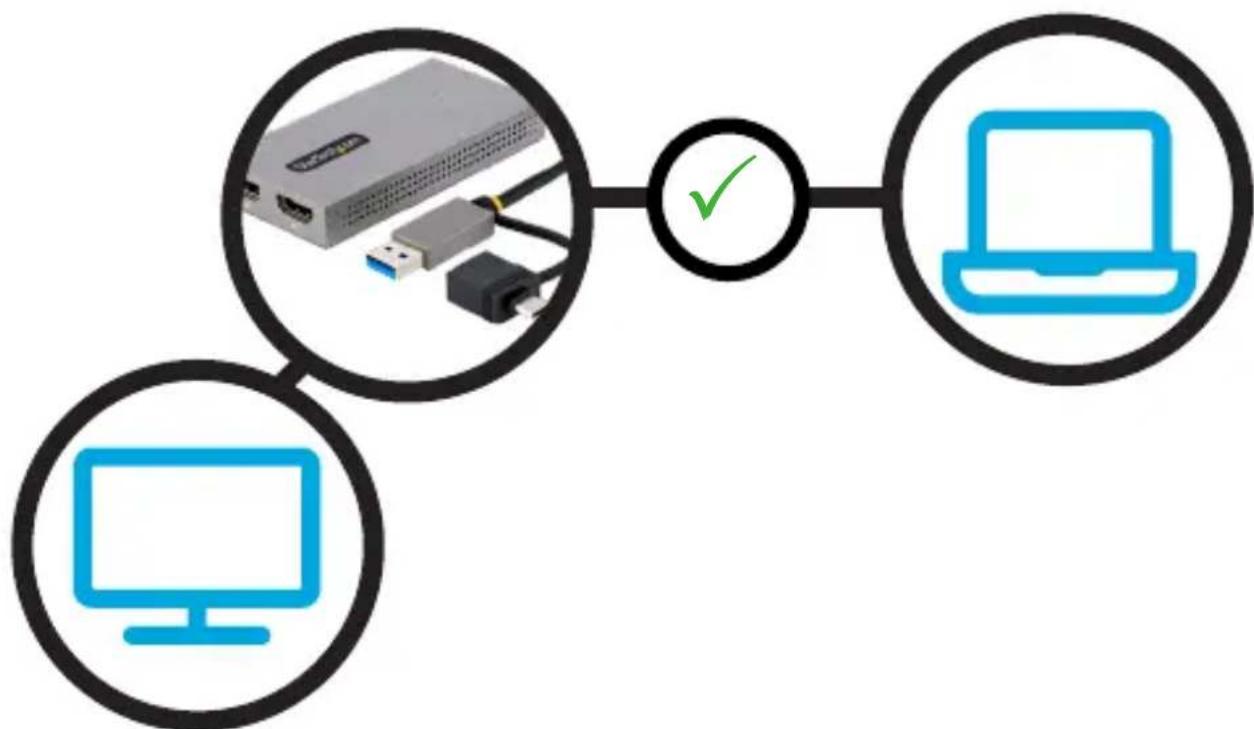
- Connect the Built-In USB Cable on the USB Display Adapter to an available USB Port on the Host Computer.
flowchart
graph TD
    A["Server"] --> B["Laptop"]
    C["Monitor"] --> B
    B -->|✓| A
To view manuals, videos, drivers, downloads, technical drawings, and more visit www.StarTech.com/support
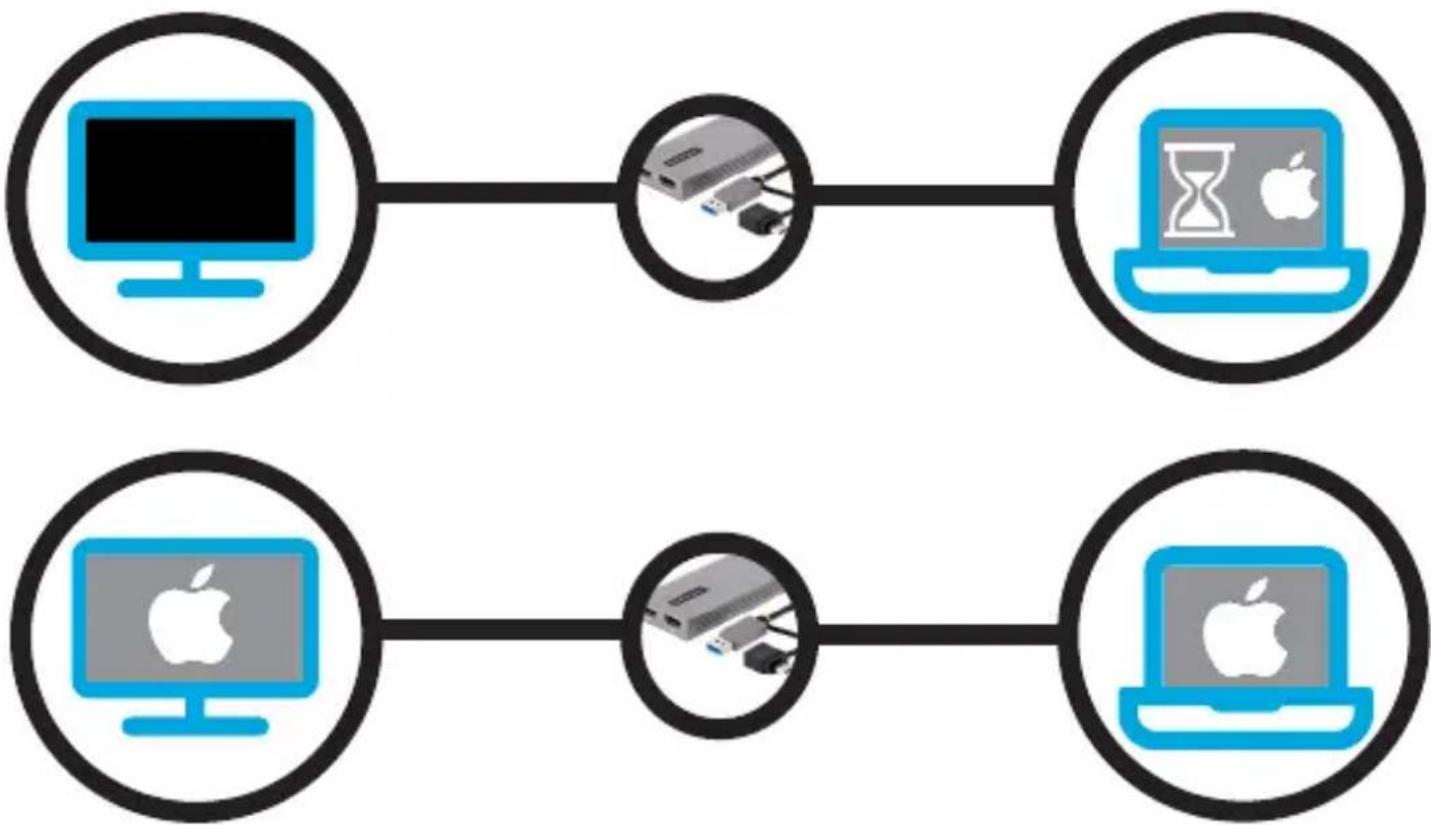
- Installation may take several seconds to complete. During the installation process the connected Display Device(s) might flicker, this is normal. Once the installation has completed, the macOS desktop will appear on the connected Display Device(s).
flowchart
graph LR
    A["Computer"] --> B["Router"]
    B --> C["Laptop with Apple logo"]
    D["Computer"] --> E["Router"]
    E --> F["Laptop with Apple logo"]
To view manuals, videos, drivers, downloads, technical drawings, and more visit www.StarTech.com/support
Windows Operation
Once the USB Display Adapter has been installed on the Host Computer, the Display Device(s) and audio controller will operate within Windows the same as a Display Device connected directly to the Host Computer's Graphics Controller.
This section of the manual outlines the full array of Windows configuration options associated to the USB Display Adapter.
Display Configuration
Identifying Display Devices Within Windows Display Settings
Windows assigns Display Numbers to each connected Display Device, so that users can identify and differentiate each monitor. This is useful to understand the order and arrangement of each connected monitor, especially when multiple Display Devices are connected to the Host Computer.
The numbers assigned to the monitors indicate their position in the monitor arrangement. The primary monitor is typically assigned the number “1,” and additional monitors are assigned subsequent numbers like “2,” “3,” and so on. These numbers help Windows identify which monitor users are referring to when making changes or adjustments in display settings.
To view manuals, videos, drivers, downloads, technical drawings, and more visit www.StarTech.com/support
To identify which number is assigned to each connected Display Device within Windows:
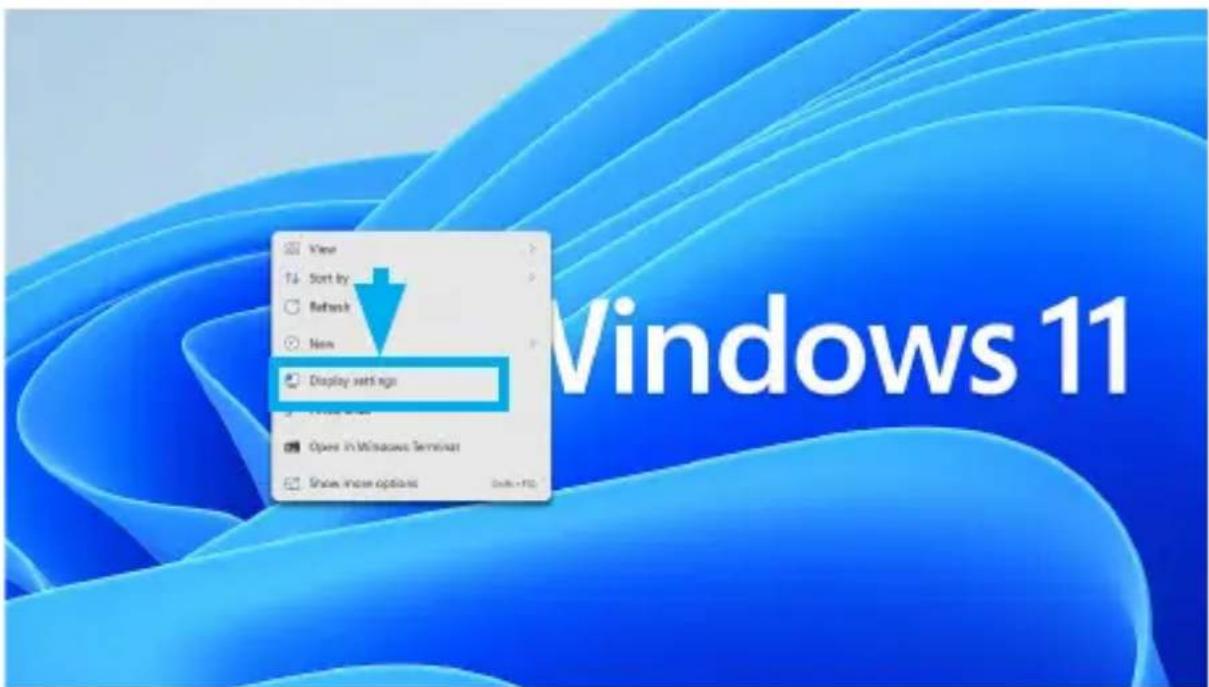
- Right-Click anywhere on the Windows Desktop and select Display Settings.
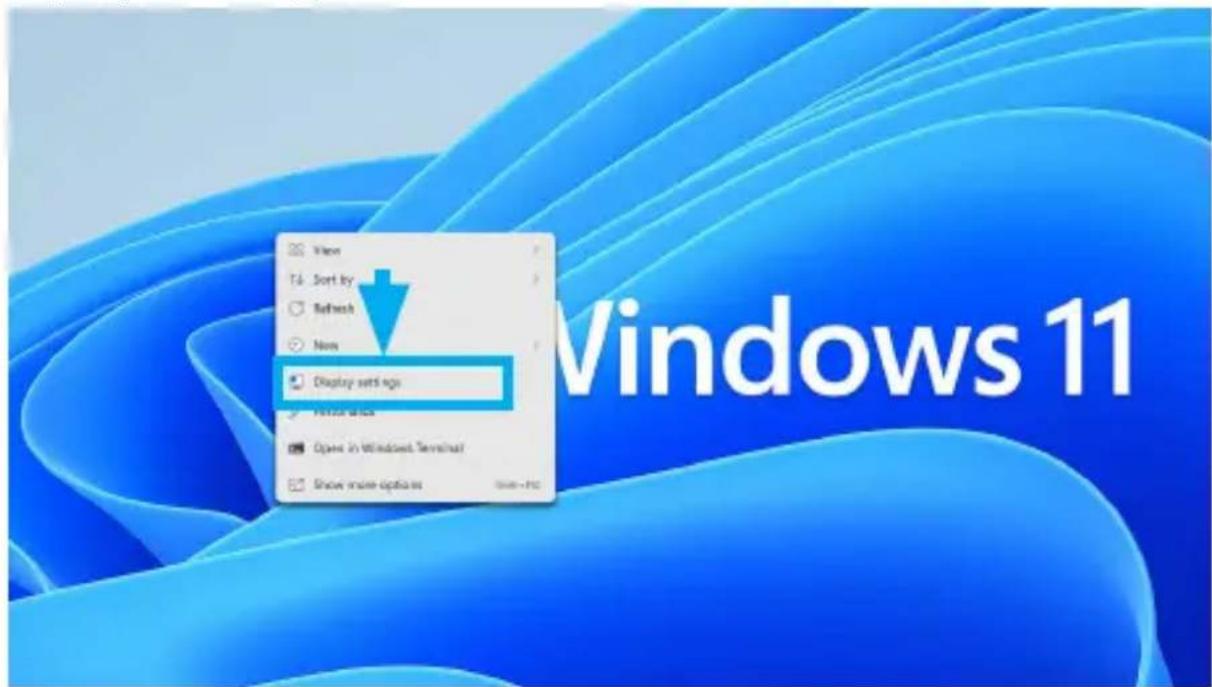
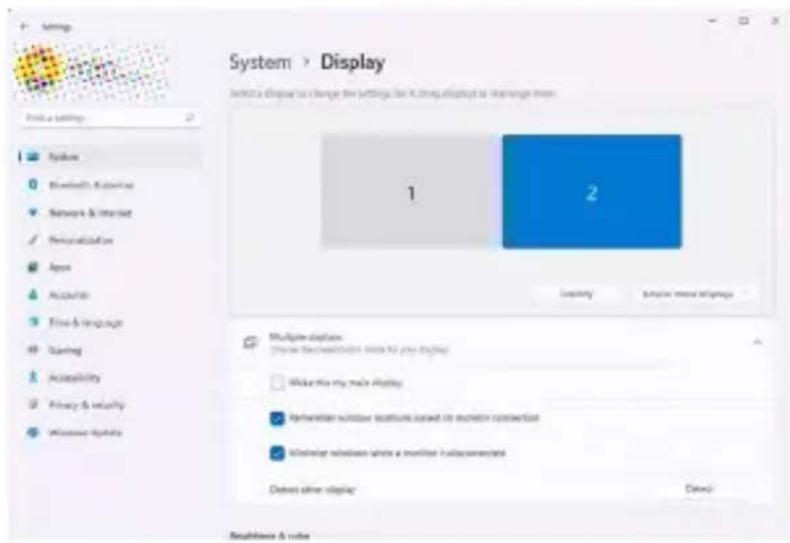
- This will open the Windows Settings app to the Display tab. Below Select a display to change the settings for it, you will see a diagram representing the current monitor arrangement and the Display Number assigned to each monitor.
To view manuals, videos, drivers, downloads, technical drawings, and more visit www.StarTech.com/support
- To identify a specific monitor, click on the Identify button located just below the monitor arrangement diagram.
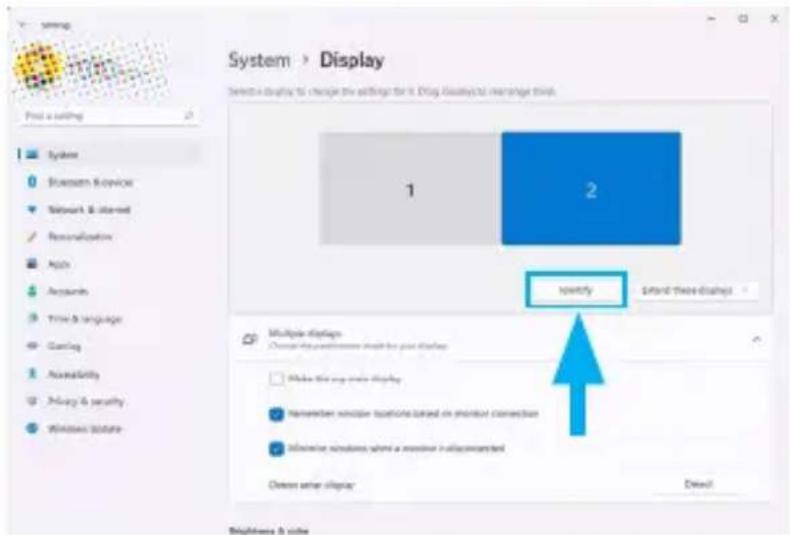
- Windows will display a large number on each monitor briefly. Watch for the numbers to appear on the screens. Each number that appears will correspond to a specific monitor.
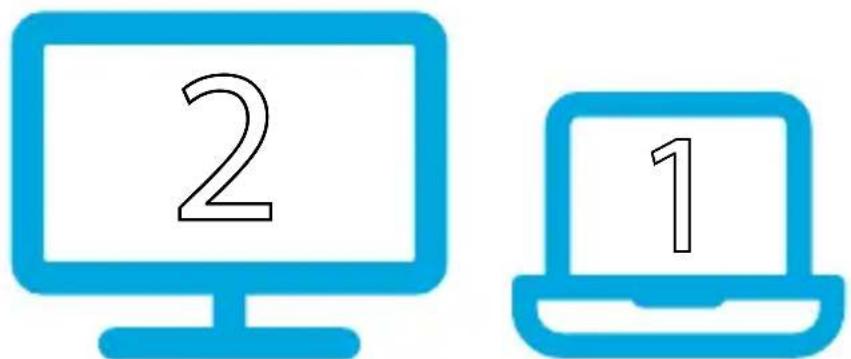
The number that is associated to each connected Display Device are now identified within Windows.
To view manuals, videos, drivers, downloads, technical drawings, and more visit www.StarTech.com/support
Configuring Display Devices for an Extended Windows Desktop
Extending the Windows Desktop provides users with the ability to expand their workspace across multiple monitors. The mouse cursor can edge-scroll between each monitor and use them as an extension of the primary monitor.
With extended desktops, users have more screen real estate to work with and can have different applications, documents, or windows open on each monitor. This makes it easier to multi-task, compare information, or work on multiple projects simultaneously.
To configure a Display Device as an extended Windows Desktop:
- Right-Click anywhere on the Windows Desktop and select Display Settings.
To view manuals, videos, drivers, downloads, technical drawings, and more visit www.StarTech.com/support
-
This will open the Windows Settings app to the Display tab. Below Select a display to change the settings for it, you will see a diagram representing the current monitor arrangement and the Display Number assigned to each monitor.
-
Click the Display Number that corresponds to the monitor that will be configured for Extended Windows Desktop. The selected monitor will become highlighted.
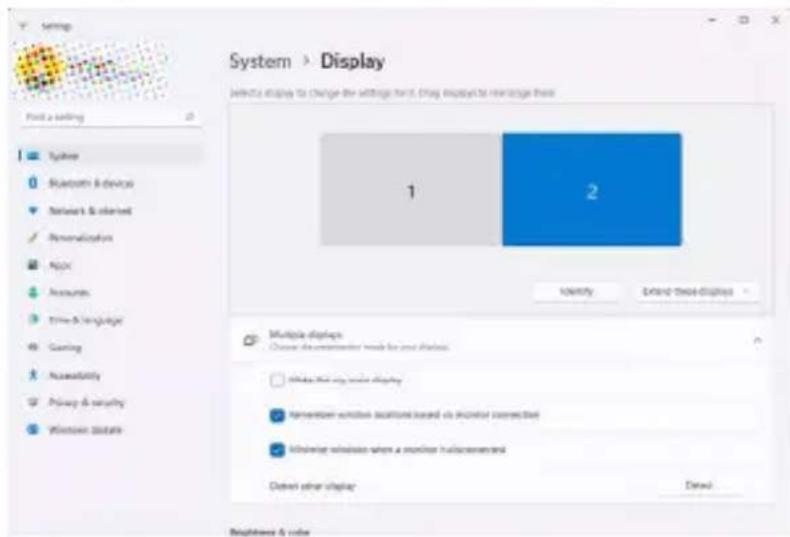
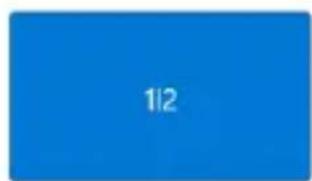
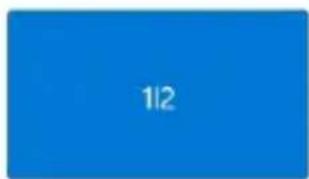
Note: It's possible that two numbers may appear within the same monitor block. This indicates that the monitors are currently configured for a mirror configuration. If the desired Display Number appears within the same monitor block as another number, simply select that monitor block which contains the desired Display Number.
To view manuals, videos, drivers, downloads, technical drawings, and more visit www.StarTech.com/support
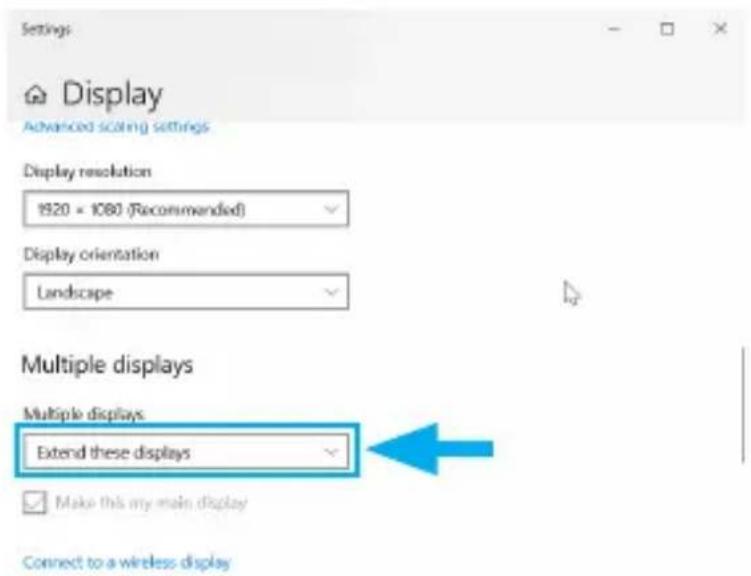
- Select the drop-down menu within the section below Select a display to change the settings for it and select Extend these displays.
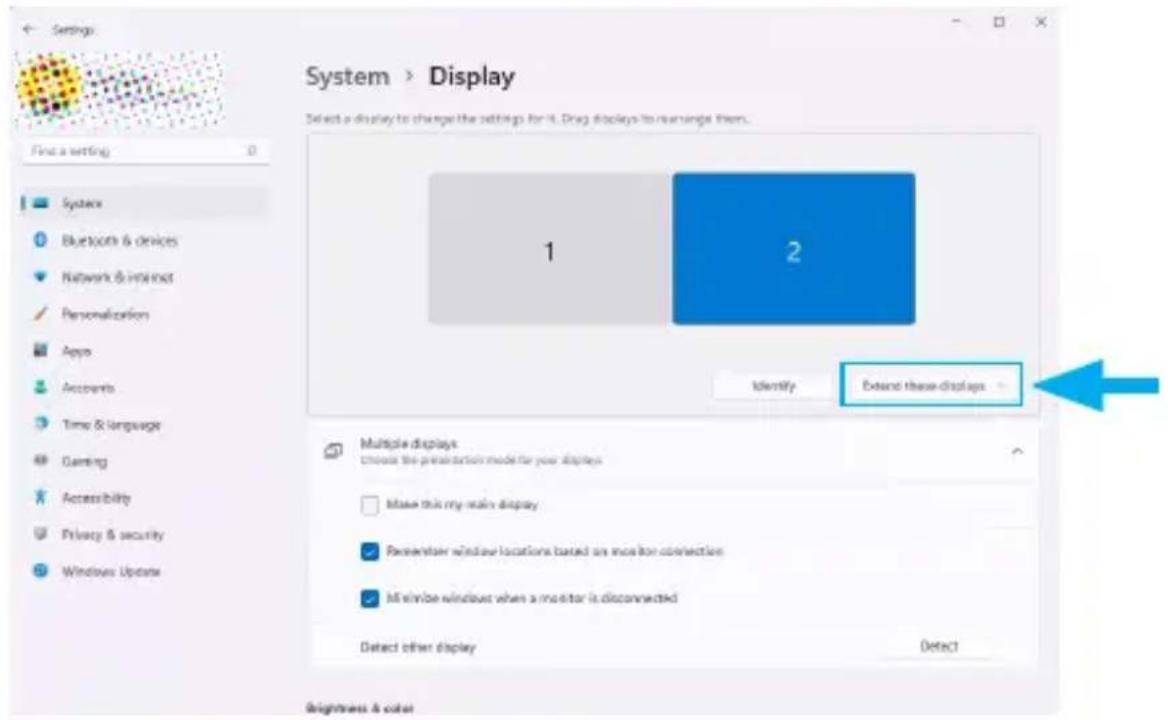
Note: In Windows 10, open Settings, and scroll down to Multiple Displays.
To view manuals, videos, drivers, downloads, technical drawings, and more visit www.StarTech.com/support
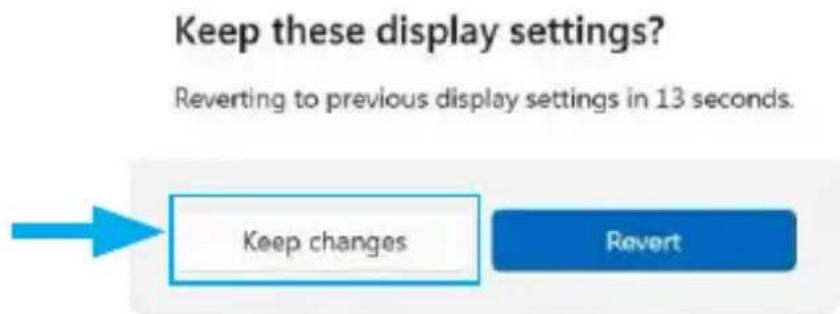
- The settings will apply and a notification will appear on the screen, with a timer requesting that the new settings be confirmed. To confirm the settings, click Keep changes before the timer expires.
Keep these display settings?
Reverting to previous display settings in 13 seconds.

flowchart
graph LR
    A["Keep changes"] --> B["Revert"]
The Display Device has now been configured as an extended Windows Desktop.
Arranging Display Devices in an Extended Windows Desktop
When Display Devices are configured for an Extended Windows Desktop, the mouse cursor can edge-scroll between each monitor, by moving the mouse off one screen and onto another.
In order for the cursor edge-scrolling function to be intuitive it's important that the Display Device arrangement in windows matches the physical arrangement of each monitor on the workstation.
To arrange Display Devices in Extended Windows Desktop:
- Right-Click anywhere on the Windows Desktop and select Display Settings.
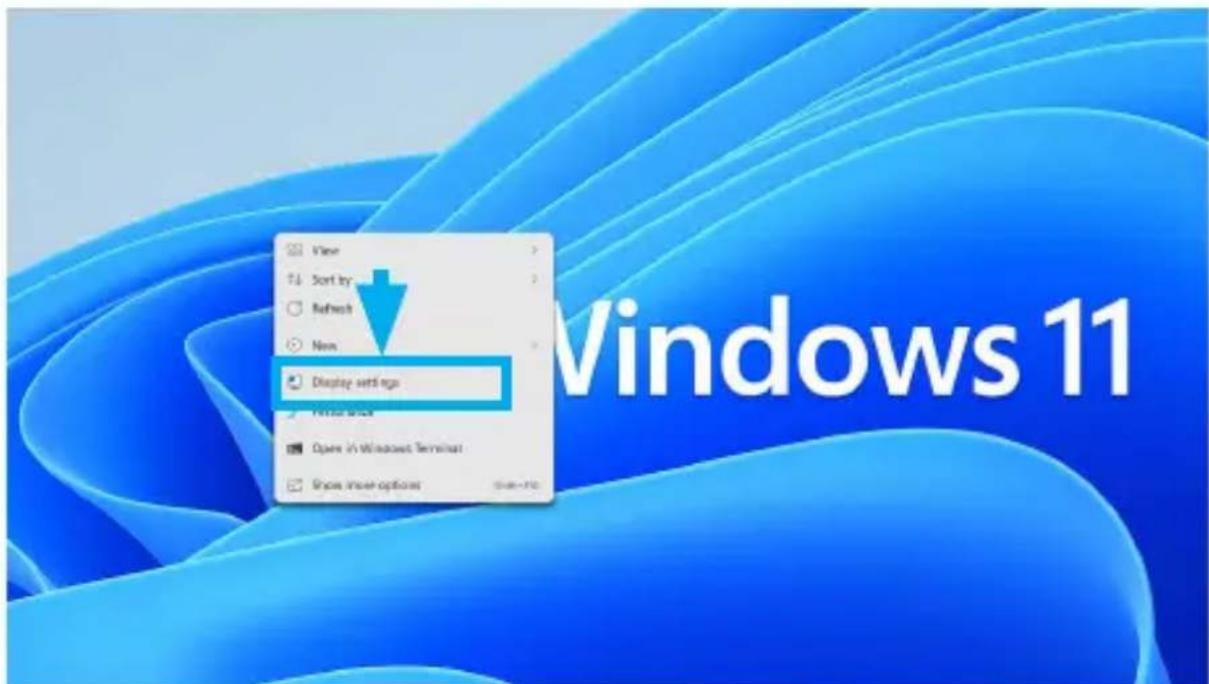
To view manuals, videos, drivers, downloads, technical drawings, and more visit www.StarTech.com/support
- This will open the Windows Settings app to the Display tab. Below Select a display to change the settings for it, you will see a diagram representing the current monitor arrangement and the Display Number assigned to each monitor.
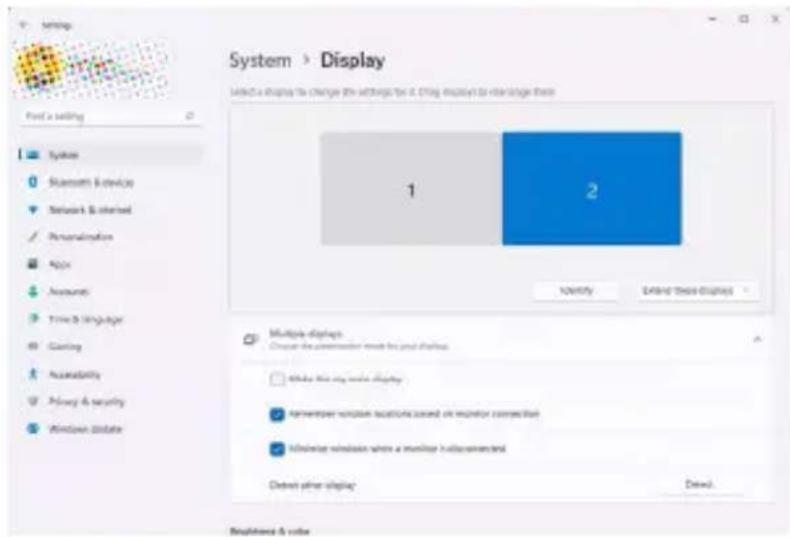
- Observe the physical location of the monitors as they're setup on the workstation.
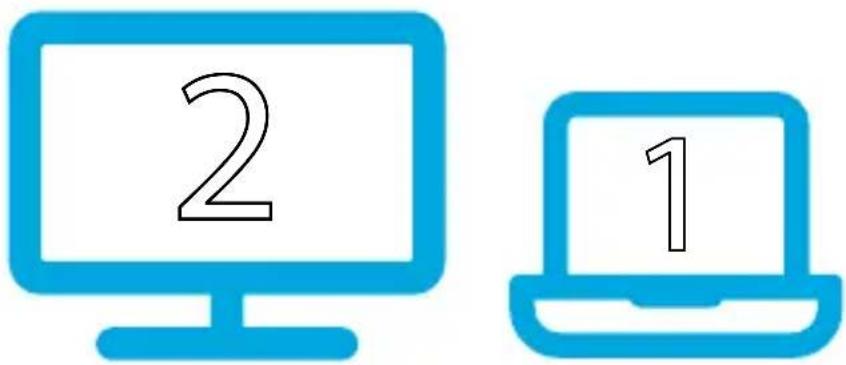
Note: You can click the Identify button to see which number corresponds to each physical display. See Identifying Display Devices Within Windows Display Settings (p.22) for more information.
To view manuals, videos, drivers, downloads, technical drawings, and more visit www.StarTech.com/support
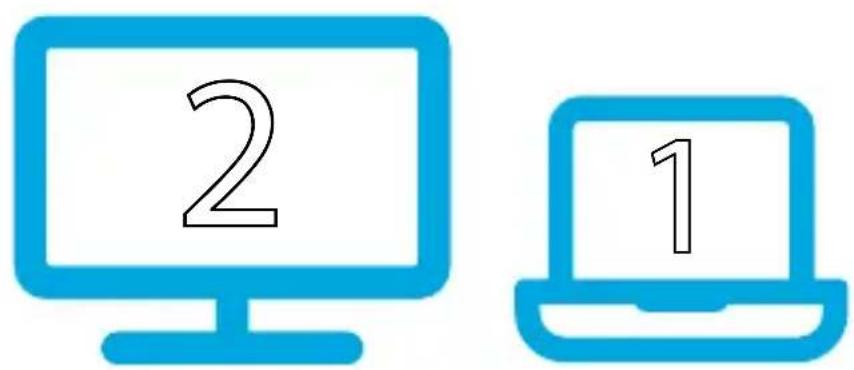
- Click and drag the Numbered Displays (within the Display tab of Windows Settings) so that the diagram matches the physical location of the monitors as they're setup on the workstation.
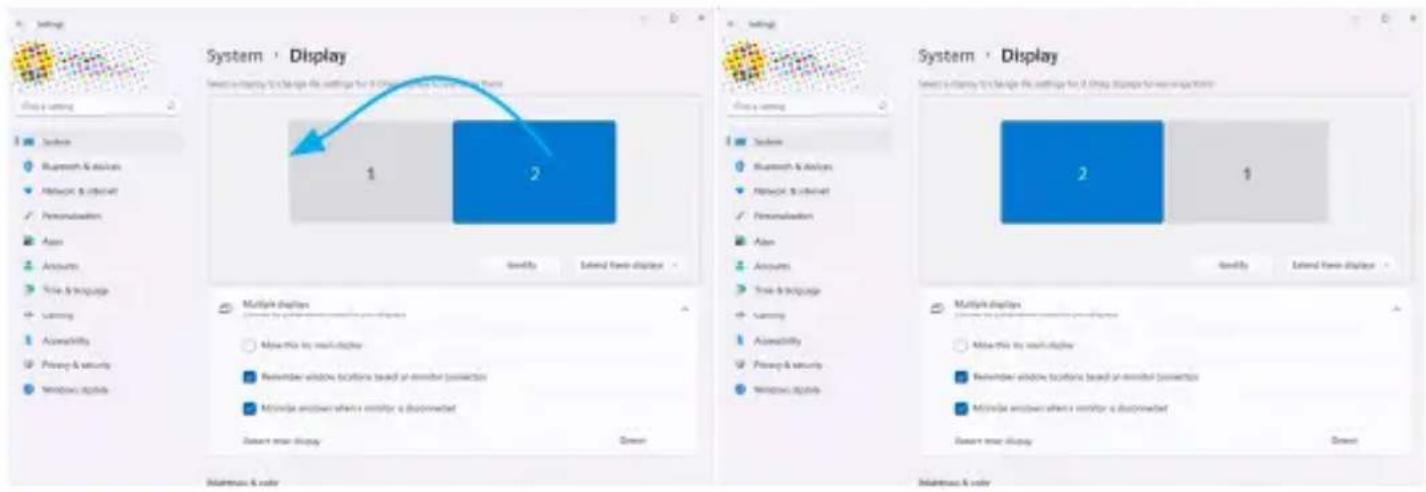
To view manuals, videos, drivers, downloads, technical drawings, and more visit www.StarTech.com/support
- Once the arrangement has changed, Apply and Cancel buttons will appear. Click the Apply button to implement the changes.
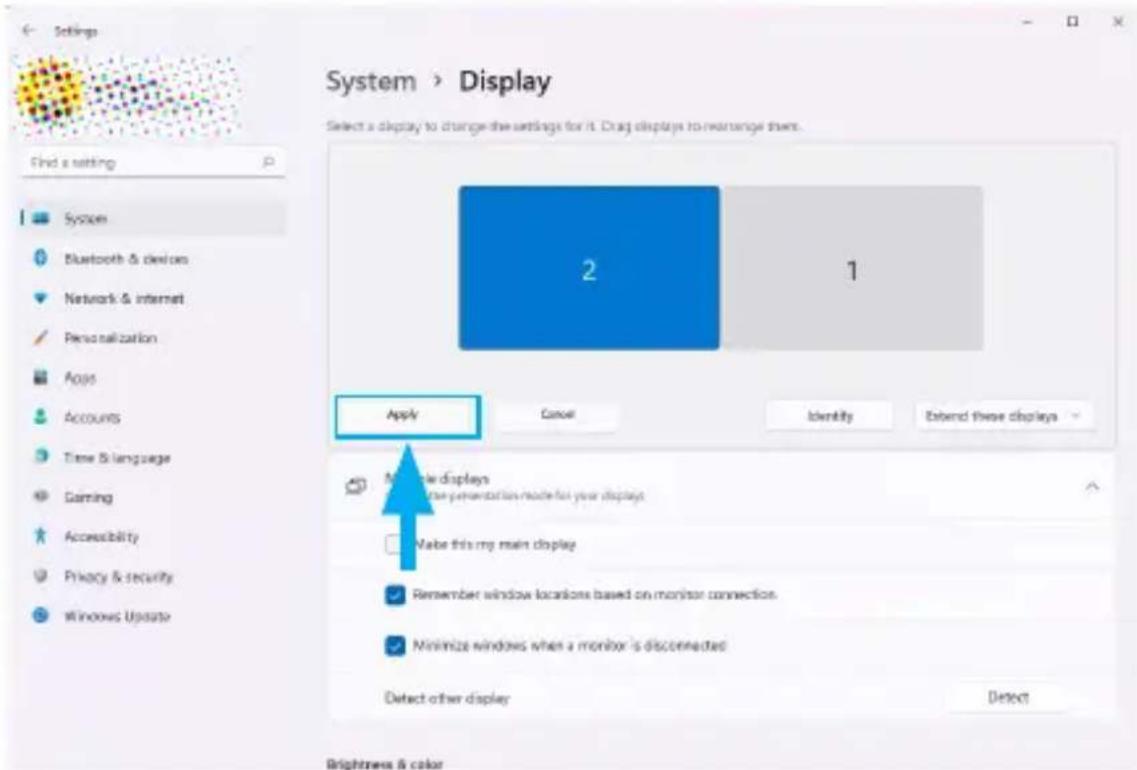
- The settings will apply and a notification will appear on the screen, with a timer requesting that the new settings be confirmed. To confirm the settings click Keep changes before the timer expires.
Keep these display settings?
Reverting to previous display settings in 13 seconds.

flowchart
graph LR
    A["Keep changes"] --> B["Revert"]
The Display Devices have now been arranged in Windows.
To view manuals, videos, drivers, downloads, technical drawings, and more visit www.StarTech.com/support
Rotate Display Devices in Windows
Rotating a Display Device in Windows enables users to change the screen orientation between horizontal (Landscape / Landscape (flipped)) and vertical (Portrait / Portrait (flipped)) to better suit a specific application. A horizontal orientation is ideal for most standard applications. However, rotating the display to a vertical orientation may be useful for tasks like reading lengthy documents or viewing images where a vertical orientation might be more suitable than the standard horizontal layout. Some specialized applications, such as graphic design or coding, might benefit from a vertical orientation to provide a larger workspace for certain tools or code lines.
To Rotate Display Devices in Windows:
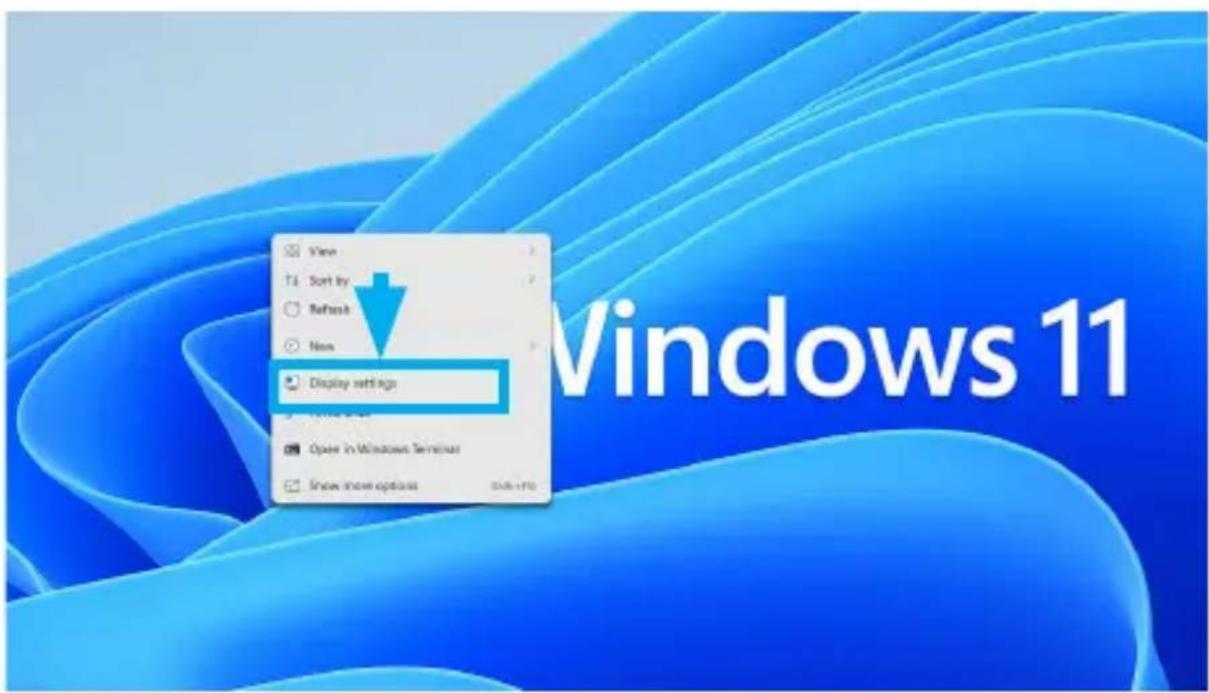
- Right-Click anywhere on the Windows Desktop and select Display Settings.
To view manuals, videos, drivers, downloads, technical drawings, and more visit www.StarTech.com/support
- This will open the Windows Settings app to the Display tab. Below Select a display to change the settings for it, you will see a diagram representing the current monitor arrangement and the Display Number assigned to each monitor.
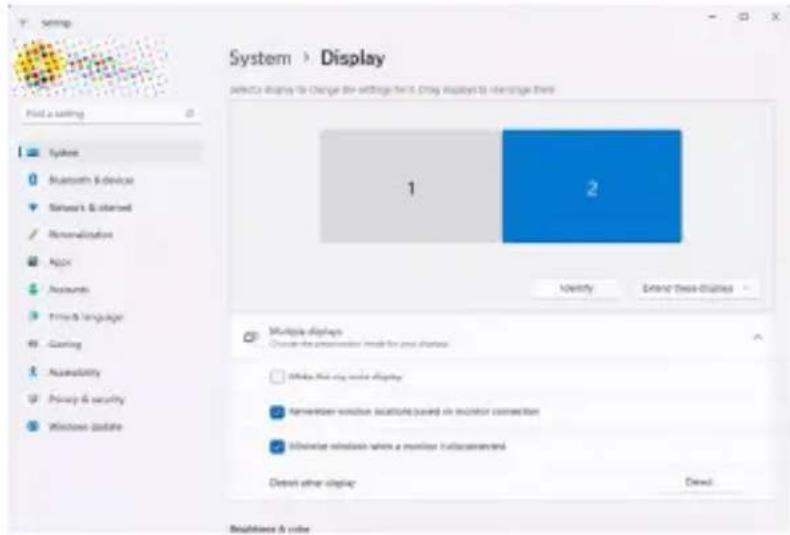
- Click the Display Number that corresponds to the monitor that will be rotated. The selected monitor will become highlighted.
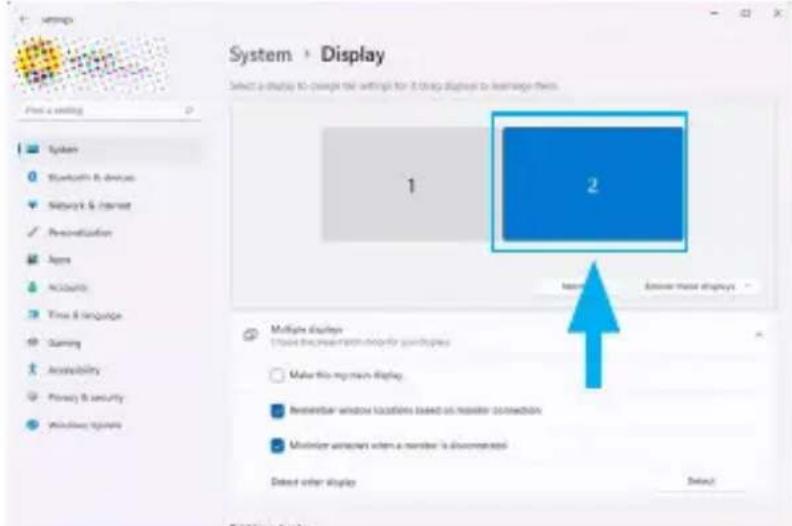
Note: Click the Identify button to see which number corresponds to each physical display. See Identifying Display Devices Within Windows Display Settings (p.22) for more information.
To view manuals, videos, drivers, downloads, technical drawings, and more visit www.StarTech.com/support
- Scroll down to the Scale & layout section, and select the Display Orientation drop-down menu.
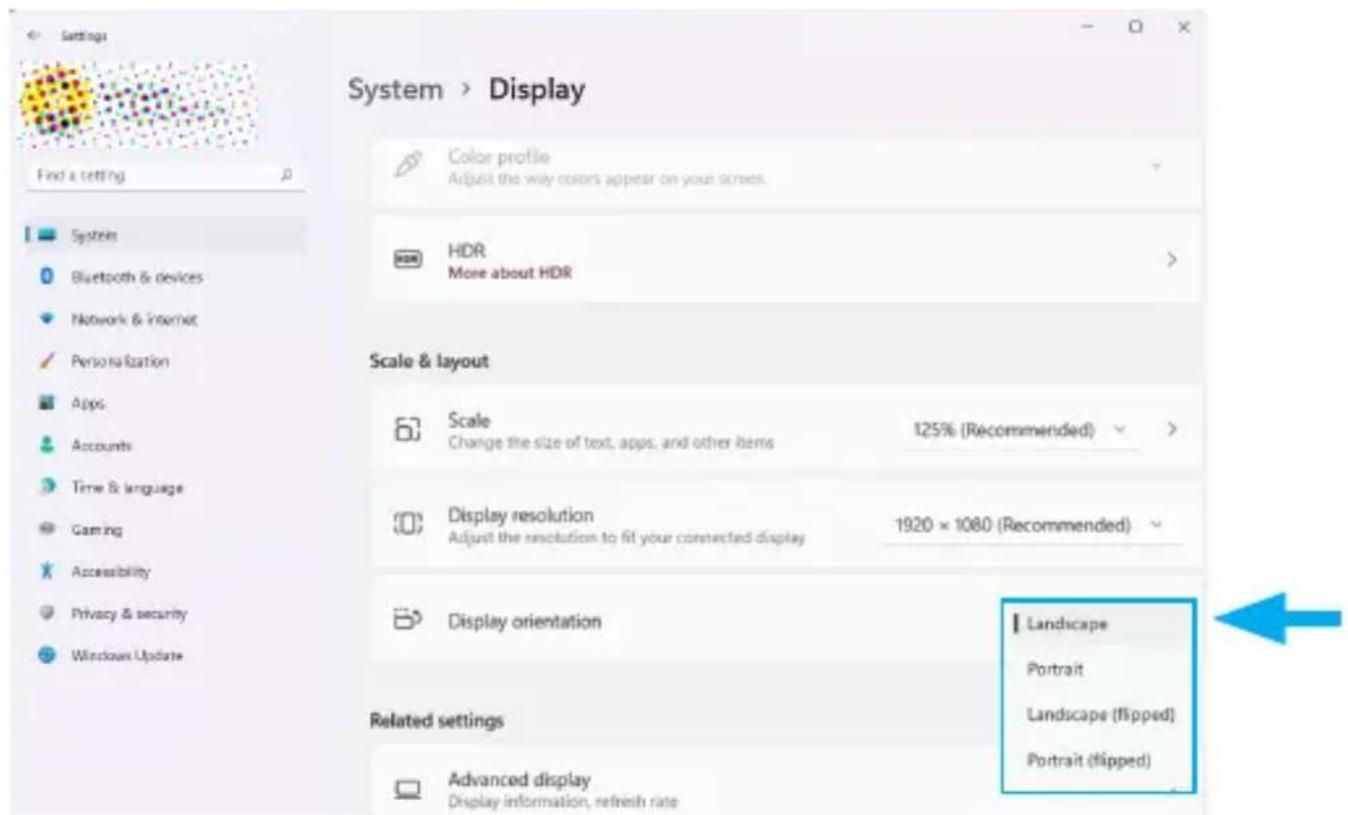
- Select the desired orientation. The settings will apply and a notification will appear on the screen, with a timer requesting that the new settings be confirmed. To confirm the settings click Keep changes before the timer expires.
flowchart
graph LR
    A["Keep changes"] --> B["Revert"]
The Display Device has now been rotated in Windows.
To view manuals, videos, drivers, downloads, technical drawings, and more visit www.StarTech.com/support
Duplicating Displays in Windows
Mirroring the Windows Desktop provides users with the ability to duplicate their screen onto another monitor or display.
With a Mirror Configuration, users can easily duplicate the content on screen to multiple displays for presentations or demonstrations. It allows the presenter to display their screen on a larger monitor or projector, ensuring that the audience can see exactly what is being shown on the presenter's screen.
To configure a Display Device for a Mirror Configuration:
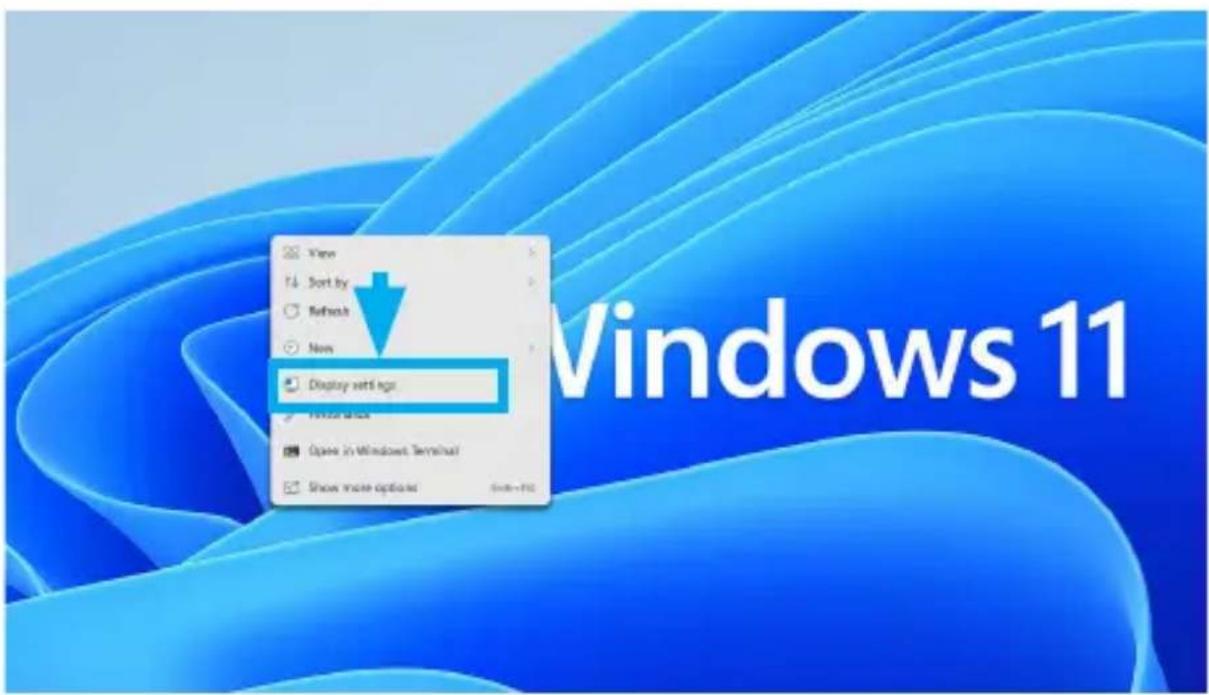
- Right-click anywhere on the Windows Desktop and select Display Settings.
- This will open the Windows Settings app to the Display tab. Below Select a display to change the settings for it, you will see a diagram representing the current monitor arrangement and the Display Number assigned to each monitor.
To view manuals, videos, drivers, downloads, technical drawings, and more visit www.StarTech.com/support
- Click the Display Number that corresponds to the monitor that will be configured for a Mirror Configuration. The selected monitor will become highlighted.
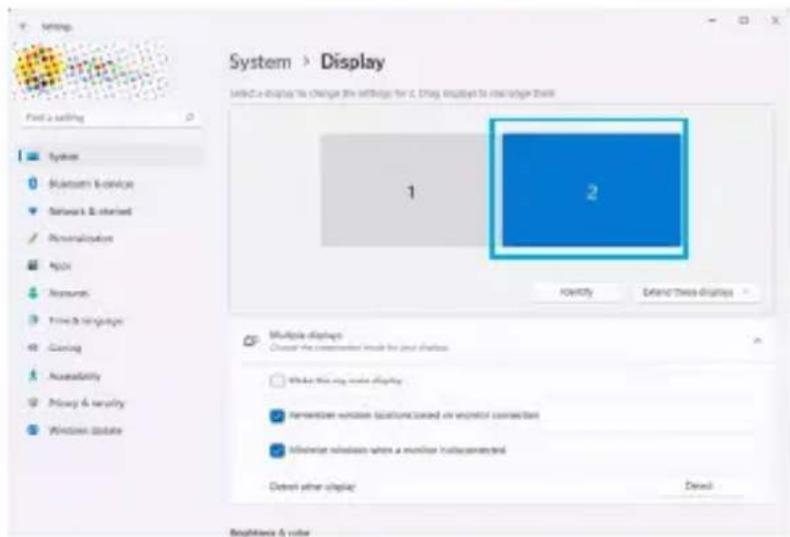
Note: It's possible that two numbers may appear within the same monitor block. This indicates that the monitors are currently already configured for a mirror configuration. However, it may not be in the desired mirror configuration. If the desired Display Number appears within the same monitor block as another number that's not the desired configuration, the monitors will need to be separated into an Extended Configuration. To separate the monitors into an Extended Configuration, follow the steps outlined in the Configuring Display Devices for an Extended Windows Desktop (p.25) section of this manual.
To view manuals, videos, drivers, downloads, technical drawings, and more visit www.StarTech.com/support
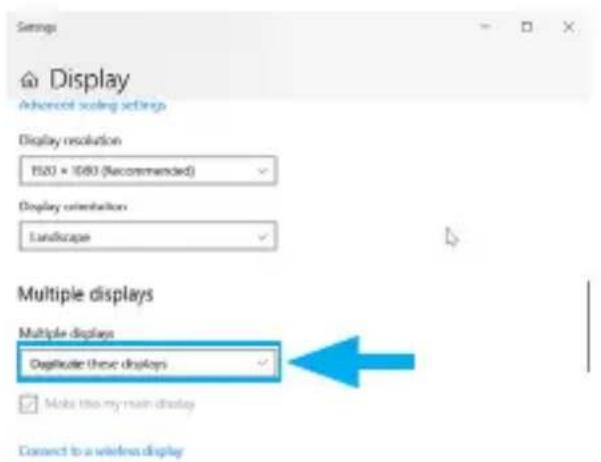
- Select the drop-down menu within the section below Select a display to change the settings for it and select Duplicate these displays.
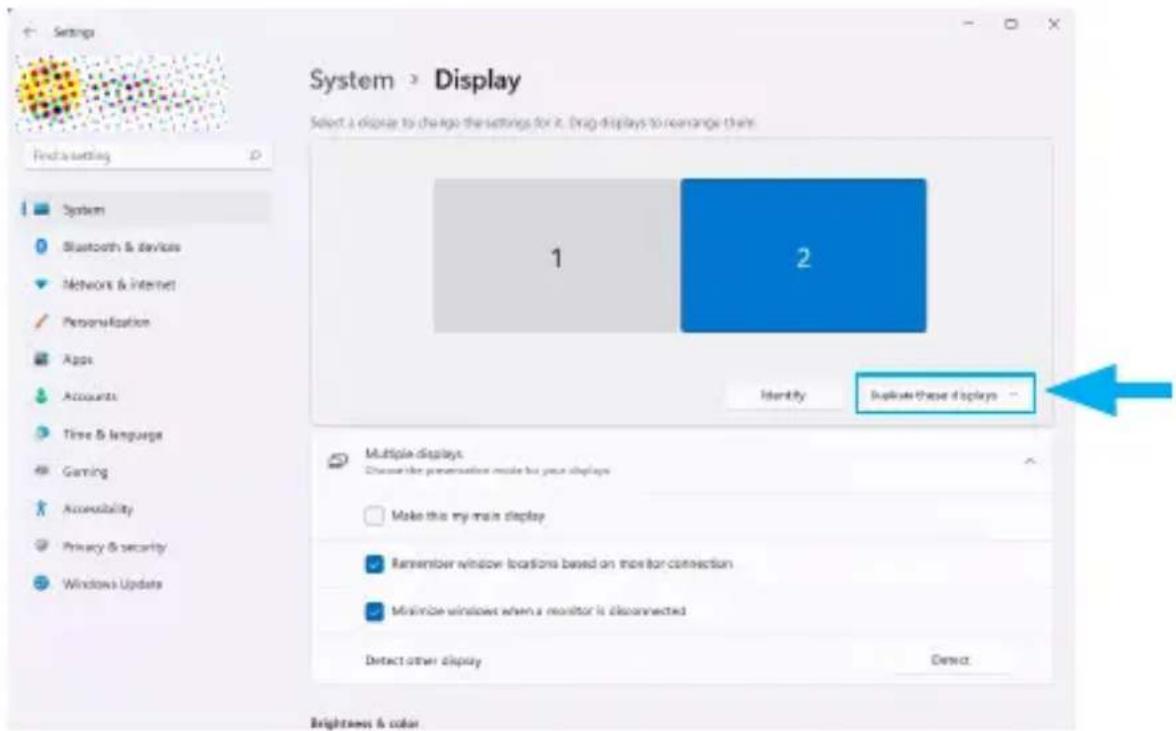
Note: On Windows 10 and earlier versions, it will be necessary to scroll to a lower location within the Display tab of the Windows Settings app, to a section called Multiple Displays to access the drop down menu. However, the remaining steps are the same.
To view manuals, videos, drivers, downloads, technical drawings, and more visit www.StarTech.com/support
- The settings will apply and a notification will appear on the screen, with a timer requesting that the new settings be confirmed. To confirm the settings, click Keep changes before the timer expires.
Keep these display settings?
Reverting to previous display settings in 13 seconds.

flowchart
graph LR
    A["Keep changes"] --> B["Revert"]
The Display Device has now been configured for a Mirror Configuration.
Configuring Resolution for Display Devices in Windows
The output resolution for the Display Devices connected via the USB Video Adapter can be adjusted within Windows.
To configure resolution for Display Devices in Windows:
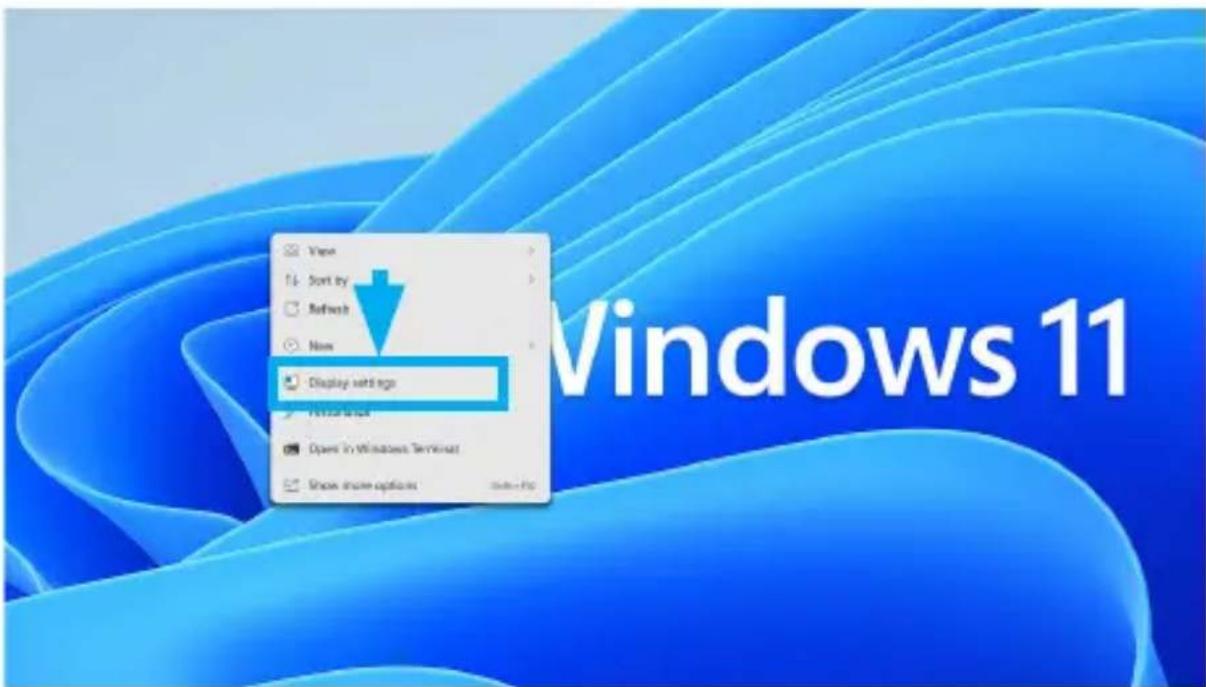
- Right-click anywhere on the Windows Desktop and select Display Settings.
- This will open the Windows Settings app to the Display tab. Below Select a display to change the settings for it, you will see a diagram representing the current monitor arrangement and the Display Number assigned to each monitor.
To view manuals, videos, drivers, downloads, technical drawings, and more visit www.StarTech.com/support
- Click the Display Number that corresponds to the monitor that will be configured for a Mirror Configuration. The selected monitor will become highlighted.
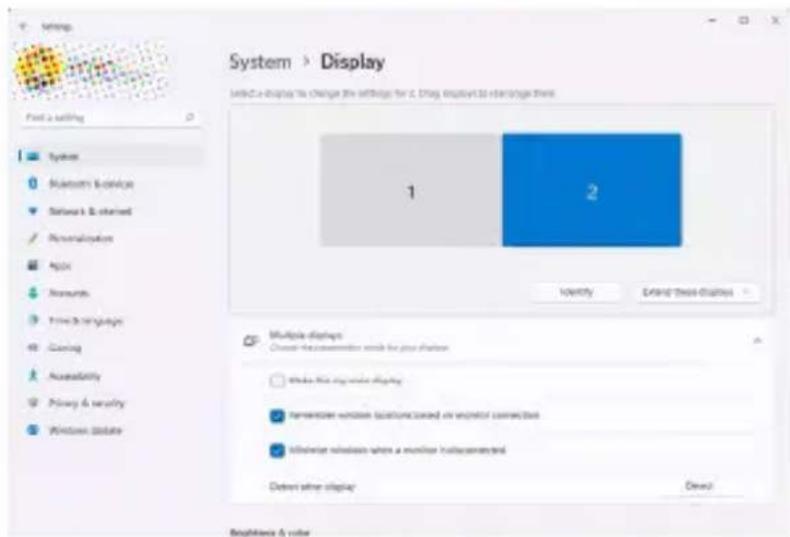
Note: You can click the Identify button to see which number corresponds to each physical display. See Identifying Display Devices Within Windows Display Settings (p.22) for more information.
To view manuals, videos, drivers, downloads, technical drawings, and more visit www.StarTech.com/support
- Scroll down the screen to the Scale & Layout section and click the drop down menu titled Display Resolution, and select the desired resolution.
Note: Only resolutions supported by the Display Device, or USB Display Adapter will be available.
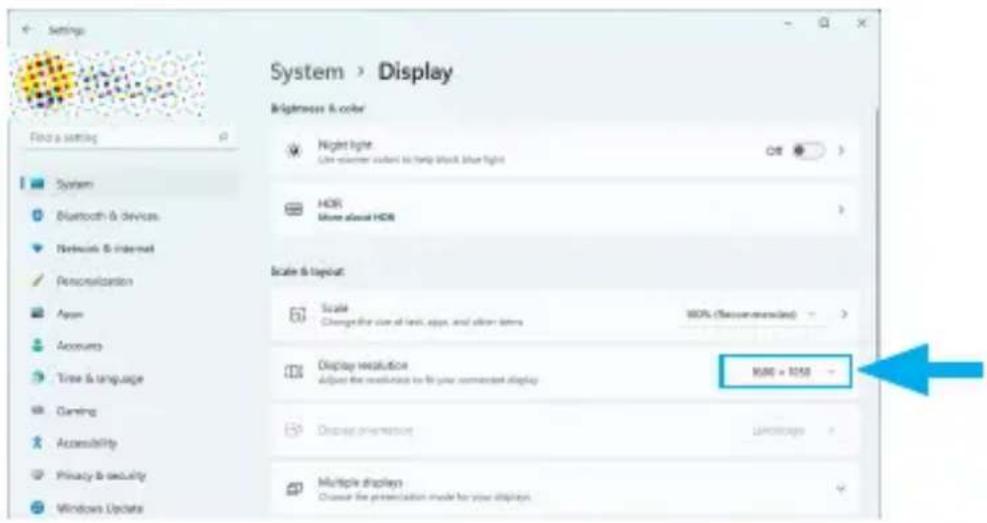
- The settings will apply and a notification will appear on the screen, with a timer requesting that the new settings be confirmed. To confirm the settings click Keep changes before the timer expires.
Keep these display settings?
Reverting to previous display settings in 13 seconds.

flowchart
graph LR
    A["Keep changes"] --> B["Revert"]
The Display Device has now been configured to the desired resolution.
To view manuals, videos, drivers, downloads, technical drawings, and more visit www.StarTech.com/support
Audio Configuration
The HDMI output port on this product features an audio controller to output audio via the HDMI output.
Selecting a Playback Device in Windows
Once the USB Display Adapter has been installed on a Host Computer, Windows will recognize it's audio controller as a playback device, which will give the Host Computer the ability to output audio via the HDMI output on the USB Display Adapter. The audio controller on the USB Display Adapter is separate and distinct from other audio controllers installed on the computer (such as the Host Computer's onboard audio controller), and Windows can only designate one controller at a time as it's active playback device.
To Select an Audio Controller as a playback device in Windows:
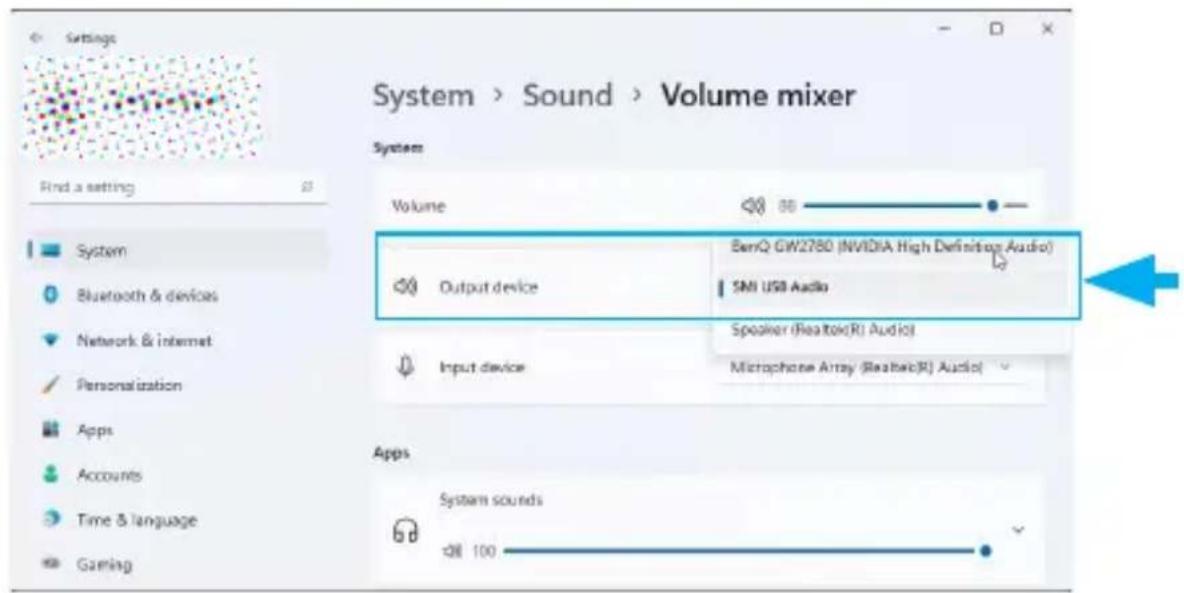
- Right-click on the Volume icon in the quick settings panel and select Open Volume Mixer.
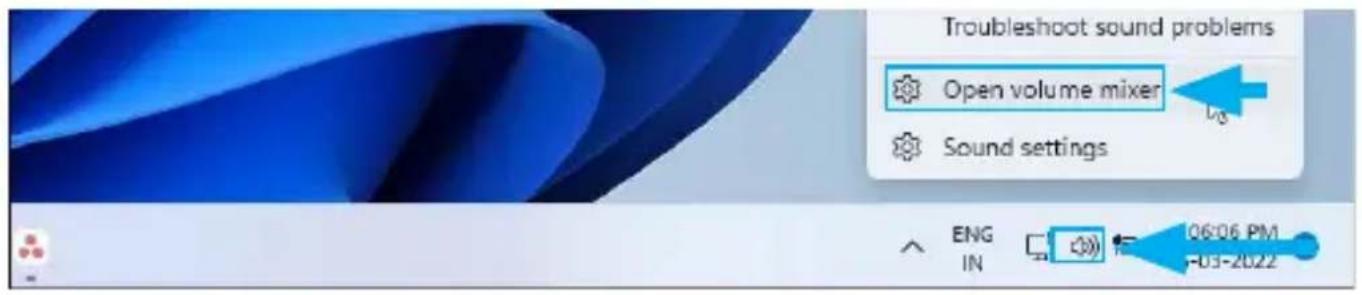
- This will open the Windows Settings app to the Sound and Volume mixer tabs. Click the drop menu titled Output Device, and select the desired audio output device.
The selected Audio Controller is now set as the active playback device.
To view manuals, videos, drivers, downloads, technical drawings, and more visit www.StarTech.com/support
Windows Troubleshooting
This section of the manual aims to provide a comprehensive troubleshooting guide for this USB Display Adapter when connected to a Windows computer. The purpose is to assist users in resolving common issues that may occur during operation. The guide will present solutions to address common issues. Each solution will be clearly outlined to ensure a straightforward troubleshooting process.
To view manuals, videos, drivers, downloads, technical drawings, and more visit www.StarTech.com/support
Setup Notes & Recommendations:
- Use short HDMI cables as much as possible (5m/15ft or shorter). Longer HDMI cables or HDMI extenders can be used but results may vary.
- This device provides video output only, and cannot be used to input or capture video to the Host Computer.
- USB Display Adapters require an existing video card or integrated graphics chip from Intel, AMD, or NVIDIA. A WDDM (Windows Display Driver Model) compatible driver must already be installed prior to installing the driver for this product. Most computers from 2007 or newer will meet this requirement.
- Make sure any outstanding Windows updates are installed to ensure the Host Computer is running the most up-to-date version of Windows.
- The following only applies to computers running Windows 8.1 and earlier operating systems. The software from other USB display adapters, and some laptop docking stations, can interfere with the installation and operation of this USB Display Adapter. It's recommended that software from DisplayLink/Synaptics, Trigger, and Fresco Logic be removed prior to installing the driver for this product.
- It's recommended that all available onboard video output ports are exhausted before adding a USB Display Adapter.
- This device will work at 4K if connected to a USB 2.0 port but expect the video performance to be poor due to the lower bandwidth of USB 2.0.
• Night Light is not supported.
To view manuals, videos, drivers, downloads, technical drawings, and more visit www.StarTech.com/support
The Driver Will Not Install
This issue typically indicates that the user is not an administrator on the computer.
To resolve this issue:
- Make sure the SMIUSBDisplaySW(.exe) file has been extracted before running the application.
- Verify that the active user account has administrator privileges.
The USB Display Adapter Does Not Output Video
This issue typically indicates that the computer cannot access the device, or the driver for the USB Display Adapter is not fully installed.
To resolve this issue:
- Please review the Setup Notes and Recommendations (p.46) within this troubleshooting section, and ensure all criteria outlined has been action on the Host Computer.
- Unplug the USB adapter from the computer and reconnect it, using a different USB port.
- Re-install the driver by following the steps outlined in the Manual Driver Installation (p.6) instructions of this manual.
To view manuals, videos, drivers, downloads, technical drawings, and more visit www.StarTech.com/support
Video Performance is Slow Compared to Other Displays
This issue typically indicates that there is not enough bandwidth available for the USB Display Adapter to perform optimally, or that the application requires greater resources than the USB Display Adapter can support.
To resolve this issue:
-
Ensure that the USB port, that the USB Display Adapter is connected to, supports 5Gbps or faster. USB 480Mbps (USB 2.0) ports do not supply enough bandwidth for the USB Display Adapter to achieve full performance.
-
Make sure the latest driver for the product is installed.
Notes:
- Some applications (ex. AutoCAD, or other 3D design software) will not function properly when used on a USB connected display. These applications should be used on displays connected to the computer's video card or its onboard video outputs.
- The Host Computer may be at it's performance capacity. Testing the USB Display Adapter on a more powerful computer can confirm this.
The HDMI Output on the USB Display Adapter Does Not Output Audio
This issue typically indicates that the Audio Controller on the USB Display Adapter is not set as the active playback device in Windows.
To resolve this issue:
Follow the Steps outlined in the Selecting a Playback Device in Windows (p.43) instructions of this manual.
The USB Adapter Does Not Play Content From a Streaming Service, Blu-ray Disc or Other Media.
This issue typically indicates that the content playing is encrypted with High-bandwidth Digital Content Protection (HDCP). This USB Video Adapter does not fully support HDCP. As a result, some protected content will playback at lower quality while other content may not play at all. Similar products from other manufacturers will also have this limitation.
To resolve this issue:
It's recommend that the protected content be viewed on displays connected to the computer's video card or its onboard video outputs.
To view manuals, videos, drivers, downloads, technical drawings, and more visit www.StarTech.com/support
The USB Display Adapter Will Not Work with an Adapter Cable That's Connected to it
Many DisplayPort to HDMI (or VGA) cables only work in one direction and will not work with this USB Display Adapter
To resolve this issue:
Check that the adapter cable is designed to work from an HDMI video source to a DisplayPort or VGA display
The USB Display Adapter Does Not Capture a Video Input
This device provides video output only, and cannot be used to input or capture video to the Host Computer.
To resolve this issue:
Use a dedicated USB Capture Device such as the StarTech.com USB3HDCAP.
macOS Operation
This section of the manual outlines the full array of macOS configuration options associated to the USB Display Adapter.
Display Configuration
Once the USB Display Adapter has been installed on the Host Computer running macOS the Display Device(s) will operate within macOS the same as a Display Device connected directly to the Host Computer's Graphics Controller.
Configuring Display Devices for a Mirror Configuration within macOS
Mirroring the macOS Desktop provides users with the ability to duplicate their screen onto another monitor or display.
With a Mirror Configuration, users can easily duplicate the content on screen to multiple displays for presentations or demonstrations. It allows the presenter to display their screen on a larger monitor or projector, ensuring that the audience can see exactly what is being shown on the presenter's screen.
To configure a Display Device for a Mirror Configuration:
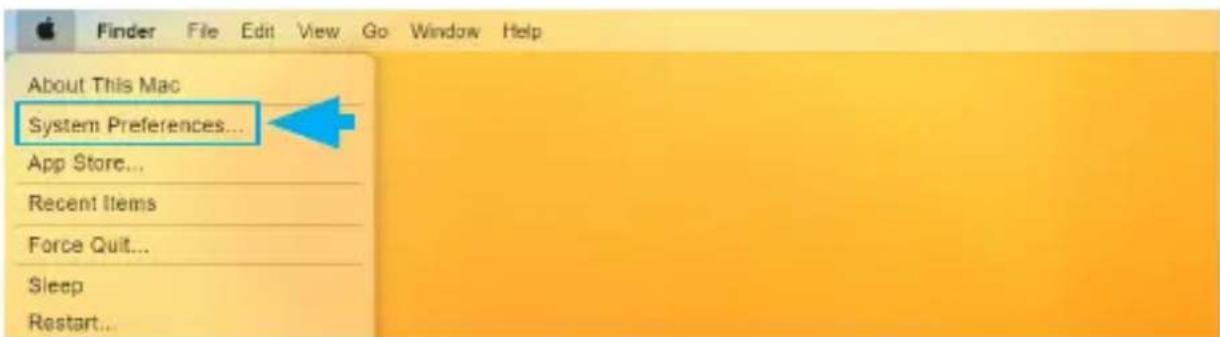
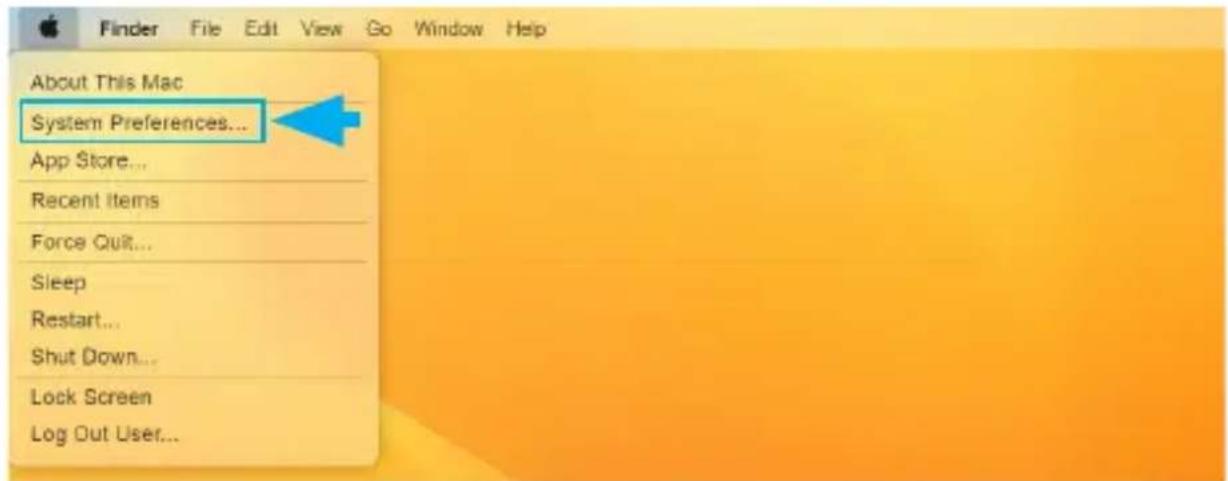
- Click on the Apple menu in the top-left corner of the screen and select System Preferences.
To view manuals, videos, drivers, downloads, technical drawings, and more visit www.StarTech.com/support
- This will open the macOS System Preferences Window. Click the Displays icon.
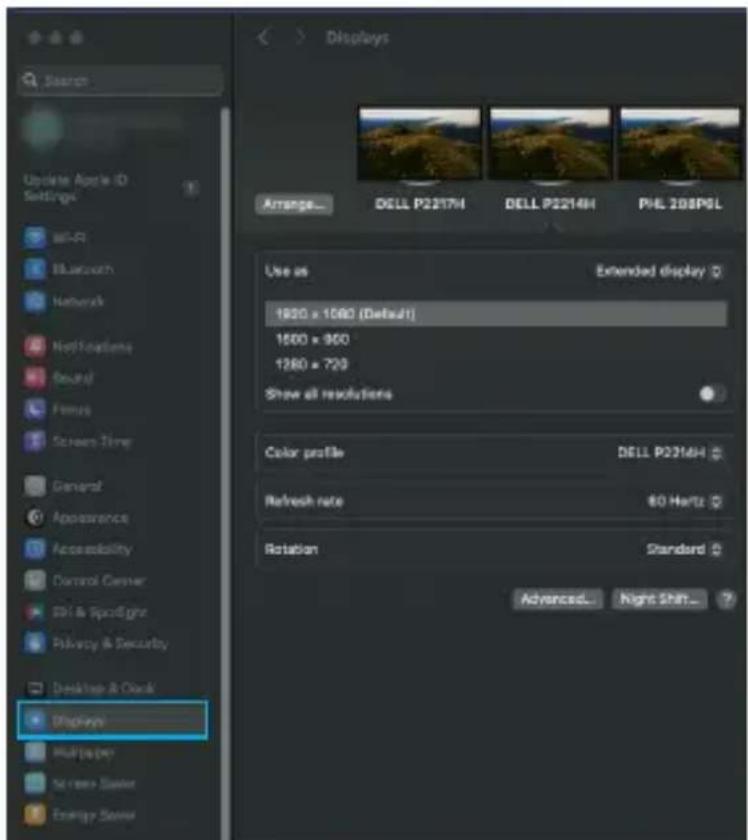
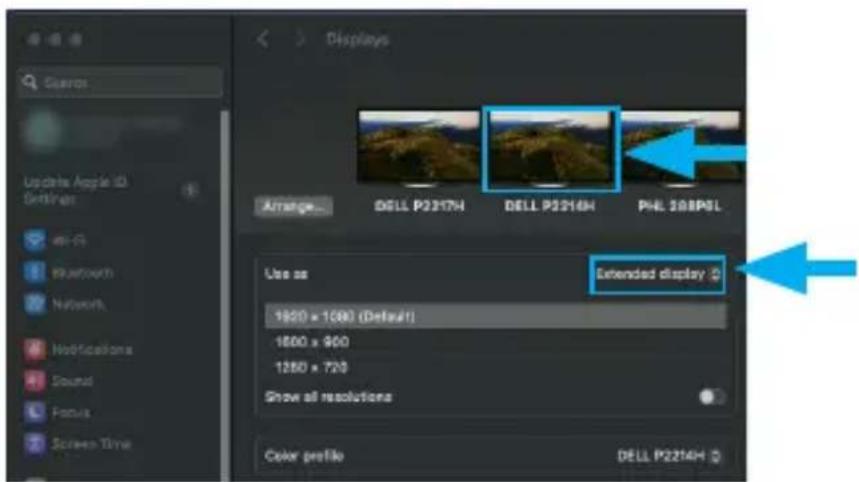
- This will open the macOS Display pane. Click the display you'd like to mirror, and select the Use as drop down menu.
To view manuals, videos, drivers, downloads, technical drawings, and more visit www.StarTech.com/support
- The Use as drop down menu will be opened. Click the Mirror for... from the drop down menu, selecting the monitor that corresponds to the monitors you'd like to
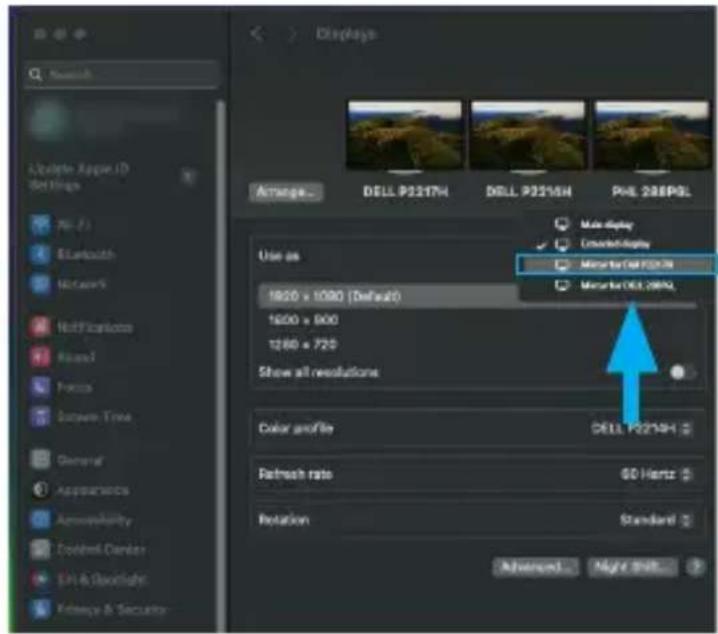
The Display Device has now been configured in a mirrored configuration.
To view manuals, videos, drivers, downloads, technical drawings, and more visit www.StarTech.com/support
Configuring Display Devices for an Extended macOS Desktop
Extending the macOS Desktop provides users with the ability to expand their workspace across multiple monitors. The mouse cursor can edge-scroll between each monitor and use them as an extension of the primary monitor.
With extended desktops, users have more screen real estate to work with and can have different applications, documents, or windows open on each monitor. This makes it easier to multi-task, compare information, or work on multiple projects simultaneously.
To configure display devices for an extended macOS desktop:
- Click on the Apple menu in the top-left corner of the screen and select System Preferences.
To view manuals, videos, drivers, downloads, technical drawings, and more visit www.StarTech.com/support
- This will open the macOS System Preferences Window. Click the Displays icon.
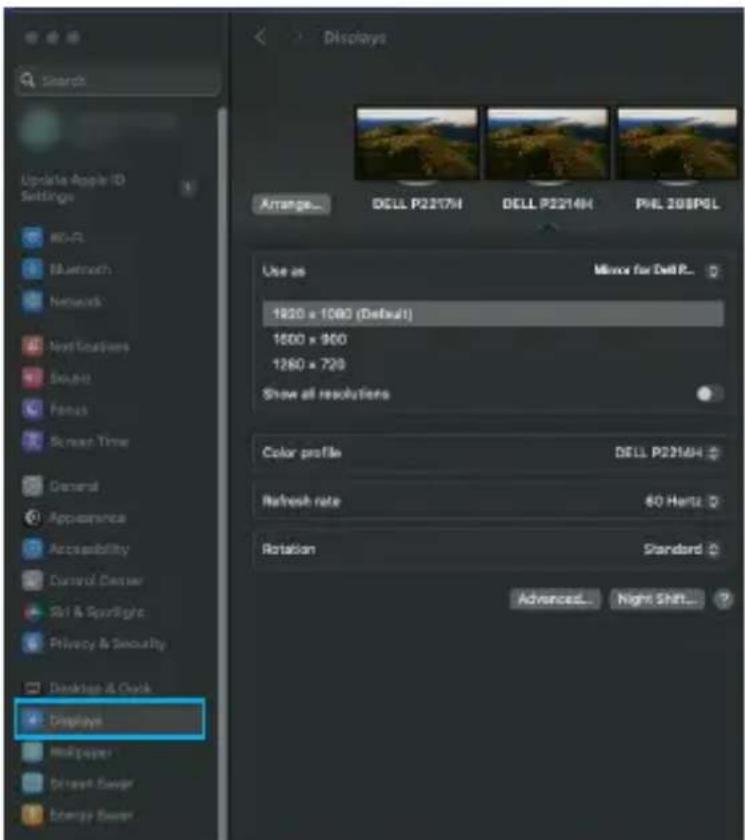
- This will open the macOS Display pane. Click the display you'd like to extend, and select the Use as drop down menu.
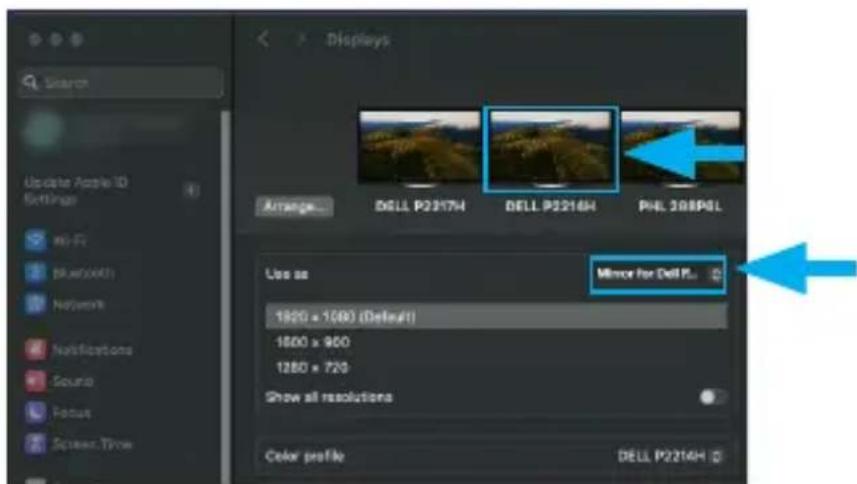
To view manuals, videos, drivers, downloads, technical drawings, and more visit www.StarTech.com/support
- The Use as drop down menu will be opened. Click the Extended display from the drop down menu.
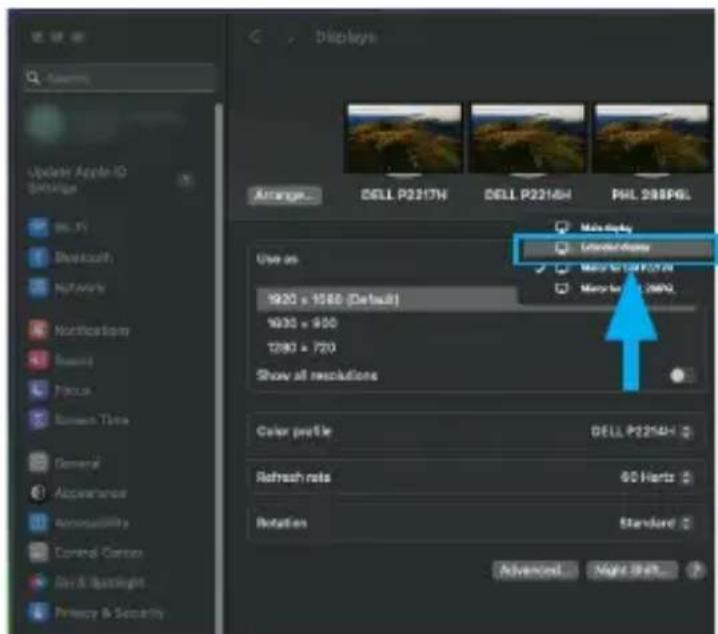
The Display Device has now been configured as an extended macOS Desktop.
To view manuals, videos, drivers, downloads, technical drawings, and more visit www.StarTech.com/support
Identifying Display Devices in an Extended macOS Desktop
macOS features a visualization on the Arrangement tab with the Displays pane of macOS System Preferences. This visualization enables users to identify and differentiate each connected monitor.
It is useful to understand the order and arrangement of each connected monitor, especially when multiple Display Devices are connected to the Host Computer.
To identify display devices in an extended macOS desktop:
- Click on the Apple menu in the top-left corner of the screen and select System Preferences.
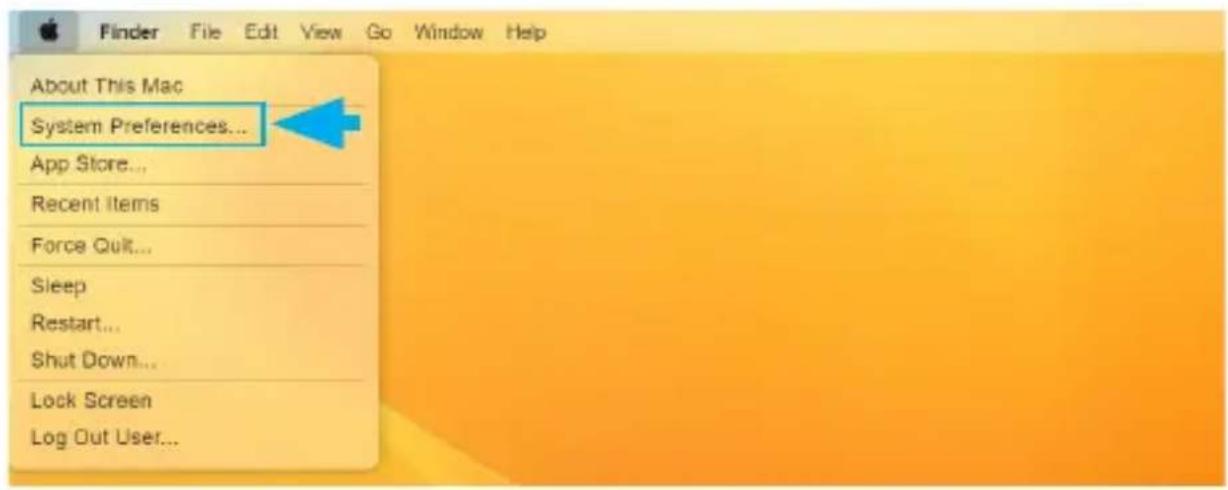
To view manuals, videos, drivers, downloads, technical drawings, and more visit www.StarTech.com/support
- This will open the macOS System Preferences Window. Click the Displays icon.
![Update Apple ID Settings 80-75 Bluetooth Network Next Locations Outdoor Focus Screen Time Demand Appearance Accessibility Control Center RS1 & Spotlight Privacy & Security Desktop & Data Displays Multi-panel Screen Save Energy Save Arrange... DELL P2217H DELL P2214H PHL 200PGL Use as Extended display 1930 x 1080 [Default] 1630 x 900 1290 x 720 Show all resolutions Color profile DELL P2214H Refresh rate 60 Hertz Rotation Standard Advanced... Night Shift...](/content/2026/05/911991/images/371cd804e09893779ac6b0bd6b41829d380bf19cf0b5e428ec78a7a7a03cd042.jpg)
- This will open the macOS Display pane. Click the Arrangement tab.
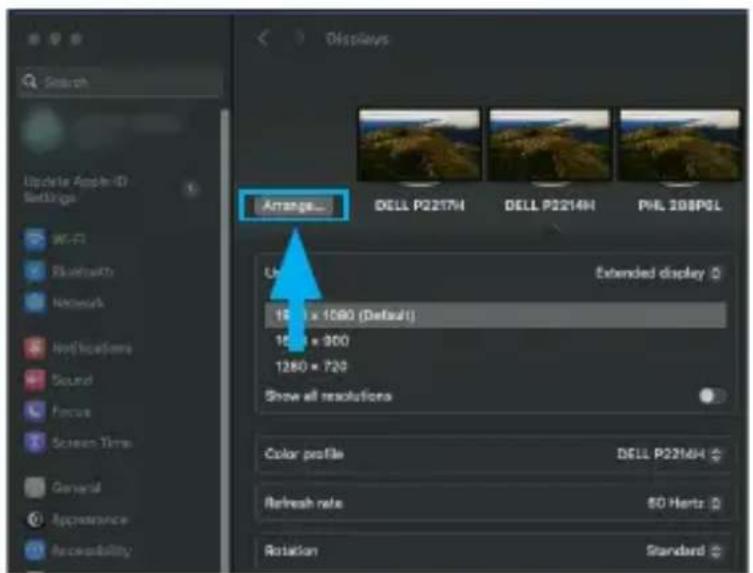
To view manuals, videos, drivers, downloads, technical drawings, and more visit www.StarTech.com/support
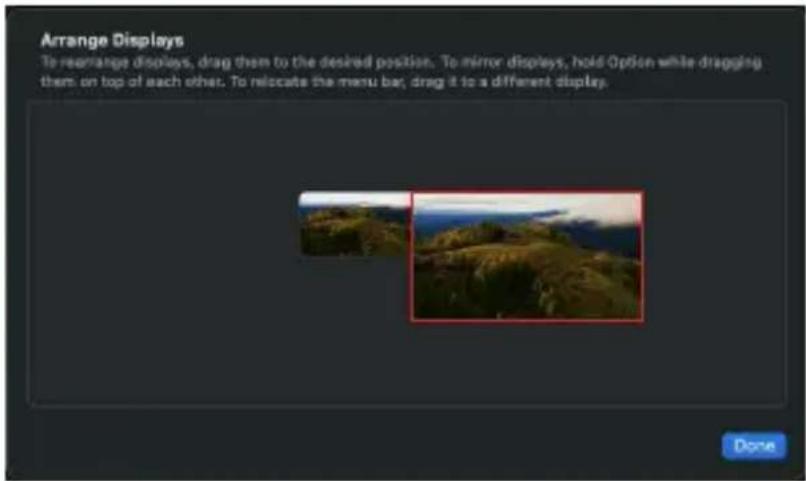
- A diagram will be displayed representing the current monitor arrangement, and each display will be represented by a rectangle. macOS will identify the primary display with a white menu bar at the top of the rectangle.
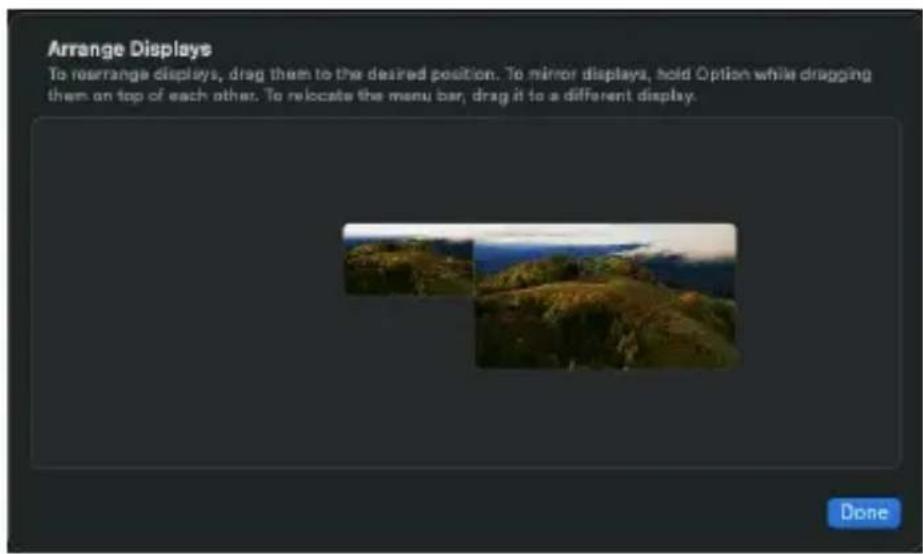
To view manuals, videos, drivers, downloads, technical drawings, and more visit www.StarTech.com/support
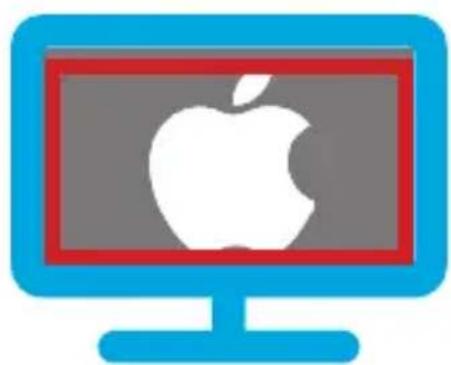
- Click and drag each of the rectangles (within the Arrangement tab). As you drag a display, you'll notice that a red-box visualization will appear on both the physical screen of the monitor that's being adjusted, and the rectangle being dragged.
natural_image
Apple logo displayed on a computer monitor screen (no text or symbols beyond the graphic)
natural_image
Blue icon of a laptop displaying the Apple logo (no text or symbols)The red-box visualization can be used to identify each display in an extended macOS Desktop.
To view manuals, videos, drivers, downloads, technical drawings, and more visit www.StarTech.com/support
Arranging Display Devices in an Extended macOS Desktop
When Display Devices are configured for an Extended macOS Desktop, the mouse cursor can edge-scroll between each monitor, by moving the mouse off one screen and onto another.
In order for the cursor edge-scrolling function to be intuitive it's important that the Display Device arrangement in macOS matches the physical arrangement of each monitor on the workstation.
To arrange display devices in an extended macOS desktop:
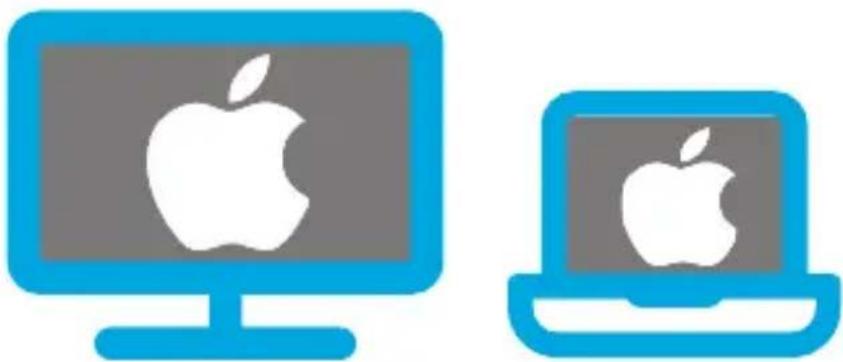
- Observe the physical location of the monitors as they're setup on the workstation.
natural_image
Two blue computer monitors, one with an Apple logo and the other with an Apple logo (no text or symbols on screens)- Click on the Apple menu in the top-left corner of the screen and select System Preferences.
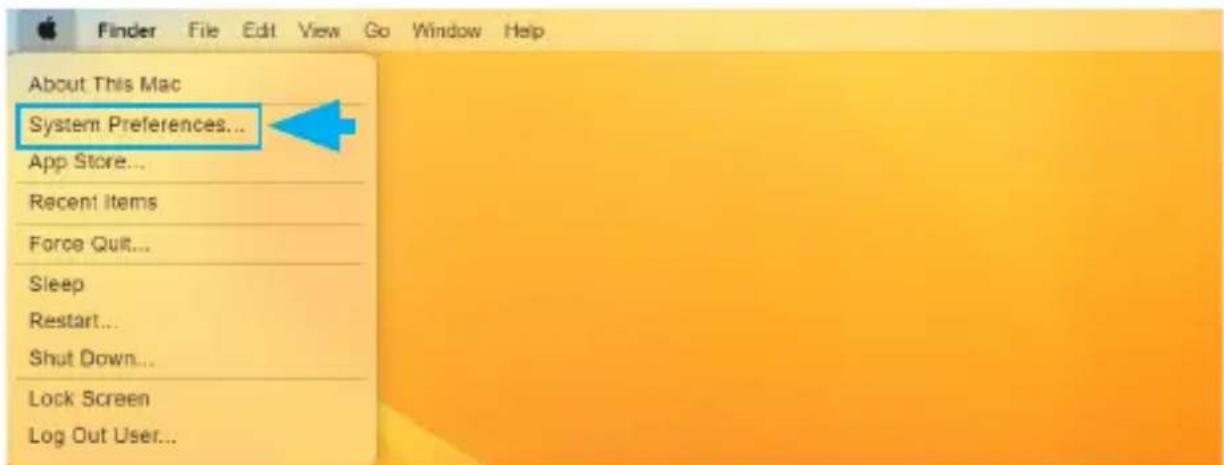
To view manuals, videos, drivers, downloads, technical drawings, and more visit www.StarTech.com/support
- This will open the macOS System Preferences Window. Click the Displays icon followed by the Arrangement Tab.
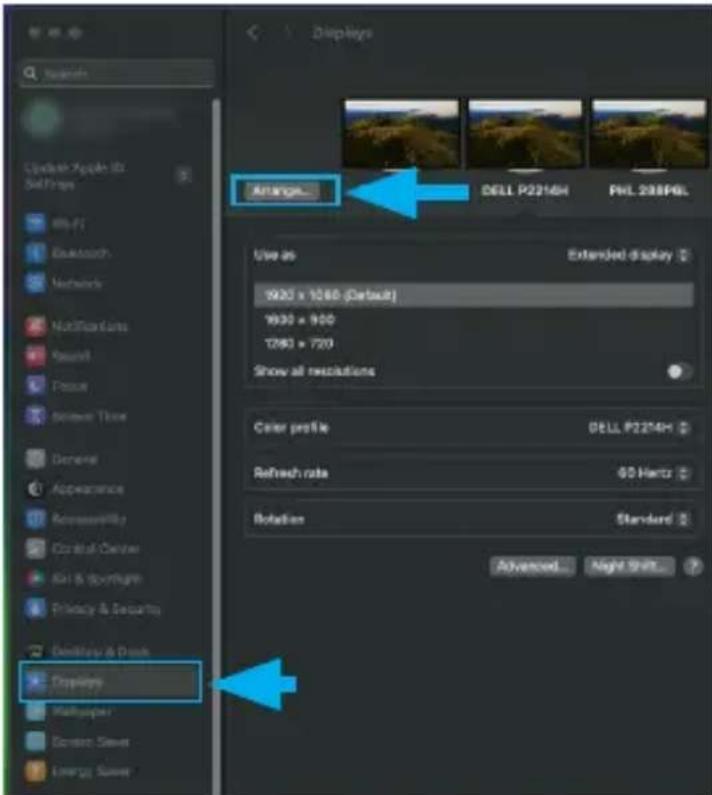
- A diagram will be displayed representing the current monitor arrangement, and each display will be represented by a rectangle.
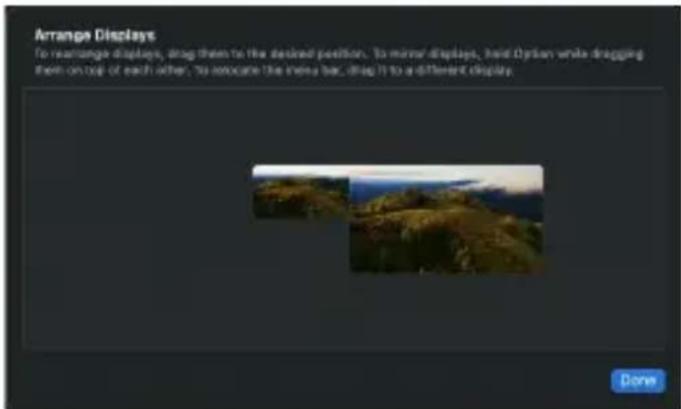
To view manuals, videos, drivers, downloads, technical drawings, and more visit www.StarTech.com/support
- Click and drag each of the rectangles (within the Arrangement tab) so that the diagram matches the physical location of the monitors as they're setup on the workstation.
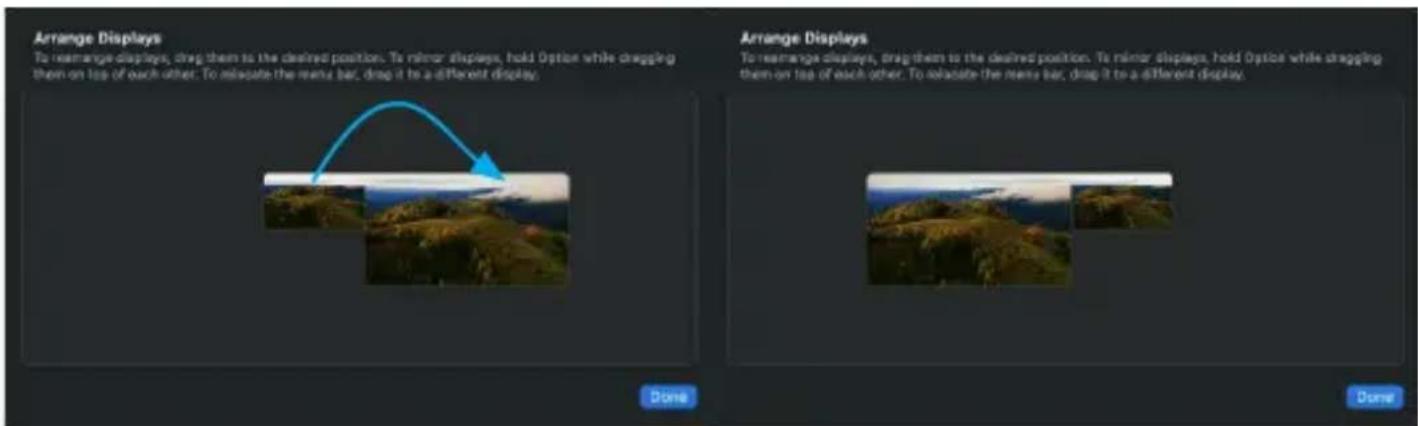
natural_image
Two blue computer monitors, one with an Apple logo and the other with a white Apple logo (no text or symbols on screens)The display devices have now been arranged in an extended macOS desktop.
To view manuals, videos, drivers, downloads, technical drawings, and more visit www.StarTech.com/support
Rotate Display Devices in macOS
Note: Display rotation is not supported on Intel based Macs running 10.15 or lower.
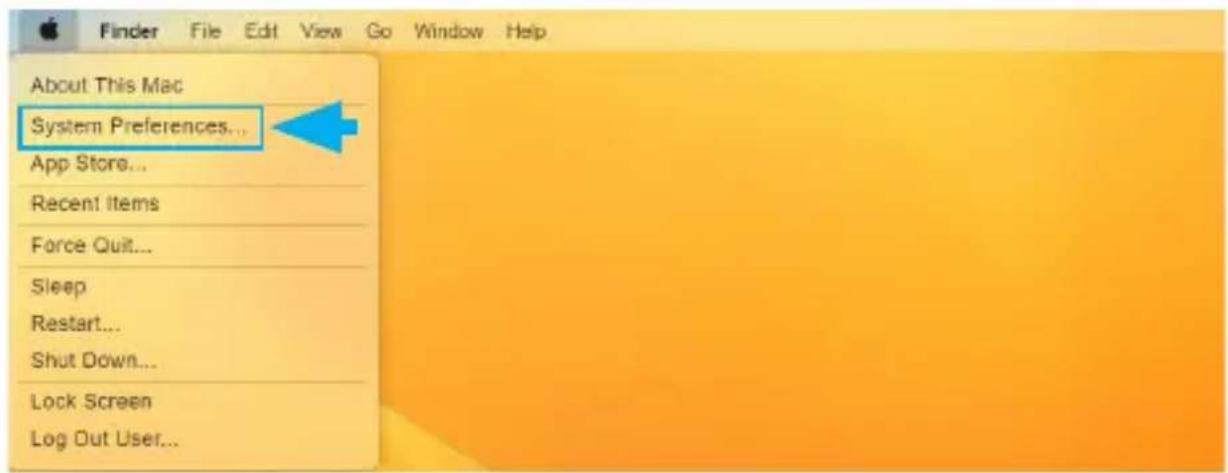
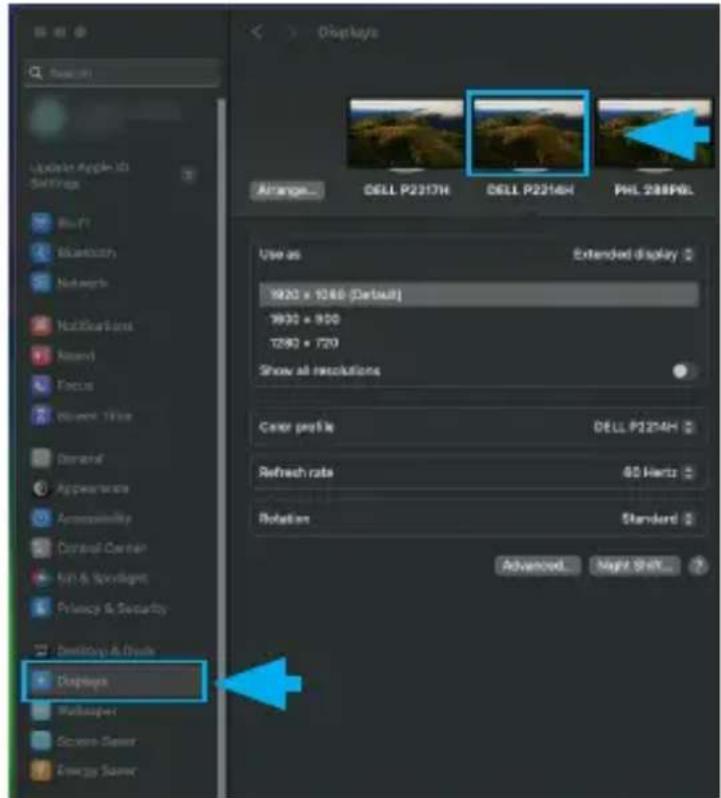
Rotating a Display Device in macOS enables users to change the screen orientation between horizontal (Standard/1080°) and vertical (90°/270°) to better suit a specific application. A Landscape orientation is ideal for most standard applications. However, rotating the display to a vertical orientation may be useful for tasks like reading lengthy documents or viewing images where a vertical orientation might be more suitable than the standard horizontal layout. Some specialized applications, such as graphic design or coding, might benefit from a vertical orientation to provide a larger workspace for certain tools or code lines.
To Rotate Display Devices in macOS:
- Click on the Apple menu in the top-left corner of the screen and select System Preferences.
To view manuals, videos, drivers, downloads, technical drawings, and more visit www.StarTech.com/support
- This will open the macOS System Preferences Window. Click the Displays icon, then select the display you'd like to rotate.
- Select the Rotate drop down menu, and choose your desired rotation.
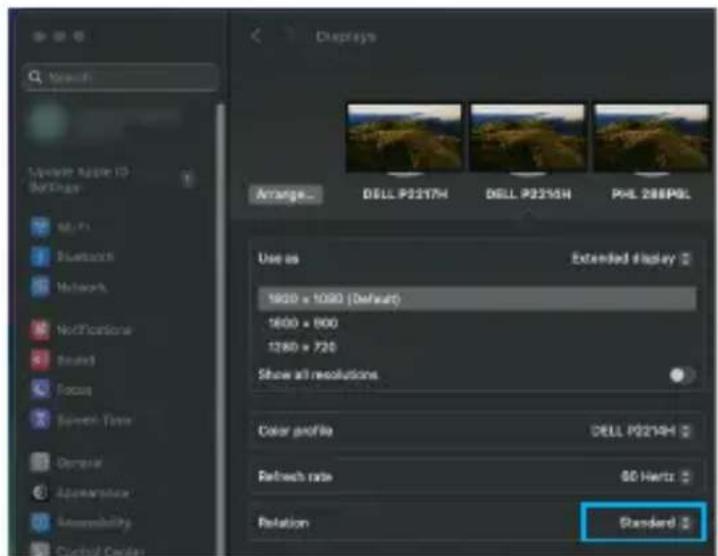
The Display Device has now been configured to the desired rotation.
To view manuals, videos, drivers, downloads, technical drawings, and more visit www.StarTech.com/support
Configuring Resolution for Display Devices in macOS
The output resolution for the Display Devices connected via the USB Video Adapter can be adjusted within macOS.
To configure resolution for Display Devices in macOS:
- Click on the Apple menu in the top-left corner of the screen and select System Preferences.
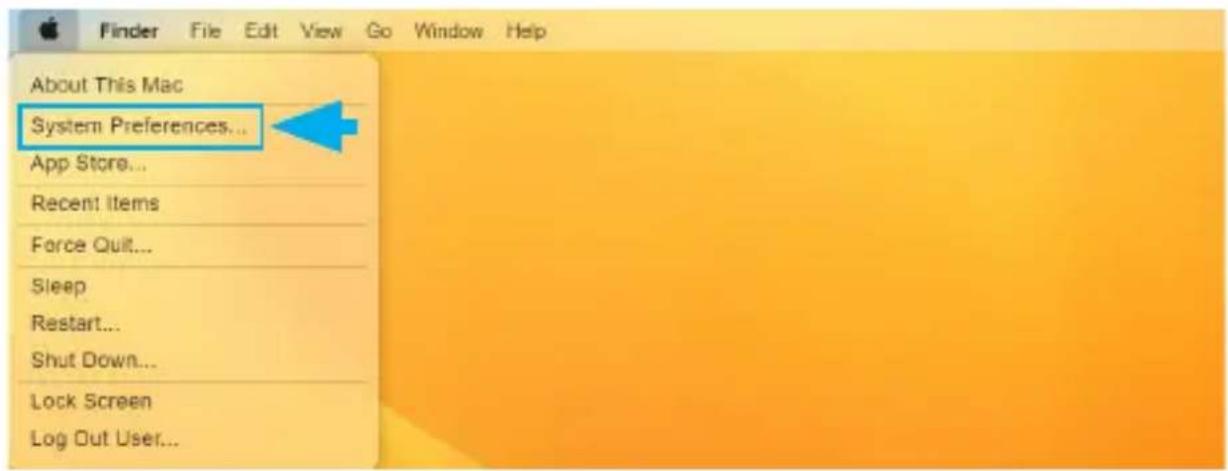
- This will open the macOS System Preferences Window. Click the Displays icon, then select the display you'd like to adjust.
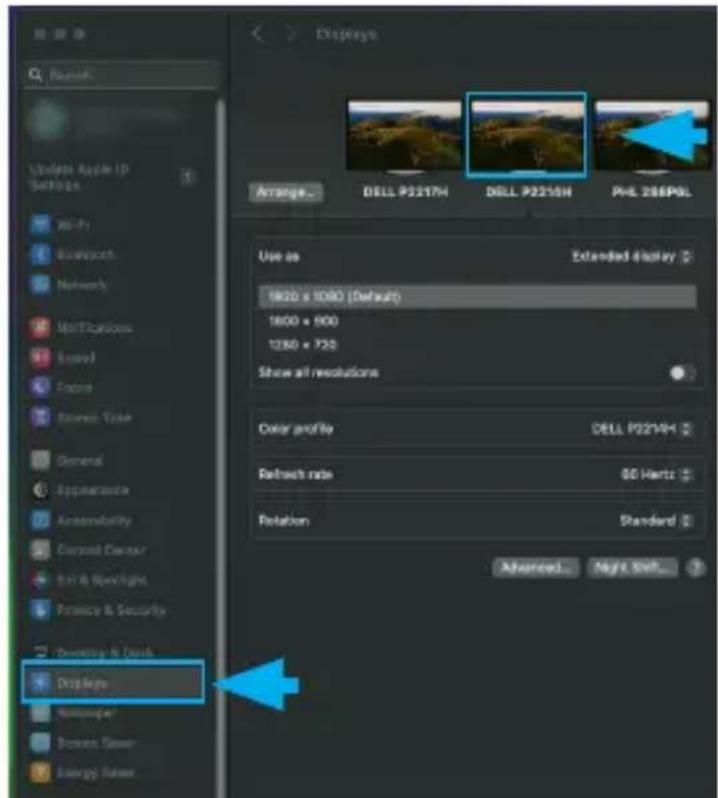
- Choose your desired resolution.
![Display Average_ DELL P2217H DELL P2215H PHL 288PGL Use as Extended display 1620 x 1030 [Default] 1600 x 900 1380 x 720 Show all resolutions Color profile DELL P2214H Refresh rate 50 Hz Rotation Standard Advanced Night Shift Lipalator Appel ID Settings N-1 Bluetooth Networks Modifications Launch Focus System Tools Demoral Applicability Accessibility Control Center Eye & Yourlight Privacy & Security Desktop & Deck Drykeys Wallpaper Screen Screen Energy Screen](/content/2026/05/911991/images/7397cfeeee025b6e17293b42bab7715499898bc9c91e7f38c444a19f0dfbd1db.jpg)
Note: Only resolutions supported by the Display Device, or USB Display Adapter will be available.
The Display Device has now been configured to the desired resolution.
To view manuals, videos, drivers, downloads, technical drawings, and more visit www.StarTech.com/support
InstantView Application Operation
Mac computers can also be configured using the InstantView Display Application (installed during Software Installation for macOS 10.15 and Up).
Configuring Display Devices for a Mirror Configuration Using the InstantView Application
Mirroring the Desktop provides users with the ability to duplicate their screen onto another monitor or display.
With a Mirror Configuration, users can easily duplicate the content on screen to multiple displays for presentations or demonstrations. It allows the presenter to display their screen on a larger monitor or projector, ensuring that the audience can see exactly what is being shown on the presenter's screen.
To configure a Display Device for a Mirror Configuration:
-
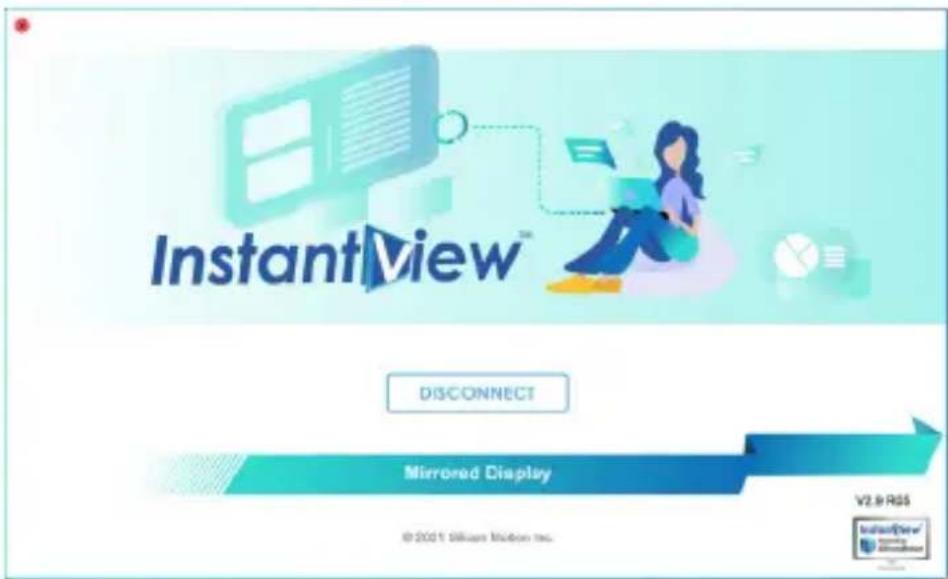
Launch the InstantView application to open the InstantView User Interface.
-
Once the InstantView Interface has been launched the
To view manuals, videos, drivers, downloads, technical drawings, and more visit www.StarTech.com/support
Mirrored/Extended Display toggle button can be used to switch between modes:
Select Mirrored Display, to switch to a Mirrored Display.
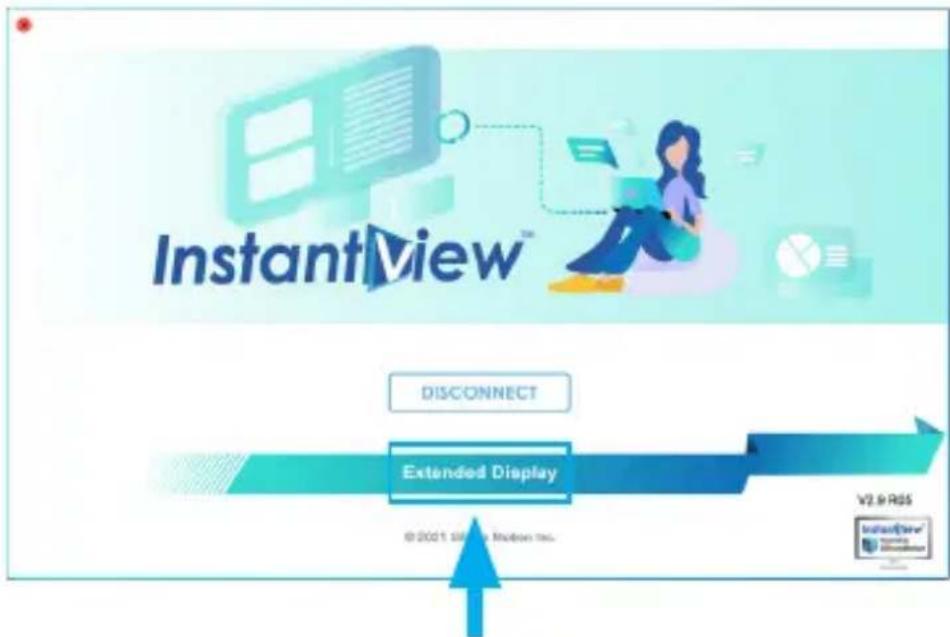
The Display Devices have now been configured in a mirrored configuration.
To view manuals, videos, drivers, downloads, technical drawings, and more visit www.StarTech.com/support
Configuring Display Devices for an Extended Display Using the InstantView Application
Extending the macOS Desktop provides users with the ability to expand their workspace across multiple monitors. The mouse cursor can edge-scroll between each monitor and use them as an extension of the primary monitor.
With extended desktops, users have more screen real estate to work with and can have different applications, documents, or windows open on each monitor. This makes it easier to multi-task, compare information, or work on multiple projects simultaneously.
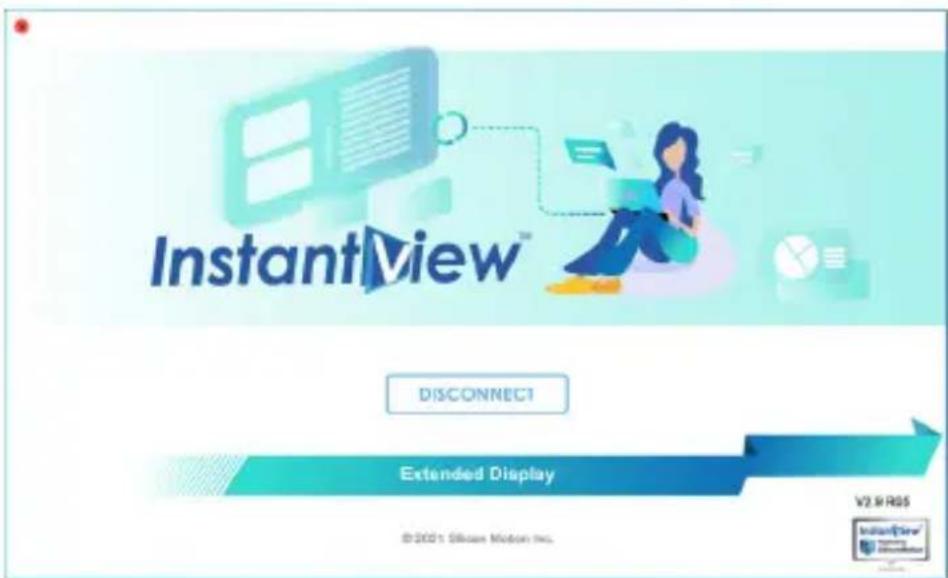
To configure display devices for an extended configuration:
- Launch the InstantView application to open the InstantView User Interface.
To view manuals, videos, drivers, downloads, technical drawings, and more visit www.StarTech.com/support
Once the InstantView Interface has been launched the Mirrored/Extended Display toggle button can be used to switch between modes:
Select Extended Display, to switch to an Extended Display.
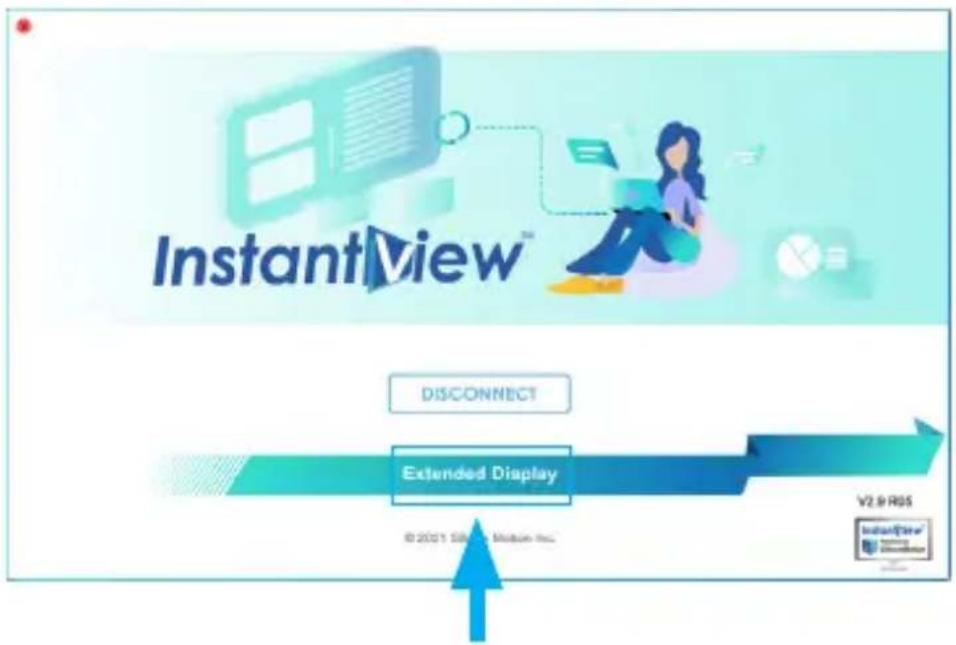
The Display Devices have now been configured in an extended configuration.
To view manuals, videos, drivers, downloads, technical drawings, and more visit www.StarTech.com/support
Access macOS Display Settings Using the InstantView Application
- Hold-down the control key on the keyboard, and click on the InstantView icon in the top right-corner of the screen, then select Display Settings.
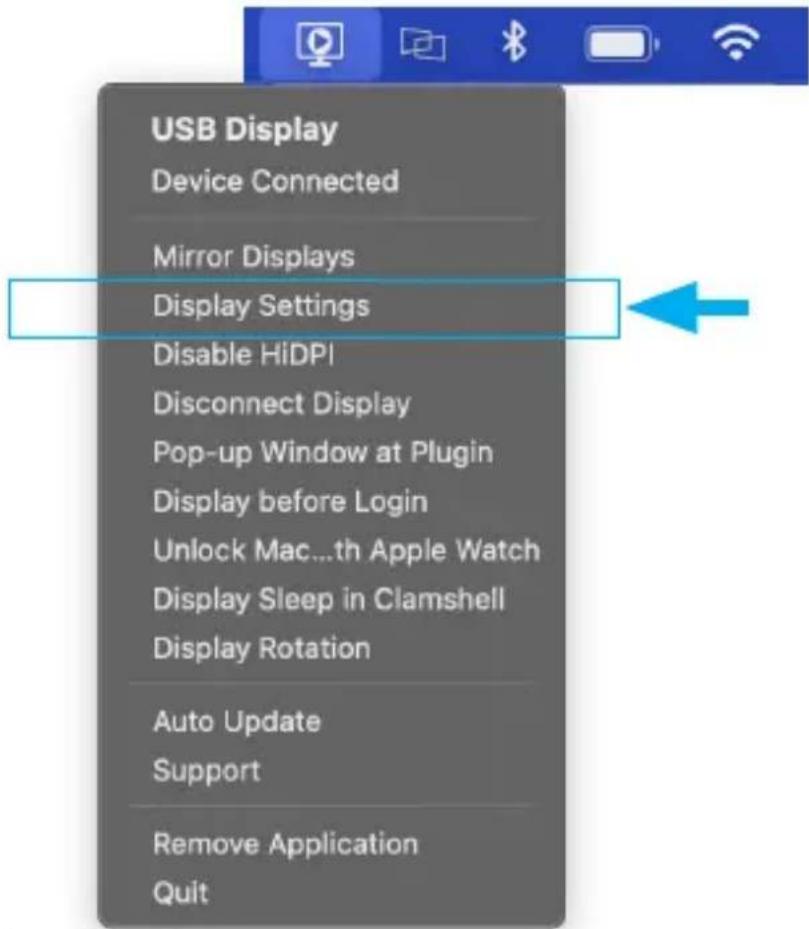
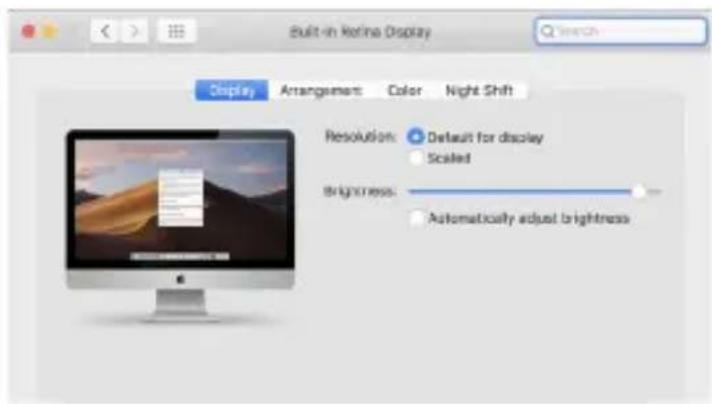
The macOS Display Settings pane is now open.
To view manuals, videos, drivers, downloads, technical drawings, and more visit www.StarTech.com/support
Disable HiDPI Using the InstantView Application
HiDPI (High Dots Per Inch) is are displays that have a higher pixel density compared to traditional displays. These high-resolution displays pack more pixels into the same physical space, resulting in sharper and crisper images, text, and graphics.
Disabling HiDPI could potentially be desirable in certain situations, such as saving battery life, or improving compatibility or performance with certain applications.
To disable HiDPI:
- Hold-down the control key on the keyboard, and click on the InstantView icon in the top right-corner of the screen, then select Disable HiDPI.
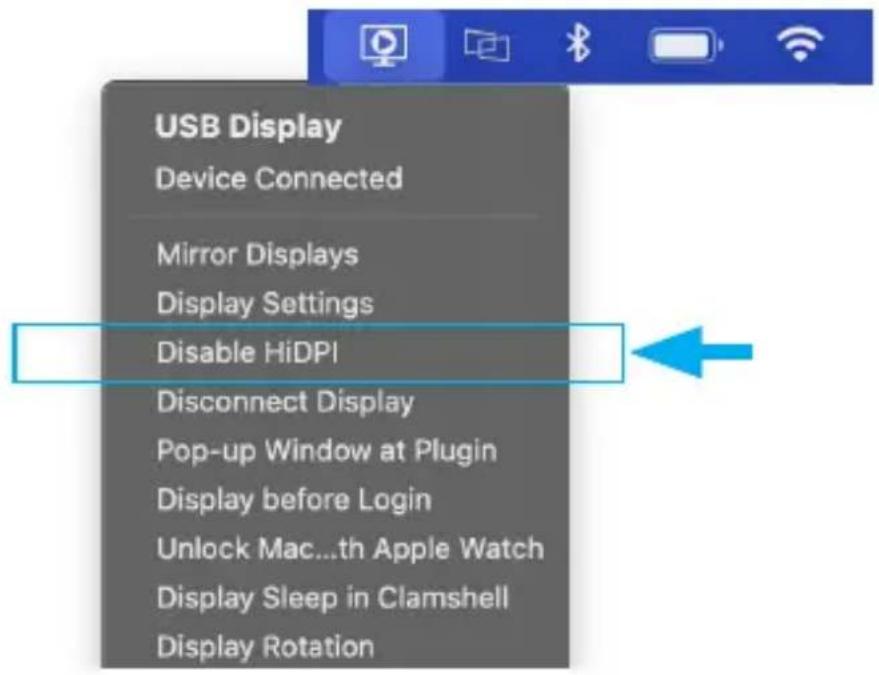
HiDPI has now been disabled.
To view manuals, videos, drivers, downloads, technical drawings, and more visit www.StarTech.com/support
Disconnect the Displays Connected to the Display Adapter Using the InstantView Application
- Hold-down the control key on the keyboard, and click on the InstantView icon in the top right-corner of the screen, then select Disconnect Display.
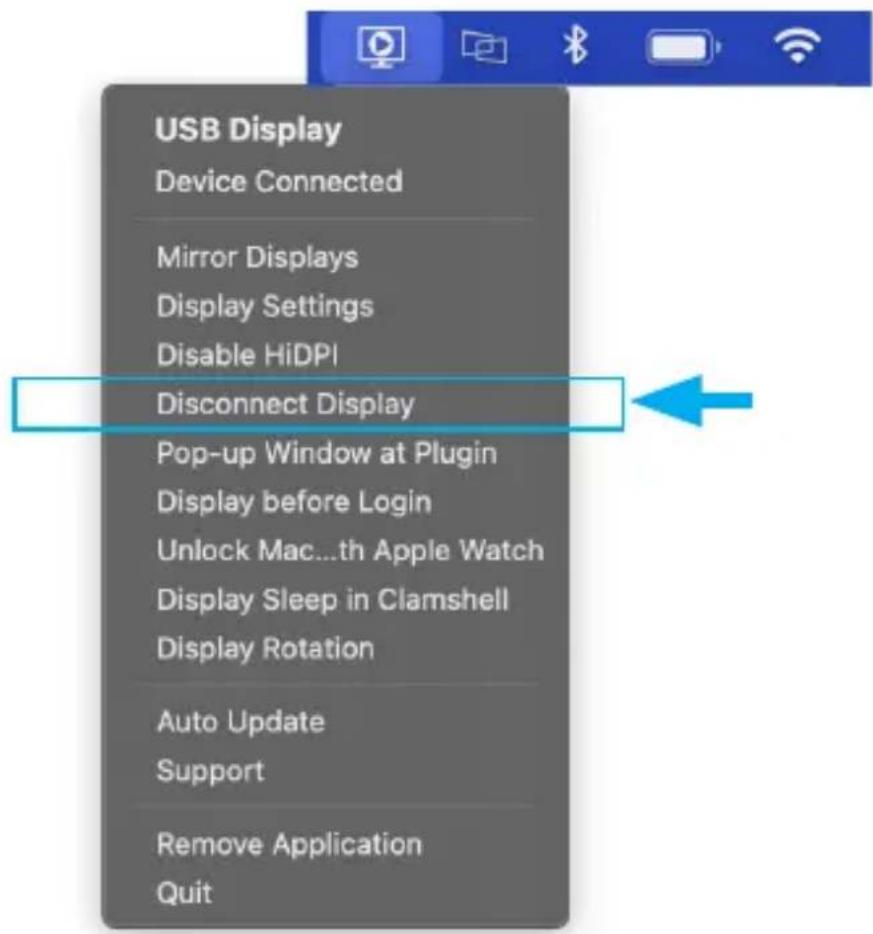
The connected displays have been disconnected.
To view manuals, videos, drivers, downloads, technical drawings, and more visit www.StarTech.com/support
Configure the InstantView Application to Open when the Display Adapter is Connected
- Hold-down the control key on the keyboard, and click on the InstantView icon in the top right-corner of the screen, then select Pop-up Window at Plugin.
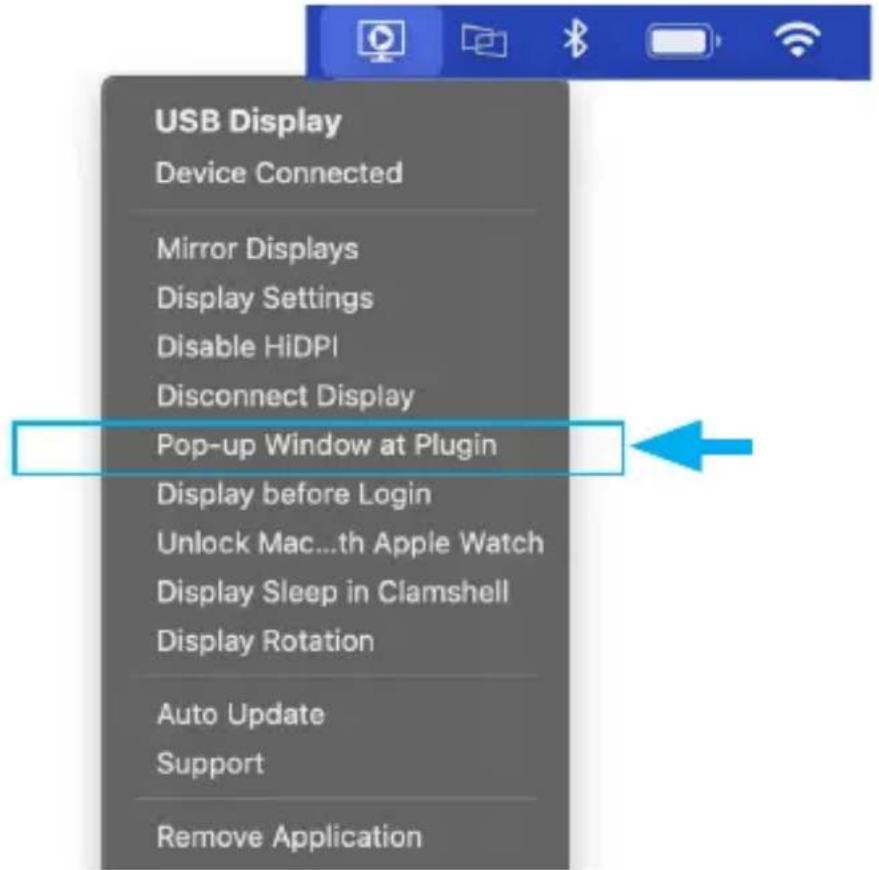
The InstantView application has now been configured to open when the Display Adapter is connected.
To view manuals, videos, drivers, downloads, technical drawings, and more visit www.StarTech.com/support
Configure the Displays Connected to the Display Adapter to Display the Login Screen While the User is Logging In
- Hold-down the control key on the keyboard, and click on the InstantView icon in the top right-corner of the screen, then select Display Before Login.
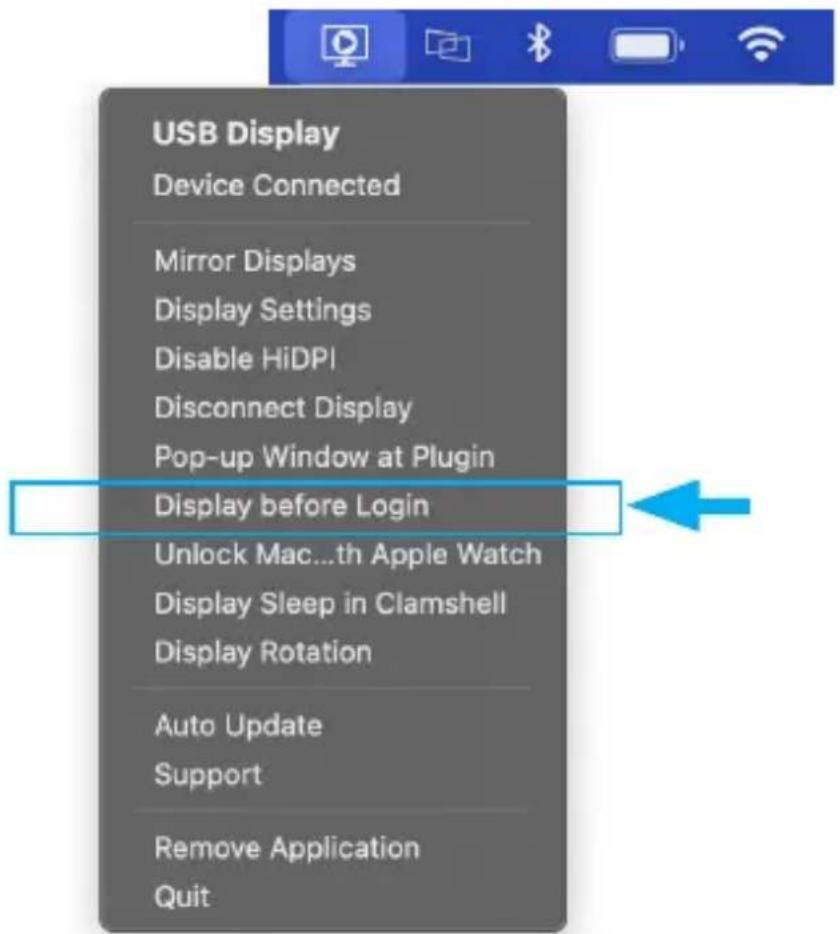
The displays connected to the display adapter have been configured to display the Login Screen while the user is Logging in.
To view manuals, videos, drivers, downloads, technical drawings, and more visit www.StarTech.com/support
Configure the InstantView Application to Support Unlocking MacBook with Apple Watch
- Hold-down the control key on the keyboard, and click on the InstantView icon in the top right-corner of the screen, then select Unlock Mac...th Apple Watch.
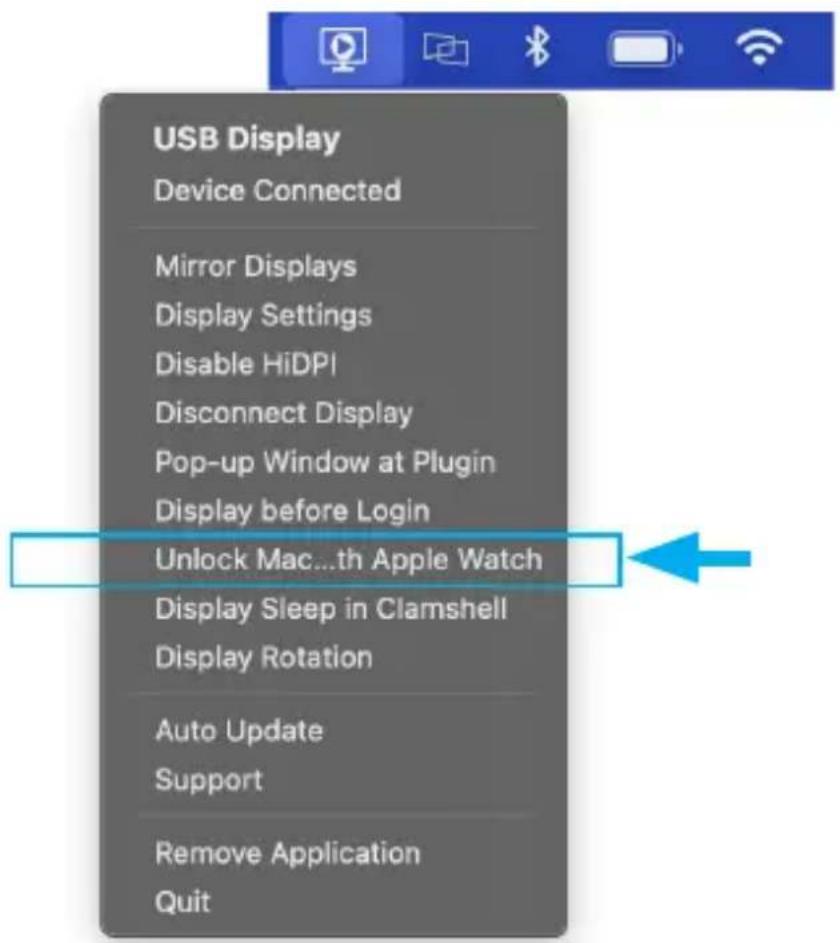
The InstantView Application has been configured to support unlocking your MacBook with Apple Watch.
Note: The MacBook and Apple Watch must also be configured to support this feature. Configure the Instant-View Application to Support Unlocking MacBook with Apple Watch.
To view manuals, videos, drivers, downloads, technical drawings, and more visit www.StarTech.com/support
Configure the InstantView Application to Put the Displays Connected to the Display Adapter into Sleep Mode When the MacBook Lid is Closed
- Hold-down the control key on the keyboard, and click on the InstantView icon in the top right-corner of the screen, then select Display Sleep in Clamshell.
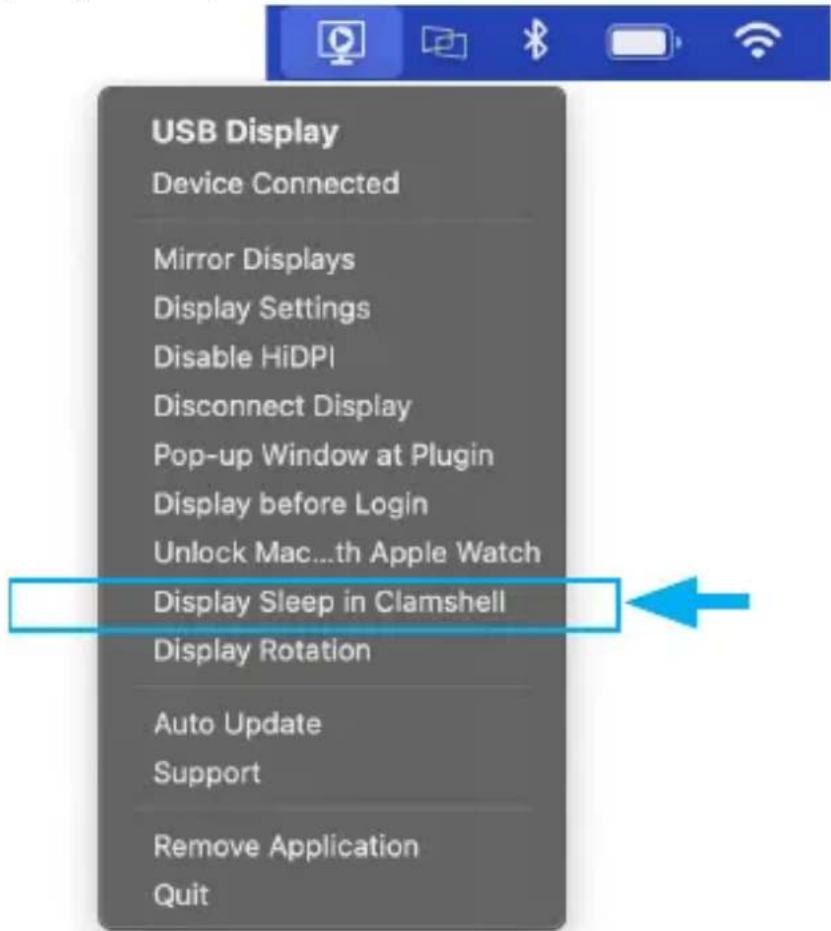
The displays connected to the Display Adapter will now go into sleep mode when the lid on the MacBook is closed.
To view manuals, videos, drivers, downloads, technical drawings, and more visit www.StarTech.com/support
Rotate Display Devices Using the InstantView Application
Note: Display rotation is not supported on Intel based Macs running 10.15 or lower.
Rotating a Display Device in macOS enables users to change the screen orientation between horizontal (Standard/1080°) and vertical (90°/270°) to better suit a specific application. A Landscape orientation is ideal for most standard applications. However, rotating the display to a vertical orientation may be useful for tasks like reading lengthy documents or viewing images where a vertical orientation might be more suitable than the standard horizontal layout. Some specialized applications, such as graphic design or coding, might benefit from a vertical orientation to provide a larger workspace for certain tools or code lines.
To Rotate Display Devices using the InstantView Application:
- Hold-down the control key on the keyboard, and click on the InstantView icon in the top right-corner of the screen, then select Display Rotation.
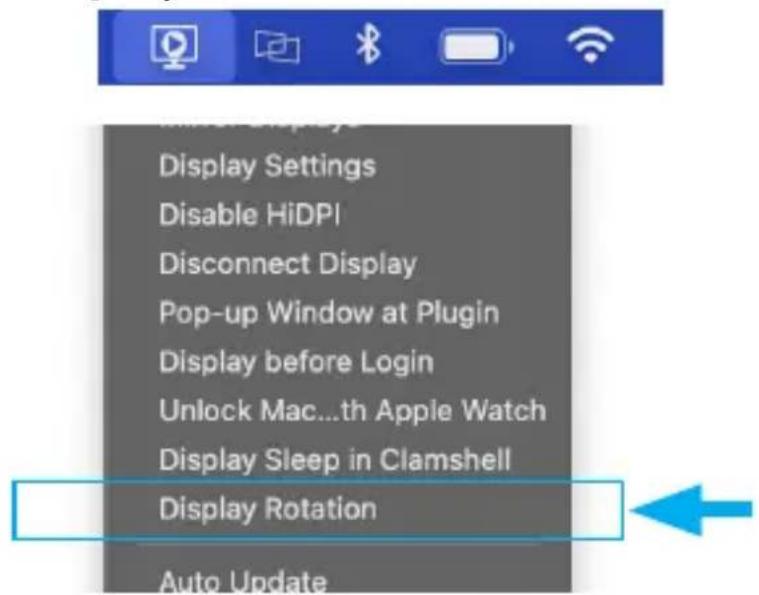
To view manuals, videos, drivers, downloads, technical drawings, and more visit www.StarTech.com/support
- This will open the macOS Display pane on each connected display. On the display you intend to adjust, choose your desired rotation.
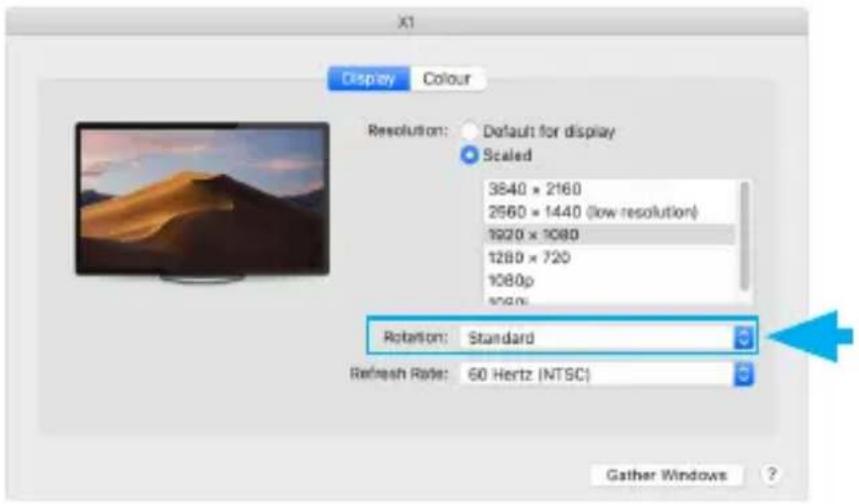
The Display Device has now been configured to the desired rotation.
Configure the InstantView Application for Automatic Updates
- Hold-down the control key on the keyboard, and click on the InstantView icon in the top right-corner of the screen, then select Display Sleep in Clamshell.
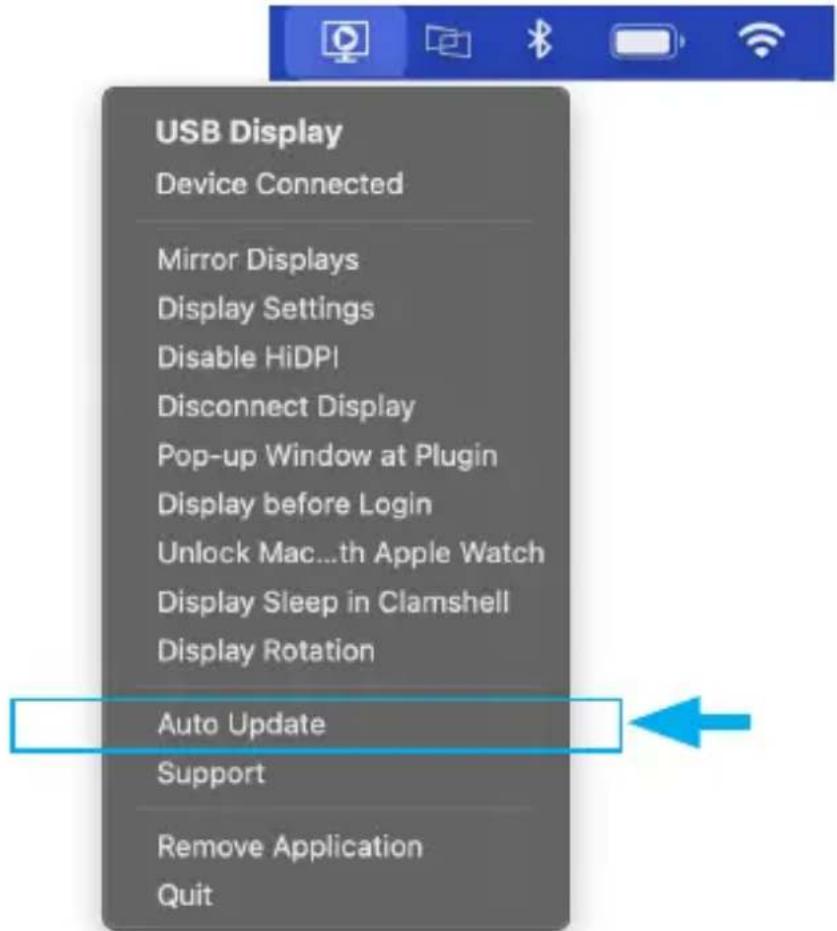
The InstantView Application is now configured for automatic updates.
To view manuals, videos, drivers, downloads, technical drawings, and more visit www.StarTech.com/support
Additional Features of the InstantView Application
- Hold-down the control key on the keyboard, and click on the InstantView icon in the top right-corner of the screen, to access these additional features.
Support
Visit the InstantView Application support page.
Remove Application
Uninstall the InstantView Application from the MacBook.
Quit
Close the InstantView Application.
Audio Configuration
The HDMI output port on this product features an audio controller to output audio via the HDMI output.
Selecting a Playback Device in macOS
Once the USB Display Adapter has been installed on a Host Computer, macOS will recognize it's audio controller as a playback device, which will give the Host Computer the ability to output audio via the HDMI output on the USB Display Adapter. The audio controller on the USB Display Adapter is separate and distinct from other audio controllers installed on the computer (such as the Host Computer's onboard audio controller), and macOS can only designate one controller at a time as it's active playback device.
To Select an Audio Controller as a playback device in macOS:
- Click on the Apple menu in the top-left corner of the screen and select System Preferences.

To view manuals, videos, drivers, downloads, technical drawings, and more visit www.StarTech.com/support
- This will open the macOS System Preferences Window. Click the Sound icon.
- Click Output, then select the device you want to use in the list of sound output devices.
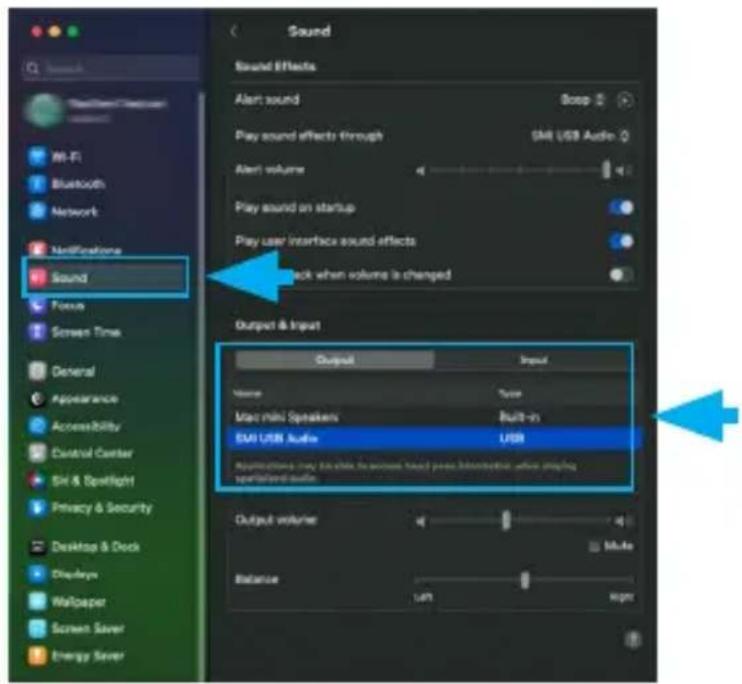
The selected Audio Controller is now set as the active playback device.
To view manuals, videos, drivers, downloads, technical drawings, and more visit www.StarTech.com/support
macOS Troubleshooting
This section of the manual aims to provide a comprehensive troubleshooting guide for this USB Display Adapter when connected to a macOS computer. The purpose is to assist users in resolving common issues that may occur during operation. The guide will present solutions to address common issues. Each solution will be clearly outlined to ensure a straightforward troubleshooting process.
Note: Night Shift in macOS is not supported.
A Supported Monitor Resolution is not Available:
This issue typically indicates that macOS is hiding some resolutions by default, depending upon the monitor and connection type.
To resolve this issue:
- Open Display from the System Preferences menu.
- Find the preferences window for the screen you want to adjust.
- If not already selected, choose the Default for display resolution setting.
- While keeping the option (alt) key pressed, choose the Scaled resolution setting.
The complete list of resolutions accepted by macOS should now be visible.
The above information is documented in the following link of Apple tech note:
https://support.apple.com/en-us/HT202471
4K Monitor is Only Outputting 1080p Resolution
This issue typically indicates that macOS is set to scale 1920x1080 resolution to 4K by default.
To resolve this issue:
- Open the Displays from System Preferences menu.
- Find the preferences window for the screen you want to adjust.
- Select 3840 x 2160 from the list of available resolutions.
The resolution will now be set to true 4K.
Video Output on the Adapter is Non-Functional
macOS High Sierra 10.13 and above have introduced a feature that requires users to approve third-party Kernel extensions or software operation will be denied by the operating system.
The Silicon Motion Display Adapter software includes a kernel extension, and failure to approve this extension will prevent the USB Display Adapter from operating.
To resolve this issue:
- Open Security & Privacy from System Preferences menu.
- From within the General section, locate the System software from developer "SILICON MOTION, INC." was blocked from loading alert.
- Click the Allow button.
- Restart the Mac.
The video output on the Display Adapter will now function.
Notes:
- Users should receive an Alert to give this approval during installation. However, on occasions it will not display during installation.
- The Allow option will only be available within the General section of Security & Privacy for 30 minutes after initial installation. If the option is not available the software will need to be uninstalled and reinstalled. After reinstallation please immediately proceed to the General section of Security & Privacy to grant access.
To view manuals, videos, drivers, downloads, technical drawings, and more visit www.StarTech.com/support
The HDMI Output on the USB Display Adapter Does Not Output Audio
This issue typically indicates that the Audio Controller on the USB Display Adapter is not set as the active playback device in macOS.
To resolve this issue:
Follow the Steps outlined in the Selecting a Playback Device in macOS (p.83) instructions of this manual.
The USB Adapter Does Not Play Content From a Streaming Service, Blu-ray Disc or Other Media.
This issue typically indicates that the content playing is encrypted with High-bandwidth Digital Content Protection (HDCP). This USB Video Adapter does not fully support HDCP. As a result, some protected content will playback at lower quality while other content may not play at all. Similar products from other manufacturers will also have this limitation.
To resolve this issue:
It's recommended that the protected content be viewed on displays connected to the computer's video card or its onboard video outputs.
The USB Display Adapter Will Not Work with an Adapter Cable That's Connected to it
This issue typically indicates that the Adapter Cable that's being used is not the correct orientation for the video output port on the USB Display Adapter. DisplayPort, HDMI and VGA Adapter cables will typically only work in one direction, and it's necessary that their input and output ports are the correct orientation for the respective video output and video input.
To resolve this issue:
Use an Adapter Cable that's the correct orientation for the video output port on the USB Display Adapter and the video input port of the Display Device.
The USB Display Adapter Does Not Capture a Video Input
This device provides video output only, and cannot be used to input or capture video to the Host Computer.
To resolve this issue:
Use a dedicated USB Capture Device such as the StarTech.com/USB3HDCAP.
To view manuals, videos, drivers, downloads, technical drawings, and more visit www.StarTech.com/support
Compliance Statements
FCC Compliance Statement
This equipment has been tested and found to comply with the limits for a Class B digital device, pursuant to part 15 of the FCC Rules. These limits are designed to provide reasonable protection against harmful interference in a residential installation. This equipment generates, uses and can radiate radio frequency energy and, if not installed and used in accordance with the instructions, may cause harmful interference to radio communications. However, there is no guarantee that interference will not occur in a particular installation. If this equipment does cause harmful interference to radio or television reception, which can be determined by turning the equipment off and on, the user is encouraged to try to correct the interference by one or more of the following measures:
• Reorient or relocate the receiving antenna
- Increase the separation between the equipment and receiver
- Connect the equipment into an outlet on a circuit different from that to which the receiver is connected
- Consult the dealer or an experienced radio/TV technician for help
Industry Canada Statement
This Class B digital apparatus complies with Canadian ICES-003.
Use of Trademarks, Registered Trademarks, and other Protected Names and Symbols
This manual may make reference to trademarks, registered trademarks, and other protected names and/or symbols of third-party companies not related in any way to StarTech.com. Where they occur these references are for illustrative purposes only and do not represent an endorsement of a product or service by StarTech.com, or an endorsement of the product(s) to which this manual applies by the third-party company in question. Regardless of any direct acknowledgement elsewhere in the body of this document, StarTech.com hereby acknowledges that all trademarks, registered trademarks, service marks, and other protected names and/or symbols contained in this manual and related documents are the property of their respective holders.
PHILLIPS ^® is a registered trademark of Phillips Screw Company in the United States or other countries.
To view manuals, videos, drivers, downloads, technical drawings, and more visit www.StarTech.com/support
Safety Statements
Safety Measures
- Wiring terminations should not be made with the product and/or electric lines under power.
- Cables (including power and charging cables) should be placed and routed to avoid creating electric, tripping or safety hazards.
Mesures de sécurité
To view manuals, videos, drivers, downloads, technical drawings, and more visit www.StarTech.com/support
Warranty Information
This product is backed by a three-year warranty.
For further information on product warranty terms and conditions, please refer to www.startech.com/warranty.
Limitation of Liability
In no event shall the liability of StarTech.com Ltd. and StarTech.com USA LLP (or their officers, directors, employees or agents) for any damages (whether direct or indirect, special, punitive, incidental, consequential, or otherwise), loss of profits, loss of business, or any pecuniary loss, arising out of or related to the use of the product exceed the actual price paid for the product.
Some states do not allow the exclusion or limitation of incidental or consequential damages. If such laws apply, the limitations or exclusions contained in this statement may not apply to you.
Hard-to-find made easy. At StarTech.com, that isn't a slogan. It's a promise.
StarTech.com is your one-stop source for every connectivity part you need. From the latest technology to legacy products — and all the parts that bridge the old and new — we can help you find the parts that connect your solutions.
We make it easy to locate the parts, and we quickly deliver them wherever they need to go. Just talk to one of our tech advisors or visit our website. You'll be connected to the products you need in no time.
Visit www.startech.com for complete information on all StarTech.com products and to access exclusive resources and time-saving tools.
StarTech.com is an ISO 9001 Registered manufacturer of connectivity and technology parts. StarTech.com was founded in 1985 and services a worldwide market.
Reviews
Share your experiences using StarTech.com products, including product applications and setup, what you love about the products, and areas for improvement.
StarTech.com Ltd.
45 Artisans Cres
London, Ontario
N5V 5E9
Canada
StarTech.com LLP
4490 South
Hamilton Road
Groveport, Ohio
43125
U.S.A.
StarTech.com Ltd.
Unit B, Pinnacle 15
Gowerton Rd,
Brackmills
Northampton
NN4 7BW
United Kingdom
StarTech.com Ltd.
Siriusdreef 17-27
2132 WT
Hoofddorp
The Netherlands
FR: startech.com/fr
DE: startech.com/de
ES: startech.com/es
NL: startech.com/nl
IT: startech.com/it
JP: startech.com/jp
To view manuals, videos, drivers, downloads, technical drawings, and more visit www.StarTech.com/support
- USB 3.0 to Dual HDMI Adapter -4K 30Hz/1080p 60Hz
- Full-Product Manual 107B-USB-HDMI
- Table of Contents
- Requirements
- Package Contents
- Product Diagram
- Windows Installation
- IMPORTANT PRE-INSTALLATION STEPS FOR AUTO DRIVER OR MANUAL SETUP
- Hardware Installation
- Software Installation
- Automatic Driver Installation
- Manual Driver Installation
- macOS Installation
- Software Installation for macOS 10.15 and Up (InstantView Display Application Installation)
- Software Installation for macOS 10.10 to 10.14
- (Legacy Display Driver Installation)
- Windows Operation
- Display Configuration
- Identifying Display Devices Within Windows Display Settings
- To identify which number is assigned to each connected Display Device within Windows:
- Configuring Display Devices for an Extended Windows Desktop
- To configure a Display Device as an extended Windows Desktop:
- Arranging Display Devices in an Extended Windows Desktop
- To arrange Display Devices in Extended Windows Desktop:
- Rotate Display Devices in Windows
- To Rotate Display Devices in Windows:
- Duplicating Displays in Windows
- To configure a Display Device for a Mirror Configuration:
- Configuring Resolution for Display Devices in Windows
- To configure resolution for Display Devices in Windows:
- Audio Configuration
- Selecting a Playback Device in Windows
- To Select an Audio Controller as a playback device in Windows:
- Windows Troubleshooting
- Setup Notes & Recommendations:
- The Driver Will Not Install
- To resolve this issue:
- The USB Display Adapter Does Not Output Video
- Video Performance is Slow Compared to Other Displays
- Notes:
- The HDMI Output on the USB Display Adapter Does Not Output Audio
- The USB Adapter Does Not Play Content From a Streaming Service, Blu-ray Disc or Other Media.
- The USB Display Adapter Will Not Work with an Adapter Cable That's Connected to it
- The USB Display Adapter Does Not Capture a Video Input
- macOS Operation
- Configuring Display Devices for a Mirror Configuration within macOS
- Configuring Display Devices for an Extended macOS Desktop
- To configure display devices for an extended macOS desktop:
- Identifying Display Devices in an Extended macOS Desktop
- To identify display devices in an extended macOS desktop:
- Arranging Display Devices in an Extended macOS Desktop
- To arrange display devices in an extended macOS desktop:
- Rotate Display Devices in macOS
- To Rotate Display Devices in macOS:
- Configuring Resolution for Display Devices in macOS
- To configure resolution for Display Devices in macOS:
- InstantView Application Operation
- Configuring Display Devices for a Mirror Configuration Using the InstantView Application
- Configuring Display Devices for an Extended Display Using the InstantView Application
- To configure display devices for an extended configuration:
- Access macOS Display Settings Using the InstantView Application
- Disable HiDPI Using the InstantView Application
- Disconnect the Displays Connected to the Display Adapter Using the InstantView Application
- Configure the InstantView Application to Open when the Display Adapter is Connected
- Configure the Displays Connected to the Display Adapter to Display the Login Screen While the User is Logging In
- Configure the InstantView Application to Support Unlocking MacBook with Apple Watch
- Configure the InstantView Application to Put the Displays Connected to the Display Adapter into Sleep Mode When the MacBook Lid is Closed
- Rotate Display Devices Using the InstantView Application
- To Rotate Display Devices using the InstantView Application:
- Configure the InstantView Application for Automatic Updates
- Additional Features of the InstantView Application
- Support
- Remove Application
- Quit
- Selecting a Playback Device in macOS
- To Select an Audio Controller as a playback device in macOS:
- macOS Troubleshooting
- A Supported Monitor Resolution is not Available:
- 4K Monitor is Only Outputting 1080p Resolution
- Video Output on the Adapter is Non-Functional
- Compliance Statements
- FCC Compliance Statement
- Industry Canada Statement
- Use of Trademarks, Registered Trademarks, and other Protected Names and Symbols
- Safety Statements
- Safety Measures
- Mesures de sécurité
- Warranty Information
- Limitation of Liability
- Hard-to-find made easy. At StarTech.com, that isn't a slogan. It's a promise.
- Reviews
- StarTech.com Ltd.
- StarTech.com LLP
Brand : StarTech.com
Model : 107B-USB-HDMI
Category : Network card / adapter