
Claire - Keyboard NATIVE INSTRUMENTS - Free user manual and instructions
Find the device manual for free Claire NATIVE INSTRUMENTS in PDF.


| Type | Virtual Piano Instrument (Kontakt Library) |
| Compatibility | Kontakt 7 or Kontakt Player (version 7+), macOS & Windows |
| Installation | Via Native Access; requires Native ID and internet |
| Sample Source | Grand piano recorded at Galaxy Hall, Belgium |
| Microphone Positions | Close (direct) and Room (Mid/Far) microphones, adjustable blend |
| Main Features | Particles engine, 4th Pedal, Mic Blend, Performance controls (Color, Dynamic, Reverb, Delay) |
| Particles Engine | Generates additional ghost notes; includes algorithm, sources, and effects |
| Effects | EQ, Compressor, Saturation, Stereo Image, Style chain; plus Reverb and Delay (Convolution, Algorithmic, Plate; Replika, Twin, Psyche) |
| Presets | Factory presets (Snapshots) and User presets; tag-based browser |
| Tuning | Stretched or Equal temperament; Reference Pitch 436-444 Hz; Detune per key |
| Velocity Response | Adjustable curve; Silent Key function; presets for Kontrol keyboards |
| Pedal Support | Sustain pedal (with half-pedaling and re-pedal), 4th pedal (MIDI assignable, adjustable strength) |
| Animations | Interactive piano artwork reacting to Mic Blend and Particles |
| Updates | Via Native Access; check for updates regularly |
| Documentation | PDF manual available for download (49 pages) |
Frequently Asked Questions - Claire NATIVE INSTRUMENTS
User questions about Claire NATIVE INSTRUMENTS
0 question about this device. Answer the ones you know or ask your own.
Ask a new question about this device
Download the instructions for your Keyboard in PDF format for free! Find your manual Claire - NATIVE INSTRUMENTS and take your electronic device back in hand. On this page are published all the documents necessary for the use of your device. Claire by NATIVE INSTRUMENTS.
USER MANUAL Claire NATIVE INSTRUMENTS
- Installation and setup 4
Installing Claire using Native Access 4
Loading Claire in Kontakt 4
- Claire overview ...... 6
Performance controls 7
Mic Blend controls 7
-
Preset Browser 9
-
Snapshots 11
Snapshots overview 11
Loading a Snapshot 11
Saving a User Snapshot 12
Deleting a User Snapshot 14
- Piano page 15
Anatomy section 15
Noises section 17
Tone section 17
- Effect page 19
Effects section 19
Ambience section 22
- Particles page 23
The information in this document is subject to change without notice and does not represent a commitment on the part of Native Instruments GmbH. The software described by this document is subject to a License Agreement and may not be copied to other media. No part of this publication may be copied, reproduced or otherwise transmitted or recorded, for any purpose, without prior written permission by Native Instruments GmbH, hereinafter referred to as Native Instruments.
"Native Instruments", "NI" and associated logos are (registered) trademarks of Native Instruments GmbH.
All other trademarks are the property of their respective owners and use of them does not imply any affiliation with or endorsement by them.
Document authored by Nicolas Sidi, Jan Ola Korte
Software version: 1.0 (11/2024)
2. Welcome to Claire
Captured from one of the world's finest and largest grand pianos, Claire delivers a harmonically rich sound that flows from deep, resonant basses to clear, shimmering overtones. Its long, extended strings create a deep, cutting bass, while a unique fourth pedal reduces the hammer-blow distance to enable a softer volume without affecting the timbre. This allows for smooth glissandos, delicate pianissimos, and fluid legato passages. Recorded at the acclaimed Galaxy Hall, Claire offers both close and room microphone setups, which can be seamlessly blended to create anything from intimate tones to expansive ambience. Further shape your sound with color, tonal shift, depth, and richness controls, dialing in mechanical and pedal noises for an authentic performance. A much-loved feature from Noire and Piano Colors, the Particles engine elevates your sound by adding layers of rippling harmonics, textures, and subtle rhythmic patterns that react to your performance, infusing your compositions with emotion and taking them in fresh, creative directions.
Claire was created in collaboration with Galaxy Instruments, who have previously partnered with us in the creation of Piano Colors, Noire, Una Corda, Electric Keys, and more.
This document shows you how to install and setup Claire and describes all features in detail, starting with the overview.
We hope you enjoy Claire!
Document conventions
In this document the following formatting is used to highlight useful information:
ItalicsIndicates paths to locations on your hard disk or other storage devices.
Bold Highlights important names, concepts, and software interface elements.
[Brackets] References keys on the computer keyboard.
| ▶ | Denotes a single step instruction. |
| → | Denotes the expected result when following instructions. |
The following three icons denote special types of information:

The light bulb icon indicates a useful tip, suggestion, or interesting fact.

The information icon highlights essential information in a given context.

The warning icon alerts you of potential risks and serious issues.
3. Installation and setup
Before making music with Claire, you must install and set up the necessary software. Follow these instructions to get started.
Installing Claire using Native Access
Native Access is your go-to app for downloading, activating, and updating all your NI music creation tools including Claire. If you are new to Native Instruments, you will first have to create your Native ID user account. To learn more about Native Access, visit our support page.
- Download and install Native Access here.
- Open the Native Access application.
- Create a Native ID, if you do not have one already.
- Login to Native Access using your Native ID.
- Click Library on the left side of Native Access.
- Click Available at the top of Native Access.
- Click the Kontakt category to only show products related to Kontakt.
- Click Install for the following products:
• Claire - Kontakt or Kontakt Player
→ The software is installed automatically.

If the software is already installed, click the Updates tab and install available updates before proceeding.
Loading Claire in Kontakt
Once installed, you can start using Claire in Kontakt. Claire is not an independent plug-in, so you first need to open an instance of Kontakt or Kontakt Player.
Kontakt offers two ways to load an instrument, the Library browser and the side pane browser.
To load an instrument using the Library browser:
- Open Kontakt as a plug-in in your host software (DAW) or as a stand-alone application.
- By default, Kontakt opens the Library browser on first launch. If you have turned this off, click Library in Kontakt's header to open the Library browser.
- Locate Claire in the Library browser. You can use the search bar to quickly find it.
- Click on the arrow icon ( ) in the top right corner of the instrument's artwork to load the instrument and its first preset.
- Alternatively, you can click the instrument's artwork to display its presets in the list on the right of the browser window.
- Double click any preset to load it. The first entry, identified by a keyboard icon, loads the instrument with its default preset.
To load an instrument using the side pane browser:
- Open Kontakt as a plug-in in your host software (DAW) or as a stand-alone application.
- In the side pane on the left, make sure that the Instruments category is selected (this should be the case by default), otherwise click Instruments to select that category.
- Locate Claire's artwork tile below.
- Click on the arrow icon ( ) in the top right corner of the instrument's artwork to load the instrument and its first preset.
- Alternatively, you can click the instrument's artwork to display the list of its presets.
- Double click any preset to load it. The first entry, identified by a keyboard icon, loads the instrument with its default preset.

If you are new to Kontakt and want more information, visit Kontakt Player and Kontakt.
4. Claire overview
This chapter introduces the main controls and areas of Claire.
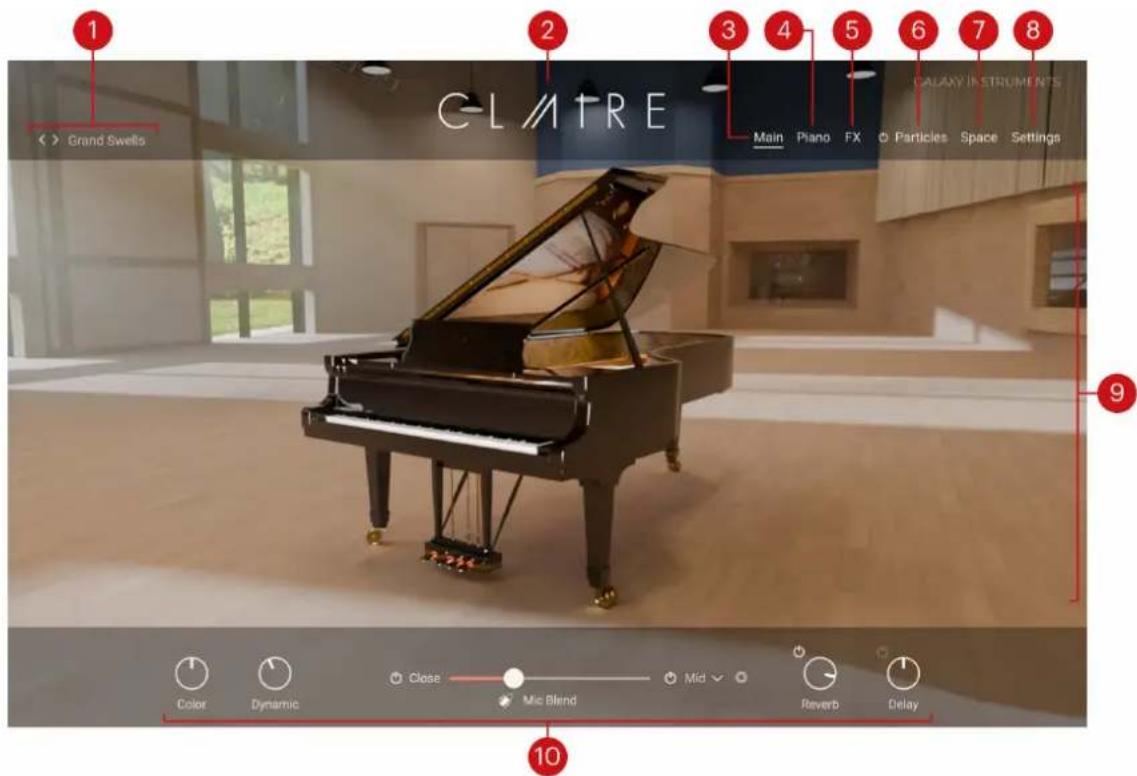
When you first open Claire, you see the Main page along with a set of global controls:
-
Preset selector: The name of the loaded preset is always visible. Presets contain values for all parameters of the instrument: They correspond to Kontakt Snapshots. The name of the preset currently loaded is displayed here. Click the left and right arrows to cycle through presets, or click the name of the preset to open the Preset Browser and select another preset from the Claire factory library.
-
About: Click the instrument name to open the About screen, which displays the credits for this instrument.
-
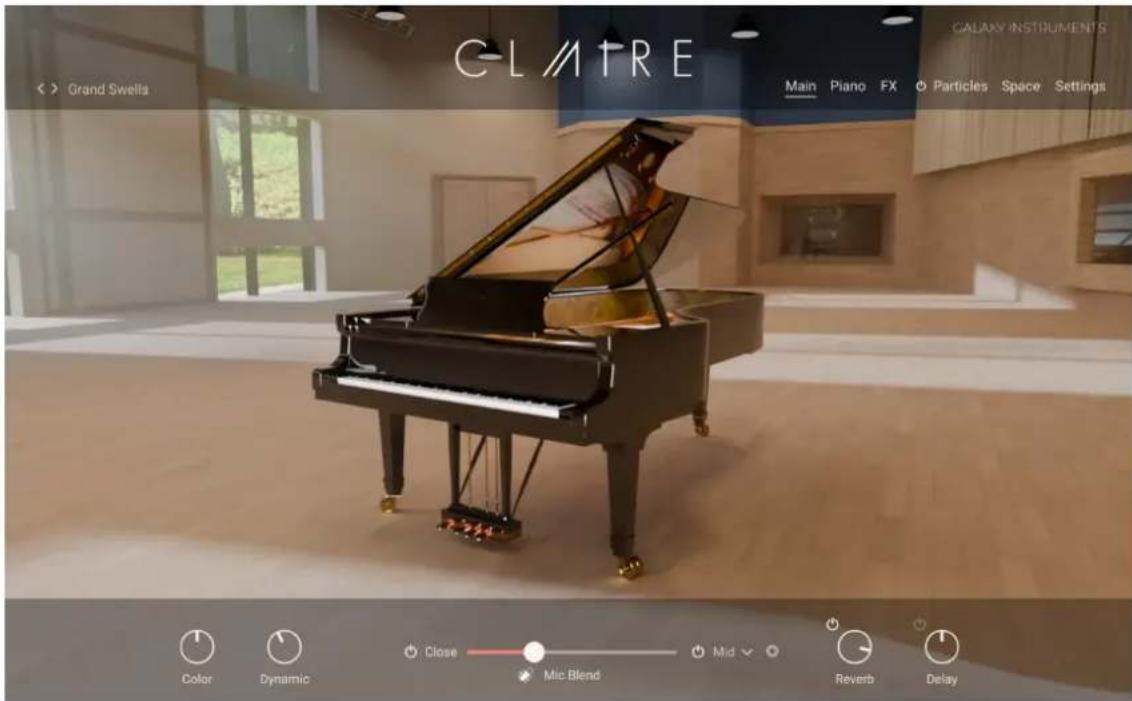
Main: Opens the Main page, showing an animated artwork of the original instrument (depicted above). This is the default page that appears when you load the instrument in Kontakt. In the picture, the point of view follows your adjustments to the Mic Blend fader below. Refer to Mic Blend controls for more information on this fader.
-
Piano: Opens the Piano page, which lets you adjust the sonic characteristics of your instrument. Refer to Piano page.
-
FX: Opens the Effect page, where you can configure various effects that will process the sound of your instrument, including equalization, dynamics, saturation, stereo image, creative, and ambience effects. Refer to Effect page.
-
Particles: Opens the Particles page, where you can configure the Particles engine. The Particles engine generates and processes a cloud of additional notes based on the notes that you play on the keyboard. Refer to Particles page. The little on/off switch left of the Particles button lets you quickly turn the Particles engine on or off.
-
Space: Opens the Space page, which lets you adjust a reverberation and a delay used as send effects. Refer to Space page.
- Settings: Opens the Settings page, which provides global settings including tuning, response, and pedal controls. Refer to Settings page.
- Central area: This is the biggest part of the instrument and it shows the various pages and Browsers.
- Performance controls: Provide a set of controls directly available while playing the Instrument. The Performance controls are always visible. Refer to Performance controls for more information.
Performance controls
The Performance controls are always available at the bottom of the instrument. They include the following elements:

- Color: Adjusts the tone from soft to hard by readjusting the sample mapping. Turning the knob right will make the instrument sound harder and crisper, with a more pronounced attack phase. Turning the Color knob to the left will achieve a warmer and softer sound, and the attack phase will be less pronounced.
- Dynamic: Controls the dynamic range by adjusting the volume while still using all velocity samples. Turning the knob left will compress the sound, turning it right will expand the dynamic range.
- Mic Blend controls: This special feature lets you configure the blend between the close microphones and the room microphones used to record the instrument. Refer to Mic Blend controls.
- Reverb: Controls the amount of signal sent to the reverb unit, and thus determines the volume of the reverb signal. The little on/off switch at the top left lets you turn the reverb unit on or off. The parameters of the reverb are available in the Reverb section of the Space page. Refer to Reverb.
- Delay: Controls the amount of signal sent to the reverb unit, and thus determines the volume of the delay signal. The little on/off switch at the top left lets you turn the delay unit on or off. The parameters of the delay are available in the Delay section of the Space page. Refer to Delay.
Mic Blend controls
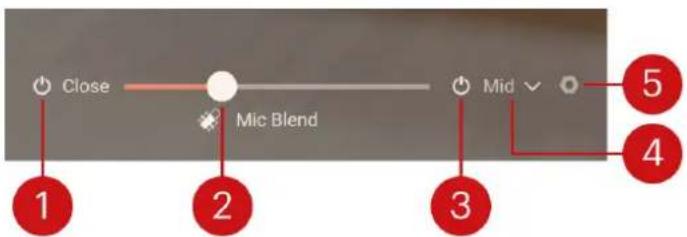
The Mic Blend controls let you modify the balance between the close microphones and the room microphones used to record the instrument.
-
Close Mics on/off switch: Turns the close microphones on or off. When off, the Mic Blend fader is locked at full right and you hear only the room microphones.
-
Mic Blend fader: Adjusts the mix between the close microphones on the left and the room microphones on the right. Moving the fader to the left makes the sound more direct and clear, while moving it to the right adds depth to the sound. The fader also controls the animation on the Main page, showing the piano closer if you move the fader towards the close microphones on the left, or showing more of the room when moving the fader towards the room microphones on the right.
-
Room Mics on/off switch: Turns the room microphones on or off. When off, the Mic Blend fader is locked at full left and you hear only the close microphones.
-
Mid/Far menu: Selects between two distinct sample sets for the room microphones. For the Mid recordings the microphones are about 3 meters away from the instrument, whereas for the Far recordings they are 11 meters away.
-
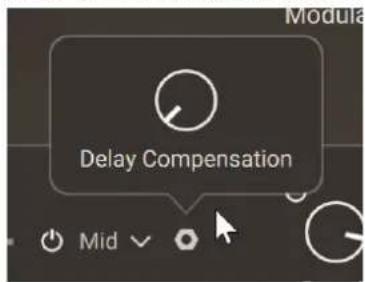
Nut icon: Opens a panel with an additional Delay Compensation knob. Because of their distance to the instrument, the room microphones induce a natural pre-delay. As you move the Mic Blend fader further to the right, this pre-delay can blur the clarity of the sound and even feel like a latency for the player. The Delay Compensation knob lets you counterbalance this effect by moving the room signal slightly ahead in time. With the knob at full left, no compensation is applied and you hear the room microphones with their natural pre-delay. With the knob at full right, you fully compensate the natural pre-delay for a clearer sound and a more direct playing experience.
When both switches are off on either side of the Mic Blend fader, the fader is locked in the middle position.
5. Preset Browser
The Preset Browser lets you find and load presets from the Claire factory library.
▶ To open the Preset Browser, click the name of the current preset in the top left corner of the instrument:
The Preset Browser follows this typical workflow:
- In the left part of the Browser, you can click the properties describing the type of sound that you are looking for.
- In the right part of the Browser, the list shows the presets matching the properties that you have selected. You can audition each of them in context before you choose one for loading and close the Browser.
The Preset Browser provides the following controls:
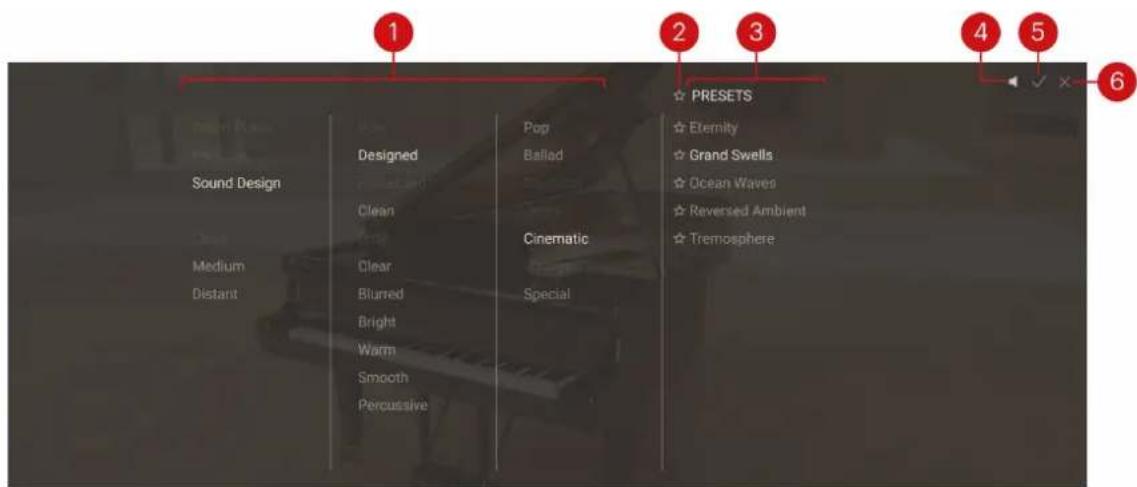
-
Tag filter: You can click the tags describing the sound that you are looking for. The PRESETS list on the right is updated accordingly. The Tag filter is organized into three columns, from left to right: Type, Character, and Style. As you select tags, the color of the remaining tags indicates whether or not some presets are available:
-
Highlighted tags are already selected. You can click them to deselect them and widen the scope of your search.
- Normal tags are not selected but they have matching presets in the current PRESETS list. You can select them to further narrow your search.
-
Faded tags are not selected and they do not have any matching presets in the current PRESETS list. You cannot select them, unless you deselect other tags first.
-
Favorites: You can click the star icons to add or remove presets to/from your Favorites. The star icons are lit for the presets set as Favorites. This way, you can quickly create a custom collection of your most beloved presets. You can then display only your Favorites by clicking the topmost star icon next to the PRESETS header. Click the topmost star icon again to display also non-Favorite presets.
-
PRESETS list: Shows the presets matching the tags selected in the Tag filter on the left. You can click a preset to load it and try it directly on your keyboard or in your DAW. You can double-click a preset to load it and close the Browser.
- Preview: Switches the Preview function on or off. When Preview is on, clicking a preset in the PRESETS list plays a short lick with the preset sound.
- OK (check mark): Keeps the selected preset loaded and closes the Preset Browser. This is the same as double-clicking the preset in the PRESETS list.
- Cancel (cross): Closes the Preset Browser without changing anything. Your Kontakt Instrument returns to its previous state.
6. Snapshots
Snapshots are Kontakt's underlying file format for instrument presets. They offer a quick and convenient way of browsing for new sounds and saving custom presets. When a User Snapshot is saved, all parameter adjustments and instrument settings are stored within the preset. Using Snapshots, you can create your own preset sounds, save them in the .nksn file format and use them in other projects, across computers or even share them with other users.
Snapshots overview
Snapshots contain the parameters and controls:
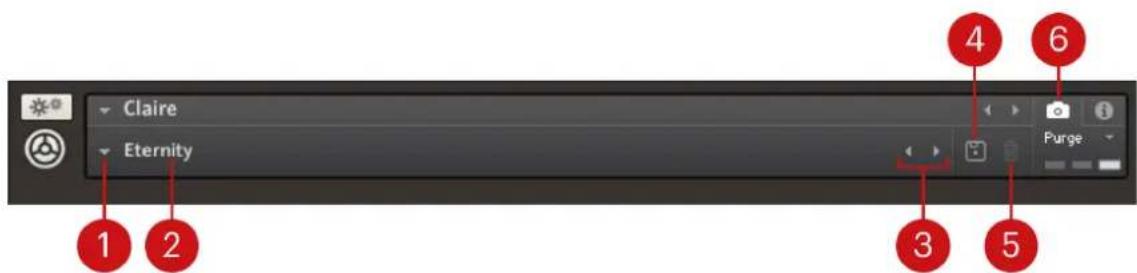
- Load Snapshot: Opens the Snapshot menu where you can load a Snapshot from the Factory or User library. For more information, refer to Loading a Snapshot.
- Snapshot Name: Displays the name of the currently selected Snapshot.
- Snapshot Previous/Next (<> icons): Allows you to quickly browse and load Snapshots. Pressing an arrow icon will load the previous or next Snapshot in the selected category. If no Snapshot is active, the first Snapshot on the list will be loaded. For more information, refer to Loading a Snapshot.
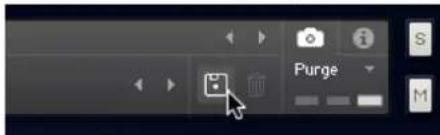
- Save Snapshot (floppy disk icon): Allows you to save changes made to a sound. When a User Snapshot is saved, the macros settings, parameter controls, and sequence are stored within it and can be accessed at any time via the User library. For more information, refer to Saving a User Snapshot.
- Delete Snapshot (bin icon): Deletes the currently selected Snapshot from the User library. You can only delete User Snapshots and not Factory Snapshots. For more information, refer to Deleting a User Snapshot.
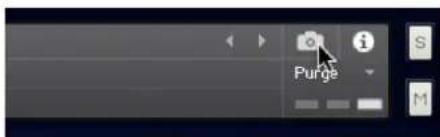
- Snapshot View (camera icon): Provides access to the Snapshot features described above; saving, loading, browsing, and deleting. When Snapshot View is selected, configuration settings and features relating to the Info View are replaced in the display.
Loading a Snapshot
Snapshots are loaded from the drop-down menu in the top header of the instrument. You can also use the arrows to the left of the floppy disk icon to load the previous or next preset.
To load and browse Snapshots using the arrow icons:
-
Click the Snapshot View (camera icon) to open Snapshot view.
-
Click the arrow icons (<> ) in the Snapshot header to browse through the Snapshots list.
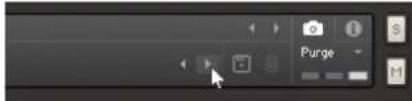
→ The previous or next Snapshot will load immediately each time an arrow icon is clicked.
To load a Snapshot from the library:
- Click the Snapshot View (camera icon) to open Snapshot view.
- Click the arrow icon next to the Snapshot name field to open the Snapshot menu.
- Select the Factory category to load a Factory preset, or select the User category to load one of your own Snapshots.
- Select an instrument category, if available.
- Select a Snapshot to load it.
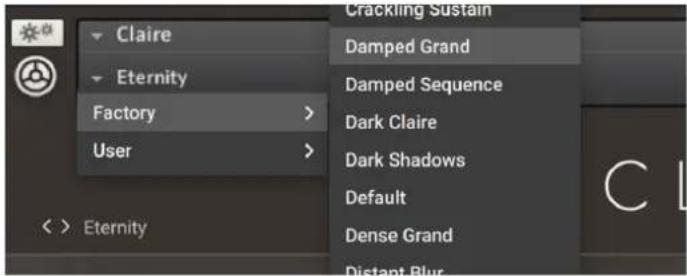
→ The loaded Snapshot is displayed in the instrument header.

The User category will not appear until you have first saved a Snapshot.
Saving a User Snapshot
You can save User Snapshots to recall your favorite sounds and settings at any time, share them with others, or create backups.
Saving a User Snapshot using the Navigator
When using Kontakt's Default view, you can save User Snapshots using the Navigator in the side pane.
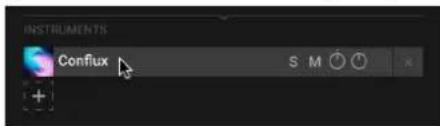
- Right-click the slot in the Navigator you want to save a User Snapshot for.
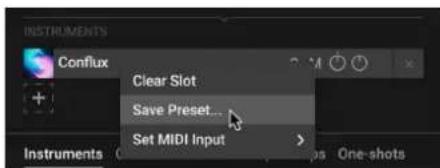
- Click Save Preset... in the context menu to open the Save dialog.
- Enter a name for your new User Snapshot and click Save. If you enter the same of an existing User Snapshot, you will be given the option to replace it by clicking Overwrite.
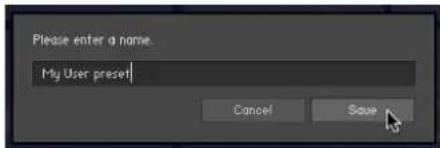
→ The User Snapshot is saved and added to the user content in the Browser.
Saving a User Snapshot using the Instrument Header
User Snapshots can be saved using the Instrument Header. When a sound parameter has been adjusted, that Save button (disk icon) becomes active.

If you are using Kontakt's Default view, the Instrument Header can be shown or hidden from the View menu in the Kontakt Header.
- Click the Snapshot view button (camera icon) in the Instrument Header.
- Click the Save button (floppy disk icon) to open the Save dialog.
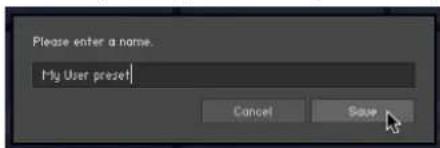
- Enter a name for your new User Snapshot and click Save. If you enter the same of an existing User Snapshot, you will be given the option to replace it by clicking Overwrite.
→ The User Snapshot is saved and added to the user content in the Browser.
User Content Folder
All User Snapshots are automatically stored in the default User Content folder. You can transfer any of your Snapshots to another computer by copying the respective Snapshot files.
The default User Content folders are:
Mac OS X: Macintosh HD/Users/
Windows: C:\Users\
Please make sure you include your Documents / My Documents folder in your regular data backups.
Deleting a User Snapshot
Snapshots can be deleted using the bin icon in the instrument header. To delete a User Snapshot:
- Click the Snapshot view (camera icon) to open Snapshot view.
- Load the User Snapshot you wish to delete.
- Click the Delete button (bin icon).
- Confirm deletion of the Snapshot by selecting Yes in the dialog box.
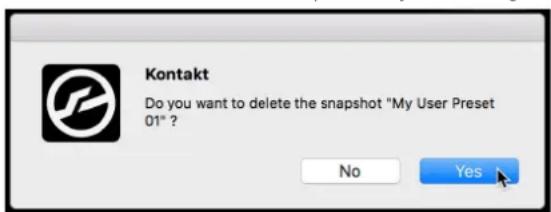
→ The User Snapshot .nksn file is deleted from the User Snapshot Library.
7. Piano page
The Piano page lets you shape the instrument's tonal character and sonic details.
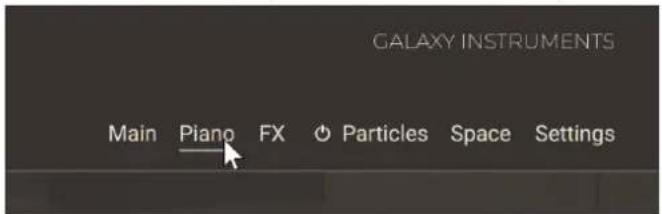
▶ Click Piano at the top right of the instrument to open the Piano page.
The Piano page is split into three sections:
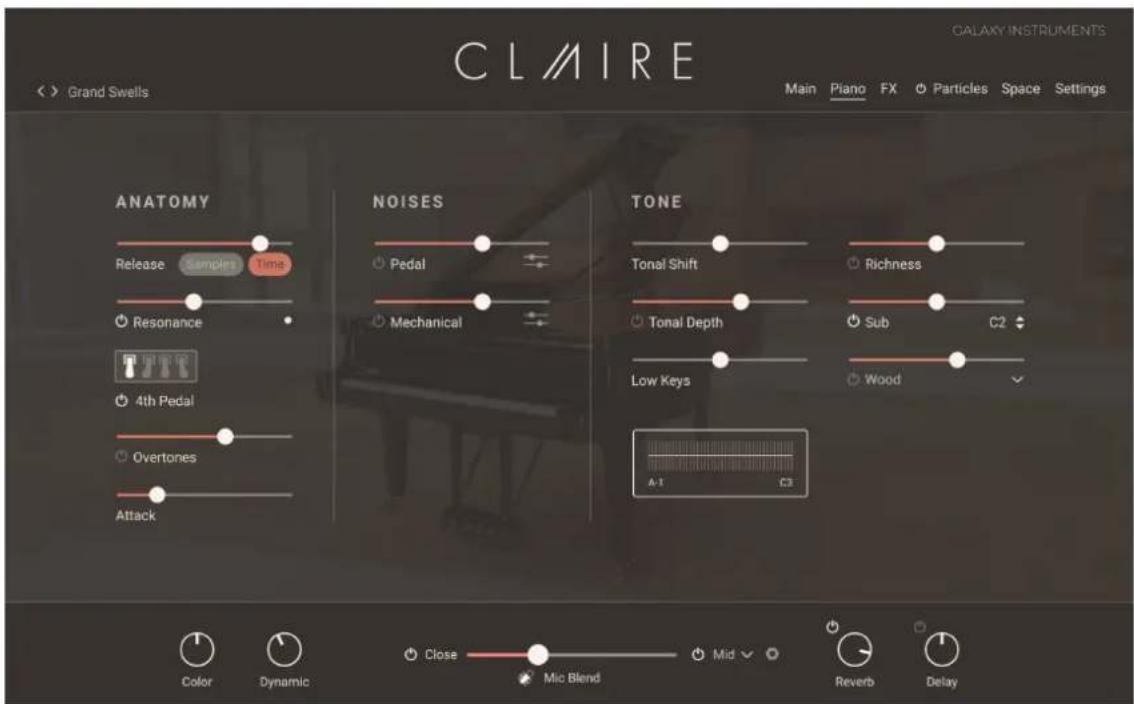
- Anatomy section: Adjusts parameters affecting the shape of the sound. Refer to Anatomy section.
- Noises section: Adds various noises to the sound. Refer to Noises section.
- Tone section: Adjusts different components of the keyboard sound. Refer to Tone section.
Anatomy section
The Anatomy section of the Piano page contains the following controls:
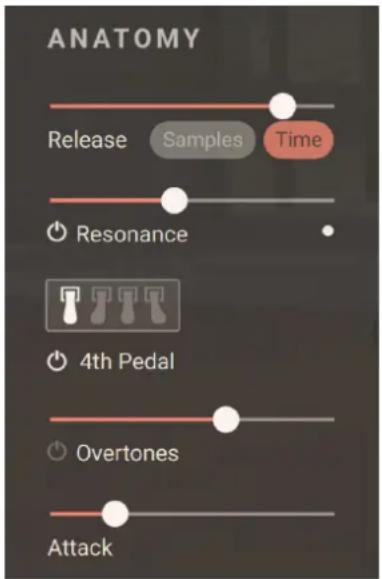
- Release: Adjusts the release phase of the sound depending on the state of the Samples/Time switch:
- If Samples is on, the Release slider adjusts the level of additional, dedicated release samples.
• If Time is on, the Release slider adjusts instead the release time of the sound.
The values for both the release samples' level and the release time are stored and recalled, so that the Release slider might jump to a different position when switching between Samples and Time.
- Resonance controls: Adds resonance samples when pressing the sustain pedal. Pressing the sustain pedal on the piano raises all the dampers at once, enabling all strings to resonate sympathetically. This adds a fuller and deeper sound to the note.
- Resonance On/Off switch: Activates or deactivates the resonance samples.
- Resonance slider: Adjusts the volume of the resonance samples.
- Pedal indicator: The resonance samples are triggered only when using the sustain pedal, which is indicated by this LED.
- 4th Pedal controls: The fourth pedal is a special feature of this grand piano. Located on the left of the three traditional pedals on the original instrument, it brings the hammer's resting point halfway to the strings. The smaller distance between hammers and strings reduces the intensity of the hammer strikes, which allows the pianist to soften the sound without changing the timbre. For example, this is a useful support when playing pianissimo very rapidly, soft arpeggios or glissandi.
- 4th Pedal On/Off switch: Turns the 4th Pedal feature on or off. When turned on, you can control the fourth pedal using MIDI (default setting) or keep the pedal always engaged using the pedal icon above. You can configure the MIDI control of the fourth pedal in the dedicated section of the Settings page. Refer to Pedal section for more information.
- 4th Pedal icon: Locks or unlocks the fourth pedal. When locked, the fourth pedal is always engaged. When unlocked, you can control the fourth pedal from a MIDI controller.
- Overtones controls: Add overtone samples to the sound. These overtones add liveliness to the sound.
- Overtones On/Off switch: Activates or deactivates the overtone samples.
- Overtones slider: Adjusts the volume of the overtone samples.
• Attack: Adjusts the attack time of the sound.
Noises section
The Noises section of the Piano page contains the following controls:
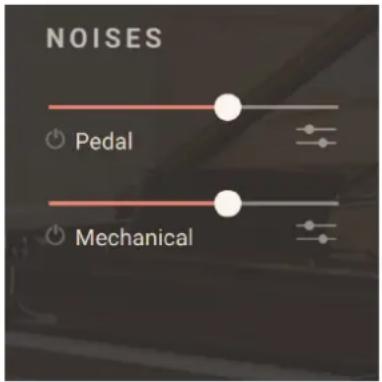
• Pedal controls: Adjust the sustain pedal noises.
- Pedal Noises On/Off switch: Turns the noises created by the sustain pedal on or off.
- Pedal Noises slider: Adjusts the volume of all sustain pedal noises.
- Pedal Noises Details icon: Displays the details of the pedal noises. Here you can set individual levels for Rumble, Damper and Strings.
• Mechanical controls: Adjust the mechanical noises.
- Mechanical Noises On/Off switch: Turns on or off the noises created when hitting or releasing a key.
- Mechanical Noises slider: Adjusts the volume of all mechanical noises.
- Mechanical Noise Details icon: Displays the details of the mechanical noises. Here you can adjust the balance between the Note On noises (hitting the key) and Note Off noises (releasing the key), and adjust the cutoff frequency of a Low Cut filter applied to these noises.
Tone section
The Tone section of the Piano page contains the following controls:
- Tonal Shift: Adjusts the playback speed of each sample, resulting in formant or character changes. Moving the slider to the left will make the instrument sound sharper and moving it to the right will result in a deeper, darker sound with a less defined attack.
- Tonal Depth controls: Adjust an additional resonance for achieving a deeper sound character.
- Tonal Depth On/Off switch: Turns the additional resonance on or off.
- Tonal Depth slider: Adjusts the volume of the additional resonance.
- Low Keys: Adjusts the volume of the keys below middle C. Moving the slider to the left decreases the volume of the lower keys, moving the slider to the right increases it. The lower the key, the stronger the effect. The little display below illustrates the current setting.
-
Richness controls: Adjust additional harmonics samples for enriching the sound. Lower settings will give the piano sound a little extra spark. You can also use it more frankly for sound design.
-
Richness On/Off switch: Turns the additional harmonics samples on or off.
- Richness slider: Adjusts the volume of the additional harmonics samples.
- Sub controls: The so-called “sub” samples are additional samples that have been recorded in order to enhance the lower frequencies of the grand piano.
- Sub On/Off switch: Activates or deactivates the sub samples.
- Sub slider: Adjusts the volume of the sub samples.
- Sub Key selector: Sets the split key below which the sub samples are being triggered.
- Attack controls: Control an additional layer of attack sounds from different kinds of hammers.
- Attack On/Off switch: Turns the additional attack sounds on or off.
- Attack slider: Adjusts the volume of the attack sounds.
- Attack selector: Selects from various attack sounds using different materials. You can also click the little arrows on the left to switch to the next or previous entry from the menu.
8. Effect page
The Effect page lets you configure various effects that enhance the main piano sound.
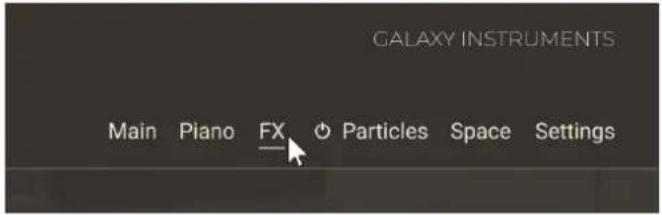
▶ Click FX at the top right of the instrument to open the Effect page.
The Effect page is split into two sections:
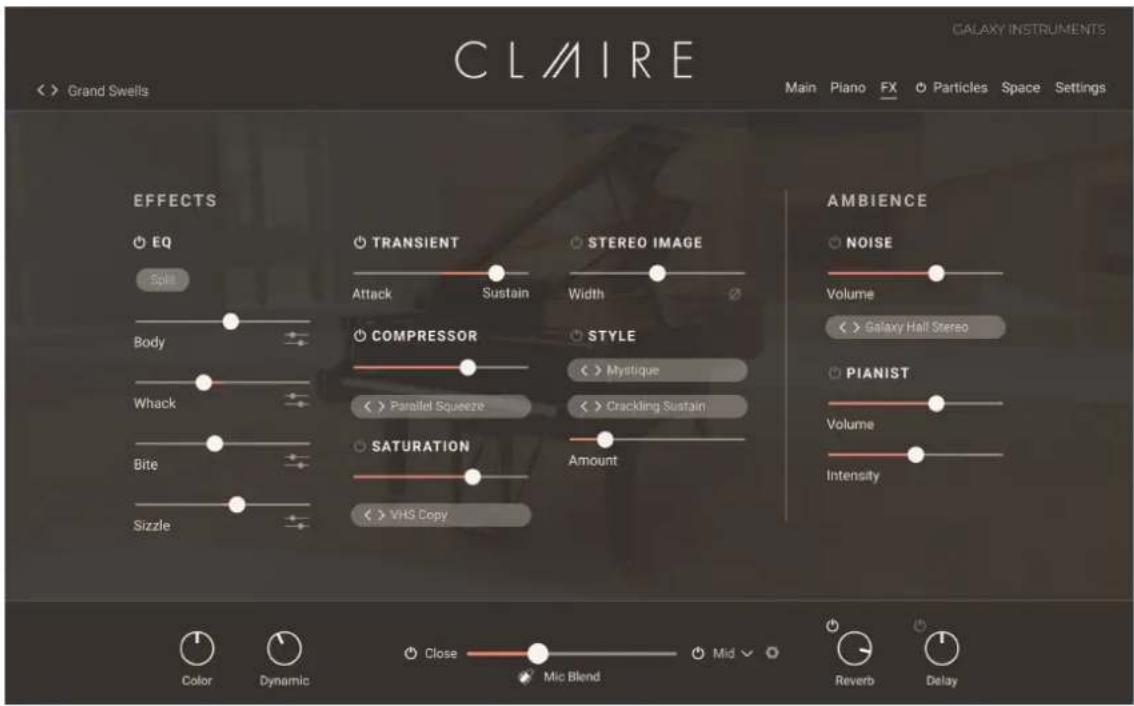
- Effects section: Adjust a collection of creative effects applied to the instrument. Refer to Effects section.
- Ambience section: Adds external sounds from the room and from the player. Refer to Ambience section.
The effects in this page affect only the main piano sound. Other effects dedicated to the particles are available in the Effects section of the Particles page. Refer to Effects section for more information.
Effects section
The Effects section of the Effect page contains the following controls:
• Equalizer controls: Adjust a four-band equalization.
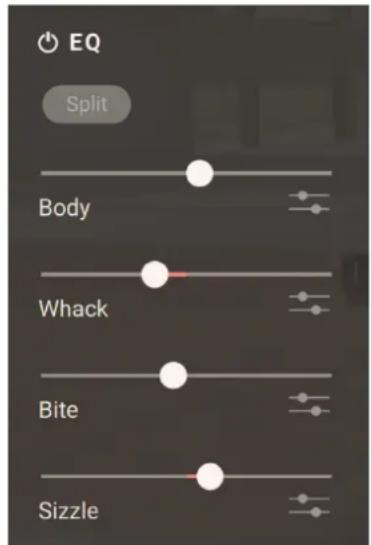
• EQ On/Off switch: Turns the equalizer on or off.
- Split button: When off (default setting), the equalization settings below apply to the sound for both the close microphones and the room microphones. If you activate the Split button, you can choose different equalization settings for each microphone set by clicking Close or Mid/Far from the selector that appears. If you deactivate Split again, the last settings apply to both microphone sets. For more information on the close microphones and room microphones, refer to Mic Blend controls.
- Gain sliders: Adjust the levels of the four frequency bands. From top to bottom, the sliders control lower to higher frequency bands. The frequency bands are described in musical terms, as shown by the labels under the sliders. You can customize the frequency band of each gain slider to your needs by clicking the Settings icon below.
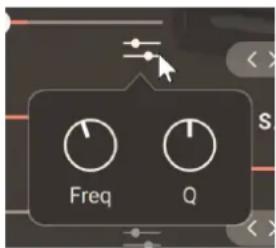
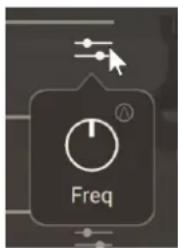
- Settings icons: Each icon opens a panel in which two parameters let you adjust the frequency response for that equalization band. For all four sliders, the Freq knob controls the center frequency of the band. As you adjust the frequency, the musical term under the Gain slider changes accordingly. For the middle two Gain sliders, a Q knob controls the sharpness of the bandwidth: The higher Q is, the narrower the band is. For the outer two Gain sliders, a Bell button lets you switch the frequency band's response between shelf (button off) and bell (button on).
- Transient controls: Adjust the transients of the sound.
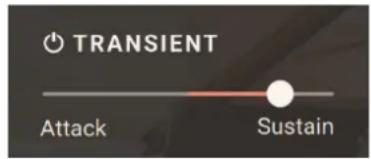
- Transient On/Off switch: Turns the transient control on or off.
- Transient slider: Accentuates the attack when pushed to the left, or lengthens the sustain when pushed to the right.
- Compressor controls: Apply a compression to the sound.
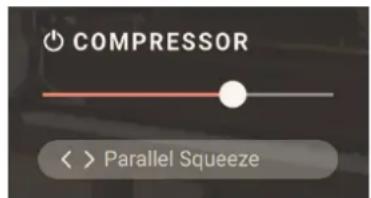
- Compressor On/Off switch: Turns the compressor on or off.
- Compressor slider: Adjusts the amount of compression.
- Compressor Type selector: Selects from various compression type with different ratio, attack and release settings as well tape saturation within certain presets. You can also click the little arrows on the left to switch to the next or previous entry from the menu.
- Saturation controls: Apply a saturation to the sound.
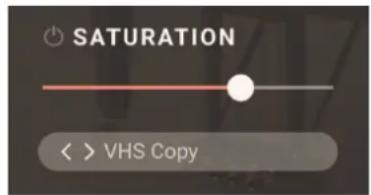
- Saturation On/Off switch: Turns the saturation on or off.
- Saturation slider: Adjusts the amount of saturation.
- Saturation Type selector: Selects from various saturation types. You can also click the little arrows on the left to switch to the next or previous entry from the menu.
- Stereo Image controls: Adjust the width of the sound in the stereo field.
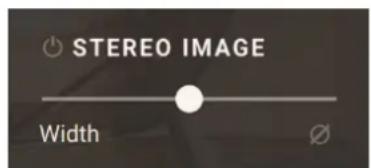
- Stereo Image On/Off switch: Turns the stereo imager on or off.
- Width slider: Widens or narrows the stereo field. The middle position corresponds to the stereo width of the original recording. Moving the slider to the left makes the sound narrower up to mono at full left, while moving it to the right artificially enhances the stereo width.
- Width Invert switch: The samples of the grand piano are panned with the low notes on the left and the high notes on the right, which corresponds to the listening position of the player. Using the Width Invert button swaps the left and right channels, changing the listening position to that of the audience.
- Style controls: Configure an additional chain of effects.
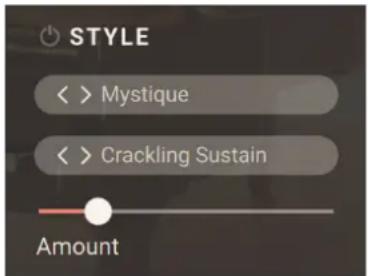
- Style On/Off switch: Turns the effect chain on or off.
- Style Category selector: Selects from various multi-effect categories. You can also click the little arrows on the left to switch to the next or previous entry from the menu.
- Style Preset selector: Selects from various multi-effect presets in the chosen category. You can also click the little arrows on the left to switch to the next or previous entry from the menu.
- Amount slider: Ajusts the amount of the selected effect chain applied to the sound.
Ambience section
The Ambience section of the Effect page contains the following controls:
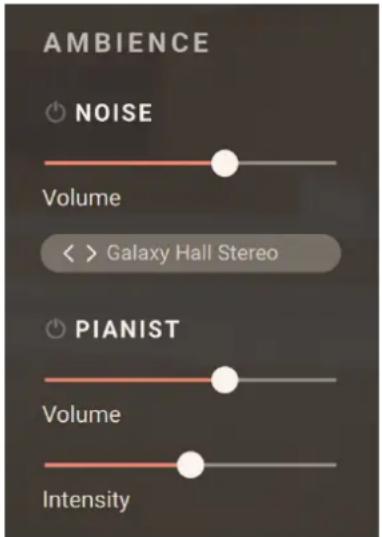
- Noise controls: Adjust the continuous ambient noise.
- Noise On/Off switch: Turns the ambient noise on or off.
- Noise Volume slider: Adjusts the volume level of ambient noise.
- Noise Source selector: Selects from different ambient noise sources.
- Pianist controls: Adjust the noises created by the pianist such as squeaks, breaths, etc. Pianist noises are only triggered if the piano is actually being played.
- Pianist On/Off switch: Turns the pianist noises on or off.
- Pianist Volume slider: Adjusts the volume level of pianist noises.
- Pianist Intensity slider: Adjusts the rate of pianist noises.
9. Particles page
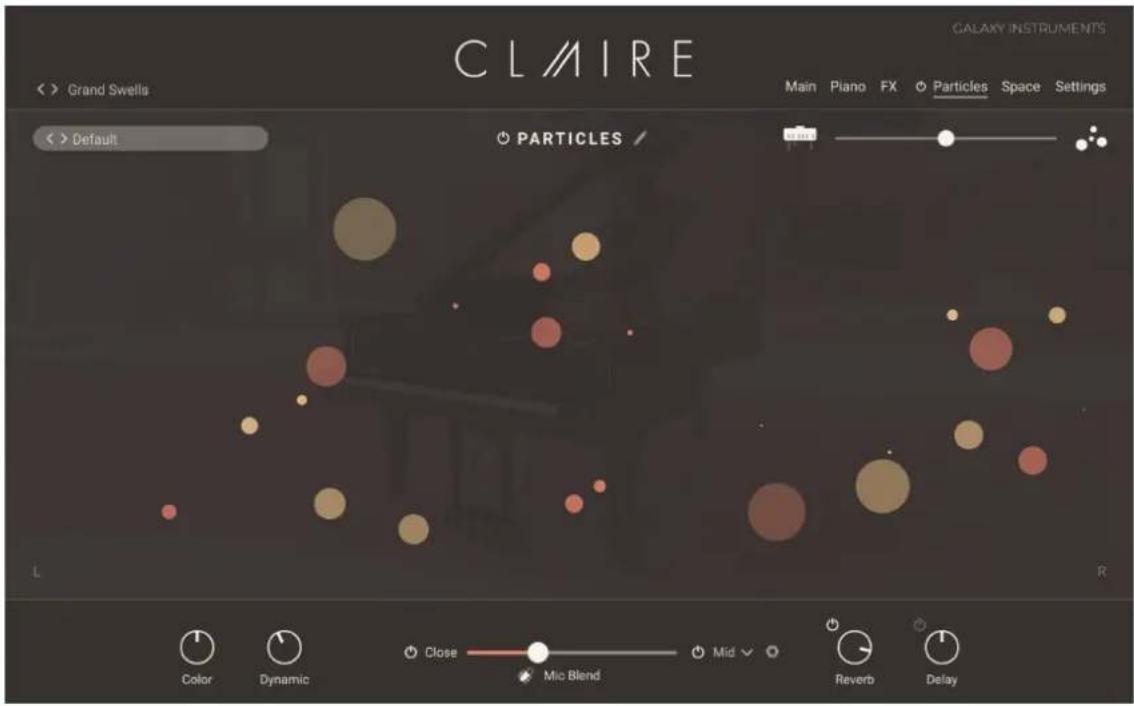
The Particles page lets you adjust the behavior of the Particles engine, which generates a cloud of additional ghost notes.
▶ Click Particles at the top right of the instrument to open the Particles page.
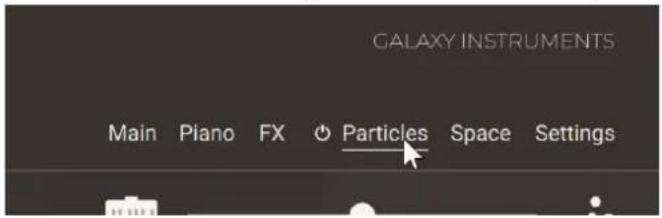
The row of controls at the top of the Particles page is always visible:

From left to right, it contains the following controls:
- Particles Preset selector: Shows the name of the loaded preset for the Particles engine. Clicking the preset name opens the Preset Browser where you can select another Particles preset. You can also click the little left/right arrow next to the preset name to quickly load the previous or next preset from the browser's result list without opening the browser. For more information on the Particles Browser, refer to Particles Browser.
- Particles On/Off switch: Turns the Particles engine on or off. This switch mirrors the on/off switch located next to the Particles button in the top right corner of the instrument.
- Particles Edit button (pencil icon): Switches the Particles page between a visual animation of the particles and the detailed parameters of the Particles engine.
- Piano/Particles Blend fader: Adjusts the blend between the main piano sound on the left, and the particles on the right.
When the Particles Edit button is off, the Particles page shows an real-time animation of the particles as they are generated. As you play and hold keys on your keyboard, the additional notes generated by the Particles engine appear as colored circles whose position indicates their pitch (vertical axis) and their stereo panning (horizontal axis), while their color indicates from which source sample(s) they are originating.
When the Particles Edit button is on, the Particles engine's parameters are organized into three sections:
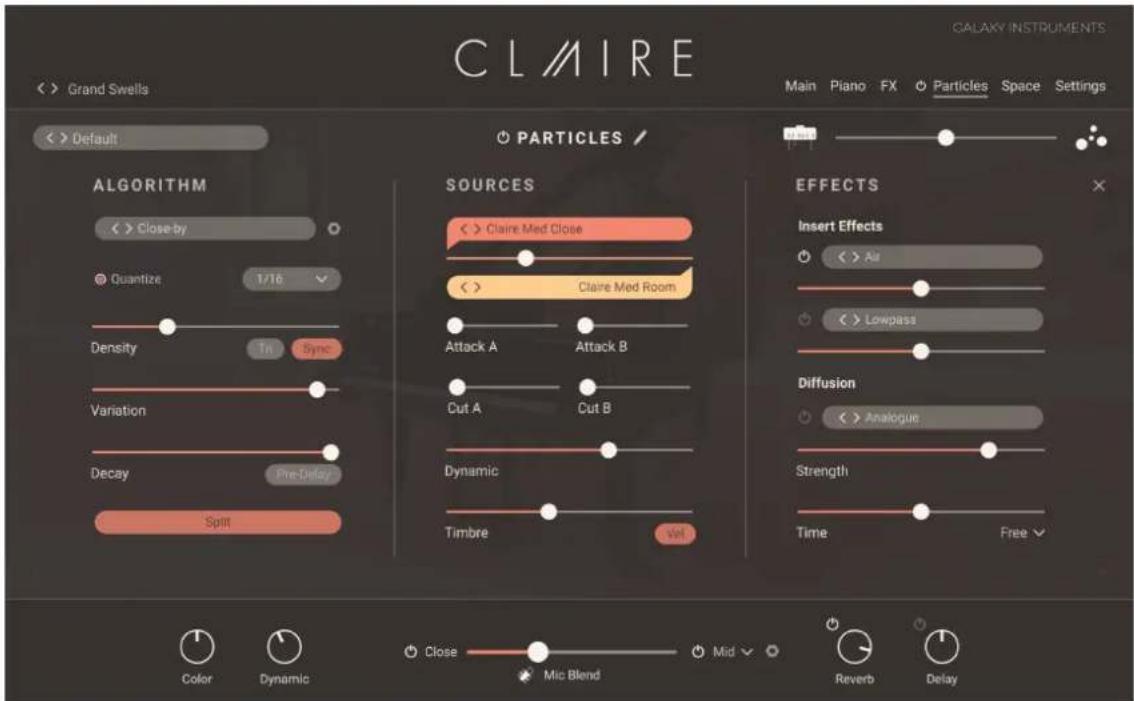
- Algorithm section: Adjusts the algorithm used to generate the particles. This will affect the timings and pitches at which the particles will be triggered. Refer to Algorithm section.
- Sources section: Selects and adjusts the two base samples triggered by the Particles engine. Refer to Sources section.
• Effects section: Configures the effects processing the particles. Refer to Effects section.
When the Particles Edit button is on and the parameters displayed, you can also click the little cross in the top right corner to hide the parameters and show instead the particles' animation.
Particles Browser
The Particles Browser lets you find and load Particles presets from the Claire factory library.
▶ To open the Particles Browser, click the name of the current Particles preset in the top left corner of the Particles page:
The Particles Browser follows this typical workflow:
- In the left part of the Browser, you can click the properties describing the type of particles that you are looking for.
- In the right part of the Browser, the list shows the presets matching the properties that you have selected.
The Particles Browser provides the following controls:
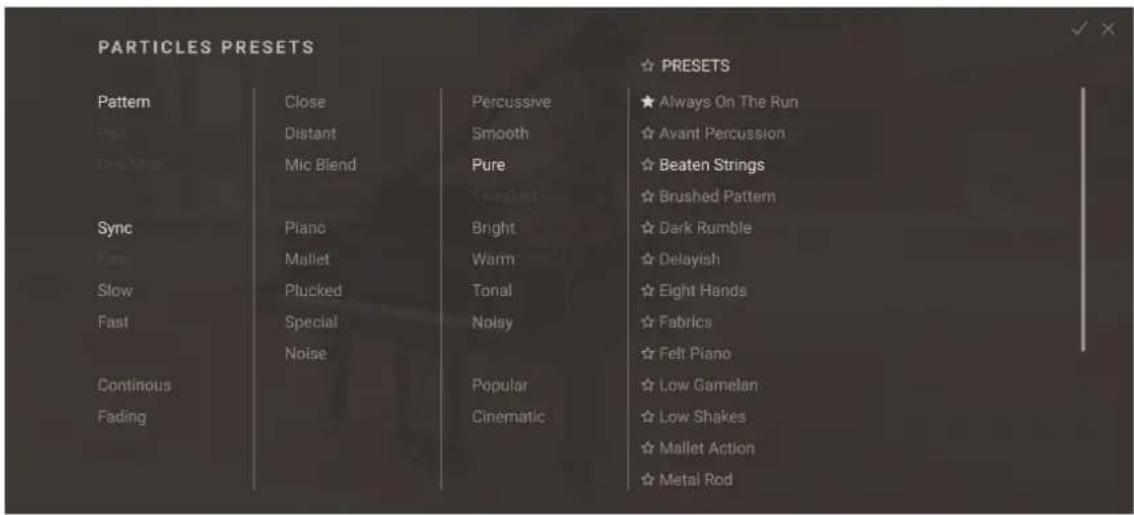
-
Tag filter: You can click the tags describing the particles that you are looking for. The PRESETS list on the right is updated accordingly. The Tag filter is organized into three columns, from left to right: Type, Character, and Style. As you select tags, the color intensity of the remaining tags indicates whether or not some presets are available:
-
Highlighted tags are already selected. You can click them to deselect them and widen the scope of your search.
- Normal tags are not selected but they have matching presets in the current PRESETS list. You can select them to further narrow your search.
-
Faded tags are not selected and they do not have any matching presets in the current PRESETS list. You cannot select them, unless you deselect other tags first.
-
Favorites: You can click the star icons to add or remove presets to/from your Favorites. The star icons are lit for the presets set as Favorites. This way, you can quickly create a custom collection of your most beloved presets. You can then display only your Favorites by clicking the topmost star icon next to the PRESETS header. Click the topmost star icon again to display also non-Favorite presets.
- PRESETS list: Shows the presets matching the tags selected in the Tag filter on the left. You can click a preset to load it and try it directly on your keyboard or in your DAW. You can double-click a preset to load it and close the Browser.
- OK (check mark): Keeps the selected preset loaded and closes the Particles Browser. This is the same as double-clicking the preset in the PRESETS list.
- Cancel (cross): Closes the Particles Browser without changing anything. Your instrument returns to its previous state.
Algorithm section
The Algorithm section of the Particles page lets you fine-tune the moments and pitches at which the particles will be triggered:
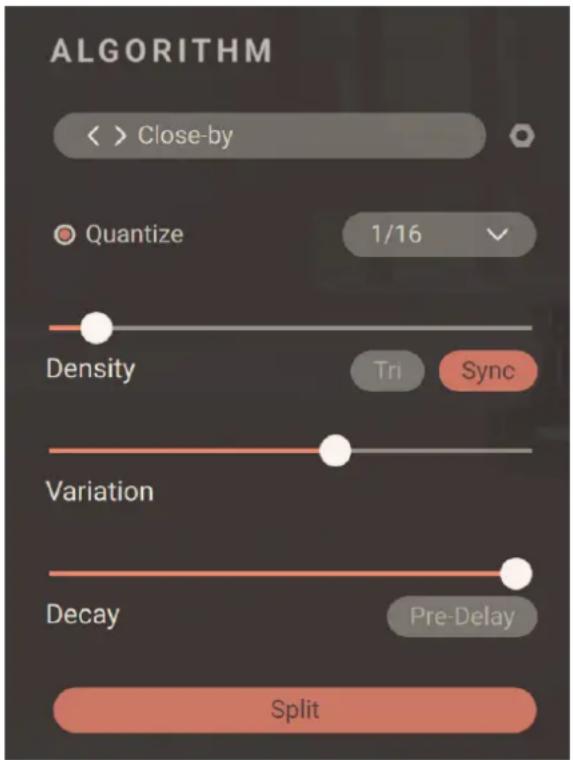
The section contains the following controls, from top to bottom:
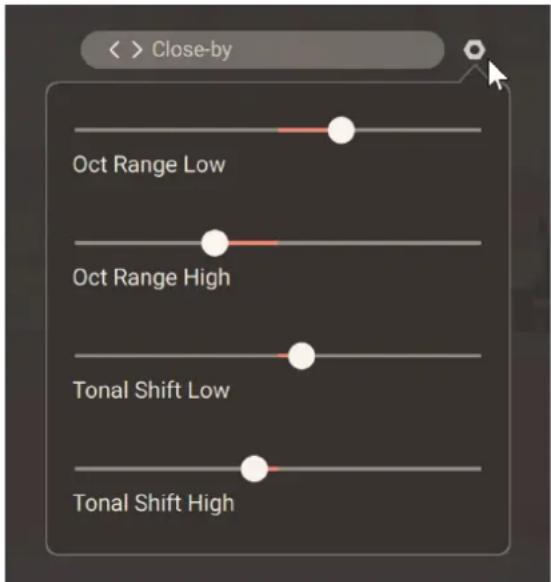
- Mode Preset selector: Selects predefined ranges for the pitches of the particles. The Particles algorithm uses both an octave range and a tonal shift range: The pitch of each particle is set randomly within these ranges. This selector provides a collection of predefined values for both ranges. You can click the preset name to open a drop-down menu and select the desired preset, or click the arrow icons next to it to quickly load the previous or next preset from the menu. Note that if you adjust the ranges using the Mode Edit icon on the right, your manual adjustments will override the settings from the selected preset.
- Mode Edit button (nut icon): Opens a Mode Edit panel in which you can manually adjust the octave range and the tonal shift range used to create the particles.
- Quantize On/Off switch: Switches the input quantization on or off. This feature works only if the Sync button below is switched on as well. When the Quantize button is on, the particles are triggered in sync with the tempo. The quantization is applied according to the note value set in the Quantize menu next to it.
- Quantize menu: Sets the quantization value used when the Quantize On/Off switch is on.
- Density: Defines the shortest delay between two particles. The delay before triggering the next particle is randomly taken between this value and the value of the Variation slider. The value is measured in note values if Sync is on, in milliseconds otherwise.
• Tri: Switches to triplets the random rhythmic pattern at which particles are triggered. - Sync: When Sync is switched on, the delays between particles depend on the tempo: the delay ranges set by the Density and Variation sliders switch to note values, and the delays between particles are random note values within that range.
- Variation: Defines the longest delay between two particles. The delay before triggering the next particle is randomly taken between the value of the Density slider and this value. The value is measured in note values if Sync is on, in milliseconds otherwise.
- Decay: Adjusts the duration of the decaying cloud after a key is pressed. When set to Infinite (at full right), the cloud will continue until all keys are released.
- Pre-Delay: When Pre-Delay is switched on, a delay is introduced between your original note and the resulting particles. When switched off, the particle cloud starts straight away as you press the key.
- Split: When Split is switched on, the panning, velocity, octave range and tonal shift range are calculated individually for each sound sources. When Split is switched off, the same parameter values are used for both sound sources.
Sources section
The Particles engine can blend two different samples as sources to generate the particles. You can set up these sources in the Sources section of the Particles page:
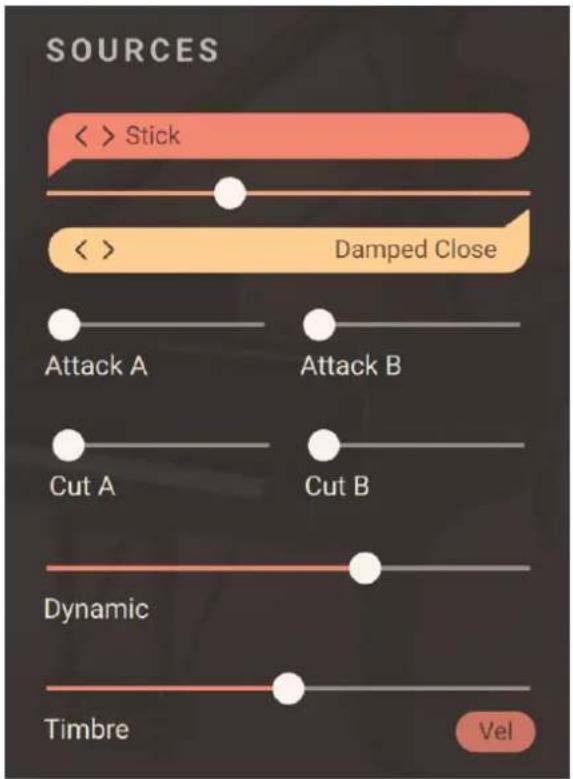
The section contains the following controls, from top to bottom:
- Source A selector: Displays the name of the sample used as source A. Clicking the name opens a mini Source Browser in which you can choose another sample for source A by selecting a sample category on the left and a sample on the right:
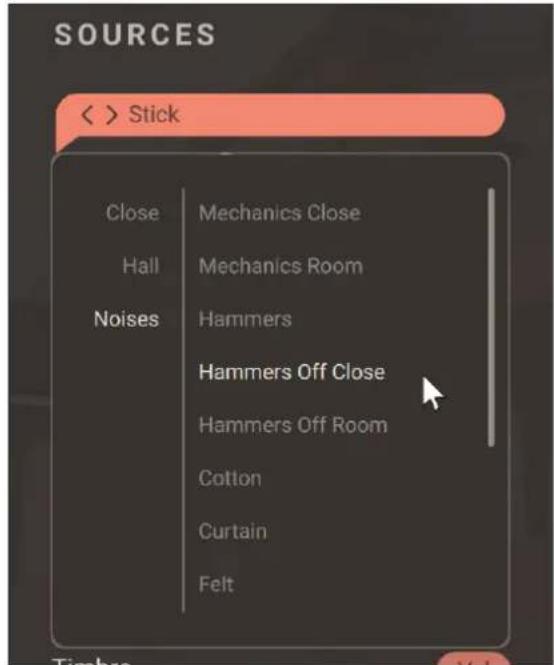
You can also click the little arrows next to the sample name to quickly load the previous or next sample from the mini Source Browser without opening it.
- Source Mix slider: Adjusts the mix between source A and source B.
- Source B selector: Displays the name of the sample used as source B. Clicking the name opens a mini Source Browser in which you can choose another sample for source B by selecting a sample category on the left and a sample on the right:
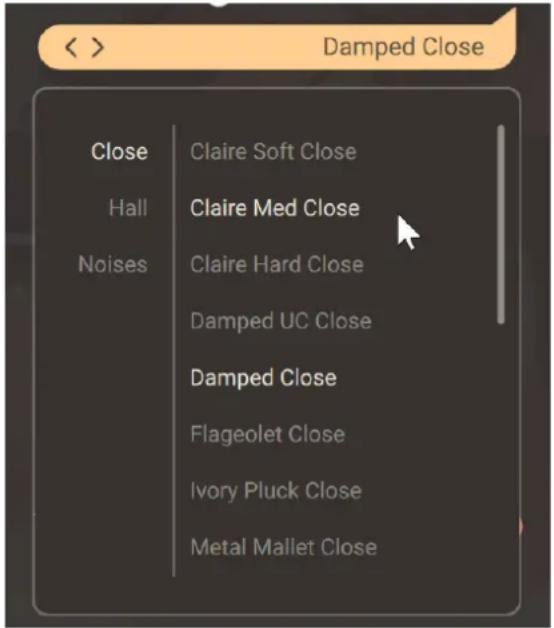
You can also click the little arrows next to the sample name to quickly load the previous or next sample from the mini Source Browser without opening it.
- Attack A: Increases the attack time of the source as you drag the slider to the right.
- Attack B: Increases the attack time of the source as you drag the slider to the right.
- Cut A: Increases the decay time of the source as you drag the slider to the right.
- Cut B: Increases the decay time of the source as you drag the slider to the right.
- Dynamic: Adjusts the dynamic range of the particles by adjusting their volume while still using the same velocity samples (these are set by the Timbre slider). The particles will be triggered at random velocities within this range. Drag left to shrink, or drag right to expand the dynamic range.
- Timbre: Changes the timbre (or tone color) of the particles from soft to hard by readjusting the sample mapping. The particles will be triggered at random timbres within this range. The Timbre slider is bipolar: at the middle position, it allows all timbres. From the middle position, drag the slider to the right to progressively limit the particles to harder sounds, and drag it to the left to progressively limit the particles to softer sounds.
- Vel (Velocity): When this button is switched on, the particles' timbre also reacts to the incoming MIDI velocities, making the Particles engine dynamically playable.
Effects section
The Particles engine provides two freely assignable effect units to shape the sound of the particles, and a diffusion effect to add space to the particle cloud. You can set these up in the Effects section of the Particles page:
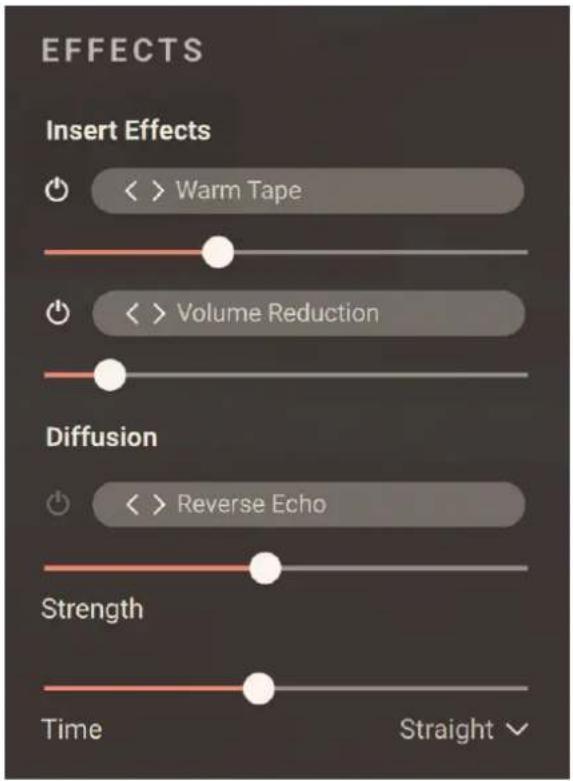
Each of the two insert effects provides the following controls:
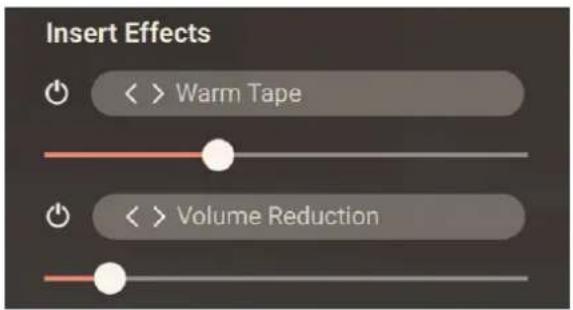
- Insert Effect On/Off switch: Turns the insert effect on or off.
- Insert Effect Preset selector: Displays the name of the loaded effect preset. Clicking the name opens a mini Effect Browser in which you can choose another insert effect by selecting an effect category on the left and an effect on the right:
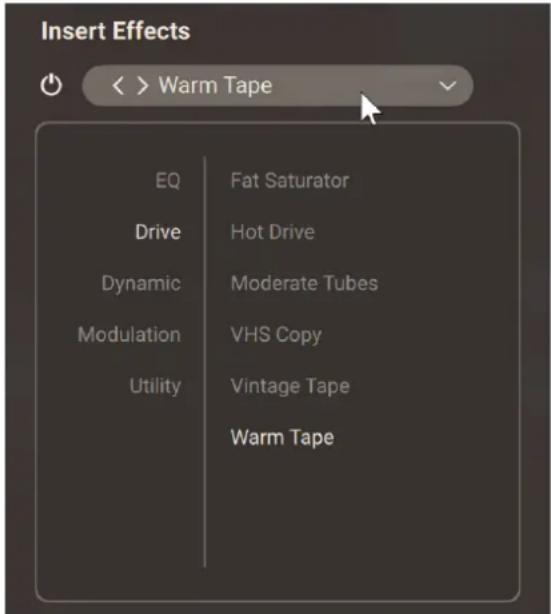
You can also click the little arrows next to the effect name to quickly load the previous or next effect from the mini Effect Browser without opening it.
- Insert Effect Amount slider: Adjusts the amount of effect applied to the particles.
The Diffusion effect provides the following controls:
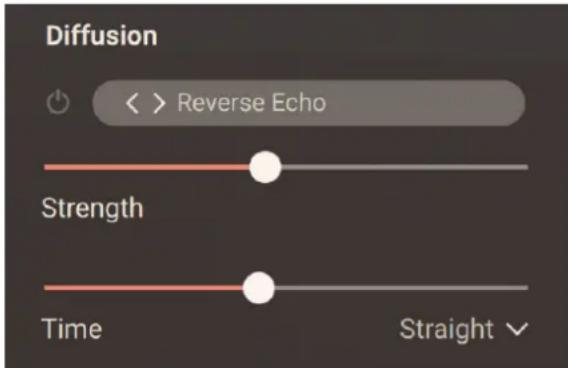
• Diffusion On/Off switch: Turns the Diffusion effect on or off.
- Diffusion Preset selector: Displays the name of the loaded Diffusion preset. Clicking the preset name opens a drop-down menu in which you can select another preset. You can also click the little arrows next to the preset name to quickly load the next or previous preset from the menu.
• Strength: Adjusts the strength of the Diffusion effect.
• Time: Adjusts the delay or reverb time and thereby the perceived size of the diffusion space.
- Sync Mode menu: This menu appears only if a delay preset is selected in the Diffusion Preset selector. This menu selects between four modes that determine the behavior of the Time control.
• Free: The delay time can bee freely adjusted in milliseconds.
- Straight: The delay time can be adjusted in even note divisions (1/16, 1/8, 1/4, etc.) relative to Kontakt's global tempo.
- Dotted: The delay time can be adjusted in dotted note divisions (1/16d, 1/8d, 1/4d, etc.) relative to Kontakt's global tempo.
- Triplets: The delay time can be adjusted in triplet note divisions (1/16t, 1/8t, 1/4t, etc.) relative to Kontakt's global tempo.

The effects in this Effects section affect only the particles. The effects dedicated to the main piano sound are available on the Effect and Space pages. Refer to Effect page and Space page for more information.
10. Space page
The Settings page lets you configure a reverberation and a delay unit for your instrument.
▶ Click Space at the top right of the instrument to open the Space page.
The Space page is split into two sections:
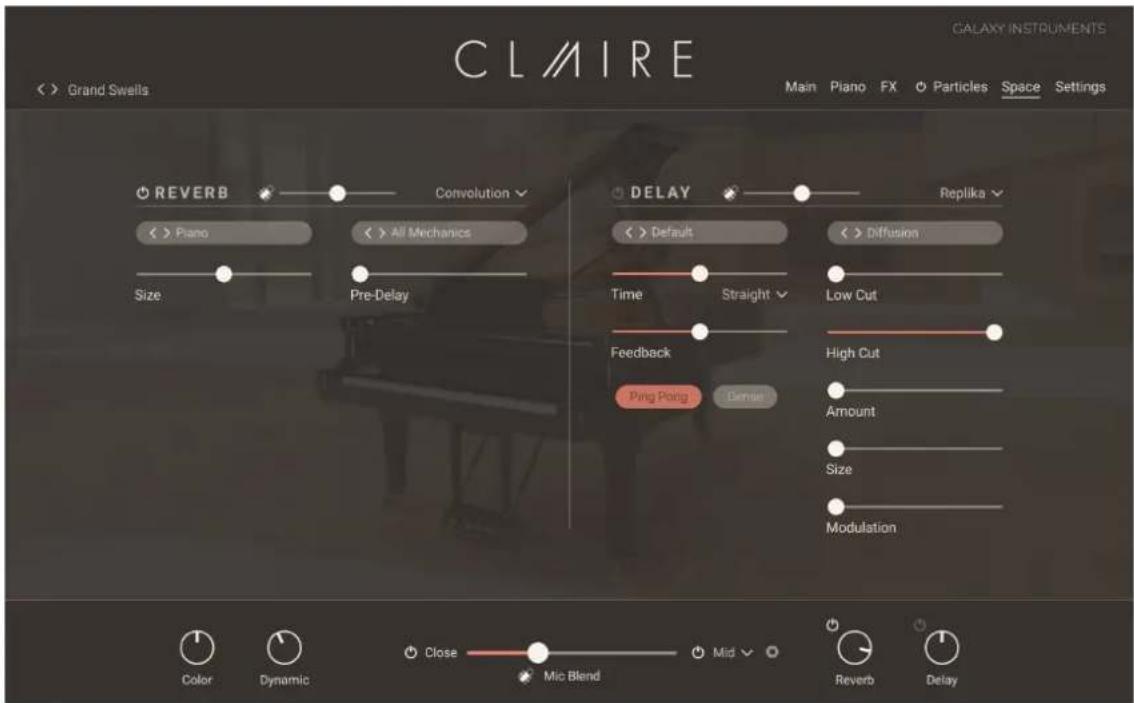
- Reverb section: Adjusts the reverberation unit. Refer to Reverb.
- Delay section: Adjusts the delay unit. Refer to Delay.

The effects in this page affect only the main piano sound. Other effects dedicated to the particles are available in the Effects section of the Particles page. Refer to Effects section for more information.
Reverb
The Reverb section allows you to apply a reverb effect to the main piano sound.
At the top of the Reverb section, the following three controls are available:

- Reverb On/Off switch: Turns the reverb on or off. This has the same effect as the Reverb On/Off switch in the Performance controls at the bottom of the window. Refer to Claire overview for more information.
- Reverb Mic Blend fader: Adjusts a dedicated blend between the close microphones and the room microphones for the signal sent to the reverb unit. This fader lets you adjust a different microphone blend for the reverb unit than for the main instrument sound, which is set in the Performance controls at the bottom of the window. Refer to Mic Blend controls for more information.
- Reverb Engine menu: Selects from three Reverb engines: Convolution, Algorithmic, and Plate. The reverb parameters below will depend on the selected engine.

You can adjust the overall amount of reverb applied to your instrument using the Reverb knob located in the Performance controls at the bottom of the instrument. Refer to Claire overview for more information.
Convolution reverb
By selecting Convolution in the Reverb Engine menu, you activate the Convolution reverb. The convolution reverb uses impulse responses of various vintage reverb units, halls, rooms, and other objects and places to recreate those acoustic situations.
The Convolution reverb contains the following controls:
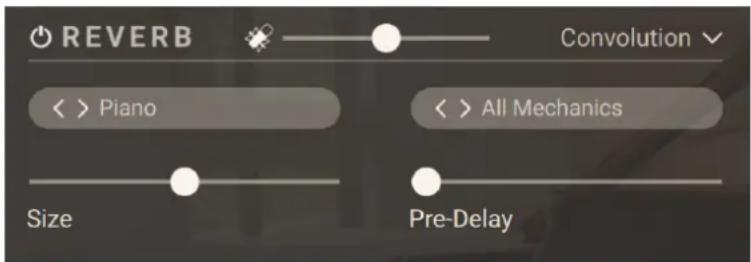
- Category selector (left menu): Selects the category of impulse responses. You can also click the little arrows on the left to switch to the next or previous entry from the menu.
- IR selector (right menu): Selects an impulse response from the selected category. You can also click the little arrows on the left to switch to the next or previous entry from the menu.
- Size: Adjusts the size of the reverb effect by lengthening or shortening the selected impulse response.
• Pre Delay: Adjusts the delay before the reverb starts.
Algorithmic reverb
By selecting Algorithmic in the Reverb Engine menu, you activate the Algorithmic reverb.
The Algorithmic reverb contains the following controls:
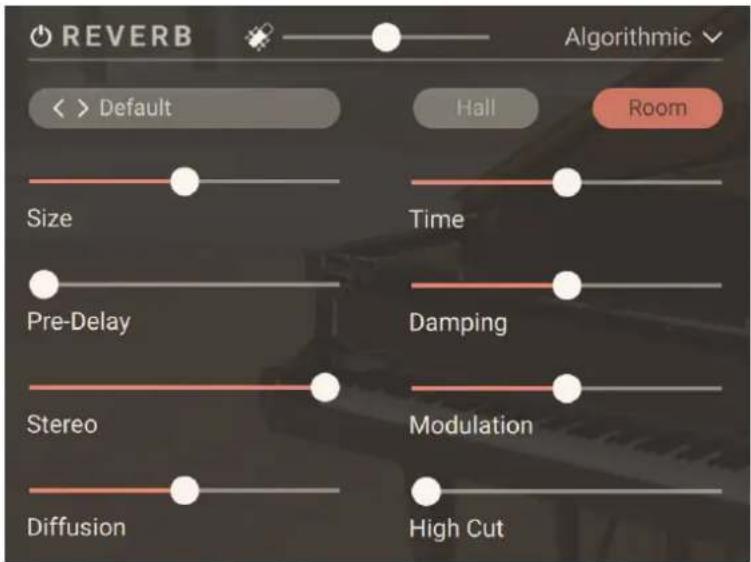
- Preset selector: Selects from various predefined settings for the effect. You can select a preset by clicking on the left and right arrows, or open the drop-down menu by clicking on the preset name.
- Hall/Room selector: Selects between two reverberation modes simulating the sound character of a hall or a room.
- Size: Adjusts the size of the hall or room simulated by the reverb effect. Higher values replicate larger spaces.
• Time: Adjusts the duration of the reverb effect.
• Pre-Delay: Introduces a short amount of delay before the reverb takes effect. - Damping: Adjusts the amount of absorption in the room simulated by the reverb effect. Higher values result in more absorption.
- Stereo: Controls the stereo image of the reverb effect. Higher values result in a wider stereo image.
- Modulation: Adjusts the amount of modulation applied to the reverb effect. At full left, no modulation is applied.
• Diffusion: Adjusts the density of the reflections in the room simulated by the reverb effect.
• High Cut:: Cuts the high-frequency content of the reverb signal.
Plate reverb
By selecting Plate in the Reverb Engine menu, you activate the Plate reverb.
The Plate reverb contains the following controls:
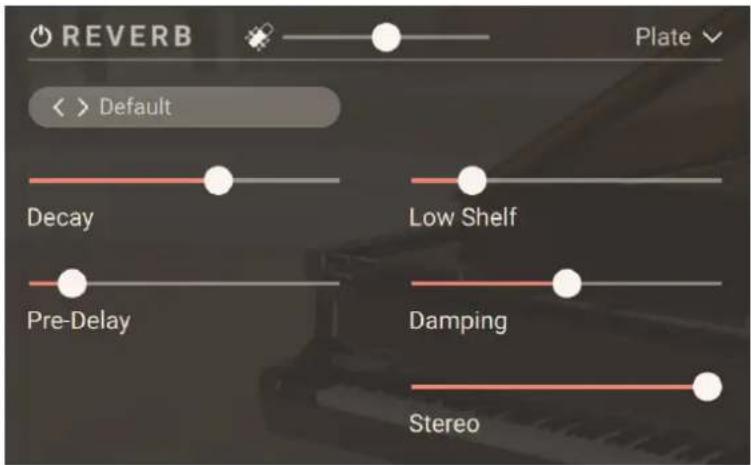
- Preset selector: Selects from various predefined settings for the effect. You can select a preset by clicking on the left and right arrows, or open the drop-down menu by clicking on the preset name.
- Decay: Adjusts the duration of the reverb effect.
- Low Shelf: Attenuates or amplifies the low-frequency content of the reverb signal.
- Pre-Delay: Introduces a short amount of delay before the reverb takes effect.
- Damping: Adjusts the amount of absorption in the room simulated by the reverb effect. Higher values result in more absorption.
- Stereo: Controls the stereo image of the reverb effect. Higher values result in a wider stereo image.
Delay
The Delay section allows you to apply a delay effect to the main piano sound.
At the top of the Delay section, the following three controls are available:

- Delay On/Off switch: Turns the delay on or off. This has the same effect as the Delay On/Off switch in the Performance controls at the bottom of the window. Refer to Claire overview for more information.
- Delay Mic Blend fader: Adjusts a dedicated blend between the close microphones and the room microphones for the signal sent to the delay unit. This fader lets you adjust a different microphone blend for the delay unit than for the main instrument sound, which is set in the Performance controls at the bottom of the window. Refer to Mic Blend controls for more information.
- Delay Engine menu: Selects from three Delay engines: Replika, Twin Delay, and Psyche Delay The delay parameters below will depend on the selected engine.

You can adjust the overall amount of delay applied to your instrument using the Delay knob located in the Performance controls at the bottom of the instrument. Refer to Claire overview for more information.
Replika
By selecting Replika in the Delay Engine menu, you activate the Replika delay. The Replika delay is a full-featured delay unit based on the Native Instruments Replika XT delay plug-in. Notably, it includes the five delay styles from Replika XT: Modern, Analog, Vintage, Tape and Diffusion, each with its own unique sound and behavior.
The Replika delay contains the following controls:
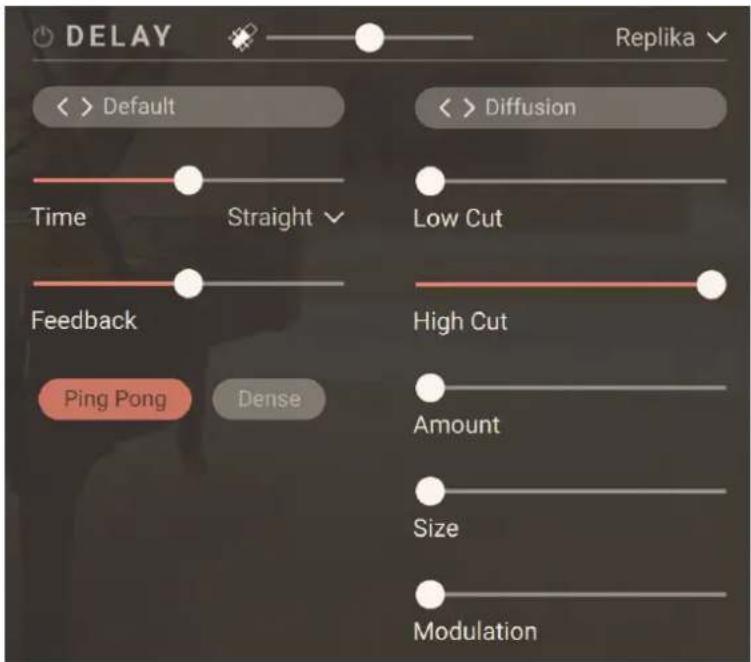
The controls in the top row of the Delay section (Delay On/Off switch, Mic Blend fader, and Delay Engine menu) are common to all types of Delay. For more information on them, refer to Delay.
- Preset selector (left menu): Selects from various predefined settings for the effect. You can select a preset by clicking on the left and right arrows, or open the drop-down menu by clicking on the preset name.
- Type selector (right menu): Selects between five different delay styles that determine the basic sound character. The last three controls of the delay vary with each type.
- Modern: Clean and defined delay with adjustable, tube-like saturation. The built-in modulation changes the delay time periodically. This shifts the timing and pitch of the delay signal, adding depth and movement to the sound. Unlike the built-in modulation, manual adjustments of the delay time do not alter the pitch of the delay signal.
- Analogue: Dark and hazy emulation of BBD (Bucket Brigade Device) delays, which include old analogue studio effects as well as many contemporary guitar pedals. The sound of the delay depends on the delay time: As the delay time is increased, the delay repeats will become darker, with more noise and distortion being introduced to the signal. The built-in modulation changes the delay time periodically. This shifts the timing and pitch of the delay signal, adding depth and movement to the sound.
- Tape: Textured and lively emulation of classic tape delays. It gives you full control over their unique properties, including the amount of saturation, the age of the tape, and the intensity of flutter.
- Vintage: Warm and crunchy emulation of early digital delay effects. The sound of the delay depends on the delay time. As the delay time is increased, the delay repeats will become grittier, with more digital artifacts being introduced to the signal. The built-in modulation changes the delay time periodically. This shifts the timing and pitch of the delay signal, adding depth and movement to the sound.
- Diffusion: Clean delay combined with a unique reverb effect. It can be used to create a wide range of different ambiences, from tight and resonant to unnaturally vast spaces.
- Time: Adjusts the delay time. Depending on the selected Sync mode, the delay time is either freely adjusted in milliseconds or synchronized to Kontakt's global tempo, which is the tempo of your DAW is Kontakt is running as a plug-in.
- Sync Mode menu: Selects between four modes that determine the behavior of the Time control.
• Free: The delay time can bee freely adjusted in milliseconds.
- Straight: The delay time can be adjusted in even note divisions (1/16, 1/8, 1/4, etc.) relative to Kontakt's global tempo.
- Dotted: The delay time can be adjusted in dotted note divisions (1/16d, 1/8d, 1/4d, etc.) relative to Kontakt's global tempo.
- Triplets: The delay time can be adjusted in triplet note divisions (1/16t, 1/8t, 1/4t, etc.) relative to Kontakt's global tempo.
- Feedback: Adjusts the level of the signal that is being fed back to the delay's input. Increasing the feedback level creates more delay repeats that decay over time. Feedback levels of 100% and above are possible, allowing the delay repeats to build up until the point of self-oscillation.
- Low Cut: Attenuates low-frequency content in the feedback path of the delay using a low-cut filter. With the slider at full left, the filter is off. Moving it to the right raises the cutoff frequency of the filter, resulting in a brighter tone of the delay.
- High Cut: Attenuates high-frequency content in the feedback path of the delay using a high-cut filter. With the slider at full right, the filter is off. Moving it to the left lowers the cutoff frequency of the filter, resulting in a darker tone of the delay.
- Ping Pong: Turns Ping Pong mode on or off. In Ping Pong mode, the delay repeats are panned hard left and right in an alternating pattern.
The remaining controls depend on the delay type selected in the Type selector, as described below.
Type: Modern
- Stereo: Switches between stereo and mono operation for the built-in modulation. When activated, the modulation between the left and the right stereo channels is offset in time, resulting in a wide stereo effect. When deactivated, the modulation affects both the left and the right stereo channels in the same way.
- Depth: Adjusts the amount of built-in modulation applied to the delay time.
- Rate: Adjusts the speed of the built-in modulation.
- Saturation: Adds tube-like saturation at the delay input. With the control at full left the saturation is bypassed, moving it to the right pushes the sound from subtle warmth to overdrive. The amount of saturation depends on the input level.
Type: Analogue
- Stereo: Switches between stereo and mono operation for the built-in modulation. When activated, the modulation between the left and the right stereo channels is offset in time, resulting in a wide stereo effect. When deactivated, the modulation affects both the left and the right stereo channels in the same way.
- Depth: Adjusts the amount of built-in modulation applied to the delay time.
- Rate: Adjusts the speed of the built-in modulation.
- BBD Type: Selects one of four BBD delay models: Clean, Warm, Dark, Grunge. The character of the four models ranges from subtle filtering and distortion (Clean, Warm) to a highly degraded sound (Dark, Grunge).
Type: Tape
- Noise: Switches the tape hiss on or off. The amount of hiss depends on the Tape Age control.
- Saturation: Adjusts the amount of tape saturation from a clean sound to overdrive.
- Tape Age: Enhances the characteristics of an aging tape, like limited high-frequency response and hiss (depending on the Noise button's state).
- Flutter: Increases the effects introduced by mechanical imperfections of the tape delay's motor and tape transport, resulting in pitch variations over time.
Type: Vintage
- Stereo: Switches between stereo and mono operation for the built-in modulation. When activated, the modulation between the left and the right stereo channels is offset in time, resulting in a wide stereo effect. When deactivated, the modulation affects both the left and the right stereo channels in the same way.
- Depth: Adjusts the amount of built-in modulation applied to the delay time.
- Rate: Adjusts the speed of the built-in modulation.
- Quality: Selects one of four quality settings for the delay: High, Medium, Low, Crunch. The High setting has a bright, subtly textured sound. Medium and Low sound darker and grittier. Crunch has a bright sound but also introduces a lot of digital artifacts to the signal.
Type: Diffusion
- Dense: Switches between two density settings for the reflection pattern of the reverb effect. When activated, the reflection pattern is dense and washed out. When deactivated, the reflection pattern is sparse with a granular quality.
- Amount: Adjusts the amount of diffusion applied to the delay signal, resulting in a reverb effect. High settings make the delay appear out of sync, so low settings are recommended if the rhythmic timing of the delay is essential.
- Size: Adjusts the swell, reflection pattern and decay of the reverb effect, giving the impression of differently sized spaces.
- Modulation: Adjusts the depth and speed of modulation applied to the diffusion, shifting the timing and pitch of the reflections for a wide reverb effect.
Twin Delay
By selecting Twin Delay in the Delay Engine menu, you activate the Twin delay. The Twin delay combines two parallel delay channels for advanced stereo effects. The two delays are dedicated to the left and right stereo channel, respectively. You can use them to create rhythmic echoes that bounce through the stereo image.
The Twin delay contains the following controls:
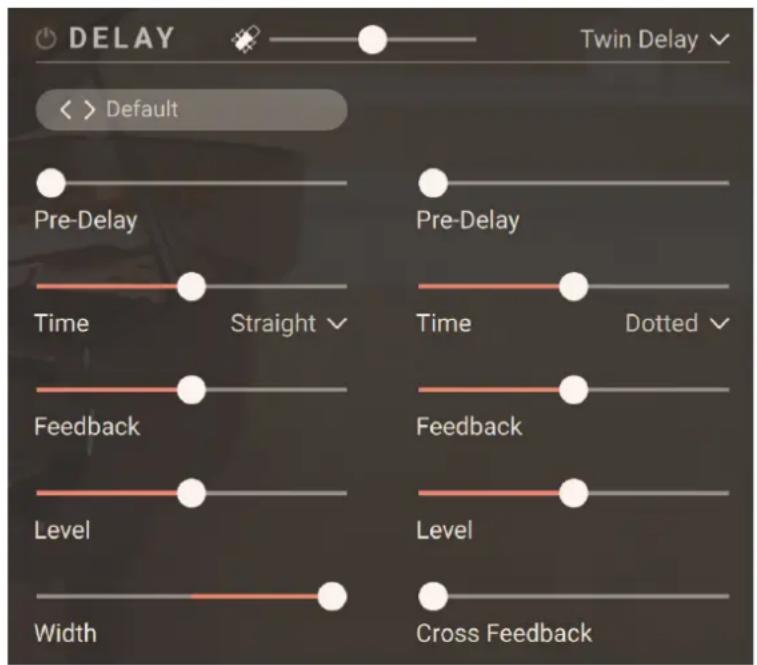

The controls in the top row of the Delay section (Delay On/Off switch, Mic Blend fader, and Delay Engine menu) are common to all types of Delay. For more information on them, refer to Delay.
- Preset selector: Selects from various predefined settings for the effect. You can select a preset by clicking on the left and right arrows, or open the drop-down menu by clicking on the preset name.
The following controls are available for each of the left and right delay channels independently:
- Pre-Delay: Adjusts the duration of the initial delay added to the channel. This predelay is independent of the Time control and does not affect the delay repeats. To achieve classic ping-pong echoes, set the same Time for both channels and increase the Pre-Delay on one of them.
- Time: Adjusts the delay time. Depending on the selected Sync mode, the delay time is either freely adjusted in milliseconds or synchronized to Kontakt's global tempo, which is the tempo of your DAW is Kontakt is running as a plug-in.
- Sync Mode menu: Selects between four modes that determine the behavior of the Time control.
• Free: The delay time can bee freely adjusted in milliseconds.
- Straight: The delay time can be adjusted in even note divisions (1/16, 1/8, 1/4, etc.) relative to Kontakt's global tempo.
- Dotted: The delay time can be adjusted in dotted note divisions (1/16d, 1/8d, 1/4d, etc.) relative to Kontakt's global tempo.
- Triplets: The delay time can be adjusted in triplet note divisions (1/16t, 1/8t, 1/4t, etc.) relative to Kontakt's global tempo.
- Feedback: Adjusts the amount of channel output that is sent back into the channel input. Moving Feedback to the right increases the number of delay repetitions.
• Level: Adjusts the output level of the delay channel.
The following controls act globally and affect both delay channels simultaneously.
- Width: Adjusts the stereo image of the delay signal. At center position, the signal is mono. Turning the control to the right increases the width of the stereo image. Turning the control to the left increases the width of the stereo image and flips the left and right stereo channel.
- Cross Feedback: Adjusts the amount of cross-feedback, which feeds the left channel output back into the right channel input and vice versa.
Psyche Delay
By selecting Psyche Delay in the Delay Engine menu, you activate the Psyche Delay. The Psyche Delay is a stereo delay effect that produces a range of atmospheric ambient echoes and reverse effects reminiscent of the so-called backwards tape sound of the 1960s.
The Psyche Delay contains the following controls:
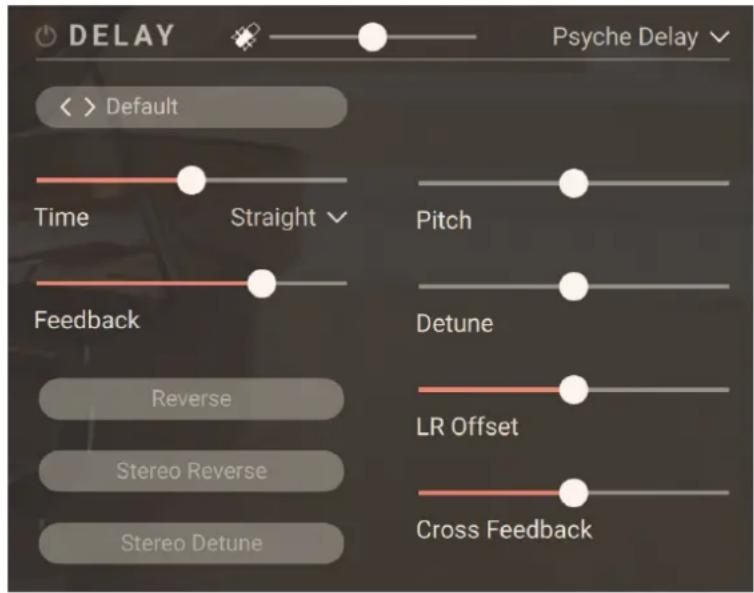

The controls in the top row of the Delay section (Delay On/Off switch, Mic Blend fader, and Delay Engine menu) are common to all types of Delay. For more information on them, refer to Delay.
- Preset selector: Selects from various predefined settings for the effect. You can select a preset by clicking on the left and right arrows, or open the drop-down menu by clicking on the preset name.
- Time: Adjusts the delay time. Depending on the selected Sync mode, the delay time is either freely adjusted in milliseconds or synchronized to Kontakt's global tempo, which is the tempo of your DAW is Kontakt is running as a plug-in.
- Sync Mode menu: Selects between four modes that determine the behavior of the Time control.
• Free: The delay time can bee freely adjusted in milliseconds.
- Straight: The delay time can be adjusted in even note divisions (1/16, 1/8, 1/4, etc.) relative to Kontakt's global tempo.
- Dotted: The delay time can be adjusted in dotted note divisions (1/16d, 1/8d, 1/4d, etc.) relative to Kontakt's global tempo.
- Triplets: The delay time can be adjusted in triplet note divisions (1/16t, 1/8t, 1/4t, etc.) relative to Kontakt's global tempo.
- Feedback: Adjusts the amount of delay output that is sent back into the delay input. Moving Feedback to the right increases the number of delay repetitions.
• Reverse: Reverses the playback of subsequent delay repeats. - Stereo Reverse: Removes the reverse effect from the right stereo channel, thus only delay repeats on the left channel are reversed.
- Stereo Detune: Applies the Detune effect to both the left and right stereo channel.
- Pitch: Adjusts the pitch of the echo repeats in the range of -12 to +12 semitones. Combined with Feedback you can use this to create progressively harmonized echo cascades.
- Detune: Adjusts the pitch of the echo repeats on the left stereo channel in the range of -50 to +50 cents. Combined with Feedback and Cross Feedback you can use this to create progressively detuned echo cascades.
- LR Offset: Enhances the stereo image of the delay by adding a timing offset between the left and right channels.
- Cross Feedback: Adjusts the amount of cross-feedback, which feeds the left channel output back into the right channel input and vice versa.
11. Settings page
The Settings page provides global settings regarding the sound and the control of your instrument.
▶ Click Settings at the top right of the instrument to open the Settings page.
The Settings page is split into three sections:
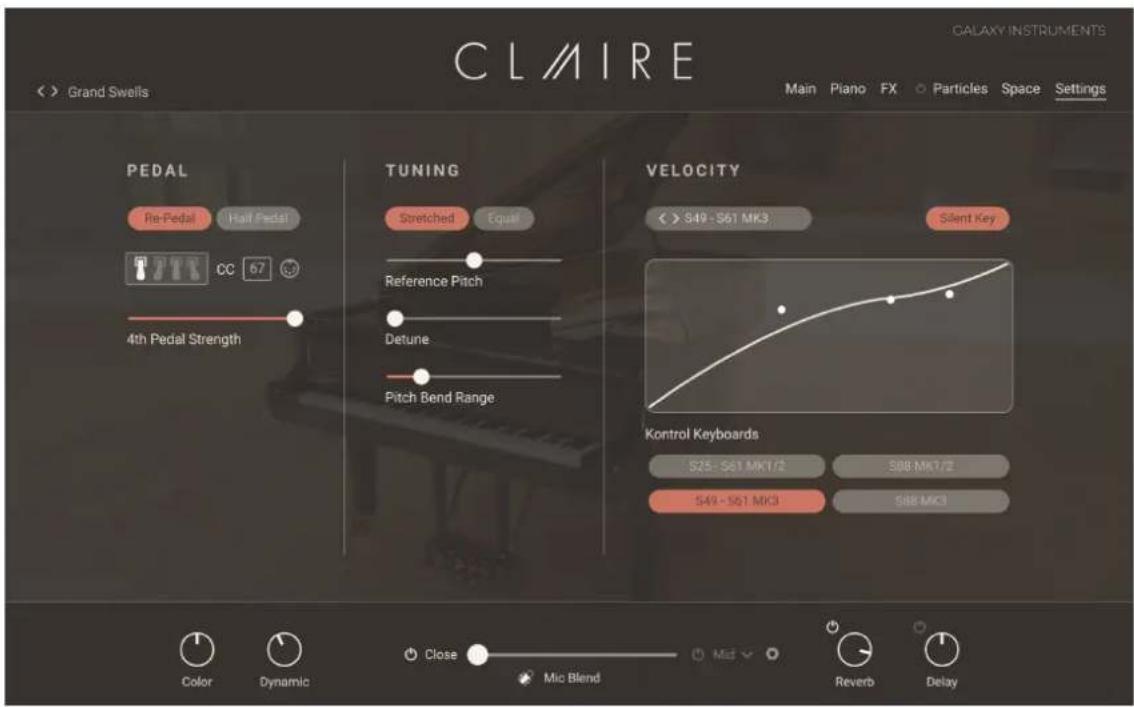
• Pedal section: Adjusts the pedal settings. Refer to Pedal section.
- Tuning section: Adjusts the tuning of the instrument. Refer to Tuning section.
• Velocity section: Adjusts the velocity response of the instrument. Refer to Velocity section.
Pedal section
The Pedal section lets you adjust settings affecting the pedals. It contains the following controls:
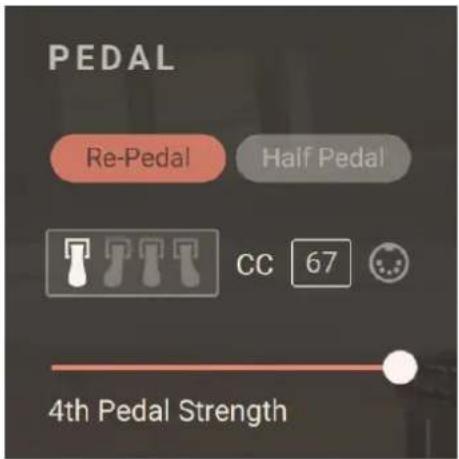
- Re-Pedal: Enables re-pedaling. When on, the sustain pedal is depressed during note release and the remaining sound sustains.
- Half Pedal: Enables the use of a continuous sustain pedal for half-pedaling, which affects the release time and the amount of resonance. For half-pedaling you need a special continuous sustain pedal. If the Half Pedal button is off, a continuous sustain pedal is transformed into an on/off switch.
• 4th Pedal settings: Adjust the behavior of the fourth pedal feature.
- 4th Pedal icon: Indicates whether the fourth pedal feature is on (pedal white) or off (pedal grayed out). You can turn the fourth pedal on or off using the 4th Pedal On/Off switch located in the Anatomy section of the Piano page. Refer to Anatomy section for more information. The other 4th Pedal settings have an effect only if the fourth pedal is active.
- 4th Pedal CC: Shows the MIDI CC number assigned to the fourth pedal. You can choose another MIDI CC number by clicking the display and selecting the desired number from the drop-down menu. Alternatively you can click the 4th Pedal MIDI Learn button (MIDI socket icon) next to the CC field and move the desired control element on your MIDI controller to quickly assign it to the fourth pedal.
- 4th Pedal Strength: Adjusts the virtual distance between the hammers and the strings, thus the amount of loudness reduction induced by the pedal.
Tuning section
The Tuning section contains settings affecting the pitch and tune of the instrument. It contains the following controls:
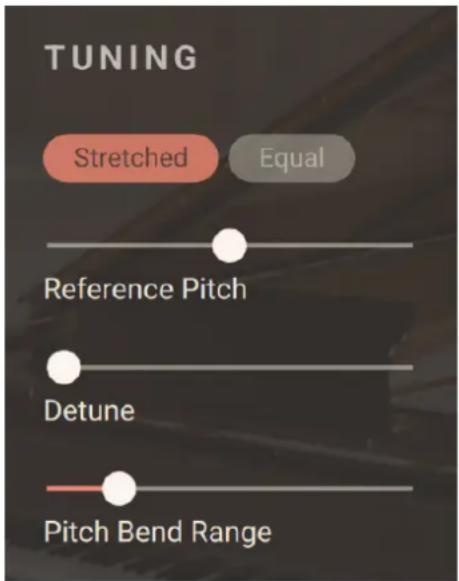
- Stretched/Equal selector: Switches the tuning system (or temperament) of the instrument between Stretched and Equal. The default setting is Stretched, which is the way the piano was tuned for sampling. Stretched tuning accommodates the natural “inharmonicity” of metal strings, which stretch harmonics beyond the strings’ ideal frequencies. Therefore, to make the instrument sound more harmonically pleasing (or “musical”), higher notes are stretched upwards. You can otherwise switch to Equal temperament, which is the most common tuning system used in Western music.
- Reference Pitch: Adjusts the instrument's basic pitch, from 436 Hz to 444 Hz.
- Detune: Slightly detunes each key differently. At full left, the keyboard is perfectly tuned. The further you drag the slider to the right, the more the keys will go out of tune.
- Pitch Bend Range: Selects the pitch range available on the Pitchbend wheel, in semitones.
Velocity section
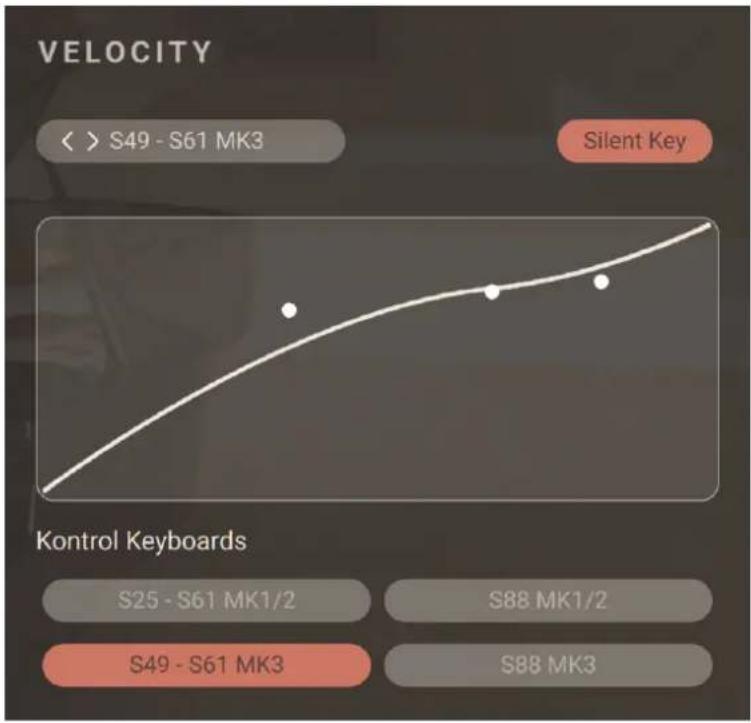
The Velocity section lets you adapt the instrument's velocity response to your keyboard and to your way of playing. It contains the following controls:
line
| Controller Keyboard | Velocity | | ------------------- | -------- | | S49 - S61 MK3 | 0 | | S88 MK1/2 | 0 | | S49 - S61 MK3 | 0 |- Velocity Curve menu: Selects from different velocity curve presets. The selected velocity curve is shown in the display below.
- Silent Key: Turns the Silent Key function on or off. When Silent Key is on, very low velocities result in no sound, as on a grand piano. Fabric and mechanical noises will be triggered though and the overtone function is active as well as the virtual string is free to vibrate sympathetically.
- Velocity Response display: Shows the current velocity response. Starting from a velocity curve preset, you can customize the response by dragging the three white dots on the display: The middle dot adjusts the position of the inflection point, and the other two dots adjust the lower and upper part of the curve.
- Kontrol Keyboards Preset buttons: Click either button to quickly select the velocity curve of that particular Kontrol keyboard. These buttons are shortcuts for the corresponding entries in the Velocity Curve menu above.
12. Credits
Produced by Uli Baronowsky with Stephan Lembke and Achim Reinhardt for Galaxy Instruments and Native Instruments
Product Design: Galaxy Instruments, Tolga Özdemir
Kontakt Development: Achim Reinhardt
NUI Development: Francesco Sabatini, Till Weinrich, Mickael Le Goff
User Interface Design: Kate Lindsay
Artwork: Alfredo Maddaluno, Ivana Verze
Product Management: Ilay Bal Arslan
Piano Technician: Andre Wedel
Sample Recording: Uli Baronowsky, Stephan Lembke, Achim Reinhardt, Eduard Telik
Assitant Engineer: Lotte Caubergh, Wes Maebe
Recorded at: Galaxy Studios at Mol, Belgium
Sample Post Production: Uli Baronowsky, Stephan Lembke, Leon Roggenkamp, Nola Ewoti, Tarik Necip, Eduard Telik
Preset Design: Uli Baronowsky, Stephan Lembke, Achim Reinhardt, Andreas Rogge, Jamil Samad
Musical Consultants: Mark Joggerst, Brigitte Angerhausen
Quality Assurance and Finalization: Elad Twito
Marketing: Samuel Hora, Ervin Reszler, Lucy Crouch, Andre Bajorat, Maik Siemer, Guillermo Frapolli
Documentation: Nicolas Sidi, Jan Ola Korte
Special Thanks: Ilay Bal Arslan, Konstantin Hess, Sebastian Müller, Nico Sidi and everybody at NI, Wilfried van Baelen, Lotte Caubergh, Mark Vanherck, Patrick Lemmens and everybody at Galaxy Studios, Andre Wedel, Mark Joggerst, Monika and Lillianna Dömer, Annika, Wilma, Pauline and Franka Lembke
- Welcome to Claire
- Document conventions
- Installation and setup
- Installing Claire using Native Access
- Loading Claire in Kontakt
- Claire overview
- Performance controls
- Mic Blend controls
- Preset Browser
- Snapshots
- Snapshots overview
- Loading a Snapshot
- Saving a User Snapshot
- Saving a User Snapshot using the Navigator
- Saving a User Snapshot using the Instrument Header
- User Content Folder
- Deleting a User Snapshot
- Piano page
- Anatomy section
- Noises section
- Tone section
- Effect page
- Effects section
- Ambience section
- Particles page
- Particles Browser
- Algorithm section
- Sources section
- Space page
- Reverb
- Convolution reverb
- Algorithmic reverb
- Plate reverb
- Delay
- Replika
- Type: Modern
- Type: Analogue
- Type: Tape
- Type: Vintage
- Type: Diffusion
- Twin Delay
- Psyche Delay
- Settings page
- Pedal section
- Tuning section
- Velocity section
- Credits
Brand : NATIVE INSTRUMENTS
Model : Claire
Category : Keyboard