TX60C - Binoculars InfiRay - Free user manual and instructions
Find the device manual for free TX60C InfiRay in PDF.


| Product Type | Thermal Imaging Rifle Scope |
| Model | InfiRay BOLT TX60C |
| Sensor Resolution | 1024 × 1024 |
| Pixel Size | 12 μm |
| Frame Rate | 50 Hz |
| Sensor Sensitivity (NETD) | ≤18 mK |
| Display | 1.03-inch AMOLED, 2560 × 2560 |
| Magnification | 3.0× (native), digital zoom up to 16× |
| Objective Lens | 60 mm f/1.0 |
| Field of View | 11.7° × 11.7° |
| Detection Range | 2700 yards |
| Dimensions | 15.12 × 4.09 × 3.03 inches |
| Weight | 35.27 oz |
| Power Supply | Built-in battery pack (8+ hrs), 18650 battery (3.5+ hrs), external USB-C |
| Internal Storage | 128 GB |
| Wireless Connectivity | Wi-Fi, Bluetooth (optional LRF) |
| Ingress Protection | IP67 |
| Operating Temperature | -4°F to 122°F |
| Housing Material | T-6061 Aluminum |
| Mounting System | 30 mm one-piece scope mount or rings |
| Warranty | 5 Years |
Frequently Asked Questions - TX60C InfiRay
User questions about TX60C InfiRay
0 question about this device. Answer the ones you know or ask your own.
Ask a new question about this device
Download the instructions for your Binoculars in PDF format for free! Find your manual TX60C - InfiRay and take your electronic device back in hand. On this page are published all the documents necessary for the use of your device. TX60C by InfiRay.
USER MANUAL TX60C InfiRay
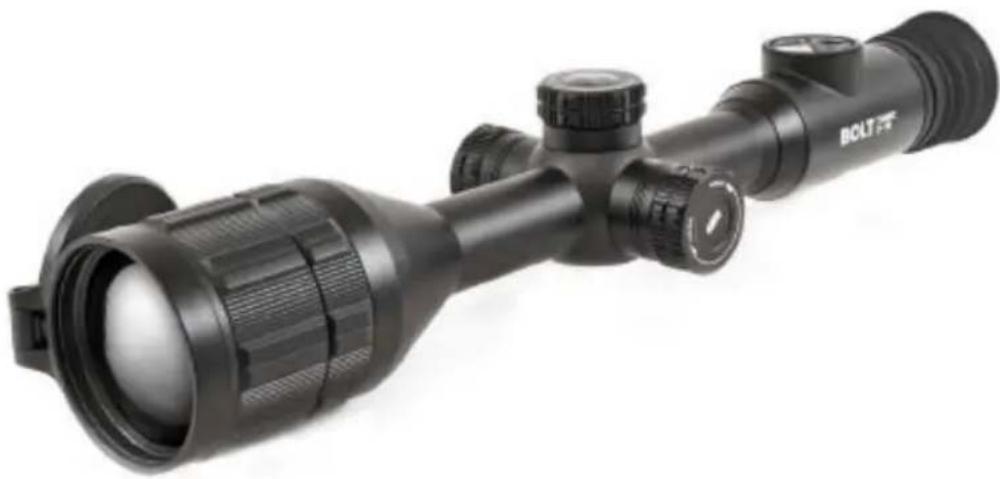
Bolt Action Optimized Thermal Rifle Scope
natural_image
Black BCLT-FT optical system with lens and eyepiece (no text or symbols visible)WARNING!
ITAR REQUIREMENTS
These products may be subject to export and foreign trade control laws of the United States and may not be exported without prior approval of the U.S. Department of State. Learn more at irayusa.com/ITAR.
FCC ID 2AYGT-2D-00
This device complies with part 15 of the FCC Rules. Operation is subject to the following two conditions: (1) This device may not cause harmful interference, and (2) this device must accept any interference received, including interference that may cause undesired operation.
CAUTION: Changes or modifications not expressly approved by IRayUSA could void the user's authority to operate the equipment.
NOTE: This equipment has been tested and found to comply with the limits for a Class B digital device, pursuant to part 15 of the FCC Rules. These limits are designed to provide reasonable protection against harmful interference in a residential installation. This equipment generates, uses and can radiate radio frequency energy and, if not installed and used in accordance with the instructions, may cause harmful interference to radio communications. However, there is no guarantee that interference will not occur in a particular installation. If this equipment does cause harmful interference to radio or television reception, which can be determined by turning the equipment off and on, the user is encouraged to try to correct the interference by one or more of the following measures:
- Reorient or relocate the receiving antenna.
- Increase the separation between the equipment and receiver.
- Connect the equipment into an outlet on a circuit different from that to which the receiver is connected.
- Consult the dealer or an experienced radio/TV technician for help.
This device was tested for typical body-supported operations and use. To comply with RF exposure requirements, a minimum separation distance of 0.5cm must be maintained between the user's body and the handset, including the antenna. Third-party belt-clips, holsters, and similar accessories used by this device should not contain any metallic components. Body accessories that do not meet these requirements may not comply with RF exposure requirements and should be avoided. Use only the supplied or an approved antenna.
WARNING: CHOKING HAZARD
Children under 3 years old can choke or suffocate on small parts of this product. This product is not a toy; keep out of reach of children.
TABLE OF CONTENTS
- Overview ...... 2
- Features ...... 2
- Tech Specs ....3
- Accessories 4
- Components and Controls .... 5
- Description of Control Buttons & Shortcuts ... 6
- Quick Start Guide......8
- Charging the Built-in Battery Pack .... 10
- Installing an 18650 Battery....11
- Battery Status Indicators .....11
- Switching the Battery Power Supply...... 12
- Battery Safety Precautions ...... 13
- External Power Supply 14
- Mounting the BOLT TX60C 14
- Operating Instructions.... 15
- Zeroing the BOLT TX60C 21
- Non-Uniformity Correction 22
- Photography and Video Recording 23
- Accessing the Internal Memory ...... 25
- Using the InfiRay Outdoor App.... 25
- Digital Zoom.... 26
- Picture in Picture (PIP)......27
- Bluetooth Laser Rangefinder ......27
- Stadiametric Rangefinder 28
- Ultra-Clear Mode.... 29
- Main Menu Options and Descriptions...... 29
- Warranty.... 46
- Basic Inspection ....47
- Basic Maintenance....47
- General Troubleshooting .....47
1. OVERVIEW
The BOLT TX60C provides hunters with a high-resolution 1024×1024 InfiRay Micro II thermal sensor at a native 3× magnification and digital zoom up to 16×, ideal for predator hunting and longer-range shots. A fast f1.0 germanium objective lens, a sensitivity rating of ≤18mK, and a 1.03-inch round 2560×2560 AMOLED display provide exceptional detail and precision. The round 30mm body design allows for easy mounting with the included one-piece cantilever mount or standard scope rings.
2. FEATURES
- 12 µm iRay Micro II thermal sensor
- ≤18 mK sensitivity
- 1.03-inch large-format AMOLED display with ultra-high 2560×2560 resolution
• High frame frequency: 50hz
• T-6061 aluminum housing
• 2700-yard detection range - Dual power supply solution for extended operation
- Compatible with ILR-1200-1 Bluetooth Laser Rangefinder Module (optional/not included)
- Four ballistics profiles and a user-defined, multi-variable ballistics calculator
- 16.0× stepped digital zoom
- Multiple zero profiles and ranges
• Traditional 30 mm diameter housing design
• Built-in 128 GB storage to support image capture and video recording
• Built-in Wi-Fi module - Mobile device App compatible
• Built-in digital compass and gravity sensor - Multiple reticle types and color options
- Ultra-Clear mode for advanced image detail
• Picture in Picture (PIP)
• Defective pixel correction - Extended eye relief
• Cold and warm image hue options - User-friendly interface
3. TECH SPECS
BOLT TX60C
| SENSOR | |
| Resolution 1024×1024 | |
| Pixel Size 12 μm | |
| Frame Rate | 50hz |
| Sensor Sensitivity | ≤18 mK |
| Image Processing | MATRIX III |
| Core | InfiRay Micro II 1024 |
| OPTICS | |
| Objective Lens | 60 mm f/1.0 |
| Magnification | 3.0× |
| Digital Zoom | 16×, Stepped |
| Field of View | 11.7° × 11.7" |
| Detection Range | 2700 Yards |
| Display Type | 1.03-inch Large-format AMOLED |
| Display Resolution | 2560×2560 |
| Color Palettes | White Hot, Black Hot, Red Hot, Color, Violet, Crimson, Viridian |
| Reticle Types | 7 (1 Dynamic, 5 Static, 1 DIY) |
| Reticle Colors | Black, White, Red, Green |
| Mounting System | 30 mm One-Piece Scope Mount or 30 mm Rings |
| P.I.P | Yes |
| Rangefinder | Stadiametric,Bluetooth ILR-1200-1 LRF (Optional/Not Included) |
| Eye Relief | 50 mm |
| Diopter Range | -5 to +3.5 |
| ELECTRONICS | |
| Onboard Recording | Video, Recoil-Activated Video, and Image |
| Onboard Storage | 128 GB |
| Wireless Connectivity | Video and Image via App |
| Data/Power Connector | USB-C |
| Power Supply | USB-C External, Built-In Battery Pack (8+ Hours),18650 Battery (3.5+ Hours) |
| Start Up Time | <10 Seconds, Instant from Standby |
| PHYSICAL | |
| Size | 15.12" × 4.09" × 3.03" |
| Weight | 35.27 Oz |
| ENVIRONMENTAL/WARRANTY | |
| Warranty | 5 Years |
| Housing Material | T-6061 Aluminum |
| Ingress Protection | IP67 |
| Operation Temperature | -4°F ~ 122°F |
| Max. Recoil | 1000 g/s ^2 (300 Win./7mm Mag) |
4. ACCESSORIES
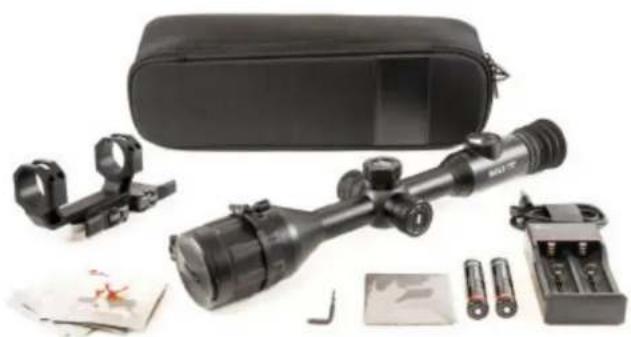
The BOLT TX60C rifle scope ships with everything you need to get out and hunt.
• BOLT TX60C Thermal Imaging Rifle Scope
- Objective Lens Cap
- Eyeguard
• IRAY-AC112 30 mm One-Piece Scope Mount
- 18650 Battery ×2
- Battery Charger
• USB-C Cable for Data/Video
- USB Power Adapter
- Lens Cloth
- Soft Case
- User Manual
natural_image
Product photo of a black optical system including a scope, clamp, and battery pack (no visible text or symbols)Optional accessories, such as the IRAY-AC96 ILR-1200-1 Bluetooth Laser Rangefinder Module, as well as various replacement accessories, including cables and factory mounts, are available for purchase. Contact 800-769-7125 or irayusa.com/support.
5. COMPONENTS AND CONTROLS
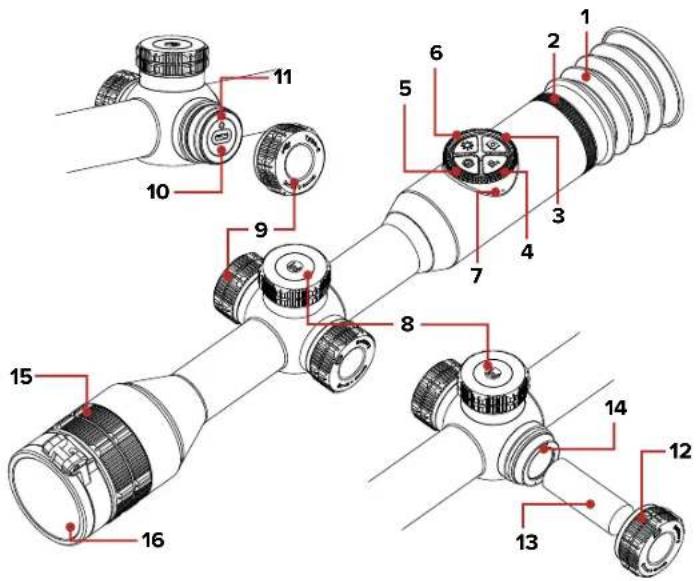
1 Eyeguard
2 Eyepiece Diopter Adjustment Ring
3 Photo Button
4 Palette Button
5 Power Button
6 Brightness Button
7 Microphone
8 Tactile Control Turret
9 USB-C Port Cover
10USB-C Port
11 LED Status Indicator
12Battery Cover
1318650 Battery
14Battery Compartment
15 Objective Lens Focus Ring
16 Objective Lens Cap
6. DESCRIPTION OF CONTROL BUTTONS AND SHORTCUTS
| Power Button | ||
| Current Screen / Menu or Device Status | Short Press Long Press | |
| Device off — Power on the device | ||
| Home screen | Perform a manual non-uniformity correction | Power off the device; enter standby mode |
| In standby mode Exit standby mode —— | ||
| Main menu | Return to the previous without saving changes | —— |
| Defective pixel correction interface | Add or remove a defective pixel from the "to be corrected" list | —— |
| Reticle zeroing interface | Exit interface and return the reticle to the last saved zero position | —— |
| Palette Button | ||
| Current Screen / Menu Short Press Long Press | ||
| Home screen Switch the color palette Turn PIP window on / off | ||
| Brightness Button | ||
| Current Screen / Menu Short Press Long Press | ||
| Home screen | Adjust the screen brightness | Enter / exit the stadiametric rangefinder |
| Photo Button | ||
| Current Screen / Menu Short Press Long Press | ||
| Home screen Take a photo | Start / stop recordinga video | |
| Photo + Palette Button | ||
| Current Screen / Menu Short Press Long Press | ||
| Reticle zeroing interface | — | Freeze the image to keep reticle centered on aiming point; press again to clear the frozen image |
| Photo + Brightness Button | ||
| Current Screen / Menu Short Press Long Press | ||
| Home screen | — | Activate / deactivate the reticle |
| Reticle zeroing interface | — | Return the reticle to the center |
| Control Turret | |||
| Current Screen / Menu | Short Press | Long Press | Rotate |
| Home screen | Enter the quick menu | Enter the main menu | Adjust the digital zoom level |
| Quick menu | Adjust parameters for a menu item | Save changes and exit to home screen | Switch menu options; move menu cursor; move reticle positionClockwise:Move left / downCounterclockwise:Move right / up |
| Main menu | Confirm any changes; open the submenu | ||
| Reticle zeroing interface | Switch between the axis of movement (X and Y) | ||
| Defective pixel correction interface | |||
NOTE: Consult the manual that comes with your ILR-1200-1 Laser Rangefinder Module (optional/not included) for rangefinder shortcuts.
7. QUICK START GUIDE
Step 1: Prepare to Use the BOLT TX60C
- Compare the box contents to the accessories list and examine each for any shipping damage. See Accessories on page 4.
- Check the lens to ensure there are no smudges or dirt present. Clean with the included lens cloth, as needed.
- Charge the built-in battery pack before using the TX60C for the first time. See Charging the Built-in Battery Pack on page 10.
- Install the eyeguard (1).
- Mount the TX60C to the weapon using the included IRAY-AC112 30 mm One-Piece Scope Mount. See Mounting the BOLT TX60C on page 14.
Step 2: Turn On and Adjust the Focus
- Open the objective lens cap (16).
- Long press the Power ⏻ Button for 2 seconds to power on the TX60C.
- Rotate the diopter adjustment ring (2) of the eyepiece until the interface icons are clear.
WARNING: Do not point the objective lens toward intense energy sources, such as the sun. This may render the electronic components inoperative. The warranty does not cover damage caused by improper operation.
Step 3: Adjust the Device Settings
From the home screen:
- Short press the Palette Button to set the color palette to white hot ♦, black hot, red hot, color, violet, crimson ■, or viridian. The icon for the selected color palette appears briefly in the bottom-right corner of the screen.
- Short press the Brightness ✦ Button to adjust the screen brightness, from 1–5.
- Short press the Power ⏻ Button to perform a non-uniformity correction, as needed.
- Rotate the Control Turret to zoom in and out on the observed object.
- Long press the Palette 📄 Button to turn on the PIP window.
-
Short press the Control Turret to enter the quick menu (see Using the Quick Menu on page 18):
a. Adjust the image sharpness, from 1–5.
b. Adjust the image contrast, from 1–5. -
Long press the Control Turret to enter the main menu (see Main Menu Options and Descriptions on page 29 for detailed instructions):
a. Turn on Ultra-Clear mode to enhance the image contrast in inclement weather, as needed.
b. Turn on the motion sensor and compass.
c. Set the non-uniformity correction (NUC) mode to automatic, manual, or background.
d. Calibrate the compass.
e. Set the date and time.
f. Set the units of measurement to meters or yards.
g. Set the image hue to warm or cold.
Step 4: Set Up the Reticle and Zero the TX60C
The reticle may be inactive when the TX60C is powered on for the first time. To activate the reticle, press and hold the Photo 🔒 and Brightness 🔒 Buttons at the same time for at least 15 seconds.
- Adjust the reticle settings (Using the Quick Menu on page 18):
a. Select the reticle type, from 1–6. A custom reticle is also available for purchase in the InfiRay Outdoor App.
b. Set the reticle color to white, black, red, or green.
- Zero the rifle scope. See Zeroing the BOLT TX60C on page 21.
a. Select the zeroing profile, A, B, or C.
b. Select, or customize, a zero distance that matches the target distance.
c. Zero the reticle.
8. CHARGING THE BUILT-IN BATTERY PACK
The BOLT TX60C has a dual power supply: a built-in rechargeable lithium-ion battery pack and an optional auxiliary 18650 battery. The TX60C supports a run time of 8 hours out of the box and 11+ hours when using an 18650 battery. The built-in battery pack is not removable or replaceable. Please ensure the battery pack is fully charged before the first use.
To charge the battery pack:
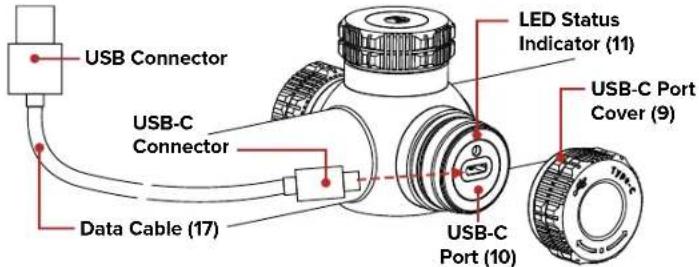
- Remove the USB-C port cover (9) by turning it counterclockwise.
- Connect the USB-C end of the data cable (17) to the USB-C port (10).
- Connect the standard USB end of the data cable to:
a. Any standard USB 3.0 port on a laptop or computer; OR
b. The included 5V–2A USB power adapter (18), and plug the power adapter into an electrical outlet.
- While charging:
a. The LED status indicator (11) above the USB-C port will turn red. When the indicator LED turns green, the battery is fully charged.
b. A charging 🔊 icon appears above the battery status indicator in the bottom-right corner of the screen.
- When fully charged, disconnect the data cable from the USB-C port and replace the USB-C port cover. Do not overcharge.
WARNING: Never charge the battery pack with a USB adapter that is greater than 5V–2A.
NOTES:
- You may charge and operate the TX60C at the same time.
- When the battery status icon turns red and only one bar remains, charge the battery right away to avoid over-discharge and a reduction in battery capacity or service life.
- Only the built-in battery pack will be charged while connected via the USB-C port.
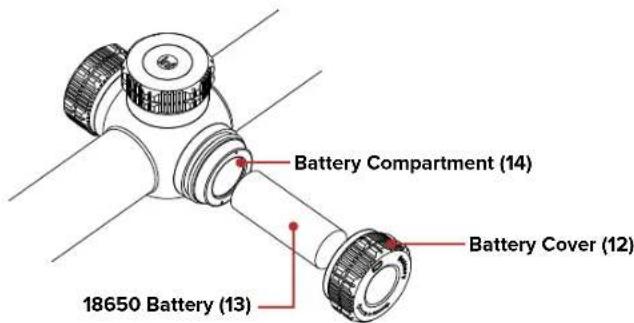
9. INSTALLING AN 18650 BATTERY
The battery compartment allows the run time of the TX60C to be expanded to 11+ hours with the use of an optional 18650 battery. Ensure the 18650 battery is fully charged before installing in the TX60C.
To install an 18650 battery:
- Remove the battery cover (12) by turning it counterclockwise.
-
Insert an 18650 battery (13) into the battery compartment (14) following the polarity markings inside the compartment. The positive [+] battery terminal faces in and the negative [-] terminal faces out.
-
Replace the battery cover.
10. BATTERY STATUS INDICATORS
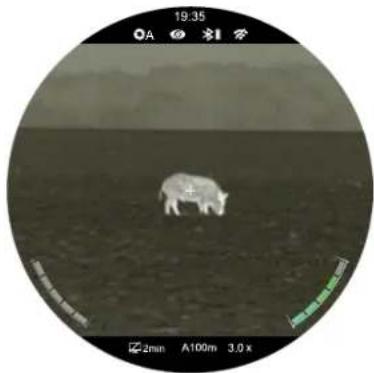
The status indicator for the built-in battery pack appears in the bottom-right corner of the screen.
If an 18650 battery is installed in the TX60C, its status indicator appears in the bottom-left corner.
The status indicator for the active battery (the battery currently being used to power the TX60C) is displayed in color, while the status
indicator for the inactive battery is displayed in gray.
natural_image
Circular grayscale image showing a white animal walking on a flat surface, with no visible text or symbols.The color and fill level of the active battery status indicator indicates the current battery charge level. The battery charging 🔊 icon appears above the built-in battery status indicator when the TX60C is connected to an external power source. See the table below.
NOTE: Charge the battery promptly when its status indicator shows one bar (5–20%) to avoid over-discharge and potential damage to the battery.
| ICON STATUS STATUS | |||
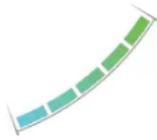 | 81% – 100% 21% | 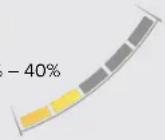 | |
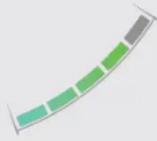 | 61% – 80% | 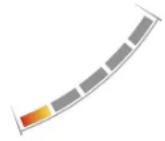 | 5% – 20%; charge the battery promptly. |
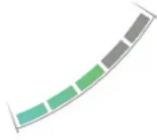 | 41% – 60% | 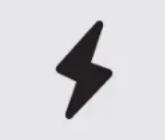 | The built-in battery is charging (external power is connected via the data cable). |
11. SWITCHING THE BATTERY POWER SUPPLY
The BOLT TX60C's dual power supply system works seamlessly to power the device:
- When the 18650 battery is installed and fully charged, it will be the preferred power source.
- If the power of the 18650 battery is low, or the 18650 battery is removed, the TX60C will automatically switch to the built-in battery pack as its primary power supply. Operation will not be interrupted during this time.
- When the TX60C is in use, the 18650 battery may be replaced at any time. During replacement, power will switch to the internal battery pack and then switch back to the new 18650 battery after replacement automatically.
- When the TX60C is connected via USB-C, the device will switch to the external power supply automatically, and the charging icon will appear above its battery status indicator in the bottom-right corner.
12. BATTERY SAFETY PRECAUTIONS
WARNING: Only use the provided USB charging/data cable to charge the built-in battery pack. Only charge the TX60C with a standard USB adapter (5V–2A), as included in the TX60C kit. Using any other types of adapters may lead to irreversible damage to the battery, adapter, or rifle scope. This damage is not covered under warranty.
WARNINGS:
- Do not use a power adapter or USB cable that has been modified or damaged.
- Do not expose the battery pack to high temperatures or flames and do not immerse in water.
- Do not leave the TX60C unattended while charging the battery pack.
- Do not leave the battery pack charging for long periods after full charge is reached. Charging time should not exceed 24 hours.
- Keep the battery pack and rifle scope out of the reach of children and pets.
- The built-in battery pack is equipped with short-circuit protection. However, any situation that may cause short-circuiting should be avoided.
- Do not connect the battery pack to any external device with an electrical current that exceeds permitted levels.
- Do not disassemble, modify, hit, or drop the battery pack.
- Do not connect an external device with a current supply that exceeds a 3.0 USB port.
- Only use compatible 18650, rechargeable batteries in the battery compartment.
To maintain optimal battery capacity and service life:
- Avoid storing a fully charged or discharged battery for long periods. Partially charging the battery is necessary if the battery will be stored for an extended period.
- If your TX60C has been stored for an extended period, it should be charged before initial use.
- Do not charge an extremely cold battery without bringing it into a warm environment. Let the battery warm up for 45 minutes before charging.
- Charge the battery at a temperature range from 30^ to 100^ ; otherwise, the service life of the battery may be reduced.
- The recommended operation temperature range is -4^ to 122^ . Avoid using the battery pack above the maximum or below the minimum recommended temperature range as this may decrease the battery pack capacity or service life.
13. EXTERNAL POWER SUPPLY
The BOLT TX60C supports the use of an external power supply, such as a 5V power bank for a mobile phone.
To connect the TX60C to an external power supply:
- Remove the USB-C port cover (9) by turning it counterclockwise.
- Connect the USB-C end of the data cable to the USB-C port (10).
- Connect the standard USB end of the data cable to the external power supply. The TX60C will automatically switch to using the external power supply for power and it will begin charging the internal battery pack.
a. A charging 🔊 icon appears above the battery status indicator for the built-in battery pack in the bottom-right corner of the screen, indicating that the battery is charging.
b. The number of bars and color of the battery indicator will change to reflect the current charge level.
-
When the external power supply is turned off, the TX60C will switch to the 18650 battery, if installed, without turning off.
-
If no 18650 battery is installed or the 18650 battery level is low, the TX60C will switch to the built-in battery pack, instead of shutting down.
NOTE: Do not connect the TX60C to an external device with a power supply that exceeds the 3.0 USB cable.
14. MOUNTING THE BOLT TX60C
The TX60C rifle scope is mounted using the included IRAY-AC112 30 mm One-Piece Mount or traditional 30mm ring mounts. Before first use, level the mount and tighten the screws to 20 in/lbs with a torque wrench.
MOUNTING NOTES:
- Please note, torque is inch-pounds, NOT foot-pounds. If you do not have a torque wrench, apply until snug. Do not overtighten.
- When mounting the TX60C on a rifle, adjust its position according to the distance between the eye and eyepiece, so that proper eye relief (50 mm) is achieved. Failure to comply with this recommendation may result in injury to the shooter by the eyepiece when shooting.
- It is recommended to install the TX60C as low as possible for a proper cheek weld; however, make sure to avoid contact with the barrel or receiver.
The TX60C is ready to be zeroed. See Zeroing the BOLT TX60C on page 21 for instructions.
15. OPERATING INSTRUCTIONS
WARNING!
Don't point the objective lens towards any intense energy sources, such as laser radiation or the sun. This may render the electronic components inoperative. The warranty does not cover damage caused by improper operation.
Using the Control Buttons
The BOLT TX60C is operated via four control buttons and a large metal tactile control turret. The large, easy-to-find control turret provides audible and tactile feedback when twisted or pressed. The control buttons can be used to perform shortcut operations from the home screen, as well as in the menu and full-screen interfaces. See Description of Control Buttons and Shortcuts on page 6 for shortcut button details.
Powering On
- Open the objective lens cap (16).
- Long press the Power ⏻ Button for 2 seconds to power on the TX60C.
To determine the current charge of the built-in battery pack, check the battery status indicator in the bottom-right corner of the screen.
Powering Off
To power off the TX60C:
- Press and hold the Power Button. The shutdown screen will open, showing a 3-second countdown.
- Continue holding the Power ⏻ Button until the countdown completes.
- "Data saving..." appears on the screen and the TX60C will shut down automatically after the data finishes saving.
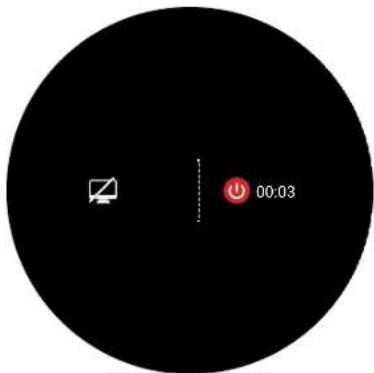
NOTE: Releasing the Power ⏻ Button at any time before the 3-second countdown reaches zero will stop the shutdown process and the rifle scope will enter standby mode. Short press the Power ⏻ Button to exit standby.
WARNING: If using an external power supply, do not disconnect the power supply when saving data, otherwise the data may not be saved.
STANDBY MODE
Standby mode may be activated to conserve the battery life of the rifle scope. When in standby mode, short press the Power ⏻ Button to exit standby and return to the home screen.
Manually Enter Standby Mode
The user may enter standby mode manually at any time.
- From the home screen, long press the Power ⏻ Button to bring up the shutdown screen.
- Release the Power ⏻ Button before the 3-second countdown finishes to enter standby.
Automatically Enter Standby Mode
The rifle scope may be set to automatically enter standby mode.
- In the main menu, set the standby time to 2, 4, or 6 minutes. Once set, the system will automatically enter standby according to the set time.
AUTOMATIC STANDBY NOTES:
- When 2min, 4min, or 6min is selected:
- After the set number of minutes of inactivity, the TX60C will enter standby automatically when it is tilted up or down at an angle of more than 70^ or left or right at an angle of more than 30^ .
- The TX60C will not enter standby mode while it is in a level (horizontal) position.
- When off is selected, standby mode is turned off and the rifle scope will operate until the batteries run out.
• See Main Menu > Standby on page 37.
Adjusting the Focus
ADJUSTING THE DIOPTER/EYEPIECE
- Rotate the eyepiece diopter adjustment ring (2) at the rear of the rifle scope right or left until the user interface is clear.
- Look closely to ensure all icons, the status bars, and the reticle appear sharp and in focus. No additional diopter adjustments are required unless the user wishes to make changes.
NOTES:
- After this initial adjustment, there is no need to rotate the eyepiece adjustment ring (2) for long distances or any other conditions.
- If necessary during standard use, you may rotate the objective lens focus ring (15) to adjust fine focus on the target object being observed. See Focusing the Objective Lens on the next page.
FOCUSING THE OBJECTIVE LENS
To adjust the focus on the target object:
- Rotate the objective lens focus ring (15) left or right.
NOTE: Re-adjusting the focus will be needed if the distance to your target changes.
Activating / Deactivating the Reticle
The reticle may be inactive when the TX60C is powered on for the first time. To activate the reticle, or to deactivate it at a later time:
- From the home screen, press and hold the Photo 🔒 and Brightness 🔒 Buttons at the same time for at least 15 seconds.
Status Bar Overview
The status bars at the top and bottom of the screen show information on the operating status of the BOLT TX60C:
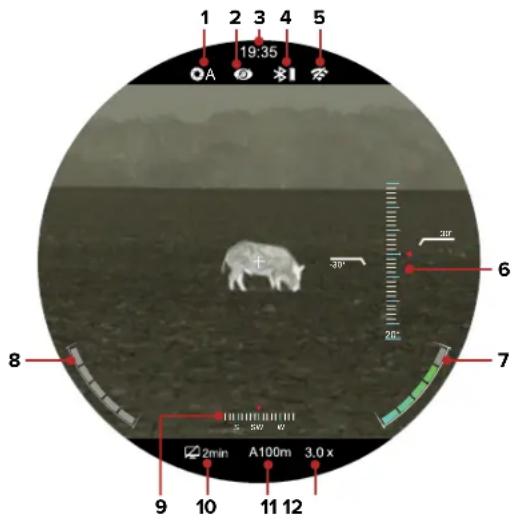
1 Non-Uniformity Correction (NUC) Mode: Shows the non-uniformity correction (NUC) icon and selected mode, automatic (A), manual (M), or background (B).
2 Ultra-Clear Mode: Shows the Ultra-Clear status, on Ⓞ or off ⏻.
3 Time: Shows the current time in 24-hour format.
4 Bluetooth: Shows the Bluetooth status: ✗ (off), ✗ (on and successfully connected to the ILR-1200-1 Bluetooth Laser Rangefinder; optional/not included), or ✗ (on but not connected to the laser rangefinder). The vertical battery icon indicates the current battery level of the laser rangefinder module.
5 Wi-Fi: Shows the Wi-Fi status, on off.
6 Gravity Sensor: The two gravity sensor indicators (tilt and pitch) display when the gravity sensor is turned on.
7 Built-in Battery Status Indicator: Shows the battery status of the built-in battery pack. When the TX60C is receiving power from the battery pack, the battery indicator is in color; when inactive, the battery indicator is gray. The charging icon appears above the status indicator when the TX60C is connected to an external power source.
8 18650 Battery Status Indicator: Shows the battery status of the rechargeable 18650 battery. When the TX60C is receiving power from the 18650 battery, the battery indicator is in color; when inactive, the battery indicator is gray.
9 Digital Compass: Displays when the compass is turned on.
10 Standby: Shows the standby icon and status, 2min, 4min, 6min, or off.
11 Zeroing Profile & Distance: Shows the selected zero profile, A, B, or C, and the zero distance.
12 Digital Zoom: Shows the selected digital zoom level, 3.0–16.0×.
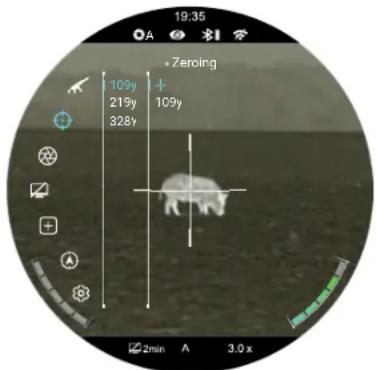
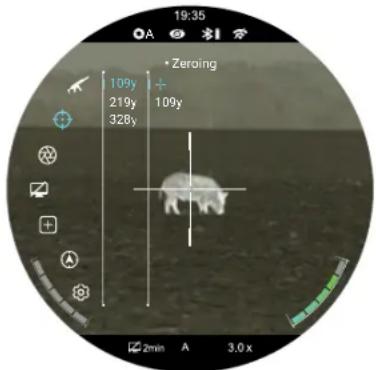
Using the Quick Menu
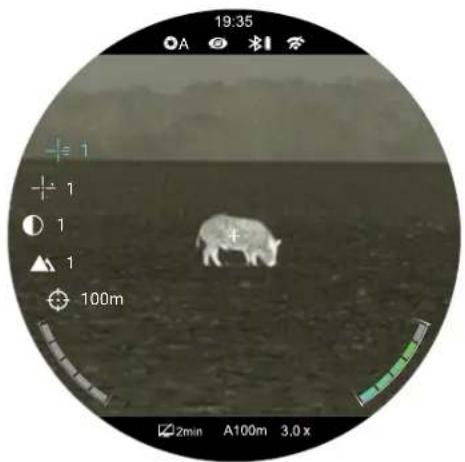
In the quick menu, the reticle type and color, the image contrast and sharpness, and the zeroing distance may be quickly adjusted.
natural_image
Circular grayscale image showing a white pig walking on a flat surface, with no visible text or symbols.- From the home screen, short press the Control Turret to enter the quick menu.
- Menu icons and text turn blue to indicate the current selection and cursor position in the quick menu.
-
Rotate the Control Turret to switch between the quick menu items, described on the next page.
-
± (Reticle Type): Short press the Control Turret to select the reticle type, from 1–6. The reticle changes as the cursor moves through the reticle types. See Reticle Types on the below. A custom reticle is also available for purchase in the InfiRay Outdoor App.
- (Reticle Color): Short press the Control Turret to set the reticle color to white, black, red, or green. The reticle changes as the cursor moves through the color options.
- (Image Contrast): Short press the Control Turret to change the image contrast level, from 1–5.
- (Image Sharpness): Short press the Control Turret to change the image sharpness level, from 1–5.
- (Zeroing Distance): Short press the Control Turret to change the selected zeroing distance within the currently selected zeroing profile. Only the zero distances in the selected profile will be available for selection. The selected zero profile and distance appear in the bottom status bar.
- Long press the Control Turret to save changes and exit the quick menu.
• After 5 seconds of inactivity, the quick menu will close automatically, saving any changes made.
Reticle Types

natural_image
Six abstract geometric symbols arranged in a row: dots, crosses, and squares (no text or labels)123456
Navigating the Main Menu
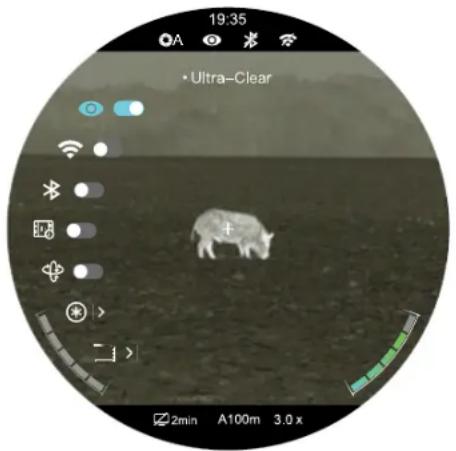
In all menu interfaces:
- From the home screen, long press the Control Turret to enter the main menu.
- Menu icons and text turn blue to indicate the current selection and cursor position in the main menu.
-
Use the Control Turret to navigate the menu:
-
Rotate to move up and down through the menu options.
- Short press to change the current parameters for the selected menu option, enter the submenu, or confirm submenu changes.
-
Long press to save any changes and exit to the home screen.
-
Short press the Power without saving. Ⓤ Button to return to the previous menu
- After 15 seconds of inactivity, the menu will automatically close and the interface will return to the home screen. Changes are NOT saved automatically, except changes to toggle on / off menu items, such as Ultra-Clear and Wi-Fi.
- Upon exiting from the main menu, the cursor location is stored for a single working session (until the TX60C is turned off). After restarting the TX60C and entering the menu, the cursor position will be at the first menu item.
16. ZEROING THE BOLT TX60C
BOLT TX60C features a "freeze" zeroing method. To zero the TX60C:
- Set a suitable target at the desired zero distance.
- Confirm that the rifle is empty, safe, and pointed in a safe direction, with no ammunition near the weapon.
- Adjust the image and device settings following the steps in the Quick Start Guide on page 8, if you have not done so already.
- Select the zeroing profile, A, B, or C.
- Based on the distance to the target you wish to zero, select a preset zero distance, OR customize one of the preset zero distances to match. The TX60C supports custom zeroing distances of 1 to 999 meters or 1 to 999 yards.
- Ensure a stable platform and natural shooting position is achieved behind the rifle.
- Load ammunition, aim, and take one good shot at the target.
- Make your rifle safe and observe the location of impact on the target.
- If the point of impact does not match the point of aim (the center of the reticle), adjust the X/Y position of the reticle.
- In the submenu for the selected zero distance, center the reticle on the aiming point and long press the Photo 📋 and Palette Ⓧ Buttons at the same time to freeze the image. The image freeze ✦ icon appears below the X/Y coordinates.
- Select the axis (X or Y) along which to move the reticle by short pressing the Control Turret to toggle between X and Y.
- Adjust the X/Y position of the reticle until the reticle matches the point of impact.
a. Rotate the Control Turret counterclockwise to move in the positive direction: X = Right and Y = Up .
b. Rotate the Control Turret clockwise to move in the negative direction: X= Left and Y= Down.
c. Upon moving the reticle, a white dot appears on the screen, representing the original position of the reticle.
-
Long press the Control Turret to save the reticle position.
-
Take a confirmation shot—the point of impact should now match the point of aim. If not, adjust the X/Y position of the reticle again.
For detailed Zeroing instructions, please see Zeroing menu > Reticle Zeroing on page 34.
17. NON-UNIFORMITY CORRECTION
A non-uniformity correction (NUC) allows a thermal imager's sensors to correct its pixels and eliminate any image defects caused by pixel drift. A NUC will be performed automatically each time the BOLT TX60C is powered on.
The TX60C has three NUC modes, automatic (A), manual (M), and background (B). The selected NUC mode, A, M, or B, appears in the top status bar. For instructions on setting the NUC mode in the main menu, see Main Menu > Calibration on page 36.
Automatic Mode
In automatic mode (A), the TX60C will perform a NUC automatically according to the internal software algorithm. There is no need to close the objective lens cap as the TX60C's internal shutter covers the sensor.
NOTE: A manual NUC (see below) may be performed at any time while in Automatic (A) mode.
Manual Mode
In manual mode (M), the user independently determines the need to perform a NUC based on the quality of the observed image. It is not necessary to close the objective lens cap during a manual NUC, as the internal shutter covers the sensor.
To perform a manual NUC while in manual mode (or automatic mode):
-
From the home screen, short press the Power ⏻ Button.
-
A manual NUC is performed instantly.
Background Mode
In background mode (B), the user independently determines the need to perform a background NUC based on the quality of the observed image. A background NUC uses less power than an automatic or manual NUC because it does not use the imager shutter to cover the sensor; instead, the user must close the lens cap.
To perform a background NUC while in background mode:
- Close the objective lens cap (16).
- From the home screen, short press the Power ⏻ Button.
- A prompt to close the lens cap appears onscreen. The background NUC starts after about 4 seconds.
NOTE: If the lens is not properly covered, a temporary “image burn” will remain in the image until the next non-uniformity correction. This “image burn” is temporary and is not a defect or sign of permanent damage.
18. PHOTOGRAPHY AND VIDEO RECORDING
The TX60C is equipped with video recording and image capture. All videos and photos are automatically saved on the internal 128 GB memory storage.
NOTE: Photo and video files are named with the time and date; therefore, it is recommended to set the date and time before using the photo and video functions. See Settings Menu > Date and Time and on page 41. Alternatively, the date and time may be synchronized in the InfiRay Outdoor App.
Photography

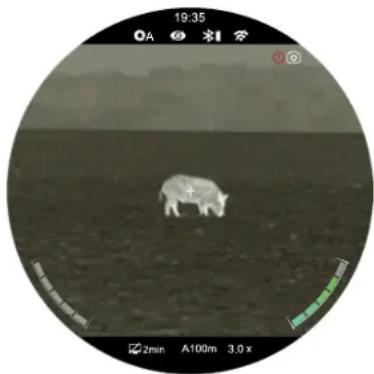
To take a photo:
- From the home screen, short press the Photo Button.
- The image will freeze for 0.5 seconds and the camera 📷 icon will appear briefly in the upper-left corner of the screen.
NOTE: A red warning icon ! appears next to the
natural_image
Circular grayscale image showing a white animal walking on a textured surface, with no visible text or symbols.camera icon in the upper-left corner of the screen when insufficient memory storage is available. Transfer video and image files to other storage media to free up space on the memory card.
Video Recording

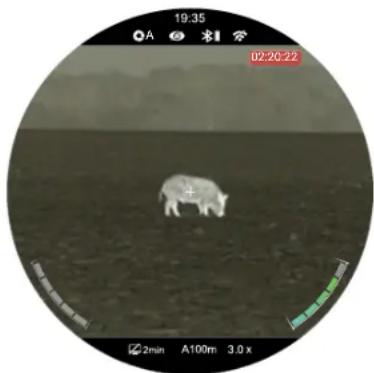
To record video:
- From the home screen, long press the Photo Button to start a video recording.
-
When the video recording starts, the video recording timer, in HH:MM:SS (hour: minute: second) format, appears in the upper-right corner of the screen.
-
When recording a video, short press the Photo Button to take a photo.
- Long press the Photo 📄 Button to stop and save the video recording.
natural_image
Circular grayscale image showing a white animal on a dark surface, with no visible text or symbols.Recoil Activated Video Recording

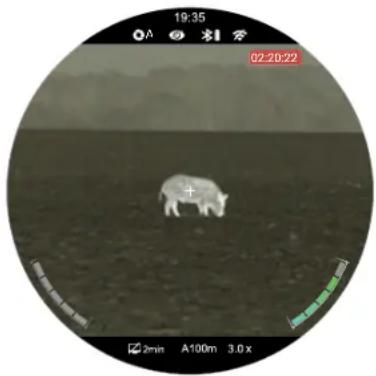
When recoil activated video is turned on in the main menu, a video is automatically recorded when a shot is taken. The TX60C will record 3 seconds before the shot and 2 minutes and 57 seconds after the shot. The video recording timer, in HH:MM:SS (hour, minute, second) format, will appear in the upper-right corner of the screen. See Main Menu >Recoil Activated Video on page 31 for instructions.
natural_image
Circular cropped image showing a white animal on a dark, textured surface with no visible text or symbols.NOTES:
- When multiple shots are taken within the same 30-second period, only one video will be taken.
- When recoil activated video recording is turned on, standard video recording is unavailable.
Video and Photography Notes
- You may enter and navigate the menu as normal during video recording.
- Only the reticle appears in recorded photos and video; the user interface (status bar and menu) is not captured.
-
Recorded photos and videos are saved to the internal memory card:
-
Photos are saved in IMG_HHMMSS_XXX.jpg format.
- Videos are saved in VID_HHMMSS.mp4 format.
- RAV videos are saved in RAV_HHMMSS.mp4 format.
• HHMMSS is hour/minute/second. - XXX is a 3-digit counter number used for image files. The counter cannot be reset. If a file is deleted from the list, its counter number is not taken by another file.
- The number of recorded files is limited only by the capacity of the internal memory.
- Check the available space of the internal storage card regularly and transfer video footage and images to other storage media to free up the memory card space.
19. ACCESSING THE INTERNAL MEMORY
When the TX60C is turned on and connected to a computer via the included data cable, it is recognized by the computer as a flash memory (USB) drive. This allows the user to access the saved multimedia files and copy or delete any desired files.
To access the internal memory:
- Turn on the TX60C and remove the USB port cover (9).
- Connect the USB-C end of the data cable to the USB-C port (10).
- Connect the USB end of the data cable to your computer.
- Double-click My Computer on the desktop of your computer.
- Double-click the USB drive named Infiray to open it.
- Double-click the drive named Internal Storage to access the built-in memory.
a. Recorded photos and videos are separated into folders by date. - Select the desired files or folders to copy or delete.
20. USING THE INFIRAY OUTDOOR APP
The BOLT TX60C can be operated using the InfiRay Outdoor App when the rifle scope is connected to a smartphone or tablet via Wi-Fi.
- Download and install the App on your smartphone or tablet:




a. Scan one of the QR codes above to download the InfiRay Outdoor App from the App Store or Google Play; OR b. Download the App for free via any app store.
- Connect the TX60C to Wi-Fi:
a. In the main menu, turn on Wi-Fi. See Main Menu > Wi-Fi on page 30 for detailed instructions.
b. Open the App and press the ViewFinder icon on the home screen.
c. Click the Connect Device WiFi button.
d. On the mobile device, go to Settings > Wi-Fi.
e. Select the TX60C from the list of Wi-Fi networks. It will appear in the list as "BOLT_XXXXX_YYYYYYYYY", where YYYYYYY is the eight-digit device serial number.
f. Enter the Wi-Fi password and tap the Join button. The default password is 12345678.
- Operate the TX60C via the App:
a. Take real-time photos and videos, with or without audio.
b. View, share, download, and delete photos and videos taken via the App, which are saved to the mobile device.
c. Change the Wi-Fi password and SSID.
d. Synchronize the date and time from the mobile device to the TX60C.
e. Update the TX60C firmware.
NOTE: When a factory reset is performed, the Wi-Fi password and SSID are reset to the defaults, BOLT_XXXXX_YYYYYYYYY and 12345678. See Settings Menu > Factory Reset on page 44.
21. DIGITAL ZOOM
The BOLT TX60C uses stepped zoom and can quickly increase the base magnification up to 16.0× by enlarging the image from 3 to 16 times digitally.
To use digital zoom:
- From the home screen, rotate the control turret to zoom in and out on the observed object.
a. Rotate clockwise to zoom in and counterclockwise to zoom out.
b. Each rotation click zooms in / out in increments of 1.0×.
- The selected digital zoom, 3.0–16.0×, appears in the bottom status bar.
22. PICTURE IN PICTURE (PIP)
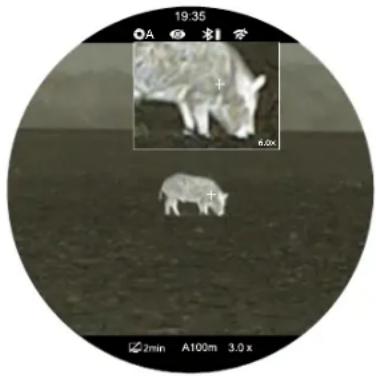
The PIP (Picture in Picture) function opens a small floating window with a magnified image-view at the top of the screen. PIP allows for improved aiming while still being able to see the wide field of view in the main body of the screen.
To activate PIP mode:
- From the home screen,
long press the Palette
Button. A 2× zoomed
image, centered on the reticle, will appear at the top of the screen.
- To exit PIP mode, long press the Palette ⬆ Button.
natural_image
Circular grayscale image showing a white animal in a field with an inset photo of a rhinoceros (no text or symbols)NOTE: Please note that the PIP image is 2× that of the total magnification shown in the bottom status bar. When the image in the main body of the screen is magnified via digital zoom, the PIP image will enlarge accordingly.
23. BLUETOOTH LASER RANGEFINDER
The BOLT TX60C is compatible with the IRAY-AC96 ILR-1200-1 Bluetooth Laser Rangefinder Module (optional/not included). Please consult the documentation included with the ILR-1200-1 for information on its operation.
When the optional ILR-1200-1 is connected to the TX60C via Bluetooth, the stadiametric rangefinder is temporarily unavailable.
24.STADIAMETRIC RANGEFINDER
The BOLT TX60C is equipped with a stadiametric rangefinder, which allows the user to calculate the approximate distance to an object if its size is known.
- Long press the
Brightness 📍 Button from the home screen to enter the stadiametric rangefinder.
- The stadiametric rangefinder interface has the following features:
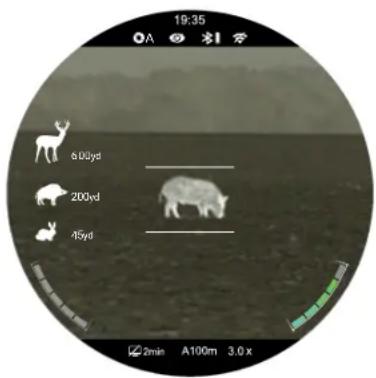
1 Stadia Lines: The two horizontal lines in the center of the screen can be adjusted to measure the size of the target object.
2 Icons and Distances: Icons and distance values for three pre-configured objects will be displayed on the left side of the screen. The pre-configured objects are Deer: 5.6' tall, Hog: 3.0' tall, and Rabbit: 7.9" tall.
Calculate the approximate distance of the observed object:
- Locate the target and position it between the stadia lines.
- Rotate the Control Turret to expand or contract the space between the horizontal lines until they touch the top and bottom edges of the target object.
a. Rotate clockwise to expand the space between the lines.
b. Rotate counterclockwise to shrink the space between the lines.
c. As you adjust the space between the horizontal lines, the rangefinder distance values on the left side of the screen are automatically recalculated.
- Long press the Brightness Button to exit the stadiametric rangefinder mode.
NOTES:
- The horizontal stadia lines are centered on the reticle, which remains onscreen.
- To change the units of measurement (meters or yards), see Settings Menu > Units of Measure on page 43.
25. ULTRA-CLEAR MODE
Ultra-Clear mode improves the image quality in inclement weather conditions, such as rain, fog, high humidity, or high temperatures as these conditions all result in lower thermal contrast. Ultra-Clear mode enhances the NETD value of the thermal sensor and improves the sensor's response rate to these challenging environmental conditions.
Ultra-Clear mode provides:
- Improved image quality and clarity; images are crisper and sharper.
- Increased image detail.
- Improved recognition of observed targets.
See Main Menu > Ultra-Clear below for instructions.
26.MAIN MENU OPTIONS AND DESCRIPTIONS
Menu and submenu options, from top to bottom are:
- Main Menu: Ultra-Clear, Wi-Fi, Bluetooth, Recoil Activated Video, Motion Sensor, Laser Calibration, Ballistics Calculation, Zeroing Profile, Zeroing, Calibration, Standby, Pixel Defect Correction, Compass Calibration, Settings.
- Zeroing Menu: Select Zero Distance, Reticle Zeroing, Customize Zero Distance.
- Settings Menu: Date, Time, Language, Unit, Status Bar, Image Hue, Factory Reset, Info.
Menu option details, descriptions, and navigation instructions are listed in order on the following pages.
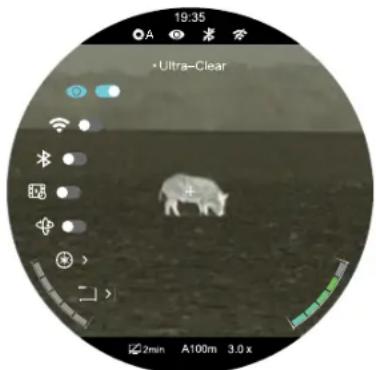
Ultra-Clear
Turn Ultra-Clear mode on / off
Ultra-Clear mode improves the image quality in inclement weather conditions, such as rain or fog.
- Long press the Control Turret to enter the main menu.
natural_image
Circular grayscale image showing a white animal on a dark surface with control buttons and a 20-minute time indicator (no readable text or symbols)- Rotate the Control Turret to select the Ultra-Clear menu item. Ultra-Clear is selected by default when the menu is accessed for the first time.
- Short press the Control Turret to toggle Ultra-Clear mode on / off. The Ultra-Clear status, on Ⓞ or off ⬇ appears in the top status bar.
- Long press the Control Turret to save and return to the home screen.
NOTE: When Ultra-Clear mode is turned on and off, the TX60C will automatically perform a shuttered non-uniformity correction.
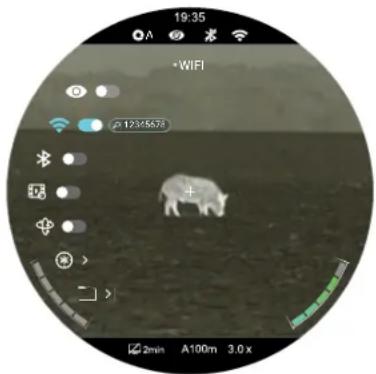
Wi-Fi
Turn Wi-Fi on / off
Turn on Wi-Fi to manipulate the TX60C via the InfiRay Outdoor App.
- Long press the Control Turret to enter the main menu.
- Rotate the Control Turret to select the Wi-Fi menu item.
- Short press the Control Turret to toggle Wi-Fi on / off. The first three times Wi-Fi is turned on, the default Wi-Fi password will appear briefly to the right of the toggle. The password will no longer be displayed after the default password is changed.
- The Wi-Fi status, on 📋 or off 🔍 appears in the top status bar.
- Long press the Control Turret to save and return to the home screen.
Bluetooth

The Bluetooth function of the BOLT TX60C requires an IRAY-AC96 ILR-1200-1 Laser Rangefinder Module (optional/not included). Please consult the documentation included with your ILR-1200-1 for more information on its operation.
Recoil Activated Video

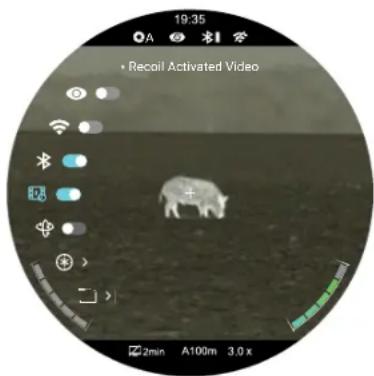
Turn recoil activated video on / off
When recoil activated video is turned on, the rifle scope will record 3 seconds before the shot and 2 minutes and 57 seconds after the shot.
- Long press the Control Turret to enter the main menu.
- Rotate the Control Turret to select the recoil activated video → menu item.
-
Short press the Control Turret to toggle recoil activated video on / off. The video recording timer, in HH:MM:SS (hour, minute, second) format, will appear in the upper-right corner when a recoil activated video is recording.
-
Long press the Control Turret to confirm the selection and return to the home screen.
NOTES:
- When multiple shots are taken within the same 30-second period, only one video will be taken.
- When recoil activated video recording is turned on, standard video recording is unavailable.
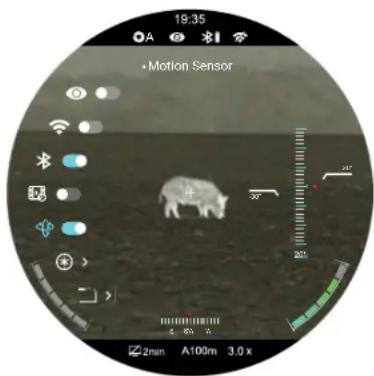
Motion Sensor

Turn the motion sensor and digital compass on / off
-
Long press the Control Turret to enter the main menu.
-
Rotate the Control Turret to select the motion sensor ✿ menu item.
-
Short press the Control Turret to toggle the motion sensor on / off. When the motion sensor
toggle is on, the tilt and pitch angles appear on the right side of the screen and the compass appears at the bottom.
- Long press the Control Turret to save and return to the home screen.
Laser Calibration

The laser rangefinder function of the BOLT TX60C requires an IRAY-AC96 ILR-1200-1 Laser Rangefinder Module (optional/not included). Please consult the documentation included with your ILR-1200-1 for more information on its operation.
Ballistics Calculation

The laser rangefinder function of the BOLT TX60C requires an IRAY-AC96 ILR-1200-1 Laser Rangefinder Module (optional/not included). Please consult the documentation included with your ILR-1200-1 for more information on its operation.
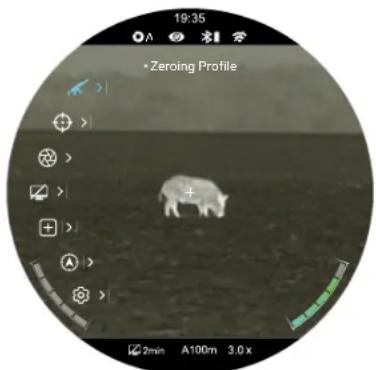
Zeroing Profile

Select the zeroing profile
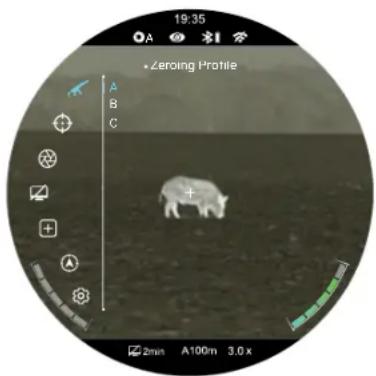
To zero the TX60C, you must first select a zeroing profile. Each of the three zeroing profiles, A, B, and C, have three preset zero distances.
- Long press the Control Turret to enter the main menu.
- Rotate the Control Turret to select the zeroing profile ↕ menu item.
- Short press the Control Turret to enter the zeroing profile submenu.
- Rotate the Control Turret to move through the zeroing profile options, A, B, and C. The selected zeroing profile appears in the bottom status bar with the zero distance.
- Short press the Control Turret to confirm the selection and return to the main menu.
Zeroing

Select or customize zero distance
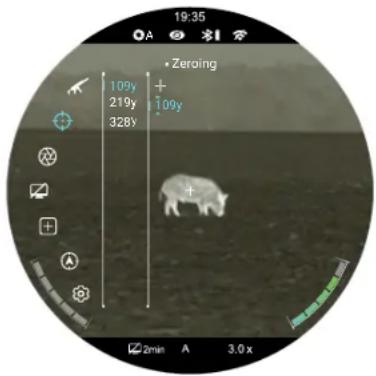
In the zeroing menu, you can select a preset zero distance, customize a preset zero distance, or adjust the reticle position for the selected zero distance. The BOLT TX60C supports custom zeroing distances of 1 to 999 yards or 1 to 999 meters.
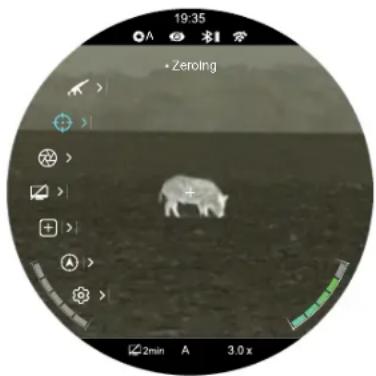
NOTE: Before selecting or customizing a zero distance, you must set a zeroing profile (A, B, or C). See the previous section.
Select a zero distance
- In the zeroing menu, rotate the Control Turret to select a preset zero distance.
- Short press the Control Turret to enter the submenu for the selected zero distance. In this submenu, you may:
a. Select the reticle zeroing ⏻ menu item to adjust the X/Y position of the reticle
at the selected zero distance. See Reticle Zeroing on the next page.
b. Select the zero distance to edit it. See Zeroing Menu > Customize Zero Distance on page 36.
Adjust the reticle position of the selected zero distance.
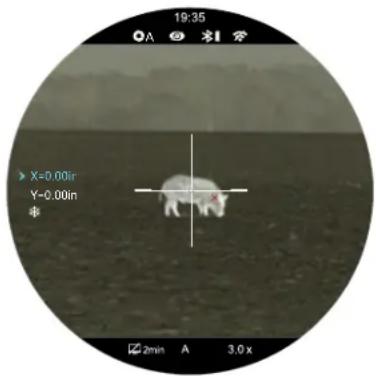
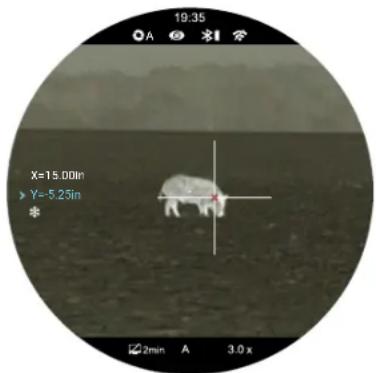
In the reticle zeroing interface, the X/Y position of the reticle may be adjusted to match the point of impact.
- In the submenu for the selected zero distance, the reticle zeroing + menu item is selected by default. Short press the Control Turret to select it and enter the reticle zeroing interface.
- The reticle zeroing interface has the following features:
1X: Horizontal point of impact change (in cm or inches).
2 Y: Vertical point of impact change (in cm or inches).
3 Freeze Icon: The icon appears when the image is frozen.
4 Reticle: Shows the new reticle position.
5 White Dot: Indicates center of original reticle position.
natural_image
Circular thermal image showing a pig on a dark surface with coordinate axes and time metadata (no readable text or symbols)NOTE: The red "X" indicates an example point of impact. It is shown in the figure for illustration purposes and is not an interface element.
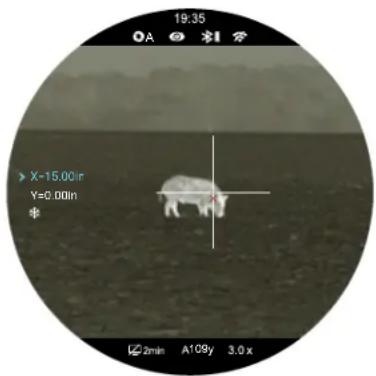
- Center the reticle on the aiming point and long press the Photo and Palette Buttons at the same time to freeze the image. The image freeze icon will appear below the X/Y coordinates.
natural_image
Circular grayscale image showing a white animal on a textured surface, with no visible text or symbols in the main scene.- Select the axis (X or Y) along which to move the cursor:
a. Short press the Control Turret to select the axis of movement, X or Y. The selected axis turns blue. The X-Axis is selected by default.
b. The cursor position is indicated by a blue arrow > icon.
- Adjust the X/Y position of the reticle until the reticle matches the point of impact.
a. X (horizontal) is the windage and Y (vertical) is the elevation.
b. Upon moving the reticle, a white dot appears on the screen, representing the original position of the reticle.
c. Rotate the Control Turret counterclockwise to move in the positive direction: X= Right and Y= Up.
d. Rotate the Control Turret clockwise to move in the negative direction: X= Left and Y= Down.
e. Rotate one click to move the reticle in the corresponding direction by 1 pixel. One full rotation (20 clicks) is equivalent to 20 pixels.
f. When adjusting your zero at a distance of 50 yards, one click will change the impact point by 0.29" as shown in the X and Y coordinate displays. At 100 yards that same click moves 0.58". At 200 yards one click moves 1.16".
g. The distance of your X/Y adjustments will update automatically
natural_image
Circular thermal image showing a polar bear on a body of water, with coordinate axes and exposure settings (no readable text or symbols)if you change your zero distance, for example from 100 to 200 yards.
- Short press the Control Turret to save the position of the first axis of movement and switch to the second axis as needed.
- Short press the Power ⏻ Button to clear the reticle position and exit to the previous screen; OR
- Long press Control Turret to save the reticle position and return to the home screen. A 5-second countdown appears on the screen, followed by "Saved Successfully."
- Take a confirmation shot—the point of impact should now match the point of aim. If not, adjust the X/Y position of the reticle again.
The BOLT TX60C supports custom zero distances of 1 to 999 yards or 1 to 999 meters.
- In the submenu for the selected zero distance, rotate the Control Turret to select the distance customization 000yd menu item.
- Short press the Control Turret to customize the zero distance. A blue arrow will appear above
- Rotate the Control Turret to increase or decrease the value of the first digit, from 0–9.
- Short press the Control Turret to switch between the three digits. The two blue arrow icons will move to indicate the selected digit.
- Long press the Control Turret to save the custom zero distance and return to the zero distance submenu.
- The new zero distance appears in the bottom status bar.
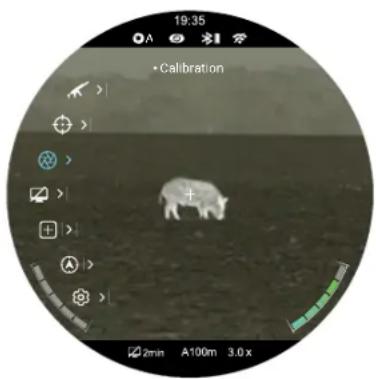
Calibration

Select the non-uniformity correction mode
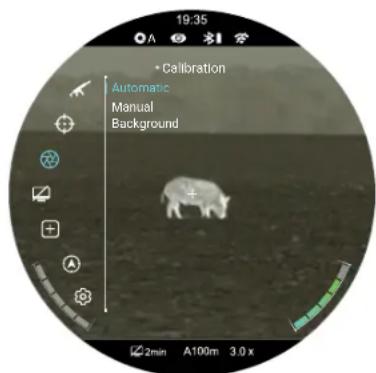
The BOLT TX60C has three non-uniformity correction (NUC) modes: Automatic (A), Manual (M), and Background (B).
- Long press the Control Turret to enter the main menu.
- Rotate the Control Turret to select the calibration ☑ menu item.
- Short press the Control Turret to enter the submenu.
natural_image
Grayscale circular image showing a white pig on a flat surface, with no visible text or symbols in the main scene.- Rotate the Control Turret to move through the submenu options, Automatic (A), Manual (M), and Background (B). The selected NUC mode appears in the top status bar.
- Long press the Control Turret to confirm the selection and return to the home screen.
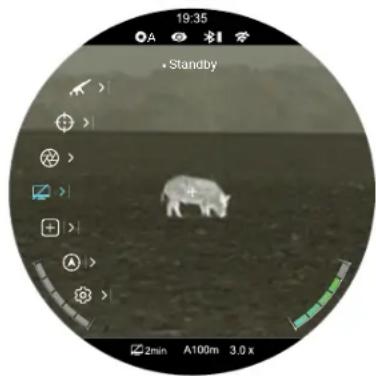
Standby
Set the automatic standby status and time
To conserve battery, the rifle scope may be set to automatically enter standby mode.
- Long press the Control Turret to enter the main menu.
-
Rotate the Control Turret to select the standby ☐ menu item.
-
Short press the Control Turret to enter the submenu.
-
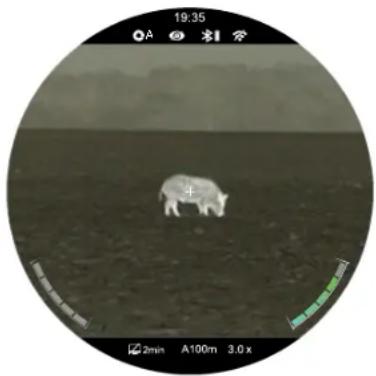
Rotate the Control Turret to move through the standby options, 2min, 4min, 6min, or off. The standby icon ☑ and the selected status appear in the bottom status bar.
-
Short press the Control Turret to confirm the selection and return to the main menu.
-
When 2, 4, or 6 minutes is selected, the TX60C will automatically enter standby mode, after the set length of inactivity to conserve battery life.
-
When in standby mode, short press the Power ⏻ Button to exit and return to the home screen.
natural_image
Circular thermal image showing a white animal on a dark surface, with no visible text or symbols in the main scene.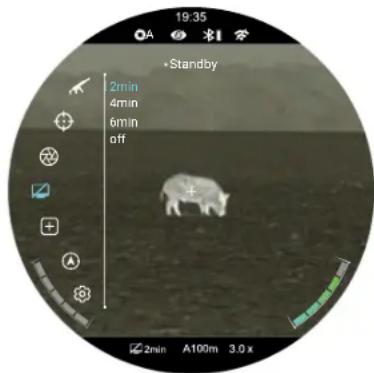
- After the set number of minutes of inactivity, the TX60C will enter standby automatically when it is tilted up or down at an angle of more than 70^ or left or right at an angle of more than 30^ .
- The TX60C will not enter standby mode while it is in a level (horizontal) position.
- Short press the Power ⏻ Button to exit standby mode.
- When off is selected, standby mode is turned off and the rifle scope will operate until the batteries run out.
Pixel Defect Correction

Select and correct defective pixels
Defective pixels are pixels that do not change correctly compared to the other image pixels—they are either brighter or darker than surrounding pixels. The BOLT TX60C has a tool that corrects defective pixels on the sensor using its internal software.
- Long press the Control Turret to enter the main menu.
- Rotate the Control Turret to select the pixel defect correction + menu option.
- Short press the Control Turret to enter the defective pixel correction interface.
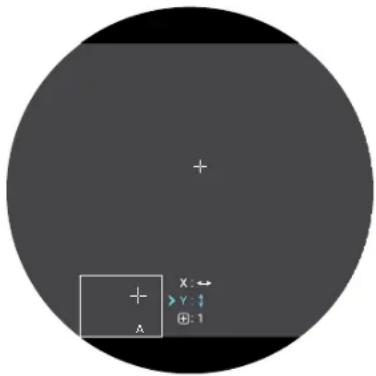
- The pixel correction interface has the following features:
1X: Select to move the cursor horizontally.
2 Y: Select to move the cursor vertically.
3 ☐ 0: Shows the number of defective pixels in the "to be corrected" list.
natural_image
Circular grayscale image showing a white animal standing on a flat surface, with no visible text or symbols.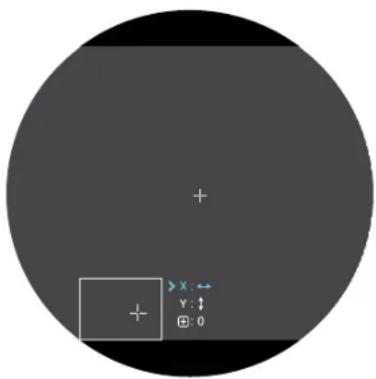
4 Cursor: The cursor appears in the center of the screen in place of the reticle. Move the cursor to the position of the defective pixel.
5 PIP Window: Shows a close-up view of the cursor location.
- Select the axis (X or Y) along which to move the cursor:
a. Short press the Control Turret to select the axis of movement, X or Y. The selected axis turns blue. The X-Axis is selected by default.
b. The cursor position is indicated by a blue arrow > icon.
- Move the cursor along the selected axis to the location of the defective pixel:
a. Rotate the Control Turret counterclockwise to move in the positive direction: X= Right and Y= Up.
b. Rotate the Control Turret clockwise to move in the negative direction: X= Left and Y= Down.
c. Rotate one click to move the cursor in the corresponding direction by 1 pixel. One full rotation (20 clicks) is equivalent to 20 pixels.
-
Short press the Control Turret to save the position of the first axis of movement and switch to the second axis as needed, and move the cursor along the second axis.
-
With the cursor in the location of the defective pixel, short press the Power ⏻ Button to add the pixel to the "to be corrected" list.
a. Add will briefly appear in the bottom-right corner of the PIP window.
b. + 0 will change to + 1 to indicate that one pixel has been added to the correction list.
-
If the defective pixel has been added in error, short press the Power ⏻ Button a second time from the same X/Y coordinates (do not move the cursor) to remove the pixel from the "to be corrected" list. Del will briefly appear in the PIP window.
-
Repeat the above steps to add additional defective pixels, as needed.
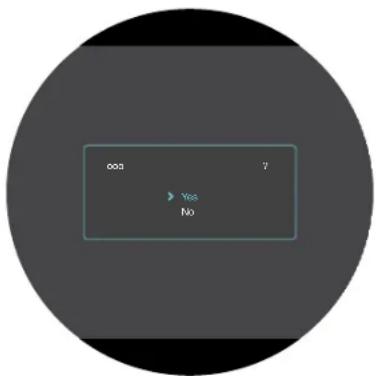
- When all defective pixels have been added to the list, long press the Control Turret to confirm changes.
- A popup window shows the message "Do you want to keep these settings?" and two options, Yes and No. Yes is selected by default.
- Short press the Control Turret to select Yes to correct the saved list of defective pixels and exit to the home screen. A 5-second countdown appears on the screen, followed by "Saved Successfully"; OR
- Rotate the Control Turret to move to No and short press the Control Turret to exit to the main menu without correcting any defective pixels.
NOTE: The PIP window will move to the top of the screen when the cursor moves into the bottom of the screen.
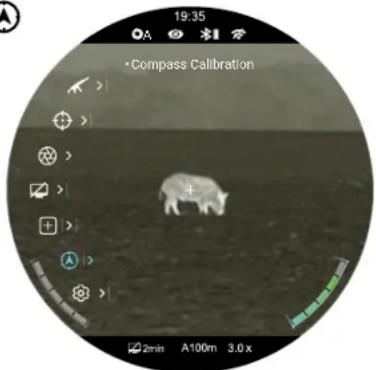
Compass Calibration
Calibrate the digital compass
- Long press the Control Turret to enter the main menu.
- Rotate the Control Turret to select the compass calibration ⚠ menu item.
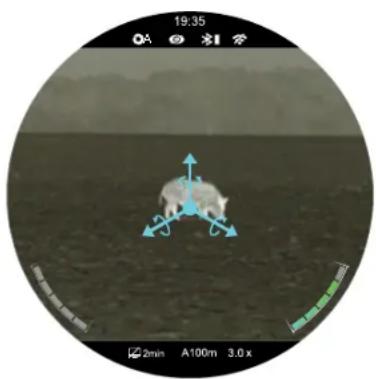
- Short press the Control Turret to begin compass calibration. A triaxial coordinate prompt will appear on the screen.
- Follow the prompt to rotate the TX60C at least 360 degrees along each axis, X, Y, and Z. Rotations must be completed within the 15-second calibration time.
- After 15 seconds, the system will exit to the home screen.
A
natural_image
Circular cropped image showing a rover on the moon's surface with coordinate axes and exposure settings (no readable text or symbols)Settings

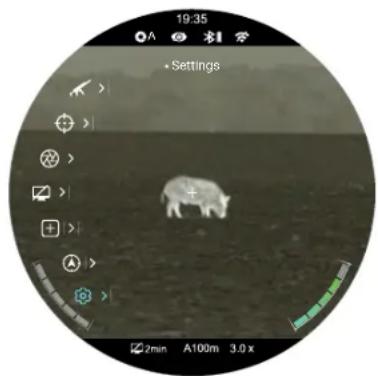
Set general settings
- Long press the Control Turret to enter the main menu.
- Rotate the Control Turret to select the settings ⚙️ menu item.
- Short press the Control Turret to enter the settings submenu. There are eight submenu items: Date, Time, Language,
Unit, Status Bar, Image Hue, Factory Reset, Info. The icon and text of the selected submenu item turns blue to indicate the current selection.
natural_image
Circular grayscale image showing a white animal on a textured surface, with no visible text or symbols.SETTINGS MENU > DATE

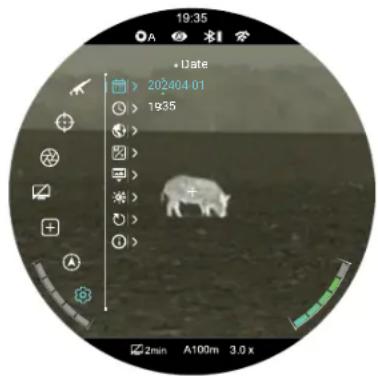
Set the date
- In the settings submenu, the date 📋 menu item is selected by default.
- Short press the Control Turret to edit the date. A blue arrow will appear above and below the year digit. The date is displayed in YYYY.MM.DD format.
- Rotate the Control Turret to select the correct value for each digit (year, month, and day).
- Short press the Control Turret to switch between digits. The two blue arrow icons move to indicate the selected digit.
- Long press the Control Turret to save the date and return to the home screen.
SETTINGS MENU > TIME

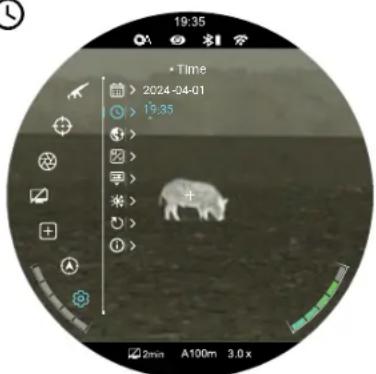
Set the time
- In the settings submenu, rotate the Control Turret to select the time ⏻ menu item.
- Short press the Control Turret to edit the time. A blue arrow will appear above and below the hour digit. The time is displayed in 24-hour format, HH:MM.
- Rotate the Control Turret to select the correct value for each digit (hour and minute).
- Short press the Control Turret to switch between digits. The two blue arrow icons move to indicate the selected digit.
- Long press the Control Turret to save the time and return to the home screen.
- The time appears on the top status bar.
SETTINGS MENU > LANGUAGE

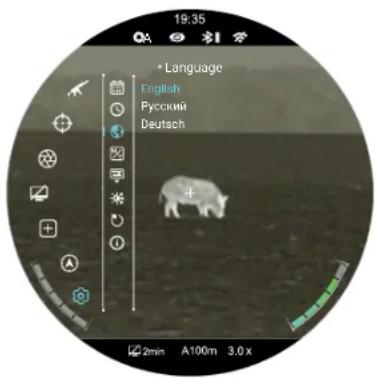
Select the language
- In the settings submenu, rotate the Control Turret to select the language 📄 menu item.
- Short press the Control Turret to enter the language submenu.
- Rotate the Control Turret to move through the language options.
- Short press the Control Turret to confirm the selection and return to the settings submenu.
SETTINGS MENU > UNIT

Select the units of measure
- In the settings submenu, rotate the Control Turret to select the unit ☑ menu item.
- Short press the Control Turret to enter the submenu.
- Rotate the Control Turret to move through the unit options, Meters and Yards.
- The selected unit of measure displays along with the selected zero profile and distance in the bottom status bar.
- Short press the Control Turret to confirm the selection and return to the settings submenu.
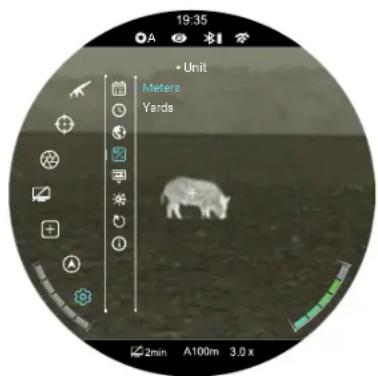
SETTINGS MENU > STATUS BAR

Turn status bar auto-hiding on / off
This function enables all interface information, aside from the reticle, to be automatically hidden for unobstructed image view.
When auto-hide is turned on, the status bar and all interface icons will be automatically hidden after 8 seconds of inactivity. The menu and shortcut buttons are disabled until the entire interface is again displayed. Press any button to show all interface information again.
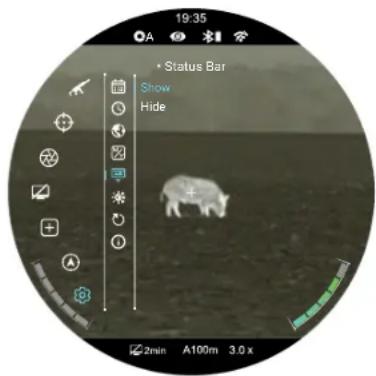
NOTE: When auto-hide is on and the main menu is open, the menu will hide after 15 seconds of inactivity and the rest of the user interface will hide after an additional 8 seconds.
- In the settings submenu, rotate the Control Turret to select the status bar ▶ menu item.
- Short press the Control Turret to enter the status bar submenu.
- Rotate the Control Turret to move through the options, Show and Hide.
- Short press the Control Turret to confirm the selection and return to the settings submenu.
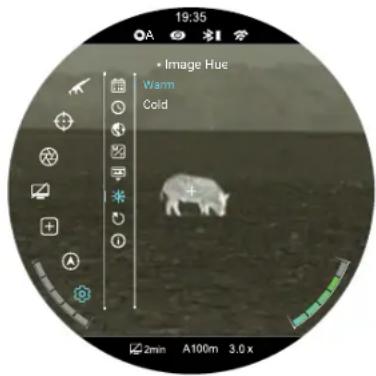
SETTINGS MENU > IMAGE HUE
Set the image temperature
- In the settings submenu, rotate the Control Turret to select the image hue ✦ menu item.
- Short press the Control Turret to enter the image hue submenu.
- Rotate the Control Turret to move through the hue options, Warm and Cold.
- Short press the Control Turret to confirm the selection and return to the settings submenu.
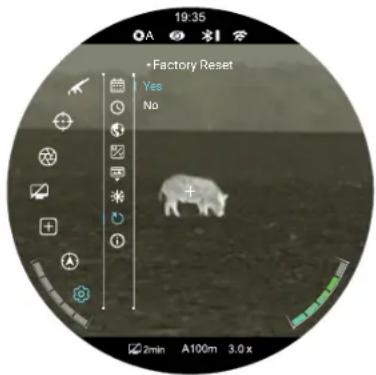
SETTINGS MENU > FACTORY RESET
Reset to factory settings
- In the settings submenu, rotate the Control Turret to select the factory reset menu item.
- Short press the Control Turret to enter the factory reset submenu. Two options, Yes and No, appear. Yes will restore factory settings and No will cancel the operation. Yes is selected by default.
- Short press the Control Turret to select Yes to confirm the factory reset. Factory settings will be restored and the TX60C will reboot automatically; OR
- Rotate the Control Turret to move to No and short press the Control Turret to cancel the factory reset and return to the submenu.
FACTORY RESET NOTES:
- A factory reset cannot be undone. - The settings listed below will be reset to the factory defaults:
• Color Palette: White Hot
• Display Brightness: 3
• Image Contrast: 3
• Image Sharpness: 3
• Digital Zoom: 3.0×
- Reticle Type: 1
- Reticle Color: Black
- Ultra-Clear mode: Off
- Wi-Fi: Off
- Bluetooth: Off
• Recoil Activated Video: Off
- Motion Sensor: Off
- Calibration: Automatic
- Standby: Off
- Language: English
- Units: Meters
- Status Bar: Show
- Image Hue: Warm
- Wi-Fi SSID:
BOLT_XXXXX_YYYYYYYY
• Wi-Fi Password: 12345678
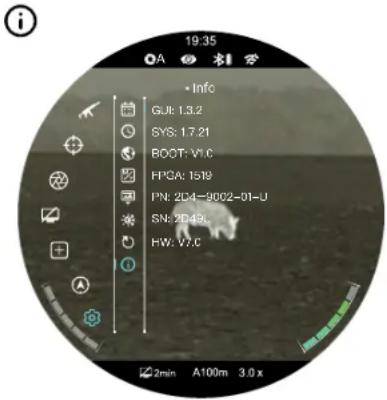
SETTINGS MENU > INFO
Show device information
- In the settings submenu, rotate the Control Turret to move through the submenu and select the info ⓘ menu item.
- Short press the Control Turret to enter the info submenu which displays the following information about the TX60C: the GUI, SYS, Boot, and FPGA versions, the part and serial numbers, and the ha
- Long press the Control Turret to return to the settings submenu.
27. WARRANTY
At iRayUSA we're first and foremost hunters and users of our products and we understand that failure isn't an option. We also understand that having to wait extended periods for repair isn't something that a customer should have to put up with when something does go wrong. During your published warranty period, iRayUSA will repair or replace, at its discretion, any optic that becomes defective during normal use. Additionally, if we cannot fix your optic in less than one week, we will offer to replace it with a replacement product in like or better condition. If you would rather wait for your specific optic to be repaired, we can handle that too.
We know you've never seen this from a thermal manufacturer, and neither have we, and that's why we started iRayUSA.
Our warranty follows the product and is not tied to the original owner. The warranty period is tied to the date of sale to the dealer. This warranty only covers normal use and does not cover cosmetic damage, normal wear, intentional damage, theft, loss, any act of God, or a condition caused by use other than intended. Any product that is modified, opened, or tampered with will void any warranty coverage. Any serial number damage or alteration on the product will be considered a modification. Be sure to register your BOLT TX60C rifle scope at irayusa.com/register.
To return a product for repair:
- Go to irayusa.com/warranty and click the Request an RMA button to request an RMA number. Returns will not be accepted without an RMA.
- The customer is responsible for shipping the product to iRayUSA, per the instructions included with the RMA. iRayUSA will return the product at no cost.
WARRANTY NOTES:
- The one-week timeline starts from the time of receipt of the product at iRayUSA.
- iRayUSA is not liable for any damages or loss incurred when shipping to iRayUSA.
- This warranty gives you specific legal rights, and you may also have other rights which vary from state to state.
Please give us a call at 800-769-7125, visit irayusa.com/warranty, or email info@irayusa.com with any questions.
28. BASIC INSPECTION
It is recommended to carry out a technical inspection before each use. Please check the following:
- The rifle scope appearance: there should be no cracks in the body or visible damage.
- The condition of the objective lens and eyepiece: there should be no cracks, greasy spots, dirt, or other deposits on the lens.
- The internal rechargeable battery pack and 18650 battery should be fully charged.
- The control buttons and turret should be in working order.
- The mount should be tight and correctly installed on the rail.
29. BASIC MAINTENANCE
Always replace the objective lens cap (16) after use to avoid damaging or scratching the lens. Never touch the lens directly; oil from your skin can damage the lens coating and surface.
Basic maintenance should be carried out at least twice a year and includes the following steps:
- Wipe the surface of the external metal and plastic components with a clean, dry cotton cloth. Do not use chemical, corrosive, or abrasive cleaners. Canned air may also be used to clean the external components.
- Clean the electric contacts and battery slots on the rifle scope using a non-greasy organic solvent.
- Check the lens and eyepiece. If necessary, remove any dirt or sand from the optics; a non-contact cleaning method is preferred.
- Cleaning the exterior of the lens should only be done with the included microfiber lens cloth or a similar product. Only clean the lens when it is visibly soiled. Frequent wiping or cleaning can degrade the anti-reflective lens coating.
30. GENERAL TROUBLESHOOTING
The troubleshooting table on the next page lists issues that may occur when operating the BOLT TX60C. Carry out the recommended troubleshooting steps in the order shown in the table. Please contact iRayUSA at 800-769-7125 or irayusa.com/support or an authorized vendor for assistance before attempting to perform any modifications or repairs beyond the scope of the troubleshooting procedures in this manual. Unauthorized repairs or modifications will void your warranty.
| ISSUE | JSES |
| The TX60C will not turn on. | The built-in battery is very low or has completely discharged. |
| The TX60C can not connect to a computer or external power supply. | External power supply has completely discharged. Check |
| Computer is turned off. Power on the computer. | |
| Data cable is damaged. Replace the cable. | |
| The TX60C can not connect to the mobile device (smartphone or tablet). | Wi-Fi is not turned on. |
| Wrong Wi-Fi password entered. | |
| Too many Wi-Fi signals nearby, which may cause interference. | |
| Wi-Fi signal is lost or interrupted. | The device is out of range of a strong Wi-Fi signal, or there are obstacles (such as concrete walls) between the device and the signal. |
| The image is blurry, the background is uneven, or vertical lines or artifacts are present. | Non-uniformity correction is required. |
| The image is too dark. | Screen brightness level is too low. |
| The GUI is clear, but the image is blurry. | The lens is not focused. |
| There is dust or ice on the interior or exterior optical surfaces of the lens. | |
| There is condensation on the interior or exterior optical surfaces of the lens. | |
| The aiming reticle shifts after firing rounds. | The TX60C is not mounted securely or the mount is not secured on the TX60C. |
| Observed target disappears. | Observing the target through glass. |
| The TX60C will not focus. | Image settings are not optimal for the current environmental conditions or the object being observed. |
| Image quality is low or the detection range is reduced. | Environmental conditions, such as snow, rain, humidity, and fog. |
| When the TX60C is used in low-temperature conditions, the image quality of the surroundings is worse than in warm-temperature conditions. | Environmental conditions. |
EPS
| Charge the battery. |
| power supply and charge It if necessary. |
| Turn on the Wi-Fi in the main menu. See Main Menu > Wi-Fi on page 30. |
| On the mobile device, go to Settings > Wi-Fi and enter the correct password. The default password is 12345678. See Main Menu > Wi-Fi on page 30. |
| Move the TX60C and mobile device to an area with no or fewer Wi-Fi signals. |
| Try again when the Wi-Fi signal is stable.Move the TX60C closer to the Wi-Fi signal. |
| Perform a non-uniformity correction. See Non-uniformity Correction on page 22. |
| From the home screen, short press the Brightness button to adjust the screen brightness. |
| Adjust the focus on the target by rotating the Objective Lens Focus Ring (15).Adjust the image sharpness in the quick menu. See Using the Quick Menu on page 18. |
| Wipe the external optical surface with the included microfiber lens cloth. |
| Wipe the external optical surface with the included microfiber lens cloth.Allow the TX60C to dry by leaving it in a warm, dry environment for at least 4 hours. |
| Check that the TX60C has been securely mounted.Make sure you are using the same brand, type, and weight of the bullets as when the TX60C and weapon were initially zeroed.If the TX60C was zeroed in different environmental conditions, a slight shift of the zero is possible. |
| Remove any glass windows from the field of view. |
| Check the external surface of the objective lens and eyepiece and, where necessary, wipe away any dust, condensation, frost, etc.In cold weather, you can use special anti-fogging coatings, such as those made for corrective glasses.Adjust the focus on the target by rotating the Objective Lens Focus Ring (15).Adjust the image sharpness in the quick menu. See Using the Quick Menu on page 18.Adjust the image and device settings. See Quick Start Guide on page 8.Turn on Ultra-Clear mode. See Main Menu > Ultra-Clear on page 29. |
| Turn on Ultra-Clear mode. See Main Menu > Ultra-Clear on page 29. |
| In warm-temperature conditions, objects being observed (surroundings and background) heat up differently because of thermal conductivity, thereby generating a high-temperature contrast. Accordingly, image quality produced by the rifle scope will be higher. In low-temperature conditions, the background will cool down to roughly the same temperature, and thus the temperature contrast is substantially reduced and image detail can go down as there is less contrast in the scene. This is a normal function of a thermal imager and is no indicator of actual detector performance. |
- Bolt Action Optimized Thermal Rifle Scope
- WARNING!
- ITAR REQUIREMENTS
- FCC ID 2AYGT-2D-00
- WARNING: CHOKING HAZARD
- TABLE OF CONTENTS
- OVERVIEW
- FEATURES
- TECH SPECS
- ACCESSORIES
- COMPONENTS AND CONTROLS
- DESCRIPTION OF CONTROL BUTTONS AND SHORTCUTS
- QUICK START GUIDE
- Step 1: Prepare to Use the BOLT TX60C
- Step 2: Turn On and Adjust the Focus
- Step 3: Adjust the Device Settings
- Step 4: Set Up the Reticle and Zero the TX60C
- CHARGING THE BUILT-IN BATTERY PACK
- NOTES:
- INSTALLING AN 18650 BATTERY
- BATTERY STATUS INDICATORS
- SWITCHING THE BATTERY POWER SUPPLY
- BATTERY SAFETY PRECAUTIONS
- WARNINGS:
- EXTERNAL POWER SUPPLY
- MOUNTING THE BOLT TX60C
- MOUNTING NOTES:
- OPERATING INSTRUCTIONS
- Using the Control Buttons
- Powering On
- Powering Off
- STANDBY MODE
- Manually Enter Standby Mode
- Automatically Enter Standby Mode
- AUTOMATIC STANDBY NOTES:
- Adjusting the Focus
- ADJUSTING THE DIOPTER/EYEPIECE
- FOCUSING THE OBJECTIVE LENS
- Activating / Deactivating the Reticle
- Status Bar Overview
- Using the Quick Menu
- ZEROING THE BOLT TX60C
- NON-UNIFORMITY CORRECTION
- Automatic Mode
- Manual Mode
- Background Mode
- PHOTOGRAPHY AND VIDEO RECORDING
- Photography
- Video Recording
- Recoil Activated Video Recording
- Video and Photography Notes
- ACCESSING THE INTERNAL MEMORY
- USING THE INFIRAY OUTDOOR APP
- DIGITAL ZOOM
- PICTURE IN PICTURE (PIP)
- BLUETOOTH LASER RANGEFINDER
- 24.STADIAMETRIC RANGEFINDER
- ULTRA-CLEAR MODE
- 26.MAIN MENU OPTIONS AND DESCRIPTIONS
- Ultra-Clear
- Turn Ultra-Clear mode on / off
- Wi-Fi
- Turn Wi-Fi on / off
- Bluetooth
- Recoil Activated Video
- Turn recoil activated video on / off
- Motion Sensor
- Turn the motion sensor and digital compass on / off
- Laser Calibration
- Ballistics Calculation
- Zeroing Profile
- Select the zeroing profile
- Zeroing
- Select or customize zero distance
- Select a zero distance
- Adjust the reticle position of the selected zero distance.
- Calibration
- Select the non-uniformity correction mode
- Standby
- Set the automatic standby status and time
- Pixel Defect Correction
- Select and correct defective pixels
- Compass Calibration
- Calibrate the digital compass
- Settings
- Set general settings
- SETTINGS MENU > DATE
- Set the date
- SETTINGS MENU > TIME
- Set the time
- SETTINGS MENU > LANGUAGE
- Select the language
- SETTINGS MENU > UNIT
- Select the units of measure
- SETTINGS MENU > STATUS BAR
- Turn status bar auto-hiding on / off
- SETTINGS MENU > IMAGE HUE
- Set the image temperature
- SETTINGS MENU > FACTORY RESET
- Reset to factory settings
- FACTORY RESET NOTES:
- SETTINGS MENU > INFO
- Show device information
- WARRANTY
- WARRANTY NOTES:
- BASIC INSPECTION
- BASIC MAINTENANCE
- GENERAL TROUBLESHOOTING
Brand : InfiRay
Model : TX60C
Category : Binoculars