
Curves Equator - Égaliseur audio numérique WAVES - Free user manual and instructions
Find the device manual for free Curves Equator WAVES in PDF.


| Product Type | Audio Plugin (Resonance Suppressor & Frequency Unmasking) |
| Developer | Waves |
| Platform | Windows & Mac (AAX, AU, VST) |
| Main Functions | Automatic resonance suppression, frequency unmasking, sidechain carving, dynamic EQ |
| Threshold Curve Modes | Adaptive (flat or factory curve) and Captured (from input or sidechain) |
| Key Controls | Main Knob (threshold), Sensitivity (knee/ratio), Shape (curve morph), Tilt (LF/HF balance), Mix (wet/dry) |
| Advanced Controls | Attack/Release (0-1000ms), Precision (depth/narrowness), Tilt Frequency (300-3000Hz), Curve Smoothing (0-100) |
| FFT Analyzer | Input FFT display with adjustable threshold curve, up to 8 nodes per curve, three crossovers (4 bands) |
| Sidechain | SC On/Off, SC Listen, Rider (level-dependent or fixed reduction), Capture SC |
| Stereo Processing | Linked, L/R Split, M/S with Balance control (-50 to +50) |
| Output Section | Auto Makeup Gain, True Peak Limiter (fixed -0.1dB ceiling), Limiter On/Off with reduction meter |
| Preset Management | Full reset, partial loading, factory presets, user presets via WaveSystem Toolbar |
| Band Cut (mix per band) | 0% to +200% reduction per band, independent of Main knob |
| Node Types | Low shelf (below 100Hz automatic), bell, high shelf (above 8kHz automatic), up to 8 per curve |
| Delta Mode | Listen to only the reduced signal (difference) |
| Documentation | User manual in PDF (24 pages) |
Frequently Asked Questions - Curves Equator WAVES
User questions about Curves Equator WAVES
0 question about this device. Answer the ones you know or ask your own.
Ask a new question about this device
Download the instructions for your Égaliseur audio numérique in PDF format for free! Find your manual Curves Equator - WAVES and take your electronic device back in hand. On this page are published all the documents necessary for the use of your device. Curves Equator by WAVES.
USER MANUAL Curves Equator WAVES
Smarter Resonance Suppression and Frequency Unmasking
User Guide
Curves Equator User Guide
INTERFACE AND CONTROLS 5
STEPS IN THE PROCESS 7
THRESHOLD CURVE: ESTABLISH WHAT WILL BE PROCESSED 8
Start With a Flat Threshold Curve 8
Capture a Threshold Curve....10
Sidechain Capture 11
MAIN PLATE PANEL: MODIFY THE THRESHOLD CURVE 14
Main Knob (Threshold) 14
Sensitivity....14
Shape....15
Tilt 15
Curve Nodes and Widgets (on the Threshold Curve) 15
Node Controls and Commands.... 16
Show/Hide Advanced Controls.... 16
FFT ANALYZER AREA: CONTROL PROCESSING AMOUNT 17
FFT Input 17
Threshold Curve 17
Crossovers.... 17
Cut (mix) Per Band.... 18
Adjusting Reduction by Band vs. Editing the Threshold Curve.... 18
Hotkey (modifier keys) On Nodes and Widgets.... 19
ADVANCED PANEL: MODEL THE SOUND 20
Sensitivity....20
Attack/Release 20
Precision 20
Tilt Frequency 21
Curve Smoothing 21
Mix 21
Limiter On/Off + Meter 22
Stereo Controls 22
Linked 22
L/R (Split) 22
M/S....22
Balance 22
PRESETS MANAGEMENT 23
Updates....24
CURVES EQUATOR
Curves Equator automatically attenuates resonances and accurately tames built-up frequencies to provide a balanced, stable sound. It opens space in a track and provides the clarity needed for an instrument or voice to punch through. There are two steps in Equator processing: 1) creating a threshold curve that determines what will be processed and what won't, and 2) controlling how those sounds will be processed. Equator can also build a threshold curve based on a sidechain signal (SC). This helps resolve buildups of conflicting frequencies and makes room for the "important" audio by cutting frequencies from a "less important" source, thus creating space in the mix.
There are two ways to create a threshold curve. Adaptive, the default mode, begins with a flat curve or a factory curve that you can mold to perfectly suit your track. It is especially valuable when you want to perform significant correction or modification to your track.
The Captured mode captures a representative portion of a song, from which it creates an accurate threshold curve. Use this mode when you are happy with the nature of your source but want to fine-tune it, whether for resonance control or gentle reshaping.
There are several tools for modeling a threshold curve and customizing the processing, and all controls that are available to input processing are there for the sidechain signal.
Even if you run a sound through Equator and don't touch any controls, other than the main threshold, you will hear blocky resonances fade away—maybe even blemishes you never noticed before—and make way for a more open and airy mix.
Interface and Controls


Tooltips
Hover over a control and its tooltip will appear in the upper right corner. Turn tooltips on or off in the menu on the right side of the Waves Toolbar.
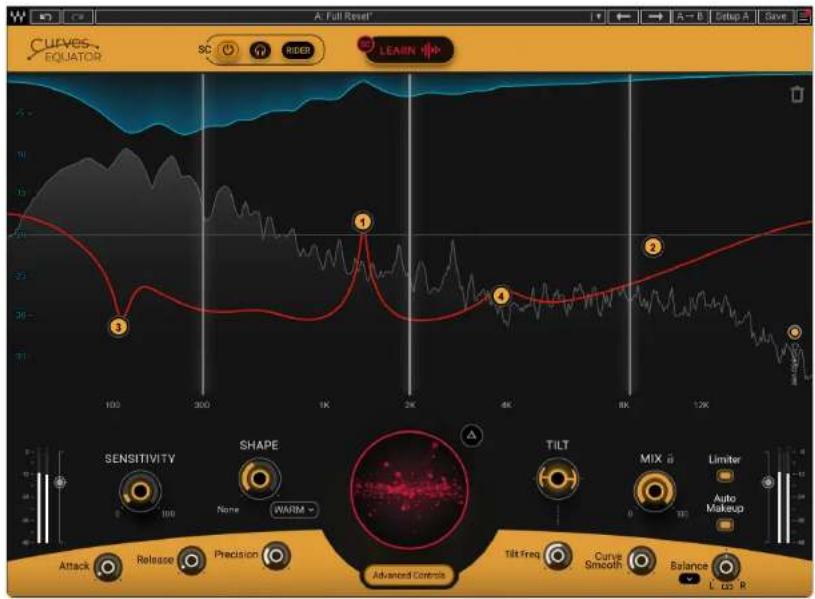
1 Input signal
2 Input meters
3 Captured/SC Captured
4 Threshold curve
5 Reduced signal
6 Curve node and widget
7 Adjustable crossover
8 Band Cut control
9 Trash the threshold curve
10 Enable sidechain mode/SC listen
11 Sensitivity: knee and ratio of dynamic reduction
12 Shape: select threshold curve and adjust curve mix
13 Main knob: adjust overall threshold
14 Tilt: adjust LF/HF focus of the threshold curve
15 Wet/Dry mix; lock protects mix when preset loads
16 Output section/limiter/makeup gain
17 Advanced controls show/hide
18 Attack time of reduction
19 Release time of reduction
20 Precision: depth and width of processing
21 Adjust tilt anchor frequency
22 Curve Smooth: softens the threshold curve
23 Balance: L/R, M/S, linked
24 Delta: listen to reduced signal only
25 Hide/Show crossovers
26 WaveSystem Toolbar: presets, A/B settings, and
INTERFACE SECTIONS
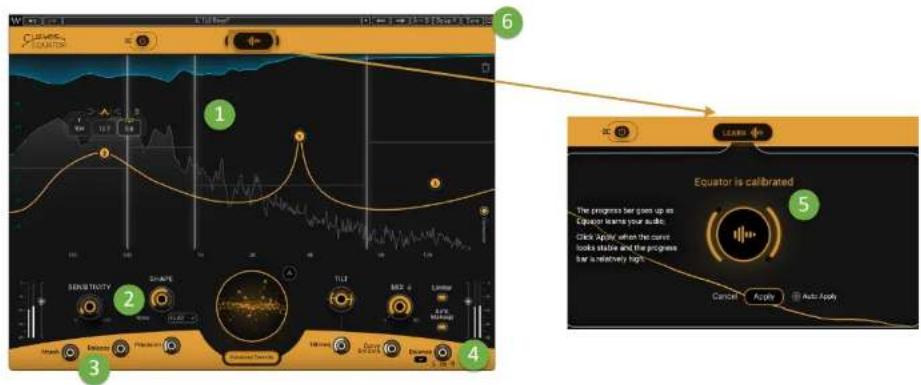
1 FFT Analyzer Displays the input FFT, allowing you to visualize where reduction is performed and required. Capture, view, and adjust the threshold curve (Equator Line) and control processing using the crossovers and nodes.
2 Main Plate Adjust the primary processing parameters, such as Threshold, Delta, Tilt, and Shape. These controls allow you to fully control the intensity, balance, and spectral properties of the processing.
3 Advanced Provides fine control over how Equator processes the audio, including attack/release, precision, tilt frequency, and curve smoothing. This allows detailed adjustments for specific needs.
4 Stereo Configure how the plugin processes stereo signals with options for linked, split, or mid/side processing. Adjust the balance to manage the processing percentage between left and right channels or mid and sides.
5 Capture Screen Click the Capture icon to start the capture. When the Threshold curve has stabilized, the capture is complete.
6 Presets Use the WaveSystem Toolbar to save and load presets or threshold curves for different audio content. Quickly apply Management previously saved settings or factory presets to streamline your workflow. The preset system allows partial loading of presets, so you don't have to re-capture your content. This saves time and improves workflow.
Steps in the Process
1 Threshold curve: Equator uses a threshold curve to determine what parts of the signal will be processed. The threshold curve can be captured from a clip of the sound or shaped from a flat file.
In both cases you can use the sidechain signal (SC Captured) as well as the main signal. Which method you use depends on production needs, the nature of the input signal, and personal preferences.
2 Set Threshold: Use the Main knob to set an overall threshold, then adjust Shape and Tilt to broadly affect the curve to your liking. Then you can accurately tailor the curve by adding graph nodes. By locally editing the curve, you can control what is being processed and what isn't with great accuracy.
3 Processing Controls: Move the crossovers to define the frequency ranges used for precise band-cut control. This provides very local processing control. Fine tune the reduction processing by using advanced controls such as nodes, attack/release, precision, and curve smoothing, as needed.
4 Adjust stereo imaging, auto makeup gain, and limiter as needed to further customize the sound.
5 Save/Load Presets: Save your settings as presets, or load factory presets and threshold curves for different audio content. The preset system allows you to load parts of presets, which saves time and improves workflow and speed.
IMPORTANT
Equator has a dynamic makeup gain module that can boost some frequencies due to reductions in others.
With very high input levels or heavily compressed/limited signals with no headroom, this might cause saturation or distortion. While auto makeup gain keeps the input and output energy levels similar, it may also color the output, altering the frequency balance.
For optimal results, provide a few dBs of headroom on your input, and avoid using makeup gain if your audio is excessively compressed or limited.
Threshold Curve: Establish What Will Be Processed
The threshold curve is just that: a curve that is adjusted (lowered) to determine which frequencies will be “shaved off” by it and will therefore be processed. Frequencies that are below the threshold are largely unprocessed. The threshold value is globally controlled by the Main knob.
There are two ways to make a threshold curve.
- Start with a flat curve.
- Create a curve derived from the input signal.
Start With a Flat Threshold Curve
Use this mode when you want to sculpt, rather than polish, your sound. If you feel that your audio needs corrective EQ or it requires processing to make it more balanced or to "pop-out" of the mix, then start by using the default flat threshold curve and then craft it as needed. This technique does not require an initial capture of the input signal.
There are three ways to open a flat curve:

Click the Trash button on the upper-right side of the graph. This flushes the captured threshold curve, if any, and loads a flat curve instead. It also clears all nodes that were set on the curve.

Go to the Shape control and select Flat. Turn the Shape value to 100. If you prefer, you can start with a factory curve from the drop-down menu.

Open the Presets menu on the WaveSystem Toolbar (circled yellow here) and select Full Reset/All to clear the curves and settings. Other reset options are available in the menu.

No matter how you open the initial flat curve, you can shape and modify it using several tools.
1 The Main knob sets the overall threshold (Main Plate panel).
2 Curve nodes are handles that let you change the shape of the threshold (FFT Analyzer).
3 Shape morphs the underlying shape of the threshold (Main Plate panel).
Capture a Threshold Curve
Use the Captured mode when you want to fine-tune your sound rather than significantly alter it. Here, Equator "listens" to a section of the input signal and averages it with a very fine resolution to create a threshold curve. Since this curve initially follows the contours of the input signal, it is ideally suited for controlling resonances and similar faults without fundamentally changing the sound structure.

To use the Captured mode, click on the Capture icon at the top of the window. This opens and closes the Capture Window.

Play a clip of the music, voice, or other sound from which you want to create the threshold curve. Pick a part of the music that is representative of the whole song in terms of level, content, and dynamics.
Capture will begin when Equator senses an input signal. You will see the curve being created in the background.

When Equator has captured enough of the input to create a valid curve, the Apply button will light up.
Click the Apply button to end the capture and close the window. You can continue the capture for a few more seconds for even better results. In general, the more audio captured, the more comprehensive the threshold curve will be.
Select Auto Apply and Equator will stop the capture when it has achieved the most stable curve. Usually this takes a bit more time than stopping manually with the Apply button.
The new capture will appear on the graph. The Sensitivity control will also appear after the capture, whether Eclipse is in Basic or Advanced mode.
Sidechain Capture
Whether you are using a captured curve or shaping a flat curve, you can use a sidechain from another DAW track to attenuate the audio on the input curve track. The sidechain's curve is flipped, removing similar frequencies between competing sources to "carve" space in the mix. This creates more space in the mix, generally without adverse effects.

To use the sidechain for analysis, you must first route audio to the sidechain in your DAW and click the SC button on the plugin. Consult your DAW's user guide.
SIDECHAIN PANEL CONTROLS
| SC On/Off | Activates the SC section. |
| SC Listen | Click and hold the button to audition the signal that the plugin is receiving from the SC buss. SC Audition requires the SC Capture button to be on, and that audio is routed to the SC buss. |
| Rider On/Off | Toggles between two types of SC level-control behavior.Rider On: The general reduction amount is triggered by the incoming SC level.Rider Off: Threshold curve sets the reduction amount, regardless of the incoming SC level. |
| Capture SC | When the SC capture mode is on, the Capture button becomes the Capture SC button. Click to start a SC capture. |
EXAMPLE: CARVE SPACE FOR A LEAD VOCAL
- Send the lead vocal to a sidechain (SC) in your DAW.
- Load Equator on any other track, group, or Aux you want to process (e.g., guitar, piano, drum group, background vocals).
- Select Capture SC and play to capture a flipped threshold based on the lead vocal track.
- Use the Main knob to lower the threshold and reduce frequencies that clash with the lead vocal. Because of the flipped curve, you will be processing only energy-rich areas that clash with the lead vocals.
By doing this, you needn't boost the lead vocal to make it cut through the mix; instead, you'll achieve the same effect by taming clashing frequencies from other tracks. This will also clear up your mix.
Similarly, you can use Equator on your master buss, and route the important channels to the SC. This will carve space for them in the mix, providing clarity and reducing clutter and muddiness.
This mode is one of the most powerful and effective features of Curves Equator. It's very useful when you want to "make room" for an important channel by carving out some frequencies from other, less important ones.
When you are capturing audio from the sidechain bus, the curve being formed during the capture is derived from the SC audio, not the input signal. Toggle the SC on/off button to compare the two curves.
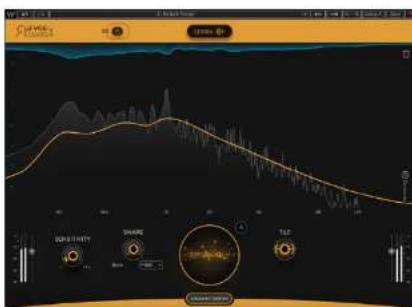
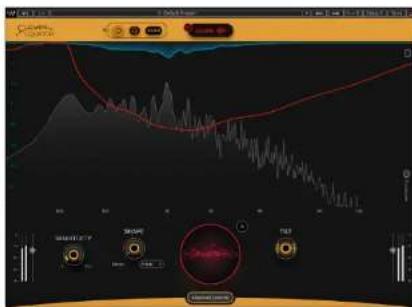
Threshold curve of the input signal (left).
Threshold curve of a sidechain signal in the same session (right).
Input and SC each maintain their curves when you move between the two. Adjust them separately.
Use the Rider to keep the SC reduction from affecting the input signal when there is little SC gain. This provides SC processing only where you need it.
AUTO-STOP
When Auto-Stop is selected, the process will end automatically when the Capture is sufficiently stable. This is a reliable and easy way to make sure your capture is sufficient.
CAPTURED RESULTS
When you play audio after completing a capture, you will see three graph elements:

line
| Point | Value | |-------|-------| | 1 | Peak | | 2 | Peak | | 3 | Peak |1 Reduced signal
2 Input signal
3 Threshold curve
TRASH CURVE

This flushes the captured threshold curve and reverts the plugin to its initial, default threshold curve. This also clears all nodes that were set on the curve.
Main Plate Panel: Modify the Threshold Curve
These controls are always shown.
The main control area is used to tailor the threshold curve. Controls include Threshold, Delta, Tilt, and Shape. These controls allow you to fully control the intensity, balance, and spectral properties during processing.
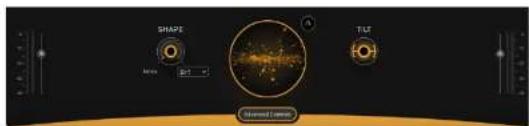
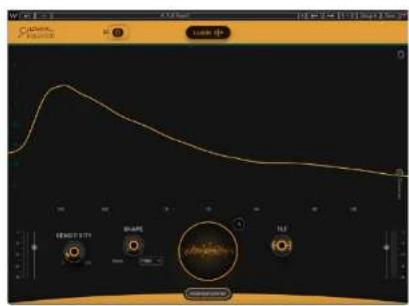
Main Plate Panel before a capture

Main Plate Panel after a capture
Main Knob (Threshold)
The Main knob controls the processing threshold. It shifts the captured threshold curve or the flat threshold curve either upward or downward, thus determining where dynamic reduction processing will begin. This action essentially "shaves" the peaks of the FFT, resulting in reduction.
Range: -40 dB to +40 dB; Default 10 dB
DELTA
Click the small triangle next to the Main knob to audition only the reduced signal (DIFF). This helps you keep track of what you are reducing, and the extent of reduction applied.
Sensitivity
Sensitivity determines the knee and ratio of dynamic compression. With a hard knee, gain reduction occurs as soon as the signal exceeds the threshold. With a softer knee, the gain reduction begins gradually, after the signal has exceeded the threshold, thus producing a "softer" response.
Shape
The Shape mix knob gradually morphs the threshold curve—whether a captured or default flat curve—into one of the balanced factory threshold curves. Select a curve from the drop-down menu.
Shape is especially useful in these two cases:
- You are using the default flat curve and you want a different "flavor" or another frequency response in the threshold curve.
- You captured a threshold from your own audio, but you'd like to apply corrective EQ to make it sound clearer and more balanced. Shaping the threshold with one of these curves may provide clarity, tame the high end, and improve overall spectral balance.
Range 0% to 100%; Default 0%
Tilt
The “Tilt” control simultaneously boosts the high frequencies and cuts the low frequencies of the threshold curve. In other words, Equator cuts less highs and more lows at positive Tilt values, and vice versa.
By default, Tilt pivots around 1 kHz, which allows you to make quick adjustments to the overall tonal balance of your audio. Tilt is commonly used in mixing and mastering to add brightness or warmth to a track without needing to adjust multiple frequency bands individually.
Range -16 dB to +16 dB; Default 0dB
Curve Nodes and Widgets (on the Threshold Curve)
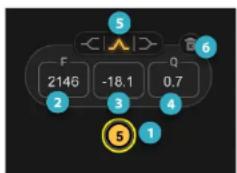
In addition to global shaping with the main plate controls, you can alter the curve using the curve nodes. A node is a handle that lets you precisely change the shape of the threshold curve at any place on the graph. Since the threshold curve determines what input sound undergoes dynamic reduction and what doesn't, small changes in the curve can have a significant influence. You can add up to eight nodes per captured curve, meaning you get eight independent nodes for the input curve and eight for the SC curve, each with its own widget and individual controls. Only one widget is visible at a time.
flowchart
graph TD
    A["5"] --> B["2146"]
    B --> C["-18.1"]
    C --> D["0.7"]
    D --> E["6"]
    E --> F["1"]
    F --> G["4"]
    G --> H["3"]
    H --> I["2"]
    I --> J["5"]
    style A fill:#f9f,stroke:#333
    style B fill:#ccf,stroke:#333
    style C fill:#cfc,stroke:#333
    style D fill:#fcc,stroke:#333
    style E fill:#cff,stroke:#333
    style F fill:#ffc,stroke:#333
    style G fill:#cfc,stroke:#333
    style H fill:#fcc,stroke:#333
    style I fill:#ffc,stroke:#333
1 Node: A control point on the threshold curve.
2 Frequency: Slide left or right over the control to adjust the frequency of the node.
3 Gain: Slide up or down to adjust the gain of the node.
4 Q: Slide left or right to adjust Q or use the mouse scroll while clicking on or hovering over the node.
5 EQ type: Select low shelf, bell, or high shelf
6 Remove widget
When a node is added at or below 100 Hz, it will open automatically as a low shelf. When a node is added at or above 8 kHz, it will open automatically as a high shelf. These EQ types can be changed with the widget.
Node Controls and Commands
- Double-click on an existing node to turn it off but not delete it. Double-click again to reactivate the node.
• Command + click and drag for precision control. - Shift + click to select multiple nodes or drag a lasso around them. This enables you to drag multi-selected nodes together.
- To delete a node, select it and click the Trash icon in the widget. To delete all nodes, Alt + click on any node's Trash icon. Automation values are kept, even for deleted nodes.
- The maximum number of nodes per captured curve is eight for the input threshold and eight for the sidechain threshold.
Show/Hide Advanced Controls
Shows or hides the advanced controls pane.
FFT Analyzer Area: Control Processing Amount
This section displays the input FFT, which enables you to visualize where reduction is performed and required. You can capture, view, and adjust the threshold curve (Equator Line), and fully control processing using the crossovers and the EQ-style nodes, which accurately adjust the threshold curve.
FFT Input
The plugin displays only the input FFT.
Threshold Curve
This curve defines the threshold of what will and what will not be subject to processing. Shift the threshold up or down using the Main knob to control the overall amount of processing.
Crossovers

Three crossovers (for a total of four bands) enable you to precisely control the power of the dynamic reduction processing at specific frequencies. The area between two crossovers is the frequency range being controlled.
Drag a crossover to the left or right to change the crossover frequency. A selected crossover is highlighted. Hover over a crossover to see its frequency.
The crossovers are automatically shown with the Advanced Controls, but you can hide or show them independently with the Crossover button at the bottom-right of the FFT analyzer.
Default crossover frequencies: 300 Hz, 2 kHz, 8 kHz
Cut (mix) Per Band

Use the horizontal Band Cut line between two crossovers to adjust the amount of reduction in that frequency range.
Band Cuts work in tandem with the Main knob; you can add up to 200% reduction per band. So, if a band's Cut line is set to 0%, there will be no reduction in that band, regardless of the Main knob setting. If, however, there is reduction in a specific band, then taking the Cut line all the way down to 200% provides double the reduction of the Main knob.
This means you can set the Main knob to a relatively high amount of reduction, to cover the worst of the problems. Then, select frequency ranges that you want to protect—frequency ranges that need less processing.
Range: 0% to +200%; Default: 100%
Adjusting Reduction by Band vs. Editing the Threshold Curve
It is important to realize the difference between using nodes to edit the curve and adjusting reduction power in specific frequency bands.
- Edit the threshold using Nodes, Shape, or Tilt to change the shape of the curve, so it influences what will and what will not be processed.
- Use the Band Cut lines to adjust the reduction power by frequency to set how much reduction will occur in a frequency range.
Hotkey (modifier keys) On Nodes and Widgets
| Hot Key | Action |
| Control + Drag node | PC: Locks the axis of a node, allowing adjustment of only Frequency or only Amount, each with precision control.Mac: Locks the axis of a node, allowing adjustment of only Frequency or only Amount. |
| Mouse wheel on a node | Adjusts the Q |
| Shift + node | Multi-select nodes |
| Alt + Trash icon in the widget | Deletes all the nodes |
| Alt + double-click on a node | Disables/Enables all nodes. |
| PC: Control + Drag NodeMac: Command + drag node | Precision Control |
| Double Click a node | Disables the node (without deleting it) |
Advanced Panel: Model the Sound
Hide/reveal these controls with the Advanced Button.
Sensitivity
Sensitivity determines the knee and ratio of dynamic compression. With a hard knee, gain reduction occurs as soon as the signal exceeds the threshold. With a softer knee, the gain reduction begins gradually, after the signal has exceeded the threshold, thus producing a “softer” response. (This control also appears once a capture is applied, whether Advanced Controls is selected or not.)
Attack/Release
Allows you to adjust the speed behavior of the EQ band gains.
Attack controls how quickly Equator responds when the input gain crosses the threshold and processing occurs. Release determines how quickly Equator returns to its original position after processing.
Adjust the attack and release times based on how fast or how slow you want Equator to process. Faster attack means transients are processed very quickly. A fast release time ensures that the processing is steady and consistent.
Attack Range: 0 ms to 1000 ms; Default: 30 ms
Release Range: 0 ms to 1000 ms; Default: 30 ms
Precision
Precision determines how deep and narrow vs. how shallow and wide Equator processes.
- High values (more precision) result in deeper and narrower cuts/boosts, which can be beneficial for sharp resonant audio material, like drum overheads.
- Low values are better for addressing general energy buildups, whether in individual instrument channels, busses, or master channels.
Range: 0 to 100; Default: 30
Very high Precision values may introduce unwanted artifacts, especially given the high number of frequency bins that Equator is employing and the fact that they are high-quality linear phase filters. These artifacts can sound like a gentle distortion and are caused by resonant frequencies and frequency boosts that are performed in a very surgical way.
Tilt Frequency
Sets the frequency of the fulcrum of the Tilt motion.
Range: 300 Hz to 3000 Hz; Default: 1000 Hz
Curve Smoothing
Smoothing enables you to make the entire threshold curve either less or more pronounced, which results in a smoother or sharper effect on the input audio. When you increase the smoothing values, Equator reduces peak levels and broadens the frequency bins for a gentler effect. Lower these values for sharper processing that is more distinct and accurate.
Smoothing modifies how the final threshold curve is rendered. This resembles adjusting the Q in a conventional EQ, which dictates how broadly or narrowly an EQ affects frequencies around a node, as well as its peak.
Range: 0 to 100; Default: 0
Mix
This is a wet/dry mix of the entire plugin.
Click the small lock icon to prevent the mix value from changing when a preset is loaded.
Range: 0 % to 100%; Default 100%
Limiter On/Off + Meter
This is a true peak limiter with a fixed output ceiling of -0.1 dB. It features a peak reduction hold and a reduction meter that updates continuously.
Range: On or Off; Default: On
AUTO-MAKEUP
Measures the RMS of the input and applies dynamic makeup gain based on the amount of gain reduction or boosting, so that the output RMS closely matches the input.
Stereo Controls
Not available in the mono component.
Linked
Applies the same processing on the left and right channels, based on the Balance control setting.
L/R (Split)
Applies independent processing on the left and right channels, based on the Balance control setting.
M/S
Applies individual processing on the mid and sides, based on the Balance control setting.
Balance
(linked to stereo controls)
The Balance control allows you to freely adjust the processing percent per side, based on the Stereo Control drop-down menu setting. This control is very useful for full mixes and stereo instruments such as synths.
For example, in M/S mode, a greater side signal typically boosts all ambient elements of a mix, while more mid signal boosts the correlated (mono/centered) elements, which often results in a tighter mix.
Range: -50 (left) to +50 (right); Default: 0
Not available in the mono component.
Presets Management
Use the Load menu to apply user presets or factory presets. The preset system allows partial loading or clearing of presets, so you needn't re-capture your content when you load a new preset. Use the WaveSystem Toolbar at the top of the plugin to save and load presets and threshold curves.
Click the small arrow to open the Presets menu. From this menu you can:
- Copy the current preset and paste it to another instance.
- Save the preset under a different name.
- Make the current preset the default, which will load whenever Equator is instantiated
- Manage the MIDI Map
- Load and reset Equator thresholds and controls.
- Open factory presets and user presets.
Full Reset enables you to reset controls and threshold curves to their factory settings:

- Reset the entire plugin (All).
- Reset all controls but leave the curves unchanged.
- Reset (flatten) the SC threshold curve but leave the Input threshold curve and control settings unchanged.
- Reset only the Input threshold curve.
Updates

Equator is periodically updated for enhancements and bug fixes.
A red dot on the Toolbar's right side indicates that updates are available. Visit Waves Central to update this and other Waves plugins.
- Curves Equator User Guide
- CURVES EQUATOR
- Interface and Controls
- Tooltips
- INTERFACE SECTIONS
- Steps in the Process
- IMPORTANT
- Threshold Curve: Establish What Will Be Processed
- Start With a Flat Threshold Curve
- Capture a Threshold Curve
- Sidechain Capture
- EXAMPLE: CARVE SPACE FOR A LEAD VOCAL
- AUTO-STOP
- CAPTURED RESULTS
- TRASH CURVE
- Main Plate Panel: Modify the Threshold Curve
- Main Knob (Threshold)
- DELTA
- Sensitivity
- Shape
- Tilt
- Curve Nodes and Widgets (on the Threshold Curve)
- Node Controls and Commands
- FFT Analyzer Area: Control Processing Amount
- FFT Input
- Threshold Curve
- Crossovers
- Cut (mix) Per Band
- Adjusting Reduction by Band vs. Editing the Threshold Curve
- Advanced Panel: Model the Sound
- Attack/Release
- Precision
- Tilt Frequency
- Curve Smoothing
- Mix
- Stereo Controls
- Presets Management
- Updates
Brand : WAVES
Model : Curves Equator
Category : Égaliseur audio numérique