
ASTRAL - Camera accessory CAME-TV - Free user manual and instructions
Find the device manual for free ASTRAL CAME-TV in PDF.


| Product Type | Wireless Follow Focus System |
| Brand | CAME-TV |
| Model | ASTRAL |
| Controller Weight | 250 g |
| Controller Dimensions | 140 x 67 x 58 mm |
| Motor Weight | 200 g |
| Motor Dimensions | 100 x 85 x 32 mm |
| Max Motor Torque | 0.50 Nm |
| Max Motor Speed | 250 rpm |
| Motor Noise | < 25 dB (at 100 rpm) |
| Motor Working Voltage | 12-18 V DC |
| Motor Quiescent Current | 70 mA (at 12 V) |
| Motor Stall Current | 1.5 A (at 12 V) |
| Controller Battery Type | LiPo |
| Controller Battery Capacity | 1000 mAh |
| Controller Battery Voltage | 3.7 V |
| Controller Working Time | Approximately 8 hours (fully charged) |
| Wireless Frequency | 2.4 GHz (2.415-2.473 GHz) |
| Communication Range | Up to 100 m (outdoor, no obstruction) |
| Transmit Power | 0 dBm |
| Working Temperature | -20 to 55 °C |
| Display | OLED (battery level, connection, calibration, memory points) |
| Control Functions | Focus, Iris, Zoom via motor; Rec/Photo buttons; A/B/C/D memory points; Torque adjustment; Calibration (Auto/Manual) |
| Charging Interface | Micro USB (5V/1A) on controller |
| Motor Interface | OB series P06 6-core aviation socket (power input); MiniUSB-10P (camera control) |
Frequently Asked Questions - ASTRAL CAME-TV
User questions about ASTRAL CAME-TV
0 question about this device. Answer the ones you know or ask your own.
Ask a new question about this device
Download the instructions for your Camera accessory in PDF format for free! Find your manual ASTRAL - CAME-TV and take your electronic device back in hand. On this page are published all the documents necessary for the use of your device. ASTRAL by CAME-TV.
USER MANUAL ASTRAL CAME-TV
Wireless Follow Focus System
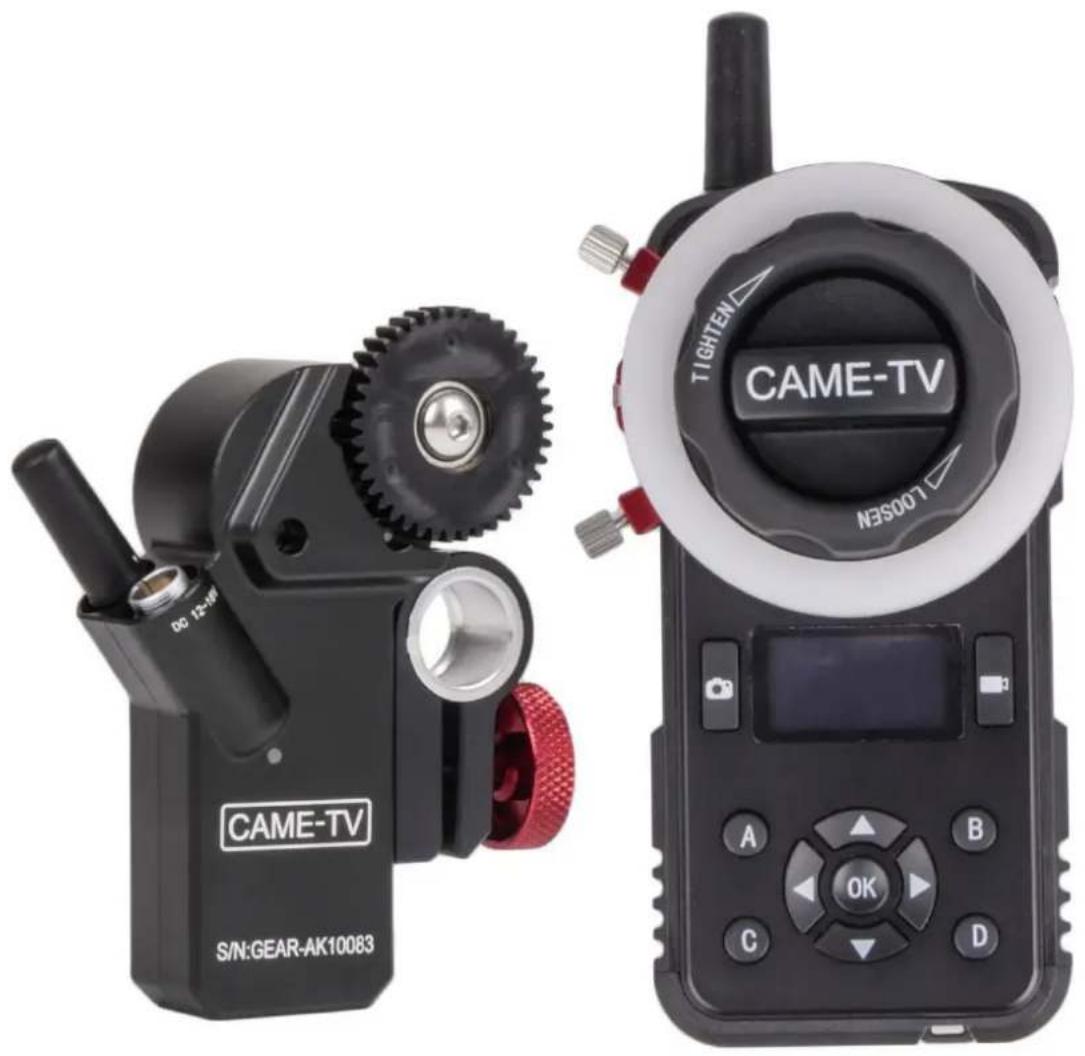
natural_image
Two black CAME-TV remote control devices with visible buttons and dials, no text or symbols on the devices themselves.V1.4
One: Brief Introduction:
The CAME-TV Came-Astral is a wireless professional follow focus system designed for industry professionals features a reliable control of focus, iris, zoom, and comes with a remote controller & motor. The controller features a control knob and a quick focus button to configure the OLED display. The maximum output spi the motor is 250rpm. Torque is high up to 0.50Nm and motor noise is low at 25db (with rotation speed rpm). With 2.4GHz wireless communication, the controller and the focus motor will be automatically paired after being turned on. The maximum transmission range is 100 meters (328 feet). The controller has a but 3.7V/1000mAh lithium-ion battery. The OLED display on the controller indicates the battery level in real time. When the battery is low, it can be charged through the Micro USB interface. The working time in the full charged state is approximately 8 hours.
Two: Controller

- Power Button
- USB Interface
- Antenna
- Torque Button
- Limitation Pins
- Marking Disk
- Focus Knob
- OLED Display
- Rec Button
- Photo Button
- A/B/C/D Point Button
- Function Button
- Lanyard Attachment
14.1/4" Thread -
Marking Disk Indicator
-
Power Button: Perform long press for 3 seconds to turn on/off.
- Micro USB Port: For Charging and upgrading firmware. Charging input is 5V/1A.
- Antenna: 2.4GHz/2dbi.
- Torque Button: To adjust the torque. Rotate counterclockwise for lighter and clockwise for harder torque.
- Limitation Pins: To adjust the rotation angle of the hand-wheel.
- Marking Disk: To mark focus in the disk.
- Focus Knob: Adjust the rotation angle of the hand-wheel to control the focus, iris, and zoom of the camera lens with the motor. The rotation angle sensor has a resolution of 12bit.
- OLED Display: Display battery level, connection status, calibration status, travel, memory point, function menu, etc.
- Rec Button: Tap once to start recording, twice to stop recording.
- Photo Button: Used to focus and take photos. This button is a two-segment button by pressing down. Press the first segment to focus camera, then press the second segment to take photos.
- A/B/C/D Point Button: First adjust the focus position by adjusting the Focus Knob. Then long press one of these buttons for 3 seconds to mark the current focus with a result of the corresponding letter will displayed on the OLED screen displays. Perform a second long press to cancel the memory focus. The corresponding letter on the screen will then disappear. The four buttons A/B/C/D can set 4 focus men positions. When the memory point is set, tap the button once to quickly switch to the memory focus position or exit the memory point position.
- Function Button: Consists of 4 direction buttons and OK button. Press the OK button in the main interface to enter the function main menu. After the function setting is completed, each time you tap the right button, you can return to the previous interface and repeat the operation to return to the main inter Tap the up button once in the main interface to turn on/off the diskindicator.
- Lanyard attachment: To attach the unit to the lanyard.
14.1/4 Thread: to mount the unit onto other accessories. - Marking Disk Indicator: To indicate the marking disk or use as lighting. Tap the UP button once in the main interface to turn on/off the disk indicator.
Three: Controller Manual
OLED Manual Display:

- Battery Level
- Focusing Knob Stroke Percentage
3 Focusing Knob Stroke Progress Bar
4 OK for Calibration complete while TX not
5 Signal Intensity. TX means not connected.
6 Memory point: A B C D
1. CALIBRATION
On the main page, please press "OK" button to enter MEMU:

flowchart
graph LR
    A["MENU"] --> B["CALIBRATE"]
    A --> C["AUTOMATIC"]
    A --> D["M-hand"]
    A --> E["M-remote"]
    A --> F["Emitter-hand"]
    A --> G["1. CALIBRATE 5. CAMERA"]
    A --> H["2. MOTOR 6. DISPLAY"]
    A --> I["3. A-B LAPSE 7. DEFAULT"]
    A --> J["4. POWER OFF 8. ABOUT"]
Select "1. CALIBRATE", then press "OK" button to enter "CALIBRATE" page
For the first time use, please calibrate once to check the overall stroke of the lens, so that the controller precisely control the stroke position of the camera lens. The motor will automatically record and save the calibration data. After this, there is no need to calibrate every time. If a new lens is used, or the positio focus motor, or the gear tooth position is changed, the lens stroke will then need to be re-calibrated automatically or manually. It supports AUTOMATIC, Manual(M-hand/M-remote), Emitter-hand Calibration.
1) AUTOMATIC Calibration:
If the camera lens has a mechanical limit, it is recommended to calibrate the camera lens with the Autor calibration function.
Please make sure the gear of the motor and lens are installed correctly first.

flowchart
graph LR
A["CALIBRATE\nAUTOMATIC\nM-hand\nM-remote\nEmitter-hand"] --> B["AUTOMATIC\nSTART"]
B --> C["AUTOMATIC\nENDPOINT 1"]
C --> D["AUTOMATIC\nENDPOINT 2"]
D --> E["AUTOMATIC\nDONE"]
E --> F["Press "OK" button to press 'OK' button\nPress 'OK' button to press 'OK' button\nPress 'OK' button to press 'OK' button\nPress 'OK' button to press 'OK' button\nPress 'OK' button to press 'OK' button\nPress 'OK' button to press 'OK' button\nPress 'OK' button to press 'OK' button\nPress 'OK' button to press 'OK' button\nPress 'OK' button to press 'OK' button\nPress 'OK' button to press "OK" button\nPress 'OK' button to press 'OK' button\nPress 'OK' button to press 'OK' button\nPress 'OK' button to press 'OK' button\nPress 'OK' button to press 'OK' button\nPress 'OK' button to press 'OK' button\nPress 'OK' button to press 'OK' button\nPress 'OK' button to press 'OK' button\nPress 'OK' button to press 'OK' button\nPress "OK" button to press "OK" button\nPress "OK" button to press "OK" button\nPress "OK" button to press "OK" button\nPress "OK" button to press "OK" button\nPress "OK" button to press "OK" button\nPress "OK" button to press "OK" button\nPress "OK" button to press "OK" button\nPress "OK" button to press "OK" button\nPress "OK" button to press "OK" button\nPress 'OK' button to press 'OK' button\nPress "OK" button to press "OK" button\nPress "OK" button to press "OK" button\nPress "OK" button to press "OK" button\nPress "OK" button to press "OK" button\nPress "OK" button to press "OK" button\nPress "OK" button to press "OK" button\nPress "OK" button to press "OK" button\nPress 'OK' button to press 'OK' button\nPress 'OK' button to press 'OK' button\nPress 'OK' button to press 'OK' button\nPress 'OK' button to press 'OK' button\nPress 'OK' button to press 'OK' button\nPress 'OK' button to press 'OK' button\nPress 'OK' button to press 'OK' button\nPress 'OK' button to press "OK" button\nPress "OK" button to press "OK" button\nPress "OK" button to press "OK" button\nPress "OK" button to press "OK" button\nPress "OK" button to press "OK" button\nPress "OK" button to press "OK" button\nPress "OK" button to press "OK" button\nPress "OK" button to press "OK" button\nPress "OK" button to press 'OK' button\nPress "OK" button to press "OK" button\nPress "OK" button to press "OK" button\nPress "OK" button to press "OK" button\nPress "OK" button to press "OK" button\nPress "OK" button to press "OK" button\nPress "OK" button to press "OK" button\nPress "OK" button to press "OK" button\nPress "OK" button to press 'OK' button\nPress 'OK' button to press 'OK' button\nPress 'OK' button to press 'OK' button\nPress 'OK' button to press 'OK' button\nPress 'OK' button to press 'OK' button\nPress 'OK' button to press 'OK' button\nPress 'OK' button to press 'OK' button\nPress 'OK' button to press 'OK' button\nPress 'OK'<br> subgraph Select<br> direction LR<br> A<br> B<br> C<br> D<br> E<br> F<br> G<br> H<br> I<br> J<br> K<br> L<br> M<br> N<br> O<br> P<br> Q<br> R<br> S<br> T<br> U<br> V<br> W<br> X<br> Y<br> Z<br> AA<br> AB<br> AC<br> AD<br> AE<br> AF<br> AG<br> AH<br> AI<br> AJ<br> AK<br> AL<br> AM<br> AN<br> AO<br> AP<br> AQ<br> AR<br> AS<br> AT<br> AU<br> AV<br> AW<br> AX<br> AY<br> AZ<br> BA<br> BB<br> BC<br> BD<br> BE<br> BF<br> BG<br> BH<br> BI<br> BJ<br> BK<br> BL<br> BM<br> BN<br> BO<br> BP<br> BPB<br> BPB<br> BPB<br> BPB<br> BPB<br> end<br><br> subgraph Select<br> direction LR<br> B --> C --> D --> E --> F --> G --> H --> I --> J --> K --> L --> M --> N --> O --> P --> Q --> R --> S --> T --> U --> V --> W --> X --> Y --> Z --> AA --> AB --> AC --> AD --> AE --> AF --> AG --> AH --> AI --> AJ --> AK --> AL --> AM --> AN --> AO --> AP --> AQ --> AR --> AS --> AF --> AH --> AI --> AJ --> AK --> AL --> AO --> AJ --> AK --> AL --> AO --> AJ --> AO --> AO --> AO --> AO --> AO --> AO --> AO --> AO --> AO --> AO --> AO --> AO --> AO --> AO --> AO --> AO --> AO --> AO --> AO --> AO --> AO --> AO --> AO --> AO --> AO --> AO --> AO --> AO --> AO --> AO --> AO --> AO --> AO --> AO --> AO --> AO --> AO --> AO --> AO --> AO --> AO --> AO --> AO --> AO --> AO --> AO --> AO --> AO --> AO --> AO --> AN<br> end<br><br> subgraph Select<br> direction LR<br> B --> C --> D --> E --> F --> G --> H --> I --> J --> K --> L --> M --> N --> O --> P --> Q --> R --> S --> T --> U --> V --> W --> X --> Y --> Z --> AA --> AB --> AC --> AE --> AF --> AG --> AH & AI --> AO & AO --> AO & AO & AO & AO & AO & AO & AO & AO & AO & AO & AO & AO & AO & AO & AO & AO & AO & AO & AO & AO & AO & AO & AO & AO & AO & AO & AO & AO & AO & AO & AO & AO & AO & AO & AO & AO & AO & AO & AO & AO & AO & AO & AO & AO & AO & AO & AO & AO & AO & AO & AO | <br> end<br><br> note1[Press "OK" button to press calibration. The motor gear w drive lens rotate clockwise and counterclockwise. It collects two ENDPOINTS automatically."]
note2["When it rotates clockwise, locked-rotor of motor gear will be identified a ENDPOINTS 1, then it will rotate counterclockwise automatically."]
note3["When it rotate counterclockwise, locked-rotor of motor gear will t identified as ENDPOINT 2."]
note4["Press "OK" button to save this record and save the calibration data."]
note5["Automatic FAIL"]
If FAIL, please check the lens limit, adjust CALI-Torque and CALI-Speed to Max, then calibrate again.
On the main page, please press "OK" button to enter MEMU, steps as follows: "CALIBRATE" -> "AUTOMATIC" -> "START" -> "ENDPOINT1" -> "ENDPOINT2" -> "DONE" -> Press "OK" button to save this record and save calibration data. After the calibration is completed, press the Right button to return to the main page.
Manual Calibration:
Manual calibration is recommended when the lens has no mechanical limit. Manual calibration can use only of the stroke of the camera lens.
Please make sure the gear of the focus motor and lens are installed correctly first.
Manual calibration is divided into M-hand and M-remote modes as below:
2)M-hand Calibration Manual
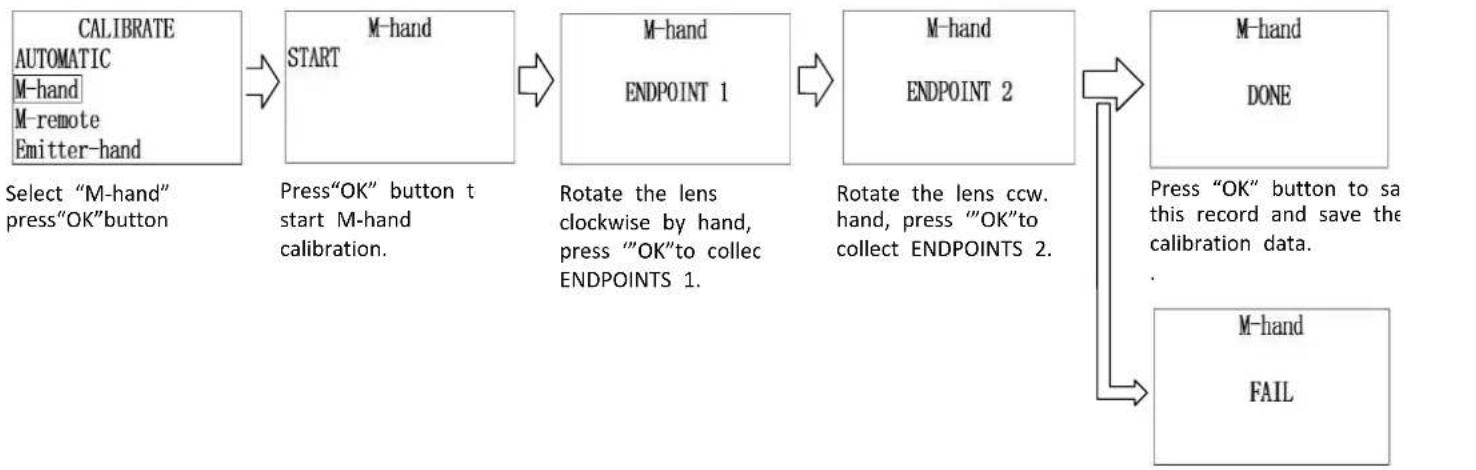
flowchart
graph LR
    A["CALIBRATE\nAUTOMATIC\nM-hand\nM-remote\nEmitter-hand"] --> B["START\nM-hand"]
    B --> C["M-hand\nENDPOINT 1"]
    C --> D["M-hand\nENDPOINT 2"]
    D --> E["DONE\nPress "OK" button to sa this record and save the calibration data."]
    D --> F["M-hand\nFAIL"]
    style A fill:#f9f,stroke:#333
    style B fill:#ccf,stroke:#333
    style C fill:#cfc,stroke:#333
    style D fill:#fcc,stroke:#333
    style E fill:#cff,stroke:#333
    style F fill:#ffc,stroke:#333
If FAIL,
please check the lens endpoints, then make Calibration again.
On the main page ,please press"OK" button to enter MENU, steps as follows: "CALIBRATE" -> "M-hand" -> "START" -> "ENDPOINT1" -> "ENDPOINT2" -> "DONE" ->Press "OK" button to save this record and save the calibration data. After the calibration is completed, press the Right button to return to the main page.
3)M-remote by Controller Button :

flowchart
graph LR
    A["CALIBRATE\nAUTOMATIC\nM-hand\nM-remote\nEmitter-hand"] --> B["M-remote\nSTART"]
    B --> C["M-remote\nENDPOINT 1"]
    C --> D["M-remote\nENDPOINT 2"]
    D --> E["M-remote\nDONE"]
    E --> F["Press "OK" button to save this record and save the calibration data."]
    F --> G["M-remote\nFAIL"]
    style A fill:#f9f,stroke:#333
    style B fill:#ccf,stroke:#333
    style C fill:#cfc,stroke:#333
    style D fill:#fcc,stroke:#333
    style E fill:#cff,stroke:#333
    style F fill:#ffc,stroke:#333
    style G fill:#cfc,stroke:#333
If FAIL, please check the lens endpoints; please check network connection if remote doesn't work, then Calibrate again.
On the main page, please press "OK" button to enter MENU, steps as follows: "CALIBRATE" -> "M-remote" "START" -> "ENDPOINT1" -> "ENDPOINT2" -> "DONE" ->Press "OK" button to save this record and save the calibration data. After the calibration is completed, press the Right button to return to the main page.
After the calibration with the focus motor, the parameters are automatically saved and recalled. The OLED screen displays “OK” to indicate that the focus motor has been calibrated. If “OK” is not displayed on the screen, the motor is not yet calibrated. The motor cannot be controlled by the controller in this case.
4) Emitter-hand Calibration by Controller
- Adjust the Limitation Pins to the position as below image and tighten them, rotate the knob to the end of CCW.


natural_image
Technical line drawing of a mechanical component with no visible text or symbols- Make sure you still press OI button and then Press the power button. Then release "OK" button, the remote knob is set as 0.0% now. Make sure step 2 and 3 is done at the same time.

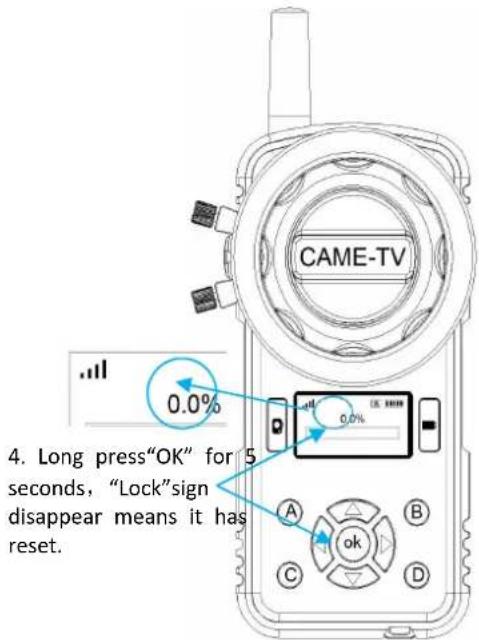
5. After it reset, then please follow these steps to make the Emitter-hand Calibration :

flowchart
graph LR
    A["CALIBRATE\nAUTOMATIC\nM-hand\nM-remote\nEmitter-hand"] --> B["Emitter-hand\nSTART"]
    B --> C["Emitter-hand\n97.2%\nMAX-POINT"]
    C --> D["Emitter-hand\n0.0%\nMIN-POINT"]
    D --> E["Emitter-hand\nDONE"]
    E --> F["Press "OK" button to say\nthis record and save the calibration data."]
    F --> G["Emitter-hand\nFAIL"]
    style A fill:#f9f,stroke:#333
    style B fill:#ccf,stroke:#333
    style C fill:#cfc,stroke:#333
    style D fill:#fcc,stroke:#333
    style E fill:#cff,stroke:#333
    style F fill:#ffc,stroke:#333
    style G fill:#fcc,stroke:#333
If FAIL is encountered, make sure the value of MAX-POINT is lower than of MAX-POINT, then make steps 1-5 to calibrate it again.
After the calibration is complete, press the Right button to return to the main page.
2. MOTOR
Press OK button in Main Page to enter Menu Page:
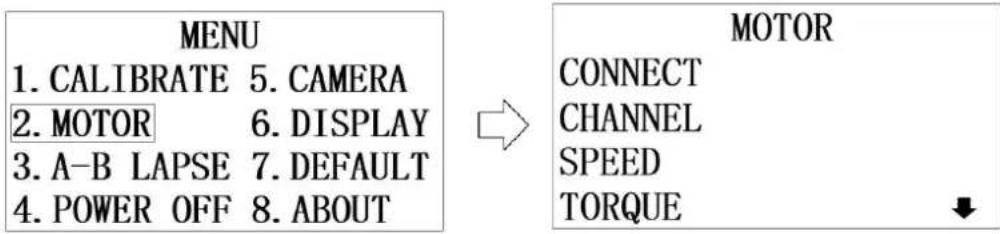
Select"2.MOTOR" and press OK button Enter Motor Main Page
1) CONNECT

flowchart
graph LR
    A["MOTOR"] --> B["CONNECT"]
    B --> C["CONNECT"]
    C --> D["CONNECT"]
    D --> E["DONE"]
    style A fill:#f9f,stroke:#333
    style B fill:#ccf,stroke:#333
    style C fill:#cfc,stroke:#333
    style D fill:#fcc,stroke:#333
    style E fill:#cff,stroke:#333
Default setting is connected. Select "CONNECT" and press OK button.
Press OK button to start the connection process (motor must be on first).
Long press the Frequency auto matching button while it shows
"Connect...", then they will be connected automatically.
Press OK button to save it. (Connection process only needed once). Then press Right Button to homepage.
2) CHANNEL: To set the communication channel between the controller and the motor. It has a total of 16 communication channels from 20-36, allowing 16 sets of CAME-TV wireless follow focus system to be used the same area at the same time.
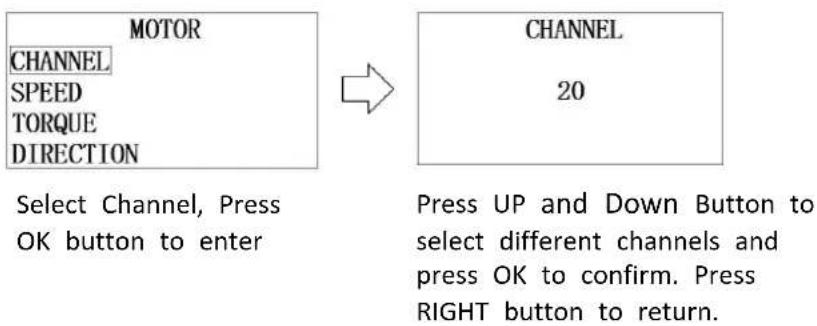
flowchart
graph LR
    A["MOTOR\nCHANNEL\nSPEED\nTORQUE\nDIRECTION"] --> B["CHANNEL\n20"]
    C["Select Channel, Press\nOK button to enter"] --> D["Press UP and Down Button to\nselect different channels and\npress OK to confirm. Press\nRIGHT button to return."]
3)SPEED
RUN-Speed: Motor running speed setting, running speed setting range 1-100, maximum running speed 250rpm.

flowchart
graph LR
    A["MOTOR"] --> B["SPEED"]
    B --> C["RUN-Speed"]
    B --> D["CALI-Speed"]
    C --> E["50"]
    D --> E
Select SPEED, Press OK button to enter
Select RUN-Speed, Press OK
Press UP and Down Button to select different speed and press OK to confirm. Press RIGHT button to return to homepage.
CALI-Speed: Motor calibration speed setting, calibration speed setting range 1-10, maximum operating speed 25rpm.

flowchart
graph LR
    A["MOTOR\nCHANNEL\nSPEED\nTORQUE\nDIRECTION"] --> B["SPEED\nRUN-Speed\nCALI-Speed"]
    B --> C["CALI-Speed\n5"]
Select SPEED, Press OK button to enter
Select CALI-Speed, Press OK
Press UP and Down Button to select different speed and press OK to confirm. Press RIGHT button to return to homepage.
4)TORQUE
RUN-Torque: Motor running torque setting, torque setting range: MINIMUM/MEDIAN/MAXIMUM, maximum torque output 0.50Nm;
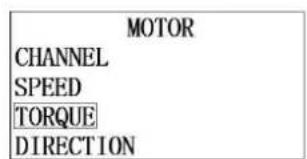
Select "TORQUE, Press" "OK" button to enter Torque settings.

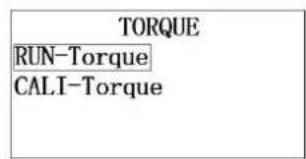


Select"RUN-Torque", Press "OK" button to enter Torque settings.
Press UP and Down Button to select different torques and press OK to confirm. Press RIGHT button to return to homepage.
CALI-Torque: Motor calibration torque setting, torque setting range: MINIMUM/MEDIAN/MAXIMUM, maximum torque output 0.25Nm.

Select "TORQUE, Press" "OK" button to enter Torque settings.


Select"CALI-Torque", Press "OK" button to enter Torque settings.
Press UP and Down Button to select different torques and press OK to confirm. Press RIGHT button to return to homepage.
5) DIRECTION:
CW: rotate clockwise.
CCW: rotate counterclockwise
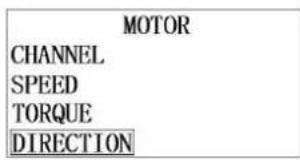
Select "DIRECTION", press OK button to enter Direction settings.


Select "CW" or "CCW", press OK Button to confirm. Press RIGHT Button to return to homepage.
3. A-B LAPSE Set switching speed for recorded focus:
SWITCH Speed speed range 1-10, Max: 250rpm.

Select "A-B LAPSE", press OK button to enter focus settings.


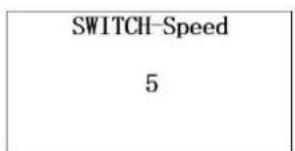
Select "SWITCH-Speed", press OK button to switch Speed.
Press UP and Down Button to select suitable speed and press OK to confirm. Press RIGHT button to return to homepage.
4. POWER OFF AutoPower-Off:
Set shutdown timer on controller if no operation takes place within selected time interval. You can choose 10min/30min/60min/Never OFF.
Select "POWER OFF", press O button to enter Auto Power off settings. Press UP and Down Button to select suitable time interval and press OK to confirm. Press RIGHT button to return to homepage.
5. CAMERA camera settings:
This function is used to control mirrorless camera and DSLR cameras of Canon / Sony / Panasonic. If motor firmware need to be upgraded, it should be operated with Canon selected.
6. DISPLAY Set screen direction:
NORMAL: displayed in the forward direction;
Select "DISPLAY", press OK button to enter screen direction settings.
Select "Normal", press OK button to screen direction
Press Right Button to homepage.
REVERSE: displayed in reverse.
Select "DISPLAY", press OK button to enter screen direction settings.
Select "Reverse", press OK button to enter screen direction settings.
Press Right Button to homepage.
7. DEFAULT restores default settings:
For normal use, it needs to be reset and calibrated after all settings are restored.


Select "DEFAULT", press OK button to restore default settings.
Select "DEFAULT", press "OK" button to restore default settings. Once restore is done, both motor and controller need to be calibrated again.
8. ABOUT
To check the firmware of Emitter and Receiver.


Select "ABOUT", press OK button to enter settings.
Press Right Button to homepage after confirm.
Four: Focus Motor

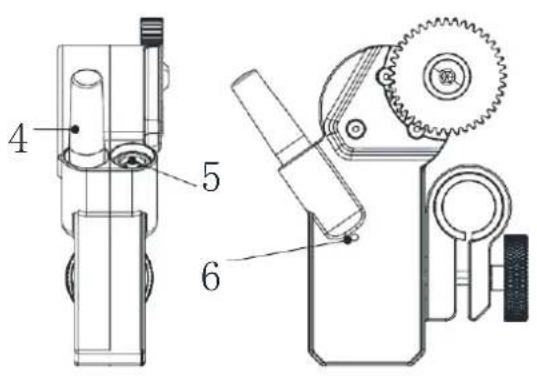

- Output gear
- Assemble fasteners
- Frequency auto matching button
- Antenna
- Power input interface
- Status indicator
-
Camera control interface
-
Output gear: adjust the lens' focus, aperture, zoom by engaging with the lens focusing.
- Assemble fasteners: install the follower motor to the appropriate bracket.
- Frequency auto matching button: When it cannot be connected because communication channel does not match. Press this button to pair connection automatically.
- Antenna: 2.4GHz/2dbi.
- Power input interface: Use OB series P06 6-core aviation socket, input power supply DC12-18V/1.5A, When the power is connected, the motor will open automatically, and will wait for connection with the contro
- Status indicator: When it is disconnected, the blue lightflashes.
When connected successfully, the green light remainson.
When the input voltage is lower than 12V, the red light flashes.
Camera control interface: The interface type is MiniUSB-10P. It can be connected to the controlled camera for remote control with a dedicated camera control cable.
Five: Specifications
General features
Working frequency: 2.415-2.473 GHz
Communication distance: 100 m (outdoor, no obstruction)
Transmit power: 0 dBm
Working temperature: -20 to 55 °C
Motor
Weight: 200g
Size: 100*85*32mm
Max torque: 0.50 Nm
Max run speed: 250 rpm
Working quiescent current: 70 mA (@12 V)
Stall current: 1.5 A (@12 V)
Working voltage: 12-18 V
Noise: <25 dB (@100 rpm)
Gear modulus: 0.8
Number of gear: 40
Controller
Weight: 250g
Size: 140*67*58mm
Battery type: LIPO
Battery voltage: 3.7 V
Battery capacity: 1000 mAh
Battery power: 3.70 Wh
CAME-TV
Service Warranty
One Year Warranty
Please Save this Card
| RMA Number | Order Number | ||
| Marchandise | Quantity | ||
| Reason of Return | |||
| Name | Date of Claim | ||
| Phone | |||
| Address | |||
Xiamen Came Technology Co., Ltd
Address: 2204 Unit, B03 Building, Chengyi North Street NO.5, Software Park Phase III, Jimei District, 361021, Xiamen City, Fujian Province, China
Tel: +86-592-6283638 ext 601(from outside Americas areas) / ext 602(from Americas areas)
Hours: Monday to Friday 09:00 - 18:00 (GMT+8)
- Wireless Follow Focus System
- One: Brief Introduction:
- Three: Controller Manual
- CALIBRATION
- 1) AUTOMATIC Calibration:
- Manual Calibration:
- 4) Emitter-hand Calibration by Controller
- After it reset, then please follow these steps to make the Emitter-hand Calibration :
- MOTOR
- 1) CONNECT
- 3)SPEED
- 4)TORQUE
- 5) DIRECTION:
- A-B LAPSE Set switching speed for recorded focus:
- POWER OFF AutoPower-Off:
- CAMERA camera settings:
- DISPLAY Set screen direction:
- DEFAULT restores default settings:
- ABOUT
- Four: Focus Motor
- Five: Specifications
- General features
- Motor
- Controller
- CAME-TV
- Service Warranty
- Xiamen Came Technology Co., Ltd
Brand : CAME-TV
Model : ASTRAL
Category : Camera accessory