C6-1-W - Video Conferencing System DVDO - Free user manual and instructions
Find the device manual for free C6-1-W DVDO in PDF.


| Product Type | All-in-One Video Conferencing System (Video Bar) |
| Brand | DVDO |
| Model | C6-1-W |
| Camera Resolution | 4K UHD (8MP CMOS sensor, 16:9) |
| Lens Field of View | 120° diagonal, 106° horizontal, 72° vertical |
| Digital Zoom | 10x |
| Microphone Array | 6 MEMS microphones |
| Microphone Pickup Distance | 6 meters |
| Speaker Power | 2 x 10W |
| Audio Processing | AEC, AGC, ANS (48 kHz sampling) |
| Privacy Cover | Automatic electric privacy cover |
| Auto Framing | Yes, with face detection and group framing |
| Voice Tracking | Yes, real-time speaker tracking |
| Bluetooth | Bluetooth 5.0 (for speakerphone use) |
| Video Output | HDMI (up to 4K30, 1080P60) and USB (UVC/UAC) |
| Audio Input | Built-in mics, 3.5mm line in, RJ45 expansion mic |
| Audio Output | Built-in speakers, 3.5mm line out |
| Power Supply | DC 12V, 2.5A (AC 110-220V adapter included) |
| Dimensions (approx) | 284mm x 122mm x 90mm |
| Compatibility | Windows 7/8/10, Mac OS X, Linux, Android |
| Mounting Options | Wall mount, desktop stand, optional monitor bracket |
| Remote Control | Infrared, requires 2 x CR2032 batteries (not included) |
| Maintenance | Clean with soft dry cloth or diluted neutral detergent; avoid solvents |
| Safety | Do not expose to rain or moisture; do not open case; use within specified temperature and humidity |
Frequently Asked Questions - C6-1-W DVDO
User questions about C6-1-W DVDO
0 question about this device. Answer the ones you know or ask your own.
Ask a new question about this device
Download the instructions for your Video Conferencing System in PDF format for free! Find your manual C6-1-W - DVDO and take your electronic device back in hand. On this page are published all the documents necessary for the use of your device. C6-1-W by DVDO.
USER MANUAL C6-1-W DVDO
natural_image
Front view of a modern video camera with a green screen and black frame (no text or symbols visible)DVDO-C6-1
Intelligent 4K All-in-One Video Bar
User Manual
Version v1.1
Preface
This manual is to ensure that the user can use the product properly and avoid danger while operating. Before using this product, please read the user manual carefully and keep it for future reference
Overview:
This manual describes the operation of Intelligent 4K All-in-One Video Bar.
Graphic Symbols
Description of graphic symbols used in this manual
| Symbols | Description |
 | This symbol indicates that the words are clarification or supplement to this article. |
 | This symbol indicates that negligence of the instructions may lead to mishandling that may cause injury or property damage. |
 | This symbol indicates a risk that may result in damage to this machine or documents.Follow the instructions to avoid property damage. |
Attention
This manual introduces functions, installations and operations for this product in details.
Please read this manual carefully before installation and use.
Precautions:
This product can only be used in the specified conditions in order to avoid any damage to the camera:
1) Do not expose the product to rain or moisture.
2) To prevent the risk of electric shock, do not open the case. Installation and maintenance should only be carried out by qualified technicians.
3) Do not use the product beyond the specified temperature, humidity or power supply specifications.
4) Please use a soft dry cloth to clean the camera. If the camera is very dirty, clean it with diluted neutral detergent; do not use any type of solvents, which may damage the surface.
Electrical Safety:
Installation and use of this product must strictly comply with local electrical safety standards.
Transportation:
Avoid any stress, vibration, or moisture during transportation, storage, installation and operation
Installation:
1) Do not rotate the camera head violently, otherwise it may cause mechanical failure; 2
) This product should be placed on a stable desktop or other horizontal surface. Do not install the product obliquely, otherwise it may display inclined image; 3
) Ensure there are no obstacles within rotation range of the holder.
4) Do not power on before completely installation.
Do Not Dismantle Camera :
We are not responsible for any unauthorized modification or dismantling.
Magnetic Interference
Electromagnetic fields at specific frequencies may affect the video image. This product is Class A. It may cause radio interference in household application. Appropriate measure is required.
Contents
1. Quick Start....4
1.1 Interfaces....4
1.2 Device Startup....4
1.2.1 Power on....4
1.2.2 Statue Indicator Light 4
1.3 Video Output....5
1.4 Audio Input ....5
1.5 Audio Output....5
2. Product Overview....6
2.1 Product Introduction....6
2.1.1 Dimensions....6
2.1.2 Supplied Accessory 6
2.2 Product Features....7
2.3 Technical Specification....8
3. How to Use....11
3.1 Remote Control 11
3.2 Menu Setting....12
3.2.1 Main Menu....12
4. Maintenance and Troubleshooting ....18
4.1 Maintenance ....18
4.2 Troubleshooting....18
1. Quick Start
1.1 Interfaces
| Interfaces | |
| USB | USB audio video in out, type C |
| HDMI | HDMI video output |
| LINE IN | Audio linear input |
| LINE OUT | 3.5mm linear output |
| Extension Mic | RJ45 extension mic |
| Power jacket | HEC3800 power socket (DC12V), inputAC110V-AC220V, output DC12V/2JI |
1.2 Device Startup
1.2.1 Power on
Connect device to power socket with DC12V power adapter.
1.2.2 Statue Indicator Light
| Green lights continuously run left to right | Boot initialization in progress |
| Blinking Blue Lights | In Bluetooth pairing mode |
| Lights Turn Blue and Stay 3S | Bluetooth pairing finished |
| Solid Green Light | Working statue:When turn off Auto-framing & Voice tracking, all light turn greenWhen turn on Auto-framing & Voice tracking partial light turn green |
| Blinking Green Light | Standby status (Device on without video) |
| Solid Red Light | Microphone Muted |
| Green Indicator Light On/Off | Volume up/down |
| Partial Light Turn Green | Partial light turns green according to the voice source |
1.3 Video Output
- USB: Connect device to PC with USB cable and open the video software to select device to output.
- HDMI: Connect device to monitor with HDMI cable, and then select the correct input source on the monitor to output.
1.4 Audio Input
- Built-in audio: It is default that the device pick up voice through built-in mics
- Audio input through 3.5mm linear audio cable: Connect to external pickup through 3.5mm audio cable (When connecting to external pickup, audio in automatically switch into external pickup.)
1.5 Audio Output
- Built-in speaker: It is default that device output voice through built-in speaker.
- Audio output through 3.5mm linear audio cable: Connect to external speaker through 3.5mm audio cable (When connecting to external speaker, audio out automatically switch into external speaker.)
2. Product Overview
2.1 Product Introduction
2.1.1 Dimensions
![122mm 9 0mm] 1 284mm 662mm r₁ 75mm 121mm](/content/2026/05/910954/images/f0d4dac0ea92fbb87843faa52c3d099331c83cc62f8c29a20cda729caf3ef652.jpg)
2-1 Dimensions
2.1.2 Supplied Accessory
When you unpack your box, please check that all the supplied accessories are included.
| Items | Quantity | •Supplied oOptional |
| All-in-one video bar | 1 | ● |
| USB cable | 1 | ● |
| Remote control(batteries not included,see instructions in paragraph 3.1) | 1 | ● |
| Quick start guide | 1 | ● |
| Power adapter | 1 | ● |
2.2 Product Features
With all-in-one design, this device has 4K UHD camera, microphone array, high fidelity speaker and electric privacy cover. Boasting powerful functions like face recognition, voice localization, voice tracking, and intelligent noise reduction, this product could automatically adjust the image size according to the number of participants to present the optimal frame. It can also detect the speaker position in real time and lock the target while having a close-up, which allows users to have hands-free operation. This device has 6 array microphones composed of MEMS microphones, and it can also be matched with external cascading microphone and advanced 3A audio algorithm, you will have an exceptional full-duplex communication experience.
● Integrated Design: Built in 4K UHD camera, microphone array, high fidelity speaker and electric privacy cover
- Ultra HD: This device adopts 8M high quality CMOS image sensor, able to capture 4K ultra HD image to present true-to-life image, bringing excellent image resolution and clarity.
- Distortion-less Wide Angle Lens: 120° wide angle with no distortion lens allows every participant is on the frame with no need to adjust the camera.
● Automatic Privacy Cover: Privacy cover will automatically close to ensure the privacy security.
- Microphone Array: Built in 6 array microphones enable speaker can be tracked in real time. THIS DEVICE breaks the distance limitation to provide virtual meeting as if you are there.
● Built in Speaker: Built in dual 10W high quality studio speaker, ensuring every participant can hear and be heard clearly.
- Audio Processing: The audio processing algorithm adopts high-fidelity 48K audio sampling rate, lossless audio transmission technology, supports AEC, AGC, ANS processing, bringing high-quality calls of 6 meters full duplex;
● Auto Framing: Built in face detection algorithm, automatically detect participant and provide optimal framing.
- Bluetooth 5.0: Connect mobile phone and other devices through Bluetooth to be used as Bluetooth speaker and microphone.
- Low Noise and High SNR: Low noise CMOS ensures the ultra SNR of image. The advanced 2D, 3D noise reduction technology further reduces the noise while ensuring the image clarity.
- Powerful Compatibility: Compatible with Windows7, windows10, Mac OS 10.10 or higher system, applicable to major cloud-based video conference platforms.
2.3 Technical Specification
| Camera | Lens | FOV | 120° (D) /106° (H) / 72° (V) |
| Iris | F2.0 | ||
| Focal Length | 1.89mm | ||
| Digital Zoom | 10X | ||
| Sensor | High quality CMOS sensor, effective pixel 8 million, 16:9 | ||
| Image | Minimum Illumination | 0.5Lux | |
| DNR | 2D & 3D | ||
| Focus | Auto/Manual | ||
| BLC | On/Off | ||
| Exposure | Parameter can be adjusted, and AE (Auto Exposure) is available | ||
| Video Adjustment | Brightness, sharpness, saturation, contrast, white balance, gain, anti-flicker, low brightness compensation and other parameters can be adjusted | ||
| SNR | ≥50dB | ||
| Video Format | HDMI: 4KP30,1080P60 compatible downward USB: 4KP30,1080P60 compatible downward | ||
| Video Compression Format | MJPEG, YUY2, H.264, H.265, NV12 | ||
| Privacy Cover | Automatic privacy cover will close when no image output and open when there is an image output. | ||
| Audio | Microphone | MicrophonePickup Distance | 6 X MEMS Microphones6 meters |
| Frequency Response | 120 Hz-16 kHz | ||
| Speaker | Speaker | Built in dual speaker | |
| Voltage | 2*10W | ||
| Output Voice Pressure | 80±3 dB 1.0M/1.0W | ||
| Frequency Response | 100 Hz-20 KHz | ||
| Audio Processing | AEC, AGC, ANS | ||
| AI Function | Group Framing | Automatically adjust the screen size according to the number of participants to present the best framing | |
| Speaker Tracking | Track each speaker in real time and ensure that the speaker is in the center of the screen. | ||
| Remote Control | Remote Control | Infrared remote control | |
| Physical Interfaces | USB | USB3.0 audio video output interface, Type C Support UVC1.1, UAC1.0 and higher | |
| HDMI | HDMI video output interface HDMI also compatible with HDMI2.0 standard | ||
| LINE IN | 3.5mm audio line input interface (when an external pickup is connected, the audio input is automatically switched to the external pickup) | ||
| LINE OUT | 3.5mm line output, can be connected to external speakers (when connecting to external speakers, the audio output will automatically switch to external speakers) | ||
| Expansion Mic Interface | RJ45 interface, able to connect to expansion microphone. | ||
| Power Interface | HEC3800 power socket (DC12V), input AC110V-AC220V output DC12V/2.5A | ||
| Indicator | Bar-shaped Indicator | While displaying the working status, it can also be lit where the speaker's voice comes from. | |
| Bluetooth | Bluetooth 5.0 | Can be connected to a mobile phone or other device via Bluetooth as a Bluetooth microphone and speaker | |
| Compatibility | Available System | Windows 7, Windows 8, Windows 10, Mac OS X, Linux, Android | |
| Power Supply Method | Supply power through power adapter | ||
| Working Condition | Storage Temperature | -10°C ~ +70°C | |
| Storage Humidity | 20%~95% | ||
| Working Temperature | -10°C ~ +50°C | ||
| Working Humidity | 20%~80% | ||
| Environment | Indoor | ||
| Installation Method | Walling Mount | Comes with walling mount bracket. While mounting, the camera needs to be as close to the wall as possible. | |
| Desktop | Comes with desktop mounting bracket | ||
| Installed on Monitor | Bracket for monitor installation(optional) | ||
3. How to Use
3.1 Remote Control
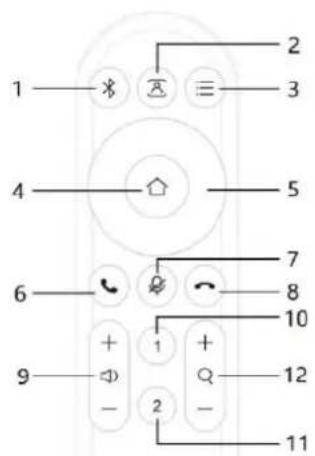
2 x 3V CR2032 batteries required (not included)
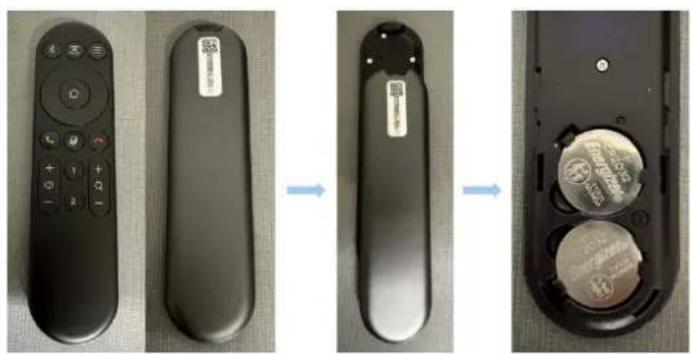
natural_image
Three-panel image showing a remote control with a label, arranged horizontally and finally into a close-up of the interior portion (no text or symbols visible)| Number | Function Description |
| 1 | Bluetooth |
| 2 | Auto Framing & Voice Tracking |
| 3 | Menu |
| 4 | HOME |
| 5 | Up, down, left, right |
| 6 | Answer call |
| 7 | Microphone muted |
| 8 | Reject the incoming call |
| 9 | Volume up/down |
| 10 | Set/call out preset #1 (Long press 3 sec to set preset, short press to call out preset) |
| 11 | Set/call out preset #2 (Long press 3 sec to set preset, short press to call out preset) |
| 12 | Zoom in/out |
3.2 Menu Setting
3.2.1 Main Menu
Press menu key on remote control and use arrow to point item to be selected.
![MENU = = = = = = = = = = = = = Language English ( Setup ) ( Exposure ) ( Color ) ( Image ) ( Noise Reduction ) ( Video Format ) ( Verion ) ( Restore Default ) [↑↓]Select [←→]Change Value](/content/2026/05/910954/images/0d26214b7ae79aa87a4852c949daad92ecc6ef87ed82b53434b5d72fab0b1524.jpg)
1) Language
Move arrow to (Language), and press to change the option
2) Setting
Move arrow to (Setting), and press【HOME】to enter the exposure interface.
Setup
Image Style
Default
Auto Framing
Close
Auto Framing Sen
Medium
Voice Location
Close
Location Sen
Medium
Max Framing
5X
Locate Mode
Smart Mode
Prompt Info
Close
Menu Mirror
Close
Transfers Mode
BULK
[↑ ↓]Select [← →]Change Value
Image Style : Default/standard/clear/bright/soft
Auto Framing: On/off
Auto Framing Sen: high/medium/low
Max Framing: 3X/5X/10X
Voice Tracking: on/off
Voice Tracking Sen: high/medium/low
Locate Mode: Smart mode/pan mode/movie mode/discussion mode
Prompt Info: On/off
Menu Mirror: On/off
Transfers Mode: Bulk/synchronization
3) Exposure
Move arrow to (exposure), press【HOME】to enter exposure interface.
| EXPOSURE | |
| = = = = = = = = = = = = | |
| Mode | Auto |
| EV | OFF |
| BLC | OFF |
| Flicker | 50Hz |
| G.Limit | 6 |
| DRC | 4 |
| [↑↓]Select [←→]Change Value | |
Exposure mode: Auto/manual/shutter priority/bright priority
Exposure Compensation(EV): On/off
Compensation Level: -7 – 7( only available in EV mode on)
BLC: On/off (only available in auto mode)
Anti-Flicker: 50Hz, 60Hz, off (only available in auto, iris priority, bright priority mode)
Gain Limit: 0 - 15(only available in auto, iris priority, bright priority mode)
Dynamic Range: 1 - 8, off
Shutter Priority: 1/30, 1/50, 1/60, 1/90, 1/100, 1/120, 1/180, 1/250, 1/350, 1/500, 1/1000, 1/2000, 1/3000, 1/4000, 1/6000, 1/10000(only available in manual, and shutter priority mode)
Bright: 0 - 23 (only available in bright priority)
4) Color
Move arrow to (color), and press【HOME】to enter color page.
| COLOR | |
| = = = = = = = = = = = = = | |
| WB Mode | Auto |
| RG Tuning | 0 |
| RW Tuning | 0 |
| Saturation | 100% |
| Hue | 4 |
| AWB Sensitivity | High |
| [↑↓]Select [←→]Change Value | |
WB Mode : Auto/manual/one-push/specified temperature
RG Tuning : -10\~10
Saturation : 0\~127
Blue Tuning : -10\~10
AWB Sensitivity : High/medium/low(only available in auto mode) Hue : 0\~8
5) Image
Move arrow to (image), and press【HOME】to enter image page.
| IMAGE | |
| Brightness | 7 |
| Contrast | 7 |
| Sharpness | 5 |
| Flip-H | OFF |
| Flip-V | OFF |
| B&W-Mode | Color |
| Gamma | Default |
| Low-Light Mode | Close |
| [↑↓]Select [←→]Change Value | |
Brightness: 0\~14
Flip-H : On/off
Gamma: Default, 0.34, 0.39, 0.47, 0.50
Contrast: 0\~14
Flip-V : On/off
Low-Light Mode: On/off
Sharpness: 0\~15
B&W-Mode: Color/B&W
6) Noise Reduction
Move arrow to (Noise Reduction), and press 【HOME】 to enter Noise Reduction page.
![NOISE REDUCTION = = = = = = = = = = = = = NR-2D OFF NR-3D 4 [↑↓]Select [←→]Change Value](/content/2026/05/910954/images/6261cbed390d52ab1d4d1722630b7cbdf1ef2bee53d96e27d4df6b0dfa596fd4.jpg)
2D NR: Auto, manual 1\~7
3DNR: Off, 1\~8
7) Version
Move arrow to (version)
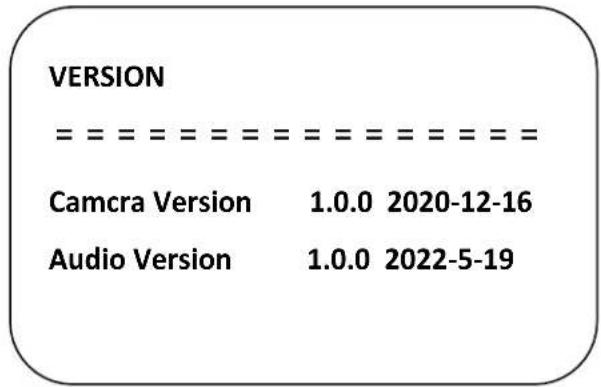
8) Restore Default
Move arrow to (restore default), and press【HOME】to enter RESTORE DEFAULT page.
RESTORE DEFAULT
Restore Default?
NO
Restore default: Yes/no (color style and video format cannot be restored)
4. Maintenance and Troubleshooting
4.1 Maintenance
1) If the camera will not be used for a long time, please turn off the power switch.
2) Use a soft cloth or lotion-free tissue to clean the camera body.
3) Use a soft dry lint-free cloth to clean the lens. If the camera is very dirty, clean it with a diluted neutral detergent. Do not use any type of solvent or harsh detergent, which may damage the surface.
4.2 Troubleshooting
1) No image
a. Check whether the power cord is connected, voltage is OK, POWER lamp is lit.
b. Check whether the camera can "self-test" after startup
c. Check that the rotary dial on rear work normally
d. Check that the HDMI cable is connected correctly
2) Image is shaky or vibrating.
Check that the video output, video monitor cable work normally.
3) Remote controller does not control the camera
a. Check that the batter of remote control is placed properly and full of power
b. Check that the working statue of the device is normal
c. Check whether the menu has been exited. Only after exiting the menu, the remote control can work normally; if the webpage outputs an image, the menu will not be displayed, then the menu will automatically exit and remote control can work on camera after 30 seconds without any operation
Copyright Notice
The entire contents of this manual, whose copyright belongs to our company may not be cloned, copied or translated in any way without the explicit permission of the company. Product specifications and information referred to in this document are for reference only and as such are subject to updating at any time without prior notice.
DVDO
Follow us


- DVDO-C6-1
- User Manual
- Preface
- Overview:
- Graphic Symbols
- Attention
- Precautions:
- Electrical Safety:
- Transportation:
- Installation:
- Do Not Dismantle Camera :
- Magnetic Interference
- Contents
- Quick Start....4
- Product Overview....6
- How to Use....11
- Maintenance and Troubleshooting ....18
- Quick Start
- Interfaces
- Device Startup
- Power on
- Statue Indicator Light
- Video Output
- Audio Input
- Audio Output
- Product Overview
- Product Introduction
- Dimensions
- Supplied Accessory
- Product Features
- How to Use
- Remote Control
- Menu Setting
- Main Menu
- 3) Exposure
- 4) Color
- 5) Image
- 6) Noise Reduction
- 7) Version
- 8) Restore Default
- Maintenance and Troubleshooting
- Maintenance
- Troubleshooting
- 1) No image
- 2) Image is shaky or vibrating.
- 3) Remote controller does not control the camera
- Copyright Notice
- DVDO
Brand : DVDO
Model : C6-1-W
Category : Video Conferencing System