H12SSL-NT - Computer Server Supermicro - Free user manual and instructions
Find the device manual for free H12SSL-NT Supermicro in PDF.


| Product Type | Server Motherboard |
| Brand | Supermicro |
| Model | H12SSL-NT |
| CPU Support | Single AMD EPYC 7002/7003 Series Processor, Socket SP3 |
| Memory Support | 8 DIMM slots, up to 2TB Registered ECC DDR4-3200 SDRAM |
| Expansion Slots | 5x PCIe 4.0 x16, 2x PCIe 4.0 x8, 2x M.2 PCIe 4.0 x4 (M-Key) |
| Network | Dual 10GbE Broadcom BCM57416, dedicated IPMI LAN (ASPEED AST2500) |
| Storage Interfaces | 8x SATA 3.0 (via JNVMe0/SATA0~7), 8x SAS3 (via LSI 3008, not on H12SSL-NT), support for up to 4 NVMe via slimSAS |
| Form Factor | 12.0 x 9.6 inches (304.8 x 243.84 mm) |
| Power Connectors | 24-pin ATX (JPWR3), dual 8-pin 12V CPU (JPWR1, JPWR2) |
| Rear I/O Ports | 1x COM, 1x VGA, 4x USB 3.0, 2x RJ45 10GbE, 1x IPMI LAN, UID switch/LED |
| Management | IPMI 2.0 with ASPEED AST2500 BMC, SuperDoctor 5, Watch Dog |
| BIOS | 256Mb AMI UEFI BIOS, ACPI 5.1, SMBIOS 3.1.1 |
| Operating Temperature | 10°C to 35°C (typical server environment) |
| Compliance | FCC Class A, CE, RoHS |
| Maintenance | Keep area clean, use ESD precautions, ensure adequate airflow |
| Safety | Follow warnings in manual; battery handling, proper disposal |
| Weight | Approximately 2.5 lbs (1.13 kg) |
Frequently Asked Questions - H12SSL-NT Supermicro
User questions about H12SSL-NT Supermicro
0 question about this device. Answer the ones you know or ask your own.
Ask a new question about this device
Download the instructions for your Computer Server in PDF format for free! Find your manual H12SSL-NT - Supermicro and take your electronic device back in hand. On this page are published all the documents necessary for the use of your device. H12SSL-NT by Supermicro.
USER MANUAL H12SSL-NT Supermicro
The information in this User's Manual has been carefully reviewed and is believed to be accurate. The vendor assumes no responsibility for any inaccuracies that may be contained in this document, and makes no commitment to update or to keep current the information in this manual, or to notify any person or organization of the updates. Please Note: For the most up-to-date version of this manual, please see our website at www.supermicro.com.
Super Micro Computer, Inc. ("Supermicro") reserves the right to make changes to the product described in this manual at any time and without notice. This product, including software and documentation, is the property of Supermicro and/or its licensors, and is supplied only under a license. Any use or reproduction of this product is not allowed, except as expressly permitted by the terms of said license.
IN NO EVENT WILL Super Micro Computer, Inc. BE LIABLE FOR DIRECT, INDIRECT, SPECIAL, INCIDENTAL, SPECULATIVE OR CONSEQUENTIAL DAMAGES ARISING FROM THE USE OR INABILITY TO USE THIS PRODUCT OR DOCUMENTATION, EVEN IF ADVISED OF THE POSSIBILITY OF SUCH DAMAGES. IN PARTICULAR, SUPER MICRO COMPUTER, INC. SHALL NOT HAVE LIABILITY FOR ANY HARDWARE, SOFTWARE, OR DATA STORED OR USED WITH THE PRODUCT, INCLUDING THE COSTS OF REPAIRING, REPLACING, INTEGRATING, INSTALLING OR RECOVERING SUCH HARDWARE, SOFTWARE, OR DATA.
Any disputes arising between manufacturer and customer shall be governed by the laws of Santa Clara County in the State of California, USA. The State of California, County of Santa Clara shall be the exclusive venue for the resolution of any such disputes. Supermicro's total liability for all claims will not exceed the price paid for the hardware product.
FCC Statement: This equipment has been tested and found to comply with the limits for a Class A or Class B digital device pursuant to Part 15 of the FCC Rules. These limits are designed to provide reasonable protection against harmful interference when the equipment is operated in industrial environment for Class A device or in residential environment for Class B device. This equipment generates, uses, and can radiate radio frequency energy and, if not installed and used in accordance with the manufacturer's instruction manual, may cause harmful interference with radio communications. Operation of this equipment in a residential area is likely to cause harmful interference, in which case you will be required to correct the interference at your own expense.
California Best Management Practices Regulations for Perchlorate Materials: This Perchlorate warning applies only to products containing CR (Manganese Dioxide) Lithium coin cells. "Perchlorate Material-special handling may apply. See www.dtsc.ca.gov/hazardouswaste/perchlorate".

WARNING: This product can expose you to chemicals including lead, known to the State of California to cause cancer and birth defects or other reproductive harm. For more information, go to www.P65Warnings.ca.gov.
The products sold by Supermicro are not intended for and will not be used in life support systems, medical equipment, nuclear facilities or systems, aircraft, aircraft devices, aircraft/emergency communication devices or other critical systems whose failure to perform be reasonably expected to result in significant injury or loss of life or catastrophic property damage. Accordingly, Supermicro disclaims any and all liability, and should buyer use or sell such products for use in such ultra-hazardous applications, it does so entirely at its own risk. Furthermore, buyer agrees to fully indemnify, defend and hold Supermicro harmless for and against any and all claims, demands, actions, litigation, and proceedings of any kind arising out of or related to such ultra-hazardous use or sale.
Manual Revision 1.0a
Release Date: April 22, 2021
Unless you request and receive written permission from Super Micro Computer, Inc., you may not copy any part of this document. Information in this document is subject to change without notice. Other products and companies referred to herein are trademarks or registered trademarks of their respective companies or mark holders.
Copyright © 2021 by Super Micro Computer, Inc.
All rights reserved.
Printed in the United States of America
Preface
About This Manual
This manual is written for system integrators, IT technicians and knowledgeable end users. It provides information for the installation and use of the H12SSL-i/C/CT/NT motherboard.
About This Motherboard
Built upon the functionality and capability of the AMD EPYC™ 7002/7003* Series processor, the H12SSL-i/C/CT/NT motherboard provides superior graphics capability and system performance while consuming little power. Please note that this motherboard is intended to be installed and serviced by professional technicians only. For processor/memory updates, please refer to our website at http://www.supermicro.com/products/.
*AMD EPYC 7003 series processor support requires BIOS version 2.0 or newer.
Conventions Used in the Manual
Special attention should be given to the following symbols for proper installation and to prevent damage done to the components or injury to yourself:

Warning! Indicates important information given to prevent equipment/property damage or personal injury.

Warning! Indicates high voltage may be encountered when performing a procedure.
Contacting Supermicro
Headquarters
Address: Super Micro Computer, Inc.
980 Rock Ave.
San Jose, CA 95131 U.S.A.
Tel: +1 (408) 503-8000
Fax: +1 (408) 503-8008
Email: marketing@supermicro.com (General Information)
support@supermicro.com (Technical Support)
Website: www.supermicro.com
Europe
Address: Super Micro Computer B.V.
's-Hertogenbosch, The Netherlands
Tel: +31 (0) 73-6400390
Fax: +31 (0) 73-6416525
Email: sales@supermicro.nl (General Information)
support@supermicro.nl (Technical Support)
rma@supermicro.nl (Customer Support)
Website: www.supermicro.nl
Asia-Pacific
Address: Super Micro Computer, Inc.
3F, No. 150, Jian 1st Rd.
Zhonghe Dist., New Taipei City 235
Taiwan (R.O.C)
Tel: +886-(2) 8226-3990
Fax: +886-(2) 8226-3992
Email: support@supermicro.com.tw
Website: www.supermicro.com.tw
Table of Contents
Chapter 1 Introduction
1.1 Quick Reference....10
Quick Reference Table....11
Motherboard Features....13
1.2 Processor and Chipset Overview....16
1.3 Special Features ....16
Recovery from AC Power Loss....16
1.4 System Health Monitoring....17
Onboard Voltage Monitors ....17
Fan Status Monitor with Firmware Control 17
Environmental Temperature Control ....17
System Resource Alert....17
1.5 ACPI Features....18
1.6 Power Supply 18
1.7 Super I/O 18
Chapter 2 Installation
2.1 Static-Sensitive Devices....19
Precautions ......19
Unpacking 19
2.2 Motherboard Installation....20
Location of Mounting Holes 20
Installing the Motherboard....22
2.3 Processor and Heatsink Installation....23
2.4 Memory Support and Installation ....31
Memory Support....31
DIMM Module Population....32
DIMM Installation ....33
DIMM Removal 33
2.5 Rear I/O Ports ....34
2.6 Front Control Panel 36
2.7 Connectors ....37
2.8 Jumper Settings ....44
How Jumpers Work....44
2.9 LED Indicators....46
Chapter 3 Troubleshooting
3.1 Troubleshooting Procedures ....48
Before Power On 48
No Power 48
No Video 49
System Boot Failure....49
Memory Errors 49
When the System Loses its Setup Configuration....49
When the System Becomes Unstable....50
3.2 Technical Support Procedures ....51
3.3 Frequently Asked Questions ....51
3.4 Returning Merchandise for Service....53
3.5 Battery Removal and Installation ....54
Battery Removal....54
Proper Battery Disposal 55
Battery Installation....55
Chapter 4 UEFI BIOS
4.1 Introduction....56
Starting the Setup Utility 56
4.2 Main Setup ....57
4.3 Advanced....59
4.4 IPMI 78
4.5 Event Logs ....81
4.6 Security....83
4.7 Boot....87
4.8 Save & Exit....89
Appendix A Software
A.1 Microsoft Windows OS Installation....91
A.2 Driver Installation....93
A.3 SuperDoctor® 5....94
A.4 IPMI....94
Appendix B Standardized Warning Statements
B.1 Battery Handling 95
B.2 Product Disposal....97
Appendix C UEFI BIOS Recovery
C.1 Overview....98
C.2 Recovering the UEFI BIOS Image....98
C.3 Recovering the BIOS Block with a USB Device....98
Chapter 1
Introduction
Congratulations on purchasing your computer motherboard from an industry leader. Supermicro boards are designed to provide you with the highest standards in quality and performance.
In addition to the motherboard, several important parts that are included with the system are listed below. If anything listed is damaged or missing, please contact your retailer.
Important Links
For your system to work properly, please follow the links below to download all necessary drivers/utilities and the user's manual for your server.
- Supermicro product manuals: http://www.supermicro.com/support/manuals/
- Product drivers and utilities: https://www.supermicro.com/wdl/driver/
- Product safety info: http://www.supermicro.com/about/policies/safety_information.cfm
- A secure data deletion tool designed to fully erase all data from storage devices can be found at our website: https://www.supermicro.com/about/policies/disclaimer.cfm?url=/wftp/utility/Lot9_Secure_Data_Deletion_Utility
- If you have any questions, please contact our support team at: support@supermicro.com
This manual may be periodically updated without notice. Please check the Supermicro website for possible updates to the manual revision level.
| H12SSL Motherboard Series Models | ||||
| Motherboard SATA LSI | ® 3008 SAS Slim SAS x8 LAN Controller | |||
| H12SSL-i 8 + 8* - 1* BCM5720L (1G) | ||||
| H12SSL-C | 8 | Yes (8 ports) | - | BCM5720L (1G) |
| H12SSL-CT | 8 | Yes (8 ports) | - | BCM57416 (10G) |
| H12SSL-NT | - | - | 2* | BCM57416 (10G) |
*Eight SATA or 2x NVMe dual use by slim SAS x8
natural_image
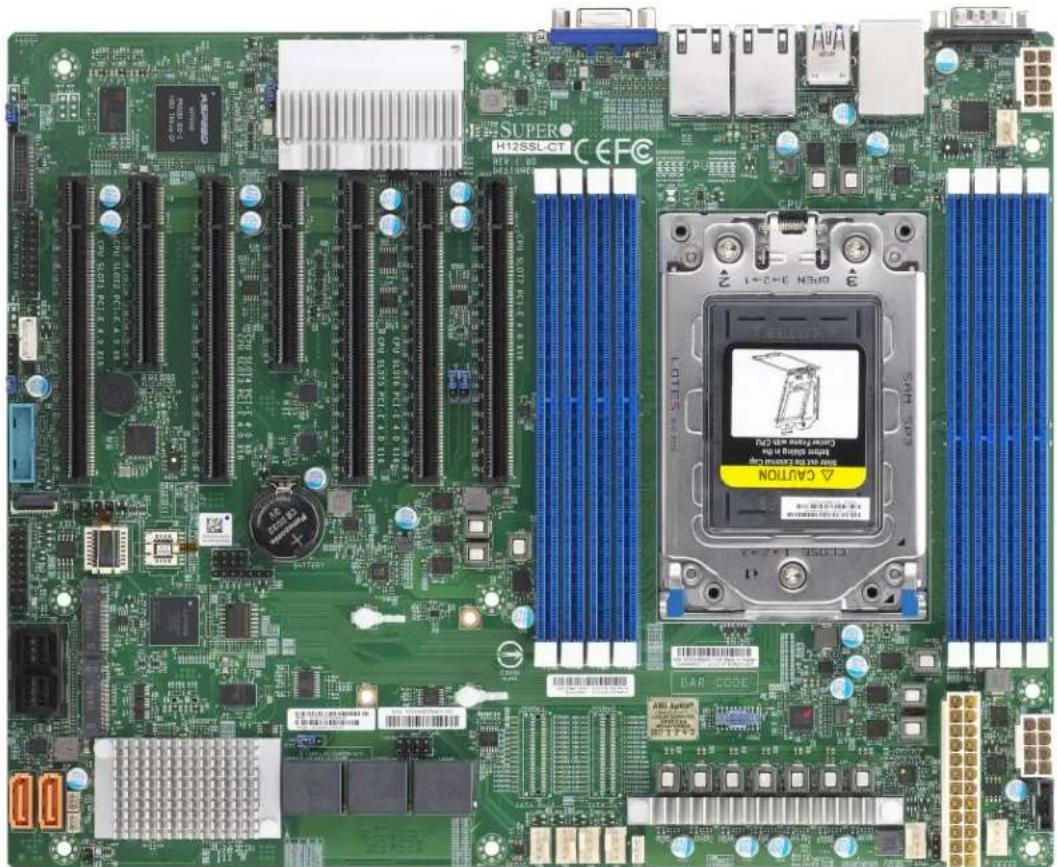
Green computer motherboard with CPU socket, RAM slots, and various hardware components (no readable text or symbols)Figure 1-1. H12SSL-i/C/CT/NT Image
Note: All graphics shown in this manual were based upon the latest PCB revision available at the time of publication of the manual. The motherboard you received may or may not look exactly the same as the graphics shown in this manual.
1.1 Quick Reference

Figure 1-2. H12SSL-i/C/CT/NT Layout
Quick Reference Table
Jumper Description Default Setting
| UID SW Unit ID switch (push-button toggle switch ON/OFF) Off | ||
| JBT1 Clear CMOS Open (Normal) | ||
| JPG1 VGA Enable/Disable Pins 1-2 (Enabled) | ||
| JPS1 SAS Enable/Disable (H12SSL-C & H12SSL-CT only) Pins 1-2 (Enabled) | ||
| JWD1 Watch Dog control Pins 1-2 (Reset) | ||
| JPL1 LAN Enable/Disable | Pins 1-2 (Enabled) | |
| JCFG1 | JNVMe0/SATA0~7 Swtich (H12SSL-i & H12SSL-NT only) | Pins 1-2 (SATA)/Pins 2-3 (NVMe) |
| JCFG2 | JNVMe1/SATA8~15 Swtich (H12SSL-NT only) | Pins 1-2 (SATA)/Pins 2-3 (NVMe) |
| JUID | UID Switch Header | |
| LED Description | Status | |
| UID LED | Rear unit ID LED | Solid blue: UID switched to ON, unit identified |
| LEDM1 | BMC heartbeat LED | Green: Blinking (BMC normal), Green: Fast blinking (BMC initializing) |
| LE1 | Power OK LED | Green: System power OK |
| LEDSAS | SAS port active LED | Green: SAS port active (H12SSL-C & H12SSL-CT only) |
| Connector | Description | |
| Battery (BT1) | Onboard CMOS battery | |
| JNCSI1 | NCSI header | |
| COM 1 | Rear panel COM port #1 | |
| FAN 1~5, A, B | System cooling fan headers | |
| IPMI_LAN | Dedicated IPMI LAN port | |
| JF1 | Front control panel | |
| JSD1, JSD2 | SATA DOM power connector | |
| M.2-M1/M.2-M2 | M.2 PCIe Interface | |
| JTPM1 | Trusted Platform Module (TPM)/Port 80 connector | |
| I-SATA0~I-SATA7 | Internal SATA Ports | |
| L-SAS0~L-SAS7 | Internal SAS Ports (H12SSL-C & H12SSL-CT only) | |
| JNVMe0/SATA0~7 | Internal SATA/NVMe Ports (H12SSL-i & H12SSL-NT only) | |
| JNVMe1/SATA8~15 | Internal SATA/NVMe Ports (H12SSL-NT only) | |
| JL1 | Chassis intrusion header | |
| JOH1 | Chassis overheat header | |
| USB 0/1 (3.0) | Back panel USB 3.0 ports (USB 0/1) | |
| USB 2/3 (3.0) | Back panel USB 3.0 ports (USB 2/3) | |
| USB 4/5 (3.0) | Internal USB 3.0 header (USB 4/5) | |
| JSTBY1 | Stand by power header | |
| JIPMB1 | 4-pin BMC external IC header | |
Connector Description
| JPWR3 24-pin ATX power supply connector | |
| JPWR1 12V 8-pin CPU core power supply connector | |
| JPWR2 12V 8-pin CPU core power supply connector | |
| JD1 Front panel external speaker header | |
| JPI2C1 Power supply SMBus I | ^2C header |
| LAN1, LAN2 Back panel LAN1, LAN2 connectors | |
| VGA Back panel VGA port | |
Note: Jumpers, connectors, switches, and LED indicators that are not described in the preceding tables are for manufacturing testing purposes only, and are not covered in this manual.
Motherboard Features
Features
CPU
• Single AMD EPYC™ 7002/7003 Series Processor in a Socket SP3
Memory
• 2TB Registered ECC DDR4-3200 SDRAM in eight DIMM slots
DIMM Size
• Up to 128GB size at 1.2V
Chipset
- System on Chip
Expansion Slots
- 5x PCIe 4.0 x16
• 2x PCIe 4.0 x8
• M.2 Interface: 2 PCIe 4.0 x4
• M.2 Form Factor: 2280, 22110
M.2 Key: M-Key
Network
• ATEN IPMI from ASPEED AST 2500 BMC for gigabit RJ45 port
• Dual RJ45 LAN ports (H12SSL-i/C (1GbE Broadcom 5720L); H12SSL-CT/NT (10GbE Broadcom 57416))
Graphics
• ASPEED AST2500 BMC chip with one VGA port
I/O Devices
• One COM connector
• Eight SATA 3.0 ports or 2x NVMe dual use by slim SAS x8
• Eight SAS3 connections supported by LSI SAS 3008 controller (L-SAS 0-3, L-SAS 4-7)
- Two SATA DOMs
Peripheral Devices
• Two USB 3.0 ports on the rear I/O panel (USB 0/1)
• Two USB 3.0 ports on the rear I/O panel (USB 2/3)
• One USB 3.0 header (USB 4/5)
Note: Table continues on the next page.
Features
BIOS
• 256Mb SPI AMI BIOS
- ACPI 5.1, SMBIOS 3.1.1, Plug-and-Play (PnP), BIOS rescue hot-key, RTC (Real Time Clock) wake up, Riser Card Auto-Detection Support
Power Management
• ACPI power management (S5)
• Power button override mechanism
• Power-on mode for AC power recovery
System Health Monitoring
- Onboard voltage monitoring for +1.8V, 3.3V, +5V, +12V, +3.3V Standby, +5V Standby, VBAT, Memory
- Onboard monitoring for CPU, system, and memory temperature
• CPU switching phase voltage regulator
• CPU Thermal Trip support
Fan Control
- Dual cooling zones
• Low-noise fan speed control
• Pulse Width Modulation (PWM) fan control
System Management
• Trusted Platform Module (TPM) support
• System resource alert via SuperDoctor® 5
• SuperDoctor® 5, Watch Dog
• Non-Maskable Interrupt (NMI)
• SUM-InBand, SUM-OOB, IPMICFG, IPMIView, SMCIPMITOOL
LED Indicators
• Power State Indicator
- CPU/Overheating
- Fan Failure
• LAN activity
- UID / Remote UID
Dimensions
• 12.0" (L) x 9.6" (W)

flowchart
graph TD
    A["AMD SP3 CPU"] --> B["RAM AST2500"]
    A --> C["RAM 10000/10000/10000/10000/10000/10000/10000/10000/10000/10000/10000/10000/10000/10000/10000/10000/10000/100"]
    A --> D["RAM 2000/2000/2000/2000/2000/2000/2000/2000/2000/2000/2000/2000/200"]
    A --> E["RAM 325/325/325/325/325/325/325/325/325/325/325/325/325/325/325/325/325/325/325/325/325/325/325/325/325/325"]
    A --> F["RAM 4476/4476/4476/4476/4476/4476/4476/4476/4476/4476/4476/4476/4476/4476/4476/4476/4476/4476/4476/4476/4476"]
    A --> G["RAM 57416 BCM 5720"]
    A --> H["RAM 1: Linux 1"]
    A --> I["RAM 2: Linux 2"]
    A --> J["RAM 3: Linux 3"]
    A --> K["RAM 4: Linux 4"]
    A --> L["RAM 5: Linux 5"]
    A --> M["RAM 6: Linux 6"]
    A --> N["RAM 7: Linux 7"]
    A --> O["RAM 8: Linux 8"]
    A --> P["RAM 9: Linux 9"]
    A --> Q["RAM 10: Linux 10"]
    A --> R["RAM 11: Linux 11"]
    A --> S["RAM 12: Linux 12"]
    A --> T["RAM 13: Linux 13"]
    A --> U["RAM 14: Linux 14"]
    A --> V["RAM 15: Linux 15"]
    A --> W["RAM 16: Linux 16"]
    A --> X["RAM 17: Linux 17"]
    A --> Y["RAM 18: Linux 18"]
    A --> Z["RAM 19: Linux 19"]
    A --> AA["RAM 20: Linux 20"]
    A --> AB["RAM 21: Linux 21"]
    A --> AC["RAM 22: Linux 22"]
    A --> AD["RAM 23: Linux 23"]
    A --> AE["RAM 24: Linux 24"]
    A --> AF["RAM 25: Linux 25"]
    A --> AG["RAM 26: Linux 26"]
    A --> AH["RAM 27: Linux 27"]
    A --> AI["RAM 28: Linux 28"]
    A --> AJ["RAM 29: Linux 29"]
    A --> AK["RAM 30: Linux 30"]
    A --> AL["RAM 31: Linux 31"]
    A --> AM["RAM 32: Linux 32"]
    A --> AN["RAM 33: Linux 33"]
    A --> AO["RAM 34: Linux 34"]
    A --> AP["RAM 35: Linux 35"]
    A --> AQ["RAM 36: Linux 36"]
    A --> AR["RAM 37: Linux 37"]
    A --> AS["RAM 38: Linux 38"]
    A --> AT["RAM 39: Linux 39"]
    A --> AU["RAM 40: Linux 40"]
    A --> AV["RAM 41: Linux 41"]
    A --> AW["RAM 42: Linux 42"]
    A --> AX["RAM 43: Linux 43"]
    A --> AY["RAM 44: Linux 44"]
    A --> AZ["RAM 45: Linux 45"]
    A --> BA["RAM 46: Linux 46"]
    A --> BB["RAM 47: Linux 47"]
    A --> BC["RAM 48: Linux 48"]
    A --> BD["RAM 49: Linux 49"]
    A --> BE["RAM 50: Linux 50"]
    A --> BF["RAM 51: Linux 51"]
    A --> BG["RAM 52: Linux 52"]
    A --> BH["RAM 53: Linux 53"]
    A --> BI["RAM 54: Linux 54"]
    A --> BJ["RAM 55: Linux 55"]
    A --> BK["RAM 56: Linux 56"]
    A --> BL["RAM 57: Linux 57"]
    A --> BM["RAM 58: Linux 58"]
    A --> BN["RAM 59: Linux 59"]
    A --> BO["RAM 60: Linux 60"]
    A --> BP["BIOS ROM MUX"]
    B --> CA["MUX"]
    CA --> CB["TPM"]
    CA --> CC["PCP USB2 (P)"]
    CA --> DD["PCP USB2 (P)"]
    CA --> DE["PCP USB2 (P)"]
    CA --> FD["PCP USB2 (P)"]
    CA --> DG["PCP USB2 (P)"]
    CA --> DH["PCP USB2 (P)"]
    CA --> DI["PCP USB2 (P)"]
    CA --> DJ["PCP USB2 (P)"]
    CA --> DK["PCP USB2 (P)"]
    CA --> DL["PCP USB2 (P)"]
    CA --> DV["PCP USB2 (P)"]
    CA --> DW["PCP USB2 (P)"]
    CA --> DX["PCP USB2 (P)"]
Figure 1-3. System Block Diagram
Note: This is a general block diagram and may not exactly represent the features on your motherboard. See the previous pages for the actual specifications of your motherboard.
1.2 Processor and Chipset Overview
The H12SSL-i/C/CT/NT motherboards offer maximum I/O expandability, energy efficiency, and data reliability in a 7-nm process architecture, and is optimized for high performance computing, NVMe storage solutions, and ideal for High Density Data Center applications.
The H12SSL-i/C/CT/NT supports the new microarchitecture 7-nm process technology, which drastically increases system performance for a multitude of server applications.
The AMD EPYC™ 7002/7003 Series Processor supports the following features:
• ACPI Power Management Logic Support Rev. 6.1
• Adaptive Thermal Management/Monitoring
• PCIe 4.0, SATA 3.0 w/transfer rates of up to 6 Gb/s
• System Management Bus (SMBus) Specification Version 2.0
1.3 Special Features
This section describes the health monitoring features of the H12SSL-i/C/CT/NT. The motherboard has an onboard System Hardware Monitor chip that supports system health monitoring.
Recovery from AC Power Loss
The Basic I/O System (BIOS) provides a setting that determines how the system will respond when AC power is lost and then restored to the system. You can choose for the system to remain powered off (in which case you must press the power switch to turn it back on), or for it to automatically return to the power-on state. See the Advanced BIOS Setup section for this setting. The default setting is Last State.
1.4 System Health Monitoring
This section describes the health monitoring features of the H12SSL-i/C/CT/NT motherboard. The motherboard has an onboard Baseboard Management Controller (BMC) chip that supports system health monitoring. Once a voltage becomes unstable, a warning is given or an error message is sent to the screen. The user can adjust the voltage thresholds to define the sensitivity of the voltage monitor.
Onboard Voltage Monitors
The onboard voltage monitor will continuously scan crucial voltage levels. Once a voltage becomes unstable, it will give a warning or send an error message to the screen. Users can adjust the voltage thresholds to define the sensitivity of the voltage monitor. Real time readings of these voltage levels are all displayed in BMC.
Fan Status Monitor with Firmware Control
Users can check the RPM status of the cooling fans through the IPMI Web interface. The chassis fans are controlled by Thermal Management.
Environmental Temperature Control
The thermal control sensor monitors the CPU temperature in real time and will turn on the thermal control fan whenever the CPU temperature exceeds a user-defined threshold. The overheat circuitry runs independently from the CPU. Once the thermal sensor detects that the CPU temperature is too high, it will automatically turn on the thermal fans to prevent the CPU from overheating. The onboard chassis thermal circuitry can monitor the overall system temperature and alert the user when the chassis temperature is too high.
Note: To avoid possible system overheating, please be sure to provide adequate airflow to your system.
System Resource Alert
This feature is available when used with SuperDoctor 5 ^® . SuperDoctor 5 is used to notify the user of certain system events. For example, you can configure SuperDoctor 5 to provide you with warnings when the system temperature, CPU temperatures, voltages and fan speeds go beyond a predefined range.
1.5 ACPI Features
ACPI stands for Advanced Configuration and Power Interface. The ACPI specification defines a flexible and abstract hardware interface that provides a standard way to integrate power management features throughout a computer system including its hardware, operating system and application software. This enables the system to automatically turn on and off peripherals such as network cards, hard disk drives and printers.
In addition to enabling operating system-directed power management, ACPI also provides a generic system event mechanism for Plug and Play and an operating system-independent interface for configuration control. ACPI leverages the Plug and Play BIOS data structures while providing a processor architecture-independent implementation that is compatible with Windows 2012/R2 and Windows 2016 operating systems.
1.6 Power Supply
As with all computer products, a stable power source is necessary for proper and reliable operation. It is even more important for processors that have high CPU clock rates. In areas where noisy power transmission is present, you may choose to install a line filter to shield the computer from noise. It is recommended that you also install a power surge protector to help avoid problems caused by power surges.
1.7 Super I/O
The ASpeed AST2500 Super I/O provides one high-speed, 16550 compatible Universal Asynchronous Receiver/Transmitter (UART), which support serial infrared communications. This UART includes a send/receive FIFO, a programmable baud rate generator, complete modem control capability and a processor interrupt system. This UART provides legacy speed with baud rate of up to 115.2 Kbps as well as an advanced speed with baud rates of 250 K, 500 K, or 1 Mb/s, which support higher speed modems.
The Super I/O provides functions that comply with ACPI (Advanced Configuration and Power Interface), which includes support of legacy and ACPI power management through the System Management Interrupt (SMI) or System Control Interrupt (SCI). It also features auto power management to reduce power consumption.
Chapter 2
Installation
2.1 Static-Sensitive Devices
Electrostatic Discharge (ESD) can damage electronic components. To prevent damage to your motherboard, it is important to handle it very carefully. The following measures are generally sufficient to protect your equipment from ESD.
Precautions
- Use a grounded wrist strap designed to prevent static discharge.
- Touch a grounded metal object before removing the board from the antistatic bag.
- Handle the board by its edges only; do not touch its components, peripheral chips, memory modules or gold contacts.
- When handling chips or modules, avoid touching their pins.
- Put the motherboard and peripherals back into their antistatic bags when not in use.
- For grounding purposes, make sure that your chassis provides excellent conductivity between the power supply, the case, the mounting fasteners and the motherboard.
- Use only the correct type of CMOS onboard battery as specified by the manufacturer. Do not install the CMOS battery upside down, which may result in a possible explosion.
Unpacking
The motherboard is shipped in antistatic packaging to avoid static damage. When unpacking the motherboard, make sure that the person handling it is static protected.
2.2 Motherboard Installation
All motherboards have standard mounting holes to fit different types of chassis. Make sure that the locations of all the mounting holes for both the motherboard and the chassis match. Although a chassis may have both plastic and metal mounting fasteners, metal ones are highly recommended because they ground the motherboard to the chassis. Make sure that the metal standoffs click in or are screwed in tightly.

Phillips
Screwdriver (1)

Phillips Screws

Standoffs (11)
Only if Needed
Tools Needed
Location of Mounting Holes
Notes:
- To avoid damaging the motherboard and its components, please do not use a force greater than 8 lb/inch on each mounting screw during motherboard installation.
- Some components are very close to the mounting holes. Please take precautionary measures to avoid damaging these components when installing the motherboard to the chassis.
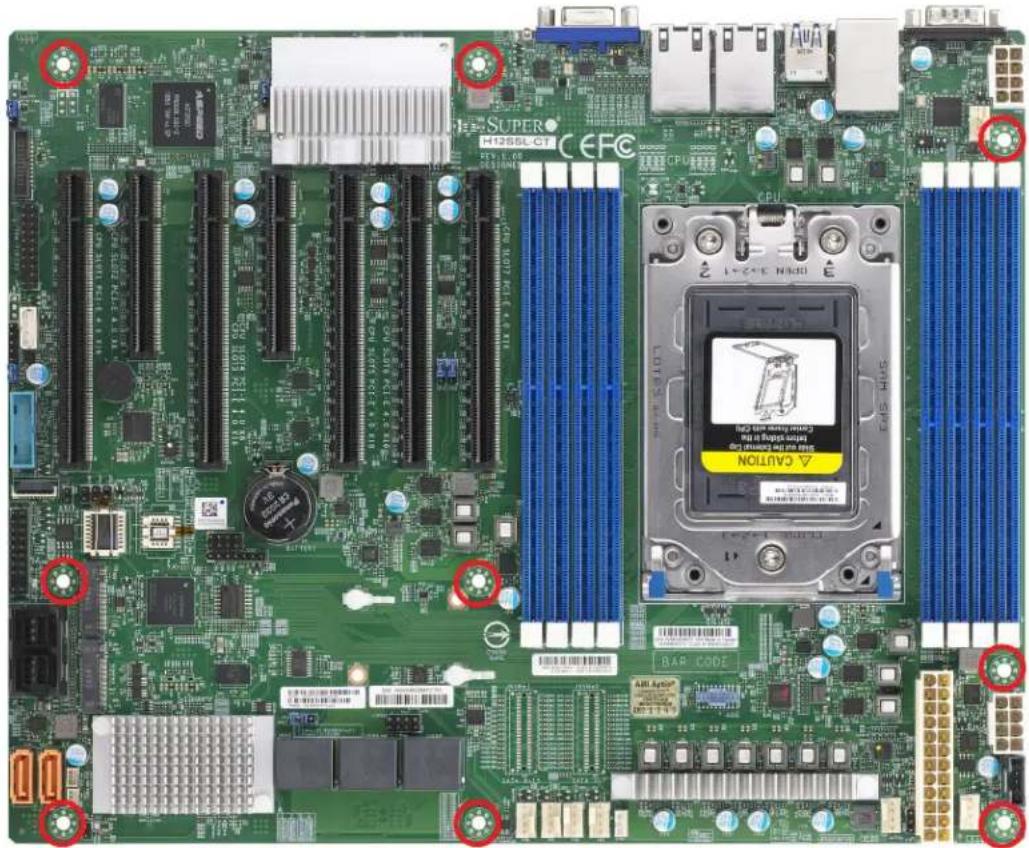
Figure 2-1. Motherboard Mounting Holes
Installing the Motherboard
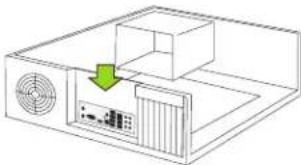
- Install the I/O shield into the back of the chassis.
natural_image
Line drawing of a computer monitor with an open box and ventilation unit, showing no text or symbols.- Locate the mounting holes on the motherboard. See the previous page for the locations.

- Locate the matching mounting holes on the chassis. Align the mounting holes on the motherboard with the mounting holes on the chassis.

- Install standoffs in the chassis as needed.
- Install the motherboard into the chassis carefully to avoid damaging other motherboard components.
- Using the Phillips screwdriver, insert a Phillips head #6 screw into a mounting hole on the motherboard and its matching mounting hole on the chassis.
- Repeat Step 5 to insert #6 screws into all mounting holes.
- Make sure that the motherboard is securely placed in the chassis.
Note: Images displayed are for illustration only. Your chassis or components might look different from those shown in this manual.
2.3 Processor and Heatsink Installation
Warning: When handling the processor package, avoid placing direct pressure on the label area of the fan.
Important:
- For the Processor/Heatsink installation you need to use a T20 screwdriver when opening/closing the CPU socket.
- Always connect the power cord last, and always remove it before adding, removing or changing any hardware components. Make sure that you install the processor into the CPU socket before you install the CPU heatsink.
- If you buy a CPU separately, make sure that you use an AMD-certified multi-directional heatsink only.
- Make sure to install the motherboard into the chassis before you install the CPU heatsink.
- When receiving a motherboard without a processor pre-installed, make sure that the plastic CPU socket cap is in place and none of the socket pins are bent; otherwise, contact your retailer immediately.
• Refer to the Supermicro website for updates on CPU support.
Installing the Processor and Heatsink
- Unscrew the screws holding down Force Frame in the sequence of 3-2-1. The screws are numbered on the Force Frame next to each screw hole.

- The spring-loaded Force Frame will raise up after the last screw securing it (#1) is removed. Gently allow it to lift up to its stopping position.

natural_image
Line drawing of a hand placing a component into a computer processor casing (no text or symbols)- Lift the Rail Frame up by gripping the lift tabs near the front end of the rail frame. While keeping a secure grip of the Rail Frame, lift it to a position so you can do the next step of removing the External Cap.
Note: The Rail Frame is spring loaded, so keep a secure grip on it as you lift it so it does not snap up.
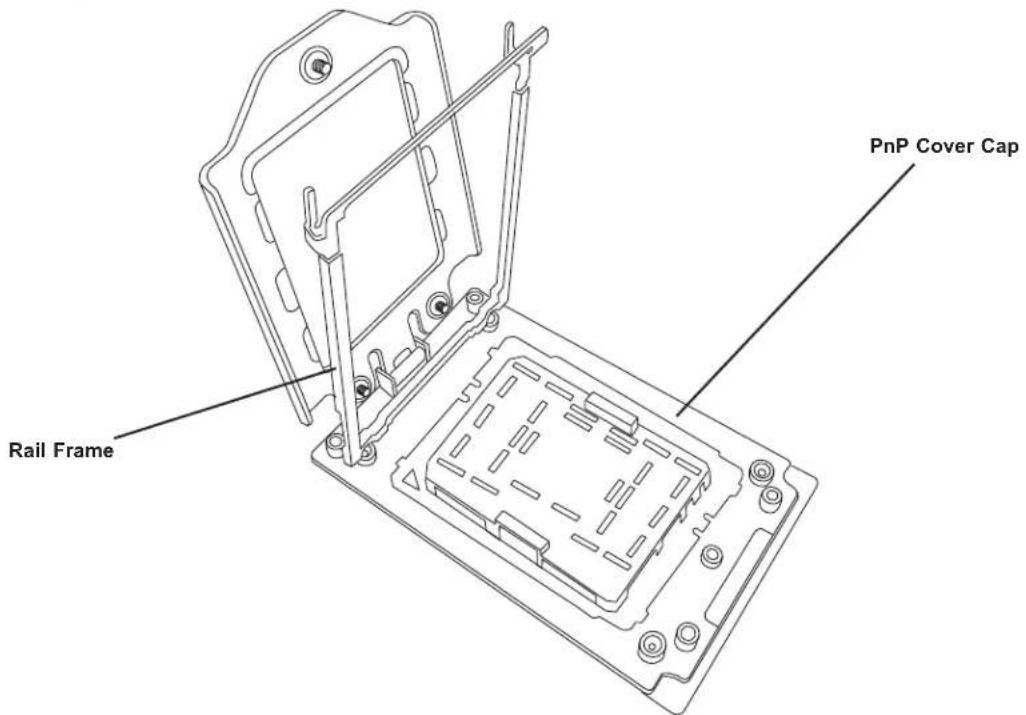
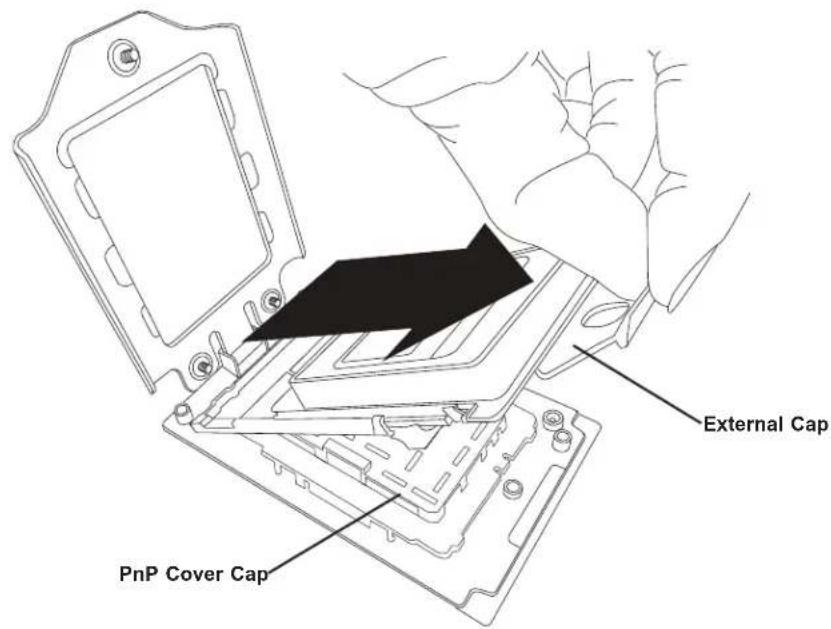
- Remove the External Cap from the Rail Frame by pulling it upwards through the rail guides on the Rail Frame.
-
The CPU Package is shipped from the factory with the Carrier Frame pre-assembled. Grip the handle of the Carrier Frame/CPU Package assembly from its shipping tray, and while gripping the handle, align the flanges of the Carrier Frame onto the rails of the Rail Frame so its pins will be at the bottom when the Rail Frame is lowered later.
-
Slide the Carrier Frame/CPU Package downwards to the bottom of the Rail Frame. Ensure the flanges are secure on the rails as you lower it downwards.

Note: You can only install the CPU inside the socket in one direction with the handle at the top. Make sure that it is properly inserted into the CPU socket before closing the Rail Frame plate. If it doesn't close properly, do not force it as it may damage your CPU. Instead, open the Rail Frame plate again, and double-check that the CPU is aligned properly.
- Lift up the Rail Frame till it securely rests in upright position. Then remove the PnP Cover Cap from the CPU socket below. Grip the two lift tabs marked "Remove" at the middle of the cap and pull vertically upwards to remove the PnP Cover Cap.

Warning! The exposed socket contacts are extremely vulnerable and can be damaged easily. Do not touch or drop objects onto the contacts and be careful removing the PnP Cover Cap and when placing the Rail Frame over the socket.
- Gently lower the Rail Frame down onto the socket until the latches on the Rail Frame engage with the Socket housing. and it rests in place. DO NOT force it into place!

natural_image
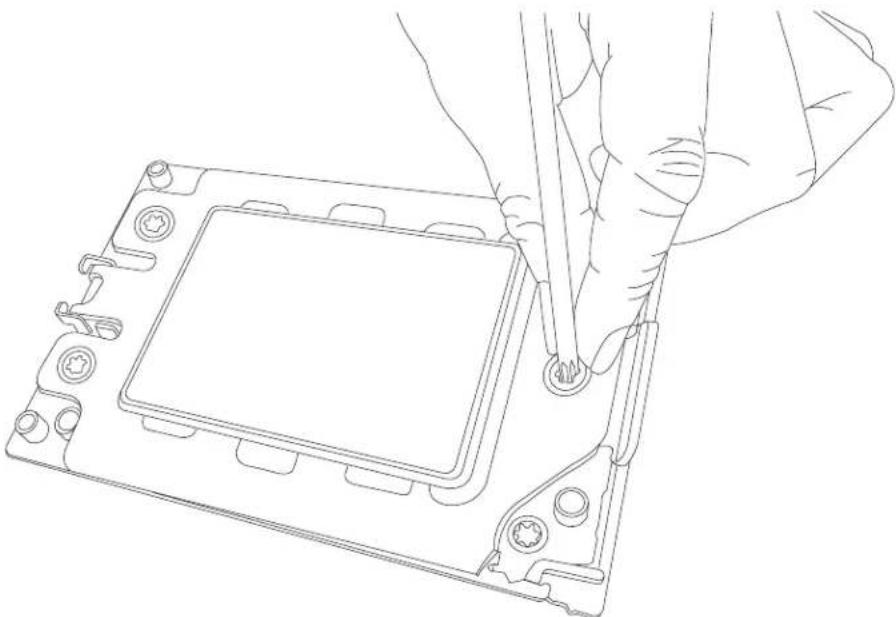
Line drawing of a computer processor with a hand adjusting its top panel (no text or symbols)- Gently lower the Force Frame down onto the Rail Frame and hold it in place until it is seated in the Socket housing. Note that the Force Frame is spring loaded and has to be held in place before it is secured. Important: Use a torque screwdriver, set it at 16.1 kgf-cm (14.0 lbf-in) with a Torx T20 screw head bit, to prevent damage to the CPU.
natural_image
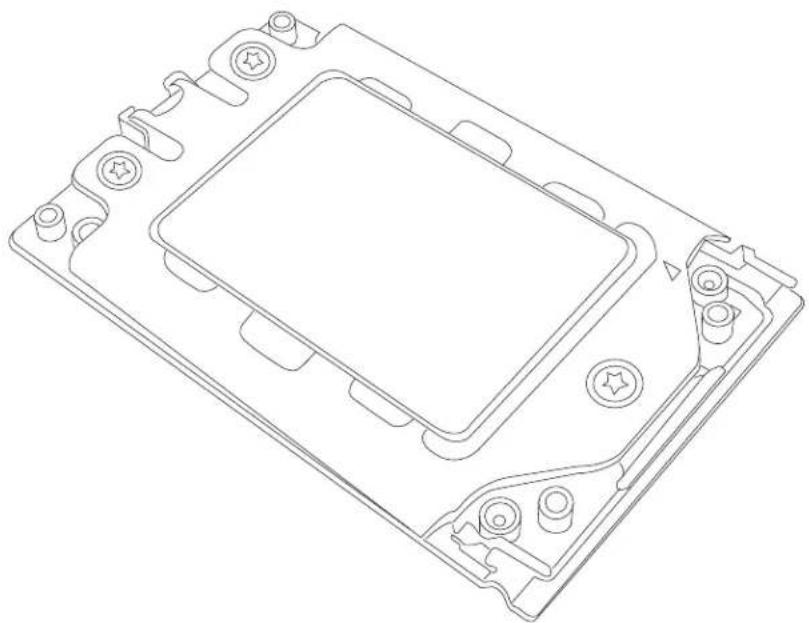
Line drawing of hands installing or adjusting a component on a flat plate (no text or symbols)- Place and re-screw the screws in the reverse order to the way you removed them (holes 1-2-3 in order). When finished, the Force Frame will be secure over both the Rail Frame and CPU Package.
natural_image
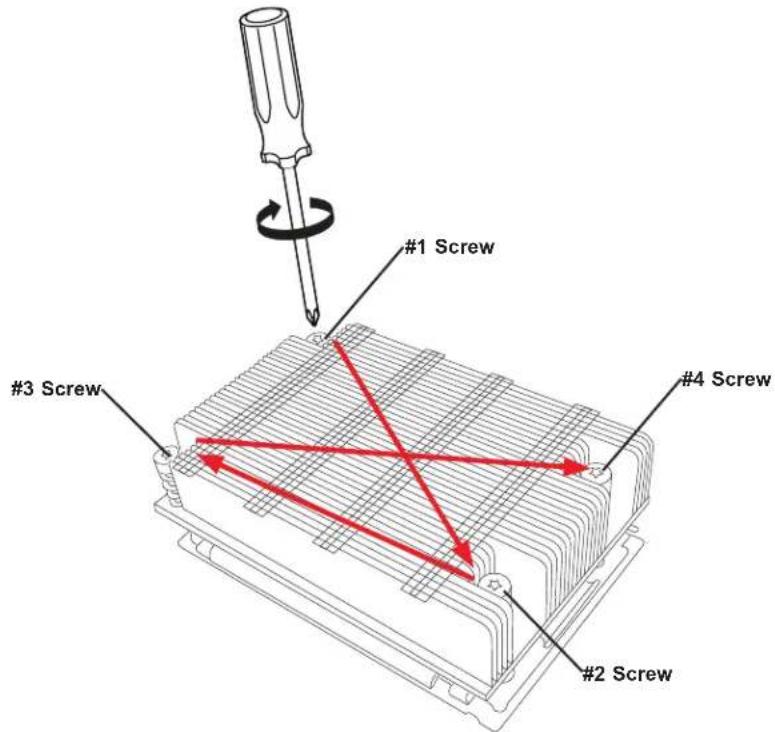
Technical line drawing of a mechanical component with mounting holes and a central square housing (no text or symbols)- After the Force Frame is secured and the CPU package is in place, now you must install the heatsink to the frame. Lower the heatsink down till it rests securely over the four screw holes on CPU Package on the socket frame.

natural_image
Technical line drawing of an electronic component with cooling fins and mounting base (no text or symbols)- Using a diagonal pattern, tighten the four screws down on the heatsink in a clockwise fashion till it is secure. The heatsink will now be secured and you have finished installing the processor and heatsink onto the motherboard. Repeat this procedure for any remaining CPU sockets on the Motherboard.
Un-installing the Processor and Heatsink
- Remove the heatsink attached to the top of the CPU Package by reversing the installation procedure.
- Clean the Thermal grease left by the heatsink on the CPU package lid to limit the risk of it contaminating the CPU package land pads or contacts in the socket housing.
- Reverse the procedure for installing the Force Frame onto the socket, unscrewing the plate in the 3-2-1 screw order and lift the Force Frame to the vertical position.
- Lift the Rail Frame using the lift tabs near the front end of the Rail Frame. Note that the Rail Frame is spring loaded, so be careful lifting it up into a vertical position.
- Grip the handle of the Carrier Frame and pull upwards to extract it from the Rail Frame. Return the Carrier Frame/CPU Package to its original shipping container.
- Grip the handle on the External Cap and return it to the Rail Frame sliding it downwards till it rests in the frame.
- Gripping the Rail Frame, rotate it downwards till it rests above and locks over the socket housing in its horizontal position.
- Push and rotate down the Force Frame till it is over the External Cap and Rail Frame into a horizontal position.
- While holding down the Force Frame, secure it back to the socket frame by securing screw 1 in place. Note that without a CPU Package in place, it is not necessary to tighten down screws 2 and 3 at this time.
2.4 Memory Support and Installation
Note: Check the Supermicro website for recommended memory modules.
Important: Exercise extreme care when installing or removing DIMM modules to prevent any possible damage.
Memory Support
The H12SSL-i/C/CT/NT supports up to 2TB Registered ECC DDR4 3200MHz speed, RDIMM/LRDIMM 3DS/3DS RDIMM memory in eight slots. Refer to the table below for additional memory information.
| Populating RDIMM/RDIMM 3DS/LRDIMM/LRDIMM 3DS DDR4 Memory Modules with AMD EPYC® 7002/700 Processors | ||||
| Type | DIMM Population | Maximum DIMM Capacity (GB) | Maximum Frequency (MHz) | |
| DIMM1 1 Channel 8 Channel | ||||
| RDIMM | 1R 32GB 256GB 32002R or 2DR 64GB 512GB 3200 | |||
| LRDIMM 3DS | 2S2R 128GB 1TB 32002S4R 256GB 2TB 3200 | |||
| 3DS RDIMM | 2S2R 128GB 1TB 32002S4R 256GB 2TB 3200 | |||
| Processors and Their Corresponding Memory Modules | ||||||||
| CPU# Channel | ||||||||
| D1 C1 | B1 A1 E1 | F1 G1 H1 | ||||||
| 1 DIMM (supported but not recommend) | ||||||||
| CPU1 | V | |||||||
| 2 DIMMs (supported but not recommend) | ||||||||
| CPU1 V | V | |||||||
| 4 DIMMs (conditionally recommended if 32 cores or fewer) | ||||||||
| CPU1 | V | V | V | V | ||||
| 8 DIMMs | ||||||||
| CPU1 | V | V | V | V | V | V | V | V |
| 16 DIMMs | ||||||||
| CPU1 | V | V | V | V | V | V | V | V |
Note: Most configurations populating fewer than eight channels are supported, but not recommended.
DIMM Module Population
There is no specific order or sequence required when installing memory modules. However do keep the following in mind:
- It is recommended that DDR4 DIMM modules of the same type, size and speed should be installed.
- Mixed DIMM speeds can be installed. However, all DIMMs will run at the speed of the slowest DIMM.
- The motherboard will support odd-numbered modules (1 or 3 modules installed). However, to achieve the best memory performance, a balanced memory population is recommended.

Figure 2-2. DIMM Numbering
DIMM Installation
- Insert the desired number of DIMMs into the memory slots, there is no specific sequence or order required.
- Push the release tabs outwards on both ends of the DIMM slot to unlock it.
- Align the key of the DIMM module with the receptive point on the memory slot.
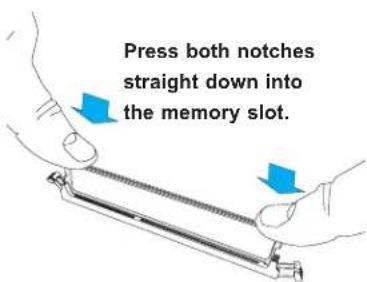
- Align the notches on both ends of the module against the receptive points on the ends of the slot.
- Press the notches on both ends of the module straight down into the slot until the module snaps into place.
- Press the release tabs to the lock positions to secure the DIMM module into the slot.
DIMM Removal
Press both release tabs on the ends of the DIMM module to unlock it. Once the DIMM module is loosened, remove it from the memory slot.


2.5 Rear I/O Ports
See Figure 2-1 below for the locations and descriptions of the various I/O ports on the rear of the motherboard.

Figure 2-1. I/O Port Locations and Definitions
| Rear I/O Ports | |||||
| # | Description | # | Description | # | Description |
| 1 | COM Port | 4 | USB 1 (3.0) | 7 | LAN Port #1 |
| 2 | IPMI LAN Port | 5 | USB 2 (3.0) | 8 | LAN Port #2 |
| 3 | USB 0 (3.0) | 6 | USB 3 (3.0) | 9 | VGA Port |
1. COM Port
There is one serial communications port (COM1) on the rear I/O panel.
2. IPMI LAN Port
One IPMI LAN port is located on the I/O back panel. This port accepts an RJ45 type cable.
3\~6. Universal Serial Bus (USB) Ports
There are four USB 3.0 ports (USB0/1 and USB2/3) on the I/O back panel. These support the type A connector.
7\~8. Gigabit LAN Ports
There are two gigabit LAN ports located on the I/O back panel (LAN1 & LAN2). These ports accept an RJ45 type cable.
9. VGA Port
There is one VGA port on the rear I/O panel.
10. UID Switch and LED Indicator
A Unit Identifier (UID) switch and UID LED are located on the I/O backpanel. The rear UID LED is located next to the UID switch. When you press the UID switch, both rear and front UID LED indicators will turn on. Press the UID switch again to turn off the LED indicators. The UID Indicator provides easy identification of a system that may be in need of service.
Note: UID can also be triggered via IPMI on the serverboard. For more information on IPMI, please refer to the IPMI User's Guide posted on our website at http://www.supermicro.com
2.6 Front Control Panel
JF1 contains header pins for various buttons and indicators that are normally located on a control panel at the front of the chassis. These connectors are designed specifically for use with Supermicro chassis. See the figure below for the location of JF1.


Figure 2-2. JF1 Pin Definitions
2.7 Connectors
Onboard Fan Headers (FAN1\~FAN5, FANA, FANB)
There are seven fan headers on the motherboard. These are 4-pin fan headers; pins 1-3 are backward compatible with traditional 3-pin fans. The onboard fan speeds are controlled by Thermal Management (via Hardware Monitoring) in the BMC. When using Thermal Management setting, please use all 4-pin fans.
| Fan HeaderPin Definitions | |
| Pin# Definition | |
| 1 Ground (Black) | |
| 2 +12V (Red) | |
| 3 Tachometer (Yellow) | |
| 4 PWM Control (Blue) |
Disk-On-Module Power Connector (JSD1 & JSD2)
The Disk-On-Module (DOM) power connector at JSD1 provides 5V power to a solid-state DOM storage device connected to one of the SATA ports. See the table below for pin definitions.
| DOM Power Pin Definitions | |
| Pin# Definition | |
| 1 5V | |
| 2 Ground | |
| 3 Ground | |
I-SATA Ports (I-SATA0\~I-SATA7), H12SSL-i/C/CT Only
The H12SSL-i/C/CT/NT has eight available SATA 3.0 ports (SATA0\~7) on the motherboard. I-SATA0\~I-SATA7 are standard SATA 3.0 ports. SATA0\~7 (JNVME0) and SATA8\~15 (JNVME1) support SATA 3.0 drives, requiring a break-out cable.
| SATA Connectors Pin Definitions | |
| Pin# | Signal |
| 1 | Ground |
| 2 | SATA_TXP |
| 3 | SATA_TXN |
| 4 | Ground |
| 5 | SATA_RXN |
| 6 | SATA_RXP |
| 7 | Ground |
L-SAS Ports (L-SAS0\~L-SAS7), H12SSL-CT & H12SSL-C Only
The motherboard supports eight SAS ports on two onboard connectors, L-SAS0\~L-SAS3 and L-SAS4\~L-SAS7. Connect hard drives to these SAS ports using a MiniSAS to 4 breakout cable, one for each connector that supports up to four drives each.
| SATA/SAS ConnectorsPin Definitions |
| Pin# Signal |
| 1 Ground |
| 2 SATA_TXP |
| 3 SATA_TXN |
| 4 Ground |
| 5 SATA_RXN |
| 6 SATA_RXP |
| 7 Ground |
NVM Express
Connections Two NVM Express ports are located on the serverboard. These ports provide high-speed, low-latency PCIe 4.0 x8 connections directly from the CPU to NVMe Solid State (SSD) drives. This greatly increases SSD data-throughput performance and significantly reduces PCIe latency by simplifying driver/software requirements resulted from direct PCIe interface from the CPU to the NVMe SSD drives.
| Number of Supported Drives on Different Models | ||||
| Types H12SSL-i H12SSL-C H12SSL-CT H12SSL-NT | ||||
| SATA 8 8 8 0 | ||||
| SAS3 0 8 8 0 | ||||
| NVMe 2 0 0 4 | ||||
TPM Header/Port 80 Connector (TPM Port)
The JTPM1 header is used to connect a Trusted Platform Module (TPM), which is available from a third-party vendor. A TPM is a security device that supports encryption and authentication in hard drives. It enables the motherboard to deny access if the TPM associated with the hard drive is not installed in the system.
Please go to the following link for more information on TPM: http://www.supermicro.com/manuals/other/TPM.pdf.
| Trusted Platform Module HeaderPin Definitions | |
| Pin# Definition Pin# Definition | |
| 1 LCLK 2 GND | |
| 3 LFRAME# 4 Key | |
| 5 LRESET# 6 N/C | |
| 7 LAD3 8 LAD2 | |
| 9 3.3V 10 LAD1 | |
| 11 LAD0 12 GND | |
| 13 SMB_CLK (optional) | 14 SMB_DAT (optional) |
| 15 P3V3_STBY | 16 SERIRQ |
| 17 GND | 18 LP_CLKRUN (optional) |
| 19 LPC_PD (optional) | 20 LPC_DRQ (optional) |
PCIe M.2 Connector (M.2-M1/M2)
The PCIe M.2 (M.2-M1/M2) connector is for devices such as memory cards, wireless adapters, etc. These devices must conform to the PCIe M.2 specifications (formerly known as NGFF). This particular PCIe M.2 supports M-Key (PCIe x4) storage card.
USB Ports (USB0\~USB5)
There are a total of six USB ports supported on the motherboard. Four are located on the back panel (USB 0/1 (3.0) and USB 2/3 (3.0)). There are also two ports located on the motherboard header (USB 4/5 (3.0)).
| Front Panel USB 3.0Pin Definitions | |||
| Pin# Definition Pin# Definition | |||
| 1 VBUS 19 Power | |||
| 2 Stda_SSRX- 18 USB3_RN | |||
| 3 Stda_SSRX+ 17 USB3_RP | |||
| 4 GND 16 GNd | |||
| 5 Stda_SSTX- 15 USB3_TN | |||
| 6 Stda_SSTX+ 14 USB3_TP | |||
| 7 GND 13 GND | |||
| 8 D- 12 USB_N | |||
| 9 | D+ | 11 | USB_P |
| 10 | x | ||
Expansion Slots
The motherboard features several expansion slots. The table below describes each slot's type and speed.
| Expansion Slots | |
| Name | Description |
| SLOT1 | PCIe 4.0 x16 |
| SLOT2 | PCIe 4.0 x8 |
| SLOT3 | PCIe 4.0 x16 |
| SLOT4 | PCIe 4.0 x8 |
| SLOT5 | PCIe 4.0 x16 |
| SLOT6 | PCIe 4.0 x16 |
| SLOT7 | PCIe 4.0 x16 |
Onboard Battery (BT1)
The onboard back up battery is located at BT1. The onboard battery provides backup power to the on chip CMOS, which stores the BIOS' setup information. It also provides power to the Real Time Clock (RTC) to keep it running.
NCSI Header (JNCSI1)
The NCSI (Network Controller Sideband Interface) header is located at JNCSI1. This header is an interface used to connect the BMC (Baseboard Management Controller) to a set of Network Interface Controllers to enable out-of-band remote manageability.
Chassis Intrusion (JL1)
A Chassis Intrusion header is located at JL1 on the motherboard. Attach the appropriate cable from the chassis to the header to inform you when the chassis is opened.
| Chassis Intrusion Pin Definitions |
| Pins Definition |
| 1 Ground |
| 2 Intrusion Input |
Overheat LED/Fan Fail (JOH1)
The JOH1 header is used to connect an LED indicator to provide warnings of chassis overheating or fan failure. This LED will blink when a fan failure occurs. Refer to the table on right for pin definitions.
| Overheat / Fan Fail Pin Definitions |
| Pins Definition |
| 1 5vDC |
| 2 OH Active |
| Overheat / Fan FailLED Status | |
| Status Definition | |
| Off Normal | |
| On, Solid Overheat | |
| On, Blinking Fan Failure | |
Standby Power Header (JSTBY1)
The Standby Power header is located at JSTBY1 on the motherboard.
| Standby Power Pin Definition |
| Pins Definition |
| 1 +5V Standby |
| 2 Ground |
| 3 Wake-up |
IPMB System Management Bus Header (JIPMB1)
A System Management Bus header for IPMI 2.0 is located at JIPMB1. Connect the appropriate cable here to use the IPMB I ^2 C connection on your system.
| IPMB HeaderPin Definitions | |
| Pin# Definition | |
| 1 Data | |
| 2 Ground | |
| 3 Clock | |
| 4 No Connection | |
Main Power Supply Connector (JPWR3)
The primary power supply connector (JPWR3) is an ATX power connector that the power supply plugs into directly.
| ATX Power 24-pin ConnectorPin Definitions | |
| Pin# Definition Pin# Definition | |
| 1 +3.3V 13 +3.3V | |
| 2 +3.3V 14 -12V | |
| 3 Ground 15 Ground | |
| 4 +5V 16 PS_ON | |
| 5 Ground 17 Ground | |
| 6 +5V 18 Ground | |
| 7 Ground 19 Ground | |
| 8 PWR_OK 20 Res (NC) | |
| 9 5VSB 21 +5V | |
| 10 +12V 22 +5V | |
| 11 +12V | 23 +5V |
| 12 +3.3V 24 Ground | |
12V 8-pin Auxiliary Power Connector (JPWR1)
JPWR1 is an 8-pin ATX power input to provide core power to the processor. Refer to the table below for pin definitions.
| 12V 8-pin Power ConnectorPin Definitions | |
| Pins Definition | |
| 1 through 4 Ground | |
| 5 through 8 +12V | |
12V 8-pin Auxiliary Power Connector (JPWR2)
JPWR2 is an 8-pin ATX power input to provide core power to the processor. Refer to the table below for pin definitions.
| 12V 8-pin Power ConnectorPin Definitions | |
| Pins | Definition |
| 1 through 4 Ground | |
| 5 through 8 +12V | |
Speaker (JD1)
If you wish to use an external speaker, attach an external speaker to pins 6\~7. See the table below for pin definitions.
| Speaker ConnectorPin Definitions | |
| Pin Setting | Definition |
| Pins 1~2 | Power LED |
| Pins 6~7 | External Speaker |
Power SMB Header (JPI2C1)
Power System Management Bus (I2C) header monitors power supply, fan and system temperatures. See the table below for pin definitions.
| Power SMB HeaderPin Definitions |
| Pin# Definition |
| 1 Clock |
| 2 Data |
| 3 PWR Fail |
| 4 Ground |
| 5 +3.3V |
2.8 Jumper Settings
How Jumpers Work
To modify the operation of the motherboard, jumpers can be used to choose between optional settings. Jumpers create shorts between two pins to change the function of the connector. Pin #1 is identified with a thicker border line on the printed circuit board. See the diagram below for an example of jumping pins 1 and 2. Refer to the motherboard layout page for jumper locations.
Note: On two-pin jumpers, "Closed" means the jumper is on and "Open" means the jumper is off the pins.

Clear CMOS (JBT1)
JBT1 is used to clear CMOS, which will also clear any passwords. Instead of pins, this jumper consists of contact pads to prevent accidentally clearing the contents of CMOS.
To Clear CMOS
- First power down the system and unplug the power cord(s).
- Remove the cover of the chassis to access the motherboard.
- Remove the onboard battery from the motherboard.
- Short the CMOS pads with a metal object such as a small screwdriver for at least four seconds.
- Remove the screwdriver (or shorting device).
- Replace the cover, reconnect the power cord(s), and power on the system.
Note: Clearing CMOS will also clear all passwords.
Do not use the PW_ON connector to clear CMOS.

JBT1 contact pads
VGA Enable/Disable (JPG1)
JPG1 allows you to enable or disable the VGA port. The default position is on pins 1 and 2 to enable VGA. See the table below for jumper settings.
| VGA Enable/DisableJumper Settings (JPG1) |
| Jumper Setting Definition |
| Pins 1-2 Enabled (default) |
| Pins 2-3 Disabled |
Watch Dog (JWD1)
JWD1 controls the Watch Dog function. Watch Dog is a monitor that can reboot the system when a software application hangs. Jumping pins 1-2 will cause Watch Dog to reset the system if an application hangs. Jumping pins 2-3 will generate a non-maskable interrupt signal for the application that hangs. Watch Dog must also be enabled in BIOS. The default setting is Reset.
Note: When Watch Dog is enabled, the user needs to write their own application software to disable it.
| Watch DogJumper Settings | |
| Jumper Setting Definition | |
| Pins 1-2 Reset (Default) | |
| Pins 2-3 NMI | |
| Open Disabled | |
SAS Enable/Disable (JPS1)
Jumper JPS1 will enable or disable the SAS ports on the motherboard. See the table below for jumper settings. The default setting is enabled.
| SAS EnableJumper Settings | |
| Pin# | Definition |
| 1-2 | Enabled (default) |
| 2-3 | Disabled |
2.9 LED Indicators
LAN Port LEDs
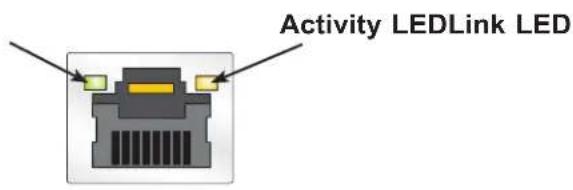
The motherboard's Ethernet ports has two LED indicators. The Activity LED is yellow and indicates connection and activity. The Link LED may be green, amber, or off to indicate the speed of the connection. Refer to the tables below for more information.
H12SSL-CT/-NT
| Link LEDConnection Link Speed Indicator | |
| LED Color Definition | |
| Orange 1 Gb/s | |
| Green 10 Gb/s |
| Activity LED | |
| Color State Definition | |
| None No Connection | |
| None Off Link | |
| Green Flashing Active | |
H12SSL-C/-i
| Link LEDConnection Link Speed Indicator | |
| LED Color Definition | |
| Off 10 Mb/s | |
| Green 100 Mb/s | |
| Orange 1 Gb/s | |
| Activity LED | |
| Color State Definition | |
| None No Connection | |
| None Off Link | |
| Green Flashing Active | |
UID Switch and LED Indicator (UID LED & UID-SW)
The rear UID LED is located next to the UID switch. The front UID LED is located on the front panel. When you press the UID switch, both rear and front UID LED indicators will turn on. Press the UID switch again to turn off the LED indicators. Use this UID Indicator to 'mark' the system, so the system can be easily identified whether on the front or back (e.g., a system rack with multiple units installed).
| UID LEDLED Indicator | ||
| Color State Definition | ||
| Blue Solid On | Unit Identified | |
| None Off | UID Off | |
BMC Hearbeat LED (LEDM1)
A BMC Heartbeat LED is located at LEDM1 on the motherboard. When LEDM1 is blinking, the BMC is functioning normally. See the table below for more information.
| BMC HeartbeatLED State | ||
| Color State Definition | ||
| Green Solid | On BMC is not ready | |
| Green Blinking | BMC Normal | |
| Green Fast Blinking | BMC: Initializing | |
Onboard Power OK LED (LE1)
LE1 is an onboard power OK LED. When this LED is lit, it means the system is turned on, and all the system power rails are ready. When the system is turned off, or any one of the system power rails fails, this LED will turn off. Turn off the system, and unplug the power cord before removing or installing any component(s).
| Onboard PowerLED Indicator | |
| LED Color Definition | |
| Off System Off | (power cable not connected) |
| Green System | On, Power OK |
Chapter 3
Troubleshooting
3.1 Troubleshooting Procedures
Use the following procedures to troubleshoot your system. If you have followed all of the procedures below and still need assistance, refer to the 'Technical Support Procedures' and/or 'Returning Merchandise for Service' section(s) in this chapter. Always disconnect the AC power cord before adding, changing or installing any non hot-swap hardware components.
Before Power On
- Check that the Power OK LED on the motherboard is on.
- Make sure that the power connector is connected to your power supply.
- Make sure that no short circuits exist between the motherboard and chassis.
- Disconnect all cables from the motherboard, including those for the keyboard and mouse.
- Remove all add-on cards.
- Install a CPU, a heatsink*, and at least one DIMM on the motherboard. Check all jumper settings properly. *Make sure that the heatsink is fully seated.
- Use the correct type of onboard CMOS battery (CR2032) as recommended by the manufacturer. To avoid possible explosion, do not install the CMOS battery upside down.
No Power
- Make sure that no short circuits exist between the motherboard and the chassis.
- Verify that all jumpers are set to their default positions.
- Turn the power switch on and off to test the system.
- The battery on your motherboard may be old. Check to verify that it still supplies \~3VDC. If it does not, replace it with a new one.
No Video
- Check that the VGA cable is connected properly, and the monitor is on.
- Set JPG1 to [1-2] and check if you follow the guidelines to install the memory module (see DIMM Module Population in chapter 2).
- Reseat the memory DIMM module.
Note: If you are a system integrator, VAR or OEM, a POST diagnostics card is recommended.
System Boot Failure
If the system does not display POST (Power-On-Self-Test) or does not respond after the power is turned on, check the following:
- Clear the CMOS settings by unplugging the power cord and contacting both pads on the CMOS Clear Jumper (JBT1). See Section 2.8 for details.
- Remove all components from the motherboard, especially the DIMM modules.
- Turn on the system with only one DIMM module installed. If the system boots, check for bad DIMM modules or slots by following the Memory Errors Troubleshooting procedure in this chapter.
Memory Errors
- Make sure that the DIMM modules are properly and fully installed.
- Confirm that you are using the correct memory. Also, it is recommended that you use the same memory type and speed for all DIMMs in the system. See Section 2.4 for memory details.
- Check for bad DIMM modules or slots by swapping modules between slots and noting the results.
When the System Loses its Setup Configuration
- Make sure that you are using a qualified power supply. An unqualified power supply may cause the system to lose the CMOS setup information. Refer to Section 1.6 for details on recommended power supplies.
- The battery on your motherboard may be old. Check to verify that it still supplies \~3VDC. If it does not, replace it with a new one.
- If the above steps do not fix the setup configuration problem, contact your vendor for repairs.
When the System Becomes Unstable
A. If the system becomes unstable during or after OS installation, check the following:
- CPU/BIOS support: Make sure that your CPU is supported and that you have the latest BIOS installed in your system.
- Memory support: Make sure that the memory modules are supported by testing the modules using memtest86 or a similar utility.
Note: Refer to the product page on our website at http://www.supermicro.com for memory and CPU support and updates.
- HDD/SSD support: Make sure that all disk drives work properly. Replace bad HDDs/SSDs with good ones.
- System cooling: Check the system cooling to make sure that all heatsink fans and CPU/system fans, etc., work properly. Check the hardware monitoring settings in the IPMI to make sure that the CPU and system temperatures are within the normal range. Also check the front panel Overheat LED and make sure that it is not on.
- Adequate power supply: Make sure that the power supply provides adequate power to the system. Make sure that all power connectors are connected. Please refer to our website for more information on the minimum power requirements.
- Proper software support: Make sure that the correct drivers are used.
B. If the system becomes unstable before or during OS installation, check the following:
- Source of installation: Make sure that the devices used for installation are working properly, including boot devices such as CD/DVD and CD/DVD-ROM.
- Cable connection: Check to make sure that all cables are connected and working properly.
- Using the minimum configuration for troubleshooting: Remove all unnecessary components (starting with add-on cards first), and use the minimum configuration (but with a CPU and a memory module installed) to identify the trouble areas. Refer to the steps listed in Section A above for proper troubleshooting procedures.
- Identifying bad components by isolating them: If necessary, remove a component in question from the chassis, and test it in isolation to make sure that it works properly. Replace a bad component with a good one.
- Check and change one component at a time instead of changing several items at the same time. This will help isolate and identify the problem.
- To find out if a component is good, swap this component with a new one to see if the system will work properly. If so, then the old component is bad. You can also install the
component in question in another system. If the new system works, the component is good and the old system has problems.
3.2 Technical Support Procedures
Before contacting Technical Support, please take the following steps. Also, note that as a motherboard manufacturer, we do not sell directly to end-users, so it is best to first check with your distributor or reseller for troubleshooting services. They should know of any possible problem(s) with the specific system configuration that was sold to you.
- Please review the 'Troubleshooting Procedures' and 'Frequently Asked Questions' (FAQs) sections in this chapter or see the FAQs on our website before contacting Technical Support.
- BIOS upgrades can be downloaded from our website.
Note: Not all BIOS can be flashed depending on the modifications to the boot block code.
-
If you still cannot resolve the problem, include the following information when contacting us for technical support:
-
Motherboard model and PCB revision number
- System configuration
- BIOS release date/version (this can be seen on the initial display when your system first boots up)
An example of a Technical Support form is posted on our website.
Distributors: For immediate assistance, please have your account number ready when contacting our technical support department by e-mail.
3.3 Frequently Asked Questions
Question: What type of memory does my motherboard support?
Answer: The H12SSL-i/C/CT/NT supports up to 2TB Registered ECC DDR4-3200 SDRAM in eight DIMM slots. See Section 2.4 for details on installing memory.
Question: How do I update my BIOS?
Answer: It is recommended that you do not upgrade your BIOS if you are not experiencing any problems with your system. Updated BIOS files are located on our website at http://www.supermicro.com. Please check our BIOS warning message and the information on how to update your BIOS on our website. Select your motherboard model and download the BIOS file to your computer. Also, check the current BIOS revision to make sure that it is newer
than your BIOS before downloading. You can choose from the zip file and the .exe file. If you choose the zip BIOS file, please unzip the BIOS file onto a bootable USB device. Run the batch file using the format FLASH.BAT filename.rom from your bootable USB device to flash the BIOS. Then, your system will automatically reboot.
Question: Why can't I turn off the power using the momentary power on/off switch?
Answer: The instant power off function is controlled in BIOS by the Power Button Mode setting. When the On/Off feature is enabled, the motherboard will have instant off capabilities as long as the BIOS has control of the system. When the Standby or Suspend feature is enabled or when the BIOS is not in control such as during memory count (the first screen that appears when the system is turned on), the momentary on/off switch must be held for more than four seconds to shutdown the system. This feature is required to implement the ACPI features on the motherboard.
Question: For the AMD EPYC platform, we found that the Windows Server 2012/2016 OS would not install properly. It however works fine with Linux OS, any suggestions?
Answer: This issue is due to Windows server OS' compatibility with the virtualization function, we suggest to disable IOMMU (Input/Output Memory Management Unit) before installing the Windows Server OS. After installing the OS and hot fix update is finished, then you could enable the IOMMU in BIOS.
BIOS >> Advanced >> NB Configuration >> IOMMU >> Change from Auto to Disabled.
Microsoft KB: 4022723
Enabled machines with AMD I/O Virtualization Technology (IOMMU) to boot without BIOS restriction.
![Aptio Setup utility - Copyright (C) 2017 American Megatrends, Inc. Advanced North Bridge Configuration Determinism Slider [Auto] CTDF Control [Auto] IDMU [Auto] ► Memory Configuration ► CPU Memory Information ► CPU2 Memory Information IOHMU Disabled Enabled Auto Enable/Disable IOHMU +: Select Screen F1: Select Item Enter: Select +/-: Change Opt. F1: General Help F2: Previous Values F3: Optimized Defaults F4: Save & Exit ESD: Exit Version 2.18.1264, Copyright (C) 2017 American Megatrends, Inc.](/content/2026/05/910950/images/a966e5ff98c8693bc1601405684e5c47478a1f2885571c7ab0cdad9687bb0d76.jpg)
https://support.microsoft.com/en-us/help/4022723/windows-10-update-kb4022723
Question: When I ran the setup.exe to install the AMD SP3 I/O driver on Windows, the following message showed up:
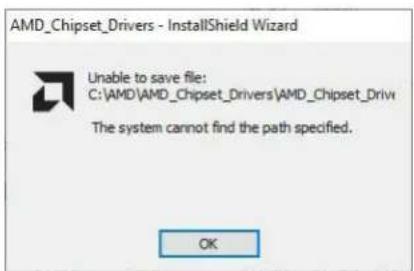
Answer: It happens in some environments. To solve this problem, click OK and save the installation package to the location you specify. The driver is then installed automatically.
3.4 Returning Merchandise for Service
A receipt or copy of your invoice marked with the date of purchase is required before any warranty service will be rendered. You can obtain service by calling your vendor for a Returned Merchandise Authorization (RMA) number. When returning to the manufacturer, the RMA number should be prominently displayed on the outside of the shipping carton and mailed prepaid or hand-carried. Shipping and handling charges will be applied for all orders that must be mailed when service is complete.
For faster service, RMA authorizations may be requested online (http://www.supermicro.com/support/rma/).
This warranty only covers normal consumer use and does not cover damages incurred in shipping or from failure due to the alteration, misuse, abuse or improper maintenance of products.
During the warranty period, contact your distributor first for any product problems.
3.5 Battery Removal and Installation
Battery Removal
To remove the onboard battery, follow the steps below:
- Power off your system and unplug your power cable.
- Locate the onboard battery as shown below.
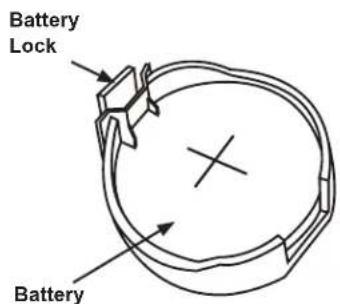
- Using a tool such as a pen or a small screwdriver, push the battery lock outwards to unlock it. Once unlocked, the battery will pop out from the holder.
- Remove the battery.
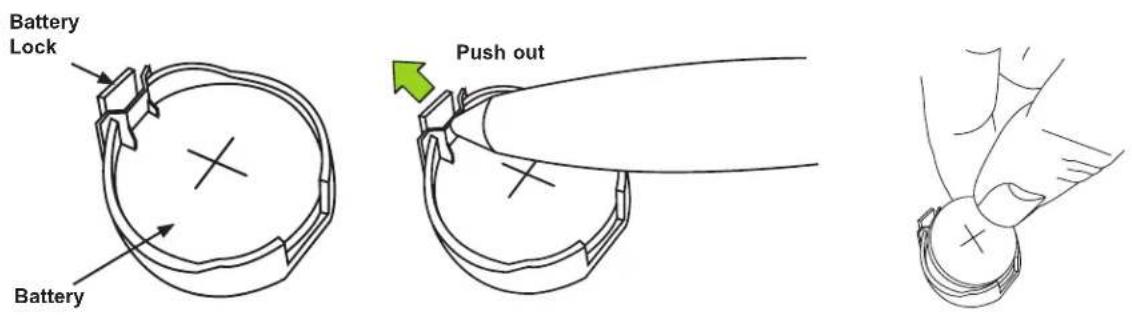
Figure 3-1. Removing the Onboard Battery
Proper Battery Disposal
Please handle used batteries carefully. Do not damage the battery in any way; a damaged battery may release hazardous materials into the environment. Do not discard a used battery in the garbage or a public landfill. Please comply with the regulations set up by your local hazardous waste management agency to dispose of your used battery properly.
Battery Installation
- To install an onboard battery, follow the steps 1&2 above and continue below:
- Identify the battery's polarity. The positive (+) side should be facing up.
- Insert the battery into the battery holder and push it down until you hear a click to ensure that the battery is securely locked.
Important: When replacing a battery, be sure to only replace it with the same type.



Chapter 4
UEFI BIOS
4.1 Introduction
This chapter describes the AMIBIOS™ Setup utility for H12SSL-i/C/CT/NT motherboards that are equipped with the EPYC 7002 Series Processor. The BIOS is stored on a chip and can be easily upgraded using a flash program.
Note: Due to periodic changes to the BIOS, some settings may have been added or deleted and might not yet be recorded in this manual. Please refer to the Manual Download area of our website for any changes to BIOS that may not be reflected in this manual.
Starting the Setup Utility
To enter the BIOS Setup Utility, hit the
The Main BIOS screen has two main frames. The left frame displays all the options that can be configured. "Grayed-out" options cannot be configured. The right frame displays the key legend. Above the key legend is an area reserved for a text message. When an option is selected in the left frame, it is highlighted in white. Often a text message will accompany it. (Note that BIOS has default text messages built in. We retain the option to include, omit, or change any of these text messages.) Settings printed in Bold are the default values.
A "▶" indicates a submenu. Highlighting such an item and pressing the
The BIOS setup utility uses a key-based navigation system called hot keys. Most of these hot keys (
4.2 Main Setup
When you first enter the AMI BIOS setup utility, you will enter the Main setup screen. You can always return to the Main setup screen by selecting the Main tab on the top of the screen. The Main BIOS setup screen is shown below. The following Main menu items will be displayed:
| System Date [Wed 07/22/2020] System Time [11:52:49] Supermicro H12SSL-NT BIOS Version 1.0 Build Date 07/22/2020 CPLD Version F0.A6.40 Memory Information Total Memory 8 GB | Set the Date. Use Tab to switch between Date elements. Default Ranges: Year: 2005-2099 Months: 1-12 Days: dependent on month |
| ++: Select Screen ↑↓: Select Item Enter: Select +/-: Change Opt. F1: General Help F2: Previous Values F3: Optimized Defaults F4: Save & Exit ESC: Exit | |
| Version 2.20.1275. Copyright (C) 2020 American Megatrends, Inc. | |
System Date/System Time
Use this option to change the system date and time. Highlight System Date or System Time using the arrow keys. Enter new values using the keyboard. Press the
Note: The time is in the 24-hour format. For example, 5:30 P.M. appears as 17:30:00. The date's default value is 01/01/2015 after RTC reset.
Supermicro H12SSL-i/C/CT/NT
BIOS Version
This item displays the version of the BIOS ROM used in the system.
Build Date
This item displays the date when the version of the BIOS ROM used in the system was built.
CPLD Version
This item displays the CPLD version of the BIOS ROM used in the system.
Memory Information
Total Memory
This feature displays the total system memory detected.
4.3 Advanced
Use the arrow keys to select a top item and press
| Aptio Setup Utility - Copyright (C) 2020 American Megatrends, Inc. | |
| Main Advanced IPMI Event Logs Security Boot Save & Exit | |
| Boot Feature Trusted Computing PSP Firmware Versions ACPI Settings Super IO Configuration Serial Port Console Redirection CPU Configuration NB Configuration PCIe/PCI/PnP Configuration USB Configuration SATA Configuration KMIP Server Configuration HTTP BOOT Configuration Network Configuration iSCSI Configuration TLS Authenticate Configuration | Boot Feature Configuration Page |
| +: Select Screen ↑↓: Select Item Enter: Select +/-: Change Opt. F1: General Help F2: Previous Values F3: Optimized Defaults F4: Save & Exit ESC: Exit | |
| Version 2.20.1275. Copyright (C) 2020 American Megatrends, Inc. | |
Warning: Take caution when changing the Advanced settings. An incorrect value, a very high DRAM frequency, or an incorrect DRAM timing setting may make the system unstable. When this occurs, revert to the default to the manufacture default settings.
▶Boot Feature
Quiet Boot
Use this feature to select the screen display between the POST messages and the OEM logo upon bootup. Select Disabled to display the POST messages. Select Enabled to display the OEM logo instead of the normal POST messages. The options are Disabled and Enabled.
Option ROM Messages
Use this feature to set the display mode for the Option ROM. Select Keep Current to display the current AddOn ROM setting. Select Force BIOS to use the Option ROM display set by the system BIOS. The options are Force BIOS and Keep Current.
Bootup NumLock State
Use this feature to set the Power on state for the
Wait For "F1" If Error
Use this feature to force the system to wait until the 'F1' key is pressed if an error occurs. The options are Disabled and Enabled.
INT19 (Interrupt 19) Trap Response
Interrupt 19 is the software interrupt that handles the boot disk function. When this item is set to Immediate, the ROM BIOS of the host adaptors will "capture" Interrupt 19 at bootup immediately and allow the drives that are attached to these host adaptors to function as bootable disks. If this item is set to Postponed, the ROM BIOS of the host adaptors will not capture Interrupt 19 immediately and allow the drives attached to these adaptors to function as bootable devices at bootup. The options are Immediate and Postponed.
Re-try Boot
If this item is enabled, the BIOS will automatically reboot the system from a specified boot device after its initial boot failure. The options are Disabled, Legacy Boot, and EFI Boot.
Power Configuration
Watch Dog Function
If enabled, the Watch Dog Timer will allow the system to reset or generate NMI based on jumper settings when it is expired for more than 5 minutes. The options are Disabled and Enabled.
Restore on AC Power Loss
Use this feature to set the power state after a power outage. Select Stay-Off for the system power to remain off after a power loss. Select Power-On for the system power to be turned on after a power loss. Select Last State to allow the system to resume its last power state before a power loss. The options are Stay Off, Power On, and Last State.
Power Button Function
This feature controls how the system shuts down when the power button is pressed. Select 4 Seconds Override for the user to power off the system after pressing and holding the power button for 4 seconds or longer. Select Instant Off to instantly power off the system as soon as the user presses the power button. The options are Instant Off and 4 Seconds Override.
▶Trusted Computing
Security Device Support
If this feature and the TPM jumper on the motherboard are both set to Enabled, onboard security devices will be enabled for TPM (Trusted Platform Module) support to enhance data integrity and network security. Please reboot the system for a change on this setting to take effect. The options are Disabled and Enabled.
▶PSP Firmware Versions
This section displays the Platform Security Processor (PSP) firmware versions.
PSP Directory Level 1 (Fixed)
• PSP Recovery BL Ver
- SMU FW Version
- ABL Version
PSP Directory Level 2 (Updateable)
• PSP Bootloader Version
- SMU FW Version
- ABL Version
▶ACPI Settings
PCI AER Support
The options are Disabled and Enabled.
High Precision Event Timer
The High Precision Event Timer (HPET) can produce periodic interrupts and is used to synchronize multimedia streams, providing smooth playback and reducing the need to use other timestamp calculations. The options are Disabled and Enabled.
NUMA Nodes Per Socket
This feature specifies the number of desired Non-Uniform Memory Access (NUMA) nodes per socket. Setting this to zero will attempt to interleave the two sockets together. The options are NPS0, NPS1, NPS2, NPS4 and Auto.
ACPI SRAT L3 Cache As NUMA Domain
Use this setting to enable/disable ACPI SRAT L3 Cache As NUMA Domain. The options are Disabled, Enabled, and Auto.
▶Super IO Configuration
The following Super IO information will display:
• Super IO Chip AST2500
▶ Serial Port 1 Configuration
Serial Port
Select Enabled to enable the selected onboard serial port. The options are Disabled and Enabled.
Device Settings
This item displays the status of a serial part specified by the user.
Change Settings
This feature specifies the base I/O port address and the Interrupt Request address of a serial port specified by the user. Select Auto to allow the BIOS to automatically assign the base I/O and IRQ address. The options are Auto, (IO=3F8h; IRQ=4); (IO=3F8h; IRQ=3, 4, 5, 6, 7, 9, 10, 11, 12); (IO=2F8h; IRQ=3, 4, 5, 6, 7, 9, 10, 11, 12); (IO=3E8h; IRQ=3, 4, 5, 6, 7, 9, 10, 11, 12); and (IO=2E8h; IRQ=3, 4, 5, 6, 7, 9, 10, 11, 12).
▶SOL Configuration
Serial Port
Select Enabled to enable the selected onboard serial port. The options are Disabled and Enabled.
Change Settings
This feature specifies the base I/O port address and the Interrupt Request address of a serial port specified by the user. Select Auto to allow the BIOS to automatically assign the base I/O and IRQ address. The options are Auto, (IO=2F8h; IRQ=3); (IO=3F8h; IRQ=3, 4, 5, 6, 7, 9, 10, 11, 12); (IO=2F8h; IRQ=3, 4, 5, 6, 7, 9, 10, 11, 12); (IO=3E8h; IRQ=3, 4, 5, 6, 7, 9, 10, 11, 12); and (IO=2E8h; IRQ=3, 4, 5, 6, 7, 9, 10, 11, 12).
▶Serial Port Console Redirection
COM1
Console Redirection
Select Enabled to enable console redirection support for a serial port specified by the user. The options are Disabled and Enabled.
*If the item above set to Enabled, the following items will become available for user's configuration:
▶Console Redirection Settings
Terminal Type
This feature allows the user to select the target terminal emulation type for Console Redirection. Select VT100 to use the ASCII Character set. Select VT100+ to add color and function key support. Select ANSI to use the Extended ASCII Character Set. Select VT-UTF8 to use UTF8 encoding to map Unicode characters into one or more bytes. The options are VT100, VT100+, VT-UTF8, and ANSI.
Bits per second
Use this feature to set the transmission speed for a serial port used in Console Redirection. Make sure that the same speed is used in the host computer and the client computer. A lower transmission speed may be required for long and busy lines. The options are 9600, 19200, 38400, 57600 and 115200 (bits per second).
Data Bits
Use this feature to set the data transmission size for Console Redirection. The options are 7 and 8.
Parity
A parity bit can be sent along with regular data bits to detect data transmission errors. Select Even if the parity bit is set to 0, and the number of 1's in data bits is even. Select Odd if the parity bit is set to 0, and the number of 1's in data bits is odd. Select None if you do not want to send a parity bit with your data bits in transmission. Select Mark to add a mark as a parity bit to be sent along with the data bits. Select Space to add a Space as a parity bit to be sent with your data bits. The options are None, Even, Odd, Mark, and Space.
Stop Bits
A stop bit indicates the end of a serial data packet. Select 1 Stop Bit for standard serial data communication. Select 2 Stop Bits if slower devices are used. The options are 1 and 2.
Flow Control
Use this feature to set the flow control for Console Redirection to prevent data loss caused by buffer overflow. Send a "Stop" signal to stop sending data when the receiving buffer is full. Send a "Start" signal to start sending data when the receiving buffer is empty. The options are None and Hardware RTS/CTS.
VT-UTF8 Combo Key Support
Select Enabled to enable VT-UTF8 Combination Key support for ANSI/VT100 terminals. The options are Disabled and Enabled.
Recorder Mode
Select Enabled to capture the data displayed on a terminal and send it as text messages to a remote server. The options are Disabled and Enabled.
Resolution 100x31
Select Enabled for extended-terminal resolution support. The options are Disabled and Enabled.
Legacy OS Console Redirection
Use this feature to select the number of rows and columns used in Console Redirection for legacy OS support. The options are 80x24 and 80x25.
Putty KeyPad
This feature selects the settings for Function Keys and KeyPad used for Putty, which is a terminal emulator designed for the Windows OS. The options are VT100, LINUX, XTERMR6, SC0, ESCN, and VT400.
Redirection After BIOS POST
Use this feature to enable or disable legacy console redirection after BIOS POST. When set to Bootloader, legacy console redirection is disabled before booting the OS. When set to Always Enable, legacy console redirection remains enabled when booting the OS. The options are Always Enable and BootLoader.
SOL
Console Redirection
Select Enabled to enable SOL console redirection support for a serial port specified by the user. The options are Disabled and Enabled.
*If the item above set to Enabled, the following items will become available for user's configuration:
▶Console Redirection Settings
Terminal Type
This feature allows the user to select the target terminal emulation type for Console Redirection. Select VT100 to use the ASCII Character set. Select VT100+ to add color and function key support. Select ANSI to use the Extended ASCII Character Set. Select VT-UTF8 to use UTF8 encoding to map Unicode characters into one or more bytes. The options are VT100, VT100+, VT-UTF8, and ANSI.
Bits per second
Use this feature to set the transmission speed for a serial port used in Console Redirection. Make sure that the same speed is used in the host computer and the client computer. A lower transmission speed may be required for long and busy lines. The options are 9600, 19200, 38400, 57600 and 115200 (bits per second).
Data Bits
Use this feature to set the data transmission size for Console Redirection. The options are 7 and 8.
Parity
A parity bit can be sent along with regular data bits to detect data transmission errors. Select Even if the parity bit is set to 0, and the number of 1's in data bits is even. Select Odd if the parity bit is set to 0, and the number of 1's in data bits is odd. Select None if you do not want to send a parity bit with your data bits in transmission. Select Mark to add a mark as a parity bit to be sent along with the data bits. Select Space to add a Space as a parity bit to be sent with your data bits. The options are None, Even, Odd, Mark, and Space.
Stop Bits
A stop bit indicates the end of a serial data packet. Select 1 Stop Bit for standard serial data communication. Select 2 Stop Bits if slower devices are used. The options are 1 and 2.
Flow Control
Use this feature to set the flow control for Console Redirection to prevent data loss caused by buffer overflow. Send a "Stop" signal to stop sending data when the receiving buffer is full. Send a "Start" signal to start sending data when the receiving buffer is empty. The options are None and Hardware RTS/CTS.
VT-UTF8 Combo Key Support
Select Enabled to enable VT-UTF8 Combination Key support for ANSI/VT100 terminals. The options are Disabled and Enabled.
Recorder Mode
Select Enabled to capture the data displayed on a terminal and send it as text messages to a remote server. The options are Disabled and Enabled.
Resolution 100x31
Select Enabled for extended-terminal resolution support. The options are Disabled and Enabled.
Legacy Console Redirection
Use this feature to select the number of rows and columns used in Console Redirection for legacy OS support. The options are 80x24 and 80x25.
Putty KeyPad
This feature selects the settings for Function Keys and KeyPad used for Putty, which is a terminal emulator designed for the Windows OS. The options are VT100, LINUX, XTERMR6, SC0, ESCN, and VT400.
Redirection After BIOS POST
Use this feature to enable or disable legacy Console Redirection after BIOS POST. When set to Bootloader, legacy Console Redirection is disabled before booting the OS. When set to Always Enable, legacy Console Redirection remains enabled when booting the OS. The options are Always Enable and BootLoader.
Legacy Console Redirection
Legacy Serial Redirection Port
For this setting, select a COM port to display redirection of Legacy OS and Legacy OPROM messages. The options include COM1 and SOL.
Serial Port for Out-of-Band Management / Windows Emergency Management Services (EMS)
Console Redirection
Select Enabled to enable EMS console redirection support for a serial port specified by the user. The options are Disabled and Enabled.
*If the item above set to Enabled, the following items will become available for user's configuration:
▶Console Redirection Settings
Out-of-Band Mgmt Port
The feature selects a serial port in a client server to be used by the Microsoft Windows Emergency Management Services (EMS) to communicate with a remote host server. The options are COM1 and SOL.
Terminal Type
Use this feature to select the target terminal emulation type for Console Redirection. Select VT100 to use the ASCII character set. Select VT100+ to add color and function key support. Select ANSI to use the extended ASCII character set. Select VT-UTF8 to use UTF8 encoding to map Unicode characters into one or more bytes. The options are VT100, VT100+, VT-UTF8, and ANSI.
Bits per second
This item sets the transmission speed for a serial port used in Console Redirection. Make sure that the same speed is used in the host computer and the client computer. A lower transmission speed may be required for long and busy lines. The options are 9600, 19200, 57600, and 115200 (bits per second).
Flow Control
Use this item to set the flow control for Console Redirection to prevent data loss caused by buffer overflow. Send a "Stop" signal to stop sending data when the receiving buffer is full. Send a "Start" signal to start sending data when the receiving buffer is empty. The options are None, Hardware RTS/CTS, and Software Xon/Xoff.
Data Bits
Use this feature to set the data transmission size for Console Redirection. The options are 7 Bits and 8 Bits.
Parity
A parity bit can be sent along with regular data bits to detect data transmission errors. Select Even if the parity bit is set to 0, and the number of 1's in data bits is even. Select Odd if the parity bit is set to 0, and the number of 1's in data bits is odd. Select None if you do not want to send a parity bit with your data bits in transmission. Select Mark to add a mark as a parity bit to be sent along with the data bits. Select Space to add a Space as a parity bit to be sent with your data bits. The options are None, Even, Odd, Mark and Space.
Stop Bits
A stop bit indicates the end of a serial data packet. Select 1 Stop Bit for standard serial data communication. Select 2 Stop Bits if slower devices are used. The options are 1 and 2.
▶CPU Configuration
SMT Control
Use this setting to specify Simultaneous Multithreading. The options are Disabled and Auto.
Core Performance Boost
This setting is used to configure for Core Performance Boost. Options include Disabled and Auto.
Global C-state Control
This setting is used to configure for Global C-state Control. Options include Disabled, Enabled, and Auto.
Local APIC Mode
This setting is used for Local APIC Mode. The options include xAPIC, x2APIC, and Auto.
CCD Control
This setting sets the number of CCDs to be used. The options include Auto, 2 CCDs, 3 CCDs, 4 CCDs, and 6 CCDs.
Core Control
This sets the number of cores to be used by your system. Once this option has been used to remove any cores, a power cycle is required in order for the future selections to take effect. Options include Auto, TWO (1+1), Four (2 + 2), Four (4+0), and Six (3 + 3). If unsure, leave this to Auto.
L1 Stream HW Prefetcher / L2 Stream HW Prefetcher
This setting is used to enable or disable the L1/L2 Stream Hardware Prefetcher. The options are Disabled, Enabled, and Auto.
SVM Mode
This setting Disables or Enables CPU Virtualization.
SMEE
This feature sets the option to enable or disable Secure Memory Encryption. The options are Disabled and Enabled.
▶CPU1 Information
These sections are for informational purposes. They will display some details about the detected CPUs on the motherboard, such as:
- CPU Version
• Number of Cores Running - Processor Family
- Processor Model
- Microcode Patch Level
• L1 Instruction Cache (Size/Method)
• L1 Data Cache (Size/Method)
• L2 Data Cache (Size/Method)
• L3 Cache per Scoket (Size/Method)
▶NB Configuration
Determinism Control
Use this setting to configure the Determinism Slider. Options include Manual and Auto.
cTDP Control
Use this setting to configure the cTDP Control. Options include Manual and Auto.
IOMMU
Use this setting to enable/disable IOMMU. Options include Disabled, Enabled, and Auto.
ACS Enable
Use this setting to enable/disable ACS. Options include Enabled, Disabled and Auto.
Package Power Limit Control
Options include Manual and Auto.
APBDIS
Options include 0, 1, and Auto.
DF Cstates
Options include Disabled, Enabled and Auto.
Preferred IO
Options include Manual and Auto.
▶ Memory Configuration
Memory Clock
This setting allows you to select different memory clock speed. Options include Auto and supported frequencies.
Memory Interleaving
This setting controls fabric level memory interleaving. Note that the channel, die and socket have requirements on memory populations and it will be ignored if the memory doesn't support the selected option. The options are Disabled and Auto.
Memory Interleaving Size
This setting controls the memory interleaving size. This determines the starting address of the interleave (bit 8, 9, 10 or 11). The options are 256 Bytes, 512 Bytes, 1 KB, 2 KB or Auto.
Chipset Interleaving
This setting controls interleave memory blocks across the DRAM chip for node 0. The options are Disabled and Auto.
BankGroupSwap
This setting controls the Bank Group Swap. The options are Enabled, Disabled and Auto.
DRAM Scrub Time
This provides a value that is the number of hours to scrub memory. The options are Disabled, 1 hour, 4 hours, 8 hours, 16 hours, 24 hours, 48 hours, and Auto.
▶CPU1 Memory Information
These sections are for informational purposes. They will display some details about the detected memory according to each CPU on the motherboard, such as:
• Detected Size (per slot, in MB)
- Current Speed (MT/s)
▶PCIe/PCI/PnP Configuration
This menu provides PCIe/PCI/PnP configuration settings and information.
PCI Bus Driver Version
PCI Devices Common Settings:
Above 4G Decoding
This setting Disables or Enables 64-bit capable devices ability to be decoded in above 4G address space (only if the system supports 64-bit PCI decoding).
SR-IOV Support
If the system has SR-IOV capable PCIe devices, this setting will Disable or Enable the Single Root IO Virtualization Support for the system.
BME DMA Mitigation
Use this setting to re-enable the Bus Master Attribute that was disabled during PCI enumeration for PCI bridges after SMM is locked. The options are Disabled and Enabled.
PCIe ARI Support
The options are Disabled, Enabled, and Auto.
PCIe Spread Spectrum
Use this setting to Disable or Enable PCIe Spread Spectrum for your system.
VGA Priority
Use this setting to select between onboard or offboard VGA support The options are Onboard and Offboard
NVMe Firmware Source
Use this setting to select between the AMI Native firmware support or the device vendor-defined firmware support. The options are Vendor Defined Firmware and AMI Native Support.
M.2 (AHCI) Firmware Source
Use this setting to select between the AMI Native firmware support or the device vendor-defined firmware support. The options are Vendor Defined Firmware and AMI Native Support.
CPU SLOT1 PCI-E 4.0 X16 OPROM
This setting enables or disables the listed PCI/PCIX/PCIe Slot OPROM option. The options include Disabled, Legacy and EFI.
CPU SLOT2 PCI-E 4.0 X8 OPROM
This setting enables or disables the listed PCI/PCIX/PCIe Slot OPROM option. The options include Disabled, Legacy and EFI.
CPU SLOT 3 PCI-E 4.0 X16 OPROM
This setting enables or disables the listed PCI/PCIX/PCIe Slot OPROM option. The options include Disabled, Legacy and EFI.
CPU SLOT 4 PCI-E 4.0 X8 OPROM
This setting enables or disables the listed PCI/PCIX/PCIe Slot OPROM option. The options include Disabled, Legacy and EFI.
CPU SLOT 5 PCI-E 4.0 X16 OPROM
This setting enables or disables the listed PCI/PCIX/PCIe Slot OPROM option. The options include Disabled, Legacy and EFI.
CPU SLOT 6 PCI-E 4.0 X16 OPROM
This setting enables or disables the listed PCI/PCIX/PCIe Slot OPROM option. The options include Disabled, Legacy and EFI.
CPU SLOT 7 PCI-E 4.0 X16 OPROM
This setting enables or disables the listed PCI/PCIX/PCIe Slot OPROM option. The options are Disabled, Legacy and EFI.
PCI-E M.2-M1 OPROM
This setting enables or disables the listed PCIe M.2-M1 option. The options are Disabled, Legacy and EFI.
PCI-E M.2-M2 OPROM
This setting enables or disables the listed PCIe M.2-M2 option. The options are Disabled, Legacy and EFI.
Onboard LAN1 Option ROM
Use this setting to select which option ROM is to be loaded for onboard LAN1 on the system. The options include Disabled, Legacy and EFI.
Onboard LAN2 Option ROM
Use this setting to select which firmware function is to be loaded for onboard LAN2 on the system. The options include Disabled and PXE.
Onboard Video Option ROM
Select Legacy to boot the system using a legacy video device installed on the motherboard. The options include Disabled, Legacy and EFI.
CPU SLOT1 PCI-E 4.0 X16 Bifurcation
This setting selects the bifurcation configuration for this particular PCIe slot. The options include Auto, x16, x8x8, x4x4x8, and x4x4x4x4.
CPU SLOT2 PCI-E 4.0 X8 Bifurcation
This setting selects the bifurcation configuration for this particular PCIe slot. The options include Auto, and x4x4.
CPU SLOT3 PCI-E 4.0 X16 Bifurcation
This setting selects the bifurcation configuration for this particular PCIe slot. The options include Auto, x16, x8x8, x4x4x8, and x4x4x4x4.
CPU SLOT4 PCI-E 4.0 X8 Bifurcation
This setting selects the bifurcation configuration for this particular PCIe slot. The options include Auto, and x4x4.
CPU SLOT5 PCI-E 4.0 X16 Bifurcation
This setting selects the bifurcation configuration for this particular PCIe slot. The options include Auto, x16, x8x8, x4x4x8, and x4x4x4x4.
CPU SLOT6 PCI-E 4.0 X16 Bifurcation
This setting selects the bifurcation configuration for this particular PCIe slot. The options include Auto, x16, x8x8, x4x4x8, and x4x4x4x4.
CPU SLOT7 PCI-E 4.0 X16 Bifurcation
This setting selects the bifurcation configuration for this particular PCIe slot. The options include Auto, x16, x8x8, x4x4x8, and x4x4x4x4.
JNVMe0/SATA 0-7
This setting selects NVMe or SATA engine for the hybrid port. When Auto is selected, JCFG1/2 jumper determines the behavior for JNVMe0/1. The options are Auto, NVME, and SATA.
JNVMe1/SATA 8-15
This setting selects NVMe or SATA engine for the hybrid port. When Auto is selected, JCFG1/2 jumper determines the behavior for JNVMe0/1. The options are Auto, NVME, and SATA.
▶Network Stack Configuration
Network Stack
This setting allows you to Disable or Enable the UEFI Network Stack.
IPv4 PXE Support
This setting allows you to Disable or Enable IPv4 PXE boot support. If disabled, IPv4 PXE boot support will not be available.
IPv4 HTTP Support
This setting allows you to Disable or Enable IPv4 HTTP boot support. If disabled, IPv4 HTTP boot support will not be available.
IPv6 PXE Support
This setting allows you to Disable or Enable IPv6 PXE boot support. If disabled, IPv6 PXE boot support will not be available.
IPv6 HTTP Support
This setting allows you to Disable or Enable IPv6 HTTP boot support. If disabled, IPv6 HTTP boot support will not be available.
PXE Boot Wait Time
This setting allows you to set in a number field the wait time to press the ESC key to abort the PXE boot. The default value is 0.
Media Detect Count
This setting allows you set in a number field the number of times presence of media will be checked. The default value is 1.
▶USB Configuration
Legacy USB Support
Select Enabled to support onboard legacy USB devices. Select Auto to disable legacy support if there are no legacy USB devices present. Select Disable to have all USB devices available for EFI applications only. The options are Enabled, Disabled and Auto.
XHCI Hand-Off
This is a work-around solution for operating systems that do not support XHCI (Extensible Host Controller Interface) hand-off. The XHCI ownership change should be claimed by the XHCI driver. The options are Enabled, and Disabled.
Port 60/64 Emulation
Select Enabled for I/O port 60h/64h emulation support, which in turn, will provide complete legacy USB keyboard support for the operating systems that do not support legacy USB devices. The options are Enabled, and Disabled.
▶SATA Configuration
This section displays the detected SATA devices installed on the system.
SATA Information
SATA Enable
This item enables or disables the onboard SATA controller supported by the Intel PCH chip. The options are Disabled, Enabled, and Auto.
SATA Hotplug
This item enables or disables the onboard SATA controller's hot plug feature (PCH). The options are Disabled and Enabled.
▶SATA Information
This section displays information on the detected SATA devices:
- I-SATA0\~7
- SATA0\~15
▶KMIP Server Configuration
This feature allows the user to adjust KMIP Server network parameters.
KMIP Server IP address
KMIP TCP Port number
TimeZone
Client UserName
Client Password
KMS TLS Certificate
▶CA Certificate
▶Client Certificate
▶Client Private Key
The options are Update, Delte and Export.
▶HTTP Boot Configuration
HTTP Boot One Time
When the HTTP boot option is created, this option when enabled, will allow the system to boot via HTTP the first time and revert to the default boot after. The options are Disabled and Enabled.
Input Description
This option is an input field that, when the HTTP boot option is created, can be used to enter text to describe or identify the HTTP connection.
Boot URI
This option is an input field used to enter a web or network address to point to the HTTP boot files. This supports the HTTP or HTTPS protocols only.
▶Network Configuration
Configured
Select Enabled to activate IPv4 network configuration. The options are Enabled and Disabled.
*If the item above is set to Enabled, the following item will become available for configuration:
Enable DHCP
This feature allows the user to select the source of the IP address for this computer. If Disabled is selected, you will need to know the local IP address of this computer and enter it to the system manually in the field. If Enabled is selected, the system will search for a DHCP (Dynamic Host Configuration Protocol) server in the network that it is attached to and request the next available IP address for this computer. The options are Enabled and Disabled.
*If the item above is set to Disabled, the following items will become available for configuration:
Local IP Address
This item sets and displays the Local IP address for this computer. This should be in decimal and in dotted quad form.
Local Net Mask
This item sets the sub-network that this computer belongs to. The value of each three-digit number separated by dots should not exceed 255.
Local Gateway
This item sets the Gateway IP address for this computer. This should be in decimal and in dotted quad form (i.e., 172.31.0.1).
Local DNS Servrs
This item sets the address for the local DNS servers for this computer. This should be in decimal and in dotted quad form (i.e., 172.31.0.1).
Save Changes and Exit
Click this to save the changes above.
▶iSCSI Configuration
iSCSI Initiator Name
This feature allows the user to enter the unique name of the iSCSI Initiator in IQN format. Once the name of the iSCSI Initiator is entered into the system, configure the proper settings for the following items.
▶ Add an Attempt
▶ Delete Attempts
▶Change Attempt Order
▶TLS Authenticate Configuration
This submenu allows the user to configure Transport Layer Security (TLS) settings.
▶Server CA Configuration
▶Enroll Certification
▶Enroll Certification using File
Use this feature to enroll certification from a file.
Certification GUID
Use this feature to input the certification GUID.
▶Commit Changes and Exit
Use this feature to save all changes and exit TLS settings.
▶Discard Changes and Exit
Use this feature to discard all changes and exit TLS settings.
▶ Delete Certification
Use this feature to delete certification. The options include Disabled and Enabled.
4.4 IPMI
This tab allows you to configure the following IPMI settings for the system.
| Aptio Setup Utility - Copyright (C) 2020 American Megatrends, Inc. Main Advanced IPMI Event Logs Security Boot Save & Exit | |
| BMC Firmware Revision 1.00.12 IPMI STATUS Working | Press <Enter> to change the SEL event log configuration. |
| System Event Log BMC Network Configuration | |
| +: Select Screen ↑↓: Select Item Enter: Select +/-: Change Opt. F1: General Help F2: Previous Values F3: Optimized Defaults F4: Save & Exit ESC: Exit | |
| Version 2.20.1275. Copyright (C) 2020 American Megatrends, Inc. | |
Use this feature to configure Intelligent Platform Management Interface (IPMI) settings.
BMC Firmware Revision
This item indicates the IPMI firmware revision used in your system.
IPMI STATUS
This item indicates the status of the IPMI firmware installed in your system.
▶System Event Log
Enabling/Disabling Options
SEL Components
Select Enabled for all system event logging at bootup. The options are Disabled and Enabled.
Erasing Settings
Erase SEL
Select Yes, On next reset to erase all system event logs upon next system reboot. Select Yes, On every reset to erase all system event logs upon each system reboot. Select No to keep all system event logs after each system reboot. The options are No, Yes, On next reset, and Yes, On every reset.
When SEL is Full
This feature allows the user to decide what the BIOS should do when the system event log is full. Select Erase Immediately to erase all events in the log when the system event log is full. The options are Do Nothing and Erase Immediately.
Note: After making changes on a setting, be sure to reboot the system for the changes to take effect.
▶BMC Network Configuration
BMC Network Configuration
Update IPMI LAN Configuration
Select Yes to enable BMC Network Configuration.
IPMI LAN Selection
This item displays the IPMI LAN setting. The default setting is Failover.
IPMI Network Link Status
This item displays the IPMI Network Link status. The default setting is Shared LAN.
Update IPMI LAN Configuration
Select Yes for the BIOS to implement all IP/MAC address changes at the next system boot. The options are No and Yes.
*If the item above is set to Yes, the following item will become available for configuration:
Configuration Address Source
This feature allows the user to select the source of the IP address for this computer. If Static is selected, you will need to know the IP address of this computer and enter it to the system manually in the field. If DHCP is selected, the BIOS will search for a DHCP (Dynamic Host Configuration Protocol) server in the network that is attached to and request the next available IP address for this computer. The options are Static and DHCP.
*If the item above is set to Static, the following items will become available for configuration:
Station IP Address
This item displays the Station IP address for this computer. This should be in decimal and in dotted quad form.
Subnet Mask
This item displays the sub-network that this computer belongs to. The value of each three-digit number separated by dots should not exceed 255.
Station MAC Address
This item displays the Station MAC address for this computer. Mac addresses are 6 two-digit hexadecimal numbers.
Gateway IP Address
This item displays the Gateway IP address for this computer. This should be in decimal and in dotted quad form (i.e., 172.31.0.1).
VLAN
This item displays the virtual LAN settings. The options are Disable and Enable.
Configure IPv6 Support
This section displays configuration features for IPv6 support.
IPv6 Support
Use this feature to enable IPV6 support. The options are Enabled and Disabled.
*If the item above is set to Enabled, the following items will become available for configuration:
Configuration Address Source
This feature allows the user to select the source of the IP address for this computer. If Static is selected, you will need to know the IP address of this computer and enter it to the system manually in the field. If DHCP is selected, the BIOS will search for a DHCP (Dynamic Host Configuration Protocol) server in the network that is attached to and request the next available IP address for this computer. The options are DHCP and Static.
*If the item "Configuration Address Source" above is set to Static, the following items will become available for configuration:
• Station IPv6 Address
- Prefix Length
• IPv6 Router1 IP Address
4.5 Event Logs
This tab allows the user to configure the following event logs settings for the system.
| Aptio Setup Utility - Copyright (C) 2020 American Megatrends, Inc. Main Advanced IPMI Event Logs Security Boot Save & Exit | |
| Change SMBIOS Event Log Settings View SMBIOS Event Log | Press <Enter> to change the SMBIOS Event Log configuration. |
| +: Select Screen ↑↓: Select Item Enter: Select +/-: Change Opt. F1: General Help F2: Previous Values F3: Optimized Defaults F4: Save & Exit ESC: Exit | |
| Version 2.20.1275. Copyright (C) 2020 American Megatrends, Inc. | |
Enabling/Disabling Options
SMBIOS Event Log
Select Enabled to enable SMBIOS (System Management BIOS) Event Logging during system boot. The options are Disabled and Enabled.
Erasing Settings
Erase Event Log
Select Yes to erase all error events in the SMBIOS (System Management BIOS) log before an event logging is initialized at bootup. The options are No, Yes, Next reset, and Yes, Every reset.
When Log is Full
Select Erase Immediately to immediately erase all errors in the SMBIOS event log when the event log is full. Select Do Nothing for the system to do nothing when the SMBIOS event log is full. The options are Do Nothing and Erase Immediately.
SMBIOS Event Log Standard Settings
Log System Boot Event
Select Enabled to log system boot events. The options are Enabled and Disabled.
MECI (Multiple Event Count Increment)
Enter the increment value for the multiple event counter. Enter a number between 1 to 255. The default setting is 1.
METW (Multiple Event Count Time Window)
This item is used to determine how long (in minutes) the multiple event counter should wait before generating a new event log. Enter a number between 0 to 99. The default setting is 60.
Note: Please reboot the system for these changes to take effect.
▶View SMBIOS Event Log
When Event Logging is on, this item allows the user to view the entries in the SMBIOS event log. The following categories are displayed:
Date/Time/Error Code/Severity
4.6 Security
This tab allows you to configure the following security settings for the system.
![Aptio Setup Utility - Copyright (C) 2020 American Megatrends, Inc. Main Advanced IPMI Event Logs Security Boot Save & Exit Administrator Password Not Installed User Password Not Installed Password Description If the Administrator's / User's password is set, then this only limits access to Setup and is asked for when entering Setup. Please set Administrator's password first in order to set User's password, if clear Administrator's password, the User's password will be cleared as well. The password length must be in the following range: Minimum length 8 Maximum length 20 Administrator Password Password Check [Setup] ► SMCI Security Erase Configuration ► Secure Boot Set Administrator Password ++: Select Screen ↑↓: Select Item Enter: Select +/-: Change Opt. F1: General Help F2: Previous Values F3: Optimized Defaults F4: Save & Exit ESC: Exit](/content/2026/05/910950/images/9c7d5f3c1cfe16a6f4fdb51abb51231b15784b9c2d029456a2f42788882fbae5.jpg)
Version 2.20.1275. Copyright (C) 2020 American Megatrends, Inc.
Administrator Password
Press Enter to create a new, or change an existing Administrator password. Note that if the Administrator Password is erased, the User Password will be cleared as well.
Password Check
Select Setup for the system to check for a password at Setup. Select Always for the system to check for a password at bootup or upon entering the BIOS Setup utility. The options are Setup and Always.
▶SMCI Security Erase Configuration
▶Secure Boot
This section contains options and menus for securing your boot mode and for key management.
Secure Boot
This option allows you specify when the Platform Key (PK) is enrolled. When enabled, the System Mode is user deployed, and the CSM function is disabled. Options include Disabled and Enabled.
Secure Boot Mode
Use this item to select the secure boot mode. The options are Standard and Custom.
CSM Support
Select Enabled to support the EFI Compatibility Support Module (CSM), which provides compatibility support for traditional legacy BIOS for system boot. The options are Disabled and Enabled.
▶Key Management
This submenu allows the user to configure the following Key Management settings.
Vendor Keys
Provision Factory Defaults
This feature is to provision the default secure boot keys set by the manufacturer when system is in the Setup mode. The options are Disabled and Enabled.
Select and press Yes to restore factory default secure boot keys and key variables. Also, it will reset the system to the User mode. Select Yes to install all default secure keys set by the manufacturer. The options are Yes and No.
▶Reset To Setup Mode
Select and press Yes to clear all secure boot variables and reset the system to the Setup mode. This option allows you to delete all Secure Boot key databases from NVRAM. The options are Yes and No.
▶Export Secure Boot variables
Use this feature to export NVRAM content of secure boot variables to files in a root folder on a file system device.
▶Enroll Efi Image
This feature is to enroll SHA256 hash of the binary into the Authorized Signature Database (DB) and to allow the image to run in the secure boot mode.
Device Guard Ready
▶Remove 'UEFI CA' from DB B (available when the system is not in Device Guard Ready)
Select and press Yes to remove Microsoft UEFI CA certificate from the DB. The options are Yes and No.
Select and press Yes to restore the DB variables to factory defaults. The options are Yes and No.
▶Platform Key (PK)
This feature allows the user to configure the settings of the platform keys.
Set New Key
Select Yes to load the new platform keys (PK) from the manufacturer's defaults. Select No to load the platform keys from a file. The options are Yes and No.
Provision Factory Default Keys
Select Enabled to install the default Secure-Boot keys set by the manufacturer. The options are Disabled and Enabled.
▶Key Exchange Keys
Set New Key
Select Yes to load the KEK from the manufacturer's defaults. Select No to load the KEK from a file. The options are Yes and No.
Append Key
Select Yes to add the KEK from the manufacturer's defaults list to the existing KEK. Select No to load the KEK from a file. The options are Yes and No.
▶ Authorized Signatures
Set New Key
Select Yes to load the database from the manufacturer's defaults. Select No to load the DB from a file. The options are Yes and No.
Append Key
Select Yes to add the database from the manufacturer's defaults to the existing DB. Select No to load the DB from a file. The options are Yes and No.
▶Forbidden Signatures
Set New Key
Select Yes to load the DBX from the manufacturer's defaults. Select No to load the DBX from a file. The options are Yes and No.
Append Key
Select Yes to add the DBX from the manufacturer's defaults to the existing DBX. Select No to load the DBX from a file. The options are Yes and No.
▶Authorized TimeStamps
Set New Key
Select Yes to load the DBT from the manufacturer's defaults. Select No to load the DBT from a file. The options are Yes and No.
Append Key
Select Yes to add the DBT from the manufacturer's defaults list to the existing DBT. Select No to load the DBT from a file. The options are Yes and No.
▶OsRecovery Signature
This item uploads and installs an OSRecovery Signature. You may select options for Update for a factory default key, or select Append to get it from a file. The file formats accepted are:
1) Public Key Certificate
a. EFI Signature List
b. EFI CERT X509 (DER Encoded)
c. EFI CERT RSA2048 (bin)
d. EFI SERT SHA256 (bin)
2) EFI Time Based Authenticated Variable
When prompted, select "Yes" to load Factory Defaults or "No" to load from a file.
4.7 Boot
Use this tab to configure Boot Settings:
| Boot Configuration | Select boot mode Legacy/UEFI | |
| Boot Mode Select | [Dual] | |
| LEGACY to EFI Support | [Disabled] | |
| FIXED BOOT ORDER Priorities | ||
| Boot Option #1 | [Hard Disk] | |
| Boot Option #2 | [CD/DVD] | |
| Boot Option #3 | [USB Hard Disk] | |
| Boot Option #4 | [USB CD/DVD] | |
| Boot Option #5 | [USB Key] | |
| Boot Option #6 | [USB Floppy] | |
| Boot Option #7 | [USB Lan] | |
| Boot Option #8 | [Network:BRCM MBA Slot 4500 v214.0.233.0] | |
| Boot Option #9 | [UEFI Hard Disk] | |
| Boot Option #10 | [UEFI CD/DVD] | |
| Boot Option #11 | [UEFI USB Hard Disk] | |
| Boot Option #12 | [UEFI USB CD/DVD] | |
| Boot Option #13 | [UEFI USB Key] | |
| Boot Option #14 | [UEFI USB Floppy] | |
| Boot Option #15 | [UEFI USB Lan] | |
| Boot Option #16 | [UEFI Network] | |
Version 2.20.1275. Copyright (C) 2020 American Megatrends, Inc.
Boot Mode Select
Use this item to select the type of device that the system is going to boot from. The options are Legacy, UEFI, and DUAL. The default setting is DUAL.
LEGACY to EFI Support
This option Disables or Enables the system to boot to an EFI OS after the boot failed from the legacy boot order.
FIXED BOOT ORDER Priorities
This option prioritizes the order of bootable devices that the system to boot from. Press
▶ Delete Boot Option
Use this feature to remove a pre-defined boot device from which the system will boot during startup. The settings are [any pre-defined boot device].
▶UEFI Application Boot Priorities
This feature allows the user to specify which UEFI devices are boot devices.
• UEFI Boot Order #1
▶NETWORK Drive BBS Priorities
This feature allows the user to specify which UEFI network drive devices are boot devices.
4.8 Save & Exit
Select the Save & Exit tab to enter the Save & Exit BIOS Setup screen.
| Aptio Setup Utility - Copyright (C) 2020 American Megatrends, Inc. Main Advanced IPMI Event Logs Security Boot Save & Exit | |
| Save Options Discard Changes and Exit Save Changes and Reset Save Changes Discard Changes Default Options Restore Optimized Defaults Save as User Defaults Restore User Defaults Boot Override BRCM MBA Slot 4500 v214.0.233.0 UEFI: Built-in EFI Shell Launch EFI Shell from filesystem device | Exit system setup without saving any changes. |
| +: Select Screen ↑↓: Select Item Enter: Select +/-: Change Opt. F1: General Help F2: Previous Values F3: Optimized Defaults F4: Save & Exit ESC: Exit | |
| Version 2.20.1275. Copyright (C) 2020 American Megatrends, Inc. | |
Save Options
Discard Changes and Exit
Select this option to quit the BIOS Setup without making any permanent changes to the system configuration, and reboot the computer. Select Discard Changes and Exit from the Exit menu and press
Save Changes and Reset
Select this option to reset the system after saving the changes.
Save Changes
After completing the system configuration changes, select this option to save the changes you have made. This will not reset (reboot) the system.
Discard Changes
Select this option and press
Default Options
Restore Optimized Defaults
To set this feature, select Restore Optimized Defaults from the Save & Exit menu and press
Save as User Defaults
To set this feature, select Save as User Defaults from the Exit menu and press
To set this feature, select Restore User Defaults from the Exit menu and press
Boot Override Section
Listed on this section are other boot options for the system (i.e., Built-in EFI shell). Select an option and press
Appendix A
Software
After the hardware has been installed, you can install the Operating System (OS), configure RAID settings and install the drivers.
A.1 Microsoft Windows OS Installation
If you will be using RAID, you must configure RAID settings before installing the Windows OS and the RAID driver. Refer to the RAID Configuration User Guides posted on our website at www.supermicro.com/support/manuals.
Installing the OS
- Create a method to access the MS Windows installation ISO file. That might be a DVD, perhaps using an external USB/SATA DVD drive, or a USB flash drive, or the IPMI KVM console.
- Retrieve the proper RST/RSTe driver. Go to the Supermicro web page for your motherboard and click on "Download the Latest Drivers and Utilities", select the proper driver, and copy it to a USB flash drive.
- Boot from a bootable device with Windows OS installation. You can see a bootable device list by pressing F11 during the system startup.

Figure A-1. Select Boot Device
- During Windows Setup, continue to the dialog where you select the drives on which to install Windows. If the disk you want to use is not listed, click on "Load driver" link at the bottom left corner.
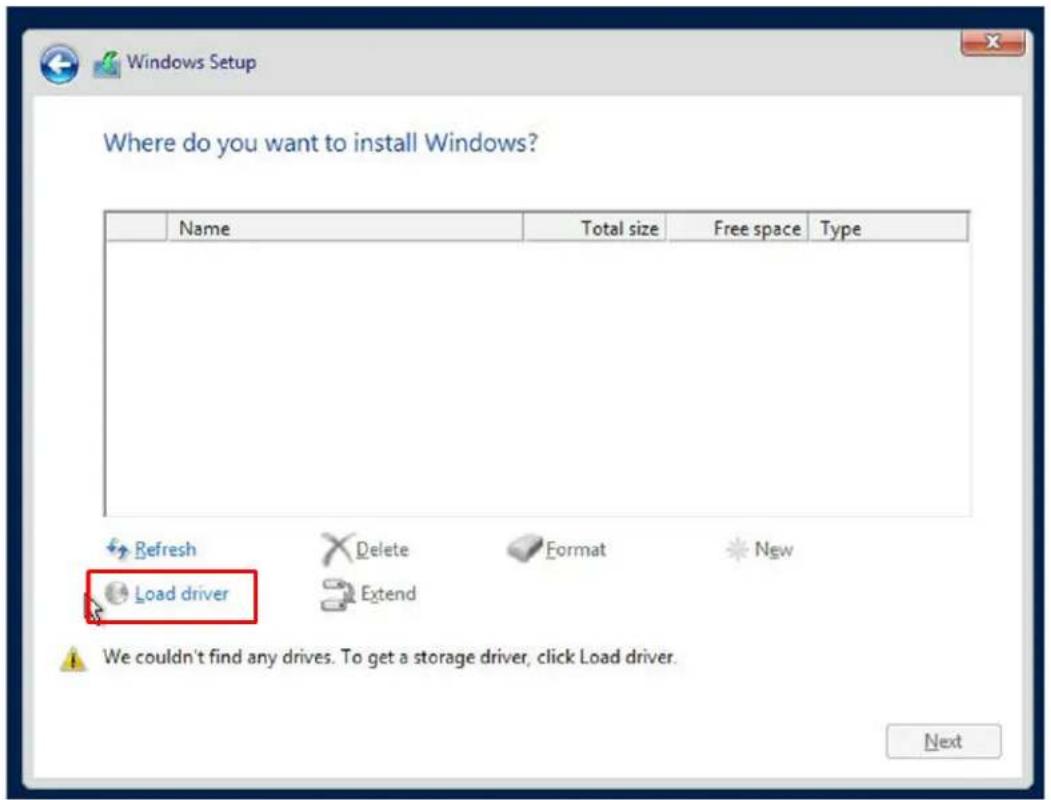
Figure A-2. Load Driver Link
To load the driver, browse the USB flash drive for the proper driver files.
- For RAID, choose the SATA/sSATA RAID driver indicated then choose the storage drive on which you want to install it.
-
For non-RAID, choose the SATA/sSATA AHCI driver indicated then choose the storage drive on which you want to install it.
-
Once all devices are specified, continue with the installation.
-
After the Windows OS installation has completed, the system will automatically reboot multiple times.
A.2 Driver Installation
The Supermicro website contains drivers and utilities for your system at https://www.supermicro.com/wdl/driver. Some of these must be installed, such as the chipset driver.
After accessing the website, go into the CDR_Images (in the parent directory of the above link) and locate the ISO file for your motherboard. Download this file to a USB flash drive or a DVD. (You may also use a utility to extract the ISO file if preferred.)
Another option is to go to the Supermicro website at http://www.supermicro.com/products/. Find the product page for your motherboard, and "Download the Latest Drivers and Utilities". Insert the flash drive or disk and the screenshot shown below should appear.
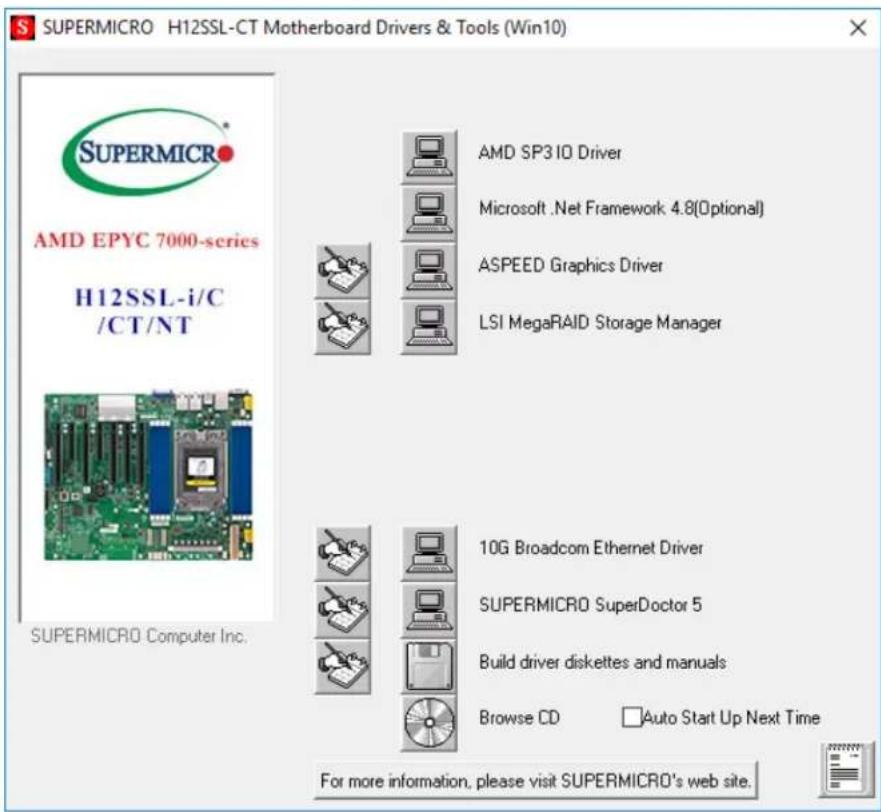
Figure A-3. Driver & Tool Installation Screen
Note: Click the icons showing a hand writing on paper to view the readme files for each item. Click the computer icons to the right of these items to install each item (from top to the bottom) one at a time. After installing each item, you must re-boot the system before moving on to the next item on the list. The bottom icon with a CD on it allows you to view the entire contents.
A.3 SuperDoctor® 5
The Supermicro SuperDoctor 5 is a program that functions in a command-line or web-based interface for Windows and Linux operating systems. The program monitors such system health information as CPU temperature, system voltages, system power consumption, fan speed, and provides alerts via email or Simple Network Management Protocol (SNMP).
SuperDoctor 5 comes in local and remote management versions and can be used with Nagios to maximize your system monitoring needs. With SuperDoctor 5 Management Server (SSM Server), you can remotely control power on/off and reset chassis intrusion for multiple systems with SuperDoctor 5 or IPMI. SuperDoctor 5 Management Server monitors HTTP, FTP, and SMTP services to optimize the efficiency of your operation.
SuperDoctor® Manual and Resources
![SuperDoctor 5 Health Info System Info Configuration Report Power Control Select Language - English [Admin] Login Motherboard: X8DTU-LN4+ Fan Speed FAN S FAN B Voltage CPU1 Vcc CPU2 DIMM +1.5 V +5 V +5VSB +12 V +1.1 V +3.3VCC +3.3VSB VBAT Temperature 100 210 100 210 100 210 100 210 100 210 100 210 100 210 100 210 100 210 100 210 100 210 100 210 100 210](/content/2026/05/910950/images/a1cda049849699f2fd4c8787f521497526fe157526c8108b0051070812ad780e.jpg)
Figure A-4. SuperDoctor 5 Interface Display Screen (Health Information)
A.4 IPMI
The H12SSL-i/C/CT/NT supports the Intelligent Platform Management Interface (IPMI). IPMI is used to provide remote access, monitoring and management. There are several BIOS settings that are related to IPMI.
Supermicro ships standard products with a unique password for the BMC ADMIN user. This password can be found on a label on the motherboard.
For general documentation and information on IPMI, please visit our website at: http://www.supermicro.com/products/nfo/IPMI.cfm.
Appendix B
Standardized Warning Statements
The following statements are industry standard warnings, provided to warn the user of situations which have the potential for bodily injury. Should you have questions or experience difficulty, contact Supermicro's Technical Support department for assistance. Only certified technicians should attempt to install or configure components.
Read this section in its entirety before installing or configuring components.
These warnings may also be found on our website at http://www.supermicro.com/about/policies/safety_information.cfm.
B.1 Battery Handling

Warning! There is the danger of explosion if the battery is replaced incorrectly. Replace the battery only with the same or equivalent type recommended by the manufacturer. Dispose of used batteries according to the manufacturer's instructions
電池の取り扱い
B.2 Product Disposal

Warning! Ultimate disposal of this product should be handled according to all national laws and regulations.
製品の廃棄
Warning: Do not upgrade the BIOS unless your system has a BIOS-related issue. Flashing the wrong BIOS can cause irreparable damage to the system. In no event shall Supermicro be liable for direct, indirect, special, incidental, or consequential damages arising from a BIOS update. If you need to update the BIOS, do not shut down or reset the system while the BIOS is updating. Doing so may cause a boot failure.
C.1 Overview
The Unified Extensible Firmware Interface (UEFI) provides a software-based interface between the operating system and the platform firmware in the pre-boot environment. The UEFI specification supports an architecture-independent mechanism for add-on card initialization to allow the UEFI OS loader, which is stored in the add-on card, to boot the system. The UEFI offers clean, hands-off control to a computer system at bootup.
C.2 Recovering the UEFI BIOS Image
A UEFI BIOS flash chip consists of a recovery BIOS block and a main BIOS block (a main BIOS image). The boot block contains critical BIOS codes, including memory detection and recovery codes for the user to flash a new BIOS image if the original main BIOS image is corrupted. When the system power is on, the boot block codes execute first. Once it is completed, the main BIOS code will continue with system initialization and bootup.
C.3 Recovering the BIOS Block with a USB Device
This feature allows the user to recover a BIOS image using a USB-attached device without the need for additional utilities. A USB flash device such as a USB flash drive or a USB CD/DVD device can be used for this purpose. A USB hard disk drive cannot be used for BIOS recovery at this time.
The file system supported by UEFI is FAT (including FAT12, FAT16, and FAT32) installed on a bootable or non-bootable USB-attached device. Note that the BIOS might need several minutes to locate the SUPER.ROM file if the media size becomes too large because it contains too many folders and files.
To perform UEFI BIOS recovery using a USB-attached device, follow the instructions below.
- Using a different system, copy the "Super.ROM" binary image file into the disc Root "\" Directory of a USB device or a writeable CD/DVD.
Note: If you cannot locate the "Super.ROM" file in your driver disk, visit our website at www.supermicro.com to download the BIOS image into a USB flash device and rename it "Super.ROM".
-
While the system is turned off, insert the USB device that contains the new BIOS binary image (SUPER.ROM).
-
Power on the system.

- After the system is turned on, the system will enter the BIOS Recovery menu. Select "Proceed with flash update" to start the BIOS recovery process. DO NOT INTERRUPT THIS PROCESS UNTIL IT IS FINISHED!
![Option Setup Utility - Copyright (C) 2018 American Megatrends, Inc. Main Advanced IPMI Event Lost Recovery Security Boot Save & Exit Please select blocks you want to update Reset NAVMM [Enclod] Boot Block Update [Enclod] Preview with flash updates Select this to start flash update ++: Select Screen T1: Select Item Enter: Select +/-: Change Opt.. F1: General Help F2: Previous Values F3: Optimized Defaults F4: Save & Exit! ESC: Exit Version 2.18.1254. Copyright (C) 2018 American Megatrends, Inc. Option Setup Utility - Copyright (C) 2018 American Megatrends, Inc. Recovery WARNING: System firmware is being updated. Keyboard is locked. DO NOT TURN THE POWER OFF ... Once firmware update is completed press any key to reject the system Program new data Write new boot block... 27% ++: Select Screen T1: Select Item Enter: Select +/-: Change Opt.. F1: General Help F2: Previous Values F3: Optimized Defaults F4: Save & Exit! ESC: Exit Version 2.18.1254. Copyright (C) 2018 American Megatrends, Inc.](/content/2026/05/910950/images/ead86b212358df07b6b94decbd35bd7d47382111ec47ff40457840f62c6b763d.jpg)
- After the Boot Sector Recovery Process is complete, press any key to reboot the system.

Notes:
• The BIOS recovery (SUPER.ROM) will not work if BIOS has a multi-block crash.
- If you have purchased an OOB license, you can do a BIOS flash again through BMC WebGUI or SUM. Please refer to these SUPERMICRO software-related videos:
- Activate OOB license: https://www.youtube.com/watch?v=V4spX_DOV7I
• SUPERMICO BIOS Update: https://www.youtube.com/watch?v=S8z6iOEHGwY
- If the BIOS flash recovery fails, contact our RMA Department to have the BIOS chip reprogrammed. This will require shipping the board to Supermicro for repair.
- Submit your RMA request at https://www.supermicro.com/support/rma
- Please make sure to follow all instructions when returning the motherboard.


- Preface
- About This Manual
- About This Motherboard
- Conventions Used in the Manual
- Contacting Supermicro
- Headquarters
- Europe
- Asia-Pacific
- Table of Contents
- Chapter 1 Introduction
- Chapter 2 Installation
- Chapter 3 Troubleshooting
- Chapter 4 UEFI BIOS
- Appendix A Software
- Appendix B Standardized Warning Statements
- Appendix C UEFI BIOS Recovery
- Chapter 1
- Introduction
- Important Links
- Quick Reference
- Motherboard Features
- Features
- CPU
- Memory
- DIMM Size
- Chipset
- Expansion Slots
- Network
- Graphics
- I/O Devices
- Peripheral Devices
- BIOS
- Power Management
- System Health Monitoring
- Fan Control
- System Management
- LED Indicators
- Dimensions
- Processor and Chipset Overview
- Special Features
- Recovery from AC Power Loss
- System Health Monitoring
- Onboard Voltage Monitors
- Fan Status Monitor with Firmware Control
- Environmental Temperature Control
- System Resource Alert
- ACPI Features
- Power Supply
- Super I/O
- Chapter 2
- Installation
- Static-Sensitive Devices
- Precautions
- Unpacking
- Motherboard Installation
- Tools Needed
- Location of Mounting Holes
- Notes:
- Installing the Motherboard
- Processor and Heatsink Installation
- Important:
- Installing the Processor and Heatsink
- Un-installing the Processor and Heatsink
- Memory Support and Installation
- Memory Support
- DIMM Module Population
- DIMM Installation
- DIMM Removal
- Rear I/O Ports
- COM Port
- IPMI LAN Port
- 3\~6. Universal Serial Bus (USB) Ports
- 7\~8. Gigabit LAN Ports
- VGA Port
- UID Switch and LED Indicator
- Front Control Panel
- Connectors
- Onboard Fan Headers (FAN1\~FAN5, FANA, FANB)
- Disk-On-Module Power Connector (JSD1 & JSD2)
- I-SATA Ports (I-SATA0\~I-SATA7), H12SSL-i/C/CT Only
- L-SAS Ports (L-SAS0\~L-SAS7), H12SSL-CT & H12SSL-C Only
- NVM Express
- TPM Header/Port 80 Connector (TPM Port)
- PCIe M.2 Connector (M.2-M1/M2)
- USB Ports (USB0\~USB5)
- Onboard Battery (BT1)
- NCSI Header (JNCSI1)
- Chassis Intrusion (JL1)
- Overheat LED/Fan Fail (JOH1)
- Standby Power Header (JSTBY1)
- IPMB System Management Bus Header (JIPMB1)
- Main Power Supply Connector (JPWR3)
- 12V 8-pin Auxiliary Power Connector (JPWR1)
- 12V 8-pin Auxiliary Power Connector (JPWR2)
- Speaker (JD1)
- Power SMB Header (JPI2C1)
- Jumper Settings
- How Jumpers Work
- Clear CMOS (JBT1)
- To Clear CMOS
- VGA Enable/Disable (JPG1)
- Watch Dog (JWD1)
- SAS Enable/Disable (JPS1)
- LED Indicators
- LAN Port LEDs
- UID Switch and LED Indicator (UID LED & UID-SW)
- BMC Hearbeat LED (LEDM1)
- Onboard Power OK LED (LE1)
- Chapter 3
- Troubleshooting
- Troubleshooting Procedures
- Before Power On
- No Power
- No Video
- System Boot Failure
- Memory Errors
- When the System Loses its Setup Configuration
- When the System Becomes Unstable
- Technical Support Procedures
- Frequently Asked Questions
- Question: Why can't I turn off the power using the momentary power on/off switch?
- Question: For the AMD EPYC platform, we found that the Windows Server 2012/2016 OS would not install properly. It however works fine with Linux OS, any suggestions?
- Returning Merchandise for Service
- Battery Removal and Installation
- Battery Removal
- Proper Battery Disposal
- Battery Installation
- Chapter 4
- UEFI BIOS
- Introduction
- Starting the Setup Utility
- Main Setup
- System Date/System Time
- Supermicro H12SSL-i/C/CT/NT
- BIOS Version
- Build Date
- CPLD Version
- Memory Information
- Total Memory
- Advanced
- ▶Boot Feature
- Quiet Boot
- Option ROM Messages
- Bootup NumLock State
- Wait For "F1" If Error
- INT19 (Interrupt 19) Trap Response
- Re-try Boot
- Power Configuration
- Watch Dog Function
- Restore on AC Power Loss
- Power Button Function
- ▶Trusted Computing
- Security Device Support
- ▶PSP Firmware Versions
- PSP Directory Level 1 (Fixed)
- PSP Directory Level 2 (Updateable)
- ▶ACPI Settings
- PCI AER Support
- High Precision Event Timer
- NUMA Nodes Per Socket
- ACPI SRAT L3 Cache As NUMA Domain
- ▶Super IO Configuration
- ▶ Serial Port 1 Configuration
- Serial Port
- Device Settings
- Change Settings
- ▶SOL Configuration
- ▶Serial Port Console Redirection
- Console Redirection
- ▶Console Redirection Settings
- Terminal Type
- Bits per second
- Data Bits
- Parity
- Stop Bits
- Flow Control
- VT-UTF8 Combo Key Support
- Recorder Mode
- Resolution 100x31
- Legacy OS Console Redirection
- Putty KeyPad
- Redirection After BIOS POST
- SOL
- Legacy Console Redirection
- Legacy Serial Redirection Port
- Serial Port for Out-of-Band Management / Windows Emergency Management Services (EMS)
- Out-of-Band Mgmt Port
- ▶CPU Configuration
- SMT Control
- Core Performance Boost
- Global C-state Control
- Local APIC Mode
- CCD Control
- Core Control
- L1 Stream HW Prefetcher / L2 Stream HW Prefetcher
- SVM Mode
- SMEE
- ▶CPU1 Information
- ▶NB Configuration
- Determinism Control
- cTDP Control
- IOMMU
- ACS Enable
- Package Power Limit Control
- APBDIS
- DF Cstates
- Preferred IO
- ▶ Memory Configuration
- Memory Clock
- Memory Interleaving
- Memory Interleaving Size
- Chipset Interleaving
- BankGroupSwap
- DRAM Scrub Time
- ▶CPU1 Memory Information
- ▶PCIe/PCI/PnP Configuration
- PCI Bus Driver Version
- PCI Devices Common Settings:
- Above 4G Decoding
- SR-IOV Support
- BME DMA Mitigation
- PCIe ARI Support
- PCIe Spread Spectrum
- VGA Priority
- NVMe Firmware Source
- M.2 (AHCI) Firmware Source
- CPU SLOT1 PCI-E 4.0 X16 OPROM
- CPU SLOT2 PCI-E 4.0 X8 OPROM
- CPU SLOT 3 PCI-E 4.0 X16 OPROM
- CPU SLOT 4 PCI-E 4.0 X8 OPROM
- CPU SLOT 5 PCI-E 4.0 X16 OPROM
- CPU SLOT 6 PCI-E 4.0 X16 OPROM
- CPU SLOT 7 PCI-E 4.0 X16 OPROM
- PCI-E M.2-M1 OPROM
- PCI-E M.2-M2 OPROM
- Onboard LAN1 Option ROM
- Onboard LAN2 Option ROM
- Onboard Video Option ROM
- CPU SLOT1 PCI-E 4.0 X16 Bifurcation
- CPU SLOT2 PCI-E 4.0 X8 Bifurcation
- CPU SLOT3 PCI-E 4.0 X16 Bifurcation
- CPU SLOT4 PCI-E 4.0 X8 Bifurcation
- CPU SLOT5 PCI-E 4.0 X16 Bifurcation
- CPU SLOT6 PCI-E 4.0 X16 Bifurcation
- CPU SLOT7 PCI-E 4.0 X16 Bifurcation
- JNVMe0/SATA 0-7
- JNVMe1/SATA 8-15
- ▶Network Stack Configuration
- Network Stack
- IPv4 PXE Support
- IPv4 HTTP Support
- IPv6 PXE Support
- IPv6 HTTP Support
- PXE Boot Wait Time
- Media Detect Count
- ▶USB Configuration
- Legacy USB Support
- XHCI Hand-Off
- Port 60/64 Emulation
- ▶SATA Configuration
- SATA Information
- SATA Enable
- SATA Hotplug
- ▶SATA Information
- ▶KMIP Server Configuration
- ▶HTTP Boot Configuration
- HTTP Boot One Time
- Input Description
- Boot URI
- ▶Network Configuration
- Configured
- Enable DHCP
- Local IP Address
- Local Net Mask
- Local Gateway
- Local DNS Servrs
- Save Changes and Exit
- ▶iSCSI Configuration
- iSCSI Initiator Name
- ▶TLS Authenticate Configuration
- ▶Server CA Configuration
- Certification GUID
- ▶ Delete Certification
- IPMI
- BMC Firmware Revision
- IPMI STATUS
- ▶System Event Log
- Enabling/Disabling Options
- SEL Components
- Erasing Settings
- Erase SEL
- When SEL is Full
- ▶BMC Network Configuration
- BMC Network Configuration
- Update IPMI LAN Configuration
- IPMI LAN Selection
- IPMI Network Link Status
- Configuration Address Source
- Station IP Address
- Subnet Mask
- Station MAC Address
- Gateway IP Address
- VLAN
- Configure IPv6 Support
- IPv6 Support
- Event Logs
- SMBIOS Event Log
- Erase Event Log
- When Log is Full
- SMBIOS Event Log Standard Settings
- Log System Boot Event
- MECI (Multiple Event Count Increment)
- METW (Multiple Event Count Time Window)
- ▶View SMBIOS Event Log
- Security
- Administrator Password
- Password Check
- ▶SMCI Security Erase Configuration
- ▶Secure Boot
- Secure Boot
- Secure Boot Mode
- CSM Support
- ▶Key Management
- Vendor Keys
- Provision Factory Defaults
- ▶Reset To Setup Mode
- ▶Export Secure Boot variables
- ▶Enroll Efi Image
- Device Guard Ready
- ▶Remove 'UEFI CA' from DB B (available when the system is not in Device Guard Ready)
- ▶Platform Key (PK)
- Set New Key
- Provision Factory Default Keys
- ▶Key Exchange Keys
- Append Key
- ▶ Authorized Signatures
- ▶Forbidden Signatures
- ▶Authorized TimeStamps
- ▶OsRecovery Signature
- Boot
- Boot Mode Select
- LEGACY to EFI Support
- FIXED BOOT ORDER Priorities
- ▶ Delete Boot Option
- ▶UEFI Application Boot Priorities
- ▶NETWORK Drive BBS Priorities
- Save & Exit
- Save Options
- Discard Changes and Exit
- Save Changes and Reset
- Save Changes
- Discard Changes
- Default Options
- Restore Optimized Defaults
- Save as User Defaults
- Boot Override Section
- Appendix A
- Software
- A.1 Microsoft Windows OS Installation
- A.2 Driver Installation
- A.3 SuperDoctor® 5
- A.4 IPMI
- Appendix B
- Standardized Warning Statements
- B.1 Battery Handling
- B.2 Product Disposal
- 製品の廃棄
- C.1 Overview
- C.2 Recovering the UEFI BIOS Image
- C.3 Recovering the BIOS Block with a USB Device
Brand : Supermicro
Model : H12SSL-NT
Category : Computer Server