
7160-1982 - Vehicle Mount Gamber-Johnson - Free user manual and instructions
Find the device manual for free 7160-1982 Gamber-Johnson in PDF.


| Product Type | Vehicle Docking Station for Dell Rugged Laptops |
| Compatible Models | Dell Latitude 12" Rugged Extreme 2-in-1, 14" Rugged, 14" Rugged Extreme, 14" Rugged Extreme Business (various models: 5404, 5414, 5420, 5424, 7204, 7214, 7330, 7404, 7414, 7424, 5430) |
| Input Voltage | 11-16 Vdc (via recommended power adapter 7300-0714) |
| Power Output | 120W |
| SKU Variants | 7160-1982-00 (Non-RF, Non-HDMI), -03 (Tri-RF, Non-HDMI), -10 (Non-RF, With-HDMI), -13 (Tri-RF, With-HDMI) |
| Adjustable Hook Settings | 5 positions for different laptop sizes |
| Screen Support | Optional, part #7110-1213, recommended in high-vibration environments |
| Cable Management | Included cable tie hardware for securing peripherals |
| Installation Requirement | Bench test recommended before vehicle installation; ensure no shorts and avoid airbag deployment zones |
| Safety Compliance | FCC Part 15, EN 55032 Class A, EN 50498, ICES-003, AS/NZS CISPR 32 |
| Driver Requirement | For HDMI variants, download drivers from www.gamberjohnson.com |
| Warranty | Opening the docking station voids warranty |
| Dimensions (Approx.) | ~12 x 10 x 2 inches (based on typical rugged laptop dock) |
| Weight (Approx.) | ~3 lbs |
Frequently Asked Questions - 7160-1982 Gamber-Johnson
User questions about 7160-1982 Gamber-Johnson
0 question about this device. Answer the ones you know or ask your own.
Ask a new question about this device
Download the instructions for your Vehicle Mount in PDF format for free! Find your manual 7160-1982 - Gamber-Johnson and take your electronic device back in hand. On this page are published all the documents necessary for the use of your device. 7160-1982 by Gamber-Johnson.
USER MANUAL 7160-1982 Gamber-Johnson
INSTALLATION INSTRUCTIONS
Product
7160-1982
Dell Rugged Laptop Docking Station
Revision
Rev B
Form
INST-1178
Printing Spec: PS-001
This instruction sheet is for the Dell Rugged Laptop docking station only. For instructions on features, set-up, and operation of the Dell Rugged computer, please refer to the manual provided by Dell with the computer.
This docking station works with
- Dell 12" Latitude Rugged Extreme 2-in-1 Laptop
- Dell 14" Rugged Laptop
- Dell 14" Rugged Extreme Laptop
- Dell 14" Rugged Extreme Business Laptop
See page 4 for adjustment instructions.
This instruction sheet is for the following products:
Item No. 7160-1982-00 Dock - Dell Rugged Laptop, Non-RF, Non-HDMI
Item No. 7160-1982-03 Dock - Dell Rugged Laptop, Tri-RF, Non-HDMI
Item No. 7160-1982-10 Dock - Dell Rugged Laptop, Non-RF, With-HDMI
Item No. 7160-1982-13 Dock - Dell Rugged Laptop, Tri-RF, With-HDMI
Gamber Johnson recommends the following power adapter to power the docking station. They can be ordered from Gamber-Johnson seperatley.
7300-0714 - Bare Wire (11-16 Vdc Input, 120w Output) - Available with the docking station as KIT 7170-1090-XX

natural_image
3D rendering of a black and gray electronic device casing with blue connectors and a central logo (no readable text or symbols)Product Mounting Disclaimer
Gamber-Johnson is not liable under any theory of contract or tort law for any loss, damage, personal injury, special, incidental or consequential damages for personal injury or other damage of any nature arising directly or indirectly as a result of the improper installation or use of its products in vehicle or any other application. In order to safely install and use Gamber-Johnson products full consideration of vehicle occupants, vehicle systems (i.e., the location of fuel lines, brake lines, electrical, drive train or other systems), air-bags and other safety equipment is required. Gamber-Johnson specifically disclaims any responsibility for the improper use or installation of its products not consistent with original vehicle manufactures specifications and recommendations. Gamber-Johnson product instruction sheets, or workmanship standards as endorsed through the Gamber-Johnson Certified Installer Program.
© Copyright 2024 Gamber-Johnson, LLC
If you need assistance or have questions, call Gamber-Johnson at 1-800-456-6868

PRE-INSTALLATION RECOMMENDATIONS
Conduct a "Bench Test"
Gamber-Johnson strongly advises a "bench test" be conducted to verify all electronic and software issues are resolved prior to installation:
- Make sure the computer is operational by itself.
- Insert computer into the docking station and verify that the computer is operating in the dock.
- Interconnect entire assembly and verify start-up of all components, including other equipment (printers, modems, scanners, etc.)
Gamber-Johnson recommends positioning of all mounts and equipment in the vehicle prior to the actual install to verify that mounting locations are safe and practical.
IMPORTANT SAFETY INFORMATION FOR INSTALLERS
Safety is dependent on the proper installation and servicing of this docking station. It is important to read and follow all instructions before installing this product.
To properly install a Gamber-Johnson docking station you must have a good understanding of automotive electrical procedures and systems, along with proficiency in the installation and service of aftermarket vehicle equipment.
There are no adjustments required at any time of the electrical components within the docking station. Opening the docking station will void the product warranty.
During Installation:
DO NOT connect this docking station to the vehicle battery until:
- All other electrical connections are made
- Mounting of all components is complete
- Verification that no shorts exist in the entire system
DO NOT install equipment or route wiring or cords in the deployment path of any air bag.
When drilling into the vehicle, DO make sure that both sides of the surface are clear of anything that could be damaged.
CAUTION: If wiring is shorted to the frame, high current conductors can cause hazardous sparks resulting in electrical fires or flying molten metal.
After installation:
Test the docking station to ensure that it is working properly.
File these instructions in a safe place and refer to them when performing maintenance or re-installing.
WARNING: Failure to follow all safety precautions and instructions may result in property damage, serious injury, or death.
DELL LAPTOP DOCKING STATION FEATURE IDENTIFICATION
IF USING FULL PCB SKU WITH HDMI: VISIT WWW.GAMBERJOHNSON.COM TO DOWNLOAD THE REQUIRED DOCKING STATION DRIVERS FOR YOUR DEVICE WWW.GAMBERJOHNSON.COM > SUPPORT > DOCKING DRIVERS


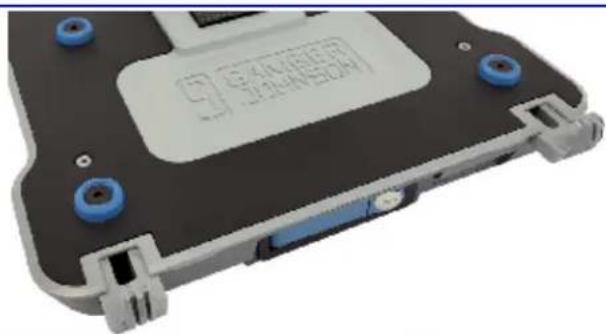
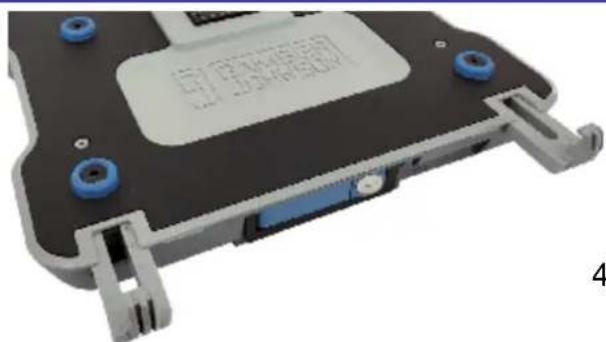
DELL RUGGED DOCKING STATION ADJUSTABILITY
Latitude 5430 & 7330 12" & 13" Rugged and Rugged Extreme Laptop
Hook Setting 1

-
Press & hold recessed button down (Use a pen, pencil, or any pointed tool)
-
Move hooks to appropriate location (1-5)
-
Release button
Note: Verify button pops back up after bring pressed
Latitude 7214 12" Rugged Extreme Convertible Laptop Hook Setting 2

natural_image
Close-up of a black hard disk with blue screw holes and a white plastic cover (no visible text or symbols)Latitude 5404, 5414, 5420, 5424, 7204 14" Rugged Laptops Hook Setting 3
natural_image
Close-up of a black hard drive with blue connectors and a white plastic cover (no visible text or symbols)Latitude 7424 14" Rugged Extreme Laptop Hook Setting 4

natural_image
Close-up of a black hard drive with blue connectors and a display screen (no visible text or symbols)Latitude 7404, 7414 14" Rugged Extreme Business Laptops Hook Setting 5
natural_image
Close-up of a black hard drive with blue connectors and a display screen (no visible text or symbols)DOCKING THE COMPUTER
To Dock The Computer:
- Ensure the Dell Docking Station front hooks are set at the correct position for your device (See Page 4)
- If the dock is in the closed position, push the lock button to open the latch.
- Holding the computer at an angle, line up the Laptop Front Pockets with the Dock's Front Hooks.
- Lower the back of the laptop down onto the dock and the docking connector.
- Lightly press down on the back of the laptop (center) to ensure it is fully seated while closing the latch.
- The rear hook will engage the back of the computer to hold it in place.

natural_image
Close-up of a mechanical device with exposed internal components and blue connectors (no visible text or symbols)
natural_image
Exterior view of a black electronic device with a display screen and mechanical components (no visible text or symbols)To Undock The Computer:
- Firmly press the Lock Button on the front Blue Latch, the Latch will spring open.
**IF NEEDED** Lightly press down on the center back of the computer and the rear hook will retract from the laptop. - Lift the back of the laptop off the dock and docking connector.
- Pull the front of the laptop out from under the front hooks.

natural_image
Close-up of a black electronic device with visible internal components and a blue cable inserted (no text or symbols)
natural_image
Close-up of a mechanical device with exposed internal components and a blue clip (no visible text or symbols)Screen Support Installation
Screen supports are recommended on all laptop dock/cradles in high-vibration environments.
Screen support can be purchased from www.GamberJohnson.com
Part Number: 7110-1213

Use #6-32 screws from screen support hardware bag to attach screen support to the left or right mounting location, do not over-torque screws.
Reccomended torque is 8-11 in/lbs.
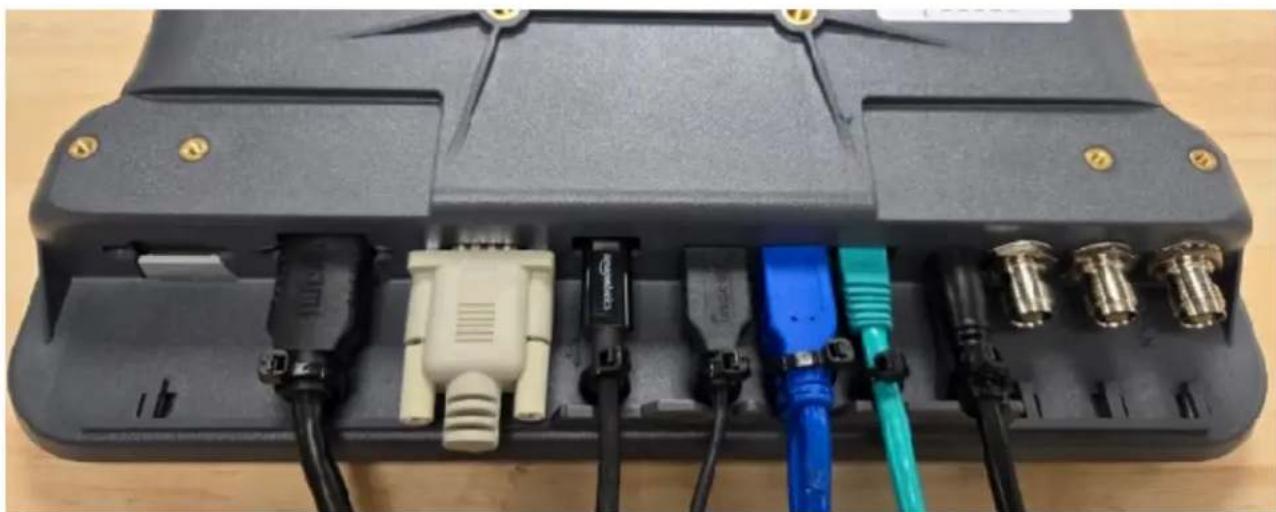
Cable Management
Use supplied cable tie hardware bag to secure all peripherals being used
natural_image
Close-up of a black electronic device chassis with multiple connected cables and connectors (no visible text or symbols)Regulatory Certification Information
Regulatory Model #: 7160-1982
GJ Model #'s & Description:
| 7160-1982-00 | Dock - DELL RUGGED LATITUDE LAPTOP - NO RF - NO HDMI |
| 7160-1982-03 | Dock - DELL RUGGED LATITUDE LAPTOP - TRI RF - NO HDMI |
| 7160-1982-10 | Dock - DELL RUGGED LATITUDE LAPTOP - NO RF - WITH HDMI |
| 7160-1982-13 | Dock - DELL RUGGED LATITUDE LAPTOP - TRI RF - WITH HDMI |
Certifications:
• EN 55032: 2015/A11: 2020 Class A
• EN 50498:2010
• ICES-003, Issue 7
• AS/NZA CISPR 32: 2015
This device complies with Part 15 of the FCC Rules. Operation is subject to the following two conditions. (1) this device may not cause harmful interference, and (2) this device must accept any interference received, including interference that may cause undesired operation.

Gamber-Johnson LLC, 5001 Joerns Drive, Stevens
Point, WI, 54481, USA, 715-344-3482
- INSTALLATION INSTRUCTIONS
- Product
- Revision
- Form
- PRE-INSTALLATION RECOMMENDATIONS
- IMPORTANT SAFETY INFORMATION FOR INSTALLERS
- DELL LAPTOP DOCKING STATION FEATURE IDENTIFICATION
- DELL RUGGED DOCKING STATION ADJUSTABILITY
- DOCKING THE COMPUTER
- To Dock The Computer:
- To Undock The Computer:
- Screen Support Installation
- Cable Management
- Regulatory Certification Information
- Certifications:
Brand : Gamber-Johnson
Model : 7160-1982
Category : Vehicle Mount