TP-580RA - Audio/video extender Kramer - Free user manual and instructions
Find the device manual for free TP-580RA Kramer in PDF.


| Product Type | Audio/Video Extender (HDMI Line Receiver) |
| Model | TP-580RA |
| Brand | Kramer |
| Video Input | 1x HDBaseT (RJ-45 female) |
| Video Output | 1x HDMI (female) |
| Max Resolution | 4K@60Hz (4:2:0) 24bpp |
| Max Data Rate | 10.2 Gbps (3.4 Gbps per channel) |
| Standards Compliance | HDMI 2.0, HDCP 1.4, HDBaseT 1.0 |
| Audio Outputs | 1x S/PDIF (RCA), 1x Analog (3.5mm mini-jack) |
| Audio Extraction | From HDBaseT input or HDMI ARC |
| Control Interfaces | RS-232 (3-pin terminal), IR (3.5mm), Micro USB (firmware) |
| Extension Distance (4K) | Up to 40 m (130 ft) |
| Extension Distance (1080p) | Up to 70 m (230 ft) |
| RS-232 Baud Rate (Control) | 115200 bps |
| RS-232 Baud Rate (Extension) | 300 to 115200 bps |
| Power Supply | 12V DC, 2A (included) |
| Power Consumption | 570 mA |
| Dimensions (W x D x H) | 12 cm x 7.2 cm x 2.4 cm (4.7" x 2.8" x 1") |
| Weight (Product) | 0.3 kg (0.6 lbs) |
| Enclosure | Aluminum, fanless (DigiTOOLS™) |
| Operating Temperature | 0° to 40°C (32° to 104°F) |
| Storage Temperature | -40° to 70°C (-40° to 158°F) |
| Humidity | 10% to 90% RHL non-condensing |
| Safety | Use only supplied power supply; disconnect power before servicing |
| Maintenance | Firmware upgrade via PROG micro USB or RS-232; no user-serviceable parts |
| Cleaning | Wipe with a dry cloth; do not use liquids |
| Reparability | Contact Kramer support; no operator serviceable parts inside |
| Included Accessories | Power supply unit |
| Warranty | 7 years (standard Kramer limited warranty) |
Frequently Asked Questions - TP-580RA Kramer
User questions about TP-580RA Kramer
0 question about this device. Answer the ones you know or ask your own.
Ask a new question about this device
Download the instructions for your Audio/video extender in PDF format for free! Find your manual TP-580RA - Kramer and take your electronic device back in hand. On this page are published all the documents necessary for the use of your device. TP-580RA by Kramer.
USER MANUAL TP-580RA Kramer
Contents
Introduction 1
Getting Started 1
Overview 3
About HDBaseT Technology 4
Defining the TP-580RA HDMI Line Receiver 5
Connecting the TP-580RA HDMI Line Receiver 6
Wiring the RJ 45 Connectors 7
Connecting to TP-580RA via RS-232 7
Operating the TP-580RA HDMI Line Receiver 8
Controlling A/V Equipment via an IR Remote Control 8
Acquiring EDID 9
Extracting the Audio 10
Configuring the TP-580RA HDMI Line Receiver 11
Setting the DIP-Switches 11
Video Auto Shut-off Delay 12
Upgrading the Firmware 13
Technical Specifications 14
Default Communication Parameters 15
Default EDID 15
Default Parameters 16
Protocol 3000 17
Kramer Protocol 3000 Syntax 17
Kramer Protocol 3000 Commands 20
Introduction
Welcome to Kramer Electronics! Since 1981, Kramer Electronics has been providing a world of unique, creative, and affordable solutions to the vast range of problems that confront the video, audio, presentation, and broadcasting professional on a daily basis. In recent years, we have redesigned and upgraded most of our line, making the best even better!
Getting Started
We recommend that you:
- Unpack the equipment carefully and save the original box and packaging materials for possible future shipment.
- Review the contents of this user manual.

Go to www.kramerav.com/downloads/TP-580RA to check for up-to-date user manuals, application programs, and to check if firmware upgrades are available (where appropriate).
Achieving the Best Performance
- Use only good quality connection cables (we recommend Kramer high-performance, high-resolution cables) to avoid interference, deterioration in signal quality due to poor matching, and elevated noise levels (often associated with low quality cables).
- Do not secure the cables in tight bundles or roll the slack into tight coils.
- Avoid interference from neighboring electrical appliances that may adversely influence signal quality.
- Position your Kramer TP-580RA away from moisture, excessive sunlight and dust.

This equipment is to be used only inside a building. It may only be connected to other equipment that is installed inside a building.
Safety Instructions

Caution: There are no operator serviceable parts inside the unit
Warning: Use only the Kramer Electronics power supply that is provided with the unit
Warning: Disconnect the power and unplug the unit from the wall before installing
Recycling Kramer Products
The Waste Electrical and Electronic Equipment (WEEE) Directive 2002/96/EC aims to reduce the amount of WEEE sent for disposal to landfill or incineration by requiring it to be collected and recycled. To comply with the WEEE Directive, Kramer Electronics has made arrangements with the European Advanced Recycling Network (EARN) and will cover any costs of treatment, recycling and recovery of waste Kramer Electronics branded equipment on
arrival at the EARN facility. For details of Kramer's recycling arrangements in your particular country go to our recycling pages at www.kramerav.com/support/recycling.
Overview
TP-580RA is a high-performance, long-reach HDBaseT™ receiver for 4K@60Hz (4:2:0) HDMI™, RS-232, IR and stereo audio signals over twisted pair that extracts (de-embeds) the stereo audio signal on its digital and analog audio ports. It extends video signals to up to 40m (130ft) over CAT copper cables at up to 4K@60Hz (4:2:0) 24bpp video resolution and provides even further reach for lower HD video resolutions.
- High Performance Standard Extender – Professional HDBaseT extender for providing long-reach signals over twisted-pair copper infrastructures. TP-580RA is a standard extender that can be connected to any market-available HDBaseT-compliant extension product. For optimum extension reach and performance, use recommended Kramer cables.
- HDMI Signal Extension – HDMI 2.0 and HDCP 1.4 compliant. Supports deep color, x.v.Color™, lip sync, HDMI uncompressed audio channels, Dolby TrueHD, DTS-HD, 2K, 4K, and 3D. EDID and CEC signals are passed through from the source to the display.
- I-EDIDPro™ Kramer Intelligent EDID Processing™ – Intelligent EDID handling, processing and pass-through algorithm that ensure Plug and Play operation for HDMI source and display systems.
- Multi-channel Audio Extension – Up to 32 channels of digital stereo uncompressed signals for supporting studio-grade surround sound.
- Audio Extraction (De-embedding) – According to auto-sensed signal attributes and per user selection, the transmitted digital audio signal or Audio Return Channel (ARC) signal, is extracted from the AV signal. In parallel to being transmitted to the HDMI AV output, this signal is transmitted to the stereo, digital audio output, and converted to an analog signal for transmission to the balanced stereo analog audio output. This enables high-quality audio playback by routing the audio to external speakers in parallel to routing to local speakers on the connected AV acceptor device (such as a TV or laptop).
- Bidirectional RS-232 Extension – Serial interface data flows in both directions, allowing data transmission and device control.
- Bidirectional Infrared Extension – IR interface data flows in both directions, allowing remote control of peripheral devices located at either end of the extended line.
- Easy Maintenance – Status LED indicators for HDMI and HDBT ports facilitate easy local maintenance and troubleshooting. Local firmware upgrade via RS-232 connection ensures lasting, field-proven deployment.
- Easy Installation – Compact DigiTOOLS™ fan-less enclosure for dropped-ceiling mounting, or side-by-side mounting of 3 units in a 1U rack space. For a recommended rack adapter, see www.kramerav.com/product/TP-580RA.
About HDBaseT Technology
HDBaseT is an advanced, all-in-one connectivity technology (supported by the HDBaseT Alliance). It is particularly suitable in the ProAV – and also the home – environment as a digital networking alternative, where it enables you to replace numerous cables and connectors by a single LAN cable used to transmit, for example, uncompressed, full high definition video, audio, IR, as well as various control signals.
Defining the TP-580RA HDMI Line Receiver
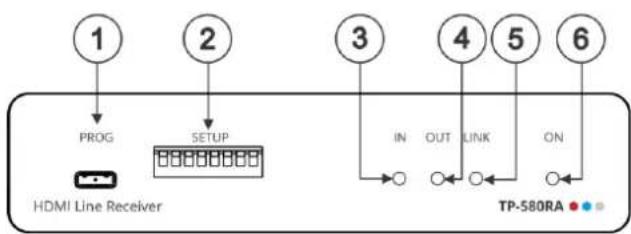
flowchart
graph TD
    A["PROG"] --> B["HDMI Line Receiver"]
    C["SETUP"] --> B
    D["IN"] --> E["TP-580RA"]
    F["OUT"] --> E
    G["LINK"] --> E
    H["ON"] --> E
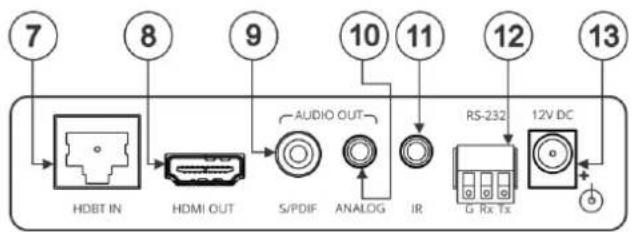
flowchart
graph LR
    A["HDBT IN"] --> B["HDMI OUT"]
    B --> C["S/PDIF"]
    C --> D["ANALOG"]
    D --> E["IR"]
    E --> F["RS-232"]
    F --> G["12V DC"]
    style A fill:#f9f,stroke:#333
    style B fill:#f9f,stroke:#333
    style C fill:#ccf,stroke:#333
    style D fill:#ccf,stroke:#333
    style E fill:#ccf,stroke:#333
    style F fill:#cfc,stroke:#333
    style G fill:#fcc,stroke:#333
Figure 1: TP-580RA HDMI Line Receiver
| # | Feature | Function |
| 1 | PROG Micro USB Port | Connect to a PC to perform firmware upgrades (via K-UPLOAD) and work with the EDID Designer. K-UPLOAD and EDID Designer can be downloaded from our Web site at: www.kramerav.com/support. |
| 2 | SETUP DIP-switches | Used to set the device behavior (see Setting the DIP-Switches on page 11). |
| 3 | IN LED | Lights green when an active far-end source HDMI input signal is detected via the HDBaseT link (an HDMI signal is detected from a source device connected to the HDBaseT transmitter that is connected to this input). |
| 4 | OUT LED | Lights green when an acceptor device is detected on the HDMI output. |
| 5 | LINK LED | Lights green when a link is established between the TP-580RA and the HDBaseT transmitter. |
| 6 | ON LED | Lights green when the device receives power. |
| 7 | HDBT IN RJ-45 Connector | Connect to the RJ-45 OUT connector on an HDBaseT transmitter (for example, TP-580T). |
| 8 | HDMI ^TM OUT Connector | Connect to an HDMI acceptor. |
| 9 | AUDIO OUT S/PDIF RCA Connector | Connect to a digital stereo audio acceptor. |
| 10 | AUDIO OUT ANALOG 3.5mm Mini Jack | Connect to an analog unbalanced stereo audio acceptor. |
| 11 | IR 3.5mm Mini Jack Connector | Connect to an external infrared emitter / sensor. |
| 12 | RS-232 3-pin Terminal Block Connector | Connect to a controlled device (so that it can be controlled from a remote serial controller); connect to a laptop to upgrade the firmware or to a control system to serially control the TP-580RA. |
| 13 | 12V DC Power Connector | 12V DC connector for powering the unit. |

The terms HDMI, HDMI High-Definition Multimedia Interface, and the HDMI Logo are trademarks or registered trademarks of HDMI Licensing Administrator, Inc.
Connecting the TP-580RA HDMI Line Receiver

Always switch off the power to each device before connecting it to your TP-580RA. After connecting your TP-580RA, connect the power to each of them and then switch on the power to each device.
You can use the TP-580RA HDMI Line Receiver and a compatible transmitter, (for example, the TP-580T HDMI Line Transmitter) to configure an HDMI transmitter/receiver system, as shown in the example in Figure 2.
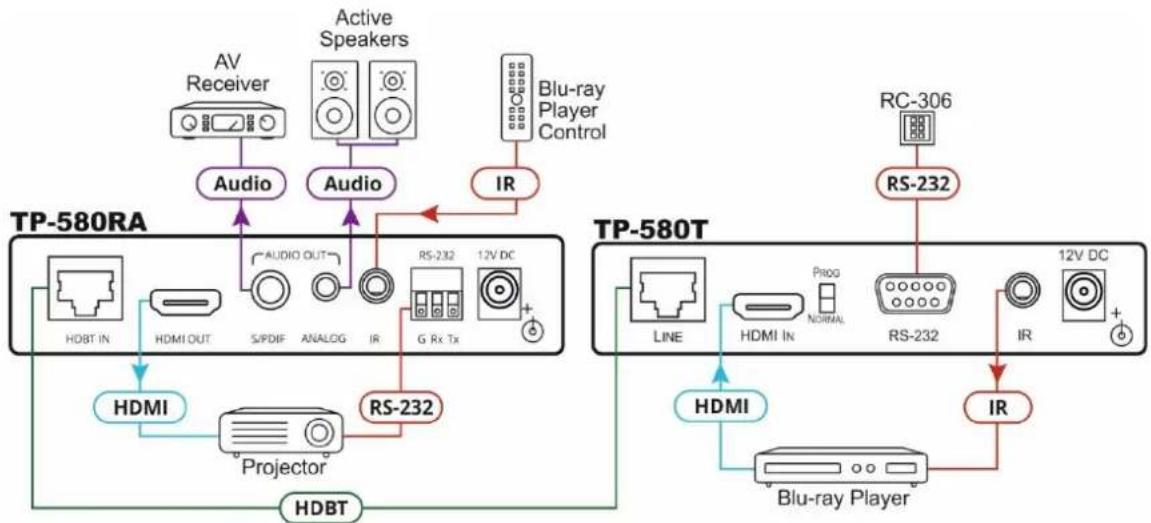
flowchart
graph TD
    subgraph TP-580RA
        A["AV Receiver"] --> B["Audio"]
        C["Active Speakers"] --> D["Audio"]
        E["Blu-ray Player Control"] --> F["IR"]
        G["RS-232"] --> H["RS-232"]
        I["G Rx Tx"] --> J["+"]
        K["RS-232 OUT"] --> L["Audio OUT"]
        M["Projector"] --> N["DS/DAI"]
        O["HDBT IN"] --> P["HDMI OUT"]
        Q["12V DC"] --> R["RS-232"]
        S["12V DC"] --> T["RS-232"]
        U["HDMT IN"] --> V["HDMI"]
        W["HDMT IN"] --> X["Progs NORMAL"]
        Y["HDMT IN"] --> Z["IR"]
        AA["HDMT IN"] --> AB["Blu-ray Player"]
    end
    subgraph TP-580T
        AC["RC-306"] --> AD["RS-232"]
        AE["RS-232"] --> AF["12V DC"]
        AG["IR"] --> AH["+"]
        AI["HDMI"] --> AJ["Blu-ray Player"]
    end
Figure 2: Connecting the TP-580RA HDMI Line Receiver
To connect the TP-580RA HDMI Line Receiver:
- Connect the HDMI OUT connector to the HDMI acceptor, (for example, a projector).
- Connect the RS-232 3-pin terminal block ⑩ the device to be controlled, (for example, the projector that is controlled by the RC-306).
- Connect the IR 3.5mm mini jack to an IR sensor.
- Connect the AUDIO OUT 8.5mm mini jack and/or AUDIO OUT S/PDIF connector to the audio acceptors (for example, amplified speakers).
- Connect an HDBT cable from the TP-580RA HDMI Line Receiver to the transmitter.
- Connect the supplied power adapter to the 12V DC Power Connector and plug the adapter into the mains electricity (not shown in Figure 2).
Wiring the RJ 45 Connectors
This section defines the TP pinout, using a straight pin-to-pin cable with RJ 45 connectors.

Note, that the cable Ground shielding must be connected / soldered to the connector shield.
| EIA /TIA 568B | |
| PIN | Wire Color |
| 1 | Orange / White |
| 2 | Orange |
| 3 | Green / White |
| 4 | Blue |
| 5 | Blue / White |
| 6 | Green |
| 7 | Brown / White |
| 8 | Brown |
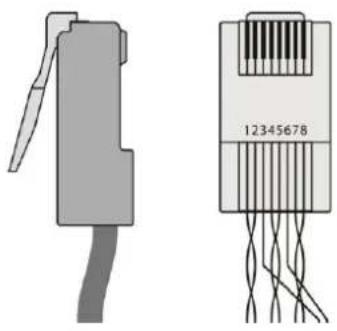
natural_image
Two types of electrical connectors: a gray connector with a cable and a black-and-white package labeled 12345678 (no text or symbols on the packages themselves)Connecting to TP-580RA via RS-232
The TP-580RA features an RS-232 3-pin terminal block connector, configured via DIP-switch 6 to support:
- RS-232 Extension: To pass data to and from the machines that are connected to the receiver.
• RS-232 Control: To control the TP-580RA.
Connect the RS-232 terminal block on the rear panel of the TP-580RA to a PC/controller, as follows (see Figure 3):
- TX pin to Pin 2
- RX pin to Pin 3
- GND pin to Pin 5
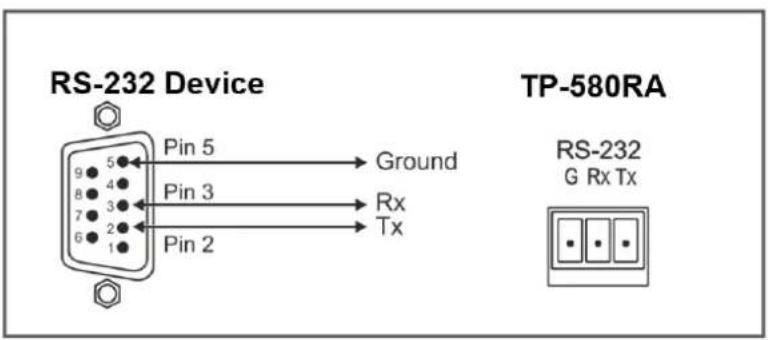
Figure 3: RS-232 Connection
Operating the TP-580RA HDMI Line Receiver
Controlling A/V Equipment via an IR Remote Control
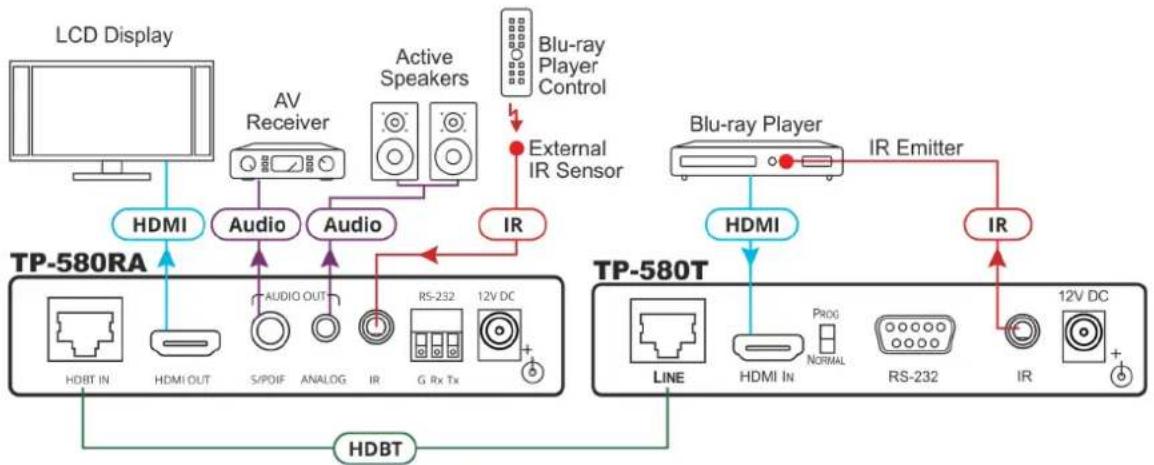
You can use an IR remote-control transmitter (that is used for controlling a peripheral device, for example, a Blu-ray disk player) to send commands from the receiver system. To use an IR remote control transmitter, connect the Kramer IR sensor cable at one end, and the Kramer IR emitter cable at the other end.
The example in Figure 4 illustrates how to control a Blu-ray disk player using an IR remote control via the TP-580RA that is connected to the TP-580T. The IR sensor is connected to the TP-580RA and an IR emitter is connected between the TP-580T and the Blu-ray disk player. The Blu-ray disk player IR remote control sends an IR command signal while pointed at the external IR sensor. The IR signal is passed over the HDBT link and the IR emitter to the Blu-ray disk player which responds to the IR command signal sent.
flowchart
graph TD
    A["LCD Display"] --> B["HDMI"]
    B --> C["TP-580RA"]
    C --> D["Audio"]
    D --> E["AV Receiver"]
    E --> F["Active Speakers"]
    F --> G["Blu-ray Player Control"]
    G --> H["External IR Sensor"]
    H --> I["IR"]
    I --> J["Audio"]
    J --> K["RS-232 12V DC"]
    K --> L["HDBT IN HDMI OUT S/POIF ANALOG IR G Rx Tx"]
    M["TP-580T"] --> N["HDMI"]
    N --> O["TP-580T LINE HDMI PROG NORMAL RS-232 IR 12V DC"]
    O --> P["IR"]
    P --> Q["IR"]
    Q --> R["IR Emitter"]
    R --> S["Blu-ray Player"]
Figure 4: Controlling a Blu-ray Player with IR Remote Control via the TP-580RA
Acquiring EDID
The EDID DIP-switch 1 determines the behavior of EDID on the device. For more information about DIP-switch settings, see Setting the DIP-Switches on page 11.
Pass-Through Mode
In the pass-through mode (DIP-switch 1 set to off), the EDID of the HDMI connected acceptor (a display in the Figure 6 examples) is automatically loaded to the TP-580RA.
The OUT LED flashes three times upon successful load of the designed EDID and then resumes normal operation.

If the display is replaced, the TP-580RA captures the new EDID from the new display. Any change in the output automatically changes the EDID that is stored in the TP-580RA.
When disconnecting the HDMI acceptor, the last EDID remains stored in the TP-580RA.
EDID Lock Mode
When in the Lock mode (DIP-switch 1 set to on), the current EDID is locked and remains unchanged even if the display is replaced on the output.
When in the lock mode the audio pass-through operation is determined by the DIP-switch 3 audio setup.
You can connect a PC loaded with EDID Designer SW tool, to the micro USB port ① to modify the EDID via the Kramer EDID Designer software.

Note that when using EDID Designer to modify the EDID (in the Lock mode), the DIP-switch 3 status is ignored.
Setting the Default EDID
You can set the TP-580RA to its EDID default value.
To set the default EDID:
- Make sure the TP-580RA is set to the Pass-through mode.
- Disconnect the output.
- Set DIP-switch 1 to the Lock mode (on).
The default EDID is loaded and locked.
Extracting the Audio
You can extract the audio of the active traversing signal to the digital (S/PDIF) and analog audio ports in one of two ways:
- Inputting the audio signal from HDBT IN.
- Inputting ARC (Audio Return Channel) signal from HDMI OUT.
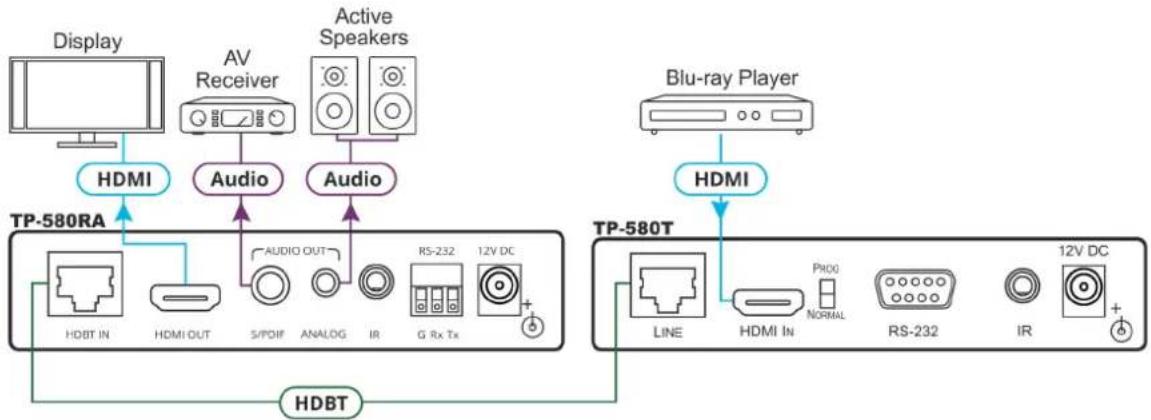
To route an input HDMI audio received through HDBT IN from the transmitter:
- Set DIP-Switch 2 to Off (up).
HDBT input audio is extracted to both digital and analog audio ports (see Figure 5).
In parallel, the active signal keeps traversing transparently between the source and the display.
flowchart
graph TD
    A["Display"] --> B["HDMI"]
    C["AV Receiver"] --> D["Audio"]
    E["Active Speakers"] --> F["Audio"]
    G["TP-580RA"] --> H["HDBT IN"]
    I["TP-580T"] --> J["LINE"]
    K["TP-580T"] --> L["HDMI IN"]
    M["TP-580T"] --> N["PRO0 NORMAL"]
    O["TP-580T"] --> P["RS-232"]
    Q["TP-580T"] --> R["IR"]
    S["TP-580T"] --> T["12V DC"]
    U["Blu-ray Player"] --> V["HDMI"]
    W["TP-580RA"] --> X["AUDIO OUT"]
    Y["TP-580T"] --> Z["G Rx Tx"]
Figure 5: Input audio signal from HDBT IN
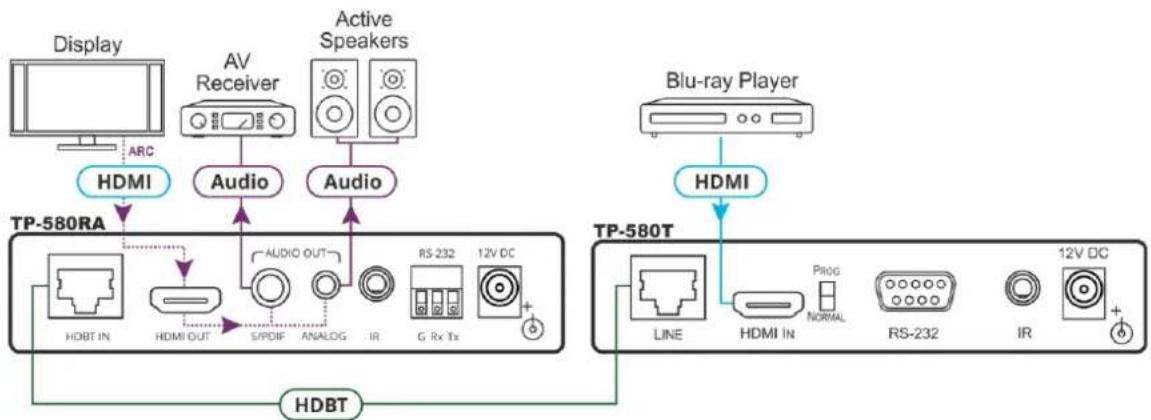
To route an input audio-return signal received through HDMI OUT from the connected display:
- Set DIP-Switch 2 to On (down).
HDMI-OUT input audio-return is extracted to both digital and analog audio ports, (see Figure 6).
In parallel, the active signal keeps traversing transparently between the source and the display.
flowchart
graph TD
    A["Display"] -->|ARC| B["HDMI"]
    B --> C["TP-580RA"]
    C --> D["Audio"]
    D --> E["AV Receiver"]
    D --> F["Active Speakers"]
    C --> G["Audio OUT"]
    G --> H["S/PDIF"]
    G --> I["ANALOG"]
    G --> J["IR"]
    C --> K["RS-232 12V DC"]
    C --> L["G Rx Tx"]
    M["Blu-ray Player"] --> N["HDMI"]
    N --> O["TP-580T"]
    O --> P["LINE"]
    O --> Q["HDMI IN"]
    O --> R["PROG NORMAL"]
    O --> S["RS-232"]
    O --> T["IR"]
    O --> U["12V DC"]
    V["HDBT"] --> C
Figure 6: ARC (Audio Return Channel) and HDBT IN Configuration
Configuring the TP-580RA HDMI Line Receiver
This section describes the following operations:
- Setting the DIP-Switches on page 11.
• Video Auto Shut-off Delay on page 12.
• Acquiring EDID on page 9.
• Extracting the Audio on page 10.
Setting the DIP-Switches
A DIP-switch that is down is On, up is Off (by default, DIP-switch 6 is set to ON and all the other DIP-switches are set to OFF). Changes to DIP-switches 7 and 8 only take effect after power-cycling the device. Changes to DIP-switches 1 and 3 only take effect after unplugging and then replugging the input cable.
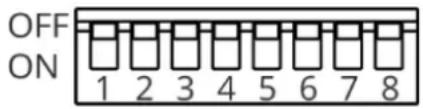
Figure 7: DIP-Switches
| # | Function | Status |
| 1 | EDID lock | Off (up) – EDID parameters are passed-through.On (down) – EDID Locked. When EDID is locked, the audio parameters are set as defined by DIP-switch 3. In the pass-through mode, DIP-switch 3 setup is ignored. |
| 2 | Extracted audio | Off (up) – HDBT IN source audio is selected for extraction.On (down) – HDMI OUT ARC sink audio is selected for extraction. |
| 3 | Audio pass-through | Off (up) – Passes the audio parameters.On (down) – Limits the audio to 2-channel LPCM.This setup is enabled after unlocking and relocking the EDID by setting DIP-switch 1 to On (EDID locked). |
| 4 | HDCP operation | Off (up) – Passes HDCP.In this state, if the sink supports HDCP, the input declares HDCP support. It will then handle HDCP on the output and input actively. If the sink does not support HDCP then the input will declare HDCP is not supported.On (down) – HDCP off.In this state, the device does not support HDCP on its input, even if HDCP is detected on the output. |
| 5 | Color space | Off (up) – Color space parameters are passed-through.On (down) – Forces RGB color space. |
| 6 | RS-232 mode | Off (up) – RS-232 control of device; RS-232 extension mode is disabled.On (down) – RS-232 extension mode. |
| 7 | HDBT FW upgrade | Off (up) – Normal operation mode.On (down) – HDBT FW upgrade mode, device normal operation is disabled.This setup is enabled only after DIP-switch 6 is set to On (RS-232 extension mode). |
| 8 | CPU FW upgrade | Off (up) – Normal operation mode.On (down) – CPU FW upgrade mode, device normal operation is disabled; DIP-switch 6 is set to Off. |
Video Auto Shut-off Delay
The TP-580RA can be configured so that the 5V power on the HDMI output can automatically be shut off after a specified delay when the TP-580RA is no longer receiving a video signal.
By default, once no video signal is detected for 5 minutes, the HDMI power is shut off. The user can set the delay by configuring the AV-SW-TIMEOUT P3K command timeout from 1 second to 15 minutes (900 seconds), where 0 – never shut off. See Default Parameters on page 16 for more details.

Once an active signal is again detected, the TP-580RA output 5V power is auto turned on.
Upgrading the Firmware
Use the Kramer K-UPLOAD software to upgrade the firmware via the TP-580RA PROG micro USB port ①, or via the RS-232 (when DIP-switch 6 set to Off (up position) allowing RS-232 to control/program the device).
The latest version of K-UPLOAD and installation instructions can be downloaded from our website at: www.kramerav.com/support/product_downloads.asp.

Note that in order to use the micro USB port, you need to install the Kramer USB driver, available at: www.kramerav.com/support/product_downloads.asp.
Technical Specifications
| Input | HDBT | On an RJ-45 female connector |
| Outputs | HDMI | On a female HDMI connector |
| Unbalanced Stereo Audio | On a 3.5mm mini jack | |
| S/PDIF | On an RCA connector | |
| IR | On a 3.5mm mini jack for IR link extension | |
| RS-232 | On a 3-pin terminal block connector for serial link extension and device firmware upgrade | |
| USB | On a Micro-USB connector for device firmware upgrade | |
| Extension line | Up to 40m (130ft) | At 4K@60Hz (4:2:0) |
| Up to 70m (230ft) | At full HD (1080p@60Hz 36bpp) | |
| Compliance | HDBaseT 1.0 | |
| Video | Max. Data Rate | 10.2Gbps (3.4Gbps per graphic channel) |
| Max. Resolution | 4K@60Hz (4:2:0) 24bpp | |
| Standards Compliance | HDMI 2.0 and HDCP 1.4 | |
| Analog Audio | Level | Up to 1 Vrms |
| THD + NOISE | 0.03% @ 1 kHz at nominal level | |
| Extended RS-232 | Baud Rate | 300 to 115200 |
| Control RS-232 | Baud Rate | 115200 |
| Enclosure | Size | DigiTools |
| Type | Aluminum | |
| Cooling | Convection ventilation | |
| Power | Source | 12V DC, 2A |
| Consumption | 570mA | |
| Environmental Conditions | Operating Temperature | 0° to 40°C (32° to 104°F) |
| Storage Temperature | -40° to +70°C (-40° to 158°F) | |
| Humidity | 10% to 90%, RHL non-condensing | |
| Accessories | Included | Power supply unit |
| General | Product Dimensions | 12cm x 7.2cm x 2.4cm(4.7" x 2.8" x 1") W, D, H |
| Product Weight | 0.3kg (0.6lbs) approx. | |
| Shipping Dimensions | 15.7cm x 12cm x 8.7cm(6.2" x 4.7" x 3.4") W, D, H | |
| Shipping Weight | 0.7kg (1.5lbs) approx. |
Specifications are subject to change without notice at www.kramerav.com
Default Communication Parameters
| RS-232 | |
| Baud Rate: | 115,200 |
| Data Bits: | 8 |
| Stop Bits: | 1 |
| Parity: | None |
| Command Format: | ASCII |
| Example (get device model name): | #model? |
| Full Factory Reset | |
| P3k command: | #factory |
| Embedded Web pages: | Select Device Settings page and click Factory reset |
Default EDID
The default EDID is set to 720p @ 60 Hz with 2-channel audio.

For some models of NEC displays/projectors there may be no audio heard, while using the default EDID. To solve the issue:
- Change the revision number in the NEC EDID block from 1 to 3.
- Add the specific vendor in NEC EDID Block 1
Detailed default EDID information is:
Monitor
Model name..... TP-580RA
Manufacturer..... KMR
Plug and Play ID..... KMR1200
Serial number...... n/a
Manufacture date...... 2015, ISO week 255
Filter driver...... None
[EMPTY]
EDID revision...... 1.3
Input signal type...... Digital
Color bit depth...... Undefined
Display type..... RGB color
Screen size.... 520 x 320 mm (24.0 in)
Power management...... Standby, Suspend, Active off/sleep
Extension blocs..... 1 (CEA-EXT)
[EMPTY]
DDC/CI.... Supported
MCCS revision...... 2.1
Display technology..... TFT
Controller...... STMicro 0x9301
Firmware revision..... 2.1
Firmware flags..... 0x006645CC
Active power on time..... Not supported
Power consumption...... Not supported
Current frequency..... 74.00kHz, 60.00Hz
Color characteristics
Default color space..... Non-sRGB
Display gamma...... 2.20
Red chromaticity..... Rx 0.674 - Ry 0.319
Green chromaticity..... Gx 0.188 - Gy 0.706
Blue chromaticity...... Bx 0.148 - By 0.064
White point (default).... Wx 0.313 - Wy 0.329
Additional descriptors... None
Timing characteristics
Horizontal scan range.... 30-83kHz
Vertical scan range..... 56-76Hz
Video bandwidth..... 170MHz
CVT standard...... Not supported
GTF standard...... Not supported
Additional descriptors... None
Preferred timing..... Yes
Native/preferred timing.. 1280x720p at 60Hz (16:10)
Modeline..... "1280x720" 74.250 1280 1390 1430 1650 720 725 730 750 +hsync +vsync
Standard timings supported
720 x 400p at 70Hz - IBM VGA
720 x 400p at 88Hz - IBM XGA2
640 x 480p at 60Hz - IBM VGA
640 x 480p at 67Hz - Apple Mac II
640 x 480p at 72Hz - VESA
640 x 480p at 75Hz - VESA
800 x 600p at 56Hz - VESA
800 x 600p at 60Hz - VESA
800 x 600p at 72Hz - VESA
800 x 600p at 75Hz - VESA
832 x 624p at 75Hz - Apple Mac II
1024 x 768i at 87Hz - IBM
1024 x 768p at 60Hz - VESA
1024 x 768p at 70Hz - VESA
1024 x 768p at 75Hz - VESA
1280 x 1024p at 75Hz - VESA
1152 x 870p at 75Hz - Apple Mac II
1280 x 1024p at 75Hz - VESA STD
1280 x 1024n at 85Hz - VESA STD
1600 x 1200p at 60Hz - VESA STD
1024 x 768p at 85Hz - VESA STD
800 x 600p at 85Hz - VESA STD
640 x 480p at 85Hz - VESA STD
1152 x 864p at 70Hz - VESA STD
1280 x 960p at 60Hz - VESA STD
EIA/CEA-861 Information
Revision number...... 3
IT underscan...... Supported
Basic audio...... Supported
YCbCr 4:4:4.... Supported
YCbCr 4:2:2.... Supported
Native formats...... 1
Detailed timing #1..... 1920x1080p at 60Hz (16:10)
Modeline...... "1920x1080" 148.500 1920 2008 2052 2200 1080 1084 1089 1125 +hsync +vsync
Detailed timing #2..... 1920x1080i at 60Hz (16:10)
Modeline..... "1920x1080" 74.250 1920 2008 2052 2200 1080 1084 1094 1124 interlace +hsync +vsync
Detailed timing #3..... 1280x720p at 60Hz (16:10)
Modeline...... "1280x720" 74.250 1280 1390 1430 1650 720 725 730 750 +hsync +vsync
Detailed timing #4..... 720x480p at 60Hz (16:10)
Modeline...... "720x480" 27.000 720 736 798 858 480 489 495 525 -hsync -vsync
CE audio data (formats supported)
LPCM 2-channel, 16/20/24 bit depths at 32/44/48 kHz
CE video identifiers (VICs) - timing/formats supported
1920 x 1080p at 60Hz - HDTV (16:9, 1:1)
1920 x 1080i at 60Hz - HDTV (16:9, 1:1)
1280 x 720p at 60Hz - HDTV (16:9, 1:1) [Native]
720 x 480p at 60Hz - EDTV (16:9, 32:27)
720 x 480p at 60Hz - EDTV (4:3, 8:9)
720 x 480i at 60Hz - Doublescan (16:9, 32:27)
720 x 576i at 50Hz - Doublescan (16:9, 64:45)
640 x 480p at 60Hz - Default (4:3, 1:1)
NB: NTSC refresh rate = (Hz*1000)/1001
CE vendor specific data (VSDB)
IEEE registration number. 0x000C03
CEC physical address..... 1.0.0.0
Maximum TMDS clock..... 165MHz
CE speaker allocation data
Channel configuration.... 2.0
Front left/right..... Yes
Front LFE...... No
Front center...... No
Rear left/right..... No
Rear center...... No
Front left/right center.. No
Rear left/right center... No
Rear LFE...... No
Report information
Date generated.... 10/3/2018
Software revision..... 2.60.0.972
Data source...... Real-time 0x0041
Operating system...... 6.1.7601.2.Service Pack 1
Raw data
00,FF,FF,FF,FF,FF,FF,00,2D,B2,00,12,00,00,00,00,FF,19,01,03,80,34,20,78,EA,B3,25,AC,51,30,B4,26.
10,50,54,FF,FF,80,81,8F,81,99,A9,40,61,59,45,59,31,59,71,4A,81,40,01,1D,00,72,51,D0,1E,20,6E,28.
55.00,07,44.21,00,00.1E,00,00,00,FD,00.38,4C,1E.53,11.00,0A,20.20,20.20,20.20,20.00,00.00,FC,00.54
50,2D,35,38,30,52,41,20,20,20,20,00,00,00,00,00,00,00,00,00,00,00,00,00,00,00,00,01.72,
02,03,1B,F1,23,09,07,07,48,10,05,84,03,02,07,16,01,65,03,0C,00,10,00,83,01,00,00,02,3A,80,18,71
38.2D,40.58.2C,45.00.07.44,21.00.00.1E.01.1D,80.18.71.1C,16,20.58.2C,25.00.07.44,21.00.00.9E.01.
1D.00.72.51.D0.1E.20.6E.28.55.00.07.44.21.00.00.1E.8C.0A.D0.8A.20.E0.2D.10.10.3E.96.00.07.44.21.
00.00,18,00.00,00.00,00.00,00.00,00.00,00.00,00.00,00.00,00.00,00.00,00.00,00.00,00.47
Default Parameters
| Parameter | Value |
| Device Name | KRAMER_ |
| Model | TP-580RA |
| Video delay power off 5V on signal loss | 5 minutes (configurable to max 15 minutes, see AV-SW-TIMEOUT on page 25) ) |
| HDCP | Follow output |
Protocol 3000
The HDMI Line Receiver can be operated using serial commands from a PC, remote controller or touch screen using the Kramer Protocol 3000.
This section describes:
- Kramer Protocol 3000 syntax (see Kramer Protocol 3000 Syntax on page 17).
- Kramer Protocol 3000 commands (see Kramer Protocol 3000 Commands on page 20).
Kramer Protocol 3000 Syntax
Host Message Format
| Start | Address (optional) | Body | Delimiter |
| # | Device_id@ | Message | CR |
Simple Command
Command string with only one command without addressing:
| Start | Body | Delimiter |
| # | Command SP Parameter_1,Parameter_2,... | CR |
Command String
Formal syntax with commands concatenation and addressing:
| Start | Address | Body | Delimiter |
| # | Device_id@ | Command_1 Parameter1_1,Parameter1_2,...|Command_2 Parameter2_1,Parameter2_2,...|Command_3 Parameter3_1,Parameter3_2,...|... | CR |
Device Message Format
| Start | Address (optional) | Body | Delimiter |
| ~ | Device_id@ | Message | CR LF |
Device Long Response
Echoing command:
| Start | Address (optional) | Body | Delimiter |
| ~ | Device_id@ | Command SP [Param1, Param2 ...] result | CR LF |
CR = Carriage return (ASCII 13 = 0x0D)
LF = Line feed (ASCII 10 = 0x0A)
SP = Space (ASCII 32 = 0x20)
Command Terms
Command
A sequence of ASCII letters ('A'-'Z', 'a'-'z' and '-'').
Command and parameters must be separated by at least one space.
Parameters
A sequence of alphanumeric ASCII characters ('0'-'9', 'A'-'Z', 'a'-'z' and some special characters for specific commands). Parameters are separated by commas.
Message string
Every command entered as part of a message string begins with a message starting character and ends with a message closing character.
Note: A string can contain more than one command. Commands are separated by a pipe ( '') character.
Message starting character
'#' – For host command/query
'\~' – For device response
Device address (Optional, for K-NET)
K-NET Device ID followed by '@'
Query sign
'?' follows some commands to define a query request.
Message closing character
CR – For host messages; carriage return (ASCII 13)
CRLF – For device messages; carriage return (ASCII 13) + line-feed (ASCII 10)
Command chain separator character
When a message string contains more than one command, a pipe ('|') character separates each command.
Spaces between parameters or command terms are ignored.
Entering Commands
You can directly enter all commands using a terminal with ASCII communications software, such as HyperTerminal, Hercules, etc. Connect the terminal to the serial or Ethernet port on the Kramer device. To enter CR press the Enter key.
(LF is also sent but is ignored by command parser).
For commands sent from some non-Kramer controllers like Crestron, some characters require special coding (such as, /X##). Refer to the controller manual.
Command Forms
Some commands have short name syntax in addition to long name syntax to allow faster typing. The response is always in long syntax.
Chaining Commands
Multiple commands can be chained in the same string. Each command is delimited by a pipe character ("|"). When chaining commands, enter the message starting character and the message closing character only once, at the beginning of the string and at the end.
Commands in the string do not execute until the closing character is entered.
A separate response is sent for every command in the chain.
Maximum String Length
64 characters
Kramer Protocol 3000 Commands
System Commands - Mandatory
All devices running Protocol 3000 use these commands.
| Command | Description | Type | Permission |
| # | Protocol handshaking | System-mandatory | End User |
| BUILD-DATE? | Get device build date | System-mandatory | End User |
| FACTORY | Reset to factory default configuration | System-mandatory | End User |
| HELP | Get command list | System-mandatory | End User |
| MODEL? | Get device model | System-mandatory | End User |
| PROT-VER? | Get device protocol version | System-mandatory | End User |
| RESET | Reset device | System-mandatory | Administrator |
| SN? | Get device serial number | System-mandatory | End User |
| VERSION? | Get device firmware version | System-mandatory | End User |
| Functions | Permission | Transparency | |
| Set: | # | End User | Public |
| Get: | - | - | - |
| Description | Syntax | ||
| Set: | Protocol handshaking | #CR | |
| Get: | - | - | |
| Response | |||
| ~nn@SPOKCR LF | |||
| Parameters | |||
| Response Triggers | |||
| Notes | |||
| Validates the Protocol 3000 connection and gets the machine numberStep-in master products use this command to identify the availability of a device | |||
| K-Config Example | |||
| “#”, 0x0D | |||
BUILD-DATE?
| Functions | Permission | Transparency | |
| Set: | - | - | - |
| Get: | BUILD-DATE? | End User | Public |
| Description | Syntax | ||
| Set: | - | - | |
| Get: | Get device build date | #BUILD-DATE?CR | |
| Response | |||
| ~nn@BUILD-DATESPdateSPtimeCR LF | |||
| Parameters | |||
| date-Format: YYYY/MM/DD where YYYY = Year, MM = Month, DD = Day time-Format: hh:mm:ss where hh = hours, mm = minutes, ss = seconds | |||
| Response Triggers | |||
| Notes | |||
| K-Config Example | |||
| "#BUILD-DATE?", 0x0D | |||
FACTORY
| Functions | Permission | Transparency | |
| Set: | FACTORY | End User | Public |
| Get: | - | - | - |
| Description | Syntax | ||
| Set: | Reset device to factory default configuration | #FACTORYCR | |
| Get: | - | - | |
| Response | |||
| ~nn@FACTORYSPOKCR LF | |||
| Parameters | |||
| Response Triggers | |||
| Notes | |||
| This command deletes all user data from the device. The deletion can take some time.Your device may require powering off and powering on for the changes to take effect. | |||
| K-Config Example | |||
| “#FACTORY”, 0x0D | |||
HELP
| Functions | Permission | Transparency | |
| Set: | - | - | - |
| Get: | HELP | End User | Public |
| Description | Syntax | ||
| Set: | - | - | |
| Get: | Get command list or help for specific command | 2 options:1.#HELPCR2.#HELPSPcommand_nameCR | |
| Response | |||
| 1.Multi-line:~nn@Device available protocol 3000 commands:CR LFcommand,SPcommand...CR LFTo get help for command use:HELP(COMMAND_NAME)CR LF2.Multi-line:~nn@HELPSPcommand:CR LFdescriptionCR LFUSAGE:usageCR LF | |||
| Parameters | |||
| Response Triggers | |||
| Notes | |||
| K-Config Example | |||
| "#HELP",0x0D | |||
MODEL?
| Functions | Permission | Transparency | |
| Set: | - | - | - |
| Get: | MODEL? | End User | Public |
| Description | Syntax | ||
| Set: | - | - | |
| Get: | Get device model | #MODEL?CR | |
| Response | |||
| ~nn@MODELSPmodel_nameCR LF | |||
| Parameters | |||
| model_name - string of up to 19 printable ASCII chars | |||
| Response Triggers | |||
| Notes | |||
| This command identifies equipment connected to Step-in master products and notifies of identity changesto the connected equipment. The Matrix saves this data in memory to answer REMOTE-INFO requests | |||
| K-Config Example | |||
| "#MODEL?",0x0D | |||
PROT-VER?
| Functions | Permission | Transparency | |
| Set: | - | - | - |
| Get: | PROT-VER? | End User | Public |
| Description | Syntax | ||
| Set: | - | - | |
| Get: | Get device protocol version | #PROT-VER?CR | |
| Response | |||
| ~nn@PROT-VERSP3000:versionCR LF | |||
| Parameters | |||
| version - XX.XX where X is a decimal digit | |||
| Response Triggers | |||
| Notes | |||
| K-Config Example | |||
| "#PROT-VER?", 0x0D | |||
RESET
| Functions | Permission | Transparency | |
| Set: | RESET | Administrator | Public |
| Get: | - | - | - |
| Description | Syntax | ||
| Set: | Reset device | #RESETCR | |
| Get: | - | - | |
| Response | |||
| ~nn@RESET SPOK CR LF | |||
| Parameters | |||
| Response Triggers | |||
| Notes | |||
| To avoid locking the port due to a USB bug in Windows, disconnect USB connections immediately after running this command. If the port was locked, disconnect and reconnect the cable to reopen the port. | |||
| K-Config Example | |||
| “#RESET”, 0x0D | |||
SN?
| Functions | Permission | Transparency | |
| Set: | - | - | - |
| Get: | SN? | End User | Public |
| Description | Syntax | ||
| Set: | - | - | |
| Get: | Get device serial number | #SN?CR | |
| Response | |||
| ~nn@SNSPserial_numberCR LF | |||
| Parameters | |||
| serial_number-14 decimal digits, factory assigned | |||
| Response Triggers | |||
| Notes | |||
| K-Config Example | |||
| "#SN?",0x0D | |||
VERSION?
| Functions | Permission | Transparency | |
| Set: | - | - | - |
| Get: | VERSION? | End User | Public |
| Description | Syntax | ||
| Set: | - | - | |
| Get: | Get firmware version number | #VERSION? CR | |
| Response | |||
| ~nn@VERSION SP firmware_version CR LF | |||
| Parameters | |||
| firmware_version - XX.XX.XXXX where the digit groups are: major.minor.build version | |||
| Response Triggers | |||
| Notes | |||
| K-Config Example | |||
| "#VERSION?", 0x0D | |||
System Commands
| Command | Description | Type | Permission |
| AV-SW-TIMEOUT | Set/get auto switching timeout | System | End user |
| DISPLAY? | Get output HPD status | Switch | End User |
| DPSW-STATUS? | Get the DIP-switch status | System | End User |
| HDCP-MOD | Set/get HDCP mode | System | Administrator |
| HDCP-STAT? | Get HDCP signal status | System | End user |
| NAME | Set/get machine (DNS) name | System | Administrator |
| NAME-RST | Reset machine name to factory default (DNS) | System | Administrator |
| SIGNAL? | Get input signal status | System | End User |
AV-SW-TIMEOUT
| Functions | Permission | Transparency | |
| Set: | AV-SW-TIMEOUT | End User | Public |
| Get: | AV-SW-TIMEOUT? | End User | Public |
| Description | Syntax | ||
| Set: | Set auto switching timeout | #AV-SW-TIMEOUTPaction,time_out CR | |
| Get: | Get auto switching timeout | #AV-SW-TIMEOUT?Paction CR | |
| Response | |||
| ~nn@AV-SW-TIMEOUT$Paction,time_out CR | |||
| Parameters | |||
| action – see Video/Audio Signal Changestime_out – timeout in seconds | |||
| Response Triggers | |||
| Notes | |||
| K-Config Example | |||
| Set the auto switching timeout to 5 seconds in the event of video signal lost:"#AV-SW-TIMEOUT 0,5",0x0D | |||
DISPLAY?
| Functions | Permission | Transparency | |
| Set: | - | - | - |
| Get | DISPLAY? | End User | Public |
| Description | Syntax | ||
| Set: | - | - | |
| Get: | Get output HPD status | #DISPLAY?SPout_idCR | |
| Response | |||
| ~nn@DISPLAYSPout_id,statusCR LF | |||
| Parameters | |||
| out_id-output numberstatus-HPD status according to signal validation0 Signal or sink is not valid1 Signal or sink is valid2 Sink and EDID is valid | |||
| Response Triggers | |||
| After execution, response is sent to the com port from which the Get was receivedResponse is sent after every change in output HPD status ON to OFFResponse is sent after every change in output HPD status OFF to ON and ALL parameters (new EDID, etc.) are stable and valid | |||
| Notes | |||
| K-Config Example | |||
| Get the output HPD status of OUT 1:"#DISPLAY? 1",0x0D | |||
DPSW-STATUS?
| Functions | Permission | Transparency | |
| Set: | - | - | - |
| Get: | DPSW-STATUS? | End User | Public |
| Description | Syntax | ||
| Set: | - | - | |
| Get : | Get the DIP-switch state | # DPSW-STATUS?SPdp_sw_idCR | |
| Response | |||
| ~nn@DPSW-STATUS?SPdp_sw_id,statusCR LF | |||
| Parameters | |||
| dp_sw_id-1....num of DIP switchesstatus-0: up, 1: down | |||
| Response Triggers | |||
| Notes | |||
| K-Config Example | |||
| get the DIP-switch 2 status:"#DPSW-STATUS? 2", 0x0D | |||
HDCP-MOD
| Functions | Permission | Transparency | |
| Set: | HDCP-MOD | Administrator | Public |
| Get: | HDCP-MOD? | End User | Public |
| Description | Syntax | ||
| Set: | Set HDCP mode | #HDCP-MOD SP inp_id,mode CR | |
| Get: | Get HDCP mode | #HDCP-MOD? SP stage_id CR | |
| Response | |||
| Set / Get: ~nn@HDCP-MOD SP stage_id,mode CR LF | |||
| Parameters | |||
| inp_id - input number (1.. max number of inputs)mode - HDCP mode:0 HDCP Off1 HDCP On2 Follow input3 Mirror output ("MAC mode")stage_id - number of chosen stage (1.. max number of inputs/outputs) | |||
| Response Triggers | |||
| Response is sent to the com port from which the Set (before execution) / Get command was receivedResponse is sent to all com ports after execution if HDCP-MOD was set by any other external control device (button press, device menu and similar) or HDCP mode changed | |||
| Notes | |||
| Set HDCP working mode on the device input:HDCP supported - HDCP_ON [default]HDCP not supported - HDCP OFFHDCP support changes following detected sink - MIRROR OUTPUT | |||
| K-Config Example | |||
| Get the input HDCP-MODE of IN 1 (HDCP Off):"#HDCP-MOD? 1,0",0x0D | |||
HDCP-STAT?
| Functions | Permission | Transparency | |
| Set: | - | - | - |
| Get: | HDCP-STAT? | End User | Public |
| Description | Syntax | ||
| Set: | None | - | |
| Get: | Get HDCP signal status | #HDCP-STAT?SPstage,stage_idCR | |
| Response | |||
| Set / Get: ~nn@HDCP-STATSPstage,stage_id,statusCR LF | |||
| Parameters | |||
| stage – input/output (0 Input, Output)stage_id– number of chosen stage (1.. max number of inputs/outputs)status – signal encryption status - valid values ON/OFF (0 HDCP Off, 1 HDCP On) | |||
| Response Triggers | |||
| Response is sent to the com port from which the Set (before execution) / Get command was receivedResponse is sent to all com ports after execution if HDCP-STAT was set by any other external control device (button press, device menu and similar) or HDCP mode changed | |||
| Notes | |||
| On output – sink statusOn input – signal status | |||
| K-Config Example | |||
| Get the HDCP input signal status of the source device connected to the INPUT:"#HDCP-STAT? 0,1",0x0D | |||
NAME
| Functions | Permission | Transparency | |
| Set: | NAME | Administrator | Public |
| Get: | NAME? | End User | Public |
| Description | Syntax | ||
| Set: | Set machine (DNS) name | #NAME SPmachine_nameCR | |
| Get: | Get machine (DNS) name | #NAME? CR | |
| Response | |||
| Set: ~nn@NAME SPmachine_name CR LF | |||
| Get: ~nn@NAME? SPmachine_name CR LF | |||
| Parameters | |||
| machine_name - string of up to 15 alpha-numeric chars (can include hyphen, not at the beginning or end) | |||
| Response Triggers | |||
| Notes | |||
| The machine name is not the same as the model name. The machine name is used to identify a specific machine or a network in use (with DNS feature on) | |||
| K-Config Example | |||
| Set the DNS name of the device to “room-442”:“#NAME room-442”,0x0D | |||
NAME-RST
| Functions | Permission | Transparency | |
| Set: | NAME-RST | Administrator | Public |
| Get: | - | - | - |
| Description | Syntax | ||
| Set: | Reset machine (DNS) name to factory default | #NAME-RSTCR | |
| Get: | - | - | |
| Response | |||
| ~nn@NAME-RSTSPOKCR LF | |||
| Parameters | |||
| Response Triggers | |||
| Notes | |||
| Factory default of machine (DNS) name is “KRAMER_” + 4 last digits of device serial number | |||
| K-Config Example | |||
| Reset the machine name (S/N last digits are 0102):“#NAME-RST KRAMER_0102”, 0x0D | |||
SIGNAL?
| Functions | Permission | Transparency | |
| Set: | - | - | - |
| Get | SIGNAL? | End User | Public |
| Description | Syntax | ||
| Set: | - | - | |
| Get: | Get input signal status | #SIGNAL?SPinp_idCR | |
| Response | |||
| ~nn@SIGNALSPinp_id,statusCR LF | |||
| Parameters | |||
| inp_id - input numberstatus - see Input Signal Status | |||
| Response Triggers | |||
| After execution, a response is sent to the com port from which the Get was receivedResponse is sent after every change in input signal status ON to OFF, or OFF to ON | |||
| Notes | |||
| K-Config Example | |||
| Get the input signal status:"#SIGNAL? 1",0x0D | |||
EDID Handling Commands
| Command | Description | Type | Permission |
| CPEDID | Copy EDID data from the output to the input EEPROM | EDID Handling | End User |
CPEDID
| Functions | Permission | Transparency | |
| Set: | CPEDID | End User | Public |
| Get: | - | - | - |
| Description | Syntax | ||
| Set: | Copy EDID data from the output to the input EEPROM | #CPEDIDSPsrc_type,src_id,dst_type,dest_bitmapCR or#CPEDIDSPsrc_type,src_id,dst_type,dest_bitmap,safe_modeCR | |
| Get: | - | - | |
| Response | |||
| ~nn@CPEDIDSPsrc_stg,src_id,dst_type,dest_bitmapCR LF~nn@CPEDIDSPsrc_stg,src_id,st_type,dest_bitmap,safe_modeCR LF | |||
| Parameters | |||
| src_type - EDID source type (usually output)0 Input1 Output2 Default EDID3 Custom EDIDsrc_id-number of chosen source stage (1.. max number of inputs/outputs)dst_type - EDID destination type (usually input)0 Input1 Output2 Default EDID3 Custom EDIDdest_bitmap - bitmap representing destination IDs. Format: XXXX...X, where X is hex digit. The binary form of every hex digit represents corresponding destinations. Setting '1' says that EDID data has to be copied to this destinationsafe_mode - 0 - device accepts the EDID as is without trying to adjust- 1 - device tries to adjust the EDID (default value if no parameter is sent) | |||
| Response Triggers | |||
| Response is sent to the com port from which the Set was received (before execution) | |||
| Notes | |||
| Destination bitmap size depends on device properties (for 64 inputs it is a 64-bit word)Example: bitmap 0x0013 means inputs 1,2 and 5 are loaded with the new EDIDIn certain products Safe_mode is an optional parameter. See the HELP command for its availability | |||
| K-Config Example | |||
| Copy the EDID data from the HDBT OUT 2 (EDID source) to HDMI INPUT:"#CPEDID 1,2,0,0x1",0x0DCopy the EDID data from the default EDID source to HDMI INPUT:"#CPEDID 2,0,0,0x5",0x0D | |||
The warranty obligations of Kramer Electronics Inc. ("Kramer Electronics") for this product are limited to the terms set forth below:
What is Covered
This limited warranty covers defects in materials and workmanship in this product.
What is Not Covered
This limited warranty does not cover any damage, deterioration or malfunction resulting from any alteration, modification, improper or unreasonable use or maintenance, misuse, abuse, accident, neglect, exposure to excess moisture, fire, improper packing and shipping (such claims must be presented to the carrier), lightning, power surges, or other acts of nature. This limited warranty does not cover any damage, deterioration or malfunction resulting from the installation or removal of this product from any installation, any unauthorized tampering with this product, any repairs attempted by anyone unauthorized by Kramer Electronics to make such repairs, or any other cause which does not relate directly to a defect in materials and/or workmanship of this product. This limited warranty does not cover cartons, equipment enclosures, cables or accessories used in conjunction with this product.
Without limiting any other exclusion herein, Kramer Electronics does not warrant that the product covered hereby, including, without limitation, the technology and/or integrated circuit(s) included in the product, will not become obsolete or that such items are or will remain compatible with any other product or technology with which the product may be used.
How Long this Coverage Lasts
The standard limited warranty for Kramer products is seven (7) years from the date of original purchase, with the following exceptions:
- All Kramer VIA hardware products are covered by a standard three (3) year warranty for the VIA hardware and a standard three (3) year warranty for firmware and software updates.
- All Kramer fiber optic cables, adapter-size fiber optic extenders, active cables, cable retractors, all Kramer speakers and Kramer touch panels are covered by a standard one (1) year warranty.
- All Kramer Cobra products, all Kramer Calibre products, all Kramer Minicom digital signage products, all HighSecLabs products, all streaming, and all wireless products are covered by a standard three (3) year warranty.
- All Sierra Video MultiViewers are covered by a standard five (5) year warranty.
- Sierra switchers & control panels are covered by a standard seven (7) year warranty (excluding power supplies and fans that are covered for three (3) years).
- K-Touch software is covered by a standard one (1) year warranty for software updates.
- All Kramer passive cables are covered by a ten (10) year warranty.
Who is Covered
Only the original purchaser of this product is covered under this limited warranty. This limited warranty is not transferable to subsequent purchasers or owners of this product.
What Kramer Electronics Will Do
Kramer Electronics will, at its sole option, provide one of the following three remedies to whatever extent it shall deem necessary to satisfy a proper claim under this limited warranty:
- Elect to repair or facilitate the repair of any defective parts within a reasonable period of time, free of any charge for the necessary parts and labor to complete the repair and restore this product to its proper operating condition. Kramer Electronics will also pay the shipping costs necessary to return this product once the repair is complete.
- Replace this product with a direct replacement or with a similar product deemed by Kramer Electronics to perform substantially the same function as the original product.
- Issue a refund of the original purchase price less depreciation to be determined based on the age of the product at the time remedy is sought under this limited warranty.
What Kramer Electronics Will Not Do Under This Limited Warranty
If this product is returned to Kramer Electronics or the authorized dealer from which it was purchased or any other party authorized to repair Kramer Electronics products, this product must be insured during shipment, with the insurance and shipping charges prepaid by you. If this product is returned uninsured, you assume all risks of loss or damage during shipment. Kramer Electronics will not be responsible for any costs related to the removal or re-installation of this product from or into any installation. Kramer Electronics will not be responsible for any costs related to any setting up this product, any adjustment of user controls or any programming required for a specific installation of this product.
How to Obtain a Remedy Under This Limited Warranty
To obtain a remedy under this limited warranty, you must contact either the authorized Kramer Electronics reseller from whom you purchased this product or the Kramer Electronics office nearest you. For a list of authorized Kramer Electronics resellers and/or Kramer Electronics authorized service providers, visit our web site at www.kramerav.com or contact the Kramer Electronics office nearest you.
In order to pursue any remedy under this limited warranty, you must possess an original. dated receipt as proof of purchase from an authorized Kramer Electronics reseller. If this product is returned under this limited warranty, a return authorization number, obtained from Kramer Electronics, will be required (RMA number). You may also be directed to an authorized reseller or a person authorized by Kramer Electronics to repair the product. If it is decided that this product should be returned directly to Kramer Electronics, this product should be properly packed, preferably in the original carton, for shipping. Cartons not bearing a return authorization number will be refused.
Limitation of Liability
THE MAXIMUM LIABILITY OF KRAMER ELECTRONICS UNDER THIS LIMITED WARRANTY SHALL NOT EXCEED THE ACTUAL PURCHASE PRICE PAID FOR THE PRODUCT. TO THE MAXIMUM EXTENT PERMITTED BY LAW, KRAMER ELECTRONICS IS NOT RESPONSIBLE FOR DIRECT, SPECIAL, INCIDENTAL OR CONSEQUENTIAL DAMAGES RESULTING FROM ANY BREACH OF WARRANTY OR CONDITION, OR UNDER ANY OTHER LEGAL THEORY. Some countries, districts or states do not allow the exclusion or limitation of relief, special, incidental, consequential or indirect damages, or the limitation of liability to specified amounts, so the above limitations or exclusions may not apply to you.
Exclusive Remedy
TO THE MAXIMUM EXTENT PERMITTED BY LAW, THIS LIMITED WARRANTY AND THE REMEDIES SET FORTH ABOVE ARE EXCLUSIVE AND IN LIEU OF ALL OTHER WARRANTIES, REMEDIES AND CONDITIONS, WHETHER ORAL OR WRITTEN, EXPRESS OR IMPLIED. TO THE MAXIMUM EXTENT PERMITTED BY LAW, KRAMER ELECTRONICS SPECIFICALLY DISCLAIMS ANY AND ALL IMPLIED WARRANTIES, INCLUDING, WITHOUT LIMITATION, WARRANTIES OF MERCHANTABILITY AND FITNESS FOR A PARTICULAR PURPOSE. IF KRAMER ELECTRONICS CANNOT LAWFULLY DISCLAIM OR EXCLUDE IMPLIED WARRANTIES UNDER APPLICABLE LAW, THEN ALL IMPLIED WARRANTIES COVERING THIS PRODUCT, INCLUDING WARRANTIES OF MERCHANTABILITY AND FITNESS FOR A PARTICULAR PURPOSE, SHALL APPLY TO THIS PRODUCT AS PROVIDED UNDER APPLICABLE LAW. IF ANY PRODUCT TO WHICH THIS LIMITED WARRANTY APPLIES IS A "CONSUMER PRODUCT" UNDER THE MAGNUSON-MOSS WARRANTY ACT (15 U.S.C.A. §2301, ET SEQ.) OR OTHER APPLICABLE LAW, THE FOREGOING DISCLAIMER OF IMPLIED WARRANTIES SHALL NOT APPLY TO YOU, AND ALL IMPLIED WARRANTIES ON THIS PRODUCT, INCLUDING WARRANTIES OF MERCHANTABILITY AND FITNESS FOR THE PARTICULAR PURPOSE, SHALL APPLY AS PROVIDED UNDER APPLICABLE LAW.
Other Conditions
This limited warranty gives you specific legal rights, and you may have other rights which vary from country to country or state to state.
This limited warranty is void if (i) the label bearing the serial number of this product has been removed or defaced, (ii) the product is not distributed by Kramer Electronics or (iii) this product is not purchased from an authorized Kramer Electronics reseller. If you are unsure whether a reseller is an authorized Kramer Electronics reseller, visit our web site at www.kramerav.com or contact a Kramer Electronics office from the list at the end of this document.
Your rights under this limited warranty are not diminished if you do not complete and return the product registration form or complete and submit the online product registration form. Kramer Electronics thanks you for purchasing a Kramer Electronics product. We hope it will give you years of satisfaction.




P/N: 2900-300863

Rev: 1


SAFETY WARNING
Disconnect the unit from the power supply before opening and servicing
For the latest information on our products and a list of Kramer distributors, visit our Web site where updates to this user manual may be found.
We welcome your questions, comments, and feedback.
- Contents
- Introduction
- Getting Started
- Achieving the Best Performance
- Safety Instructions
- Recycling Kramer Products
- Overview
- About HDBaseT Technology
- Defining the TP-580RA HDMI Line Receiver
- Connecting the TP-580RA HDMI Line Receiver
- To connect the TP-580RA HDMI Line Receiver:
- Wiring the RJ 45 Connectors
- Connecting to TP-580RA via RS-232
- Operating the TP-580RA HDMI Line Receiver
- Controlling A/V Equipment via an IR Remote Control
- Acquiring EDID
- Pass-Through Mode
- EDID Lock Mode
- Setting the Default EDID
- To set the default EDID:
- Extracting the Audio
- Configuring the TP-580RA HDMI Line Receiver
- Setting the DIP-Switches
- Video Auto Shut-off Delay
- Upgrading the Firmware
- Default Communication Parameters
- Default EDID
- Detailed default EDID information is:
- EIA/CEA-861 Information
- CE audio data (formats supported)
- CE video identifiers (VICs) - timing/formats supported
- CE vendor specific data (VSDB)
- CE speaker allocation data
- Report information
- Raw data
- Default Parameters
- Protocol 3000
- Kramer Protocol 3000 Syntax
- Host Message Format
- Simple Command
- Command String
- Device Message Format
- Device Long Response
- Command Terms
- Command
- Parameters
- Message string
- Message starting character
- Query sign
- Message closing character
- Command chain separator character
- Entering Commands
- Command Forms
- Chaining Commands
- Maximum String Length
- Kramer Protocol 3000 Commands
- System Commands - Mandatory
- What is Covered
- What is Not Covered
- How Long this Coverage Lasts
- Who is Covered
- What Kramer Electronics Will Do
- What Kramer Electronics Will Not Do Under This Limited Warranty
- How to Obtain a Remedy Under This Limited Warranty
- Limitation of Liability
- Exclusive Remedy
- Other Conditions
Brand : Kramer
Model : TP-580RA
Category : Audio/video extender