
Steel 625 - Lawn mower LawnMaster - Free user manual and instructions
Find the device manual for free Steel 625 LawnMaster in PDF.


| Product Type | Rotary lawn mower |
| Brand | LawnMaster |
| Model | Steel 625 |
| Cutting Width | 18 inches (457 mm) |
| Cutting Height Adjustment | Single lever, 10 positions, 10 mm - 65 mm |
| Engine Type | 4-stroke |
| Engine Oil Grade | 10W30 |
| Fuel Type | Unleaded petrol, 91 octane |
| Grass Catcher Capacity | 47 liters |
| Drive Type | Manual push (self-propelled model available) |
| Mulching Capability | Yes (with mulch plug) |
| Height of Cut (max) | 65 mm |
| Height of Cut (min) | 10 mm |
| Spark Plug Gap | 0.7 - 0.8 mm |
| Blade Bolt Torque | 20 Nm (flail blades), 50 Nm (center bolt) |
| Warranty | 5 years comprehensive parts and labor |
| Self-Propelled Control | Drive lever on handlebar (on self-propelled models) |
| Handlebar Folding | Yes, with pivot bolt knobs |
| Safety Features | Zone start, rear flap, spark plug disconnect before maintenance |
Frequently Asked Questions - Steel 625 LawnMaster
User questions about Steel 625 LawnMaster
0 question about this device. Answer the ones you know or ask your own.
Ask a new question about this device
Download the instructions for your Lawn mower in PDF format for free! Find your manual Steel 625 - LawnMaster and take your electronic device back in hand. On this page are published all the documents necessary for the use of your device. Steel 625 by LawnMaster.
USER MANUAL Steel 625 LawnMaster
STEEL BODY MOWER OWNER'S MANUAL
TABLE OF CONTENTS
1. CONTENTS
2. SAFETY INSTRUCTIONS
Before Using The Mower Operation
Engine Information
Handlebar Folding Instructions
Assembling The Catcher
Starting The Mower Cold
Starting The Mower Hot
Stopping The Engine
Throttle Control Lever
Zone Start
Recoil Start
Key Start
Cutting Height Adjustment
Cutting Blade Adjustment
Grass Catcher
Mulching Models
Fitting And Removing The Mulcher Plate
Self-Propelled Models
4. MAINTENANCE
Engine
Check Engine Oil Level
Clean The Air Filter
Check Spark Plug
Rotating Screen
Throttle Control & Self-Propelled Control
Fasteners And Linkages
Blade Care
Change Worn Or Damaged Blades
Disc Blade Assembly
Blade Replacement Torque Settings
Carburettor Adjustment
5. CLEANING & STORAGE
Cleaning The Mower Body
Cleaning The Catcher Muffler
Cleaning Under Self-Propelled Drive Cover Storage
6. WARRANTY
7. TROUBLESHOOTING & SPARE PARTS
FOR YOUR RECORDS
The following information should be recorded as a reference should you wish to contact your Service Agent.
Model:
Serial Number:
Purchase Date:
Purchase Price:
Owner's Name:
Retailers Name:
Address:
Before using your new Rotary Mower read the Owner's Manual carefully until you completely understand and can follow all warnings and safety instructions before commissioning and operating your mower.
SAFETY INSTRUCTIONS

WARNING
Precautions must be taken to avoid injury to the operator, or any bystander...or damage to your mower.
Key to Mower SymbolsKey to Mower Symbols

Warning
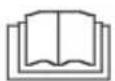
Read instructions before starting operations

Be careful of object(s) thrown from the mower
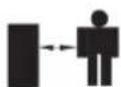
Keep other people away from the danger zone

Disconnect spark plug before maintenance

Danger – Keep hands and feet away from cutting blades

Be careful of hot surfaces
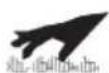
Danger – Do not touch hot surfaces
This sign is used to indicate important information for your safety and to prevent damage.

WARNING
Read this manual before using the lawnmower. It is essential that operators study it for their own and others' safety
- Read the instructions carefully. Be familiar with the controls and use of the equipment.
- Know how to stop the lawnmower and disengage the controls quickly in an emergency.
- The operator or user is responsible for accidents or hazards occurring to other people or property.
SAFETY
- Never allow children or people unfamiliar with these instructions to use the lawnmower.
- Never operate the lawnmower while people or animals are nearby.
- While mowing, always wear substantial footwear and long trousers. Do not operate the lawnmower when barefoot or wearing open sandals.
- Never operate the lawnmower with defective guards, shields or without safety protection devices in place and in good working order.
- Do not operate the lawnmower in a confined space where dangerous carbon monoxide fumes can collect.
- Never cut grass while walking backwards.
- Always wear suitable eye & ear protection when operating the lawnmower.
- Mow only in daylight hours or in good artificial light.
- Never lift or carry the lawnmower while the engine is running.
-
Keep hands and feet well clear of rotating blades and components.
-
Always stop the engine when you leave the lawnmower unattended and when crossing roads, pathways or gravel drives.
- Never mow without the catcher or mulch plug fitted or without the rear flap being in the closed/down position.
BEFORE USING THE MOWER
- LawnMaster mowers with 4 Stroke engines require 10W30 oil (LawnMaster Oil, PP01020005, recommended). OIL MUST BE PLACED IN ENGINE BEFORE STARTING.
Please refer to Engine Manual, for filling volume and method. Failure to do so will result in engine damage and will void engine warranty.
- DO NOT TIP THE MOWER, as this will flood and damage the engine and may void warranty claims.
- Learn how to stop the engine quickly in an emergency bymoving the throttle to the 'STOP' position.
- Do not start the engine unless the rear flap and/or grasscatcher are securely in position.
- Thoroughly inspect the area where the lawnmower is to be used and remove all stones, sticks, wires, bones and any other foreign objects.
- When mowing on slopes, only mow across the face, never up and down. Exercise extreme caution when changing direction. Do not attempt to mow excessively steep gradients. A 15° incline is the maximum recommended.
OPERATION
-
General
-
Check that the lawnmower is in good working order before using.
- Do not adjust throttle or governor settings, as this will have a detrimental effect on the mowers cutting ability and ultimately shorten the lawnmower's working life.
-
DO NOT TIP THE MOWER, as this will flood the engine and may void warranty claims.
-
Lawnmower Body
-
Visually inspect to see that the cutting blade(s), blade bolts and cutting disc are not worn or damaged.
-
Regularly check that all nuts, bolts, linkages and connections are tight and secure.
-
Repair or replace excessively worn or damaged components with genuine Spare Parts only.
-
Ensure that the blade assembly is not worn or damaged. Always replace worn or damaged blades and bolts in sets to preserve correct balance.
-
Fuel
-
Add fuel before you start mowing.
• Refuel and lubricate outdoors only. - Only remove the fuel cap and add fuel while the engine is stopped.
- Thoroughly clean any fuel spillages before starting the engine.
• After refuelling or topping up with engine oil, ensure that the filler caps are replaced securely. -
Store fuel in a cool place away from direct sunlight in a suitable container
-
Engine, Drive & Blade
Stop the engine and disconnect the spark plug before attempting to:
- Clean the mower.
• Un-block the cutting mechanisms. - Carry out maintenance or repairs.
- Inspect the mower if abnormal vibrations occur or after striking a foreign object.
- Damaged or worn blades and bolts are major hazards. Only use genuine LawnMaster spare part.
- Please note blades may be tucked under blade disc for safety and transport reasons before use. Once the engine is started they will relocate themselves for cutting.
- Check all fasteners regularly. Always ensure the mower is in a safe operating condition.
- Check for grass build up around the engine and muffler which may cause overheating and/or a fire hazard.
Open the carton and remove the lawnmower and its accessories...and you will find:
- 1 x Rotary Mower
• 1 x Grass catcher TOP (If Applicable)
• 1 x Grass catcher BASE (If Applicable) - 8 x Screws for Catcher (If Applicable)
- 1 x Mulch plug (if applicable)
- 1 x Owner's Manual
- 1 x Engine manufacturer's Owner's Manual
Take precautions when doing this to ensure that you do not put undue stress on your back when lifting from the carton. It is recommended that two people lift out the mower to prevent injury or use a suitable hoist, if available.
Engine information
Refer to the separate Engine Manufacturer's Owners' Manual (supplied with every rotary mower) that accompanies this booklet and carry out all of the safety checks before proceeding with the commissioning of the mower.


WARNING
Engines fitted to rotary mowers are shipped without oil. Check the Engine Manufacturer's manual for oil grade details. 10W30 OIL MUST BE PLACED IN ENGINE BEFORE STARTING (LawnMaster Oil, PP01020005, recommended).
With the lawnmower in a level position;
- Remove the oil dipstick.
- Wipe the dipstick clean.
- Fill to the full mark, pouring slowly - DO NOT OVERFILL. Then screw the dipstick securely back into place.
Note that if the engine is overfilled, it will smoke excessively or appear to be seized.


WARNING
Petrol vapour is highly flammable. Handle with extreme care. Store in approved containers only!

Your engine will run best on fresh, clean unleaded petrol (91 octane). Use of unleaded fuel results in fewer combustion deposits, burns cleaner and gives longer valve life.
Do not over-fill the petrol tank to allow for fuel expansion. It is recommended that approximately 5mm to 10mm of tank space is left for this.
When Handling Fuel:
• Do not fill tank when the engine is running.
• Do not smoke or expose naked flame.
• Do fill the tank in open, well-ventilated area.
- Do wipe away any spills.
- Do move the mower away from any petrol fumes before starting the engine.
- DO NOT TIP THE MOWER, as this will flood and damage the engine and may void warranty claims.
HANDLEBAR FOLDING INSTRUCTIONS
Open the lawn mower cardboard carton carefully folding back the carton top flaps.
- Lift out the plastic grass catcher components.
- With the aid of a second person carefully lift the lawnmower out of the cardboard carton and place on a level surface.

- Loosen the two handle bar pivot bolt knobs (A) (where fitted).
- Fold the handle bars out straight, inline with the lower handle bars. Tighten the two handle bar pivot bolt knobs (A) to secure the handle bars in position.
ASSEMBLING THE CATCHER
LawnMaster 18" steel mowers have a large 47L catcher capacity made with robust high density plastic with a unique grass flap design, allowing operator to check the volume' of grass in the catcher.
Some mowers may also have a small lightweight fabric catcher designed for easy storage that requires no assembly.

Plastic Catcher
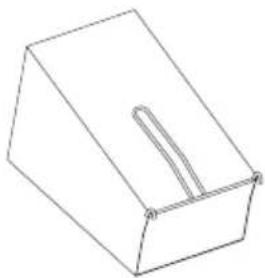
Fabric Catcher
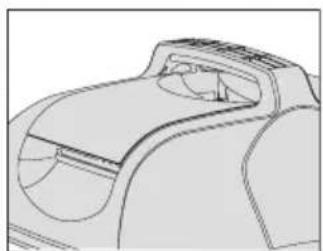
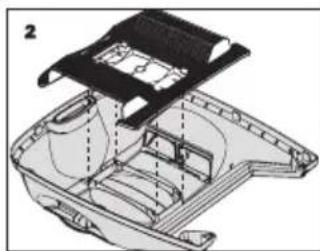
- Assemble the adjustable covers 1A or directional covers 1B to the top half of the grasscatcher.
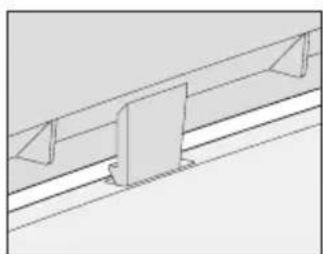
- Locate the centre protrusion of the mesh into the centre hole on the inside of the catcher top, ensuring the curved edge of the mesh faces the rear handle. Firmly push the mesh into the top half of the catcher, making sure that the four snap hooks engage securely.
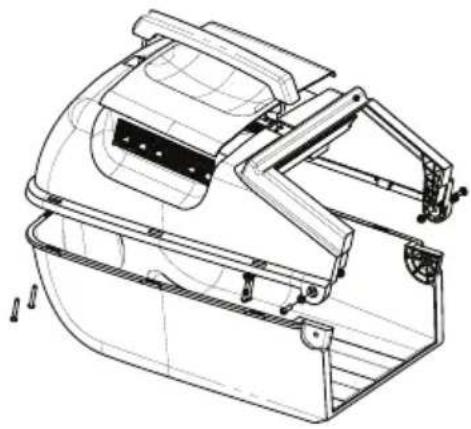
- Loosely locate the rear handle areas of the top and bottom catcher halves then loosely locate the side edges. Check that all eight hooks from the top half are loosely located in the slots on the bottom half then firmly push the two halves together over each snap hook. Check that all of the snap hooks have engaged securely.
- Tighten the all six screws, two fitted to the front of the catcher, two at the back of the catcher and two fitted on on the handle. See Image below.





OPERATING THE MOWER

WARNING
Never start or run the engine indoors or in poorly ventilated areas. Engine exhaust contains carbon monoxide gas which can be fatal. Keep hands, feet and clothing away from moving parts.
Open the fuel shut off valve (where fitted).
Move the throttle control to choke / start position.
Primer / Choke Start
For lawnmowers fitted with a primer bulb – firmly press 3-4 times after the throttle control lever has been moved to the run position.
Some mowers may require no priming, simply put throttle to start / choke position | and pull starting cord to start the mower.
- Grasp the starter grip and pull slowly until resistance is felt and then pull the starter cord with a rapid, smooth movement to start the engine. Do not allow the cord to snap back.
- For models without a 'zone start' feature, place your foot against the mower body then grasp the starter grip.
- Repeat the starting procedure above if necessary.
- When the engine starts, move the throttle to the run position and to the speed desired.
- In the case of flooding occurring, move the throttle to the stop position, pull the starter cord 5 - 6 times, then move the throttle lever to the choke / start or run position and pull the starter cord as above.
Starting The Mower Hot
Follow the above #1 to #5 steps for restarting after emptying catcher or short rest periods. A warm engine will usually start in the idle position. However, if it fails to start, follow the cold start procedure.
Stopping The Engine
To stop the engine, move the throttle control to the stop position. Turn the fuel shut-off valve (where fitted) to the close / off position when the mower is not in operation to prevent fuel leakage from the carburettor.
Throttle Control Lever
The throttle control lever is located on the right hand side of the handle. The throttle lever is moved fully forward into the detented choke / start position to start a cold engine.
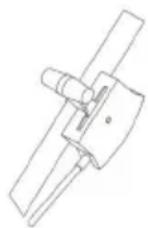
The run position has a detented position for working (or governed) speed and a graduated quadrant slide allows for selected slower running speeds.
Note that the engine speed dictates the speed and operation of the cutting system.
Zone Start
Note that as soon as the engine is cranked the cutting blades rotate immediately. Models fitted with Zone Start allow effortless, trouble free, 'at the handle' starting while keeping feet and hands away from the cutting mechanism and danger zones. To start simply pull the zone start handle firmly as you push the mower handlebar away.
Recoil Start
Refer to the Engine Manufacturer's Owners' Manual for details.
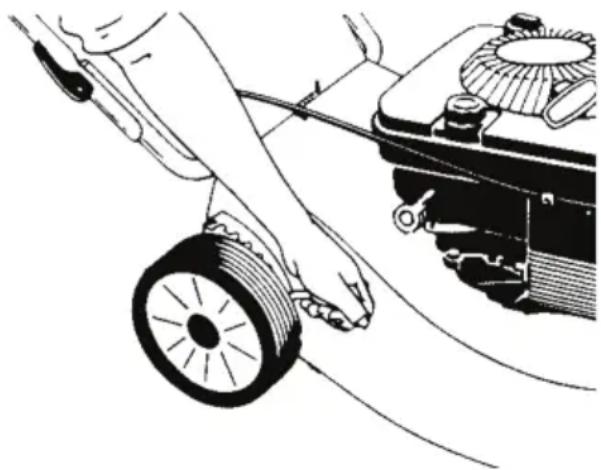
Cutting Height Adjustment
The single lever height adjustment makes for easy change from one height setting to another. There are ten cutting heights available (from 10mm-65mm) and the most suitable height should be selected that best suits the grass and weather conditions. To adjust the height of cut setting, follow the steps below.
- Grip the height adjustment lever by the black knob.
- Apply an outward force to the lever to
disengage it from the quadrant rack setting.
- Holding the lever out, move the lever up or down the quadrant rack to the desired cut height.
- Engage the lever into the quadrant rack by releasing the outward force.

Note when using a mulching mower, using the higher height settings will give the best mulching performance. On some models there are two holes in the axle bell cranks on the left hand side of the mower. The correct setting for the connecting rod link is to have the rear of the link in the top hole and the front of the link in the lower hole.

WARNING
Always disconnect the spark plug lead when adjusting the blade, to prevent accidental engine start.
Cutting Blade Adjustment
It is essential that the relationship between the blade(s) and mower body is kept in good adjustment and that cutting edges are kept sharp to ensure good cutting performance, minimum power consumption and prolonged life for the cutting edges.
Carry out the following procedures before commencing work and re-check the settings every 2 to 3 hours of mowing or when the cutting performance is noticeably reduced. During mowing, the blade tips can move relatively to the mower body through normal work or by hitting obstructions. Check that the cutting blade(s) is correctly set to the mower body by measuring the distance between the blades and the lawnmower skirt, vertically. This distance should nominally be 3 mm.
Disconnect the spark plug cable and carefully rotate the blade by hand and check that the distance is nominally correct all around the mower body. If adjustment is necessary, proceed as follows:
- Remove the spark plug cable from spark plug.

Recommended check dimension 3mm inside mower body
- Rotate the blade(s) manually until it is accessible from the rear flap area.
• Using a crescent spanner on the end of the blade, apply an upward or downward force to correct the distance.
- Re-check each blade and make marginal adjustments as necessary.
• Re-fit the spark plug cable.
If it is impossible to obtain a good clean cut, it may be necessary to take the mower to your local Service Agent to have a new set of blades fitted.
Grass Catcher

WARNING
Always shut off the engine and ensure it has stopped before fitting and removing the grass catcher or raising the rear flap
Your rotary lawnmower can be operated with the grass catcher fitted, or removed as a utility mower.
Note that if the lawnmower is used with the catcher removed, the rear flap must be fitted and located in the down / closed position. To fit the grass catcher, stop the engine and position the catcher on the ground behind the mower. Raise the rear flap and lift the catcher into position ensuring the catcher tongue is located over the rear axle. Slide the catcher forward and upward; lower the flap so that the lugs on the flap locate into the square holes on top of the catcher. Your catcher is now attached.
To remove the grass catcher, stop the engine, hold the catcher by its top handle and raise the rear flap. Lift the grass catcher up and away from the lawnmower and return the grass flap to its down / closed position.
Avoid leaving the catcher in direct sunlight when not in use. The catcher will not deteriorate if stored wet but prolonged exposure to sunlight can cause premature UV breakdown. Dust and clippings will build up inside the catcher and on its venting screen, particularly during wet weather mowing. This debris will impede the function of the catcher so it should be removed by hosing out with water when necessary.
Mulching Models

WARNING
Always wait until the engine has stopped and the blade has stopped rotating before fitting or removing the mulcher plug.
Mulch mowing is recommended at the higher end of the height of cut settings to allow a good even cut and distribution of clippings through the lawn. Mulch mowing involves different mowing practices to conventional mowing and here are a few helpful guidelines to provide the best results with your mulching mower.
- Avoid mulching the lawn in wet conditions. Wet grass will build up on the inside of the body, fall off in clumps and not spread evenly into the lawn. The best time to mulch is in the late afternoon or early evening. By this time the grass is usually dry and the sensitive, newly cut grass is not exposed to the direct sunlight.
- Limit your ground speed to suit the conditions and to obtain the best finish and distribution. The slower the forward speed the better the finish.
- Do not try to mulch on a low cutting height setting. Remember the maximum cut should be 25 mm off the top of the grass or one third of the grass height, whichever is the lesser amount.
Top 1/3 of height or 25mm max

• Always mulch at maximum throttle setting. When engine speed is reduced or the workload is too much, the blades will not mulch the grass efficiently resulting in a poor quality finish.
- Keep the blades sharp for optimum mulching performance and to reduce engine power loss and speed.
- Keep the underside of the lawnmower body clean so that the airflow is not restricted. All rotary lawnmowers are fitted with a convenient wash nozzle for this purpose.
- If a trail of grass is visible, raise the cutting height of the mower.
- If the conditions for mulching are not ideal and (or) there are trails of clippings visible after cutting, there are several steps that you can take. Convert your lawnmower back to catcher mode to remove some of the matted grass, remove over the clippings, raise the height of cut or rake up the clippings after mowing.
- It is recommended to vary the direction of mowing from week to week to prevent matting of the grass. One-week mow east to west, the next mow north to south.
- You may notice excess clippings being dropped during turning; these areas should be re-mown at the end to distribute properly.
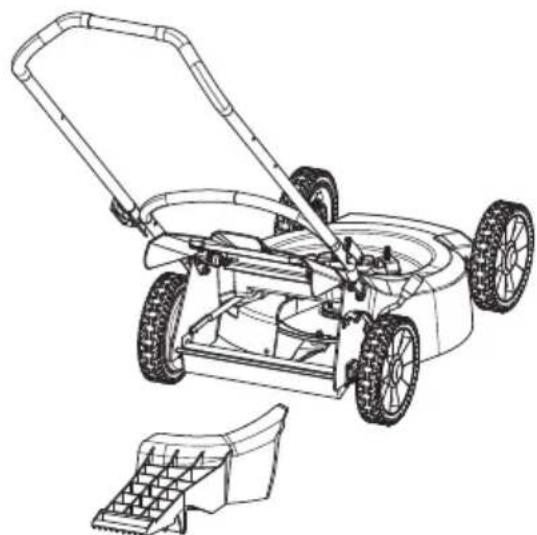
Fitting & Removing The Mulcher Plug
The following list of instructions are ony applicable for mowers that can mulch and catch.
Fitting The Plug
- With the engine stopped, raise the rear flap of the mower and remove the grass catcher.
- Insert the long right hand side of the mulch plug first into the rear chute of the mower.
- Rotate the left hand side into the rear chute of the mower and push it as far forward as possible.
- Align the pins that are on the underside of the mulch plug with that of the slots on the surface of ledge on the base of the mower. The mulch plug will rest on this flat surface and hang of the back.
- Lower the rear flap to ensure the mulch plug is correctly seated. The rear flap should close against the vertical face of the mulch plug.
Removing The Plug
- With the engine stopped, raise the rear flap of the mower.
- Grasp the rear side of the mulch plug and lift up and away from the mower.
- Guide the mulch plug out by rotating the shorter left hand side to the right, then guide the longer right hand section until you clear the mower.
Self-Propelled Models

Drive Lever
To engage drive, squeeze the levers toward the handle and hold against the main handle. To disengage drive, release the drive levers.
Important To Prevent Damage
Regular maintenance is essential for the continued safe operation of the machine. Correct servicing will prolong the working life of the machine and safeguard the Warranty. Always fit genuine Service Parts as these are accurately matched to the required duty.

WARNING
Do not hold the engagement lever in a semi-engage position for long periods of time to avoid excessive clutch wear.
MAINTENANCE
Engine
Refer to the Engine Manufacturer's Owners' Manual for engine maintenance information.


WARNING
Rotary mower (running) engines can seize without sufficient oil
Check Engine Oil Level
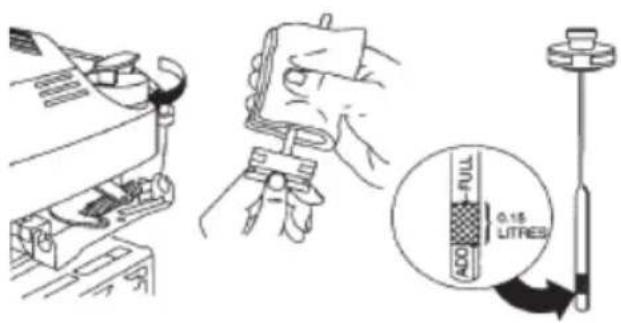
Periodically the oil level should be checked to ensure it is correct. Engine oil also requires changing after the initial first five hours of use, and then every 50 hours of normal use and 25 hours of heavy use thereafter. With the mower in a level position:
- Remove the oil dipstick.
- Wipe the dipstick clean replace and remove.
- If the engine oil level is below the minimum mark on the dipstick, top up with the correct grade of engine oil to the full mark on the dipstick. DO NOT OVER FILL. Then screw the dipstick securely back into place.
Note that if the engine is overfilled, it will smoke excessively or appear to be seized.
Clean The Air Filter
Remove and clean the air filter cartridge at three monthly intervals or every 25 hours of normal use. The air filter cartridge may require servicing more often under dusty operating conditions. To service the air filter cartridge, follow the procedures detailed in the Engine Manufacturer's Owners' Manual.
Check Spark Plug
Clean and reset the spark plug gap every 25 hours of operation. Remember, in small engines, difficult starting and erratic running is most often attributable to a dirty, oily or carbonated spark plug. Do not file or sand blast the spark plug electrode but clean by scraping or wire brushing, then cleaning with a commercial solvent. Clean and reset the spark plug gap at 0.7 - 0.8mm (0.030") every 100 hours of operation. Always fit the recommended spark plug.

Rotating Screen
Through prolonged operation, the rotating screen may become clogged with grass and debris. Clean the screen in line with the engine manufacturer's recommendations to avoid over heating and possible engine damage.
Throttle Control & Self Propelled Control
-
The throttle control lever quadrant should have medium grease smeared over it to protect it from corrosion and to give a smooth operation.
-
For the self propelled, lubricate the cable every 25 hours of mowing by applying a light oil to the top of the inner wire and allowing it to gravity drain down the inside.
• Measure the length of the clutch spring (18mm) when the clutch engagement lever is in the disengaged position.
- Push the clutch engagement lever forward until it touches the handlebar, this is when the drive is in engaged position.
- The clutch spring should be stretched to 28mm (10mm longer). To adjust the clutch spring stretch rotate the thumb wheel on the cable support block (one click at a time).
- To increase the stretch, rotate the thumb wheel in an anti-clockwise direction. To decrease the stretch, rotate the thumb wheel in a clockwise direction.
- Check that the clutch disengages by pulling the mower backwards (with the engagement lever released) - the rear wheels should free wheel. If not, do not attempt to start the mower as it may drive off unattended.
- If the mower free wheels, test the mower at all engine speeds ensuring that it self-disengages when the drive clutch engagement lever is released.
- If you still experience problems, please contact with service dealer or agent.
Drive Wheel Cleaning And Drive Pawl Lubrication (Self Propelled Mowers Only)
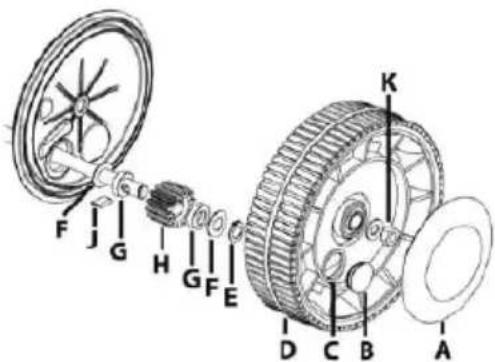
Figure 1 above: rear drive wheels for SP models
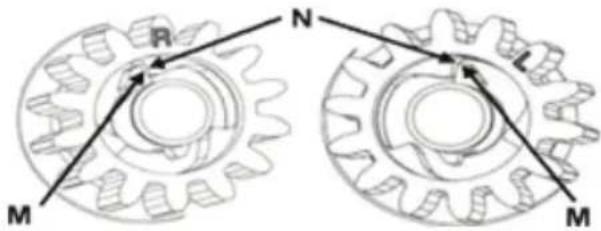
Figure 2 above: Rear wheel pinions and pawls
Every 50 hours:
- Disconnect the spark plug lead.
- Support the rear wheels off the ground and remove the wheel caps (A).
- Remove the nyloc nut and tension washer (K) retaining the wheel (D).
- Remove the wheel (D) from the axle and clean the inside of the wheel hub.
-
Remove the circlip (E), outer washer (F), outer bush (G), pinion gear (H) and pawl (J) from the drive shaft (recording the orientation of the pinion gear and the pawl to ensure correct reinstallation).
-
Clean all components.
- Lightly grease the pawl(J),the slot in the figure 1. Rear drive wheels shaft, bushes (G) and the inside of the pinion gear (H) with light general purpose grease then refit the components onto the drive shaft in the NGrass Catcher ect orientation, retaining them with the circlip (E).
Note: The pinion gear (H) is marked "R" on one side and "L" on the other. The pinion gear (H) is to be fitted with the "R" displayed when fitted on the right hand drive side of the mower and with the "L" displayed when fitted on the left hand drive side. Refer to figure 2. The right and left side of the mower is indicated while standing in the operator position.
Note: The pawl must always be orientated so that the side with the large flat face (M) will come in contact with the flat faces inside the pinion gear (N). The orientation is important to ensure that the pawl will drive the pinion gear when the clutch is engaged). Refer to figure 2.
- Replace the wheel and retain using the tension washer and the nyloc nut (K). Tension the nut just enough to remove the side to side movement of the wheel.
- Replace the wheel caps (A) and re-attach the spark plug lead and lower the wheels to the ground.
Fasteners & Linkages
Check that all nuts, bolts, pins and linkages are secured correctly in place and are in good condition.
Blade Care
Check the condition of the blades, bolts and cutter assembly regularly. Remember that badly worn blades will affect grass cutting, catcher fill and cause excessive mower vibration.

WARNING
Always disconnect the spark plug lead when working on the disc blade assembly. This will prevent accidental engine start.
To maintain balance, always fit a complete set of blades and fasteners. To replace the blades, proceed as follows:
- Set the lawnmower to highest cutting height.
- Lift the rear flap and prop open to allow access to the blade area.
- Remove each blade, blade retaining bolt, nut, washer and discard.
- Fit the new blades, blade bolts, washer and nuts.
- Torque the blade nuts (20 Nm) and check each blade is free to move after tightening.
- Remove the prop from the rear flap and replace the spark plug cable.
It is recommended that you use an authorised Service Agent for any replacement, sharpening or balancing blade work.
Disc Blade Assembly
Stop the engine and disconnect the spark plug lead before fitting new blades:
• Work from the catcher flap.
- With the rear flap secured, undo the blade nut, applying upward pressure to the bolt head into the blade disc. (The head of the bolt will not rotate due to the diamond shape in the underside of the head).
Assembly: Fit as per the drawing remembering to push the head of the bolt into the blade disc. (this will stop the bolt head from turning).
- Ensure correct order of assembly.
- DO NOT lay mower on side (4 stroke models).
- We recommend changing blades, bolts, nuts and washers as a set. Metal fatigue and damage may occur which may not be visible to the operator. Always replace all blades to ensure correct engine balance, reducing vibration and wear. Tighten nuts on blade bolts to 14-19 Nm (Newton Metres) or 10-14ft lbs.
• Always turn the nut to check tightness, not the bolt.
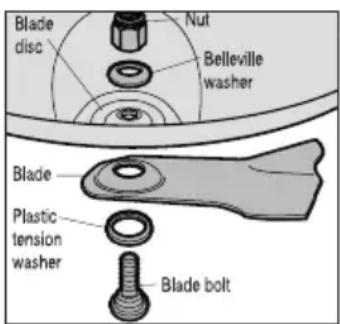

If The Disc Is Damaged, Replace As Follows;
- With its spark plug facing upward, tip the lawnmower. Refer to engine Engine Manufacturer's Owners' Manual.
- Remove the centre bolt; pull the disc blade assembly off the three locating pins on the boss.
- Assemble in reverse order and torque to 50 Nm.
Bar Blade Assembly
- Tip the lawnmower with its spark plug upward - refer to Engine Manufacturer's Owners' Manual.
- Remove the centre bolt and spring washer; pull the blade and carrier off the engine shaft.
- Either sharpen and balance the old blade or fit a new one.
- Grease the engine shaft; assemble in reverse order ensuring the drive key is located correctly.
- Torque the centre bolt to 50 Nm.
Blade Replacement Torque Settings
Centre Bolt 50 Nm Flail Blade Bolts 20 Nm (free to move)

Carburettor Adjustment
Check your Engine Manufacturer's Owners' Manual when carburettor adjustment is required to compensate for changes in fuel, temperature, altitude or load.
CLEANING & STORAGE

WARNING
Do not use a water hose around the engine. It may contaminate fuel or enter ignition system & result in poor running & starting problems.
There is a direct relationship between the lawnmower's life and the care and attention given to the lawnmower, both during and after operation. After use it is important that the lawnmower is thoroughly cleaned down and inspected so that it will be in good working order the next time it is required. Disconnect the spark plug lead and thoroughly clean the engine, underside of the chassis, wheels and grass catcher.
Muffler

WARNING
Care should be taken when cleaning around the muffler. Ensure that the muffler is cool enough to touch before cleaning.
Always clean around the muffler area regularly to reduce the risk of fire and damaging the mower. Brush the grass, dirt or combustible debris from the muffler.
Storage
After each mowing season or if the lawnmower is not going to be used for 30 days or more, it is recommended that:
- The engine oil should be changed.
- All fuel should be removed.
Run the engine until it is warm and drain the engine oil and refill with the correct grade to the required level.
The fuel shut off valve should be closed off (where fitted) then remove all fuel from the carburettor, fuel line and tank to prevent the formation of gum like deposits. The lawnmower should then be started up and run until all of the fuel left in the system is used.
Remove the spark plug and pour 15ml of engine oil into the cylinder, crank slowly to distribute the oil and replace the spark plug. Store the lawnmower in a clean dry area away from direct sunlight, as this will have an aging effect on the plastic catcher assembly and other plastic component. Always store the mower on a flat, level surface.
WARRANTY
The seller warrants this rotary lawnmower to be free from defects in material and workmanship. Subject to the following conditions, the rotary lawnmower comes complete with a five-year comprehensive parts and labour warranty; with the exception of domestic mowers being used for commercial, institutional, industrial, rental or income producing purposes which are limited to 90 days of warranty.
- This warranty does not include the engine and batteries (if fitted), which are covered by separate manufacturers warranties.
- This warranty excludes normal wear and tear, misuse, neglect, accidental damage or defects arising from failure to comply with the instructions as outlined in this Owners Manual. Wearing parts such as blades, blade bolts, belts and spark plugs, which can be subjected, to use beyond their normal working capacity are also excluded.
- This warranty is void if parts other than genuine spare parts have been used or if repairs have
been carried out by other than authorized Service Agents.
- This warranty does not cover the costs of transportation of any part(s) but does cover the labour / part costs incurred in repairing or replacing any defective part(s).
- The seller reserves the right to inspect any faulty part(s) in order to determine the validity of the warranty claim or for any other reason.
- The seller has no liability for any incidental, consequential or special damages and / or expenses resulting from any defect in their product.
These conditions do not affect the purchasers' statutory rights under the laws of the place, state or country of purchase. If warranty service is required, contact your nearest authorised Service Agent

TROUBLESHOOTING
| Problem: The engine does not start, runs erratically or experiences power loss. | |
| Possible Cause Remedy | |
| Throttle not in choke/start position. Move throttle to choke/start position. Pump primer more. | |
| Fuel tank empty or fuel shut off valve closed. | Fill tank with recommended fuel grade and open fuel shut-off valve. |
| Air filter element is dirty. Service or replace air filter. | |
| Spark plug loose. Tighten spark plug. | |
| Spark plug cable disconnected. Re-fit cable to spark plug. | |
| Defective spark plug. Replace damaged spark plug. | |
| Spark plug gap incorrect. Replace damaged spark plug/refer to engine manual. | |
| Carburettor is flooded with fuel. | Move throttle to STOP position, pull the starter cord 5-6 times, move the throttle to RUN and start engine. |
| Dirt, water or stale fuel in the tank. | Drain and clean fuel tank. Refill with clean, fresh fuel before starting. |
| Vent hole in the filler cap is blocked. Clean or replace the filler cap. | |
| Problem: The engine skips at high speed | |
| Possible Cause Remedy | |
| Spark plug gap too small. Refer to engine manual. | |
| Problem: The engine idles poorly | |
| Possible Cause Remedy | |
| Blocked engine cooling fins and air passages. | Remove debris from around the engine. |
| Air filter element is dirty. Service or replace the air filter. | |
| Problem: The engine overheats | |
| Possible Cause Remedy | |
| Cooling airflow restricted. Remove debris from around the engine. | |
| Incorrect spark plug fitted. Refer to the engine manual. | |
| Low engine oil level Check oil level and top up if necessary. | |
| Problem: Excessive vibration and/or noise | |
| Possible Cause Remedy | |
| Cutting assembly is loose. Refer to blade care/changing blades. | |
| Cutting assembly is unbalanced. Refer to blade care/changing blades. | |
| Problem: Oil leaks from muffler or air filter | |
| Possible Cause Remedy | |
| Mower tipped up or handled incorrectly. | Check oil level, air filter & spark plug and correct as necessary. |
| If fault persists, consult your authorised Service Agent | |
SPARE PARTS

WARNING
Use only genuine LawnMaster spare parts to ensure safety/performance. Substitute parts can be dangerous and will invalidate the warranty.
When ordering spare parts, please give the following information:
- Part Number.
• Description And Quantity Required. - Machine Type/Model
- Batch And Serial Number
If the unit requires further repairs or services please visit www.steelfort.co.nz to find your local service dealer. For all other enquiries contact Steelfort Customer Services +64 6 350 1350.
LawnMaster®
Steelfort
500 Rangitikei Street
Private Bag 11045
Palmerston North, 4442, New Zealand
06 350 1350 | steelfort.co.nz
Steelfort Auckland
880 Great South Road, Penrose
Auckland, 1061, New Zealand
09 573 1324 | outlet@steelfort.co.nz

SCAN TO VIEW THE
LAWNMASTER RANGE

- STEEL BODY MOWER OWNER'S MANUAL
- TABLE OF CONTENTS
- CONTENTS
- SAFETY INSTRUCTIONS
- MAINTENANCE
- CLEANING & STORAGE
- WARRANTY
- TROUBLESHOOTING & SPARE PARTS
- FOR YOUR RECORDS
- MODEL
- SERIAL NUMBER
- PURCHASE DATE
- PURCHASE PRICE
- OWNER'S NAME
- RETAILERS NAME
- ADDRESS
- WARNING
- KEY TO MOWER SYMBOLSKEY TO MOWER SYMBOLS
- SAFETY
- BEFORE USING THE MOWER
- OPERATION
- OPEN THE CARTON AND REMOVE THE LAWNMOWER AND ITS ACCESSORIES...AND YOU WILL FIND
- ENGINE INFORMATION
- WITH THE LAWNMOWER IN A LEVEL POSITION
- WHEN HANDLING FUEL
- HANDLEBAR FOLDING INSTRUCTIONS
- ASSEMBLING THE CATCHER
- OPERATING THE MOWER
- PRIMER / CHOKE START
- STARTING THE MOWER HOT
- STOPPING THE ENGINE
- THROTTLE CONTROL LEVER
- ZONE START
- RECOIL START
- CUTTING HEIGHT ADJUSTMENT
- CUTTING BLADE ADJUSTMENT
- GRASS CATCHER
- MULCHING MODELS
- FITTING & REMOVING THE MULCHER PLUG
- FITTING THE PLUG
- REMOVING THE PLUG
- DRIVE LEVER
- IMPORTANT TO PREVENT DAMAGE
- ENGINE
- CHECK ENGINE OIL LEVEL
- CLEAN THE AIR FILTER
- CHECK SPARK PLUG
- ROTATING SCREEN
- THROTTLE CONTROL & SELF PROPELLED CONTROL
- EVERY 50 HOURS
- FASTENERS & LINKAGES
- BLADE CARE
- DISC BLADE ASSEMBLY
- IF THE DISC IS DAMAGED, REPLACE AS FOLLOWS
- BAR BLADE ASSEMBLY
- BLADE REPLACEMENT TORQUE SETTINGS
- CARBURETTOR ADJUSTMENT
- MUFFLER
- STORAGE
- SPARE PARTS
- LAWNMASTER®
- STEELFORT
- STEELFORT AUCKLAND
Brand : LawnMaster
Model : Steel 625
Category : Lawn mower