CA-R-ALFA.001 - Car electronic accessory PIONEER - Free user manual and instructions
Find the device manual for free CA-R-ALFA.001 PIONEER in PDF.


| Product Type | Vehicle Infotainment Interface (Infodapter) |
| Compatible Vehicles | Alfa Romeo (models with OEM infotainment) |
| Compatible Head Units | Aftermarket head units with steering wheel control input and rear camera input; Pioneer units require DIP switch 1 On |
| Main Functions | Display vehicle settings and parking sensor info; integrate steering wheel controls; optional reverse camera input |
| DIP Switches | 4 switches: 1 = Pioneer/Other head units, 2 = PAL/NTSC for camera, 3 = Reset display, 4 = Not used |
| Configuration Menu Access | Press and hold speech button for 2 seconds; navigate with Track Up/Down; select with speech button |
| Connections | ISO connector, steering wheel control input, reverse camera input (RCA), park brake (green), mute (grey), speed pulse (pink), reverse (purple) |
| Power Supply | 12V DC (from head unit ISO connector) |
| Dimensions (approx.) | 70 x 50 x 20 mm |
| Weight (approx.) | 50 g |
| Operating Temperature | -20°C to 70°C (typical automotive) |
| Included Accessories | Infodapter module, wiring harness, instruction manual |
| Compatibility Note | OEM DNA switch remains functional; Infodapter displays DNA setting on display |
| Maintenance | No user maintenance required; keep connectors clean and dry |
| Safety | Install by qualified professional; disconnect battery before installation; ensure proper grounding |
Frequently Asked Questions - CA-R-ALFA.001 PIONEER
User questions about CA-R-ALFA.001 PIONEER
0 question about this device. Answer the ones you know or ask your own.
Ask a new question about this device
Download the instructions for your Car electronic accessory in PDF format for free! Find your manual CA-R-ALFA.001 - PIONEER and take your electronic device back in hand. On this page are published all the documents necessary for the use of your device. CA-R-ALFA.001 by PIONEER.
USER MANUAL CA-R-ALFA.001 PIONEER
...connecting to the aftermarket
CTUAR01 ALFA ROMEO INFODAPTER

natural_image
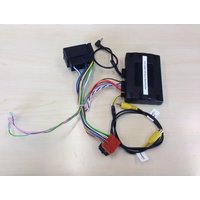
Electronic component with wiring and audio cable, no visible text or symbolsINSTRUCTION MANUAL
ABOUT
The Connects2 Infodapter for Alfa Romeo vehicles allows vehicle setting and parking sensor information to be displayed on any aftermarket head unit with rear camera input. The Infodapter also allows the use of the steering wheel controls with almost every steering wheel control compatible head unit on the market.
DIP SWITCH SETTINGS
See Fig 1.
Up = Off, Down = On
1: On = Pioneer head units. Off = All other head units
2: Setting for reverse camera. On = PAL, Off = NTSC. The default setting is Off (NTSC).
3: Resets the display settings back to default. If the display settings have been manipulated in a way that it is no longer possible to make adjustments, change the DIP switch #3 from Off to On and back. This will reset the screen settings to the factory defaults. During this procedure the screen background will change to red. While the background is red, no settings can be made.
4: Not applicable
Interface Connections


flowchart
graph TD
    A["10 Reverse camera (optional)"] --> B["11 To car connector"]
    C["11"] --> D["12 Car Connector"]
    E["① Aftermarket head"] --> F["④ Reverse Camera Input"]
    G["⑤ ISO Connector"] --> H["⑥ Park Brake (Green)"]
    I["③ Steering Wheel Control Input"] --> J["② Alfa Romeo Infodapter"]
    K["⑦ Mute(Grey)"] --> L["⑧ Speed Pulse (Pink)"]
    M["⑨ Reverse (Purple)"] --> N["⑦"]
① Speech Button
② Track Up/Down
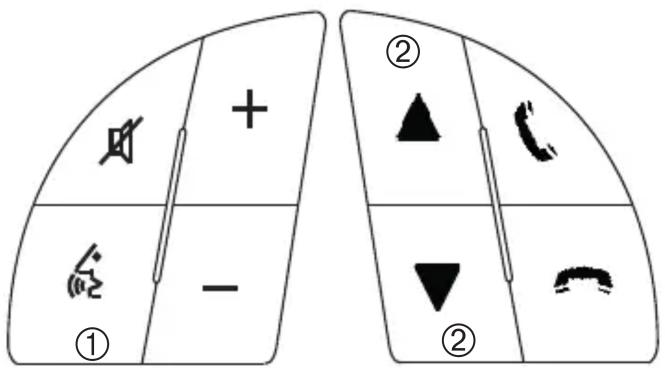
Fig 3.
Configuration Menu
To access the menu, push and hold the speech button for 2 seconds (Fig. 3). This will enable the configuration menu. To navigate through the menu options use the Track Up/Track Down buttons. To select a menu option, push the speech button once.
Configuration Menu
Vehicle Settings
Infodapter Settings
Language
Version
< Back
- Vehicle Settings
Vehicle settings can be adjusted via the menu. All vehicle setup options that were available with the original head unit, are now available through the aftermarket head unit. See the vehicle handbook for more information regarding these features.
Vehicle Settings
Display
Clock
Safety and Driving Assistance
Lights
Doors and Locks
< Back
- Infodapter Settings
Screen Size/Position - Make sure all 4 corner markers are touching the corners of the aftermarket head unit display.
Screen Size/Position
Horizontal Size
Horizontal Position
Vertical Size
Vertical Position
< Back
o Picture Settings - Adjust Brightness, contrast and colour saturation.
Infodapter Settings
Screen Size/Position
Picture Settings
Preferences
<Back
- Preferences -
Park Assist Version - Select according to the colour configuration of the park assist fitted to the vehicle.
Camera Connected - Select Yes if an optional camera is connected.
Reverse Priority* - Select which image (Camera or Park Assist) will be shown by default when reversing. The driver can select the desired image by pushing the Source button (Fig.3) while reversing. (*Note this option is only available when Camera Connected is set to Yes)
Park Brake Source - Set to Speed, Brake or Always On.
Restore factory settings - Reverts all Infodapter settings to factory defaults. (This does not restore vehicle settings)
Preferences
Park Assist Version 0 Camera Connected Yes Reverse Priority Park Assist Park Brake Source Speed Restore factory settings < Back
DNA Settings
Note that the OEM DNA switch is still functional. The Infodapter will display the relevant DNA setting on the aftermarket head unit display.
Brand : PIONEER
Model : CA-R-ALFA.001
Category : Car electronic accessory