
SV431DPUA2 - Switch StarTech.com - Free user manual and instructions
Find the device manual for free SV431DPUA2 StarTech.com in PDF.


| Product Type | DisplayPort USB KVM Switch |
| Number of Ports | 4 |
| Video Interface | DisplayPort |
| USB Support | USB 2.0/3.0 |
| Audio Support | 3.5mm jacks (mic & speaker) |
| Max Resolution | 4K@30Hz |
| Dimensions (W x D x H) | 20.0 x 7.5 x 4.0 cm |
| Weight | 500 g |
| Power Source | USB bus-powered or external DC 5V |
| Power Consumption | 2.5W |
| Operating Temperature | 0°C to 40°C |
| Switching Method | Push-button, keyboard hotkeys, or auto-scan |
| Indicators | LED for active port |
| Cable Included | 4 x DisplayPort + 4 x USB cable (or combined) |
| Mounting Options | Desktop or under-desk mountable |
| Compatibility | Windows, macOS, Linux |
| Safety | Do not expose to liquids; use only provided power adapter |
| Cleaning | Wipe with a soft, dry cloth |
| Spare Parts | Not available for individual sale |
| Repairability | No user-serviceable parts; contact support |
Frequently Asked Questions - SV431DPUA2 StarTech.com
User questions about SV431DPUA2 StarTech.com
0 question about this device. Answer the ones you know or ask your own.
Ask a new question about this device
Download the instructions for your Switch in PDF format for free! Find your manual SV431DPUA2 - StarTech.com and take your electronic device back in hand. On this page are published all the documents necessary for the use of your device. SV431DPUA2 by StarTech.com.
USER MANUAL SV431DPUA2 StarTech.com
4-Port USB KVM Switch | DisplayPort | 4K 60Hz
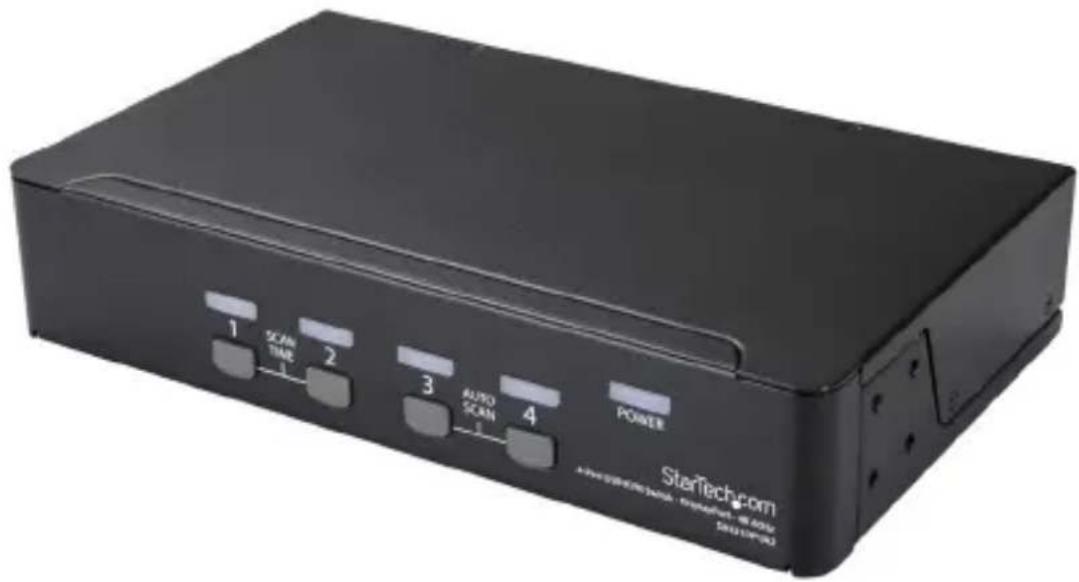
Actual product may vary from photos
User Manual
SKU#: SV431DPUA2
For the latest information and specifications visit
www.startech.com/SV431DPUA2
Compliance Statements
FCC Compliance Statement
This equipment has been tested and found to comply with the limits for a Class B digital device, pursuant to part 15 of the FCC Rules. These limits are designed to provide reasonable protection against harmful interference in a residential installation. This equipment generates, uses and can radiate radio frequency energy and, if not installed and used in accordance with the instructions, may cause harmful interference to radio communications. However, there is no guarantee that interference will not occur in a particular installation. If this equipment does cause harmful interference to radio or television reception, which can be determined by turning the equipment off and on, the user is encouraged to try to correct the interference by one or more of the following measures:
• Reorient or relocate the receiving antenna
- Increase the separation between the equipment and receiver
- Connect the equipment into an outlet on a circuit different from that to which the receiver is connected
- Consult the dealer or an experienced radio/TV technician for help
Industry Canada Statement
This Class B digital apparatus complies with Canadian ICES-003.
Use of Trademarks, Registered Trademarks, and other Protected Names and Symbols
This manual may make reference to trademarks, registered trademarks, and other protected names and/or symbols of third-party companies not related in any way to StarTech.com. Where they occur these references are for illustrative purposes only and do not represent an endorsement of a product or service by StarTech.com, or an endorsement of the product(s) to which this manual applies by the third-party company in question. Regardless of any direct acknowledgement elsewhere in the body of this document, StarTech.com hereby acknowledges that all trademarks, registered trademarks, service marks, and other protected names and/or symbols contained in this manual and related documents are the property of their respective holders.
To view manuals, videos, drivers, downloads, technical drawings, and more visit www.startech.com/support
Safety Statements
Safety Measures
- Wiring terminations should not be made with the product and/or electric lines under power.
- Cables (including power and charging cables) should be placed and routed to avoid creating electric, tripping or safety hazards.
Mesures de sécurité
To view manuals, videos, drivers, downloads, technical drawings, and more visit www.startech.com/support
Table of Contents
Compliance Statements....1
Safety Statements....2
Product Diagram....5
Front View 5
Rear View....6
Product Information....7
Package contents....7
Requirements 7
Installation 8
Setting Up a PC 8
Connecting a Console to the KVM Switch....8
Connecting a Computer to the KVM Switch 9
Operation 10
Selecting a Computer....10
Starting an Auto Scan....10
Setting Scan Time Duration....11
Using hotkey Commands....12
Disabling hotkey Commands 12
Selecting a Computer....13
Starting an Auto Scan....13
Setting Scan Time Duration....13
Scanning Computers Manually....13
To view manuals, videos, drivers, downloads, technical drawings, and more visit www.startech.com/support
Disabling the Audio Stick Feature....14
Using an Alternative hotkey Command....15
About the LED indicators....15
Troubleshooting....16
To view manuals, videos, drivers, downloads, technical drawings, and more visit www.startech.com/support
Product Diagram
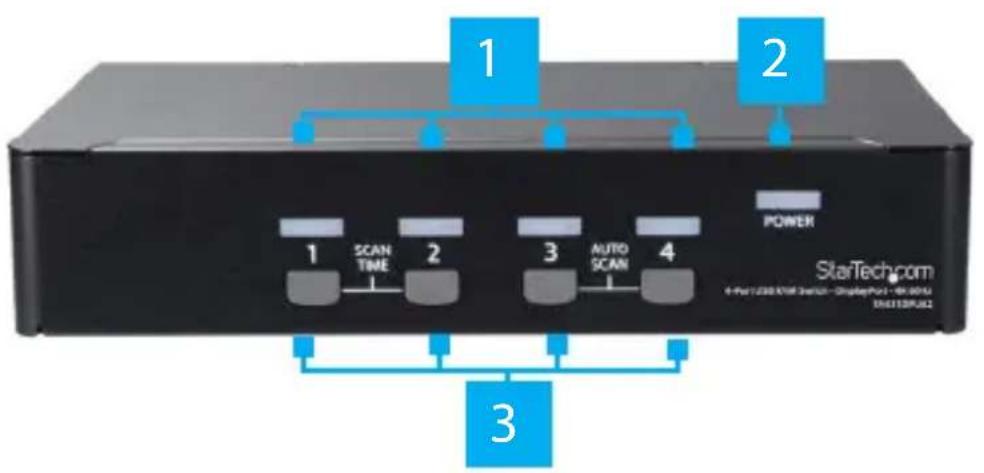
Front View
flowchart
graph TD
    A["Power"] --> B["1 SCAN TIME"]
    A --> C["2"]
    A --> D["3 AUTO SCAN"]
    A --> E["4"]
    B --> F["3"]
    C --> G["3"]
    D --> H["3"]
    E --> I["3"]
    style A fill:#000,stroke:#fff,color:#fff
    style B fill:#888,stroke:#333
    style C fill:#888,stroke:#333
    style D fill:#888,stroke:#333
    style E fill:#888,stroke:#333
    style F fill:#ccc,stroke:#333
    style G fill:#ccc,stroke:#333
    style H fill:#ccc,stroke:#333
    style I fill:#ccc,stroke:#333
| 1 | Port Selection/Link LEDs |
| 2 | Power LED |
| 3 | Port Select Buttons |
To view manuals, videos, drivers, downloads, technical drawings, and more visit www.startech.com/support
Rear View
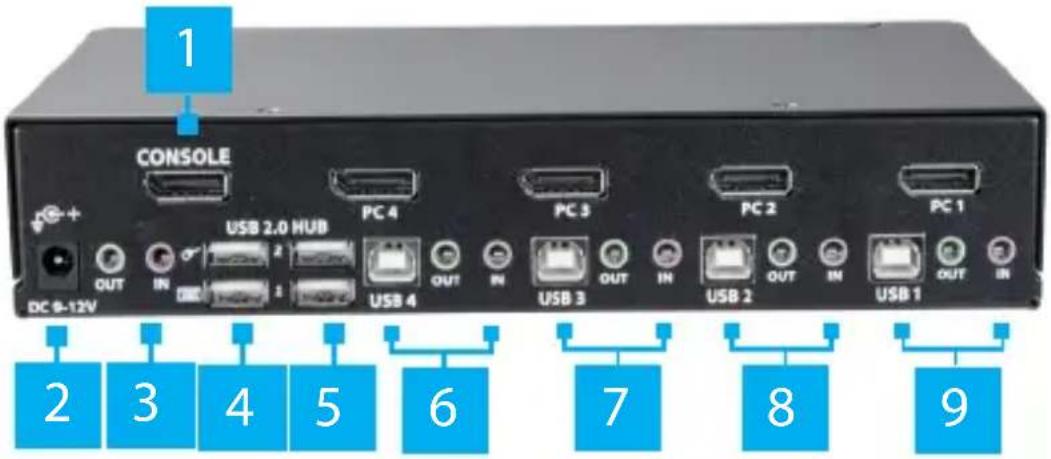
| 1 | Console DisplayPort Port PC 4 Ports | |
| 2 | Power Adapter Port PC 3 Ports | |
| 3 | Console Speaker and Mic Ports | 8 PC 2 Ports |
| 4 | USB Keyboard and Mouse Ports | 9 PC 1 Ports |
| 5 | Console USB Ports |
To view manuals, videos, drivers, downloads, technical drawings, and more visit www.startech.com/support
Product Information
Package contents
• KVM Switch x 1
- Foot Pads x 4
• Universal Power Adapter (NA/JP, EU, UK, ANZ) x 1
- Quick-Start Guide x 1
Requirements
Requirements are subject to change. For the latest requirements, please visit www.StarTech.com/SV431DPUA2.
Cables
- USB-A to USB-cable or USB-C to USB-B cable'
• 3.5 mm audio cables
PC
- Computer system or video card enabled with DisplayPort
• Computer system enabled with USB
Components
- Display device (for example, monitor, projector, TV, and so on) enabled with DisplayPort
- Standard wired or wireless USB keyboard
- Standard wired or wireless USB mouse
Installation
Setting Up a PC
The following setup changes are required for PC users and aren't necessary if you're using a mac.
- In Standard CMOS, set Halt on Error to All But Keyboard.
- In PNP and PCI Setup, set PNP OS Installed to Yes.
- In PNP and PCI Setup, set USB IRQ to Enabled.
Connecting a Console to the KVM Switch
- Turn off your computer and any devices or peripherals that are connected to it (for example, printers, external hard drives, and so on).
-
Connect a monitor or display to the console DisplayPort port.
-
Do one of the following:
-
Connect a keyboard and a mouse to the USB keyboard and mouse ports.
-
If you're using a combination wireless keyboard and mouse, connect the wireless receiver to the keyboard port.
-
If necessary, do any of the following:
-
Connect speakers to the console audio speaker port.
- Connect a microphone to the console mic port.
- Connect USB peripherals to the USB hub ports.
Connecting a Computer to the KVM Switch
You can connect up to four computers to the KVM switch.
- Turn off the computers that you want to connect to the KVM switch and any devices or peripherals that are connected to the computers (for example, printers, external hard drives, and so on).
- Connect a DisplayPort video cable to the DisplayPort port on your computer and to one of the PC DisplayPort ports on the KVM switch.
- Connect a USB cable to the USB port on the computer and to the PC USB port on the KVM switch
- If you're using audio, connect speakers and/or a microphone to the PC audio speaker and mic ports on the KVM switch.
- To connect additional computers, repeat steps 1 to 4.
- If you want to share USB peripherals between connected computers or devices, connect the peripherals to the USB hub ports on the KVM switch.
- Connect the universal power adapter to a power source and to the power adapter port on the KVM switch. The power LED should illuminate.
-
Turn on any devices or peripherals that are connected to the computer, and then turn on the connected computer. Wait for the computer to finishing loading and then test the functionality of the keyboard and mouse of the connected computer.
-
If additional computers are connected to the KVM switch, select a different port and repeat step 8 until you have tested the functionality of all of the connected computers.
Operation
Selecting a Computer
Port Selection Buttons
- Push the port selection button for the connected computer that you want to select. The port selection/link LED illuminates red to indicate the selected port.
HotKeys
If you are using a computer that's running a version of Windows® or Linux®, you can use hotkey commands to select a computer.
- Press Left Ctrl, Left Ctrl,
Starting an Auto Scan
The KVM switch includes an Auto Scan feature that you can use to scan through the connected computers in sequence with a fixed scan time. If any keyboard or mouse activity is detected during the Auto Scan process, the scanning is paused until the activity stops and then the scan resumes with the next computer in the sequence.
To view manuals, videos, drivers, downloads, technical drawings, and more visit www.startech.com/support
Port Selection Buttons
- Press port selection buttons 3 and 4 simultaneously. The port selection/link LEDs blink during the Auto Scan process. To exit the Auto Scan, press any of the port selection buttons.
Hotkeys
If you're using a computer that's running a version of Windows or Linux, you can use hotkey commands to start an Auto Scan.
- Press Left Ctrl, Left Ctrl, F1. The port selection/link LEDs blink during the Auto Scan process. To exit the Auto Scan, press Left Ctrl, Left Ctrl. For more information about hotkey commands, see the "Using hotkey commands" section of the manual.
Setting Scan Time Duration
You can set the duration of the scan time to 3, 8, 15, or 30 seconds.
Port Selection Button
- Press port selection buttons 1 and 2 simultaneously. The KVM switch beeps to indicate the duration of the scan time. It will beep once for 3 seconds, twice for 8 seconds, three times for 15 seconds, and four times for 30 seconds.
Hotkeys
If you're using a computer that's running a version of Windows or Linux, you can use hotkey commands to start an Auto Scan.
To view manuals, videos, drivers, downloads, technical drawings, and more visit www.startech.com/support
- Press Left Ctrl, Left Ctrl, F3. The KVM switch beeps to indicate the duration of the scan time. It will beep once for 3 seconds, twice for 8 seconds, three times for 15 seconds, and four times for 30 seconds. For more information about hotkey commands, see the “Using hotkey commands” section of the manual.
Using hotkey Commands
If you're using a computer that's running a version of Windows or Linux, you can use hotkey commands to operate the KVM switch. All hotkey commands begin by pressing the Left Ctrl key twice and then pressing one or two additional keys.
The KVM switch emits a high-pitched beep when you enter a correct hotkey command sequence and low-pitched beep when you enter an incorrect command. Incorrect hotkey commands aren't sent to the computer.
Note: Hotkey commands aren't supported in the macOS operating system.
Disabling hotkey Commands
By default, hotkey commands are enabled on the KVM switch.
- Press and hold the Left Shift key and press Num Lock twice. Release the Left Shift key and then press the Left Ctrl key.
Note: To enable hotkey commands, repeat the key sequence used to disable the hotkey commands.
To view manuals, videos, drivers, downloads, technical drawings, and more visit www.startech.com/support
Selecting a Computer
- Press the Left Ctrl key twice and the number of the PC port that you want to select. For example, if you want to select computer 2, you would press Left Ctrl, Left Ctrl, 2.
Caution! Don't use the numeric keyboard on the right side of your keyboard when you complete the hotkey command above.
Starting an Auto Scan
- Press Left Ctrl, Left Ctrl, F1. The port selection/link LEDs blink during the Auto Scan process.
Note: To exit the Auto Scan, press Left Ctrl, Left Ctrl.
Setting Scan Time Duration
You can set the duration of the scan time to 3, 8, 15, or 30 seconds.
- Press Left Ctrl, Left Ctrl, F3. The KVM switch beeps to indicate the duration of the scan time. It will beep once for 3 seconds, twice for 8 seconds, three times for 15 seconds, and four times for 30 seconds.
Scanning Computers Manually
The KVM switch includes a manual scan feature that you can use to switch between connected computers that are turned on.
- Press Left Ctrl, Left Ctrl, F2.
To view manuals, videos, drivers, downloads, technical drawings, and more visit www.startech.com/support
- Do one of the following:
• To select the previous computer, press the up arrow key.
• To select the next computer, press the down arrow key.
- To stop the manual scan, press any key.
Disabling the Audio Stick Feature
By default, the Audio Stick feature is enabled on the KVM switch, which means that the audio selection is determined by the computer that is currently selected. For example, if you switch to computer 2, the audio selection changes to computer 2.
You can disable the Audio Stick feature and make the audio selection independent from the computer that is currently selected. For example, if you select computer 1 and then switch to computer 2, the audio selection remains with computer 1 until you change it.
- Press Left Ctrl, Left Ctrl, F5. The KVM switch beeps once to indicate that the Audio Stick feature is disabled.
Note: To enable the Audio Stick feature, press Left Ctrl, Left Ctrl, A. The KVM switch beeps twice to indicate that the Audio Stick feature is enabled.
To view manuals, videos, drivers, downloads, technical drawings, and more visit www.startech.com/support
Using an Alternative hotkey Command
In addition to the Left Ctrl hotkey commands, there are two alternative commands that you can use to select a computer:
- Press Scroll Lock, Scroll Lock,
. - Press and hold the Left Shift key and press Num Lock twice. Release the Left Shift key and then press the number of the port that you want to select.
Note: Do not use the numeric keypad on the right side of the keyboard when you complete the hotkey commands listed above.
About the LED indicators
The KVM switch comes with a port selection/link LED for each port, as well as a power LED. For more information about the LEDs, consult the table below.
LED Behavior Scenario
| Power LED Illuminated KVM switch is receiving power | ||
| Illuminated green | Connected computer is turned on | |
| Port selection/ link LEDs | Illuminated red | Connected computer is currently selected |
| Blinking Auto Scan process is in progress | ||
To view manuals, videos, drivers, downloads, technical drawings, and more visit www.startech.com/support
Troubleshooting
I can't get my wireless mouse and keyboard to work
Some wireless mice and keyboards do work with KVM switches, but in general, most wireless mice and keyboards don't support KVM switches. If you're using a wireless mouse and keyboard in your setup and are experiencing issues with your KVM switch, try the following:
- Remove the wireless mouse and keyboard transmitters from the console USB mouse an keyboard ports, and move the transmitters to one of the USB hub ports on the KVM switch.
Note: Hotkey commands won't work if the wireless keyboard transmitter is plugged into one of the USB hub ports.
- If you're still experiencing issues, replace the wireless mouse and keyboard with a wired mouse and keyboard.
I can't get my gaming or combination mouse and keyboard to work
StarTech.com recommends that you might use a standard 3-button wired mouse and a 104-key wired keyboard in your setup.
Gaming mice and keyboards and combination mice and keyboards have more buttons and functionality than 3-button mice and 104-key keyboards. Most KVM switches don't support the additional key functions and using them in your setup may impact the performance of your KVM switch.
To view manuals, videos, drivers, downloads, technical drawings, and more visit www.startech.com/support
My display or video destination uses a different type of video connector than DisplayPort
If the display or video destination in your setup uses a different type of video connector than DisplayPort, you can use a converter to change the output type. For more information, visit www.StarTech.com to see the different types of converters that are available.
My keyboard keeps repeating keys when it's plugged into the KVM switch
To resolve this issue, try the following:
- If you're running a version of the Windows OS, in the Control Panel, navigate to the keyboard settings and adjust the repeat delay and repeat rate until the keys no longer repeat.
- If your keyboard is plugged into one of the USB keyboard ports on the KVM switch, unplug it and plug it into one of the USB hub ports.
Note: Hotkey commands aren't available if your keyboard is plugged into a USB hub port.
My mouse doesn't move properly between my monitors
If you're running a version of the Windows OS, in order for your mouse to move properly between your monitors, you need to rearrange your monitors in Windows to match the physical location of your monitors in your setup.
-
In the Control Panel, navigate to the display settings.
-
To see how the operating system has ordered the monitors, click Identify.
To view manuals, videos, drivers, downloads, technical drawings, and more visit www.startech.com/support
- Click and drag the monitor icons until the order in the operating system matches the physical setup of the monitors.
- Click OK to apply the changes and close the window.
Warranty Information
This product is backed by a two-year warranty.
For further information on product warranty terms and conditions, please refer to www.startech.com/warranty.
Limitation of Liability
In no event shall the liability of StarTech.com Ltd. and StarTech.com USA LLP (or their officers, directors, employees or agents) for any damages (whether direct or indirect, special, punitive, incidental, consequential, or otherwise), loss of profits, loss of business, or any pecuniary loss, arising out of or related to the use of the product exceed the actual price paid for the product.
Some states do not allow the exclusion or limitation of incidental or consequential damages. If such laws apply, the limitations or exclusions contained in this statement may not apply to you.
Hard-to-find made easy. At StarTech.com, that isn't a slogan. It's a promise.
StarTech.com is your one-stop source for every connectivity part you need. From the latest technology to legacy products — and all the parts that bridge the old and new — we can help you find the parts that connect your solutions.
We make it easy to locate the parts, and we quickly deliver them wherever they need to go. Just talk to one of our tech advisors or visit our website. You'll be connected to the products you need in no time.
Visit www.startech.com for complete information on all StarTech.com products and to access exclusive resources and time-saving tools.
StarTech.com is an ISO 9001 Registered manufacturer of connectivity and technology parts. StarTech.com was founded in 1985 and has operations in the United States, Canada, the United Kingdom and Taiwan servicing a worldwide market.
Reviews
Share your experiences using StarTech.com products, including product applications and setup, what you love about the products, and areas for improvement.
StarTech.com Ltd.
45 Artisans Cres.
London, Ontario
N5V 5E9
Canada
StarTech.com LLP
2500 Creekside Pkwy.
Lockbourne, Ohio
43137
U.S.A.
StarTech.com Ltd.
Unit B, Pinnacle
15 Gowerton Rd., Brackmills
Northampton
NN4 7BW
United Kingdom
FR: startech.com/fr
DE: startech.com/de
ES: startech.com/es
NL: startech.com/nl
IT: startech.com/it
JP: startech.com/jp
- 4-Port USB KVM Switch | DisplayPort | 4K 60Hz
- Compliance Statements
- FCC Compliance Statement
- Industry Canada Statement
- Use of Trademarks, Registered Trademarks, and other Protected Names and Symbols
- Safety Statements
- Safety Measures
- Mesures de sécurité
- Table of Contents
- About the LED indicators....15
- Troubleshooting....16
- Product Diagram
- Front View
- Rear View
- Product Information
- Package contents
- Requirements
- Cables
- PC
- Components
- Installation
- Setting Up a PC
- Connecting a Console to the KVM Switch
- Connecting a Computer to the KVM Switch
- Operation
- Selecting a Computer
- Port Selection Buttons
- HotKeys
- Starting an Auto Scan
- Setting Scan Time Duration
- Port Selection Button
- Using hotkey Commands
- Disabling hotkey Commands
- Scanning Computers Manually
- Disabling the Audio Stick Feature
- Using an Alternative hotkey Command
- About the LED indicators
- Troubleshooting
- I can't get my wireless mouse and keyboard to work
- I can't get my gaming or combination mouse and keyboard to work
- My display or video destination uses a different type of video connector than DisplayPort
- My keyboard keeps repeating keys when it's plugged into the KVM switch
- My mouse doesn't move properly between my monitors
- Warranty Information
- Limitation of Liability
- Hard-to-find made easy. At StarTech.com, that isn't a slogan. It's a promise.
- Reviews
Brand : StarTech.com
Model : SV431DPUA2
Category : Switch