
M1580 - Binoculars Steiner - Free user manual and instructions
Find the device manual for free M1580 Steiner in PDF.


| Product Type | Binoculars |
| Brand | Steiner |
| Model | M1580 |
| Eye Relief | Long eye relief; extendable by folding rubber eyecups down for use with eyeglasses or gas masks |
| Interpupillary Distance Adjustment | Yes, via hinge with indexed scale; set by pivoting tubes until single image seen |
| Diopter Adjustment | Yes, individual on each eyepiece with marked diopter scale; note settings for future use |
| Reticle | Mil-scale reticle (10 mil increments) on applicable models for distance estimation |
| Compass (Optional) | Analog or digital compass; digital features ON/OFF, bearing display, declination adjustment, auto-off after 10 seconds |
| Rubber Armoring | Yes, for secure grip and slip resistance on wet surfaces |
| Carrying Strap | Included, attaches via loops on binocular and eyepiece cover |
| Objective Caps | Included, right and left, with snaps |
| Eyepiece Cover | Included, fits over eyepieces when not in use |
| Eyecups | Foldable rubber eyecups for normal and eyeglass use |
| Cleaning (Exterior) | Lint-free cloth; soap and water for grease; dry with clean cloth |
| Cleaning (Optics) | Blower, soft brush, lens tissue with lens cleaner; avoid breathing on lenses |
| Safety Warning | Never point at sun; risk of serious eye damage and damage to optical elements |
| Handling Precautions | Use neckstrap; avoid dropping; do not force adjustments beyond stops; keep dry and clean |
| Extreme Conditions (Heat/Cold) | Avoid direct sun; allow gradual temperature change; use covers when entering air-conditioned areas |
| Extreme Conditions (Sand/Dust/Salt) | Keep covers on; clean optics before storing; avoid salt spray; dry thoroughly after use |
| Battery (Digital Compass Models) | Located under thumb screw on objective side; low battery indicated by 'b---' |
| Repairability | Factory pre-aligned; do not disassemble. Replaceable parts: binocular body, rubber eyecup, eyepiece cover, carrying strap, objective caps |
Frequently Asked Questions - M1580 Steiner
User questions about M1580 Steiner
0 question about this device. Answer the ones you know or ask your own.
Ask a new question about this device
Download the instructions for your Binoculars in PDF format for free! Find your manual M1580 - Steiner and take your electronic device back in hand. On this page are published all the documents necessary for the use of your device. M1580 by Steiner.
USER MANUAL M1580 Steiner
The Binocular-Specialists!

OPERATOR'S
MAINTENANCE MANUAL

natural_image
Black-and-white photo of a person using binoculars, no visible text or symbolsSTEINER BINOCULARS
Military ruggedness and precision
07/03
WARNING!
When using the binocular, never point it directly at the sun.
The heat generated by the focused rays of the sun may cause serious damage to your eyes and to the optical elements of the binocular.
DON'T DO IT!

DESCRIPTION & SPECIAL FEATURES
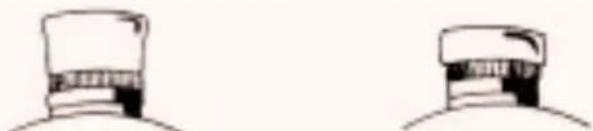
STEINER binoculars provide long eye relief for eyeglass or gasmask users. By folding the rubber eyecups (1) down and over the eyepiece you will increase the eye relief of the binocular.

All images in this manual for illustration purposes only.
natural_image
Two identical line drawings of a hat with a textured cap, shown from different angles (no text or symbols)NORMAL FOLD DOWN
The binoculars are lightweight, compact instruments intended for use in general field observation and fire direction. Where applicable, the right side of the binocular includes a reticle graduated in mils.
The objective and eye piece covers (2) provide protection for the binocular. The binocular is equipped with a carrying strap (3) for easy portability.
The binocular consists of two telescopes hinged at the center by an index pin and sleeve arrangement.
DESCRIPTION & SPECIAL FEATURES (CONT'D)

- Rubber Eyecups
- Housing, left
- Housing, right
-
Objective Caps
-
Interpupillary Scale
- Knurled Adapter Ring
- Diopter Scale
- Eyepiece Cover
Each telescope is comprised of eyecups (1), a housing assembly (2 or 3) and objective covers (4).
The binoculars are optically pre-aligned at the factory and must not be disassembled.
The friction necessary to maintain the proper interpupillary distance (distance between the eyes) is created by rubber O-rings installed in the grooves of the index pin.
Once this distance is set for your eye spacing, the reading on the interpupillary scale (5) can be noted for future reference.
By rotating the knurled adapter ring (6) of the eyepieces, you can focus each telescope to accommodate your particular optical characteristics. The reading on each diopter scale (7) should then be noted for future reference. The eyepiece cover (8) should be placed over the eyepieces when the binocular is not in use.
HANDLING PRECAUTIONS
DO'S
Handle the binocular with care. Dropping or jarring the binocular can damage or misalign the optics. Use the neckstrap to protect against accidental dropping of the binocular. Keep the binocular as clean and dry as possible and always store in clean, dry place when not actually in use. Follow the instructions outlined in this manual to obtain the best possible usage and service from the binocular.
DON'T S
Do not use a dry cloth to clean the glass surfaces of the binocular. See also "Cleaning Instructions".
Do not attempt to open or close the binocular beyond its stop limits as this may damage internal and external parts. Do not unnecessarily expose the binocular to severe weather elements. For special precautions see also “Extreme Cold / Heat” and “Other Extreme Conditions”.
Do not force the knurled adapter rings beyond marked diopter scale readings as this may damage internal parts.
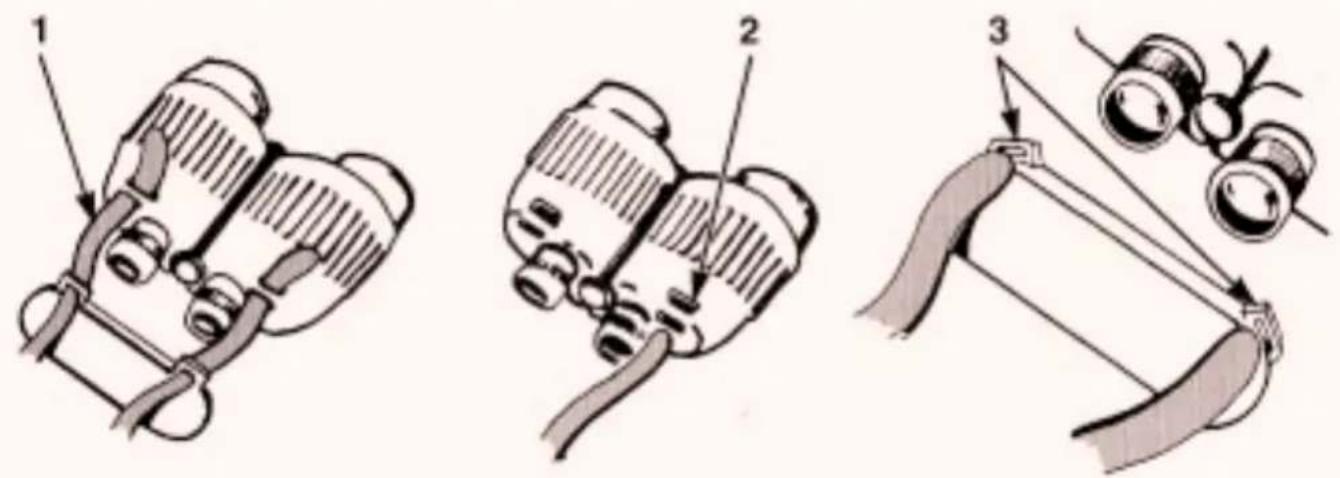
How to Remove / INSTALL CARRYING STRAP
Loosen loops from neck strap (1)
Slide strap out of binocular holding loops (2)
Slide strap out of eyepiece cover holding loops (3)
Install one end of carrying strap through eyepiece cover holding loop (3)
Slide end of carrying strap (1) through holding loop (2) on bottom of binocular and fix the loop of the carrying strap.
Repeat procedure for other end of carrying strap.
OPERATING ADJUSTMENTS
WARNING!
When using binocular, never point it directly at the sun.

natural_image
Simple line drawing of a tank inside a circle with crosshairs (no text or symbols)Adjusting and Using Your Binocular
Adjusting the binocular begins by setting the interpupillary distance.
This is the distance between the pupils of your eyes. The binocular tubes pivot on a hinge, moving the tubes closer or further apart. Pivot the binocular tubes until you see a single image when looking through the binocular.
natural_image
Illustration of binoculars with no visible text or symbolsHow to Focus
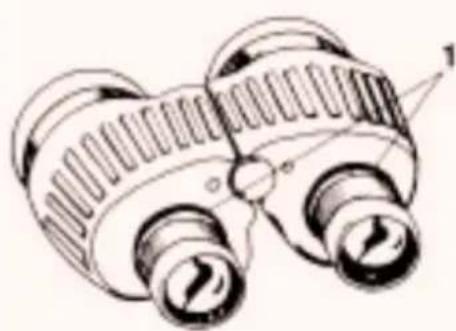
- Choose an image, sign or a tree approx. 50 m away to view.
• Cover one of the objectives lenses. - Look through the binocular with both eyes open.
- Turn the eyepiece (1) of the uncovered lens until the image appears clear and sharp
- Now repeat the procedure with the opposite lens.
- When viewing through both lenses, all images from 20 m to infinity will be bright, clear and sharp.
- Make note of your diopter setting as it can be unique to each user.
- Higher power models (10x–20x) may require higher initial focus distance.
NORMAL OPERATION
(1) Place carrying strap around your neck.
(2) Remove eyepiece cover by first rotating binocular telescopes inward and then lifting off eye lens cover.
(3) Unsnap objective caps from front of binocular and let them hang down from binocular.
(4) Close the telescopes of the binocular until the interpupillary index scale is at the proper setting for use.
(5) Rotate the eyepiece adapter rings to obtain the proper diopter settings on the diopter scale.
(6) When sighting through the binocular, hold it in a comfortable and stable position.
(7) Refer to "Extreme Cold/Heat" and "Other Extreme Conditions" for precautions to be observed when unusual weather or atmosphere conditions prevail.
(8) Under the special conditions when direct sunlight enters the binocular a portion of this light will be reflected back producing a glitter effect which may be detectable at positions in the general target field.

natural_image
Line drawing of a person wearing a hard hat and safety vest with gloves (no text or symbols)CLEANING INSTRUCTIONS
BINOCULAR EXTERIOR
Clean the exterior of the binoculars (but not the lenses) with a lint-free cloth. Remove grease spots, fingerprints and other soil with soap and water and a well wrung-out cloth; then dry with a clean, lint-free cloth. Remove dirt and lint from objective and eye lens cover interior surfaces with a blower.
OPTICAL SURFACES
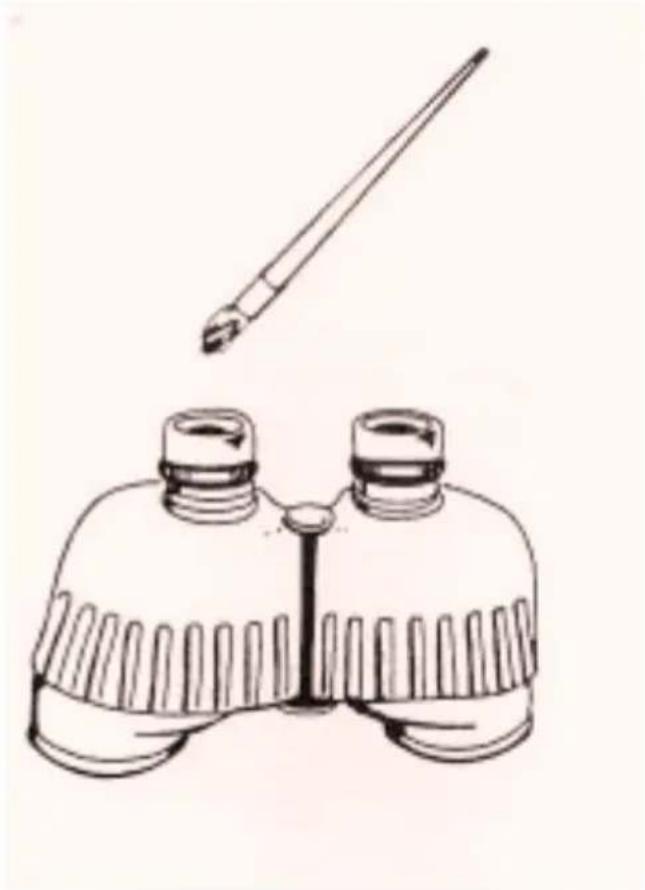
Blow as much dust and dirt as possible from the exposed lens surfaces. Then, using a soft brush, brush across the surface with light, quick strokes, flicking the brush after each stroke to dislodge the dust it has picked up. When all visible particles of dust and dirt have been removed, moisten a piece of lens tissue with lens cleaner and gently wipe over the surfaces.
natural_image
Illustration of an open binoculars with a pipette above it (no text or symbols)(1) Avoid breathing directly on the optical elements of the binocular. The breath may condense and freeze.
(2) Do not expose the binocular to sudden and extreme temperature changes, such as carrying it directly from a well-heated area into sub-zero temperatures. Extreme temperature changes may cause the optical elements to crack.

natural_image
Cartoon illustration of a person with a thermometer and flame, no text or symbols present
natural_image
Simple line drawing of a smiling sun with a thermometer beside it (no text or symbols)EXTREME HEAT
(1) Do not allow the binocular to lie unprotected from the direct rays of the sun. The intensified heat may damage the binocular mechanisms.
(2) Place the binocular objective and eye lens covers on the binocular before entering an airconditioned area. This will permit the binocular to cool down gradually and prevent condensation from forming.
OTHER EXTREME CONDITIONS
SAND AND DUST
(1) Always keep the binocular objective and eye lens covers on when not actually in use. Sand and dust will etch glass surfaces and can penetrate through the smallest openings, thereby causing damage to adjusting mechanisms.
(2) Upon completion of operations, remove all particles of sand and dust from optical elements as per "Cleaning Instructions" before installing protective objective and eye lens covers.

natural_image
Simple line drawing of desert cacti with no text or symbols
natural_image
Line drawing of a small boat with a mast and sail, floating on water (no text or symbols)HIGH HUMIDITY OR SALTY CONDITIONS
(1) Avoid exposing the binocular to direct salt spray. Salt water is extremely corrosive and can cause irreparable damage to the binocular.
(2) Always dry the binocular thoroughly after use and immediately clean lens as per "Cleaning Instructions" and install objective and eye lens covers.
USE OF RETICLE
(where applicable)
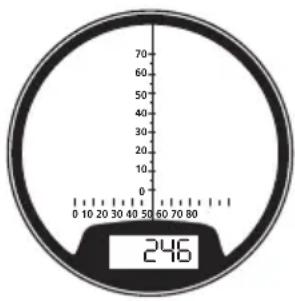
One of the telescopes of the binocular includes a horizontal and vertical scale reticle graduated in 10-mil increment unit markings (1 unit – 10 mils, 2 units – 20 mils, etc.). The format of the reticle might differ from the one shown here, but it works the same way.

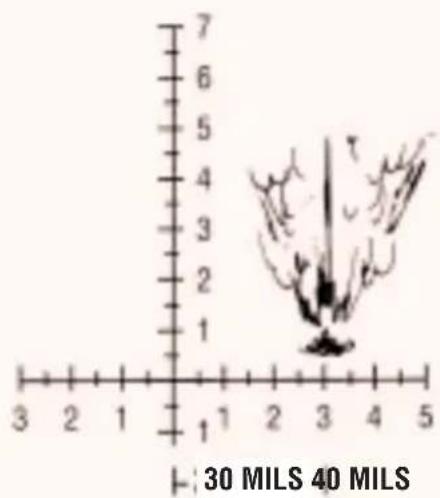
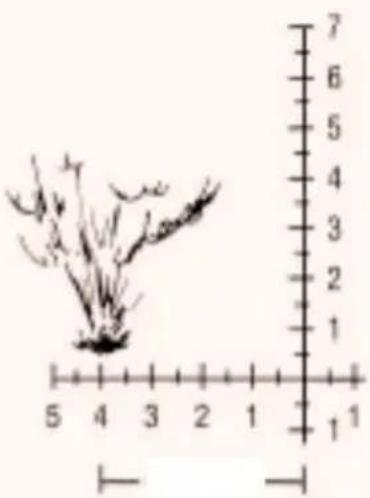
Fire corrections can be made by viewing the impact area and determining angular corrections by use of the left or right horizontal reticle scale.
USE OF RETICLE (CONT'D)
In determining range, if an object fills one 10 mil unit marking on the horizontal reticle scale and is known to be 10 meters wide, the object is 1000 meters away. If the same size object fills two unit markings (20 mils), it would be 500 meters away. When this formula is used, the distance will be given in the same units of measurement (feet, meters, etc.) as is used in estimating the known size of the object. The same formula can be used to determine range with the vertical reticle scale when the height of an object is known. The use of the vertical scale is preferred (especially on level terrain), since objects are often viewed obliquely along the horizontal axis.

$$ \text { DISTANCE } = \frac {\text { Known size }}{\text { Scale Size }} \times 1. 0 0 0 $$

$$ \text { Size } = \frac {\text { Distance } \times \text { Scale Size }}{1 . 0 0 0} $$
USE OF COMPASS
(where applicable)

How to use the Analog Compass
Read the bearing to which you are pointing the binocular. Line up the object to which you would like to get the bearing on the vertical scale and read the bearing beneath.
For analog compass models the bearing is illuminated by daylight and can be illuminated by a touch of the button on the side of the compass at night (7x50 models).

How to use the Digital Compass
ON/OFF: Press ON/M bar to turn compass on. Display will run through a warm-up cycle and display 'CAL' (calculating). After two seconds, the display will show the current setting, e.g. 'd 0' or 'd 10' (see below). The binocular will turn itself off after 10 seconds of non-use.
Bearings: Press bearing bar: display shows instant bearing. Hold bearing bar down: display shows 4x per second average while you hold the bar down.
Memory: To enter bearings: Sight the binocular on an object and take the bearing, allow the binocular to turn off. The bearing will be automatically saved and will be stored until next usage. When turning the binocular compass on this last bearing will re-appear. To record another bearing, simply reset this process.
Declination: The difference of the angle between true north and magnetic north is called declination. This can vary by your position on the earth and on the compass orientation towards the magnetic north. This declination can be adjusted on the digital compass up to +/- 40 degrees maximum. The declination can be found on all marine charts and enhanced topographic maps. Please also be aware of annual changes in declination.
USE OF COMPASS (CONT'D)
How to use the Digital Compass (cont'd)
Setting the Declination:
The compass has to be switched off with no reading in the display. Press and hold the bearing bar, at the same time, press the ON button. Then release both at once. The reading 'd 00' is shown in the display (if there is a positive or negative number in this location, it may mean that the setting has already been tested or established). Pressing the BEARING bar while in a declination setting mode decreases the declination by 1 degree increments, pressing the ON button increases the declination. After setting the current local and correct declination, allow the compass to shut itself off and the declination will be automatically saved and will be viewed during the start-up process (see above).
Display of Low Battery Warning:
If the batteries need to be replaced, reading 'b---' will be displayed. If the reading 'b---' appears, bearing may no longer be possible or displayed for less than 10 seconds. The batteries are located on the large objective lens side of the binocular under the thumb screw.
Other features:
- Light entrance window (red window on compass).
Measures light and automatically adjusts LED display brightness.
- Reticle – to determining distance.
- Rubber armoured – for good grip and minimizes slipping on wet surfaces.
- Long Eye Relief - easy use with eye glasses by rolling down the eye cups.
REPLACABLE PARTS
The Binocular-Specialists!

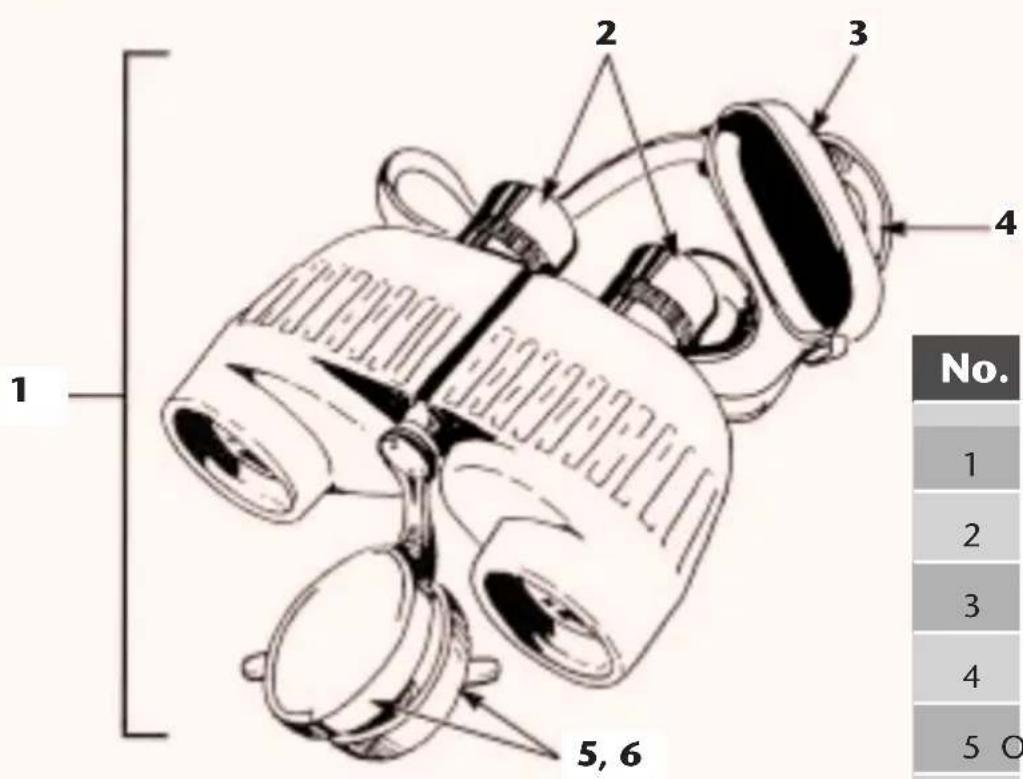
| No. | Description Qty | |
| 1 | Binocular | 1 |
| 2 | Rubber | Eyecup |
| 3 | Eyepiece | Cover |
| 4 | Carrying | Strap |
| 5 | Objective Cap, right 1 | |
| 6 | Objective Cap, left 1 | |

- STEINER BINOCULARS
- Military ruggedness and precision
- WARNING!
- DON'T DO IT!
- DESCRIPTION & SPECIAL FEATURES
- DESCRIPTION & SPECIAL FEATURES (CONT'D)
- HANDLING PRECAUTIONS
- DO'S
- DON'T S
- How to Remove / INSTALL CARRYING STRAP
- OPERATING ADJUSTMENTS
- When using binocular, never point it directly at the sun.
- Adjusting and Using Your Binocular
- How to Focus
- NORMAL OPERATION
- CLEANING INSTRUCTIONS
- BINOCULAR EXTERIOR
- OPTICAL SURFACES
- EXTREME HEAT
- OTHER EXTREME CONDITIONS
- SAND AND DUST
- HIGH HUMIDITY OR SALTY CONDITIONS
- USE OF RETICLE
- USE OF RETICLE (CONT'D)
- USE OF COMPASS
- How to use the Analog Compass
- How to use the Digital Compass
- USE OF COMPASS (CONT'D)
- How to use the Digital Compass (cont'd)
- Setting the Declination:
- Display of Low Battery Warning:
- Other features:
- REPLACABLE PARTS
Brand : Steiner
Model : M1580
Category : Binoculars