BS26410 - Grill BeefEater - Free user manual and instructions
Find the device manual for free BS26410 BeefEater in PDF.


| Product Type | Side Burner for Barbecue (Grill) |
| Brand | BeefEater |
| Model | BS26410 |
| Fuel Type | Universal LPG (propane) – convertible to Natural Gas with kit |
| Ignition | Manual – press and turn control knob to High |
| Construction Materials | Stainless steel, porcelain enamel, cast iron burner |
| Included Accessories | Trivet, drip plate, connector hose |
| Safety Features | Gas shut-off valve, leak test procedure, warning labels |
| Installation | Outdoor only – minimum 450mm clearance from combustibles, not for marine or caravan |
| Warranty | 24 months full – additional 8 years on enamel burner box, 3 years on stainless steel grills/plates |
| Certifications | Complies with Australian Standards AS 5601 |
| Recommended Use | Domestic outdoor barbecues – not for commercial use |
| Care & Cleaning | Wash with hot soapy water, avoid abrasive cleaners, polish stainless steel with appropriate products |
| Service Frequency | Every 2 years by authorised service person |
| Country of Origin | Australia |
Frequently Asked Questions - BS26410 BeefEater
User questions about BS26410 BeefEater
0 question about this device. Answer the ones you know or ask your own.
Ask a new question about this device
Download the instructions for your Grill in PDF format for free! Find your manual BS26410 - BeefEater and take your electronic device back in hand. On this page are published all the documents necessary for the use of your device. BS26410 by BeefEater.
USER MANUAL BS26410 BeefEater
natural_image
Line drawing of a gas stove with a lid and cooling unit (no text or symbols)IMPORTANT SAFETY INSTRUCTIONSCONTENTSCONGRATULATIONS

Dear customer.
Congress oral care and thank you for choosing our appliance. We are sure you will find it a pleasure to use. Before you use the appliance, we recommend that you read through the relevant sections of this manual, which provide a description of your appliance and its functions.
To avoid the risks that are always present when you use an appliance, it is important that the appliance is installed correctly and that you read the safety instructions carefully to avoid misuse and hazards.
We recommend that you keep this instruction booklet for future reference and pass it on to any future owners.
After unpacking the appliance, please check it is not damaged. If in doubt, do not use the appliance but contact your local customer care centre.
This appliance complies with requirements of Australian Standards A56363.
CONDITIONS OF USE
These important notes apply to your appliance, failure to adhere to these conditions of use may affect your ability to make a claim under the manufacture's warranty.
- This appliance MUST be installed and serviced only by a qualified licensed person.
- This product is intended for installation and use at a domestic residence only. This product is not intended for commercial use.
• This product is not suitable for installation or use in marine craft, caravans or recreational vehicles. - This product must be installed in accordance with these instructions, the requirements of AS/N75 5601, and in accordance with local authority.
- This product must be installed, operated and must be opened as per the instructions.
- Ventilation holes in the unit must not be obscured by the installation.
Please ensure you read the instruction manual fully before you call for service, or a full service fee could be applicable.
Record modal and serial number here
Model number
Serial number
PNC
Important safety instructors ....3
Assembly
One-First Independent
Care and Health Centers
Order installation.
We think
Please read the user manual carefully and store in a handy place for later reference.
The symbols you will see in this booklet have these meanings:

WARNING
This symbol indicates information concerning your personal safety.

CAUTION
This symbol indicates information on how to avoid damaging the appliance.

IMPORTANT
This symbol indicates tips and information about use of the appliance.

ENVIRONMENT
This symbol indicates tips and information about economical and ecological use of the appliance.
IMPORTANT INFORMATION THAT MAY IMPACT YOUR MANUFACTURER'S WARRANTY
Adherence to the directions for use in this manual is extremely important for health and safety. Failure to strictly adhere to the requirements in this manual may result in personal injury, property damage and affect your ability to make a claim under the BeefEater manufacturer's warranty provided with your product. Products must be used, installed and operated in accordance with this manual. You may not be able to claim on the BeefEater manufacturer's warranty in the event that your product fault is due to failure to adhere this manual.
Please read the user manual carefully and store in a handy place for later reference.

IMPORTANT
Important - check for any damages or marks
If you find the appliance is damaged or marked, you must report it within 7 days if you wish to claim for damage/ marks under the manufacturer's warranty. This does not affect your statutory rights.

ENVIRONMENT
Information on disposal for users
- Most of the packing materials are recyclable. Please dispose of those materials through your local recycling depot or by placing them in appropriate collection containers.
- If you wish to discard this product, please contact your local authorities and ask for the correct method of disposal.

WARNING
This appliance must be serviced only by a qualified licensed person.
Improper installation, adjustment, alteration or maintenance can cause injury or property damage. Please contact your nearest Electrolux Service Department for additional information or assistance for an approved installer.
NOTE: This manual must remain with the owner for future reference.

WARNING
• Do not lean over appliance when lighting.
• Do not leave the appliance unattended when alight.
• Do not delay lighting once the gas has been turned on.
- Do not store or use aerosol cans in the vicinity of the appliance.
- Do not store flammable liquids in the vicinity of the appliance.
- Do not use caustic or abrasive based cleaners on the appliance.
- Do not attempt to dismantle or adjust the control valves.
- Do not attempt to dismantle or adjust the regulator.
• Do not test for leaks with a naked flame.
- Do not modify the construction of this appliance or modify the injector orifice size.
- Do not obstruct any ventilation of the appliance.
- Do not allow children to operate or play near the appliance.

CAUTION
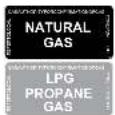
This appliance is set up for Universal LPG and is labelled accordingly. A natural gas conversion kit is available if required. Conversion of this unit to natural gas must be carried out by a qualified licensed person and a Certificate of Compliance must be issued to the owner at the completion of the installation and conversion.
ASSEMBLY AND GAS CONNECTION INSTRUCTIONS
ASSEMBLY AND GAS CONNECTION INSTRUCTIONS

Assembly
Attach your side barnar in your barbecue trolley as explained in the separate barbecue/trolley instructions.
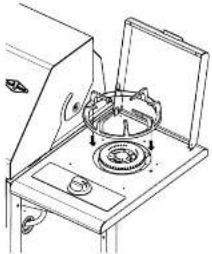
Attach The Trivet
Place the trivet on the body of the side burner. The small notches underneath the trivet should sit neatly in the holes in the steel, as shown.
natural_image
Technical line drawing of a mechanical device with two circular components and a lid (no text or symbols)Temporarily Remove The Drip Plate
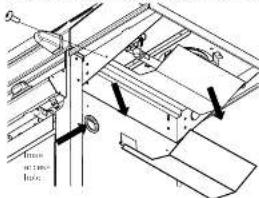
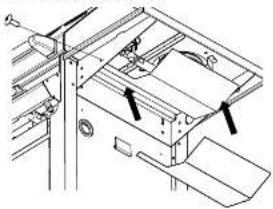
In order to properly connect the braces to the side burner, you may find it easier to remove the drip plate from underneath the side burner.
Simply, ends the screw at the iron, of the side burner as shown, and then eases the rear trip plate legs from the side burner body.
You now have clear access to the side burner inlets.
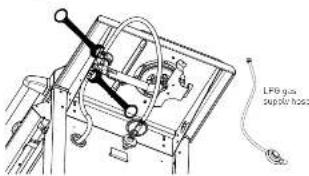
Connection to Barbecue
Fusare all gas contrasts on the barbecue and side bume are set to III-
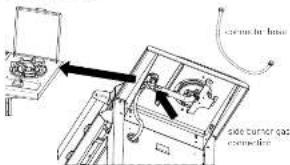
Take the connector nose that came with the side burner. Connect one end to the inlet of the bar secure. Connect the other and to the left side gas connection point of the side burner.
If your barbecue came with a cabinet trolley/ cart, your connector hose should be ready to be attached to the barbecue inlet (as indicated by the separate cart instructions). In this case, simply pass the free end of the hose through the hose access hole in the side of the cart prior to connecting to the side burner inlet.
Connection To Gas Supply
Use all gas conces on the barbecue and side bume are set to D=
Attach the gas supply hose to the right side inlet of the side burner.
If the gas supply hose is not already attached to the gas supply, then attach it now.
If your barbecue came with a cabinet trolley/cart, your gas supply house may already be attached to a portable gas cylinder located inside the cabinet. In this case, simply pass the rope end of the base through the house access hole in the side of the cart prior to connecting to the side burran inlet. Using two spammers, lighter all gas connections, do not overlighten.
Replace The Drip Plate
Push the rear drip plate tabs back into the slots at the back of the side burner body, and secure the front of the drag plate with the screw removed set or.
natural_image
Technical line drawing of a mechanical assembly with no visible text or symbolsSecure All Joints And Leak Test
The gas leak testing procedure should be conducted every time a gas cylinder is refilled and reconnected to the appliance, or after any new gas connection is made. Never use a naked flame to check for gas leaks.
In a small container, we can a solution of water and detergent or soap. Mo the solution well
Make sure that the gas supply valve on the gas cylinder or the shut off valve or the supply line is turned on. Make sure that the gas control valves on the appliance are all turned oil.
Using a brush or spray bottle apply the solution to the gas line and each joint in the gas line, including the hose and regulator.
Eubling of the so clean we indicate that there is a leak present. Re-light lens to re-seal and joints that are leaking
If a leak persists contact your distributor for assistance.
OPERATING INSTRUCTIONS
CARE AND MAINTENANCE

Operation of the optional side burner
Lighting
- Check the central knot is in the Ill position and re-serve the gas line is properly connected.
- Raise the lid and check that the burner and burner cap are in the secret proposal.
- Press and turn the control knob slowly (3-4 seconds) in a counter-clockwise direction to the High position until a clock is heard. When the burner is alight, select your desired heat setting. A low flame or summer condition is ablation by turning the can't be knock anti-clockwise to Low.
If the burner fails to give, turn the control knot to 01, wait 5 minutes and repeat the lighting procedure.
After Use
- Turn the control knob to be 31 position and turn the gas cylinder valve off when the barbecue is not in use.
- Clean off any food spills and then close the lid.

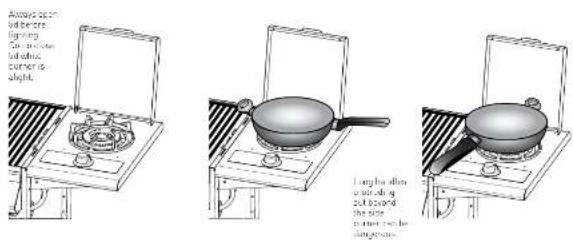
WARNING
When using the side burner ensure that any handle fitted to a wok, pot or pan is positioned so that it is out of reach of children.
WARNING
Safety with woks and pots and pans
When using a wok, pot or pan on the side burner ensure that any handle is positioned so that it is out of reach of children. Long handles protruding out beyond the side burner can be dangerous. Keep children away from the appliance when it is operating. Never leave an operating barbecue unattended.
Stainless steel cleaning and maintenance
Clean the appliance as required or at least twice annually with hot socony water. Avoid abrasive cleaners or brushes as these will mark the porcelain enamel or stainless steel surfaces of the appliance. If you cook food directly over the burner frame, causing more espous or smoke, the vowing glass where fitted will need more frequent cleaning.
Stainless steel care and cleaning
After the expansion has been used, wash down the surfaces with hot soapy water. The surface of the stainless steel has a grain. Always clear along the grain of the steel. This will avoid unwanted marks. Rear the ocean or salt water environment, wash regularly, nine and then dry before covering. Covering a salt sprayed plain raw steel product while still wet will allow salt deposits to form, causing rust to form even on very high grade stainless.
Discoloration of stainless steel
The discoloration of stainless steel, caused by high heat is caused by Chromium Oxide and sometimes appears as a light brown colouring over the surface of the steel. In most cases, this discoloration can be removed with a suitable stainless steel polish.
NOTE: Discoloration of the stainless steel is not covered under warranty.
Porcelain enamel cleaning and maintenance
After the appliance has been used, wash down the surfaces with hot soapy water. Near the ocean or salt-water environment, wash regularly, rinse and then dry before covering. Highly caustic cleaners should be avoided.
Rust
Cast iron and steel are metals and will rust if you do not provide sufficient metal resistance and cure. Rust occurs when the surface of the metal starts to oxid se. Generally, rust will occur on any exposed metal surface if it is not protected from the elements. Even stainless steel can be collected by long-term exposure to the elements. To prevent exposure to the elements, store your barbecue, hood and trolley under the protection of a purpose made cover.
Do
- Wash regularly with warm soapy water or detergent using a clean cloth and, if necessary, a soft bristle brush.
- Remove non-washable deposits using an approved clearer.
- In the case of stainless steel, clean or one direct clean only, along the original polis' lines.
- Rinse well, with clean water and wipe dry.
- Keep barbecue covered when not in use, eg polyester barbecue cover.
Don't
- Use steel wool or metallic scrapers to remove non-washable deposits.
- Allow grease or dirt to accumulate or to dry out and burden.
- Use cleaners can bring horseshubbing as high bleach content.
CONDITION CLEANING PRODUCT METHOD
| Readily removedstainsLight greaseRout the cleaningSalt spray | Soap, liquid cetergents, or powder cetergentswith warm water. Methylated spirits may beused before fresh brown oil detergent | Avoid scratching. Do not use cleaners containingbleaching agents. Rinse with clean water toremove red dust, covering components and drybefore covering. Only use mild detergents onperbecue fascia. |
| Non washabledepositsHeavy grease | Concentrated detergent. Dornessic cleaningpowders. Recommended stainless steel,cleaners. | Do not use stone, wood. Rub in straight linesalong the polish pattern. Avoid scratching,scratching. Rinse with clean water and dry. |
i IMPORTANT
Care should be taken with all cleaning agents to avoid damage to any associated non-stainless steel components. Fire, safety and protective clothing regulations should be closely adhered to.
CARE AND MAINTENANCE
Service and maintenance
This appliance should be checked and serviced by an author and service person every 2 years to ensure the appliance remains in a safe operation condition. These services are not covered by warranty.
| SERVICE AND MAINTENANCE FREQUENCY BY AUTHORISED | |||
| EACH USE EVERY SIX | MONTHS EVERY SIX MONTHS | ||
| Check gas supply hose(s) for cracks and leaks | √ | ||
| Check gas regulator for leaks | √ | ||
| Check that all gas fittings are tight | √ | ||
| Clean and inspect burner | √ | ||
| Clean and inspect gas injector | √ | ||
| Check the gas control valve on the cylinder | √ | ||
| Inspect ignition system | √ | ||
| Inspect gas control valve | √ | ||
Most importantly, this is an outdoor appliance. Ensure it is positioned safely away from anything that can catch fire.
Indoor Use Only: Under no circumstances is this side burner to be used indoors. This includes garages or any other enclosed area.
Clearance From Combustibles: Ensure the side burner remains at a distance of at least 45cm (18" from any combustible material such as wood, gypsum, paper and plant. Do not store combustible materials, gasoline or flammable liquids or vapours within 45cm (18" of the appliance.
Adequate Ventilation: Ensure there is adequate ventilation for the appliance and cylinder. This is required not only for proper combustion, but also to prevent gas build up.
Firm Level Surface: Use your barbecue only on a firm level surface. This appliance is not designed for recreational vehicles, and shall not be installed on a boat or any marine craft.
Protection From Weather: Keep the side burner protected from adverse weather, including rain and high winds. Polyvinyl covers are available that have been specially designed for this range of barbecues.
Allow clear access to the entire gas supply hose and regulator.
Maintenance Access: When your side burner is installed, you should be able to access the gas supply line including the gas piping or hose, gas regulator, gas cylinder and any shut off valves.
Partial Enclosures: Many backyards have areas that are partially classified off, such as balconies and pergolas. In some cases, it is hard to decide whether these partially enclosed areas should be classified as indoor areas, particularly in terms of permanent (non-classable) ventilation. The gas safety authorities have agreed on the definition of partial enclosures below.
Partial Enclosures (Australia Only)
This appliance shall only be used in air above ground, open air situation with natural ventilation, without stagnant areas where gas leakage and products of combustion are rapidly dispersed by wind and natural convection. Any enclosure in which the appliance is used shall comply with one of the following:
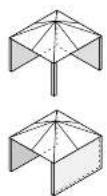
Within a partial enclosure that includes an overhead cover and no more than two walls.
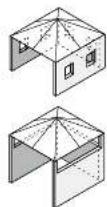
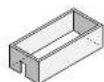
Any enclosure with walls on all sides, but at least one permanent opening at ground level, and no overhead cover.
Within a partial enclosure that includes an overhead cover and more than two walls, the following shall apply:
- At least 25% of the total wall area is completely open; and
- at least 30% of the remaining wall area is open and unrestricted.
In the case of balconies, at least 20% of the total of the side, back and front wall areas shall be and remain open and unrestricted.
OUTDOOR INSTALLATION INSTRUCTIONS

WARNING
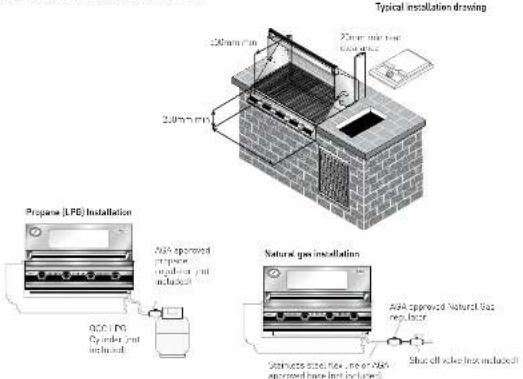
Contact your local municipality for any building codes regulating the installation of outdoor barbecue appliances. Outdoor installations must conform to local codes or, in the absence of local codes, with the following.
We recommend that this installation be done in a masonry structure and carried out by a professional tradesperson. Other non-combustible material such as Hardiplank, Villaboard with metal studs may also be used.
This appliance must not be installed under or on any combustible material. Minimum clearance from combustible construction materials to all sides of the appliance is 450mm. Australian Standards Code A5: 5601

WARNING
When using an LPG/Propane supply system in an enclosure, ventilation must be provided. Gas vapour is highly explosive and can cause serious bodily injury or damage to property if allowed to accumulate in a confined space and ignited.
Installing the Inbuilt Side Burner
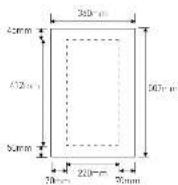
This application can only be installed in an enclosure constructed of non combustible material.
- Determine the position of the cutout for the side burner using the diagram shown on this page.
- Prepare that no gas, electricity or any other services run near the position of the carout.
- Depending on the depth of the bench into which the side burner is being installed, it may be necessary to connect the gas roses to the side burner first.
- Secure the side burner by drilling through the mounting plate.

Electrolux Warranty
FOR SALES IN AUSTRALIA AND NEW ZEALAND APP. WANCE: REEFFATER SIGNATURE BRO
This document sets out the terms and conditions of the product warranties for BeefEater Appliances. It is an important document. Please keep it with your proof of purchase documents in a safe place for future reference should there be a manufacturing defect in your Appliance. This warranty is in addition to other rights you may have under the Australian Consumer Law.
1. In this warranty:
(a) "ACL or Australian Consumer Law" means Schedule 2 to the Competition and Consumer Act 2013;
(b) 'Appliances' means any Electrolux product purchased by you and accommodation by this document;
(c) 'ASC' means Electrolux's authorised serviced centres;
(d) "BosFaro" is the brand controlled by EcoSanlux Home Products Pty. Ltd. of 163 O'Brien Street, Massot NSW 2020. APN 51 004 782 341 In respect of Appliances purchased in Australia and EcoSanlux (N.V.) Limited (collectively "EosFaro") of S-S Mall Burgess Road, Mount Wellington, in respect of Appliances purchased in New Zealand
(e) 'Warranty Period' means the period specified in clause 5 of this warranty;
(i) 'you' means the purchaser of the Appliance not having purchased the Appliance for re-sale, and 'your' has a corresponding meaning.
- Applications This warranty only applies to new Appliances, purchased and used in Australia or New Zealand and is in addition to and does not exclude, restrict, or mostly in any way other rights and remedies under a law to which the Appliances or services retail, including any non-excluclonic statutory guarantee in Australia and New Zealand.
-
Warranty Period: Subject to these terms and conditions, this warranty continues for in Australia for a period of 24 months and in New Zealand for a period of 24 months, following the date or original purchase of the Appliance. Specific components are warranted against manufacturing defects in Australia and New Zealand for the periods last below;
-
Enamel burner box - Further 8 years parts only
- Stainless steel plates, grills and humens. - Further 3 years parts only
- Gas fuel plates, grills and furnaces Furnet 1 year parts only
- Repair or replace warranty: During the Warranty Period, Electrolux or its ASC will, at no extra charge if your Appliance is readily accessible for service, without special equipment and subject to those terms and conditions, repair or replace any parts which it considers to be defective. Electrolux may, in its absolute discretion, choose whether the remedy offered for a valid warranty claim is repair or replacement. Electrolux or its ASC may be refurbished parts to repair your Appliance. You agree that any replaced Appliances or parts become the property of Electrolux.
- Travel and transportation costs: Subject to cause 7, Electroux will bear the reasonable cost of transportation. Travel and delivery of the Appliance to and from Electroux on its AGC. Travel and transportation will be amended by Electroux as part of any valid warranty claim.
- Proof of purchase is required before you can make a claim under this warranty.
- Exclusions: You may not make a claim under this warranty unless the defect claimed is due to faulty or defective parts or workmanship. This warranty does not cover.
(a) light globes, barclides, filers or similar palatable parts;
(b) ports and Appliances not supplied by Haddoux;
(c) cosmetic damage which does not affect the operation of the
(II) damage to the Appliance caused by: (II) resilience or accident;
(i) misuse or abuse. Including failure to properly maintain or service
(ii) Improper, negligent or fully servicing or repair works done by
anyone other than bydorox, administered repanal of Acc
16. Pupper, E. F., their rainclown disturbance or abnormal pressure is up
In particular of the process is
(a) incorrect, improper or inappropriate operation
MIF insect or certain intestinal;
(x) failure to comply with any additional instructions supplied with
In solution, Electrous is not liable under this warranty if:
(a) the Appliance has been, or Hechtrude reasonably believes that the Appliance has been, used for purposes other than those for which the Appliance was blended, including where the Appliance has been used for any non-domestic purpose;
(b) the Appliance is modified without authority from Electrolux in writing;
(c) The Appliances serial number or warranty sea has been removed as defined.
- How to claim under this warranty: To enquire about claiming under this warranty, please follow these steps.
(a) carefully check the operating instructions, user manual and the
Items of the warranty;
(b) Have the model and serial number of the Appliance available
(2) Revs the door of purchasing an invoice; available;
-
Australia: For Appliances and services provided by Bostonux in Australia's Bostonux goods come with guarantees that cannot be excluded under the Australian Consumer's law. You are entitled to a replacement or refund for a major failure and for compensation for any other reasonably responsible loss or damage. You are also entitled to have the Appliance reported or replaced if the Appliance fails to be of scoreable quality and the failure does not amount to a minor failure, "Acceptable quality" and "major failure" have the same meaning as referred to in the AOCI.
-
New Zealand: For Appliances and services provided by Electrolux in New Zealand, the Appliances come with a guarantee by Beclinux pursuant to the provisions of the Consumer Guarantee Act, the Sale of Goods Act and the Fair Trading Act, where the Appliance was purchased in New Zealand for commercial purposes the Consumer Guarantee Act does not apply.
- Confidentiality: You accept that if you make a warranty claim, Electrolux and its agents including ASC may exchange information in relation to you to enable Electrolux to meet its obligations under the warranty
Important Notice
Before calling for service, please ensure that the steps listed in clause 8 above have been followed.
| FOR SERVICEor to find the address of your nearestouronal service centre in AustraliaPLEASE CALL 1300 507 939(for the road or other road) (Presten.co.uk) | AUSTRALIAELECTROLUX HOME PRODUCTSIND O'Hordan Street, Masord NSW 2POCBesafeateroob.co.nz | FOR SPARE PARTSor to find the address of your nearestspare parts centre in AustraliaPLEASE 13 13 50(for the road or other road) (Presten.co.uk) |
| FOR SERVICEor to find the address of your nearestoutlined service centre in New ZealandPLEASE CALL 0800 10 66 10(Presten.co.uk) | NEW ZEALANDELECTROLUX (NZ) Limited5.0 Nail Hurgas Road, Mount Wellingtonbesafeateroob.co.nz | FOR SPARE PARTSor to find the address of your nearestspare parts centre in New ZealandPLEASE 0800 10 66 20(New Zealand) |
Erik, RBO VA, Jun17
For more information on all Beefeater products, or for dimension and installation information, call into your retailer, phone or email our customer care team or visit our website:
AUSTRALIA
phone: 1300 307 939
fax: 1800 356 669
email: customercare@electrolux.com.au
web: beefeaterbbq.com
NEW ZEALAND
phone: 0800 436 245
fax: 0800 225 088
email: customercare@electrolux.co.nz
web: beefeaterbbq.com
Beefeater. We are part of the Electrolux Family. To add a touch of professional inspiration to your home, visit electrolux.com.au
- IMPORTANT SAFETY INSTRUCTIONSCONTENTSCONGRATULATIONS
- CONDITIONS OF USE
- WARNING
- CAUTION
- IMPORTANT
- ENVIRONMENT
- IMPORTANT INFORMATION THAT MAY IMPACT YOUR MANUFACTURER'S WARRANTY
- ASSEMBLY AND GAS CONNECTION INSTRUCTIONS
- Assembly
- Attach The Trivet
- Temporarily Remove The Drip Plate
- Connection to Barbecue
- Connection To Gas Supply
- Replace The Drip Plate
- Secure All Joints And Leak Test
- OPERATING INSTRUCTIONS
- CARE AND MAINTENANCE
- Operation of the optional side burner
- Lighting
- After Use
- Stainless steel cleaning and maintenance
- Stainless steel care and cleaning
- Discoloration of stainless steel
- Porcelain enamel cleaning and maintenance
- Rust
- Do
- Don't
- i IMPORTANT
- Service and maintenance
- Partial Enclosures (Australia Only)
- OUTDOOR INSTALLATION INSTRUCTIONS
- Installing the Inbuilt Side Burner
- Electrolux Warranty
- In this warranty:
- AUSTRALIA
- NEW ZEALAND
Brand : BeefEater
Model : BS26410
Category : Grill