1200 Series BMG1240BB - Grill BeefEater - Free user manual and instructions
Find the device manual for free 1200 Series BMG1240BB BeefEater in PDF.


| Product Type | Freestanding Gas Grill |
| Brand | BeefEater |
| Model | 1200 Series BMG1240BB |
| Primary Cooking Surface | Approximately 720 sq in (4,645 cm²) |
| Total Cooking Surface | Approximately 1,000 sq in (6,452 cm²) including warming rack |
| Number of Main Burners | 4 |
| BTU Output (Main Burners) | 60,000 BTU total (approx. 15,000 BTU per burner) |
| Side Burner | 1 (10,000 BTU) |
| Ignition System | Electronic push-button ignition |
| Fuel Type | Liquid Propane (LP) or Natural Gas (NG) convertible |
| Material | 304 Stainless Steel hood and body |
| Cooking Grates | Porcelain-coated cast iron |
| Flavorizer Bars | Stainless steel |
| Warming Rack | Stainless steel |
| Temperature Gauge | Built-in lid thermometer |
| Dimensions (with cart) | Approx. 48 x 26 x 45 inches (122 x 66 x 114 cm) |
| Weight | Approximately 120 lbs (54 kg) |
| Cart Material | Stainless steel with locking casters |
| Side Shelves | Fold-down, stainless steel |
| Grease Management | Removable grease tray and cup |
| Cleaning | Stainless steel cleaner recommended for exterior; burners and grates can be brushed |
| Safety Features | Regulator with automatic shutoff; flame tamers |
| Warranty | Limited lifetime on stainless steel hood, 10 years on burners, 2 years on other parts |
| Included Accessories | Rotisserie kit, LP hose/regulator |
Frequently Asked Questions - 1200 Series BMG1240BB BeefEater
User questions about 1200 Series BMG1240BB BeefEater
0 question about this device. Answer the ones you know or ask your own.
Ask a new question about this device
Download the instructions for your Grill in PDF format for free! Find your manual 1200 Series BMG1240BB - BeefEater and take your electronic device back in hand. On this page are published all the documents necessary for the use of your device. 1200 Series BMG1240BB by BeefEater.
USER MANUAL 1200 Series BMG1240BB BeefEater
Assembly and Operating Instructions
BEEFEATER 1200 SERIES
MODELS:
| BMG1230BB | BMG1251BB | BBG1240SB |
| BMG1240BB | BMG1231SB | BBG1250SB |
| BMG1250BB | BMG1241SB | BBG1230BB |
| BMG1230SB | BMG1251SB | BBG1240BB |
| BMG1240SB | BBG1230BB | BBG1250BB |
| BMG1250SB | BBG1240BB | BBG1230SB |
| BMG1231BB | BBG1250BB | BBG1240SB |
| BMG1241BB | BBG1230SB | BBG1250SB |
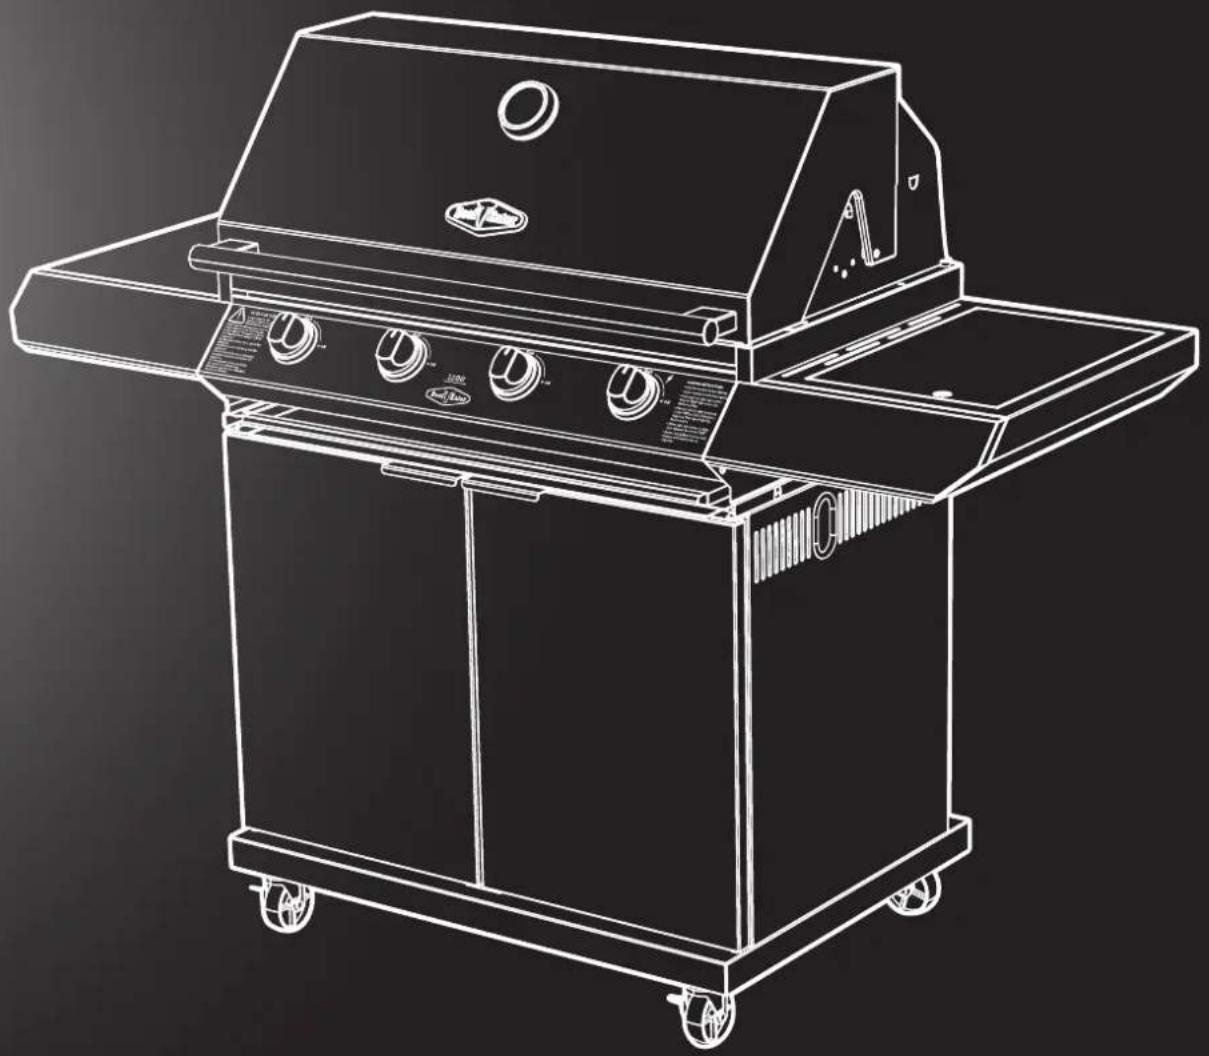
natural_image
Line drawing of a portable electric grill with control panel and wheels (no text or symbols)Dear customer,
Congratulations and thank you for choosing our barbecue. We are sure you will find it a pleasure to use. Before you use the barbecue, we recommend that you read through the relevant sections of this manual, which provide a description of your appliance and its functions.
To avoid the risks that are always present when you use an appliance, it is important that the appliance is installed correctly and that you read the safety instructions carefully to avoid misuse and hazards.
We recommend that you keep this instruction booklet for future reference and pass it on to any future owners.
After unpacking the appliance, please check it is not damaged. If in doubt, do not use the appliance but contact your local customer care centre.
This appliance complies with requirements of Australian Standards AS/NZS 5263.1.7.
Conditions of use
These important notes apply to your appliance, failure to adhere to these conditions of use may affect your ability to make a claim under the manufacture's warranty.
- This appliance must be serviced only by a qualified licenced person.
• This product is intended for personal, domestic or household use only, not commercial use.
• This product is intended for outdoor use only. - This product must be installed, operated and maintained as per the instructions.
- Ventilation holes in the unit must not be obscured by the installation.
Please ensure you read the instruction manual fully before you call for service, or a full service fee could be applicable.
Record model and serial number here:
Model number:
Serial number:
PNC:
Important safety instructions....3
Gas cylinder safety information....6
Know your barbecue....7
Contents 8
Trolley assembly 9
Natural gas conversion 12
Using your barbecue.... 13
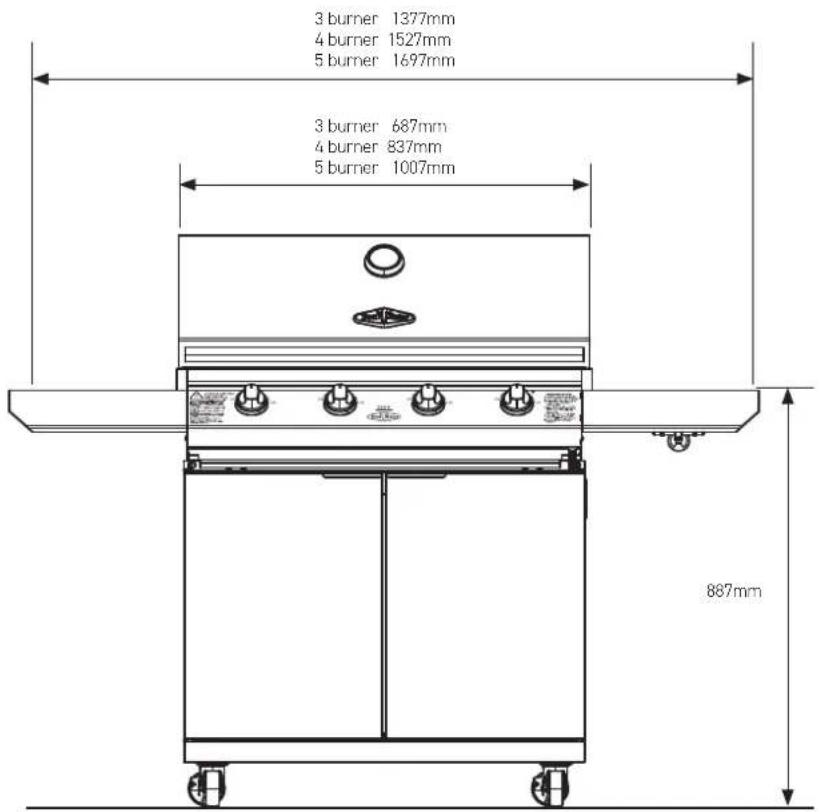
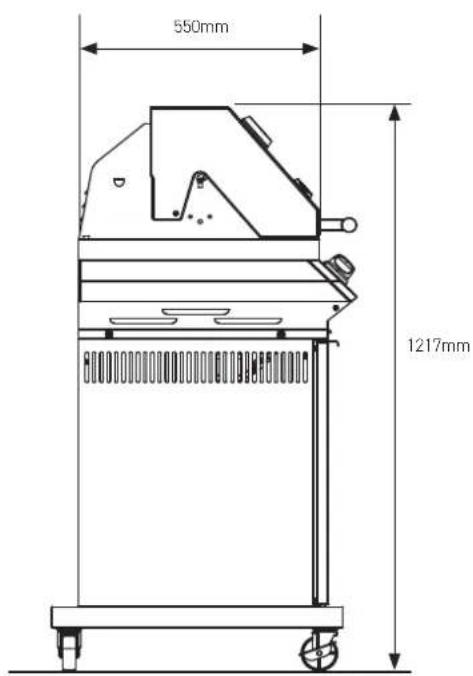
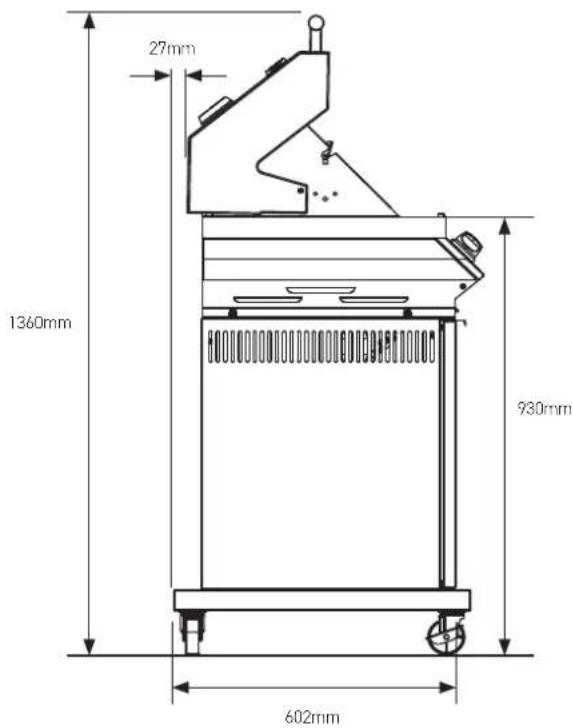
Technical information.... 15
Locating your barbecue.... 16
Installing your barbecue.... 18
Cleaning and storing your barbecue.... 20
Maintenance....21
Troubleshooting.... 22
Warranty 23
Please read the user manual carefully and store in a handy place for later reference.
The symbols you will see in this booklet have these meanings:

WARNING
This symbol indicates information concerning your personal safety.

CAUTION
This symbol indicates information on how to avoid damaging the appliance.

IMPORTANT
This symbol indicates tips and information about use of the appliance.

ENVIRONMENT
This symbol indicates tips and information about economical and ecological use of the appliance.
IMPORTANT INFORMATION THAT MAY IMPACT YOUR MANUFACTURER'S WARRANTY
Adherence to the directions for use in this manual is extremely important for health and safety. Failure to strictly adhere to the requirements in this manual may result in personal injury, property damage and affect your ability to make a claim under the BeefEater manufacturer's warranty provided with your product. Products must be used, installed and operated in accordance with this manual. You may not be able to claim on the BeefEater manufacturer's warranty in the event that your product fault is due to failure to adhere this manual.
Please read the user manual carefully and store in a handy place for later reference.

IMPORTANT
Important – check for any damages or marks
If you find the barbecue is damaged or marked, you must report it within 7 days if you wish to claim for damage/marks under the manufacturer's warranty. This does not affect your statutory rights.

ENVIRONMENT
Information on disposal for users
• Most of the packing materials are recyclable.
Please dispose of those materials through your local recycling depot or by placing them in appropriate collection containers.
- If you wish to discard this product, please contact your local authorities and ask for the correct method of disposal.

WARNING
This appliance must be serviced only by a qualified licensed person.
Improper installation, adjustment, alteration or maintenance can cause injury or property damage and may affect your ability to claim under the manufacturer's warranty.
Please contact your nearest BeefEater Service Department for additional information or assistance for an approved installer.
Note to the installer
This manual must remain with the owner for future reference.

WARNING
• Do not lean over barbecue when lighting.
• Do not leave the barbecue unattended when alight.
- Do not delay lighting once the gas has been turned on.
- Do not spray aerosols in the vicinity of this appliance while it is in operation.
- Do not use or store flammable materials in or near this appliance.
• Do not place articles on or against this appliance
- Do not use caustic or abrasive based cleaners on the barbecue.
- Do not attempt to dismantle or adjust the control valves.
- Do not attempt to dismantle or adjust the regulator.
• Do not test for leaks with a naked flame.
• Do not modify this appliance.
- Do not obstruct any ventilation of the barbecue.
- Do not allow children to operate or play near the barbecue.
Failure to adhere to the above warnings may cause injury or property damage and affect your ability to make a claim under the manufacturer's warranty.

CAUTION
This appliance is set up for Universal LPG and is labelled accordingly. A natural gas conversion kit is available if required. Conversion of this unit to natural gas must be carried out by a qualified licensed person and a Certificate of Compliance must be issued to the owner at the completion of the installation and conversion.

IMPORTANT
BeefEater Barbecues are approved for OUTDOOR USE ONLY and must not be used in a building, garage or any other enclosed area.
- BeefEater Barbecues must not be used inside recreational vehicles or boats.
- Read instructions thoroughly before operating this Barbecue.
• Save this manual for future reference.
• Always use the Barbecue on a flat, level surface.
• Some foods produce flammable fats and juices. Regular cleaning is essential. - Attend an operating barbecue at all times. Damage caused by fat & grease fires is not covered by warranty.
- When not in use keep Barbecue dry and covered.

WARNING
If you smell gas:
- Shut off gas to the appliance.
- Extinguish any open flame.
3.Openhood. - If odour continues, immediately call your gas supplier or your fire department.
For your safety
- Do not store or use gasoline or other flammable vapours or liquids in the vicinity of this or any other appliance.
- An LPG cylinder not connected for use shall not be stored in the vicinity of this or any other appliance.

WARNING
Failure to follow these instructions and observe the warnings provided in this operations manual could result in fire, explosion or burn hazard, which could cause property damage, personal injury or death.
Gas vapour is highly explosive and can cause serious bodily injury or damage to property if allowed to accumulate in a confined space and ignited.
This appliance must not be installed under or on any combustible material. Minimum clearance from combustible materials to all sides of the appliance is 450mm (18").
These instructions must be left with the owner.
NOTE:
- Do not use gas other than the type specified on the Data Plate.
- The appliance is designed for use by adults, keep children away from the barbecue at all times.
- Use only on a flat, level, stable non-combustible surface. Do not use this appliance on any surface that can burn or melt.
- When in use, gas cylinder should be kept at designated mountings of barbecue, and supply hoses kept away from any hot surfaces.
- To prevent accidental fires, before using the appliance ensure that there is no apparent damage to hose and regulator and all joint connections are in good order and not leaking.
- Use a soapy water solution on all joints in order to check for leaks. If bubbles appear, it indicates that there is a leak and the appliance must not be used.
- LPG cylinder, regulator and hose must comply with national standards.
- Do not move or attempt to move the appliance while in operation.
9Do not operate this appliance before leak checking hoses and gas cylinder connection.
To the installer
- For fixed installations, in Australia refer also to the requirements of AS/NZS5601, local authority, gas, electricity, and any other relevant statutory regulations.
- For fixed installations, refer to AS/NZS5601 for pipe sizing details.
- Consult other trades. Where required, consult a bricklayer or an electrician for parts of the installation that could have an effect on these areas.
- Allow a 20mm gap from back of barbecue body for ventilation and air access.
- Test appliance for correct operation before leaving, and instruct user on its use.
- If correct operation cannot be achieved, disconnect barbecue from gas supply, and contact your nearest BeefEater dealer.
- Please only use BeefEater supplied hose(s) to connect this appliance. Natural Gas conversion kits are available .from your nearest BeefEater dealer or via our online accessory and spare parts store by visiting shop.beefeaterbbq.com.au.
•Australia only (applies to all gas types): Where a mobile appliance is to be connected to a fixed gas supply via a flexible hose connection, a retaining tether of adequate strength shall be fixed to the appliance and be suitable to be fixed to the wall within 50mm of each connection point. The length of the tether shall not exceed 80% of the length of the hose assembly. In this way, if the barbecue is accidentally moved, the tether stops the barbecue from stretching the hose.
Do not
• Lean over barbecue when lighting.
• Leave cooking food unattended.
• Delay lighting burners after turning gas on.
- Spray or store aerosols in vicinity of barbecue whilst in operation.
- Place articles on or against this appliance
• Store combustible materials, gasoline or flammable liquids or vapours within 450mm (18") of barbecue.
• Use caustic based cleaning agents on the barbecue.
• Operate barbecue with any cover on.
• Use plastic or glass utensils on the barbecue.
• Operate barbecue in strong winds.
• Attempt to dismantle control valves.
• Attempt to dismantle or adjust regulator.
• Test for gas leaks with a naked flame.
• Store gas cylinder indoors, or in any enclosed area.
- Lay the gas cylinder down. Always keep it upright.
• Usebarbecueindoors.
• Expose hose to direct sunlight.
• Modify the construction of this appliance or the size of any
burner or valve orifice.
- Move the appliance during use.
• Obstruct any ventilation of barbecue or the cylinder. - Allow the flexible gas supply hose or any electrical cord to come in contact with hot surface of the appliance.
- Allow children to operate this appliance.
• Use charcoal or any other solid fuel in this appliance. - Disconnect any gas fittings while the appliance is operating.
• Use a rusty or dented gas cylinder or cylinder with a damaged gas valve.
• Fill the gas cylinder beyond 80% capacity. - Touch some accessible parts, other than the ones meant for handling. They may be hot.
Do
• Spanner tighten all gas fittings as per instructions.
- Check all gas hoses and line connections for damage, cuts or cracks each time the appliance is about to be used.
• Always leak test with a solution of soapy water.
- Check main opening, throat and venturi to each burner and pilot flame tube regularly for insect nests (eg. wasp, ants or spiders). Nests are dangerous and must be cleaned out thoroughly.
• Visually check burner flames to confirm lighting.
• Use your barbecue only on a level surface.
• Attend barbecue whilst cooking food.
• Preheat the barbecue for up to 10 minutes.
• After cooking turn barbecue to high for up to 10 minutes to burn off excess grease.
• Let the barbecue cool before replacing any lid or cover.
• Regularly replace foil material in grease/drip tray.
- Keep children away from barbecue at all times.
• Have the gas cylinder filled by an authorised LPG supplier.
• Refer to this instruction manual if in doubt concerning assembly, installation, or operation.
• Use protective gloves when handling hot components.
- Close the gas cylinder valve after each use.
- Clean the grease/drip tray regularly and clean the appliance at least twice annually.
• Always remove any lid or cover off the appliance before lighting.
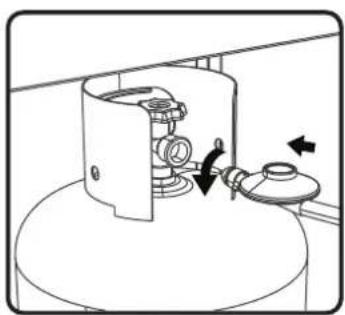
- Carefully follow the instructions relating to the hose/regulator connection.
- Keep the barbecue area free from combustible materials, gasoline, flammable liquids or vapours.
i IMPORTANT
Should the appliance go out for any reason, turn off all control knobs and the cylinder gas valve. Wait 5 minutes before attempting to relight the appliance.
- If a grease or fat fire should occur, immediately turn off all control knobs and the gas cylinder valve until the fire is out. Remove all food from the appliance.
- A leak test must be carried out prior to using the appliance for the first time and whenever the gas cylinder is refilled or whenever the gas hose and regulator have been disconnected from the gas cylinder or appliance.
Gas cylinders must be stored outdoors, out of reach of children and must not be stored in a building, garage or any other enclosed area.
• This appliance is designed to be used with a gas cylinder not exceeding 9KG (20lbs) capacity.
• The Gas cylinder must be constructed and marked in accordance with specifications for LP Gas Cylinders.
- Ensure gas cylinder is within the expiration date, it is not advised to use or attempt to refill a gas cylinder that is outside of its expiration date.
- The gas cylinder supply valve must be turned off when the appliance is not in use.
- The gas cylinder used must incorporate a safety collar to protect the valve assembly.
• The gas cylinder must always be kept and used in the upright position.

IMPORTANT
When disconnecting and removing the gas cylinder for the purpose of refilling, always observe the following procedure:
- Ensure that all gas control valves on the appliance and the gas cylinder are turned off before disconnecting the gas line from the cylinder.
- Do not smoke or use a naked flame near the appliance or gas cylinder while disconnecting the gas line between the appliance and gas cylinder.
- Remove the gas cylinder from the enclosure before disconnecting the gas line from the appliance.
- Tighten all connections before placing the gas cylinder back in its enclosure.
The Gas Leak Testing Procedure should be conducted every time the gas cylinder is refilled and reconnected to the appliance – before using the appliance.
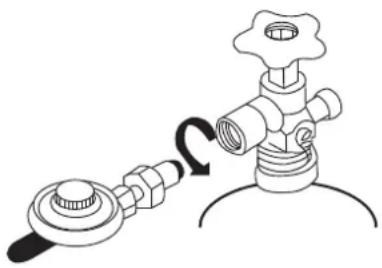
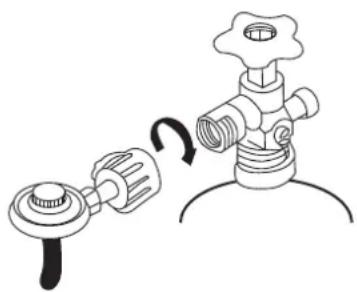
Regulator Connection
- Check that all control knobs are in the 'Off' position.
- Make sure the cylinder valve is off by turning the valve knob all the way clockwise.
- Remove the protective cap from the cylinder if present.
- Make connection as described in figures 1 and 2.
- Leak-test the connection with a soapy water solution. (See Gas Leak Testing Procedure).
Hose and regulator replacement must be a genuine part specified for this appliance and is obtainable from your nearest BeefEater stockist.
FIG 1
Standard POL regulator
natural_image
Diagram of a mechanical valve assembly with a rotating knob (no text or labels)FIG 2
Quick connect regulator
natural_image
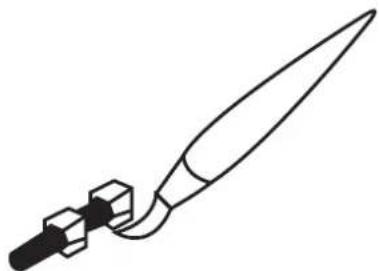
Diagram showing a valve mechanism with a rotating valve and a base component (no text or symbols)Gas Leak Test Procedure
Use the following procedure to check for gas leaks. Never use a naked flame to check for gas leaks.
- In a small container, mix up a solution of water and detergent or soap. Mix the solution well.
- Make sure that the gas supply valve on the gas cylinder is turned on.
- Make sure that the gas control valves on the appliance are all turned off.
- Using a brush or spray bottle apply the solution to the gas line and each join in the gas line. See Fig 3.
- Bubbling of the solution will indicate that there is a leak present.
- Re-tighten or re-seal any joints that are leaking.
- If a leak persists then contact your distributor or the manufacturer for assistance.
FIG 3
natural_image
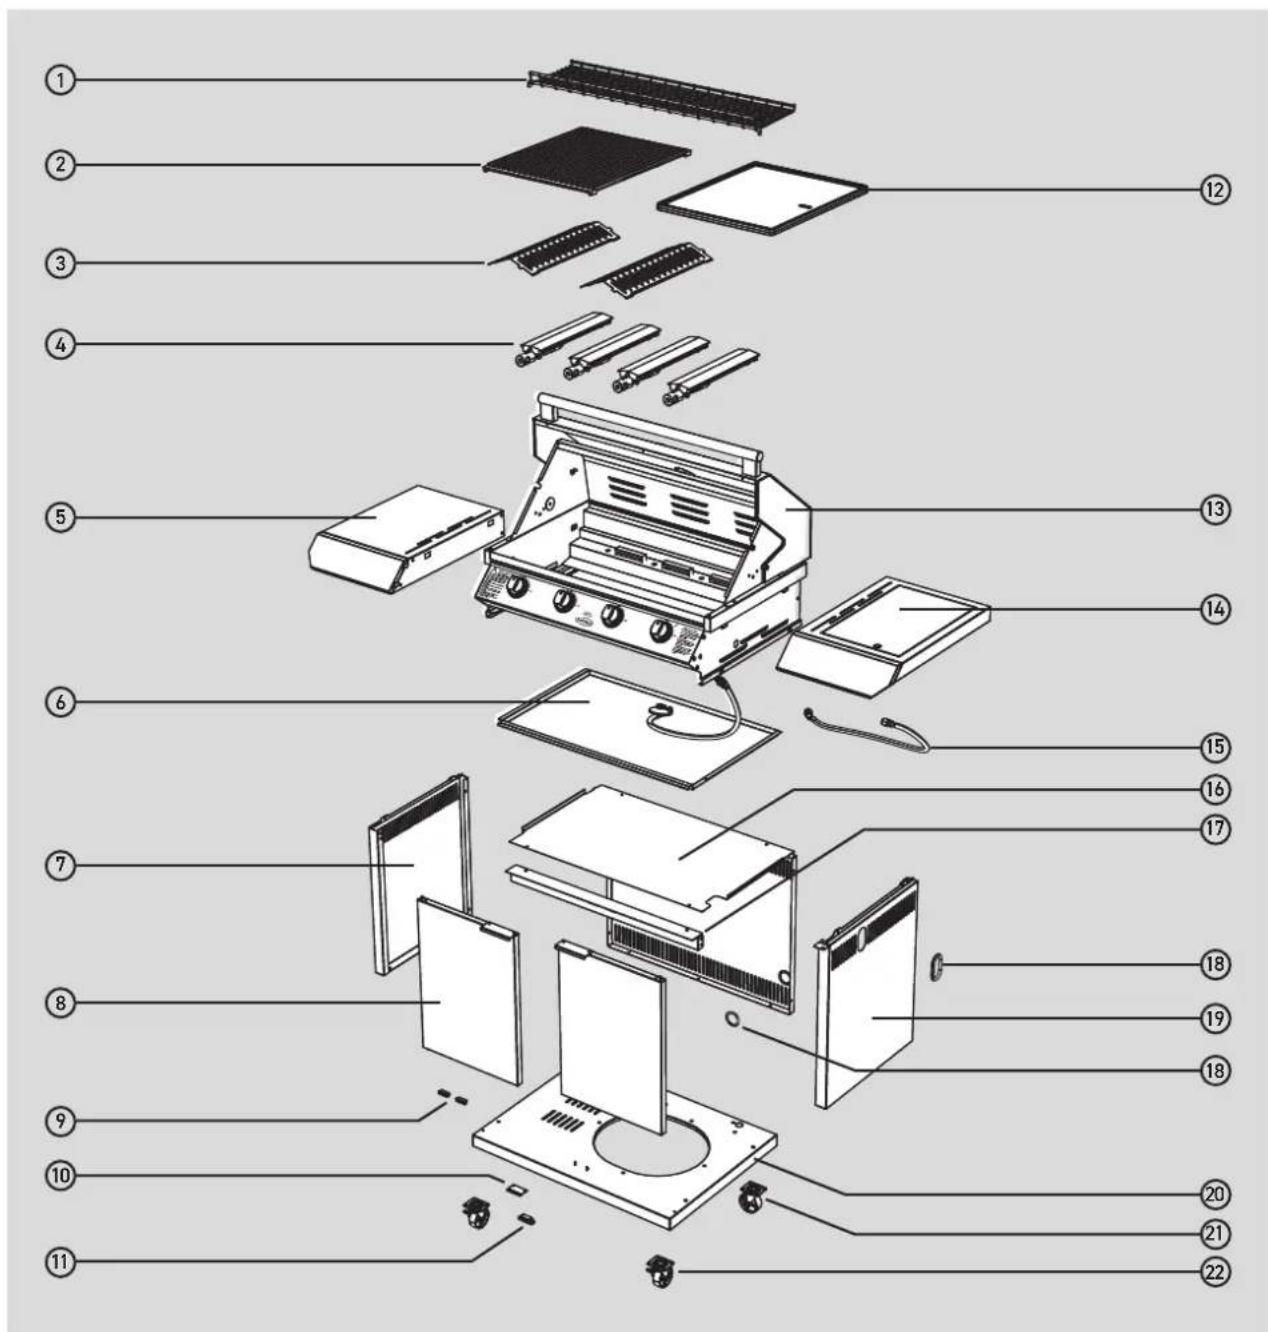
Simple line drawing of a pointed tool with a base and connector (no text or symbols)4 burner mobile barbecue
①
Rack
②
Grill plate
③
Vaporiser x2
4
Burner x2
5
LH side table
6
Spill tray
7
LH side panel
⑧
Doors
⑨
Door catches
10
Door striker plate
⑪
Door catch
12
Hotplate
13
Burner box and hood
14
RH side burner assy
15
Side burner hose
16
Separation panel
17
Brace
18
Grommet
19
RH side panel
20
Base panel
21
Caster x2
22
Brake caster x2
4 burner mobile barbecue shown
Hood closed
Hood open
Fasteners supplied: Time required: Tools required:
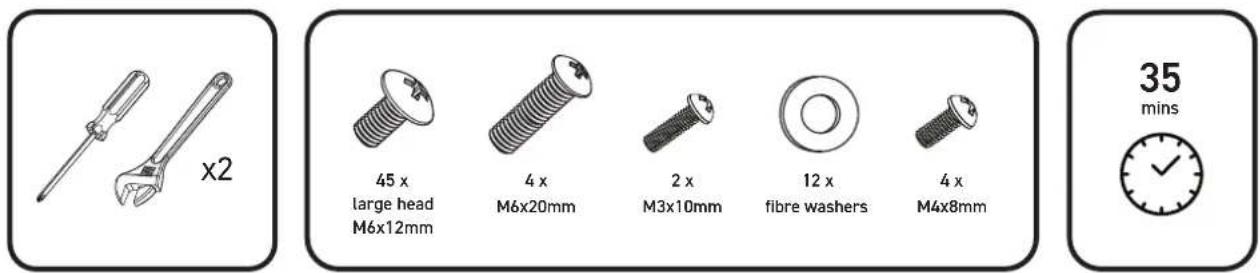
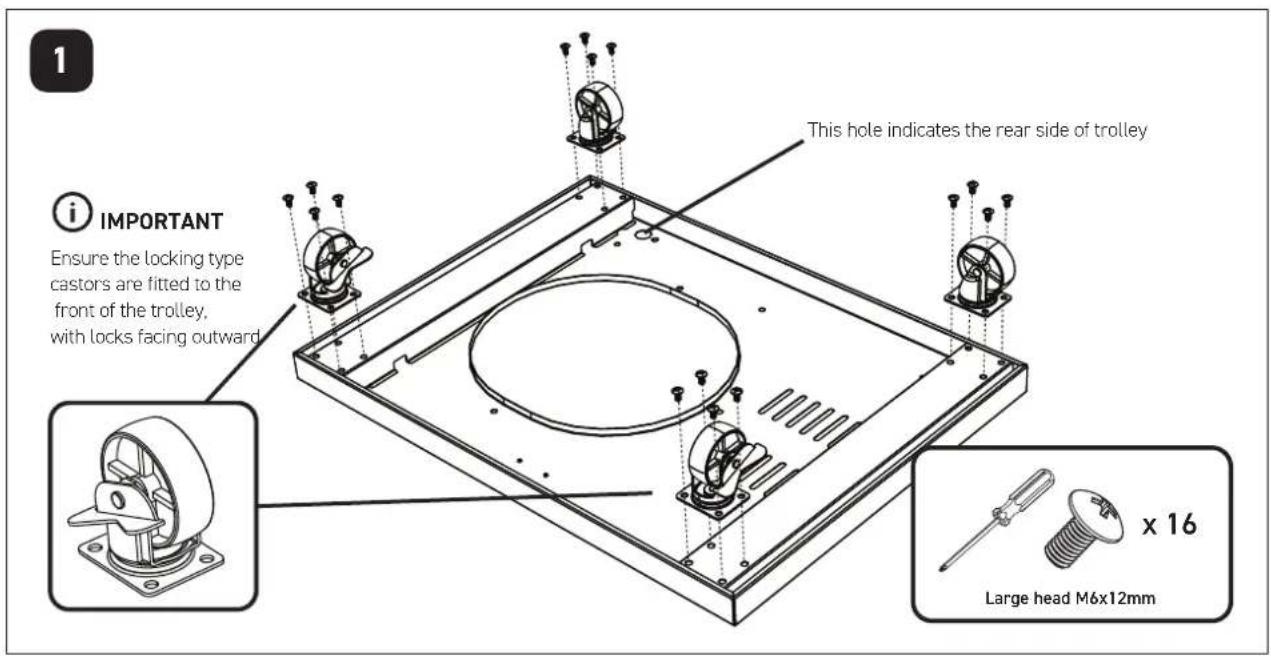
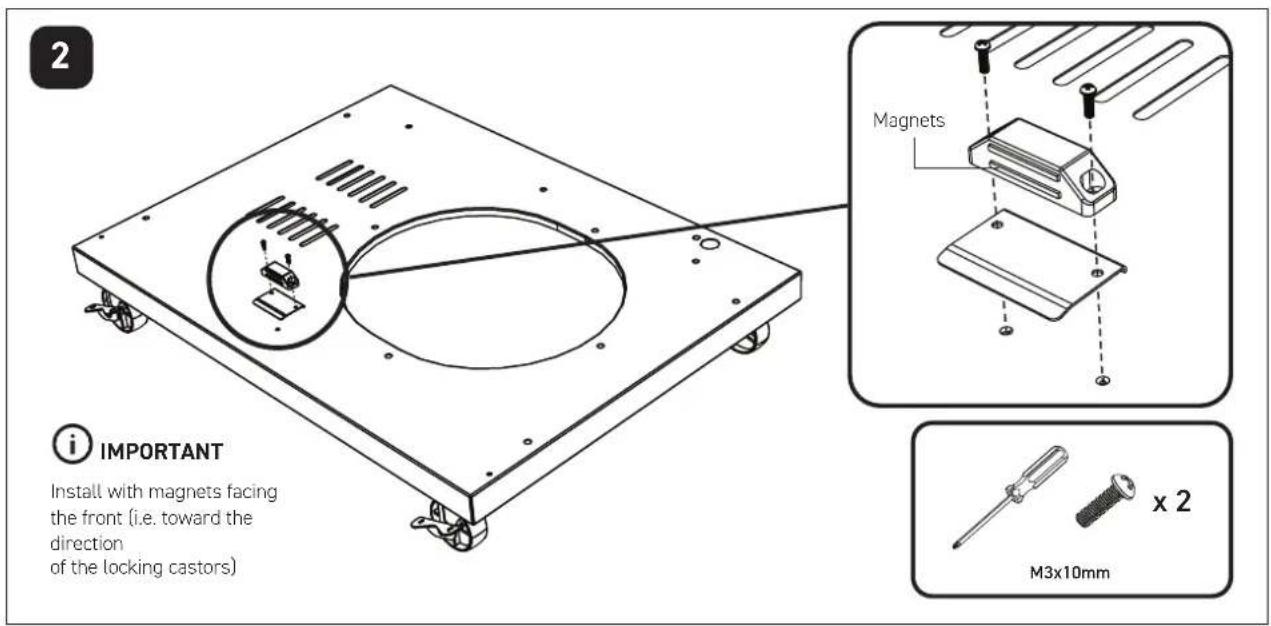
3
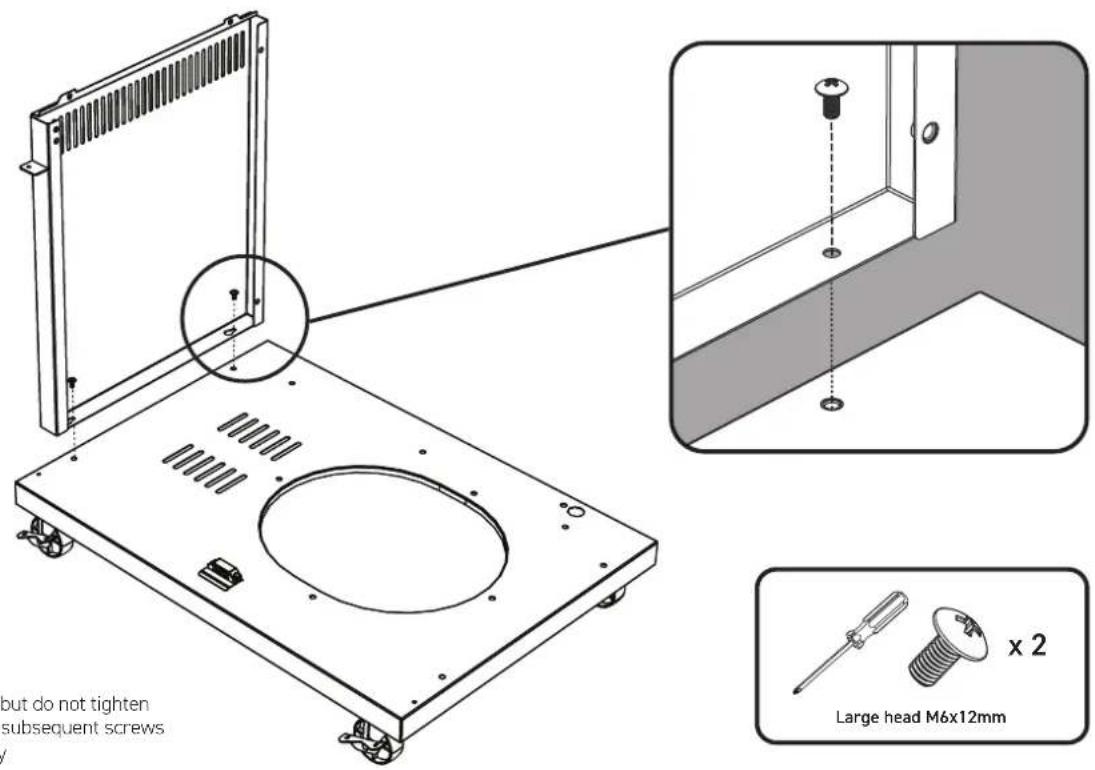
4
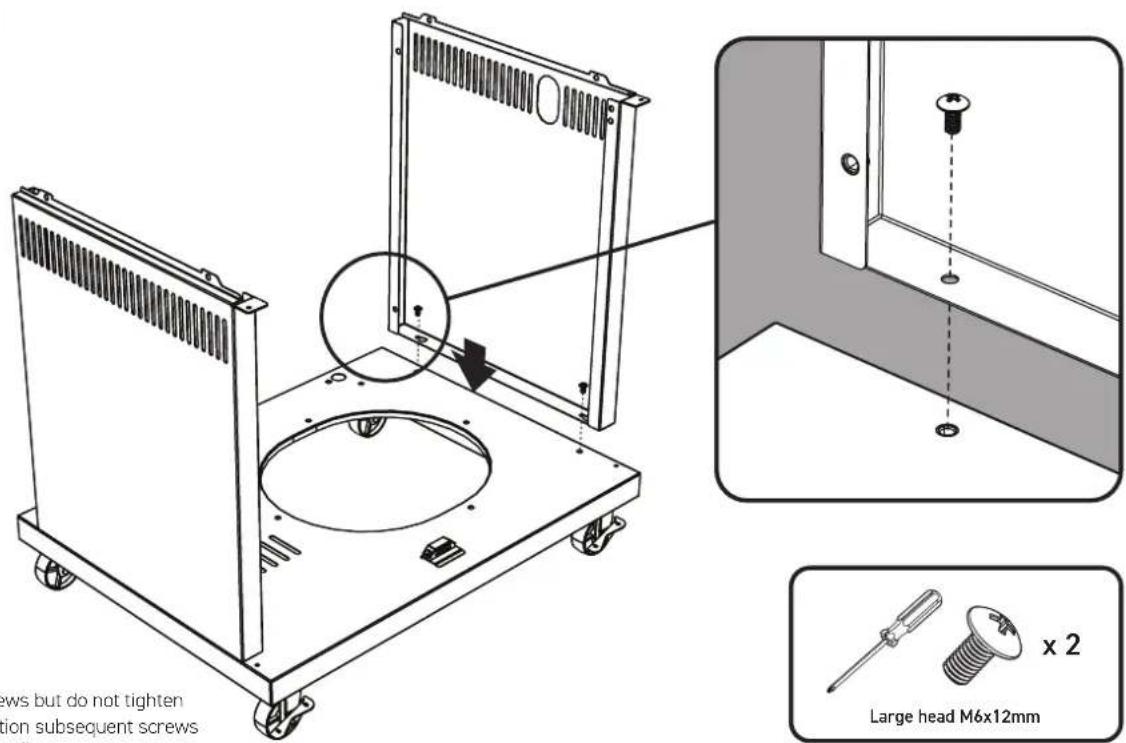
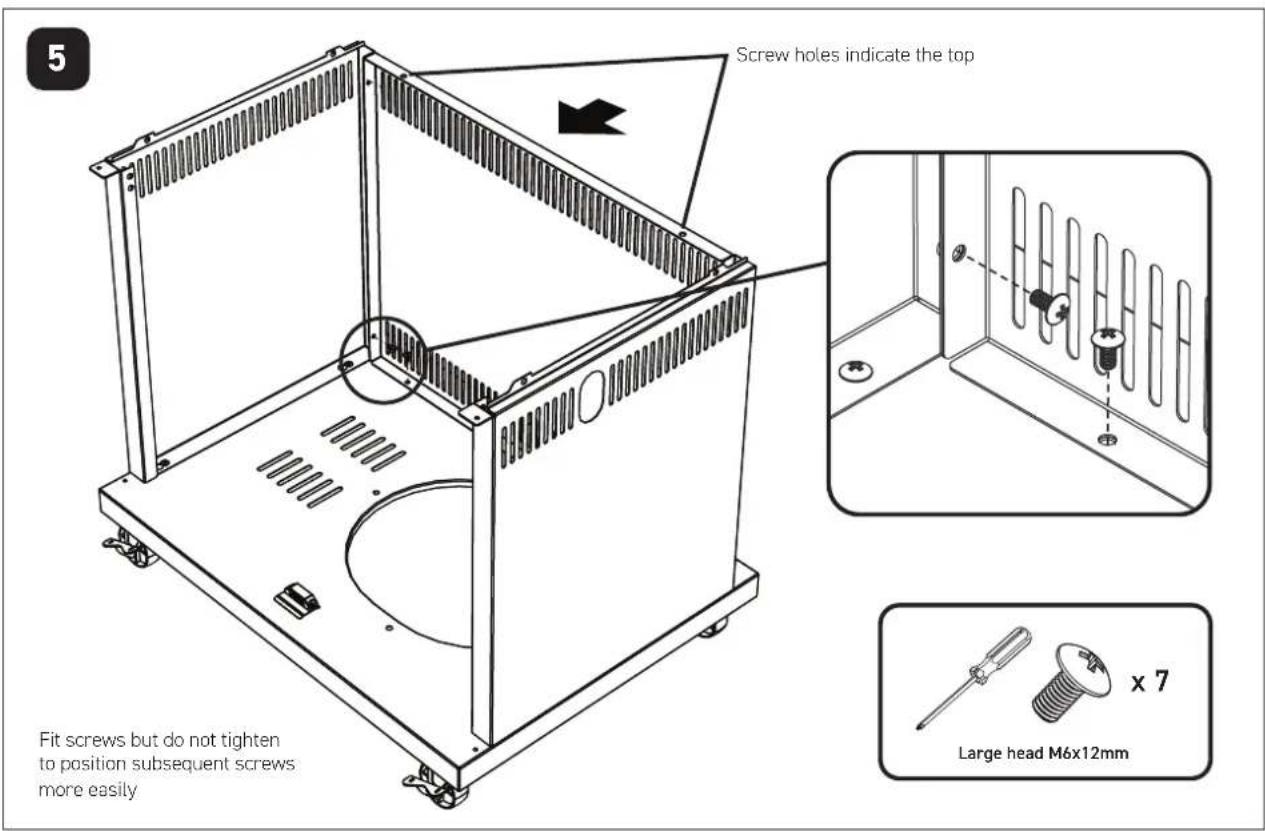
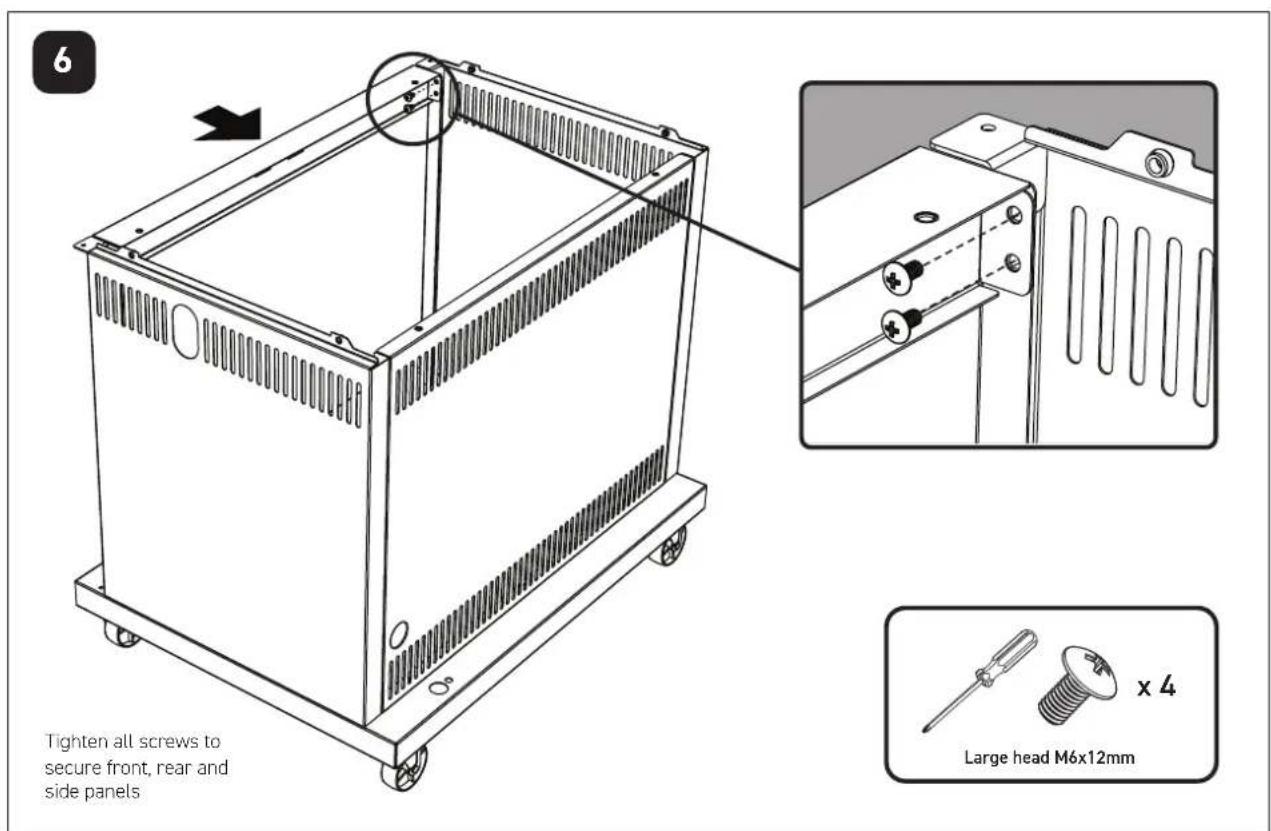
Fit screws but do not tighten to position subsequent screws more easily
9
First fit lower door pin into the hole on the base assembly. Then depress the upper door pin with your finger, line up with the hole above on the separator panel, and release to allow the pin into the hole.
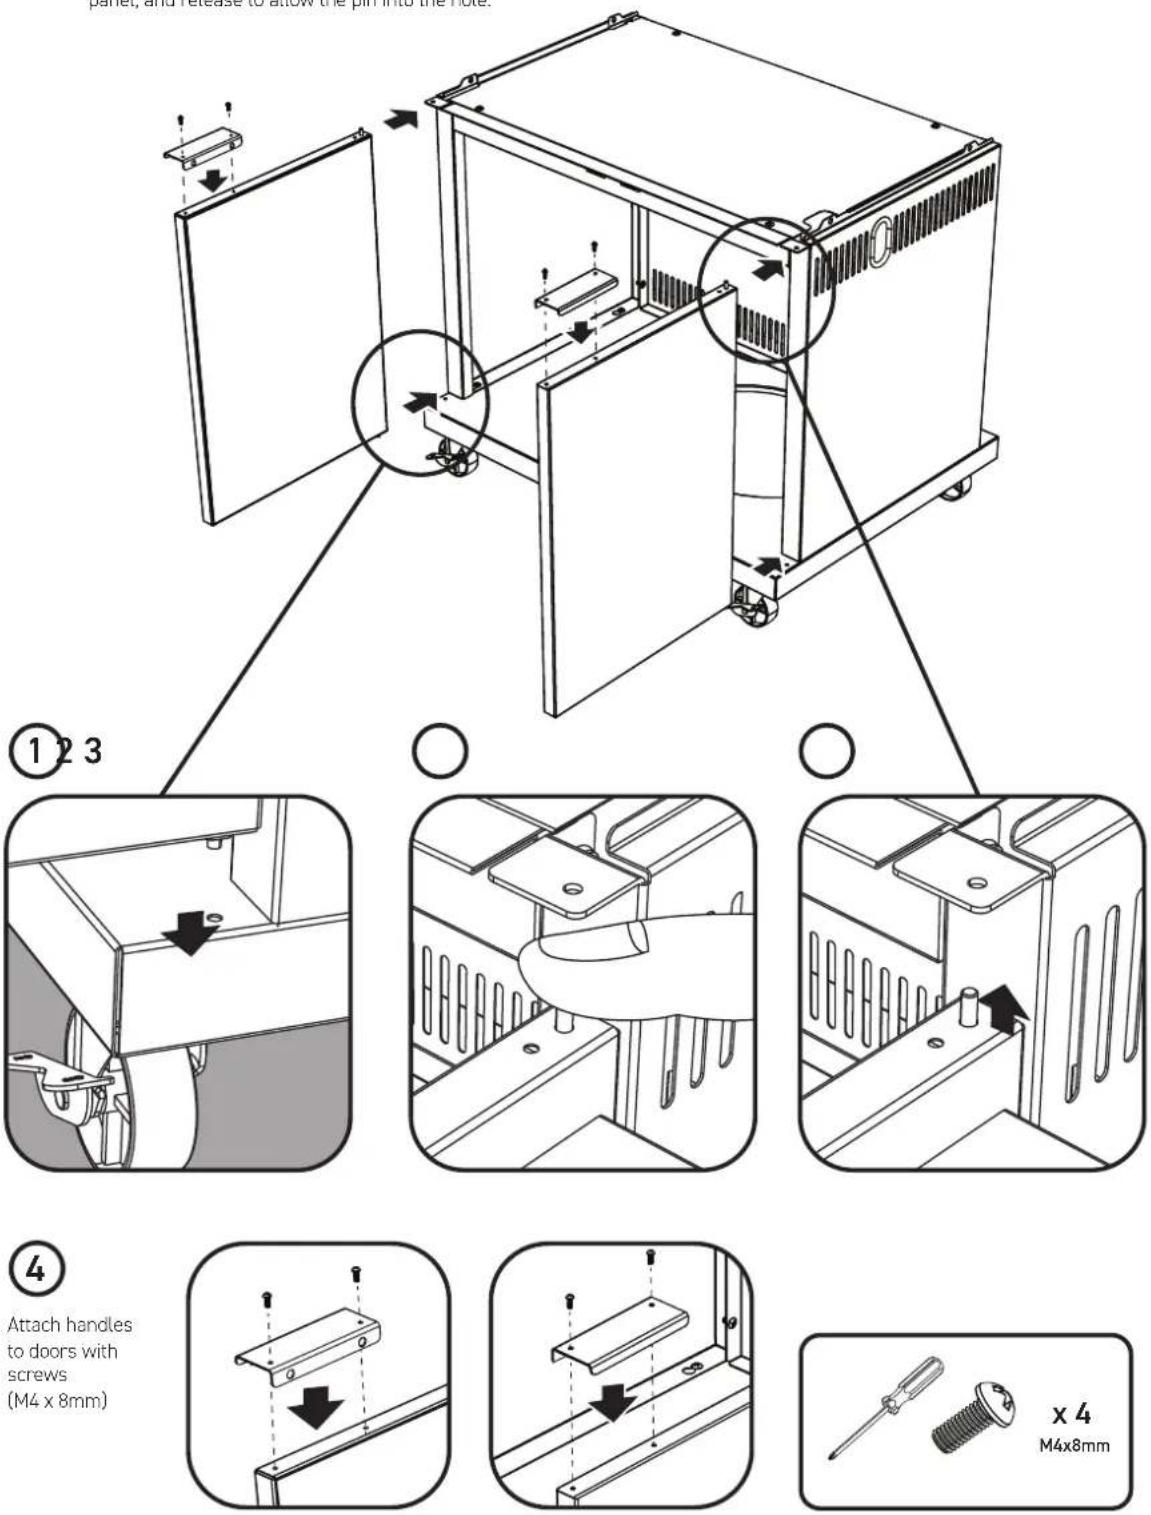
Attach handles to doors with screws (M4 x 8mm)
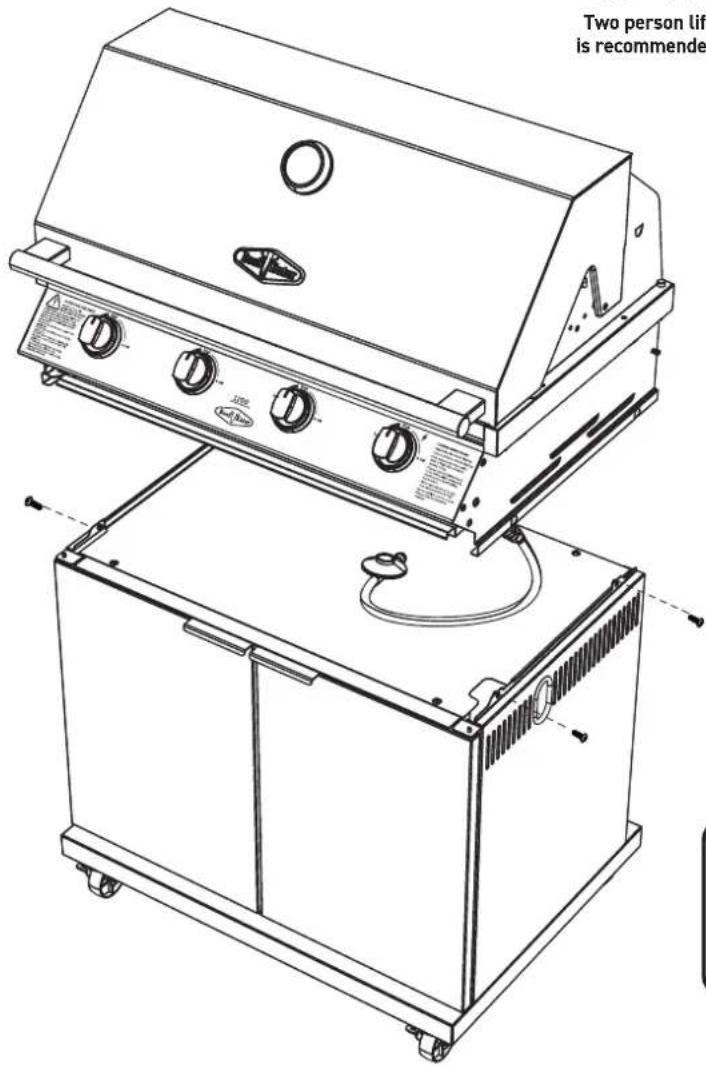
10
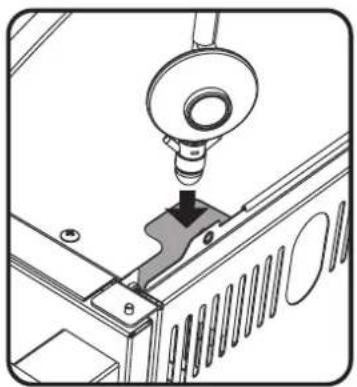
Ensure Gas Regulator Transport
Retaining Tie is removed, so Regulator
can be fed through notch as shown

natural_image
Technical line drawing of a mechanical assembly with a component inserted into a housing (no text or symbols)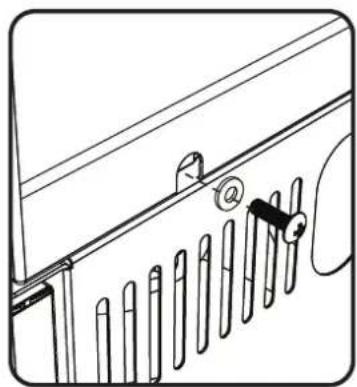
natural_image
Technical line drawing of a mechanical assembly with vertical supports and a circular component (no text or symbols)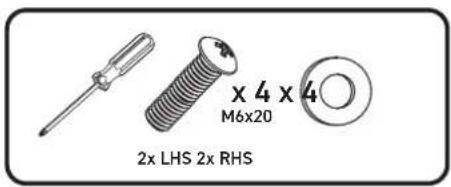
11
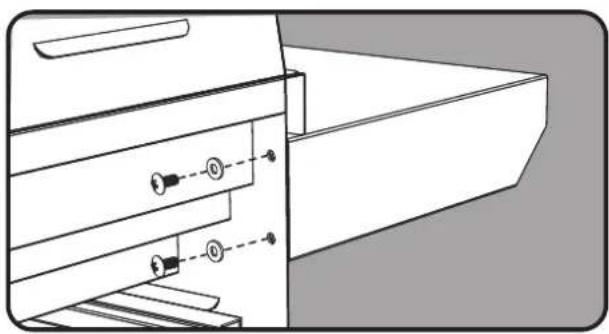
natural_image
Technical line drawing of a mechanical assembly with no visible text or symbols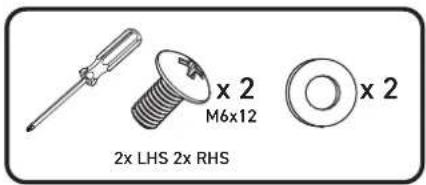
12
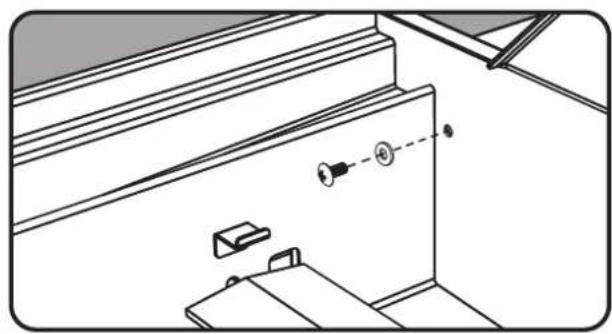
natural_image
Technical line drawing of a door assembly with lock and bracket (no text or symbols)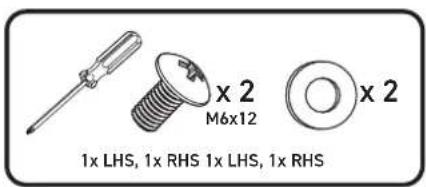
natural_image
Technical line drawing of a mechanical assembly with mounting holes and a dashed line indicating a reference point (no text or symbols present)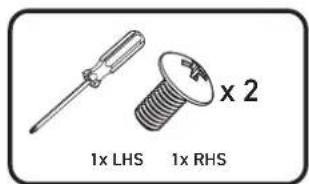
14
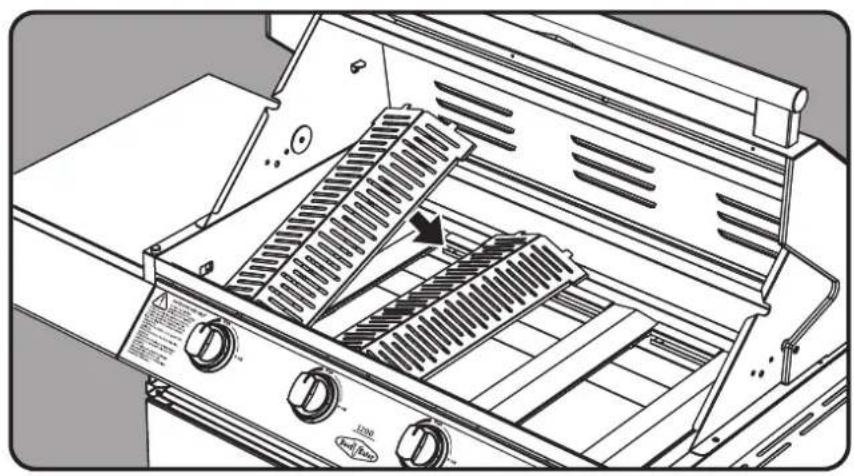
natural_image
Line drawing of a portable stove interior showing grating and grilles (no text or symbols)
IMPORTANT
Remove plastic film if fitted
15
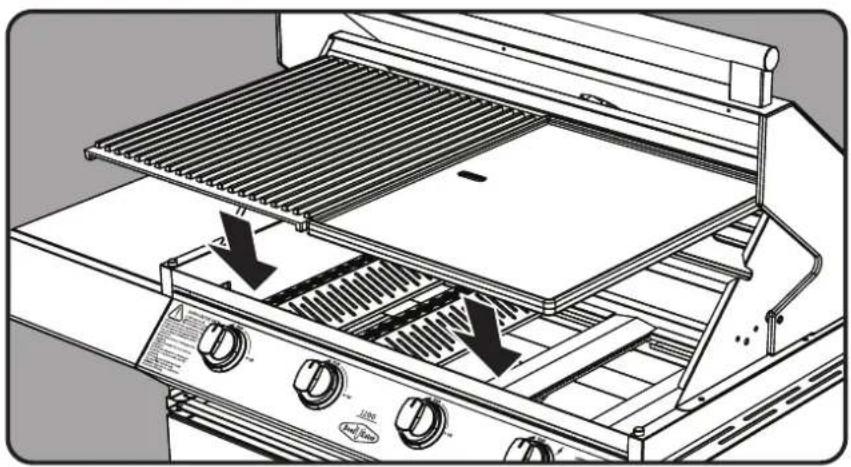
natural_image
Line drawing of a Level 1 electric grill with heat exchangers and cooling fins (no text or symbols)16
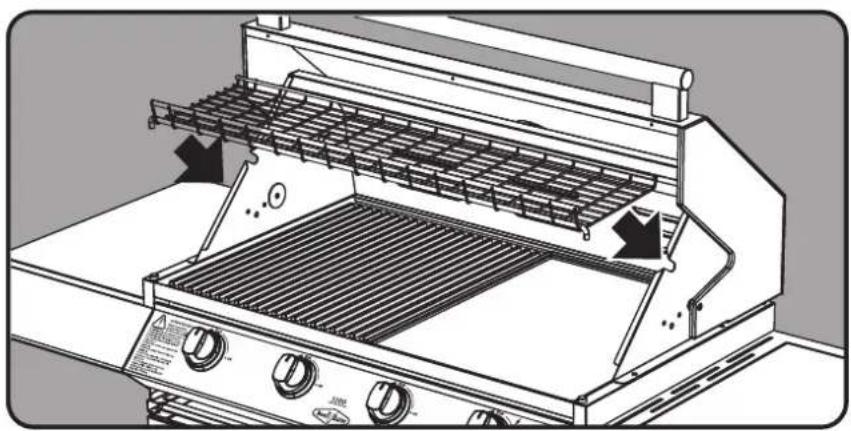
natural_image
Line drawing of a portable electric grill with grating and control panel (no text or symbols)17
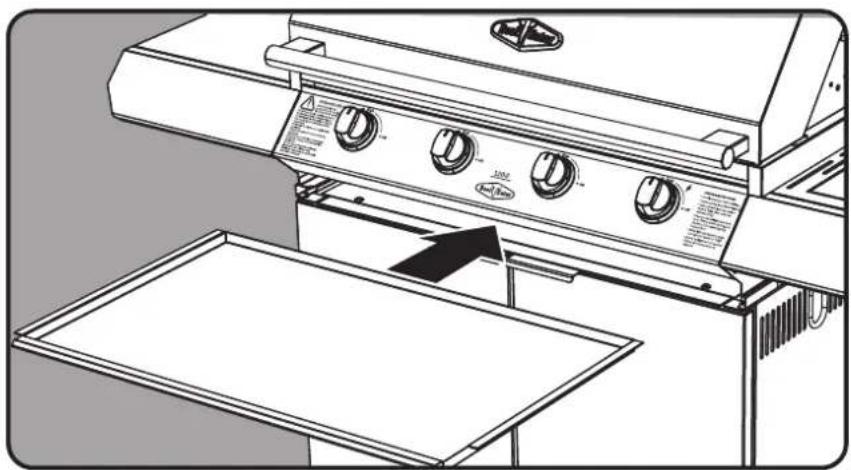
1
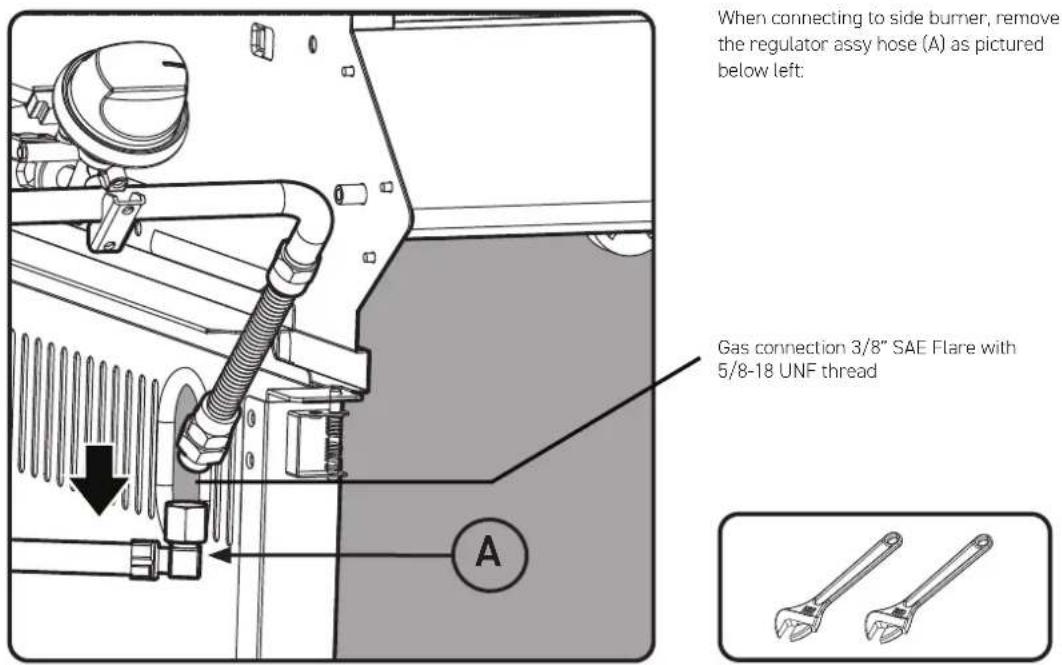
2
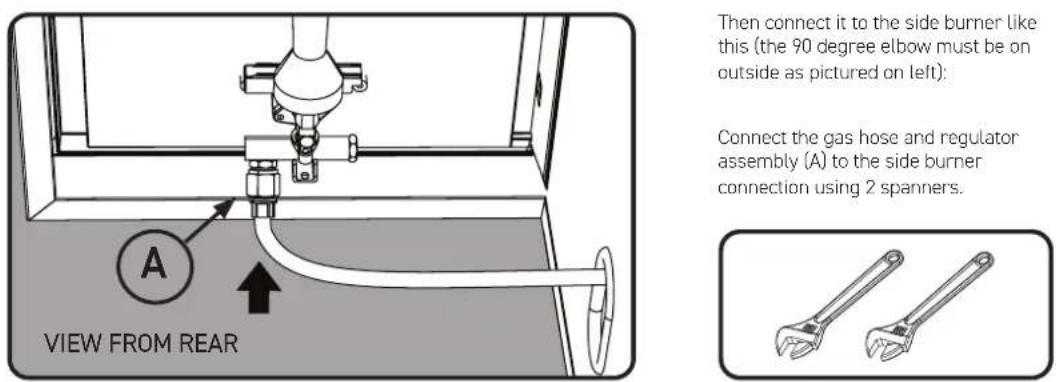
For models without side burner and side table, do not disconnect the gas hose and skip steps 1-4 on page 19
3
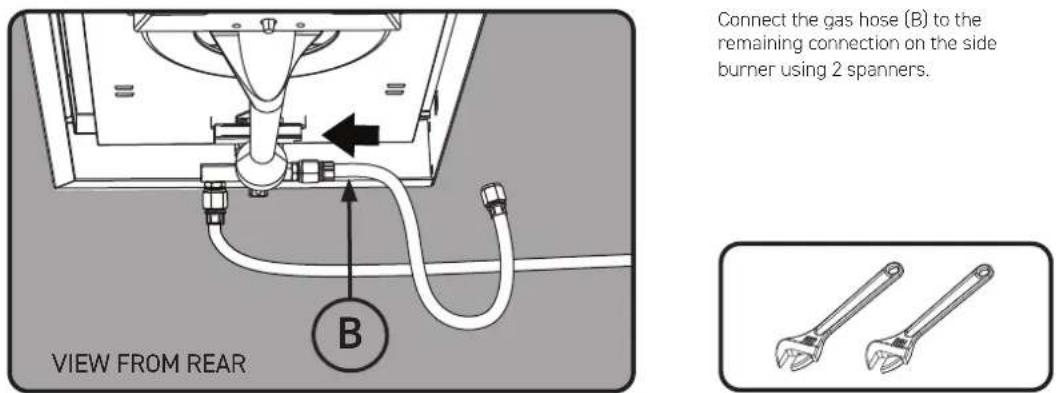
4
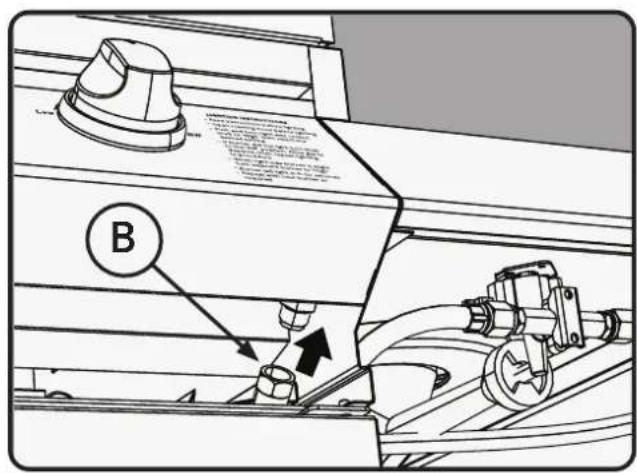
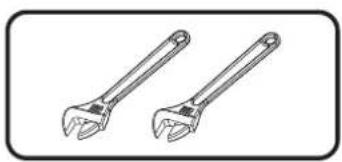
Connect the other side of gas hose (B) to the BBQ connection using 2 spanners.
natural_image
Two identical adjustable wrenches shown in side profile (no text or symbols)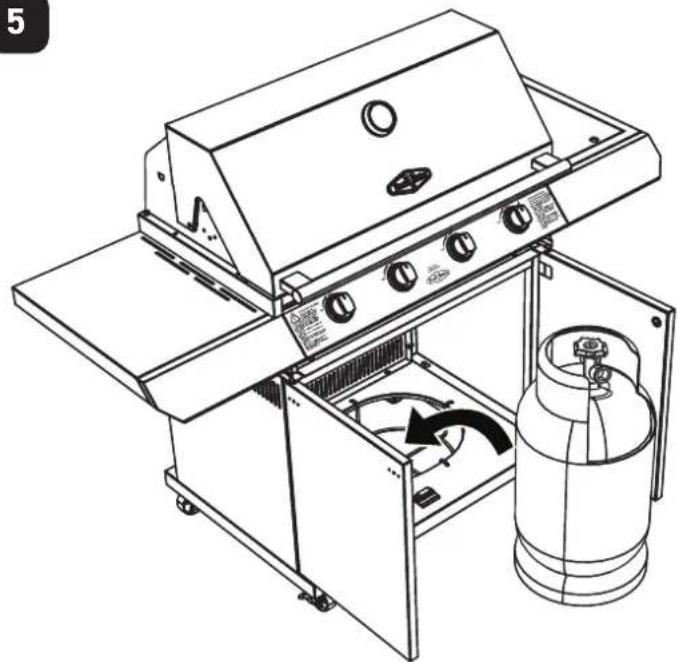
natural_image
Line drawing of a gas stove with a gas cylinder and fan, showing internal components and airflow direction (no text or symbols)
WARNING
To ensure gas tight connections, complete the gas leak test procedure before and after gas hose connection and after every reconnection of the gas cylinder. Failure to do so may result in a fire or explosion.
natural_image
Diagram of a mechanical device with rotating components and directional arrows indicating motion (no text or symbols)Leak test procedure
- Ensure all gas valves are in the 'OFF' position.
- In a small container, mix a solution of water and detergent or soap.
• After connection of the hose, turn on the gas supply at the gas bottle.
• Using a brush apply the solution to all gas connection points and look for bubbles forming.
• Bubbling will indicate a leak.
- Turn off the gas supply and re-tighten the joint. Repeat the leak test.
- If the leak persists, turn off the gas at the bottle and contact a licensed gas fitter to correct.

WARNING
Conversion of this unit to natural gas must be carried out by a qualified licensed person and a Certificate of Compliance must be issued to the owner on completion of the installation and conversion. Conversion of this barbecue by unlicensed persons may result in improper functioning of the appliance, injury, property damage and may affect your ability to make a claim under the manufacturer's warranty.
Converting the unit to natural gas
This barbecue is set up for LPG gas and is labelled accordingly. A natural gas conversion kit is available (Part Number BNG1200) as an accessory if required.
The components in the kit are:
- 6 x brass injectors (natural gas)
- 700mm hose with 12 " male pipe thread at one end and 3/8" SAE Flare with 5/8-18 UNF female thread at the other end
- Natural gas regulator with 12 " female pipe threads on inlet and outlet
- 1500mm hose with 12 " male pipe thread at one end and quick connect at the other end
• 2000mm tether (mobile use only) - Natural gas sticker
1. Replace 'gas type' sticker
- Locate LPG gas sticker located on the lower face of the control panel and remove it. Put natural gas sticker in its place
2. Change the injectors
- Remove the burners and grease tray from the appliance to gain access to the injectors
3. Connecting the appliance to a natural gas supply
- The appliance shall be installed in accordance to AS/NZS5601 gas installations and any relevant local gas fitting rules.
- Remove the fitted LPG gas bottle hose and regulator from the adaptor mounted to the semi-rigid appliance pipe
- Connect the conversion kit hoses and natural gas regulator. Ensure the flow arrow on the regulator points towards the appliance
- Carry out a leakage check on all connections
4. Adjust the turndown setting on the valve
NOTE: The final step in the conversion of the barbecue to natural gas is the adjustment of the turndown setting.
• Light each burner and rotate the control knob to the lowest setting, then remove the knob from the valve shaft.
- Using a small flat-blade screwdriver adjust the turndown adjustment screw to achieve a small steady flame on the burner.
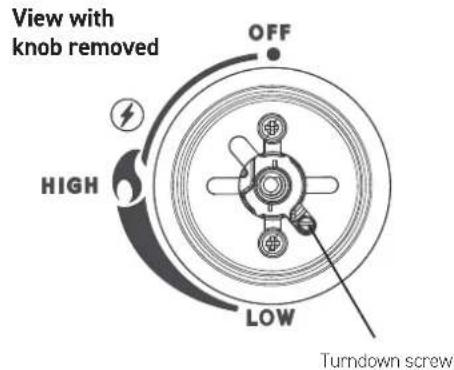
- Replace the knob.
• Recheck the operation of the burner at the maximum and turndown. - Repeat procedures for all valves.
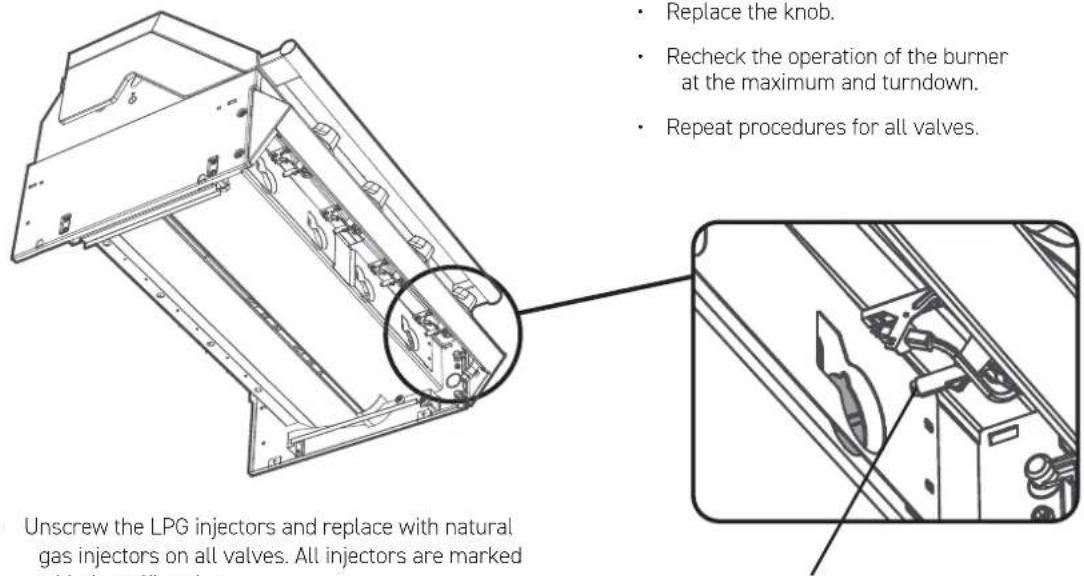
Remove LPG injector and install injector for natural gas.
- Unscrew the LPG injectors and replace with natural gas injectors on all valves. All injectors are marked with the orifice size
• Do not overtighten injectors
Before you light the Barbecue
Perform the following checks:
• Make sure all connections are tight, and leak-tested. Gas regulators fitted with a hand-tightened wheel must be checked to ensure they are secured.
- Check that all control knobs are in the 'Off' position, and that gas supply is turned off.
- Ensure that the Hood on the barbecue, and the Lid on the side-burner are open. If lids are closed there is a risk of gas accumulating inside, and creating a dangerous situation.
- The hose and regulator supplied with this barbecue must be used at all times whilst operating this barbecue. Inspect the hose and regulator regularly for cracks or any sign of damage. If there is excessive abrasion or wear, replace only with a genuine BeefEater regulator.
Grease Tray
Neatly line the grease tray with some aluminium foil sheeting to aid in clean up. Cut the foil to shape, and make sure it sits on the bottom of the tray.
Fill the tray with 6mm (1/4") layer of dry sand or other non-combustible absorbent material to absorb grease. Change the foil and absorbent material regularly to reduce the likelihood of grease tray fire.
Lighting the Barbecue
Ensure the appliance is placed on a flat, level, non-combustible surface.
- Ensure the regulator is connected to the LPG cylinder (See Regulator Connection page 4.), and the hose is not subject to any twisting, and is not close to hot surfaces.
• Verify all joints are spanner tight and check for leaks after turning on gas supply. See correct procedure on page 4. - Ensure all knobs are in the 'Off' position.
• Ensure cooking plate and grill are in place.
• Open Gas Cylinder valve
NOTE: The barbecue is fitted with a safety feature that prevents the burners from being accidentally turned on.
You must push the knob inwards to disengage the lock, and only then start turning it.
Light each burner by following this procedure:
• Read all instructions before lighting.
• Open Hood before lighting.
- Push in and turn Right-Hand-Side knob counter-clockwise to 'High'.
- If ignition does not occur, return to 'Off' and repeat after 5 minutes.
Check for a clear blue flame with just a tip of yellow.
Once the right-hand-side burner is alight, light each successive burner from right to left.
WARNING
Excess yellow tipping means the combustion is not right, if that is observed, turn the Barbecue burners off, and refer to troubleshooting at the end of this manual.
Do not use more than 2 burners on 'High' with the hood closed.
If the burner does not light
Keep the control knob pushed, and return the knob in the clockwise direction to the 'Off' position. Wait 5 minutes, and repeat the lighting procedure steps 1 - 4 above again. If after a few attempts you still can not light the burners, contact your retailer before proceeding.
Manual Lighting
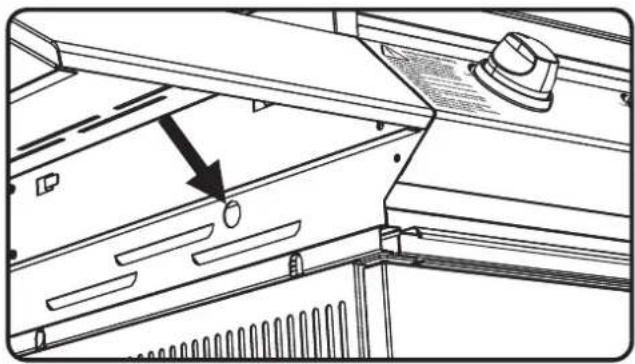
Press and turn the right hand control knob anti-clockwise to the 'High' position, then light the right hand burner immediately through a hole provided in the middle of the right hand barbecue side panel.
natural_image
Technical line drawing of a computer rack with a knob and handle (no text or symbols)Check for proper burner operation
Following operating instructions light each burner and check for a clear blue flame with just a tip of yellow. Excess yellow tipping can be adjusted using the screw on the side of the burner. If you are unable to achieve correct operation, consult your dealer.
Preparing the Plate and Grill
Your barbecue has heavy duty enamelled Cast Iron plate and grill. Enamel is a hard, non-rusting surface which will ensure the long life of your cooking surface.
The plate and grill are ready to use, but it is recommended to wash them with warm soapy water and a soft cloth, and rinse before use.
To ensure the longevity of the enamel surface on the Cast Iron plate and grill it is strongly advised to avoid impact with other metal parts and sharp utensils.
To turn off a burner
Simply turn the knob (without pushing) clockwise to the 'Off' position.
After Use
It is a good idea to leave the barbecue on for about 10 minutes after you have finished cooking. This helps to burn away any excess food residues and oil, and makes cleaning easier.
- Be sure to turn off all control knobs and the gas supply.
- Allow the barbecue to cool.
- Clean the drip tray and cooking surfaces. Clean any food spills from the side burner, if one is installed.
- Lower the hood and side burner lid.
The gas cylinder supply valve must be turned off when the appliance is not in use.
Direct Cooking Method
Commonly used for traditional barbecuing. Place food over the lit grill section. Some flaring may occur, so care must be taken while cooking. Check inside the roasting hood regularly. The direct cooking method is recommended for steaks, chops, sausages, and hamburgers.
Indirect Cooking
Indirect cooking involves little or no heat directly underneath the food. Instead, the food is placed on the grill, the burners below the food are turned off or Low, and burners on either side are used. The hood is closed to trap heat and moisture. With this method, heat circulates around the food, cooking by convection. By trapping the vapour inside your "outdoor oven", the cooking vapour will fall back on the food on all sides, not just from underneath. The food cooks more evenly, and stays moist in the process. Indirect cooking is similar to using a conventional oven and is recommended for rotisserie cooking, roasts, poultry, casseroles, vegetables and whole fish. When cooking a roast, it is a good idea to use a roast holder and baking dish. Always use a baking dish with a depth greater than 35mm. Shallower trays may fill quickly and overflow, which may cause a fat fire.
Controlling the Burners
The control knob can now be turned to the desired heat setting, Low, High or anywhere in between. The control knob does not need to be pushed in while selecting the heat setting.
Operating the side Side Burner
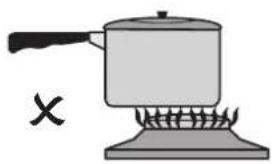
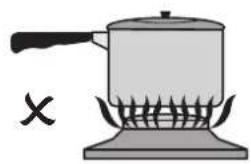
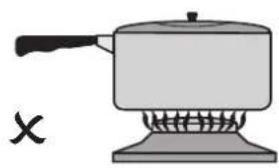
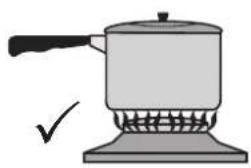
Do not use oversized cookware or place cookware off-centre over the burner as this can cause high temperatures in control knob and surrounding panels. Cookware should not exceed 200mm in diameter, the use of larger cookware may cause damage to the appliance and is not covered under warranty.
natural_image
Simple line drawing of a pot on a stove with a 'X' mark, no text or symbols presentIncorrect - pan not centred.
natural_image
Illustration of a pot on a stove with a crossed-out 'X' symbol (no text or labels)Incorrect - flame to high
natural_image
Simple line drawing of a pot on a stove with a handle and base, no text or symbols present.Incorrect - pan too large
natural_image
Simple line drawing of a cooking pot with a handle and checkmark indicating heating (no text or symbols)Correct
Most importantly, this is an outdoor appliance. Ensure your barbecue is positioned safely away from anything that can catch fire.
Outdoors Use Only
Under no circumstances is this barbecue to be used indoors. This includes garages or any other enclosed area.
Clearance from Combustibles: Ensure your barbecue remains at a distance of at least 45cm (18") from any combustible material such as wood, gyprock, paper and plants. Do not store combustible materials, gasoline or flammable liquids or vapours within 45cm (18") of the barbecue.
Adequate Ventilation
Ensure there is adequate ventilation for both the barbecue and cylinder. This is required not only for proper combustion, but also to prevent gas build up.
75mm ventilation and air-intake gap is to be left at rear of the barbecue in fixed installations.
Firm Level Surface
Use your barbecue only on a firm level surface. This barbecue is not designed for recreational vehicles, and shall not be installed on a boat or any marine craft.
Protection From Weather: Keep the barbecue protected from adverse weather, including rain and high winds.
Polyvinyl covers are available that have been specially designed for this range of barbecues. Allow clear access to the entire gas supply hose and regulator.
Maintenance Access: When your barbecue is installed, you should be able to access the gas supply line including the gas piping or hose, gas regulator, gas cylinder and any shut off valves.
Partial Enclosures: Many backyards have areas that are partially closed off, such as balconies and pergolas. In some cases, it is hard to decide whether these partially enclosed areas should be classified as indoor areas. This manual provides clear definition of such areas in page 17 for your reference.
Connect the Regulator to the gas Cylinder

WARNING
Verify 'Gas Type' label & data plate attached to side of barbecue is correct for the gas you are about to connect to.
The hose and regulator is connected to the barbecue and leak tested at factory. Do not disassemble unnecessarily.
- Make sure burner valves are in the 'Off' position.
- Screw regulator side to the cylinder, and hand-tighten. See more details on page 4.
NOTE: Do not modify this appliance. Any deviation from the factory settings could result in a safety hazard.
- If moving the barbecue from one place to another, never drag the cylinder behind. Disconnect the cylinder first, move, and re-connect once reached the new location.
• For storage and cylinder exchange, disconnect hose at the cylinder only, do not disconnect hose from the appliance.
• If you have purchased a trolley with a Side-Burner, please refer to Trolley instruction book for correct connection of the Side-Burner to the gas supply.
Partial Enclosures (Australia Only)
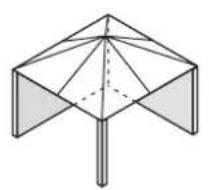
This appliance shall only be used in an above ground, open air situation with natural ventilation, without stagnant areas, where gas leakage and products of combustion are rapidly dispersed by wind and natural convection. Any enclosure in which the appliance is used shall comply with one of the following:
natural_image
Geometric diagram of a triangular prism with internal triangular segments and dashed lines indicating hidden edges (no text or symbols)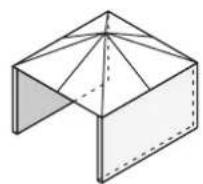
Within a partial enclosure that includes an overhead cover and no more than two walls.
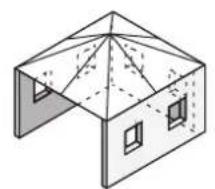
natural_image
Isometric line drawing of a two-story building with windows and roof structure (no text or symbols)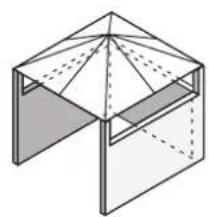
natural_image
Isometric line drawing of a 3D geometric structure resembling a cage or truss, with no text or symbols present.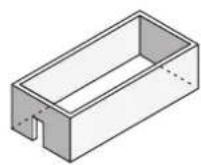
Any enclosure with walls on all sides, but at least one permanent opening at ground level, and no overhead cover.
Within a partial enclosure that includes an overhead cover and more than two walls, the following shall apply:
- At least 25% of the total wall area is completely open; and
- at least 30% of the remaining wall area is open and unrestricted.
In the case of balconies, at least 20% of the total of the side, back and front wall areas shall be and remain open and unrestricted.
Before proceeding, you need to establish the gas type which your barbecue will run on, and the style of installation you need.
Natural Gas or LPG/Propane.
Before beginning installation or assembly, check that the gas type which the barbecue is designed for is correct for the gas available to you. In most countries the choices are natural gas or LPG/propane. You will find the gas type label on the side of your barbecue. If your barbecue uses the incorrect gas type, or if you are unsure, consult your dealer before going any further. Using the wrong type of gas for a barbecue is extremely dangerous.
Natural Gas Conversion
Most newly purchased barbecues are made for LPG/propane. A natural gas conversion kit is available to allow your barbecue to run on Natural Gas. This kit includes all parts required for installation.
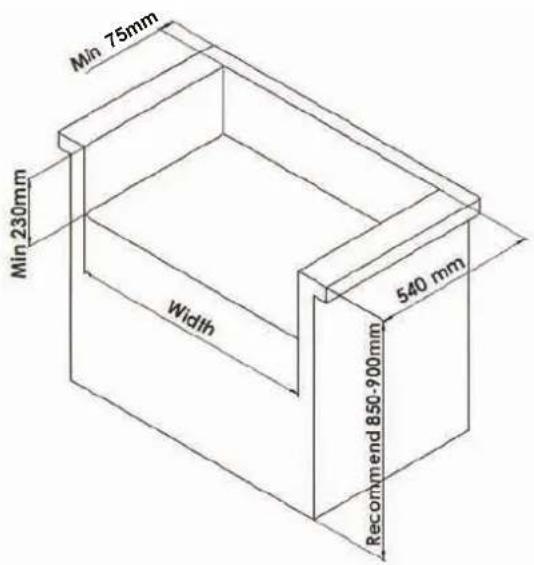
1200 SERIES BUILT-IN BBQ INSTRUCTIONS
To suit sizes: 3b, 4b and 5b
mm 3 burner 4 burner 5 burner
| Width 675mm 825mm 994mm |
| Height (min) 230mm |
| Depth (including 20mm clearance at rear) 540mm |
| Clearance at rear (min) 75mm |
| Minimum clearance to combustion materials 450mm |
natural_image
Line drawing of a portable stove with a circular frame below (no text or symbols)
natural_image
Line drawing of a mechanical device with four ports and a circular top (no text or symbols)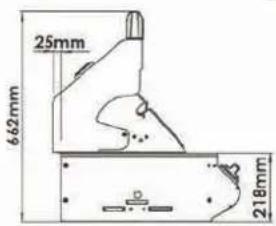
General Dimensions
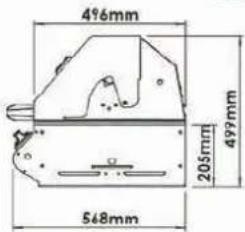
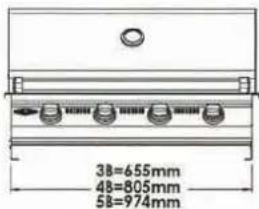
All installation work must be done by qualified professionals.
General Requirements
We recommend that this installation be done in a masonry structure and carried out by a professional tradesperson. Other non-combustible material such as Hardiplank, Villaboard with metal studs may also be used.
This appliance must not be installed under or on any combustible material. Minimum clearance from combustible construction materials to all sides of the appliance is 450mm (18").
Warning: Contact your local municipality for any building codes regulating the installation of outdoor barbecue appliances. Outdoor installations must conform to local codes or, in the absence of local codes, with:
• USA: National Fuel Gas Code, ANSI Z223.1/NFPA 54
• CAN: B149.1 Natural Gas & Propane Installation Code.
• AUST: Australian Standards Code AS: 5601
as well as the requirements of any local council, gas, electricity authority or other statutory regulation.
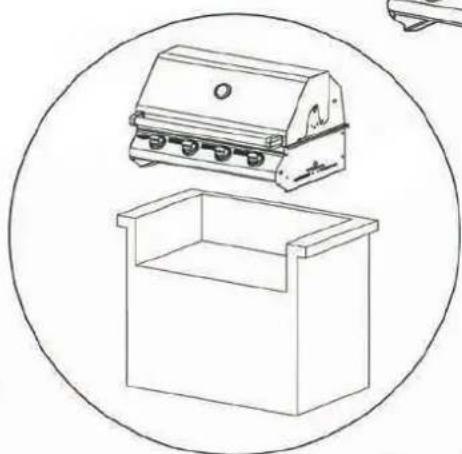
The Barbecue Cavity
Your barbecue has been designed to sit into a cavity or cutout rather than be placed directly onto a flat surface. It is important that the dimensions of the cavity conform exactly to those listed on page 18. This will ensure the barbecue sits correctly in the cavity, and that the barbecue has sufficient ventilation to operate efficiently and safely. The dimensions of the construction also provide approximately 75mm behind the rear of the barbecue to allow the hood to open freely.
In creating the cavity, you should ensure that you have convenient access to the gas connection point and associated hardware:
- If the gas for your barbecue is supplied by a portable gas bottle, you will need access to the gas connection point, the gas hose and the gas cylinder at all times.
- If the gas for your barbecue is supplied by a fixed piped gas supply (either natural gas or 45kg LPG cylinders), you will need access to the gas connection point, the piping and the shutoff valve.
The Cylinder Compartment
If the gas for your barbecue is to be supplied by a portable LPG/propane cylinder, you will need to ensure that adequate provision is made to house the cylinder safely. The following must be adhered to:
Keep out of heat: The cylinder and hose must be sheltered from the sun's direct heat. The flexible PVC hose assembly supplied must not be exposed to
temperatures in excess of 60^ C ( 140^ F). DO NOT allow the hose to come in contact with the hot surface of the barbecue body.
Keep cylinder upright: The cylinder must be housed securely. It must remain upright at all times. It can be either attached to a firm vertical wall by a cylinder bracket, or stored on a firm level base.
Requirements for cylinder base: If the cylinder is to be stored on a flat base, the base must be made from non-combustible material. Soil or grass is not an appropriate surface. Ensure there is adequate drainage, and that water cannot collect around the cylinder.
Requirements for cylinder compartment: Where the cylinder is to be kept inside an enclosure, you must ensure there is 200 square centimetres of open ventilation at each of the top and the bottom of the enclosure, for each cylinder stored in it. This prevents leaking gas from building up in a confined space. Gas vapour is highly explosive and can cause serious bodily injury or damage to property if allowed to accumulate in a confined space and ignited.
Lower The Barbecue Into Position
When lowering the barbecue onto the brickwork, do not push the barbecue back as far as it will go. Ensure there is at least 40mm clearance behind the rear of the barbecue to allow for proper ventilation.
Cleaning Vitreous Enamel Surfaces and Barbecue Control Panel
Although porcelain enamel will keep its lustrous finish even under adverse conditions, it still needs regular cleaning. After the appliance has been used, wash down the surfaces with hot soapy water. Caustic cleaners should be avoided. For barbecues near the ocean or salt-water environment, more frequent cleaning and servicing should be conducted. Wash regularly, rinse and then dry before covering. (In a salt water or marine environment, more rapid deterioration can be expected which is not covered by warranty).
The cleaning and care instructions are essential for the proper functioning and operation of your appliance over time. Failure to adhere to these care instructions may affect your ability to make a claim under the manufacturer's warranty.
Cleaning Plates and Grills
Many food acids, marinades, juices and sauces contain highly acidic elements that will slowly attack the surface of the plates and grills if not removed after cooking.
• After use, remove all solid material from the cooking surfaces using a brass bristle brush or plastic scourer. Brushes specifically designed for this purpose can be purchased from your BeefEater retailer. Wipe off remaining residue with a paper towel.
- Gently wash the surface of the grills with a soft sponge and a solution of hot water and a mild dishwashing liquid. Do not use highly caustic, harsh or abrasive chemical cleaners to clean the cooking grills. Always check the manufacturer's recommendations for the cleaner prior to use.
- Coat the grills with a layer of cooking oil. This will help protect the surfaces between uses.
- For porcelain enamel coated cooking surfaces, do not use any metal tools to clean the surface. Use only a brass bristle wire brush to remove hard deposits.
Do not clean the cooking surfaces in a dishwashing machine. For hard deposits and heavy grease, do not use steel wool or metal scrapers. Use concentrated detergent or domestic cleaning powders.
Cleaning The Drip Tray
Never remove the grease tray while the barbecue is hot. Always remove and clean the grease tray after the unit has cooled down.
Replace aluminium foil on main drip tray (if used) and clean both waste trays at regular intervals to prevent grease build-up, which could result in a grease fire and void the barbecue warranty.
Cleaning The Burners
- Check main opening, throat and venturi to each burner regularly for insect nests (eg. wasp, ants or spiders). Nests are dangerous and must be cleaned out thoroughly.
- Remove burners periodically and scrub clean with soapy water and a wire brush making sure that the ports are free of obstructions.
Replace burners in the correct position and dry by lighting each one to avoid subsequent corrosion.
A clogged burner can lead to a fire beneath the grill.

Storing Your Barbecue
When storing barbecue for extended periods, be certain all controls and cylinder valves are turned off. If storing the barbecue indoors remove gas cylinder and store the cylinder in a ventilated area outdoors.
Gas cylinders must be stored outdoors, out of reach of children and must not be stored in a building, garage or any other enclosed area.
The barbecue should be covered when not in use. eg a polyester or vinyl barbecue cover. Frequently check and tighten all nuts and bolts on the barbecue and trolley
The gas cylinder supply valve must be turned off when the appliance is not in use.

WARNING
Note: For storage and cylinder exchange, disconnect hose at the cylinder only, do not disconnect hose from appliance.
Please note that environmental conditions need to be taken into account with regards to the maintenance required on your product. In particular units installed in humid climates or seaside locations will be more susceptible to surface corrosion/discolouration over time. In these conditions Electrolux strongly recommends cleaning and drying your barbecue after every use and covering it when not in use to minimise exposure to the elements.
This appliance should be checked and serviced by an authorised service person every 2 years to ensure the appliance remains in a safe operating condition. (These services are not covered by warranty). Replacement parts are available from your authorised BeefEater Dealer.
| Service and Maintenance Schedules Each Use 6 Monthly 2 Yearly | |||
| Check gas supply hose(s) for cracks and leaks | √ | ||
| Check gas regulator for leaks | √ | ||
| Check that all gas fittings are tight | √ | ||
| Inspect and clean ignition module and probe | √ | ||
| Inspect and clean barbecue Burners | √ | ||
| Check gas cylinder expiration date | √ | ||
| Inspect and clean gas injectors | √ | ||
| Check gas control valve on cylinder | √ | ||
| Inspect gas control valves | √ | ||
| Inspect and proof all internal structure barbecue and trolley | √ | ||
| Condition Possible Cause Solution | ||
| Flame goes out while in use | Empty gas cylinder Replace cylinder | |
| Air mixed in hoses Re-ignite and allow operating for a short while, till clears out | ||
| Blockage Seek professional assistance | ||
| Ignition failure | Gas cylinder valve close Turn off knob button, then open the cylinder valve | |
| Air mixed in the hoses Re-ignite and allow operating for a short while, till clears out | ||
| Rubber hose wrapped, deformed Or pinched | Foul smell of gas | |
| Spark escaping Ensure the spark probe is in Place, not deformed, clean | ||
| No spark Seek professional assistance | ||
| Foul smell of gas | Damage to hose Turn cylinder valve off, replace Hose | |
| Leakage Leak-test, and tighten where required. If leakage can't be rectified, cease using appliance, and seek professional assistance | ||
| Burner went off Shut off valves, wait for 5 minutes and reignite | ||
| Incorrect combustion Seek professional assistance | ||
| Flame appear to separate off the Burner or flame burns with noise | Blockage of burner ports Clean the burner thoroughly. If problem persists, seek Professional assistance | |
| Yellow tipping in flame | Air/gas mixture screw in burner Incorrect | Try to open screw to remove Yellow. If not changing, seek Professional assistance |
This document sets out the terms and conditions of the product warranties for BeefEater Appliances. It is an important document. Please keep it with your proof of purchase documents in a safe place for future reference should there be a manufacturing defect in your Appliance. This warranty is in addition to other rights you may have under the Australian Consumer Law.
1. In this warranty:
(a) 'ACL' or 'Australian Consumer Law' means Schedule 2 to the Competition and Consumer Act 2010;
(b) 'Appliance' means any Electrolux product purchased by you and accompanied by this document;
(c) 'ASC' means Electrolux's authorised serviced centres;
(c) 'BeefEater' is the brand controlled by Electrolux Home Products Pty Ltd of 163 O'Riordan Street, Mascot NSW 2020, ABN 51 004 762 341 in respect of Appliances purchased in Australia and Electrolux (NZ) Limited (collectively "Electrolux") of 3-5 Niall Burgess Road, Mount Wellington, in respect of Appliances purchased in New Zealand;
(e) 'Warranty Period' means the period specified in clause 3 of this warranty;
(f) 'you' means the purchaser of the Appliance not having purchased the Appliance for re-sale, and 'your' has a corresponding meaning.
-
Application: This warranty only applies to new Appliances, purchased and used in Australia or New Zealand and is in addition to (and does not exclude, restrict, or modify in any way) other rights and remedies under a law to which the Appliances or services relate, including any non-excludable statutory guarantees in Australia and New Zealand.
-
Warranty Period: Subject to these terms and conditions, this warranty continues for in Australia for a period of 12 months and in New Zealand for a period of 12 months, following the date of original purchase of the Appliance. Specific components are warranted against manufacturing defects in Australia and New Zealand for the periods listed below;
- Burner Box - Further 4 years parts only
-
Repair or replace warranty: During the Warranty Period, Electrolux or its ASC will, at no extra charge if your Appliance is readily accessible for service, without special equipment and subject to these terms and conditions, repair or replace any parts which it considers to be defective. Electrolux may, in its absolute discretion, choose whether the remedy offered for a valid warranty claim is repair or replacement. Electrolux or its ASC may use refurbished parts to repair your Appliance. You agree that any replaced Appliances or parts become the property of Electrolux.
-
Travel and transportation costs: Subject to clause 7, Electrolux will bear the reasonable cost of transportation, travel and delivery of the Appliance to and from Electrolux or its ASC. Travel and transportation will be arranged by Electrolux as part of any valid warranty claim.
-
Proof of purchase is required before you can make a claim under this warranty.
-
Exclusions: You may not make a claim under this warranty unless the defect claimed is due to faulty or defective parts or workmanship. This warranty does not cover:
(a) light globes, batteries, filters or similar perishable parts;
(b) parts and Appliances not supplied by Electrolux;
(c) cosmetic damage which does not affect the operation of the Appliance;
(d) damage to the Appliance caused by:
(i) negligence or accident;
(ii) misuse or abuse, including failure to properly maintain or service;
(iii) improper, negligent or faulty servicing or repair works done by anyone other than an Electrolux authorised repairer or ASC;
(iv) normal wear and tear;
(v) power surges, electrical storm damage or incorrect power supply;
(vi) incomplete or improper installation;
(vii) incorrect, improper or inappropriate operation;
(viii) insect or vermin infestation;
(ix) failure to comply with any additional instructions supplied with the Appliance;
In addition, Electrolux is not liable under this warranty if:
(a) the Appliance has been, or Electrolux reasonably believes that the Appliance has been, used for purposes other than those for which the Appliance was intended, including where the Appliance has been used for any non-domestic purpose;
(b) the Appliance is modified without authority from Electrolux in writing;
(c) the Appliance's serial number or warranty seal has been removed or defaced.
- How to claim under this warranty: To enquire about claiming under this warranty, please follow these steps:
(a) carefully check the operating instructions, user manual and the terms of this warranty;
(b) have the model and serial number of the Appliance available;
(c) have the proof of purchase (e.g. an invoice) available;
(d) telephone the numbers shown below.
-
Australia: For Appliances and services provided by Electrolux in Australia: Electrolux goods come with guarantees that cannot be excluded under the Australian Consumer Law. You are entitled to a replacement or refund for a major failure and for compensation for any other reasonably foreseeable loss or damage. You are also entitled to have the Appliance repaired or replaced if the Appliance fails to be of acceptable quality and the failure does not amount to a major failure. 'Acceptable quality' and 'major failure' have the same meaning as referred to in the ACL.
-
New Zealand: For Appliances and services provided by Electrolux in New Zealand, the Appliances come with a guarantee by Electrolux pursuant to the provisions of the Consumer Guarantees Act, the Sale of Goods Act and the Fair Trading Act. Where the Appliance was purchased in New Zealand for commercial purposes the Consumer Guarantee Act does not apply.
-
Confidentiality: You accept that if you make a warranty claim, Electrolux and its agents including ASC may exchange information in relation to you to enable Electrolux to meet its obligations under this warranty.
Important Notice
Before calling for service, please ensure that the steps listed in clause 8 above have been followed.
| AUSTRALIA | FOR SERVICEor to find the address of your nearest authorised service centre in AustraliaPLEASE CALL 1300 307 939For the cost of a local call | FOR SPARE PARTSor to find the address of your nearest spare parts centre in AustraliaPLEASE CALL 13 13 50For the cost of a local call |
| NEW ZEALAND | FOR SERVICEor to find the address of your nearest authorised service centre in New ZealandPLEASE CALL 0800 10 66 10 | FOR SPARE PARTSor to find the address of your nearest spare parts centre in New ZealandPLEASE CALL 0800 10 66 20 |
For more information on all Beefeater products, or for dimension and installation information, call into your retailer, phone or email our customer care team or visit our website:
AUSTRALIA
phone: 1300 307 939
email: customercare@beefeaterbbq.com
web: beeffeaterbbq.com
NEW ZEALAND
phone: 0800 436 245
email: customercare@beefeaterbbq.com
web: beefeaterbbq.com
BeefEater. We are part of the Electrolux Family.
To add a touch of professional inspiration to your
home, visit electrolux.com.au
- BEEFEATER 1200 SERIES
- Conditions of use
- WARNING
- CAUTION
- IMPORTANT
- ENVIRONMENT
- IMPORTANT INFORMATION THAT MAY IMPACT YOUR MANUFACTURER'S WARRANTY
- Note to the installer
- NOTE:
- To the installer
- Do not
- Do
- i IMPORTANT
- Regulator Connection
- Gas Leak Test Procedure
- burner mobile barbecue
- 10
- Leak test procedure
- Converting the unit to natural gas
- Replace 'gas type' sticker
- Change the injectors
- Connecting the appliance to a natural gas supply
- Adjust the turndown setting on the valve
- Before you light the Barbecue
- Grease Tray
- Lighting the Barbecue
- If the burner does not light
- Manual Lighting
- Check for proper burner operation
- Preparing the Plate and Grill
- To turn off a burner
- After Use
- Direct Cooking Method
- Indirect Cooking
- Controlling the Burners
- Operating the side Side Burner
- Outdoors Use Only
- Adequate Ventilation
- Firm Level Surface
- Connect the Regulator to the gas Cylinder
- Partial Enclosures (Australia Only)
- Natural Gas or LPG/Propane.
- Natural Gas Conversion
- SERIES BUILT-IN BBQ INSTRUCTIONS
- General Requirements
- The Barbecue Cavity
- The Cylinder Compartment
- Lower The Barbecue Into Position
- Cleaning Vitreous Enamel Surfaces and Barbecue Control Panel
- Cleaning Plates and Grills
- Cleaning The Drip Tray
- Cleaning The Burners
- Storing Your Barbecue
- In this warranty:
- AUSTRALIA
- NEW ZEALAND
Brand : BeefEater
Model : 1200 Series BMG1240BB
Category : Grill