1600 Series BMG1651DA - Grill BeefEater - Free user manual and instructions
Find the device manual for free 1600 Series BMG1651DA BeefEater in PDF.


| Product Type | Gas Barbecue Grill |
| Brand | BeefEater |
| Model | 1600 Series BMG1651DA |
| Fuel Type | LPG (Natural gas conversion kit available) |
| Number of Main Burners | 5 |
| Side Burner | Yes, 1 |
| Ignition Type | Automatic piezo ignition |
| Overall Dimensions (Lid Closed) | 804.5 mm (W) x 926 mm (D) x 1670 mm (H) |
| Overall Dimensions (Hood Open) | 804.5 mm (W) x 975 mm (D) x 1840 mm (H) |
| Weight | Approximately 65 kg (143 lbs) |
| Construction Material | Stainless steel and powder-coated steel |
| Cooking Surface | Solid plate and grill plates included |
| Temperature Control | Variable control knobs for each burner |
| Mobile / Trolley | Yes with locking casters |
| Outdoor Use Only | Yes – not for use in enclosed areas |
| Gas Consumption (Total) | Up to 101 MJ/h (depending on gas type) |
| Regulator Pressure | 2.75 kPa for LPG; 1.00 kPa for Natural Gas |
| Assembly Required | Yes – full assembly included in manual |
| Cleaning Method | Removable grease tray, flame tamers, and cooking plates |
| Warranty | 2 years (plus 3 years on burner box) |
| Safety Certifications | Australian Standards AS5263 |
Frequently Asked Questions - 1600 Series BMG1651DA BeefEater
User questions about 1600 Series BMG1651DA BeefEater
0 question about this device. Answer the ones you know or ask your own.
Ask a new question about this device
Download the instructions for your Grill in PDF format for free! Find your manual 1600 Series BMG1651DA - BeefEater and take your electronic device back in hand. On this page are published all the documents necessary for the use of your device. 1600 Series BMG1651DA by BeefEater.
USER MANUAL 1600 Series BMG1651DA BeefEater
Assembly and Operating Instructions
1600 SERIES
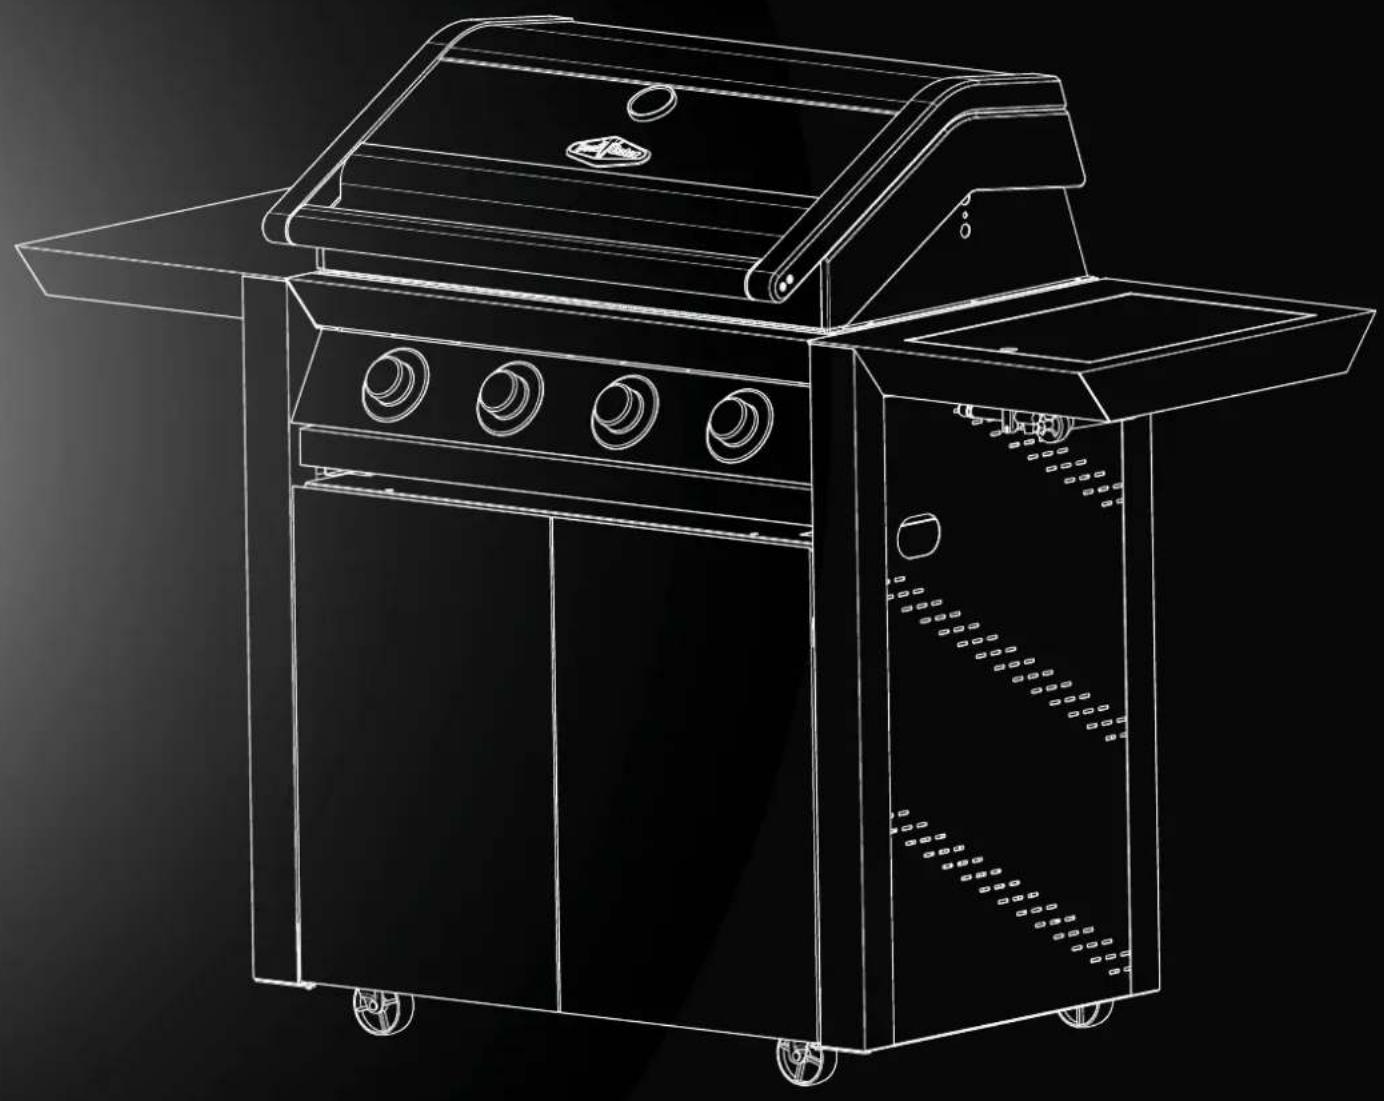
TROLLEY MODELS BMG1641SA, BMG1651SA, BMG1641DA & BMG1651DA
natural_image
Line drawing of a portable electric grill with control panel and wheels (no text or symbols)Dear Customer,
Congratulations and thank you for choosing our barbecue. We are sure you will find it a pleasure to use. Before you use the barbecue, we recommend that you read through the relevant sections of this manual, as well as the built-in manual to get a full understanding of your appliance and its functions.
To avoid the risks that are always present when you use an appliance, it is important that the appliance is installed correctly and that you read the safety instructions carefully to avoid misuse and hazards.
We recommend that you keep both instruction booklets for future reference and pass it on to any future owners.
After unpacking the appliance, please check it is not damaged. If in doubt, do not use the appliance but contact your local customer care centre.
This appliance complies with requirements of Australian Standards AS5263.
Conditions of use
These important notes apply to your appliance, failure to adhere to these conditions of use may affect your ability to make a claim under the manufacture's warranty.
- This appliance must be serviced only by a qualified licenced person.
- This product is intended for personal, domestic or household use only, not commercial use.
• This product is intended for outdoor use only. - This product must be installed, operated and maintained as per the instructions.
Please ensure you read both instruction manuals fully before you call for service, or a full service fee could be applicable.
Record model and serial number here:
Model number: ....
Serial number: ....
PNC:
Important safety instructions .... 3
Product description 4
Product dimensions 5
Assembling the barbecue 6
Side burner operating instructions 22
Gas specifications and mobile restraint 23
Notes 24
Warranty....27
Please read the user manual carefully and store in a handy place for later reference.
The symbols you will see in this booklet have these meanings:

WARNING
This symbol indicates information concerning your personal safety.

CAUTION
This symbol indicates information on how to avoid damaging the appliance.

IMPORTANT
This symbol indicates tips and information about use of the appliance.

ENVIRONMENT
This symbol indicates tips and information about economical and ecological use of the appliance.
IMPORTANT INFORMATION THAT MAY IMPACT YOUR MANUFACTURER'S WARRANTY
Adherence to the directions for use in this manual is extremely important for health and safety. Failure to strictly adhere to the requirements in this manual may result in personal injury, property damage and affect your ability to make a claim under the BeefEater manufacturer's warranty provided with your product. Products must be used, installed and operated in accordance with this manual. You may not be able to claim on the BeefEater manufacturer's warranty in the event that your product fault is due to failure to adhere this manual.
Please read the user manuals carefully and store in a handy place for later reference.

IMPORTANT
Important – check for any damages or marks
If you find the barbecue is damaged or marked, you must report it within 7 days if you wish to claim for damage/ marks under the manufacturer's warranty. This does not affect your statutory rights.

ENVIRONMENT
Information on disposal for users
- Most of the packing materials are recyclable. Please dispose of those materials through your local recycling depot or by placing them in appropriate collection containers.
- If you wish to discard this product, please contact your local authorities and ask for the correct method of disposal.

WARNING
This appliance must be serviced only by a qualified licensed person.
Improper installation, adjustment, alteration or maintenance can cause injury or property damage and may affect your ability to claim under the manufacturer's warranty.
Please contact your nearest BeefEater Service Department for additional information or assistance from an approved installer.
Notes to the installer
- After the barbecue is removed from the packaging take care to protect the gas hose connection from damage.
- Wear gloves when assembling the barbecue to protect your hands from cuts
- This manual must remain with the owner for future reference.

WARNING
- Do not lean over barbecue when lighting.
- Do not leave the barbecue unattended when alight.
- Do not delay lighting once the gas has been turned on.
- Do not store or use aerosol cans in the vicinity of the barbecue.
- Do not store or use flammable liquids or flammable materials in the vicinity of this barbecue.
- Do not use caustic or abrasive based cleaners on the barbecue.
-
Do not attempt to dismantle or adjust the control valves.
-
Do not attempt to dismantle or adjust the regulator.
- Do not test for leaks with a naked flame.
- Do not modify the construction of this appliance or modify the injector orifice size.
- Do not place articles on or against this appliance
- Do not obstruct any ventilation of the barbecue.
- Do not allow children to operate or play near the barbecue.
Failure to adhere to the above warnings may cause injury or property damage and affect your ability to make a claim under the manufacturer's warranty.

CAUTION
This appliance is set up for LPG gas and is labelled accordingly. A natural gas conversion kit is available as an accessory if required. Conversion of this unit to natural gas must be carried out by a qualified licensed person and a Certificate of Compliance must be issued to the owner at the completion of the installation and conversion.

IMPORTANT
BeefEater Barbecues are approved for OUTDOOR USE ONLY and must not be used in a building, garage or any other enclosed area.
- BeefEater Barbecues must not be used inside recreational vehicles or boats.
- Read instructions thoroughly before operating this Barbecue.
- Save this manual for future reference.
• Always use the Barbecue on a flat, level surface. - Some foods produce flammable fats and juices. Regular cleaning is essential.
- Attend an operating barbecue at all times. Damage caused by fat & grease fires is not covered by warranty.
- When not in use keep Barbecue dry and covered.

WARNING
If you smell gas:
- Shut off gas to the appliance.
- Extinguish any open flame.
3.Openhood. - If odour continues, immediately call your gas supplier or your fire department.
For your safety
- Do not store or use gasoline or other flammable vapours or liquids in the vicinity of this or any other appliance.
- An LPG cylinder not connected for use shall not be stored in the vicinity of this or any other appliance.
① 4 burner barbecue BMG1641 shown
② Left hand side table
③ Separation panel
④ Side panel LH
⑤ Side panel support LH and RH
⑥ Brace
⑦ Door LH
⑧ Base panel
⑨ Right hand side burner
⑩ Rear panel
⑪ Side panel RH
⑫ Door RH
⑬ Locking castors x 2
⑭ Castors x 2
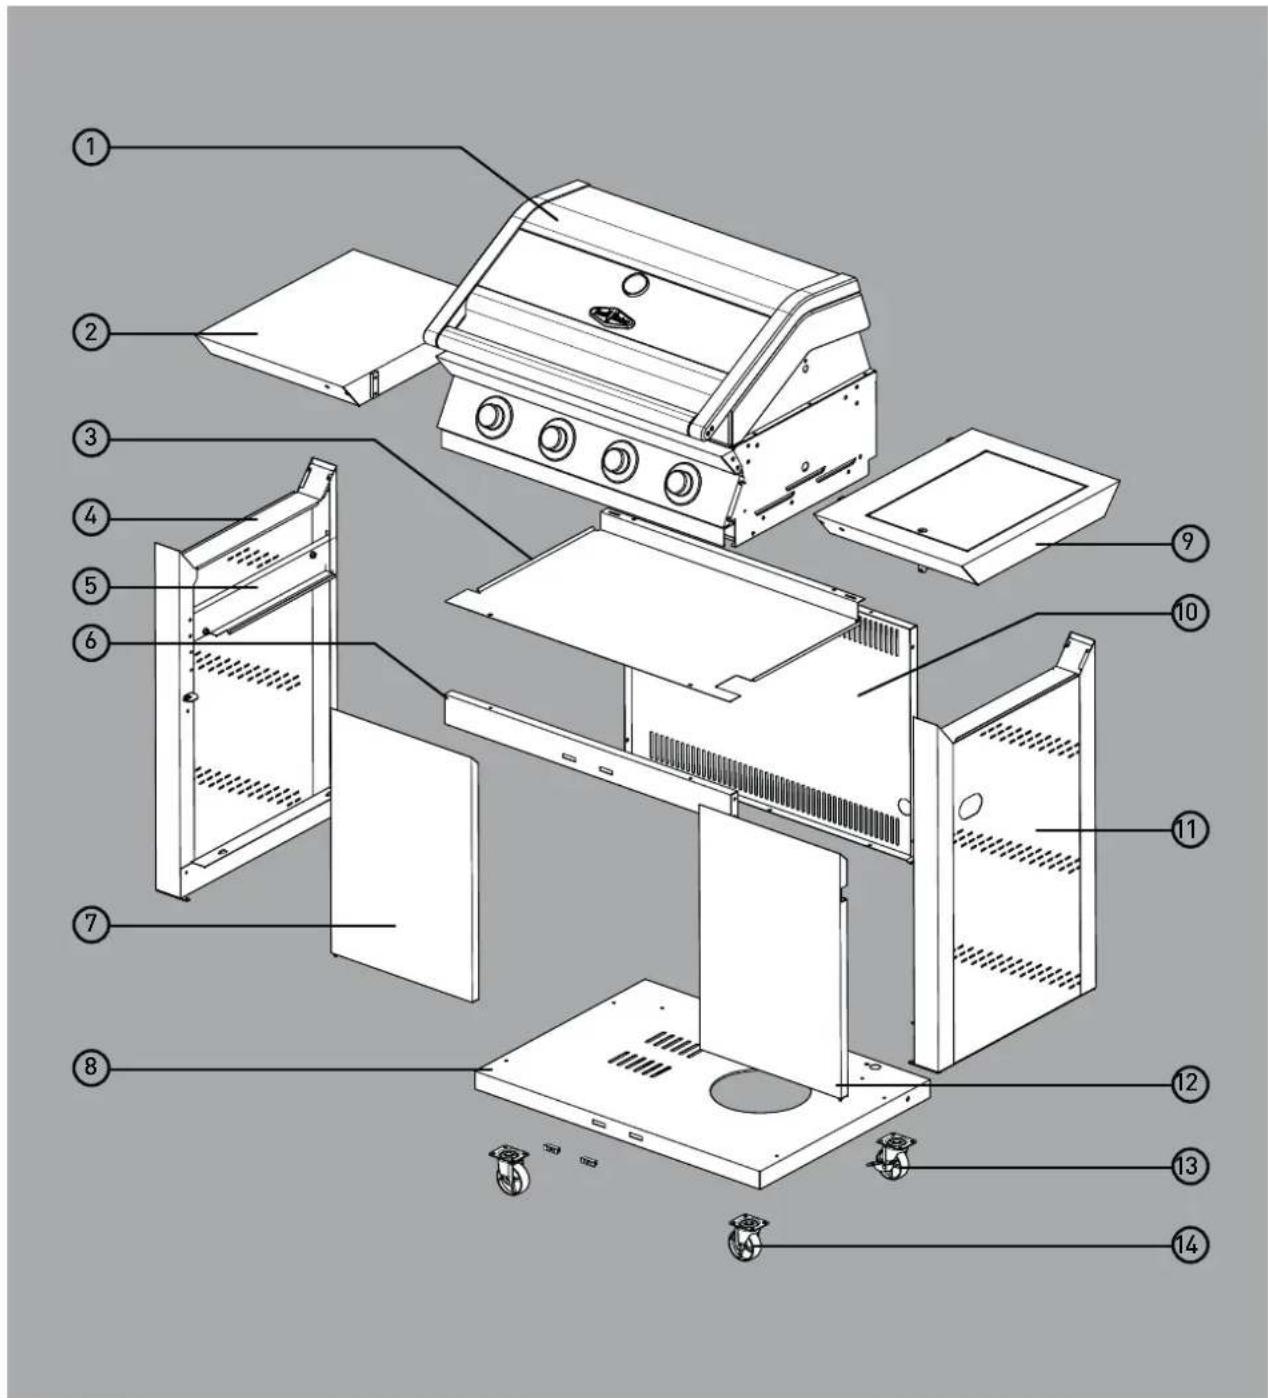
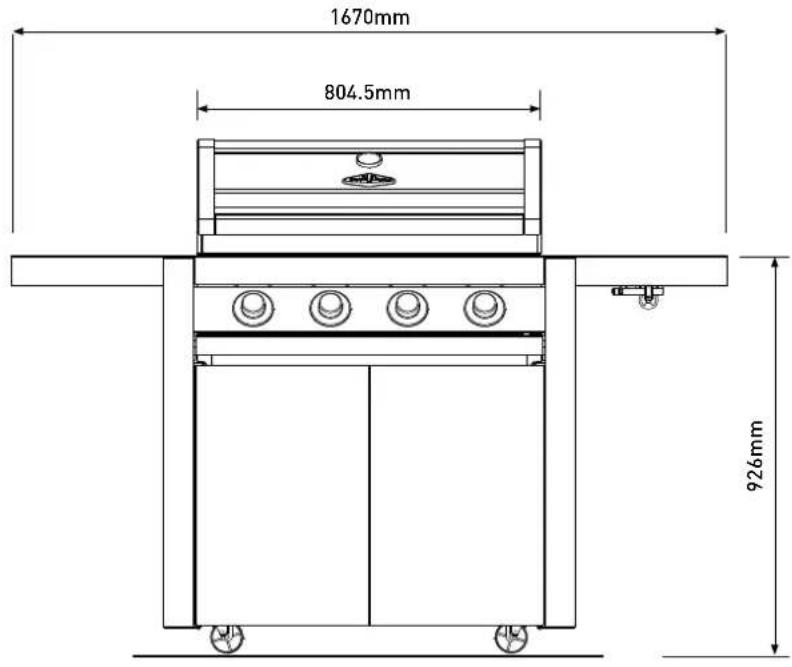
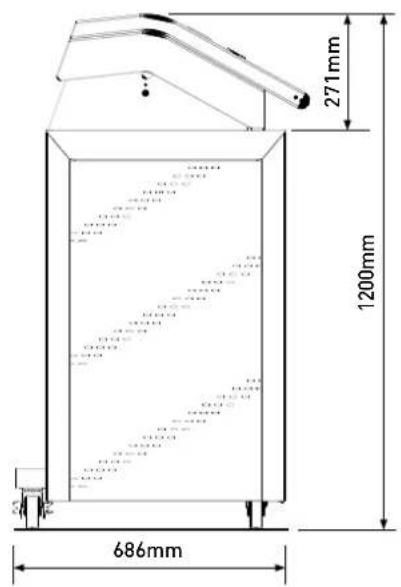
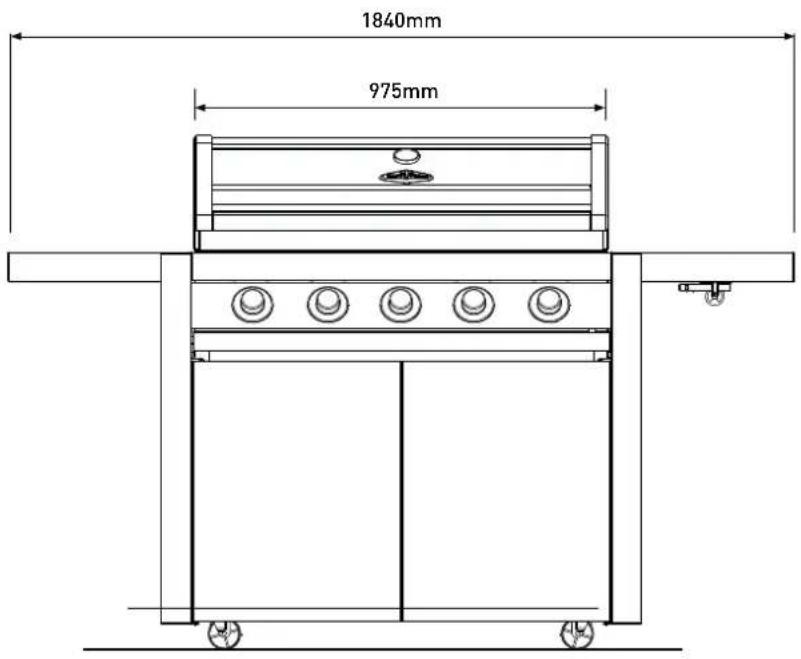
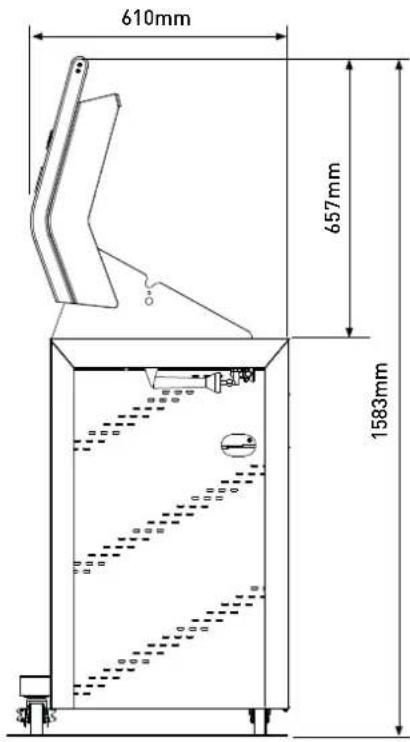
Hood open
Tools required: Fasteners supplied:
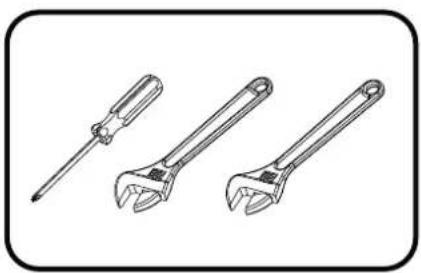
natural_image
Illustration of three wrenches: a screwdriver, an adjustable wrench, and a standard wrench (no text or symbols present)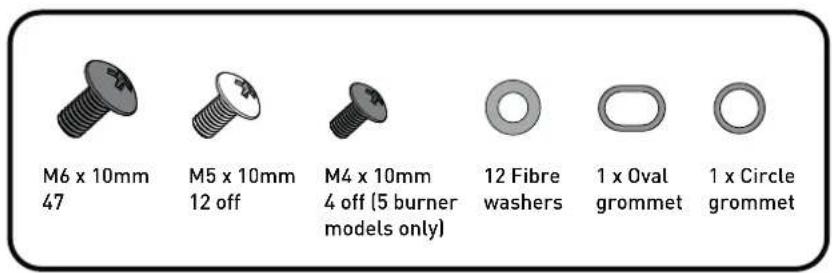
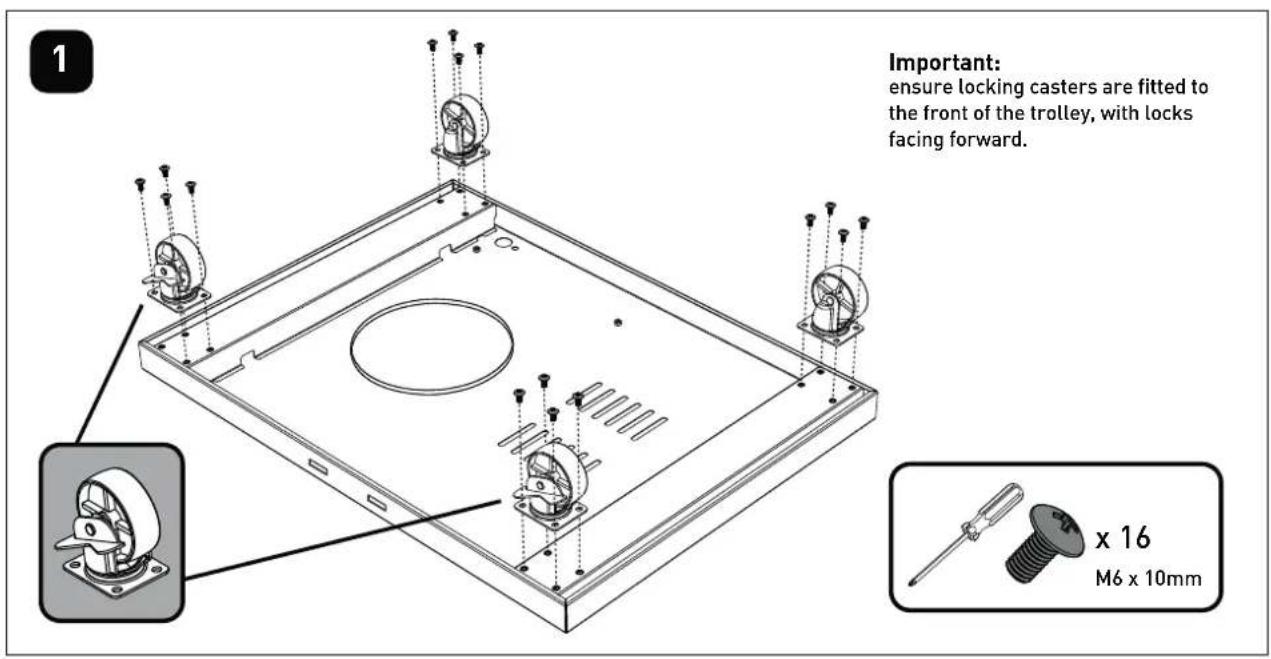
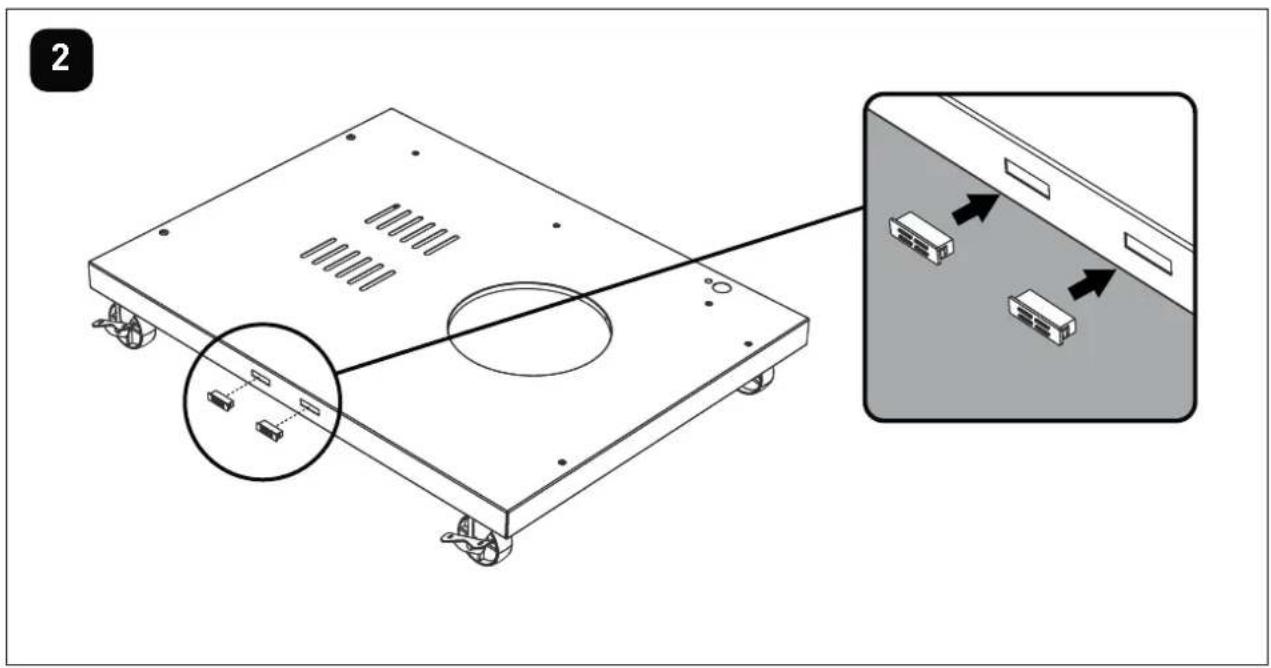
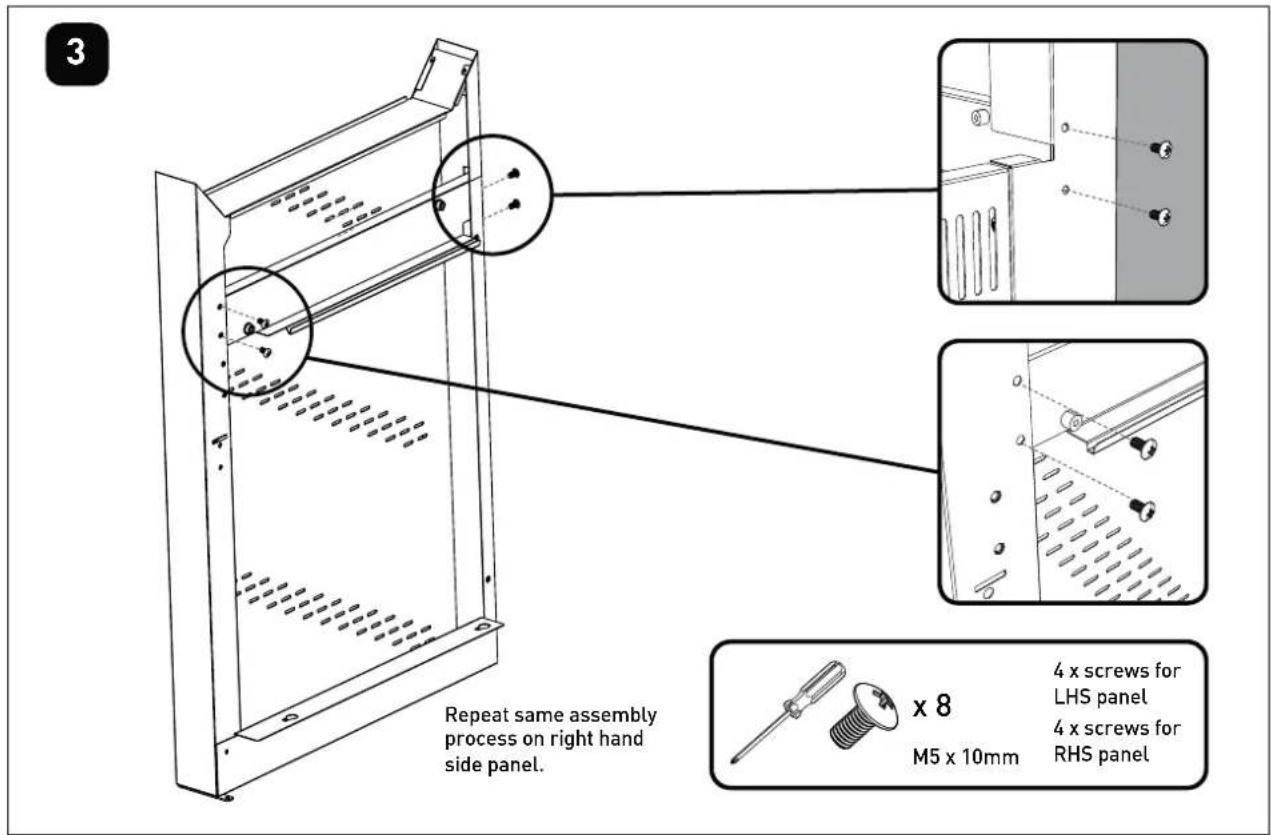
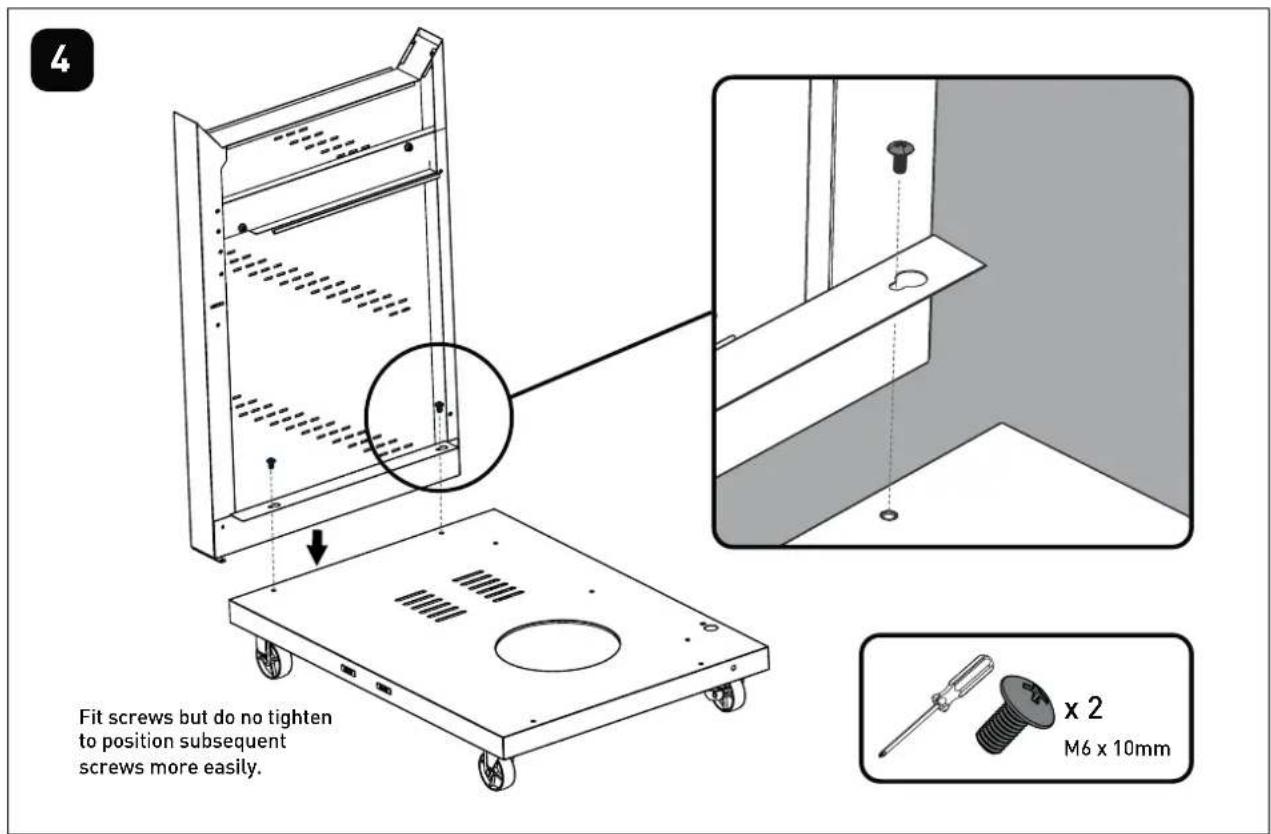
5
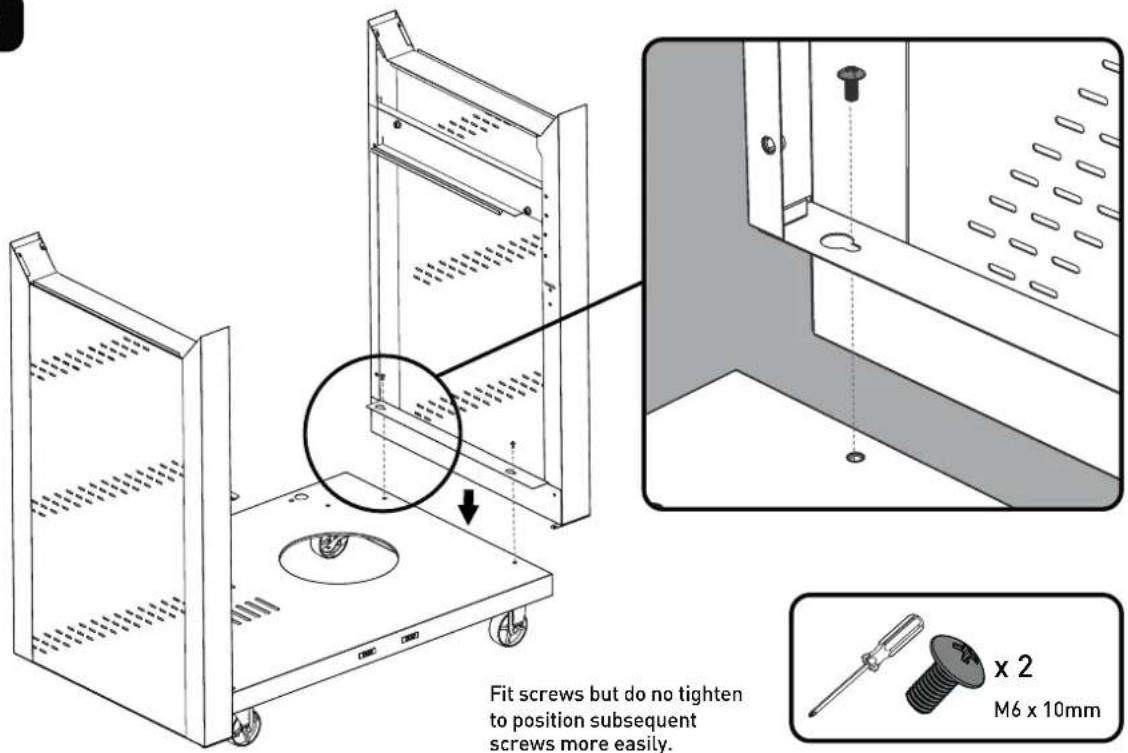
6
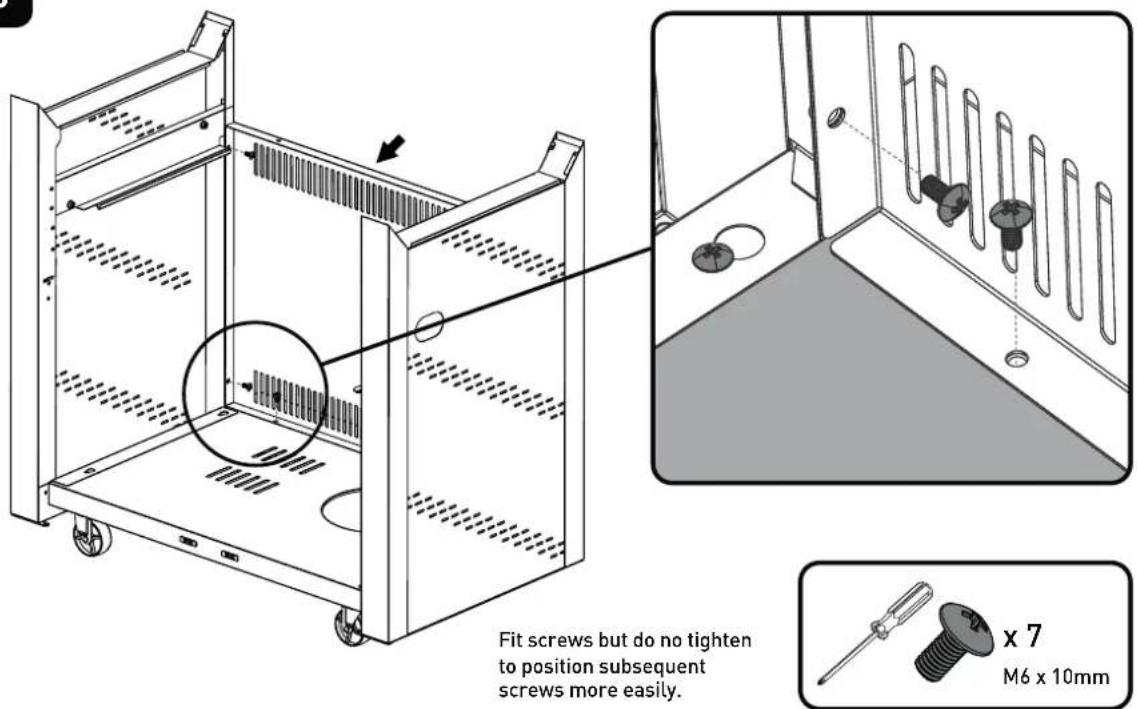
7
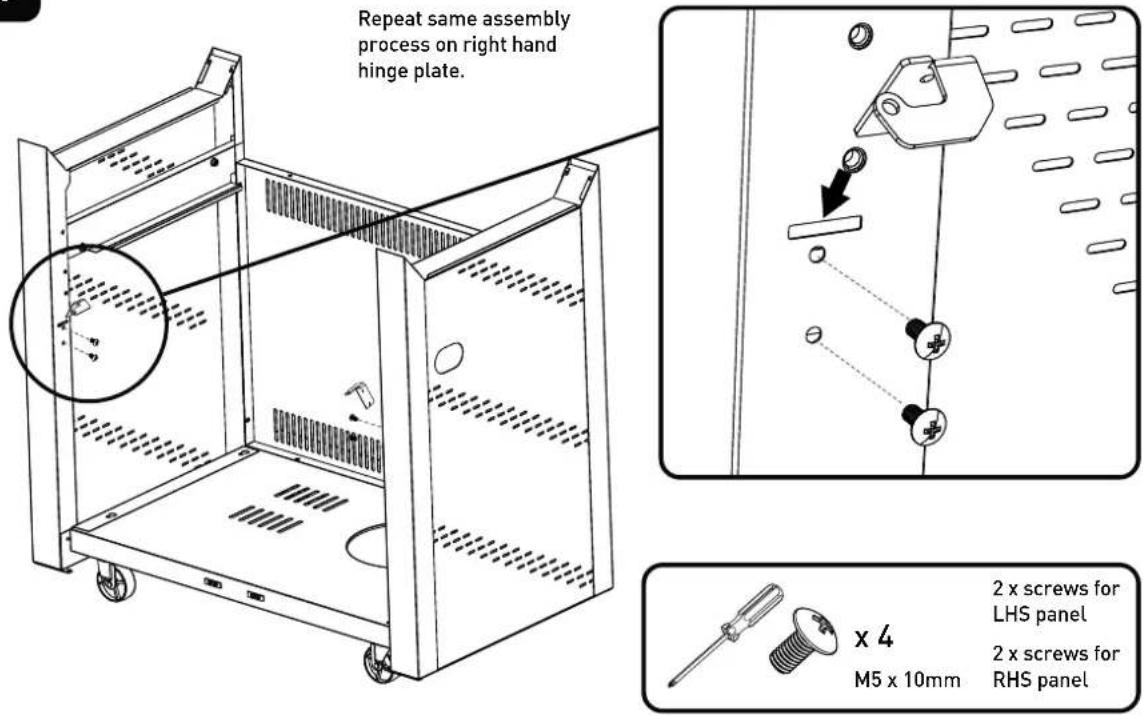
8
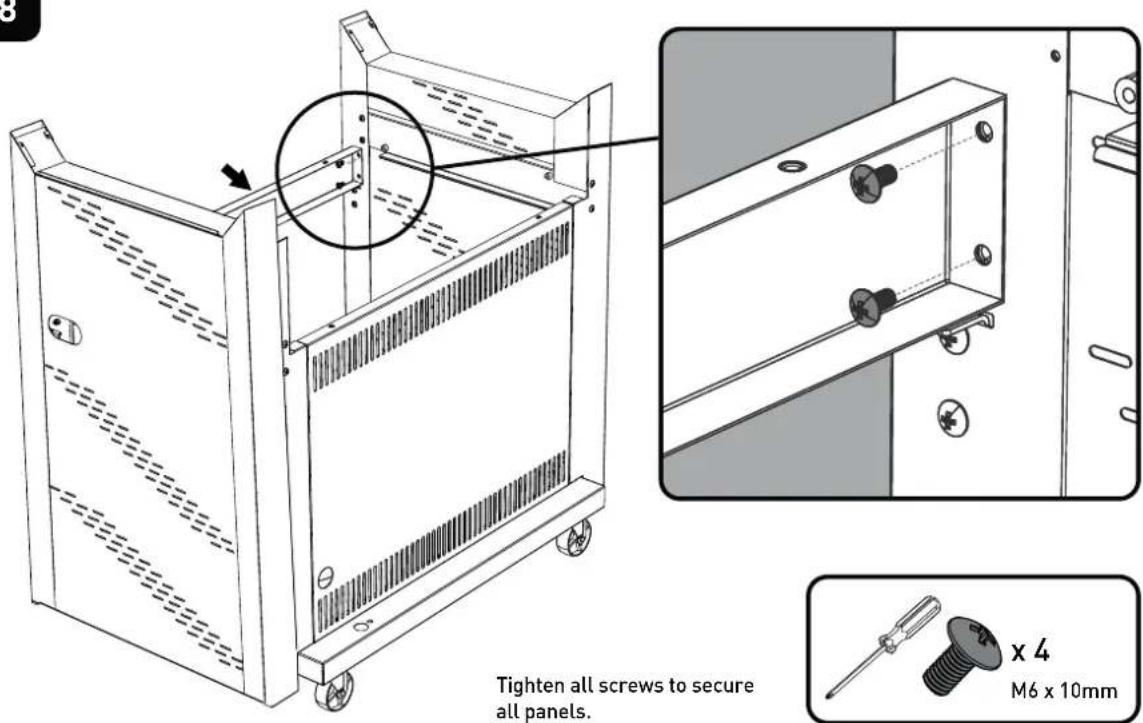
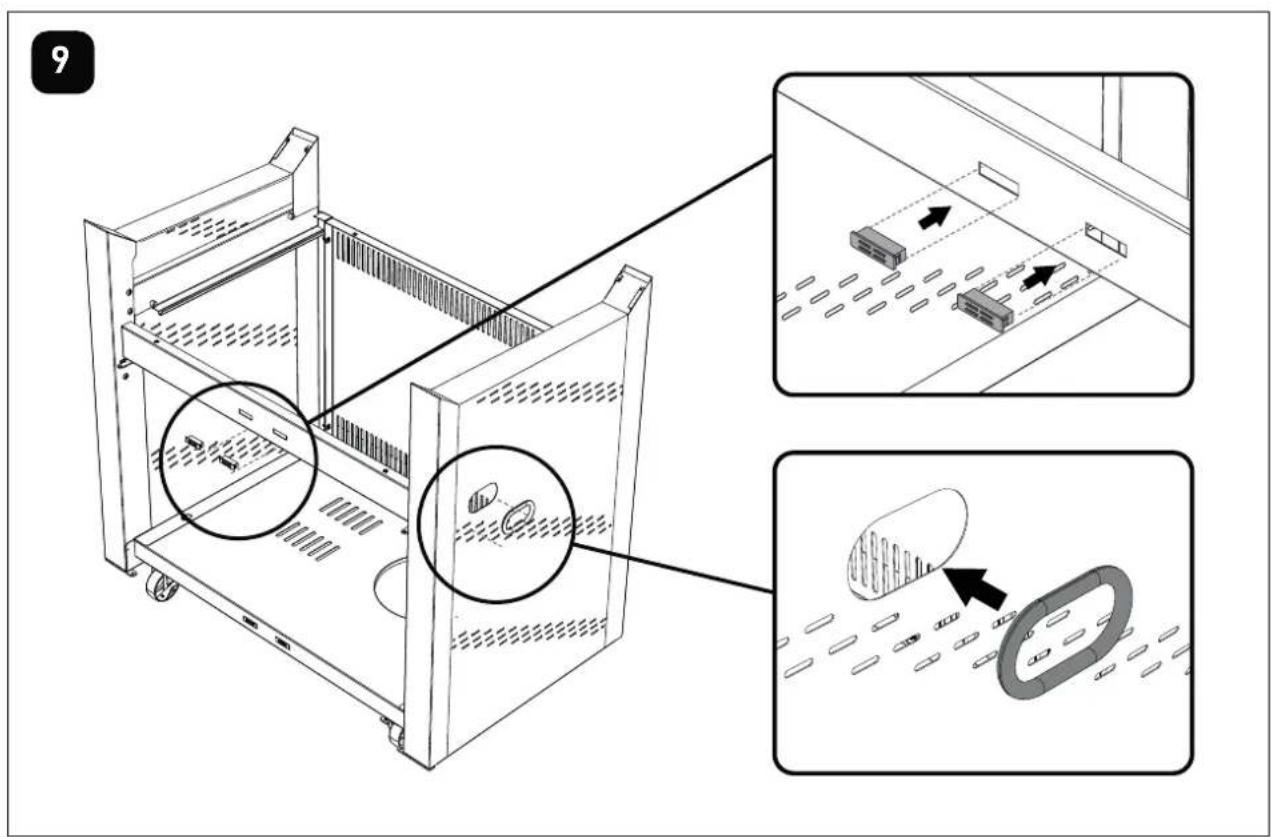
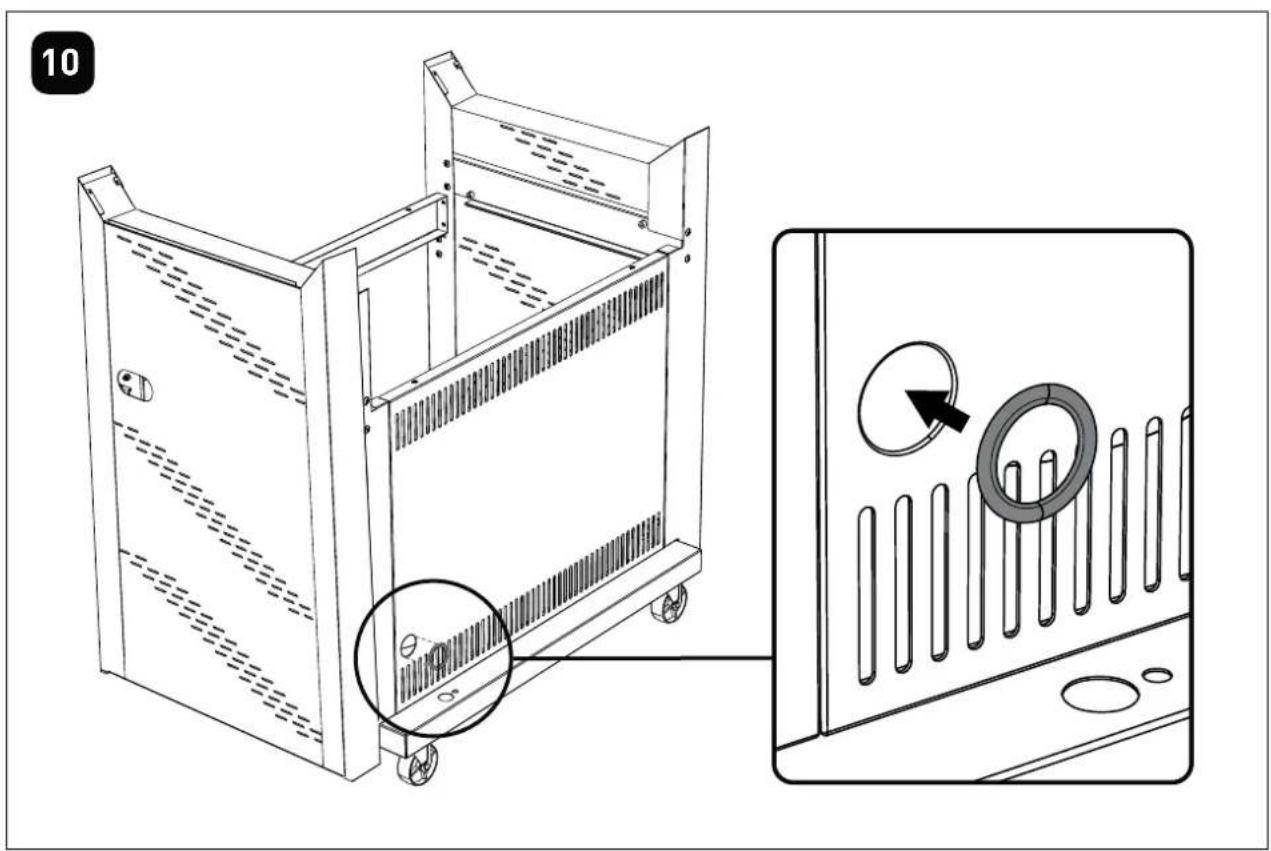
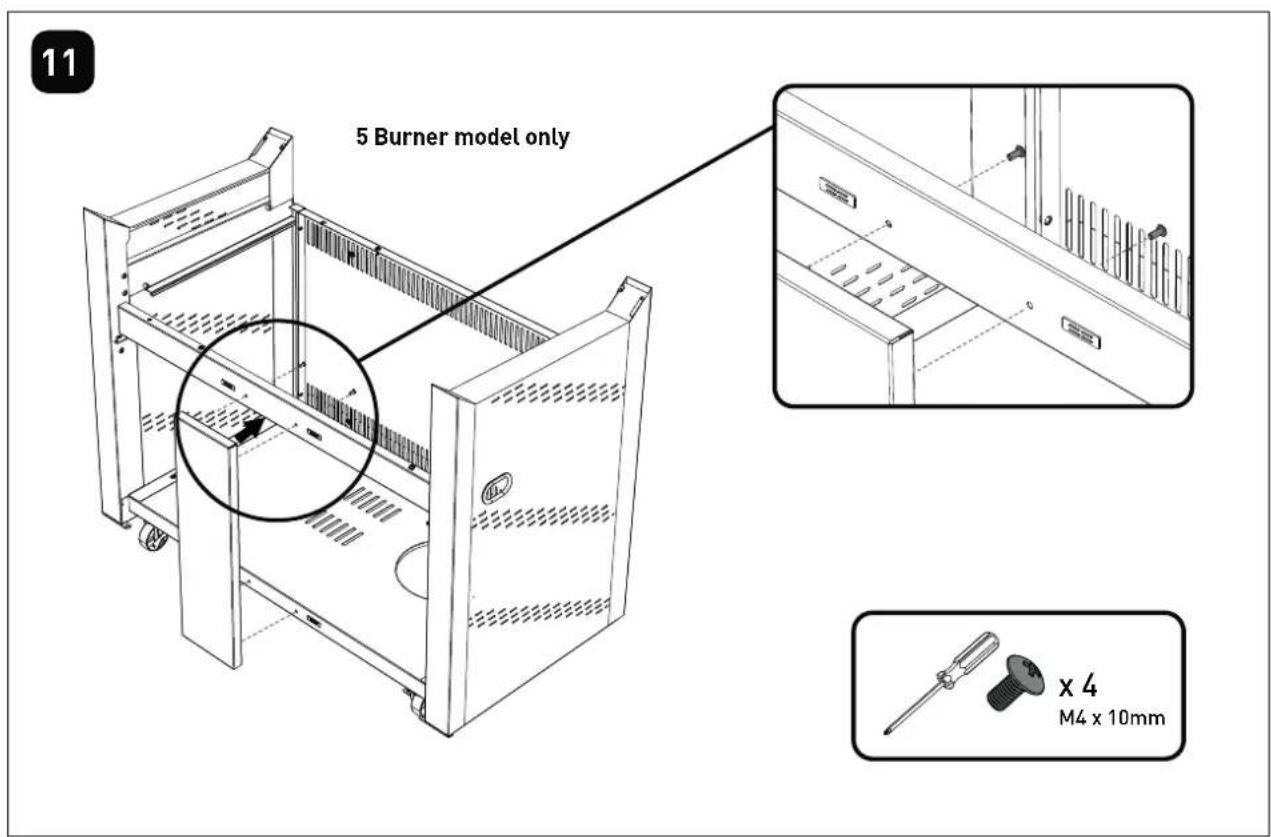
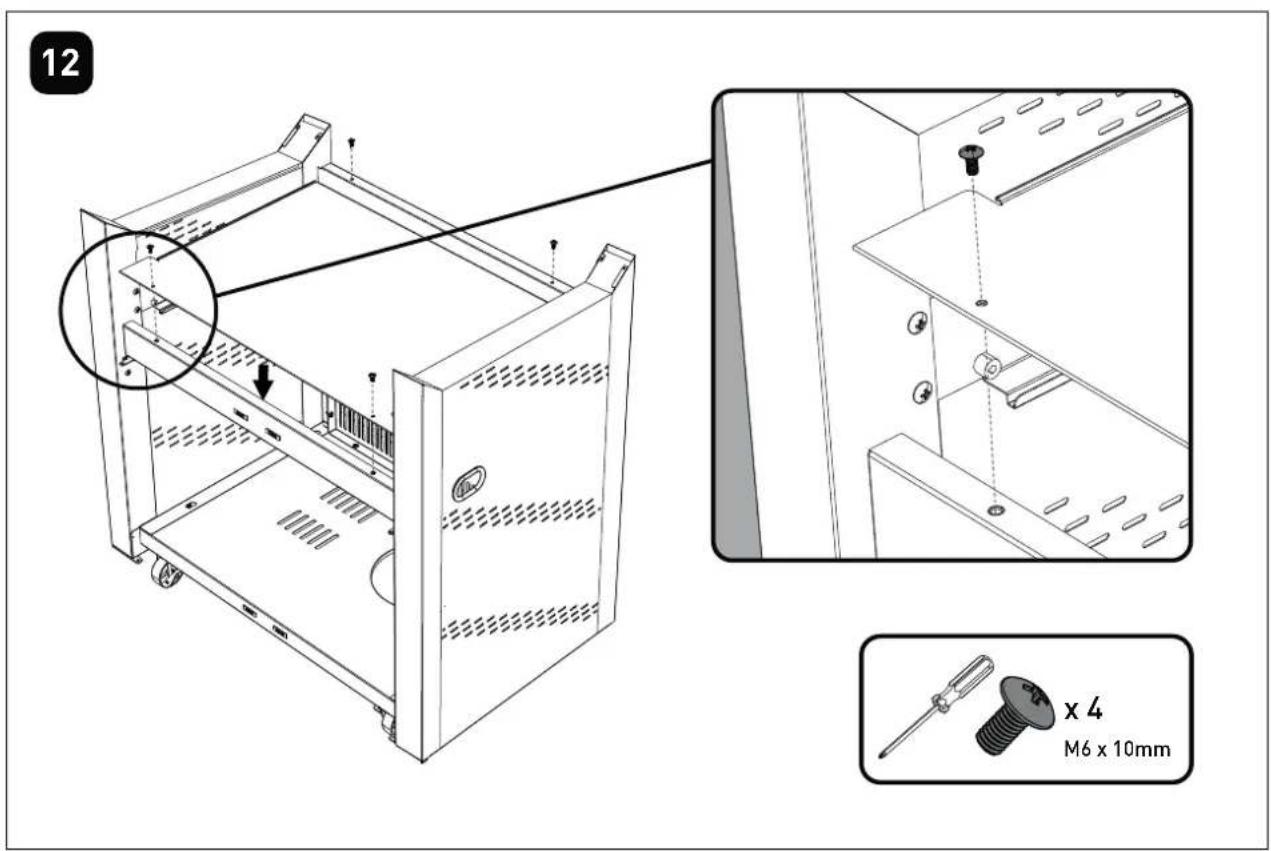
13
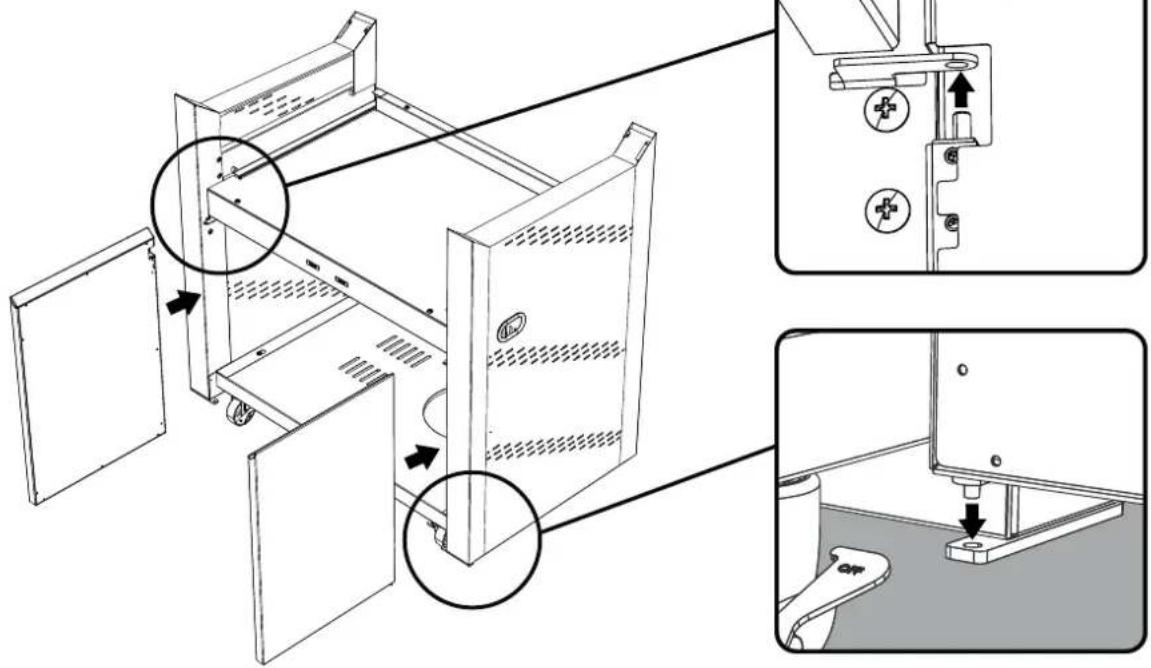
First fit lower door pin into the hole on the base assembly. Then depress the upper door pin with your finger, line up with the hole above on the separator panel, and release to allow the pin into the hole.
14
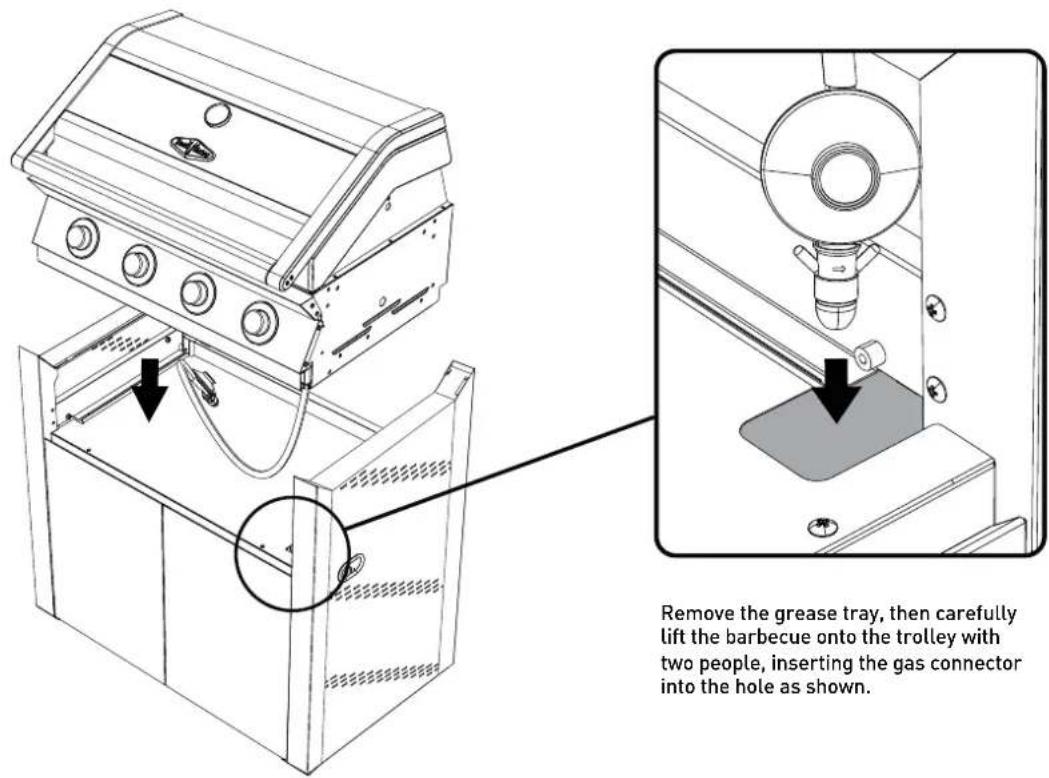
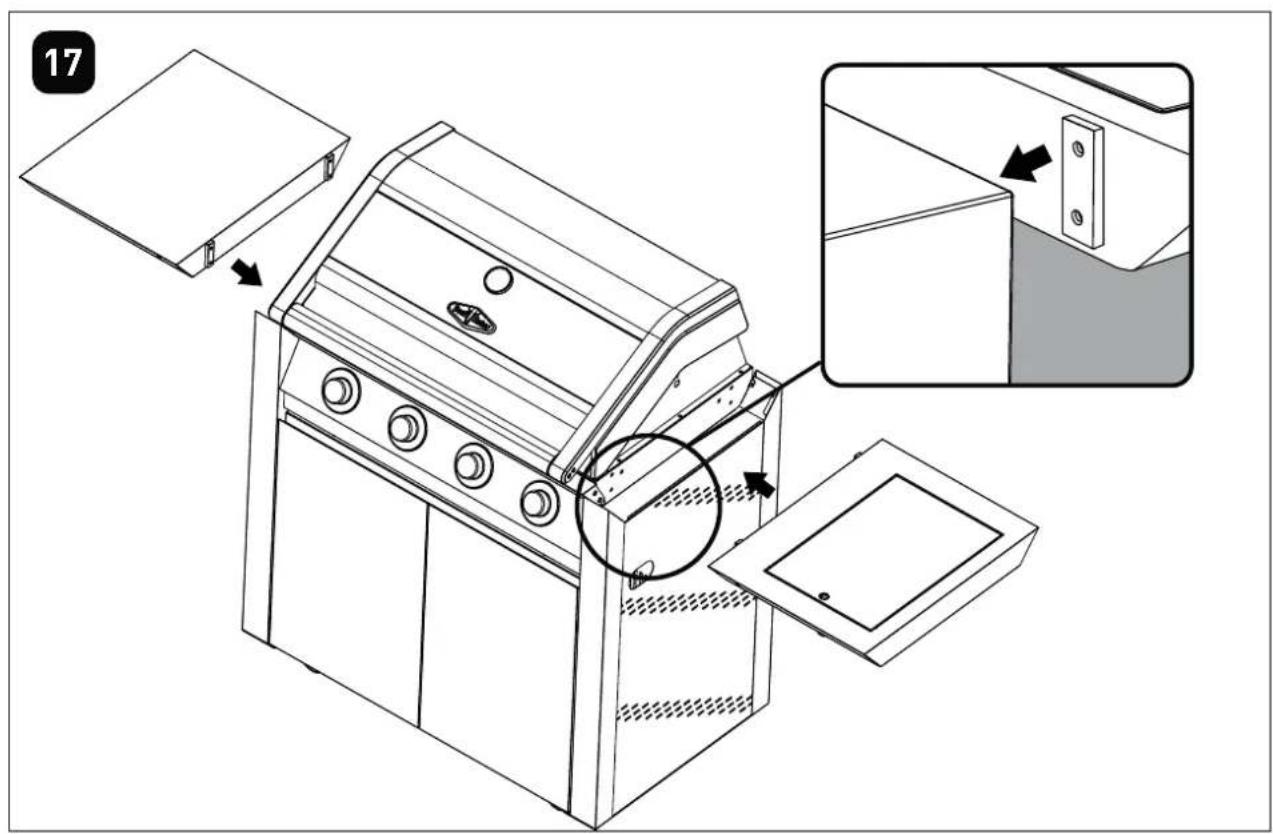
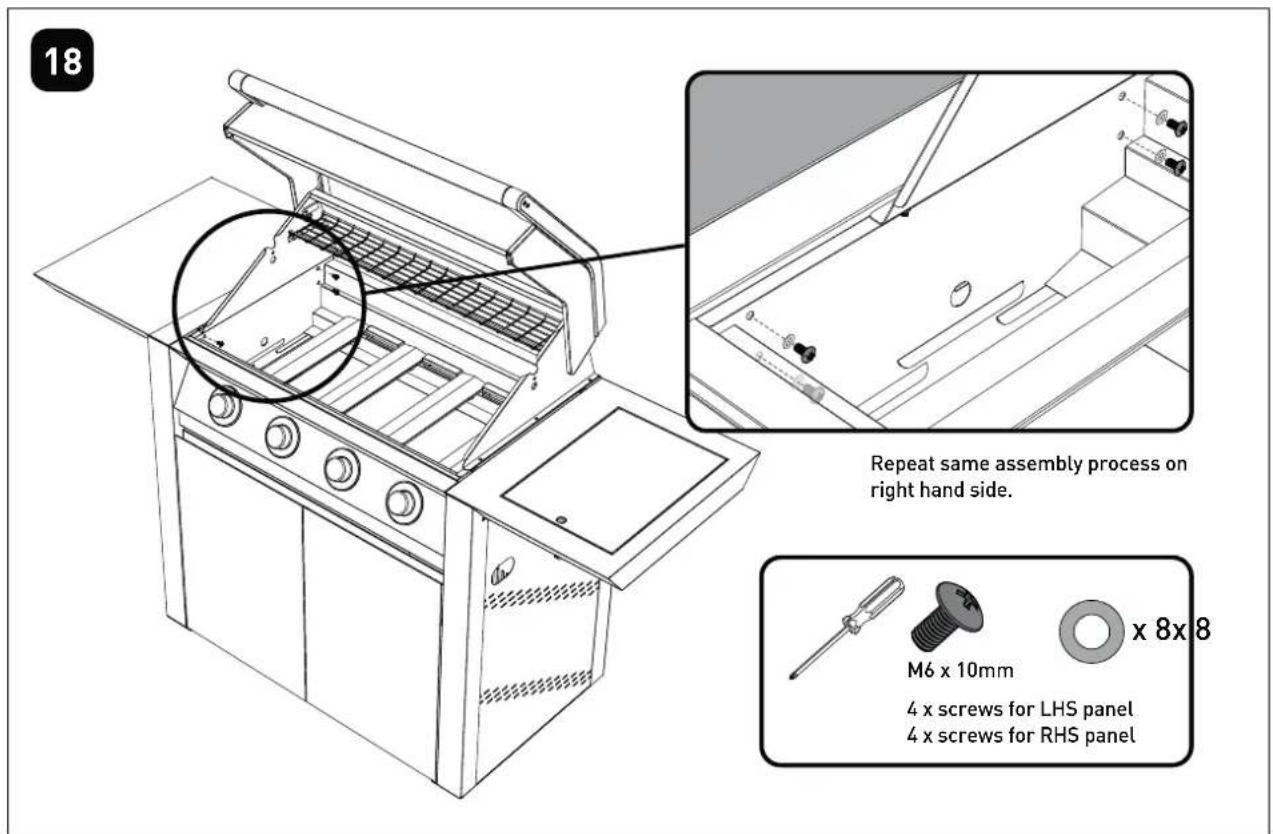
Remove the grease tray, then carefully lift the barbecue onto the trolley with two people, inserting the gas connector into the hole as shown.
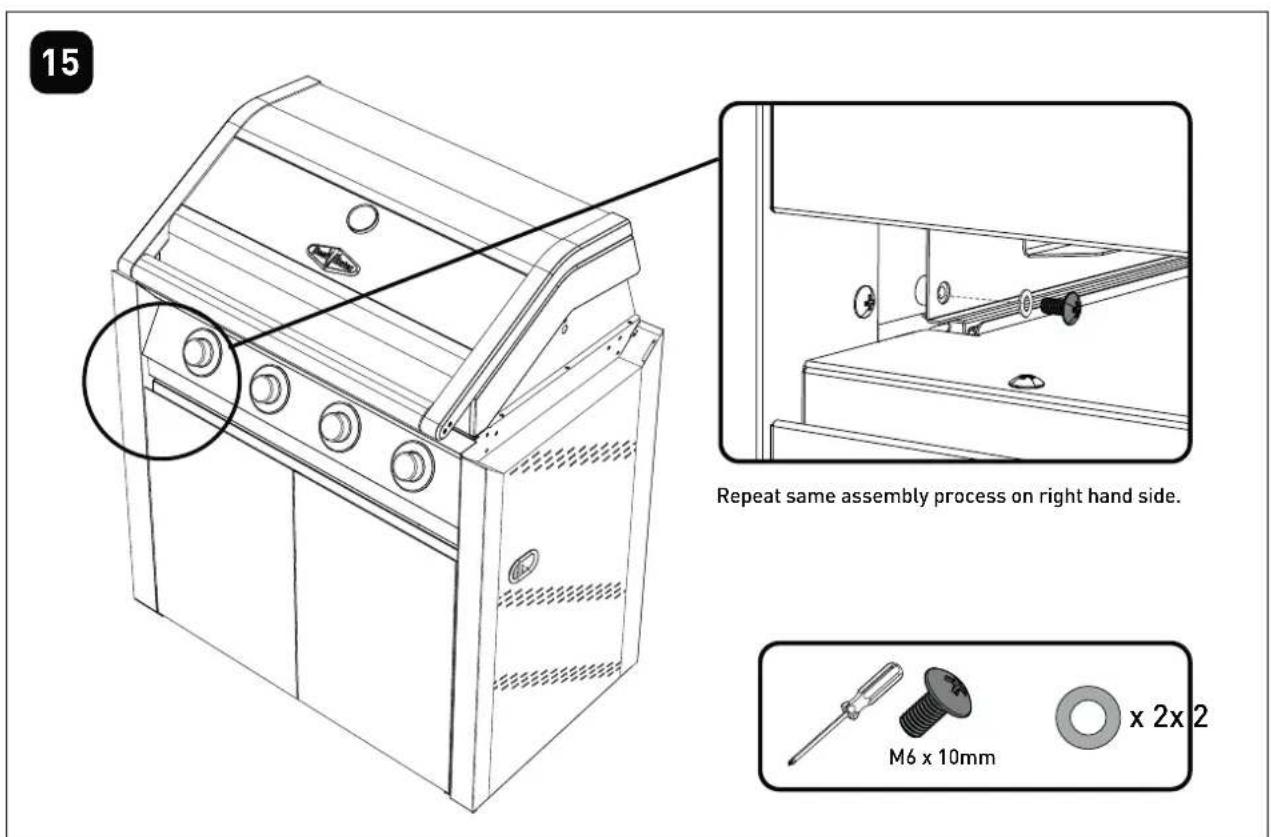
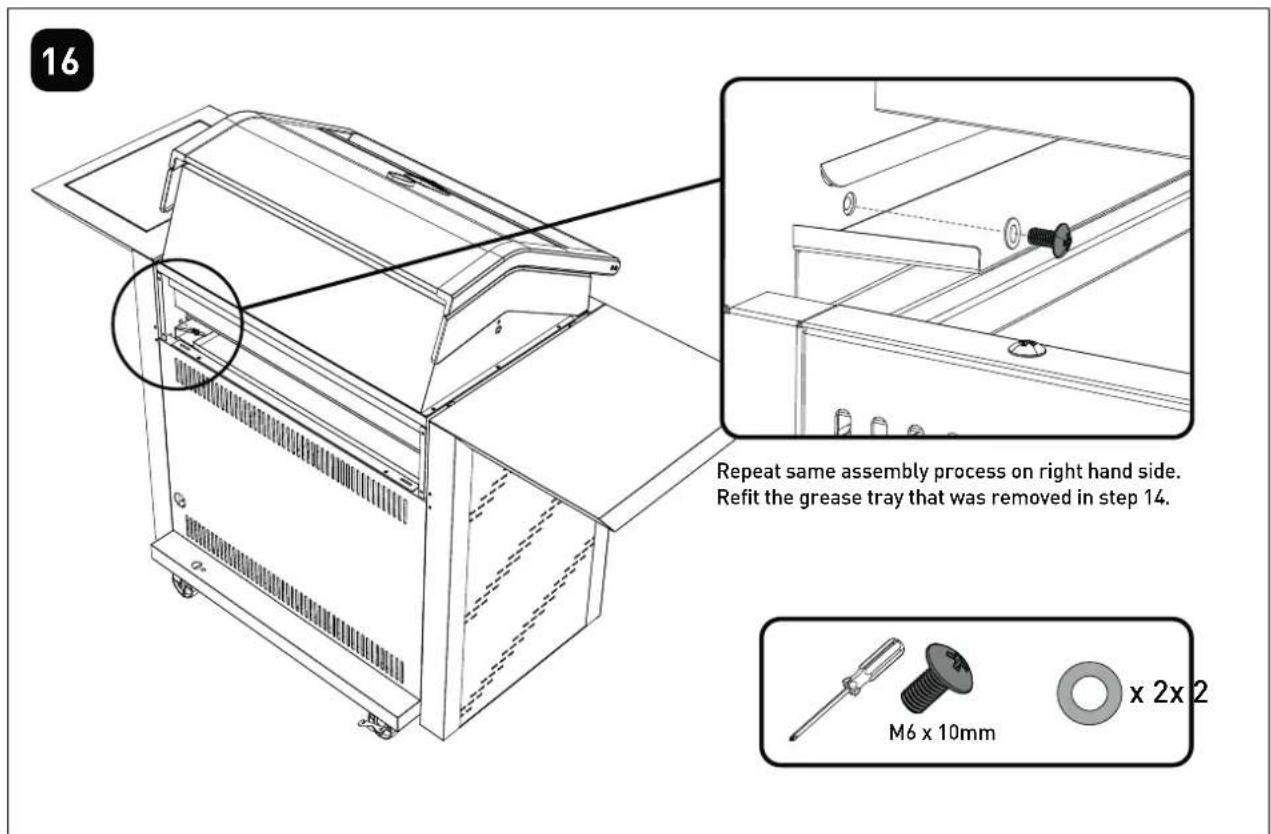
19
natural_image
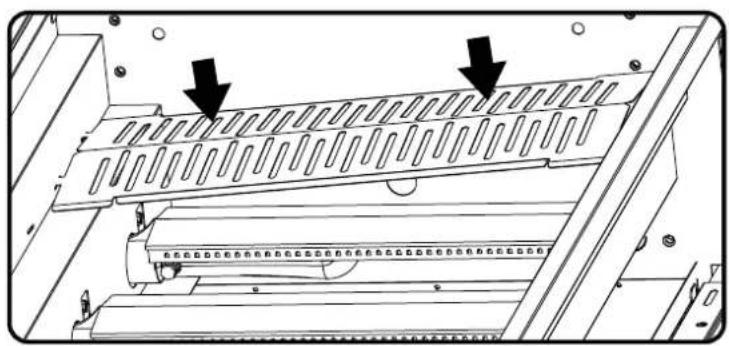
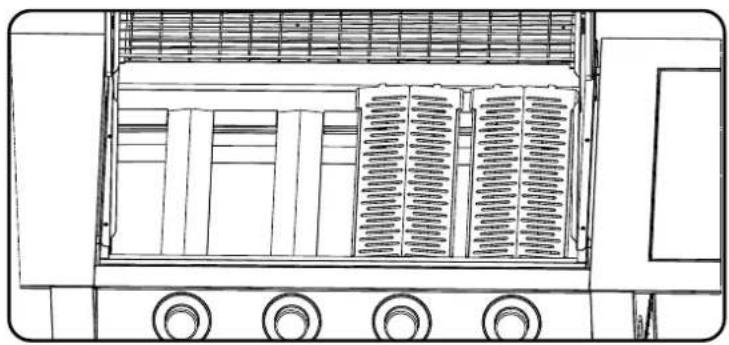
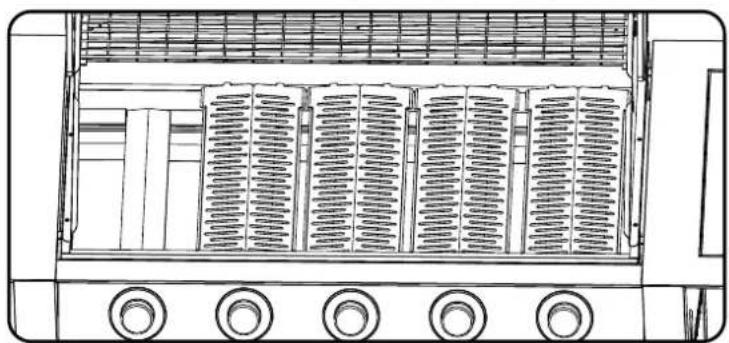
Technical diagram of a mechanical assembly with two arrows pointing to a grid-like structure (no text or symbols present)Install the flame tamers above the burners that will be under a grill plate. See below for configuration.
For 4 burner models:
natural_image
Technical line drawing of a portable kitchen appliance with ventilation grilles and three wheels (no text or symbols)For 5 burner models (to suit Option 1 plate and grill setup, see Step 20):
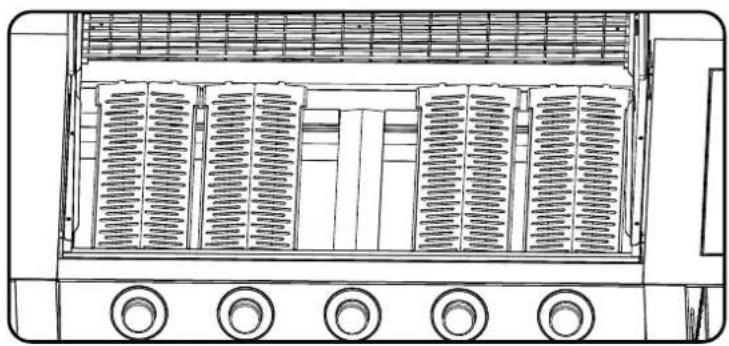
natural_image
Technical line drawing of a portable air conditioner unit with cooling fans and ventilation grilles (no text or symbols)For 5 burner models (to suit Option 2 plate and grill setup, see Step 20):
natural_image
Technical line drawing of a portable oven with heat exchangers and cooling fans (no text or symbols)20
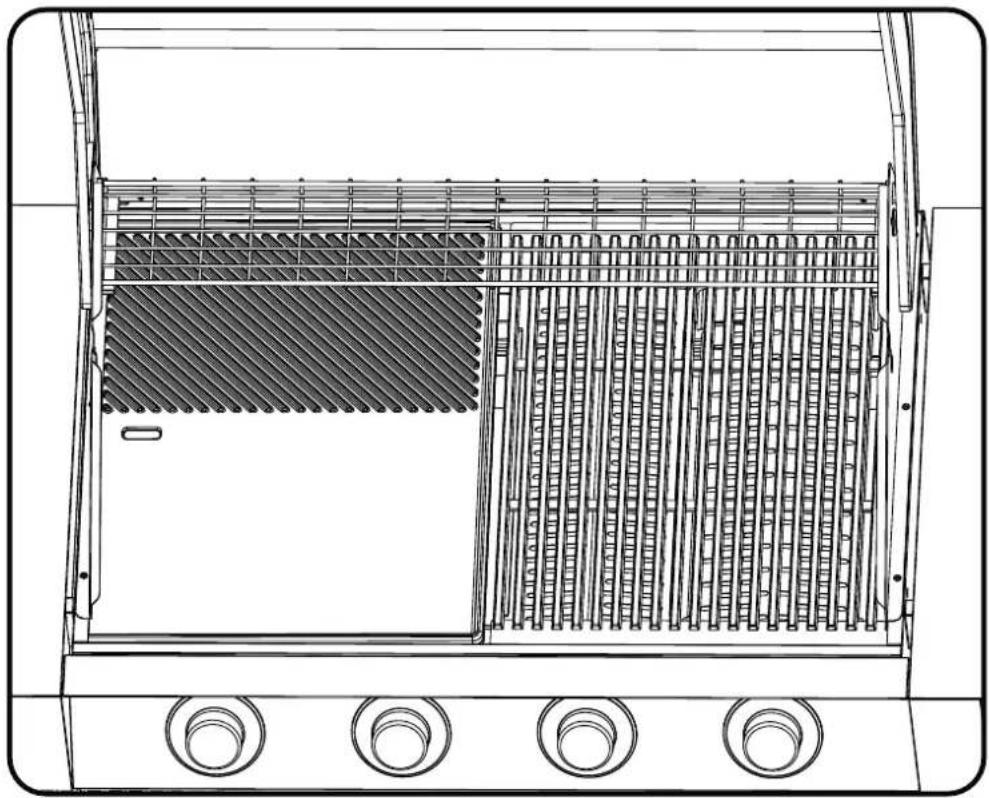
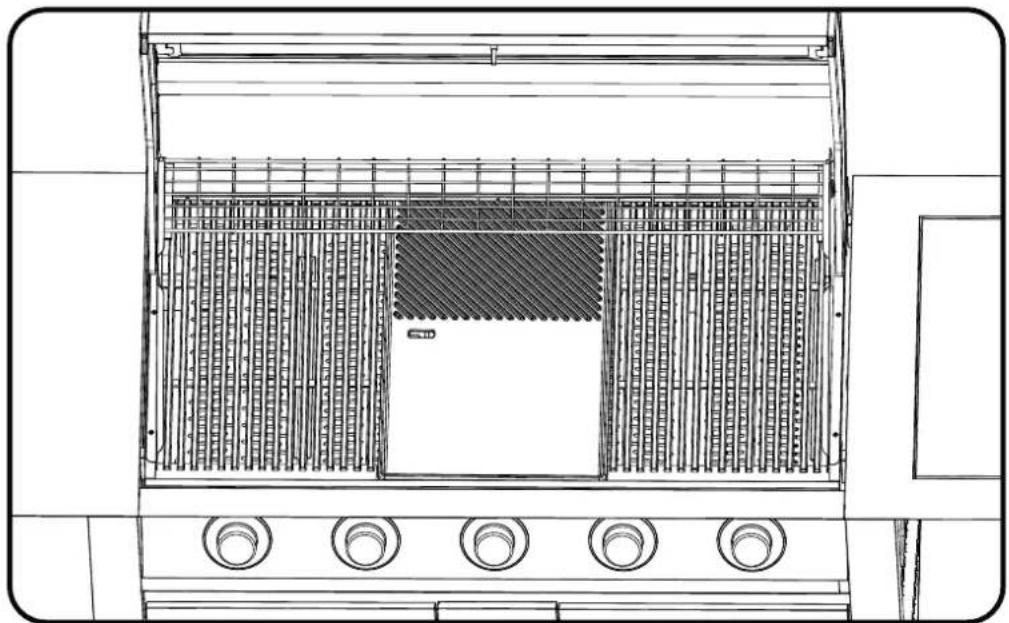
Install the solid plate and grill/s in one of the below configuration options, in order to keep the fat drainage hole from being placed directly above a burner. For easier installation, place the solid plate first, followed by the grill plates.
For 4 burner models:
natural_image
Technical line drawing of a portable air conditioner unit with cooling fins and ventilation grilles (no text or symbols)For 5 burner models:
Option 1
natural_image
Top-down schematic of a double boiler or gas stove with internal grating and control panel (no text or labels)For 5 burner models:
Option 2
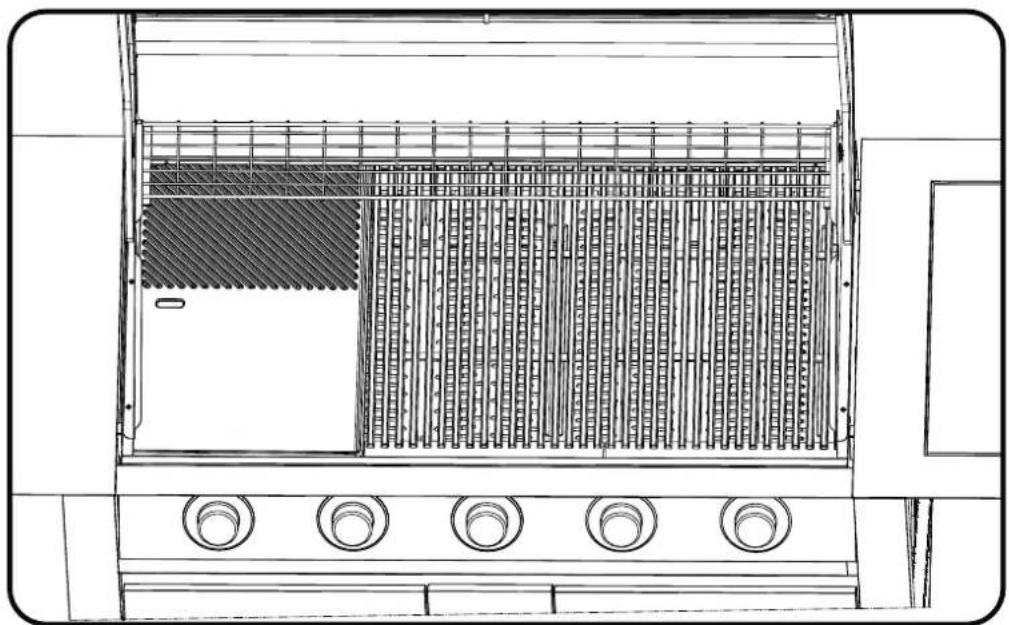
natural_image
Technical line drawing of a portable air conditioner unit with grating and ventilation slots (no text or symbols)21
Plate and grill removal
The plate and grill may be removed for cleaning following below steps:
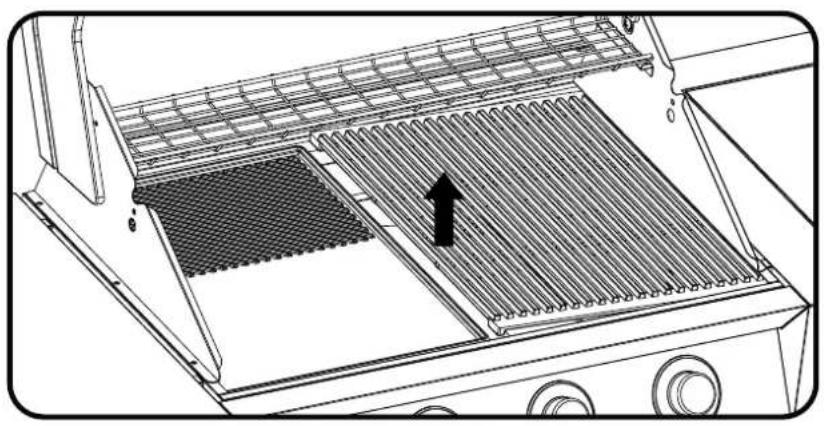
natural_image
Technical line drawing of a mechanical device with internal grating and a black arrow indicating a component (no text or symbols present)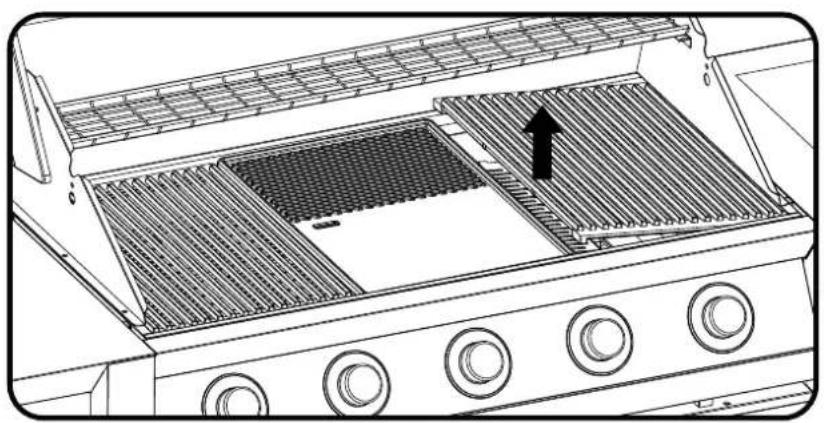
natural_image
Technical line drawing of a grating machine interior showing heat exchanger and fan (no text or symbols)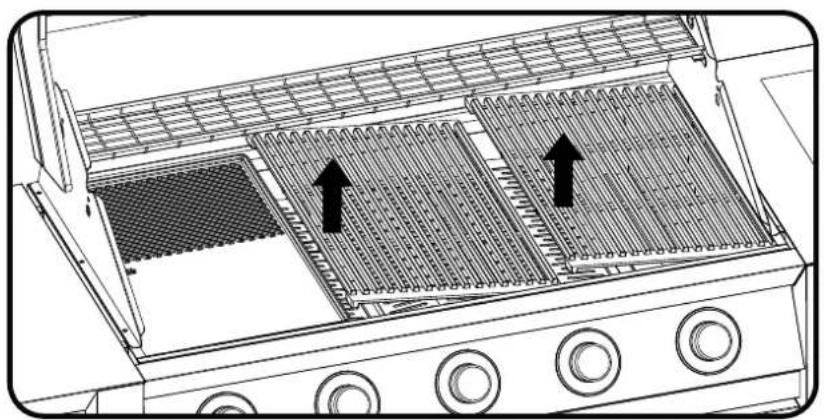
natural_image
Diagram of a portable stove interior showing two grating chambers with heat sinks and ventilation grilles (no text or labels)First lift up the grill from the centre edge as pictured, then remove the solid plate (and 2nd grill if fitted) for cleaning.
22
Connecting the side burner
To connect the side burner:
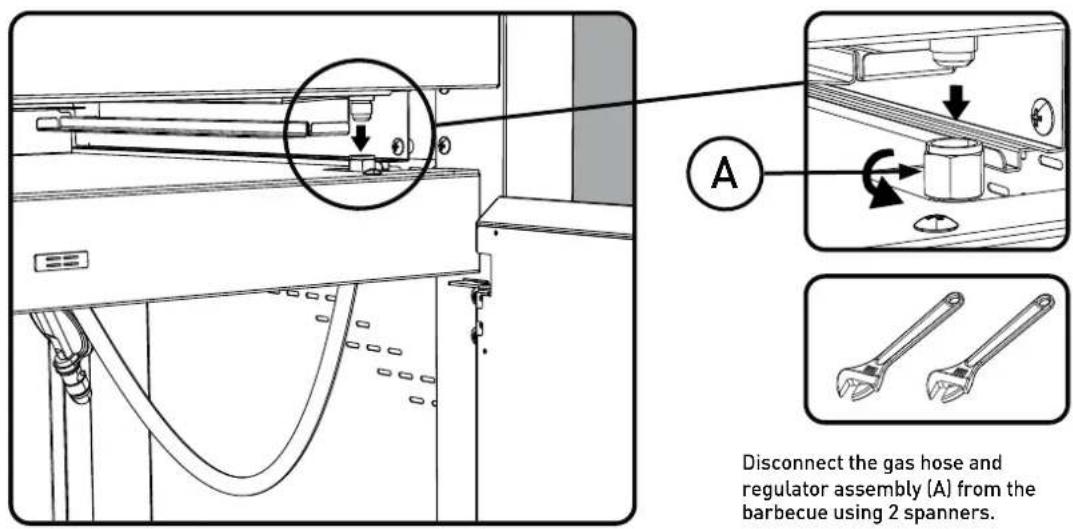
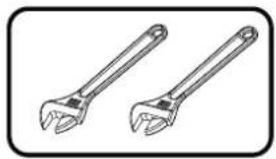
Disconnect the gas hose and regulator assembly (A) from the barbecue using 2 spanners.
23
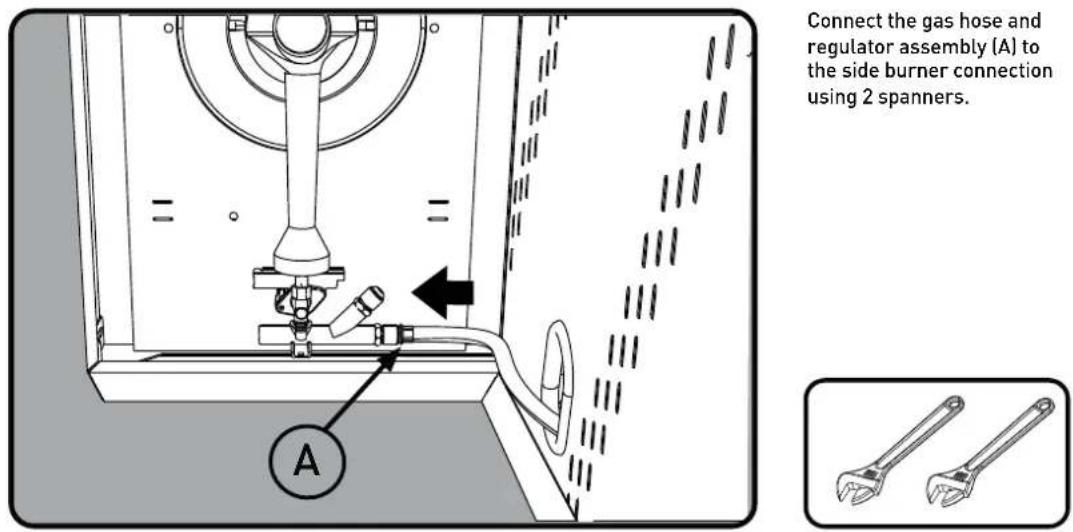
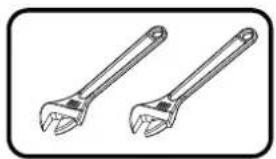
Connect the gas hose and regulator assembly (A) to the side burner connection using 2 spanners.
natural_image
Two identical adjustable wrenches shown in side profile (no text or symbols)24
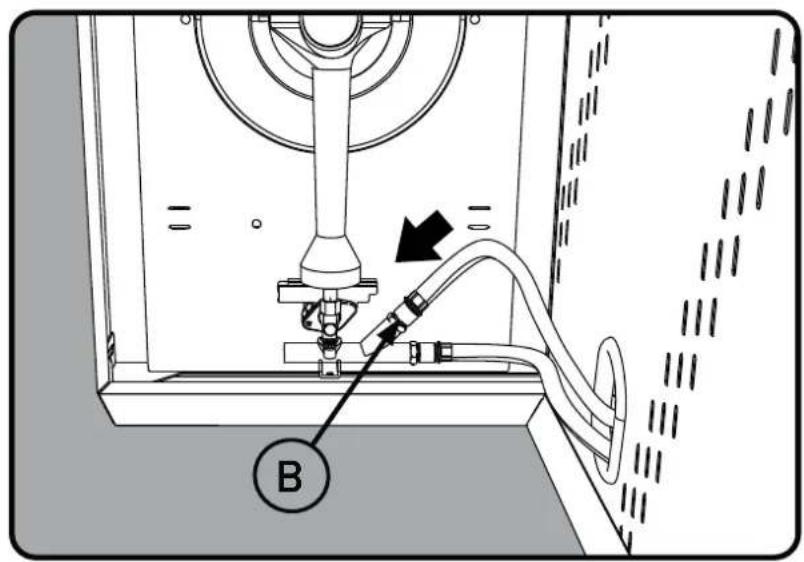
Connect the gas hose (B) to the remaining connection on the side burner using 2 spanners.
natural_image
Two identical adjustable wrench illustrations shown in side profile (no text or symbols)25
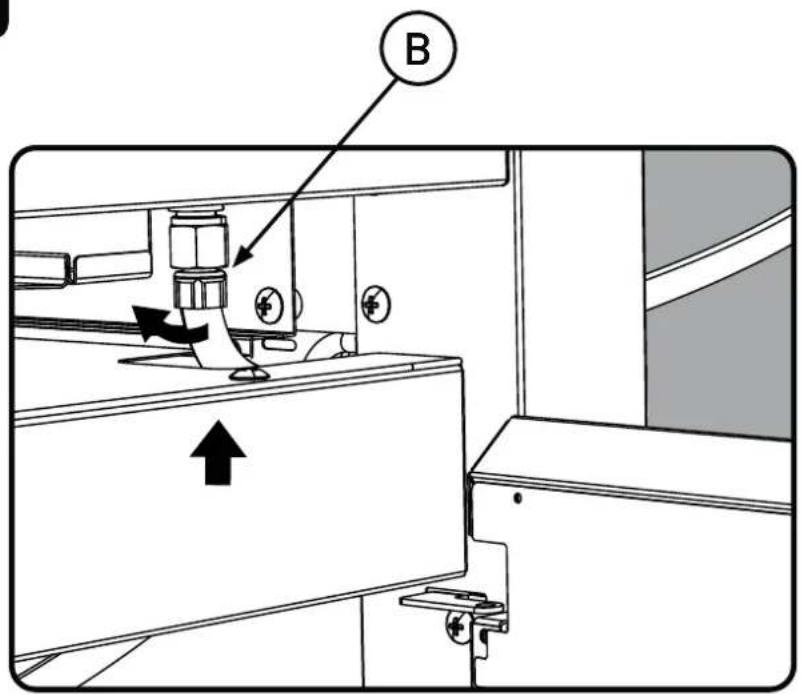
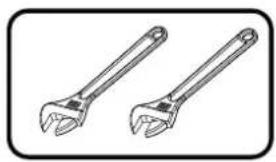
Connect the other side of gas hose (B) to the barbecue connection using 2 spanners
natural_image
Two identical adjustable wrench illustrations shown in side profile (no text or symbols)26

IMPORTANT
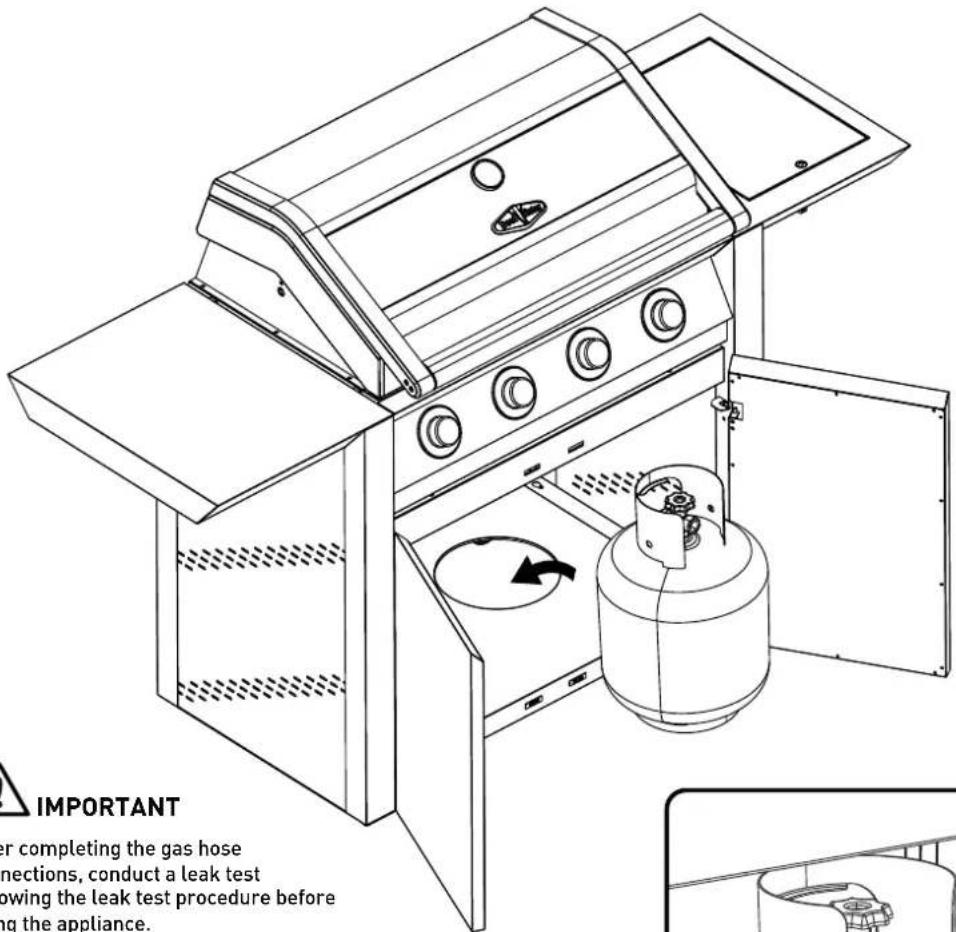
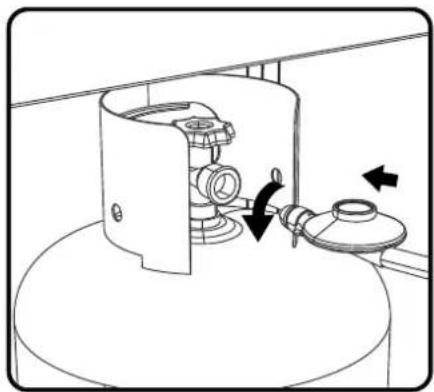
After completing the gas hose connections, conduct a leak test following the leak test procedure before using the appliance.

WARNING
To ensure gas tight connections, complete the gas leak test procedure before and after gas hose connection and after every reconnection of the gas cylinder. Failure to do so may result in a fire or explosion.
natural_image
Line drawing of a mechanical device with a rotating knob and base plate, showing no text or symbols.Leak test procedure
- Ensure all gas valves are in the 'OFF' position.
- In a small container, mix a solution of water and detergent or soap.
• After connection of the hose, turn on the gas supply at the gas bottle. - Using a brush, apply the solution to all gas connection points and look for bubbles forming.
• Bubbling will indicate a leak.
- Turn off the gas supply and re-tighten the joint. Repeat the leak test.
- If the leak persists, turn off the gas at the bottle and contact a licensed gas fitter to correct.
Control functions
Before lighting the side burner:
- Check that all hoses and gas fittings are tight
- Open the roasting hood
- Check all control knobs are in the 'OFF' position
- Ensure that the cooking surfaces are clean
• Turn the gas isolation valve 'ON'
Lighting instructions
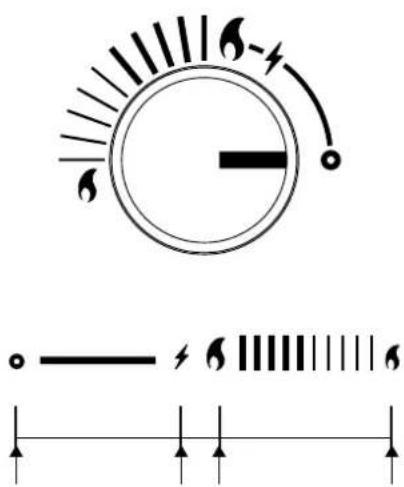
OFF IGNITE HIGH LOW

WARNING
- Do not close the lid with the side burner lit
- Do not attempt to light the burner with the lid closed
- To light the burner, depress the knob and rotate to ⚙. The starter mechanism will click and the burner will light
- If the burner did not light, depress the knob and turn back to the 'OFF' position
- Allow several minutes for gas to disperse then repeat lighting procedure
- Once ignited, the knob can then be turned to the desired heat setting. The knob does not need to be pushed in while selecting the heat setting
Manual lighting
- In the event of the automatic ignition system not working, the barbecue can be lit manually
- Position the manual igniter next to the burner. Depress the knob and rotate to 'HIGH'
• The burner should light - Do not attempt to manually light the burner for more than 5 seconds
- If the burner did not light, depress the knob and turn back to the 'OFF' position
- Allow several minutes for gas to disperse then repeat lighting procedure
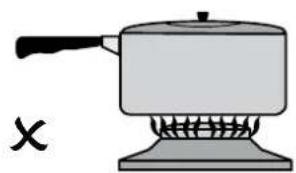
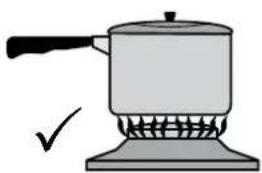
Using cookware on the side burner
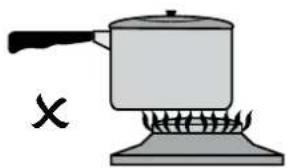
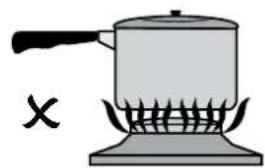
Do not use oversized cookware or place cookware off-centre over the burner as this can cause high temperatures in control knob and surrounding panels. Cookware should not exceed 200mm in diameter, the use of larger cookware may cause damage to the appliance and is not covered under warranty.
natural_image
Simple line drawing of a pot on a stove with a cooking pan, no text or symbols presentIncorrect - pan not centred
natural_image
Simple line drawing of a pot on a stove with a cooking pan (no text or symbols)Incorrect - flame too high
natural_image
Simple line drawing of a pot on a stove with a handle and steam rising (no text or symbols)Incorrect - pan too large
natural_image
Simple line drawing of a pot on a stove with a checkmark indicating the cooking step (no text or symbols)Correct
Gas Type Natural Gas Universal LPG
| Injector orifice diameter - barbecue burner | BMG1641SA 1.80 1.10 | ||||||||
| BMG1651SA 1.80 1.10 | |||||||||
| BMG1641DA 1.90 1.15 | |||||||||
| BMG1651DA 1.90 1.15 | |||||||||
| Injector orifice diameter - side burner 1.80 1.15 | |||||||||
| Gas consumption | Barbecue burners | 4 | 5 | 4 | 5 | 4 | 5 | 4 | 5 |
| Side burners | No | Yes | No | Yes | |||||
| BMG1641SA Total Gas Consumption (MJ/h) | 60 | 75 | 75 | 90 | 60 | 75 | 76 | 91 | |
| BMG1651SA Total Gas Consumption (MJ/h) | 60 | 75 | 75 | 90 | 60 | 75 | 76 | 91 | |
| BMG1641DA Total Gas Consumption (MJ/h) | 68 | 85 | 83 | 100 | 68 | 85 | 84 | 101 | |
| BMG1651DA Total Gas Consumption (MJ/h) | 68 | 85 | 83 | 100 | 68 | 85 | 84 | 101 | |
| Regulator Pressure (kPa) | 1.00 | 2.75 | |||||||
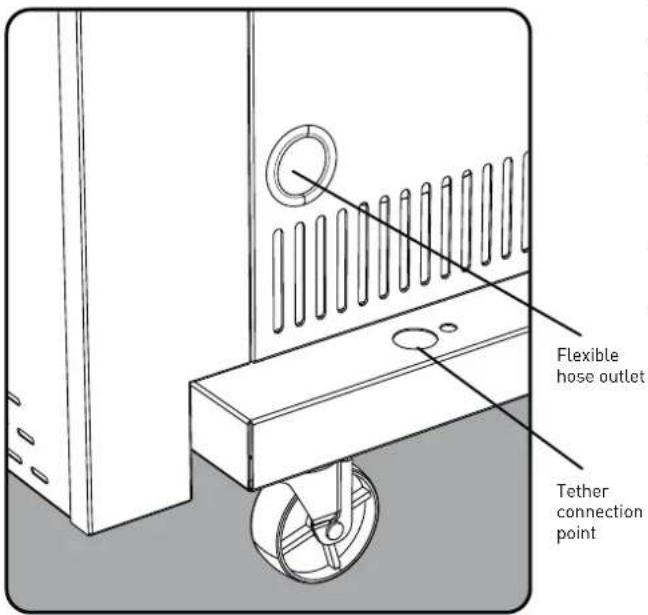
Mobile restraint with hose assembly
When the mobile barbecue is connected to a fixed gas supply via a flexible hose connection, a retraining tether of adequate strength shall be fixed to the appliance and be suitable to be fixed to the wall within 50mm of each connection point. The retaining tether must be less than 80% of the gas hose length.

IMPORTANT
For further information on:
• GAS SPECIFICATIONS
• LPG INSTALLATION
• NATURAL GAS INSTALLATION
• OPERATING INSTRUCTIONS
• COOKING INSTRUCTIONS
- CLEANING AND CARE
- TROUBLESHOOTING
- CLEARANCE TO COMBUSTIBLE CONSTRUCTION AND LOCATION OF THE APPLIANCE.
REFER TO BUILT-IN INSTRUCTION MANUAL
NOTES
NOTES

Electrolux Warranty
FOR SALES IN AUSTRALIA AND NEW ZEALAND
APPLIANCE: BEEFEATER 1600 SERIES BBQ
This document sets out the terms and conditions of the product warranties for BeefEater 1600 series BBQ. It is an important document. Please keep it with your proof of purchase documents in a safe place for future reference should there be a manufacturing defect in your Appliance. This warranty is in addition to other rights you may have under the Australian Consumer Law.
1. In this warranty:
(a) 'ACL' or 'Australian Consumer Law' means Schedule 2 to the Competition and Consumer Act 2010;
(b) 'Appliance' means any Electrolux product purchased by you and accompanied by this document;
(c) 'ASC' means Electrolux's authorised serviced centres;
(d) 'BeefEater' is the brand controlled by Electrolux Home Products Pty Ltd of 163 O'Riordan Street, Mascot NSW 2020, ABN 51 004 762 341 in respect of Appliances purchased in Australia and Electrolux (NZ) Limited (collectively "Electrolux") of 3-5 Niall Burgess Road, Mount Wellington, in respect of Appliances purchased in New Zealand;
(e) 'Warranty Period' means the period specified in clause 3 of this warranty;
(f) 'you' means the purchaser of the Appliance not having purchased the Appliance for re-sale, and 'your' has a corresponding meaning.
- Application: This warranty only applies to new Appliances, purchased and used in Australia or New Zealand and is in addition to (and does not exclude, restrict, or modify in any way) other rights and remedies under a law to which the Appliances or services relate, including any non-excludable statutory guarantees in Australia and New Zealand.
- Warranty Period: Subject to these terms and conditions, this warranty continues for in Australia for a period of 24 months and in New Zealand for a period of 24 months, following the date of original purchase of the Appliance. Specific components are warranted against manufacturing defects in Australia and New Zealand for the periods listed below;
- Burner Box - Further 3 years.
- Repair or replace warranty: During the Warranty Period, Electrolux or its ASC will, at no extra charge if your Appliance is readily accessible for service, without special equipment and subject to these terms and conditions, repair or replace any parts which it considers to be defective. Electrolux may, in its absolute discretion, choose whether the remedy offered for a valid warranty claim is repair or replacement. Electrolux or its ASC may use refurbished parts to repair your Appliance. You agree that any replaced Appliances or parts become the property of Electrolux.
- Travel and transportation costs: Subject to clause 7, Electrolux will bear the reasonable cost of transportation, travel and delivery of the Appliance to and from Electrolux or its ASC. Travel and transportation will be arranged by Electrolux as part of any valid warranty claim.
- Proof of purchase is required before you can make a claim under this warranty.
- Exclusions: You may not make a claim under this warranty unless the defect claimed is due to faulty or defective parts or workmanship. This warranty does not cover:
(a) light globes, batteries, filters or similar perishable parts;
(b) parts and Appliances not supplied by Electrolux;
(c) cosmetic damage which does not affect the operation of the Appliance;
(d) damage to the Appliance caused by:
(i) negligence or accident;
(ii) misuse or abuse, including failure to properly maintain or service;
(iii) improper, negligent or faulty servicing or repair works done by anyone other than an Electrolux authorised repairer or ASC;
(iv) normal wear and tear;
(v) power surges, electrical storm damage or incorrect power supply;
(vi) incomplete or improper installation;
(vii) incorrect, improper or inappropriate operation;
(viii) insect or vermin infestation;
(ix) failure to comply with any additional instructions supplied with the Appliance;
In addition, Electrolux is not liable under this warranty if:
(a) the Appliance has been, or Electrolux reasonably believes that the Appliance has been, used for purposes other than those for which the Appliance was intended, including where the Appliance has been used for any non-domestic purpose;
(b) the Appliance is modified without authority from Electrolux in writing;
(c) the Appliance's serial number or warranty seal has been removed or defaced.
- How to claim under this warranty: To enquire about claiming under this warranty, please follow these steps:
(a) carefully check the operating instructions, user manual and the terms of this warranty;
(b) have the model and serial number of the Appliance available;
(c) have the proof of purchase (e.g. an invoice) available;
(d) telephone the numbers shown below.
-
Australia: For Appliances and services provided by Electrolux in Australia: Electrolux goods come with guarantees that cannot be excluded under the Australian Consumer Law. You are entitled to a replacement or refund for a major failure and for compensation for any other reasonably foreseeable loss or damage. You are also entitled to have the Appliance repaired or replaced if the Appliance fails to be of acceptable quality and the failure does not amount to a major failure. 'Acceptable quality' and 'major failure' have the same meaning as referred to in the ACL.
-
New Zealand: For Appliances and services provided by Electrolux in New Zealand, the Appliances come with a guarantee by Electrolux pursuant to the provisions of the Consumer Guarantees Act, the Sale of Goods Act and the Fair Trading Act. Where the Appliance was purchased in New Zealand for commercial purposes the Consumer Guarantee Act does not apply.
- Confidentiality: You accept that if you make a warranty claim, Electrolux and its agents including ASC may exchange information in relation to you to enable Electrolux to meet its obligations under this warranty.
Important Notice
Before calling for service, please ensure that the steps listed in clause 8 above have been followed.
| AUSTRALIA | FOR SERVICEor to find the address of your nearest authorised service centre in AustraliaPLEASE CALL 1300 307 939For the cost of a local call | FOR SPARE PARTSor to find the address of your nearest spare parts centre in AustraliaPLEASE CALL 13 13 50For the cost of a local call |
| NEW ZEALAND | FOR SERVICEor to find the address of your nearest authorised service centre in New ZealandPLEASE CALL 0800 10 66 10 | FOR SPARE PARTSor to find the address of your nearest spare parts centre in New ZealandPLEASE CALL 0800 10 66 20 |
Contact us if you need more help
AUSTRALIA
phone: 1300 307 939
email: customercare@beefeaterbbq.com
web: beefeaterbbq.com
NEW ZEALAND
phone: 0800 436 245
email: customercare@electrolux.co.nz
web: beefeaterbbq.com
- Assembly and Operating Instructions
- SERIES
- WARNING
- CAUTION
- IMPORTANT
- ENVIRONMENT
- IMPORTANT INFORMATION THAT MAY IMPACT YOUR MANUFACTURER'S WARRANTY
- Notes to the installer
- 13
- 14
- 20
- 22
- Connecting the side burner
- 23
- 26
- Leak test procedure
- Control functions
- Manual lighting
- Mobile restraint with hose assembly
- NOTES
- Electrolux Warranty
- In this warranty:
- AUSTRALIA
- NEW ZEALAND
Brand : BeefEater
Model : 1600 Series BMG1651DA
Category : Grill