
GF 520 DV IPI - Frying Pan JOTUL - Free user manual and instructions
Find the device manual for free GF 520 DV IPI JOTUL in PDF.


| Type | Direct Vent Gas Stove |
| Brand | Jøtul |
| Model | GF 520 DV IPI |
| Fuel Type | Natural Gas (factory set), convertible to Propane with included kit |
| Input (Natural Gas) | 16,500 - 30,000 BTU/hr |
| Input (Propane) | 16,500 - 29,000 BTU/hr |
| Steady State Efficiency | 70.01% NG / 71.72% LP |
| Ignition System | Intermittent Pilot Ignition (IPI) with optional Continuous Pilot (CPI) mode |
| Power Supply | 120 VAC, 60 Hz; backup 6V DC from 4 AA batteries |
| Remote Control | Proflame 2 with thermostat, flame modulation, accent light control, and child lock |
| Vent System | Direct vent, approved with multiple brands (DuraVent, Amerivent, etc.); 6.625" adapter |
| Certifications | ANSI Z21.88-2019 • CSA 2.33-2019; CAN/CGA 2.17-M17 |
| Safety Features | Integrated barrier screens, automatic shutoff, lockout protection, child safety lock |
| Glass Material | Ceramic front and side panels |
| Maintenance | Annual inspection by qualified technician; clean glass with non-abrasive cleaner; vacuum valve compartment |
| Spare Parts & Repairability | Fuel conversion kits (NG/LP), replacement glass, gaskets, burner, logs, remote, control board; full illustrated parts list provided |
| Warranty | 5 years on cast iron/steel, 2 years on burner/enamel, 1 year on electrical/gas components |
Frequently Asked Questions - GF 520 DV IPI JOTUL
User questions about GF 520 DV IPI JOTUL
0 question about this device. Answer the ones you know or ask your own.
Ask a new question about this device
Download the instructions for your Frying Pan in PDF format for free! Find your manual GF 520 DV IPI - JOTUL and take your electronic device back in hand. On this page are published all the documents necessary for the use of your device. GF 520 DV IPI by JOTUL.
USER MANUAL GF 520 DV IPI JOTUL
natural_image
Technical line drawing of a multi-tiered industrial cabinet or enclosure with a central opening and top mount (no text or symbols)Jøtul GF 520 DV IPI
Direct Vent Gas Stove
Pilot-on-Demand Ignition
Installation and Operation Instructions
Certified to ANSI Z21.88-2019 • CSA 2.33-2019
and CAN/CGA 2.17-M17.
INSTALLER: Leave this manual with the appliance.
OWNER: Retain this manual for future reference.
WARNING: If the information in these instructions is not followed exactly, a fire or explosion may result causing property damage, personal injury or loss of life.
- Do not store or use gasoline or other flammable vapors and liquids in the vicinity of this or any other appliance.
- WHAT TO DO IF YOU SMELL GAS
- Do not try to light any appliance.
- Do not touch any electrical switch; do not use any phone in your building.
- Leave the building immediately.
- Immediately call your gas supplier from a neighbor's phone. Follow the gas supplier's instructions.
- If you cannot reach your gas supplier, call the fire department.
- Installation and service must be performed by a qualified installer, service agency or the gas supplier.
- In the Commonwealth of Massachusetts, a carbon monoxide (CO) detector shall be installed in the same room as the appliance.
This appliance may be installed in an aftermarket, permanently located, manufactured home or mobile home, where not prohibited by local codes.
This appliance is only for use with the types of gas indicated on the rating plate. A conversion kit is supplied with the appliance.
! DANGER

natural_image
Abstract graphic with overlapping circular shapes and a flame-like shape (no text or symbols)HOT GLASS WILL
CAUSE BURNS.
DO NOT TOUCH GLASS
UNTIL COOLED.
NEVER ALLOW CHILDREN
TO TOUCH GLASS.
A barrier designed to reduce the burn hazard from the glass viewing area is provided with this appliance and shall be installed for the protection of children and other at-risk individuals.
THIS OWNER'S MANUAL PROVIDES INFORMATION TO ENSURE SAFE INSTALLATION AND EFFICIENT, DEPENDABLE OPERATION. PLEASE READ THESE INSTRUCTIONS IN THEIR ENTIRETY AND MAKE THEM AVAILABLE TO ANYONE USING OR SERVICING THE APPLIANCE.
DO NOT ATTEMPT TO ALTER OR MODIFY THE CONSTRUCTION OF THIS APPLIANCE OR ITS COMPONENTS. ANY MODIFICATION OR ALTERATION WILL VOID THE WARRANTY, CERTIFICATION AND LISTING OF THIS APPLIANCE.
THIS APPLIANCE MUST BE INSTALLED AND MAINTAINED BY A QUALIFIED SERVICE TECHNICIAN OR AGENCY.
Suggested Tools for Installation and Service
• External regulator (for Propane only)
- Piping which complies with local code
- Manual shut-off valve - T-Handle required in Massachusetts
- Sediment trap - if required by code
- Tee joint
- Pipe wrench
- Pipe sealant
- 10 mm open end wrench
• 1/2", 7/16" open end wrench
• Phillips head screwdriver
- Flat head screwdriver
- 1/4" nut driver
- Gloves
- Safety glasses
- Torx T-20 screwdriver for Fuel Conversion
PLEASE NOTE:
Initial Break-in
It is normal for smoke and odor to occur during the initial stages of operation, depending upon temperatures generated over time. This “curing” condition can be alleviated by promoting fresh air circulation within the immediate vicinity of the appliance. Please see page 23 for further information.
Operation Sound
Please be aware that cast iron and steel components expand and contract with temperature fluctuations that are often

accompanied by “creaking” or “pinging” sounds. This is the result of natural thermal activity.
generate a slight hum at the low setting and progressively increase with the velocity of forced air.
Installation Requirements for the Commonwealth of Massachusetts THIS PRODUCT MUST BE INSTALLED BY A LICENSED MASTER OR JOURNEYMAN PLUMBER OR GAS-FITTER WHEN INSTALLED IN THE COMMONWEALTH OF MASSACHUSETTS.
- If there is not one already present, on each floor level where there are bedroom(s), a carbon monoxide detector and alarm shall be placed in the living area outside the bedroom(s). The carbon monoxide detector shall comply with NFPA 720 (Current Edition).
- A carbon monoxide detector shall:
a) Be located in the room that houses the appliance or equipment;
b) Be either hard-wired or battery powered or both; and
c) Shall comply with NFPA 720 (Current Edition). - A Product-approved vent terminal must be used, and if applicable, a Product-approved air intake must be used. Installation shall be in strict compliance with the manufacturer's instructions. A copy of the installation instructions must remain with the appliance or equipment at the completion of the installation.
- A Manual gas supply line shut-off valve must be installed.
NATIONAL FIREPLACE INSTITUTE

CERTIFIED
www.nficertified.org
We recommend that our gas products be installed and serviced by professionals who are certified in the U.S. by the National Fireplace Institute® (NFI) as NFI Gas Specialists.

Table of Contents
-
Specifications......4
-
Initial Assembly 5
-
General Information...... 6
-
Safety Information ...... 6
-
Installation Requirements......7
Floor Protection 7
Clearances 7-8
Mobile Home Installation....9
- Vent Requirements ....10
Vertical Termination....12
Horizontal Termination....13-15
-
Fuel Conversion......16-19
-
Gas Connection....20
-
Gas Pressure....20
-
Accessories ...... 21
Firebox Panel Kits 21-22
Ash Lip Installation 23
- Burner Media Installation......24
Beach Fire Log Set.... 24-25
Birch Log Set 26-27
-
System Check 28
-
Flame Picture Adjustment ..... 29
-
Operation Guidelines......30
Burner Operation....31
Features Overview 32
Remote Control 33-35
- Maintenance 36
Annual Cleaning 36
Glass Care & Replacement 36-38
Safety Screen Replacement 39
Battery Replacement 40
- Appendix ......41
Wiring Diagram 41
Illustrated Parts Lists 42-44
-
Warranty Statement ......45
-
Lighting Instructions ....47
Jøtul GF 520 DV IPI (POD)
Direct Vent Gas Heater
Manufactured and Distributed by:
Jøtul North America
55 Hutcherson Dr.
Gorham, Maine 04038
Certified Test Standards
This appliance complies with National Safety standards and is tested and listed by
Intertek Testing Services of Middleton, Wisconsin to ANSI Z21.88-2019 • CSA 2.33-2019, "Vented Gas
Fireplace Heater" and CAN/CGA 2.17-M17.

WARNING:
READ AND UNDERSTAND ALL OPERATING INSTRUCTIONS BEFORE ATTEMPTING TO OPERATE THIS APPLIANCE. DO NOT ALLOW ANYONE TO OPERATE THIS APPLIANCE WHO HAS NOT READ AND UNDERSTOOD THESE INSTRUCTIONS.
KEEP THE REMOTE CONTROL TRANSMITTER WHERE CHILDREN CANNOT REACH IT.

WARNING:
SEVERE INJURY. THIS APPLIANCE CAN BE SET TO OPERATE THERMOSTATICALLY. BE AWARE THAT THE STOVE MAY BE VERY HOT EVEN WHEN THE BURNER IS NOT APPARENTLY OPERATING.
KEEP CHILDREN AWAY FROM THE APPLIANCE.

WARNING:
FIRE HAZARD. CAN CAUSE SEVERE INJURY OR DEATH. THE APPLIANCE CAN TURN ON SUDDENLY. KEEP AWAY FROM THE APPLIANCE BURNER WHEN OPERATING THE REMOTE SYSTEM.
1. Specifications
Input Rates
Natural Gas
16,500 BTU/hr. minimum input 30,000 BTU/hr. maximum input
Propane
16,500 BTU/hr. minimum input 29,000 BTU/hr. maximum input
| Inlet Pressure: | MIN | MAX |
| Natural Gas: | 5.0 WC (1.25 kPa) | 7.0 WC (1.74 kPa) |
| Propane: | 12.0 WC (3.0 kPa) | 14.0 WC (3.48 kPa) |
| Manifold Pressure: | MIN | MAX |
| Natural Gas: | 1.1 WC (.27 kPa) | 3.80 WC (.95 kPa) |
| Propane: | 2.9 WC (.72 kPa) | 11.0 WC (2.74 kPa) |
• SIT Proflame 2 Intermittent Pilot Ignition - 120V / 60 Hz
• Steady State Efficiency: 70.01% NG / 71.72% LP
• CSA P4.1-15 Fireplace Efficiency: NG - 64.19% LP - 65.47%
- Factory Air Shutter Open Settings: NG - 0" LP - 1/16"
- On Demand Pilot Mode
• Power Requirement: 120 VAC
Back-up Battery Pack: 4, AA - 1.5v ea.
• Ambient Temperature Range: 32 -122°F (0 - 50°C)


Figure 1.1 Dimensioned views, GF 520 DV IPI
Miscellaneous Hardware Bag Contents
• Fuel Conversion Kit, LP 158329
• Rock Wool Embers, 1 oz. .....157259
• 1.5v AA Alkaline Batteries, 4 ...... 224109
- Remote Control Transmitter ....157495
- Remote Transmitter Wall Bracket ....223951BKP
• GF 520 DV IPI Manual.....130084
• Rear Intake Air Diverter .....226861
• Sheet Metal Screws, 2....117917
• Ash Lip Screws......117874
Options & Accessories
- Beach Fire Log Set ....158263
- Birch Log Set......158388
- Black Reflective Panel......158342
- Fluted Liner....158288
• Fuel Conversion Kit, LP 158329
• Fuel Conversion Kit, NG - ......158330

BARRIER SCREEN
The front door and side glass panels of this appliance are equipped with
integrated Certified Safety Barrier Screens which must remain installed at all times. Should a screen become damaged, contact your authorized Jøtul dealer for original equipment replacement assemblies.
2. Initial Assembly
STOP! FOR EASIEST ACCESS, INSTALL FUEL CONVERSION AND FIREBOX PANELS BEFORE REMOVING THE STOVE FROM THE PALLET.
The above is heavy.

DO NOT DRAG THE STOVE.
Have assistance available to move the stove into position. Place removed parts on a blanket, towel, or other protective material.
Unpacking the Stove
EXCEPT AS NOTED, ALL INSTRUCTIONS ARE ORIENTED FACING THE FRONT OF THE STOVE.
- Open the Firebox
Remove the Top Plate and set aside.
Remove the Front Plate by lifting it up off of the front plate hooks. See fig. 2.1.
- Remove the Latch Tool from the shipping pallet and use it to remove the Glass Panel by pulling the two latch hooks out to disengage them from the glass frame. Fig. 2.2.
-
Tilt the glass frame forward, then lift it straight up and out of the spring glass retainer.
-
Remove the Miscellaneous Hardware kit from the firebox and inspect the contents. Refer to the list on the previous page and contact your dealer if any items are missing.
- Install Backup Batteries: Four AA batteries are supplied in the Miscellaneous Kit. The battery box is located in the right side of the controls compartment. Orient battery polarity (+ - ) as designated on the box label. See also fig. 15.10, page 37.
Remote Transmitter: Install 3 AAA batteries supplied into the hand-held transmitter unit. The transmitter and appliance have been synchronized at the factory. - Optional Equipment and Burner Media: See Sections 10 and 11 for specific installation instructions.
- Remove the two lag screws from the rear of the base of the stove. Retain these screws for mobile home installation if needed. See Pg. 9 figs. 5.4 and 5.5.

natural_image
Technical line drawing of a cabinet or enclosure with internal components and mounting brackets (no text or symbols)Figure 2.1 Remove Front Plate.

natural_image
Technical line drawing of a mechanical housing or enclosure with mounting brackets and internal components (no text or symbols)Figure 2.2
Disengage the glass frame latches to open the firebox.
RE-INSTALL THE TOP PLATE BEFORE CONNECTING VENT PIPE TO THE STOVE.
3. General Information
THIS HEATER MUST BE INSTALLED AND MAINTAINED BY A QUALIFIED SERVICE AGENCY.
The installation and repair of this appliance must be done by a qualified service person. Failure to properly install and maintain this heater could result in an unsafe or hazardous installation, which may result in a fire, explosion, property damage, personal injury or loss of life.
This appliance should be inspected before use and at least annually. More frequent cleaning may be required due to excessive lint from carpeting, bedding material, etc. It is imperative that control compartments, burners, and circulating air passageways of the appliance be kept clean. See Maintenance section for details.
■ THIS APPLIANCE MUST NOT BE CONNECTED TO A CHIMNEY OR FLUE SERVING ANY OTHER APPLIANCE.
The installation must conform to local codes. Your local Jøtul dealer can assist you in determining what is required in your area for a safe and legal installation. Some areas require a permit to install a gas burning appliance. Always consult your local building inspector, or authority having jurisdiction, to determine what regulations apply in your area.
CODE COMPLIANCE : Your local officials have final authority in determining if a proposed installation is acceptable. Any requirement that is requested by the local authority having jurisdiction, that is not specifically addressed in this manual, defaults to local code. In the absence of local codes, the installation requirements must comply with the current edition of National codes. In the U.S., these requirements are established in the National Fuel Code, ANSI Z223.1.(NFPA 54) current edition. In Canada, the codes have been established in CAN/CGA B149 Fuel Installation Code, current edition.
The appliance, when installed, must be electrically grounded in accordance with local codes or, in absence of local codes, with the National Electrical Code, ANSI/NFPA 70, or the Canadian Electrical Code, CAN/CSA C22.1.
■ CAUTION: Label all wires prior to disconnection when servicing controls. Wiring errors can cause improper and dangerous operation.
Verify operation after servicing.
■ DO NOT OPERATE THIS STOVE IF ANY PART HAS BEEN UNDER WATER. Call a qualified service technician to inspect the heater and to replace any part of the control system and any gas control which may have been under water.
4. Safety Information
Due to the high operating temperatures this appliance should be located out of traffic and away from furniture and draperies. Maintain proper clearance to combustible mantels and fireplace trim.
Children and adults should be alerted to the hazards of high surface temperatures and should stay away to avoid burns or clothing ignition.
■ Young children should be supervised while they are in the same room as the appliance. Toddlers, young children and others may be susceptible to accidental contact burns. A physical barrier, such as a child guard, is recommended to be used if there are at-risk individuals in the house. To restrict access to a fireplace or stove, install an adjustable safety gate to keep toddlers, young children and other at-risk individuals out of the room and away from hot surfaces.
This appliance includes permanent, integrated safety barriers designed to reduce the risk of burns from the hot viewing glass. These barriers shall remain installed for the protection of children and other at-risk individuals.
The appliance must not be operated with the front door open or ajar.
A damaged screen barrier must be replaced only with Jøtul GF 520 Front Replacement Screen 226647, or Side Replacement Screen 226648, available from any Jøtul Authorized Dealer.
■ Any safety screen, guard, or barrier removed for servicing an appliance must be replaced prior to operating the appliance. See maintenance instructions.
■ Clothing or other flammable materials should not be placed on or near the fireplace.
■ Never allow anyone to use the fireplace if they are unfamiliar with its operation.
■ NEVER store or use gasoline or any other flammable vapors or liquids in the vicinity of this appliance.
■ Never burn any solid materials (wood, cardboard, paper, coal, etc.) in this appliance. Use with natural gas or propane fuel ONLY.
■ Do not slam or strike the glass panel.
■ This appliance is NOT for use with aftermarket glass doors.
■ Wear gloves and safety glasses while installing or performing maintenance procedures on this appliance.
5. Installation Requirements
Location
In selecting a location for the stove, consider the following points:
1) Heat distribution
2) Vent termination requirements
3) Gas supply line routing
4) Traffic areas, furniture, draperies, etc.
The stove may be located on or near conventional construction materials, however, proper clearance to combustibles must be maintained in order to provide adequate air circulation around the appliance. Also, it is important to provide adequate access around the stove for servicing and operation.
The clearance and hearth specifications listed in this manual are the minimum requirements for combustible material. A combustible material is anything that can burn (i.e. sheet rock, wall paper, wood, fabrics etc.). These surfaces are not limited to those that are visible and also include materials that may be located behind non-combustibles.
If you are not sure of the combustible nature of a material, consult your local fire officials. Remember, “Fire Resistant” materials are considered combustible: they are difficult to ignite, but will burn. Also, “fire-rated” sheet rock is considered combustible.
Floor Protection
The Jøtul GF 520 DV IPI has been approved for installation directly on combustible floor materials. No additional floor protection is required, however, we recommend that the stove be installed on a non-compressible, solid surface.

WARNING:
INSTALLING THIS STOVE ON A COMPRESSIBLE SURFACE SUCH AS A THICK CARPET OR FOAM FLOOR MAT WILL CAUSE THE STOVE
TO SETTLE AFTER INSTALLATION WHICH MAY CREATE LEAKS IN THE VENTING SYSTEM!
Stove and Vent Clearance Requirements
Minimum Clearances from the Stove to Combustibles:
Measured from:
Rear: 11/2" (38 mm) Rear Shroud
Room Ceiling: 43" (1092 mm) Top Plate
Corner: 5 5/8" (86 mm) Side Plate
Side: 10" (254 mm) Side Plate
Minimum Clearances between Vent Pipe and Combustible Materials:
Horizontal Run:
Off the top of the pipe 2" (51 mm)
Off the sides and bottom 1" (25 mm)
Vertical Run:
All sides 1" (25 mm)

Figure 5.1. Corner Wall clearances.
Alcove Installation
Maximum Alcove Depth: 24" (607 mm)
Minimum Alcove Width*: 44" (1118 mm)
Minimum Alcove Ceiling Height from floor: 60" (1524 mm)
* Alcove clearances are determined through testing in specific construction configurations which often result in greater clearances than an open stove installation.
Clearance to Combustible Materials Above Stove
Minimum Height from floor: 60" (1524 mm) with 24" (610 mm) maximum depth.
Distance to Gas Supply
Suggested gas supply location is within 12" of the rear of the center line of the stove.
Distance to Electrical Supply
A grounded permanent electrical supply should be installed within 6 ft. of the center line of the exhaust pipe.

Figure 5.2 Alcove Clearances.
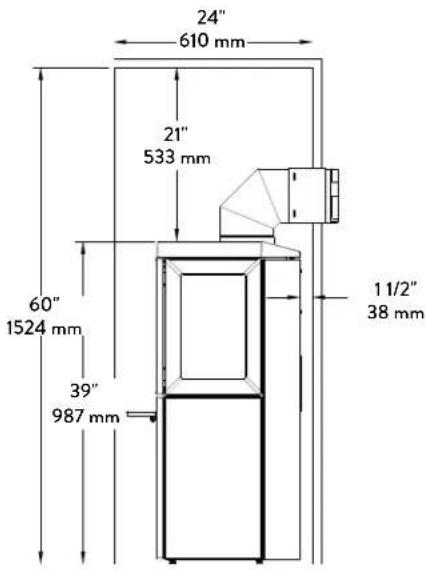
Figure 5.3. Alcove Depth and Height Clearances
Mobile Home Installation
The GF 520 DV IPI is approved for installation in a mobile home in the U.S. and Canada with the following requirements:
■ The stove must be secured to the floor of the mobile home.
■ Provision must be made to secure an electrical ground between the stove and the mobile home chassis.
■ The stove must be installed in accordance with Title 24 CFR, Part 3280-Manufactured Home Construction and Safety Standard in the U.S.
In Canada, comply with CSA Z240.4, Gas Equipped Recreational Vehicles and Mobile Housing.
■ Always contact your local officials about installation restrictions and requirements in your area.
THIS APPLIANCE MAY BE INSTALLED AS AN OEM INSTALLATION IN A MANUFACTURED (MOBILE) HOME AND MUST BE INSTALLED IN ACCORDANCE WITH THE MANUFACTURER'S INSTRUCTIONS AND THE MANUFACTURED HOME CONSTRUCTION AND SAFETY STANDARD, TITLE 24 CFR, PART 3280. THIS APPLIANCE IS ONLY FOR USE WITH THE TYPE OF GAS THAT IS INDICATED ON THE STOVE'S RATING PLATE. A GAS CONVERSION KIT IS PROVIDED WITH THE GF 520 DV IPI GAS STOVE.
THIS APPLIANCE MAY BE INSTALLED IN AN AFTERMARKET PERMANENTLY LOCATED, MANUFACTURED (MOBILE) HOME, WHERE NOT PROHIBITED BY LOCAL CODES.
Procedure
- Using the two #12 x 3 1/2" screws used to secure the stove to the shipping pallet, secure the GF 520 DV IPI to the floor of your mobile home through the two holes at the rear of the base of the stove. If needed, longer hardware can be used.

Figure 5.4
Mobile Home Installation

natural_image
Line drawing of a room corner with a screw, sink, and wall-mounted fixture (no text or symbols)Figure 5.5
Mobile Home Installation
6. Venting Requirements
The Jøtul GF 520 DV IPI gas stove may be installed with a vertical or horizontal termination and must conform to the configuration requirements described below.
This appliance is approved for use with vent systems from the following manufacturers:
• DuraVent DirectVent Pro and GS Series
• American Metal Products (Amerivent)
• Security Chimneys International, Ltd. (Secure Vent)
• Selkirk Metalbestos (Direct Temp)
• Metal-Fab, Inc. (Sure-Seal Direct Vent)
• Industrial Chimney Corp. (ExcelDirect)
• Bernard Dalsin Mfg. (Pro Form)
• Olympia Chimney Supply, Inc. (Ventis Direct Vent)
Use parts of one manufacturer only - DO NOT MIX VENT COMPONENTS FROM DIFFERENT MANUFACTURERS IN THE SAME SYSTEM.
Installation of any components not manufactured or approved by Jøtul or failure to meet all clearance requirements will void all warranties and could result in property damage, bodily injury, or serious fire.
The approved vent configurations described in this manual are derived from extensive testing under controlled laboratory conditions. Gas appliance performance can be negatively affected by variables present in the installation environment, i.e: atmospheric pressure, strong prevailing winds, adjacent structures and trees, snow accumulation, etc. These conditions should be taken into consideration by the installer and stove owner when planning the vent system design.
IMPORTANT
- JOINT SEALING REQUIREMENT: APPLY A 1/8" BEAD OF HIGH-TEMPERATURE SEALANT OR MIL-PAC® TO THE MALE SECTION OF THE INNER VENT PIPE. THE CEMENT SHOULD FORM A SEAL BETWEEN THE INNER AND OUTER PIPES.
- NEVER MODIFY ANY VENTING COMPONENT, OR USE ANY DAMAGED VENTING PRODUCT.
- THE GAS APPLIANCE AND VENT SYSTEM MUST BE VENTED DIRECTLY TO THE OUTSIDE OF THE BUILDING AND NEVER ATTACHED TO A CHIMNEY SERVING A SOLID FUEL OR GAS BURNING APPLIANCE. EACH DIRECT VENT GAS APPLIANCE MUST HAVE ITS OWN SEPARATE VENT SYSTEM. COMMON VENT SYSTEMS ARE PROHIBITED.
- IF THE VENTING SYSTEM IS DISASSEMBLED FOR MAINTENANCE OR ANY OTHER REASON, IT MUST BE PROPERLY REASSEMBLED AND RESEALED IN ACCORDANCE WITH THE ORIGINAL VENT MANUFACTURER'S INSTRUCTIONS.
CONFIRM THAT ALL INTERLOCKING JOINTS ARE TIGHTLY RE-SECURED AND THAT ALL SEALS ARE MAINTAINED INTACT.
REINSTALL ANY FASTENERS AND REPLACE AS NECESSARY.
Figure 6.1.
DO NOT USE SILICONE
SEALANT.

RE-INSTALL THE TOP PLATE BEFORE CONNECTING VENT TO THE STOVE.
Vent Restriction
The GF 520 DV IPI is equipped with an Exhaust Restrictor Plate which enables regulation of the exhaust gas flow. The plate prevents overly-strong draft that can cause poor combustion and weak flame picture. Follow the guidelines below and on the following pages to determine the correct restrictor plate setting for your particular installation.
Exhaust Restrictor
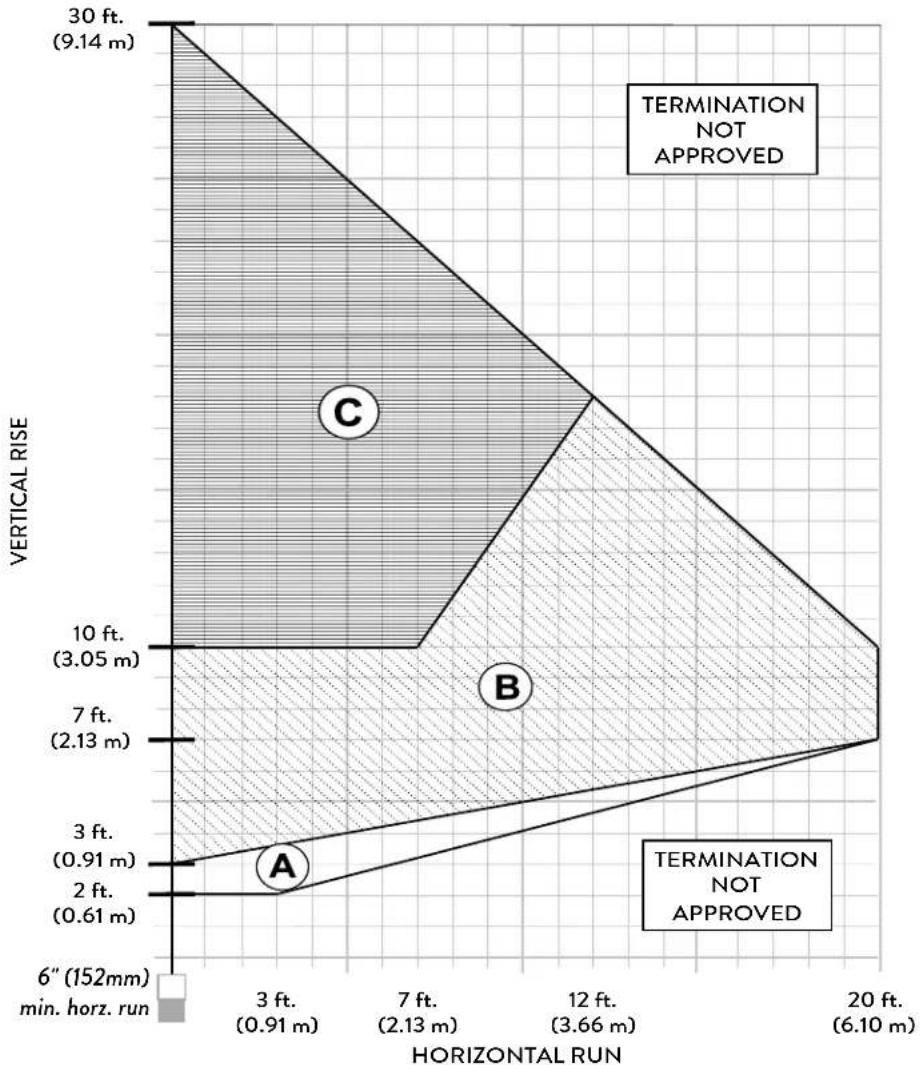
The Exhaust Restrictor plate is located on the rear of the firebox. It is adjusted by rotating the dial on the back shroud within a range beginning at the factory-set, fully open position (no restriction) to a fully restricted position. See Figs. 6.2 and 6.3. The Minus (-) and Plus (+) signs on the dial relate to degrees of restriction, from zero to approximately 70%. The three, lettered positions correlate to the termination zones (A,B,C) diagramed in figure 6.4. Use the diagram to determine the degree of restriction and shutter setting that correlates to your vent configuration.
Adjusting Exhaust Restrictor Plate:
- Use a 1/4" nut driver to loosen the screw and then use the pivot tab to set the dial to the position appropriate to your termination zone. See figs. 6.2-6.4, page 11.
- Re-tighten the screw after adjustment.
Approved Horizontal and Vertical Vent Terminations
- NOTE: Long vertical vent runs (over 12 ft.) in uninsulated air space may require the stove be operated in CPI mode for best performance.
- ALL VENTING MUST TERMINATE (END) WITHIN ONE OF THE DESIGNATED AREAS.
- SET STOVE EXHAUST RESTRICTOR TO THE POSITION THAT CORRESPONDS TO THE VENT TERMINATION AREA IN THE MATRIX. When termination is exactly on a division line, use the less restrictive position. For example, if termination is 10 feet high and offset 7 feet, restriction should be set at Position B.
- Up to two 45irc elbows or one additional 90irc elbow is permitted in addition to the first elbow, however, a 5 foot reduction in horizontal length must be made for each additional elbow whether 45irc or 90irc .
area
| Horizontal Run | Vertical Rise | Label | | -------------- | ------------- | ------------------------- | | 6" (152mm) | 0.61 | | | 3 ft. (0.91 m) | 0.91 | | | 7 ft. (2.13 m) | 2.13 | | | 12 ft. (3.66 m)| 3.66 | | | 20 ft. (6.10 m)| 6.10 | | | Vertical Rise | Vertical Rise | Termination Not Approved | | | | | | | | | | | | | | | | | | | | | | | | | | | | | | | | | | | | | | | | | | | | | | | | | | | | | | | | | | | | | | | | | | | | | | | | | | | | | | | | | | | | | | | | | | | | | | | | | | | | | | | | | | | | | | | | | | | | | | | -------------------- | | | | 3 ft. (0.91 m) | 0.91 | | | 7 ft. (2.13 m) | 2.13 | | | 12 ft. (3.66 m) | 3.66 | | | 20 ft. (6.10 m) | 6.10 | | | Vertical Rise | Vertical Rise | Termination Not Approved | | | Vertical Rise | | | | Vertical Rise | | | | Vertical Rise | | | | Vertical Rise | | | | Vertical Rise | | | | Vertical Rise | | | | Vertical Rise | | | | Vertical Rise | | | | Vertical Rise | | | | Vertical Rise | | | | Vertical Rise | | | | Vertical Rise | |Figure 6.2. Vent Termination Restriction Zones - NG / LP. See also Snorkel Termination vent run restrictions, pg. 14.

Figure 6.3. Use a 1/4" nut driver to loosen the Restrictor screw.

Figure 6.4. Determine the dial notch position appropriate to your vent configuration as designated in Fig 6.2. Pivot the dial to align the screw with that notch.
Vertical Vent Termination
This appliance may be vertically vented through a ceiling or to a roof termination using the following guidelines:
The termination should fall within the shaded areas of the grids depicted in the Vent Matrix, fig. 6.2, page 11.
■ Maximum Horizontal run is 20 ft. (152 cm) See Fig. 6.2 for related termination zone limitations.
■ Minimum Vertical Termination is 6 ft. (183 cm).
■ Total run, including offsets, must not exceed 30 ft. (9.14m).
■ Vent Terminus Clearance: In no case shall any discharge opening on the cap be less than 18 in. (457 mm) horizontally from the roof surface. See fig. 6.6.
Steep roofs, nearby trees, and predominantly windy conditions can contribute to poor draft and/or promote draft reversal. Increasing the height of the vent may alleviate these conditions.
■ Use Wall Straps to support an offset pipe run at intervals of three feet to avoid excessive stress on the offsets.
A firestop is required at every floor. The floor opening should be framed to 10" X 10" inside dimension.
Any venting that is exposed in living space above the first floor must be enclosed. Always maintain the required 1" clearance from all sides of the vertical vent system. Insulation in attic space must be retained by an insulation barrier.
FUNCTIONALITY NOTE:
LONG, VERTICAL VENT CONFIGURATIONS MAY REQUIRE THE APPLIANCE BE OPERATED IN CONTINUOUS PILOT MODE (CPI) TO ASSURE ADEQUATE DRAFT AND PROPER PERFORMANCE.
Air Intake Diverter
The GF 520 DV IPI comes with an Air Intake Diverter in the miscellaneous kit. This is to be installed in installations with a vertical installation greater than 10 ft, in installations with excessive draft conditions, or when the flame picture shows a flame with weak rear flame and a large front flame.
Installation Instructions:
Using a 1/4" driver, use the two sheet metal screws provided in the misc. kit to secure the Air Diverter to the Rear Burner Skirt. Install the Air Diverter with the bends facing downward. See fig. 6.5.

Figure 6.5. Install the Air Intake Diverter. NOTE: Install with the bends facing DOWN.
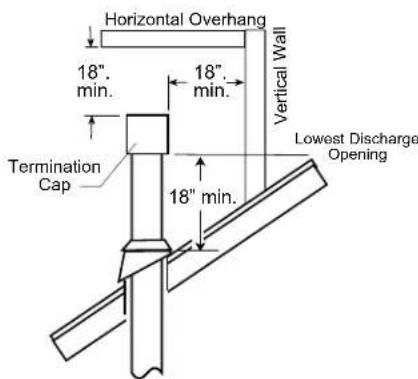
Figure 6.6. Vertical vent termination height above roof.

natural_image
Cross-sectional diagram of a mechanical or fluidic device with labeled components and directional arrows (no text or symbols present)Figure 6.7. Co-linear Termination is permitted with 2 foot (62 cm) maximum horizontal run (A).
RE-INSTALL THE TOP PLATE BEFORE CONNECTING VENT TO THE STOVE.
Horizontal Termination
■ Any horizontal termination must fall within the shaded portion of the vent window matrix shown in fig. 6.2.
■ Any horizontally-terminated vent run must include a minimum 12" (61 cm) vertical rise with a minimum 6" horizontal run. See figs. 6.8, 6.9, 6.10.
■ Horizontal termination requirements:
1) Maximum vertical run is 30 ft. (9.14m)
2) Maximum horizontal run is 20 ft. (6.1m)
■ ELBOW RESTRICTION: Up to two 45° elbows or one 90° elbow may be used in addition to the first elbow.
The horizontal run must be reduced by 5 feet for each additional elbow, whether 45° or 90°.
■ Wall Cut-out Opening: A minimum 10" X 10" (250 mm x 250 mm) square hole is required for proper pipe clearances through a combustible wall.
Horizontal Vent Pipe Clearance to Combustible Material: From Top Surface: 2" (51 mm)
From Sides: 1" (25 mm)
DO NOT FILL AIR SPACE WITH ANY TYPE OF INSULATION.
Any horizontal run of vent must be level or have a 1/4 in. rise for every foot of run toward the termination cap. NEVER ALLOW THE VENTING TO RUN DOWNWARD FROM STOVE TO TERMINATION; A DOWNWARD VENT RUN TRAPS HEAT AND CREATES A FIRE HAZARD.
The horizontal termination cap must maintain a 3" clearance to any overhead combustible projections 2 1/2" or less. It must also maintain 12" clearance from projections exceeding 2 1/2".
A direct vent terminal may not be recessed into a wall or siding.
■ Install a Vinyl Siding Standoff (Dura-Vent #950) between the vent termination and an exterior wall covered by vinyl siding material to prevent potential heat damage to the siding.

Figure 6.8. Recommended Horizontal Termination.
■ SNORKEL TERMINATION:
• HORIZONTAL RUN MUST NOT EXCEED 2 FEET (61 CM).
A 14" (356mm) or 36" (914mm) snorkel termination is approved in conformance with the vent rise/run and termination clearance specifications published in this manual. See figs. 6.9 - 6.10.
The snorkel termination must comply with grade and building clearance requirements per local and national building codes.

Figure 6.9. Optional Snorkel Termination
■ Any horizontally terminated vent run must include a minimum 1 ft. (61 cm) vertical rise.
At minimum vertical run, the total horizontal run (A) must not exceed 5 ft. (152.4 cm).

Figure 6.11. Optional Corner Installation Clearances
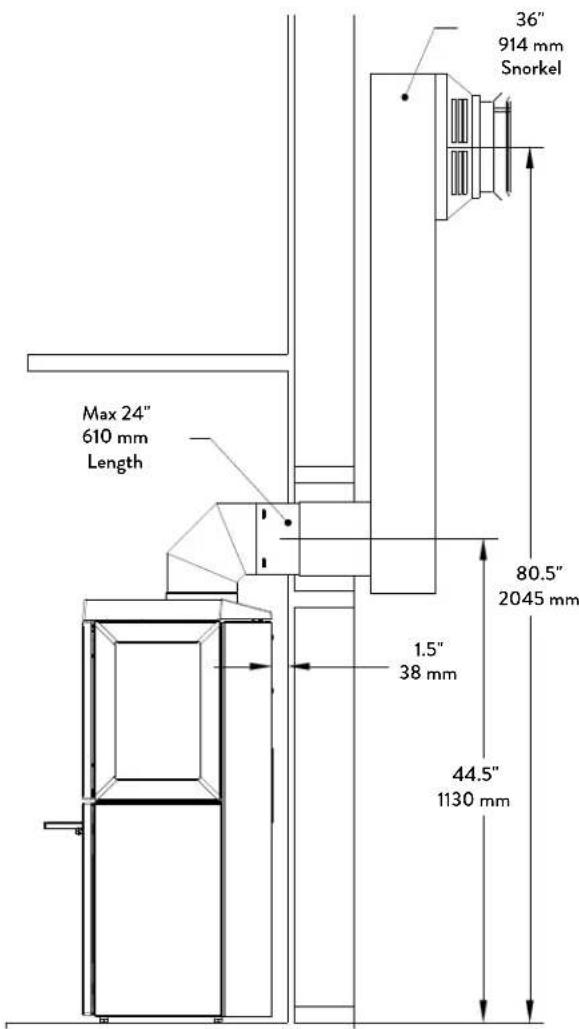
Figure 6.10. Minimal Pipe Exposure Clearances.
■ 2 FT. MAX. HORIZONTAL RUN (A) TO SNORKEL TERMINATION

Horizontal Termination Clearance Requirements

V Vent Terminal
☒ Air Supply
Terminals Prohibited in this Area
Figure 6.12. Vent Terminal Clearances, Canada and United States

Figure 6.13. Termination Clearance to overhangs.
| Canadian Installations 1 | U.S. Installations 2 | ||
| A | Clearance above grade, veranda, porch, deck, or balcony | 12 in. (30 cm) | 12 in. (30 cm) |
| B C | Clearance to window or door that may be opened 12 in. (30 cm) | (30 cm) | 9 in. (23 cm) We recommend 12 in. to prevent condensation on a window. |
| C C | Clearance to permanently closed window 12 in. (30 cm) | 9 in. (23 cm) We recommend 12 in. to prevent condensation on a window. | |
| D | Vertical clearance to ventilated soffit located above the terminal within a horizontal distance of 2 ft. (60 cm) from the center line of the terminal | 18 in. (46 cm) 18 in. (46 cm) | |
| E C | Clearance to unventilated soffit 12 in. (46 cm) | 12 in. (46 cm) | |
| F C | Clearance to outside corner 12 in. (46 cm) | 9 in. (23 cm) We strongly recommend 12 in. particularly where strong winds prevail. | |
| G C | Clearance to inside corner 12 in. (46 cm) | 9 in. (23 cm) We strongly recommend 12 in. particularly where strong winds prevail. | |
| H | Clearance to each side of center line extended above a gas meter or regulator | 3 ft. (91 cm) within a height 15 ft. above the meter/regulator assembly | * |
| I C | Clearance to service regulator vent outlet 3 ft. (91 cm) | * | |
| J | Clearance to nonmechanical air supply inlet to building or the combustion air inlet to any other appliance | 12 in. (30 cm) 9 in. (23 cm) | |
| K C | Clearance to a mechanical air supply inlet 6 ft. (1.83 m) | 3 ft. (91 cm) above if within 10 ft. (3 m) horizontally | |
| L | Clearance above paved sidewalk or paved driveway located on public property | 7 ft. (2.13 m) 3 | * |
| M C | Clearance under veranda, porch, deck, or balcony | 12 in. (30 cm) 4 | 12 in. (30 cm) 4 |
| N | Clearance to propane tank relief valve and filler connection | 5 ft. (1.52 m) 5 / 10 ft. (3.05 m) 6 | 5 ft. (1.52 m) 5 / 10 ft. (3.05 m) 6 |
1) In accordance with the current CSA B149.1, Natural Gas and Propane Installation Code.
2) In accordance with ANSI Z223.1/NFPA 54, National Fuel Gas Code
* For clearances not specified in ANSI Z223.1/NFPA 54 or CSA B149.1, the clearance will be in accordance with local installation codes and the requirements of the gas supplier.
3) A vent shall not terminate directly above a sidewalk or driveway which is located between two single family dwellings and serves both dwellings.
4) Permitted only if veranda, porch, deck, or balcony is fully open on a minimum of two sides beneath the floor.
5) Minimum clearance to tanks not filled on site.
6) Minimum clearance to tanks filled on site from bulk truck.
7. Fuel Conversion
The GF 520 DV IPI gas stove is shipped from the factory equipped to burn NATURAL GAS only. If PROPANE gas is to be used as fuel, the appliance must first be converted by using the Propane Conversion Kit 158329 included with the stove. Use Natural Gas Conversion Kit 158330 to revert back to Natural gas.
WARNING:
THE CONVERSION KIT IS TO BE INSTALLED BY AN AUTHORIZED SERVICE TECHNICIAN IN ACCORDANCE WITH THE MANUFACTURER'S INSTRUCTION AND ALL CODES AND REQUIREMENTS OF THE AUTHORITY HAVING JURISDICTION. FAILURE TO FOLLOW THESE INSTRUCTIONS COULD RESULT IN SERIOUS INJURY OR PROPERTY DAMAGE. THE QUALIFIED AGENCY PERFORMING THIS WORK ASSUMES RESPONSIBILITY FOR THIS CONVERSION.
IN CANADA:
THE CONVERSION SHALL BE CARRIED OUT IN ACCORDANCE WITH THE REQUIREMENTS OF THE PROVINCIAL AUTHORITIES HAVING JURISDICTION AND IN ACCORDANCE WITH THE REQUIREMENTS OF THE CAN1-B149.1 AND .2 INSTALLATION CODE.
Tools required:
- 1/2" or 13 mm wrench or deep-well socket,
- Torx T20 screw driver
- 7/16" open-end wrench
- Small pliers or vice-grip
Conversion Kit Contents:
• 1, regulator tower LP
- LP orifice: #52
• 1, Pilot Injector - BL.020 for NG - 226758
.013 for LPG - 226759
- Label A - to be completed and applied to the backside of the access control door.
- Label B - apply to the stove's Rating Plate
- Small valve label - apply to valve body
- Instructions
Fuel Conversion Procedure
- Turn off gas supply to stove.
- Remove top and front cast. Release the glass frame latches to remove the glass frame and open the firebox. Tilt the glass frame forward and lift it out of the stove. See initial assembly page 5.
-
Open the Controls Compartment under the firebox. If opening the Controls Compartment for the first time, loosen the Air Shutter wing nut located below the firebox floor and rotate the handle 180°. Push the Air Shutter handle as far back as it will travel. See fig. 7.1.
-
Lift out Rear Burner Skirt.
-
Remove the Burner: Lift the front of the burner base to disengage it from the support brackets and pull it forward off of the burner injector. Then tilt it side-to-side and pull it out through the firebox opening. Fig. 7.2.
-
Change the Burner Injector.
See fig. 7.3. Using a 1/2" open end wrench or deep-well socket, remove the burner injector from the orifice holder and replace it with the injector supplied in the conversion kit.
CAUTION: DO NOT OVER TIGHTEN!
-
Change the Pilot Injector, Fig 7.3.
-
Use the 7/16" wrench to loosen the pilot hood, hold the pilot mounting bracket with pliers to prevent bending the pilot bracket.
-
Lift the Pilot Hood and remove the pilot injector and replace with one in fuel conversion kit. Replace the pilot head and orient the hood to project flame to the Flame Sensor and burner carry-over ports. Be sure to orient the hood to project flame to the Flame Sensor and the burner carry-over ports.
-
Flip the Air Shutter. Carefully bend open the Air Shutter Handle and flip the Air Shutter so it displays "LP". Carefully bend the Air Shutter Handle back around the Air Shutter. See fig 7.3
-
Replace the Burner. Tilt the burner assembly downward to engage the venturi tube with air shutter assembly. BE CERTAIN THE BURNER IS LEVEL AND SECURELY ENGAGED WITH THE FRONT SUPPORTS ON THE FIREBOX FLOOR.

natural_image
Diagram showing a mechanical or electrical component with directional arrows indicating motion (no text or symbols)Figure 7.1. Rotate the Air Shutter Handle 180irc and push Air Shutter FULLY back to disengage burner from injector.
130084_Rev 3 GF 520 DV IPI 9/24

natural_image
Technical line drawing of a mechanical assembly with mounting brackets and internal components (no text or symbols)Figure 7.2. Remove Burner.

Figure 7.3. Injector and Pilot conversion. The Air Shutter MUST be flipped for LP conversion.

Figure 7.4. Regulator motor connection terminal "M".
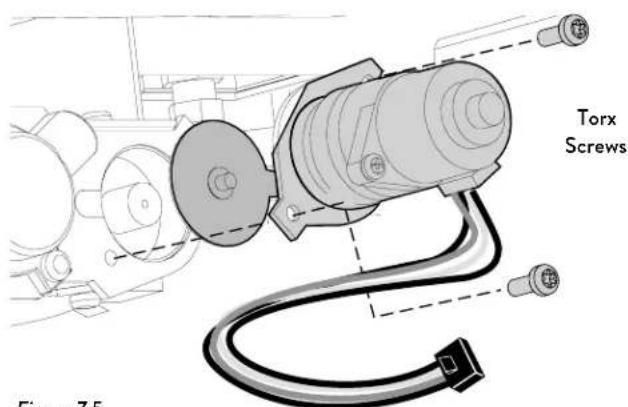
Figure 7.5. Regulator motor removal and installation.
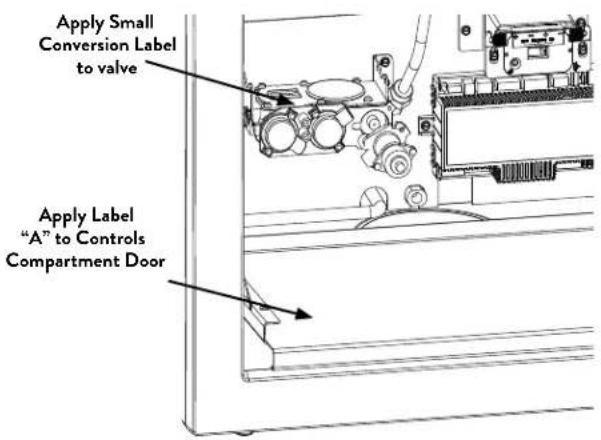
Figure 7.6. Conversion label "A" location.
9. Regulator Conversion.
- Disconnect the Regulator motor wire harness lead from module Terminal "M", fig. 7.4
• Using a Torx T-20 screwdriver, remove the mounting screws from the original regulator and remove that assembly and leads from the gas valve.
• Install the conversion regulator motor using the new components included from that kit. - Connect the motor leads to Terminal "M" on the IFC. See Figs. 7.4 - 7.5.
CAUTION: TAKE CARE TO AVOID CRIMPING WIRE LEADS DURING REASSEMBLY.
-
Apply the identification labels to the stove where they can be seen by a service person.
-
Label A: apply to the Controls Compartment Door, near the lighting instructions. Fig. 7.6.
- Label B: apply to the designated field on the stove rating plate stored under the gas valve in the Control Compartment.
-
Small Conversion Label: apply to valve.
-
Reassemble the stove and apply gas to the system.
- Leak Check: Check for leaks using a soapy water solution or digital gas detector.
NEVER USE OPEN FLAME TO CHECK FOR GAS LEAKS. AVOID WETTING THE IFC UNIT OR MOTORIZED REGULATOR WHEN CONDUCTING LEAK CHECK.
Fuel Conversion, cont'd.
- Confirm correct gas pressure. Use a manometer to check pressures as specified under Section 9, Gas Pressure (page 20).
- NATURAL GAS ONLY: Adjust the Air Shutter. Fig. 7.7
The factory setting for NG is 1/16" open. Adjustment may be necessary to provide the best flame picture depending upon the specific vent configuration.
- Start with the shutter set open to 1/16".
- Push the shutter stem back (to the rear) to restrict air.
- Pull the shutter stem forward (toward yourself) to open the shutter and add oxygen to the fuel mix.
With some experimentation, you will find the shutter position that works best for that particular installation.
- Run the stove at least 15 minutes to let the burner settle-in before making further adjustments in very small increments (1/16" - 1/8")
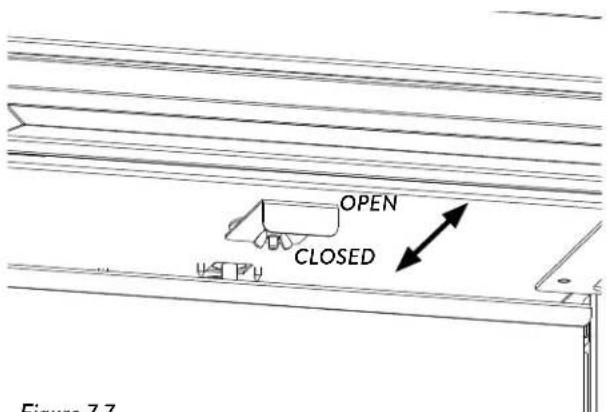
Figure 7.7. Air shutter adjustment.
8. Gas Supply Connection
Route the gas supply line to the flex line behind the unit. Gas installation should be approximately 12" from the center line on either side of the unit.
The gas supply line should be 3/8" npt with a 1/2" diameter supply, or the appropriate size to provide sufficient gas pressure to the valve regardless of the input setting.
■ The use of Flexible Gas Appliance Connectors is acceptable in many areas in the U.S. However, Canadian methods vary depending on local code.
■ ALL INSTALLATIONS MUST COMPLY WITH LOCAL CODE OR IN THE ABSENCE OF LOCAL CODE, MUST COMPLY WITH THE MOST RECENT EDITION OF THE NATIONAL FUEL GAS CODE ANSI Z223.1/NFPA 54 OR CAN-B149.
All codes require a gas shut-off valve (gas cock) and union, to be installed in the supply line, and in the same room as the appliance. This allows for the disconnection of the stove for servicing and maintenance. See fig. 8.1.
A T-HANDLE GAS COCK IS REQUIRED IN MASSACHUSETTS TO COMPLY WITH CODE 248CMR.
- Secure all joints tightly using appropriate tools and sealing compounds. For propane units be sure to use compounds that are propane resistant. Turn on gas supply and test for gas leaks at all joints.

flowchart
graph TD
    A["1/2" x 3/8" Flare Shut-off Valve"] --> B["3/8" Flex Tubing"]
    B --> C["3/8" NPT x 3/8" Flare Fitting"]
    C --> D["3/8" Nipple"]
    D --> E["3/8" Union"]
    E --> F["3/8" Close Nipple"]
    F --> G["3/8" Shut-off Valve"]
    G --> H["1/2" x 3/8" Reducer"]
    H --> I["Gas Stub"]
Figure 8.1. Gas supply line connection alternatives.
9. Gas Pressure
Correct gas pressure is essential for efficient and safe operation of the GF 520 DV IPI gas stove. It is important that the correct pressure is established at the time of the installation. Proper gas pressure provides a consistent flow of gas to the appliance and is instrumental in checking for gas leaks.
Pressure Test: Attach a manometer to the appropriate test point on the valve. See fig. 9.1.
The gauge connections are located on the front of the valve. Connections are identified by:
A - for Manifold Pressure (the amount of gas that is coming out of the valve to the burner.)
B - for Inlet or Supply Pressure (the amount of gas coming to the valve.)
ALWAYS TEST PRESSURES WITH VALVE CONTROL KNOB SET ON HIGH.

Figure 9.1. Pressure test points.
INLET GAS PRESSURES
(inches water column)
MIN MAX
NATURAL GAS 5.0 7.0
PROPANE
12.0
14.0
The appliance and its appliance main gas valve must be disconnected from the gas supply piping system during any pressure testing on that system at test pressures in excess of 1/2 psig (3.5 kPa).
The appliance must be isolated from the gas supply line by closing its individual manual gas shut-off valve (gas cock) during any pressure testing of the gas supply piping system that is equal to or less than 1/2 psig (3.5 kPa).
MANIFOLD PRESSURES
(inches water column)
MIN MAX ____
NATURAL GAS 1.1 3.5
PROPANE
2.9
10.0
10. Accessories
Firebox Panel Kit Black Reflective Glass Panel Kit 158342
Reflective Black Glass Contents:
• Rear Panel .....226763
• Lower Glass Retainer...227027
- Cotton Gloves, 2
- Instructions
Tools:
- Flat head screw driver
-1/4" hex socket
INSTALL FUEL CONVERSION KIT BEFORE INSTALLING PANEL KIT.
THE PANEL IS FRAGILE. SUPPORT EACH WITH BOTH HANDS. HANDLE THE GLASS PANEL WITH THE COTTON GLOVES PROVIDED TO MINIMIZE FINGERPRINTS. SKIN OILS ARE DIFFICULT TO REMOVE FROM THE GLASS SURFACE.

natural_image
Technical line drawing of a 3D printer or printer assembly (no text or symbols visible)Figure 10.1. Install Rear Panel.
ORIENT GLASS PANEL WITH THE SMOOTH SIDE FACING OUT.
- Bend the two Lower Glass Retainer Brackets to 90 degrees and place on the rear of the log shelf, in each corner.
- Set the Rear Panel, bottom first, behind the pilot assembly shield and resting on the rear shelf. See fig. 10.1.
- Use a flat head screwdriver to bend the rear retainer tab at 45irc to keep glass from falling forward. See fig. 10.2.
- Repeat the process for the tab on the opposite side.
NOTE: If the Glass Panel is installed in a location prone to vibration, the retainer tab can be adjusted to hold the glass tighter.
- Remove the Baffle by removing the two M6 nuts in the upper front corners of the firebox.
- Use a 1/4" hex socket to loosen the screw on one of the retaining tabs. Rotate the tab until it is holding the glass panel tight to the firebox and tighten the screw.
- Replace the Baffle.
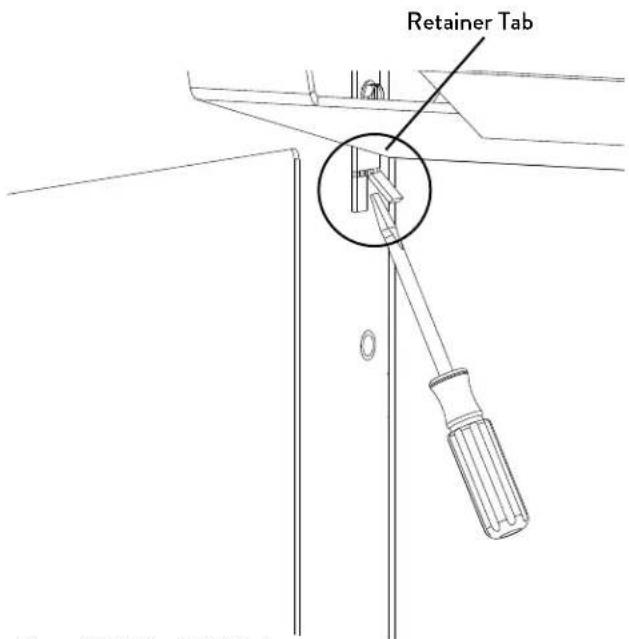
Figure 10.2. Bend Side Tabs
Firebox Panel Kit Fluted Panel Kit 158288
Fluted Panel Kit Contents:
• Rear Panel 226943
- Instructions
Tools:
- Flat head screw driver
INSTALL FUEL CONVERSION KIT BEFORE INSTALLING PANEL KIT.
- Use the screwdriver to bend out the front tab of the retainer clips on each side slightly, only enough to allow the screwdriver access from the front. See fig. 10.3.
- Install the bottom of the panel first, then stand the panel against the rear wall of the firebox. See fig. 10.4.
- Insert the screwdriver underneath the tab previously bent and twist to bend the tab against the panel. Repeat this step on the other side and bend the tabs equally so the panel is centered and retained in the firebox. See fig 10.5.

natural_image
Technical line drawing of a mechanical assembly with internal components and mounting brackets (no text or symbols)Figure 10.4. Install Panel.

Figure 10.3. Bend the front tab on each side slightly.

natural_image
Technical line drawing of a mechanical assembly with vertical supports and mounting brackets (no text or symbols)Figure 10.5. Bend both tabs fully to retain Panel.
Optional Ash Lip
Your GF 520 IPI comes with an optional Ash Lip to give you options for your desired look. Included in the miscellaneous kit are two bolts to be used if you desire to attach the ashlip.
Instructions:
Use a small screwdriver to push out the two nylon plugs from the rear of the lower front plate in the location shown in figure 10.6. Hold the Ash Lip in place and hand start the two bolts included in the misc. kit in the holes where the plugs were removed. Use a 13mm wrench or socket and ratchet to tighten the two bolts under the ashlip.

natural_image
Technical line drawing of a cabinet or enclosure with two circular annotations highlighting specific components (no text or symbols present)Figure 10.6. Ash Lip bolt locations.
11. Install Burner Media
Do not install burner media until after all other accessory installations or component adjustments have been completed.
Log Set 158263
NOTE: LOG COMPONENTS ARE FRAGILE. WEAR SAFETY GLOVES AND HANDLE LOGS WITH CARE.
Contents:
1 Rear Log......226921
2 Left Side Log......226922
3 Right Side Log......226923
4 Left Middle Log......226924
5 Right Middle Log......226925
Ember Stones 6 oz.
Inspect the log parts and report any damage to your dealer. DO NOT INSTALL DAMAGED LOGS.
- Rear Log: Engage the holes in the underside of Rear Log #1 with two pins, one on the burner base and one on the burner skirt.
- Place 12-15 Ember Stones on each side of the rear of the Burner as shown in fig. 11.2. KEEP EMBER STONES AWAY FROM THE PILOT CARRY-OVER AREA AND BURNER PERIMETER.
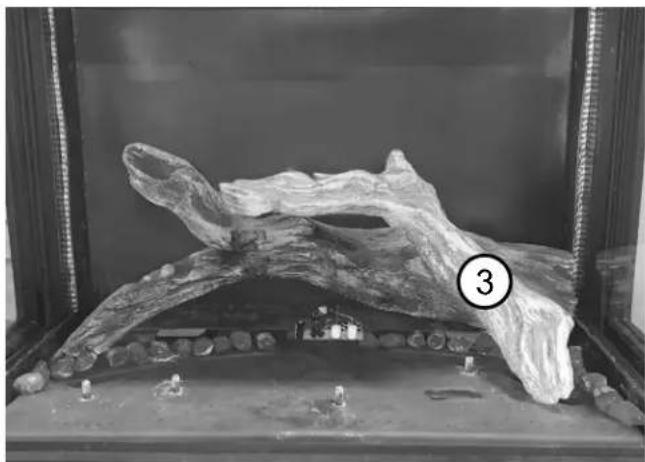
- Right Side Log: Engage the hole on the underside of Right Log #3 with the pin on the right side of the burner. Lean the other side against Rear Log #1. Align the groove on the bottom of Right Log #3 with the large bump on Rear Log #1.

natural_image
Black-and-white photo of a metallic object inside a transparent enclosure, labeled with number 1 (no text or symbols on the object itself)Figure 11.1. Set the #1 Rear Log on the rear pins, one on the Burner and one on the Burner Skirt.
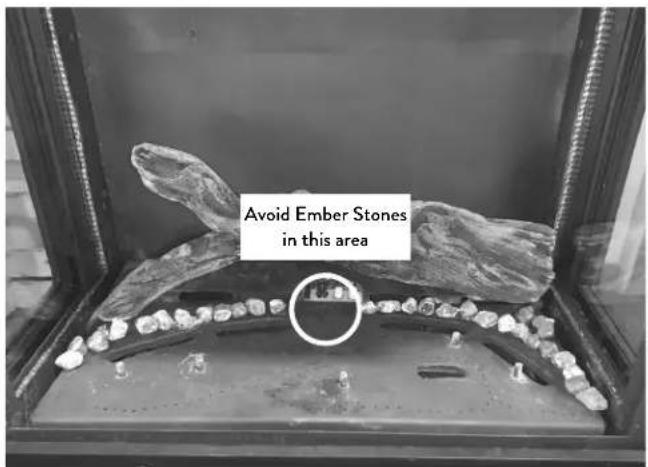
Figure 11.2. Place 12-15 Ember Stones on each side of the Burner. Avoid the Pilot carry-over area.
natural_image
Fossilized jawbone displayed in a museum display case, with no visible text or symbols on the animal itself.Figure 11.3. Rest the end of the #3 Right Log in the small pocket on the Base Log.
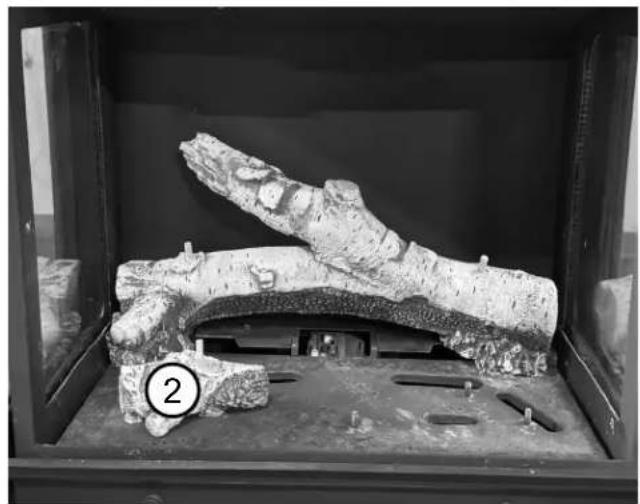
- Left Side Log: Engage the hole on the underside of Left Side Log #2 with the pin on the left side of the burner. Lean the other side against Rear Log #1. Align the indentation on Left Side Log #2 with the small bump on Rear Log #1.
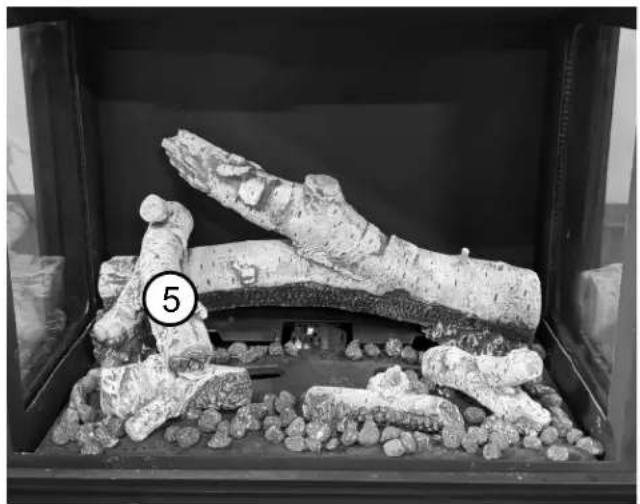
- Right Middle Log: Engage the holes on the underside of Right Middle Log #5 with the two pins on the middle right of the Burner as shown.
- Left Middle Log: Engage the hole on the underside of Left Middle Log with the pin on the middle left of the Burner. Rest the other side of the log on Right Middle Log #5.
- If desired, spread the Ember Stones over the Burner Base in a thin layer. DO NOT COVER GAS PORTING HOLES ON THE SIDES OR FRONT OF THE BURNER. PLACE STONES OVER THE REAR PORTS ONLY AND UP TO THE REAR FLANGE OF THE BURNER.
KEEP EMBER STONES AWAY FROM THE PILOT CARRY-OVER AREA AND BURNER PERIMETER.
The Rock Wool included the Miscellaneous Kit is intended as an enhancement to replicate glowing embers. Use a toothbrush or tweezers to sparingly apply small pinches of fibers over the front of the burner base after the log components have been installed. The ample supply of rock wool is provided for ease of handling and application purposes only. DO NOT USE THE ENTIRE QUANTITY OF ROCK WOOL. Use no more than 1/4 of the material supplied.
Please be aware that sooting may occur with Propane fuel under minimum vent configurations. Should soot develop, use a soft brush to clean the log and remove some or all of the rock wool from the burner.

natural_image
Fossilized bone specimen displayed in a museum case, no visible text or labelsFigure 11.4. Place #2 Left Side Log on the far left pin and rest the other end on the bump on #1 Rear Log.

natural_image
Fossilized bone specimen displayed in a 3D printing press, with a numbered label (5) on the base (no text or symbols on the specimen itself)Figure 11.5. Place #5 Right Middle Log on the two middle right pins on the burner.

natural_image
Black-and-white photo of a textured, irregularly shaped object on a gravel base, labeled with number 4 in the corner (no readable text or symbols)Figure 11.6. Place #4 Left Middle Log on the middle left pin on the burner and rest the other end on #5 Right Middle Log. Arrange Ember Stones over the Burner Base.
Do not install burner media until after all other accessory installations or component adjustments have been completed.
Birch Log Set 158388
NOTE: LOG COMPONENTS ARE FRAGILE. WEAR SAFETY GLOVES AND HANDLE LOGS WITH CARE.
Contents:
1 Rear Log......227191
2 Lower Left Log......227192
3 Middle Lower Log......227193
4 Right Lower Log......227194
5 Left Upper Log......227195
6 Right Upper Log......227196
7 Middle Log......227197
Ember Stones ....6 oz.
Inspect the log parts and report any damage to your dealer. DO NOT INSTALL DAMAGED LOGS.
- Rear Log: Engage the holes in the underside of #1 Rear Log with two pins, one on the burner base and one on the burner skirt.
- Lower Left Log: Engage the holes in the underside of #2 Lower Left Log with the two pins on the front left side of the burner.
- Middle Lower Log: Engage the hole on the underside of #3 Middle Lower Log with the pin in the middle of the burner. Arrainge the log so that the right side of the log rests in front of the front right burner hole.

natural_image
Black-and-white photo of a fossilized bone specimen in a 3D printing press, with a numbered label (1) on the bone itself.Figure 11.7. Set the #1 Rear Log on the rear pins, one on the Burner and one on the Burner Skirt.
natural_image
Interior view of a geological excavation site showing exposed tree bark and embedded debris (no text or symbols visible)Figure 11.8. Set the #2 Lower Left Log on the two front left pins.

natural_image
Interior view of a fire extinguisher with exposed wood and firewood, labeled with number 3 (no text or symbols on main subject)Figure 11.9. Place the #3 Middle Lower Log on the middle front pin.

natural_image
Black-and-white photo of a fossilized tree trunk inside a container, with a numbered label (4) on the side and no visible text or symbols.Figure 11.10. Place the #4 Right Lower Log on the two pins on the right side of the burner.

Figure 11.11. Set the #2 Lower Left Log on the two front left pins.
- Right Lower Log: Engage the holes on the underside of #4 Right Lower Log with the two pins on the right side of the burner.
- If desired, spread the Ember Stones over the Burner Base in a thin layer. DO NOT COVER GAS PORTING HOLES ON THE SIDES OR FRONT OF THE BURNER. PLACE STONES OVER THE REAR PORTS ONLY AND UP TO THE REAR FLANGE OF THE BURNER.
KEEP EMBER STONES AWAY FROM THE PILOT CARRY-OVER AREA, CENTER OF THE BURNER AND BURNER PERIMETER.
- Left Upper Log: Engage the holes on the underside of #5 Left Upper Log with the pin on the left side of #1 Rear Log and the pin on #2 Lower Left Log.
- Right Upper Log: Engage the hole on the underside of #6 Right Upper Log Log with the pin on the right side of #1 Rear Log and the pin on #4 Lower Right Log.
- Middle Log: Place the #7 Middle Log with the flat base in the center of the burner in the area left clear of ember stones and rest the left side of the log in the groove on #5 Left Upper Log.
The Rock Wool included the Miscellaneous Kit is intended as an enhancement to replicate glowing embers. Use a toothbrush or tweezers to sparingly apply small pinches of fibers over the front of the burner base after the log components have been installed. The ample supply of rock wool is provided for ease of handling and application purposes only. DO NOT USE THE ENTIRE QUANTITY OF ROCK WOOL. Use no more than 1/4 of the material supplied.
Please be aware that sooting may occur with Propane fuel under minimum vent configurations. Should soot develop, use a soft brush to clean the log and remove some or all of the rock wool from the burner.
natural_image
Interior view of a fire safety enclosure with firewood and gravel (no text or symbols visible)Figure 11.12. Place #5 Left Upper Log on the pins located on #1 Rear Log and #2 Left Lower Log.

natural_image
Black-and-white photo of a firewood stove burner with visible wood shavings and gravel base (no text or symbols)Figure 11.13. Place #6 Right Upper Log on the two pins on #1 Rear Log and #4 Lower Right Log.

natural_image
Black-and-white photo of a firewood stove burner with carved wood and gravel, labeled with number 7 (no text or symbols on the main subject)Figure 11.14. Place the #7 Middle Log in the center of the burner and rest the left side of the log in the groove on #5 Left Upper Log.
12. System Check
- PURGING THE GAS LINE: When lighting the appliance for the first time, it will take a few moments to clear the gas line of air. Once this purge is complete, the appliance will operate as described in the lighting instructions. From a cold start, it may be helpful to let the pilot light burn in mode for 10 - 15 minutes to establish positive draft, before turning the burner on. See the procedure on the inside back cover of this manual. Subsequent burner starts will not require purging the gas line unless the supply line is shut off.
- PILOT FLAME: You can monitor the pilot flame located behind the burner at the rear of the firebox. The pilot flame should be steady - not lifting or floating. The flame should be blue in color around the pilot hood, with traces of yellow toward the outer edges. Fig. 12.1.
The pilot flame should engulf the top 1/8" of the flame sensor. The pilot flame should project from the pilot hood port toward the burner carry-over ports. Adjust the pilot flame using the adjustment screw to the left of the valve regulator. See fig. 12.2.
- See Flame Appearance / Air Shutter for air shutter settings and adjustments. Note: The more offsets there are in the vent system, the greater the need for an air shutter adjustment.

natural_image
Illustration of a person pouring liquid from a bottle onto a table with a cup and paper nearby (no text or symbols)Figure 12.1. Normal pilot flame projection.

WARNING:
PILOT ADJUSTMENT SHOULD ONLY BE PERFORMED BY A QUALIFIED, PROFESSIONAL SERVICE TECHNICIAN.

Figure 12.2. Pilot flame regulation.
INITIAL FIRING PROCESS - Heat-curing the Stove Paint
This appliance has been painted with the highest quality coating used in the hearth industry. Manufacturers have selected this product because it has been proven durable, colorfast, and beautiful at temperatures up to 1200°F/650°C. Although the paint has been air-dried at the factory, it must be heat-cured in order to maximize its coating properties and durability. This process occurs during initial firing of the appliance and will generate odor and some visible smoke.
We recommend you do the following BEFORE operating the appliance for the first time:
- Ventilate: Open doors and windows and use a fan to circulate fresh air throughout the room.
- Vacate: The fumes are non-toxic, but can be uncomfortable for babies, small children, pregnant women, elderly, pets, or anyone having breathing difficulties.
Gas Appliance Curing Process
- After the installer has confirmed proper burner function at all heat levels, the homeowner should operate the appliance at a low setting for several hours, followed by several hours operation at a high setting.
- Off-gassing by paint and log set ceramic material may leave a white, powdery deposit on the inside surface of the glass panel. This residue must be removed using a non-abrasive hearth gas appliance glass cleaner or warm water to prevent permanent etching of the glass.
DO NOT USE AMMONIA-BASED CLEANERS. DO NOT CLEAN HOT GLASS.
See OPERATION sections, pages 27-32, for detailed, day-to-day operating procedures.
13. Flame Appearance / Air Shutter Adjustment
The GF 520 DV IPI gas stove is shipped from the factory equipped to burn Natural gas and the air inlet shutter has been set to provide optimal combustion efficiency under a variety of venting configurations. The air shutter may be adjusted, however, to accommodate the conditions of your individual installation and to provide the desired flame picture. Other installation-related variables can also affect the flame picture:
Too large an air setting - the appliance will generate a flame that is blue and transparent, or an "anemic" flame.
Too small an air setting - the appliance will generate very long yellow flames resulting in black soot deposits on the logs, on the inside walls of the appliance, and potentially on the exterior termination cap. Sooting is caused by incomplete combustion in the flames and/ or insufficient combustion air entering the air shutter opening.
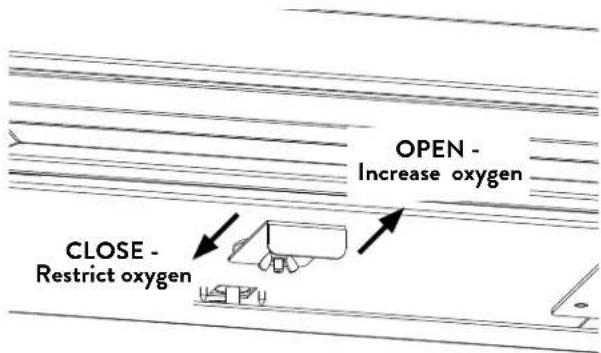
Figure 13.1. Pull the shutter forward to increase primary air. Push it back to restrict air.
To adjust the air shutter:
-
Loosen the wing nut shown in fig. 13.1. Slide the Air Shutter Handle forward toward yourself to open the air shutter and back to provide less air. Before making any adjustments, start at the mid-point of the total range of adjustment.
-
Allow the stove to burn for 20-30 minutes on the HIGH setting, observing the flame continuously. If the flame appears weak, slow, or sooty, increase the air shutter opening in 1/16" - 1/8" increments until the desired flame picture is achieved. Allow the flames a few minutes to "settle-in" after each adjustment.
-
Tighten the wing nut to secure the shutter at the desired setting.
natural_image
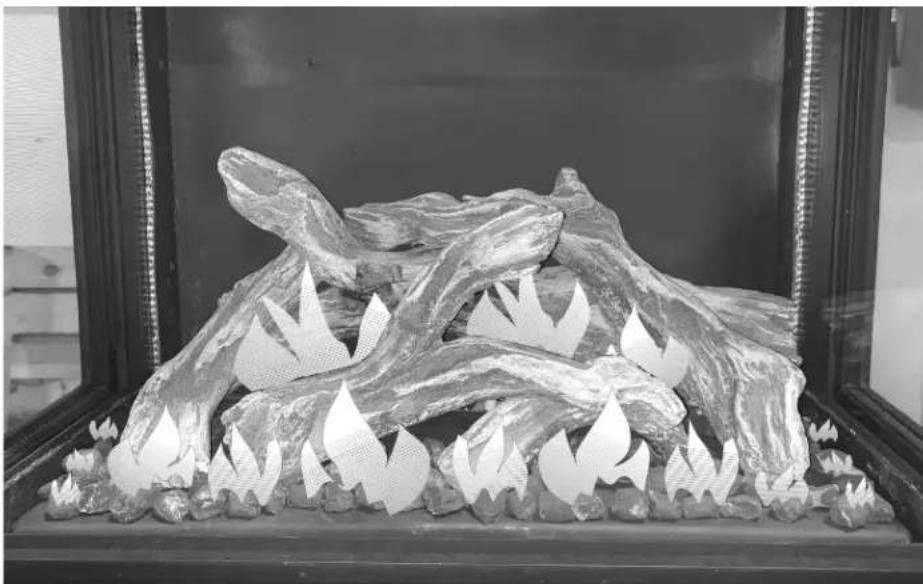
Black-and-white photo of a decorative firewood display with flame patterns, mounted on a dark frame (no text or symbols visible)Figure 13.2. Log Set burner flame picture.
14. Operation
Important Notes
- For the first several hours of operation, it is common to detect some odor as the metal and manufacturing materials cure under heat. This condition is temporary and can be alleviated by allowing plenty of fresh air to circulate through the area.
- Condensation may develop on the glass upon each lighting of the appliance. This "fog" will disappear as the glass heats.
- IMPORTANT: It will be necessary to clean the glass after the first few fires. A white powdery residue will be evident which results from the burner media curing. Use a non-abrasive hearth gas appliance glass cleaner and warm water.
IF THE GLASS IS NOT CLEANED, THIS RESIDUE CAN CAUSE THE GLASS TO BECOME PERMANENTLY ETCHED.
DO NOT USE AMMONIA-BASED CLEANERS.
- Keep the control compartments and area under the appliance free of dust. Always keep the appliance area clear and free from combustible materials, gasoline and other flammable liquids.
- This appliance can be operated with a continuously burning pilot flame. Exercise caution when using household products containing combustible vapors.
- CAUTION: DO NOT OPERATE THIS APPLIANCE WITH ANY OF THE GLASS PANELS REMOVED, CRACKED OR BROKEN. REPLACEMENT OF THE GLASS SHOULD BE DONE ONLY BY A LICENSED OR QUALIFIED SERVICE PERSON. USE ONLY REPLACEMENT GLASS PROVIDED BY YOUR AUTHORIZED J∅TUL DEALER. NEVER SUBSTITUTE ANY OTHER TYPE OF GLASS.
REMOVE GLASS ONLY FOR ROUTINE MAINTENANCE.
ALWAYS HANDLE GLASS CAREFULLY.
WARNING:
READ AND UNDERSTAND ALL OPERATING INSTRUCTIONS BEFORE ATTEMPTING TO OPERATE THIS APPLIANCE. DO NOT ALLOW ANYONE TO OPERATE THIS APPLIANCE WHO HAS NOT READ AND UNDERSTOOD THESE INSTRUCTIONS. KEEP THE REMOTE CONTROL TRANSMITTER WHERE CHILDREN CANNOT REACH IT.
WARNING:
SEVERE INJURY. THIS APPLIANCE CAN BE SET TO OPERATE THERMOSTATICALLY. BE AWARE THAT THE APPLIANCE MAY BE VERY HOT EVEN WHEN THE BURNER IS NOT APPARENTLY OPERATING. KEEP CHILDREN AWAY FROM THE APPLIANCE.
WARNING:
OBSERVE CAUTION NEAR THE GLASS PANEL.
THE GLASS MAY SHATTER IF STRUCK BY AN OBJECT. ALWAYS HANDLE THE GLASS PANEL WITH CARE.
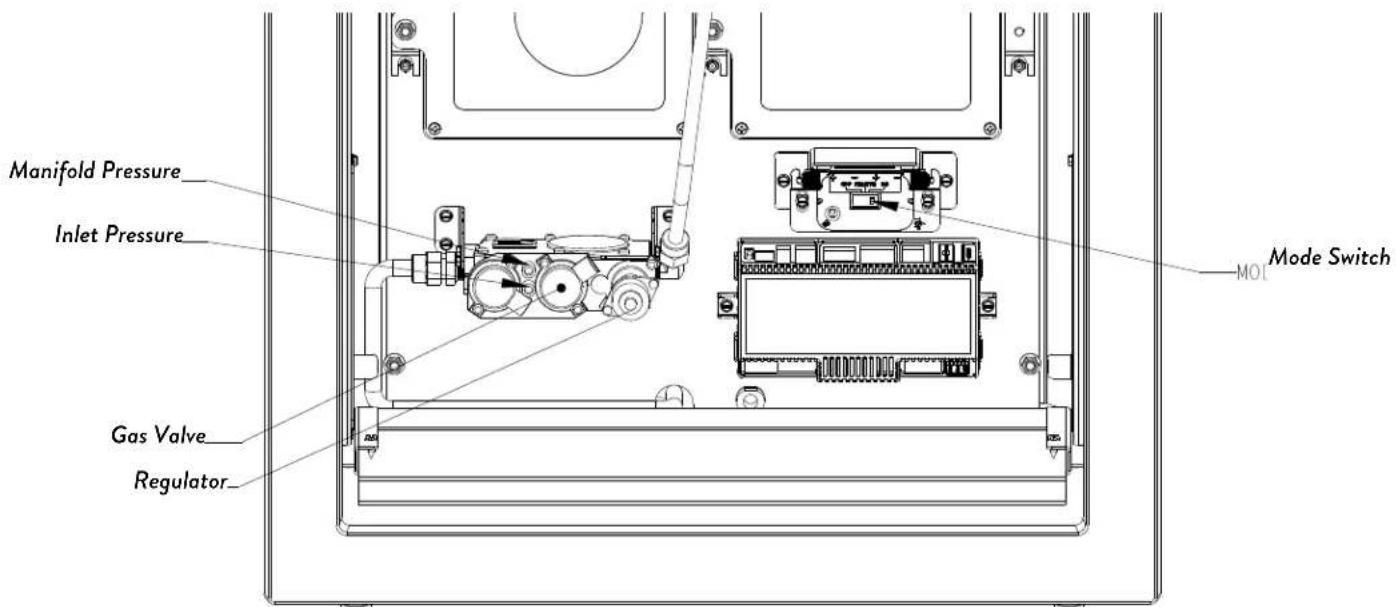
Figure 14.1. GF 520 DV IPI Controls Compartment.
Burner Operation
Familiarize yourself with the controls of the GF 520 DV IPI and be sure that anyone else using the appliance is also familiar with the controls and operation procedures. Always follow the Lighting Instructions on the inside back cover of this manual and also located on the inside the Controls Access Panel.
This appliance is equipped with an ignition device that lights the pilot automatically. Do not try to light the pilot by hand.
- Set the Mode Switch to OFF. See fig. 14.1.
- Confirm the stove is connected to 120VAC house current.
- Mode Switch Function:
• ON / OFF - Use for manual control of the burner.
When set to ON, the pilot will light, followed by burner ignition.
- REMOTE - Set for handheld transmitter control or remote thermostatic control.
Features Overview
The Proflame 2 Integrated Fireplace Control (IFC) incorporates electronic remote control of the Jøtul GF 520 DV IPI features. It is configured to control the on/off operation both manually and thermostatically, with standard and "Smart" thermostat features. It will also control flame modulation and accent lighting functions.
The burner utilizes an IPI system (Intermittent Pilot Ignition) and may also be switched to keep the pilot lit continuously if desired (CPI - Continuous Pilot Ignition).
CPI NOTE: This appliance is equipped to automatically extinguish the pilot light after 7 days if there is no call for heat during that period. The pilot will convert to IPI mode and reignite at the next call for heat.
Power is provided to the IFC by 120V house current. In the event of a power failure, burner operation is backed-up by a 6V battery pack (four, 1.5v AA).
Remote Control Transmitter
The remote transmitter has all controls available on its face for reliable, ease of use. It gives room temperature readout, set temperature readout, all function abilities as well as childproof lockout and low battery indicator. Icons appear on the screen indicating which mode of operation you are controlling. The four button controls are easy to learn and simple to operate. The transmitter is powered by three (3), 1.5V AAA batteries.
Remote Control Receiver
The receiver is integrated with the IFC board which is located within the valve compartment.
Integrated Fireplace Control (IFC)
The IFC is the electrical heart of the system. It provides power to all components and converts to 6.5v DC in the event of power failure. The IFC also sends power to the accent light, however, when no line power is available, that feature will not function. The battery back-up only allows continued remote control of burner functions.
Sit 886 Modulating Valve
This valve has the ability to be stepped down in six increments between high and low. It can be done manually or by setting the remote control to the Smart thermostat modulation mode. Automatic modulation means that as the room temperature approaches the limit set for shut down, the valve gradually decreases or "steps-down" the fire intensity. Conversely, as room temperature cools, the valve gradually increases flame intensity. The overall result is more comfortable, even heating that minimizes temperature peaks and valleys.
Pilot Assembly
The pilot assembly consists of a pilot hood, electrode, and a flame sensor. The electrode sends a spark to the pilot hood which ignites the gas. The sensor is then engulfed by the pilot flame, flame rectification occurs and the burner ignites when there is a call for heat.
Intermittent Pilot Flame Rectification Process
When there is a call for heat, the pilot will automatically make four attempts to light the burner before locking out.
On the first attempt, the pilot will spark for up to sixty (60) seconds. If rectification occurs within that time, the burner will light off. If rectification does not occur, the pilot will extinguish.
If the main burner ignites and rectification is lost, the system will extinguish the burner and immediately ignite the pilot and relight the burner. The system will attempt to light the main burner three (3) more times. On the fourth attempt, the system will again light the pilot and then sit idle with only the pilot burning for sixty (60) seconds in order to establish draft to support combustion air flow.
If rectification still does not occur with the main burner lit, the system will "lock out".
A lock-out condition is cleared by cancelling the call for heat; i.e. switching the burner off, or adjusting the thermostat.
INSTALLER / OPERATOR NOTE
Under certain conditions wherein draft is unstable or weak, it is advisable to run the system in Continuous Pilot mode (CPI). Warm weather, extreme cold weather, a long vent run, or high wind conditions are all contributing factors that can interfere with IPI functionality. A continuously running pilot can generate sufficient heat to help establish and maintain the draft strength required for rectification to occur.
ATTENTION:
- SHUT "OFF" MAIN GAS SUPPLY PRIOR TO REMOVING OR REPLACING BATTERIES.
- IN CASE OF REMOTE CONTROL MALFUNCTION, TURN OFF THE IFC DEVICE USING THE MAIN "ON/OFF" SWITCH.
- FOR INSTALLATION/MAINTENANCE, TURN "OFF" THE IFC BY DISCONNECTING THE MAIN POWER SUPPLY PLUG.
Remote Control Functions
Pilot Mode
Set the Mode switch to ON to light the pilot. The burner will ignite and remain on until manually switched OFF.
NOTE: This appliance is equipped with a timed valve that will automatically shut off the pilot light after seven (7) days. Follow the Lighting Instructions inside the control compartment door to relight the pilot.
Burner Control
Set the stove burner switch to REMOTE for Proflame 2 remote control.
OFF - Turns off both remote and manual burner functionality. Switch to OFF when the stove will not be used for an extended period of time.
Remote Transmitter
The Transmitter features a simple button layout and informative display screen. See fig. 14.2.
LCD DISPLAY - graphically indicates temperature settings and status of the Thermostat, Burner, and Accent Lamp.
ON / OFF Key - controls Burner and Lamp functions.
THERMOSTAT Key - Used to set either Manual or Thermostatic Control and index through thermostatic functions.
UP / DOWN Arrow Key - Selects thermostat temperature range and flame height.
MODE Key - used to select the component to be controlled: CPI/IPI, Burner, Fan and Accent Lamp.
Initializing the System
- Press the Controls Access Door to release its magnetic catch and swing the panel down. Switch the Mode to REMOTE.
- Install three AAA batteries into the Transmitter handset.
- Press the PRG button on the Left front corner of the switch plate. The board will "beep" three times and a yellow LED will indicate a 10-second synchronization time limit.
- Within 10-seconds, press the Transmitter ON button. The IFC will "beep" three or four times to indicate that it has acknowledged the transmitter command and sets to the particular code of that Transmitter.
- After initialization, place the Mode switch in the REMOTE position. The hand-held transmitter can then be used to control the burner.
To return to full Manual functionality:
- Switch the Mode to REMOTE.
- Press the red button on the until it "beeps" three times. Within 10 seconds, press the button again until acknowledgement is signalled.
Remote transmitter function keys.

The supplied Wall Mount Bracket can be used for convenient transmitter storage.

Figure 14.2. Remote transmitter display data.
Remote Transmitter Controls
Temperature Indication Display
With the transmitter in the OFF position, press the Thermostat Key and the Mode Key at the same time. The display screen will show the current room temperature cycling between Fahrenheit and Celsius indicators each time the keys are pressed simultaneously. Fig. 14.3.
Pilot Mode
With the transmitter in the OFF position, press the transmitter Mode key - IPI is the default mode. Fig. 14.4. Press the Up arrow to index to the CPI icon and activate the Continuous Pilot Ignition mode. Fig. 14.5. Pressing the Down Arrow Key will return to Intermittent Pilot Ignition. A single "beep" will confirm reception of the command.
NOTE: Setting the stove Pilot Mode switch to IPI will disable remote IPI/CPI switching.
Turn on the Burner
■ Press the ON/OFF Key on the Transmitter.
The display will show all the active icons. At the same time, the Receiver will activate the Pilot Ignitor. First the pilot will ignite, followed shortly by the burner. A single "beep" from the Receiver will confirm reception of the command.
Turn off the Burner
Press the ON/OFF Key. The display will show only the room temperature and icon. At the same time, the Receiver will deactivate the call for heat and the burner will shut down. Fig. 14.7. A single "beep" from the Receiver will confirm reception of the command.
Remote Burner Control
There are six flame levels available.
With the system ON, and the burner flame level at maximum, press the Down Arrow Key once to reduce the flame height by one step. Each time the Down Key is pressed, the flame will step down until the burner is finally turned off. Fig. 14.8.
The Up Arrow Key will increase the flame height each time it is pressed. If the Up Arrow Key is pressed while the system is on but the flame is off, the flame will come on in the High position as in figs. 14.8 - 14.10. A single "beep" will confirm reception of the command.
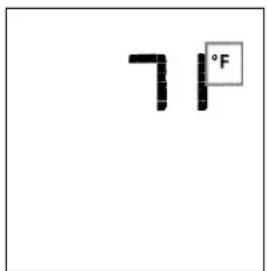
Fig. 14.3. Room temperature readings

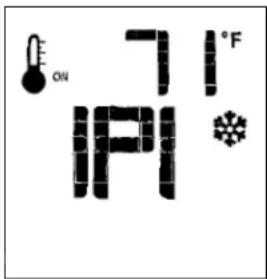
Fig. 14.4. IPI is the default position.
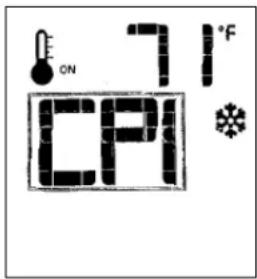
Fig. 14.5. CPI ON.
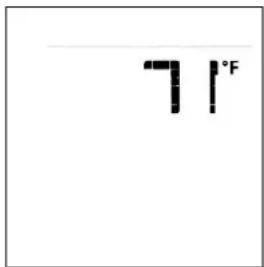
Fig. 14.6. Burner shut-down

Fig. 14.7. Burner OFF.

Fig. 14.8. Flame Level 1.
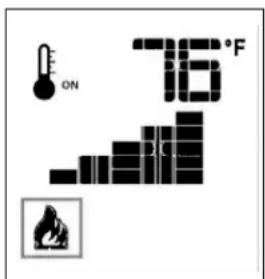
Fig. 14.9. Flame Level 5.

Fig. 14.10. Flame Level 6.
Room Thermostat (Transmitter Operation)
The Remote Control can operate as a room thermostat. The thermostat can be set to a desired temperature to control the comfort level in a room.
To activate this function, press the Thermostat Key. The display will indicate that the room thermostat is "ON" and the current Set Temperature is now displayed. Fig. 14.11.
To adjust the Set Temperature, press the Up or Down Arrow Keys until the desired Set Temperature is displayed. Fig. 14.12.
SMART Thermostat Function
This function adjusts the flame intensity according to the difference in the Set Point temperature and the actual room temperature. As the room temperature gets closer to the Set Point, the Smart Function will modulate flame intensity down.
To activate this function, press the Thermostat Key until the word "SMART" appears to the right of the thermometer bulb icon. Fig. 14.13.
To adjust the temperature, press the Up or Down Arrow Keys until the desired Set Temperature is displayed. Fig.14.14.
Accent Lamp Control
■ With the Remote ON, press the Mode Key to index to the Lamp icon. Figs. 14.15.
- Pressing the Up Arrow Key will turn the Lamp ON. Press the arrow keys to adjust the brightness. Fig. 14.16.
■ Pressing the Down Arrow Key will turn the Lamp OFF.
Child Safety Lock
This function will lockout the Transmitter to prevent unsupervised operation.
To activate the Lock, press the Mode key and UP Key at the same time. Fig. 14.17.
To de-activate the Lock, press the Mode Key and UP Key at the same time.

Fig. 14.11. Thermostat ON.

Fig. 14.12. Change Set Temperature.

Fig. 14.13. Smart Mode Fig. 14.14. Smart Set Temp.
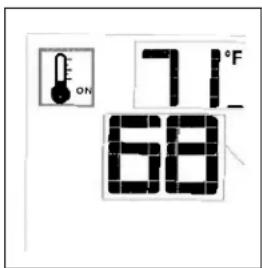

Fig. 14.15. Lamp Control.

Fig. 14.16. Lamp ON.

Fig. 14.17. Lock ON.
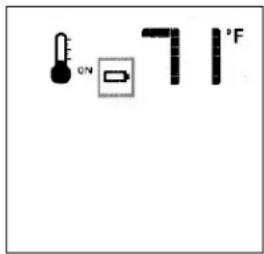
Fig. 14.18. Low Battery. See page 34.
15. Maintenance
NOTICE:
■ THIS APPLIANCE AND VENT SYSTEM MUST BE INSPECTED ANNUALLY BY A QUALIFIED GAS TECHNICIAN. Keep this manual for reference.
■ IMPORTANT: ALWAYS TURN OFF THE GAS SUPPLY AND DISCONNECT POWER FROM THE APPLIANCE BEFORE ANY SERVICE WORK IS PERFORMED.
GLASS AND SAFETY SCREEN BARRIERS
■ DO NOT OPERATE THIS APPLIANCE IF ANY OF THE GLASS PANELS OR SAFETY SCREEN BARRIERS IS REMOVED, CRACKED, DAMAGED OR MISSING.
■ REPLACE DAMAGED COMPONENTS USING ONLY GENUINE J∅TUL PARTS AVAILABLE FROM ANY J∅TUL AUTHORIZED DEALER. REPLACEMENT SHOULD BE DONE ONLY BY A LICENSED OR QUALIFIED SERVICE PERSON.
■ CAUTION: HANDLE BROKEN GLASS WITH CARE. REMOVE THE LOG SET AND USE A VACUUM TO CLEAN ANY REMAINING GLASS FRAGMENTS FROM THE BURNER AND FIREBOX.
Annual Cleaning
Vent System
The entire vent system, including the chimney if appropriate, should be inspected every year. If the venting is disassembled for any reason, it should be reassembled and sealed according to the vent manufacturer's instructions provided at the initial installation. DO NOT USE SILICONE SEALANT.
Burner System
Periodically inspect the firebox, valve compartment, convection airways and optional blower to BE CERTAIN THAT THE FLOW OF COMBUSTION AND VENTILATION AIR IS UNOBSTRUCTED.
The valve compartment should be vacuumed regularly to remove dust and debris. Vacuum more frequently if there are pets in the home.
■ Use a soft brush attachment and handle log set components carefully.
The pilot assembly and burner base should be inspected and cleaned annually by a qualified technician. Replace any component showing evidence of corrosion.
Glass Care
Clean the glass only when necessary. Wipe the surface with a clean, dampened, soft cloth. Follow with a dry, soft towel. Take care not to scratch the glass surface.
WARNING: DO NOT USE ABRASIVE CLEANERS ON THE GLASS. NEVER CLEAN THE GLASS WHEN IT IS HOT. DO NOT USE AMMONIA-BASED CLEANING SOLUTIONS.
Glass and Gasket Inspection
It is important that the glass gasket be inspected at least annually. Examine the ribbon gasket for signs of deterioration and make sure the gasket has a positive seal. Replace the gasket if necessary. Refer to the replacement parts list on page 39.
NOTE: INSPECT THE GLASS SURFACE FOR SCRATCHES AS THESE CAN WEAKEN THE PANEL TENSILE STRENGTH. REPLACE THE PANEL IF ANY SCRATCHES ARE FOUND. USE ONLY DOOR GLASS KIT 158067 AND SIDE GLASS PANEL 158080. DO NOT SUBSTITUTE ANY OTHER TYPE OF GLASS.
Front Door Glass & Gasket Replacement Kit 158335
Read through these instructions before beginning the procedure
Tools: Needle nose pliers or flathead screwdriver
- Lift and remove the Top Plate and Front Plate
- Use the Latch Tool to pull each latch hook forward to disengage them from the glass frame. Fig. 2.2, page 5.
- Lift the glass frame up and off of the firebox.
- The glass panel is held in place by four tabs at the frame corners. Use a screwdriver or small pliers to pry these up just enough to release the glass panel. See fig. 15.1, page 34.
- Remove the old gasket material.
- Wrap the new gasket material evenly around the edge of the glass, peeling back the protective strip to expose the adhesive as you go, leaving a 1/2" overlap at the top. Press the adhesive side down onto the glass surface. Do not stretch the gasket.
- Place the gasketed glass within the frame and carefully bend each of the corner retainer tabs back just enough to secure the glass in the frame. The Replacement Glass kit includes 4 Tinnerman compression clips for use in case a tab should break. The clips engage over the edge of the frame sides.
Side Glass & Gasket Replacement Kit 158334
Read through these instructions before beginning the procedure. Tool List:
- Two 10mm wrenches
- 1/4 inch drive
- 4mm hex key
Replace the Side Glass Panel
- Lift off the Top Plate.
- Remove the Front Plate. Use the Latch Tool to pull each latch hook forward to disengage the glass frame from the firebox. Lift the glass frame up and off of the stove. See figs. 2.1 and 2.2 pg 5.
- Remove the 10mm nut and bolt from the rear top side of the side assembly.
- LOOSEN the 10mm bolt on the inside front of the side screen assembly.
- LOOSEN the 10mm bolt on the inside back of the side screen assembly.
- Remove the side assembly by tipping and lifting off the unit.
- Remove the four 10mm nuts holding the side glass frames.
- Install replacement side glass and gasket:

Figure 15.1. Front Glass replacement.

Figure 15.3. Remove the Nut and Bolt from the rear top of the Side Assembly

Figure 15.4. Loosen the bolt on the inside front of the Side Assembly
130084 Rev 3 GF 520 DV IPI 9/24
- Wrap the new gasket material evenly around the edge of the glass, peeling back the protective strip to expose the adhesive, leaving a 1/2" overlap at the end seam. Press the adhesive side down onto the glass surface. Do not stretch the gasket.
- Place the panel within the frame, ensuring the gasket seam is on the top.
- Replace the Side Glass Frame. Place the front of the frame in the channel on the firebox then swing the frame onto the four retaining studs. Using the four 10mm nuts previously removed.
- Replace the Side Assembly and tighten the two loosened bolts on the inside front and back of the side assembly.
- Replace the 10mm bolt and screw removed form the rear top side of the side assembly.
- Replace the front and top plates.
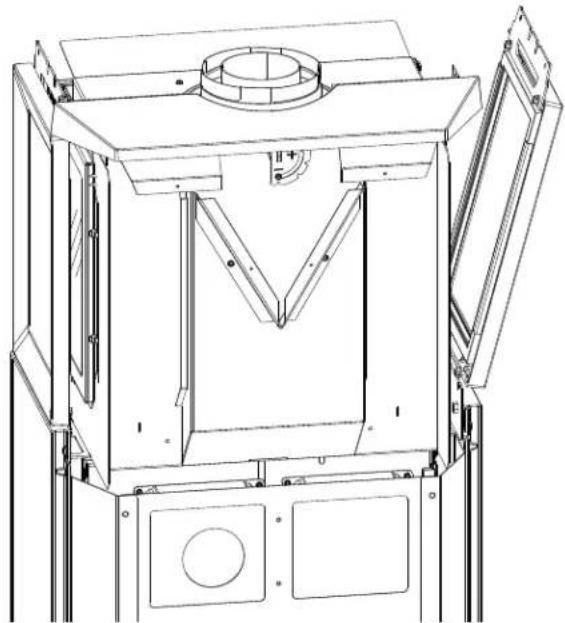
natural_image
Technical line drawing of a mechanical device with mounting brackets and internal components (no text or symbols)Figure 15.6. Remove the side assembly and set aside.

Figure 15.5. Loosen the bolt on the inside rear of the Side Assembly

natural_image
Technical line drawing of a cabinet or enclosure with mounting feet and structural components (no text or symbols)Figure 15.7. Remove the nuts holding the glass frame.
Safety Screen Maintenance and Replacement
Cleaning
The integrated, Invisimesh® safety screens, located in front of the door and side glass panels, should be periodically cleaned to remove dust, lint, and other air-bourne debris. Over time, and with continuous exposure to heat, these materials can contribute to variations in the screen hue.
Remove the front plate and clean both sides of the screen using a fine, soft bristle brush or vacuum attachment.
APPLY ONLY VERY GENTLE PRESSURE TO AVOID DAMAGING THE SCREEN.
226647 Front Safety Screen Replacement
Tools: #4 hex key
The front safety screen is easily accessible from the back of the front plate.
Use a #4 Hex Key to remove the eight button head screws and retainer brackets as shown in fig. 15.8.
The replacement screen and frame installs as a single unit using the original eight brackets and screws. Screen material must sit flush to inner cast rib.

Figure 15.8. Remove front screen retainer screws and brackets.
Side Safety Screen Replacement 226648
Tool List:
- Two 10mm wrenches
- 1/4" Driver
- #4 hex key
-
Follow steps 1-7 in the instructions for the side glass replacement kit on pg. 34 to remove the side assembly.
-
Use the 4mm hex key to remove the four button head screws and two screen brackets.
-
Remove the old screen and place the new screen on the side assembly with the screen material resting against the cast rib of the side plate.
-
Replace the screen brackets and screws.
-
Follow steps 10-12 in the instructions for the side glass replacement kit on pg. 35 to reassemble the stove.

natural_image
Technical line drawing of a multi-layered structural frame assembly (no text or symbols)Figure 15.9. Remove front screen retainer screws and brackets.
Remote Transmitter Battery Replacement
The life-span of hand-held transmitter batteries depends upon battery quality, the frequency of set point changes, frequency of ignition call changes, etc.
When battery power is low, a Battery icon will appear on the transmitter display before all power is lost. See fig. 14.2, page 30. The icon will disappear with installation of three, fresh AAA batteries.
NOTE: Avoid inadvertently pressing the thermostat function key when replacing the batteries. Doing so will turn off thermostatic functions. To restore that function, re-install the batteries while again pressing the thermostat key.
Receiver Battery Replacement
A red LED on the IFC board indicates low battery power.
- Disconnect electrical power from the appliance.
- Open the Control Panel.
- The battery box located in the right side control compartment. Slide the two battery cover sliders outward to open the box. Pull out the battery holder. Install four new AA batteries noting the polarity indicated on the front of the box. Insert the battery holder and slide the battery cover sliders inward to lock.
- Reconnect power to the stove.
Battery Box

Figure 15.10. Receiver battery replacement.
16. Appendix
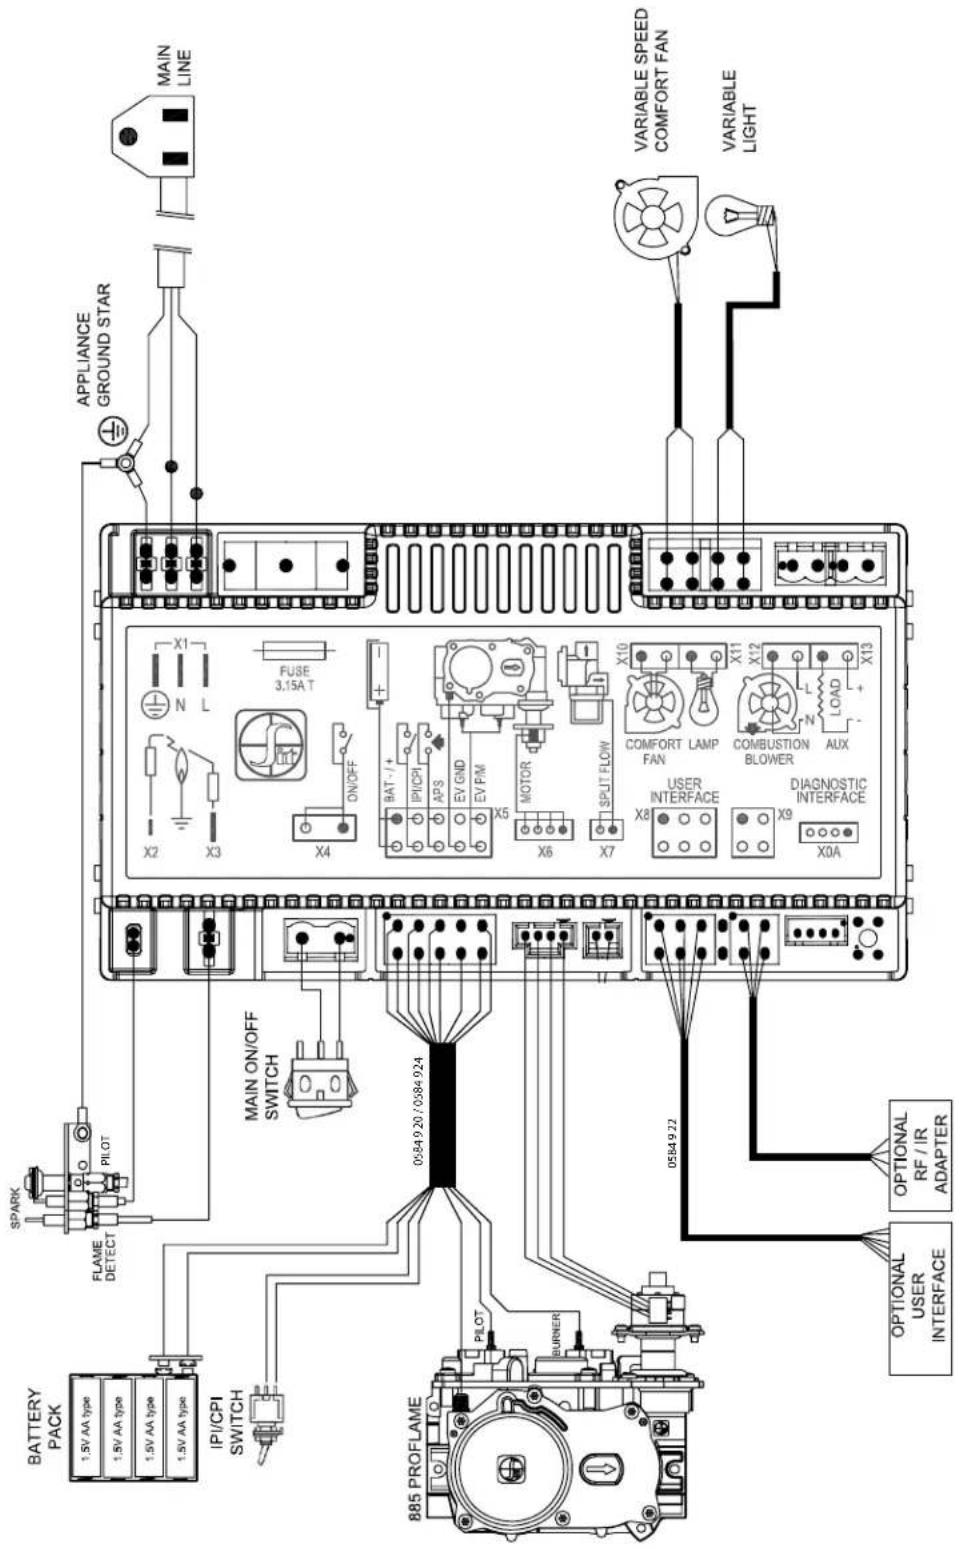
Figure 16.1 GF 520 DV IPI Proflame 2 Wiring Schematic including Premium Upgrade components

GF 520 DV IPI Firebox and Cast Iron Assembly
No. Part No. Description
| 1 | 117917 Screw, HWH SMA #8 x 1/2 SL Blk Oxide - PIC |
| 2 | 226725 Convection Air Shroud, GF520 |
| 3 | 227013 Weldment, Restrictor Outer, GF520 |
| 4 | 223241 Gasket, Exhaust Restrictor / Washer |
| 5 | 120004 Washer, Fender, 6.4mm ID x18mm OD x 1.6mm, Zinc,DIN 9021 - PIC |
| 6 | 225469 Inner Restrictor Rod, GF 305/500 |
| 7 | 225466 Restrictor Plate, GF 305/500 |
| 8 | 10502392 Top Plate, Front, MB, GF 520 |
| 9 | 226858 Heat Shield, Top Plate, GF520 |
| 10 | 9962 Bolt, Hex Cap M6x10 DIN 6928 8.8 Ser Flange Zinc -PIC |
| 11 | 22476392 Light Box, Delay Door Mount, MB |
| 12 | 157601 Accent Light Wire Harness, Single Light, Proflame 2Stoves |
| 13 | 117967 Screw, Pan Head #7 x 3/8 PH SMA Zinc - PIC |
| 14 | 222943 Light Bulb, 130 Volt, 35 Watt |
| 15 | 222974 Glass, Ceramic, Light Fixture |
| 16 | 222977 Gasket, Light Cover |
| 17 | 22476792 Light Shade, IPI Stoves, MB |
| 18 | 117968 Nut, M6 Serrated Flange plain - PIC |
| 19 | 225942 Latch, Glass Frame, GF305 DV IPI |
| 20 | 129322 Adapter Pipe, 6.625 dia |
| 21 | 129118 Gasket, Starter, 6.75" ID x 8.25" OD - PIC |
| 22 | 118034 Screw, M6 x 12, Button Head, Hex Socket, Blk Oxide |
| 23 | 226658 Screen Retainer, GF520 |
| 24 | 117130 Bolt, Hex Head Serr Flange M6x12 Blk - PIC |
| 25 | 10502292 Side Plate, MB, GF 520 |
| 26 | 226659 Front Plate Hanger, Right Side, GF520 |
| 27 | 226667 Support Bracket, Top Plate, GF520 |
| 28 | 226647 Screen, Assembly, Front, GF 520 |
| 29 | 22665492 Glass Frame, GF520, MB |
| 30 | 129124 Gasket, Tadpole, .25 X 1.25 Nominal, Graphite, SelfAdhesive (70 in) |
| 31 | 226723 Glass, Ceramic, Front, GF 520 |
| 32 | 220042 Clip, U Type (Tinnerman) - PIC |
| 33 | 226666 Glass Frame, Side, GF520 |
| 34 | 226724 Glass, Ceramic, Side, GF 520 |
| 35 | 129124 Gasket, Tadpole, .25 X 1.25 Nominal, Graphite, SelfAdhesive (46 in) |
No. Part No. Description
| 36 | 9911 | Bolt, Hex Cap, M6x45, DIN 933, Class 8.8, Blk - PIC |
| 37 | 118039 | Sleeve, .375" OD X .312" ID X 1.188", SS - PIC |
| 38 | 118408 | Spacer, .400"ID x .500" OD .625"LG |
| 39 | 226467 | Spring, 1.5" Length 316 SS |
| 40 | 226655 | Retainer Glass Frame, GF520 |
| 42 | 226918 | Blower Chevron, GF520 |
| 43 | 129159 | Lanyard, Rating Plates |
| 44 | 22666592 | Access Door Controls, GF520, MB |
| 45 | 222664 | Protection Cap, M8 Hex, Black |
| 46 | 99115 | Bolt, Hex Head M8 x 12 Blk - PIC |
| 47 | 10502892 | Base Plate, MB, GF 520 |
| 48 | 22666492 | Access Wall Controls, GF520 |
| 49 | 226660 | Retainer, Side to Base, GF520 |
| 50 | 10502692 | Base, Side Plate, MB, GF 520 |
| 51 | 117875 | Bolt, M8 x 20, Hex Serrated Flange Hd Class 8.8 Black Oxide |
| 52 | 226648 | Screen, Assembly, Side, GF 520 |
| 53 | 226657 | Front Plate Hanger, Left Side, GF520 |
| 54 | 117975 | Nut,Wing M6 Zinc - PIC |
| 55 | 226955 | Handle, Air Shutter |
| 56 | 220734 | Gasket, 2.25" OD x 188" ID x .125" T - PIC |
| 57 | 226677 | Handle, Air Shutter, GF520 |
| 58 | 158219 | Replacement Burner Assembly, GF520 |
| 59 | 221390 | Primary Air Shutter Asby |
| 60 | 220018 | Orifice, #37 |
| 45025 | Orifice, #52 / LP | |
| 61 | 223231 | Orifice Holder, Drop In Assembly, 12.5" Tube |
| 62 | 225525 | Grommet, Silicone, Pilot Plug, GF500/160/305 |
| 63 | 222280 | Gasket, Drop In Orifice Holder |
| 64 | 226919 | Intake Air Diverter, GF520 |
| 65 | 226745 | Pilot Assembly, NG, Flat Brkt, SS Body, 18" Tube, IPI w/LP Injector |
| 66 | 226670 | Rear Shelf, GF520 |
| 67 | 226861 | Intake Air Diverter, Rear Shelf, GF520 |
| 68 | 226948 | Panel Retainer, GF520 |
| 69 | 226656 | Baffle, Firebox, GF520 |
| 70 | 10502492 | Top Plate, Rear, MB, GF 520 |
| 71 | 226668 | Rear Shroud, GF520 |
| 72 | 226857 | Rear Heat Shield Top Plate |
GF 520 DV IPI Illustrated Parts Breakdown
Use only parts available from Jøtul authorized dealers.

Figure 16.3 GF 520 DV IPI Valve Assembly and IFC Components.
No. Part No. Description
| 1 | 117917 Screw, HWH SMA #8 x 1/2 SL Blk Oxide - PIC |
| 2 | 226661 Controls Board, GF520 |
| 3 | 158 Replacement Blower, Flat Pack, GF520 |
| 4 | 118055 Kepnut, M4, Ext. Tooth Lockwasher, Stl, Zinc Plate - PIC |
| 5 | 117920 Screw, Pan Head, Phillips, M4 X 8, Zinc - PIC |
| 6 | 117968 Nut, M6 Serrated Flange plain - PIC |
| 7 | 226663 Blower Bracket, GF520 |
| 8 | 118410 Vibration Damping Grommet, .27 Dia, .33 Thick |
| 9 | 118411 Sleeve Washer, Insulated Nylon #10 Screw, .313 Height |
| 10 | 226939 Fan Mounting Bracket, GF520 |
| 11 | 226916 Remote Receiver Bracket, GF 520 |
| 12 | 158006 Proflame 2 Battery Box |
| 13 | 224109 Battery, Alkaline, AA |
| 14 | 158065 Replacement Valve Harness, GF 160 DV IPI |
| 15 | 157323 Replacement 2 Light Holder Harness |
No. Part No. Description
| 16 | 157492 | Power Cord Ass'y, Proflame 2 IPI Stoves |
| 17 | 158xxx | Replacement Valve Harness, GF 520 DV IPI |
| 18 | 158xxx | Replacement Blower Harness, GF 520 DV IPI |
| 19 | 158053 | Proflame 2 On/Off (X4) Jumper, GI 535/635 |
| 20 | 157634 | Replacement Proflame 2 Control Board w/Labels |
| 21 | 117951 | Wire Strain Relief, Heyco 7P-2 (Large) |
| 22 | 222292 | Elbow, 90 deg, Brass 3/8 NTP X 3/8" Dia Flare |
| 23 | 118214 | Screw, #8 X 1/4", Taptite, SLHWH, SZPL |
| 24 | 226662 | Valve Bracket, GF520 |
| 25 | 225792 | Valve, NG, 50% TD, Proflame w/Stepper Motor,SIT 0885009 |
| 26 | 223215 | Adapter, Straight, Brass, 3/8 NTP x 3/8" Dia Flare-PIC |
| 27 | 129707 | Flex Tube, 3/8" OD x 36", 3/8" Female FlareConnectors w/Adapters |
18. Jøtul Gas Product Warranty
This warranty policy applies to gas products identified by the Jøtul trade name as set forth below.
A. LIMITED FIVE YEAR WARRANTY - Cast Iron, Steel Doors, Surround Components, Firebox:
Jøtul North America Inc. (J∅TUL) warrants, to the original retail purchaser, that those components of the Jøtul Gas Stove or Fireplace specified above will be free of defects in material and workmanship for a period of five (5) years from the date of purchase. This warranty is subject to the terms, exclusions and limitations set forth in the following text.
B. LIMITED TWO YEAR WARRANTY - Burner, Ceramic Burner, Burner Treatments, Firebox Panels:
J∅TUL warrants, to the original retail purchaser, that those components of the Jøtul Gas Stove or Fireplace specified above will be free of defects in material and workmanship for a period of two (2) years from the date of purchase. Ceramic burners are warranted against functional defects for a period of two (2) years from the date of purchase. This warranty is subject to the terms, exclusions, and limitations set forth in the following text.
C. LIMITED TWO YEAR WARRANTY - Enamel Finish:
J∅TUL warrants, to the original retail purchaser, the enamel finish on cast iron components of the Jøtul Stove or Fireplace Insert specified above against peeling or fading for a period of two (2) years from the date of purchase. This warranty is subject to the terms, exclusions and limitations set forth below.
D. LIMITED ONE YEAR WARRANTY - Gas & Electrical Components (controls, plumbing, valve, blower):
J∅TUL warrants, to the original retail purchaser, that those components of the Jøtul Gas Stove or Fireplace specified above will be free of defects in material and workmanship for a period of one (1) year from the date of purchase. This warranty is subject to the terms, exclusions, and limitations set forth in the following text.
J∅TUL will repair or replace (including parts & labor), at its option, any of the above components determined by J∅TUL to be covered by this warranty. You must, at your own expense, arrange to deliver or ship the component to an authorized Jøtul dealer and arrange for pickup or delivery of the component after repairs have been made. If, upon inspection, J∅TUL determines that the component is covered by this warranty, the repair or replacement will be made as set forth above. This warranty is not transferable and is extended only to, and is solely for the benefit of, the original retail purchaser of the Jøtul Gas Stove or Fireplace. This paragraph sets forth the sole remedy available under this warranty in the event of any defect in the Jøtul Gas Stove or Fireplace.
The warranty period for any replaced component will be the remaining unexpired portion of the warranty period for the original component.
Please retain your dated sales receipt in your records as proof of purchase.
EXCLUSIONS AND LIMITATIONS
NOTICE: This warranty is void if installation or service is performed by someone other than an authorized installer, service agency or gas supplier, or if installation is not in conformance with the installation and operating instructions contained in this owner's manual or local and/or national fire and building regulations. A listing of local authorized installers, service agencies and gas suppliers can be obtained from the National Fireplace Institute at http://www.nficertified.org/. This warranty does not cover the following:
1) Repair or replacement of parts that are subject to normal wear and tear during the warranty period or to parts that may require replacement in connection with normal maintenance. These parts include lamp bulbs, paint, gaskets, and glass (except to the extent such parts suffer damage from thermal stress).
2) Damage due to incorrect installations not in conformance with the installation instructions contained in this owner's manual or local and/or national fire and building regulations.
3) Damage due to service performed by an installer, service agency or gas supplier, unless otherwise agreed to in writing by J∅TUL.
4) Labor or other costs associated with the repair of gas controls, plumbing, burners, log set, lamp bulbs, or sheet metal firebox beyond the warranty period.
5) Damage caused by unauthorized modification, use or repair.
6) Damage to enameled surfaces caused by improper operation or misuse, including use that is not in conformance with the operating instructions contained in this owner's manual. Such damage can typically be identified by bubbling, cracking, or discoloration of the enamel finish.
7) Costs incurred by travel time and/or loss of service.
8) Damage incurred while the Jøtul Gas Stove or Fireplace is in transit. IN NO EVENT SHALL J∅TUL, ITS PARENT COMPANY,
SHAREHOLDERS, AFFILIATES, OFFICERS, EMPLOYEES, AGENTS OR REPRESENTATIVES BE LIABLE OR RESPONSIBLE TO YOU FOR ANY SPECIAL, INDIRECT, INCIDENTAL, CONSEQUENTIAL, PUNITIVE OR OTHER SIMILAR DAMAGES, INCLUDING, BUT NOT LIMITED TO, LOST PROFITS, LOST SALES, INJURY TO PERSON OR PROPERTY, OR DAMAGES TO A STRUCTURE OR ITS CONTENTS, ARISING UNDER ANY THEORY OF LAW WHATSOEVER. ALL IMPLIED WARRANTIES, INCLUDING THE IMPLIED WARRANTIES OF MERCHANTABILITY AND FITNESS FOR A PARTICULAR PURPOSE, OR OTHERWISE, ARE LIMITED IN DURATION TO THE LENGTH OF THIS WRITTEN WARRANTY. EXCEPT AS EXPRESSLY SET FORTH HEREIN, J∅TUL MAKES NO ORAL, WRITTEN OR OTHER WARRANTY WITH RESPECT TO J∅TUL GAS STOVES OR FIREPLACES.
Some states do not allow the exclusion or limitation of incidental or consequential damages, or limitations on the length of implied warranties. Therefore, the above exclusions or limitations may not apply to you. This warranty gives you specific legal rights, and you may have other rights, which vary from state to state.
J∅TUL reserves the right to discontinue, modify or change the materials used to produce the Jøtul Gas Stove or Fireplace. J∅TUL shall have the right to replace any defective component with substitute components determined by J∅TUL to be of substantially equal quality and price.
The dollar value of J∅TUL's liability for breach of this warranty shall be limited exclusively to the cost of furnishing a replacement component. J∅TUL shall not in any event be liable for the cost of labor expended by others in connection with any defective component. Any costs or expenses beyond those expressly assumed by J∅TUL under the terms of this warranty shall be the sole responsibility of the owner(s) of the Jøtul Gas Stove or Fireplace.
No dealer, distributor, or other person is authorized to modify, augment, or extend this limited warranty on behalf of J∅TUL. NO MODIFICATION OR CHANGE TO THIS WARRANTY WILL BE EFFECTIVE UNLESS IT IS MADE IN A WRITTEN DOCUMENT MANUALLY SIGNED BY AN AUTHORIZED OFFICER OF J∅TUL.
An authorized installer may have been provided with certain information related particularly to the Jøtul Gas Stove or Fireplace; however, no authorized installer or other person who may service the appliance is an agent of J∅TUL. No inference should be made that J∅TUL has tested, certified, or otherwise pronounced any person as qualified to install or service the appliance. J∅TUL shall not be liable or otherwise responsible for any error or omission by a person installing or servicing a Jøtul Gas Stove or Fireplace.
If you believe your Jøtul Gas Stove or Fireplace is defective, you should contact your nearest authorized Jøtul dealer, who will process a warranty claim. IN ORDER TO QUALIFY FOR WARRANTY COVERAGE, J∅TUL MUST RECEIVE NOTICE OF A POSSIBLE DEFECT WITHIN SIXTY (60) DAYS OF THE DATE THE DEFECT IS FIRST DISCOVERED, OR REASONABLY COULD HAVE BEEN DISCOVERED.
This warranty is given by Jøtul North America, Inc., 55 Hutcherson Drive, Gorham, Maine 04038 USA
This page is intentionally left blank
LIGHTING INSTRUCTIONS
WARNING: If you do not follow these instructions exactly, a fire or explosion may result causing property damage, personal injury, or loss of life.
A. This appliance is equipped with an ignition device which automatically lights the pilot. Do Not try to light the pilot by hand.
B. BEFORE LIGHTING, smell all around the appliance area for gas. Be sure to smell next to the floor because some gas is heavier than air and will settle to the floor.
WHAT TO DO IF YOU SMELL GAS:
- Extinguish any open flame
- Open windows.
- Do not light any appliance.
- Do not touch any electrical switches.
- Do not use any phone in your building.
- Immediately call your gas supplier from outside of the house.
- If the gas supplier is unavailable, call the fire department from outside of the house.
C. Use only your hand to push in or turn the gas control switch. Never use tools. If the knob will not push in or turn by hand, do not try to repair it. Call a qualified technician. Force or attempted repair may result in a fire or explosion.
D. Do not use this appliance if any part has been under water. Immediately call a qualified service technician to inspect the appliance and to replace any part of the control system and any gas control which has been under water.
OPERATING INSTRUCTIONS
-
STOP! Read the safety information above.
-
Set the Burner Switch to the "OFF" position.
- NOTE: This appliance is equipped with an ignition device which automatically lights the pilot. Do not try to light the pilot by hand.
-
Wait five (5) minutes to clear out any gas. Then, smell for gas, including near the floor. If you smell gas, STOP! Follow "B" in the safety information above. If you do not smell gas, go to the next step.
-
This appliance is intended to be operated by remote control. Set the Burner Switch to "REMOTE" to enable remote communication.
-
With the Remote Transmitter OFF, press the Mode button then toggle UP/DOWN to CPI mode. The pilot will light.
-
Press the Power button to light the burner. CPI mode is set to run for up to seven (7) days if desired.
-
If the appliance will not operate, follow the instructions below "To Turn Off Gas To Appliance", and call your service technician or gas supplier.
-
See the Owner's Manual for more detailed remote control instructions.
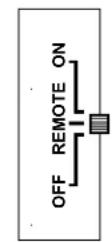
BURNER SWITCH
REMOTE CONTROLS

ON / OFF

THERMO- STAT

UP / DOWN

MODE
TO TURN OFF GAS TO APPLIANCE
- Set the remote thermostat to the lowest setting.
-
Set the Burner switch to the "OFF" position.
-
IF SERVICE IS TO BE PERFORMED:
- Turn off all electric power to the appliance
130084.Rev.3
September 2024
This appliance must be installed in conformance with local and national building regulations. Before beginning the installation, it is important that these instructions be carefully read and understood. Jøtul maintains a policy of continual product development. Consequently, products may differ in specification, color or type of accessories from those illustrated or described in various publications.
Your stove has a unique serial number stamped on the rating plate located in the control compartment. Please record the serial number in the space below. You may also wish to attach your purchase receipt to this page for future reference.
MODEL NAME: Jøtul GF 520 DV IPI
SERIAL NUMBER:____
DATE OF PURCHASE:____
AUTHORIZED DEALER:____
ADDRESS ____
PHONE: ____
INSTALLER: ____
FUEL TYPE: ____
FUEL CONVERSION: NO ____ YES____
INSTALLATION DATE: ____
INSTALLATION TECHNICIAN: ____

Jøtul North America
55 Hutcherson Dr.
Gorham, Maine 04038-2634
Jøtul ASA
P.O. Box 1411
N-1602 Fredrikstad
Norway
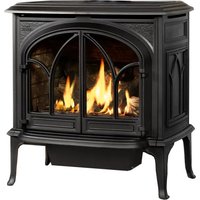
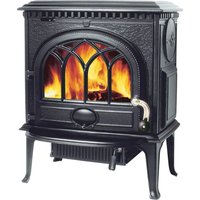
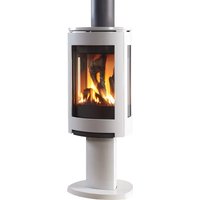
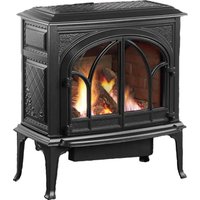
- Jøtul GF 520 DV IPI
- Direct Vent Gas Stove
- Installation and Operation Instructions
- ! DANGER
- Suggested Tools for Installation and Service
- PLEASE NOTE:
- Initial Break-in
- Operation Sound
- Table of Contents
- Jøtul GF 520 DV IPI (POD)
- Direct Vent Gas Heater
- Certified Test Standards
- WARNING:
- Specifications
- Input Rates
- Natural Gas
- Propane
- Miscellaneous Hardware Bag Contents
- Options & Accessories
- BARRIER SCREEN
- Initial Assembly
- Unpacking the Stove
- General Information
- Safety Information
- Installation Requirements
- Location
- Floor Protection
- Stove and Vent Clearance Requirements
- Alcove Installation
- Clearance to Combustible Materials Above Stove
- Distance to Gas Supply
- Distance to Electrical Supply
- Mobile Home Installation
- Procedure
- Venting Requirements
- IMPORTANT
- RE-INSTALL THE TOP PLATE BEFORE CONNECTING VENT TO THE STOVE.
- Vent Restriction
- Exhaust Restrictor
- Adjusting Exhaust Restrictor Plate:
- Approved Horizontal and Vertical Vent Terminations
- Vertical Vent Termination
- Air Intake Diverter
- Installation Instructions:
- Horizontal Termination
- ■ SNORKEL TERMINATION:
- Fuel Conversion
- IN CANADA:
- Tools required:
- Conversion Kit Contents:
- Fuel Conversion Procedure
- CAUTION: DO NOT OVER TIGHTEN!
- Regulator Conversion.
- CAUTION: TAKE CARE TO AVOID CRIMPING WIRE LEADS DURING REASSEMBLY.
- NEVER USE OPEN FLAME TO CHECK FOR GAS LEAKS. AVOID WETTING THE IFC UNIT OR MOTORIZED REGULATOR WHEN CONDUCTING LEAK CHECK.
- Fuel Conversion, cont'd.
- Gas Supply Connection
- Gas Pressure
- INLET GAS PRESSURES
- Accessories
- Firebox Panel Kit Black Reflective Glass Panel Kit 158342
- INSTALL FUEL CONVERSION KIT BEFORE INSTALLING PANEL KIT.
- ORIENT GLASS PANEL WITH THE SMOOTH SIDE FACING OUT.
- Firebox Panel Kit Fluted Panel Kit 158288
- Optional Ash Lip
- Instructions:
- Install Burner Media
- Log Set 158263
- Contents:
- Rear Log......226921
- Left Side Log......226922
- Right Side Log......226923
- Left Middle Log......226924
- Right Middle Log......226925
- Birch Log Set 158388
- Rear Log......227191
- Lower Left Log......227192
- Middle Lower Log......227193
- Right Lower Log......227194
- Left Upper Log......227195
- Right Upper Log......227196
- Middle Log......227197
- System Check
- INITIAL FIRING PROCESS - Heat-curing the Stove Paint
- Gas Appliance Curing Process
- DO NOT USE AMMONIA-BASED CLEANERS. DO NOT CLEAN HOT GLASS.
- Flame Appearance / Air Shutter Adjustment
- To adjust the air shutter:
- Operation
- Important Notes
- Burner Operation
- Features Overview
- Remote Control Transmitter
- Remote Control Receiver
- Integrated Fireplace Control (IFC)
- Sit 886 Modulating Valve
- Pilot Assembly
- Intermittent Pilot Flame Rectification Process
- INSTALLER / OPERATOR NOTE
- ATTENTION:
- Remote Control Functions
- Pilot Mode
- Burner Control
- Remote Transmitter
- Initializing the System
- Remote Transmitter Controls
- Temperature Indication Display
- Turn on the Burner
- Turn off the Burner
- Remote Burner Control
- Room Thermostat (Transmitter Operation)
- SMART Thermostat Function
- Accent Lamp Control
- Child Safety Lock
- Maintenance
- NOTICE:
- GLASS AND SAFETY SCREEN BARRIERS
- Annual Cleaning
- Vent System
- Burner System
- Glass Care
- Glass and Gasket Inspection
- Front Door Glass & Gasket Replacement Kit 158335
- Side Glass & Gasket Replacement Kit 158334
- Replace the Side Glass Panel
- Safety Screen Maintenance and Replacement
- Cleaning
- Front Safety Screen Replacement
- Side Safety Screen Replacement 226648
- Tool List:
- Remote Transmitter Battery Replacement
- Receiver Battery Replacement
- Appendix
- GF 520 DV IPI Illustrated Parts Breakdown
- Jøtul Gas Product Warranty
- LIMITED FIVE YEAR WARRANTY - Cast Iron, Steel Doors, Surround Components, Firebox:
- LIMITED TWO YEAR WARRANTY - Burner, Ceramic Burner, Burner Treatments, Firebox Panels:
- LIMITED TWO YEAR WARRANTY - Enamel Finish:
- LIMITED ONE YEAR WARRANTY - Gas & Electrical Components (controls, plumbing, valve, blower):
- EXCLUSIONS AND LIMITATIONS
- LIGHTING INSTRUCTIONS
- WHAT TO DO IF YOU SMELL GAS:
- OPERATING INSTRUCTIONS
- TO TURN OFF GAS TO APPLIANCE
Brand : JOTUL
Model : GF 520 DV IPI
Category : Frying Pan