
BPD8B - Dishwasher BLACK & DECKER - Free user manual and instructions
Find the device manual for free BPD8B BLACK & DECKER in PDF.


| Type | Dishwasher |
| Brand | Black & Decker |
| Model | BPD8B |
| Place Settings | 8 |
| Power Supply | 120 V, 60 Hz, 15 A circuit |
| Water Pressure | 5.8 - 14.5 psi (0.04 - 1 MPa) |
| Wash Programs | Heavy, Normal, ECO, Glass, 90 min, Rapid |
| Special Features | Hi Temp (140°F), Heated Dry (158°F), Control Lock, Delay Start (up to 24 h), Rinse Aid Indicator |
| Filter System | Coarse, Main, Fine filters |
| Spray Arms | Upper and lower, removable for cleaning |
| Rack Features | Adjustable upper rack, foldable tines, silverware basket |
| Installation | Quick connect assembly for faucet; drain hose to sink/standpipe; 4 casters (2 lockable) |
| Safety | Grounding required; anti-tip; hydrogen gas warning; child lock |
| Maintenance | Clean filters weekly; clean spray arms; descale with vinegar; winterize if freezing |
| Warranty | 1 year parts and labor |
| Customer Support | 844-299-0879 (Mon-Fri, 10:30 AM - 6:30 PM EST) |
Frequently Asked Questions - BPD8B BLACK & DECKER
User questions about BPD8B BLACK & DECKER
0 question about this device. Answer the ones you know or ask your own.
Ask a new question about this device
Download the instructions for your Dishwasher in PDF format for free! Find your manual BPD8B - BLACK & DECKER and take your electronic device back in hand. On this page are published all the documents necessary for the use of your device. BPD8B by BLACK & DECKER.
USER MANUAL BPD8B BLACK & DECKER
natural_image
Line drawing of a black-and-white kitchen appliance with wheels and control panel (no text or symbols)Thank you for choosing BLACK+DECKER!
PLEASE READ BEFORE RETURNING THIS PRODUCT FOR ANY REASON.
If you have a question or experience a problem with your BLACK+DECKER purchase, go to www.blackanddecker.com/instantanswers
If you can't find the answer or do not have access to the Internet, call 844-299-0879 from 10:30 a.m. to 6:30 p.m. EST Mon. - Fri. to speak with an agent. Please have the catalog number available when you call.
SAVE THIS MANUAL FOR FUTURE REFERENCE.
CONTENTS
SAFETY INFORMATION
Important Safety Instructions....4-5
Electrical Requirements....6
SET UP & USE
Installation Instructions....7
Parts & Features....8
Operation & Use 9-21
CLEANING & CARE 22-25
TROUBLE SHOOTING & WARRANTY
Before You Call For Service....26
Customer Service....26
Troubleshooting....27-29
Limited Warranty 30
PRODUCT REGISTRATION
Thank you for purchasing our BLACK+DECKER product. This easy-to-use manual will guide you in getting the best use of your product.
Remember to record the model and serial numbers. They are on a label on the rear.
Model number
Serial number
Date of purchase
Staple your receipt to your manual. You will need it to obtain warranty service.
SAFETY INFORMATION

DANGER
DANGER - Immediate hazards which WILL result in severe personal injury or death

WARNING
WARNING - Hazards or unsafe practices which COULD result in severe personal injury or death

CAUTION
CAUTION - Hazards or unsafe practices which COULD result in minor personal injury
IMPORTANT SAFETY INSTRUCTIONS

WARNING
When using electrical appliances, basic safety precautions should be followed, including the following
- READ ALL INSTRUCTIONS BEFORE USE
- Do not abuse, sit on, stand on or place any heavy objects on the door or dish rack of the dishwasher when it is open. The appliance could tip forward.
- Do not operate your dishwasher unless all enclosure panels are properly in place. Open the door very carefully if the dishwasher is operating, there is a risk of water squirting out.
- When loading items to be washed:
1) Locate sharp items so that they are not likely to damage the door seal;
2) Warning: Knives and other utensils with sharp points must be loaded in the basket with their points down or placed in a horizontal position.
- Check that the detergent receptacle is empty after completion of the wash cycle.
- Use only detergent and rinse additives designed for an automatic dishwasher.
- Never use soap, laundry detergent, or hand washing detergent in your dishwasher. Keep these products out of the reach of children.
- Keep children away from detergent and rinse aid. Keep children away from the open door of the dishwasher, there could still be some detergent left inside.
- This appliance is not intended for use by persons (including children with reduced physical, sensory or mental capabilities, or lack of experience and knowledge, unless they have been given supervision or instruction concerning use of the appliance by a person responsible for their safety.)
- Children should be supervised to ensure that they do not play in or on a dishwasher.
- Do not tamper with controls.
- Do not wash plastic items unless they are marked “Dishwasher Safe” or the equivalent. For plastic items not so marked, check the manufacturer’s recommendations.
SAFETY INFORMATION
- Dishwasher detergents are strongly alkaline, they can be extremely dangerous if swallowed. Avoid contact with skin and eyes and keep children away from the dishwasher when the door is open.
- The door should not be left in the open position since this could present a tripping hazards.
- If the supply cord is damaged, it must be replaced by the manufacturer or its service agent or a similarly qualified person in order to avoid a hazard.
- Remove the door to the washing compartment when removing an old dishwasher from service or discarding it.
- Dispose of packing materials properly.
- Use the dishwasher only for its intended function.
- During installation, the power supply must not be excessively or dangerously bent or flattened. Do not tamper with controls.
- The appliance is to be connected to the water mains using new hose sets and that old hose-sets should not be reused.
- The maximum number of place settings to be washed is 8.
- The maximum permissible inlet water pressure is 14.5 psi (1 MPa).
- The minimum permissible inlet water pressure is 5.8 psi (0.04 MPa).
- Do not use this dishwasher outdoors.
- This appliance must be properly installed in accordance with the installation instructions before its use.
- This appliance must be connected to a proper electrical outlet with the correct electrical supply.
- Disconnect electrical power and water intake hose to dishwasher before cleaning and/or servicing.
- Under certain conditions, hydrogen gas may be produced in a hot-water system that has not been used for two weeks or more. HYDROGEN GAS IS EXPLOSIVE. If the hot-water system has not been used for such a period, before using the dishwasher turn on all hot-water faucets and let the water flow from each for several minutes. This will release any accumulated hydrogen gas. As the gas is flammable, do not smoke or use an open flame during this time.
SAVE THESE INSTRUCTIONS
HOUSEHOLD USE ONLY
GROUNDING INSTRUCTIONS
ELECTRICAL REQUIREMENTS
In the event of malfunction or breakdown, grounding provides a path of least resistance for electric current to reduce the risk of electric shock. The appliance must be connected to a cord having an equipment-grounding conductor and a grounding plug. The plug must be plugged into an appropriate outlet that is properly installed and grounded in accordance with all local codes and ordinances.
DANGER - Improper connection of the equipment grounding conductor can result in a risk of electric shock. The conductor with insulation having an outer surface that is green with or without yellow stripes is the equipment grounding conductor. If repair or replacement of the cord or plug is necessary, do not connect the equipment-grounding conductor to a live terminal. Check with a qualified electrician or service person if the grounding instructions are not completely understood, or if in doubt as to whether the appliance is properly grounded. Do not modify the plug connected to the appliance - if it will not fit the outlet, have a proper outlet installed by a qualified electrician.
FOR GROUNDED, CORD-CONNECTED APPLIANCE RATED LESS THAN 15A AND INTENDED FOR USE ON A NOMINAL 120V SUPPLY CIRCUIT
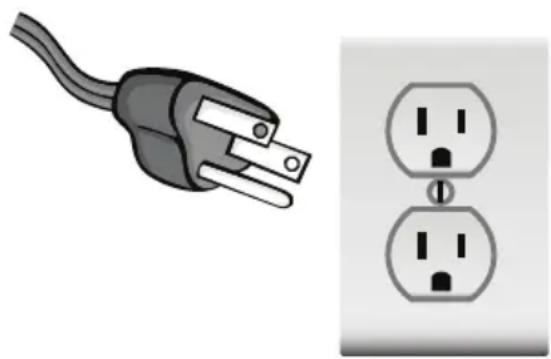
The appliance is for use on a nominal 120V circuit and should be connected to a grounding outlet that looks like the one illustrated below. The use of a temporary adaptor is not recommended.
natural_image
Illustration of an electric plug and its corresponding electrical socket (no text or symbols)SET UP & USE
POWER SUPPLY CORD
- Avoid the use of an extension cord because of potential safety hazards under certain conditions. Have a qualified electrician or serviceman to install an outlet near the appliance.
- If it is absolutely necessary to use an extension cord, extreme care must be exercised.
a) Use only a grounding type 3-wire extension cord that has a 3-blade grounding plug and a 3-slot receptacle that will accept the plug on the appliance.
b) The marked electrical rating of the extension cord must equal to or greater than the electrical rating of the appliance. The longer cord should be arranged so that it will not drape over the counter top or table top where it can be pulled on by children or tripped over unintentionally.
NOTE: Neither BLACK+DECKER nor the dealer can accept any liability for damage to the product or personal injury resulting from failure to observe the electrical connection procedures.
INSTALLATION INSTRUCTIONS

WARNING: Electrical Shock Hazard - Disconnect electrical power before installing dishwasher.
Failure to do so can result in death or electrical shock.

CAUTION: The installation of the pipes and electrical equipment should be done by professionals.
The installation position of dishwasher should be near the existing inlet and drain hoses and power cord.
One side of the cabinet sink should be chosen to facilitate the connection of drain hoses of the dishwasher.
Position the appliance in the desired location. The back should rest against the wall behind it, and the sides, along the adjacent cabinets or wall. The dishwasher is equipped with water supply and drain hoses that can be positioned to the right or the left to facilitate proper installation.

WARNING: DO NOT USE AN EXTENSION CORD OR AN ADAPTER PLUG WITH THIS APPLIANCE.
DO NOT, UNDER ANY CIRCUMSTANCES, CUT OR REMOVE THE GROUND CONNECTION FROM THE POWER CORD.

WARNING - RISK OF FIRE
It is important the plug fits tightly into the wall outlet. If the plug does not fit securely and appears loose, it should not be used. Have a licensed electrician replace the receptacle.
SET UP & USE
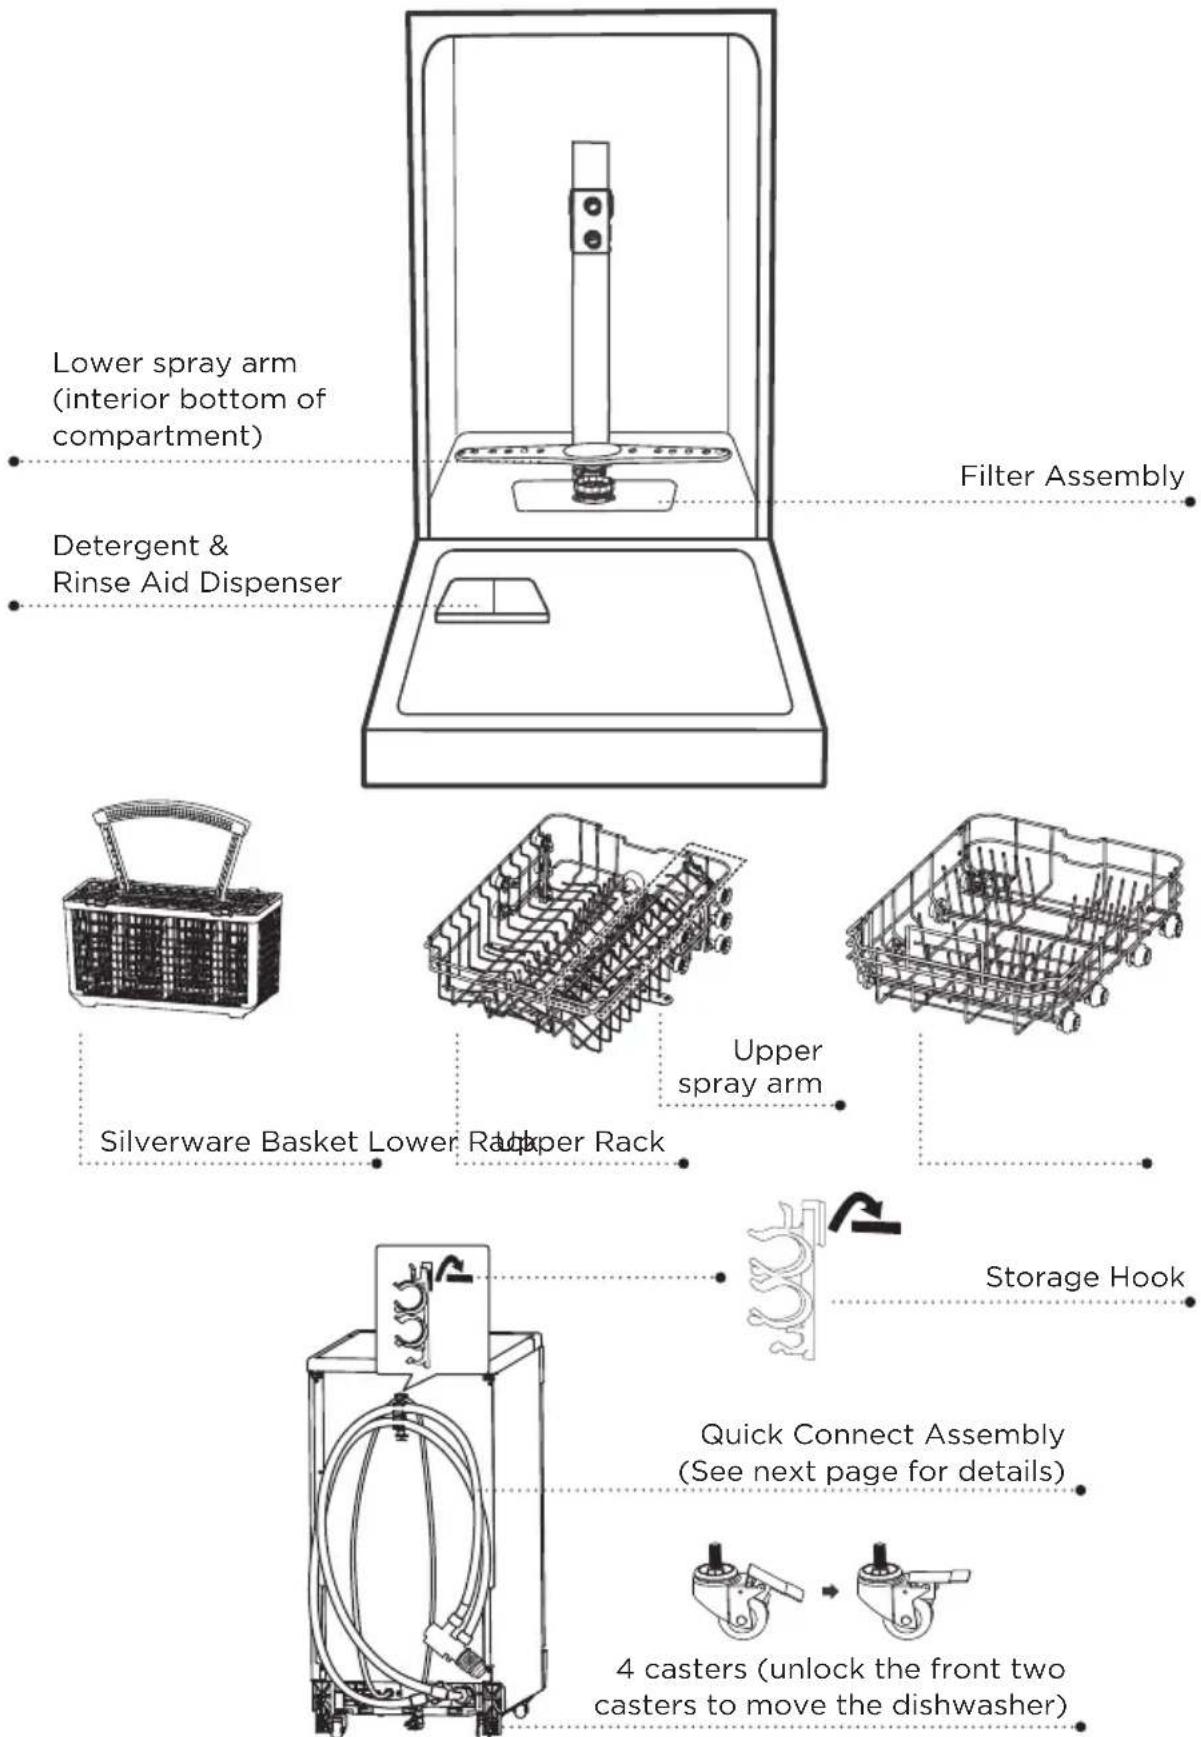
PARTS & FEATURES
SET UP & USE
WATER CONNECTION
Your dishwasher comes equipped with a 'quick connect' assembly (includes inlet and drain hose). The faucet adapter must be installed on the faucet before you can connect the dishwasher. This adapter is included inside your dishwasher. The faucet adapter is compatible with faucets inclusive of either male (outside) or female (inside) threaded faucet connections.
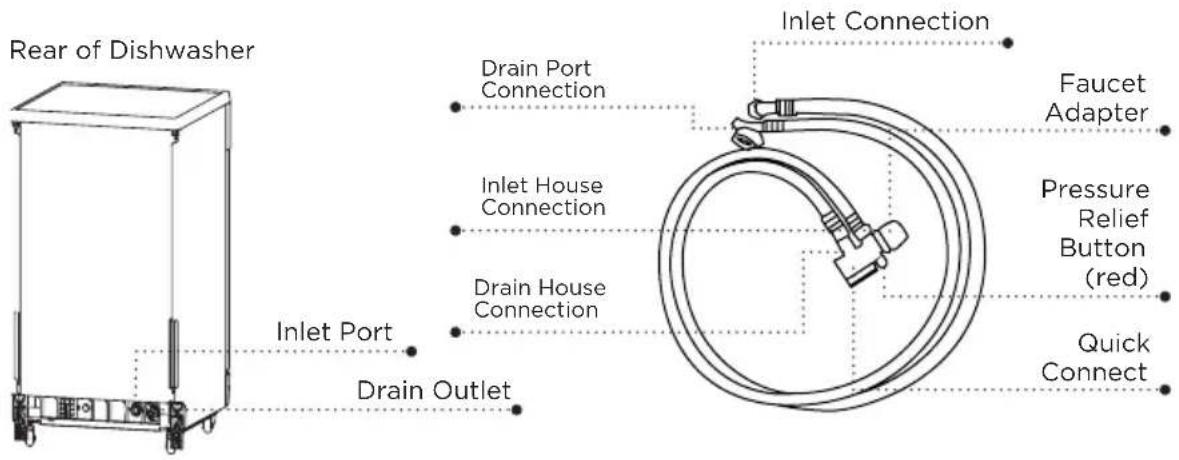

WARNING: In order to avoid that there is more water staying in the inlet hose, please close the faucet after using.
- Screw the faucet adapter onto (or into) the faucet tap. Check for leaks (use Teflon tape to eliminate if necessary).
- Connect the six-sided connection of the drain hose to the drain port connection on the back of the dishwasher cabinet. Do not over-tighten (to avoid damage to threads).
- Connect the star-shaped connection of the inlet hose to the inlet port on the back of the dishwasher cabinet. Do not over-tighten (to avoid damage to threads).
- Connect the circular connection of the drain hose onto the longer (bottom) male connection on the quick connect.
- Connect the circular connection of the inlet hose onto the shorter (top) male connection on the quick connect.
- Attach the quick connect onto the faucet adapter, by pulling down the outer locking collar on the quick connect, while pushing the quick connect upward onto the faucet adapter.
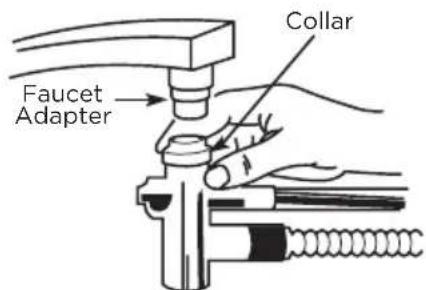
- When the quick connect snaps onto the faucet adapter, release the locking collar. Verify the connection is secure.
- Slowly open the hot water line and check for any sign of water leaks at all hose connections. If leaks are located, immediately close the water supply and repair the hose connections.
SET UP & USE
To Disconnect the Quick Connect Assembly
- Turn off hot water.
- Relieve water pressure from the quick connect assembly before disconnecting it from the faucet by depressing the red pressure relief button.
- Depress the locking collar and remove the quick connect from the faucet.
CONNECT THE DRAIN HOSE
Insert the end of the drain hose into the drain outlet located at the back of the unit. The other end of the hose should be positioned using one of the following methods:
A. Over the edge of a wash basin. Secure the guide to the side of the basin wall with a hook tap with a piece of string to prevent the drain hose from moving.
B. In a laundry tub. The laundry tub should not be higher than 39 in. (100cm). Wash basins should not be over 39 in. (100cm).
C. In a standpipe. The standpipe should not be longer than 39 in. (100cm).
D. Insert the drain hose into a drain pipe with a minimum diameter of 1.5 inches (4 cm).
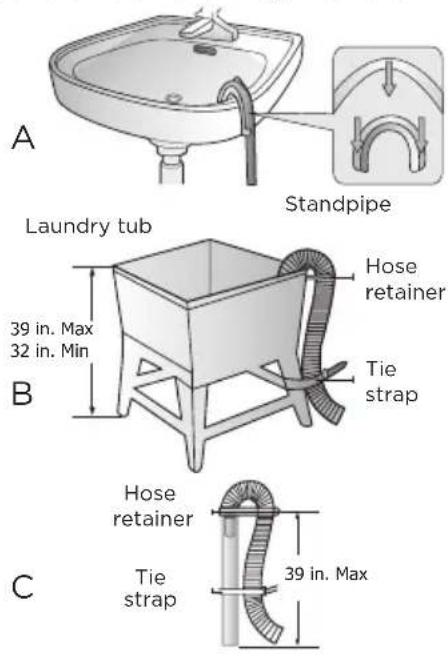
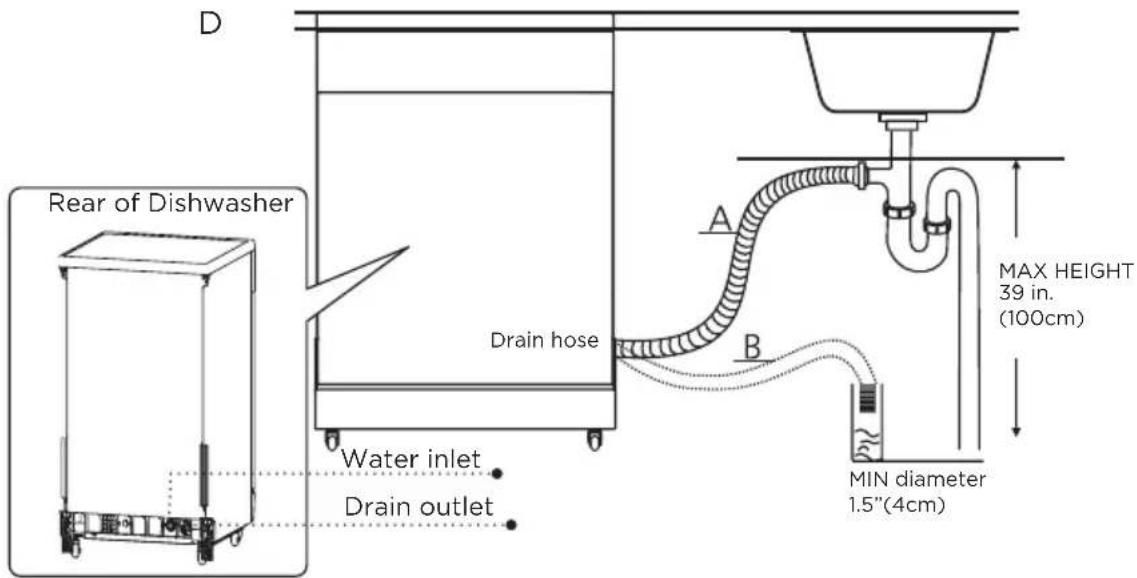
NOTE: Avoid bending or crimping the drain hose. The free end of the hose must not be immersed in water to avoid backflow. If you need a drain hose extension, make sure to use a similar drain hose. It must not be longer than 13 feet (4 meters) otherwise the dishwasher will not drain properly.
SET UP & USE
IMPORTANT!
- Once you open the water supply line, (even if it is closed immediately thereafter), the inlet hose will be pressurized.
- To relieve water pressure from inside the inlet hose, (make sure the water line (faucet) is closed): press and hold the red pressure relief button on the quick connect until the flow of water stops.

WARNING: FAILURE TO RELIEVE WATER PRESSURE, BEFORE
DISCONNECTING THE QUICK-CONNECT FROM THE FAUCET, WILL RESULT IN BACK-PRESSURE OVER-SPRAY. THE TEMPERATURE OF INCOMING WATER CAN BE VERY HOT, AND BACK-PRESSURE OVER-SPRAY COULD CAUSE SEVERE BURNS AND/OR SCALDING.

DANGER: DO NOT LET CHILDREN DISCONNECT THE DISHWASHER; CLOSE SUPERVISION OF CHILDREN IS ALWAYS IMPORTANT AROUND APPLIANCES.
NOTE: Hard water conditions will adversely affect the washing performance of your dishwasher. Hard water conditions will also contribute to 'lime' (white film substance) deposits and/or 'scaling' on the stainless steel surface of the dishwasher tub and heater element, located in the sump underneath the removable filter screen. To assist in minimizing these conditions, it is recommended to periodically operate/rinse the inside of the dishwasher (empty) using 1 cup of white vinegar at least once a week.
DISCONNECTING YOUR DISHWASHER
- Shut off the water supply at the faucet.
- Disconnect the power supply cord.
START OF DISHWASHER
The following things should be checked before starting the dishwasher:
- The dishwasher is level and fixed properly.
- The inlet valve is open.
- There is a leakage at the connections of the connectors.
- The wires are tightly connected.
- The power is switched on.
- The inlet and drain hoses are not knotted.
- All packing materials and printings should no be taken out from the dishwasher.
SET UP & USE
CONTROL PANEL
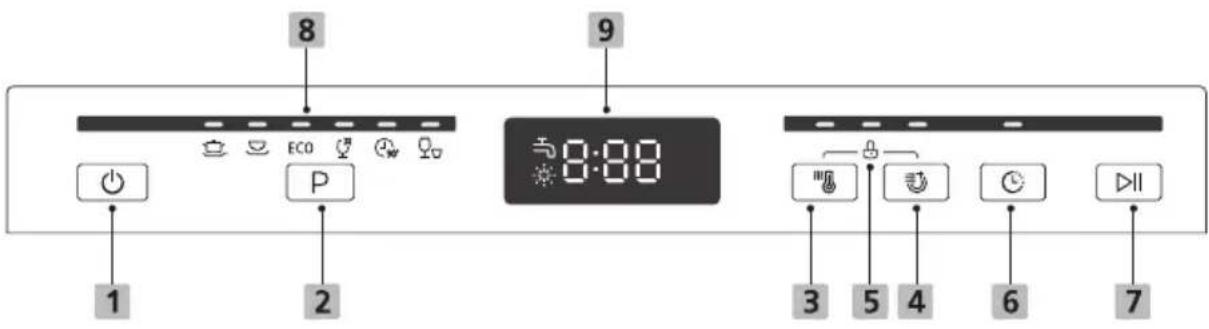
| 1 Power | Press this button to turn on your dishwasher, the screen lights up. |
| 2 Program | Select the appropriate washing program, the selected program indicator will be lit. After completing the program and function selection, the Start / Cancel button to start. |
| 3 Hi Temp | When the “Hi Temp” function is selected, the temperature of the water will be maintained at 140°F (60°C) max. |
| 4 Heated Dry | The “Heated Dry” function is selected. The water temperature is at 158°F (70°C). (It can be used with all programs except glass.) |
| 5 Control Lock | This option allows you to lock the buttons on the control panel, so children cannot accidentally start the dishwasher by pressing the buttons on the panel. Only the Power button remains active. To lock or unlock the buttons on the control panel, press and hold the Hi Temp button + Heated button for 3 seconds simultaneously. |
| 6 Delay | Press the Delay button to increase the delay start time. Delay a cycle for up to 24 hours in one-hour increments. After setting the delay time, press the Start / Cancel button to start. |
| 7 Start / Cancel | To start the selected washing program.Press the button for 3 seconds to cancel the program, when the dishwasher is working.Press the button for 3 seconds to cancel the delay start after it has been programmed. |
SET UP & USE
| 8 Cycle indicator | HeavyFor heavily soiled items include pots and pans with dried on food.NormalThis is the standard program suitable for normally soiled loads, such as pots, plates, glasses and lightly soiled pans.ECOFor normally soiled loads, such as pots, plates, glasses and lightly soiled pans.GlassFor lightly soiled dishware and glass.90 minFor normal/lightly soiled loads that need a quick wash and do not need to be completely dry.RapidA shorter wash for lightly soiled loads that do not need to be completely dry. |
| 9 Screen | ※ Rinse AidIf the “*” indicator is lit, it means the dishwasher is low on dishwasher rinse aid and requires a refill.→ Water FaucetIf the indicator is lit, it means the water faucet is closed.8:88 Time DisplayIndicates remaining cycle time, delay start time and error codes. For each cycle time the display will show the remaining time counting down until it reaches 0:00 indicating the end of the cycle. after 8 seconds the display will indicate END. |
RINSE AID DISPENSER
Rinse Aid improves drying, eliminating spots and streaks on your glasses and dishes. It is automatically released during the final rinse to prevent water from forming droplets. The rinse aid dispenser is located inside the door next to the detergent dispenser.
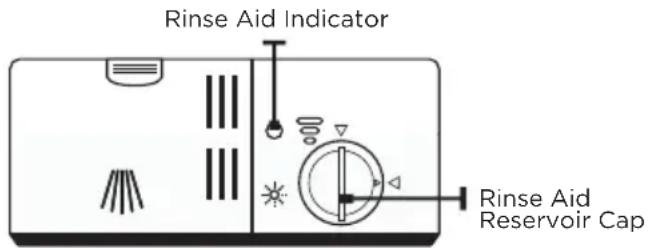
WARNING: Only use branded rinse aid for dishwasher. Never fill the rinse aid dispenser with any other substances. (Examples: Liquid Detergent or other soap). This would damage the appliance.
REFILLING THE RINSE AID DISPENSER
When the Rinse Aid symbol is illuminated on the control panel, it indicates that the rinse aid dispenser requires a refill.
If the rinse-aid warning light in the control panel in not illuminated, you can check the amount of rinse-aid in the dispenser by the color of rinse aid indicator next to the cap. When the rinse-aid dispenser is full, the circular indicator will be dark. As the rinse-aid diminishes, the size of the dark circle decreases as shown below. You should never let the rinse aid get below 1/4 full.
Full 3/4 full 1/2 full 1/4 full Empty
○
To fill the dispenser:
- Remove the rinse aid reservoir cap by rotating it counterclockwise.
- Carefully pour in the rinse-aid into its dispenser, while avoiding overflow.
- Close the rinse aid reservoir cap by rotating it clockwise.
Note: clean any spilled or excessive rinse aid to avoid excessive foaming when the dishwasher is in use.
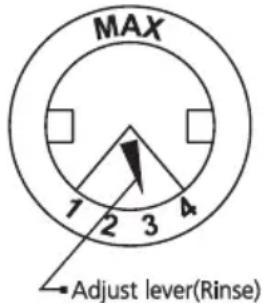
The rinse aid dispenser has four settings. "1" selects the smallest amount or rinse aid, while "4" releases the largest amount of rinse aid that is released during the rinse cycle. The recommended setting is on "3". If the dishes still are not drying properly or are spotted, adjust the dial to a higher number. If there are sticky white stains or a bluish film on glassware or silverware adjust the dial to a lower setting.
SET UP & USE
DETERGENT DISPENSER
The dispenser must be refilled before the start of each wash cycle. Follow the dishwasher detergent manufacturer recommendation on the packaging.
Always add the detergent just before starting the dishwasher, otherwise it could get damp and will not dissolve properly.
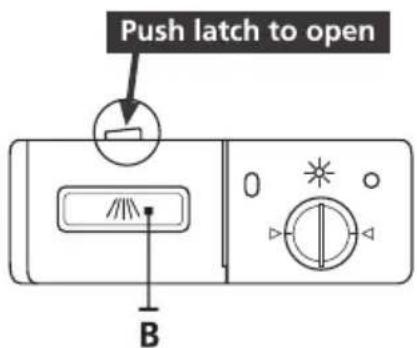
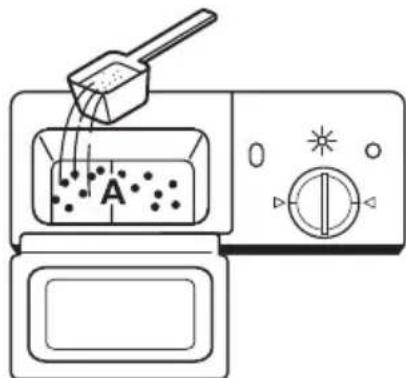
To fill the detergent dispenser press the release catch to oven the cover.
Add detergent to fill the larger compartment for the main wash cycle. For heavily soiled dishes add some detergent into the smaller compartment as well for the pre-wash cycle.
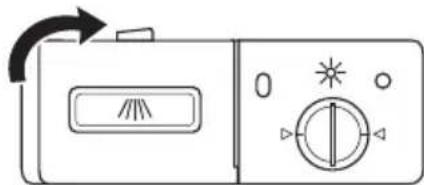
Close the cover and press the release catch until it locks into place.
SET UP & USE
BEFORE LOADING YOUR DISHWASHER
RECOMMENDATIONS
Wash items which are identified as dishwasher-safe in your dishwasher.
For delicate items, select a program with the lowest possible temperature.
To prevent damage, do not take glass and cutlery out of the dishwasher immediately after the program has ended.
DO NOT WASH THE FOLLOWING ITEMS IN A DISHWASHER
- Cutlery with wooden, horn china or mother-of-pearl handles
- Plastic items that are not heat resistant
- Older cutlery with glued parts that is not temperature resistant
• Bonded cutlery items or dishes - Pewter or cooper items
- Crystal glass
• Steel items subject to rusting - Wooden platters
- Items made from synthetic fibres
NOTE:
• Some types of glasses can become dull after a large number of washes
• Silver and aluminium parts have a tendency to discolor during washing
- Glazed patterns may fade if machine washed frequently
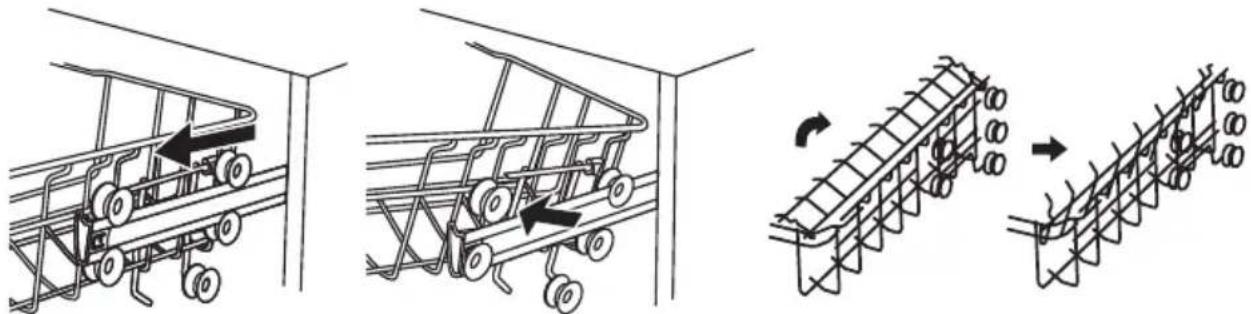
ADJUSTING THE RACKS
The height of the upper rack can be easily adjusted to accommodate taller dishes in either the upper or lower rack.
natural_image
Technical line drawings of a vehicle chassis with wheels and structural supports, showing mechanical assembly (no text or symbols)Lower Position Upper Position
To raise the rack when it is in lower position, pull it out and remove it.
Align the rollers as shown to reinsert and push in.
The tines can be folded to make room for larger items. They can also be removed when not in use.
SET UP & USE
Scrape off any large amounts of leftover food. Soften remnants of burnt food in pans. It is not necessary to rinse the dishes under running water.
Load the dishwasher in following way:
- Place items such as cups, glasses, pots/pans, etc. face down.
- Curved items, or those with recesses, should be loaded at a slant so that water can drain off.
- All utensils should be stacked securely and can not tip over.
- All utensils should be placed so that the spray arms can rotated freely during washing.
- Load hollow items such as cups, glasses, pans etc. with the opening downwards so that water cannot collect inside.
- Dishes and items of cutlery must not lie inside one another, or cover each other.
• To avoid damage to glasses, they must not touch. - Load large items which are most difficult to clean into the bottom rack.

CAUTION: Long and/or sharp items of cutlery such as carving knives must be positioned horizontally in the basket. Knives with long blades loaded in an upright position are a potential hazard.
LOADING THE DISHWASHER
When loading dishes, pull out the upper rack sufficiently so you can load it without striking the counter with dishes.
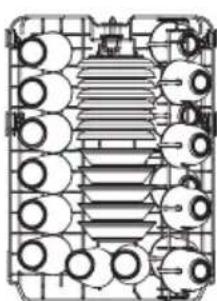
The upper rack is designed for small plates, mugs and glasses marked "Recommended Loading". If you have several small plates in is recommended that you load them into the dishwasher in two half rows The front of each plate should face the back of the plate in front of it, and the open sides of the plates at the center of the dishwasher face each other.
Recommended Loading
natural_image
Pure technical diagram of a mechanical or electrical component layout without any text, numbers, or symbolsTop Rack
natural_image
Technical line drawing of a mechanical or electrical component assembly (no text or symbols)Bottom Rack
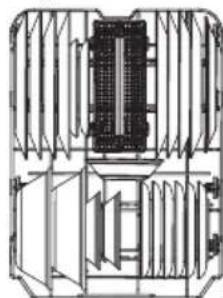
Dinner plates, soup bowls, plates, pots, lids, casserole dishes, and plate should be loaded in the bottom rack. Load large items such as pots and pans into the dishwasher so their open sides face downwards
Silverware Basket

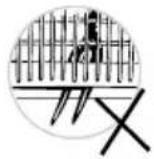
CAUTION: Long and/or sharp items of cutlery such as carving knives must be positioned horizontally in the basket. Knives with long blades loaded in an upright position are a potential hazard.

WARNING: DO NOT LET ANY ITEM EXTEND
THROUGH BOTTOM.
ALWAYS LOAD SHARP UTENSILS WITH
THE SHARP POINT DOWN!
UNLOADING THE DISHWASHER
To prevent water dripping from the upper basket into the lower basket, we recommend that you empty the lower basket first, followed by the upper basket.

WARNING: Items will be hot. To prevent injury do not take remove items from the dishwasher until approximately 15 minutes after the wash program has ended.
SET UP & USE
WASH CYCLE TABLE
| Program Cycle Selection Information | Description of Cycle | Detergent pre/ main | Running time (min) | Energy (Kwh) | Water (l) | Rinse Aid | |
 Heavy Heavy | For the heaviest soiled loads such as pots, pans, casserole dishes and dishes that have been sitting with dried food on them for a while. | Pre-wash 1 Pre-wash 2 Main wash (149°F) Rinse 1 Rinse 2 Last Rinse(154°F) Drying | Pre-wash compartment for normal/heavily soiled + fill main wash compartment | 165 0.76 | 19 | ● | |
 Normal Normal | For normal ly soiled loads, such as pots, plates,glasses and lightly soiled pans. Standard daily cycle. | Pre-wash 1 Pre-wash 2 Main wash (113-140°F) Rinse 1 Rinse 2 Last Rinse(149°F) Drying | Pre-wash compartment for normal/heavily soiled + fill main wash compartment | 121-150 | 0.56-0.64 | 9.7-19 | ● |
| [YSXX]ECO | For lightly soiled loads, such as glasses, crystal and fine china. | Pre-wash Main wash (122 °F) Rinse 1 Rinse 2 Last Rinse (143 °F) Drying | Fill main wash compartment | 155 0.53 | 16 | ● | |
| [SG6T]Glass | For lightly soiled dishware and glass. | Pre-wash Main wash (122 °F) Rinse 1 Rinse 2 Last Rinse (143 °F) Drying | Fill main wash compartment | 125 0.60 | 16 | ● | |
 90 min 90 min | A shorter wash for normal/lightly soiled loads that do not need to be completely dry. | Pre-wash (122 °F) Main wash (140 °F) Rinse (131 °F) Last Rinse (154 °F)* Quick Drying | Pre-wash compartment for normal/heavily soiled + fill main wash compartment | 90 0.83 | 13 | ● | |
 Rapid Rapid | A shorter wash for lightly soiled loads that do not need to be completely dry. | Pre-wash (131 °F) Main wash (140 °F) Rinse (131 °F) Last Rinse (136 °F)* Quick Drying | Fill main wash compartment | 60 0.56 | 13 | ● | |
Note:
* Quick Drying will not completely dry dishes due to the fast cycle time.
SET UP & USE
STARTING A WASH CYCLE
- Pullout the dishwasher racks, load the dishes and push the racks back in.
- Add Detergent and Rinse Aid as needed.
- Insert the plug into the socket. The power supply is 120V/60 Hz.
- Make sure that the water supply is turned on to full pressure.
- Close the door and press the POWER button to turn on the dishwasher
- Choose a wash program and the corresponding indicator light will turn on.
- Press the Start/Cancel button, the dishwasher begins to start.
NOTE: When you press the Start/Pause button to pause during washing, the display time will stop blinking and the program will pause and remain this cycle till you restart it again.
SET UP & USE
CHANGE THE PROGRAM
You can modify the washing program, when the dishwasher just runs for a short time. Otherwise, the detergent may have already been released, and the appliance may have already drained the wash water. If this is the case, the detergent dispenser must be refilled (see the section entitled “Loading the Detergent”).
To change the washing program, press the program button more than three seconds the machine will be in stand by state, then you can change the program to the desired cycle setting (see the section entitled “Starting a wash cycle”)
NOTE: If you open the door when washing, the machine will pause. When you close the door, you need press start/pause button to keep the machine working.
FORGOT TO ADD A DISH
A forgotten dish can be added any time before the detergent dispenser opens.
- Press the start/pause button.
- Open the door slightly to stop the wash cycle.
- After the spray arms stop working, you can open the door completely.
- Add forgotten dishes.
- Close the door.
- Press the start/pause button, the dishwasher will run after 10 seconds.
AT THE END OF THE WASH CYCLE
When the working cycle has finished, the buzzer of dishwasher will sound 8 seconds, then stop. Turn off the appliance using the ON/OFF button, shut off the water supply and open the door of the dishwasher. Wait a few minutes before unloading the dishwasher to avoid handling the dishes and utensils while they are still hot and more susceptible to breakage. They will also dry better. Since the appliance is standing by, it will power off automatically after 30 minutes without any operation.
Switch Off the Dishwasher
All the phase lights are off, only in this case, the program has ended.
- Switch off the dishwasher by pressing the ON/OFF button.
- Turn off the water tap!
- Allow time for your dishes to dry before opening the door.
Condensing Drying Method Your dishwasher uses a non-vented drying method. After the final rinse the water is pumped out and the unit shuts off. The remaining water on the hot dishes will eventually evaporate, condense and run off into the bottom of the unit. To ensure that your dishes dry well, it is highly recommended that a rinse aid be used. Be advised that items such as cups and glasses, which have a concave bottom, may retain droplets of water.
Open the door carefully Hot dishes are sensitive to knocks. The dishes should therefore be allowed to cool down around 15 minutes before removing from the appliance. Open the dishwasher's door, leave it ajar and wait a few minutes before removing the dishes. In this way they will be cooler and the drying will be improved.
Unloading the dishwasher It is normal that the dishwasher is wet inside.

WARNING: It is dangerous to open the door when washing, because the hot water may scald you.
CLEANING & CARE
FILTERING SYSTEM
The filter prevents larger remnants of food or other objects from getting inside the pump.
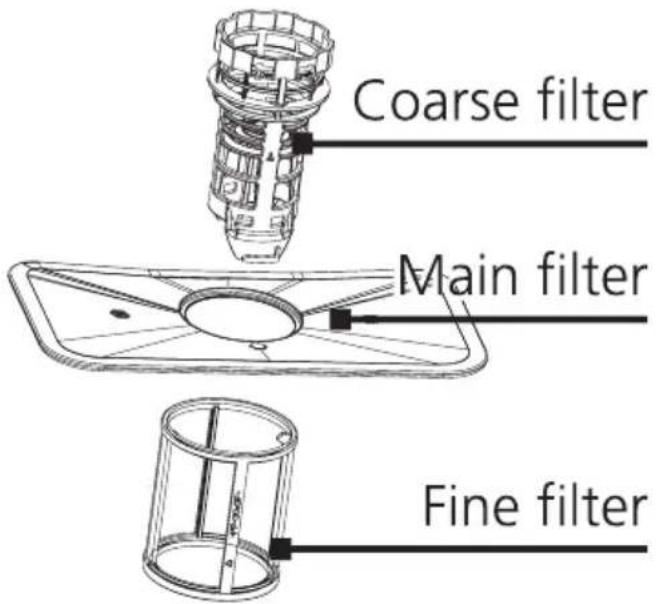
The filter system consists of a coarse filter, a flat (Main filter) and a micro filter (fine filter).
Coarse Filter - Larger items, such as pieces of bone or glass, that could block the drain are trapped in the coarse filter. To remove the items caught by the filter, gently squeeze the tap on the top of this filter and lift out.
Main Filter - Food and soil particles trapped by this filter are pulverized by a special jet on the spray arm and washed down to drain.
Fine Filter - This filter holds soil and food residue in the sump area and prevents it from being deposited on the dishes during wash cycle.
Note: Images are for illustration purposes only and may differ slightly depending on model purchased.
FILTER ASSEMBLY
The filter efficiently removes food particles from the wash water. For best performance and results, the filter assembly must be cleaned regularly. It is recommended to remove the larger food particles trapping in the filter after each wash cycle by rinsing the filter and cup under running water. Lift out the filter assembly to remove it.
CLEANING & CARE

WARNING: Never run the dishwasher without the filters in place. The dishwasher must never be used without the filters. Improper replacement of the filter may reduce the performance level of the appliance and damage dishes and utensils.
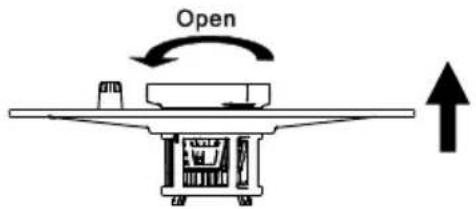
Rotate the filter assembly counter clockwise to unlock it and lift out.
Remove the fine filter from the bottom of the filter assembly. Detach the coarse filter from the main filter by gently squeezing the tabs at the top and lifting it off.
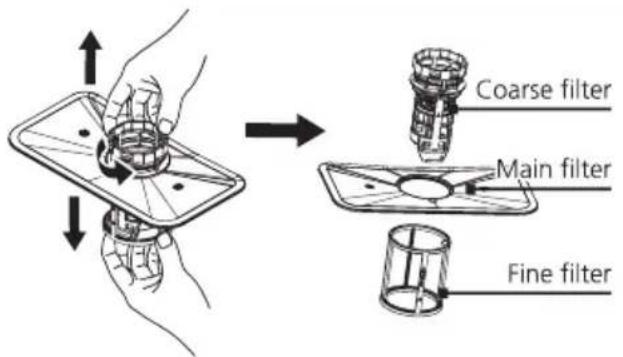
Remove any food particles and clean filters by rinsing under running water. A soft brush can be used if needed.
Replace the filter assembly in reverse order as the removal.
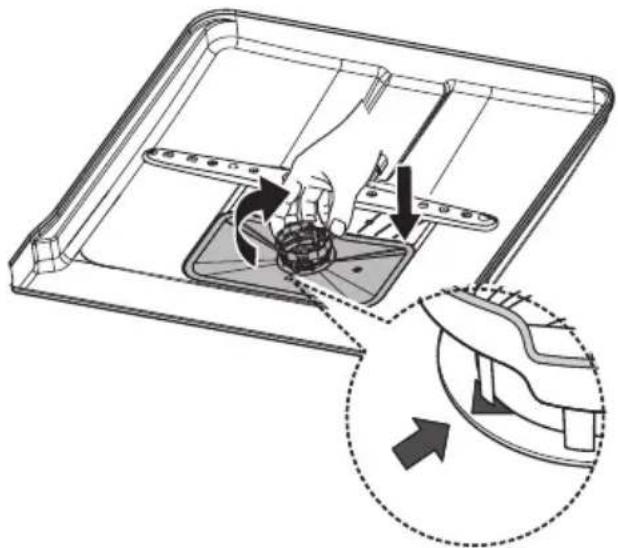
Re-insert the entire assembly in the dishwasher, positioning in its seat, rotating clockwise until it locks into the closed position as shown.
Check the filters for clogs and debris after each use of the dishwasher.

WARNING: Handle filters carefully when cleaning. If the filters become damaged or dented it could effect the performance of the dishwasher.
NOTE: The entire filter assembly should be cleaned once a week.
NOTE: Images are for illustration purposes only and may differ slightly depending on model purchased.
CLEANING & CARE
CARING FOR THE DISHWASHER
The control panel can be cleaned by using a lightly dampened cloth and dry thoroughly.
Never use sharp objects, scouring pads or harsh cleaners on any part of the dishwasher.
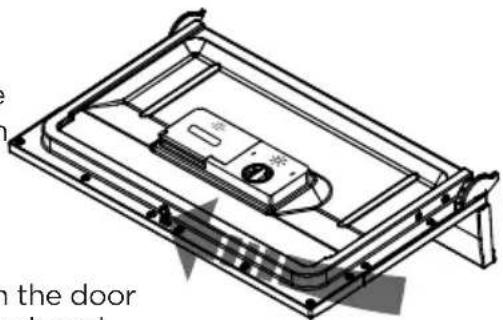
CLEANING THE DOOR
To clean the edge around the door, you should use only a soft warm, damp cloth. To avoid penetration of water into the door lock and electrical components, do not use a spray cleaner of any kind.
natural_image
Technical line drawing of a mechanical device with no visible text or symbols
WARNING: Never use a spray cleaner to clean the door panel as it may damage the door lock and electrical components.
Abrasive agent or some paper towel should not be used because of the risk of scratching or leaving spots on the stainless steel surface.
PROTECT AGAINST FREEZING
Please take frost protection measures on dishwasher in winter. Each time after washing cycles, please operate as follows:
- Cut off electrical power to the dishwasher.
- Turn off the water supply and disconnect the water inlet pipe from the water valve.
- Drain water from the inlet pipe and water valve. (Use a pan to catch the water)
- Reconnect the water inlet pipe to the water valve.
- Remove the filter at the bottom of the tub and use a sponge to use up water in sump.
NOTE: If your dishwasher cannot work because of the ice, please contact professional service persons.
NOTE: If your dishwasher is not operating because of ice or frost accumulation please call for service.
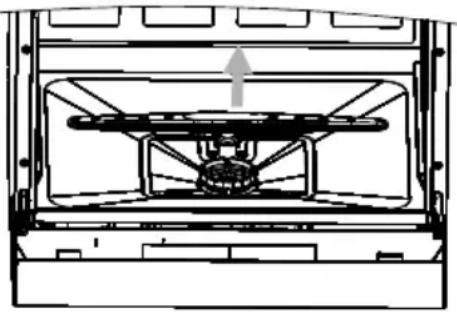
CLEANING THE SPRAY ARMS
The spray arms can be easily removed for periodic cleaning of the nozzles, to prevent possible clogging. Wash them under running water and carefully replace them in their seats, checking that their rotary movement is in no way impeded. Grasp the middle of the spray arm, pull it upwards to remove it. Wash the arms under a jet of running water and return them carefully to their seat. After reassembly, check that the spray arms have been installed correctly and turn freely.
natural_image
Technical line drawing of a mechanical assembly with no visible text or symbolsMAINTAINING THE DISHWASHER
- After every wash, turn off the water supply to the appliance and leave the door slightly open so that moisture and odors are not trapped inside.
- Before cleaning or performing maintenance, always remove the plug from the socket.
- To clean the exterior and rubber parts of the dishwasher, do not use solvents or abrasive cleaning products. Only use a cloth with warm soapy water. To remove spots or stains from the surface of the interior, use a cloth dampened with water with a little vinegar, or a cleaning product made specifically for dishwashers.
- It is recommend that you run a wash cycle with the dishwasher empty and then remove the plug from the socket, turn off the water supply and leave the door of the appliance slightly open. This will help the door seals to last longer and prevent odors from forming within the appliance.
- If the appliance must be moved, try to keep it in the vertical position. If absolutely necessary, it can be positioned on its back.
- One of the factors that cause odors to form in the dishwasher is food that remains trapped in the seals. Periodic cleaning with a damp sponge will prevent this from occurring.
TROUBLESHOOTING & WARRANTY
BEFORE YOU CALL FOR SERVICE
IF THE APPLIANCE FAILS TO OPERATE:
A) Check to make sure that the appliance is plugged in securely. If it is not, remove the plug from the outlet, wait 10 seconds and plug it in again securely.
B) Check for a blown circuit fuse or a tripped main circuit breaker. If these seem to be operating properly, test the outlet with another appliance.
IF NONE OF THE ABOVE SOLVES THE PROBLEM, CONTACT A QUALIFIED TECHNICIAN. DO NOT TRY TO ADJUST OR REPAIR THE APPLIANCE YOURSELF.
IMPORTANT
DO NOT RETURN THIS PRODUCT TO THE STORE
If you have a problem with this product, please contact the BLACK+DECKER Customer Satisfaction Center at 844-299-0879 or service@appliance.com.
DATED PROOF OF PURCHASE, MODEL # AND SERIAL # REQUIRED FOR WARRANTY SERVICE
TROUBLESHOOTING & WARRANTY
Troubleshoot your problem by using the chart below. If the appliance still does not work properly, contact the BLACK+DECKER customer service center. Customers must never troubleshoot internal components.
TROUBLE POSSIBLE CAUSE POSSIBLE REMEDY
| Dishwasher doesn't start | Fuse blown, or the circuit breaker tripped. | Replace fuse or reset circuit breaker. Remove any other appliances sharing the same circuit with the dishwasher. |
| Power supply is not turned on. | Make sure the dishwasher is turned on and the door is closed securely. Make sure the power cord is properly plugged into the wall socket. | |
| Door of dishwasher not properly closed. | Check to make sure there are no obstructions. Close the dishwasher door making sure it latches. | |
| Water not pumped from dishwasher | Kink in drain hose. Check drain hose. | |
| Filter clogged. Check the coarse filter. | ||
| Kitchen sink clogged. | Check kitchen sink to make sure it is draining well. If problem is kitchen sink or plumbing, contact a plumber. | |
| Suds in the tub | The type of detergent used was not for dishwashers. | Make sure the detergent that was used was dishwasher detergent. If a type of soap or detergent was used that is not for dishwasher use, open the door of the dishwasher and let sudes evaporate. Add 1 gallon of cold water to the tub. Close and latch the dishwasher, then Start the “soak” wash cycle to drain out the water. Repeat if necessary. |
| Spilled rinse-aid. Always wipe up rinse-aid spills immediately. | ||
| White film on inside surface | Hard water minerals. | To clean the interior, use a damp sponge. It can be cleaned with a mild soap and water solution. Make sure all soap residue is wiped off after cleaning. |
| There is discolouration or rust stains on cutlery. | The affected items are not corrosion resistant. | Only wash corrosion resistant/dishwasher safe items in the dishwasher. |
TROUBLESHOOTING & WARRANTY
TROUBLE POSSIBLE CAUSE POSSIBLE REMEDY
| Knocking noise in the wash cabinet | The spray arm is knocking against an item in a basket. | Interrupt the program, and rearrange the items which are obstructing the spray arm. |
| Rattling noise in the wash cabinet | Only wash corrosion resistant/dishwasher safe items in the dishwasher. | Interrupt the program and rearrange the items of crockery. |
| Knocking noise in the water pipes | There is an issue with the plumbing or installation of pipes. | This is not caused by the dishwasher and should not impact the dishwasher performance. Contact a qualified plumber to fix any water pipe issues. |
| The dishes are not clean | The dishes were not loaded correctly. | See notes in “Loading the Dishwasher Baskets” |
| The program was not powerful enough. | Select a more intensive program. See “Wash Cycle Table” | |
| Not enough detergent was dispensed. | Use more or change your detergent. | |
| Item are blocking the path of spray arms. | Rearrange the items so that the spray can rotate freely. | |
| The filter combination in the base of wash cabinet is not clean or is not correctly fitted. This may cause the spray arm jets to get blocked. | Clean and/or fit the filter combination correctly. Clean the spray arm jets. See “Cleaning the Spray Arms” | |
| Cloudiness on glassware | Combination of soft water and too much detergent. | Use less detergent if you have soft water and select a shortest cycle to wash the glassware and to get them clean. |
| Black or gray marks on dishes | Aluminum utensils have rubbed against dishes. | Use a mild abrasive cleaner to eliminate those marks. |
TROUBLESHOOTING & WARRANTY
TROUBLE POSSIBLE CAUSE POSSIBLE REMEDY
| The dishes are not drying | Improper loading | Load the dishwasher as suggested in the directions. |
| Too little rinse-aid | Increase the amount of rinse-aid/Refill the rinse-aid dispenser. | |
| Dishes are removed too soon. | Do not empty your dishwasher immediately after washing. Open the door slightly so that the steam can escape. Begin unloading the dishwasher only once the dishes are barely warm to the touch. Empty the low basket first. This prevents water form dropping off dishes in the upper basket. | |
| A short wash program was selected. | The short wash programs do not have significant drying times to dry dishes completely. Chose a longer wash program. | |
| The cutlery or dishes are made with materials such as plastic not suitable for a dishwasher. | Water drainage is more difficult with these items. Cutlery or dishes of this type are not suitable for washing in the dishwasher. |
ERROR CODES
When some malfunctions occur, the appliance will display error codes. Provide the error code when you call for service.
CODES MEANINGS POSSIBLE CAUSE
| E1 Longer inlet time. | Faucets is not opened, or water intake is restricted, or water pressure is too low. |
| E3 | Not reaching required temperature. |
| E4 Overflow. Some element of dishwasher leaks. |

WARNING: If overflow occurs, turn off the main water supply before calling for service. If there is water in the base pan because of an overfill or small leak, the water should be removed before restarting the dishwasher.
TROUBLESHOOTING & WARRANTY
LIMITED WARRANTY
Any repair, replacement, or warranty service, and all questions about this product should be directed to BLACK+DECKER at 844-299-0879 from the USA or Puerto Rico.
BLACK+DECKER warrants to the original purchaser that the product will be free from defects in material, parts and workmanship for the period designated for this product. The warranty commences the day the product is purchased and covers up to a period of 1 year (12 months) for labor/1 year (12 months) for parts (manufacturing defects only).
BLACK+DECKER agrees that it will, at its option, replace the defective product with either a new or remanufactured unit equivalent to your original purchase during the warranty period.
Exclusions: This warranty does not apply to the below:
-
If the appearance or exterior of the product has been damaged or defaced, altered or modified in design or construction.
-
If the product original serial number has been altered or removed or cannot be readily determined.
-
If there is damaged due to power line surge, user damage to the AC power cord or connection to improper voltage source.
-
If damage is due to general misuse, accidents or acts of God.
-
If repair attempts are done by unauthorized service agents, use of parts other than genuine parts or parts obtained from persons other than authorized service companies.
-
On units that have been transferred from the original owner.
-
On products that have been purchased as refurbished, like new, second-hand, in a "As-Is" or "Final Sale" terms.
-
To products used in a commercial or rental setting.
-
To products used in settings other than ordinary household use or used other than in accordance with the provided instructions.
-
To damages for service calls for improper installations.
-
Transportation and shipping costs associated with the replacement of the unit.
-
Service calls to instruct you how to use your product.
-
Service calls to repair or replace the house fuse, reset the circuit breaker or correct the wiring in the house.
REPAIR OR REPLACEMENT AS PROVIDED UNDER THIS WARRANTY IS THE EXCLUSIVE REMEDY OF THE CUSTOMER; BLACK+DECKER SHALL NOT BE LIABLE FOR ANY INCIDENTAL OR CONSEQUENTIAL DAMAGES FOR BREACH OF ANY EXPRESS OR IMPLIED WARRANTY ON THIS PRODUCT, EXCEPT TO THE EXTENT PROHIBITED BY APPLICABLE LAW. ANY IMPLIED WARRANTY OF MERCHANTABILITY OF FITNESS FOR A PARTICULAR PURPOSE ON THIS PRODUCT IS LIMITED TO THE DURATION OF THE WARRANTY.
Some states do not allow the exclusion or limitations of incidental or consequential damages, or limitations on how long the warranty lasts. In these cases the above exclusions or limitations may not apply to you. This warranty gives you specific legal rights and you may also have other rights which vary from state to state.
Obtaining Service: To obtain service, product literature, supplies or accessories please call 844-299-0879 to create a ticket for exchange/repair. Please make sure to provide the date of purchase, model number and a brief description of the problem. Our customer service representative will contact you or send detailed return instructions.
BLACK+DECKER does not warrant that the appliance will work properly in all environmental conditions, and makes no warranty and representation, either implied or expressed, with respect to the quality, performance, merchantability, or fitness for a particular purpose other than the purpose identified within this user's manual. W Appliance Co. has made every effort to ensure that this user's manual is accurate and disclaims liability for any inaccuracies or omissions that may have occurred. Information in this user's manual is subject to change without notice and does not represent a commitment on the part of BLACK+DECKER BLACK+DECKER reserves the right to make improvements to this user's manual and/or to the products described in this user's manual at any time without notice. If you find information in this manual that is incorrect, misleading, or incomplete, please contact us at 844-299-0879.
W Appliance Co.
1356 Broadway
New York, NY 10018
BLACK & DECKER, BLACK+DECKER, the BLACK & DECKER and BLACK+DECKER logos and product names and the orange and black color scheme are trademarks of The Black & Decker Corporation, used under license. All rights reserved.
Product in this box may differ slightly from that pictured. Does not affect function. Not all accessories shown in photography are included in this package.
Imported by W Appliance, Inc., 1356 Broadway, New York, NY 10018
- CONTENTS
- SAFETY INFORMATION
- SET UP & USE
- TROUBLE SHOOTING & WARRANTY
- PRODUCT REGISTRATION
- DANGER
- WARNING
- CAUTION
- IMPORTANT SAFETY INSTRUCTIONS
- SAVE THESE INSTRUCTIONS
- HOUSEHOLD USE ONLY
- GROUNDING INSTRUCTIONS
- ELECTRICAL REQUIREMENTS
- POWER SUPPLY CORD
- INSTALLATION INSTRUCTIONS
- WARNING - RISK OF FIRE
- WATER CONNECTION
- CONNECT THE DRAIN HOSE
- IMPORTANT!
- DISCONNECTING YOUR DISHWASHER
- START OF DISHWASHER
- RINSE AID DISPENSER
- REFILLING THE RINSE AID DISPENSER
- DETERGENT DISPENSER
- BEFORE LOADING YOUR DISHWASHER
- RECOMMENDATIONS
- DO NOT WASH THE FOLLOWING ITEMS IN A DISHWASHER
- NOTE:
- ADJUSTING THE RACKS
- LOADING THE DISHWASHER
- UNLOADING THE DISHWASHER
- STARTING A WASH CYCLE
- CHANGE THE PROGRAM
- FORGOT TO ADD A DISH
- AT THE END OF THE WASH CYCLE
- Switch Off the Dishwasher
- CLEANING & CARE
- FILTERING SYSTEM
- FILTER ASSEMBLY
- CARING FOR THE DISHWASHER
- CLEANING THE DOOR
- PROTECT AGAINST FREEZING
- CLEANING THE SPRAY ARMS
- MAINTAINING THE DISHWASHER
- TROUBLESHOOTING & WARRANTY
- BEFORE YOU CALL FOR SERVICE
- IMPORTANT
- DO NOT RETURN THIS PRODUCT TO THE STORE
- ERROR CODES
- LIMITED WARRANTY
Brand : BLACK & DECKER
Model : BPD8B
Category : Dishwasher