COM190 - Oven TRAEGER - Free user manual and instructions
Find the device manual for free COM190 TRAEGER in PDF.


| Product Type | Wood Pellet Grill & Smoker Oven |
| Model Number | COM190 |
| Brand | Traeger |
| Cooking Area (main) | 646 square inches |
| Total Cooking Area | 884 square inches with top warming rack |
| Temperature Range | 180°F to 450°F (82°C to 232°C) |
| Fuel Type | All-natural hardwood pellets |
| Hopper Capacity | 20 lb (9 kg) |
| Power Supply | 120 V ~ 60 Hz, 700 W |
| Ignition System | Automatic electric ignition with hot rod |
| Controller Type | Digital arc controller with PID technology |
| Wi-Fi Connectivity | WiFIRE® enabled for remote control via app |
| Construction Material | All-steel body with powder-coat finish |
| Dimensions (with lid closed) | 48 x 22 x 44 inches (122 x 56 x 112 cm) |
| Weight | 130 lb (59 kg) |
| Cleaning | Removable drip tray and grease spout for easy cleaning |
| Maintenance | Ash removal recommended every 3-5 uses; grease bucket disposal |
| Safety Features | Overheat protection; safety shut-off; sturdy locking casters |
| Spare Parts Availability | Authorized dealers and Traeger website; part numbers listed in manual |
| Repair Service | Traeger customer support and certified technicians available |
| Warranty | 3-year limited warranty against defects |
| Recommended Pellet Brand | Traeger All-Natural Hardwood Pellets (or equivalent) |
Frequently Asked Questions - COM190 TRAEGER
User questions about COM190 TRAEGER
0 question about this device. Answer the ones you know or ask your own.
Ask a new question about this device
Download the instructions for your Oven in PDF format for free! Find your manual COM190 - TRAEGER and take your electronic device back in hand. On this page are published all the documents necessary for the use of your device. COM190 by TRAEGER.
USER MANUAL COM190 TRAEGER
natural_image
Exterior view of a black industrial water heater with attached mechanical components (no visible text or symbols)COMMERCIAL PELLET GRILL
FOR OUTDOOR USE ONLY!
WARNING! DO NOT STORE OR USE COMBUSTIBLE MATERIALS NEAR THIS APPLIANCE!
USE ONLY TRAEGER BRAND HARDWOOD BBQ PELLETS IN THE OPERATION OF THIS UNIT.
COM190 WIRING DIAGRAM

flowchart
graph TD
    A["CONTROL"] --> B["FIBERGLASS WIRING"]
    B --> C["5 AMP FUSE FOR HOT ROD ON BACK OF CONTROL"]
    C --> D["MEAT PROBE SELECTOR SWITCH"]
    D --> E["ORANGE WHITE"]
    E --> F["AUGER DRIVE MOTOR"]
    E --> G["AUGER DRIVE MOTOR"]
    E --> H["DRAFT INDUCER FAN"]
    E --> I["DRAFT INDUCER FAN"]
    E --> J["MOLEX CONNECTOR TYPICAL"]
    J --> K["LEFT BURNER"]
    J --> L["RIGHT BURNER"]
    M["POWER CORD"] --> N["WHITE BLACK"]
    O["PURPLE WHITE"] --> P["MOLEX CONNECTOR TYPICAL"]
    Q["RED WHITE"] --> R["FIREPOT"]
    S["WHITE"] --> T["Black"]
    U["MINIMUM"] --> V["350"]
    W["MINIMUM"] --> X["350"]
    Y["MINIMUM"] --> Z["350"]
COMPONENT DIAGRAM 1

COMPONENT DIAGRAM 2
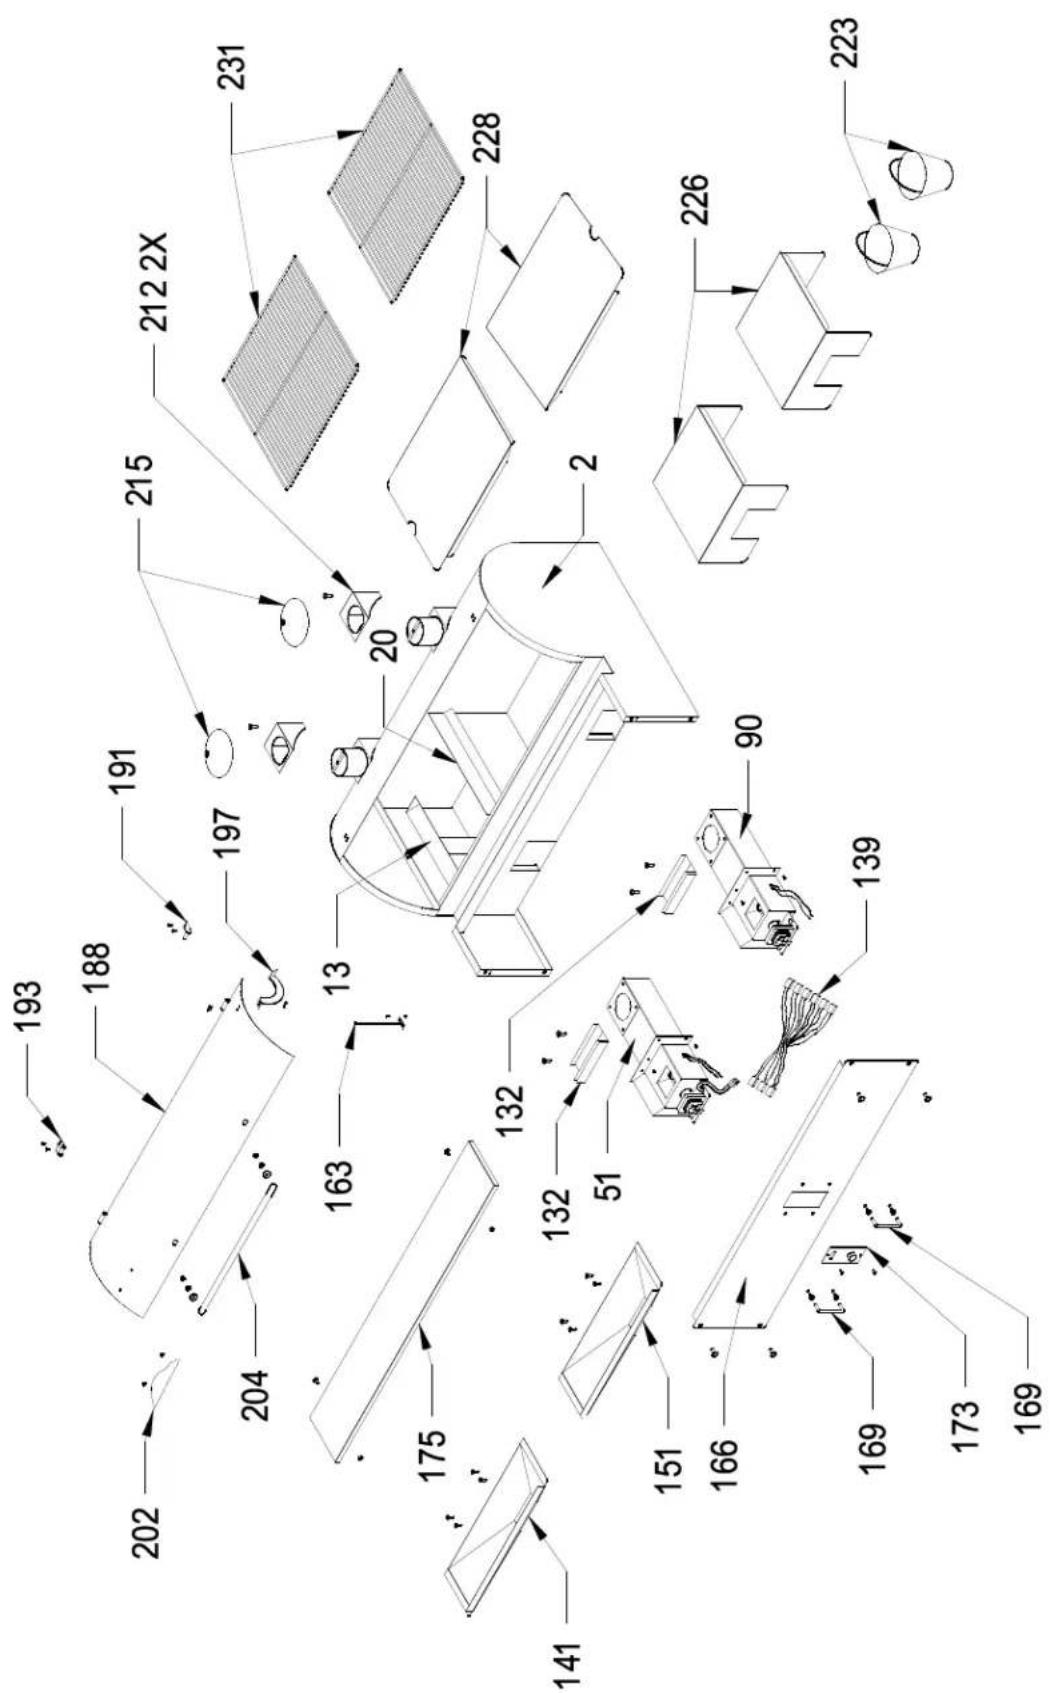
COMPONENT DIAGRAM 3
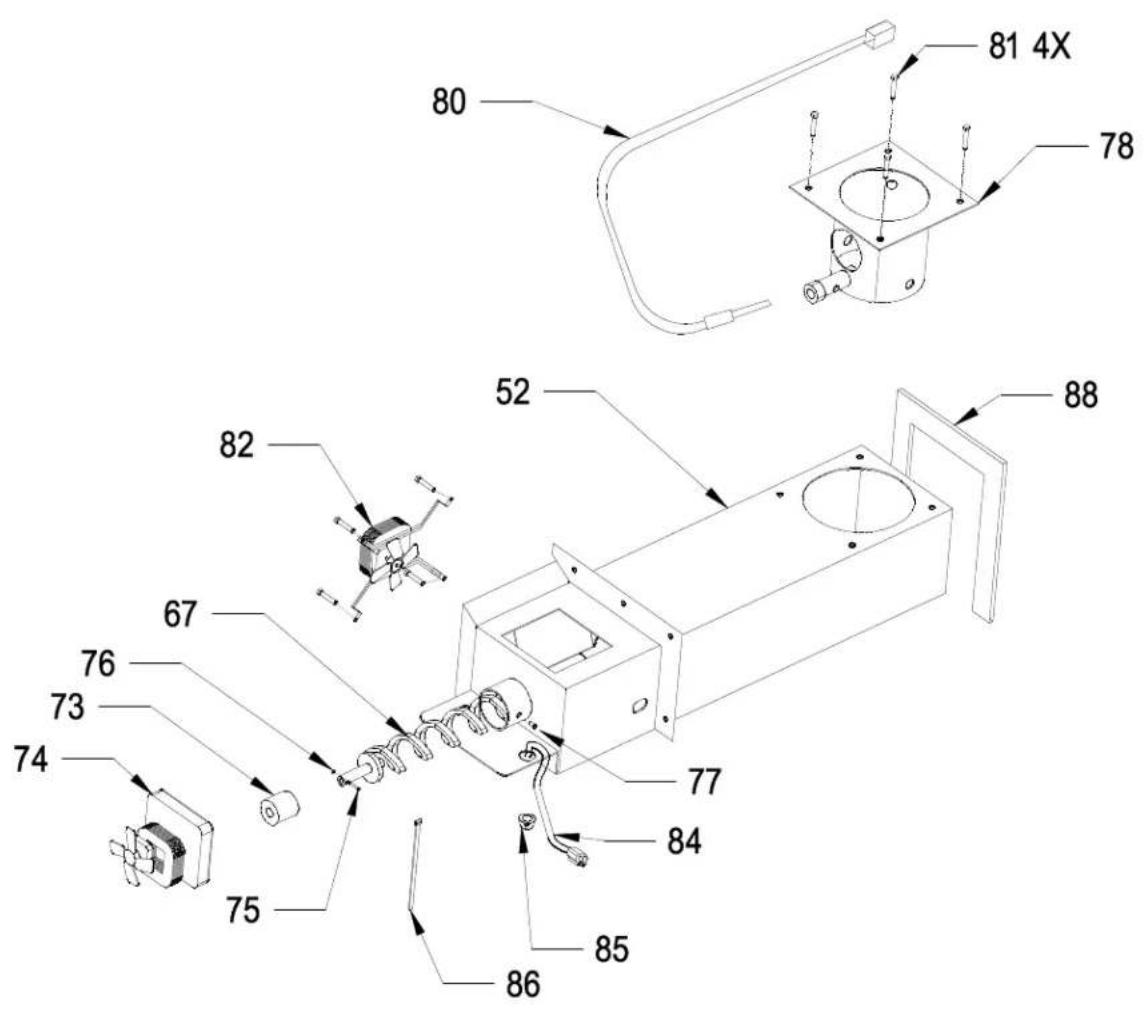
INTRODUCTION
Congratulations on the purchase of your Traeger Wood Pellet Grill, Model COM190. With proper set-up, operation, and maintenance, this grill will provide you with delicious food and years of cooking enjoyment.
READ THESE INSTRUCTIONS CAREFULLY BEFORE ATTEMPTING TO ASSEMBLE THIS UNIT. SPEND A FEW MINUTES FAMILIARIZING YOURSELF WITH THE PARTS AND DIAGRAMS.
NOTE: NUMBERS FOLLOWING PART NAMES THROUGHOUT THIS MANUAL REFER TO THE COMPONENT DIAGRAMS.
After removing the box, remove all parts from inside the Grill and the Tool Box (87). Remove any remaining packaging material from inside the Grill as well. Remove the straps securing the Trailer Tongue Assembly (71) and the Wheels (125) to the Pallet. Set all parts safely aside until you are ready for assembly. Make sure you have, and can identify all of the following parts:
(1) Trailer Tongue Assembly (71)
(2) Wheels (125)
(4) Heat Baffles (226)
(4) Grease Drain Pans (228)
(4) Porcelain Grills (231)
(4) Grease Buckets (223)
(1) Container of Bolts, Washers and Nuts
NOTE: THE ASSEMBLY OF THE COM190 IS A TWO-PERSON OPERATION!
You will need to complete the assembly process which includes:
1) Removing the Shipping Support
2) Installing the Trailer Tongue Assembly (71)
3) Installing the Wheels (125)
4) Removing the COM190 from the Pallet
5) Positioning the Heat Baffles (226) over the Firepots (78).
6) Setting the Grease Drain Pans (228) over the Heat Baffles (226).
7) Placing the Porcelain Grills (231) on the Grill Supports.
8) Hanging the Grease Buckets (223) on the Bucket Hooks.
TOOLS REQUIRED FOR ASSEMBLY:
(2) 3/4" wrenches or 3/4" socket / ratchet set
(1) 7/16" socket / driver or wrench
(1) Tire iron or lug wrench
(1) 1/4" socket / driver or wrench
Follow these step by step instructions and you will be cookin' in no time!
SECTION ONE: ASSEMBLY INSTRUCTIONS
REMOVING THE SHIPPING SUPPORT:
As indicated on the diagram below, block up or otherwise support the Grill before removing the Shipping Support in preparation for installing the Trailer Tongue Assembly (71). Remove the two Lag Bolts securing the Shipping Support to the Pallet with your 7/16" wrench. Remove the Bolt attaching the Shipping Support to the Trailer Tongue Receiver with your 3/4" wrench. Set the Shipping Support safely aside. Leave the Shipping Brackets in place at this time.

NOTE: BLOCK GRILL SECURELY BEFORE REMOVING THE SHIPPING SUPPORT AND INSTALLING THE TRAILER TONGUE.
INSTALLING THE TRAILER TONGUE ASSEMBLY:
Thread the Wire Harness (57) through the Trailer Tongue Assembly (71). Carefully slide the Trailer Tongue Assembly (71) into the Trailer Tongue Receiver, centered on the Trailer Frame (38). Be careful not to damage the wiring. Align the two holes in the Trailer Tongue Assembly (71) with the two holes in the Trailer Tongue Receiver. Insert a 1/2" x 4 1/2" Bolt (127) with Flat Washer into each hole and install Flat Washer, Lock Washer and Nut. MAKE SURE THE 2 BOLTS ARE TIGHT. Attach the white ground wire, with the ring connector, to the hex screw installed below the 2" Ball Hitch. Once the Trailer Tongue Assembly (71) is installed, the Jack Stand can be used to help support the Grill during subsequent assembly.
MOUNTING THE WHEELS:
With the Grill supported by the Jack Stand and the Pallet, remove the two Lag Bolts and the Shipping Brackets on each end of the Axle (66). Raise one side of the Grill high enough to install a Wheel (125) and securely block in place. Bolt a Wheel (125) on to the Axle (66) with the Lug Nuts (128) provided. MAKE SURE ALL LUG NUTS ARE TIGHT. Repeat this process on the opposite end of the Axle.
REMOVING THE COM190 FROM THE PALLET:
Remove any temporary blocking used to support the Grill so that it rests on the Wheels (125). Put a board under each wheel as a ramp and carefully roll the COM190 off the end of the pallet. Use the Trailer Tongue Assembly (71) to steer the Grill. Put the Jack Stand down to help you move the Grill.
NOTE: IF AT THIS POINT YOU ARE READY TO START YOUR GRILL, REFER TO THE INITIAL FIRING INSTRUCTIONS IN SECTION TWO OF THIS MANUAL OR ON A SEPARATE SHEET IN THE PELLET HOPPER OR THE TOOL BOX, BEFORE PROCEDING WITH FURTHER ASSEMBLY.
POSITIONING THE HEAT BAFFLES:
Position each Heat Baffle (226) directly over a Firepot (78) with the long legs pointing downward. The notched leg of the Heat Baffle (226) fits over a Burner Assembly (51, 90) and into the Heat Baffle Support (132) found on the top of each Burner Assembly (51, 90).
POSITIONING THE GREASE DRAIN PANS:
RECOMMENDATION for ease of clean-up: Line the Grease Drain Pans (228) with heavy-duty aluminum foil. Be sure the edges and ends of the foil are tight against the bottom of the Grease Drain Pans (228).
Position one Grease Drain Pan (228) so that the Short Lip end hooks over the Grease Drain Pan Support (20) in the center of the Grill between the two Heat Baffles (226). The Long Lip end should rest in one of the V-Shaped Grease Drains (13) located inside the Grill on the right and left. The Short Lip end of the second Grease Drain Pan (228) rests on the first in the center of the Grill with the Long Lip end placed in the V-Shaped Grease Drain (13) on the opposite end of the Grill.
POSITIONING THE PORCELAIN GRILLS:
Position the Porcelain Grills (231) on the Grill Supports that run the length of the cooking area.
HANGING THE GREASE BUCKETS:
Locate the Grease Drain Tubes, extending below the Grill on the right and left ends. Hang a Grease Bucket (223) on each Bucket Hook.
IMPORTANT NOTICE!
Licensing requirements vary from state to state. You should check with the appropriate licensing authorities to determine if your unit needs to be licensed as a trailer or similar licensing and/or whether it needs to be licensed if used for commercial food preparation. If required, please contact the factory for Proof of Origin certificate to assist you with the licensing of your unit.
SECTION TWO: TRAEGER SUPPORT
Parts are identified in the front of this manual on the COM190 COMPONENT
DIAGRAM, documents. To order parts: Call, E-mail or
write to your Traeger Dealer or Traeger Pellet Grills. Please provide your name, phone number, address, Model and Serial Number of the Grill (located on a label inside the Hopper Lid), along with the part identification.
TRAEGER PELLET GRILLS, LLC BLDG R-1.
10450 SW Nimbus Ave STE a
Portland, Or 97223-9904
TRAEGER TECHNICAL SUPPORT
Available 7 Days a Week 5AM to 7PM
Pacific Time
TRAEGER PARTS DEPARTMENT
Available Weekdays 8AM to 3:30PM
Pacific Time
TRAEGER SALES/ORDER DESK
Available Weekdays 8AM to 4:30PM
Pacific Time
TOLL-FREE TELEPHONE: 1-800-872-3437
E-mail: service@traegergrills.com
Website: www.traegergrills.com

- COMMERCIAL PELLET GRILL
- FOR OUTDOOR USE ONLY!
- INTRODUCTION
- READ THESE INSTRUCTIONS CAREFULLY BEFORE ATTEMPTING TO ASSEMBLE THIS UNIT. SPEND A FEW MINUTES FAMILIARIZING YOURSELF WITH THE PARTS AND DIAGRAMS.
- NOTE: NUMBERS FOLLOWING PART NAMES THROUGHOUT THIS MANUAL REFER TO THE COMPONENT DIAGRAMS.
- NOTE: THE ASSEMBLY OF THE COM190 IS A TWO-PERSON OPERATION!
- TOOLS REQUIRED FOR ASSEMBLY:
- SECTION ONE: ASSEMBLY INSTRUCTIONS
- REMOVING THE SHIPPING SUPPORT:
- INSTALLING THE TRAILER TONGUE ASSEMBLY:
- MOUNTING THE WHEELS:
- REMOVING THE COM190 FROM THE PALLET:
- POSITIONING THE HEAT BAFFLES:
- POSITIONING THE GREASE DRAIN PANS:
- POSITIONING THE PORCELAIN GRILLS:
- HANGING THE GREASE BUCKETS:
- IMPORTANT NOTICE!
- SECTION TWO: TRAEGER SUPPORT
Brand : TRAEGER
Model : COM190
Category : Oven