
RCU300 - Remote control Analog Way - Free user manual and instructions
Find the device manual for free RCU300 Analog Way in PDF.


| Product Type | Rackmount Remote Control Unit |
| Brand | Analog Way |
| Model | RCU300 |
| Rack Height | 2 RU |
| Dimensions (without ears & rear mount) | 16.77 x 3.46 x 20.0 in (426 x 88 x 510 mm) |
| Dimensions (with handles) | 19 x 3.46 x 21.45 in (483 x 88 x 545 mm) |
| Weight (without accessories) | 11.7 kg (24.25 lbs) |
| Power Supply | 100-240 VAC, 50/60 Hz, 6A; redundant hot-swappable |
| Max Power Consumption | 115 W |
| Main Function | Master control unit for LiveCore image processors, enabling large-scale video wall systems |
| Front Panel Indicators | 4 LEDs: Power, HDD Activity, Temperature, Fan status (Green/Red) |
| Operating Temperature | 0 to 40°C (32 to 104°F) |
| Humidity | 10% to 80%, non-condensing |
| Noise Level (front @1m) | 54 dBA |
| Noise Level (rear @1m) | 56 dBA |
| Thermal Dissipation | 392 BTU/hr |
| Safety Compliance | IEC/UL/EN 60950-1, CSA22.2#60950-1, ETL Listed |
| Warranty | 3 years on parts and labor (back to factory) |
| Included Accessories | 2 power cords, RJ45 cable, rack rails, screw kit, quick start guide |
Frequently Asked Questions - RCU300 Analog Way
User questions about RCU300 Analog Way
0 question about this device. Answer the ones you know or ask your own.
Ask a new question about this device
Download the instructions for your Remote control in PDF format for free! Find your manual RCU300 - Analog Way and take your electronic device back in hand. On this page are published all the documents necessary for the use of your device. RCU300 by Analog Way.
USER MANUAL RCU300 Analog Way
Rackmount Control Unit – Ref. RCU300
Thank you for choosing Analog Way and the Rackmount Control Unit. By following these simple steps, you will be able to install and use your RCU device.
RCU is a rack mountable master control unit that combine and control mulple Analog Way LiveCore™ image processors to create a large-scale system soluon for video wall applicaons that require a large amount of inputs, outputs and layers.
WHAT'S IN THE BOX
• 1x Rackmount Remote Control Unit
- 2x Power Supply cords
• 1x RJ45 Ethernet cable
- 1x Rack rail kit
- 1x Screw kit
• 1x Quick Start Guide
• 1x Safety instrucon

Go to our website to register your product(s) and be need about new rmware updates:
hp://bit.lv/AW-Register
*Quick Start Guide is available on www.analogway.com
PANEL DESCRIPTION
LEDs (see Secon below)
Startup/Shutdown

FRONT PANEL
USB Ports
Double Power Supplies
Connecon panel

REAR PANEL
SET UP THE RCU
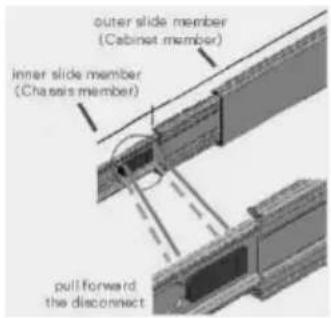
Step 1 Take the inner member (smaller slide channel) apart by sharply pulling the front acvang release latch forward.
Step 2 Each slide is pre-aached with front and rear adjustable brackets. Loosen the nuts on the both brackets, and decide the proper setback distance to the opening, then ghten the nuts on the front brackets.
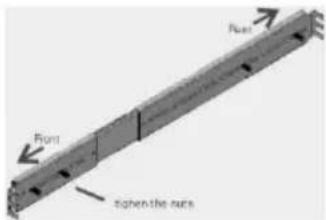
Step 3 Extend the rear brackets to where it reaches the rear rack. Do not fully ghten rear bracket screws unl nal adjustment is made.
Repeat step 2 & step 3 above for other side of outer slide member.
Step 4 For chassis width of 430mm, each the L-shaped bracket to the front mounng ange using screw & nylon ring from screw kit (bar nut kit is oponal for your selecon).
For chassis width over 430mm, each the L-shaped bracket to the back of the moung ange using screw & nylon ring from screw kit.

Step 5 For chassis width of 430mm, each the L-shaped bracket to the rear moung ange using & nylon ring from screw kit, then ghten rear bracket moung.
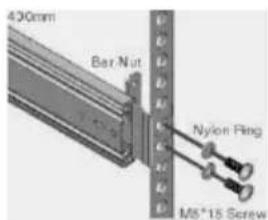
For chassis width over 430mm, each the L-shaped bracket to the back of the moung ange screw & nylon ring from screw kit.

Repeat step 4 & step 5 for the other side of the slide.
Step 6 Aach the inner slide member to your RCU using screw from screw kit.

Step 7 Pick up the RCU and insert it with inner slide member into the intermediate member. The RCU will be locked when it reaches the fully open posion, then pull forward on the front acvang release latch in order to push the RCU all the way inward ll the closed positon.
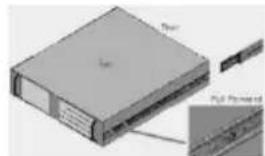
Step 8 Plug the mouse and the screen to your RCU.
Step 9 Plug the two Power Supply cords to the RCU and switch on the two Power Supplies.
Your RCU is now ready to be used!
LED indicator for operang system
Four LEDs are placed on the le side of the front panel to indicate system health and acvity.
| LED | DESCRIPTION | GREEN | RED |
 | System Power | Normal | Abnormal |
 | Hard Drive Disk acvity | Data Access | No light |
 | Temperature in the chassis | Normal | Abnormal |
 | Cooling fan status | Normal | Abnormal |
When the system power is on, the Power LED is GREEN.
If the Power LED is RED, it indicates a redundant power supply module failure. Examine the redundant power supply right away and replace the failed module with a working one.
If the fan LED is RED, it indicates a failed cooling fan, and the alarm is also acvated. Replace the failed fan with a working one immediately.
If the temperature LED is RED, it means that inside of the chassis is overheated (more than 50° C). An audible alarm will be acvated. Inspect the fan Iter and the rear secon of the chassis immediately. Make sure the airrow inside the chassis is smooth and not blocked by dust or other parcles.
SPECIFICATIONS
Dimensions (in Rack Units - RU)
2RU
Dimensions (without rack ears and rear rack mount)
W 16.77" x H 3.46" x D 20.0"
▶ L 426 mm x H 88 mm x P 510 mm
Dimensions (with handles)
W 19" x H 3.46" x D 21.45"
▶ L 483 mm x H 88 mm x P 545 mm
Dimensions (without handles)
W 16.77" x H 3.46" x D 20.0"
▶ L 426 mm x H 88 mm x P 510 mm
Weight without accessories
▶ 11,7 kg / 24.25 lbs
Shipping weight accessories included
▶ Temperature: 0 to 40°C (32 to 104°F)
▶ Humidity: 10% to 80%, non-condensing
▶ Use: indoor
Warranty
3-year warranty on parts and labor back to factory
Noise (@1,6m height)
Front: 54 DBa@1m
Rear: 56 DBa@1m
Thermal dissipoon
392 BTU/hr
Polluon degree
▶ 2
Electrical installaon required
▶ TT, TN or IT 230V for Norway (IEC60364-1)
Power Supply
▶ 100-240 VAC 50/60Hz 6A
▶ Redundant power supplies, hot swappable
▶ Max consumpon: 115 W
▶ Overvoltage category: II (IEC60664-1)
Safety Compliance
▶ IEC/UL/EN 60950-1, CSA22.2#60950-1, ETL Listed (US & Canada)
Supplied with
▶ 2 x Power supply cords
▶ 1 x Pair of front handles + screws
▶ 1 x Pair of rack slide rails
1 x Quick Start Guide*
TROUBLESHOOTING RCU
Should you encounter diculty with your RCU device, please contact our technical support department. See below for contact details.
CONTACT INFORMATION

Analog Way SAS - Headquarters
techsupport@analogwayusa.com
Analog Way Pte Ltd
Tel.: +65 6292 5800
Fax: +65 6292 5205
152 Beach Road
15-03 Gateway East
SINGAPORE 189721
Sales/General informaon:
sales@analogwayasia.com
Technical support:
techsupport@analogwayasia.com


- RACKMOUNT CONTROL UNIT – REF. RCU300
- WHAT'S IN THE BOX
- PANEL DESCRIPTION
- SET UP THE RCU
- LED INDICATOR FOR OPERANG SYSTEM
- SPECIFICATIONS
- DIMENSIONS (IN RACK UNITS - RU)
- DIMENSIONS (WITHOUT RACK EARS AND REAR RACK MOUNT)
- DIMENSIONS (WITH HANDLES)
- DIMENSIONS (WITHOUT HANDLES)
- WEIGHT WITHOUT ACCESSORIES
- SHIPPING WEIGHT ACCESSORIES INCLUDED
- WARRANTY
- NOISE (@1,6M HEIGHT)
- THERMAL DISSIPOON
- POLLUON DEGREE
- ELECTRICAL INSTALLAON REQUIRED
- POWER SUPPLY
- SAFETY COMPLIANCE
- SUPPLIED WITH
- TROUBLESHOOTING RCU
- ANALOG WAY SAS - HEADQUARTERS
- ANALOG WAY PTE LTD
- GATEWAY EAST
- SALES/GENERAL INFORMAON
- TECHNICAL SUPPORT
Brand : Analog Way
Model : RCU300
Category : Remote control