
ID1230 - Graphic tablet VIEWSONIC - Free user manual and instructions
Find the device manual for free ID1230 VIEWSONIC in PDF.


| Product Type | Pen Display (Graphic Tablet) |
| Brand | ViewSonic |
| Model | ID1230 |
| Display Size | 11.6 inches (29.46 cm) |
| Display Resolution | 1920 x 1080 |
| Pen Technology | Electromagnetic resonance, battery-less |
| Pressure Sensitivity | 8192 levels |
| Pen Resolution | 5080 LPI |
| Pen Tilt Angle | +/- 60 degrees |
| Report Rate | 300 PPS (average) |
| Detectable Height | 10 mm |
| Connectivity | Mini HDMI, USB Type C (full function), USB Type A |
| Dimensions (W x H x D) | 321.3 x 194.2 x 12.3 mm (12.65 x 7.65 x 0.48 inches) |
| Weight | 0.6 kg (1.32 lbs) |
| Power Supply | USB 5V/2A (via USB C) |
| Power Consumption | 7W typical, standby ≤3W |
| Operating Systems | Windows 7/8/10/11, macOS 10.15 or above |
| Package Contents | Pen display, pen, HDMI to Mini HDMI cable, USB C to C cable, USB C to A cable, nib removal tool, replacement nibs, quick start guide |
| Safety Precautions | Ensure ventilation, avoid water and heat, use only specified attachments, disconnect when not in use |
| Cleaning Instructions | Use soft dry cloth; for stubborn dirt, use non-ammonia, non-alcohol based cleaner |
| Pen Nib Replacement | Replace when too short or sharp; use included nib removal tool |
| Warranty | 1-3 years depending on country (limited warranty) |
| Compliance | FCC, CE, RoHS2, WEEE |
Frequently Asked Questions - ID1230 VIEWSONIC
User questions about ID1230 VIEWSONIC
0 question about this device. Answer the ones you know or ask your own.
Ask a new question about this device
Download the instructions for your Graphic tablet in PDF format for free! Find your manual ID1230 - VIEWSONIC and take your electronic device back in hand. On this page are published all the documents necessary for the use of your device. ID1230 by VIEWSONIC.
USER MANUAL ID1230 VIEWSONIC
IMPORTANT: Please read this User Guide to obtain important information on installing and using your product in a safe manner, as well as registering your product for future service. Warranty information contained in this User Guide will describe your limited coverage from ViewSonic® Corporation, which is also found on our web site at http://www.viewsonic.com in English, or in specific languages using the Regional selection box of our website.
Thank you for choosing ViewSonic®
As a world-leading provider of visual solutions, ViewSonic® is dedicated to exceeding the world's expectations for technological evolution, innovation, and simplicity. At ViewSonic®, we believe that our products have the potential to make a positive impact in the world, and we are confident that the ViewSonic® product you have chosen will serve you well.
Once again, thank you for choosing ViewSonic®!
Safety Precautions
Please read the following Safety Precautions before you start using the device.
- Keep this user guide in a safe place for later reference.
- Read all warnings and follow all instructions.
- Allow at least 4" (10 cm) clearance around the device to ensure proper ventilation.
- Place the device in a well-ventilated area. Do not place anything on the device that prevents heat dissipation.
- Do not use the device near water. To reduce the risk of fire or electric shock, do not expose the device to moisture.
- Avoid exposing the device to direct sunlight or other sources of sustained heat.
- Do not install near any heat sources such as radiators, heat registers, stoves, or other devices (including amplifiers) that may increase the temperature of the device to dangerous levels.
- Use a soft, dry cloth to clean the external housing. Please see the "Maintenance" section for more information.
- Oil may collect on the screen if you touch it. Please see the "Maintenance" section for more information.
- Do not touch the screen surface with sharp or hard objects, as it may cause damage to the screen. Only use the supplied pen, or fingers for models that support touch input.
- When moving the device, be careful not to drop or bump the device on anything.
- Do not place the device on an uneven or unstable surface. The device may fall over resulting in an injury or a malfunction.
- Do not place any heavy objects on the device or connection cables.
- If smoke, an abnormal noise, or a strange odor is present, immediately turn the device off and call your dealer or ViewSonic®. It is dangerous to continue using the device.
- When connecting to a power outlet, DO NOT remove the grounding prong.
- Please ensure grounding prongs are NEVER REMOVED.
- Protect the power cord from being treaded upon or pinched, particularly at the plug, and at the point where it emerges from the equipment. Ensure that the power outlet is located near the equipment so that it is easily accessible.
- Only use attachments/accessories specified by the manufacturer.
- Disconnect the device if it is not going to be used for a long period of time.
Contents
Safety Precautions....3
Introduction 6
Package Contents 6
System Requirements....7
Product Overview....8
Front and Side View 8
I/O Ports 8
Making Connections......9
Connecting to the Pen Display....9
HDMI and USB Type C 9
USB Type C 10
Driver Installation, Use, and Removal......11
Installing Drivers and Software (Windows) 11
Pen Display Driver 11
Setting the Display Area (Windows)....12
Pen Input Settings (Windows)....13
Uninstalling the Driver (Windows) 15
Installing Drivers and Software (macOS)....16
Pen Display Driver 16
Pen Input Settings (macOS)....18
Uninstalling the Driver (macOS) 20
Using the Pen Display 21
Turning the Device On/Off 21
On-Screen Display (OSD) Menu....22
Configuring the Settings 23
General Operations.... 23
On-Screen Display (OSD) Menu Tree 24
Appendix....26
Specifications....26
Pen 26
Troubleshooting 27
Pen 27
FAQ....28
Maintenance....29
General Precautions.... 29
Cleaning the Screen.... 29
Cleaning the Case 29
Disclaimer....29
Replacing a Pen Nib 30
Regulatory and Service Information 31
Compliance Information....31
FCC Compliance Statement.... 31
Industry Canada Statement.... 31
CE Conformity for European Countries 31
Declaration of RoHS2 Compliance.... 32
Indian Restriction of Hazardous Substances 33
Product Disposal at End of Product Life 33
Copyright Information....34
Customer Service....35
Limited Warranty 36
Mexico Limited Warranty.... 39
Introduction
Package Contents
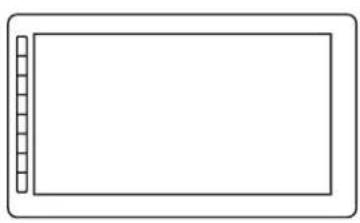
natural_image
Simple line drawing of a rectangular frame with vertical tick marks on the left side (no text or symbols)
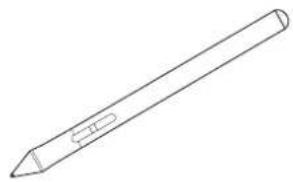
natural_image
Line drawing of a pencil with a sharpened tip and eraser (no text or symbols)ID1230 Pen Display Quick Start Guide Electromagnetic Pen
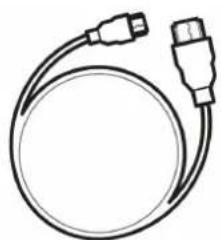
natural_image
Simple line drawing of a cable with two connectors (no text or symbols)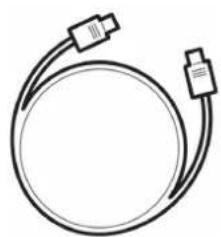
natural_image
Simple line drawing of a cable with two connectors (no text or symbols)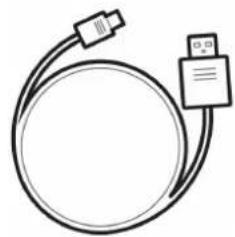
natural_image
Simple line drawing of a cable with two connectors (no text or symbols)HDMI to Mini HDMI Cable USB Type C to USB Type C Cable USB Type C to USB Type A Cable

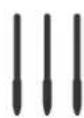
Nib Removal Tool Replacement Pen Nib
NOTE: The USB and video cables included in your package may vary depending on your country. Please contact your local reseller for more information.
System Requirements
- Operating System:
» PC: Windows 7/8/10/11
» Mac: macOS 10.15 or above
- CPU:
» Pentium 233 MHz or above
- Memory:
» 64 MB or above
- Hard Disk Space:
» 128 MB or above
- Interface:
» HDMI and USB interface
» Full function USB Type C or Thunderbolt 3 interface
Product Overview Front and Side View
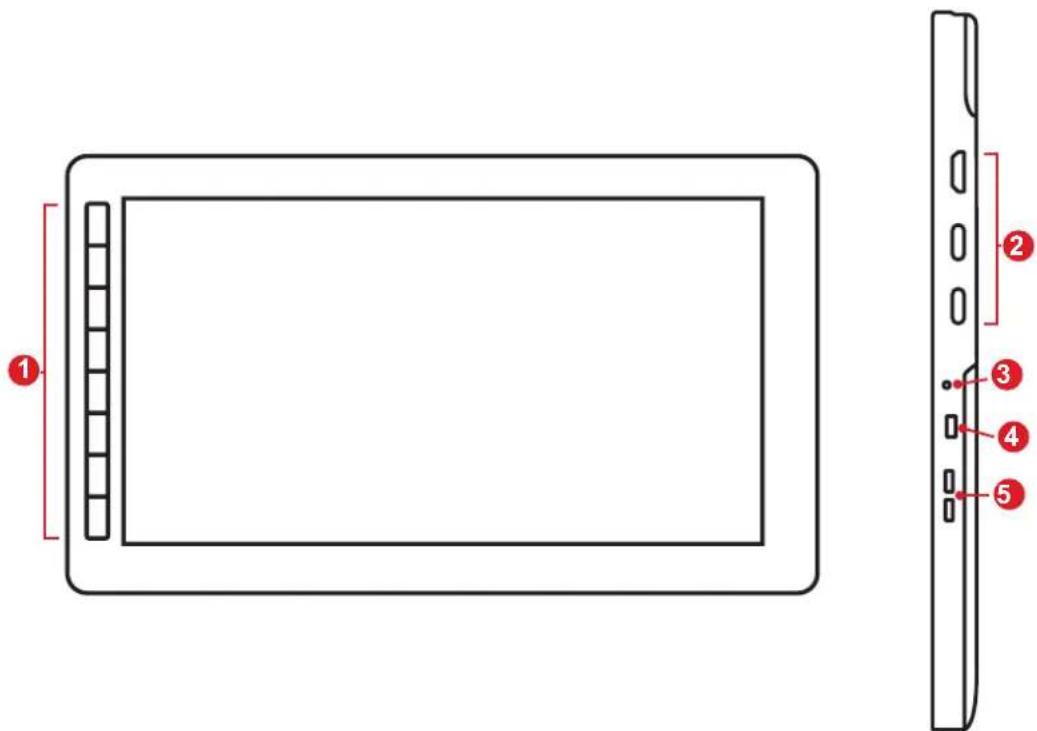
-
Express Keys
-
I/O Ports
-
LED Indicator
-
Power Key 5. Menu Keys
I/O Ports
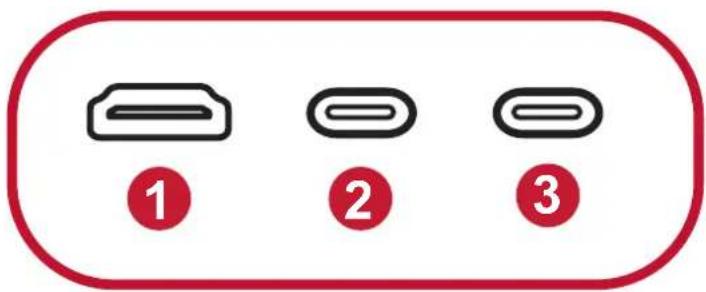
-
Mini HDMI
-
USB Type C
-
USB Type C
Making Connections
Connecting to the Pen Display
The pen display can be connected to a computer by either HDMI and USB Type C, or only USB Type C.
HDMI and USB Type C
- Ensure the power of the computer and pen display are off before connecting them.
- Connect one end of the HDMI cable to the HDMI port of your computer. Then connect the Mini HDMI end of the cable to the Mini HDMI port of the pen display.
- Connect the USB Type A end of the USB cable to your computer. Then connect the USB Type C end to the pen display.
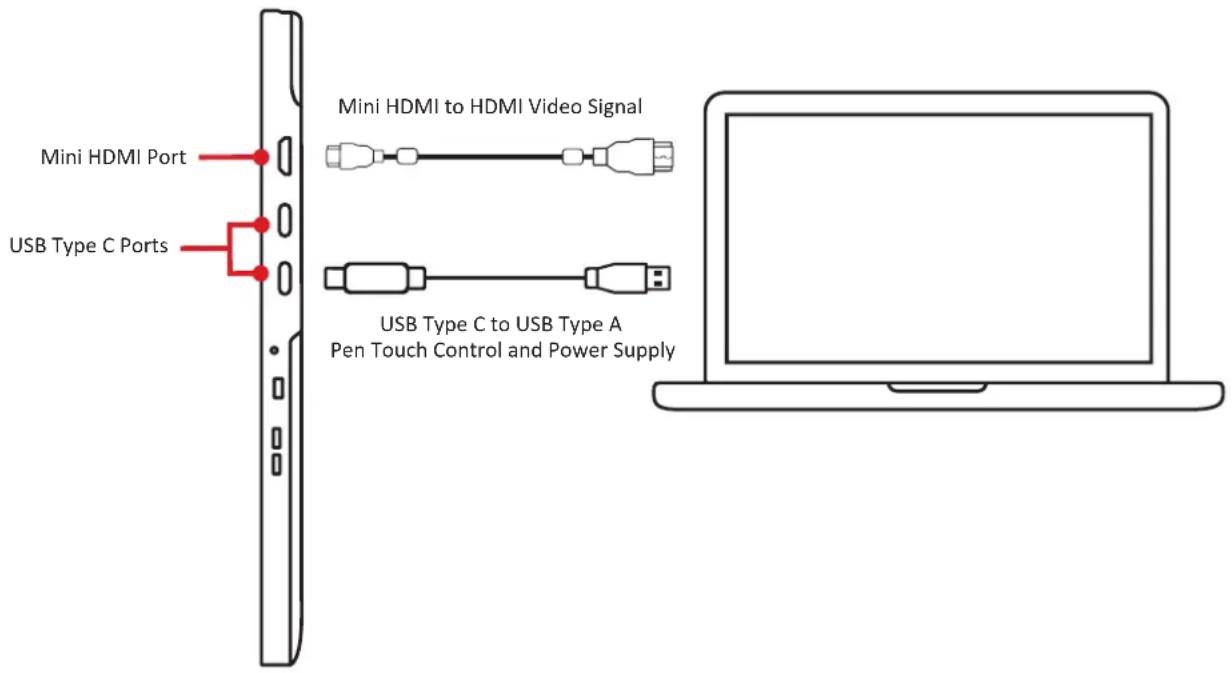
NOTE: If connected to a desktop computer, and a monitor was already connected to the computer itself, then the tablet and monitor must be connected to the same graphics card of the desktop computer.
USB Type C
- Ensure your computer is equipped with a full function USB Type C interface or Thunderbolt 3 interface.
- Connect one end of the double-sided USB Type C cable to the USB Type C port of the pen display. Then connect the other end to the USB Type C port of the computer.
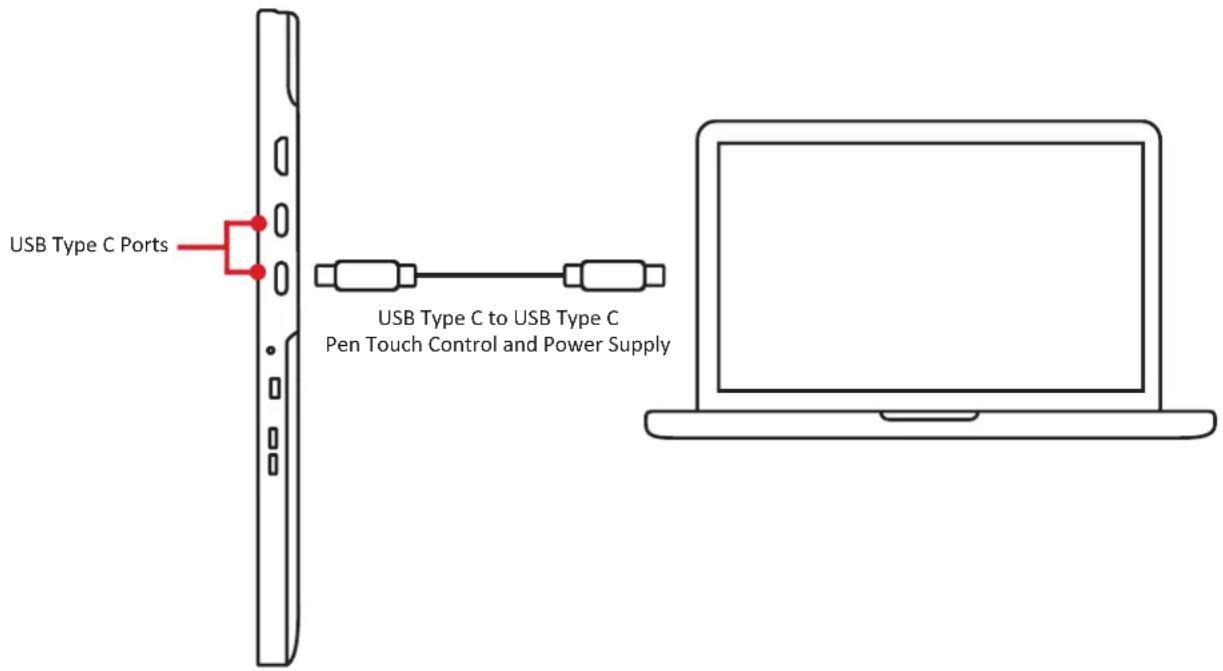
NOTE: If the power supply from the USB Type C port of the computer is insufficient, the screen of the pen display might flicker. In this case, connect a USB Type C to USB Type A cable to the USB Type C power supply port of the pen display, and connect the other end of the USB cable to the computer or a USB power adapter to ensure that sufficient power is supplied to the pen display.
Driver Installation, Use, and Removal
Installing Drivers and Software (Windows)
System Requirements: Windows 7/8/10 or above.
Before connecting and using the pen display, it is necessary to install the below drivers and software. The drivers and software can be downloaded at:
https://www.viewsonicglobal.com/q/ID1230
Pen Display Driver
- Open the installation file and install the driver.
- After the installation completes, you will need to restart the computer.
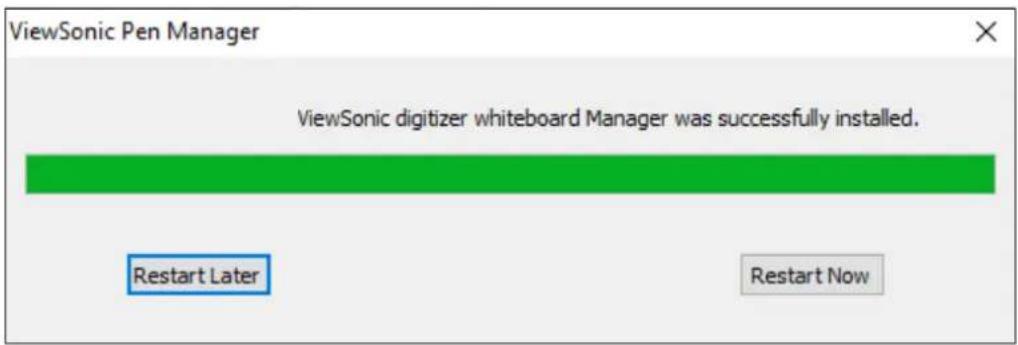
Setting the Display Area (Windows)
After the pen display is connected to the computer, the Display settings will need to be adjusted.
To access your computer's Display settings:
- Go to: Start > Settings > System > Display, or
- Right Click on the Desktop and select Display settings.
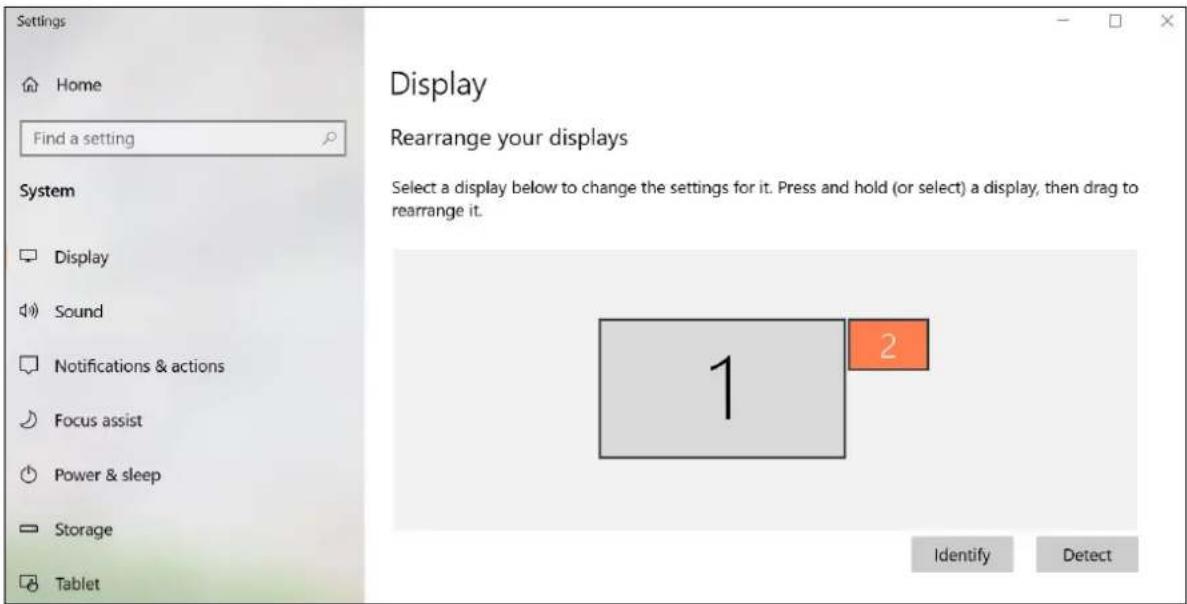
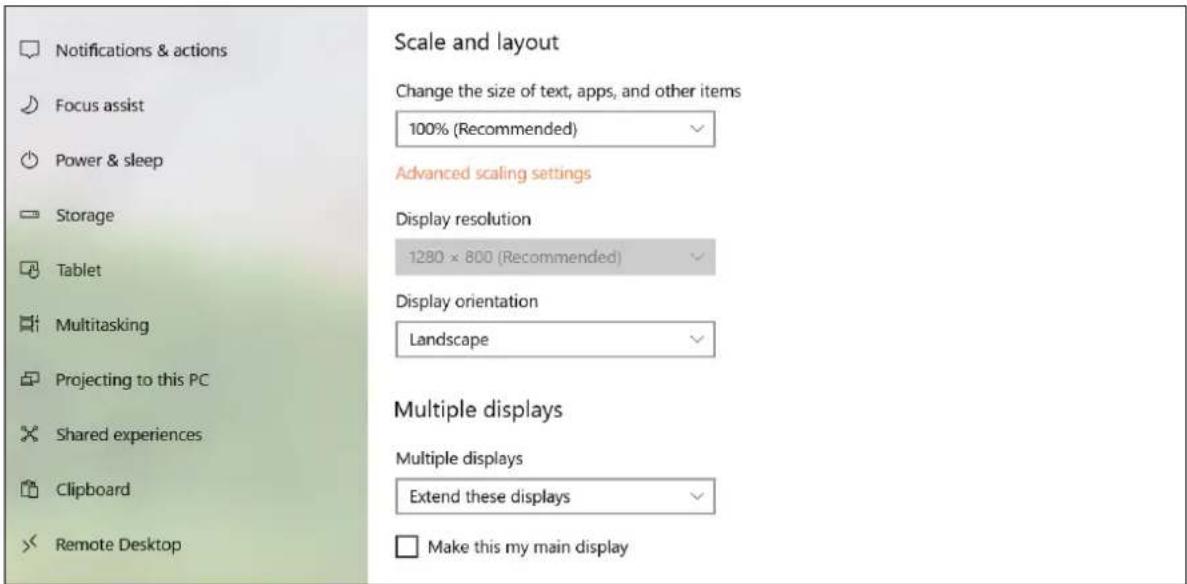
Once inside the Display settings, ensure the pen display is selected and:
- Display orientation is set to Landscape or Portrait, and
- Multiple displays is set to Extend these displays.
Pen Input Settings (Windows)
To adjust the pen input settings:
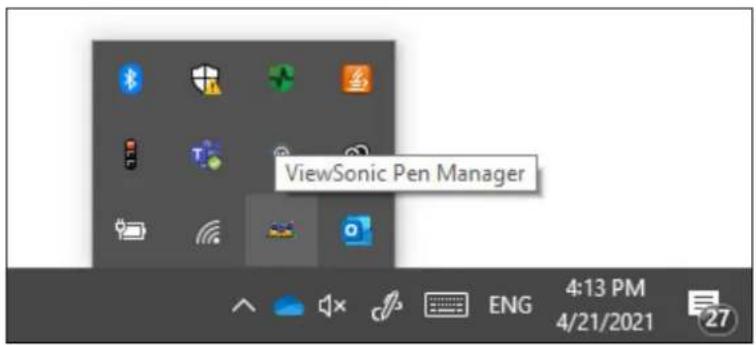
- Open ViewSonic Pen Manager either by going to: Start > ViewSonic Pen Manager or selecting the ViewSonic Pen Manager icon from the System Tray.
- Adjustments to the pen can be made by selecting the Pen tab.
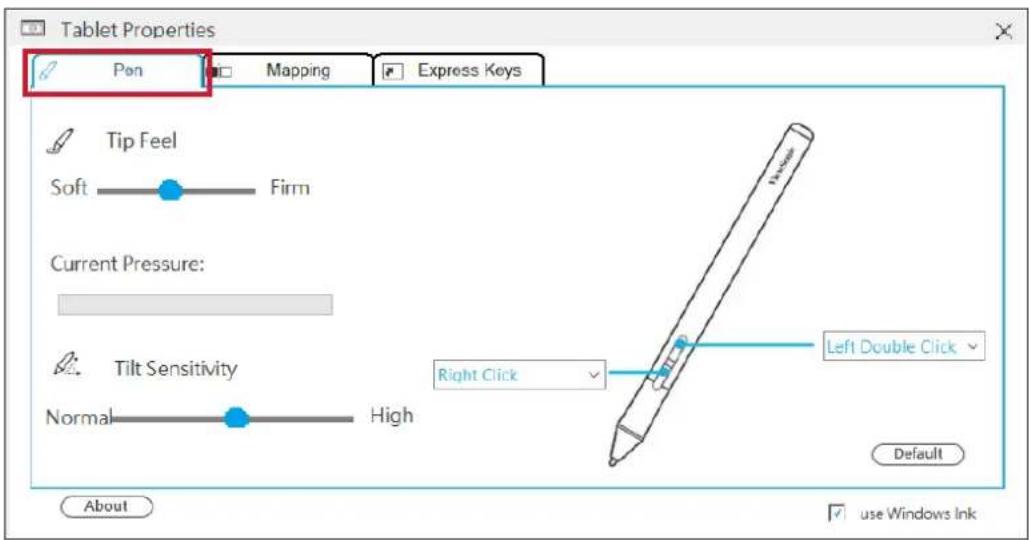
- Select the Mapping tab to adjust screen orientation and display.
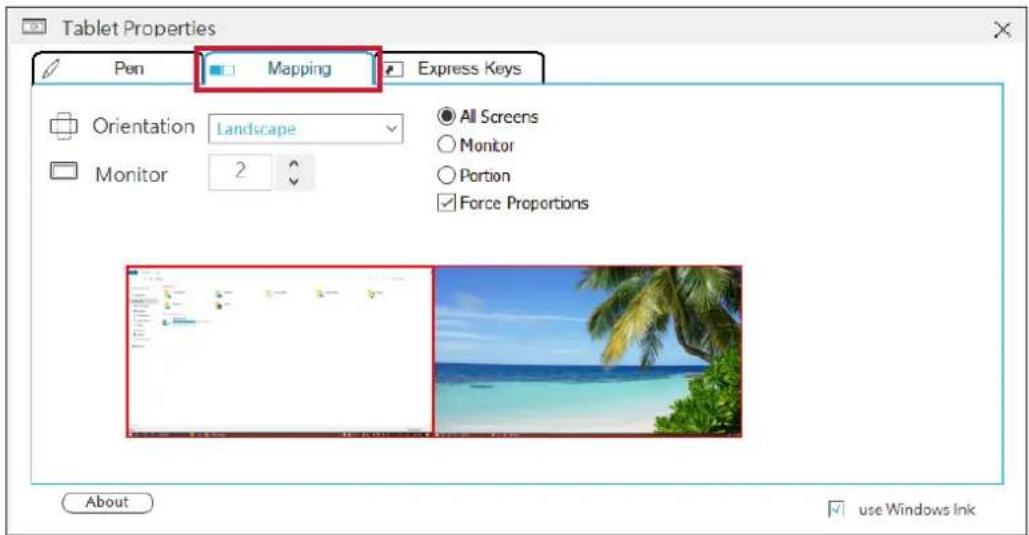
- Select the Express Keys tab to customize the six (6) express keys on the pen display.
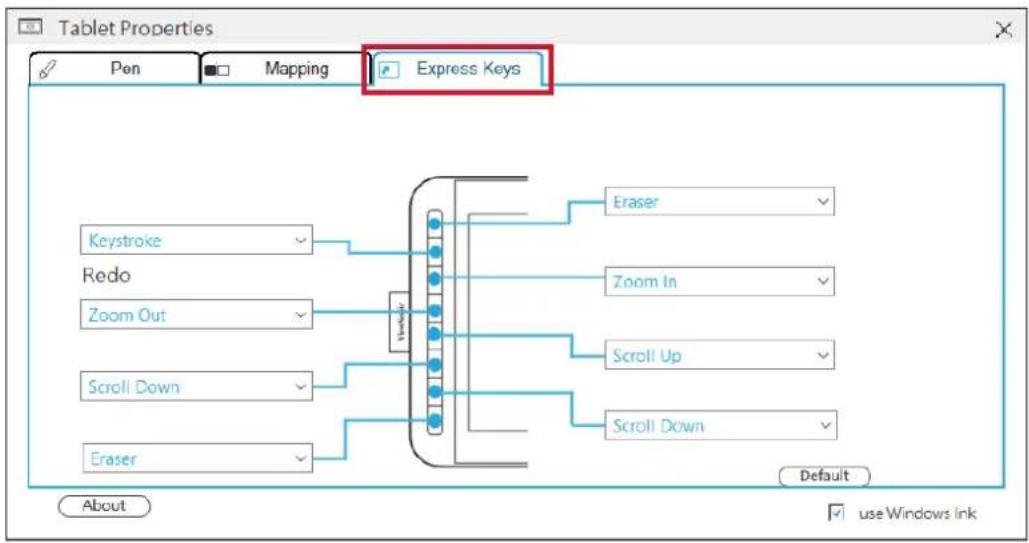
Uninstalling the Driver (Windows)
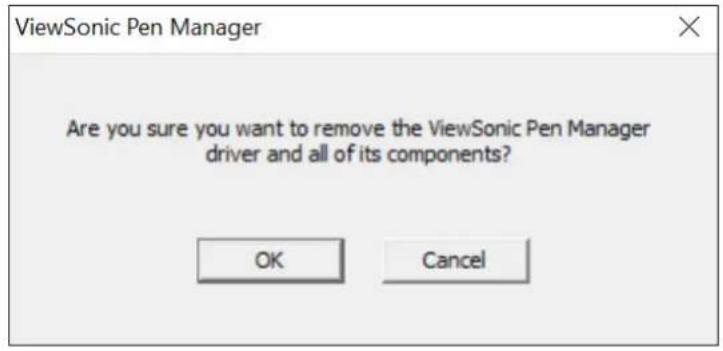
There are two ways to uninstall the driver:
- Start > ViewSonic Pen Manager > Right Mouse Click > Uninstall or
- Open the Control Panel > Programs > Programs and Features > ViewSonic Pen Manager > select Uninstall/Change
Installing Drivers and Software (macOS)
System Requirements: 10.15 or above.
Before connecting and using the pen display, it is necessary to install the below drivers and software. The drivers and software can be downloaded at:
https://www.viewsonicglobal.com/q/ID1230
Pen Display Driver
- Open the Pen Display Driver installation file and install the driver.
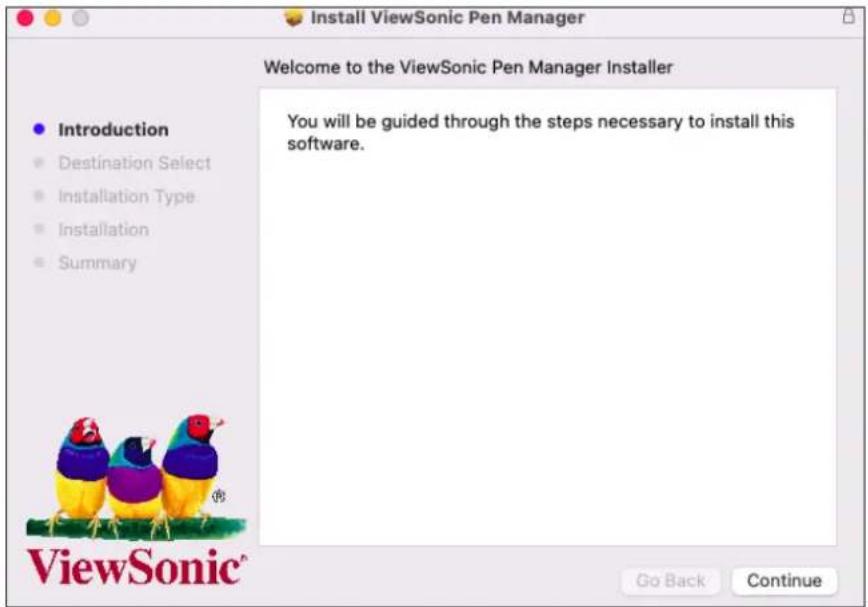
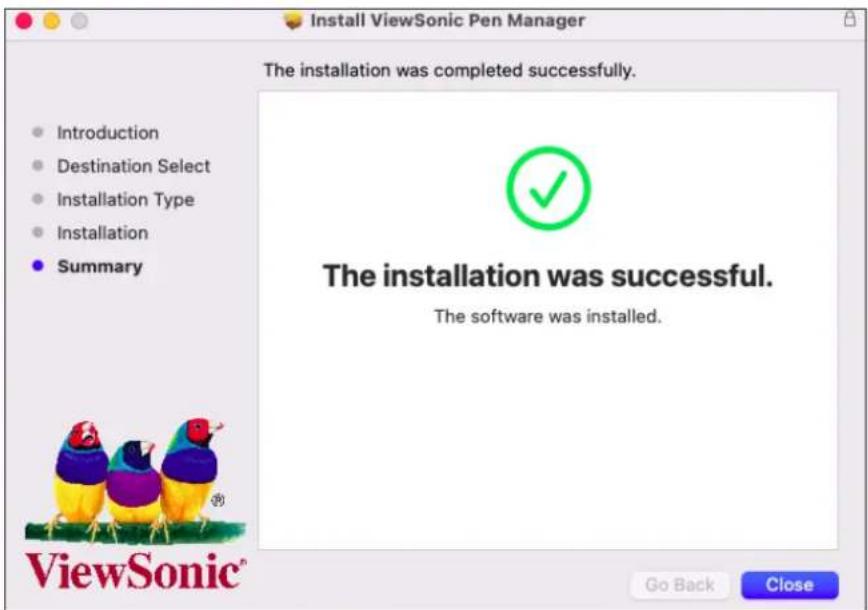
- After the installation completes, you will need to restart the computer.
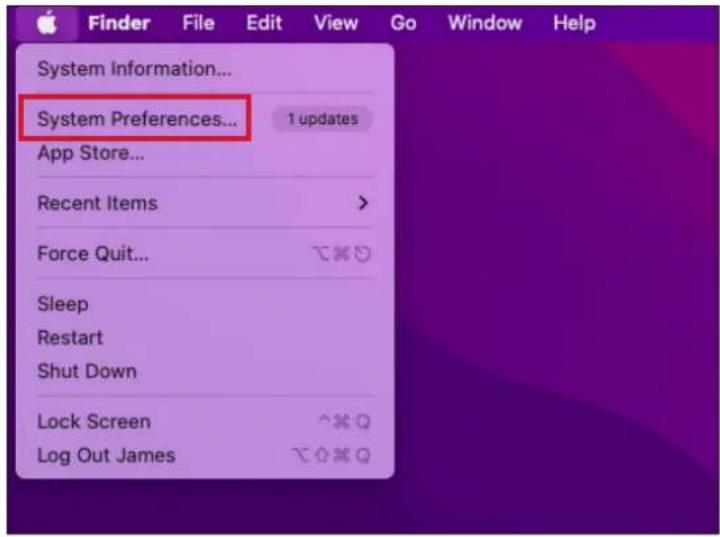
- After plugging in the Pen Display it will request some privacy settings to work correctly. Go to: System Preferences > Security & Privacy
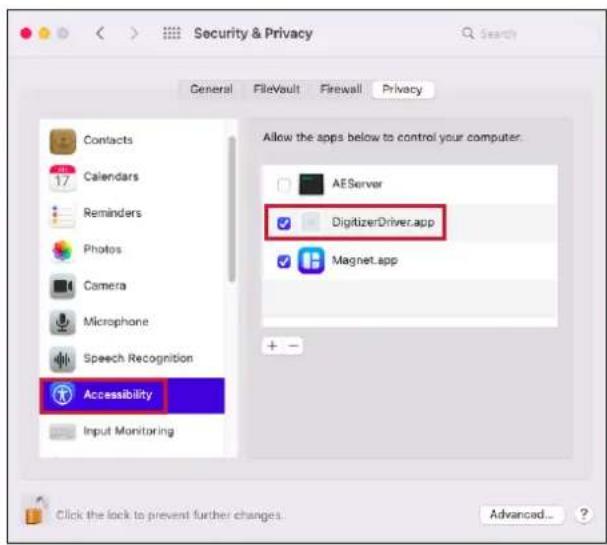
- Under Security & Privacy, check the box next to DigitizerDriver.app in both Accessibility and Input Monitoring.
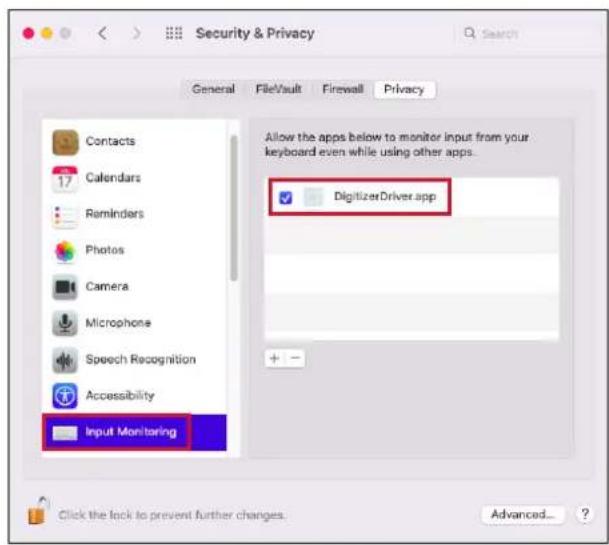
- The ViewSonic Pen Manager menu will now be visible at the bottom of System Preferences.
Pen Input Settings (macOS)
To adjust the pen input settings:
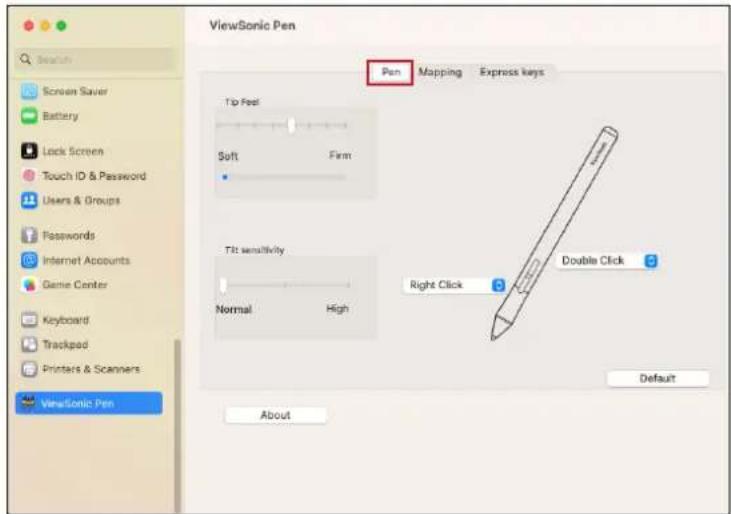
- Open ViewSonic Pen Manager by going to: System Settings > ViewSonic Pen Manager
- Adjustments to the pen can be made by selecting the Pen tab.
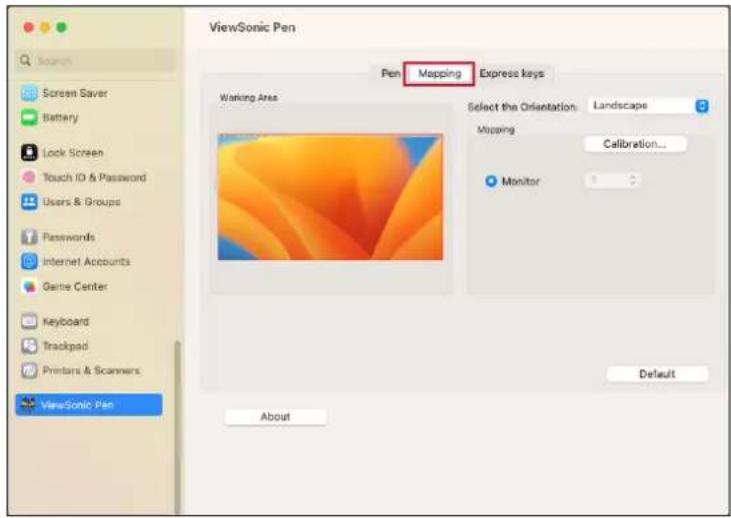
- Select the Mapping tab to adjust screen orientation and display format.
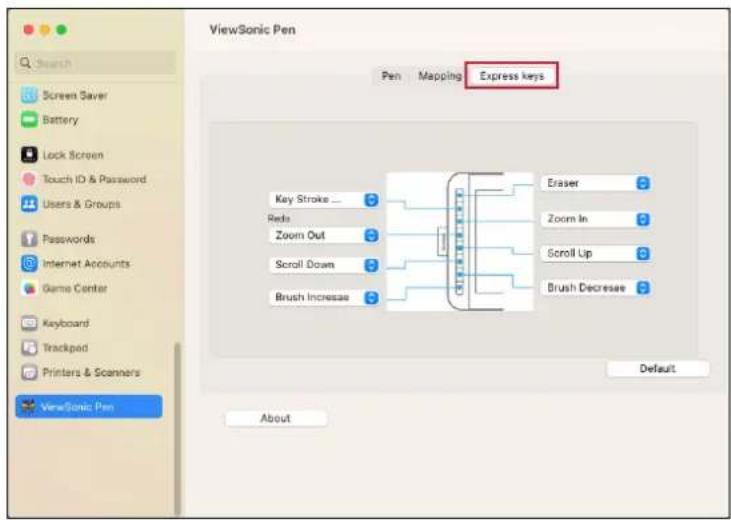
- Select the Express Keys tab to customize the six (6) express keys on the pen display.
Uninstalling the Driver (macOS)
- Go to: Applications > Tablet Utility > Uninstall-Driver
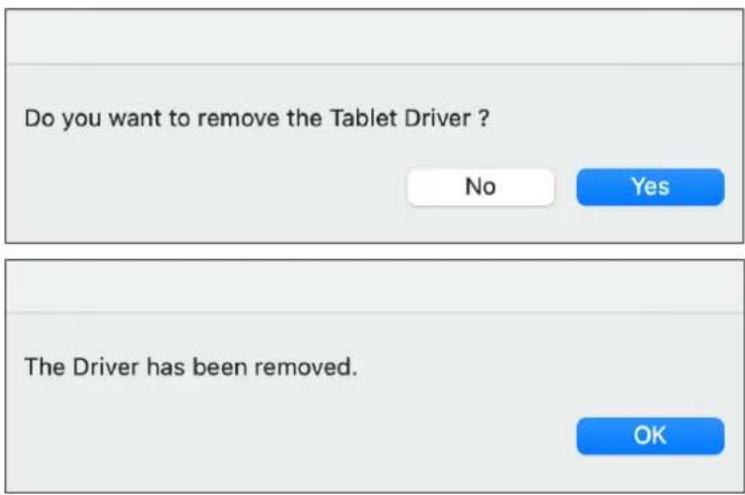
- After uninstalling the driver, restart your Mac.
Using the Pen Display
Turning the Device On/Off
- Ensure the display is connected properly to the computer.
- Press the Power key to turn on the display.
- To turn the display off, press the Power key again.
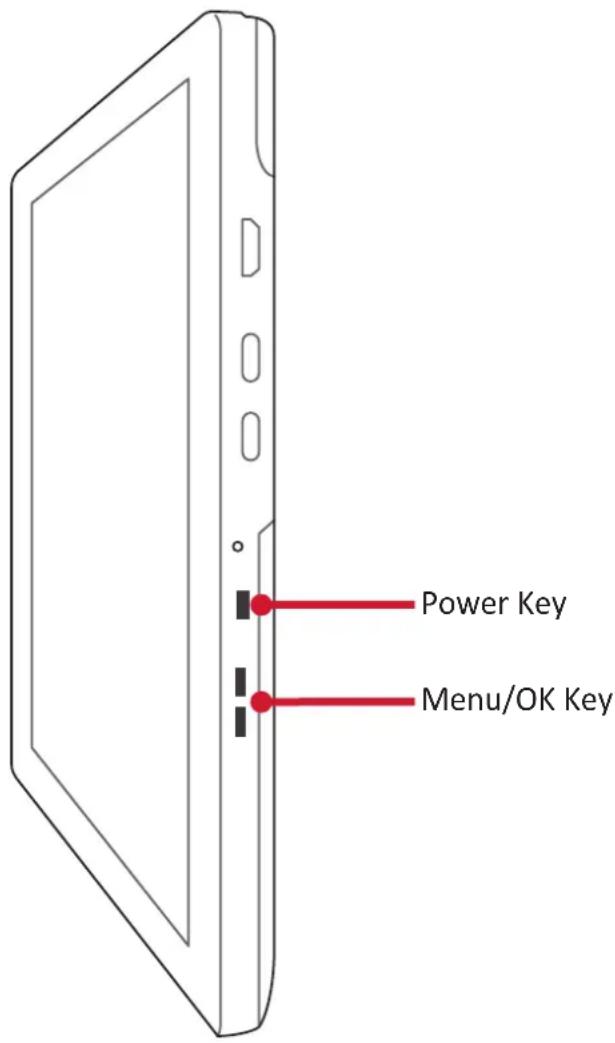
NOTE: The display will still consume some power as long as it is connected. If the display is not being used for a long period of time, please disconnect it.
On-Screen Display (OSD) Menu
Press the Menu key to activate the On-Screen Display (OSD) Menu.
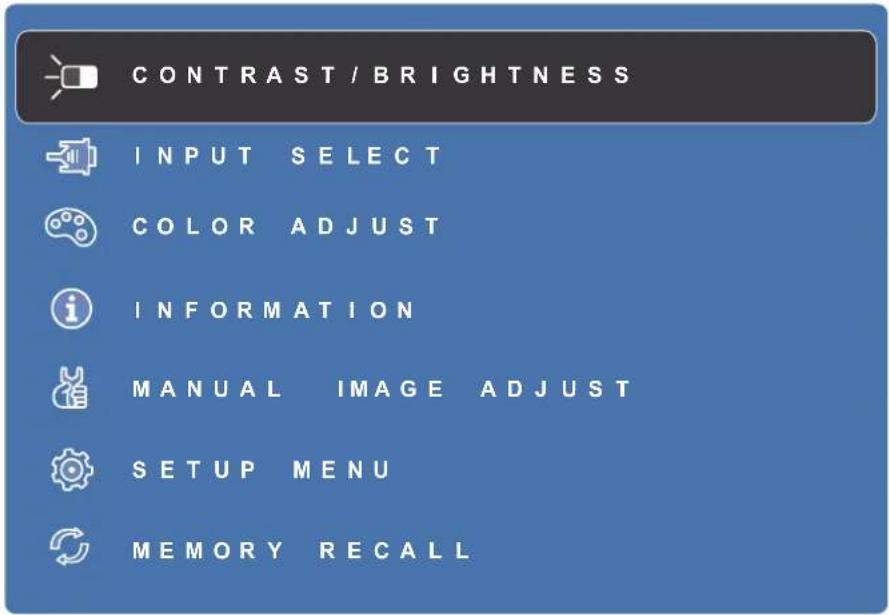

| Menu | Description |
| Contrast/Brightness | Adjust the contrast or brightness level. |
| Input Select | Select the input source. |
| Color Adjust | Select one of the preset color settings. |
| Information | Displays the timing mode coming from the graphics card in the computer, the LCD model number, the serial number, and the ViewSonic® website URL. |
| Manual Image Adjust | Manually set a variety of image quality adjustments. |
| Setup Menu | Adjust On-Screen Display (OSD) settings. |
| Memory Recall | Returns the adjustments back to factory settings. |
Configuring the Settings
General Operations
- Press the Menu key to display the On-Screen Display (OSD) Menu.
- Press the ▼ or ▲ key to select the main menu. Then press the Menu key to enter the selected menu.
- Press the ▼ or ▲ key to select the desired menu option. Then press the Menu key to enter the sub-menu.
- Press the ▼ or ▲ key to adjust/select the setting. Then press the Menu key to confirm.
NOTE: Certain menu option adjustments do not require the user to press the Menu key to confirm the selection.
On-Screen Display (OSD) Menu Tree
| Main Menu Sub-menu Menu Option | |||
| Contrast/Brightness | Contrast (-/+, 0~100) | ||
| Brightness (-/+, 0~100) | |||
| Input Select | HDMI | ||
| Type C | |||
| Color Adjust | sRGB | ||
| Bluish | |||
| Cool | |||
| Native | |||
| Warm | |||
| User Color | Red (-/+, 0~100) | ||
| Green (-/+, 0~100) | |||
| Blue (-/+, 0~100) | |||
| Information | |||
| Manual Image Adjust | Sharpness (-/+, 0~100) | ||
| Dynamic Contrast | On | ||
| Off | |||
| Response Time | Standard | ||
| Advanced | |||
| Ultra Fast | |||
| Aspect Ratio | 4:3 | ||
| Full Screen | |||
| Overscan | On | ||
| Off | |||
| Eco Mode | Standard | ||
| Optimize | |||
| Conserve | |||
| ViewMode | |||
| Blue Light Filter (-/+, 0~100) | |||
| Main Menu Sub-menu Menu Option | |||
| Setup Menu | Language Select | English | |
| Français | |||
| Deutsch | |||
| Español | |||
| Italiano | |||
| Suomi | |||
| Русский | |||
| Türkçe | |||
| 日本語 | |||
| 한국어 | |||
| 繁體中文 | |||
| 简体中文 | |||
| Česká | |||
| Svenska | |||
| Resolution Notice | On | ||
| Off | |||
| OSD Position | H. Position (-/+, 0~100) | ||
| V. Position (-/+, 0~100) | |||
| OSD Timeout (-/+, 5/15/30/60) | |||
| OSD Background | On | ||
| Off | |||
| Auto Power Off | On | ||
| Off | |||
| Sleep | 30 minutes | ||
| 45 minutes | |||
| 60 minutes | |||
| 120 minutes | |||
| Power Indicator | On | ||
| Off | |||
Appendix
Specifications
| ItemCategory Specifications | ||
| LCD | Type 1920 x 1080 LCD, | |
| Display Size 29.46 cm, 11.6" | ||
| Surface Treatment Hard-coating (8H) | ||
| Resolution | Supported | 1920 x 1080 |
| Power | USB | 5V/2A, USB C power supply |
| Operating conditions | Temperature 0°C to 40°C (32°F to 104°F) | |
| Humidity 20% to 80% (non-condensing) | ||
| Storage conditions | Temperature -10°C to 60°C (-2°F to 140°F) | |
| Humidity 10% to 90% (non-condensing) | ||
| Dimensions | Physical(W x H x D) | 321.3 x 194.2 x 12.3 mm(12.65" x 7.65" x 0.48") |
| Weight | Physical | 0.6 kg (1.32 lbs) |
| Power Consumption | On 7W (Typical) | |
| Standby ≤ 3W | ||
Pen
| ItemSpecifications | |
| Type Electromagnetic resonance | |
| Power Supply Battery-less | |
| Resolution | 5080 LPI (lines per inch) |
| Pressure Sensitivity | 8192 |
| Report Rate | Average 300 PPS (points per second) |
| Detectable Height | 10 mm |
| Pen Tilt Angle +/- 60° | |
| OS Supported Win | 10 (32/64 bit), Win 8, Win 7, Win XP; macOS 10.15 or above. |
Troubleshooting
This section describes some common problems that you may experience when using the monitor.
| Problem or Issue Possible Solutions | |
| No picture on the display | ·Ensure the USB cable is connected properly at both ends.·Ensure USB connectors are connected directly to the PC - not to an external hub.·Try another USB port on the computer.·Ensure the computer is powered on.·Ensure all drivers are installed and updated (if applicable). |
| Display interference | ·Check if other nearby electrical devices are causing interference. |
| The display is not clear | ·Touching the display with your fingers may leave fingerprints and skin oil making the display unclear.·Use a soft, dry cloth to remove any fingerprints or skin oil. |
Pen
| Problem or Issue Possible Solutions | |
| The pen is not working | Try using the computer's mouse; if the mouse also does not work please restart the computer.Reinstall the pen driver (if applicable). |
| The pen nib is too short, or not making proper contact with the display | Check the condition of the pen nib. If it is too short, please replace the pen nib. |
| The cursor is not moving correctly | Try restarting the computer.Ensure the USB cable is connected properly at both ends. |
FAQ
| Question Possible Solutions | |
| How to find out whether the driver was installed properly? | After the driver was properly installed, and when the tablet and computer are connected properly, a small driver icon will appear in the icon tray of the computer.When the electromagnetic pen is used on the tablet, it will be able to control the cursor properly, and it will be able to sense pressure during the pressure test in the driver control panel. |
| What should I do if the small digital control panel icon did not appear in the icon tray of the computer after driver installation was completed? | If the driver was installed for the first time, the computer must be restarted after installation to let the driver complete the initial installation.Make sure that the tablet is connected properly to the USB interface of the computer (it is recommended to connect to the USB interface at the back of the computer) and has not become loose.If it was confirmed that the tablet was connected to the USB interface of the computer but there was still no small driver icon, please try to connect to other USB interfaces and restart the computer. |
| The tablet cannot be used properly, how do I determine whether the malfunction is a hardware or software issue? | Connect the tablet with another computer to test it; if the tablet and the electromagnetic pen can be used on the other computer like a mouse without installing the driver, it means that the malfunction was caused by the current computer. |
| How does the tablet realize drawing creations? | The tablet is only a type of input device for computers; it is considered hardware,and not drawing software.If you want to perform drawing creations, it must be used with corresponding drawing software to realize drawing creations. It is recommended you purchase or download related drawing software. |
Maintenance
General Precautions
- Make sure the display is turned off and unplugged.
- Never spray or pour any liquid directly onto the screen or case.
- Handle the display with care.
Cleaning the Screen
- Wipe the screen with a clean, soft, lint-free cloth. This removes dust and other particles.
- If the screen is still not clean, apply a small amount of non-ammonia, non-alcohol based glass cleaner onto a clean, soft, lint-free cloth; then wipe the screen.
Cleaning the Case
- Use a soft, dry cloth.
- If the case is still not clean, apply a small amount of non-ammonia, non-alcohol based, mild non-abrasive detergent onto a clean, soft, lint-free cloth, then wipe the surface.
Disclaimer
- ViewSonic® does not recommend the use of any ammonia or alcohol-based cleaners on the display screen or case. Some chemical cleaners have been reported to damage the screen and/or case of the monitor.
- ViewSonic® will not be liable for damage resulting from use of any ammonia or alcohol-based cleaners.
Replacing a Pen Nib
When the pen nib gets too short or develops a sharp edge, it can be replaced with spare nibs.
To replace a pen nib:
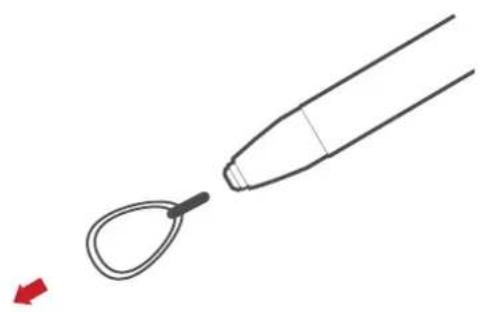
- Use the Nib Removal Tool to pull the old nib straight out of the pen.
natural_image
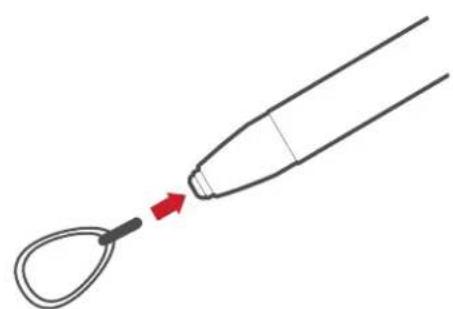
Simple line drawing of a medical or laboratory tool with a loop and a handle, no text or symbols present.- Insert a new pen nib into the pen and push the nib in until it stops and is held firm.
natural_image
Simple line drawing of a medical or laboratory tool with a red arrow pointing to a tip (no text or symbols)Regulatory and Service Information
Compliance Information
This section addresses all connected requirements and statements regarding regulations. Confirmed corresponding applications shall refer to nameplate labels and relevant markings on the unit.
FCC Compliance Statement
This device complies with part 15 of FCC Rules. Operation is subject to the following two conditions: (1) this device may not cause harmful interference, and (2) this device must accept any interference received, including interference that may cause undesired operation. This equipment has been tested and found to comply with the limits for a Class B digital device, pursuant to part 15 of the FCC Rules.
These limits are designed to provide reasonable protection against harmful interference in a residential installation. This equipment generates, uses, and can radiate radio frequency energy, and if not installed and used in accordance with the instructions, may cause harmful interference to radio communications. However, there is no guarantee that interference will not occur in a particular installation. If this equipment does cause harmful interference to radio or television reception, which can be determined by turning the equipment off and on, the user is encouraged to try to correct the interference by one or more of the following measures:
- Reorient or relocate the receiving antenna.
- Increase the separation between the equipment and receiver.
- Connect the equipment into an outlet on a circuit different from that to which the receiver is connected.
- Consult the dealer or an experienced radio/TV technician for help.
Warning: You are cautioned that changes or modifications not expressly approved by the party responsible for compliance could void your authority to operate the equipment.
Industry Canada Statement
CAN ICES-003(B) / NMB-003(B)
CE Conformity for European Countries

The device complies with the EMC Directive 2014/30/EU and Low Voltage Directive 2014/35/EU.
The following information is only for EU-member states:
The mark shown to the right is in compliance with the Waste Electrical and Electronic Equipment Directive 2012/19/EU (WEEE). The mark indicates the requirement NOT to dispose of the equipment as unsorted municipal waste, but use the return and collection systems according to local law.

Declaration of RoHS2 Compliance
This product has been designed and manufactured in compliance with Directive 2011/65/EU of the European Parliament and the Council on restriction of the use of certain hazardous substances in electrical and electronic equipment (RoHS2 Directive) and is deemed to comply with the maximum concentration values issued by the European Technical Adaptation Committee (TAC) as shown below:
| Substance | Proposed Maximum Concentration | Actual Concentration |
| Lead (Pb) 0.1% < 0.1% | ||
| Mercury (Hg) 0.1% < 0.1% | ||
| Cadmium (Cd) 0.01% < 0.01% | ||
| Hexavalent Chromium (Cr6+) 0.1% | < 0.1% | |
| Polybrominated biphenyls (PBB) 0.1% < 0.1% | ||
| Polybrominated diphenyl ethers (PBDE) | 0.1% < 0.1% | |
| Bis (2-ethylhexyl) phthalate (DEHP) | 0.1% < 0.1% | |
| Butyl benzyl phthalate (BBP) 0.1% | < 0.1% | |
| Dibutyl phthalate (DBP) 0.1% < 0.1% | ||
| Diisobutyl phthalate (DIBP) 0.1% < 0.1% |
Certain components of products as stated above are exempted under the Annex III of the RoHS2 Directives as noted below. Examples of exempted components are:
- Lead as an alloying element in aluminum containing up to 0.4% lead by weight.
• Copper alloy containing up to 4% lead by weight. - Lead in high melting temperature type solders (i.e. lead-based alloys containing 85% by weight or more lead).
- Electrical and electronic components containing lead in a glass or ceramic other than dielectric ceramic in capacitors, e.g. piezoelectronic devices, or in a glass or ceramic matrix compound.
Indian Restriction of Hazardous Substances
Restriction on Hazardous Substances statement (India). This product complies with the “India E-waste Rule 2011” and prohibits use of lead, mercury, hexavalent chromium, polybrominated biphenyls or polybrominated diphenyl ethers in concentrations exceeding 0.1 weight % and 0.01 weight % for cadmium, except for the exemptions set in Schedule 2 of the Rule.
Product Disposal at End of Product Life
ViewSonic ^® respects the environment and is committed to working and living green. Thank you for being part of Smarter, Greener Computing. Please visit the ViewSonic ^® website to learn more.
USA & Canada:
https://www.viewsonic.com/us/go-green-with-viewsonic
Europe:
https://www.viewsonic.com/eu/go-green-with-viewsonic
Taiwan:
https://recycle.moenv.gov.tw/
For EU users, please contact us for any safety/accident issue experienced with this product:
ViewSonic Europe Limited
Haaksbergweg 75
1101 BR Amsterdam
Netherlands
+31 (0) 650608655
EPREL@viewsoniceurope.com
https://www.viewsonic.com/eu/


Copyright Information
Copyright© ViewSonic® Corporation, 2023. All rights reserved.
Macintosh and Power Macintosh are registered trademarks of Apple Inc.
Microsoft, Windows, and the Windows logo are registered trademarks of Microsoft Corporation in the United States and other countries.
ViewSonic ^® , the three birds logo, OnView, ViewMatch, and ViewMeter are registered trademarks of ViewSonic ^® Corporation.
VESA is a registered trademark of the Video Electronics Standards Association. DPMS, DisplayPort, and DDC are trademarks of VESA.
ENERGY STAR ^® is a registered trademark of the U.S. Environmental Protection Agency (EPA).
Disclaimer: ViewSonic® Corporation shall not be liable for technical or editorial errors or omissions contained herein; nor for incidental or consequential damages resulting from furnishing this material, or the performance or use of this product.
In the interest of continuing product improvement, ViewSonic® Corporation reserves the right to change product specifications without notice. Information in this document may change without notice.
No part of this document may be copied, reproduced, or transmitted by any means, for any purpose without prior written permission from ViewSonic® Corporation.
ID1230_UG_ENG_1c_20240402
Customer Service
For technical support or product service, see the table below or contact your reseller.
NOTE: You will need the product's serial number.
| Country/ Region Website Country/ Region Website | |||
| Asia Pacific & Africa | |||
| Australia www.viewsonic.com/au/ Bangladesh www.viewsonic.com/bd/ | |||
| 中国 (China) | www.viewsonic.com.cn | 香港(繁體中文) | www.viewsonic.com/hk/ |
| Hong Kong (English) www.viewsonic.com/hk-en/ India www.viewsonic.com/in/ | |||
| Indonesia www.viewsonic.com/id/ | Israel | www.viewsonic.com/il/ | |
| 日本 (Japan) | www.viewsonic.com/jp/ | Korea | www.viewsonic.com/kr/ |
| Malaysia | www.viewsonic.com/my/ | Middle East | www.viewsonic.com/me/ |
| Myanmar | www.viewsonic.com/mm/ | Nepal | www.viewsonic.com/np/ |
| New Zealand | www.viewsonic.com/nz/ | Pakistan | www.viewsonic.com/pk/ |
| Philippines | www.viewsonic.com/ph/ | Singapore | www.viewsonic.com/sg/ |
| 臺灣 (Taiwan) | www.viewsonic.com/tw/ | ประเทศไทย | www.viewsonic.com/th/ |
| Việt Nam | www.viewsonic.com/vn/ | South Africa & Mauritius | www.viewsonic.com/za/ |
| Americas | |||
| United States | www.viewsonic.com/us | Canada | www.viewsonic.com/us |
| Latin America | www.viewsonic.com/la | ||
| Europe | |||
| Europe | www.viewsonic.com/eu/ | France | www.viewsonic.com/fr/ |
| Deutschland | www.viewsonic.com/de/ | Қазақстан | www.viewsonic.com/kz/ |
| Россия | www.viewsonic.com/ru/ | España www.viewsonic.com/es/ | |
| Türkiye | www.viewsonic.com/tr/ | Україна | www.viewsonic.com/ua/ |
| United Kingdom | www.viewsonic.com/uk/ | ||
Limited Warranty
ViewSonic® Pen Display
What the warranty covers:
ViewSonic® warrants its products to be free from defects in material and workmanship during the warranty period. If a product proves to be defective in material or workmanship during the warranty period, ViewSonic® will, at its sole option, and as your sole remedy, repair or replace the product with a similar product. Replacement Product or parts may include remanufactured or refurbished parts or components. The repair or replacement unit or parts or components will be covered by the balance of the time remaining on the customer's original limited warranty and the warranty period will not be extended. ViewSonic® provides no warranty for any third-party software whether included with the product or installed by the customer, installation of any unauthorized hardware parts or components (e.g. Projector Lamps). (Please refer to: "What the warranty excludes and does not cover" section).
How long the warranty is effective:
ViewSonic® displays are warranted for between 1 and 3 years, depending on your country of purchase, for all parts including the light source and for all labor from the date of the first consumer purchase.
Who the warranty protects:
This warranty is valid only for the first consumer purchaser.
What the warranty excludes and does not cover:
- Any product on which the serial number has been defaced, modified, or removed.
- Damage, deterioration, or malfunction resulting from:
» Accident, misuse, neglect, fire, water, lightning, or other acts of nature, unauthorized product modification, or failure to follow instructions supplied with the product.
» Repair or attempted repair by anyone not authorized by ViewSonic®.
» Damage to or loss of any programs, data, or removable storage media.
» Normal wear and tear.
» Removal or installation of the product.
- Software or data loss occurring during repair or replacement.
- Any damage of the product due to shipment.
- Causes external to the product, such as electric power fluctuations or failure.
- Use of supplies or parts not meeting ViewSonic's specifications.
- Failure of owner to perform periodic product maintenance as stated in the User Guide.
- Any other cause which does not relate to a product defect.
- Damage caused by static (non-moving) images displayed for lengthy periods of time (also referred to as image burn-in).
- Software - Any third-party software included with the product or installed by the customer.
- Hardware/Accessories/Parts/Components – Installation of any unauthorized hardware, accessories, consumable parts or components (e.g. Projector Lamps).
- Damage to, or abuse of, the coating on the surface of the display through inappropriate cleaning as described in the product User Guide.
- Removal, installation, and set-up service charges, including wall-mounting of the product.
How to get service:
- For information about receiving service under warranty, contact ViewSonic® Customer Support (Please refer to the “Customer Service” page). You will need to provide your product’s serial number.
- To obtain warranty service, you will be required to provide: (a) the original dated sales slip, (b) your name, (c) your address, (d) a description of the problem, and (e) the serial number of the product.
- Take or ship the product, freight prepaid, in the original container to an authorized ViewSonic® service center or ViewSonic®.
- For additional information or the name of the nearest ViewSonic® service center, contact ViewSonic®.
Limitation of implied warranties:
There are no warranties, express or implied, which extend beyond the description contained herein including the implied warranty of merchantability and fitness for a particular purpose.
Exclusion of damages:
ViewSonic's liability is limited to the cost of repair or replacement of the product. ViewSonic® shall not be liable for:
- Damage to other property caused by any defects in the product, damages based upon inconvenience, loss of use of the product, loss of time, loss of profits, loss of business opportunity, loss of goodwill, interference with business relationships, or other commercial loss, even if advised of the possibility of such damages.
- Any other damages, whether incidental, consequential or otherwise.
- Any claim against the customer by any other party.
- Repair or attempted repair by anyone not authorized by ViewSonic®.
Effect of state law:
This warranty gives you specific legal rights, and you may also have other rights which vary from state to state. Some states do not allow limitations on implied warranties and/or do not allow the exclusion of incidental or consequential damages, so the above limitations and exclusions may not apply to you.
Sales outside the U.S.A. and Canada:
For warranty information and service on ViewSonic® products sold outside of the U.S.A. and Canada, contact ViewSonic® or your local ViewSonic® dealer.
The warranty period for this product in mainland China (Hong Kong, Macao, and Taiwan Excluded) is subject to the terms and conditions of the Maintenance Guarantee Card.
For users in Europe and Russia, full details of warranty provided can be found at: http://www.viewsonic.com/eu/ under "Support/Warranty Information".
Mexico Limited Warranty
ViewSonic® Pen Display
What the warranty covers:
ViewSonic® warrants its products to be free from defects in material and workmanship, under normal use, during the warranty period. If a product proves to be defective in material or workmanship during the warranty period, ViewSonic® will, at its sole option, repair or replace the product with a like product. Replacement product or parts may include remanufactured or refurbished parts or components & accessories.
How long the warranty is effective:
ViewSonic® LCD displays are warranted for between 1 and 3 years, depending on your country of purchase, for all parts including the light source and for all labour from the date of the first consumer purchase.
Who the warranty protects:
This warranty is valid only for the first consumer purchaser.
What the warranty excludes and does not cover:
- Any product on which the serial number has been defaced, modified or removed.
- Damage, deterioration, or malfunction resulting from:
» Accident, misuse, neglect, fire, water, lightning, or other acts of nature, unauthorized product modification, unauthorized attempted repair, or failure to follow instructions supplied with the product.
» Causes external to the product, such as electrical power fluctuations or failure.
» Use of supplies or parts not meeting ViewSonic®'s specifications.
» Normal wear and tear.
» Any other cause which does not relate to a product defect.
- Any product exhibiting a condition commonly known as “image burn-in” which results when a static image is displayed on the product for an extended period of time.
- Removal, installation, insurance, and set-up service charges.
How to get service:
For information about receiving service under warranty, contact ViewSonic® Customer Support (Please refer to the attached “Customer Service” page). You will need to provide your product’s serial number, so please record the product information in the space provided below on your purchase for your future use. Please retain your receipt of proof of purchase to support your warranty claim.
For Your Records
Product Name: Model Number:
Document Number: Serial Number:
Purchase Date: Extended Warranty Purchase? (Y/N)
If so, what date does warranty expire?
- To obtain warranty service, you will be required to provide (a) the original dated sales slip, (b) your name, (c) your address, (d) a description of the problem, and (e) the serial number of the product.
- Take or ship the product, in the original container packaging, to an authorized ViewSonic® service center.
- Round trip transportation costs for in-warranty products will be paid by ViewSonic®.
Limitation of implied warranties:
There are no warranties, express or implied, which extend beyond the description contained herein including the implied warranty of merchantability and fitness for a particular purpose.
Exclusion of damages:
ViewSonic®’s liability is limited to the cost of repair or replacement of the product. ViewSonic® shall not be liable for:
- Damage to other property caused by any defects in the product, damages based upon inconvenience, loss of use of the product, loss of time, loss of profits, loss of business opportunity, loss of goodwill, interference with business relationships, or other commercial loss, even if advised of the possibility of such damages.
- Any other damages, whether incidental, consequential or otherwise.
- Any claim against the customer by any other party.
- Repair or attempted repair by anyone not authorized by ViewSonic®.
| Contact Information for Sales & Authorized Service (Centro Autorizado de Servicio) within Mexico: | |
| Name, address, of manufacturer and importers:México, Av. de la Palma #8 Piso 2 Despacho 203, Corporativo Interpalmas,Col. San Fernando Huixquilucan, Estado de MéxicoTel: (55) 3605-1099 http://www.viewsonic.com/la/soporte/index.htm | |
| NÚMERO GRATIS DE ASISTENCIA TÉCNICA PARA TODO MÉXICO: 001.866.823.2004 | |
| Hermosillo:Distribuciones y Servicios Computacionales SA de CV.Calle Juarez 284 local 2Col. Bugambilas C.P: 83140Tel: 01-66-22-14-9005E-Mail: disc2@hmo.megared.net.mx | Villahermosa:Compumantenimietnos Garantizados, S.A. de C.V.AV. GREGORIO MENDEZ #1504COL, FLORIDA C.P. 86040Tel: 01 (993) 3 52 00 47 / 3522074 / 3 52 20 09E-Mail: compumantenimientos@prodigy.net.mx |
| Puebla, Pue. (Matriz):RENTA Y DATOS, S.A. DE C.V. Domicilio:29 SUR 721 COL. LA PAZ72160 PUEBLA, PUE.Tel: 01(52).222.891.55.77 CON 10 LINEASE-Mail: datos@puebla.megared.net.mx | Veracruz, Ver.:CONEXION Y DESARROLLO, S.A DE C.V. Av.Americas # 419ENTRE PINZÓN Y ALVARADOFracc. Reforma C.P. 91919Tel: 01-22-91-00-31-67E-Mail: gacosta@qplus.com.mx |
| Chihuahua:Soluciones Globales en ComputaciónC. Magisterio # 3321 Col. MagisterialChihuahua, Chih.Tel: 4136954E-Mail: Cefeo@soluglobales.com | Cuernavaca:Compusupport de Cuernavaca SA de CVFrancisco Leyva # 178 Col. Miguel HidalgoC.P. 62040, Cuernavaca MorelosTel: 01 777 3180579 / 01 777 3124014E-Mail: aquevedo@compusupportcva.com |
| Distrito Federal:QPLUS, S.A. de C.V.Av. Coyoacán 931Col. Del Valle 03100, México, D.F.Tel: 01(52)55-50-00-27-35E-Mail : gacosta@qplus.com.mx | Guadalajara, Jal.:SERVICRECE, S.A. de C.V.Av. Niños Héroes # 2281Col. Arcos Sur, Sector Juárez44170, Guadalajara, JaliscoTel: 01(52)33-36-15-15-43E-Mail: mmiranda@servicrece.com |
| Guerrero Acapulco:GS Computación (Grupo Sesicomp)Progreso #6-A, Colo Centro39300 Acapulco, GuerreroTel: 744-48-32627 | Monterrey:Global Product ServicesMar Caribe # 1987, Esquina con Golfo PérsicoFracc. Bernardo Reyes, CP 64280Monterrey N.L. MéxicoTel: 8129-5103E-Mail: aydeem@gps1.com.mx |
| MERIDA:ELECTROSERAv Reforma No. 403Gx39 y 41Mérida, Yucatán, México CP97000Tel: (52) 999-925-1916E-Mail: rrrb@sureste.com | Oaxaca, Oax.:CENTRO DE DISTRIBUCION YSERVICIO, S.A. de C.V.Murguía # 708 P.A., Col. Centro, 68000, OaxacaTel: 01(52)95-15-15-22-22Fax: 01(52)95-15-13-67-00E-Mail. gpotai2001@hotmail.com |
| Tijuana:STDAv Ferrocarril Sonora #3780 L-CCol 20 de NoviembrTijuana, Mexico | FOR USA SUPPORT:ViewSonic® Corporation381 Brea Canyon Road, Walnut, CA. 91789 USATel: 800-688-6688E-Mail: http://www.viewsonic.com |
LCD Mexico Warranty Term Template In UG
VSC_TEMP_2008

natural_image
Illustration of three colorful bird figurines (yellow, blue, purple) perched on a green surface, no text or symbols present.ViewSonic®
- Thank you for choosing ViewSonic®
- Safety Precautions
- Contents
- Safety Precautions....3
- Introduction 6
- Making Connections......9
- Connecting to the Pen Display....9
- Driver Installation, Use, and Removal......11
- Using the Pen Display 21
- Appendix....26
- Regulatory and Service Information 31
- Introduction
- Package Contents
- System Requirements
- - Operating System:
- - CPU:
- - Memory:
- - Hard Disk Space:
- - Interface:
- Product Overview Front and Side View
- I/O Ports
- Making Connections
- Connecting to the Pen Display
- HDMI and USB Type C
- USB Type C
- Driver Installation, Use, and Removal
- Installing Drivers and Software (Windows)
- Pen Display Driver
- Setting the Display Area (Windows)
- Pen Input Settings (Windows)
- Uninstalling the Driver (Windows)
- Installing Drivers and Software (macOS)
- Pen Input Settings (macOS)
- Uninstalling the Driver (macOS)
- Using the Pen Display
- Turning the Device On/Off
- On-Screen Display (OSD) Menu
- Configuring the Settings
- General Operations
- Appendix
- Troubleshooting
- Maintenance
- General Precautions
- Cleaning the Screen
- Cleaning the Case
- Disclaimer
- Replacing a Pen Nib
- Regulatory and Service Information
- Compliance Information
- FCC Compliance Statement
- Industry Canada Statement
- CE Conformity for European Countries
- The following information is only for EU-member states:
- Declaration of RoHS2 Compliance
- Certain components of products as stated above are exempted under the Annex III of the RoHS2 Directives as noted below. Examples of exempted components are:
- Indian Restriction of Hazardous Substances
- Product Disposal at End of Product Life
- USA & Canada:
- Europe:
- Taiwan:
- Copyright Information
- Customer Service
- Limited Warranty
- ViewSonic® Pen Display
- What the warranty covers:
- How long the warranty is effective:
- Who the warranty protects:
- What the warranty excludes and does not cover:
- How to get service:
- Limitation of implied warranties:
- Exclusion of damages:
- Effect of state law:
- Sales outside the U.S.A. and Canada:
- Mexico Limited Warranty
- For Your Records
Brand : VIEWSONIC
Model : ID1230
Category : Graphic tablet