SA-A5 - Hi-Fi System AVer - Free user manual and instructions
Find the device manual for free SA-A5 AVer in PDF.


| Product Type | Streaming Audio System (Hi-Fi System) |
| Model | SA-A5 (SAB5V2 Streaming Audio Box) |
| Brand | AVer |
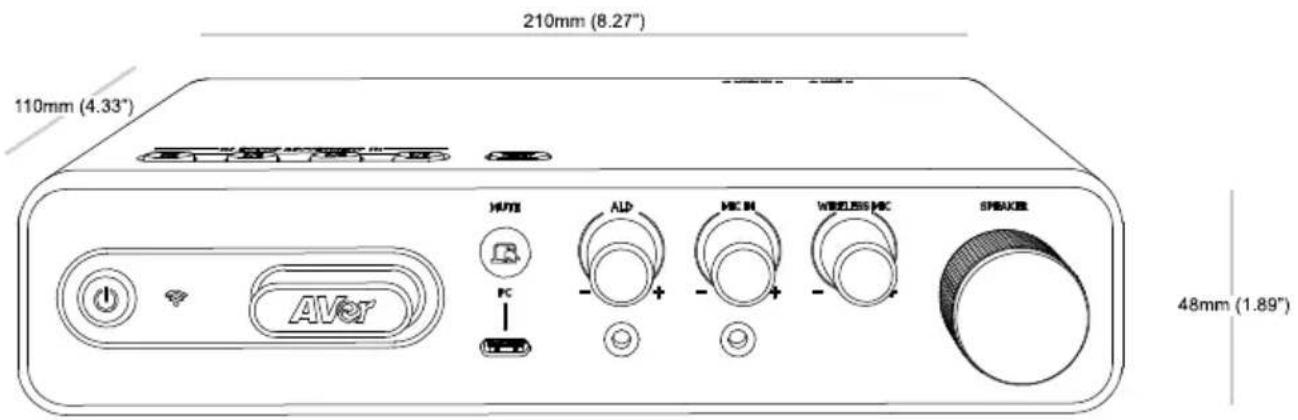
| Dimensions (Main Unit) | 210 x 110 x 48.5 mm (8.27 x 4.33 x 1.91 in) |
| Weight (Main Unit) | 530 g ±50 g (1.17 lb) |
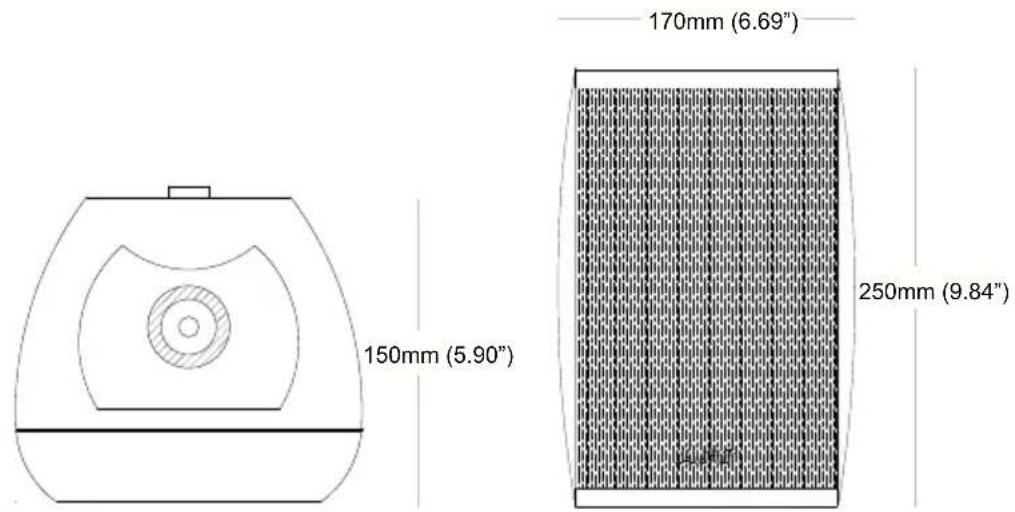
| Dimensions (Speakers) | 170 x 250 x 150 mm (6.69 x 9.84 x 5.90 in) each |
| Weight (Speakers) | 4.75 kg (10.47 lb) each |
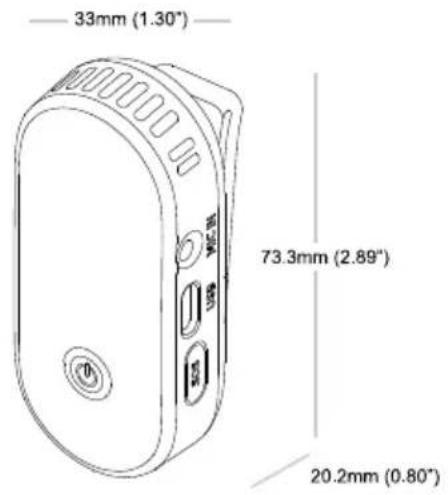
| Dimensions (Pendant Microphone) | 33 x 20.2 x 73.3 mm (1.30 x 0.80 x 2.89 in) |
| Weight (Pendant Microphone) | 35 g (1.23 oz) |
| Power Supply | DC 19V, 3.42A min (UL Listed adapter included) |
| Power Consumption | 65W max; Standby <1.5W (WoW) |
| Wireless Microphone Frequency | 2.4 GHz |
| Microphone Coverage | Up to 20 m (65 ft) |
| Microphone Talk Time | 8-10 hours; rechargeable in <3 hours |
| Audio Outputs | Speaker push-in terminals, Line Out (3.5mm), ALD (3.5mm) |
| Audio Inputs | Wireless Mic, Mic In (3.5mm), Line In (3.5mm), USB (UAC) |
| Network Connectivity | Ethernet (10/100), web application control |
| Special Features | PC Mute, Page Mute, SOS Alert (US), Input Lock, Web App |
| Safety Standards | FCC Part 15, IC RSS-102, CE, RoHS |
| Operating Temperature | 0°C to 40°C (32°F to 104°F) |
| Storage Temperature | -30°C to 60°C (-22°F to 140°F) |
| Spare Parts Availability | Replacement microphones, batteries, receiver dongle, charging case available |
| Repairability | User-replaceable microphone battery; other repairs by qualified technician |
| Care Instructions | Clean with dry cloth; avoid moisture; use only included power adapter |
Frequently Asked Questions - SA-A5 AVer
User questions about SA-A5 AVer
0 question about this device. Answer the ones you know or ask your own.
Ask a new question about this device
Download the instructions for your Hi-Fi System in PDF format for free! Find your manual SA-A5 - AVer and take your electronic device back in hand. On this page are published all the documents necessary for the use of your device. SA-A5 by AVer.
USER MANUAL SA-A5 AVer
natural_image
Line drawing of a portable electronic device with a grid panel, two earbuds, and a control panel (no text or symbols)SA-A5 Streaming Audio System
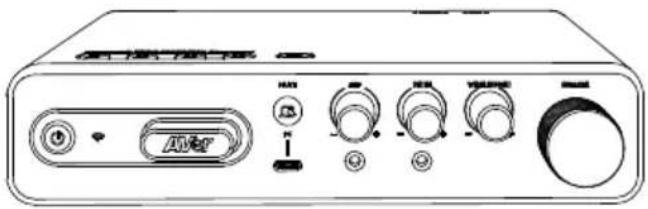
natural_image
Front panel of a portable electronic device with control knobs and indicator lights (no visible text or symbols)SAB5V2 Streaming Audio Box
— User Manual —
The power cord shall be connected to a socket-outlet with grounded connection.
This product is intended to be supplied by a UL Listed Certificate power adapter and power cord, output comply with LPS or PS2, rated 19Vdc, 3.42A min., and Tma 35 degree C min. Please contact manufacturer, UL File owner or AVer for further information and assistance.
Federal Communication Commission Interference Statement
This device complies with Part 15 of the FCC Rules. Operation is subject to the following two conditions: (1) This device may not cause harmful interference, and (2) this device must accept any interference received, including interference that may cause undesired operation.
This equipment has been tested and found to comply with the limits for a Class B digital device, pursuant to Part 15 of the FCC Rules. These limits are designed to provide reasonable protection against harmful interference in a residential installation. This equipment generates, uses and can radiate radio frequency energy and, if not installed and used in accordance with the instructions, may cause harmful interference to radio communications. However, there is no guarantee that interference will not occur in a particular installation. If this equipment does cause harmful interference to radio or television reception, which can be determined by turning the equipment off and on, the user is encouraged to try to correct the interference by one of the following measures:
- Reorient or relocate the receiving antenna.
- Increase the separation between the equipment and receiver.
- Connect the equipment into an outlet on a circuit different from that to which the receiver is connected.
- Consult the dealer or an experienced radio/TV technician for help.
FCC Caution: Any changes or modifications not expressly approved by the party responsible for compliance could void the user's authority to operate this equipment.
This Class B digital apparatus complies with Canadian ICES-003.
For Wireless Device:
For SAT5 Pendant Microphones:
This equipment complies with FCC radiation exposure limits set forth for an uncontrolled environment. End users must follow the specific operating instructions for satisfying the RF exposure compliance.
For SAR5 Microphone Receiver:
This equipment complies with FCC radiation exposure limits set forth for an uncontrolled environment. This equipment should be installed and operated with minimum distance 20cm between the receiver & your body.
IC Notice
This device contains licence-exempt transmitter(s)/receiver(s) that comply with Innovation, Science and Economic Development Canada's licence-exempt RSS(s). Operation is subject to the following two conditions:
- This device may not cause interference.
- This device must accept any interference, including interference that may cause undesired operation of the device.
This equipment complies with IC RSS-102 radiation exposure limits set forth for an uncontrolled environment.
For SAR5 Microphone Receiver:
This equipment complies with IC RSS-102 radiation exposure limits set forth for an uncontrolled environment. This equipment should be installed and operated with minimum distance 20cm between the radiator & your body.
Europe – EU Declaration of Conformity
This device complies with the essential requirements of the Radio Equipment Directive (2014/53/EU). The following test methods have been applied in order to prove presumption of conformity with the essential requirements of the Radio Equipment Directive (2014/53/EU).
PSTI Statement of Compliance
Please refer to the following website: https://www.aver.com/product-security-advisory
DISCLAIMER
No warranty or representation, either expressed or implied, is made with respect to the contents of this documentation, its quality, performance, merchantability, or fitness for a particular purpose. Information presented in this documentation has been carefully checked for reliability; however, no responsibility is assumed for inaccuracies. The information contained in this documentation is subject to change without notice.
In no event will AVer Information Inc. be liable for direct, indirect, special, incidental, or consequential damages arising out of the use or inability to use this product or documentation, even if advised of the possibility of such damages.
TRADEMARKS
“AVer” is a trademark owned by AVer Information Inc. Other trademarks used herein for description purpose only belong to each of their companies.
COPYRIGHT
© 2024 AVer Information Inc. All rights reserved. | March 1, 2024
All rights of this object belong to AVer Information Inc. Reproduced or transmitted in any form or by any means without the prior written permission of AVer Information Inc. is prohibited. All information or specifications are subject to change without prior notice.
More Help
For FAQs, technical support, software and user manual download, please visit:
Non-USA
Download Center: https://www.aver.com/download-center
Technical Support: https://www.aver.com/technical-support
USA
Download Center: https://www.averusa.com/pro-av/support/
Technical Support: https://averusa.force.com/support/s/contactsupport
Contact Information
Headquarters
AVer Information Inc.
8F, No.157, Da-An Rd., Tucheng Dist.,
New Taipei City 23673, Taiwan
Tel: +886 (2) 2269 8535
USA Branch Office
AVer Information Inc., Americas
44061 Nobel Drive, Fremont, CA 94538, USA
Tel: +1 (408) 263 3828
Toll-free: +1 (877) 528 7824
Europe Branch Office
AVer Information Europe B.V.
Westblaak 134, 3012 KM, Rotterdam, The
Netherlands
Tel: +31 (0) 10 7600 550
Japan Branch Office
アバー・インフォメーション株式会社
Vietnam Branch Office
Công ty TNHH AVer Information (Việt Nam)
Controls and Connections....4
SAB5V2 Streaming Audio Box 4
Pendant Microphones 6
Charging Case 7
Speakers 7
Power Connection....8
Wall Mount Installation 8
Getting Started....9
Set up Your SAB5V2 Streaming Audio Box 9
Insert the Microphone Receiver (Dongle) 9
Set up Your Microphone 9
Pair Your Pendant Microphone 9
Use Your Microphone....10
For Emergencies.... 11
Charge Your Microphone 11
Replace Your Microphone Battery 12
Set up Your Speakers....12
Connect Your Speaker Cables....12
Audio Features 13
Page Mute....13
Audio Output to Assistive Listening Devices (ALD) 14
In the Classroom....15
Hybrid Learning....16
Web Application Settings 18
Access to the web application....18
Login....19
Device Status 20
Audio 21
Network 23
System 25
Specification 26
SAB5V2 Streaming Audio Box 26
Pendant Microphones 28
Wireless Receiver Dongle 29
Charging Case 29
Speakers 29
Environmental Specifications 30
Troubleshooting 31
Overview
Package Contents
SAB5V2 Streaming Audio Box
SAB5V2 Streaming Audio Box
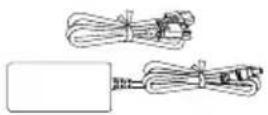
Power Adapter & Power Cord(s)
natural_image
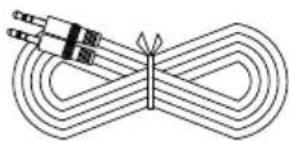
Pure diagram of a coiled wire or filament with no text, numbers, or symbols3.5 Stereo to 3.5 Stereo Cable (10m)
natural_image
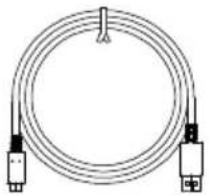
Pure electrical circuit lines without any symbolsUSB 3.0 Type-C to Type-A Cable (1.83m)
SAB5V2 QR Code Card
Pendant Microphones
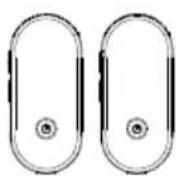
SAT5 Pendant Microphones
natural_image
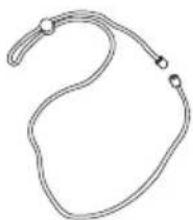
Simple line drawing of a loop with two endpoints and a handle (no text or symbols)Lanyard (x2)
natural_image
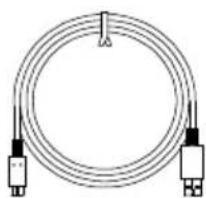
Coiled cable with two connectors and a clip, no text or symbols visibleUSB 3.0 Type-C to Type-A Cable (1.5m)
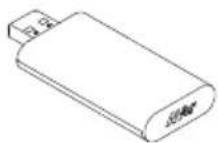
SAR5 Microphone Receiver (Dongle)
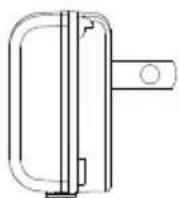
Wall Mount Type Adapter
Pendant Microphones Optional Accessories

natural_image
Line drawing of a closed open electronic device with two ports and a lid (no text or symbols)SAC5 Charging Case
natural_image
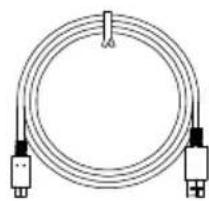
Pure electrical circuit lines without any symbolsUSB 3.0 Type-C to Type-A Cable (3m)
Speakers
natural_image
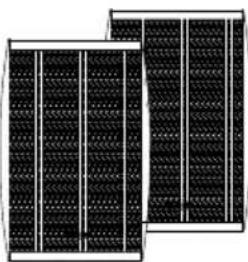
Two black-and-white panels with grid patterns, no visible text or symbolsSpeakers
natural_image
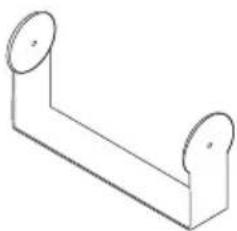
Simple line drawing of a mechanical bracket or support structure (no text or symbols)Wall Mount Bracket (x2)

Bracket Knob (x4)
natural_image
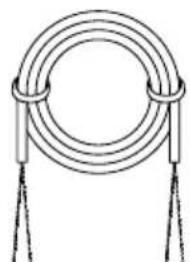
Simple line drawing of a coiled wire with two tassels (no text or symbols)Speaker Cable (20m)
Drill Template (x2)
SA-A5 QR Code Card
Dimensions
SAB5V2 Audio Streaming Box
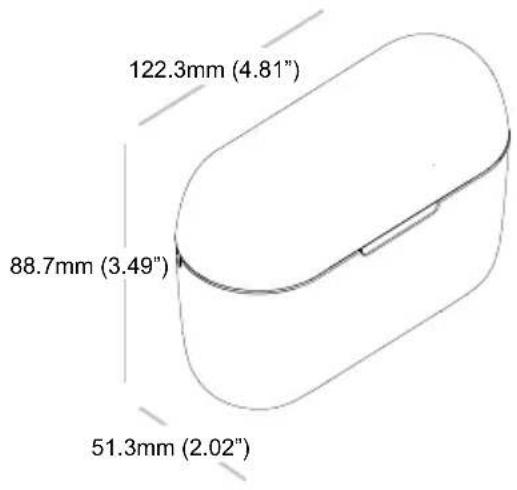
Charging Case
Pendant Microphones
Speakers
Controls and Connections
SAB5V2 Streaming Audio Box
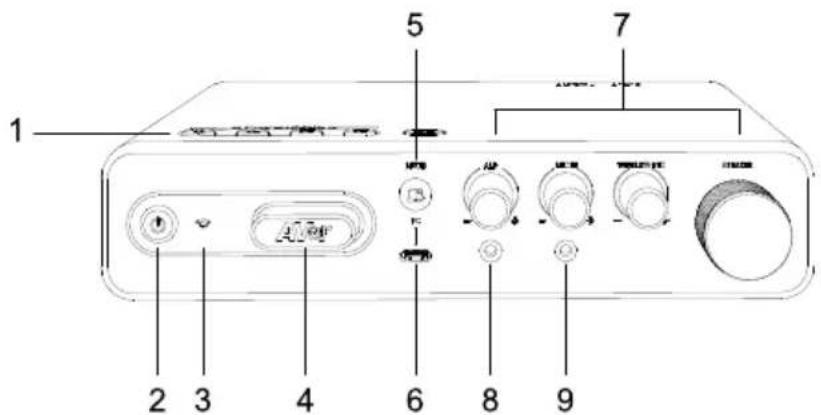
Top Cover
- Sound Adjustment Buttons
Front Panel
- Power Button
Short press: Power on.
Long press for 5 seconds: Enter Standby Mode.
Solid green: Power on
★ Flashing green: Start-up
Solid red: Wake-on-LAN mode (when connected to power)
★ Flashing red: Updating firmware
Solid orange: Input lock mode
- Status LED
- Solid blue: Microphone(s) is paired
○ Off: Microphone(s) isn't paired
-
Microphone Receiver (Dongle) Slot and Plug
-
PC Mute Button
- Solid red: PC is muted
○ Off: PC isn't muted
-
PC (USB Type-C) Port
-
Volume Controls:
Assistive Listening Device (ALD) / Mic In / Wireless Mic / Speakers
-
Assistive Listening Device (ALD) Port
-
Mic In Port
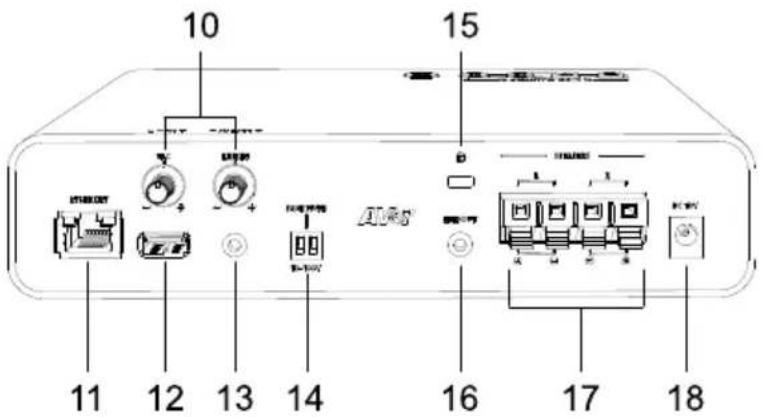
Back Panel
- Volume Controls:
USB Audio Class (UAC) / Line In
- Ethernet Port
- USB Type-A Port
- Line In Port
- Page Mute Port
- Kensington Lock
- Line Out Port
- Speaker Push-in Terminal Connector Block
- DC Power Jack
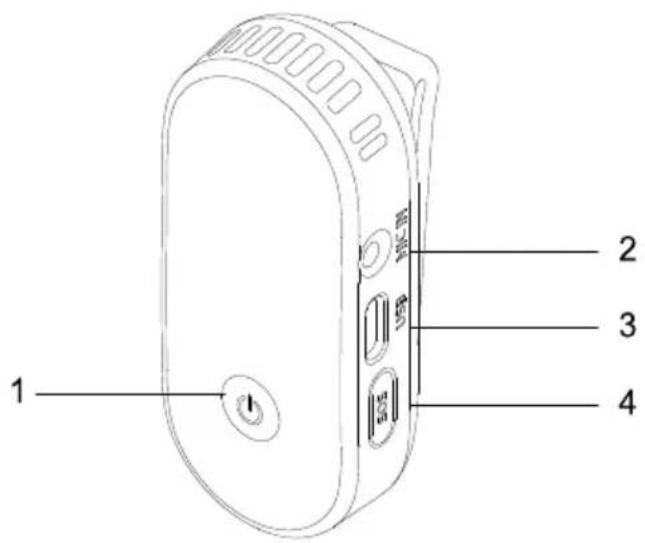
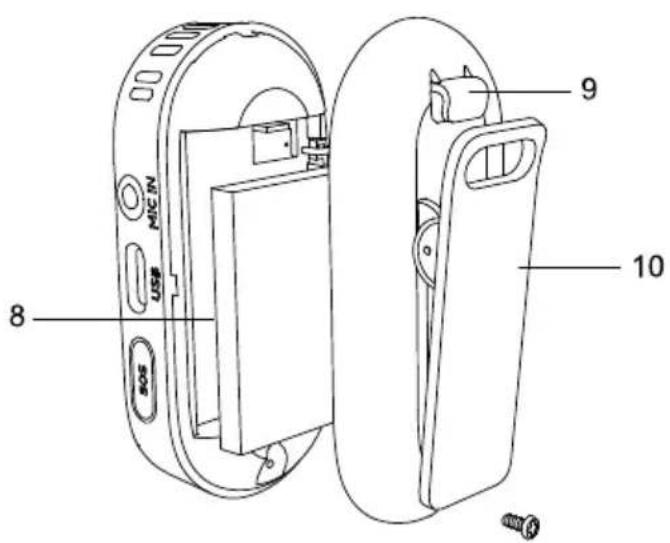
Pendant Microphones
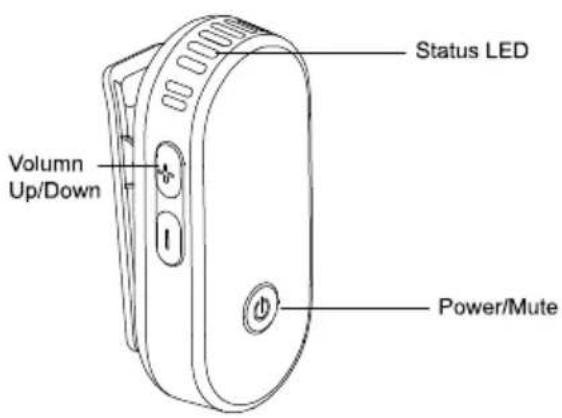
- Power/Mute Switch
Press and hold for 3 seconds to turn the microphone on or off. - Mic In Port
- USB Type-C Port
- SOS Button (on Teacher Microphone)
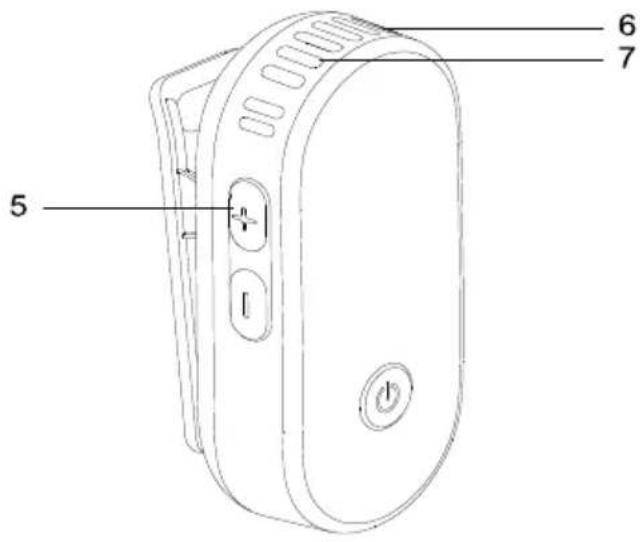
-
Volume Up/Down
-
Battery LED
Solid green: Normal
★ Flashing red: Low battery
- Status LED
Solid blue: Paired
★ Flashing blue: Not transmitting to a receiver or out of range
Solid red: Mute
★ Flashing red: Low battery
-
Battery Door
-
Lanyard Hook
-
Microphone Clip
Charging Case
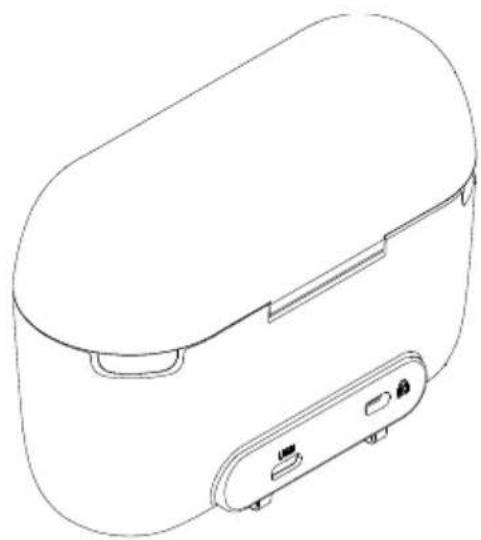
natural_image
Line drawing of a closed rice cooker with lid and buttons (no text or symbols)USB Type-C Port Kensington Lock
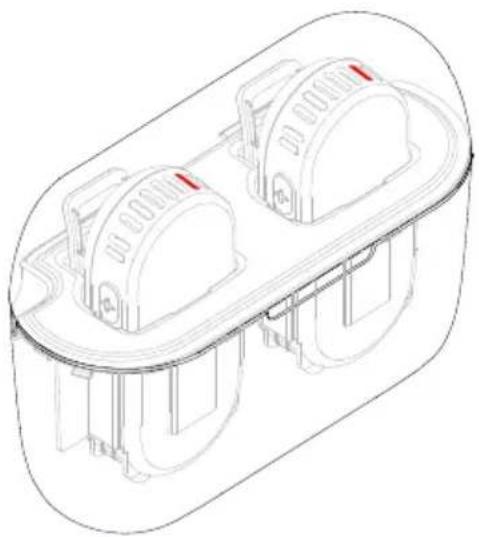
natural_image
Technical line drawing of a mechanical component with two circular features and mounting brackets (no text or symbols)- Solid green: Fully charged
Solid red: Charging
Speakers
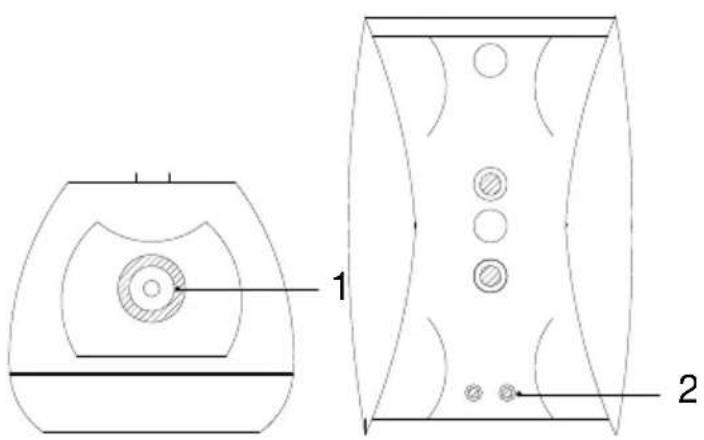
-
Wall Mount Bracket Knob
-
Speaker Spring Binding Post Terminal Connector
Power Connection
Connect the included power adapter and power cord to a power outlet with grounding connection.
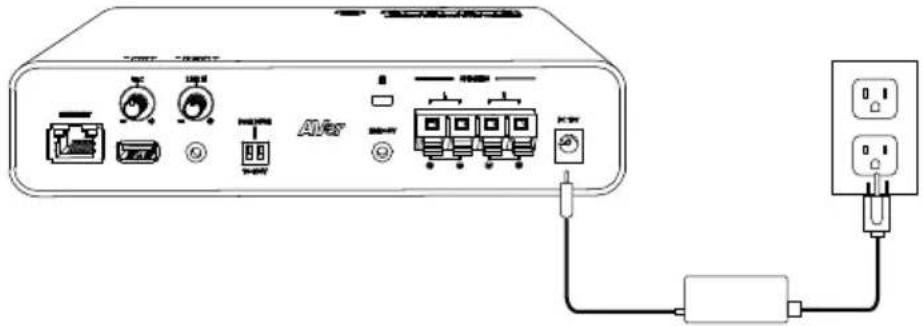
Wall Mount Installation
The speakers should be mounted 2.13m (7 feet) from a wall outlet.
- Level and tape the template to the wall. Drill pilot holes through the template and into the wall.
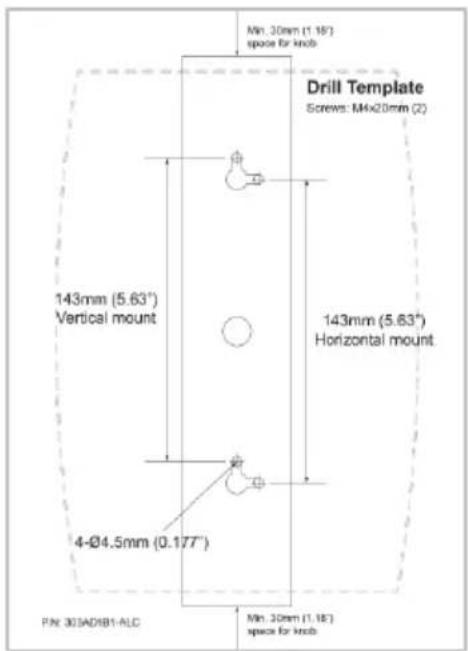
-
Remove the template and insert anchors.
-
Cement wall: M4x20mm self-tapping screws (2) + plastic conical anchor
● Wooden wall: M4x20mm self-tapping screws (2) -
Insert screws through the bracket and tighten to the wall.
- Connect your speaker cables to the spring binding post terminal connectors.
- Place the speaker inside the bracket and tighten the top and bottom bracket knobs to secure.
- Loosen the bracket knobs to adjust the speaker angle as needed.
Getting Started
Set up Your SAB5V2 Streaming Audio Box
Insert the Microphone Receiver (Dongle)
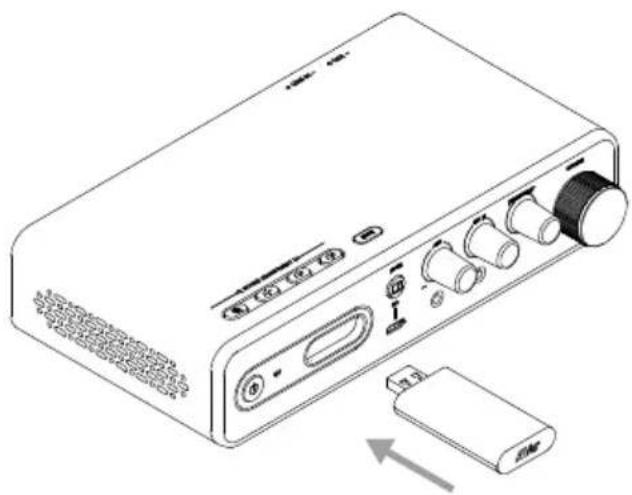
natural_image
Line drawing of a portable electronic device with ports, buttons, and an external battery (no text or symbols)- Remove the plug and insert the microphone receiver (dongle) included in the SAB5V2 Streaming Audio System.
- Short press the Power button to turn on the SAB5V2 Streaming Audio Box.
Note: Hot-plugging may damage your device. Please plug in the receiver before powering on and unplug it after powering off.
Set up Your Microphone
Pair Your Pendant Microphone
natural_image
Line drawing of a white electronic device with Wi-Fi signal icon above, no text or symbols presentSolid blue: Paired
★ Flashing blue: Not transmitting to a receiver or out of range
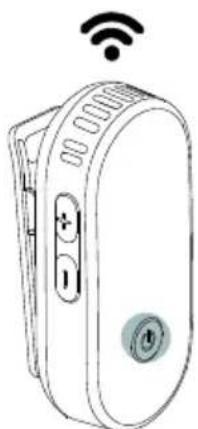
- Make sure you have inserted the microphone receiver (dongle) and turned on the SAB5V2 Streaming Audio Box.
- Press and hold the Power/Mute button on the microphone for 3 seconds until you see a solid green light, then release the button to continue the pairing process.
- Pairing is successful when the status LEDs on both the microphone(s) and the SAB5V2 Streaming Audio Box turn solid blue.
Use Your Microphone
natural_image
Line drawing of a handheld device with attached cable and ports, no text or symbols presentPlease follow the instructions below for optimal audio quality.
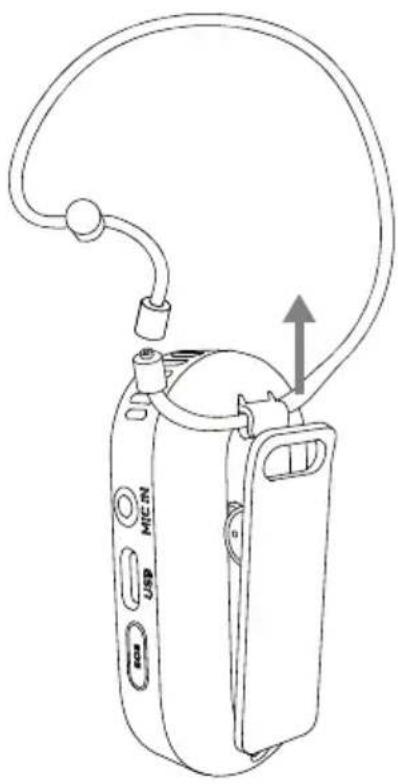
- Tuck the lanyard through the hook and pull hard to secure the lanyard. Then wear it around your neck.
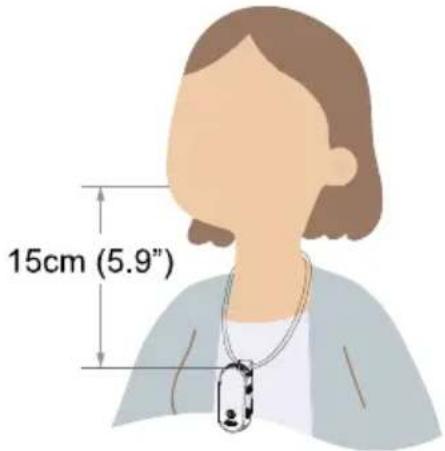
- Adjust the lanyard to position the microphone approximately 15cm (5.9") from mouth.
- Press and hold the Power/Mute button for 3 seconds to power on > press again to mute > press and hold for 3 seconds to power off.
- Adjust the volume with the Volume Up/Down buttons on the side of the microphone.
-
The microphone will automatically turn off:
-
When it is out of range and after 3 minutes of trying to connect.
● After being muted for 30 minutes.
Solid blue: Paired
★ Flashing blue: Not transmitting to a receiver or out of range
Solid red: Mute
★ Flashing red: Low battery
For Emergencies
The emergency feature is only available in the US.
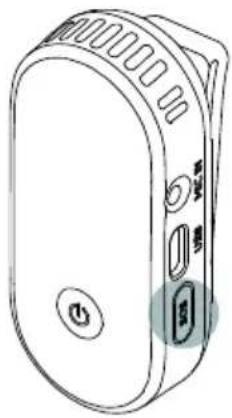
natural_image
Line drawing of a device with circular components and buttons (no text or symbols)★ Status LED and battery LED flash red.
- Connect the SAB5V2 Streaming Audio Box to your local network with an Ethernet cable and the Device Management software. (Download here: https://www.aver.com/Downloads/search?q=SAA5)
- Press and hold the SOS button on the Teacher Microphone for 3 seconds to send your location to the SA-A5 Streaming Audio System.
- Both status LED and battery LED will flash red.
- Your microphone will work normally after sending an SOS alert.
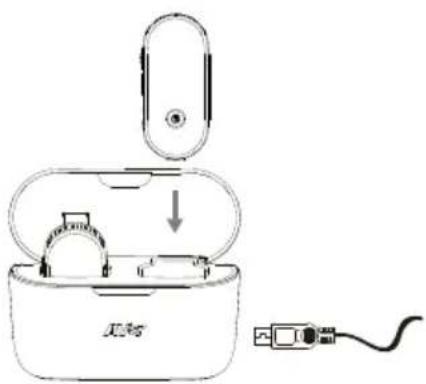
Charge Your Microphone
- It will take less than 3 hours to fully charge your microphones.
- Your microphone can get up to 8-10 hours of talk time on a single charge.
● 10 minutes of charge will provide 1 hour of talk time. - Your microphones function normally while charging.
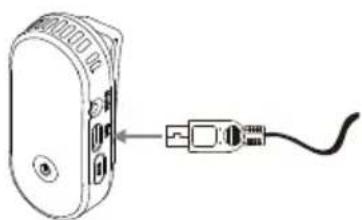
natural_image
Diagram of a device with ports and an attached cable, no text or symbols presentTo charge, plug your charging case or microphone into a power source using the included USB Type-C cable.
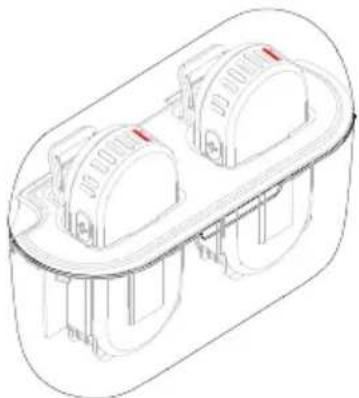
natural_image
Technical line drawing of a dual-chamber electronic device (no text or symbols)The status LED lights on the microphones can be seen through the lid.
- Solid green: Fully charged
Solid red: Charging
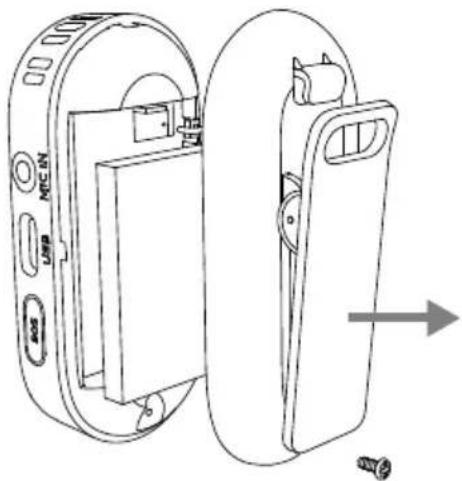
Replace Your Microphone Battery
[Note] The battery should be replaced by its manufacturer, service technician or a similarly qualified person.
natural_image
Technical line drawing of a device housing with internal components and a directional arrow (no text or symbols)-
Turn off the microphone. Loosen the screw and open the battery door.
-
Remove the battery by gently pulling up from the notch on the bottom.
-
Insert the replacement battery, close the battery door, and tighten the screw.
Set up Your Speakers
Connect Your Speaker Cables
-
Push down the spring binding post terminal connector on the back of your speakers to reveal the hole.
-
Insert the stripped end of the speaker wire into the hole in the center of the terminal connector. Make sure that the wire is connected to the correct terminal. The red wire should be connected to the red terminal, and the black or white wire (based on your speaker) should be connected to the black terminal.
-
Release the terminal connector. Make sure the wire is held securely and there are no loose strands.
-
Repeat the process for the other speaker wire.
Audio Features
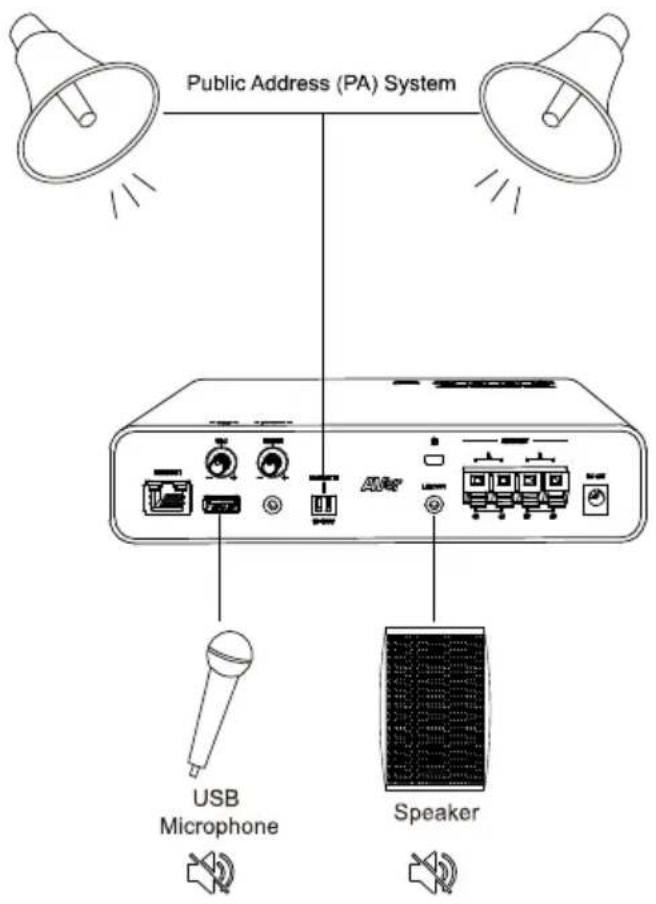
Page Mute
When the page mute input terminal senses a strong enough signal, it will automatically mute all other audio inputs sources. This is to allow that everyone can hear the broadcasts from the Public Address System.
Audio Output to Assistive Listening Devices (ALD)
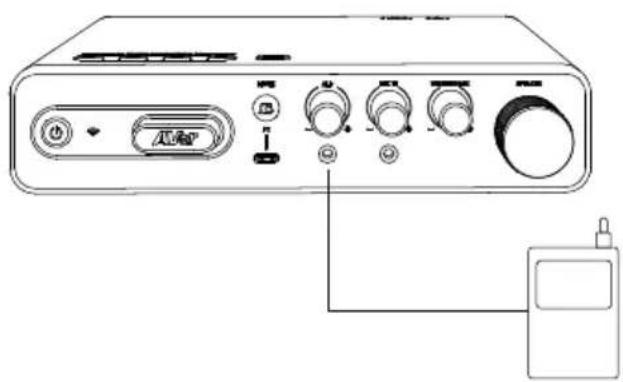
Assistive Listening Devices (ALD) can help students hear a teacher speaking across the room or hear a conversation in a noisy room.
-
Turn the ALD volume control all the way down on the SAB5V2 Streaming Audio Box.
-
Plug your transmitter into the ALD port on the front panel of the SAB5V2 Streaming Audio Box using the included 3.5mm to 3.5mm stereo cable.
-
Speak into the microphone and slowly adjust the volume control for a suitable audio level.
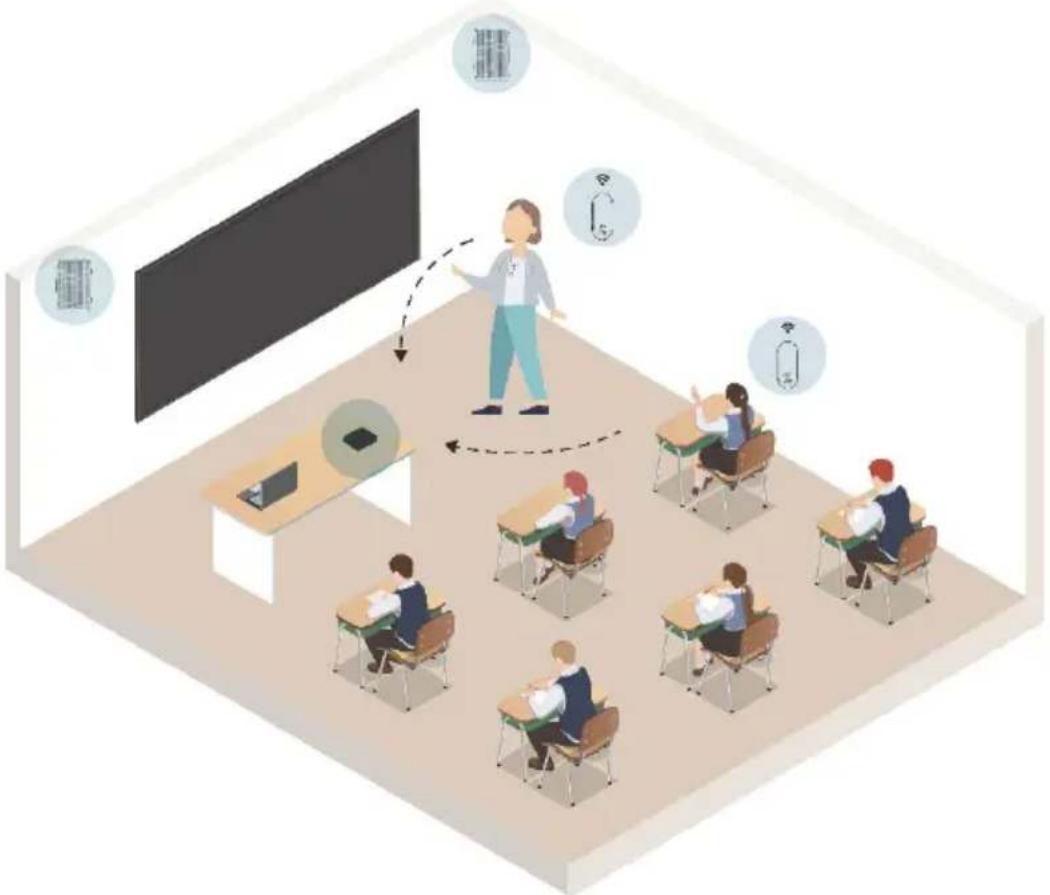
In the Classroom
flowchart
graph TD
    A["Teacher"] --> B["Classroom 1"]
    B --> C["Classroom 2"]
    C --> D["Classroom 3"]
    D --> E["Classroom 4"]
    E --> F["Classroom 5"]
    F --> G["Classroom 6"]
    G --> H["Classroom 7"]
    H --> I["Classroom 8"]
    I --> J["Classroom 9"]
    J --> K["Classroom 10"]
    K --> L["Classroom 11"]
    L --> M["Classroom 12"]
    M --> N["Classroom 13"]
    N --> O["Classroom 14"]
    O --> P["Classroom 15"]
    P --> Q["Classroom 16"]
    Q --> R["Classroom 17"]
    R --> S["Classroom 18"]
    S --> T["Classroom 19"]
    T --> U["Classroom 20"]
    U --> V["Classroom 21"]
    V --> W["Classroom 22"]
    W --> X["Classroom 23"]
    X --> Y["Classroom 24"]
    Y --> Z["Classroom 25"]
-
Short press to turn on the SAB5V2 Streaming Audio Box. Press and hold the Power/Switch button on the microphone for 3 seconds to pair your pendant microphone.
-
Or use a wired microphone by:
-
Plugging it into the Mic In port on the pendant microphone that has been paired with the SAB5V2 Streaming Audio Box.
● Plugging it into the Mic In port on the front panel of the SAB5V2 Streaming Audio Box.
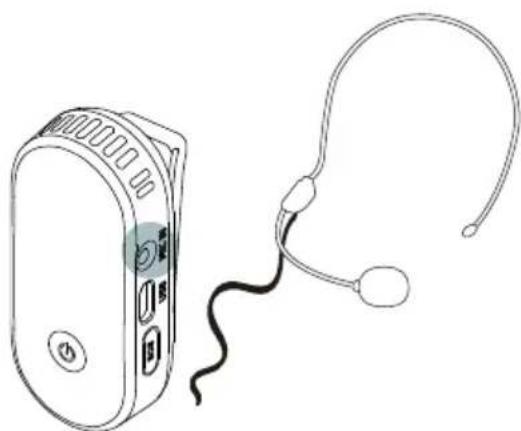
natural_image
Line drawing of a portable electronic device connected to a pair of earphones (no text or symbols)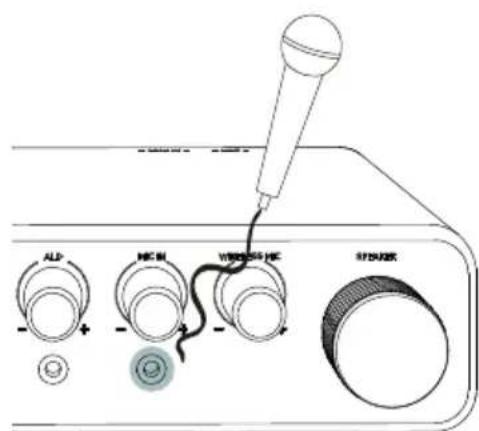
Hybrid Learning
flowchart
graph TD
    A["Student"] --> B["Teacher"]
    B --> C["Classroom 1"]
    B --> D["Classroom 2"]
    B --> E["Classroom 3"]
    B --> F["Classroom 4"]
    B --> G["Classroom 5"]
    B --> H["Classroom 6"]
    B --> I["Classroom 7"]
    B --> J["Classroom 8"]
    B --> K["Classroom 9"]
    B --> L["Classroom 10"]
    style A fill:#f9f,stroke:#333
    style B fill:#ccf,stroke:#333
    style C fill:#cfc,stroke:#333
    style D fill:#fcc,stroke:#333
    style E fill:#cff,stroke:#333
    style F fill:#ffc,stroke:#333
    style G fill:#cfc,stroke:#333
    style H fill:#fcc,stroke:#333
    style I fill:#cfc,stroke:#333
    style J fill:#fcc,stroke:#333
    style K fill:#cfc,stroke:#333
    style L fill:#fcc,stroke:#333
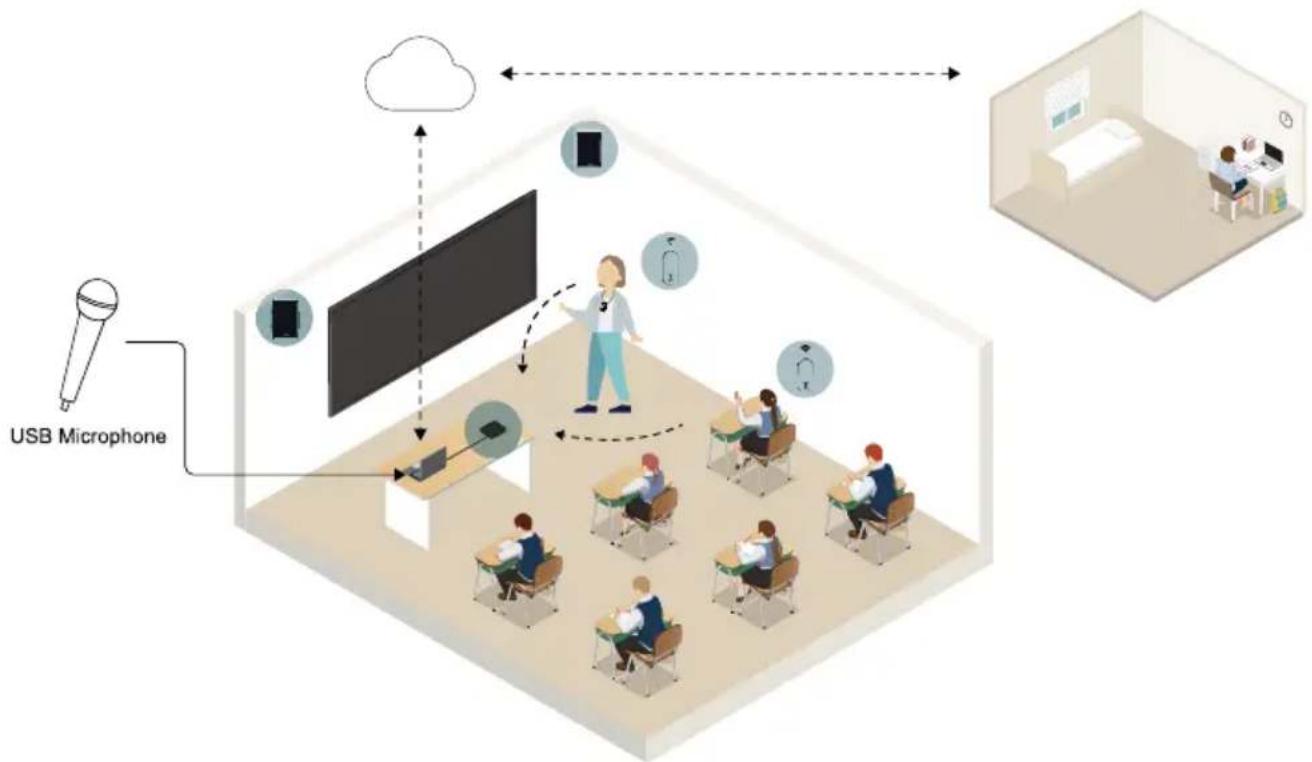
- Short press to turn on the SAB5V2 Streaming Audio Box. Press and hold the Power/Switch button on the microphone for 3 seconds to pair your pendant microphone.
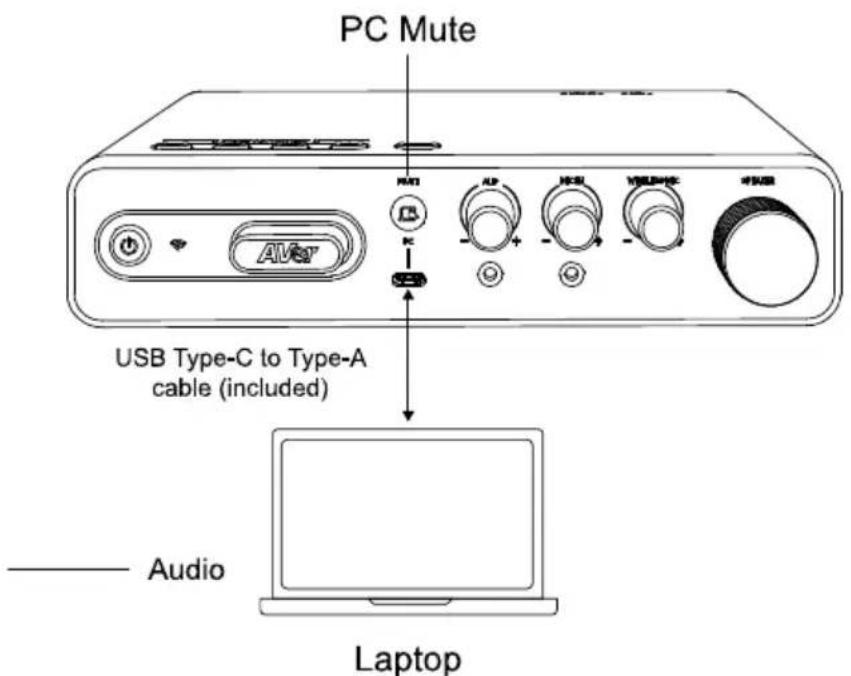
- Connect devices. A slight popping sound during connection is considered a normal phenomenon.
- USB microphone
When using your pendant or wired microphone, make sure your USB camera's built-in microphone (if any) is turned off to reduce feedback.
- Open your video conferencing software, such as Google Meet, Skype, Microsoft Teams or Zoom, and select "SAB5 Series" as the microphone and speaker source.
- Sound Adjustment Button behaviors:
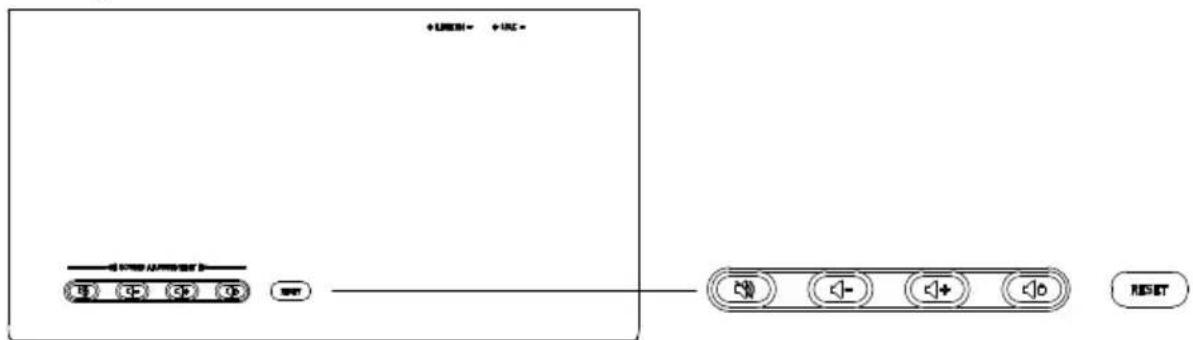
| Icon | Action | Function |
 | Press and release | Mute the whole Audio System. |
 | Short press | Lower volume in steps. |
| Long press | Lower volume continuously. | |
 | Short press | Raise the volume in steps. |
| Long press | Raise the volume continuously. | |
 | Press and release | Lock / unlock the current volume settings, except the wireless microphone (RX) input. |
| RESET | Press and hold (10 seconds) | Reset to factory default settings. |
- How to use the PC Mute button:
- Press to mute PC speakers and sounds from online students to reduce distraction in class. They will still be able to hear you.
Web Application Settings
Access to the web application
- Connect your SAB5V2 Streaming Audio box to the power adapter and the Ethernet cable.
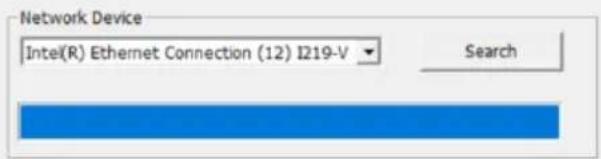
- To find your SAB5V2 Streaming Audio Box IP address, download the AVer IPCam Utility from https://www.aver.com/Downloads/search?q=AVer%20IPCam%20Utility%20for%20Camera%20IP%20Searching and launch the application.
- Click Search to view all available devices on the screen.
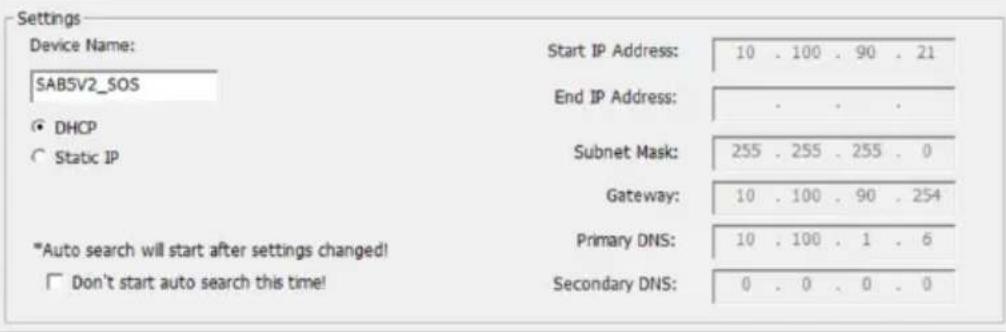
- Select your SAB5V2 Streaming Audio Box from the device list to view more information in the Settings field.
- Double click on the IPv4 Address field to open the web application in your internet browser.
Network Setting | Date/Time Setting | Maintenance | Import/Export Config |
| No. | Status | Progress | Model Name | Device Name | FW version | IPv4 Address | MAC Address | IPv6 A |
| 1 | Working | PTC310UV2 | AVer | 0.1.0000.51 ... | 10.100.90.20:80 | 02:00:70:98:76:05 | []:80 | |
| 2 | Working | FONE700 | FONE700 | 0.0.8300.81 | 10.100.90.172:80 | 00:18:1a:60:33:cc | []:80 | |
| 3 | Working | SABSV2 | SABSV2 | 9.0.0000.00 | 10.100.90.21:80 | 00:18:1a:60:4e:aa | []:80 | |
| 4 | Working | ProAV CAM-P1 | ProAV CAM-P1 | 0.0.9900.09 | 10.100.90.63:80 | 00:18:1a:0c:b2:08 | []:80 | |
| 5 | Working | CAM550 | CAM550 | 0.0.8004.71 | 10.100.90.67:80 | 00:18:1a:60:41:03 | []:80 | |
Login
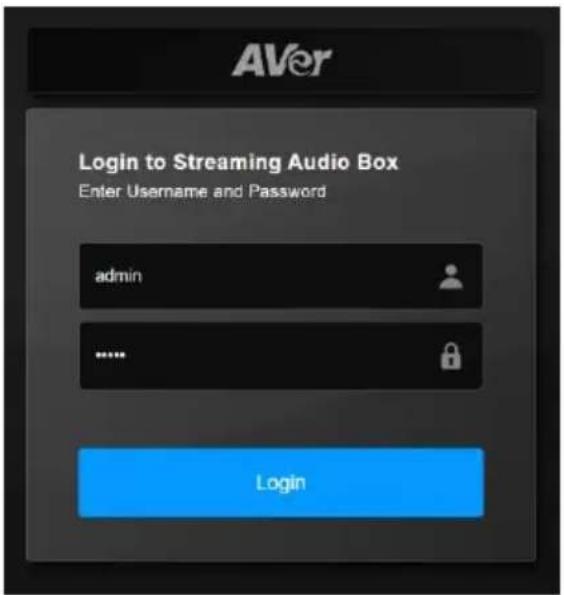
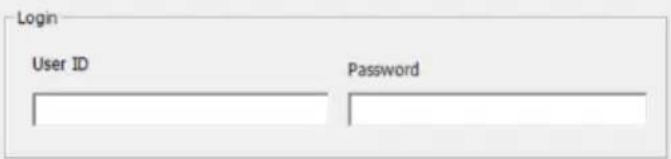
- Enter the default Username and Password: admin / admin to log in.
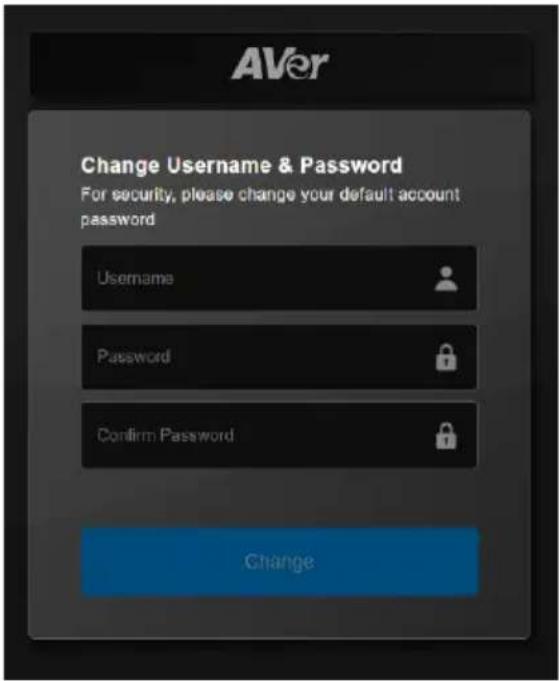
- For first time login, the system will ask you to change your Username and Password.
- Read anonymous usage data policy. Select the checkbox to agree, and then click Done.
- Log in with your new Username and Password. You will see the web application main page.
Device Status
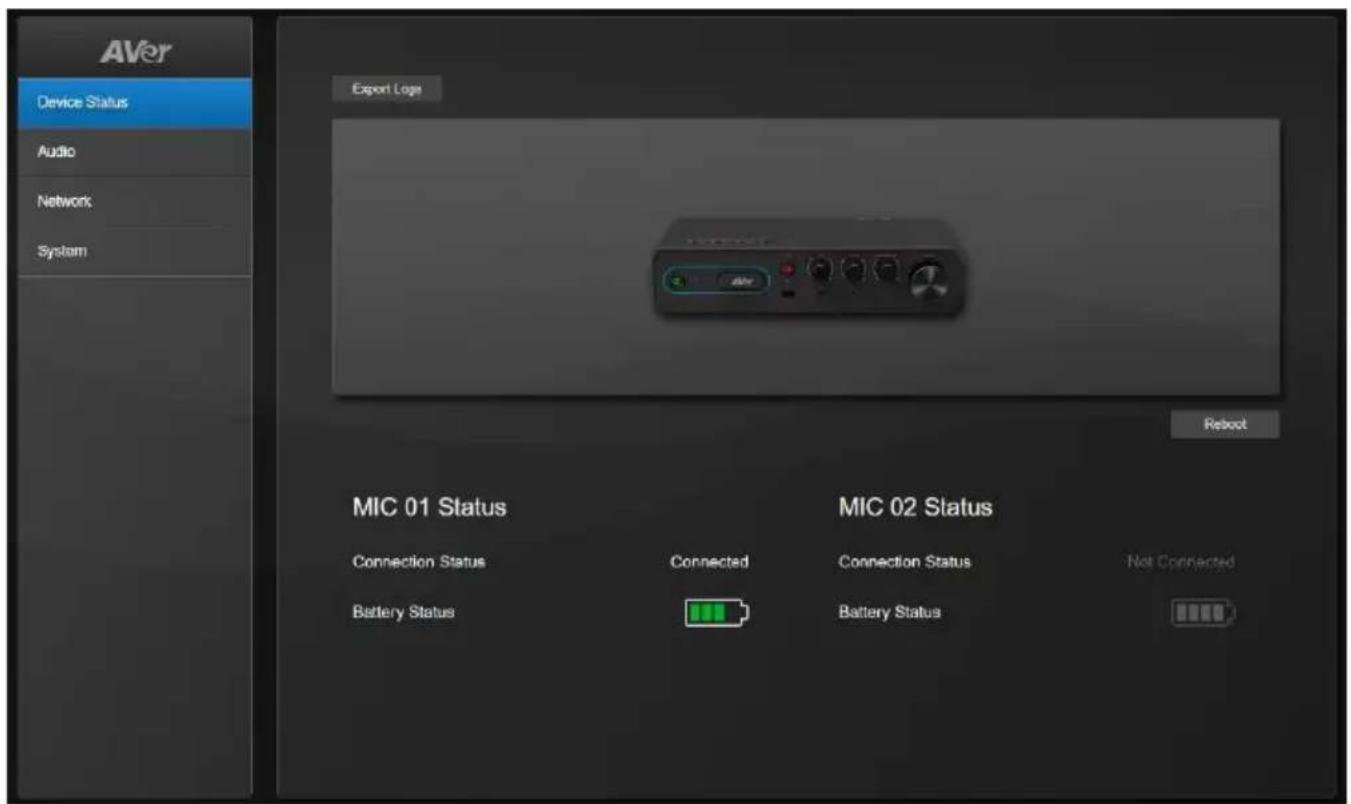
| Item | Description |
| Export Logs | Click to download the logs for current settings to your local files. |
| Reboot | 1. Click to restart your Streaming Audio Box, and click OK on the pop-up window to continue. It may take a few minutes to reboot.2. Refresh your web browser and log in again when the reboot is finished. |
View microphone connection status and battery status.
- Connection Status
Connected / Not Connected
- Battery Status
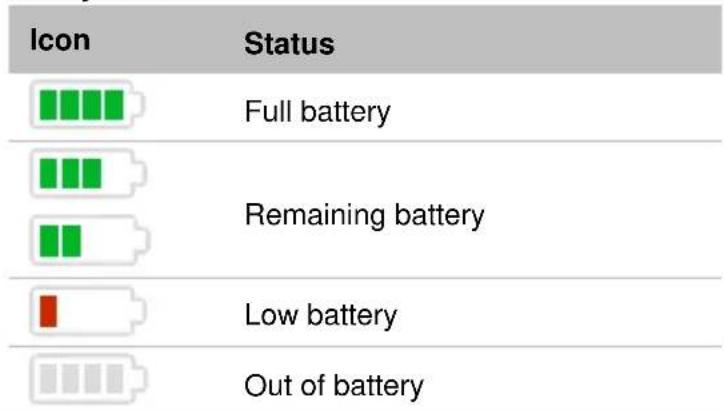
bar
| Icon | Status | |---|---| | Full battery | Full battery | | Remaining battery | Remaining battery | | Low battery | Low battery | | Out of battery | Out of battery |Audio
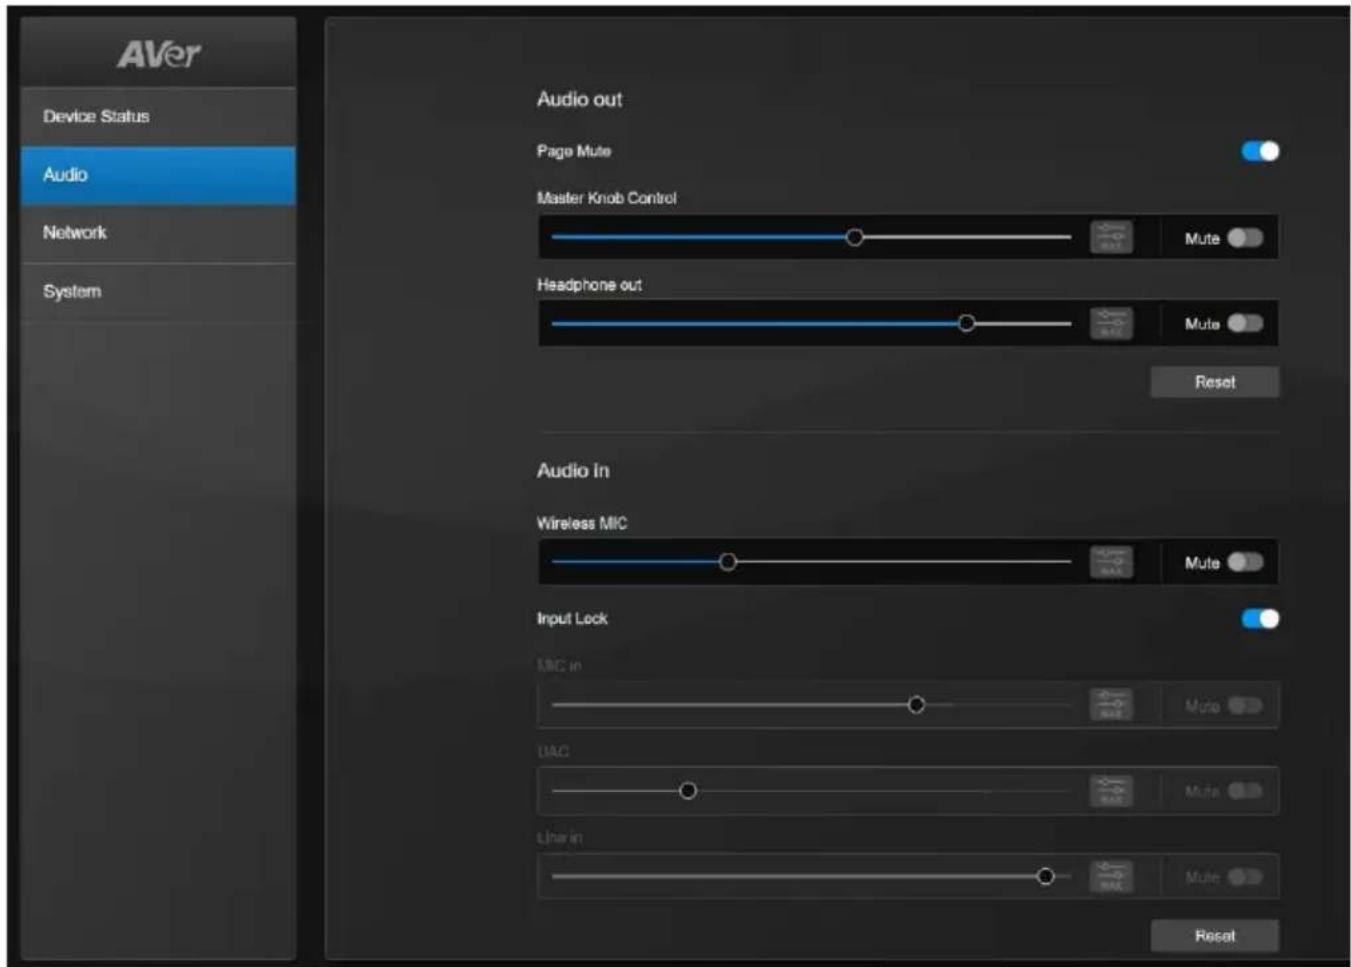
Audio Out
| Item | Description |
| Page Mute | Click the toggle switch to turn on or off the public amplifier mute function. For more information about this function, please refer to.<Page Mute>. |
| Master Knob Control | Drag the slider to adjust the volume.Click Max Volume Setting MAX to set up the maximum volume.When finished, click OK. You can only adjust the volume in a certain range.Click the Mute toggle switch to mute or unmute each setting. |
| Headphone out | |
| Reset | Click to reset all the settings to factory default values. |
Audio In
| Item | Description |
| Input Lock | Click the toggle switch to lock or unlock input settings.When the switch is on, you cannot change MIC in, UAC and Line in values. |
| Wireless MIC | Drag the slider to adjust the volume. |
| MIC in | Click Max Volume Setting MAX to set up the maximum volume.When finished, click OK. You can only adjust the volume in a certain range. |
| UAC | |
| Line in | Click the Mute toggle switch to mute or unmute each setting. |
| Reset | Click to reset all the settings to factory default values. |
Network
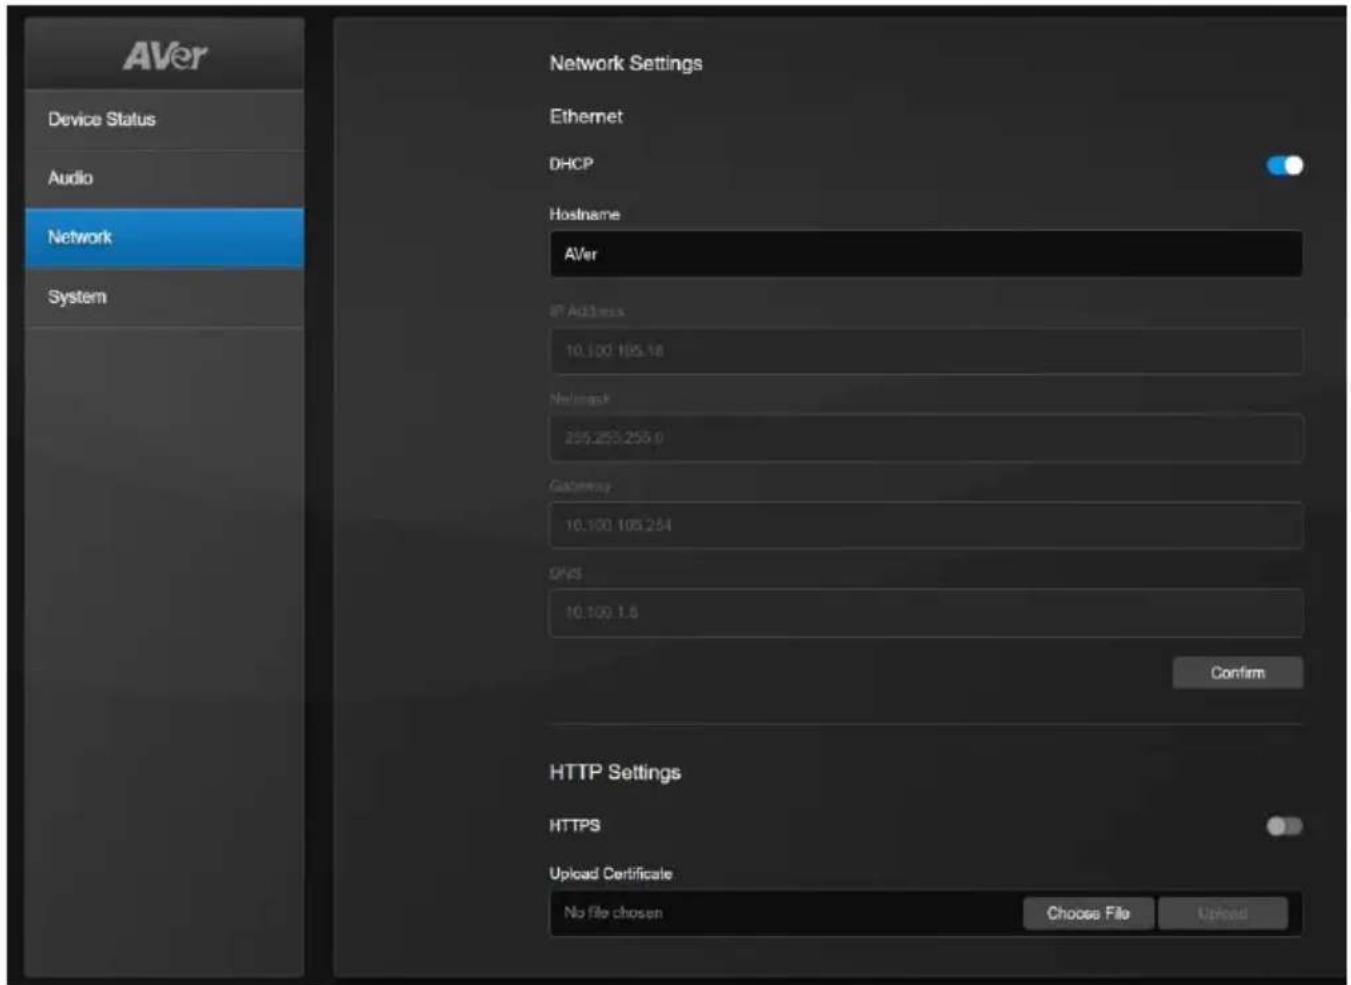
Network Setting
| Item | Description |
| DHCP | Click the toggle switch to switch between DHCP and Static IP.DHCP: The system will assign a related IP address to the device.Static IP: You may manually enter IP Address, Netmask, Gateway and DNS. |
| Hostname | Click to edit the Hostname. When finished, click Confirm. |
| IP Address | 1. Turn off the DHCP toggle switch to switch to Static IP.2. You may manually enter IP Address, Netmask, Gateway and DNS in the text boxes.3. When finished, click Confirm. |
| Netmask | |
| Gateway | |
| DNS |
HTTPS Settings
Click the HTTPS toggle switch to turn on or off the function. When HTTPS function is on, it will establish a secure connection between your browser and your Streaming Audio Box.
- Create a SSL certificate file for encryption and decryption.
- In Upload Certificate setup field, click Choose File to select the certificate file on your computer.
- When finished, click Upload.
System
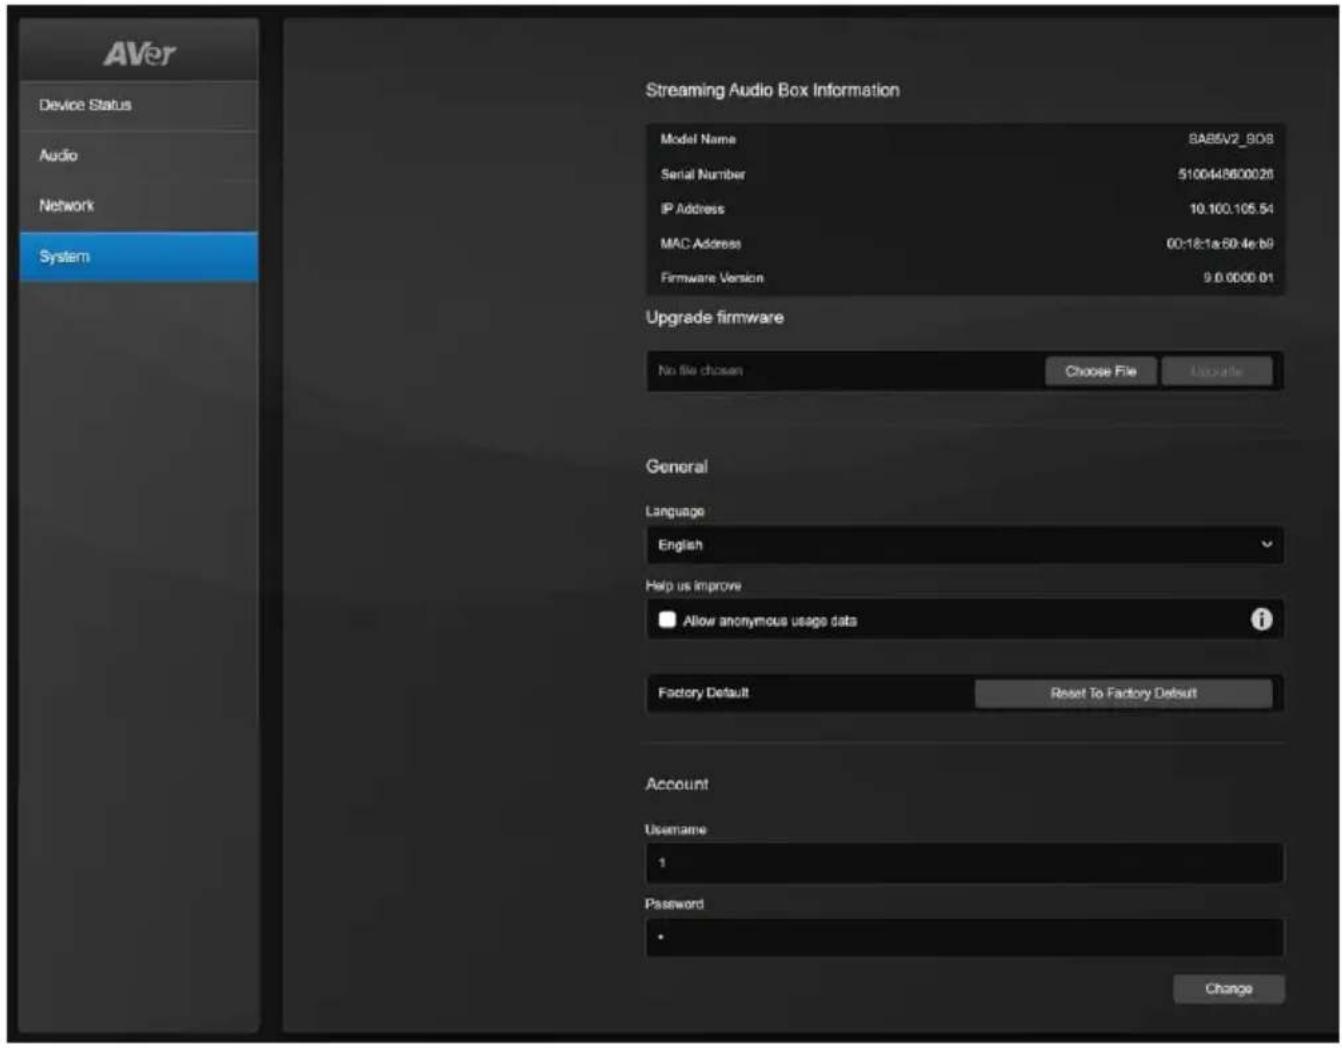
| Item | Description |
| Streaming Audio Box Information | View your device information, including Model Name, Serial Number, IP Address, MAC Address, and Firmware Version. |
| Upgrade Firmware | 1. Download firmware update file from Aver Download Center to your computer.2. Click Choose File to select the firmware update file.3. Click Upgrade to upgrade your device firmware. |
| Language | Select from the drop-down list to change the system language. |
| Help us improve | Select or unselect the checkbox to allow or don’t allow to send anonymous usage data to AVer. |
| Factory Default | Click Reset To Factory Default to set all settings to factory default values. |
| Username | Change the login username in the text box. When finished, click Change. |
| Password | Change the login password in the text box. When finished, click Change. |
SAB5V2 Streaming Audio Box
| DC Power | 19V |
| Standby Mode | <1.5W (WoL) |
| Power Consumption | 65W max. |
| Dimensions (W x D x H) | 210 x 110 x 48.5mm (excluding rubber) |
| Net Weight | 530g ±50g |
| Power Button | Solid green: Power onFlashing green: Start-upSolid red: Wake-on-LAN mode (when connected to power)Flashing red: Updating firmware or resetting to factory default.Solid orange: Input lock mode |
| Status LED | Solid blue: Microphone(s) is pairedOff: Microphone(s) isn't paired |
| PC Mute Button | Solid red: PC is mutedOff: PC isn't muted |
| Top Cover Sound Adjustment Buttons |  Mute the whole Audio System. Mute the whole Audio System. Volume down.[STY7]Volume up. Volume down.[STY7]Volume up. Lock the current volume settings, except the wireless microphone (RX) input.RESETReset to factory default settings. Lock the current volume settings, except the wireless microphone (RX) input.RESETReset to factory default settings. |
| PC Port | USB Type-C |
| ALD Port | 3.5mm stereo for assistive listening devices |
| Mic In Port | 3.5mm mono |
| UAC Port | USB Type-A 2.0 |
| Line In Port | 3.5mm stereo |
| Line Out Port | 3.5mm stereo |
| Speaker Out | Speaker push-in terminal connector block |
| Ethernet Port | 1 |
| DC Power Jack | 19V |
| Kensington Lock | 1 |
| Page Mute Port | 1 |
Pendant Microphones
| Teacher | Student | |
| Style | Pendant with clip and lanyard | |
| Channels | 1 | |
| Transmission Type | Wireless | |
| Wireless Frequency | 2.4 GHz | |
| Frequency Response | 50 Hz - 20 kHz | |
| Coverage | 20m (65 ft.) | |
| Microphone Capsule | Omni-directional electret condenser | |
| Battery | Rechargeable and removable Li-ion battery | |
| Battery Power | 3.7V | |
| Talk Time | 8-10 hours | |
| Charging Time | <3 hours | |
| Charging Method | USB Type-C | |
| Dimensions (W x D x H) | Microphone: 33 x 20.2 x 73.3mm (excluding clip)Receiver: 55 x 30 x 10mm | |
| Net Weight | 35g | |
| Power/Mute Switch | Press and hold the Power/Mute button for 3 seconds to power on > press again to mute > press and hold for 3 seconds to power off. | |
| Volume | Up/Down buttons | |
| Safey Alert | SOS button | N/A |
| Status LED | Solid blue: PairedFlashing blue: Not transmitting to a receiver or out of rangeSolid red: MuteFlashing red: Initiating an SOS Rescue (Teacher) | |
| Battery LED | When in use:Solid green: NormalFlashing red: Low batteryWhen charging:Solid green: Fully chargedSolid red: Charging | |
| Mic In Port | 3.5mm stereo | |
| USB Type-C Port | 1 | |
| Power Rating | 5 VDC, 0.4A | |
Wireless Receiver Dongle
| Transmission Type | Wireless |
| Wireless Frequency | 2.4 GHz |
| Power Rating | 5 VDC, 0.5A |
Charging Case
| Charging Time | <3 hours |
| Input Voltage | 5V |
| Charging Voltage | 5V |
| Dimensions (W x D x H) | 122.3 x 88.7 x 51.3mm |
| Net Weight | 115g |
| USB Type-C Port | USB 2.0 Type-C |
| Kensington Lock | 1 |
Speakers
| Total Harmonic | <1% at 1kHz |
| Distortion | |
| Frequency Response | 88Hz -25kHz ± 3dB |
| Sensitivity | 88 dB 1 Watt (1M1W) |
| Impedance | 6 Ohms nominal |
| Mounting | Wall mount |
| Dimensions (W x D x H) | 170 x 250 x 150mm |
| Net Weight | 4.75kg |
| Power Output | 15W RMS each |
Environmental Specifications
| Working temp. | 0°C - 40°C |
| Working RH | 10% - 90% |
| Storage temp. | -30°C - 60°C |
| Storage RH | 10% - 90% |
Specifications are subject to change without prior notice.
Troubleshooting
Microphone doesn't pair.
- Make sure the SAB5V2 Streaming Audio Box is turned on. A solid green or orange light on the Power button will indicate that it is powered on.
- Make sure the SAB5V2 Streaming Audio Box is not placed in an enclosed space where the Wi-Fi signal may be obstructed.
- Press and hold the Power/Mute button on the microphone for 3 seconds to power off, and try pairing again.
No or low volume from the microphone.
- Make sure the microphone is not muted. A solid red light on top of the microphone indicates that it's muted.
- Adjust the volume with the Volume Up/Down buttons on the side of the microphone.
- Position the microphone approximately 15cm (5.9") from mouth for optimal audio quality.
I hear feedback (squealing).
- The volume may be too high. Adjust the Volume Up/Down buttons on the side of the microphone.
- The microphone may be too close to the speaker. Move the microphone away from the speaker.
No sound for the speaker
- Make sure the SAB5V2 Streaming Audio Box is turned on. A solid green or orange light on the Power button will indicate that it is powered on.
- Check if the SAB5V2 Streaming Audio Box is not muted. If yes, press the Mute Speaker button 📋 on the top of the Audio Box to unmute.
- Make sure the SAB5V2 Streaming Audio Box volume input is unlocked. If you see a solid orange light on the Power button, press the lock/unlock button 🔔 to unlock input settings. The Power button will display a solid green light, and try increase speaker volume to resolve the issue.
- SA-A5 Streaming Audio System
- SAB5V2 Streaming Audio Box
- Federal Communication Commission Interference Statement
- For Wireless Device:
- For SAT5 Pendant Microphones:
- For SAR5 Microphone Receiver:
- IC Notice
- Europe – EU Declaration of Conformity
- DISCLAIMER
- TRADEMARKS
- COPYRIGHT
- More Help
- Non-USA
- USA
- Contact Information
- Headquarters
- USA Branch Office
- Europe Branch Office
- Japan Branch Office
- Vietnam Branch Office
- Getting Started....9
- Web Application Settings 18
- Specification 26
- Troubleshooting 31
- Overview
- Package Contents
- Pendant Microphones
- Pendant Microphones Optional Accessories
- Speakers
- Dimensions
- Controls and Connections
- Top Cover
- Front Panel
- Back Panel
- Charging Case
- Power Connection
- Wall Mount Installation
- Getting Started
- Set up Your SAB5V2 Streaming Audio Box
- Set up Your Microphone
- Use Your Microphone
- For Emergencies
- Charge Your Microphone
- Replace Your Microphone Battery
- Set up Your Speakers
- Connect Your Speaker Cables
- Audio Features
- Page Mute
- Audio Output to Assistive Listening Devices (ALD)
- In the Classroom
- Hybrid Learning
- - USB microphone
- Web Application Settings
- Access to the web application
- Login
- Device Status
- - Connection Status
- - Battery Status
- Audio
- Network
- HTTPS Settings
- System
- Troubleshooting
- Microphone doesn't pair.
- No or low volume from the microphone.
- I hear feedback (squealing).
- No sound for the speaker
Brand : AVer
Model : SA-A5
Category : Hi-Fi System