MI-7172 - Support CPU Mount-It! - Free user manual and instructions
Find the device manual for free MI-7172 Mount-It! in PDF.


| Product Type | CPU Support Bracket |
| Brand | Mount-It! |
| Model | MI-7172 |
| Dimensions (W x D x H) | 7.9 x 5.9 x 2.0 in (200 x 150 x 50 mm) |
| Weight | 0.5 lb (0.23 kg) |
| Material | Steel with powder coating |
| Load Capacity | 15 lb (6.8 kg) |
| Compatibility | ATX, Micro ATX, Mini ITX towers |
| Color | Black |
| Installation | Mounts to CPU tower using included screws; supports standard 120mm fan holes |
| Adjustability | Height adjustable from 0.5 to 1.5 in (12 to 38 mm) |
| Maintenance & Cleaning | Wipe with a dry, lint-free cloth; do not use liquids or abrasives |
| Safety | Ensure bracket is securely fastened to prevent CPU damage; do not exceed weight limit |
| Spare Parts & Repairability | Non-user serviceable; contact Mount-It! for replacement |
| Warranty | 1 year limited warranty |
| Package Contents | Bracket, mounting screws, user manual |
Frequently Asked Questions - MI-7172 Mount-It!
User questions about MI-7172 Mount-It!
0 question about this device. Answer the ones you know or ask your own.
Ask a new question about this device
Download the instructions for your Support CPU in PDF format for free! Find your manual MI-7172 - Mount-It! and take your electronic device back in hand. On this page are published all the documents necessary for the use of your device. MI-7172 by Mount-It!.
USER MANUAL MI-7172 Mount-It!
natural_image
Technical line drawing of a mechanical device with a flat top and side support bracket (no text or symbols)
Please scan this QR code to visit the product page.
DELUXE GAMING CPU MOUNT WITH SLIDING TRACK

HAVE QUESTIONS?
Monday - Friday from 8:00am - 4:00pm PST

support@mount-it.com

(855) 925-5668

www.mount-it.com
Thank you for choosing Mount-It!
EN Read the entire instruction manual before you start installation and assembly. If you have any questions regarding any of the instructions or warnings, please contact M:cur-12 for assistance.
CAUTION: Live with products heavier than the rated weights indicated may result in variability causing possible injury.
- Safety gear and proper tools must be used. This product should only be installed by professionals.
- This product is designed to be installed on solid concrete walls, masonry walls or wood stud walls.
* Make sure that the supporting surface will safely support the combined weight of the equipment and all attached hardware and components. Use the mounting screen provided and DO NOT OVER TIGHTEN mounting screen.
* This product contains small items that could be a craving hazard if swallowed. Keep these items away from children.
- This product is intended for indoor use only. Using this product outdoors could wait to product failure and personal injury.
IMPORTANT: Ensure that you have reserved all parts according to the component, checked at prior to installation. If any parts are missing or faulty, contact K-0014; for a replacement
MAINTENANCE:
- 10. Equipment and safety in the states' applications between the cities. The private vehicle cars (including equipment) are only manufactured in a control and control water bottle installed with less mass more reliable air than, less water an additional or more air above.
A. ATENÇÃO OU SEM PRODIO MAIN
Mount and Accessories
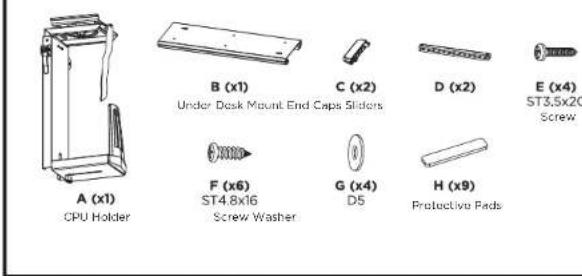
Check carefully to make sure there are no missing or defective parts. Some hardware provided may not be used. Use the correct mounting hardware suitable for your installation.
CHOKING HAZARD. Package includes small parts.
Not for children under 3 years. Adult supervision is required
Missing Parts? Call us at (855) 925-5668 and we will ship replacement parts free of charge.
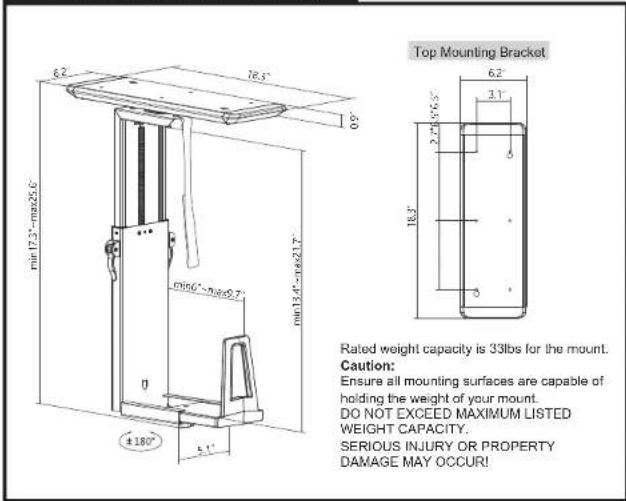
DIMENSIONS & WEIGHT CAPACITY
Step 1
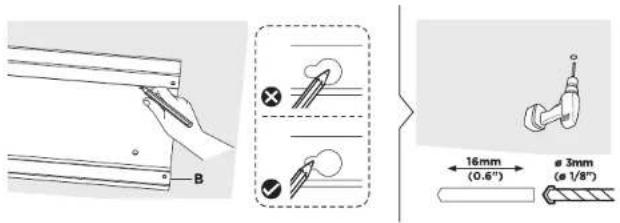
Prepare the Mounting Surface
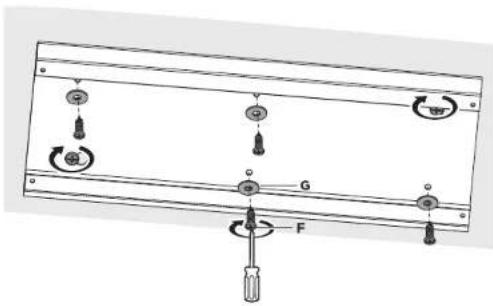
- Hold the Under Desk Mount (#B) underneath the desk in the desired location. Ensure adequate depth from the edges of the desk to accommodate the dimensions of your PC case. Using a pencil mark the center of the smaller end of the 2 keyhole shaped screw slots as shown here. Remove the desk mount and drill a hole in the marked location using a 1/8" (3mm) drill bit to a depth of 0.6" (16mm).
Step 2
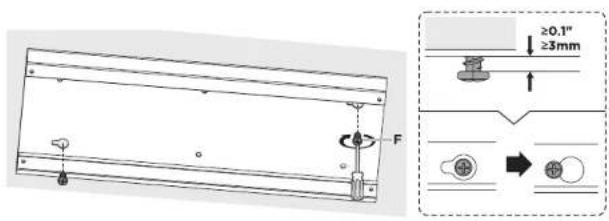
Attach the Mount
- Partially install 2 Screws (#F) into the drilled locations, leaving a gap of approximately 1/10^ (3mm) between the desk and the bottom of the screw head. Place the Under Desk Mount (#B) over the two screws and slide the mount so that the screws are resting in the smaller end of the keyhole slots.
Step 3
Secure the Desk Mount
• Install the remaining 4 Screws (#F) and Washers into the desk. Tighten all 6 screws until secure.
Step 4
Install the Protective Pads
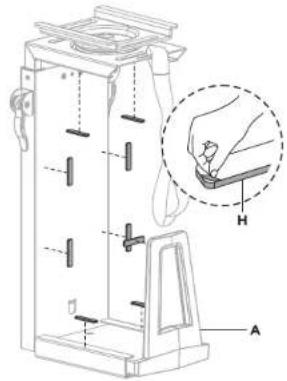
- Apply the Protective Pads (#H) as shown on the CPU Holder (#A) by peeling off the adhesive cover and sticking them to the CPU Holder.
Step 5
Install the Sliders
• Install the Sliders (#D) onto the protruding edges on the top of the CPU holder then slide the CPU Holder into the Under Desk Mount.
Step 7
Insert the PC
- Locale and partially loosen the hand knob on the bottom of the CPU Holder. Expand the lower horizontal arm fully or to a size greater than the width of the CPU. Support the base of the CPU holder with one hand and unlatch the levers on each vertical side of the CPU Holder. Lower the bottom portion to the lowest level. - Insert the CPU and center it against the vertical column of the CPU Holder. Ensure the fabric pullhandle is hanging over the top of the case and accessible for future use. Lift the bottom of the mount to slide the mount upward until the top of the PC case is touching or close to the top of the of the CPU holder. Pull the latches back down to secure the height setting in place. Press the lower horizontal arm in until it is snug against the side of the CPU case and tighten the hand knob back down.
Step 6
Attach the End Caps
- Place the End Caps (#C) on each end of the Under Desk Mount and secure them in place with Screws (#E). This will prevent the PC Holder from sliding out of the mount.
Visit us at www.mount-it.com for product registration and warranty information.
Our US based customer service team is standing by to answer any questions you have about your Mount-It! product.
Available by phone Monday - Friday from 8:00am to 4:00pm PST.
Chat live with an agent on our website!

support@mount-it.com

(855) 925-5668

www.mount-it.com
Brand : Mount-It!
Model : MI-7172
Category : Support CPU