
RFX9900DM - Car radio Rockford Fosgate - Free user manual and instructions
Find the device manual for free RFX9900DM Rockford Fosgate in PDF.


| Product Type | Car Stereo Receiver with Multi-Source Playback |
| Dimensions (Dashboard Cutout) | 182mm x 53mm |
| Power Supply | 12V DC (10.8V - 15.6V allowable) |
| Output Power | 45W x 4 Channels @ 4 Ohm |
| Fuse Rating | 15A |
| FM Tuner Frequency Range | 87.5 MHz - 107.9 MHz |
| FM Tuner Sensitivity | 2.8 µV |
| AM Tuner Frequency Range | 530 kHz - 1710 kHz |
| AM Tuner Usable Sensitivity | 38 dBµV |
| USB/SD/DMD Playback | Supports FAT16/FAT32, SNR >60dB, Frequency Response 20Hz - 20kHz |
| SiriusXM Ready | Requires SiriusXM Vehicle Tuner (sold separately) and subscription |
| Bluetooth Connectivity | Built-in Bluetooth for hands-free calling and audio streaming |
| Audio Sources | Radio (FM/AM), SiriusXM, USB, SD, AUX, CD/DVD Changer (CDC/DVDC), DMD |
| Preset Stations | 6 per band for FM1, FM2, AM; 6 per bank for SXM1, SXM2, SXM3 |
| Subwoofer Output | Dedicated subwoofer preamp output with on/off control |
| Illumination Control | 10 levels of brightness adjustment |
| Wired Remote Inputs | Two wired remote ports |
| Power Antenna Output | Yes |
| Installation | DIN-size chassis with mounting hardware; avoid high temperature, dust, and vibration |
| Safety | Replace fuse only with same type and rating |
Frequently Asked Questions - RFX9900DM Rockford Fosgate
User questions about RFX9900DM Rockford Fosgate
0 question about this device. Answer the ones you know or ask your own.
Ask a new question about this device
Download the instructions for your Car radio in PDF format for free! Find your manual RFX9900DM - Rockford Fosgate and take your electronic device back in hand. On this page are published all the documents necessary for the use of your device. RFX9900DM by Rockford Fosgate.
USER MANUAL RFX9900DM Rockford Fosgate
![graph TD A["POWER CONNECTOR"] --> B["POWER ANTENNA"] A --> C["MEMORY (B+)"] A --> D["FRONT LEFT SPEAKER"] A --> E["REAR LEFT SPEAKER"] A --> F["BLACK"] A --> G["GROUND (GND)"] A --> H["RED"] A --> I["IGNITION SWITCH (ACC)"] D --> J["+ WHITE"] D --> K["− WHITE BLACK"] E --> L["+ GREEN"] E --> M["− GR…](/content/2026/05/904113/images/6559149f35014abb8ad96d2bcb894eb4841744fe653c19d978007d00e9daf42a.jpg)
FUSE REPLACEMENT:
If the fuse blows, check the power connection and replace the fuse. If the fuse blows again after the replacement, there may be an internal malfunction. In this case, contact your nearest repair center.
Warning:
Only replace fuse with the same type and rating. Use of a different type or rating may cause serious damage/safety concerns.
INSTALLATION
PRECAUTIONS
Choose the mounting location carefully so that the unit will not impair the safe operation of the vehicle, or interfere with the driver.
Avoid installing the unit where it would be subject to high temperature, such as from direct sunlight or hot air from the heater, or where it would be subject to dust, dirt or excessive vibration.
Use only the supplied mounting hardware for a safe and secure installation.

To support the unit
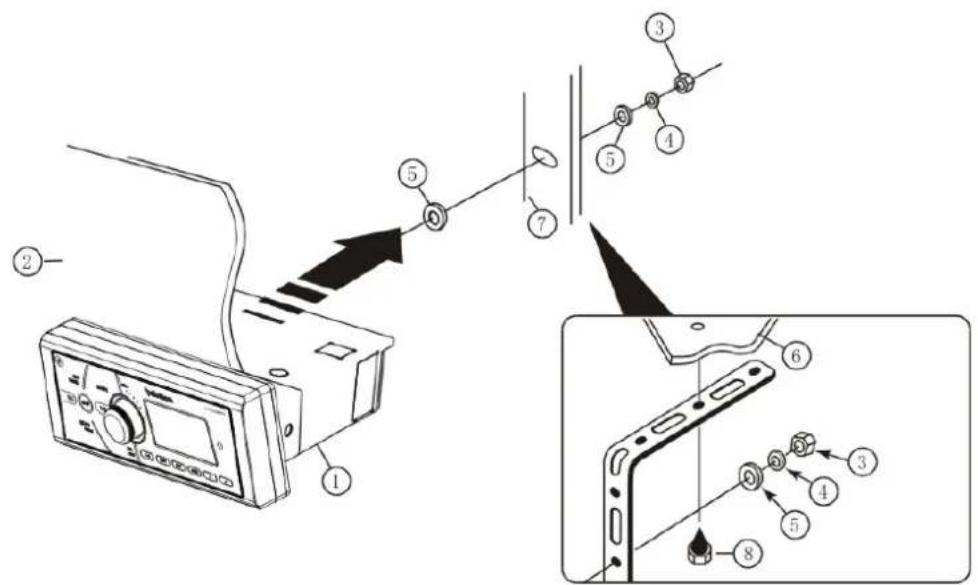
- UNIT
- DASH BOARO
- HEX NUT M5
- LOCK WASHER
- PLAIN WASHER
- MARINE BODY
- REAR SUPPORT STRAP
- TAPPING SCREW
- M5x15 HEY BOLT
NOTE:
Short press: Press less than 2 seconds.
Long press: Press and hold more than 2 seconds.
POWER Button (1)
● Power ON/OFF
Short press the button to turn on/off the unit.
VOLUME PUSH SEL (7)
- Volume Control
Rotate the knob to control the volume 0-40.
- Select VOL/BAS/TRE/BAL/FAD/DSP
Short press to select VOL/BAS/TRE/BAL/FAD/DSP (FLAT/CLASSIC/POP/ROCK) then rotates the knob to adjust desired setting. Press the knob again to select desired functions.
Unit will return to normal previous display if left without any key be pressed for 5 seconds.
- Select AREA/ILLUM
Long press to select AREA (USA/EUR)/ILLUM (0-10), then rotate the knob to adjust desired setting. Press the knob again to select desired functions. Unit will return to normal previous display if left untouched for 5 seconds.
- AREA
By pressing the knob again, the unit will be in Radio AREA selection mode. Rotate the knob to choose USA or EUR (Europe).
- ILLUM
You can adjust the Illumination brightness in this mode, there are 10 levels you can select, when you find the desired brightness by rotating the knob, press the knob will save the setting.
MODE (6)
- MODE Selection
Short press MODE button to choose desired listening mode, RADIO
(FM/AM)/SiriusXM/USB1/USB2 (SD)/AUX/CDC (DVDC)/Bluetooth
DISP (4)
- System Time Setting
Long press this button until hour icon begins to flash, rotate volume knob to adjust hour indication. And then short press until minute icon begins to flash, rotate volume knob to adjust minute indication. The system will save current time and exit time setting if user press the key again or there is no action within 5 seconds.
BAND/SUB (3)
- Band Switch
Short Press this key to change Band between AM-FM1-FM2
- Subwoofer ON/OFF
Long press this key to choose between Subwoofer ON and OFF.
RADIO OPERATION
MODE (6)
- MODE Selection
Short press MODE button to select radio mode.
BAND/SUB (3)
- Band Selection
In radio mode, short press BAND button to locate the desired band. The reception band will change in the following order:
FM1 - FM2 - AM
SEEK+ (2)/SEEK- (5)
- Automatic Seek
Short press to automatically seek the higher/lower radio station.
- Manual tuning
Long press to enter manual tuning mode, then short press to seek the higher/lower frequency.
The manual tuning mode will exit automatically if there is no action within 5 seconds.
PRESET 1-6 (11/12/13/14/15/16)
- Store Preset Station
Long press a PRESET button, the current station will be stored, and the
Corresponding preset number will appear in the display. The PRESET buttons can be used to store 6 stations in each band (FM1, FM2, and AM) for convenient access to your favorite stations.
- Recall Preset Station
To recall a station, select a band (if needed). Short press a Preset button and the unit will turn to the corresponding stored station.
SCAN/MENU (9)
- All Station Scanning
Press SCAN button to scan all stations. The unit will keep on scanning every 5 seconds until you press the SCAN button again to stop scan function.
AS.PS (10)
- Automatically Store
Long press this button for more than 2 seconds, and the unit will automatically scan and store the strongest stations in the FM/AM band. To stop this function before the automatic storing is complete, shortly press this button again.
- Preset Station Scanning
Long press this button to scan preset station. The unit will keep on scanning every 5 seconds until you press the SCAN button again to stop scan function.
Everything worth listening to is on SiriusXM, getting over 130 channels, including the most commercial-free music, plus the best sports, news, talk and entertainment. A SiriusXM Vehicle Tuner (sold separately) and Subscription are required. For more information, visit www.siriusxm.com.
To listen to SiriusXM Satellite Radio, a subscription is required. Activate the SiriusXM Vehicle Tuner using one of the two methods below:
• Online: Go to www.siriusxm.com/activatenow
• Phone: Call 1-866-635-2349
To view the 8 digit Radio ID of the SiriusXM Vehicle Tuner, tune to channel 000.

SiriusXM Display Diagram
MODE (6)
- Mode Selection
Short press MODE button to select SiriusXM mode.
Note: If there is no SiriusXM TUNER connected this mode will be skipped. Please connect your SiriusXM Tuner to the SiriusXM port located at the back of the unit. Then press MODE button to change to SiriusXM mode.
SEEK+ (2)/SEEK- (5)
- Channel Browsing
If category setting is off, short press the buttons to start browsing all channels. Press the SEEK+/SEEK- key to browsing next/previous channels, Press the enter key to select the channel showed on LCD and play it. If there is no key pressed in 5s, the LCD will change back to display current playing channel information again.
- Category Browsing
If the category setting is on, short press the buttons to start browsing channels in current category. Press the SEEK+/SEEK- key to browsing next/previous channels, Press the enter
key to select the channel showed on LCD and play it. If there is no key pressed in 5s, the LCD will change back to display current playing channel information again.
- Rapid Channel Browsing
If category set is off, press and hold the buttons goes into rapid channel browsing mode, you can browsing all channels in higher speed, if you release the touch key, the LCD will show the information of the last browsed channel. , Press the enter key to select the channel showed on LCD and play it. If there is no key pressed in 5s, the LCD will change back to display current playing channel information again.
- Category Selection
If the category setting is on, long press and hold the buttons over 2S to select previous/next category.
AS.PS (10)
- Direct Channel Tuning
Short press this button, "Select: - - -" will show on the display. Then, the first character will flash. Rotate the Volume knob to select number 0-9 and press it to enter then the second character flash. Use the same operation to select other character. After select the last number, press Volume knob to enter and play.
- Channel Category Setting
Long press this button to enter category setting while “CAT” will show at the bottom left of the screen, when press again, the category setting will be off, and “CAT” will disappear.
BAND/SUB (3)
● Bank of presets Selection
In SiriusXM mode, short press this button to change the bank of presets. The current bank of presets will change in the following order: SXM1 – SXM2 – SXM3
- Reset
In SiriusXM mode, press and hold BAND and Enter button to reset the SiriusXM mode to the factory default setting. When finished the reset operation finished, the locked channel will be unlocked, the presets storing will be cleared, the parental control passcode will be restored default passcode, etc.
PRESET 1-6 (11/12/13/14/15/16)
- Store Preset Channel
Long press a PRESET button, the current channel will be stored, and the corresponding preset number will appear in the display. The PRESET buttons can be used to store 6 channels in each bank of presets (SXM1, SXM2, and SXM3) for convenient access to your favorite channels.
- Recall Preset Channel
To recall a preset channel, select a bank of channels (if needed). Short press a Preset button and the unit will turn to the corresponding stored channel.
SCAN/MENU (9)
- Channel scanning
Short press the button to scan all the channels. The unit will keep on scanning every 5 seconds per channel until you press the SCAN button again to stop scan function.
PARENTAL CONTROL
You can lock any SiriusXM channels you do not want others to have access without your permission. The default code is "5220". In case you forget your code please disconnect the unit completely from the power.
● GUIDE ON HOW TO ENTER THE CODE USING THE PRESET BUTTONS
When the first character is flashing, rotate the Volume knob to select number 5 and press it to enter then the second character flash. The same operation to select the rest character "2", "2", "0". When done, press Volume knob to confirm.
- TO LOCK A CHANNEL
Select a channel that you wish to lock then long press SCAN button — "Lock Channel" will show on the display. Enter the code then press Volume knob to confirm — "Channel Locked" will show on the display
- TO UNLOCK A CHANNEL
Select the channel that you wish to unlock then long press SCAN button—"Unlock Channel" will show on the display. Enter the code then press Volume knob to confirm—"Channel Unlocked" will show on the display
• TO CHANGE THE CODE
Press and hold BAND Button — "Old Code" will show on the display. Enter the old code then press Volume knob to confirm — "New Code" will show on the display. Enter your new code then press Volume knob again to confirm — "SetCode ok" will show on the display.
- LOCKED CHANNEL MANAGEMENT
When you want browse the locked channels, press and hold "Volume SEL" button and "1" button simultaneously to enter the locked channel browsing mode. You can browse the entire locked channel by rotating the Volume knob after entering the correct passcode. Select a locked channel and press Volume knob if you want to unlock that locked channel, and if you want to unlock all the locked channel, you just rotate the Volume knob until the "CLEAR ALL LOCKED" advisory display, then press the Enter button to execute.
Sirius, XM and all related marks and logos are trademarks of Sirius XM Radio Inc. All rights reserved."
USD/SD OPERATION
MODE (6)
- MODE Selection
Short press MODE button to select USB/SD mode.
Note: If there is no USB or SD Card reader device connected this mode will be skipped. If there is a USB or SD Card reader device connected to USB1 port, the USB mode will be displayed, and if there is a USB or SD Card reader device connected to USB2 port, the SD mode will be displayed.
SEEK+ (2)/SEEK- (5)
- Track Selection
Short press to automatically seek the previous/next track. - Track FF/FR
Press and hold the buttons to fast forward/fast rewind.
Preset 1/ PAUSE-PLAY (11)
- Track PAUSE-PLAY
Short press to pause player. Press 1 button again to resume play.
Preset 2/ RPT (12)
- Track Repeat
Short press 5 button and select "Repeat: ONE" to repeat same song. Press 5 button and select "Repeat: ALL" to repeat all tracks or to stop repeat function.
Preset 3/ INT Button (13)
- Track Introduce
Short press to play all songs in intro mode. The unit will play the first 10 seconds of each song continuously until you press this button again to stop intro function.
Preset 4/ RDM Button (14)
- Track Random
Short press 4 button and select "Random: Track" to play all tracks in random. Press this button again and select "Random: Off" to cancel random function.
SCAN/MENU (9)
- Folder Navigation
Short press the button, and then rotate volume knob to guide and select the music folder, press volume knob to enter folder and confirm.
DMD OPERATION
MODE (6)
- MODE Selection
Short press MODE button to select DMD mode.
Note: If there is no DMD connected, this mode will be skipped. If there is a DMD connected to the DMD port, the DMD mode will be displayed.
In this mode, you need control your DMD directly.
AUX IN OPERATION
MODE (6)
- MODE Selection
Short press MODE button to select AUX mode.
Note: This unit can be connected to any portable music devices such as MP3 Player, TV and
DVD through the AUX IN located at the back of the unit. Press MODE button to change the mode to "AUX" mode. In this mode, all controls and functions has to be controlled through your music device.
CDC/DVDC OPERATION
MODE (6)
- MODE Selection
Short press MODE button to select CDC-DVDC mode.
Note: If there is no CDC-DVDC connected, this mode will be skipped. If there is a DMD connected to the CDC & DVDC port, the CDC-DVDC mode will be displayed.
The unit only support the specified CD/DVD Changer, or it will not work. Please consult your local dealer
SEEK+ (2)/SEEK- (5)
- Track Selection
Short press to automatically seek the previous/next track.
- Track FF/FR
Press and hold the buttons to fast forward/fast rewind.
Preset 1/ PAUSE-PLAY (11)
- Track PAUSE-PLAY
Short press to pause player. Press 1 button again to resume play.
Preset 2/ RPT (12)
- Track Repeat
Short press 5 button and select "Repeat: ONE" to repeat same song. Press 5 button and select "Repeat: ALL" to repeat all tracks or to stop repeat function.
Preset 3/ INT Button (13)
- Track Introduce
Short press to play all songs in intro mode. The unit will play the first 10 seconds of each song continuously until you press this button again to stop intro function.
Preset 4/ RDM Button (14)
- Track Random
Short press 4 button and select "Random: Track" to play all tracks in random. Press this button again and select "Random: Off" to cancel random function.
BAND/SUB (3)/SCAN/MENU (9)
- Disc selection
You may short press BAND as "pre-disc" button and SCAN as "next-disc" button.

- POWER
- MODE
- PAIR
- SCAN
- AS/PS
- BAND
- MUTE
- PLAY/PAUSE
- REPEAT
- INTRO
- RANDOM
- SELECT
- MENU
- GOTO
- DISP
- VOL+,VOL-
- REMIND/FORWARD
- ENT
- NEXT/PREVIOUS
- NUMO - NUM9
SPECIFICATIONS
Note: Specifications and the design are subject to possible modification without notice due to improvement.
| USB/SD/DMD PLAYER | SPECIFICATION |
| Signal to Noise Ratio | >60dB |
| Frequency response | 20HZ – 20KHZ |
| Channel Separation | >60dB |
| TUNER(AM) | |
| Frequency Range | 530KHZ – 1710KHZ |
| Usable Sensitivity | 38dBuV |
| TUNER(FM) | |
| Frequency Range | 87.5MHZ – 107.9MHZ |
| Sensitivity | 2.8uV |
| Stereo Separation | 30dB |
| Signal to Noise Ratio | 50dB |
| LINE-OUT | |
| Output | 3.6 V (max) |
| Impedance | 10k Ohm |
| GENERAL | |
| Power Supply | 12V DC (10.8-15.6V allowable) |
| Speaker Impedance | 4 or 8 Ohm |
| Output Power | 45W X 4 CH@4Ohm |
| Fuse | 15A |
| PROBLEM | CAUSE | CORRECTIVE ACTION |
| No power | Blown fuse, power wires disconnected | Check the fuse and power wire or ground wire connection |
| No sound | Mute is on, Volume set at minimum, wiring is not properly connected | Turn Mute to off, adjust volume to a desired level, check the speaker wire |
| Cannot read some USB devices | This unit is not 100% compatible with all USB devices or the USB devices has special format. | Try to format the USB device in FAT 16/32 standard |
| Unit powers off | The battery may be too low (the unit operating voltage is 10.8v to 15.6v). | |
| Unit takes about 45 seconds to recognize some USB device | This is normal. The unit sometimes takes longer time to read all the files inside the USB device. | Try to remove the USB device and insert it again. |
| Operations keys does not work | Completely disconnect the power for 1 minute or 2 then plug it back in again | |
| The unit picks up the engine noise. | Check the ground wire. | |
| The PRESET Station memory is gone after battery change or discharge | This is normal. User has to re-program. | |
| The radio does not work. The radio station automatic selection does not work | The antenna cable is not connected or the signals are too weak | Insert the antenna cable firmly or select a station manually |
| Check Tuner(Display message in SiriusXM mode) | Check the SiriusXM tuner connection on the back of the unit to ensure that it's correctly connected. | |
| Check Antenna(Display message in SiriusXM mode) | Ensure the SiriusXM antenna cable is connected to the SiriusXM tuner correctly. Check the SiriusXM antenna wire for breaks or sharp bends. Replace the antenna ifnecessary. If the message remains, the antenna may have been damaged. | |
| No Signal (Display message in SiriusXM mode) | The vehicle must be outside, and the antenna must have a clear view of the southern sky. The magnetic antenna must be mounted on the outside of the vehicle for the best reception. | |
| Channel Not Subscribed(Display message in SiriusXM mode) | This channel is not included in your SiriusXM subscription plan. Call 1-800-XM-RADIO (1-800-967-2346) to subscribe. | |
| Channel Not Available(Display message in SiriusXM mode) | This channel is not a valid SiriusXM channel. The channel number has been entered incorrectly, or the channel was removed from the SiriusXM channel lineup. | |
| Channel Locked (Display message in SiriusXM mode) | The selected channel has been locked by the parental controls, or a mature channel has been selected. A prompt to enter the unlock code will appear. Enter the unlock code as described on page 9. | |
| Subscription Updated (Display message in SiriusXM mode) | An update to your SiriusXM subscription has been received by the SiriusXM tuner. Press any button to continue. |
WARRANTY INFORMATION:
Should this product require service, you may obtain specific information by contacting the dealer from whom this product was purchased.
For any service related questions, please call our technical service team.
Technical Support Phone Number: 574-293-1521

- FUSE REPLACEMENT
- WARNING
- INSTALLATION
- PRECAUTIONS
- NOTE
- POWER BUTTON (1)
- VOLUME PUSH SEL (7)
- MODE (6)
- DISP (4)
- BAND/SUB (3)
- RADIO OPERATION
- SEEK+ (2)/SEEK- (5)
- PRESET 1-6 (11/12/13/14/15/16)
- SCAN/MENU (9)
- AS.PS (10)
- SIRIUSXM DISPLAY DIAGRAM
- PARENTAL CONTROL
- USD/SD OPERATION
- DMD OPERATION
- AUX IN OPERATION
- CDC/DVDC OPERATION
- SPECIFICATIONS
- WARRANTY INFORMATION
Brand : Rockford Fosgate
Model : RFX9900DM
Category : Car radio