Netron EN4 - Lighting Obsidian - Free user manual and instructions
Find the device manual for free Netron EN4 Obsidian in PDF.


| Product Type | EtherDMX Gateway / DMX Node |
| Model | Netron EN4 |
| Brand | Obsidian |
| DMX Ports | 4 x 5-pin XLR, bidirectional, optically isolated, RDM capable |
| Ethernet Ports | 2 x Gigabit RJ45 (1 PoE) |
| Display | Full color OLED |
| Control | Encoder with push-to-select and back button |
| Protocols | Art-Net, sACN, DMX512, RDM |
| Presets | 14 factory Netron presets, 10 user presets |
| Cues | 99 cues with fade time, hold time, and linking |
| Remote Triggers | 10 remote inputs via contact closure, DMX, Art-Net, or sACN |
| DMX Monitoring | Built-in DMX monitor with grid, list, and address view |
| Test Generator | DMX, Art-Net, and sACN test generator |
| Power Input | Power In/Thru via locking connector; PoE on one Ethernet port |
| Dimensions (approx) | Compact desktop unit (exact dimensions not provided) |
| Weight (approx) | Lightweight, under 1 kg (estimate) |
| Safety | Use only as directed; avoid moisture; disconnect power before cleaning |
| Maintenance | Clean with dry cloth; do not use liquids or solvents |
| Spare Parts & Repairability | Contact Obsidian support for service; no user-serviceable parts |
| General Information | Manufactured by Obsidian Control Systems B.V., Netherlands. Firmware upgradeable via web interface. |
Frequently Asked Questions - Netron EN4 Obsidian
User questions about Netron EN4 Obsidian
0 question about this device. Answer the ones you know or ask your own.
Ask a new question about this device
Download the instructions for your Lighting in PDF format for free! Find your manual Netron EN4 - Obsidian and take your electronic device back in hand. On this page are published all the documents necessary for the use of your device. Netron EN4 by Obsidian.
USER MANUAL Netron EN4 Obsidian
©2020 OBSIDIAN CONTROL SYSTEMS all rights reserved. Information, specifications, diagrams, images, and instructions herein are subject to change without notice. Obsidian Control Systems logo and identifying product names and numbers herein are trademarks of ADJ PRODUCTS LLC. Copyright protection claimed includes all forms and matters of copyrightable materials and information now allowed by statutory or judicial law or hereinafter granted. Product names used in this document may be trademarks or registered trademarks of their respective companies and are hereby acknowledged. All non – ADJ brands and product names are trademarks or registered trademarks of their respective companies.
OBSIDIAN CONTROL SYSTEMS and all affiliated companies hereby disclaim any and all liabilities for property, equipment, building, and electrical damages, injuries to any persons, and direct or indirect economic loss associated with the use or reliance of any information contained within this document, and/or as a result of the improper, unsafe, insufficient and negligent assembly, installation, rigging, and operation of this product.
OBSIDIAN CONTROL SYSTEMS B.V.
Junostraat 2 | 6468 EW Kerkrade, The Netherlands
+31 45 546 85 66
Art-Net
This device incorporates Art-Net™, Designed by and Copyright Artistic License Holdings Ltd
Document Version: An updated version of this document may be available online. Please check www.obsidiancontrol.com for the latest revision/update of this document before beginning installation and use.
| Date | Document Version | Note |
| 12/17/19 | 1.0 | INITIAL RELEASE |
| 12/27/19 | 1.5 | Added Art-Net copyright |
| 01/06/20 | 2.0 | Updated software |
| 01/21/20 | 2.5 | Updated Menu Options |
| 09/21/20 | 3.0 | Updated Firmware to V2.4 |
CONTENTS
GENERAL INFORMATION 4
OVERVIEW 5
CONNECTIONS 6
MENU:
NAVIGATION 10
HOME SCREEN 11
PRESETS 12
NETRON PRESETS 13
CUES 14
DMX PORTS 15
REMOTE INPUT 16
VIEW AND TEST 17
IP ADDRESS 19
SYSTEM 20
INFORMATION 21
Please read and understand the instructions in this manual carefully and thoroughly before attempting to operate this device. These instructions contain important safety and use information.
CUSTOMER SUPPORT
Contact your local Obsidian Controls Systems dealer or distributor for any product related service and support needs. Also visit forum.obsidiancontrol.com with questions, comments or suggestions.
OBSIDIAN CONTROL SERVICE EUROPE – Monday – Friday 08:30 to 17:00 CET +31 45 546 85 63 | support@obsidiancontrol.com
OBSIDIAN CONTROL SERVICE USA – Monday – Friday 08:30 to 17:00 PST (866) 245 – 6726 | support@obsidiancontrol.com
OVERVIEW
INTRODUCTION
The Netron devices offer unique and powerful DMX management features. Most settings can be accessed from the intuitive display and menu system.
All settings are available from the integrated web page, which allows remote access to this device from any web-browser. The multi-purpose EN4, EP4, and EN12 EtherDMX Gateways essentially package Art-Net and sACN conversion, Merger, DMX patch-bay, and a DMX scene recorder into one device.
KEY FEATURES
- sACN and Art-Net to DMX conversion
- Factory defined NETRON presets
- 10 User Presets
- 99 Cues with Fade Time, Hold Time and Cue linking
- External contact closures to trigger cues and preset recall (EN12 only)
- DMX Monitor
- DMX and Ethernet Test Generator
SOFTWARE AND OPERATION
This document provides safety information and mechanical installation instructions.
For setup and operation of all software features, please update the devices to the latest release. Download and study the full user guides from http://obsidiancontrol.com/netron.
The NETRON Ether-DMX devices offer a comprehensive and easy to use feature set, and are continuously improving. It is advised to periodically check for updates on the Obsidian product pages.
CONNECTIONS
DMX CONNECTIONS
All DMX Output connections are 5pin female XLR; however, the pin – out on all sockets is pin 1 to shield, pin 2 to cold (−), and pin 3 to hot (+). Pins 4 and 5 are not used.
Carefully connect DMX cables to the respective ports.
To prevent damaging the DMX ports, provide strain relief and support. Avoid connecting FOH Snakes to the ports directly.
Certain functions may require adapters (purchased separately), such as a 5 pole XLR male to 5 pole XLR male.
| Pin | Connection |
| 1 | Com |
| 2 | Data - |
| 3 | Data + |
| 4 | Not connected |
| 5 | Not connected |
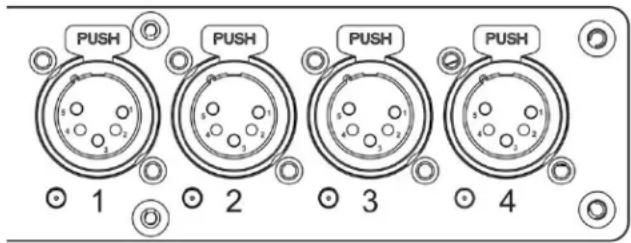
ETHERNET DATA CONNECTION
The Ethernet cable is connected on the back of the gateway into the port labeled A or B. Devices can be daisy chained, but it is recommended not to exceed 10 Netron devices in one chain. Because these devices use locking RJ45 connectors, and the use of locking RJ45 ethernet cables is recommended, any RJ45 connector is suitable.
To connect multiple devices to an EtherDMX Source, an Ethernet switch is required to split the data into the desired number of streams.
The Ethernet connection is also used to connect a computer to the Netron device for remote configuration via a web browser. To access the web interface, simply enter the IP address shown in the display in any web browser connected to the device. Information about the web access can be found in the manual.
CONNECTIONS: EN4 FRONT & REAR PANELS
FRONT CONNECTIONS
- (4) 5pin DMX/RDM optically isolated ports
- Ports are bidirectional for DMX In and Output
- Full color OLED display
- Encoder w. Push to Select / Exit Button
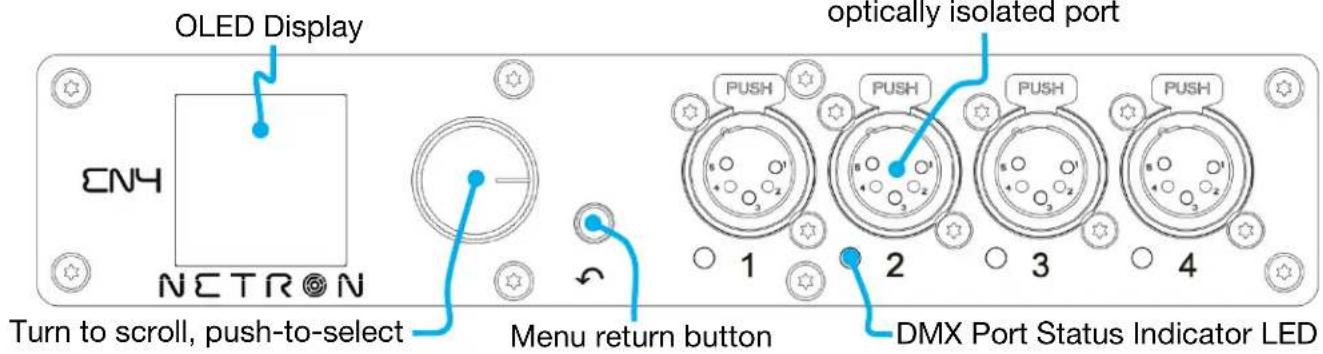
DMX PORTS STATUS INDICATOR LEDs
| LED Color | Solid | Blink | Flashing/Strobing |
| DMX PORTS RED | Error | ||
| DMX PORTS GREEN | DMX In | DMX Lost | |
| DMX PORTS BLUE | DMX Out Stable | DMX Lost | |
| DMX PORTS WHITE | Flash on RDM packets |
All LEDs are dimmable and can be turned off via the Menu/System/Display menu.
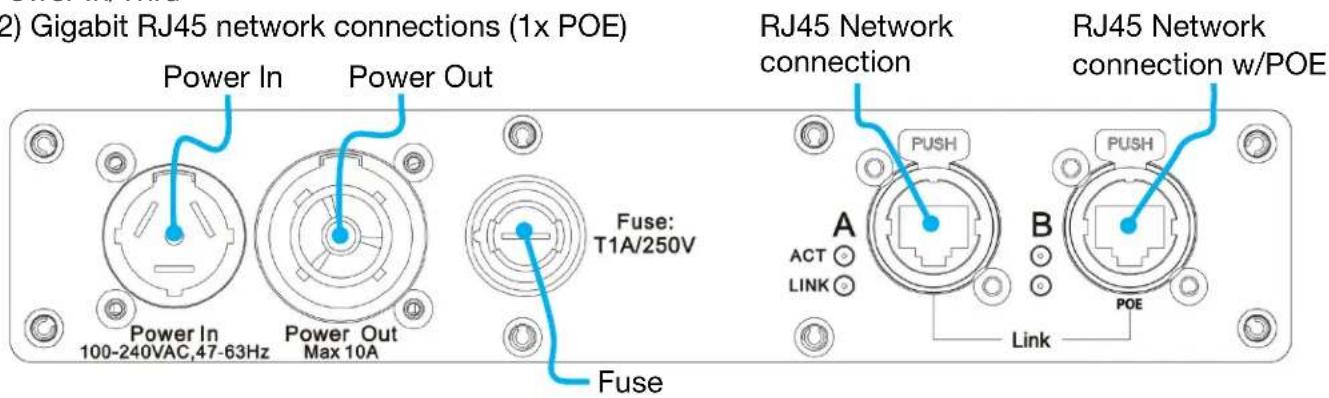
REAR CONNECTIONS
- Power In/Thru
- (2) Gigabit RJ45 network connections (1x POE)
- (2) Gigabit RJ45 network connections (1x POE)
CONNECTIONS: EN12 (FRONT & REAR PANELS)
FRONT CONNECTIONS
- (12) 5pin DMX/RDM optically isolated ports
- Ports are bidirectional for DMX In and Output
- Full color OLED display
- Encoder w. Push to Select / Exit Button
5-Pin DMX/RDM optically isolated port

DMX PORTS STATUS INDICATOR LEDs
| LED Color | Solid | Blink | Flashing/Strobing |
| DMX PORTS RED | Error | ||
| DMX PORTS GREEN | DMX In | DMX Lost | |
| DMX PORTS BLUE | DMX Out | DMX Lost | |
| DMX PORTS WHITE | Flash on RDM packets |
All LEDs are dimmable and can be turned off via the Menu/System/Display menu.
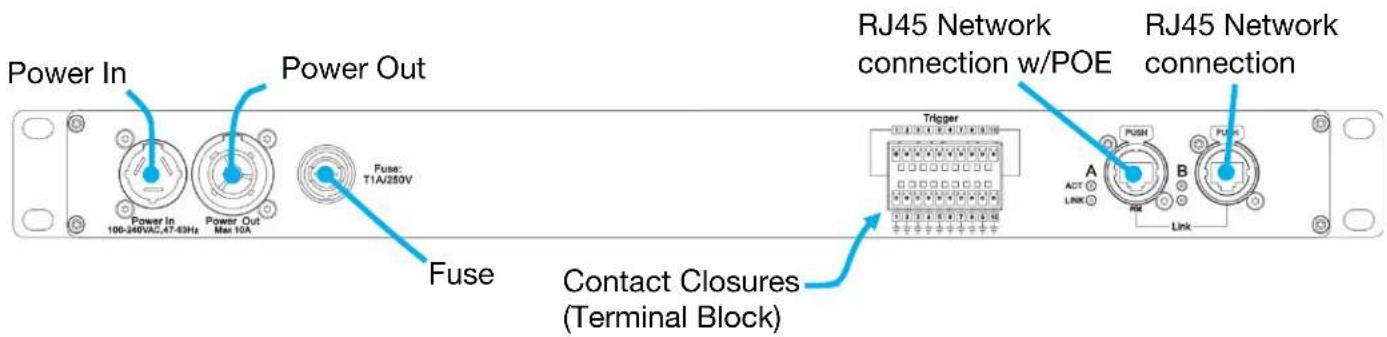
REAR CONNECTIONS
- (2) Gigabit RJ45 network connections (1x POE)
- (10) Contact Closures (Terminal Block)
CONNECTIONS: EP4 (FRONT & REAR PANELS)
FRONT CONNECTIONS
- (4) 5pin DMX/RDM optically isolated ports
- Ports are bidirectional for DMX In and Output
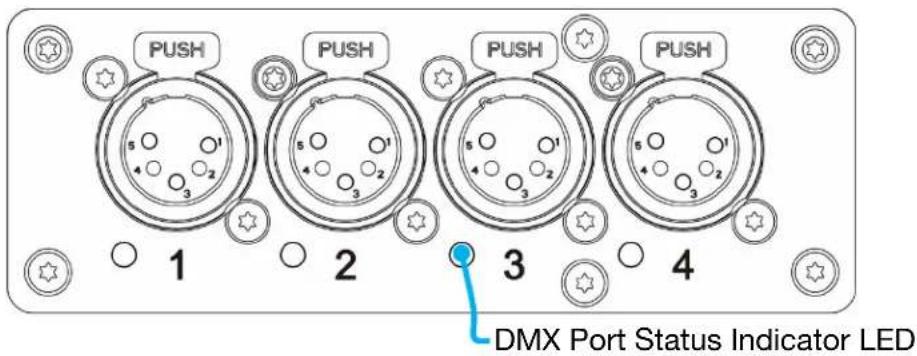
DMX PORTS STATUS INDICATOR LEDs
| Ports | LED Color | Solid | Blink | Flashing/Strobing |
| DMX | RED | Error | ||
| DMX | GREEN | DMX In | DMX Lost | |
| DMX | BLUE | DMX Out Stable | DMX Lost | |
| DMX | WHITE | Flash on RDM packets |
The LEDs are dimmable from the System – Display menu and can be turned off completely if desired.
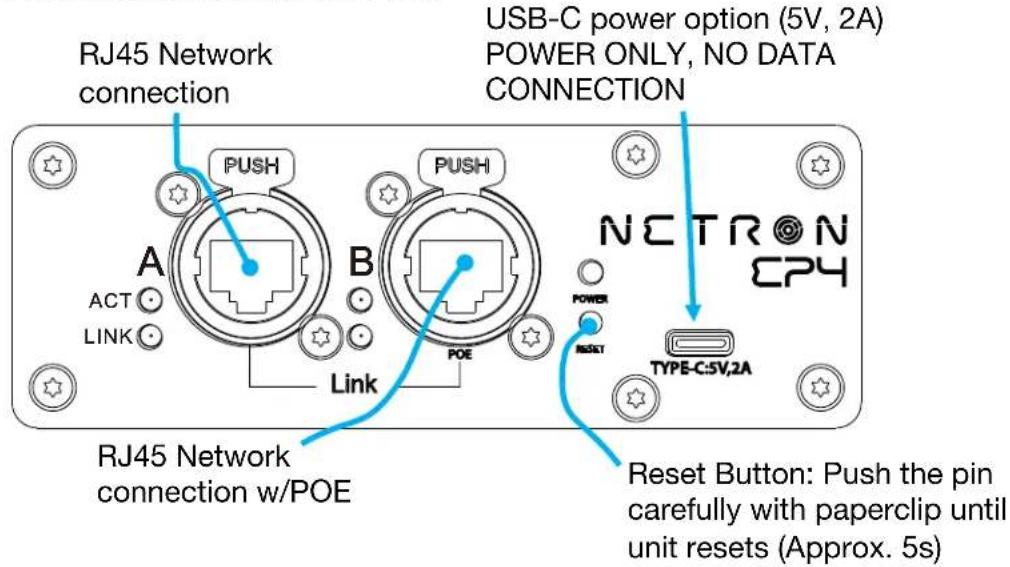
REAR CONNECTIONS
- USB-C power option (5V, 2A). POWER ONLY, NO DATA CONNECTION
- (2) Gigbabit RJ45 network connections (1x POE)
MENU: NAVIGATION
The Netron devices use a small OLED display for feedback and setup. The encoder dials up and down through the menu, a push of the encoder selects an item or saves an entry. Revert to a previous menu or cancel an entry with a single push of the back arrow.

natural_image
Abstract black-and-white concentric circle target symbol with no text or symbols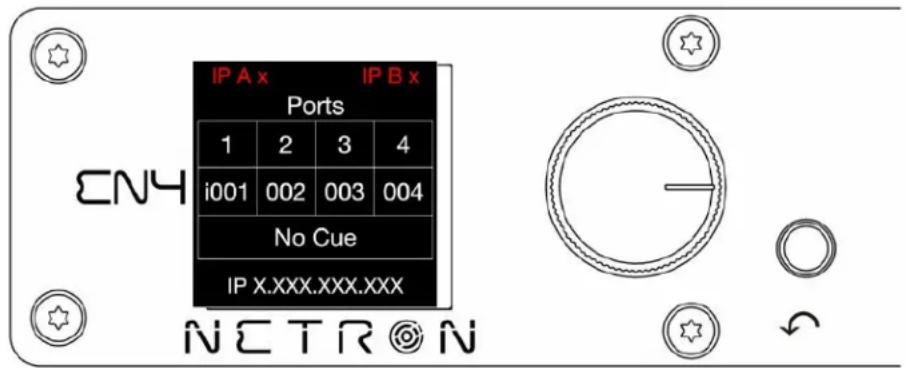
| Wheel Right | Scroll down in menu list / increase values |
| Wheel Left | Scroll up in menu list / decrease values |
| Wheel Push | Enter Menu, Select menu item, go down one level in menu, confirm values. |
| Back Arrow | Go up one level in menu tree, cancel change of values, hold for 2 seconds to return to home screen |
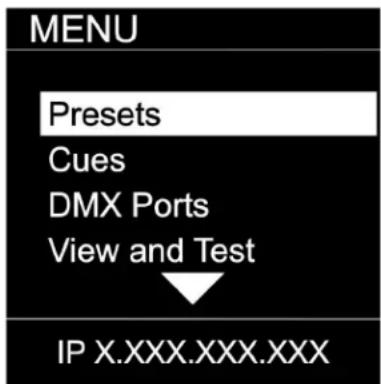
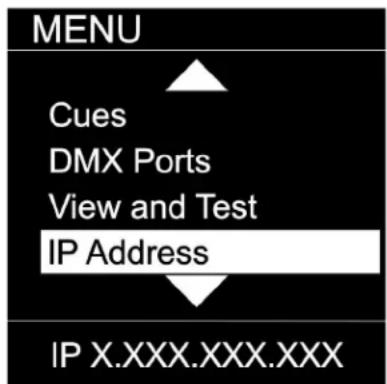
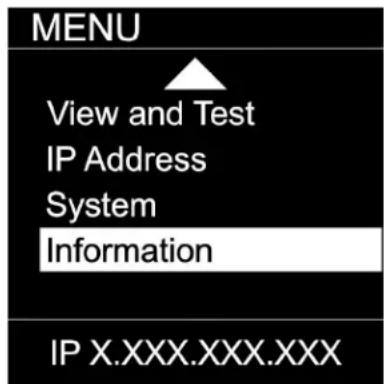
As you scroll up or down the menu, the arrows indicate that more items are available above or below that which is displayed, and only show when needed.
MENU: HOME SCREEN
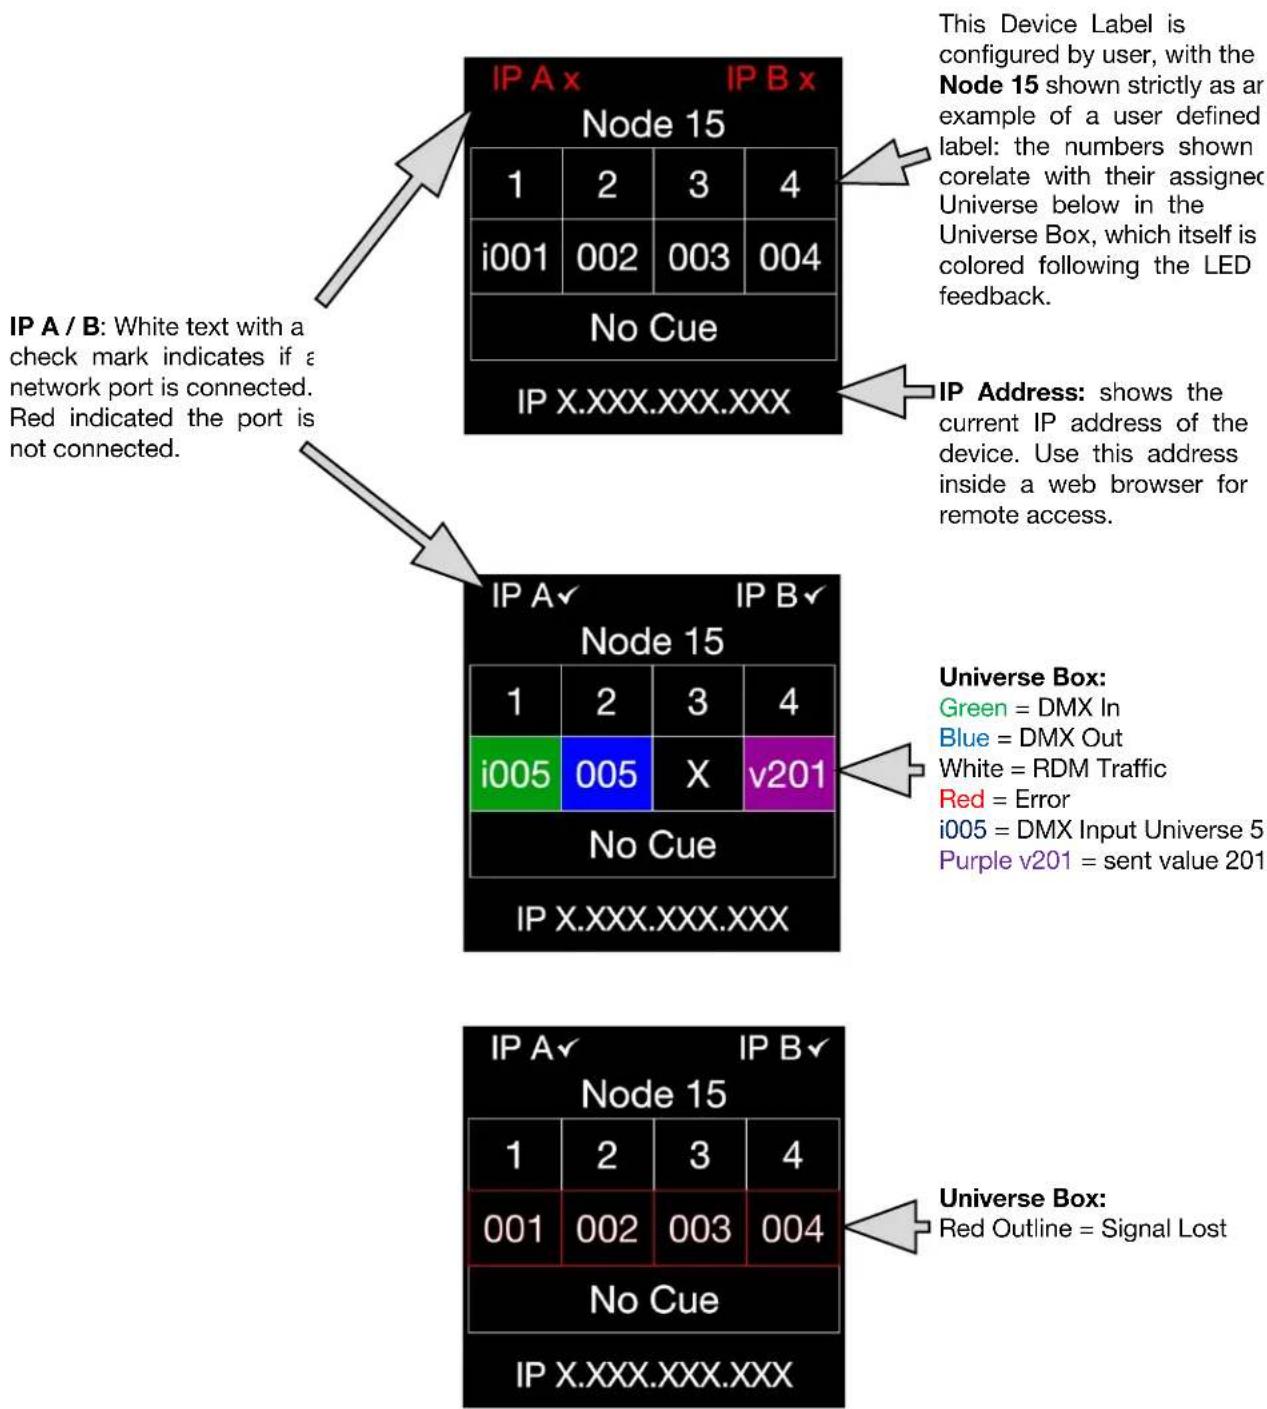
This is the default screen providing quick status feedback and indicates IP and DMX traffic.
flowchart
graph TD
    A["Node 15"] --> B["IP A x"]
    A --> C["IP B x"]
    B --> D["Node 15"]
    C --> E["Node 15"]
    D --> F["i001"]
    D --> G["002"]
    D --> H["003"]
    D --> I["004"]
    E --> J["No Cue"]
    E --> K["No Cue"]
    F --> L["IP X.XXX.XXX.XXX"]
    G --> M["IP X.XXX.XXX.XXX"]
    H --> N["IP X.XXX.XXX.XXX"]
    I --> O["IP X.XXX.XXX.XXX"]

    P["Node 15"] --> Q["i005"]
    P --> R["005"]
    P --> S["X"]
    P --> T["v201"]
    Q --> U["No Cue"]
    R --> V["No Cue"]
    S --> W["No Cue"]
    T --> X["No Cue"]

    Y["Node 15"] --> Z["i005 = DMX In Blue = DMX Out White = RDM Traffic Red = Error i005 = DMX Input Universe 5 Purple v201 = sent value 201"]
    Y --> AA["No Cue"]
    Z --> AB["Green = DMX In Blue = DMX Out White = RDM Traffic Red = Error i005 = DMX Input Universe 5 Purple v201 = sent value 201"]
    AA --> AC["Red Outline = Signal Lost"]

    AD["Node 15"] --> AE["i001"]
    AD --> AF["002"]
    AD --> AG["003"]
    AD --> AH["004"]
MENU: PRESETS
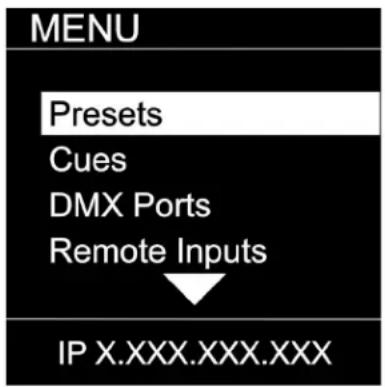
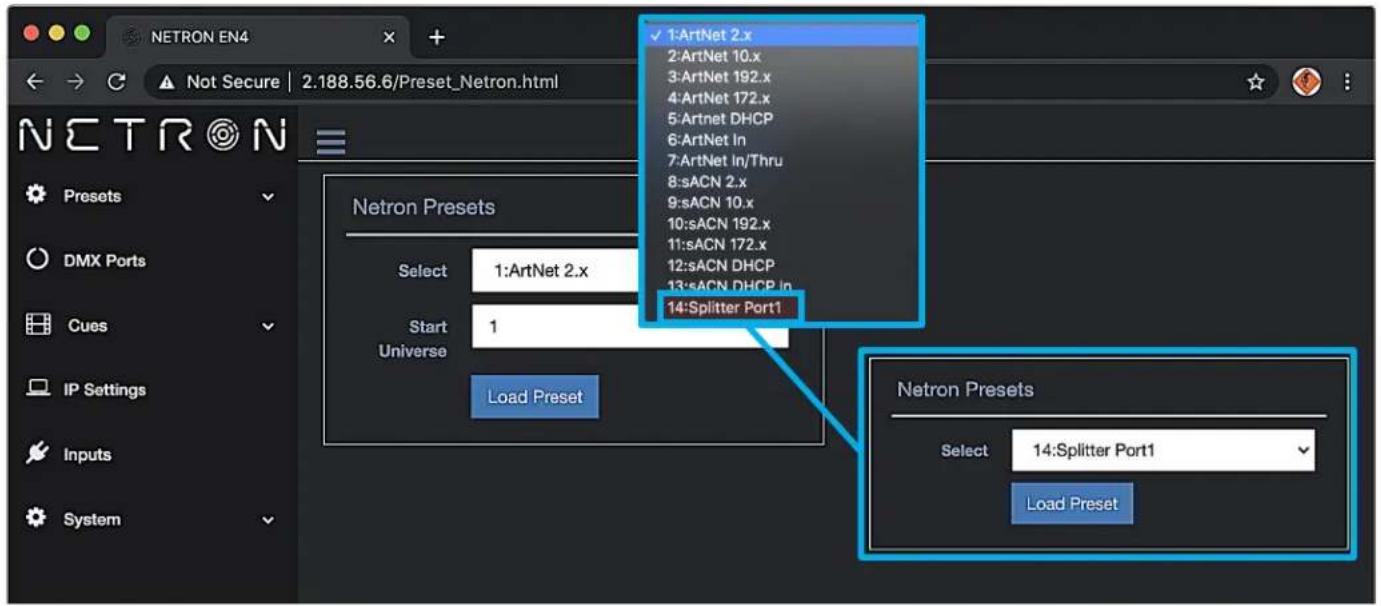
Several simple presets are preprogrammed into the device for fast setup. Some presets require additional input like a start Universe.
| SUB MENU | OPTION / VALUES | DESCRIPTION | ||
| 1 :ArtNet 2.x | Universe 1 – 32767 | See NETRON Presets | ||
| MENU | 2 :ArtNet 10.x | Universe 1 – 32767 | ||
| NETRON Presets | 3 :ArtNet 192.x | Universe 1 – 32767 | ||
| 4. ArtNet 172.x | Universe 1 – 32767 | |||
| 5. ArtNet DHCP | Universe 1 – 32767 | |||
| USER PRESETS | 6. ArtNet In | Universe 1 – 32767 | ||
| 7. :ArtNet In/Thru | Universe 1 – 32767 | |||
| 8. sCAN 2.x | Universe 1 – 32767 | |||
| 9. sCAN 10.x | Universe 1 – 32767 | |||
| 10. sACN 192.x | Universe 1 – 32767 | |||
| 11. :sACN 172.x | Universe 1 – 32767 | |||
| IP X.XXX.XXX.XXX | 12. sACN DHCP | Universe 1 – 32767 | ||
| 13. sACN DHCP In | Universe 1 – 32767 | |||
| 14. :Splitter Port1 | ||||
| MENU | 1 :MyPreset 1...10 :MyPreset 10 | Save Preset | Preset Saved | |
| Load Preset | Preset Loaded | |||
| NETRON Presets | Rename Preset | 12 Character Label | ||
| USER PRESETS | ||||
| IP X.XXX.XXX.XXX | ||||
MENU: NETRON PRESETS
These simple presets are preprogrammed into the device for fast setup. Some presets require additional input like a start Universe. Note that DMX Ports 1-12 apply to model EN12, and that greyed DMX Ports 1-4 apply to EN4/EP4 models.
| Label | Ethernet | DMX Ports | ||||||||||||||
| IP Address | Subnet | Protocol | Option | 1 | 2 | 3 | 4 | 5 | 6 | 7 | 8 | 9 | 10 | 11 | 12 | |
| Artnet 2.x | Automatic 2.x | 255.0.0.0 | Artnet | Universe # | Output | Output | Output | Output | Output | Output | Output | Output | Output | Output | Output | Output |
| X | X | X+1 | X+2 | X+3 | X+4 | X+5 | X+6 | X+7 | X+9 | X+10 | X+11 | X+12 | ||||
| RDM | Yes | Yes | Yes | Yes | Yes | Yes | Yes | Yes | Yes | Yes | Yes | Yes | ||||
| Artnet 10.x | Automatic 10.x | 255.0.0.0 | Artnet | Universe # | Output | Output | Output | Output | Output | Output | Output | Output | Output | Output | Output | Output |
| X | X | X+1 | X+2 | X+3 | X+4 | X+5 | X+6 | X+7 | X+9 | X+10 | X+11 | X+11 | ||||
| RDM | Yes | Yes | Yes | Yes | Yes | Yes | Yes | Yes | Yes | Yes | Yes | Yes | ||||
| Artnet 192.x | Automatic 192.x | 255.0.0.0 | Artnet | Universe # | Output | Output | Output | Output | Output | Output | Output | Output | Output | Output | Output | Output |
| X | X | X+1 | X+2 | X+3 | X+4 | X+5 | X+6 | X+7 | X+9 | X+10 | X+11 | X+2 | ||||
| RDM | Yes | Yes | Yes | Yes | Yes | Yes | Yes | Yes | Yes | Yes | Yes | Yes | ||||
| Artnet 172.x | Automatic 172.x | 255.0.0.0 | Artnet | Universe # | Output | Output | Output | Output | Output | Output | Output | Output | Output | Output | Output | Output |
| X | X | X+1 | X+2 | X+3 | X+4 | X+5 | X+6 | X+7 | X+9 | X+10 | X+11 | X+3 | ||||
| RDM | Yes | Yes | Yes | Yes | Yes | Yes | Yes | Yes | Yes | Yes | Yes | Yes | ||||
| Artnet DHCP | DHCP | DHCP | Artnet | Universe # | Output | Output | Output | Output | Output | Output | Output | Output | Output | Output | Output | Output |
| X | X | X+1 | X+2 | X+3 | X+4 | X+5 | X+6 | X+7 | X+9 | X+10 | X+11 | X+12 | ||||
| RDM | yes | Yes | Yes | Yes | Yes | Yes | Yes | Yes | Yes | Yes | Yes | Yes | ||||
| Artnet In | Automatic 2.x | 255.0.0.0 | Artnet | Universe # | Input | Input | Input | Input | Input | Input | Input | Input | Input | Input | Input | Input |
| X | X | X+1 | X+2 | X+3 | X+4 | X+5 | X+6 | X+7 | X+9 | X+10 | X+11 | X+12 | ||||
| Artnet In / Thru | Automatic 2.x | 255.0.0.0 | Artnet | Universe # | Input | Input | Input | Input | Input | Input | Output | Output | Output | Output | Output | Output |
| X | X | X+1 | X+2 | X+3 | X+4 | X+5 | Clone 1 | Clone 2 | Clone 3 | Clone 4 | Clone 5 | Clone 6 | ||||
| sACN 2.x | Automatic 2.x | 255.0.0.0 | sACN | Universe # | Output | Output | Output | Output | Output | Output | Output | Output | Output | Output | Output | Output |
| X | X | X+1 | X+2 | X+3 | X+4 | X+5 | X+6 | X+7 | X+9 | X+10 | X+11 | X+12 | ||||
| RDM | not supported | |||||||||||||||
| sACN 10.x | Automatic 10.x | 255.0.0.0 | sACN | Universe # | Output | Output | Output | Output | Output | Output | Output | Output | Output | Output | Output | Output |
| X | X | X+1 | X+2 | X+3 | X+4 | X+5 | X+6 | X+7 | X+9 | X+10 | X+11 | X+11 | ||||
| RDM | not supported | |||||||||||||||
| sACN 192.x | Automatic 192.x | 255.0.0.0 | sACN | Universe # | Output | Output | Output | Output | Output | Output | Output | Output | Output | Output | Output | Output |
| X | X | X+1 | X+2 | X+3 | X+4 | X+5 | X+6 | X+7 | X+9 | X+10 | X+11 | X+2 | ||||
| RDM | not supported | |||||||||||||||
| sACN 172.x | Automatic 172.x | 255.0.0.0 | sACN | Universe # | Output | Output | Output | Output | Output | Output | Output | Output | Output | Output | Output | Output |
| X | X | X+1 | X+2 | X+3 | X+4 | X+5 | X+6 | X+7 | X+9 | X+10 | X+11 | X+3 | ||||
| RDM | not supported | |||||||||||||||
| sACN DHCP | DHCP | DHCP | sACN | Universe # | Output | Output | Output | Output | Output | Output | Output | Output | Output | Output | Output | Output |
| X | X | X+1 | X+2 | X+3 | X+4 | X+5 | X+6 | X+7 | X+9 | X+10 | X+11 | X+12 | ||||
| RDM | not supported | |||||||||||||||
| sACN DHCP In | DHCP | DHCP | sACN | Universe # | Input | Input | Input | Input | Input | Input | Input | Input | Input | Input | Input | Input |
| X | X | X+1 | X+2 | X+3 | X+4 | X+5 | X+6 | X+7 | X+9 | X+10 | X+11 | X+12 | ||||
| Splitter Port 1 | Automatic 2.x | 255.0.0.0 | Artnet | Input | Output | Output | Output | Output | Output | Output | Output | Output | Output | Output | Output | |
| X | Clone 1 | Clone 1 | Clone 1 | Clone 1 | Clone 1 | Clone 1 | Clone 1 | Clone 1 | Clone 1 | Clone 1 | Clone 1 | |||||
MENU: CUES
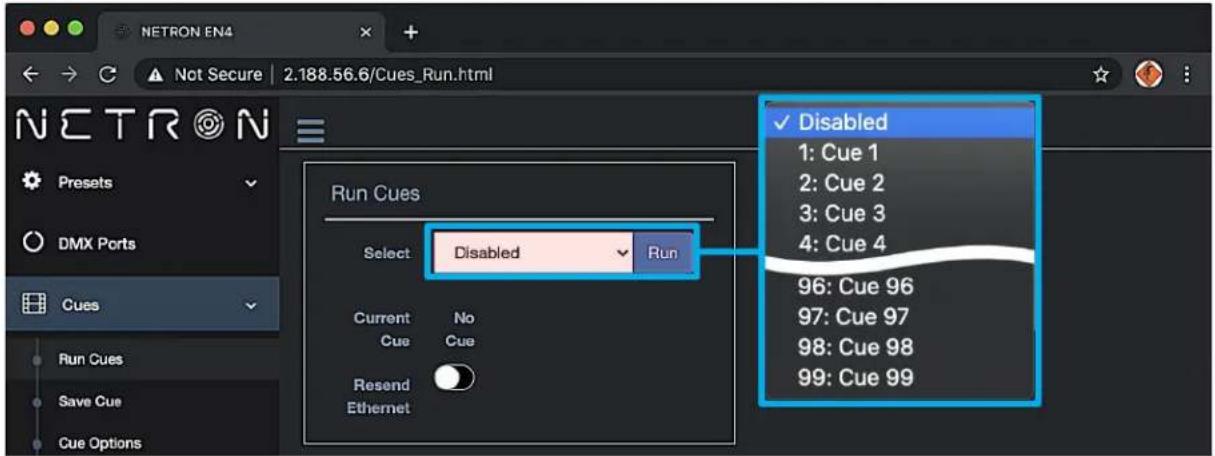
A cue is a full static snapshot of all DMX values of all ports. The device supports 99 cues with fade and hold times, plus a link option to loop multiple cues together. This allows small “mini” cuelists to be created. Cues are used for standalone operation, as a backup for signal loss or can be assigned to one of the switch inputs. This is often used for fire alarm situations where a system has to go to a defined state and stop all console playback. Cues can be sent as Ethernet Universes so one device can drive many other Netron nodes.
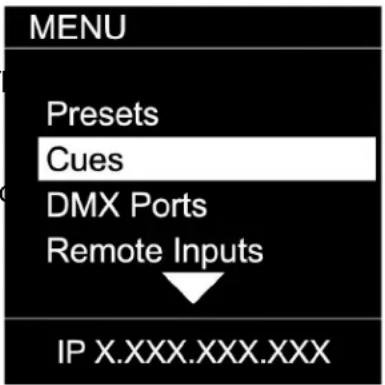
| SUB MENU | OPTIONS / VALUES | DESCRIPTION | |||
| Run Cue | 1 - 99 | Go/Off | Select the desired cue | ||
| RUN CueSave CuesRename CueLink Cues | Save Cue | 1:Cue 1...99:Cue 99 | Save Cue? | Yes/No | Save all values on all ports to a cue slot |
| Rename Cue | 1 - 99 | 12 Character Label | Edit name of cue | ||
| IP X.XXX.XXX.XXX | |||||
| MENU | |||||
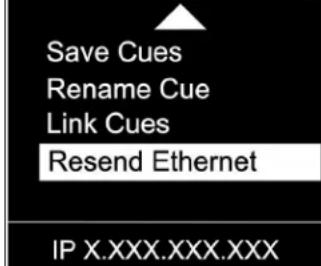 | Link Cues | 1 - 99 | Fade Time | 0s - 99.59min | Set the fade time of the cue |
| Hold Time | 0s - 99.59min | Set the time to hold the cue until the next cue is started | |||
| Link to Cue | Disable, 1 - 99 | Set the next Cue | |||
| Resend Ethernet | Disable | Cue data is not sent over Ethernet | |||
| Enable | Cue data is sent on the Universe number and protocol assigned to the ports. | ||||
MENU: DMX PORTS
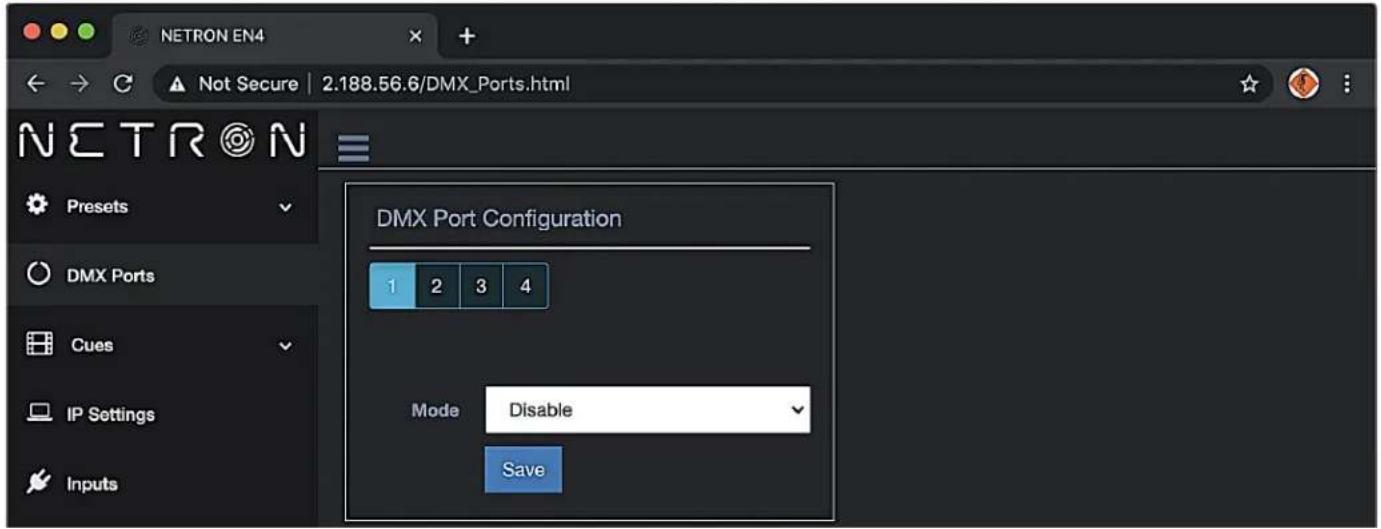
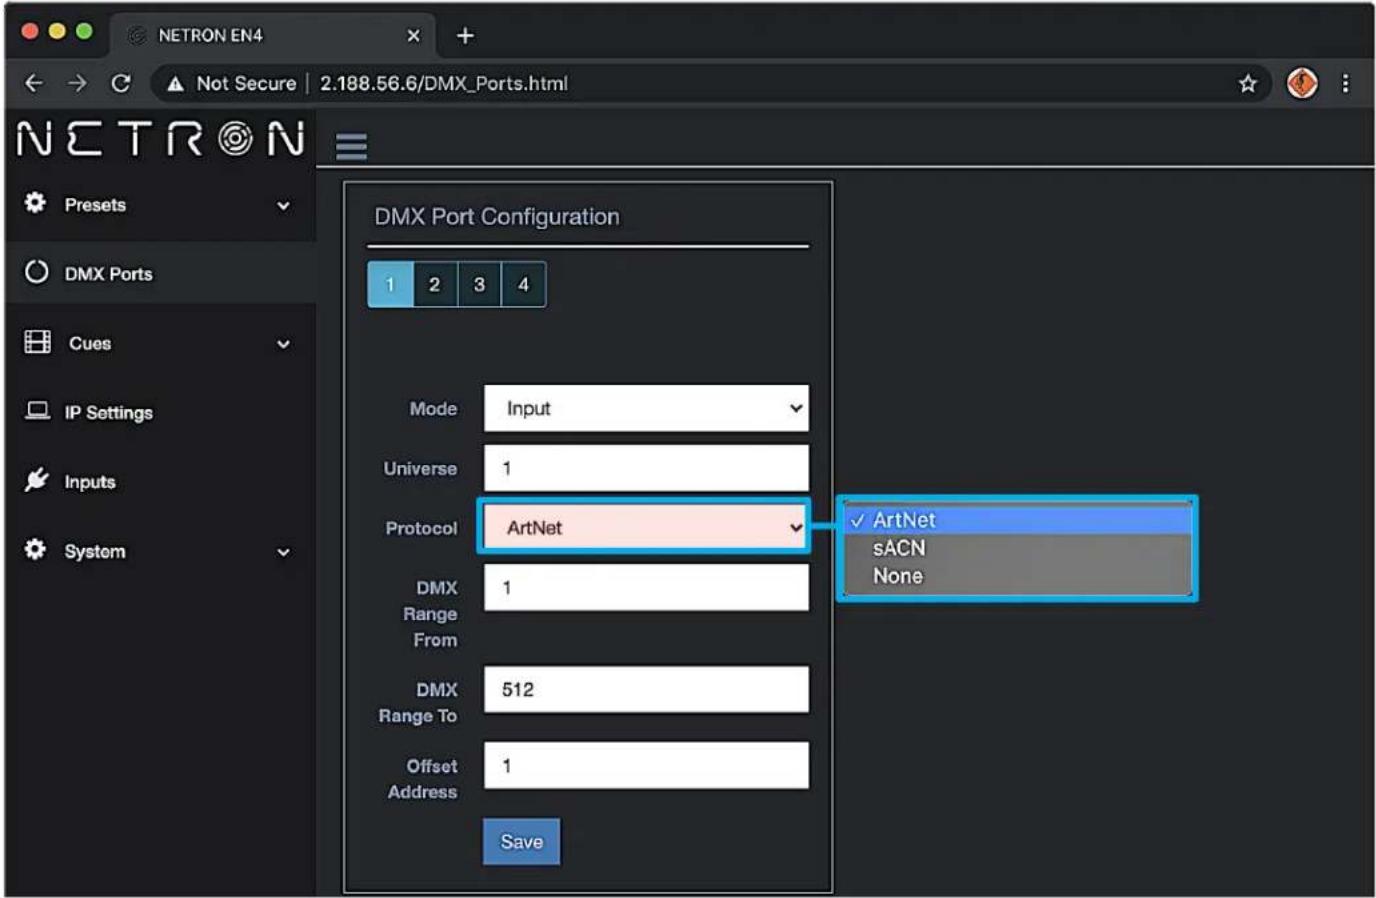
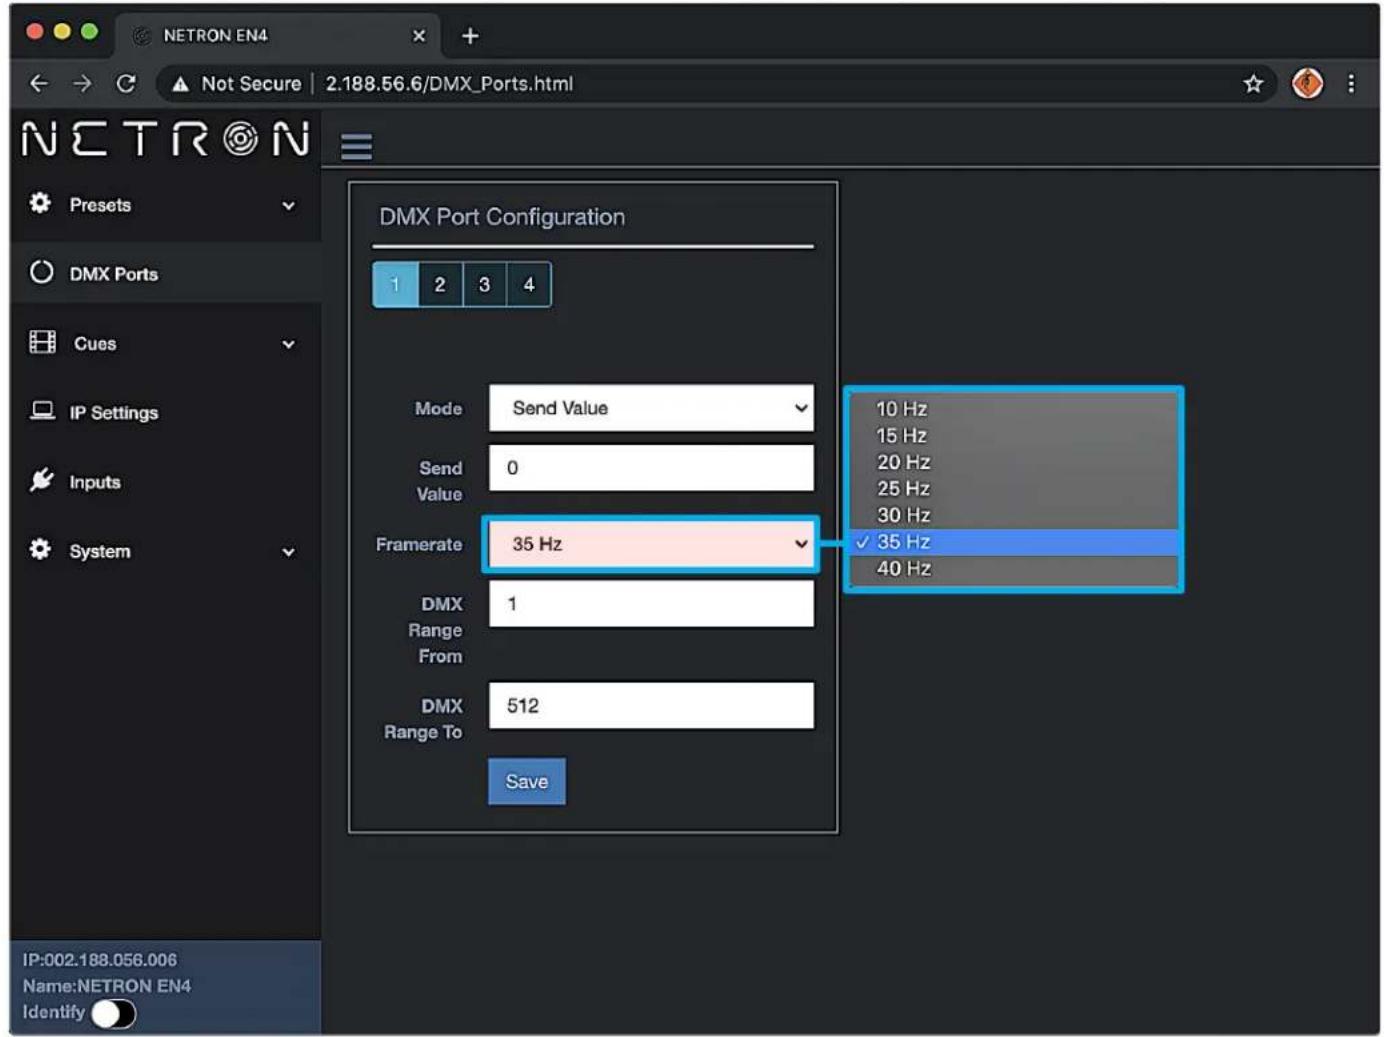
Select a port number to adjust its settings. Depending on the Mode, certain options are not relevant and hidden from the display or web interface.
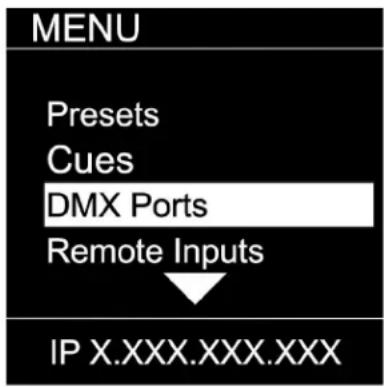
| SUB MENU | OPTIONS / VALUES | DESCRIPTION | ||
| Mode | Disable | The port is disabled. | ||
| Input | The port receives DMX values and assigns them to the selected Universe. | |||
| Output | The port sends out DMX Values on the selected Universe | |||
| Send Value | 0 - 255 | Send a static DMX value | ||
| Universe | 1 - 32767 | Select the EtherDMX Universe | ||
| MENU | Protocol | Art-Net, sACN, None | Select the EtherDMX protocol per port | |
| FrameRate | 10, 15, 20, 25, 30, 35, 40 | Select the desired frame rate. | ||
| RDM | Disable, Enable | Disable / Enable RDM traffic for this port | ||
| Port 1 | Merge | OFF | The merger is disabled | |
| Port 2 | HTP | The sources are merged by Highest Takes Precedence | ||
| Port 3 | LTP | The sources are merged by Last Takes Precedence | ||
| Port 4 | Toggle | The complete source Universe is switched as soon as a single value changes | ||
| Backup | The merge universe is activated if the main universe has no valid traffic | |||
| IP X.XXX.XXX.XXX | Clone | None, Port 2, Port 3, Port 4 | Replicates the identical DMX data from another port | |
| Range | From: 1 - 512 | To limit the DMX range, set the first address of the DMX port | ||
| To: 1 - 512 | To limit the DMX range, set the last address of the DMX port | |||
| Offset Addr | Off, 2 - 511 | Offset start address, incoming channel X value is sent on this port as channel X+Offset, Channels are cut off if they exceed 512 | ||
MENU: REMOTE INPUT
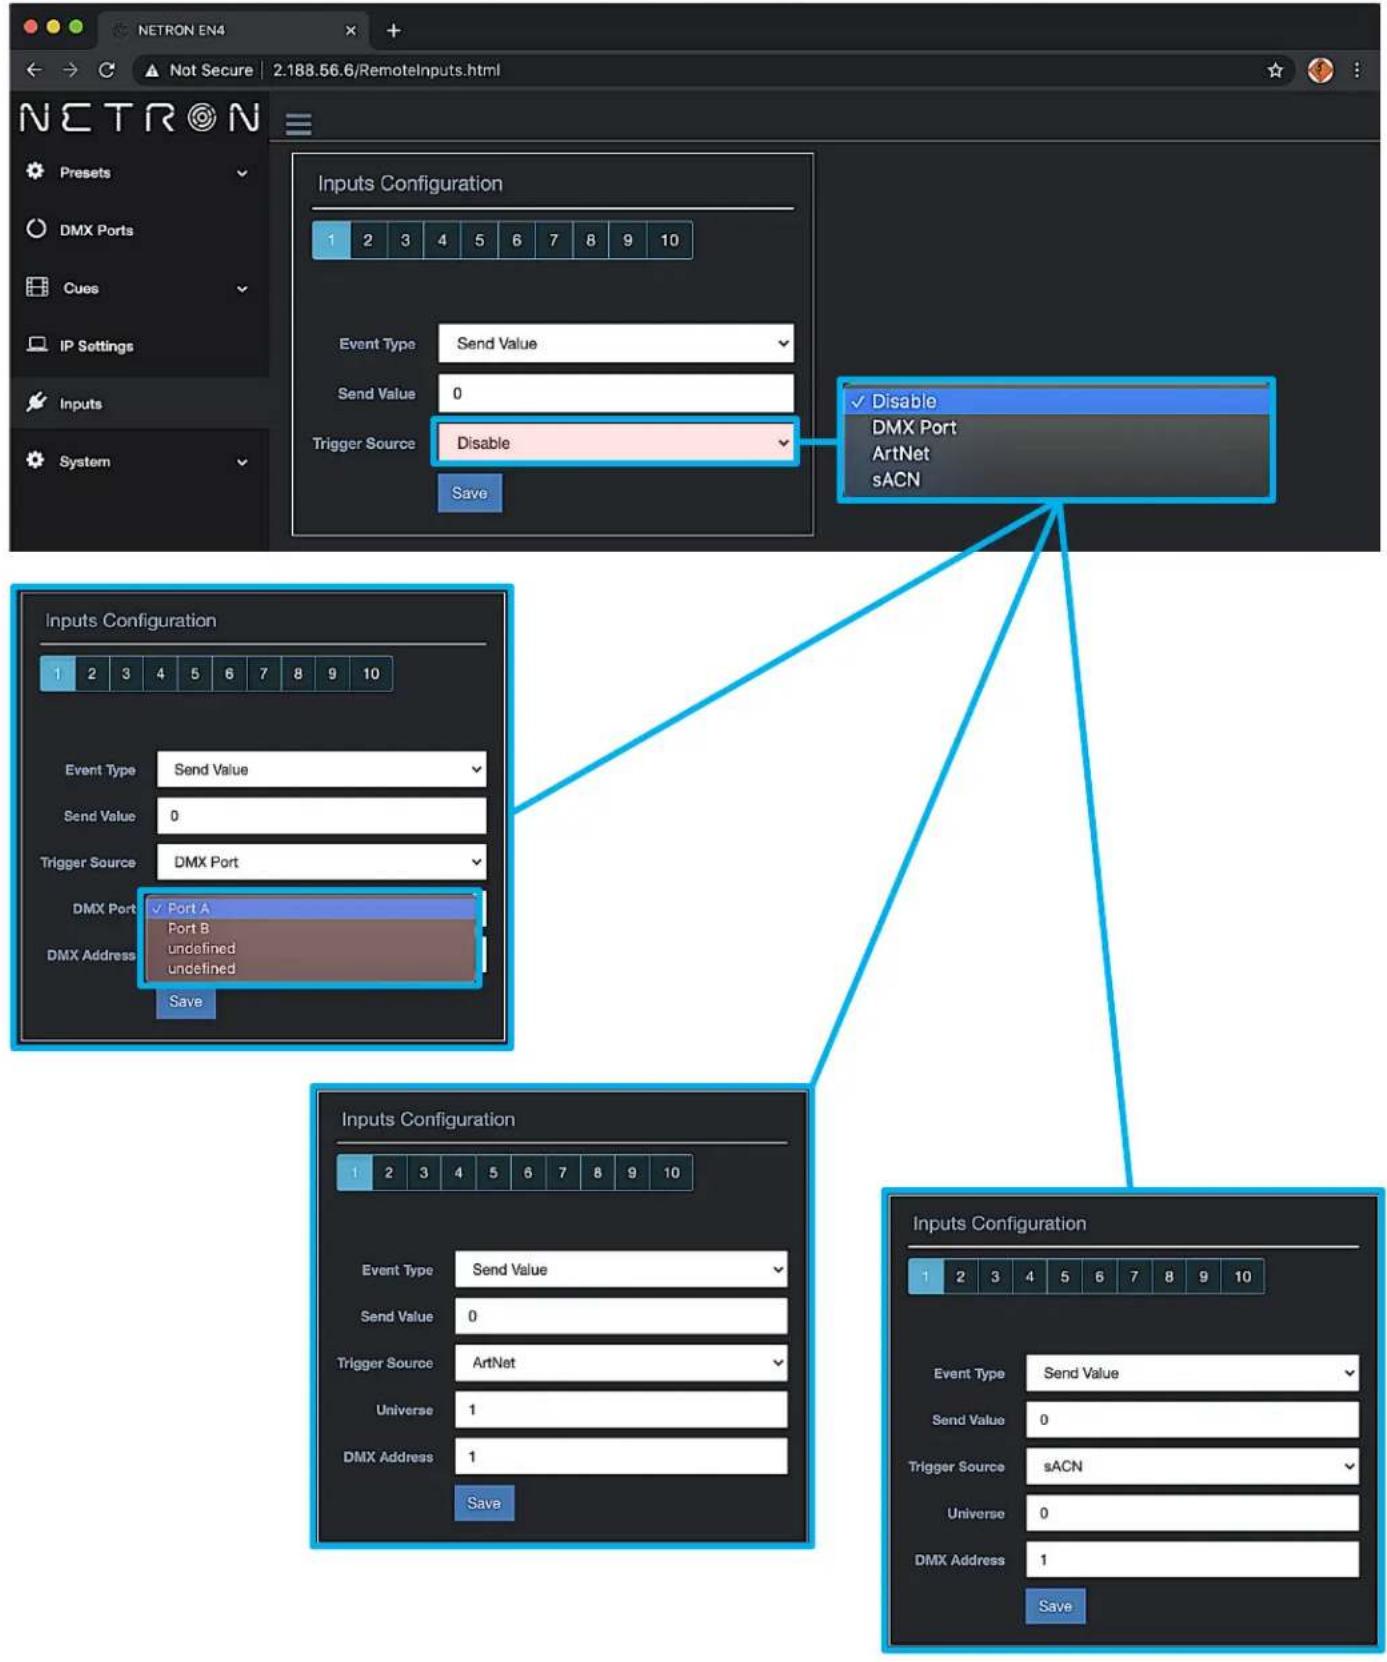
The device supports ten remote assignments that can trigger specific actions like recalling a cue or preset. These events are recalled using local contact closures, DMX In, or a specific EtherDMX Universe Address.
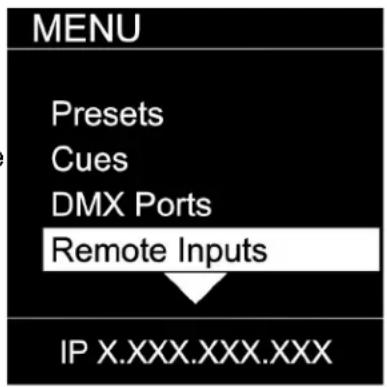
| SUB MENU | OPTIONS / VALUES | DESCRIPTION | |||
| MENU | Cue | 1 – 99 | Recall a specific cue number | ||
| Input 1Input 2Input 3Input 4[GDBW] | Cue Mode | Trigger | The cue is activated, and all times and links are processed even if the contact is opened again | ||
| Toggle | The cue is activated, and all times and links are processed only if the contact is closed. Once toggle is opened, device will assume DMX traffic or No DMX status. This allows to alternate between two cues for example with the toggle switch. | ||||
| Netron Preset | a,b,c,... | Recalls this Netron preset when the contact is closed | |||
| IP X.XXX.XXX.XXX | User Preset | 1 – 10 | Recalls this user preset when contact is closed | ||
 | Disable DMX | Stops all DMX output for as long as contact is closed | |||
| Send Value | 0 – 255 | Sends specific DMX value on all ports for as long as contact is closed | |||
Input 1Input 2Input 3Input 4 | Source | disabled | Input is disabled | ||
| DMX Port | 1 – xx | Use DMX Port. Port must be set as Input | |||
| Art-Net | Art-Net Trigger | ||||
| sACN | sACN Trigger | ||||
| Universe | Set Universe for remote trigger | ||||
| IP X.XXX.XXX.XXX | Address | Set DMX Address for remote trigger | |||
DMX Map for Remote Trigger
Inputs can be remotely activated over DMX, Art-Net, or sACN. The input is activated if the DMX value is at the value shown below.
| Value | Action |
| 0 – 10 | Idle |
| 11 – 20 | Input 1 |
| 21 – 30 | Input 2 |
| 31 – 40 | Input 3 |
| 41 – 50 | Input 4 |
| 51 – 60 | Input 5 |
| 61 – 70 | Input 6 |
| 71 – 80 | Input 7 |
| 81 – 90 | Input 8 |
| 91 – 100 | Input 9 |
| 101 – 110 | Input 10 |
| 111 – 255 | Idle |
MENU: VIEW AND TEST
This Netron device provides a variety of tools right from the fro display to monitor and test the system. Colors indicate changing values.
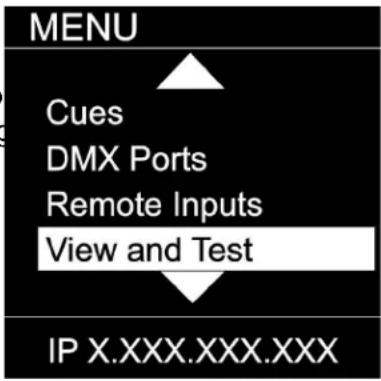
| SUB MENU | OPTIONS / VALUE | Description | ||
| DMX View | View | Port 1 – 4 | View the DMX values of a specific port | |
| Range | From: 1 – 512 | default 1 | ||
| To: 1 – 512 | default 512 | |||
| Start Monitor | Start Monitoring Values. Use Encoder to dial to the desired DMX address. Push Encoder to change display readout style (Grid, List, Address) | |||
| MENU | Art-Net View | Universe | 1 – 32767 | View a specific Art-Net Universe |
| Range | From: 1 – 512 | default 1 | ||
| To: 1 – 512 | default 512 | |||
| DMX View | Start Monitor | Start Monitoring Values. Use Encoder to dial to the desired DMX address. Push Encoder to change display readout style (Grid, List, Address) | ||
| Art-Net View | ||||
| sACN View | ||||
| DMX Port Test | ||||
| IP X.XXX.XXX.XXX | sACN View | Universe | 1 – 32767 | View a specific sACN Universe |
| Range | From: 1 – 512 | default 1 | ||
| To: 1 – 512 | default 512 | |||
| Start Monitor | Start Monitoring Values. Use Encoder to dial to the desired DMX address. Push Encoder to change display readout style (Grid, List, Address) | |||
| IP X.XXX.XXX.XXX | sACN View | Output | Port 1 – 4 | Send generator values on specific port |
| All Ports | Send generator values on all ports | |||
| Range | From: 1 – 512 | default 1 | ||
| To: 1 – 512 | default 512 | |||
| Speed | 1 – 10, Manual | Select the speed of generator | ||
| sACN View | Universe | 1 – 32767 | Select Art-Net Universe | |
| DMX Port Test | Range | From: 1 – 512 | default 1 | |
| Art-Net Test | To: 1 – 512 | default 512 | ||
| sACN Test | Speed | 1 – 10, Manual | Select the speed of generator | |
| IP X.XXX.XXX.XXX | sACN View | Universe | 1 – 32767 | Select sACN Universe |
| Range | From: 1 – 512 | default 1 | ||
| To: 1 – 512 | default 512 | |||
| Speed | 1 – 10, Manual | Select the speed of generator | ||
MENU: VIEW AND TEST (continued)
Monitor (DMX View, Art-Net View, sACN View)
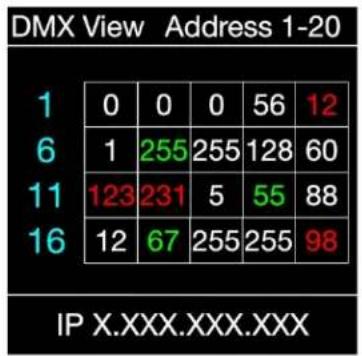
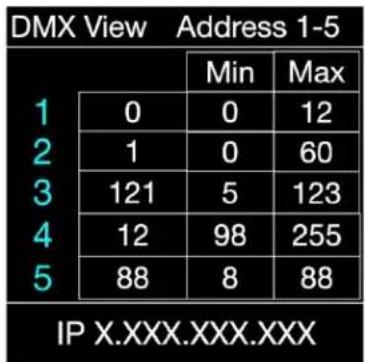
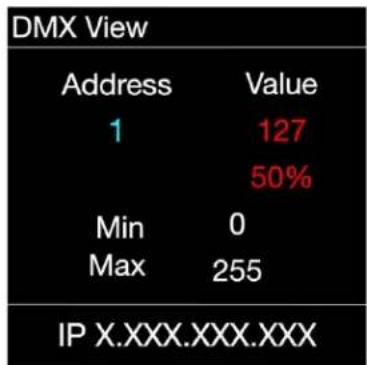
The monitoring options are helpful to find faults, or simply watch incoming traffic. Three styles are available by clicking the encoder wheel. Dial the wheel to change the display to the desired address, and exit the monitor with the back button.
DMX Test Display - Grid
The color coding helps to quickly identify changing DMX values.
Cyan: DMX Address
Green: Value Decreased
Red: Value Increased
White: Value stable (after 10 seconds)
heatmap
DMX View Address 1-20 | | 1 | 0 | 0 | 0 | 56 | 12 | |---|---|---|---|---|---|---| | 1 | 6 | 1 | 255 | 255 | 128 | 60 | | 6 | 11 | 123 | 231 | 5 | 55 | 88 | | 16 | 16 | 12 | 67 | 255 | 255 | 98 | IP X.XXX.XXX.XXX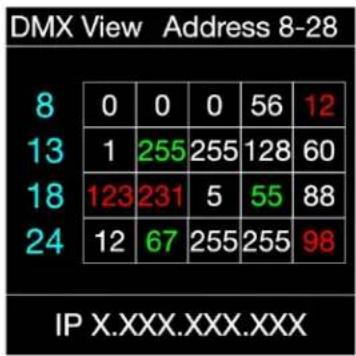
heatmap
DMX View Address 8-28 | | 0 | 0 | 0 | 56 | 12 | |---|---|---|---|---|---| | 8 | 0 | 0 | 0 | 56 | 12 | | 13 | 1 | 255 | 255 | 128 | 60 | | 18 | 123 | 231 | 5 | 55 | 88 | | 24 | 12 | 67 | 255 | 255 | 98 | IP X.XXX.XXX.XXX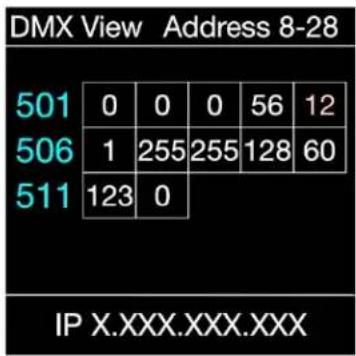
DMX Test Display - Line
DMX Test Display - Address
MENU: IP ADDRESS
Set the desired device IP address in this menu. Every Netron device is set to a unique 2.x.x.x address at the factory, and after every reset to this default. For Art-Net systems, it should never be necessary to adjust this IP. Any custom address and subnet can be assigned so the node can operate within any network environment. EP4 devices default to 2.0.0.1 as they contain no display. Configure each EP4 to a unique IP using the web remote access.
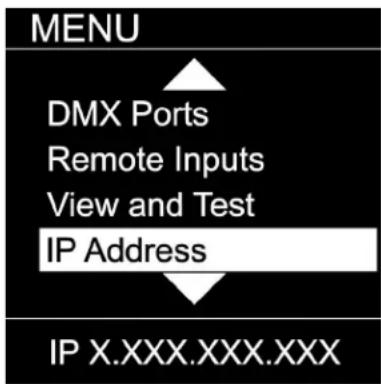
| SUB MENU | OPTIONS / VALUES | Description | ||
| DHCP IP | The device waits for a DHCP server address | |||
| After 30s it assigns itself a unique 169.254.x.x address but continues to monitor DHCP server requests. | ||||
| DHCP IP | Automatic 2.x | The device is set to a unique 2.x.x.x Address, Subnet 255.0.0.0 | ||
| Automatic 2.X | Automatic 10.x.x | The device is set to a unique 10.x.x.x Address, Subnet 255.0.0.0 | ||
| Automatic 10.x Custom IP | Custom IP | IP Address | x.x.x.x | Assign any desired numbers. The device does not check the validity of address and subnet values. |
| Subnet Mask | x.x.x.x | |||
| IP X.XXX.XXX.XXX | Automatic 192.x | The device is set to a unique 192.x.x.x Address, Subnet 255.0.0.0 | ||
| Automatic 172.x | The device is set to a unique 172.x.x.x Address, Subnet 255.0.0.0 | |||
MENU: SYSTEM
This menu contains all the settings to configure and manage the device.
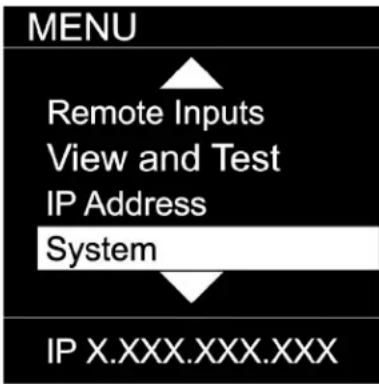
| SUB MENU | OPTIONS / VALUES | Description | |||
| Device Name | 12 Character Label | Set a device name | |||
| Device ID | 0 - 999 | Set an optional device ID | |||
| MENU | Display | DisplayTimeout | Disable | Display stays on indefinitely | |
| Device Name | 10s, 30s, 1m, 5m, 10m | Display goes dark after this time | |||
| Device ID | Screen Brightness | 1-10 | Adjust the brightness of the internal display | ||
| Device ID | LED Brightness | 0-10 | Adjust the brightness of the front LEDs. Set to 0 to disable them. | ||
| Display | Home Screen | Device Info | The display shows port and connectivity information | ||
| ArtNet Start | Cue Browser | The display shows a list of stored cues which can easily be browsed and started by the encoder wheel | |||
| IP X.XXX.XXX.XXX | ArtNet Start | Universe 0Universe 1 | Universe 1 is sent to Art-Net 0-0Universe 1 is sent to Art-Net 0-1 | ||
| MENU | Lock Device | PIN: 000 (011) | Lock | Disable | The device does not require a pin |
| Timeout | The device asks for a pin after the display times out | ||||
 | ManualLock:000(011) | Lock / Unlock | Lock the device immediately | ||
| Lock Device | |||||
| Startup | |||||
| Signal Loss | Cue | Run a specific Cue at startup | |||
| Wait for Data | No DMX is sent until valid data is received for the ports.The last incoming values continue to be sent on the ports until the time is expired. Once timeout has completed the device will perform one of the below actions | ||||
| Backup Config | |||||
| [7T86] | |||||
| IP X.XXX.XXX.XXX | Send 0 | ||||
| MENU | Signal Loss | Hold Last Look | Forever, 0s, 10s, 30s,1m, 5m, 10m, 60m | The last incoming values continue to be sent on the ports until the time is expired. Once timeout has completed the device will perform one of the below actions. | |
 | Fade to 0 | 0-60s (30s) | Crossfade to DMX 0. Set to 0s for instant out. | ||
| Signal Loss | Cue | No Cue | Start Cue X | ||
| Backup Config | Disable DMX | DMX traffic is turned off on all ports | |||
| Backup Config | Save Config | Config Saved | Save current configuration including all cue data | ||
| Backup Config | Load Config | Config Loaded | Reload configuration. Backups can be exported and imported from the web interface | ||
| RDM Processing | All Disable | Disables RDM processing on the device | |||
 | All Enable | Enables all RDM processing on the device | |||
| IP X.XXX.XXX.XXX | Factory Reset | Pin: 000 (011) | Confirm | Device will be reset to factory defaults.Yes/No | Reset the device to factory default. It will reload NETRON Preset 1. All cues are deleted, and all settings are set to default. |
| Pin: 000 (007) | Confirm | Device will be reset to User Preset 1.Yes/No | Reset the device to User Preset 1. | ||
MENU: INFORMATION
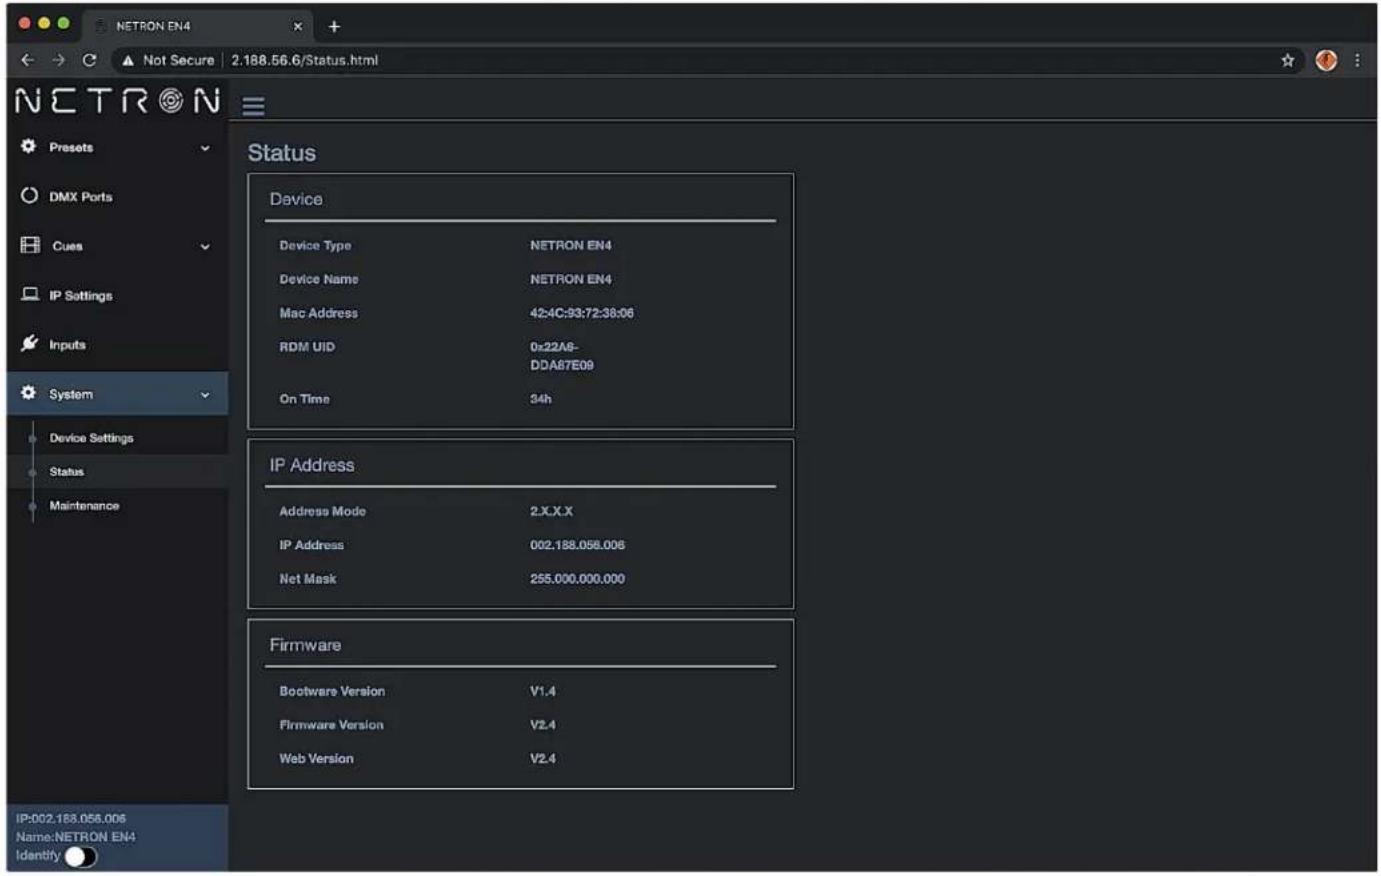
This menu provides information about the device.
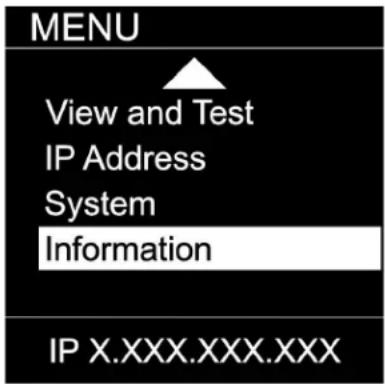
| SUB MENU | OPTIONS / VALUES | DESCRIPTION | |
| Software Version | Boot SW V#Firmware: V# | Display the current software version | |
| MENU | |||
| Software VersionProduct On TimeMAC AddressRDM UID | Product On Time | Time: XXXXX(H) | Total time the device has been powered on. |
| IP X.XXX.XXX.XXX | MAC Address | x:x:x:x:x:x | Displays MAC address |
| RDM UID | UID1: xxxx | Displays product RDM UID. | |
Ensure the device and a computer are do not share IP address, but are in the same IP address range and connected.
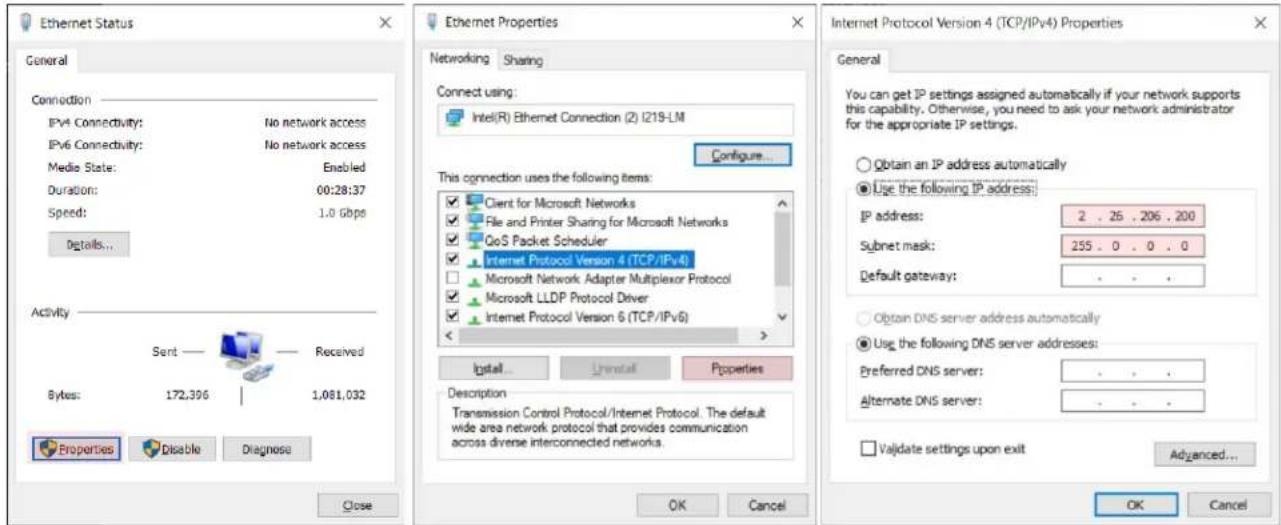
PC Configuration Sample: Please note your PC configuration results may vary.
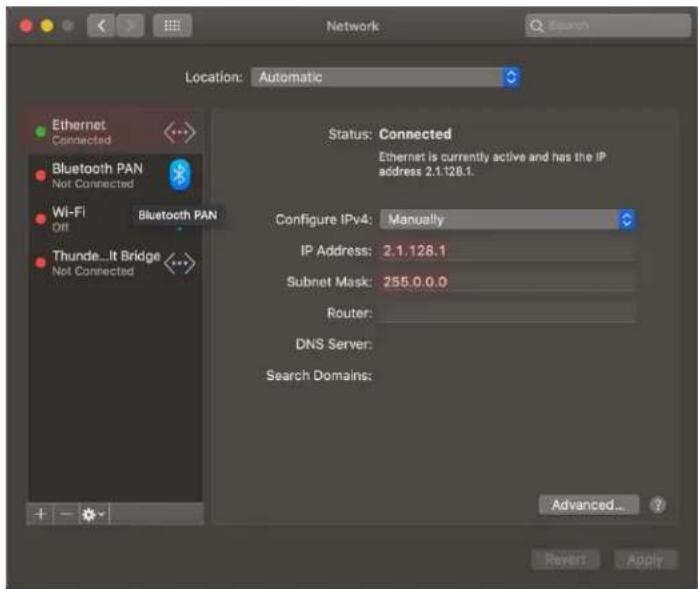
MAC OS Configuration Sample: Please note your MAC OS configuration results may vary.
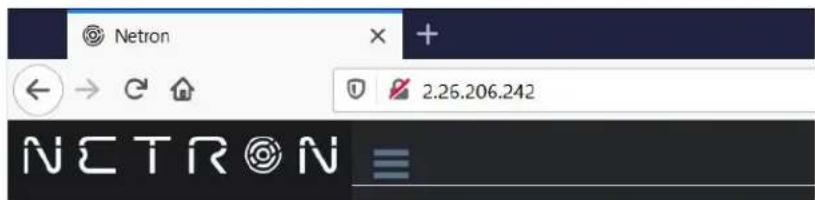
Browser Sample: Enter the device IP address into a web browser to access the device page.
WEB REMOTE MENU: HOMEPAGE
Please note that Netron devices are not compatible with Microsoft Internet Explorer. Also, the antivirus software AVAST is known to block important communication with NETRON, and must be disabled for the web interface and firmware updates to function.
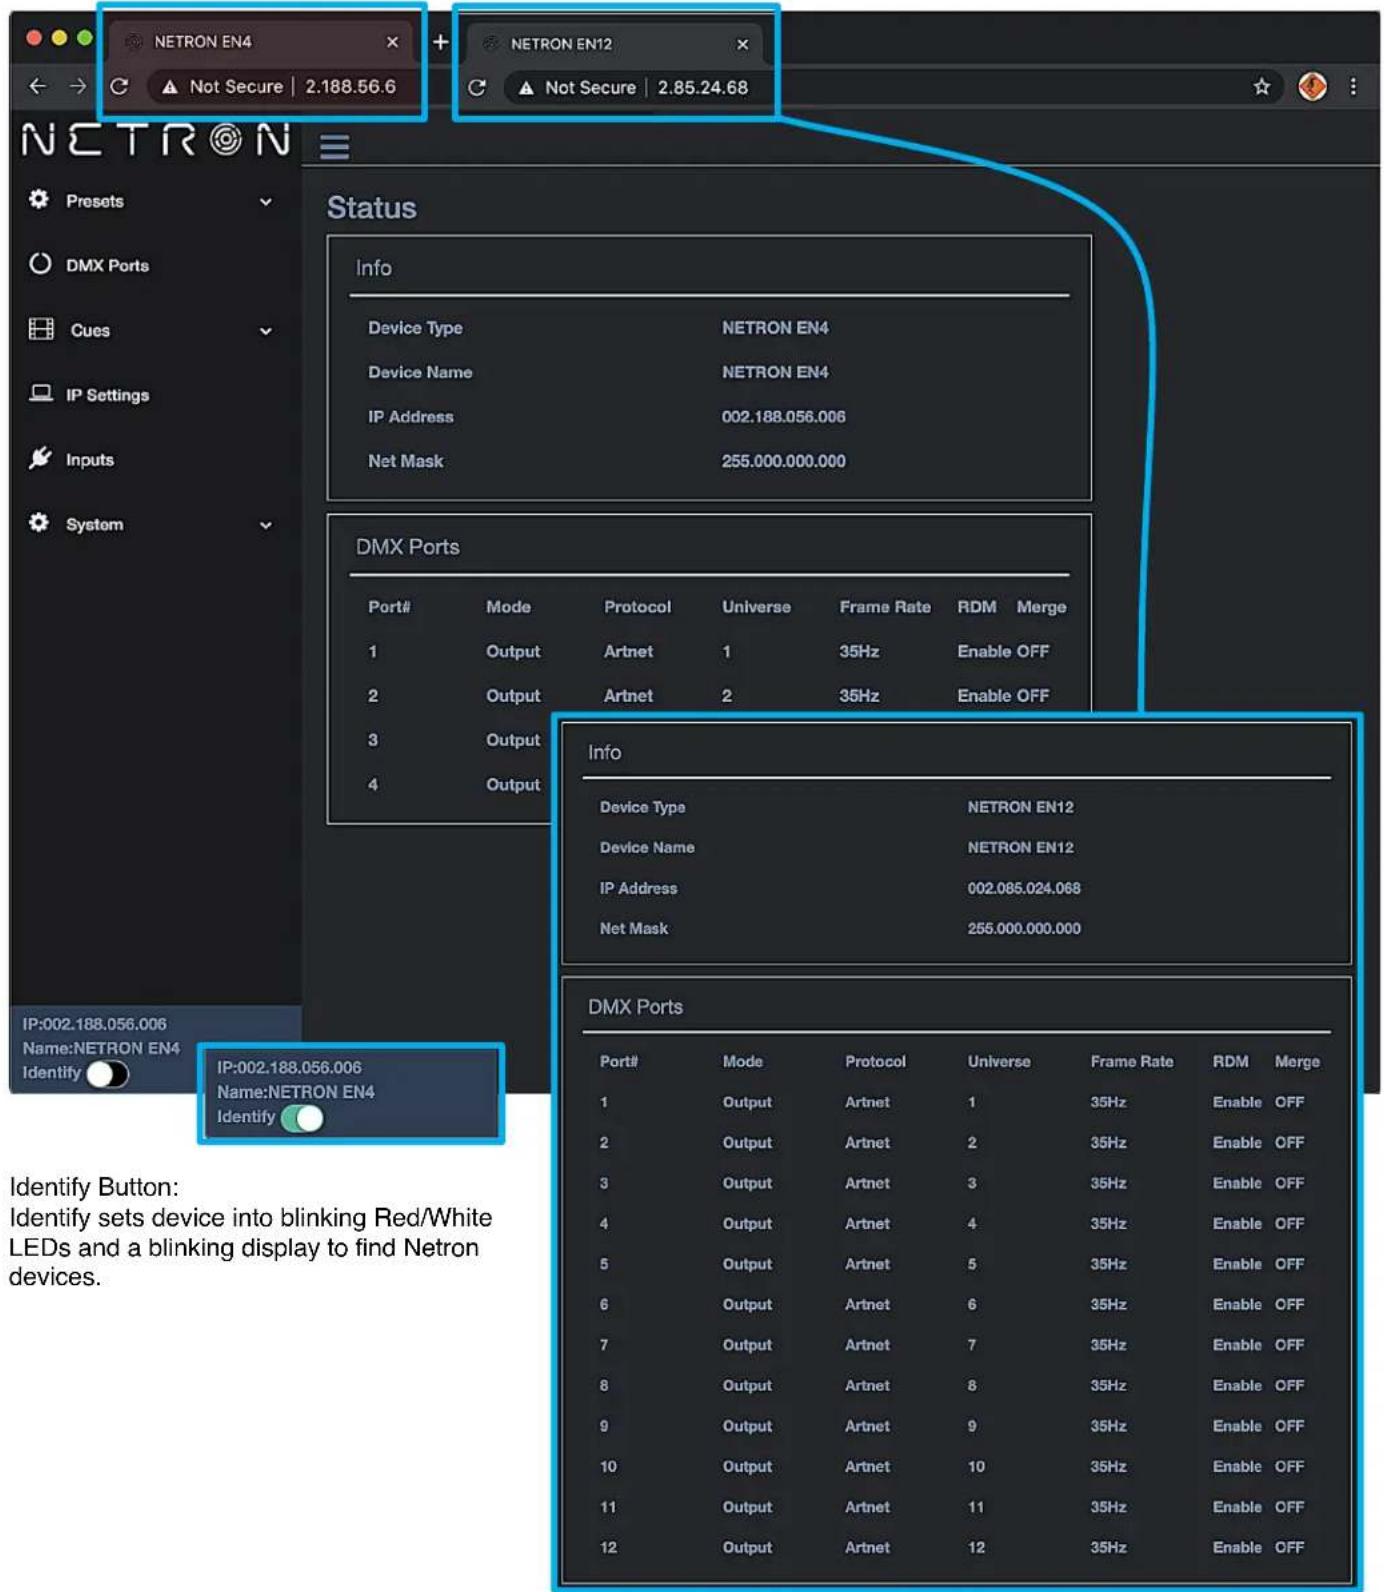
WEB REMOTE MENU: PRESETS - NETRON PRESETS
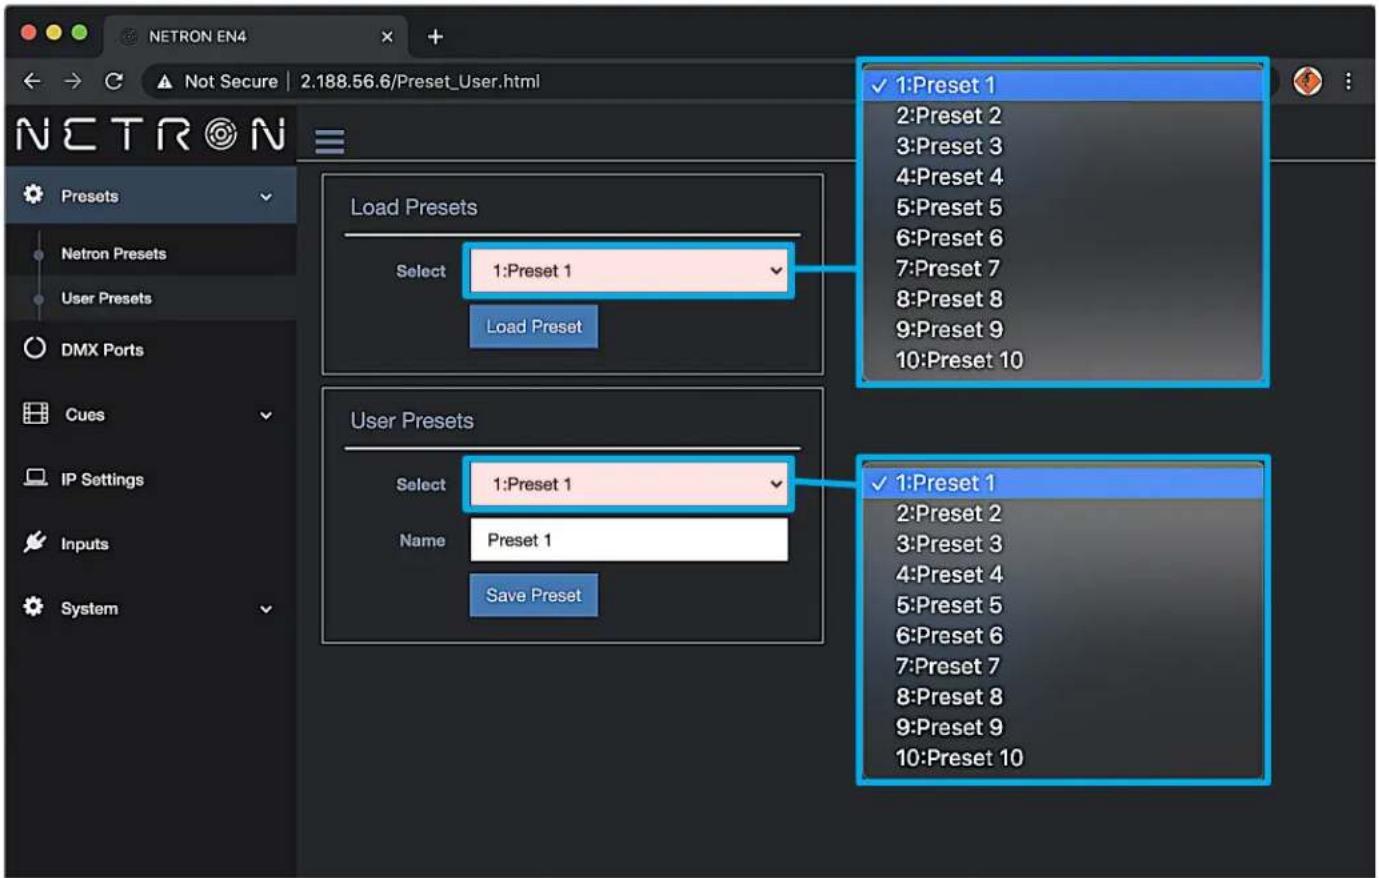
WEB REMOTE MENU: PRESETS - USER PRESETS
WEB REMOTE MENU: DMX PORTS - OUTPUT
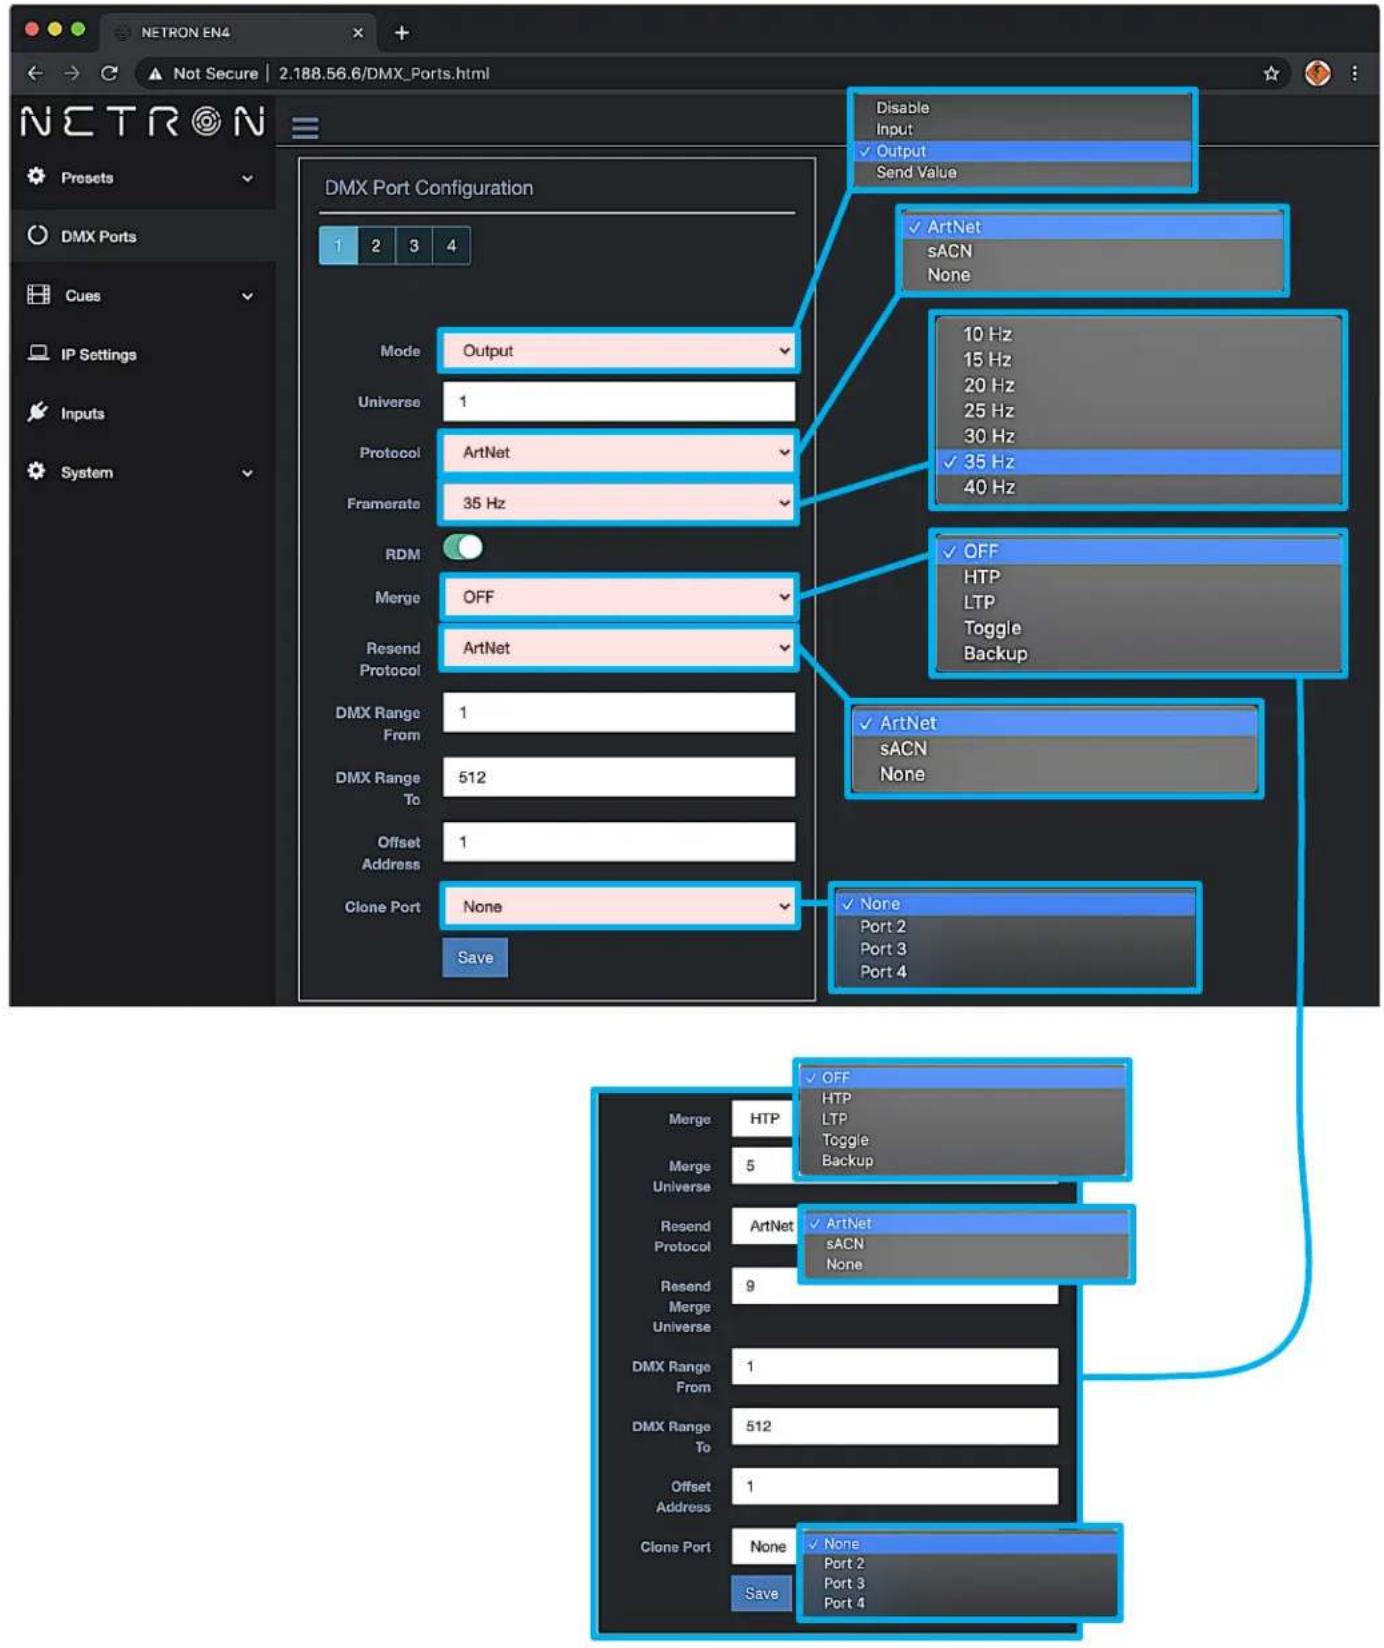
WEB REMOTE MENU: DMX PORTS - DISABLE
WEB REMOTE MENU: DMX PORTS - INPUT
WEB REMOTE MENU: DMX PORTS - SEND VALUE
WEB REMOTE MENU: CUES - RUN CUES
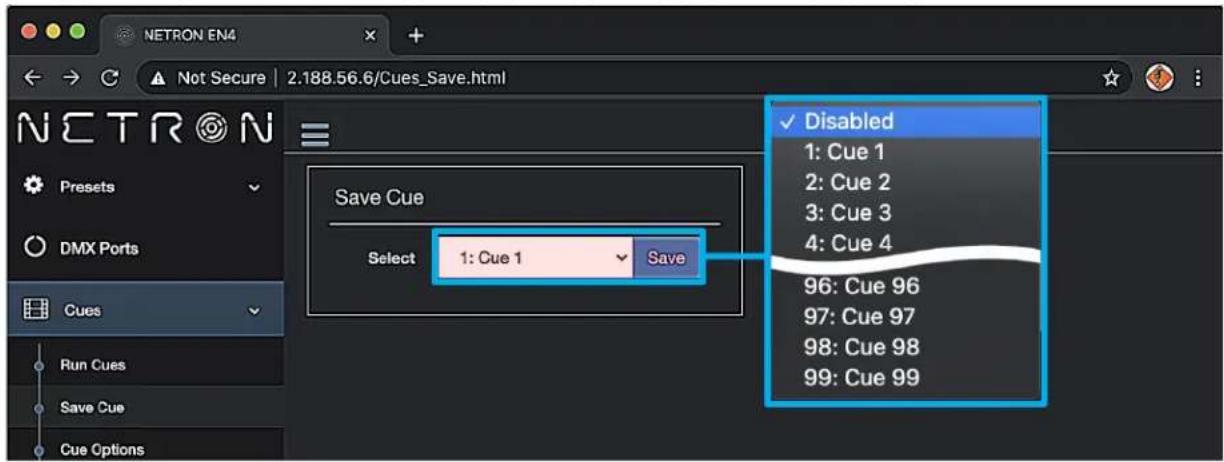
WEB REMOTE MENU: CUES - SAVE CUES
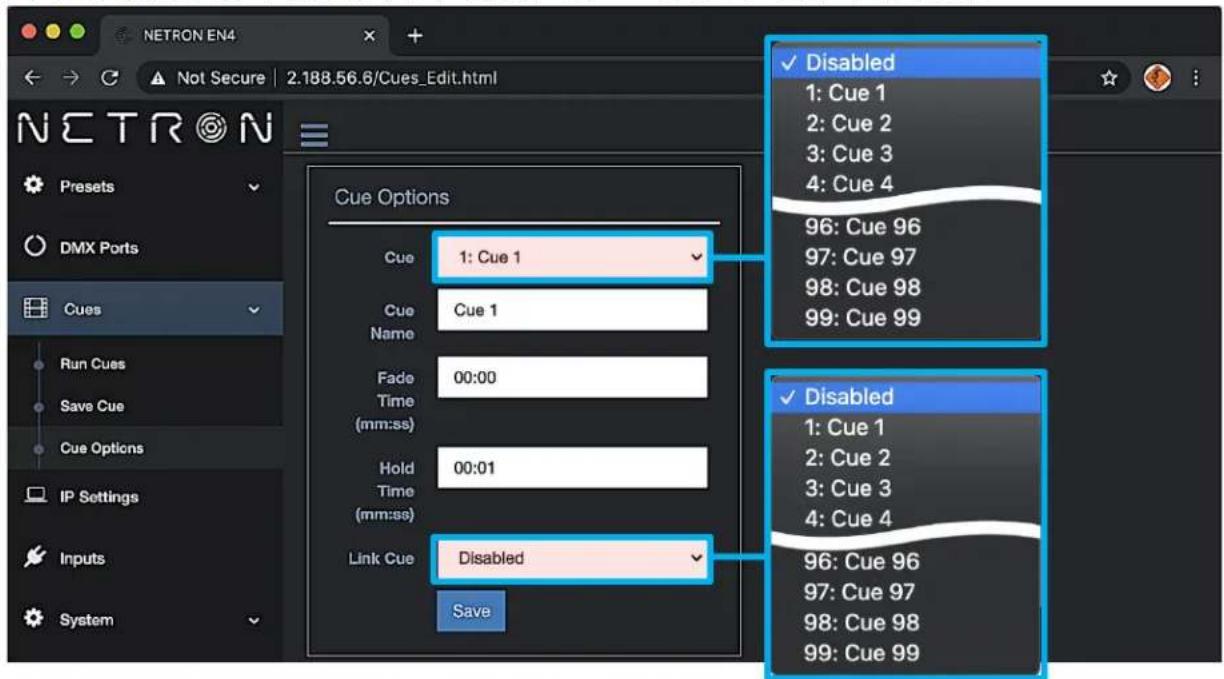
WEB REMOTE MENU: CUES - CUE OPTIONS
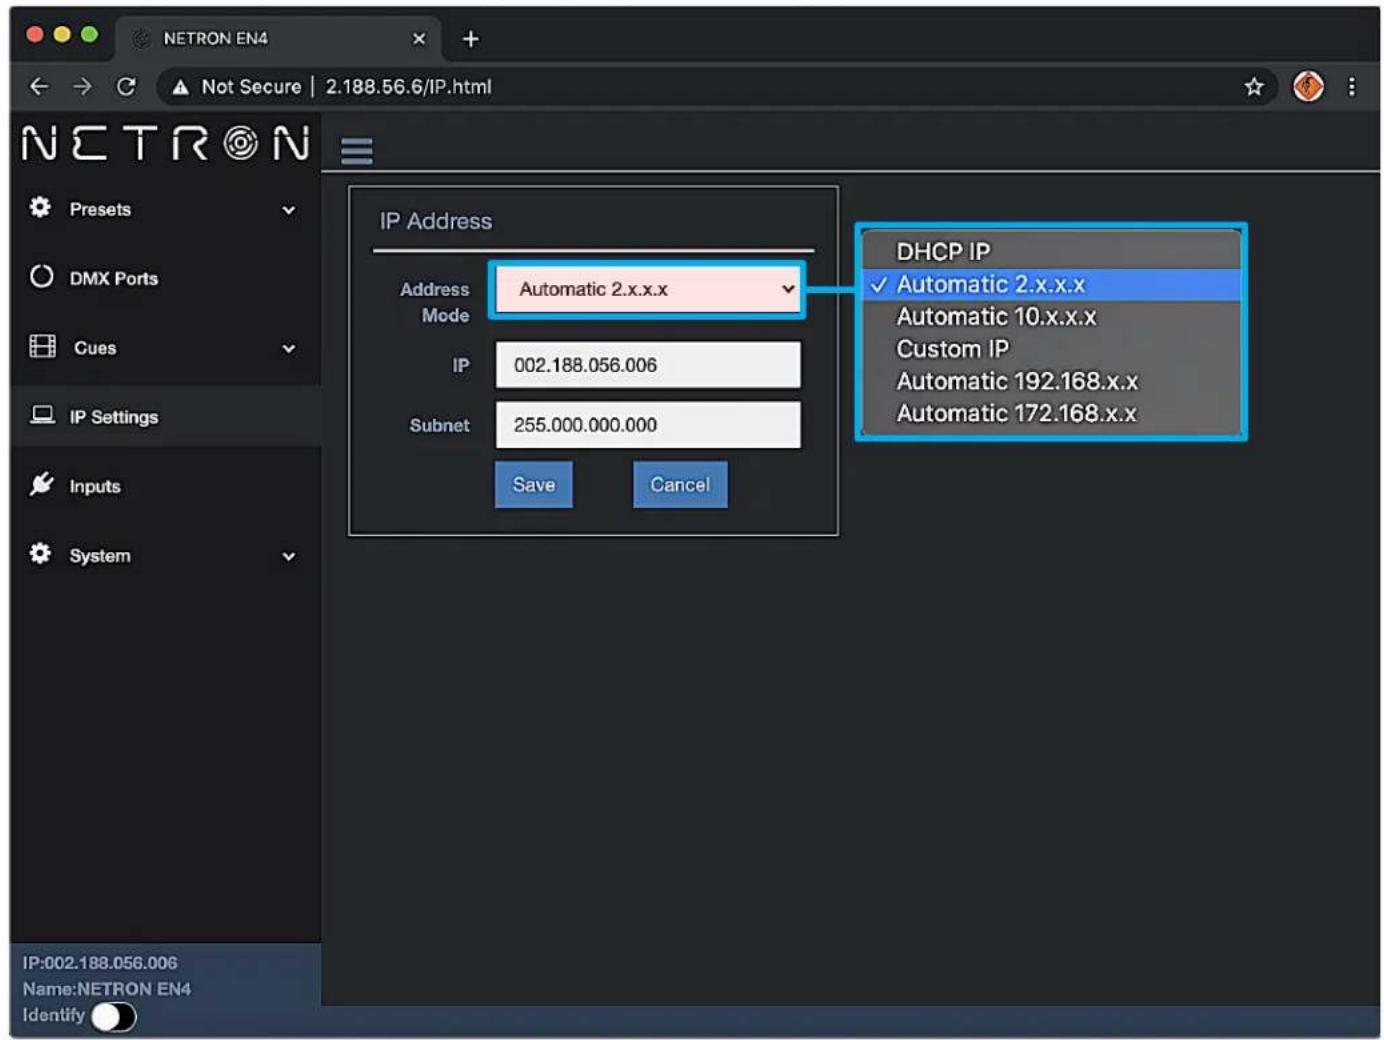
WEB REMOTE MENU: IP SETTINGS
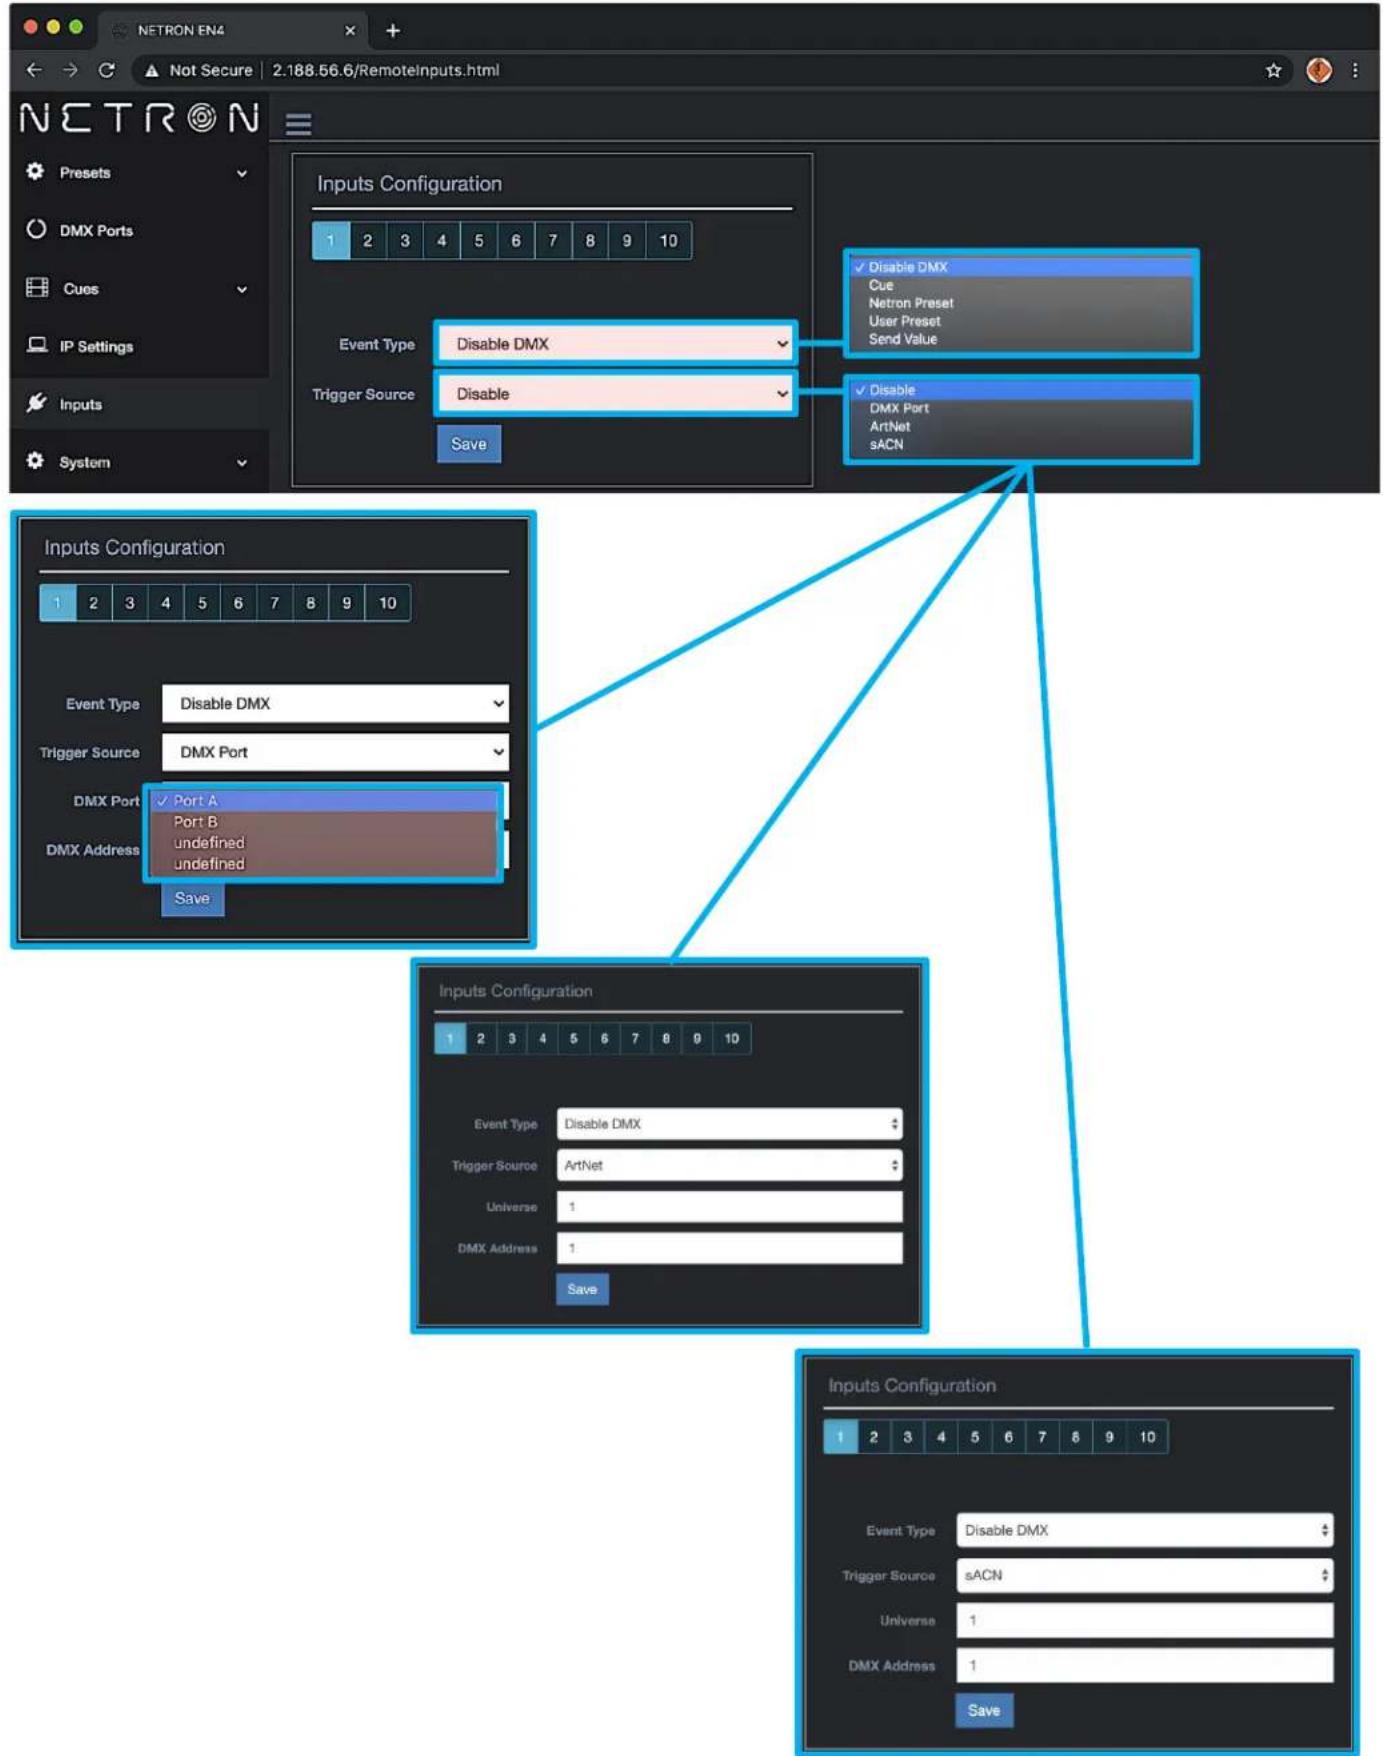
WEB REMOTE MENU: INPUTS - DISABLE DMX
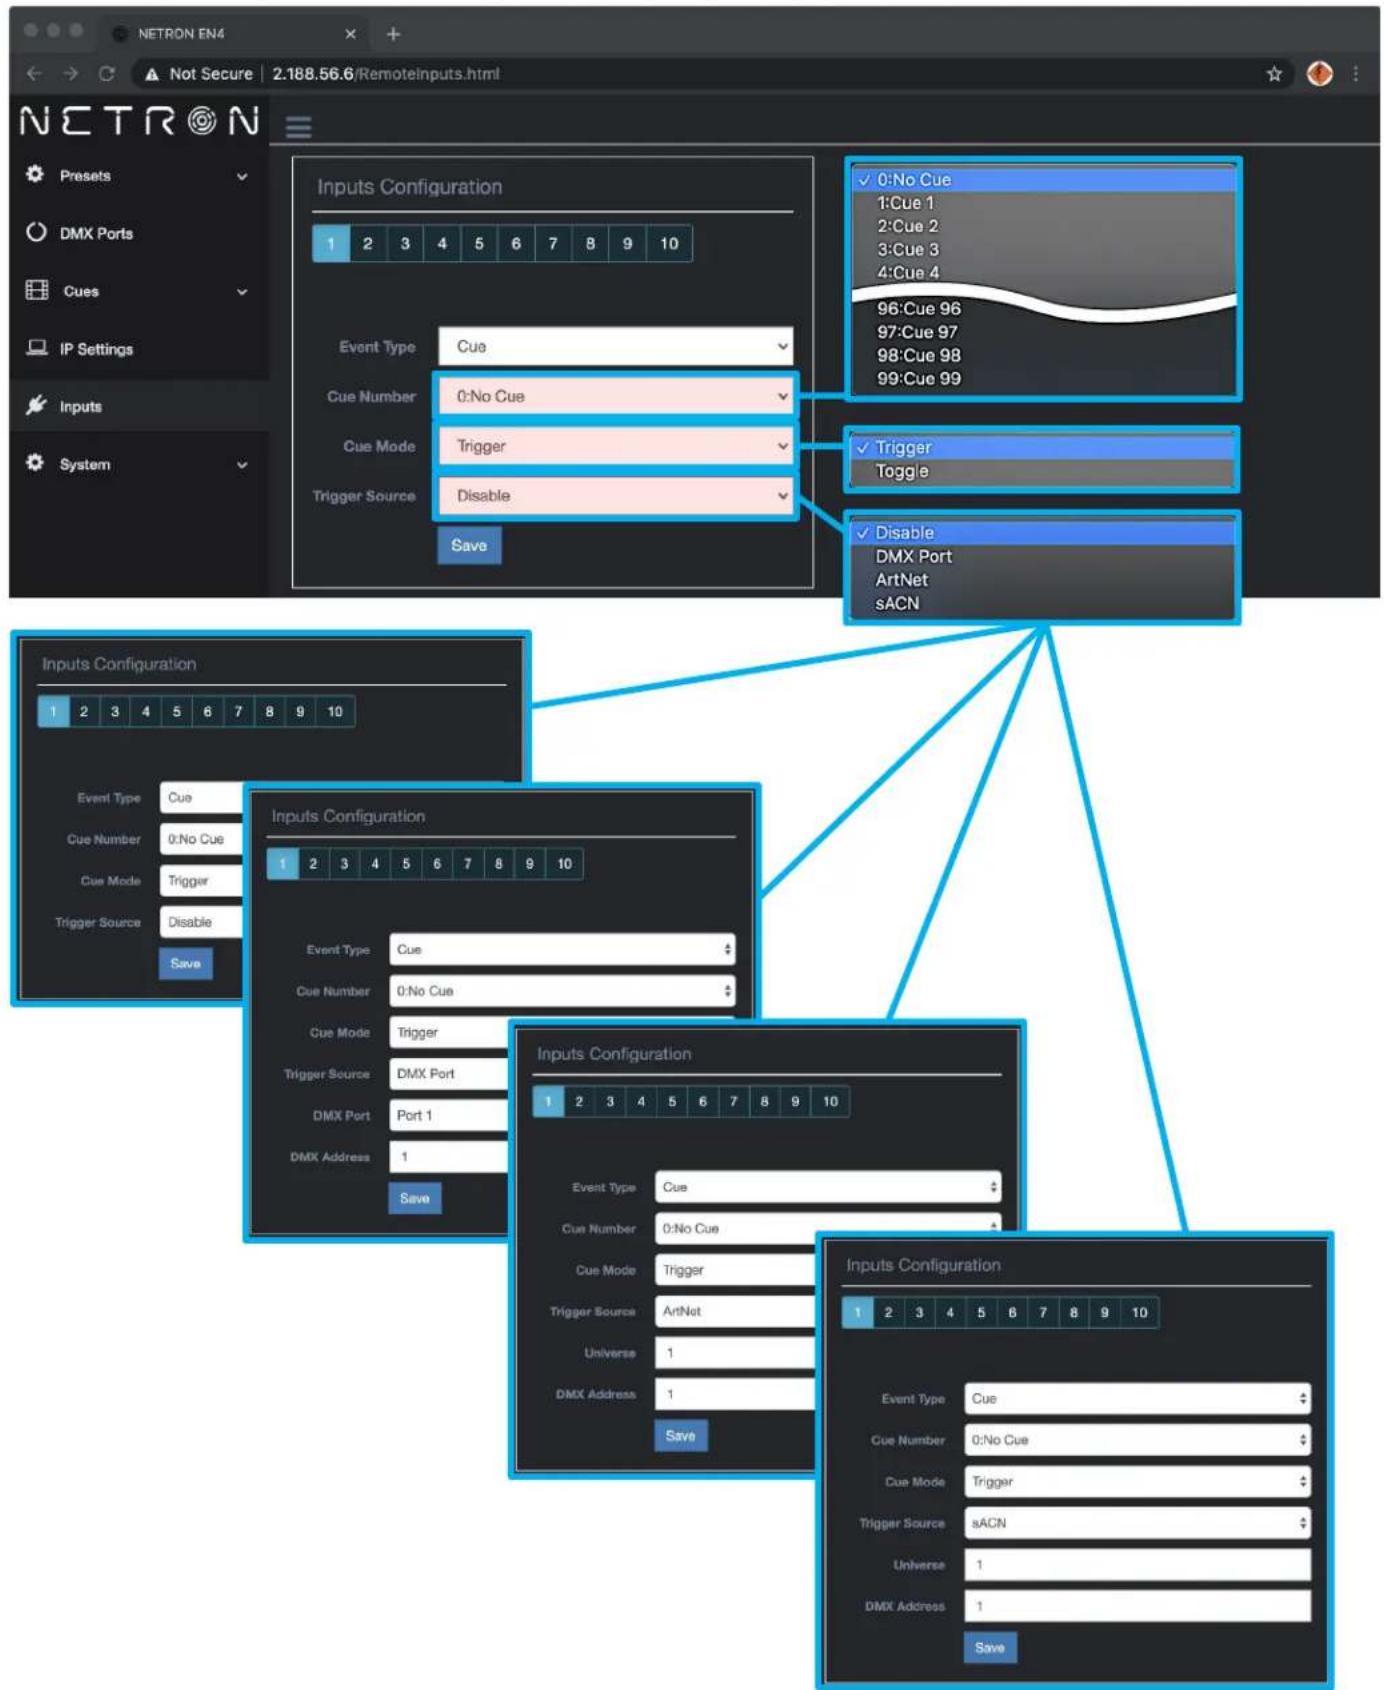
WEB REMOTE MENU: INPUTS - CUE
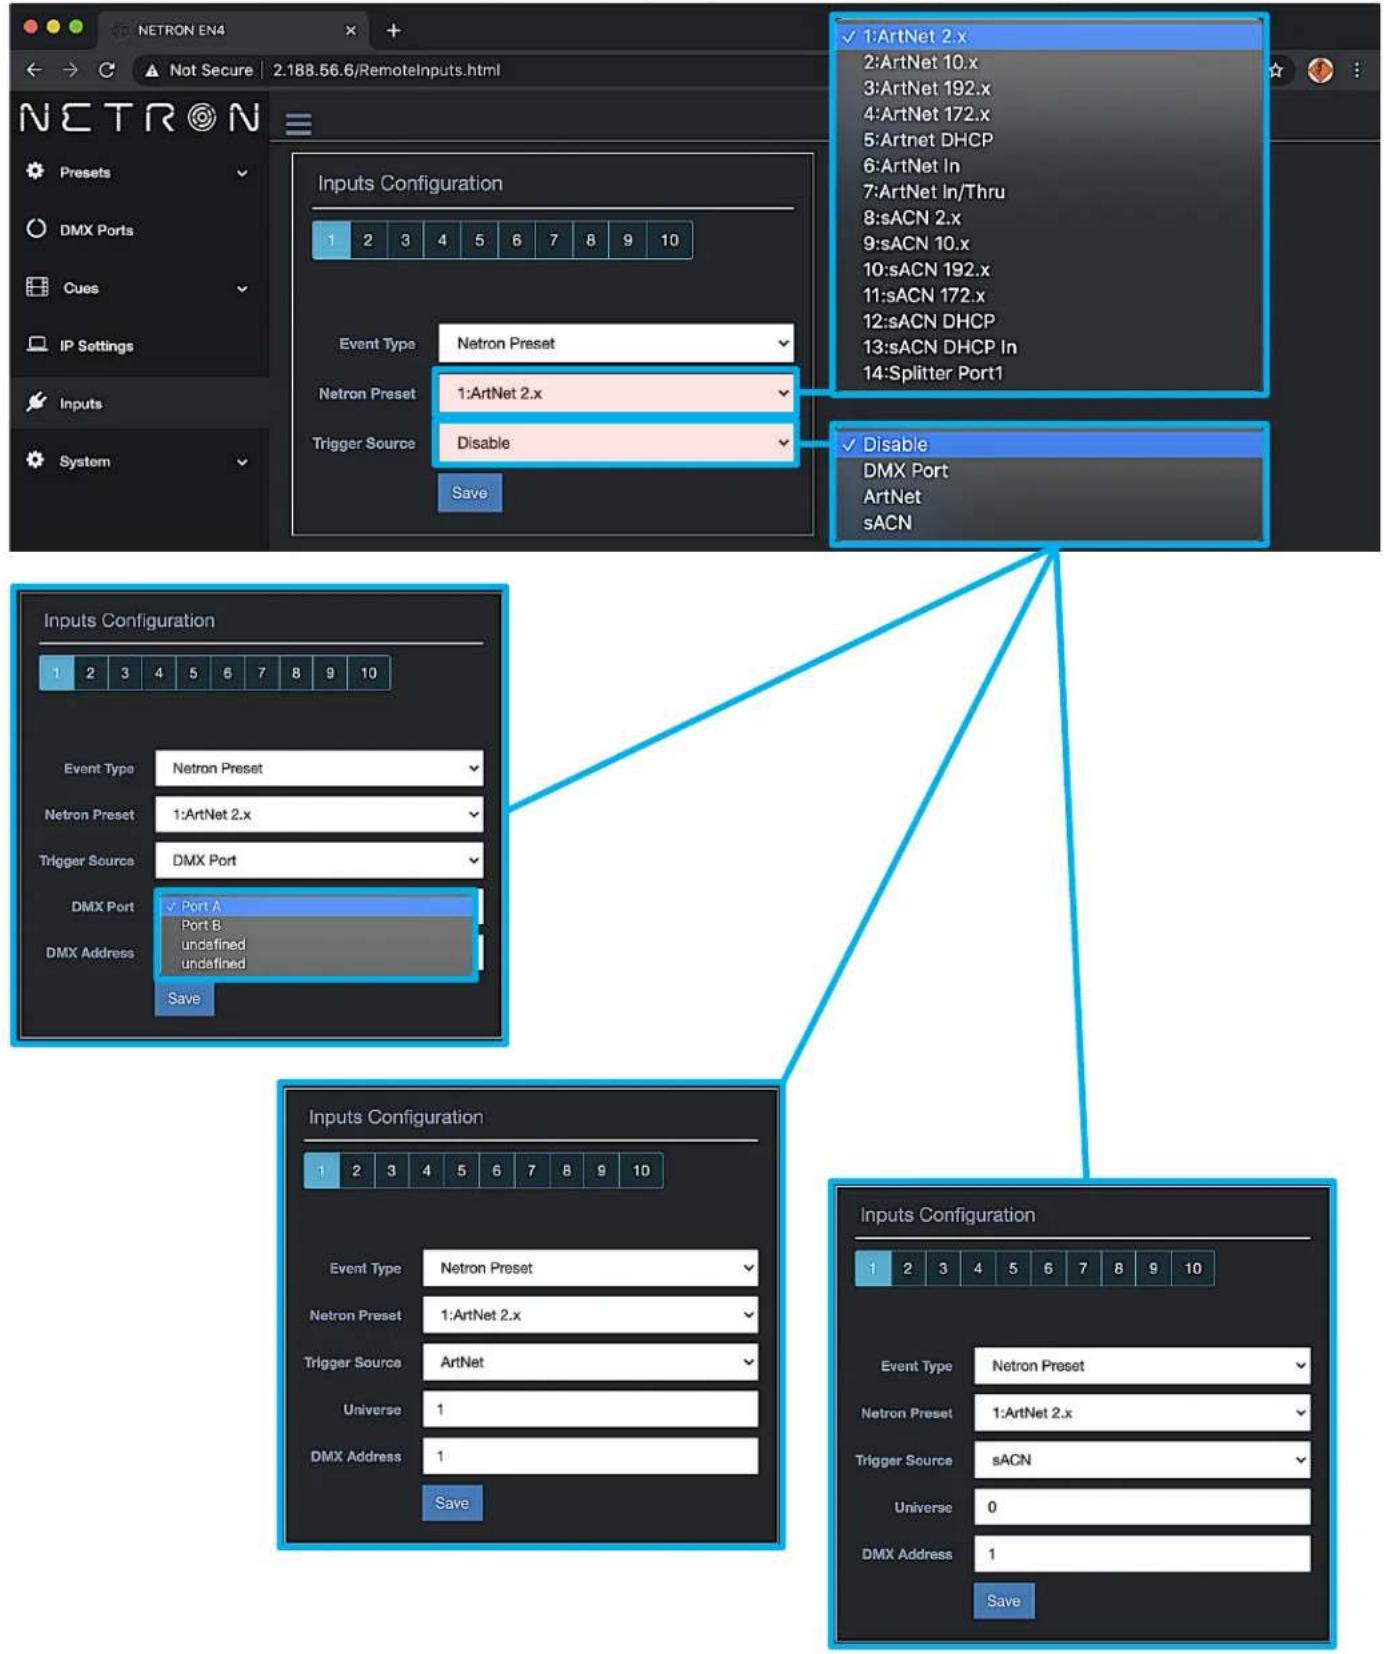
WEB REMOTE MENU: INPUTS - NETRON PRESETS
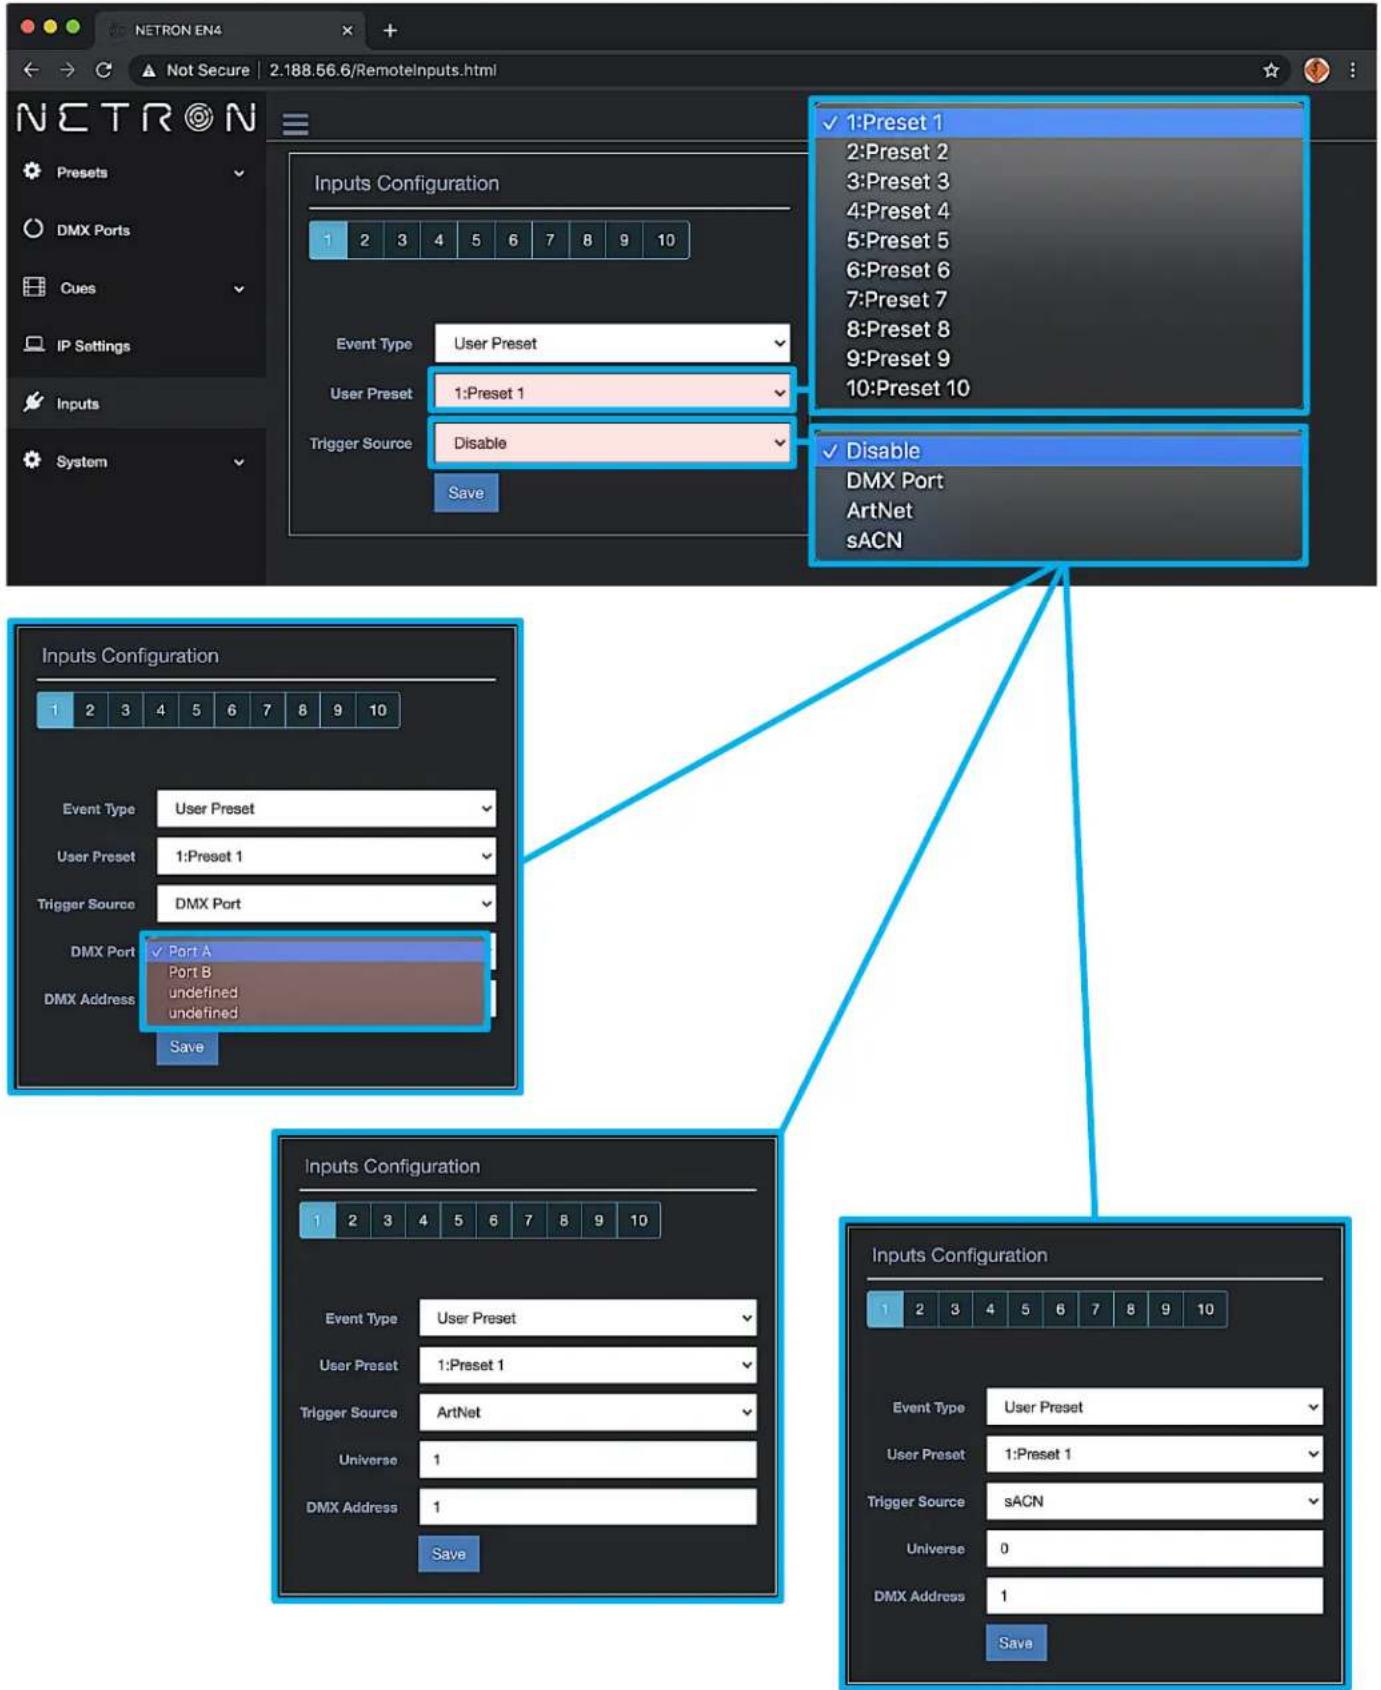
WEB REMOTE MENU: INPUTS - USER PRESETS
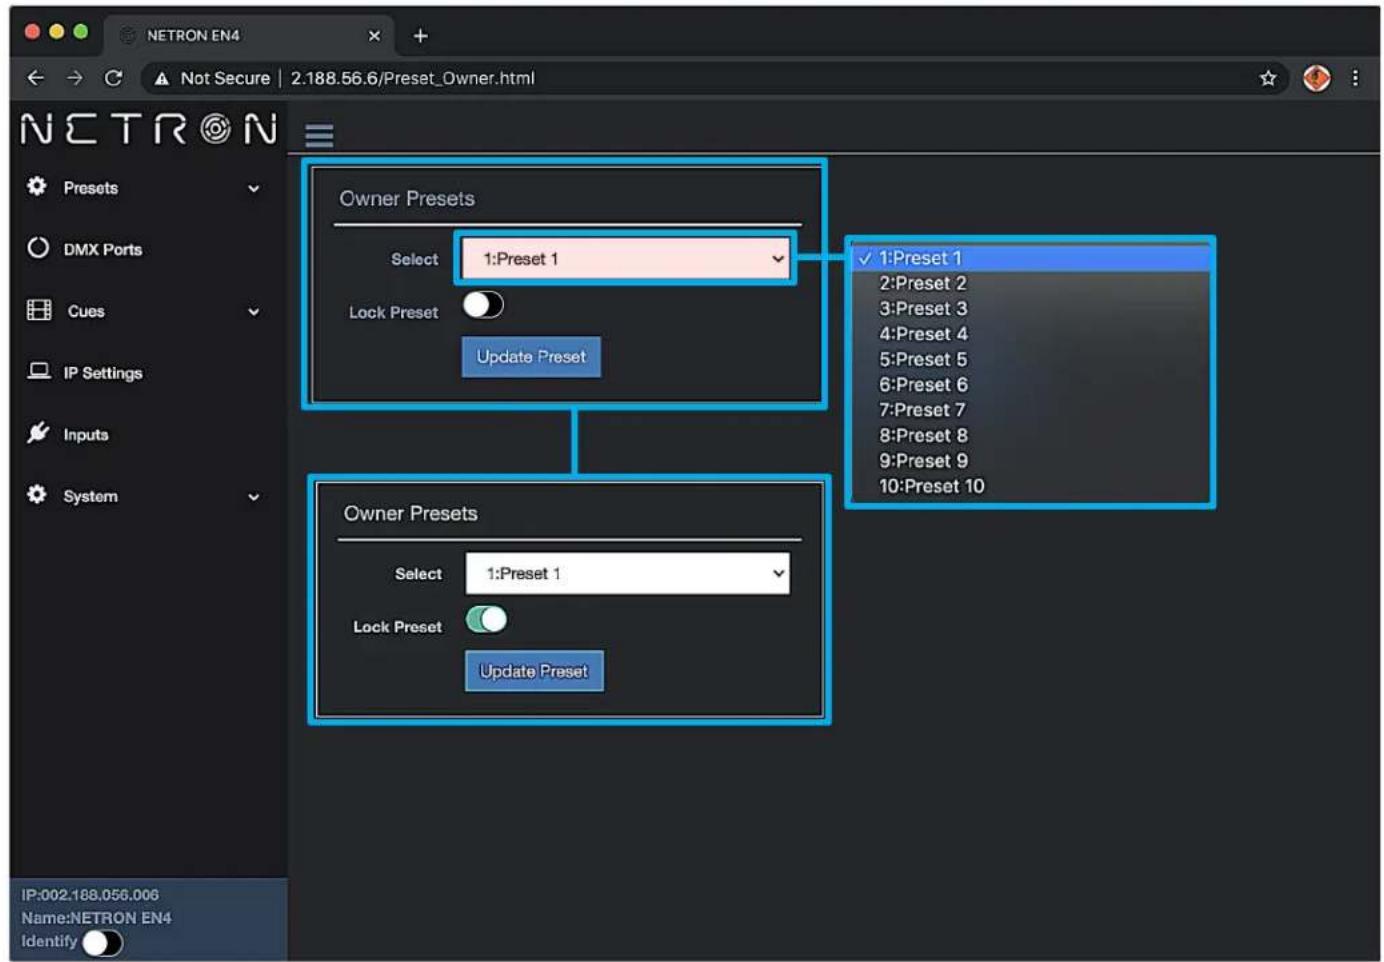
WEB REMOTE MENU: INPUTS - OWNER PRESET
Device owners can lock any of the user presets so they cannot be overwritten. This is especially useful for rental equipment to ensure a company specific preset can be reloaded and is not edited by any user.
To access this function, use the specific URL IP_Address/Preset_Owner.htm, which is not part of the main interface. Select the desired preset, activate the lock, and Update to confirm. Owner presets are indicated with a lock symbol in the display.
WEB REMOTE MENU: INPUTS - SEND VALUE
WEB REMOTE MENU: SYSTEM - DEVICE SETTINGS
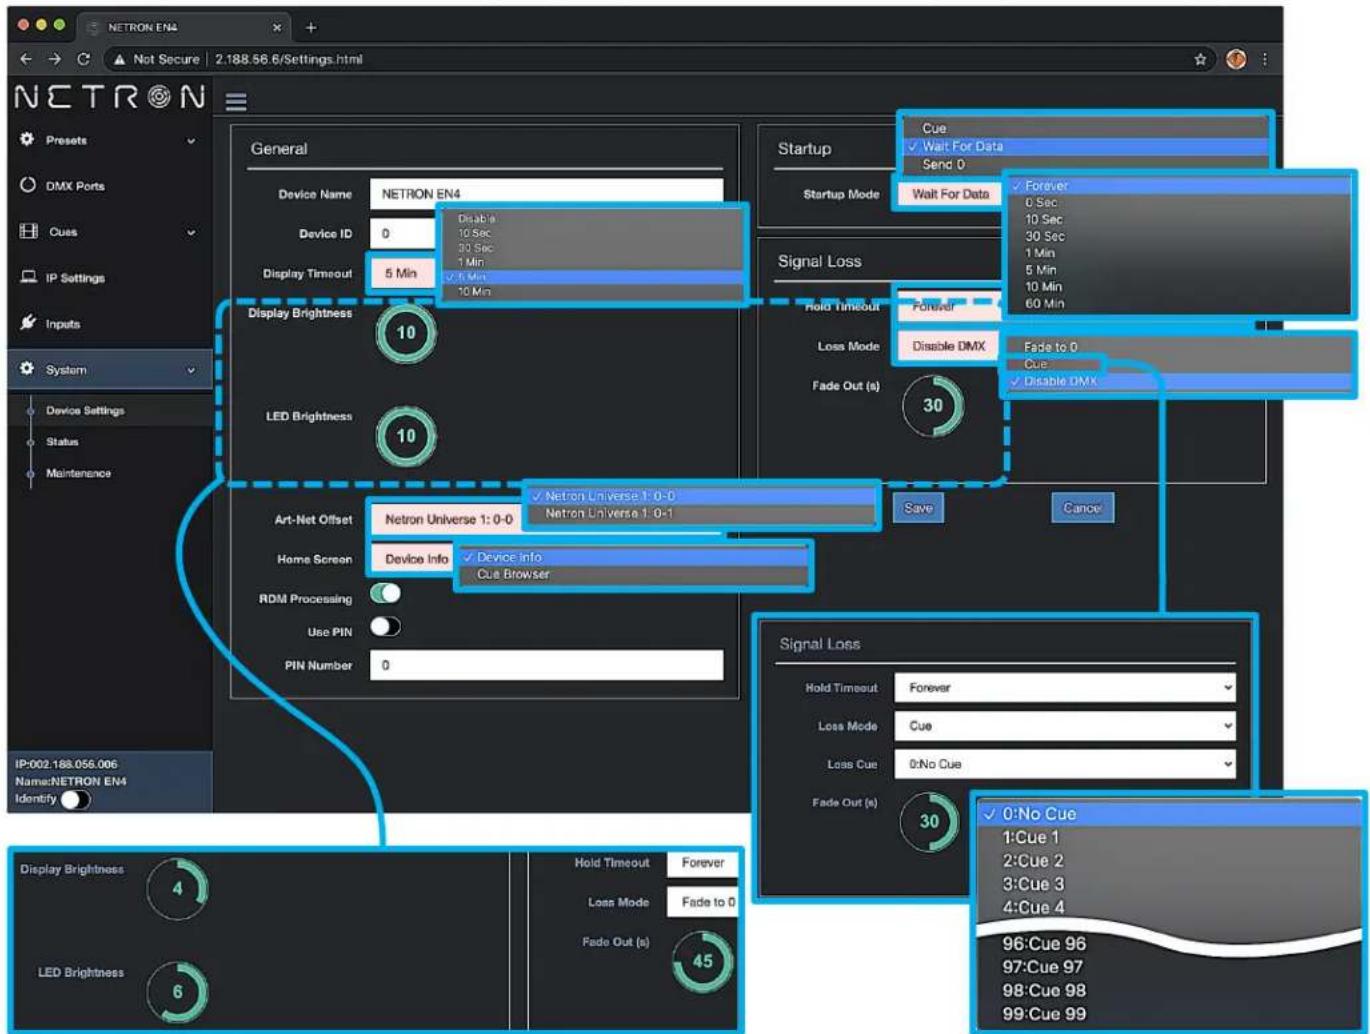
Use cursor to click and drag around to desired time.
WEB REMOTE MENU: SYSTEM - STATUS
FIRMWARE UPDATES
Updates for improved performance or to add additional features may be available on www.obsidiancontrol.com.
To install a firmware upgrade, connect to the device through a web browser and open the System - Maintenance menu.
Always back up the configuration first. Export to a file using the web interface.
- Upload the firmware file, then update the device. Do not power cycle during the update process. The update is provided in two files, Display NFW and Web IMG. Both need to be installed for a full upgrade.
- Reset to factory defaults.
- Reload the configuration file from the web interface.
Confirm the upgrade is installed from the Information/Software Version Display.
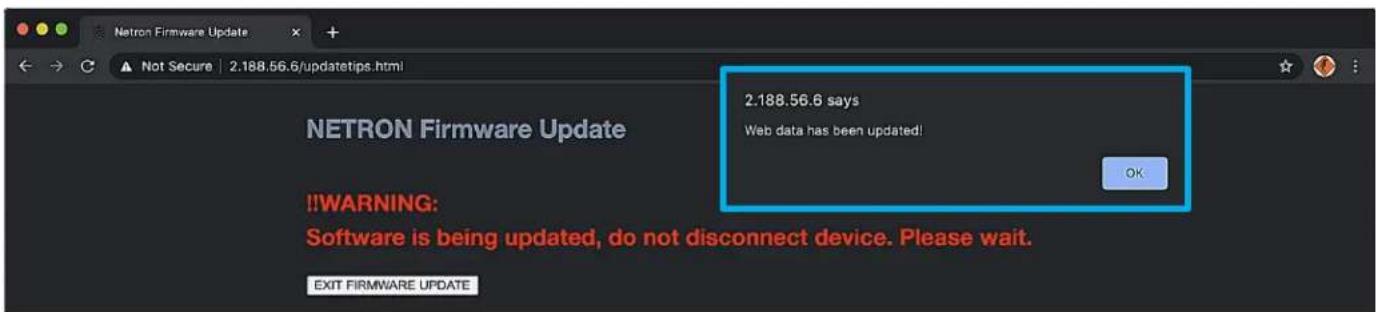
If the system menu is corrupt and or cannot be opened, then the Netron device can be updated from an IP address e.g. 2.26.206.242/update.html.
Each device has a unique Device IP Address; the one shown is only an example.
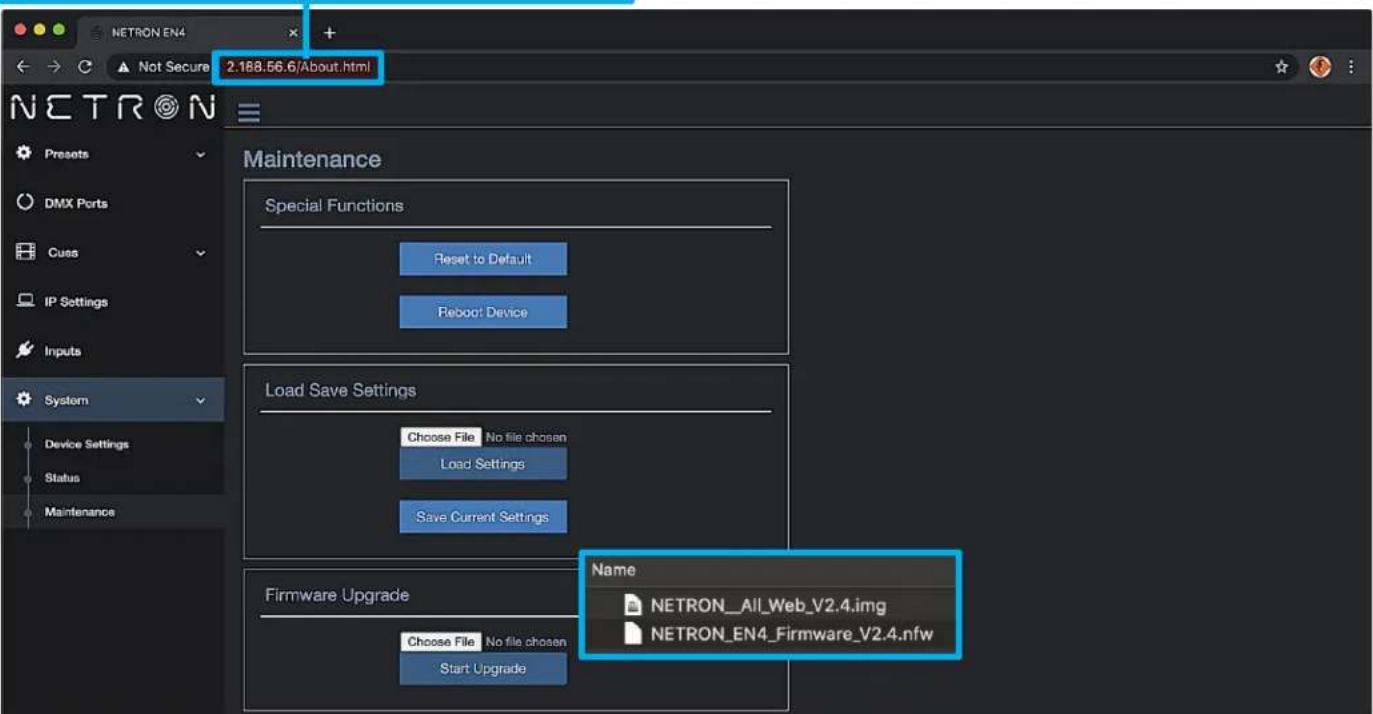
Each device has a unique Device IP Address; the one shown is only an example.
- OBSIDIAN CONTROL SYSTEMS B.V.
- Art-Net
- CONTENTS
- CUSTOMER SUPPORT
- OVERVIEW
- INTRODUCTION
- KEY FEATURES
- SOFTWARE AND OPERATION
- CONNECTIONS
- DMX CONNECTIONS
- ETHERNET DATA CONNECTION
- CONNECTIONS: EN4 FRONT & REAR PANELS
- FRONT CONNECTIONS
- REAR CONNECTIONS
- CONNECTIONS: EN12 (FRONT & REAR PANELS)
- CONNECTIONS: EP4 (FRONT & REAR PANELS)
- MENU: NAVIGATION
- MENU: HOME SCREEN
- MENU: PRESETS
- MENU: NETRON PRESETS
- MENU: CUES
- MENU: DMX PORTS
- MENU: REMOTE INPUT
- DMX Map for Remote Trigger
- MENU: VIEW AND TEST
- MENU: VIEW AND TEST (continued)
- Monitor (DMX View, Art-Net View, sACN View)
- DMX Test Display - Grid
- MENU: IP ADDRESS
- MENU: SYSTEM
- MENU: INFORMATION
- WEB REMOTE MENU: HOMEPAGE
- WEB REMOTE MENU: INPUTS - OWNER PRESET
- WEB REMOTE MENU: SYSTEM - STATUS
- FIRMWARE UPDATES
Brand : Obsidian
Model : Netron EN4
Category : Lighting