NDI20X - Security Camera Feelworld - Free user manual and instructions
Find the device manual for free NDI20X Feelworld in PDF.


| Product Type | PTZ Security Camera |
| Model | NDI20X |
| Brand | Feelworld |
| Image Sensor | 1/2.8-inch Progressive Scan CMOS |
| Optical Zoom | 20x |
| Digital Zoom | 12x |
| Maximum Resolution | 1920x1080 @ 60fps |
| Video Compression | H.265 / H.264 / MJPEG |
| NDI Support | NDI|HX3, NDI|HX2, Full NDI |
| Pan Range | 360° endless |
| Tilt Range | -30° to +90° |
| Power Supply | PoE+ (802.3at) or DC 12V 2A |
| Power Consumption | Max. 18W |
| Dimensions (W x H x D) | 180mm x 180mm x 210mm |
| Weight | 1.5 kg |
| Operating Temperature | -10°C to 50°C |
| Storage Temperature | -20°C to 60°C |
| IP Rating | IP66 (weatherproof) |
| Main Functions | PTZ control, 20x optical zoom, NDI streaming, auto tracking, preset positions, privacy masking |
| Care & Cleaning | Clean lens with soft dry cloth; avoid harsh chemicals; ensure power off before cleaning |
| Safety | Indoor/outdoor use; mount securely; use provided screws; avoid exposure to extreme heat |
| Spare Parts & Repairability | Contact Feelworld support for spare parts; repairs by authorized technicians only |
| General Information | Professional PTZ camera for live production, broadcasting, and surveillance |
Frequently Asked Questions - NDI20X Feelworld
User questions about NDI20X Feelworld
0 question about this device. Answer the ones you know or ask your own.
Ask a new question about this device
Download the instructions for your Security Camera in PDF format for free! Find your manual NDI20X - Feelworld and take your electronic device back in hand. On this page are published all the documents necessary for the use of your device. NDI20X by Feelworld.
USER MANUAL NDI20X Feelworld
natural_image
Line drawing of a cylindrical device mounted on a base, showing internal components and no text or symbols.User Manual
natural_image
Abstract network diagram with interconnected nodes and circles, no text or symbols presentContent
Declarations....3
Chapter 1 Your Product....5
1.1 In the Box....5
1.2 Product Overview....5
1.2.1 Product Model....5
1.2.2 Dimension....5
1.2.3 Main Features....6
Chapter 2 Install Your Product....8
2.1 Camera Interface Explanation....8
2.1.1 External Interface....8
2.1.2 Bottom Dial Switch....9
2.1.3 RS-232 Interface....9
2.2 Bracket Mount....10
Chapter 3 Use Your Product....13
3.1 Video Output....13
3.1.1 Power on initial configuration....13
3.1.2 Video Output....13
3.2 Remote Controller....14
3.2.1 Keys Instruction....14
3.2.2 Applications....15
3.3 Menu Setting....17
3.3.1 Main Menu....17
3.3.2 System Setting....17
3.3.3 Camera Setting....18
3.3.4 P/T/Z 21
3.3.5 Video Format.... 22
3.3.6 Version....22
3.3.7 Restore Default....23
3.4 Network Connection....23
3.4.1 Connecting Mode....23
3.5 IE Log In....25
3.5.1 Web client 25
3.5.2 Preview....26
3.6 Configuration.... 26
3.6.1 Local Configuration....26
3.6.2 Audio Configuration....26
3.6.3 Video Configuration....27
3.6.4 Network Configuration....29
3.6.5 System Configuration....30
3.7 NDI Instruction....32
3.7.1 NDI|HX Environment Configuration....32
3.7.2 NDI|HX Network Audio and Video Encoding Parameters....32
3.7.3 NDI|HX Instruction of vmix.... 34
3.7.4 NDI|HX Instruction of OBS.... 35
3.7.5 Several Problem solving....35
3.7.6 Setting of NDI Applied to Video Conference Software....36
3.8 Logout.... 38
Chapter 4 Support....39
4.1 Camera Maintenance and Troubleshooting....39
4.1.1 Camera Maintenance....39
4.1.2 Troubleshooting....39
Chapter 5 Appendix....41
5.1 VISCA Protocol List....41
5.1.1 Camera Return Command....41
5.1.2 Camera Control Command.... 41
5.1.3 Inquiry Command....44
5.2 Pelco-D Protocol Command List....46
5.3 Pelco-P Protocol Command List....47
Thank you for choosing our product!
This User Manual is designed to show you how to use this camera quickly and make use of all the features. Please read all directions and instructions carefully before using this product.
Declarations
Installation Safety Summary
Safety Precautions
For all camera installation procedures, please observe the following important safety and handling rules avoid damage to yourself and the equipment.
To protect users from electric shock, ensure that the chassis connects to earth via the ground wire provided in the AC power Cord.
The AC Socket-outlet should be installed near the equipment and be easily accessible.
Unpacking and Inspection
Before opening camera shipping box, inspect it for damage. If you find any damage, notify the shipp carrier immediately for all claims adjustments. As you open the box, compare its contents against the packing slip. If you find any shortages, contact your sales representative.
Once you have removed all the components from their packaging and checked that all the listed components are present, visually inspect the system to ensure there was no damage during shipping. there is damage, notify the shipping carrier immediately for all claims adjustments.
Site Preparation
The environment in which you install your camera should be clean, properly lit, free from static, and adequate power, ventilation, and space for all components.
Electric Safety
Installation and operation must accord with electric safety standard
Polarity of power supply
The power supply of the product is ±12V , the max electrical current is 2A .Polarity of the power supply drawing.
Careful of installation
Never move the camera by seizing the camera head. Don't rotate camera head by hand; otherwise, mechanical trouble will occur.
This series item must be put on the smooth desk or platform, and it can not be installed slant way. If the camera is installed on TV or computer, the base can be fixed by four double-sided adhesive trays.
Don't apply in corrosive liquid, as or solid environment to avoid the cover which is made up of organic material.
To make sure no obstacle in rotation range.
Never power on before installation is completed.
Don't disassemble discretionarily.
We are not responsible for any unauthorized modification or dismantling.
1.1 In the Box
Power Adapter × 1
RS232 serial port line × 1
Remote control × 1
1.2 Product Overview
1.2.1 Product Model
The User Manual is applicable to: 20X NDI Camera(Support PoE) 30X NDI Camera(Support PoE)
1.2.2 Dimension
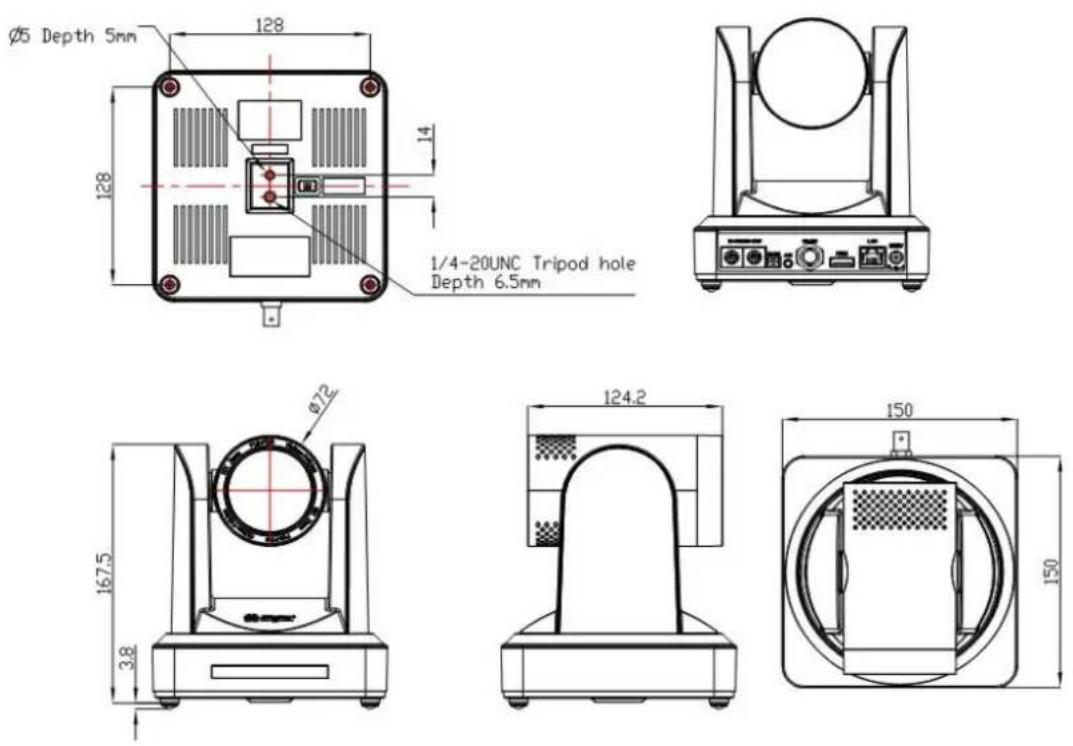
Figure 1.1 NDI Camera dimension
1.2.3 Main Features
Camera Performance
NDI camera offers perfect functions, superior performance and rich interfaces. The features include advanced ISP processing algorithms to provide vivid images with a strong sense of depth, high resolution and fantastic color rendition. It supports H.265/H.264 encoding which makes motion video fluent and clear even with less than ideal bandwidth conditions.
1) Superb High-definition Image: It employs 1/2.8 inch high quality CMOS sensor. Resolution is up to 1920×1080 with frame rate up to 60 fps.
2) Various Optical Zoom Lens: It has 20X/30X optical zoom lens for options.
3) Leading Auto Focus Technology: Leading auto focus algorithm makes lens a fast, accurate and stable auto-focusing.
4) Low Noise and High SNR: Low Noise CMOS effectively ensure high SNR of camera video. Advanced 2D/3D noise reduction technology is also used to further reduce the noise, while ensuring image sharpness.
5) Quiet PTZ: By adopting high accuracy step driving motor mechanism, it works extremely quiet and moves smoothly and very quickly to designated position.
6) Multi-Format Video Outputs: support HDMI,3G-SDI,NDI and IP stream. The 3G-SDI is available for 100m transmission at 1080p60 format.
7) Low-power Sleep Function: Support low-power sleep/wake up, the consumption is lower than 500mW under sleep mode.
8) Support Multiple Control Protocol: Support VISCA, PELCO-D, PELCO-P protocols which can also be automatically recognized. Support VISCA control protocol through IP port.
9) RS-232 Cascade Function: Support RS-232 cascade function which is convenient for installing.
10) 255 Presets Positions: Up to 255 presets (10 presets by remoter).
11) Wide Application: Tele-education, Lecture capture, Webcasting, Videoconferencing, Tele-training, Tele-medicine, Interrogation and Emergency command systems.
12) Support PoE
Network performance
1) Audio Input Interface: 3.5mm Stereo Jack.
2) Multiple Audio/Video Compression: Support H.264/H.265 video compression; AAC,MP3 and G.711A audio compression; Support compression of resolution up to 1920×1080 with frame up to 60 fps and 2 channel 1920×1080p with 30 fps compression.
3) Multiple network protocol: Support ONVIF,RTSP,RTMP,NDI protocols and RTMP push mode, easy to link streaming media server.
Technical Specification
| Model | 20X | 30X |
| Camera Parameter | ||
| Sensor | 1/2.8 inch high quality HD CMOS sensor | |
| Effective Pixels | 207megapixel、16:9 | |
| Output Resolutions | 720p25/29.97/30/50/59.94/60; 1080i50/59.94/60; 1080p25/30/29.97/30/50/59.94/60 | |
| Optical Zoom | 20Xf=5.5~110mm | 20Xf=4.9~129mm |
| View Angle | 3.3° (tele)54.7° (wide) | 2.34° (tele)65.1° (wide) |
| AV | F1.6 ~ F3.5 | F1.6 ~ F4.7 |
| Digital Zoom | 10X | |
| Minimum Illumination | 0.5Lux(F1.8, AGC ON) | |
| DNR | 2D & 3D DNR | |
| White Balance | Auto/Manual/One Push/3000K/3500K/4000K/4500K/5000K/5500K/6000K/6500K/7000K | |
| Focus | Auto/Manual | |
| Aperture | Auto/Manual | |
| Electronic Shutter | Auto/Manual | |
| BLC | ON/OFF | |
| WDR | OFF/Dynamic level adjustment | |
| Video Adjustment | Brightness/Color/Saturation/Contrast/Sharpness/B/W mode/Gamma curve | |
| SNR | >55dB | |
| Input/Output Interface | |
| Video Interface | HDMI、3G-SDI、NDI |
| Image Code Stream | Double streams outputs simultaneously |
| Video Compression forma | H.265、H.264 |
| Control Signal Interface | RS-232 Ring through RS232 output, RS-485 |
| Control Protocol | Protocol: VISCA/Pelco-D/Pelco-P; |
| Audio Input Interface | Double track 3.5mm linear input; |
| Audio Compression Format | AAC、MP3、G.711A |
| HD IP Interface | 100M IP port (10/100BASE-TX)Support IP VISCA control protocol |
| Network Protocol | RTSP、RTMP、ONVIF、GB/T28181、NDI |
| Power Interface | HEC3800 outlet (DC12V) |
| PTZ Parameter | |
| Pan Rotation | -170°~+170° |
| Tilt Rotation | -30°~+90° |
| Pan Control Speed | 0.1 ~60°/sec |
| Tilt Control Speed | 0.1~30°/sec |
| Preset Speed | Pan: 60°/sec, Tilt: 30°/sec |
| Preset Number | 255 presets (10 presets by remote controller) |
| Other Parameter | |
| Supply Adapter | AC110V-AC220V to DC12V/1.5A |
| Input Voltage | DC12V±10% |
| Input Current | 1A (Max) |
| Consumption | 12W(Max) |
| Store Temperature | -10°C~+60°C |
| Store Humidity | 20%~95% |
| Working Temperature | -10°C~+50°C |
| Working Humidity | 20%~80% |
| Dimension | 150mm×150mm×167.5mm |
| Weight | 1.4kg |
| Working Environment | Indoor |
| Remote Operation (IP) | Remote Upgrade, Reboot and Reset |
| Accessory | Power Supply、RS232 Control Cable、Remoter |
| Optional Accessory | Bracket |
Chapter 2 Install Your Product
2.1 Camera Interface Explanation
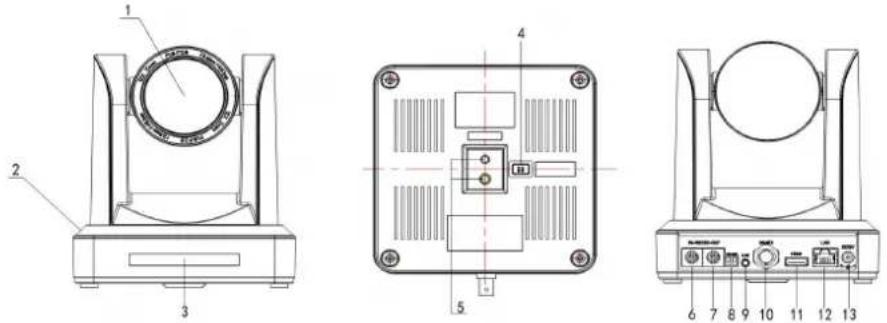
Figure 2.1 Camera Interface
Interface explanation
1、Camera Lens 6、RS232 Control Interface (input)
2、Camera Base 7、RS232 Control Interface (output)
3、 Remote Controller Receiv 8、RS485 Input (left +,right-) 13、DC12V Input Power Supply Socke Light
4、Bottom Dial Switch 9、Audio Input Interface
5、Tripod Screw Hole 10、3G-SDI interface
2.1.1 External Interface
External interface: RS232 Input /Output, RS485 Input, Audio Input, 3G-SDI Output, HDMI Output, DNI Network Output Interface, DC12V Power Interface.
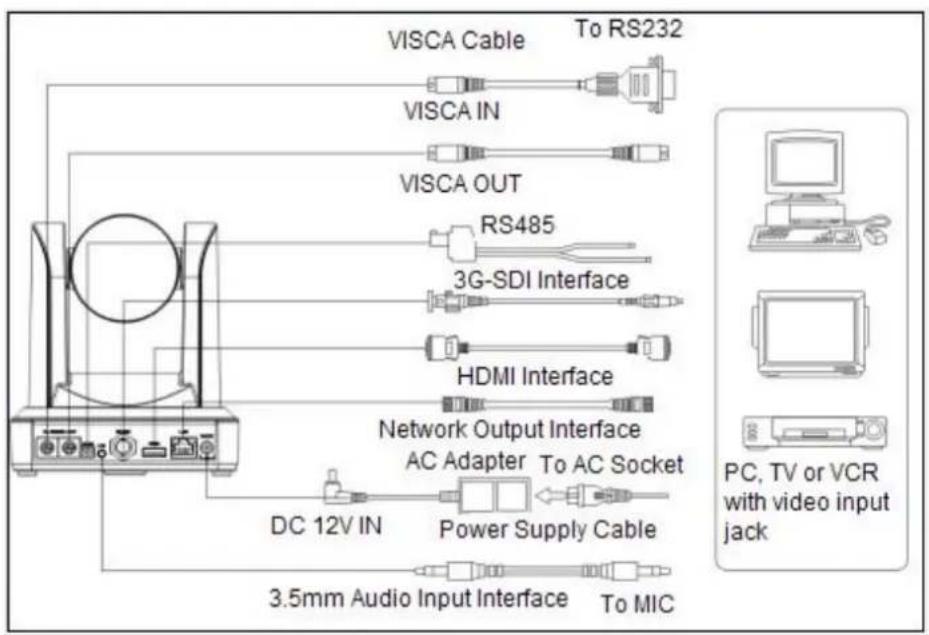
Figure 2.2 External Interface diagram
2.1.2 Bottom Dial Switch
NDI Camera Bottom Dial Switch diagram shown in Figure 2.3
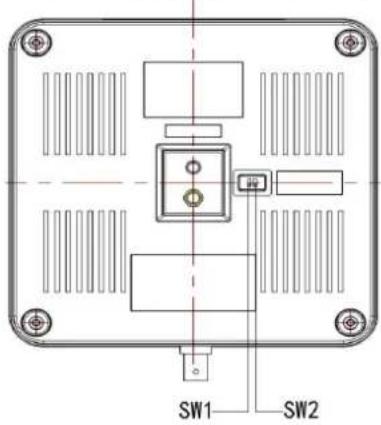
Figure 2.3 Bottom Dial Switch diagram
two DIP switches are set to ON or OFF to select different modes of operation as shown in Table 2.1
Table 2.1 Dial Switch setting
| NO. | SW2 | SW1 | Explanation |
| 1 | OFF | OFF | Updating mode |
| 2 | ON | ON | Working mode |
2.1.3 RS-232 Interface
1) RS-232 interface
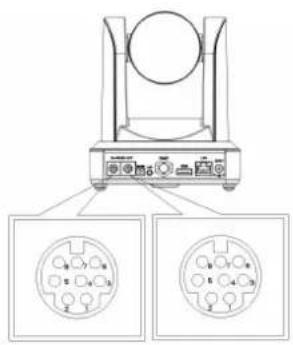
Computer or keyboard and camera connection method
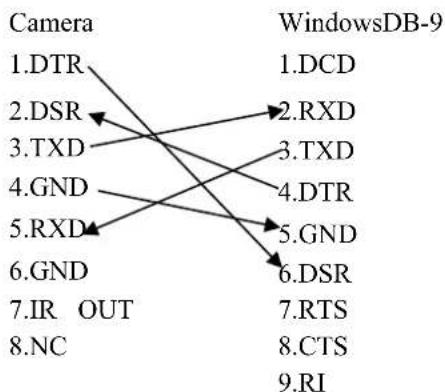
flowchart
graph TD
    A["Camera"] --> B["1.DTR"]
    A --> C["2.DSR"]
    A --> D["3.TXD"]
    A --> E["4.GND"]
    A --> F["5.RXD"]
    A --> G["6.GND"]
    A --> H["7.IR OUT"]
    A --> I["8.NC"]
    J["WindowsDB-9"] --> K["1.DCD"]
    J --> L["2.RXD"]
    J --> M["3.TXD"]
    J --> N["4.DTR"]
    J --> O["5.GND"]
    J --> P["6.DSR"]
    J --> Q["7.RTS"]
    J --> R["8.CTS"]
    J --> S["9.RI"]

2) RS-232 Mini-DIN 8-pin Port Definition
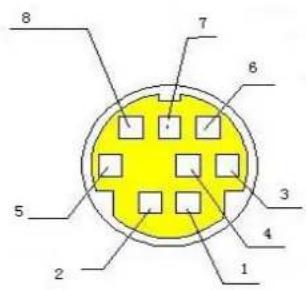
| NO. | Port | Definition |
| 1 | DTR | Data Terminal Ready |
| 2 | DSR | Data Set Ready |
| 3 | TXD | Transmit Data |
| 4 | GND | System Ground |
| 5 | RXD | Receive Data |
| 6 | GND | System Ground |
| 7 | IR OUT | IR Commander Signal IR |
| 8 | NC | No Connection |
3) RS232(DB9) Port Definition
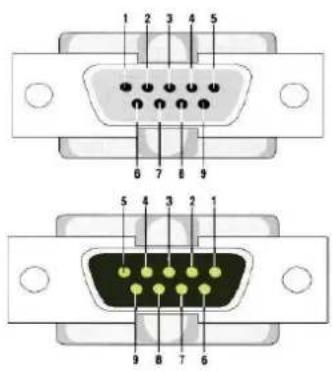
| NO. | Port | Definition |
| 1 | DCD | Data Carrier Detect |
| 2 | RXD | Receive Data |
| 3 | TXD | Transmit Data |
| 4 | DTR | Data Terminal Ready |
| 5 | GND | System Ground |
| 6 | DSR | Data Set Ready |
| 7 | RTS | Request to Send |
| 8 | CTS | Clear to Send |
| 9 | RI | Ring Indicator |
4) VISCA networking as shown below
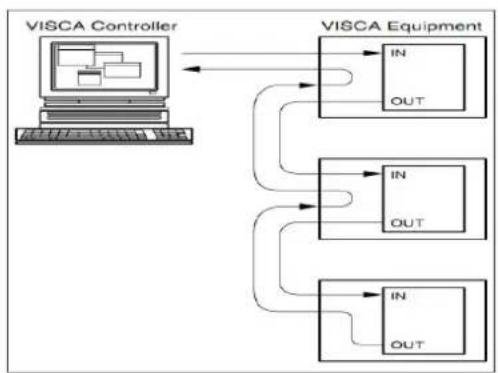
flowchart
graph TD
    A["VISCA Controller"] --> B["VISCA Equipment"]
    B --> C["IN OUT"]
    B --> D["IN OUT"]
    B --> E["IN OUT"]
    C --> F["Out"]
    D --> G["Out"]
    E --> H["Out"]
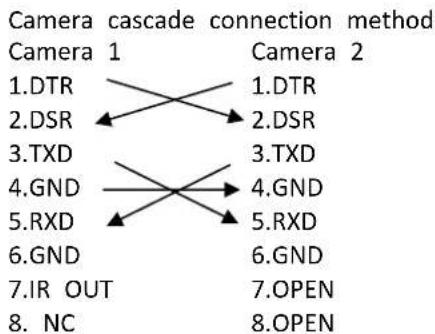
flowchart
graph TD
    A["1. DTR"] --> B["2. DSR"]
    B --> C["3. TXD"]
    C --> D["4. GND"]
    D --> E["5. RXD"]
    E --> F["6. GND"]
    F --> G["7. IR OUT"]
    G --> H["8. NC"]
Note: PTZ Camera has RS232 input and output interface, so you can cascade as the above way.
2.2 Bracket Mount
Note: Bracket can only be wall mounted or upside down mounted on template and concrete wall, but can not be installed on plasterboard.
1) Wall mount step
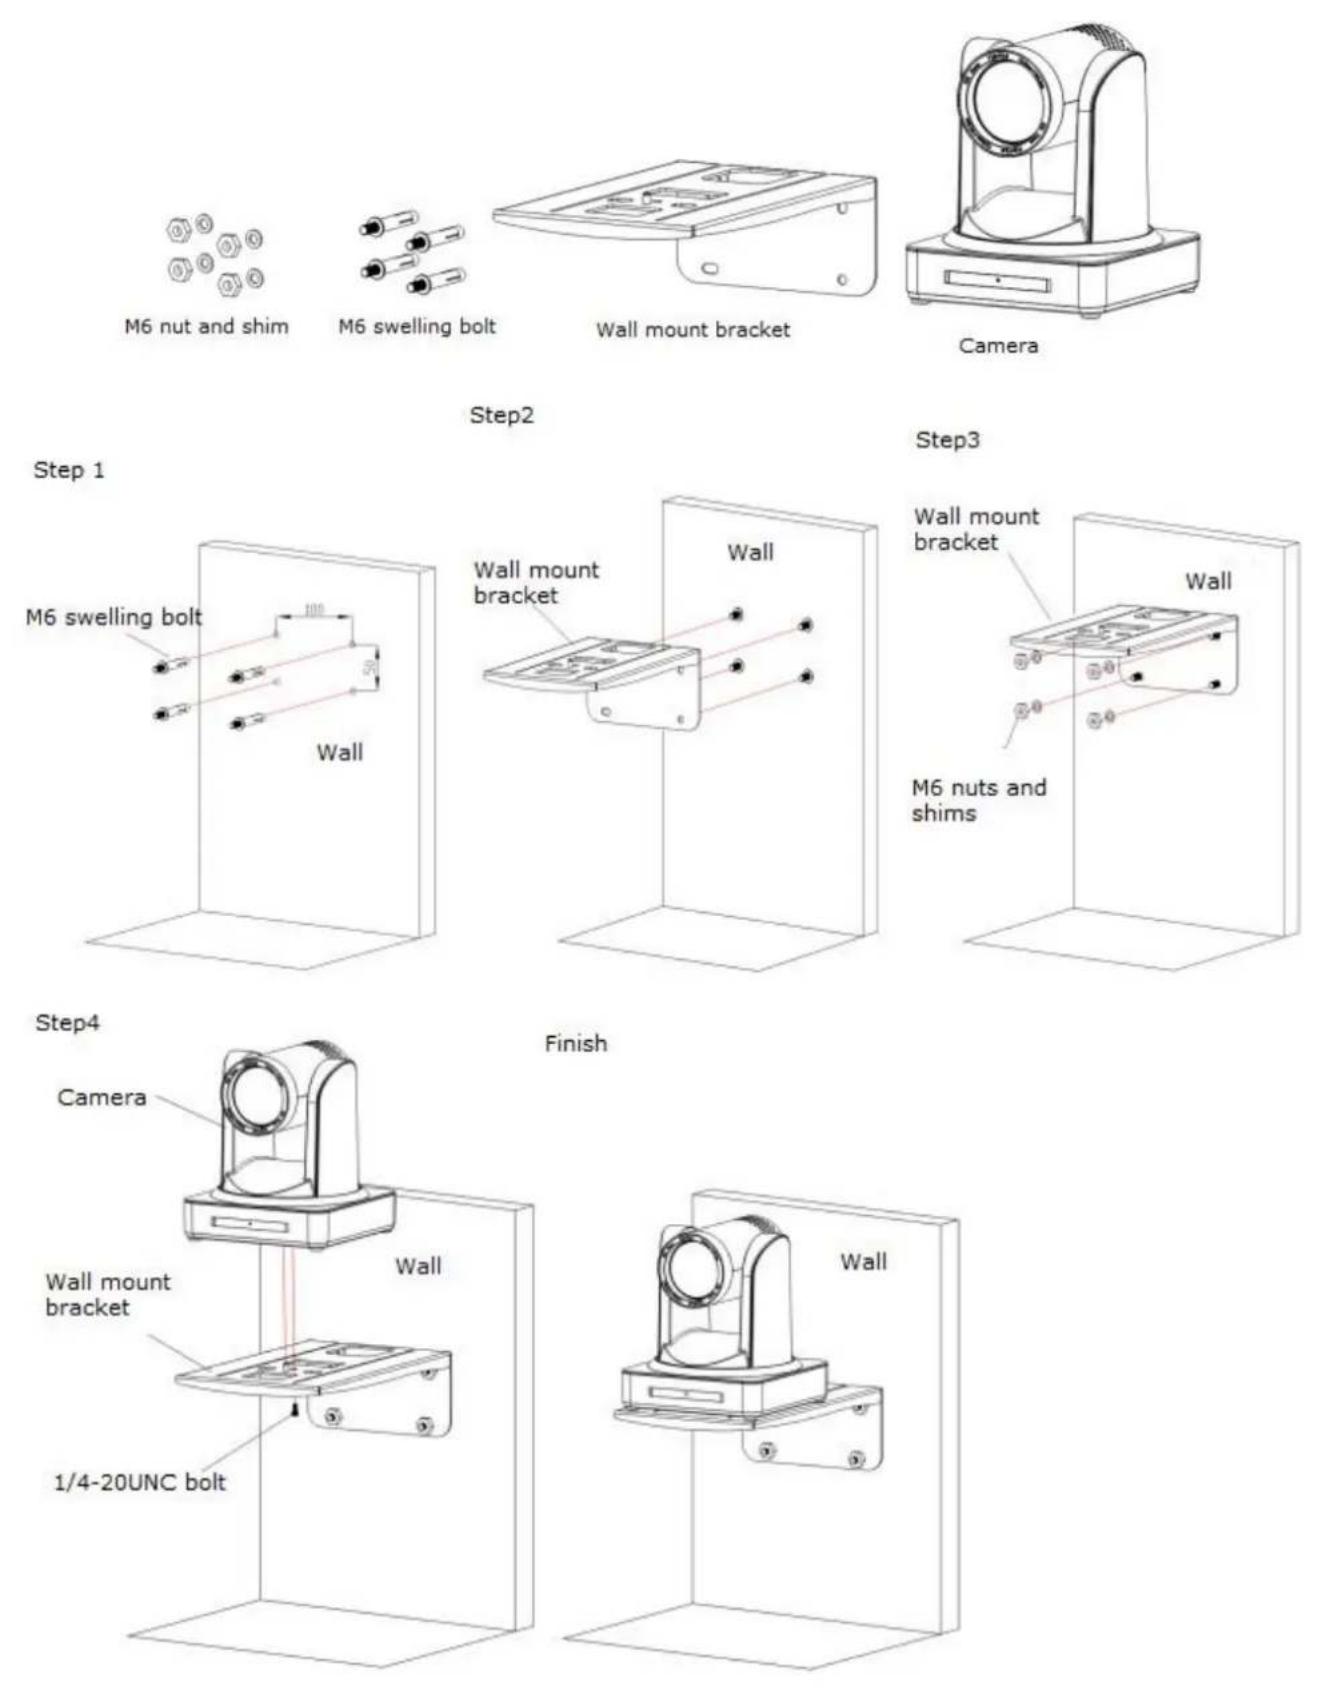
2) Upside down mount step
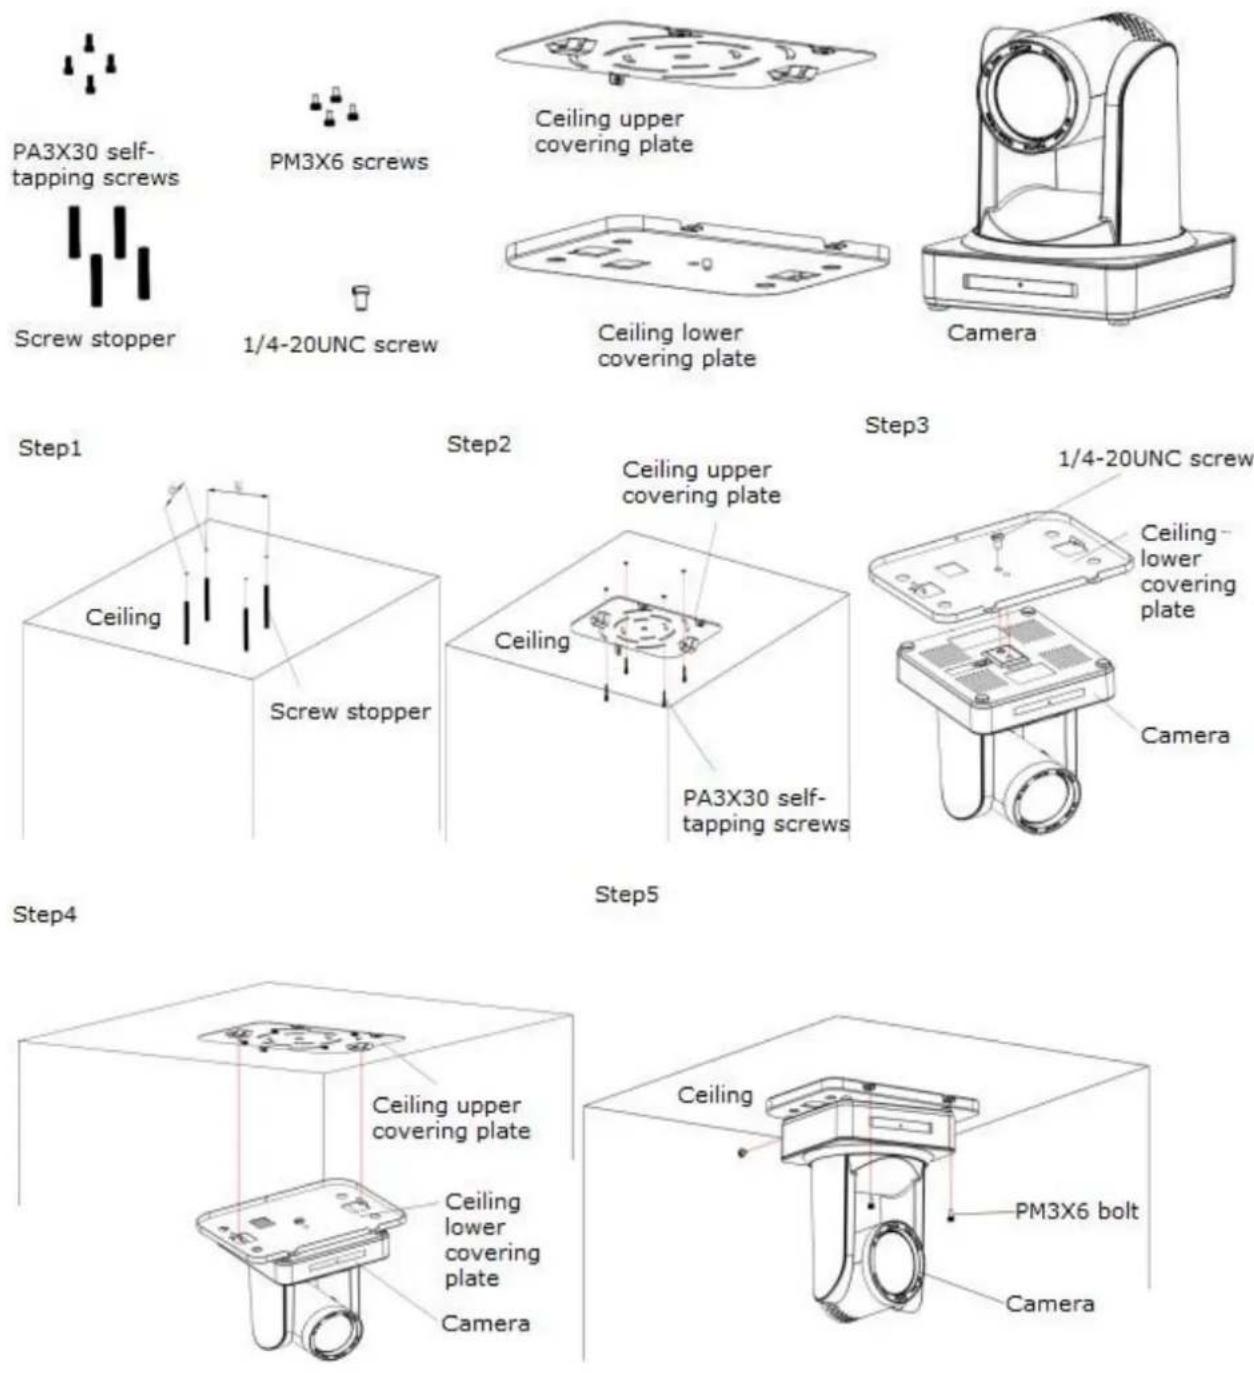
Note: The bracket mount is the optional accessory.
3.1 Video Output
3.1.1 Power on initial configuration
1) Power on: Connect DC12V power supply adapter with power supply socket.
2) Initial configuration: Power on with power indicator light on and remote control receiver light blinking, camera head moves from bottom left to the bottom, and then goes to the HOME position (intermediate position of both horizontal and vertical), while the camera module stretches. When remote control receiver light stops blinking, the self-checking is finished.
Note: If you set preset 0, when Power on self-test is completed, the camera automatically moves to the preset 0 position
3.1.2 Video Output
PTZ Camera has a variety of video output: LAN, HDMI and 3G - SDI.
1) Video Output from LAN
a. Network Cable Connection Port: refer to No.12 in Figure2.1
b. Webpage Login: Open your browser and enter 192.168.5.163 in the address bar (factory default); press Enter to enter into the login page; click on the "player is not installed, please download and install!" and follow the installation steps for installation. Then enter the user name admin and password admin (factory default); press Enter to enter into the preview page, users can carry out PTZ control, configuration and other operations.
2) HDMI Video Output
a. HDMI Video Cable Connection: refer to No.11 in Figure2.1.
b. Connect the camera and the monitor via HDMI video cable; video output is available after camera self-test.
3) 3G-SDI Video Output
a. 3G-SDI video cable connection: refer to No.10 in Figure2.1
b. Connect the camera and the monitor via 3G-SDI video cable; video output is available after camera self-test.
Note: When the device is first powered on, the current IP address of the camera is displayed in the upper left corner of the screen.
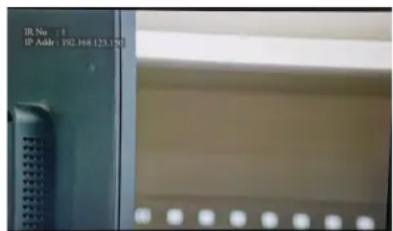
3.2 Remote Controller
3.2.1 Keys Instruction
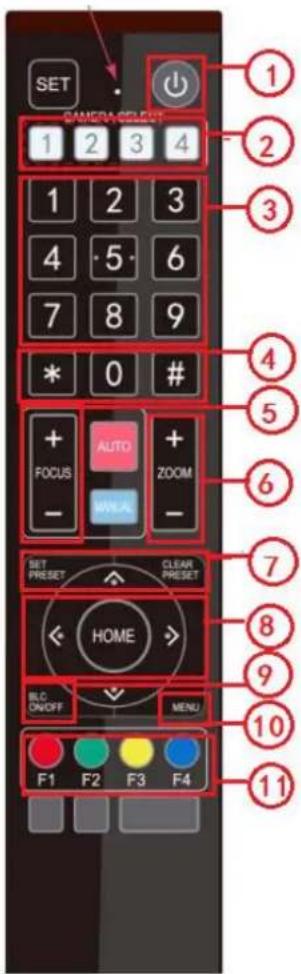
1. Standby Key
After 3S long press, the camera will step into standby mode. Long press 3S again, the camera will
self-test again and back to HOME position. (Note: If power-on mode is turned on and Preset 0 is
set, and there is no operation within 12s, it will automatically point to the specified preset position.
2. Camera Selection
Select the camera address which wants to be controlled
3. Number Key
Set or run 0-9 presets
4. \*,# Key
Key combination use
5. Focus Control Key
Auto Focus: Enter into auto focus mode.
Manual Focus: The camera focus mode is manual
Switch the camera focus mode to manual focus by pressing [focus +] or [focus -] to adjust
6. Zoom Control Key
Zoom+: Lens near
Zoom—:Lens far
7. Set or Clear Preset key
Set Preset: Set preset key + 0-9 number key:
Clear Preset key: Clear preset key + 0-9 number key
8. Pan/Tilt Control Key
Press Key :Up
Press Key :Down
Press Key :Left
Press Key: Right
"HOME" Key: Return to the middle position or enter into the next level menu
9. BLC Control Key
Back Light ON / OFF: Turn on or off the back light
10. Menu Setting
Open or close the OSD menu
Enter / exit the OSD menu or return to the previous menu
11. Camera IR Remote Control Address Setting
【*】+【#】+【F1】:Camera Address No.1
【*】+【#】+【F2】:Camera Address No. 2
【*】+【#】+【F3】:Camera Address No. 3
Finishing initialization, it can receive and execute the IR commands. Press the remote controller button, the indicator light is flashing; release the button, the indicator light stops flashing. Users can control the pan/tilt/zoom, setting and running preset positions via the IR remote controller.
Key Instruction:
-
In this instruction, "press the key" means a click rather than a long-press, and a special note will be given in a long-press for more than one second is required.
-
When a key-combination is required, do it in sequence. For example,“【*】+【#】+【F1】”means press“【*】”first and then press“【#】”and last press“【F1】”.
1) Camera Selection
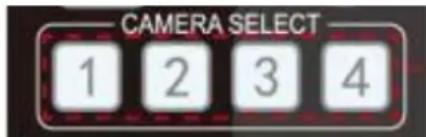
Select the camera address to control.
2) Pan/Tilt Control
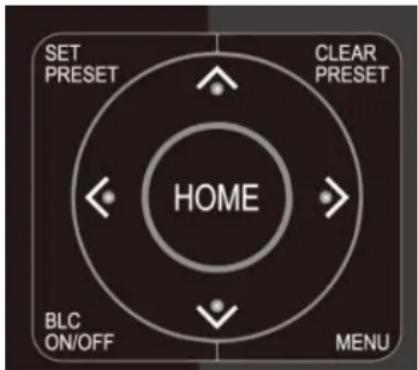
Press and hold the up/down/left/right key, the pan/tilt will keep running, from slow to fast, until it runs to the endpoint; the pan/tilt running stops as soon as the key released.
3) Zoom Control
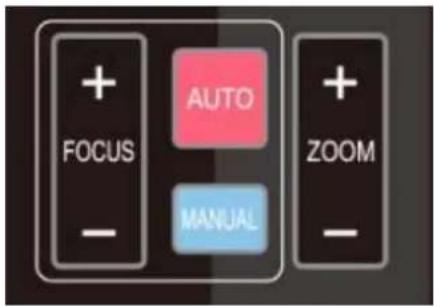
ZOOM IN: press "ZOOM ▲ 】" key
ZOOM OUT: press "ZOOM ▼ 】" key
Press and hold the key, the camera will keep zooming zooming out and stops as soon as the key is released.
4) Focus Control
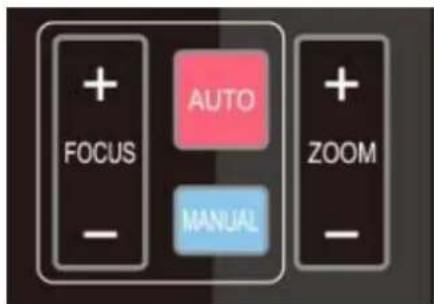
Focus (near):Press “【focus+】” key (Valid only in man focus mode)
Focus (far): Press "【focus-】"key (Valid only in ma focus mode)
Auto Focus: Support
Manual Focus: Support
Press and hold the key, the action of focus will keep continue and stops as soon as the key is released.
5) BLC Setting
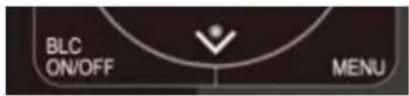
BLC ON / OFF: support
6) Presets Setting, Running, Clearing
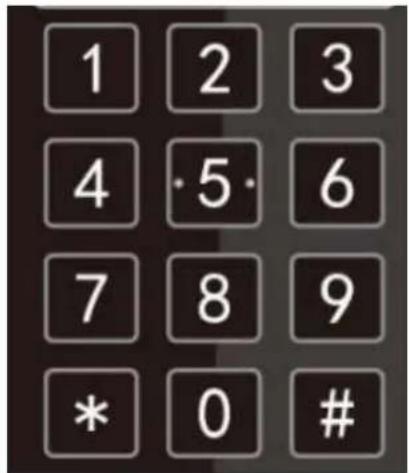
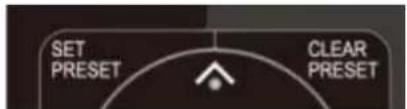
- Preset setting: to set a preset position, the users should press the “【SET PRESET】” key first and then press the number key 0-9 to set a relative preset,
Note: 10 preset positions in total are available by rem controller.
- Preset Running: Press a number key 0-9 directly to a relative preset.
Note: Action in vain if a relative preset position is not existed.
- Preset clearing : to clear a preset position, the use press the “【CLEAR PRESET】” key first and then press the number key 0-9 to clear the relative preset;
Note : press the“【#】” key three times continually 1 cancel all the presets.
7) Camera Remote Controller Address Setting
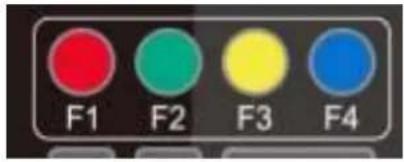
【*】+【#】+【F1】:Camera Address No.1
【*】+【#】+【F2】:Camera Address No. 2
【*】+【#】+【F3】:Camera Address No. 3
In normal working mode, press 【MENU】key to display the menu, using scroll arrow to point at or highlight the selected items.
![MENU ===================== Language English (Setup) (Camera) (P/T/Z) (Video Format) (Version) (Restore Default) |↑↓|Select |← →|Change Value [Menu]Back [Home]OK](/content/2026/05/903617/images/21fb1d0562e6ae79c653b18139a6e2d9eb2360b5708c55195f6450cfb6d69440.jpg)
Language: Language setting, Chinese / English
Setup: System setting
Camera Option: Camera Setting
P/T/Z: Pan tilt setting
Version: camera version setting
Restore Default: Reset setting
[↑↓] Select: for selecting menu
[← →]Change Value: for modify parameters
[Menu]Back: Press [MENU] to return
[Home] OK: Press [Home] to confirm
3.3.2 System Setting
Move the pointer to the (Setup) in the Main Menu, click the 【HOME】key and enter into the (System Setting) as shown below
![SETUP --------==------------------ Protocol Auto Visca Address 1 Visca Address Fix OFF PELCO-P Address 1 PELCO-D Address 1 Baudrate 9600 [↑↓]Select |← →|Change Value [Menu]Back](/content/2026/05/903617/images/7c4e50cc8685d6e9a61866dfad6d09b7fb2ccb34dda90f211a0646de7f35c9ad.jpg)
Protocol: VISCA/Pelco-P/Pelco-D/Auto
Visca ADDR: VISCA=1\~7 Pelco-P=1\~255 Pelco-D = 1\~255
Baud rate: 2400/4800/9600/115200
Visca Address Fix: On/Off
3.3.3 Camera Setting
Move the pointer to the (CAMERA) in the Main Menu, click [HOME] key and enter the (CAMERA) as follow.
![CAMERA (Exposure) (Color) (Image) (Focus) (Noise Reduction) Style Default [↑↓]Select [←→]Change Value |Menu|Back |HomelOK](/content/2026/05/903617/images/648189e70066abb5ad45a6f9a823a5e8573158558ae62fcb4b7cf93452e61511.jpg)
Exposure: Enter into Exposure setting
Image: Enter into image setting
Color: Enter into color setting
Focus: Enter into focus setting
Noise Reduction: Enter into noise reduction
1) EXPOSURE
Move the pointer to the (EXPOSURE) in the Main Menu, click the【HOME】and enter the (EXPOSURE SET) as follow.
![EXPOSURE ===================== Mode Auto EV OFF BLC OFF Flicker 50Hz G.Limit 3 DRC 2 [↑↓]Select |← →|Change Value [Menu]Back](/content/2026/05/903617/images/63829f8a00e1b6e30753a8c2002ec96c40d57a814caa2d919ef97ce69256448a.jpg)
Mode : Auto, Manual, Shutter priority, Iris priority and Brightness priority.
EV : On/Off (only available in auto mode)
Compensation Level: -7\~7 (only available in auto mode when EV is ON)
BLC: ON/OFF for options (only available in auto mode)
Anti-Flicker: OFF/50Hz/60Hz for options (only available in Auto/Iris priority/Brightness priority modes)
Gain Limit: 0\~15(only available in Auto/ Iris priority /Brightness priority mode)
WDR: Off,1\~8
Shutter Priority:1/25,1/30,1/50,1/60,1/90,1/100,1/120,1/180,1/250,1/350,1/500,1/1000,1/2000,1/3000,1/4000,1/6000,1/10000(only available in Manual and Shutter priority mode)
IRIS Priority:OFF,F11.0,F9.6,F8.0,F6.8,F5.6,F4.8,F4.0,F3.4,F2.8,F2.4,F2.0,F1.8(only available in Manual and Iris priority mode)
Brightness: 0\~23 (only available in Brightness priority mode)
2) COLOR SETTING
Move the pointer to the (COLOR) in the Main Menu, click the【HOME】and enter the (COLOR SET) as follow.
![COLOR WB Mode Auto RG Tuning 0 BG Tuning 0 Saturation 100% Hue 7 AWB Sensitivity High [↑↓]Select [← →]Change Value [Menu]Back](/content/2026/05/903617/images/629f9e540379a605ffa904d805a065ee9f56008834a1ddc7cc7973b77ec7820b.jpg)
WB Mode: Auto, 3000K、3500K、4000K、4500K、5000K、5500K、6000K、6500K、7000K, Manual, One Push
Red Gain: 0\~255(only available in Manual mode)
Blue Gain: 0\~255(only available in Manual mode)
Saturation: 60%,70%,80%,90%,100%,110%,120%,130%
Hue: 0\~14
AWB Sensitivity: high/middle/low
Color Temp: high/middle/low
Color Style: Default, style1\~4.
3) IMAGE
Move the pointer to the (IMAGE) in the Menu, click the 【HOME】 and enter the (IMAGE) as follow.
IMAGE
Brightness 7
Contrast 7
Sharpness 4
Flip-H OFF
Flip-V OFF
B&W-Mode Color
Gamma Default
DZoom OFF
DCI Close
| ↑ ↓ |Select |← →|Change Value
[Menu]Back
Brightness: 0\~14
Contrast: 0\~14
Sharpness: 0\~15
Flip-H: On/Off
Flip-V: On/Off
B&W Mode: color, black/white
Gamma: default, 0.47, 0.50, 0.52, 0.55
DZoom: digital zoom options: On/Off
DCI: Dynamic Contrast: Off,18
4) FOCUS
Move the pointer to the (FOCUS) in the Menu, click the 【HOME】 and enter the (FOCUS) as follow.
![FOCUS --------= Focus Mode Auto AF-Zone Center AF-Sensitivity Low | ↑ ↓ |Select |← →|Change Value [Menu]Back](/content/2026/05/903617/images/b8450ffe7f75264c22d52d59f09a5ec9b6df0171d92d1e5be39120e3e170997a.jpg)
Focus Mode: Auto, manual
AF-Zone: Up, middle, down
AF-Sensitivity: High, middle, low
5) NOISE REDUCTION
Move the pointer to the (NOISE REDUCTION) in the Menu, click the 【HOME】 and enter the (NOISE REDUCTION) as follow.
![NOISE REDUCTION NR-2D 3 NR-3D 5 Dynamic Hot Pixel OFF [↑↓]Select [← →]Change Value [Menu]Back](/content/2026/05/903617/images/b6974ed220b0127f32941a37da7007d6aabe458835c98525dfdbf146fd8ba2da.jpg)
2D Noise Reduction: Auto, close, 1 3D Noise Reduction: Close, 1 Dynamic Hot Pixel: Close, 1\~
3.3.4 P/T/Z
Move the pointer to the (P/T/Z) in the Main Menu, click the 【HOME】 and enter the (P/T/Z) as follow.
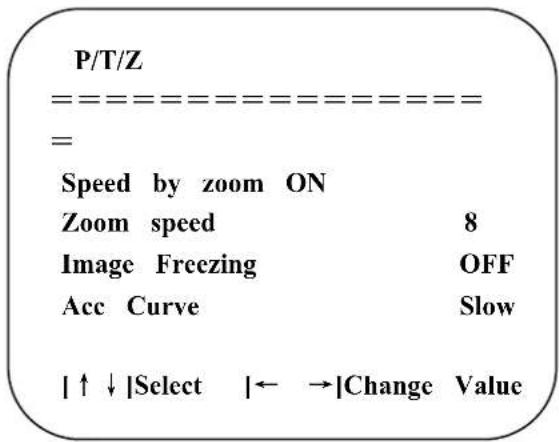
Depth of Field: Only effective for remote controller, On/ Off;
When zoom in, the PT control speed by remoter will become slow),
Zoom Speed: Set the zoom speed for remote controller,1\~8
Image Freezing: On/Off
Accelerating Curve: Fast/slow
3.3.5 Video Format
Move the pointer to the (Video Format) in the Menu, click the 【HOME】 and enter the (Video Format) as follow.
![VIDEO FORMAT --------[1080P60 1080P50 1080I60 1080I50 1080P30 1080P25 720P60 720P50 720P30 720P25 1080P59.94 1080I59.94 1080P29.97 720P59.94 720P29.97 [↑↓]Select [Menu]Back [Home]OK](/content/2026/05/903617/images/f4ba9d7781c2e5d6b5748f25b075f78e21a0d9c425d17e63c1558b73ae5dcdd8.jpg)
Note: 1. 1080P60 Downward Compatibility;
- Exit menu after modifying parameter to save it after powered off
3.3.6 Version
Move the pointer to the (VERSION) in the Main Menu, click the 【HOME】 and enter the (VERSION) as follow.
![VERSION MCU Version 2.0.0.15 2015-12-18 Camera Version 2.0.0.13 2015-12-18 AF Version 2.0.0.6 2015-12-11 Lens 12X(20X) [Menu]Back](/content/2026/05/903617/images/85a9dac157cfe12e68055e7cd8479ddc6726e3417a334250329205238c8eb5fa.jpg)
MCU Version: Display MCU version information
Camera Version: Display camera version information
AF Version: Display the focus version information
Lens: Display the lens zoom
Move the pointer to the (RESTORE DEFAULT) in the Main Menu, click【HOME】 and enter the (RESTORE DEFAULT) as follow.
RESTORE DEFAULT
Restore Default? NO
[↑↓|Select |← →|Change Value [Menu]Back [Home]OK
Restore default: options: yes/no; after restoring default, the video format won't be restored.
Note: If the address of former remoter is not 1 but another one from 2,3,4, the corresponding camera address will restore to 1 when all parameters or system parameters are restored. User should change the remoter address to be 1 (press No.1 according to the camera so to get normal operation)
3.4 Network Connection
3.4.1 Connecting Mode
Direct connection: Connect the camera and computer by network connecting cable.
Internet connection mode: Connect the camera to Internet by Router or Switch and user can log in the device by browser.
Note: Please do not put the power and network cable in places where can be easily touched to prevent video quality lowered by unstable signal transmission due to poor contact of cables.
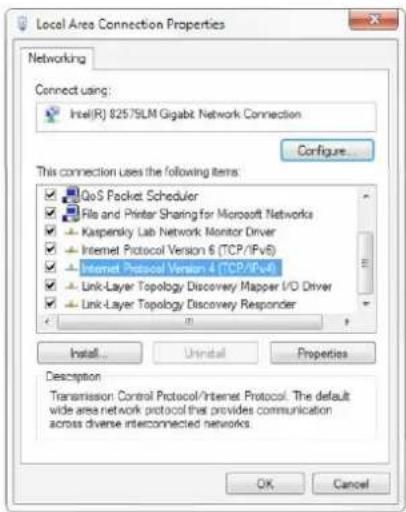
The computer must have the network segment where the camera IP address belongs to. The device will not be accessible if without the segment. I.E. The camera default IP address is 192.168.5.163, then segment 5 must be added in the computer. Specific steps are as below:
1) open the window of Local Area Connection Properties on computer, double click or click the property "Internet" protocol version 4 (TCP/IPv4) to enter into the Internet Protocol Version 4(TCP/IPv4) Properties window.
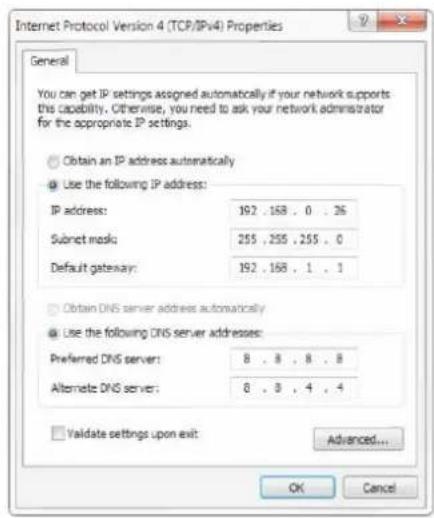
2) select "Advanced" to enter into the Advanced TCP/IP Setting and add IP and subnet mask in the IP browser as picture shown below. Click the "Confirm" to finish the adding of IP segment. User can add the corresponding network segment according to the revised IP address of the camera.
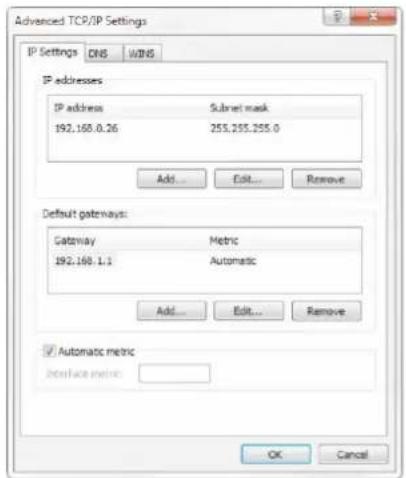
Note: The IP address to be added cannot be same with that of other computers or devices. The existence of this IP address needs to be verified before adding
3) Click the "Start" and select "Operation" to input cmd as picture below to verify if the network segment has been successfully added.
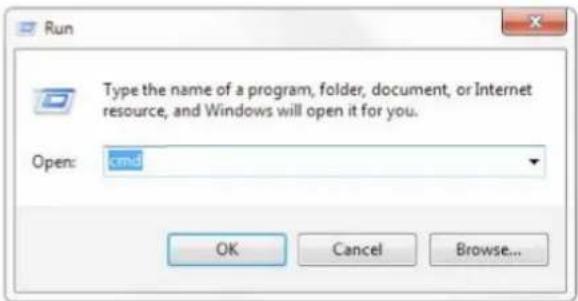
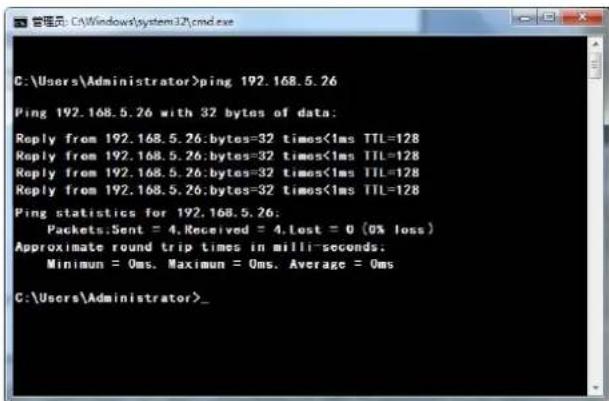
4) Click "OK" and open the DOS command window, input ping 192.168.5.26 and press Enter key, it will show
message as below: which means network segment adding is succeed.
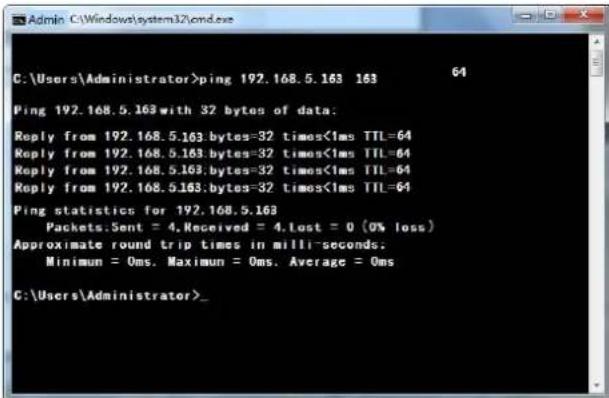
5) User can also to verify network connection as steps above mentioned after the finish of camera self-check. If IP is default, open DOS command window and input 192.168.5.163, then press Enter key. It will show message as below: which means network connection is normal.
3.5 IE Log In
3.5.1 Web client
1) Web client Log In
Input the IP address 192.168.5.163 of the device in the address filed of browser and click Enter button to enter into Web Client login page as below picture. User can login as administrator and normal user. If login as administrator (Default User name/Password: admin), users can preview, playback, configuration and cancel in the Web Client; If login in as normal user(Default User name/Password:user1 or user2), users can only preview, playback and cancel, no option for configuration.
Note: Web access supported browsers: IE,360 browser, Google browser and other conventional browser.
2) Download/Install Plug in
When first using IE browser to access the web conferencing camera, the login page will appear "Playback plug-in is not installed, please download and install!". Click on this message, download and install MRWebXinstall.exe, according to information prompts.
After installing the plug, enter user name and password, click and Sign (initial default user name and password: "admin", users can change the user name and password on their own after entering) into the Web client management interface.
3.5.2 Preview
After successful login into the management interface, it enters the video preview interface. In the preview screen, users can control PTZ, zoom, focus, video capture, sound, focus, full screen and set the preset position, run, delete and other operations.
You can record the video and save it on SD Card when SD Card built in. Video can be saved on the Computer at Local.
1) Login as administrator
User name, password, the default admin PTZ control can be carried out, zoom, focus, video capture, sound, zoom, full screen and set the preset position, run, and delete; you can preview, configuration, log off.
2) Login as normal user
Default User name/password: user1 or user2 PTZ control can be carried out, zoom, focus, video capture, sound, zoom, full screen and set the preset position, un,and delete; you can preview and log off.
NOTE: There is no configuration right for normal user login.
3.6 Configuration
Click Configuration to enter into the device parameters setting page
There are the following options: audio configuration, video configuration, network configuration, PTZ configuration, internet access configuration, system configuration, detailed description see the following table.
| Menu | Explanation |
| Local configuration | Including video preview mode,record video packing time,record video storage rou settings etc. |
| Audio configure | Including audio compressing format,sampling frequency,sampling precision,compressin code rate settings etc. |
| Video configure | Including video encoding,stream release,RTB Broadcasting,video parameters,character-overlapping,character size,video output setting etc. |
| Network configure | Including basic parameters,Ethernet,DNS, GB28181 etc. |
| System configure | Including equipment property,system time,user management,version update,Reset,Reboot device settings etc. |
3.6.1 Local Configuration
Video Preview Mode: user can choose real-time priority or fluency priority: The delay will be small when under real time priority mode and fluency will be good when under fluency priority mode. Setting based on the user need (Default value: real time normal (2), real time best (1), fluency normal (3), fluency good (4) and fluency best (5))
Recording packing time(minute): Set recording video packing time (default is 10, range from 1\~120 minutes)
Recording/Snapshot file storage route: Set local recording video/snapshot file storage route. (Default D: MyIPCam)
Click the Save button to make settings effective.
3.6.2 Audio Configuration
Switch: Choose to enable the audio or not.
Compressing format: Set audio compressing format and the device will reboot automatically after change (default MP3, PCM, AAC optional)
Sampling frequency:Set sampling frequency and the device will reboot automatically after change (default 44100,16000,32000 and 48000 optional)
Sampling precision: Set sampling precision (default 16bits)
Compressing code rate: Set audio compressing code rate (default 64bits,32,48,96,128bits optional)
Note : Click "SAVE", it will remind "Enable has changed. Restart the device to take effect after the success of the save", then please reboot the camera to make new setting effect.
3.6.3 Video Configuration
1) Video encoding
Code stream: Different video output mode setting, use different streams. (Main stream, secondary stream)
Compression Format: Set the video compression format, save and reboot to take it effect (primary/secondary stream default: H.264, H.265 optional)
Profile: Profile Mode Setting (Default, HBP, MP Optional)
Video Size: Set video image resolution, save and reboot to take it effect (main stream default 1920 * 1080 or 1280 * 720 optional; default secondary stream 640 * 320,320 * 180,1280 * 720,1920 * 1080 optional)
Stream Rate control:Set rate control mode,save and reboot to take it effect (Primary/secondary stream default variable bit rate,fixed rate is for option).
Image Quality: Set the image quality, image quality can be changed only when rate control is variable bit rate, (main stream defaulted is better, secondary stream default is not good, there are best, better, good, bad, worse, worst for options).
Rate (Kb/s): Set the video bit rate (main stream default 4096Kb/s, 64-12288Kb/s optional; secondary stream default 1024Kb/s, 64-10240Kb/s optional).
Frame rate (F/S): Set the video frame rate (primary/secondary stream default 25F/S, primary stream 5-60F/S optional, secondary stream 5-30F/S optional).
Key frame interval: Set the key frame interval (primary/secondary stream default 75F, primary/stream 1-300F optional. Secondary stream 1-150F optional).
Stream Name: When streaming via rtsp or rtmp, user can modify stream name. Main Stream(live/av0), substream(live/av1)
Click the "Save" button to display the "saved successfully" message, then settings take effect.
2) Stream Release
Switch: To turn on/off the main/secondary stream.
Protocol: primary / secondary stream applies RTMP protocol.
Host Port: server port number (default 1935,0-65535 optional)
Host Address: server IP addresses (default 192.168.5.11)
Stream Name: choose a different stream name (live / av0, live / av1 optional).
User: Set the user name.
Password: Set the password.
Click on the "Save" button to display the "Save successful" message, then settings take effect.
Method of obtaining RTSP: rtsp: // device IP address: 554 / live / av0 (av0 main stream; av1 secondary stream)
3) RTP Broadcasting
Main/Sub Stream: On/off
Protocol: RTP or TS
Address: Default 224.1.2.3. It can be edited.
Port: Main Stream Default Port: 4000, Sub Stream Default Port: 4002)
Visit: Address comes up after setting. Eg; rtp://224.1.2.3:400@lp://@224.1.2.3:4000;
4) Video Parameters
A. Focus: Focus mode, focus range, focus sensitivity can be set.
Focus Mode: set the focus mode (the default auto, manual optional)
Focus range: set the focus range (the default middle, the upper and lower optional)
Focus Sensitivity: Set the focus sensitivity (default is low, high, medium optional)
B.Exposure:Eexposure mode,exposure compensation,back light compensation,anti-flicker,gain limit,wide dynamic, shutter speed,aperture value and brightness can be set.
Exposure Mode: Set the exposure mode (the default automatic, manual, shutter priority, aperture priority, Brightness priority optional)
Exposure compensation: Exposure compensation setting is active when it is auto status (default is off).
Exposure compensation value: Set the exposure compensation value, valid when it is set for auto(default 0,-7 to 7 optional).
BLC: Set back light compensation, valid when it is auto status (default is off).
Anti-flicker: Set up anti-flicker mode, valid when status of automatic, aperture or brightness priority (default 50Hz, closed, 60Hz optional).
Gain limit: set the gain limits, auto, active when it is status of aperture or brightness priority(default 3, 0-15 optional).
Dynamic range: set the dynamic range (default 5,0-8 optional).
Brightness: Set the brightness value, active when it is a state of brightness priority (default 7,0-23 optional).
C.Color: White balance, saturation, color, white balance, sensitivity, color temperature, gain red and blue gain can be set.
White balance modes: Set the white balance mode (the default automatic, 3000K, 4000K, 5000K, 6500K, manual, One-push optional).
Note: Click the "Correction" button when selected the One-push white balance mode.
Saturation: Set the saturation (default 80%,60%,70%,80%,90%,100%,110%,120%,130%,optional).
Auto white balance Sensitivity: Sensitivity Auto white balance settings (default is low, high, medium optional).
Chroma: Set the chrome (default 7,0-14 optional).
Color Temperature: set color temperature(Default setting:High, with low, middle for options)
Red Gain: Set the red gain, effective when it is manual (default 255,0-255 optional).
Blue Gain: Sets the Blue gain, effective when it is manual (default 199,0-255 optional).
D. Image: Brightness, contrast, sharpness, black and white mode, the gamma curve, Horizontal Flip and Vertical Flip can be set.
Brightness: Set the brightness (default 6,0-14 optional).
Contrast: set the contrast (default 8,0-14 optional).
Sharpness: Set the sharpness value (default 7, 0-15 optional).
Black and white mode: Set black and white mode (default color, black/white optional).
Gamma: Gamma value setting (default, 0.45, 0.50, 0.52, 0.55 optional).
Flip Horizontal: Set Flip Horizontal (default Off, On optional).
Flip Vertical: Set vertical flip (default Off, On optional)
E. Noise Reduction: 2D noise reduction, 3D noise reduction and dynamic dead pixel correction available.
2D Noise Reduction: Set 2D noise reduction level (default Auto,1-7 and Off optional).
3D Noise Reduction: Set 3D noise reduction level (default 5,1-8 and Off optional).
Dynamic dead pixel correction: Set Dynamic dead pixel correction (default Off,1-8 optional).
Click "Refresh" to make revision of any video parameters of a,b,c,d,e effective
5) Character-Overlapping
Display date and time: Set whether to display the time and date (default display).
Display Title: Set whether to display the title (default display).
Font Color of Time: Set font color of time and date (default white, black, yellow, red, blue optional).
Font Color of Title: Set font color of title (default white, black, yellow, red, blue optional).
Moving characters: Set the display position of moving date, time and title , click on the "up, down, left, right" buttons to move the corresponding character position.
Title Content: Set title content (default CAMERA1).
Time Content: Set time content(default 1970/01/10 05:36:00)
Click on the "Save" button and display the "Save successful" message, then valid
6) Character Size
Main stream character size: Set the character size of the display, the device will restart automatically after changed and saved (default 24,24,16 optional)
Secondary stream character size: Set the character size of the display, the device will restart automatically after changed and saved(default 16,24,16 optional)
Click on the "Save" button to display "Parameter saved successfully" message, set to take effect
7) Video Output
Output Format: Set the video output format (default 1080P60, 1080P50, 1080P30, 1080P25, 1080I60, 1080I50, 720P60, 720P50, 720P30, 720P25, 1080P59.94, 1080I59.94, 1080P29.97, 720P59.94, 720P29.97 optional).
Click on the "Save" button, it will be valid when display "Save successful".
3.6.4 Network Configuration
1) Network port
Data port: set the data port, the device will restart automatically after changed (default 3000, 0-65535 optional).
Web Port: Set Web port, the device will restart automatically after changed (default is 80,0-65535 is optional).
Onvif Port: Set Onvif port, the device will restart automatically after changed (default 2000, 0-65535 optional).
Soap Port: Set Soap port (default 1936,0-65535 optional).
RTMP Port: Set RTMP port (default 1935,0-65535 optional).
RTSP Port: Set RTSP port, the device will restart automatically after changed (default 554,0-65535 optional).
Visca Port: Set Visca port, the device will restart automatically after changed (default 3001, 0-65535 optional).
Click on the "Save" button, it will be valid when display "Save successful".
RTMP access: RTMP: / / equipment IP address: 1935 / live/av0 (av0 main stream; av1 second stream)
RTMP Access : rtmp:// equipment IP address: 1935 / live/av0 (av0 main stream; av1 second stream)
2) Ethernet parameters
DHCP: Enable or disable obtain IP automatically can be set. Save changes and reboot the device to takes effect (Default:OFF)
IP Address: Set the IP address, save changes and reboot the device to takes effect (default 192.168.5.163)
Note: This IP address is the same with the one used to login Web page.
Subnet Mask: Set the subnet mask (default 255.255.255.0).
Default Gateway: Set the default gateway (default 0.0.0.0).
Physical Address: Set the physical address (the parameter is read-only but can not be modified).
Click on the "Save" button, it will be valid when display "Save successful". (Note: To prevent IP conflicts When modify).
3) DNS Parameters
Preferred DNS server: set the preferred DNS server. (Default 0.0.0.0).
Alternate DNS server: Alternate DNS server settings. (Default 0.0.0.0).
Click on the "Save" button, it will be valid when display "Save successful".
4)GB28181
Switch: set whether open GB28181, can check
Time Synchronization: whether synchronization time is set, you can check
Stream Type: stream type setting (the default main stream, secondary stream optional)
Sign effective time (in seconds): 3600 Range 5-65535
Heartbeat time (seconds): 60 Range 1-65535
Register ID: 34020000001320000001
Register User name: IPC
Register Password: 12345678
Equipment ownership: Users can add their own
Administrative regions: Users can add their own
Alarm Zone: Users can add their own
Equipment installation address: Users can add their own
Local SIP Port: 5060 Range 0-65535
GB28181 Server Address: IP address of the computer
Server SIP Port: 5060 Range 0-65535
Server ID: 34020000002000000001
Click on the "Save" button, it will be valid when display "Save successful".
3.6.5 System Configuration
1) Device Properties
Device Name: Set the device name (the default Camera1, user can add their own).
Device ID: Set the device ID (default 1, Read-Only).
System Language: Set the system language (default Simplified Chinese, English optional). Need to re-login after modify and save the setting.
Click on the "Save" button, it will be valid when display "Save successful".
2) System Time
Date Format: Set the date format (YYYY-MM-DD default That year - month - day,MM-DD-YYYY namely Month - Day -Year,DD-MM-YYYY date - month - year Optional).
Date separator: set the date separator (default '/', '.', '-' Optional).
Time Zone: Set the time zone (default East eight districts, other time zones optional).
Time Type: Set the time types (default 24 hours, optional 12 hours).
Time setting: Set time mode (to choose the computer time synchronization, NTP server time synchronization, or set manually).
Computer Time: Set the computer synchronization valid.
Update interval: Set the NTP server automatic updated time interval. Valid after setting NTP server synchronization (default one day, 2-10 days Optional).
NTP server address or domain name: Set NTP server address or domain name (default time.nits.gov). Valid after setting NTP server synchronization.
NTP Server Port: Sets the NTP server port (default 123). Valid after setting NTP server synchronization.
Set the time manually, Effective when set manually.
Click on the "Save" button, it will be valid when display "Save successful".
3) User Management
Select users: Set the user type (the default administrator, Common User 1, Common User 2 optional)
User name: set the user name (Select User Administrator default admin; select a common user1 default user1; to select a common user 2 default user2; user can modify their own)
Password: Set a password(Select User Administrator default admin; select a common user1 default user1; to select a common user 2 default user2; user can modify their own).
Password confirmation: Confirm the input passwords are the same or not.
Click on the "Save" button to display the "Save successfully" message, then the set is to take effect.
Note: Please note the case-sensitivity of the user name and password. If login page by a common user's name and password, one does not have configuration privileges but can only operate to preview, logoff.
4) Version upgrade
MCU version V1.0.1 2019-11-14
Camera version V1.0.4 2020-7-1
AF version V4.0.8 2019-10-10
NDI version V4.5.2 2020-6-3
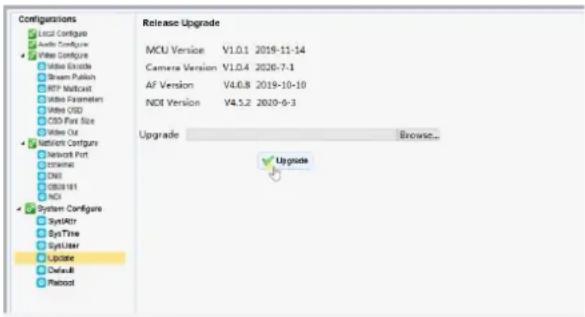
Users only read the version information above which is consistent with the menu version but can not modify. Different types of the machine has different information.
Update file:
Click "Browse ..." installation, to select the upgrade file in the pop-up window.
Click on the "Upgrade" button, the upgrade dialog will appear. the device will reboot automatically after update successfully. (Note: make sure the power and network is keeping connected during the process. or the upgrade will fail)
Note: After the version upgrade is complete, you need to restore factory defaults; a, through web to restore the factory default configuration; b, through the recovery menu; c, remote control shortcut * # 6;
Choose one of the above three ways. If chose a, the IP accounts, passwords also need to be restored to the default.
5) Restore factory setting
Click on pop-up "Restore Factory Defaults" button and choose "YES" or "NO", then the device will restart automatically and restore factory setting.
6) Reboot
Click on the pop-up "Reboot" button and choose "YES" or "NO", then the device will restart automatically
3.7 NDI Instruction
3.7.1 NDI|HX Environment Configuration
1) Connect the LAN port of PC and camera to the same switch or router.
2) Make sure the camera and PC are in the same network segment, with different IP addresses, and the subnet mask and gateway are consistent.
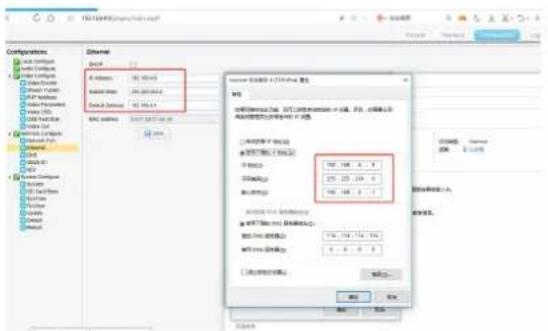
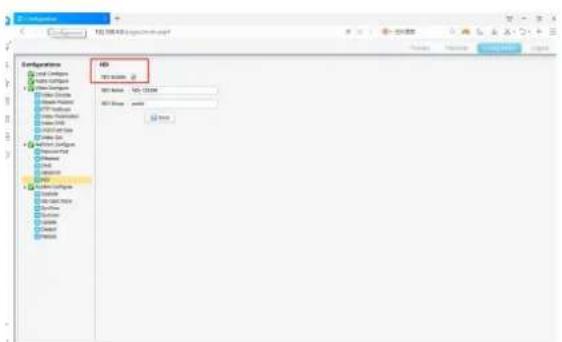
3) PC login web page to open NDI|HX
4) Enable the NDI Studio Monitor provided on NDI's official website to test whether the NDI|HX function is normal.
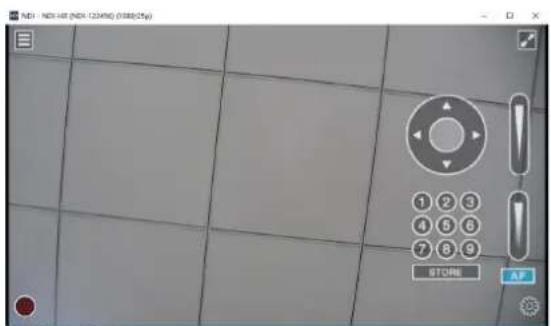
The success of last step indicates that NDI|HX can be used normally.
3.7.2 NDI|HX Network Audio and Video Encoding Parameters
1) NDI|HX Audio Encoding Parameter Configuration
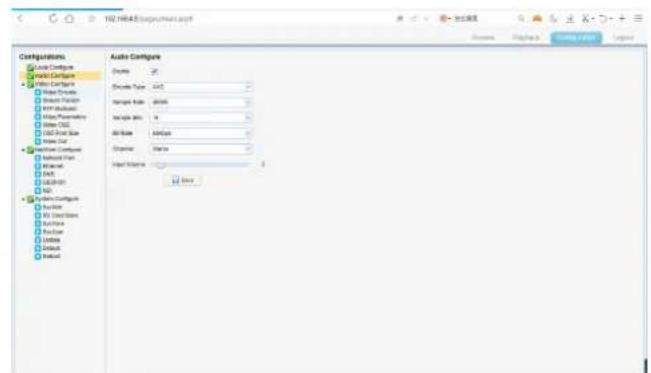
NDI | HX only supports audio format AAC.AAC 48000KHz 64kbps is recommended.
2) NDI|HX Video Encoding Parameter Configuration
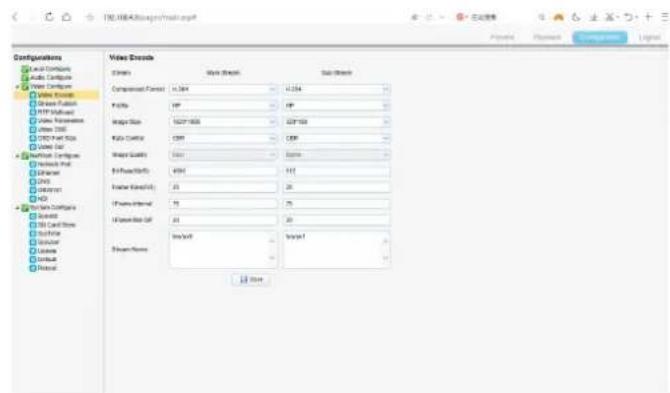
High bandwidth mode: Main Stream
Low bandwidth mode: Sub Stream
Recommendation for Configuration of Video Encoding Parameters:
1, 1920 * 1080: 4096 kb/s
2, 1280 * 720: 2048 kb/s
3,640 * 480: 1024 kb/s
3,640 * 360: 1024 kb/s
4, 320 * 180: 512 kb/s
4, 320 * 240: 512 kb/s
The higher the bit rate, the better the image quality. Self-configuration according to the actual situation.
Instruction:
- The high and low bandwidth is switched on at the same time, which can be switched by users according to the actual situation.
- The frame rate affects the video delay, and the higher the frame rate, the smaller the video delay.
- The HEVC(H265) format has been supported since NDI4.5, while the previous version only supported the H264 format.
- When the video frame rate is 60 frames, two streams can be turned on at most at the same time. It is recommended not to acquire other streams when NDI is turned on, so as to ensure the smooth flow of NDI video.
-
Video Out is used for SDI and HDMI. Since SDI and HDMI are turned on by default, it is recommended to adjust the Video Out Format to 720PX with X representing the frame rate.
6.To configure 60FPS for Video frame rate, you need to configure Video Out Format to 1080P60 or 720P60. -
The frame rate of the video encoding portion is consistent with or multiples of the video output, for example: If video encoding frame rate is 25, then the video output configuration should be 1080P25, 1080P50 or 720P25, 720P 50; If video encoding frame rate is 30, then the video output configuration should be 1080P30 or 720P30; If video encoding frame rate is 60, then the video output configuration should be 1080P60 or 720P60;
3.7.3 NDI|HX Instruction of vmix
1) vmix23 and later version support NDI|HX
2) Open vmix23 and add the NDI source
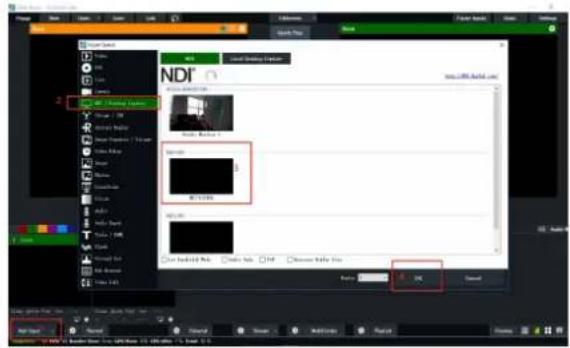
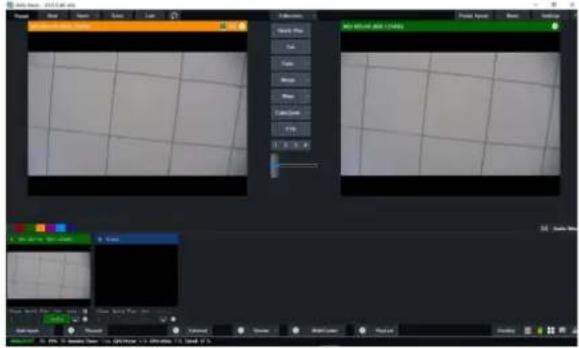
3) Turn on low bandwidth mode
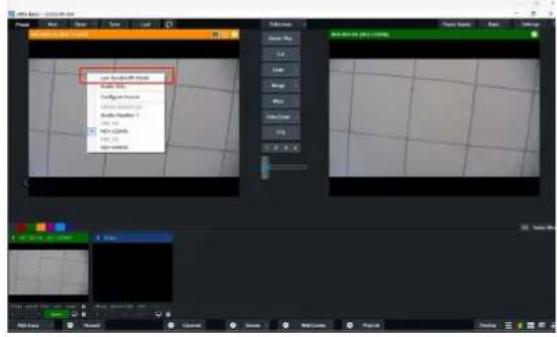
4) vmix configuration delay parameter. The number of frames is based on the frame rate. For example, if the frame rate is 25FPS, then a frame of data is 40ms and the frames are 5, then the network delay will increase by about 200ms.
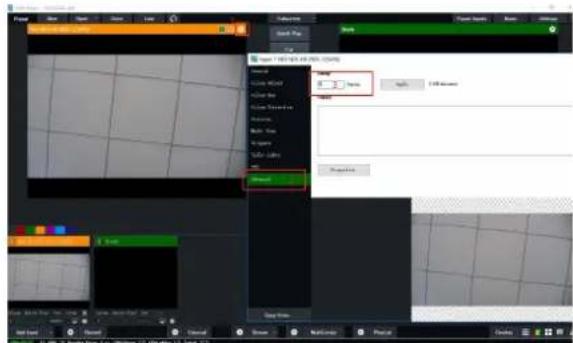
5) The control can select Sony VISCA over IP, the address select the camera IP address, and click Connect.
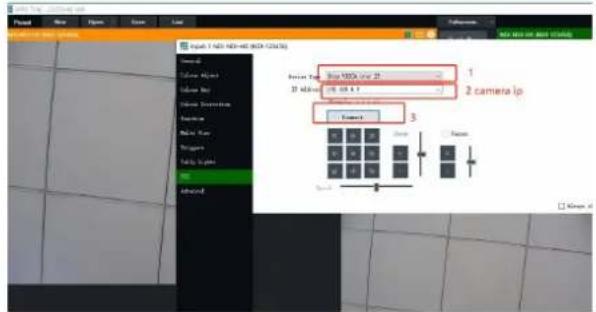
3.7.4 NDI|HX Instruction of OBS
1) Users need download OBS-NDI plug-in from official forum OBS-NDI plug-in reference address: https://github.com/Palakis/obs-ndi/releases/tag/4.7.0
2) OBS adds NDI source
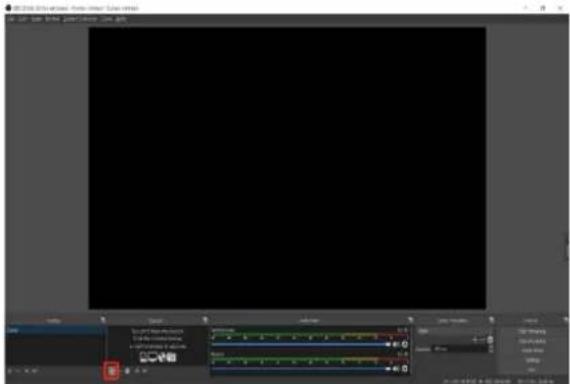
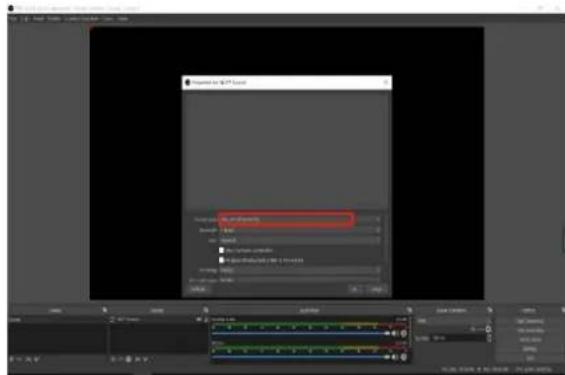
4) Open the audio
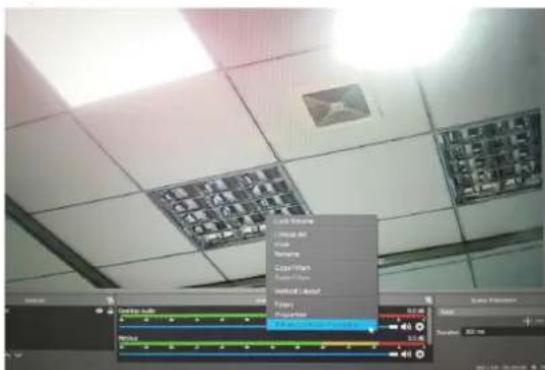
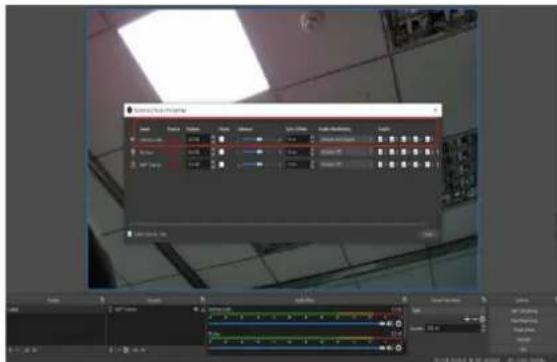
3.7.5 Several Problem solving
1) Whether NDI|HX has significant latency in using vmix? A: 1. The client configures the cache, causing the latency to increase. 2. Set the frame rate to 60 frames can reduce latency.
2) NDI|HX can use vmix to print out the picture normally., while the screen will be black during the use. Can PTZ be controlled during the process?
A: 1. The computer configuration problem leads to the failure of drawing. Please refer to the minimum configuration provided by NDI's official website.
- When vmix obtains the NDI source, NDI|HX will request the key frame. If the key frame acquisition time is greater than 100ms, it can only be solved by restarting the camera. Therefore, it is recommended not to fetch other network streams, such as RTSP, RTMP, page preview, etc., when using NDI 60 frames.
3) How long does the NDI|HX delay?
A: The tested average delay is about 130ms, and the lowest delay is about 80ms when NDI|HX's using configuration is 1920* 1080 4096kbs 60fps and video output configuration is 720P60. Test software:NDI Studio Monitor,turn on low latency mode.
4) How does NDI|HX modify network audio and video parameters?
A: Refer to the section of NDI|HX Network Video and Audio Encoding Parameters Configuration.
5) Can NDI|HX search the source but not get the image?
A: Refer to the section of NDI|HX Environment Configuration.
6) Can NDI|HX normally print out pictures with vmix?
A: vmix23 and later version can print out pictures normally.
7) Which format does NDI support, NDI|HX or FULL NDI?
A: NDI|HX compression (h264, h265) is supported, while FULL NDI compression is not supported. The H265 video compression format is supported only with the latest NDI4.5.2
3.7.6 Setting of NDI Applied to Video Conference Software
1) The NDI camera connects to the NDI signal via a software plug-in provided by the NDI and connects the video and audio directly to the meeting.
NDI software download site: https://www.ndi.tv/tools/#download-tools
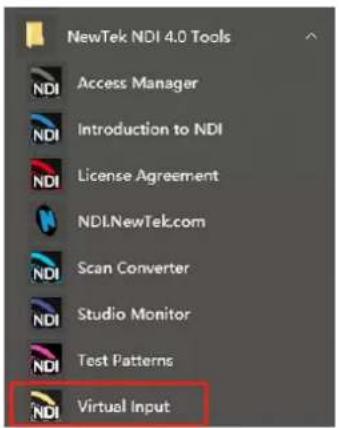
2) Install "NewTek NDI 4.1 Tools", multiple applications will be added to the computer, and in the Video software user will see a camera option named "NewTek NDI Video" and a microphone option named "NewTek NDI Audio".
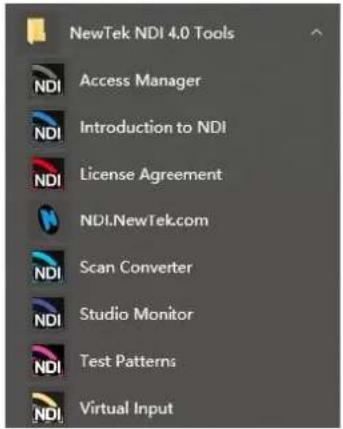
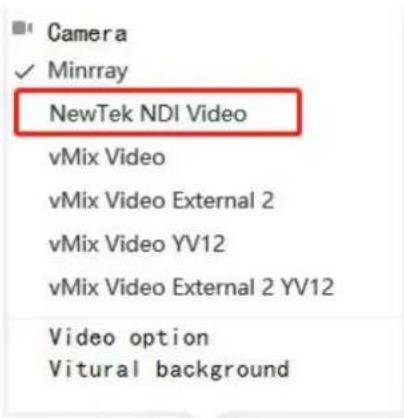
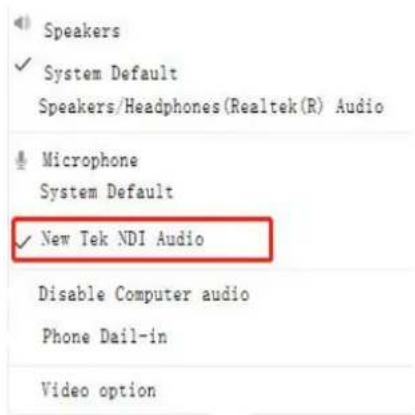
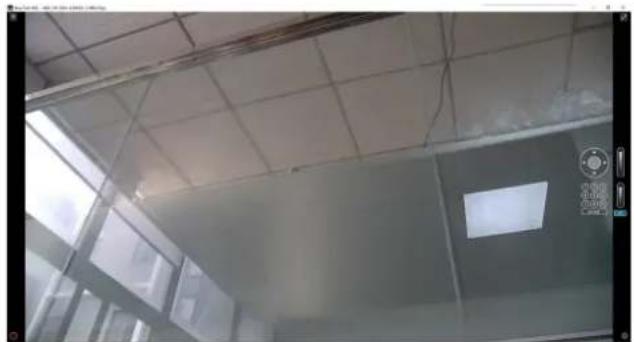
3) In the NDI software, "Studio Monitor" is the drawing program for NDI. Open the program to view the NDI screen and control the camera.
natural_image
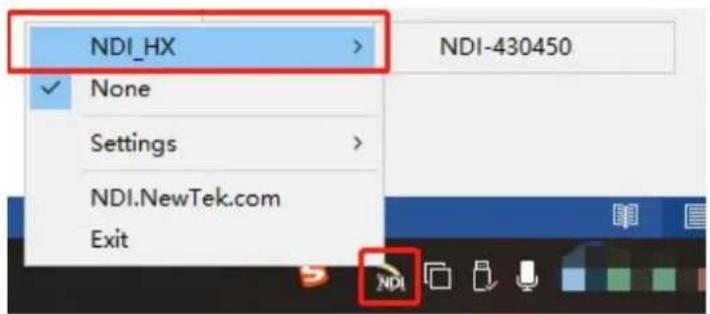
Interior view of a modern building with large windows and ceiling grilles (no visible text or symbols)4) Use the NDI camera to join the video conference. First open the "Virtual Input" program in the NDI software. The program will mount a background program in the background, right-click the icon and select the NDI device.
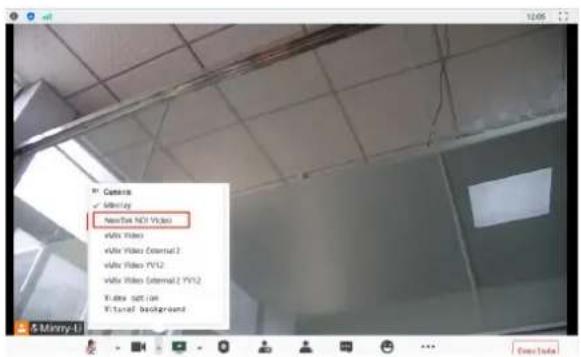
5) When selected, the load is complete. Enter the Video software and click "NewTek NDI Video" to use the NDI camera screen. If the camera is connected to Audio, click "NewTek NDI Audio" from the microphone device to use the camera Audio.
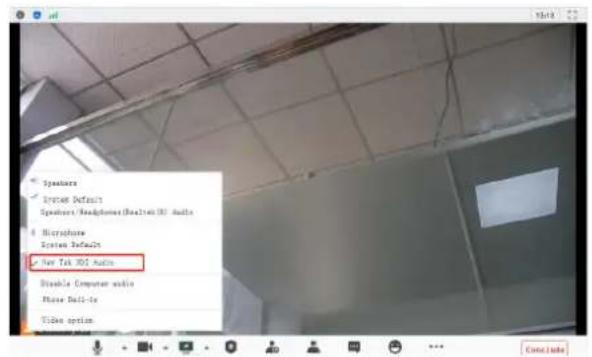
Currently, NDI is supported by Tencent conference, nail, enterprise WeChat, small fish easy connect, ZOOM, Welink, Microsoft Teams.
3.8 Logout
Point "Logout" pop - up "Confirmation" dialog; select "Yes" or "No", choose "Yes" to exit the current page and return to the user login interface again.
Chapter 4 Support
4.1 Camera Maintenance and Troubleshooting
4.1.1 Camera Maintenance
1) If camera is not used for long time, please turn off power adapter switch and AC plug.
2) Use soft cloth or tissue to clean the camera cover.
3) Use soft cloth to clean the lens; Use neuter cleanser if bad smeared. No use strong or corrosive cleanser or corrosive cleanser avoiding scuffing.
4.1.2 Troubleshooting
1) No video output
——a, Check whether the camera power supply is connected, the voltage is normal, the power indicator is lit.
b, Whether the machine could do self-inspection after restarted.
c, Check whether the bottom of the DIP switch is the normal operating mode (see Table 2.2 and Table 2.3)
d, Check whether the video output cable or video display is normal
2) No image sometimes
——a, Check whether the video output cable or video display is normal
3) Image dithering when zoom-in or zoom-out
——a, Check whether the camera installation position is solid
b, Whether there is shaking machine or objects around the camera
4) Remote controller can not work
— — a, Remote control address is set to 1 (if the machine is set back to the factory defaults, remote control addresses need to be back to 1 too)
b, Check whether the battery is installed on the remote controller or low.
c, Check the camera working mode is the normal operating mode
d, Check the menu whether is closed, camera control through remote controller is only available after exiting the menu. If video output from LAN, menu will not be displayed, menu will automatically exists 30s later, then it can be controlled by remote controller.
5) Serial port can not work.
—a, Check whether the camera serial device protocol, baud rate, address is consistent
b, Check whether the control cable is connected properly
c, Check whether the camera working mode is the normal operating mode
6) Web pages can not log in
—a, Check whether the camera is showing normally.
b, Check whether the network cable is connected properly(Ethernet port yellow light flashes to indicate
normal network cable connection)
c, Check whether your computer is added the segment and the segment is consistent with the IP address of the camera
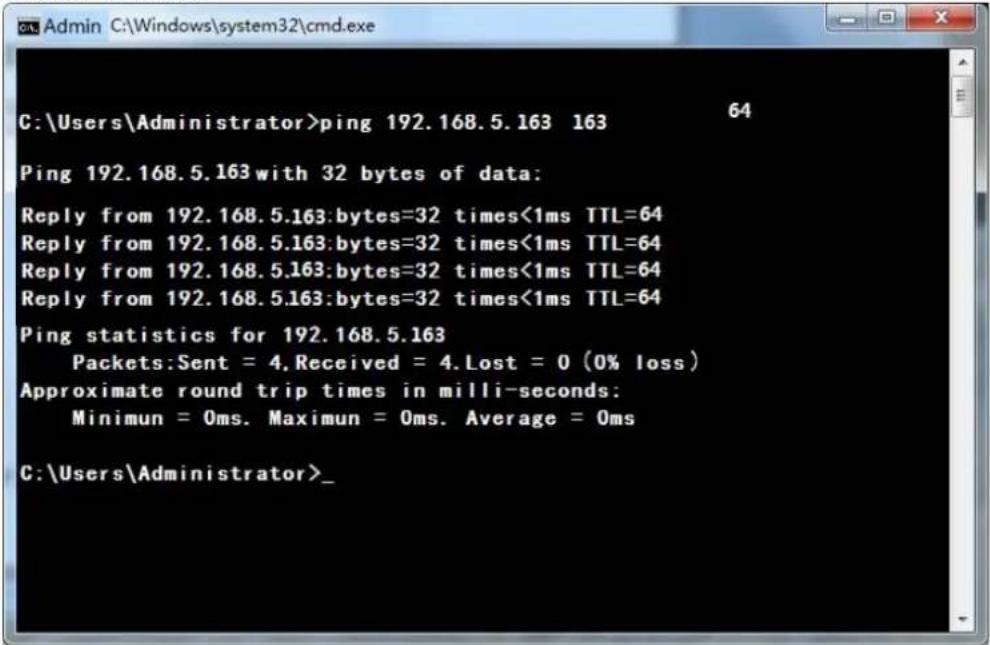
d, Click "Start" and select "Run" and then type "cmd" in the computer;Click "OK" then turn on a DOS command window to enter ping 192.168.5.163. Press the Enter key to appear message as follows: Description network connection is normal
5.1 VISCA Protocol List
5.1.1 Camera Return Command
| Ack/Completion Message | ||
| Command packet | Note | |
| ACK | z0 41 FF | Returned when the command is accepted. |
| Completion | z0 51 FF | Returned when the command has been executed. |
z = camera address + 8
| Error Messages | ||
| Command packet | Note | |
| Syntax Error | z0 60 02 FF | Returned when the command format is different or wh a command with illegal command parameters is accepted |
| Command Not Executable | z0 61 41 FF | Returned when a command cannot be executed due to current conditions. For example, when commands controlling the focus manually are received during auto focus. |
5.1.2 Camera Control Command
| Command | Function | Command packet | Note |
| AddressSet | Broadcast | 88 30 0p FF | p: Address setting |
| IF_Clear | Broadcast | 88 01 00 01 FF | I/F Clear |
| CommandCancel | 8x 21 FF | ||
| CAM_Power | On | 8x 01 04 00 02 FF | Power ON/OFF |
| Off | 8x 01 04 00 03 FF | ||
| CAM_Zoom | Stop | 8x 01 04 07 00 FF | |
| Tele(Standard) | 8x 01 04 07 02 FF | ||
| Wide(Standard) | 8x 01 04 07 03 FF | ||
| Tele(Variable) | 8x 01 04 07 2p FF | p = 0(low) - F(high) | |
| Wide(Variable) | 8x 01 04 07 3p FF | ||
| Direct | 8x 01 04 47 0p 0q 0r 0s FF | pqrs: Zoom Position | |
| CAM _Focus | Stop | 8x 01 04 08 00 FF | |
| Far(Standard) | 8x 01 04 08 02 FF | ||
| Near(Standard) | 8x 01 04 08 03 FF | ||
| Far(Variable) | 8x 01 04 08 2p FF | p = 0(low) - F(high) | |
| Near (Variable) | 8x 01 04 08 3p FF | ||
| Direct | 8x 01 04 48 0p 0q 0r 0s FF | pqrs: Focus Position | |
| Auto Focus | 8x 01 04 38 02 FF | ||
| Manual Focus | 8x 01 04 38 03 FF | ||
| CAM _Zoom Focus | Direct | 8x 01 04 47 0p 0q 0r 0s 0t 0u 0v 0w FF | pqrs: Zoom Position tuvw: Focus Position |
| CAM_WB | Auto | 8x 01 04 35 00 FF | |
| 3000K | 8x 01 04 35 01 FF | ||
| 4000k | 8x 01 04 35 02 FF | ||
| One Push mode | 8x 01 04 35 03 FF | ||
| 5000k | 8x 01 04 35 04 FF | ||
| Manual | 8x 01 04 35 05 FF | ||
| 6500k | 8x 01 04 35 06 FF | ||
| CAM_RGain | Reset | 8x 01 04 03 00 FF | Manual Control of R Gain |
| Up | 8x 01 04 03 02 FF | ||
| Down | 8x 01 04 03 03 FF | ||
| Direct | 8x 01 04 43 00 00 0p 0q FF | pq: R Gain | |
| CAM_Bgain | Reset | 8x 01 04 04 00 FF | Manual Control of B Gain |
| Up | 8x 01 04 04 02 FF | ||
| Down | 8x 01 04 04 03 FF | ||
| Direct | 8x 01 04 44 00 00 0p 0q FF | pq: B Gain | |
| CAM_AE | Full Auto | 8x 01 04 39 00 FF | Automatic Exposure mode |
| Manual | 8x 01 04 39 03 FF | Manual Control mode | |
| Shutter priority | 8x 01 04 39 0A FF | Shutter Priority Automatic Exposure mode | |
| Iris priority | 8x 01 04 39 0B FF | Iris Priority Automatic Exposure mode | |
| Bright | 8x 01 04 39 0D FF | Bright mode | |
| CAM_Shutter | Reset | 8x 01 04 0A 00 FF | Shutter Setting |
| Up | 8x 01 04 0A 02 FF | ||
| Down | 8x 01 04 0A 03 FF | ||
| Direct | 8x 01 04 4A 00 00 0p 0q FF | pq: Shutter Position | |
| CAM_Iris | Reset | 8x 01 04 0B 00 FF | Iris Setting |
| Up | 8x 01 04 0B 02 FF | ||
| Down | 8x 01 04 0B 03 FF | ||
| Direct | 8x 01 04 4B 00 00 0p 0q FF | pq: Iris Position | |
| CAM_Gain Limit | Gain Limit | 8x 01 04 2C 0p FF | p: Gain Position |
| CAM_Bright | Reset | 8x 01 04 0D 00 FF | Bright Setting |
| Up | 8x 01 04 0D 02 FF | ||
| Down | 8x 01 04 0D 03 FF | ||
| Direct | 8x 01 04 4D 00 00 0p 0q FF | pq: Bright Position | |
| CAM_ExpComp | On | 8x 01 04 3E 02 FF | Exposure Compensation ON/OFF |
| Off | 8x 01 04 3E 03 FF | ||
| Reset | 8x 01 04 0E 00 FF | Exposure Compensation Amount Setting | |
| Up | 8x 01 04 0E 02 FF | ||
| Down | 8x 01 04 0E 03 FF | ||
| Direct | 8x 01 04 4E 00 00 0p 0q FF | pq: ExpComp Position | |
| CAM_Back Light | On | 8x 01 04 33 02 FF | Back LightCompensation |
| Off | 8x 01 04 33 03 FF | ||
| CAM_WDRStrength | Reset | 8x 01 04 21 00 FF | WDR Level Setting |
| Up | 8x 01 04 21 02 FF | ||
| Down | 8x 01 04 21 03 FF | ||
| Direct | 8x 01 04 51 00 00 0p FF | p: WDR Level Position | |
| CAM_NR (2D) | 8x 01 04 53 0p FF | P=0-7 0:OFF | |
| CAM_NR (3D) | 8x 01 04 54 0p FF | P=0-8 0:OFF | |
| CAM_Gamma | 8x 01 04 5B 0p FF | p = 0 - 4 0: Default 1: 0.45 2:0.50 3: 0.55 4: 0.63 | |
| CAM_Flicker | OFF | 8x 01 04 23 00 FF | OFF |
| 50HZ | 8x 01 04 23 01 FF | 50HZ | |
| 60HZ | 8x 01 04 23 02 FF | 60HZ | |
| CAM_Aperture | Reset | 8x 01 04 02 00 FF | Aperture Control |
| Up | 8x 01 04 02 02 FF | ||
| Down | 8x 01 04 02 03 FF | ||
| Direct | 8x 01 04 42 00 00 0p 0q FF | pq: Aperture Gain | |
| CAM_Memory | Reset | 8x 01 04 3F 00 pq FF | pq: Memory Number(=0 to 254)Corresponds to 0 to 9 on the Rem Commander |
| Set | 8x 01 04 3F 01 pq FF | ||
| Recall | 8x 01 04 3F 02 pq FF | ||
| CAM_LR_Reverse | On | 8x 01 04 61 02 FF | Image Flip Horizontal ON/OFF |
| Off | 8x 01 04 61 03 FF | ||
| CAM_PictureFlip | On | 8x 01 04 66 02 FF | Image Flip Vertical ON/OFF |
| Off | 8x 01 04 66 03 FF | ||
| CAM_ColorSaturatio n | Direct | 8x 01 04 49 00 00 00 0p FF | P=0-E0:60% 1:70% 2:80% 3:90%4:100% 5:110% 6:120%7:130% 8:140% 9:150%10:160% 11:160% 12:180%13:190% 14:200% |
| CAM_IDWrite | 8x 01 04 22 0p 0q 0r 0s FF | pqrs: Camera ID (=0000 to FFFF) | |
| SYS_Menu | ON | 8x 01 04 06 06 02 FF | Turn on the menu screen |
| OFF | 8x 01 04 06 06 03 FF | Turn off the menu screen | |
| IR_Receive | ON | 8x 01 06 08 02 FF | IR(remote commander)receive On/Off |
| OFF | 8x 01 06 08 03 FF | ||
| IR_ReceiveReturn | On | 8x 01 7D 01 03 00 00 FF | IR(remote commander)receive message via the VISCA communication ON/OFF |
| Off | 8x 01 7D 01 13 00 00 FF | ||
| CAM_SettingReset | Reset | 8x 01 04 A0 10 FF | Reset Factory Setting |
| CAM_Brightness | Direct | 8x 01 04 A1 00 00 0p 0q FF | pq: Brightness Position |
| CAM_Contrast | Direct | 8x 01 04 A2 00 00 0p 0q FF | pq: Contrast Position |
| CAM_Flip | OFF | 8x 01 04 A4 00 FF | Single Command For Video Flip |
| Flip-H | 8x 01 04 A4 01 FF | ||
| Flip-V | 8x 01 04 A4 02 FF | ||
| Flip-HV | 8x 01 04 A4 03 FF | ||
| CAM_VideoSystem | Set camera video system | 8x 01 06 35 00 0p FF | P: 0~E Video format0:1080P60 8:720P301:1080P50 9:720P252:1080i60 A :1080P59.943:1080i50 B :1080i59.944:720P60 C:720P59.945:720P50 D :1080P29.976:1080P30 E :720P29.977:1080P25 |
| Pan_tiltDrive | Up | 8x 01 06 01 VV WW 03 01 | VV: Pan speed 0x01 (low speed) to 0x18 (high speed)WW: Tilt speed 0x01 (low speed) to 0x14 (high speed)YYYY: Pan PositionZZZZ: Tilt Position |
| Down | 8x 01 06 01 VV WW 03 02 | ||
| Left | 8x 01 06 01 VV WW 01 03 | ||
| Right | 8x 01 06 01 VV WW 02 03 | ||
| Upleft | 8x 01 06 01 VV WW 01 01 | ||
| Upright | 8x 01 06 01 VV WW 02 01 | ||
| DownLeft | 8x 01 06 01 VV WW 01 02 | ||
| DownRight | 8x 01 06 01 VV WW 02 02 | ||
| Stop | 8x 01 06 01 VV WW 03 03 | ||
| AbsolutePosition | 8x 01 06 02 VV WW0Y 0Y 0Y 0Y 0Z 0Z 0Z 0Z FF | ||
| RelativePosition | 8x 01 06 03 VV WW0Y 0Y 0Y 0Y 0Z 0Z 0Z 0Z FF | ||
| Home | 8x 01 06 04 FF | ||
| Reset | 8x 01 06 05 FF | ||
| Pan-tiltLimitSet | Set | 8x 01 06 07 00 0W0Y 0Y 0Y 0Y 0Z 0Z 0Z 0Z FF | W:1 UpRight 0:DownLeftYYYY: Pan Limit Position(TBD)ZZZZ: Tilt Limit Position(TBD) |
| Clear | 8x 01 06 07 01 0W07 0F 0F 0F 07 0F 0F 0F FF |
5.1.3 Inquiry Command
| Command | Function | Command packet | Note |
| CAM_PowerInq | 8x 09 04 00 FF | y0 50 02 FF | On |
| y0 50 03 FF | Off(Standby) | ||
| CAM_ZoomPosInq | 8x 09 04 47 FF | y0 50 0p 0q 0r 0s FF | pqrs: Zoom Position |
| CAM_FocusAFModelInq | 8x 09 04 38 FF | y0 50 02 FF | Auto Focus |
| y0 50 03 FF | Manual Focus | ||
| CAM_FocusPosInq | 8x 09 04 48 FF | y0 50 0p 0q 0r 0s FF | pqrs: Focus Position |
| CAM_WBModelInq | 8x 09 04 35 FF | y0 50 00 FF | Auto |
| y0 50 01 FF | 3000K | ||
| y0 50 02 FF | 4000K | ||
| y0 50 03 FF | One Push Mode | ||
| y0 50 04 FF | 5000K | ||
| y0 50 05 FF | Manual | ||
| y0 50 00 FF | 6500K | ||
| CAM_RGainInq | 8x 09 04 43 FF | y0 50 00 00 0p 0q FF | pq: R Gain |
| CAM_BGainInq | 8x 09 04 44 FF | y0 50 00 00 0p 0q FF | pq: B Gain |
| CAM_AEModelInq | 8x 09 04 39 FF | y0 50 00 FF | Full Auto |
| y0 50 03 FF | Manual | ||
| y0 50 0A FF | Shutter priority | ||
| y0 50 0B FF | Iris priority | ||
| y0 50 0D FF | Bright | ||
| CAM_ShutterPosInq | 8x 09 04 4A FF | y0 50 00 00 0p 0q FF | pq: Shutter Position |
| CAM_IrisPosInq | 8x 09 04 4B FF | y0 50 00 00 0p 0q FF | pq: Iris Position |
| CAM_Gain LimitInq | 8x 09 04 2C FF | y0 50 0p FF | p: Gain Positon |
| CAM_BrightPosInq | 8x 09 04 4D FF | y0 50 00 00 0p 0q FF | pq: Bright Position |
| CAM_ExpCompModelInq | 8x 09 04 3E FF | y0 50 02 FF | On |
| y0 50 03 FF | Off | ||
| CAM_ExpCompPosInq | 8x 09 04 4E FF | y0 50 00 00 0p 0q FF | pq: ExpComp Position |
| CAM_BacklightModelInq | 8x 09 04 33 FF | y0 50 02 FF | On |
| y0 50 03 FF | Off | ||
| CAM_WDRStrengthInq | 8x 09 04 51 FF | y0 50 00 00 00 0p FF | p: WDR Strength |
| CAM_NRLevel(2D) Inq | 8x 09 04 53 FF | y0 50 0p FF | P: 2DNRLevel |
| CAM_NRLevel(3D) Inq | 8x 09 04 54 FF | y0 50 0p FF | P:3D NRLevel |
| CAM_FlickerModelInq | 8x 09 04 55 FF | y0 50 0p FF | p: Flicker Settings(0: OFF, 1: 50Hz, 2:60Hz) |
| CAM_ApertureInq | 8x 09 04 42 FF | y0 50 00 00 0p 0q FF | pq: Aperture Gain |
| CAM_PictureEffectModelInq | 8x 09 04 63 FF | y0 50 00 FF | Off |
| y0 50 04 FF | B&W | ||
| CAM_MemoryInq | 8x 09 04 3F FF | y0 50 0p FF | p: Memory number last operated. |
| SYS_MenuModelInq | 8x 09 06 06 FF | y0 50 02 FF | On |
| y0 50 03 FF | Off | ||
| CAM_LR_Reverselnq | 8x 09 04 61 FF | y0 50 02 FF | On |
| y0 50 03 FF | Off | ||
| CAM_PictureFlipInq | 8x 09 04 66 FF | y0 50 02 FF | On |
| y0 50 03 FF | Off | ||
| CAM_ColorSaturationInq | 8x 09 04 49 FF | y0 50 00 00 00 0p FF | p: Color Gain setting Oh (60% to Eh (130%) |
| CAM_IDInq | 8x 09 04 22 FF | y0 50 0p FF | p: Gamma ID |
| IR_ReceiveInq | 8x 09 06 08 FF | y0 50 02 FF | On |
| y0 50 03 FF | Off | ||
| IR_ReceiveReturn | y0 07 7D 01 04 00 FF | Power ON/OFF | |
| y0 07 7D 01 04 07 FF | Zoom tele/wide | ||
| y0 07 7D 01 04 38 FF | AF ON/OFF | ||
| y0 07 7D 01 04 33 FF | Camera _Backlight | ||
| y0 07 7D 01 04 3F FF | Camera _Memory | ||
| y0 07 7D 01 06 01 FF | Pan_titleDriver | ||
| CAM_BrightnessInq | 8x 09 04 A1 FF | y0 50 00 00 0p 0q FF | pq: Brightness Position |
| CAM_ContrastInq | 8x 09 04 A2 FF | y0 50 00 00 0p 0q FF | pq: Contrast Position |
| CAM_FlipInq | 8x 09 04 A4 FF | y0 50 00 FF | Off |
| y0 50 01 FF | Flip-H | ||
| y0 50 02 FF | Flip-V | ||
| y0 50 03 FF | Flip-HV | ||
| CAM_GammaInq | 8x 09 04 5B FF | y0 50 0p FF | p: Gamma setting |
| CAM_VersionInq | 8x 09 00 02 FF | y0 50 ab cd mn pq rs tu vw FF | ab cd : vender ID ( 0220 ) mn pq : model ID ST ( 0510 )、U2( 0512 )、U3 ( 0513 )、HD ( ? ? )rs tu : ARM Versionvw : reserve |
| VideoSystemInq | 8x 09 06 23 FF | y0 50 0p FF | P: 0~E Video format0:1080P608:720P301:1080P509:720P252:1080i60 A:1080P59.943:1080i50 B:1080i59.944:720P60 C :720P59.945:720P50 D:1080P29.976:1080P30 E :720P29.977:1080P25 |
| Pan-tiltMaxSpeedInq | 8x 09 06 11 FF | y0 50 ww zz FF | ww: Pan Max Speed zz:Tilt Max Speed |
| Pan-tiltPosInq | 8x 09 06 12 FF | y0 50 0w 0w 0w 0w0z 0z 0z 0z FF | www: Pan Position zzzz:Tilt Position |
Note:[X] in the above table indicates the camera address to be operated, [y]=[x+8] .
5.2 Pelco-D Protocol Command List
| Function | Byte1 | Byte2 | Byte3 | Byte4 | Byte5 | Byte6 | Byte7 |
| Up | 0xFF | Address | 0x00 | 0x08 | Pan Speed | Tilt Speed | SUM |
| Down | 0xFF | Address | 0x00 | 0x10 | Pan Speed | Tilt Speed | SUM |
| Left | 0xFF | Address | 0x00 | 0x04 | Pan Speed | Tilt Speed | SUM |
| Right | 0xFF | Address | 0x00 | 0x02 | Pan Speed | Tilt Speed | SUM |
| Upleft | 0xFF | Address | 0x00 | 0x0C | Pan Speed | Tilt Speed | SUM |
| Upright | 0xFF | Address | 0x00 | 0x0A | Pan Speed | Tilt Speed | SUM |
| DownLeft | 0xFF | Address | 0x00 | 0x14 | Pan Speed | Tilt Speed | SUM |
| DownRight | 0xFF | Address | 0x00 | 0x12 | Pan Speed | Tilt Speed | SUM |
| Zoom In | 0xFF | Address | 0x00 | 0x20 | 0x00 | 0x00 | SUM |
| Zoom Out | 0xFF | Address | 0x00 | 0x40 | 0x00 | 0x00 | SUM |
| Focus Far | 0xFF | Address | 0x00 | 0x80 | 0x00 | 0x00 | SUM |
| Focus Near | 0xFF | Address | 0x01 | 0x00 | 0x00 | 0x00 | SUM |
| Stop | 0xFF | Address | 0x00 | 0x00 | 0x00 | 0x00 | SUM |
| Set Preset | 0xFF | Address | 0x00 | 0x03 | 0x00 | Preset ID | SUM |
| Clear Preset | 0xFF | Address | 0x00 | 0x05 | 0x00 | Preset ID | SUM |
| Call Preset | 0xFF | Address | 0x00 | 0x07 | 0x00 | Preset ID | SUM |
| Query Pan Position | 0xFF | Address | 0x00 | 0x51 | 0x00 | 0x00 | SUM |
| Query Pan Position Response | 0xFF | Address | 0x00 | 0x59 | Value High Byte | Value Low Byte | SUM |
| Query Tilt Position | 0xFF | Address | 0x00 | 0x53 | 0x00 | 0x00 | SUM |
| Query Tilt Position Response | 0xFF | Address | 0x00 | 0x5B | Value High Byte | Value Low Byte | SUM |
| Query Zoom Position | 0xFF | Address | 0x00 | 0x55 | 0x00 | 0x00 | SUM |
| Query Zoom Position Response | 0xFF | Address | 0x00 | 0x5D | Value High Byte | Value Low Byte | SUM |
5.3 Pelco-P Protocol Command List
| Function | Byte1 | Byte2 | Byte3 | Byte4 | Byte5 | Byte6 | Byte7 | Byte8 |
| Up | 0xA0 | Address | 0x00 | 0x08 | Pan Speed | Tilt Speed | 0xAF | XOR |
| Down | 0xA0 | Address | 0x00 | 0x10 | Pan Speed | Tilt Speed | 0xAF | XOR |
| Left | 0xA0 | Address | 0x00 | 0x04 | Pan Speed | Tilt Speed | 0xAF | XOR |
| Right | 0xA0 | Address | 0x00 | 0x02 | Pan Speed | Tilt Speed | 0xAF | XOR |
| Upleft | 0xA0 | Address | 0x00 | 0x0C | Pan Speed | Tilt Speed | 0xAF | XOR |
| Upright | 0xA0 | Address | 0x00 | 0x0A | Pan Speed | Tilt Speed | 0xAF | XOR |
| DownLeft | 0xA0 | Address | 0x00 | 0x14 | Pan Speed | Tilt Speed | 0xAF | XOR |
| DownRight | 0xA0 | Address | 0x00 | 0x12 | Pan Speed | Tilt Speed | 0xAF | XOR |
| Zoom In | 0xA0 | Address | 0x00 | 0x20 | 0x00 | 0x00 | 0xAF | XOR |
| Zoom Out | 0xA0 | Address | 0x00 | 0x40 | 0x00 | 0x00 | 0xAF | XOR |
| Stop | 0xA0 | Address | 0x00 | 0x00 | 0x00 | 0x00 | 0xAF | XOR |
| Focus Far | 0xA0 | Address | 0x01 | 0x00 | 0x00 | 0x00 | 0xAF | XOR |
| Focus Near | 0xA0 | Address | 0x02 | 0x00 | 0x00 | 0x00 | 0xAF | XOR |
| Set Preset | 0xA0 | Address | 0x00 | 0x03 | 0x00 | Preset ID | 0xAF | XOR |
| Clear Preset | 0xA0 | Address | 0x00 | 0x05 | 0x00 | Preset ID | 0xAF | XOR |
| Call Preset | 0xA0 | Address | 0x00 | 0x07 | 0x00 | Preset ID | 0xAF | XOR |
| Query Pan Position | 0xA0 | Address | 0x00 | 0x51 | 0x00 | 0x00 | 0xAF | XOR |
| Query Pan Position Response | 0xA0 | Address | 0x00 | 0x59 | Value High Byte | Value Low Byte | 0xAF | XOR |
| Query Tilt Position | 0xA0 | Address | 0x00 | 0x53 | 0x00 | 0x00 | 0xAF | XOR |
| Query Tilt Position Response | 0xA0 | Address | 0x00 | 0x5B | Value High Byte | Value Low Byte | 0xAF | XOR |
| Query Zoom Position | 0xA0 | Address | 0x00 | 0x55 | 0x00 | 0x00 | 0xAF | XOR |
| Query Zoom Position Response | 0xA0 | Address | 0x00 | 0x5D | Value High Byte | Value Low Byte | 0xAF | XOR |
- Content
- Declarations....3
- Chapter 1 Your Product....5
- Chapter 2 Install Your Product....8
- Chapter 3 Use Your Product....13
- Chapter 4 Support....39
- Chapter 5 Appendix....41
- Declarations
- Installation Safety Summary
- Safety Precautions
- Unpacking and Inspection
- Site Preparation
- Electric Safety
- Polarity of power supply
- Careful of installation
- Don't disassemble discretionarily.
- In the Box
- Product Overview
- Product Model
- Dimension
- Main Features
- Camera Performance
- Network performance
- Technical Specification
- Chapter 2 Install Your Product
- Camera Interface Explanation
- Interface explanation
- External Interface
- Bottom Dial Switch
- RS-232 Interface
- 1) RS-232 interface
- 2) RS-232 Mini-DIN 8-pin Port Definition
- 3) RS232(DB9) Port Definition
- 4) VISCA networking as shown below
- Bracket Mount
- 1) Wall mount step
- Video Output
- Power on initial configuration
- Video Output
- Remote Controller
- Keys Instruction
- Standby Key
- Camera Selection
- Number Key
- \*,# Key
- Focus Control Key
- Zoom Control Key
- Set or Clear Preset key
- Pan/Tilt Control Key
- BLC Control Key
- Menu Setting
- Camera IR Remote Control Address Setting
- 1) Camera Selection
- 2) Pan/Tilt Control
- System Setting
- Camera Setting
- 1) EXPOSURE
- 2) COLOR SETTING
- 3) IMAGE
- 4) FOCUS
- 5) NOISE REDUCTION
- P/T/Z
- Video Format
- Version
- Network Connection
- Connecting Mode
- IE Log In
- Web client
- 1) Web client Log In
- 2) Download/Install Plug in
- Preview
- 1) Login as administrator
- 2) Login as normal user
- Configuration
- Local Configuration
- Audio Configuration
- Video Configuration
- 1) Video encoding
- 2) Stream Release
- 3) RTP Broadcasting
- 4) Video Parameters
- 5) Character-Overlapping
- 6) Character Size
- 7) Video Output
- Network Configuration
- 1) Network port
- 2) Ethernet parameters
- 3) DNS Parameters
- 4)GB28181
- System Configuration
- 1) Device Properties
- 2) System Time
- 3) User Management
- 4) Version upgrade
- 5) Restore factory setting
- 6) Reboot
- NDI Instruction
- NDI|HX Environment Configuration
- NDI|HX Network Audio and Video Encoding Parameters
- Instruction:
- NDI|HX Instruction of vmix
- NDI|HX Instruction of OBS
- Several Problem solving
- Setting of NDI Applied to Video Conference Software
- Logout
- Chapter 4 Support
- Camera Maintenance and Troubleshooting
- Camera Maintenance
- Troubleshooting
- 1) No video output
- 2) No image sometimes
- 3) Image dithering when zoom-in or zoom-out
- 4) Remote controller can not work
- 5) Serial port can not work.
- 6) Web pages can not log in
- VISCA Protocol List
- Camera Return Command
- Camera Control Command
- Inquiry Command
- Pelco-D Protocol Command List
- Pelco-P Protocol Command List
Brand : Feelworld
Model : NDI20X
Category : Security Camera