
SkyPanel X22 - Lighting ARRI - Free user manual and instructions
Find the device manual for free SkyPanel X22 ARRI in PDF.


| Brand | ARRI |
| Model | SkyPanel X22 |
| Product Type | LED Panel Light |
| Light Source | RGBACL (Red, Green, Blue, Amber, Cyan, Lime) LEDs |
| Color Temperature Range | 2000 K - 10000 K (tunable white) |
| Color Rendition | Full gamut color mixing with extensive gel library and source matching |
| Protection Rating | IP66 (dust-tight and protected against powerful water jets) |
| Control Methods | Control panel, DMX, Art-Net, sACN, RDM, CRMX (wireless DMX), Bluetooth 5.0, web portal |
| Dimming Curves | Linear, S-curve, Exponential (default), Logarithmic |
| Built-in Effects | 15 effects including Candle, Fire, Lightning, Strobe, Explosion, etc. |
| Wireless Control | Integrated LumenRadio CRMX transceiver and Bluetooth 5.0 |
| Power Input | Mains (AC) and Battery (42V DC) |
| Yoke / Mounting | Modular yoke available; quick-release latches for easy attachment |
| Accessory Compatibility | S60 adapter for use with SkyPanel S60-C accessories |
| Firmware Update | Via USB-C flash drive or web portal |
| Status Indication | Multi-color status LED (green, blue, orange, red) for operation and errors |
| Multi-Unit Array | Up to 3 devices can be grouped as a single virtual device |
| Maintenance | Clean with dry cloth; avoid high-pressure jet or steam cleaning |
| Safety Features | Strobe effect warning; IP66 protection; electrical safety checks |
Frequently Asked Questions - SkyPanel X22 ARRI
User questions about SkyPanel X22 ARRI
0 question about this device. Answer the ones you know or ask your own.
Ask a new question about this device
Download the instructions for your Lighting in PDF format for free! Find your manual SkyPanel X22 - ARRI and take your electronic device back in hand. On this page are published all the documents necessary for the use of your device. SkyPanel X22 by ARRI.
USER MANUAL SkyPanel X22 ARRI
November 2023 • 1.0 • English
L5.0049706
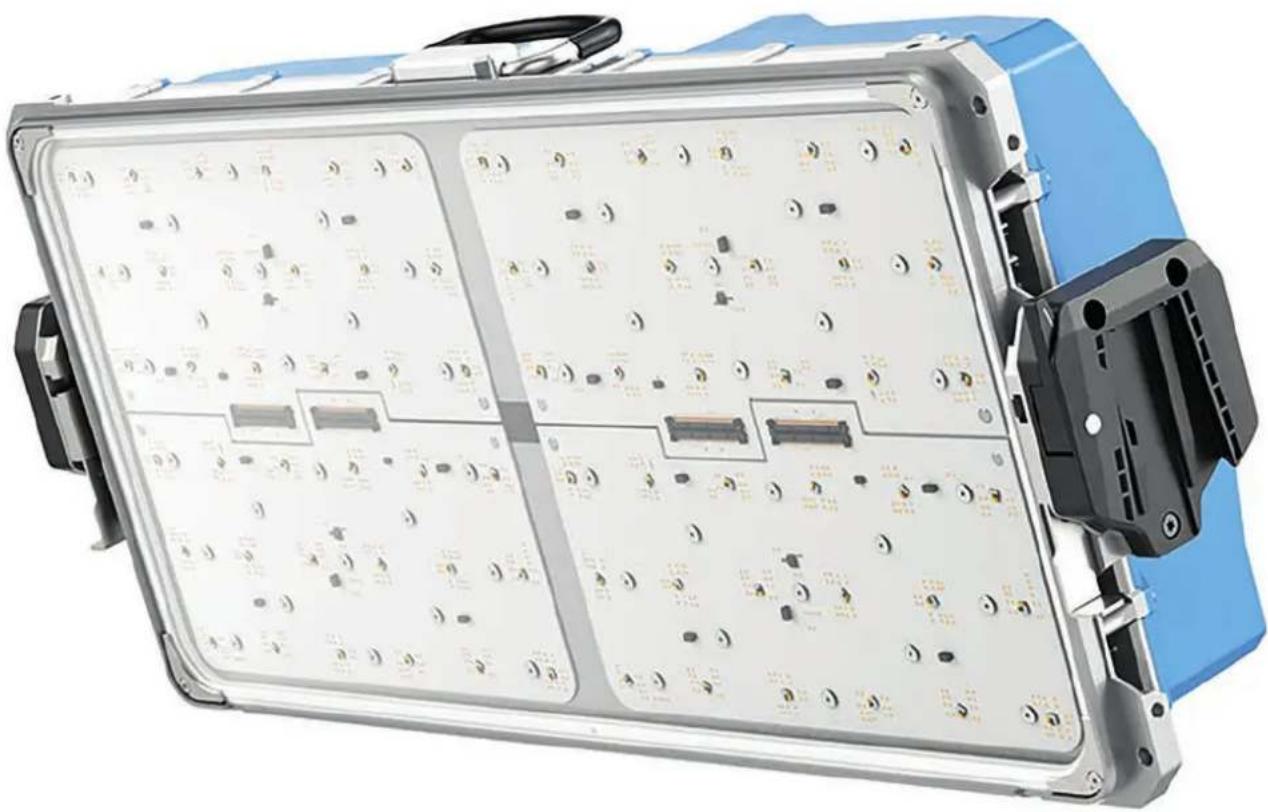
natural_image
Close-up of a blue electronic device chassis with multiple internal components and connectors (no visible text or symbols)Disclaimer
Before using the product, be sure to read and understand all respective instructions.
The product is available for commercial customers only.
For product specification changes since this document was published, refer to the latest publications of ARRI data sheets or data books, etc., for the most up-to-date specifications.
Not all products and / or types are available in every country. Please check with an ARRI sales representative for availability and additional information.
The information given in this document is subject to change without notice.
While ARRI endeavors to enhance the quality, reliability and safety of their products, customers agree and acknowledge that the possibility of defects thereof cannot be eliminated entirely. To minimize risk of damage to property or injury (including death) to persons arising from defects in the products, customers must incorporate adequate safety measures in their work with the system and have to heed the stated canonic use.
ARRI or its subsidiaries expressly exclude any liability, warranty, demand or other obligation for any claim, representation, or cause, or action, or whatsoever, express or implied, whether in contract or tort, including negligence, or incorporated in terms and conditions, whether by statute, law or otherwise. In no event shall ARRI or its subsidiaries be liable for or have a remedy for recovery of any special, direct, indirect, incidental, or consequential damages, including, but not limited to lost profits, lost savings, lost revenues or economic loss of any kind or for any claim by third party, downtime, good will, damage to or replacement of equipment or property, any cost or recovering of any material or goods associated with the assembly or use of our products, or any other damages or injury of the persons and so on or under any other legal theory.
Neither ARRI nor its subsidiaries assume any liability for infringement of patents, copyrights or other intellectual property rights of third parties by or arising from the use of ARRI products or any other liability arising from the use of such products. No license, express, implied or otherwise, is granted under any patents, copyrights or other intellectual property right of ARRI or others.
In the case one or all of the foregoing clauses are not allowed by applicable law, the fullest extent permissible clauses by applicable law are validated.
Imprint
The device contains proprietary information of Arnold & Richter Cine Technik GmbH & Co. Betriebs KG; it is provided under a license agreement containing restrictions on use and disclosure and protected by copyright law. Reverse engineering of the software is prohibited.
No part of this publication may be used for distribution, reproduction, transmission, transcription, storage in a data retrieval system, or translated into any language in any form by any means without the prior written permission of Arnold & Richter Cine Technik GmbH & Co. Betriebs KG.
If you are downloading files from our web pages for your personal use, make sure to check for updated versions.
ARRI cannot take any liability whatsoever for downloaded files, as technical data are subject to change without notice.
Due to continued product development the information in this document may change without notice. The information and intellectual property contained herein is confidential between ARRI and the client and remains the exclusive property of ARRI. If you find any problems in the documentation, please report them to us in writing. ARRI does not warrant that this document is flawless.
Art-Net ^™ Designed by and Copyright Artistic Licence Holdings Ltd.
ARRI, the ARRI Logo, ARRIMAX, ARRISUN, EB, LIOS, L-Series, MAX Technology, M-Series, Orbiter, POCKETPAR, Quick Lighting Mount, QLM, True Blue, SkyPanel, SKYPANEL, Stellar, T12 as well as the blue/silver color combination are registered trademarks of Arnold & Richter Cine Technik GmbH & Co. Betriebs KG.
Original version.
For Further Assistance
1 About this document
This user manual contains detailed information about the features and functionalities of the device. Please visit the website http://www.arri.com to download the operating manual, where applicable, and much more information about this and other ARRI products.
Keep all manuals and all other operating and assembly instructions belonging to the device in a safe place for future reference and possible subsequent owners
For useful information in addition to these manuals please have a look at the ARRI learn & help section on the ARRI website.
The ARRI Academy courses provide unrivalled insights into the full possibilities of working with ARRI camera systems, lenses, lighting systems and accessories.
Our advanced service training courses are designed to transfer detailed knowledge about how to service and repair all types of ARRI products and give you permanent access to detailed service instructions, special tools and service parts. To learn more, please visit ARRI academy or contact academy@arri.de.
For more details about the product, please refer to the ARRI website at:
SkyPanel X product page

Searchkeys: SkyPanel X, L1.0048487
ARRI documentation portal

Document Revision History
Document ID: L5.0049706
Version Release Date Note
1.0 November 2023 First release
2 About this Product
The SkyPanel X represents the next generation of high-end panel lights – max connectivity and best color/brightness setup. It enables maximum usability for users and rentals while keeping the high-end parameters of ARRI in terms of quality, innovation and reliability.
The SkyPanel X is conceived as a state of the art modular design able to deliver soft and hard lighting. It is optimized for fast, safe and intuitive operation.
The SkyPanel X is an IP 66-rated device. It is protected against powerful water jets (100 liters per minute at 3 m distance with a 12.5 mm nozzle from all directions). This must be clear cold water to avoid corrosion and other material degradation, and never related to high-pressure jet or steam cleaning, which corresponds to a different rating.
ARRI did not only test the SkyPanel X in its facilities and on the field, but also by an independent lab, the TÜV Süd. The test includes a dust-tight test (IP 6x), a waterproof test (IP x6), an electrical safety check after both tests, plus an overall overview on searching for any trace of water inside of the fixture after all testing is performed.
2.1 Features
Light Field
The SkyPanel X is more versatile than a conventional soft light. It can produce hard and soft light using optical accessories.
Even Light Field
The SkyPanel X soft light produces a homogeneous, single-shadow light field, delivering natural results.
Vibrant Colors, Full Spectrum Lighting
True-to-life color rendition is an outstanding feature of the SkyPanel X. The fully tunable white light of the luminaire can be adjusted for different skin tones, camera sensors and mixed light environments. Full gamut color mixing enables the rendition of all color shades. The extensive gel library offers a wide range of familiar colors at the user's fingertips.
Cool Light Beam
The SkyPanel X does not emit any infrared or UV radiation and thus does not forward heat, making actors feel comfortable in the light beam.
Weatherproof
The SkyPanel X is a weatherproof luminaire. It fulfills protection class IP 66.
Multi Unit Control
Multiple devices can be connected in a network via RJ45 wiring. They can be configured as arrays of maximum three devices per array. The array acts as one virtual device and can be controlled via one control panel.
2.2 Properties
Accessory Holder
Optical accessories are placed on the front of the device and secured by two retaining clips. The S60 adapter allows the use of optical accessories for the SkyPanel S60-C.
Yoke
Different yokes are available for the SkyPanel X. The manual yoke made of aluminum is stable and lightweight. The Modular Yoke is designed to carry two or three devices in an array setup.
The two quick-release latches on both sides of the SkyPanel X allow for quick mounting and removing of the yoke or other mounting accessories (like Modular Yoke, twin quick lock or truss adapter) from ARRI. The yoke is included in some sets. It can be ordered separately in case you need a special version.
Tilt-Lock
The high strength tilt-lock provides secure locking. It eliminates movement and slippage and ensures that the SkyPanel X will stay where you put it.
Control
All functions of the SkyPanel X are controllable through DMX, Art-Net or sACN. The device is also fully RDM compatible (with suitable controllers) and is equipped with an RDM feedback channel for reporting all set parameters including system status.
The SkyPanel X is equipped with an integrated CRMX transceiver for wireless control and RDM communication. The integrated Bluetooth 5.0 transceiver interfaces to the ARRI LiCo Bluetooth app.
Control Panel
For location use a control panel for the SkyPanel X is available. The control panel supports control of intensity, color temperature, green-magenta point, hue, saturation and many more parameters. The control panel can be stowed and used on the backside of the device or off the device via a connector cable.
2.3 Control Options
You can control or configure the SkyPanel X with the options listed in the table below:
| Option Control Configuration Information | |||
| Control Panel Yes Yes | Control Panel: Properties and Use of the Control Modes [▶ 14] | ||
| DMX Yes No See SkyPanel X DMX Protocol | Specification (Download here) | ||
| LumenRadio CRMX (wireless DMX) | Yes No | Wireless Menu [▶ 28] | |
| RDM No Yes | DMX RDM [▶ 25] | ||
| Art-Net and sACN Yes No | Network Settings Menu [▶ 26] | ||
| ARRI Lighting Service Manager ALSM | No Yes Download ALSM package | from the ALSM Website | |
| SkyPanel X Web Portal No Yes | Software Tools and Firmware [▶ 38] | ||
| Bluetooth Yes Yes | Bluetooth [▶ 29] | ||
2.4 Status LED
The status LED on the rear side of the SkyPanel X indicates the status of the device:
| Status LED Behavior Description | ||
 | Green / steady Normal operation | |
 | Green and blue / steady Normal operationArt-Net, DMX, sACN traffic receiving | |
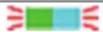 | Green and blue / blinking Normal operationWireless DMX traffic receiving | |
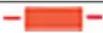 | Orange / blinking slow (2 Hz) Warning, degraded mode | |
 | Red / steady Error (fail safe mode) | |
3 Product Layout
Back View
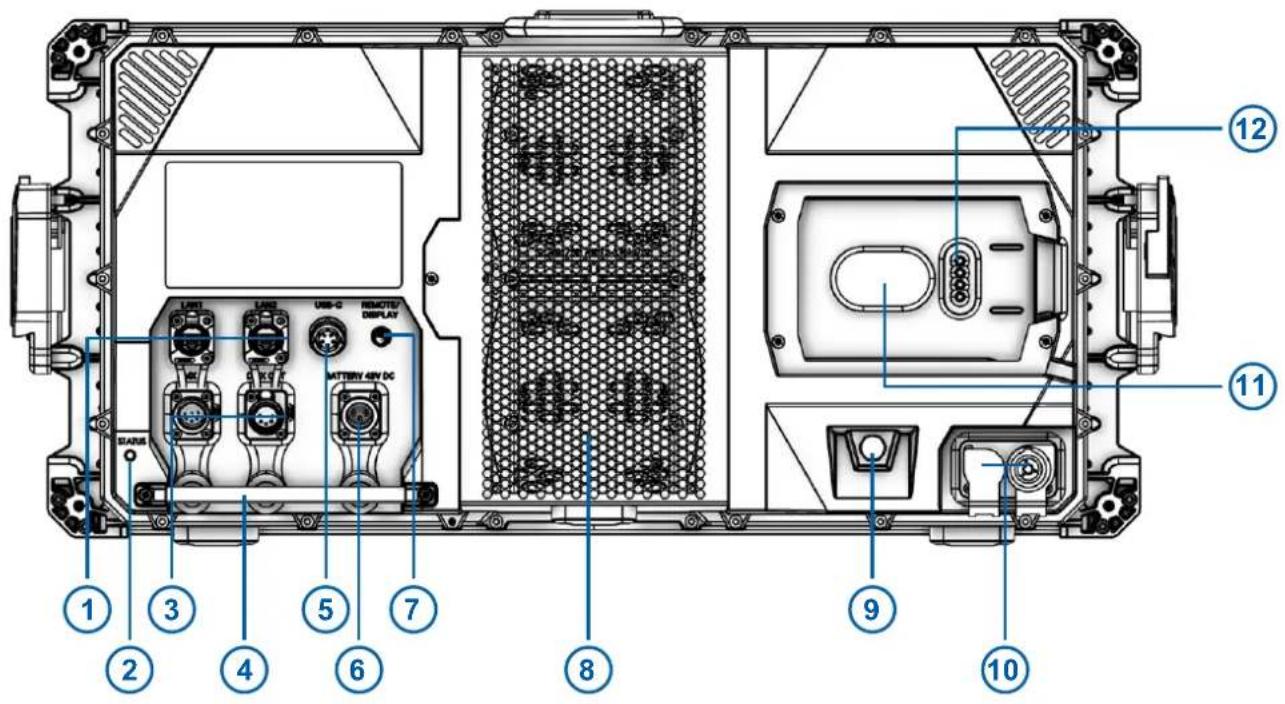
Illustration 1: Back View
1 LAN 1 / 2 (with rubber caps) 7 Remote / display connector
2 Status LED 8 Fan cover
3 DMX in / thru / out (with rubber caps) 9 Climate membrane
4 Focus handle (not for rigging / safety wiring) 10 Mains in / thru (with rubber caps)
5 USB-C connector (with protective cap) 11 Control panel holding magnet
6 Battery in (with rubber cap) 12 Control panel connector pins
Left View
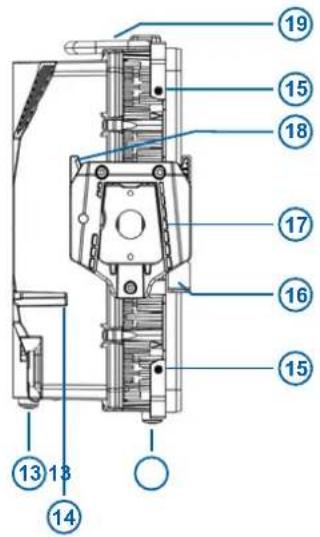
Illustration 2: Left View (as seen from the front)
13 Rubber foot (3x)
14 Drain for control panel recess
15 Accessories holder (4x)
16 Retaining clip for accessories (left and right side)
17 Yoke bracket (left and right side)
18 Quick release lever
19 Handle and safety rope attachment
4 Overview of Control Panel Control Modes
CCT
The CCT mode provides control of intensity, color temperature and green/magenta point.
Additionally the Extended Color Control is available to fine tune the beam parameters.
HSI
The HSI mode provides control of intensity, color temperature, green/magenta point, Hue and Saturation.
Additionally the Extended Color Control is available to fine tune the beam parameters.
X,Y Coordinates
X, Y coordinates determines the color displayed by its xy coordinates in the CIE 1931 diagram.
Additionally the Extended Color Control is available to fine tune the beam parameters.
RGBACL
Simple mode for the generation of colored light. It allows control of the overall intensity and the intensities of the colors red, green, blue, amber, cyan and lime. Please note the color space setting.
Additionally the Extended Color Control is available to fine tune the beam parameters.
Gel Selection
The gel mode offers an extensive color filter list. The color temperature of the virtual white light can be set continuously.
Additionally the Extended Color Control is available to fine tune the beam parameters.
Source Matching
Source Matching saves a lot of time when you need a specific illumination. Set the light source which fits best to your demands.
Effects
The effect generator creates 15 different lighting effects on demand. Activate a lighting effect by pressing the encoder and set the parameters as usual.
Some effects support the feature Change Color, where you can set the Effect Color Mode.
Cue
Cue is a transition between two settings. First set each setting, then set the cue parameters transition time, hold times and direction.
Favorites
You can save up to 246 favorites. A favorite can freely be modified and called up any time. The favorites are saved permanently.
5 Overview of DMX Control Modes
Legacy CCT & RGBW Mode
The legacy CCT & RGBW mode is available with 8 bit and 16 bit resolution. It provides control of intensity, color temperature and green/magenta point, RGBW channels and cross fade from white to color and vice versa.
Additional control channels like fan control, effect selection, light strobe, strobe macros and a control channel to activate DMX presets are present.
Ultimate Modes
The SkyPanel X supports different ultimate modes:
Ultimate (8 bit resolution) and Extended Ultimate (16 bit resolution)
The ultimate modes provide control of intensity, color temperature, green / magenta point and color mode selection (RGB & CCT, HSI & CCT, XY coordinates, raw, not calibrated RGBACL).
Extended Bi Ultimate (16 bit resolution)
The extended bi ultimate mode provides the same features as the ultimate and extended ultimate modes. It provides cross fade from white to color in each color mode.
Additional control channels like fan control, effect selection, light strobe, strobe macros and a control channel to activate DMX presets are present.
Please find more information in the SkyPanel X DMX Protocol Specification which is available for free download here.
Multi Zone Modes
The multi zone modes split up each light engine virtually in two zones which can be controlled independently.
- One device with four light engines is split up in 8 zones (8 Zone Mode RGB or CCT & RGB or CCT & RGBACL),
- Two devices set up in an array are split up in 16 zones (16 Zone Mode RGB),
- Three devices set up in an array are split up in 24 zones (24 Zone Mode RGB).
Please find more information in the section Multi Zone Modes [▶ 36].
6 Control Panel: Properties and Use of the Control Modes
This section describes the use of the control modes via the control panel.
Please find a complete overview of the parameters and options of the individual features when controlling the device via DMX or a network protocol in the SkyPanel X DMX protocol specification, which is available for free download here.
To Set the Intensity in all Control Modes
The encoder sets the intensity in all modes as the default setting (except Effect, Cue and Favorites).
The current value is shown in large letters on the display when changed. The encoder reacts dynamically: fast turning changes the intensity in large steps, slow turning allows very precise adjustment of the intensity.
Press the Intensity quick button to open the intensity shortcut menu: Change the intensity quickly at fixed intervals (+/- 1%, +/- 10%) or to absolute values (0%, 25%, 50%, 75%, 100%). Back leaves the intensity shortcut menu.
6.1 Menu Operation
Layout of the Display
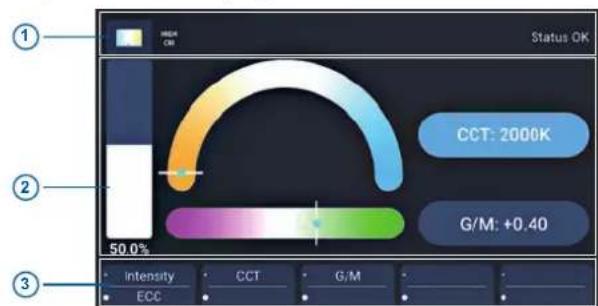
Illustration 3: Control panel display layout
The status bar (1) gives information about the mode and status messages (symbols and text). The area beam parameters (2) contains information about the recent lighting parameters (e.g. brightness, color temperature, lighting effects).
The area quick / user button labels (3) shows the recent function of the corresponding quick / user button. The upper row shows the function linked to a short press, while the lower row shows the function linked to a long press of the of the quick / user button.
Function and Behavior of the Control Elements
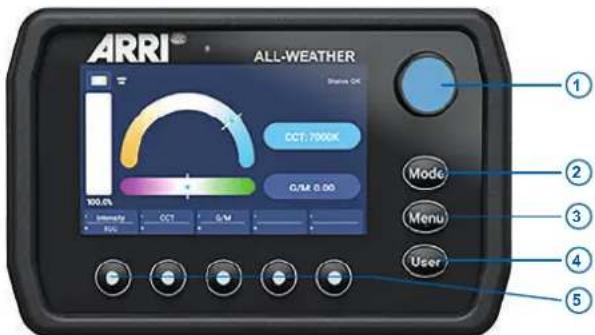
Illustration 4: Control elements of the control panel
| Element Input Result | ||
| Encoder Turn Change | the value of the select parameter. | |
| Single press • Select element, confirm or change value.• Jump one level up. | ||
| When Intensity is selected:Toggle between recent intensity and blackout. | ||
| Double press No function. | ||
| Triple press No function. | ||
| Mode Short press Open | the Mode menu. | |
| Long press Save the recent settings as a favorite. | ||
| Menu Short press Open | the Menu. | |
| Long press Lock and unlock (> 3 seconds) control panel. | ||
| User Short press Open | the User menu. | |
| Long press Open programmer view of user buttons. | ||
| Quick Buttons Short | press Calls up the assigned function of the upper row. | |
| Long press Calls up the assigned function of the lower row. | ||
7 Control Panel: Mode Menu
The Mode menu contains all modes the SkyPanel X can be set to.
The following modes are available:
• CCT [▶ 16]
• HSI [▶ 16]
• X,Y Coordinates [▶ 16]
- RGBACL [▶ 17]
- Gel Selection [▶ 17]
- Source Matching [▶ 17]
- Effect [▶ 19]
- Cue [▶ 20]
- Favorites [▶ 20]
Use the encoder to select the mode.
7.1 CCT
Select the parameter to set with a quick button:
- Intensity
• Color temperature CCT
• Green-magenta point G/M - ECC calls up the extended color control menu.
Set the value of the selected parameter with the encoder. Press Mode long to save all recent settings as a favorite.
7.2 HSI
Select the parameter to set with a quick button:
- Intensity
• Hue - Saturation
- ECC calls up the extended color control menu.
- More calls up the menu to set the color temperature CCT and the green-magenta point G/M.
Set the value of the selected parameter with the encoder. Press Mode long to save all recent settings as a favorite.
7.3 X,Y Coordinates
Select the parameter to set with a quick button:
- Intensity
- x Value
- y Value
- Gamut calls up the Gamut selection list (Rec 709, Rec 2020, PLASA – RGBW calibrated, ARRI Spectra Gamut, Black Body Curve).
- ECC calls up the extended color control menu.
Set the value of the selected parameter with the encoder. Press Mode long to save all recent settings as a favorite.
7.4 RGBACL
Select the parameter to set with a quick button:
- Intensity
- Red, Green, Blue, Amber, Cyan, Lime to set the portion of the selected color in the color mix
- ECC calls up the extended color control menu.
- More calls up the menu to set the color temperature CCT and the green-magenta point G/M. Activate the Calibration Mode with Cal. to On to activate the CCT and G/M parameters.
Set the value of the selected parameter with the encoder. Press Mode long to save all recent settings as a favorite.
7.5 Gel Selection
Select the parameter to set with a quick button:
- Intensity
- Gel: Calls up the gel list depending on the
- Brand: Toggles between LEE and Rosco
- Category: Calls up the category
- ECC calls up the extended color control menu.
- Base CCT calls up the menu to set the color temperature CCT of the virtual white light.
- No color removes all gels.
Set the value of the selected parameter with the encoder. Press Mode long to save all recent settings as a favorite.
Available filter brands and categories implemented in the gel library:
| Rosco LEE | |
| Color Correction Color Correction | |
| CalColor Color Filters | |
| Storaro Selection 600 Series | |
| Roscolux Cosmetic Filters | |
| 700 Series |
7.6 Source Matching
Select the parameter to set with a quick button:
- Intensity
- Category calls up the list of available categories (see table below).
- Source calls up the list of available light sources depending on the category (see table below).
- ECC calls up the extended color control menu.
Set the value of the selected parameter with the encoder. Press Mode long to save all recent settings as a favorite.
Available categories and light sources in source matching mode:
| Category Light Sources | ||
| Incandescent Tungsten Bulb | IncandescentHalogenAntique BulbWarm Antique Bulb | Christmas LightsNight LightInfrared Heat LampGrow Light |
| Fluorescent CFL Soft White | CFL Bright WhiteCFL Cool WhiteCFL Daylight | Cool White 1Cool White 2Cool White 3Warm WhiteCFL Blacklight |
| Discharge HMI | High Pressure SodiumLow Pressure SodiumMercury Vapor | Metal HalideCeramicCarbon ArcXenon |
| Other Candle | Gas FireSun DirectSun OvercastSun Blue HourMobile PhoneComputer MonitorElectroluminescenceBlow TorchRoad Flare | Amber CautionGreen Traffic LightYellow Traffic LightRed Traffic LightBlue Glow StickGreen Glow StickRed Glow StickYellow Glow StickPink Glow StickViolet Glow Stick |
7.7 Effect
Turn and press the encoder to select an effect.
Upon selection the effect menu opens. Depending on the effect different parameters are available.
The parameter Intensity is available in every effect. Available parameters of each effect:
| Effect Parameters Description | ||
| Candle Speed | CCT Range | Low flickering of a warm light, slower than fire and less energetic. The light gentle fades in CCT and brightness with periods of static behavior in between. It consists of „flutters" and static periods. |
| Clouds Passing Speed | OffsetTrigger | Slow variations in intensity and CCT that can be offset. The effect is most useful when using many devices that are offset to prevent a simultaneous effect on different devices. |
| Club Lights Speed | Color Variety (3, 6, 9, 12, 15, 18, 21 or 24 colors) | Random colors that pulse, flash and fade. |
| Cop Car Color Combo | Flash Pattern | Creates an on-board blue, blue/red, blue/white, blue/red/white, blue/orange, blue/red/orange, red/orange, orange or red flashing effect to mimic a police car, an ambulance or a fire brigade. |
| Explosion Trigger | DecayChange Color | Creates a bright flash with fast increasing and slow decreasing intensity. Press the quick button „Trigger" to trigger an explosion. |
| Fire Speed | CCT Range | Creates a flickering fire effect with randomly changing color temperature. |
| Fireworks Speed | Colors | Bright flashes of color and have a quick start and fade to zero intensity. |
| Fluorescent Flicker Speed | FrequencyChange Color | Fluorescent color with static periods and then periods of the light flickering on and off. |
| Lightning Speed | SequenceTriggerChange Color | Creates an on-board flashing lightning effect. Intensity, speed and frequency of flashing can be controlled. |
| Paparazzi Speed | Flash TypeChange Color | Effect that mimics a flash bulb or modern camera flash. |
| Party Effect Speed | Flash Type | The Party effect calls up the color spectrum or changes the color saturation from full to less and vice versa in an endless loop. |
| Pulsing Frequency | DurationChange Color | A pulsing or throbbing effect where the color and speed can be set. |
| Strobe Speed | Change Color | Generates a white or colored strobe effect with adjustable speed. |

DANGER
Risk of injury or death through epileptic seizure triggered by a strobe effect.
▶ Do not use the strobe effect near stairways, in corridors or near public exits.
▶ Mount strobes as high above head height as practicable.
▶ Provide advance notice that strobe lighting is in use. Display advisory notices on the set, at the point of ticket sales, on tickets if possible, in the program, and at the entrance(s) to the venue or studio.
▶ Avoid extended periods of continuous flashing, particularly at frequencies of 10 to 20 flashes per second. At flash rates below 5 flashes per second, it is estimated that only 5% of flicker-sensitive persons will be at risk of seizure.
▶ Make sure that personnel at the venue are trained in the care of a person who is having an epileptic seizure and able to provide care if necessary.
▶ If strobes are in use and a person has a seizure, switch the strobes off immediately.
| Effect Parameters Description | ||
| Television Speed | CCT Range | Creates an on-board TV effect. Cool CCT that changes intensity every few seconds. |
| Welding Speed | Min. LevelChange Color | Quick bright flashes with a fast decay. |
When you change a parameter of the active effect via DMX or the control panel, the internal effect generator recalculates the values immediately. As a result, the effect may be stepped, stuttering or uneven for a short time. Do not change the parameters while the effect is active if it is important that the effect runs smoothly.
7.8 Cue
The color mode Cue is a transition between two settings.
Available parameters:
- Status 1: Set the beam parameters for the first setting by choosing a color mode and its parameters.
- Status 2: Set the beam parameters for the second setting by choosing a color mode and its parameters.
- Hold 1 / Hold 2: Holding time for each setting.
- Trans. Time: Transition time between the two settings.
- Loop: Number of transitions between both settings.
- Bounce: Toggles between Bounce and Forward.
- Reset: Toggles between Reset and Stop. Reset sets the transition back to start while Stop is stopping a running transition.
- Start: Starts the transition with the settings.
7.9 Favorites
Favorites are snapshots of the recent beam parameters in the moment you save it. Save a favorite by pressing Mode long in the main screen of a control mode.
The favorites are sorted in the order they were saved. Open the control mode Favorites and scroll through the list to call up or delete a favorite.
8 Control Panel: Main Menu
The main menu contains several sub menus to set up the device according to your demands:
Light Control Menu [▶ 21]
DMX Menu [▶ 23]
Network Settings Menu [▶ 26]
Wireless Menu [▶ 28]
Flash Drive Functions Menu [▶ 29]
Display Setup Menu [▶ 31]
Fixture Info Menu [▶ 32]
Fixture Settings Menu [▶ 32]
Factory Reset [▶ 32]
Press the Menu button to open the Main Menu. Choose a sub menu to open the overview of functions available in the respective menu.
8.1 Light Control Menu
8.1.1 Host / Client Mode
When Host / Client mode is On, the SkyPanel X acts as a host and controls the client devices via DMX. The client devices will exactly mimic the behavior of the host device.
The devices must be connected to each other via a wired DMX data link. By default the Host / Client mode is not active.
To set the Host / Client Mode
1) Open Light Control > Host / Client Mode.
2) Activate or deactivate the mode with a quick button or with the encoder.
The menu closes upon your selection or automatically after some seconds.

NOTICE
Only one device in the DMX data link may be the host. If more than one device is host, all devices in the DMX data link deactivate the Host / Client mode (Off).
8.1.2 Operational Mode
The operational mode determines the interaction of light quality, brightness and operating noise:
- High CRI Vari Fan: Optimized for high color quality and temperature regulated cooling,
- High Output: High brightness with lower CRI and high fan speed,
- Standard (default): High color quality and low noise,
or light optimized for digital ARRI cameras:
- ARRI ALEXA Standard: high color quality and low noise,
- ARRI ALEXA Vari Fan: optimized for high color quality and temperature regulated cooling, or
- ARRI ALEXA High Output: High brightness with lower CRI and high fan speed.
To set the operational mode
1) Open Light Control > Operational Mode.
2) Select the operational mode with a quick button or with the encoder.
The menu closes upon your selection or automatically after some seconds.
8.1.3 Dimming Curve
The SkyPanel X supports four dimming curves. The dimming curve is a global setting. It affects both the intensity control via the control panel or wired DMX, wireless DMX, Art-Net and sACN.
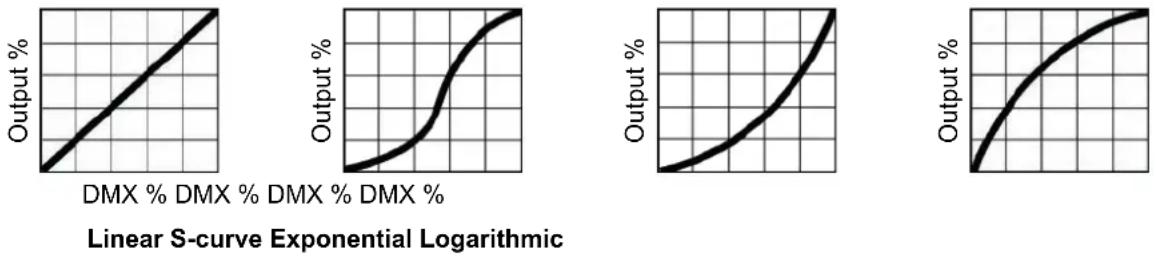
Linear S-curve Exponential Logarithmic
- Linear: The intensity changes proportional to the encoder or the channel value.
- „S“ curve: The resolution is both high at lower and higher intensity levels and low at intensity levels in between. Use this dimming curve, when you need a high resolution at low and high intensity levels.
- Exponential (default): This is the default setting. The resolution is high at lower intensity levels and low at higher intensity levels. Use this dimming curve when you need a high resolution at low intensity levels.
- Logarithmic: The resolution is low at lower intensity levels and high at higher intensity levels. Use this dimming curve when you need a high resolution at high intensity levels.
To set the dimming curve
1) Open Light Control > Dimming Curve.
2) Select the dimming curve with a quick button or with the encoder.
The menu closes upon your selection or automatically after some seconds.

NOTICE
The dynamic of an effect using the intensity is very low, when you choose a basic intensity value in a flat area of the dimming curve. Choose a different effect or select another dimming curve to create a more dynamic effect.
8.1.4 Tungsten Mode
The Tungsten Mode mimics the dimming curve and strike on-and-off effect of a traditional tungsten lamp. The CCT warms as the light is dimmed. When the intensity drops to zero quickly there is a short afterglow of warm light. This mode is perfect for mixing the SkyPanel X with tungsten sources or for producing a familiar effect. The default setting is Off.
To activate and deactivate the tungsten mode
1) Open Light Control > Tungsten Mode.
2) Activate or deactivate the mode with a quick button or with the encoder.
The menu closes upon your selection or automatically after some seconds.
8.1.5 Cue Transition Type
The cue transition type determines the fade type between two settings when fading from white light to colored light and vice versa or when fading between two colors. The table below shows the available fade types.
| Cue Transition Type Description | |
| Direct (default setting) Color 1 > Color 2 | |
| Through Black Color 1 > Black (no light) > Color 2 | |
| Through White Color 1 > White (light, 3.200 K) > Color 2 | |
| Over White Point Color 1 > Above CIE white point | > Color 2 |
| Under White Point Color 1 > Below CIE white point | > Color 2 |
To set the cue transition type
1) Open Light Control > Cue Transition Type.
2) Select the cue transition type with a quick button or with the encoder.
The menu closes upon your selection or automatically after some seconds.
8.1.6 High Speed Mode
The High Speed mode generates flicker-free light for High Speed shootings. The default setting is Off.
To activate and deactivate the high speed mode
1) Open Light Control > High Speed Mode.
2) Activate or deactivate the High Speed mode with a quick button or with the encoder.
The menu closes upon your selection or automatically after some seconds.
8.1.7 RGBACL Color Space
When using RGBACL mode, the SkyPanel X by default does not generate colors in a calibrated color space. The color is generated with optimized brightness within the specified tolerances.
You can activate the calibrated color space Kodak Pro Photo Color Gamut / ESTA standard E1.54 to force the generation of calibrated colors. The color space setting is a global setting.
To activate and deactivate the calibrated RGBACL color space
1) Open Light Control > RGBACL Color Space.
2) Activate or deactivate the RGBACL calibrated mode with a quick button or with the encoder.
The menu closes upon your selection or automatically after some seconds.
8.2 DMX Menu
8.2.1 Priorities
The SkyPanel X can be controlled via DMX or network protocols. When receiving control data from different sources, the device prioritizes the received data as shown in the table below:
| Priority (wireless priority OFF) Priority (wireless priority ON) | |
| Wired DMX / RDM Wireless DMX / RDM | |
| Wireless DMX / RDM Bluetooth | |
| Bluetooth Wired DMX / RDM | |
| sACN sACN | |
| Art-Net Art-Net | |
| Control Panel / Web page via HTTP Control Panel | / Web page via HTTP |
8.2.2 DMX Address
When you use the SkyPanel X with wireless or wired DMX in a DMX data network, you must assign a DMX address to the device to be able to control it. The SkyPanel X calculates, dependent on the DMX mode, the required DMX address space. DMX addresses which will not fit in the DMX address space will not be accepted.
To assign a DMX address
1) Open DMX > DMX Address.
2) Select the DMX address with a quick button and / or with the encoder.
The menu closes upon your selection or automatically after some seconds.
8.2.3 DMX Mode
The SkyPanel X offers 10 different DMX modes. Please find a detailed overview of all DMX modes in the document SkyPanel X DMX Protocol Specification which is available for free download here.
To set a DMX Mode
1) Open DMX > DMX Mode.
2) Select the DMX mode with the encoder.
The menu closes upon your selection or automatically after some seconds.
8.2.4 DMX Loss Behavior
You can set the behavior of the device when the control signal is lost. The table below shows the available options:
| Option Description | |
| Hold Last Command The last | received DMX values are used until the device is switched off or valid DMX data is received again. |
| Black Out The device douses | to 0% intensity immediately. |
| Hold 2 min and fade out The | ast received DMX values are used for 2 minutes. After 2 minutes the device douses to 0% intensity.When valid DMX data is received after less than 2 minutes, these data will be used. |
To set the DMX Loss Behavior
1) Open DMX > Loss Behavior.
2) Select the DMX Loss Behavior with a quick button or the encoder.
The menu closes upon your selection or automatically after some seconds.

NOTICE
The setting of the DMX loss behavior is part of a DMX preset. Therefore the setting can change when calling up a DMX preset.
8.2.5 DMX Transition Type
The DMX transition type determines the fade type between two DMX settings when fading from white light to colored light and vice versa or when fading between two colors. The table below shows the available fade types.
| DMX Transition Type Description | |
| Direct (default setting) Color 1 > Color 2 | |
| Through Black Color 1 > Black (no light) > Color 2 | |
| Through White Color 1 > White (light, 3.200 K) > Color 2 | |
| Over White Point Color 1 > Above CIE white point | > Color 2 |
| Under White Point Color 1 > Below CIE white point | > Color 2 |
To set the DMX transition type
1) Open DMX > Transition Type.
2) Select the DMX transition type with a quick button or with the encoder.
The menu closes upon your selection or automatically after some seconds.
8.2.6 DMX Termination
A DMX data link needs to be terminated to suppress reflections of the data signal on an open end of the data link. Signal reflections can trigger unexpected behavior of devices in the data link.
Terminate the DMX data link on the last device in the data link. Terminate the DMX data link on both ends, when you use the RDM functionality. The SkyPanel X provides an internal DMX data link termination.
To terminate the data link
1) Open DMX > Termination.
2) Select the Option On (terminated) or Off (not terminated) with a quick button or the encoder.
The menu closes upon your selection or automatically after some seconds.
8.2.7 DMX RDM
The SkyPanel X communicates using RDM (Remote Device Management) in accordance with ESTA's American National Standard E1.20-2006: Entertainment Technology RDM Remote Device Management Over DMX512 Networks.
RDM is a bi-directional communication protocol for use in DMX512 control systems. It is the open standard for DMX512 device configuration and status monitoring.
The RDM protocol allows data packets to be inserted into a DMX512 data stream without affecting existing non-RDM equipment. It allows a console or dedicated RDM controller to send commands to and receive messages from specific devices.
In time critical installations the RDM data packets could cause a DMX signal delay. To avoid unexpected behavior of the devices, you can deactivate the RDM functionality in critical installations.
To activate and deactivate RDM
1) Open DMX > RDM.
2) Select the Option On (RDM active) or Off (RDM not active) with a quick button or the encoder.
The menu closes upon your selection or automatically after some seconds.
8.2.8 DMX / RDM Gateway
The DMX/ RDM gateway functionality forwards RDM commands from Art-Net, sACN or CRMX to the XLR DMX ports. This way it is possible to integrate devices which are linked via wired DMX to a wireless DMX or Ethernet control network.
To activate and deactivate the DMX / RDM gateway
1) Open DMX > DMX / RDM Gateway.
2) Select the Option On (DMX / RDM Gateway active) or Off (DMX / RDM Gateway not active) with a quick button or the encoder.
The menu closes upon your selection or automatically after some seconds.
8.2.9 Valid Filter
In the default setting, the SkyPanel X checks the integrity of the received DMX data stream. If certain parameters of the data stream change (e.g. number of received DMX channels), the device will display a warning and check the DMX data stream again before it recognizes the data stream as a valid control signal.
If the length of the data stream changes frequently, the check may lead to unexpected behavior of the device. Therefore the function can be deactivated. The SkyPanel X then accepts all received data without further check.
To activate and deactivate the valid filter
1) Open DMX > Valid Filter.
2) Select the Option On (Valid Filter active) or Off (Valid Filter not active) with a quick button or the encoder.
The menu closes upon your selection or automatically after some seconds.
8.2.10 DMX Preset Activation Confirmation
This feature gives an optical feedback when a DMX preset is activated. The device flashes in red light for 3 seconds after a DMX preset has been activated.
To activate or deactivate the DMX Preset Activation Confirmation
1) Open DMX > DMX preset Activation Confirmation.
2) Select the Option On (Activation Confirmation active) or Off (Activation Confirmation not active) with a quick button or the encoder.
The menu closes upon your selection or automatically after some seconds.
8.3 Network Settings Menu
The menu Network Settings contains various parameters and functions for setting up the SkyPanel X in an ethernet network.
Most parameters and functions are set automatically by the device dependent on the Network Mode. In Manual Network Mode you can set the parameters
- IP address
- Subnet mask
- Gateway address
- DNS 1, and
• DNS 2
manually.
We recommend the Manual Network Mode only in installations where any other Network Mode option will not work. There are some sources of error in Manual Network Mode that can lead to unexpected behavior of the device or completely block the installation. Because of this, you should only use the Manual Network Mode if you know exactly what you are doing.
8.3.1 Network Mode
The menu Network Mode contains all network relevant parameters. Please find a brief overview of the parameters and their options below.
Connection
Accessible in no network mode as it is an information. Shows the status of the network connection:
- Connection OK: Network connection established and running.
- Not connected: No network found.
IP Address
Accessible in Manual Network Mode. Shows the IP address of the device.
Network Mode
Accessible in all network modes. Set the network mode using this menu. The SkyPanel X supports these network modes:
- DHCP: The device will automatically receive an IP address from a DHCP server, such as a network router.
- Art-Net 2.x.x.x: Provides a simple way to set up the device in an Art-Net custom configured network.
- Art-Net 10.x.x.x: Provides a simple way to set up the device in an Art-Net custom configured network.
- Manual: Manual setting allows for a static IP address to be set.
- Auto IP: Auto IP will automatically generate an IP address.
Subnet Mask
Accessible in Manual Network Mode. Shows the Subnet mask of the device.
Art-Net / sACN
Accessible in all network modes. The SkyPanel X supports these Art-Net/sACN modes:
- Automatic: The device will automatically detect and switch between Art-Net and sACN signals on the network. If both are present, sACN will be prioritized.
- Art-Net only: The device only listens for Art-Net signals.
- sACN only: The device only listens for sACN signals.
- Off: The device ignores both Art-Net and sACN signal.
Art-Net Universe
Accessible in all network modes. Allows for the additional universes of DMX. Setting can be changed from 0 to 32.767.
Art-Net Net Sub Uni
Accessible in no network mode as it is an information. Shows the Art-Net net sub universe.
sACN Universe
Accessible in all network modes. Allows for the additional universes of DMX over sACN. Setting can be changed from 1 to 63.999.
Art-Net / sACN Merge Mode
Accessible in all network modes. The menu offers the following options:
- Last Takes Precedence: The device follows the latest received command from any network controller.
- Highest Takes Precedence: The device follows the highest set value from any network controller.
Gateway Address
Accessible in Manual Network Mode. Shows the gateway address of the device.
Bonjour
Accessible in all network modes. The SkyPanel X can be found automatically in a network using the Bonjour application. You can activate or deactivate Bonjour in this menu. You can also set the status via RDM or the Web Portal.
If Bonjour is disabled, the fixture cannot be automatically detected by the ARRI Lighting Service Manager (ALSM).
PTP
Accessible in all network modes. Precision Time Protocol (PTP) is used for automatic sorting of the list of available devices during array configuration.
DNS 1 / DNS 2
Accessible in Manual Network Mode. Sets the DNS address (Domain Name System) of the device.
Timeserver
Accessible in all network modes. Shows the current network IP address. You can change the IP address as desired.
Logserver
Accessible in all network modes. Shows the current network IP address. You can change the IP address as desired.
MAC Address
Accessible in no network mode as it is an information. Shows the MAC address of the device.
8.4 Wireless Menu
The SkyPanel X is equipped with a wireless DMX transmitter supporting the LumenRadio CRMX, CRMX2 protocol and DMX via Bluetooth in a BLE format.
If there is no DMX traffic received via a wired interface (DMX-512A, ArtNet or sACN) and wireless DMX is activated via the menu, the device can be linked to a wireless DMX transmitter via an RDM discovery command. Once linked successfully, the device processes wireless DMX data and respond to RDM requests only via the wireless link.
The DATA LED on the rear side of the device fades from blue to green followed by a 2 second fade from green to blue as soon as CRMX is active AND CRMX data is received and processed by the device.
If the CRMX Data State is set to Off, no wireless DMX and no wireless RDM traffic will be processed.
8.4.1 CRMX
This setting will activate or deactivate the internal LumenRadio CRMX wireless chip.
To activate or deactivate CRMX
1) Open Wireless > CRMX.
2) Select the Option On (CRMX active) or Off (CRMX not active) with a quick button or the encoder.
The menu closes upon your selection or automatically after some seconds.
8.4.2 CRMX Link
Activate CRMX to link a SkyPanel X to a CRMX transmitter. The message Linked appears on successful linking.
Depending on the CRMX transmitter and the CRMX Mode you need to enter additional information.
To enter additional CRMX information
1) Open Wireless > CRMX Linking Key and enter the 8 digit CRMX linking key with the encoder. Confirm the setting with OK.
2) Open Wireless > CRMX Mode and select the CRMX mode (CRMX Classic or CRMX2).
3) Open Wireless > CRMX Output and select the output number (Range A...H (CRMX 2); A, C, E, G (CRMX classic)).
→ The device can now be detected by a CRMX transmitter.
To Unlink a SkyPanel X from a Wireless DMX transmitter
1) Open Wireless > CRMX Link.
2) Unlink the device by pressing the quick button or the encoder for three seconds.
Press Menu or Back to close the menu.

NOTICE
As soon as DMX or RDM traffic is detected via the other interfaces and the wireless priority is set to Off (CRMX > Off), any wireless DMX or RDM data will be ignored and the SkyPanel X processes the wired DMX/RDM traffic. Set the wireless priority to On (CRMX > On) to activate CRMX communication again.
8.4.3 Bluetooth
The SkyPanel X supports the LumenRadio Bluetooth Smart (BLE) Technology. Additionally it is equipped with an internal, dedicated Bluetooth 5.0 dongle. It offers longer range and faster response.
You can control the device via the ARRI LiCo Bluetooth app. The app is available free of charge in the App store and the Play store.
Set Bluetooth to On for smart devices to take control over the SkyPanel X. Off will avoid Bluetooth conflicts with other smart devices.
To activate and deactivate Bluetooth
1) Open Wireless > Bluetooth.
2) Select the On (Bluetooth active) or Off (Bluetooth not active) with a quick button or the encoder.
The menu closes upon your selection or automatically after some seconds.
You may need to enter a Bluetooth code to establish the connection to a smart device.
To enter a Bluetooth code
1) Open Wireless > Bluetooth Code.
2) Enter the Bluetooth code with the encoder.
The menu closes automatically after entering the code.
8.5 Flash Drive Functions Menu
8.5.1 Favorites
The list of favorites can be saved to a USB-C flash drive. The favorites may be restored or uploaded to a different device.
To save favorites
1) Connect a USB-C flash drive to the SkyPanel X.
2) Open Flash Drive Functions > Save Values.
3) All favorites are saved as one file in the root directory of the flash drive.
4) Confirm the success message by pushing the encoder.
To load favorites
1) Connect a USB-C flash drive to the SkyPanel X.
2) Open Flash Drive Functions > Load Values.
3) Select the desired list of favorites from the list.
4) Push the encoder or OK to load the list into the device. All favorites stored in the device will be overwritten.
5) Confirm the success message by pushing the encoder.
8.5.2 DMX User Presets
The list of DMX user presets can be saved to a USB-C flash drive. They may be restored or uploaded to a different device.
To save DMX user presets
1) Connect a USB-C flash drive to the SkyPanel X.
2) Open Flash Drive Functions > Save Presets.
3) All DMX user presets are saved as one file in the root directory of the flash drive.
4) Confirm the success message by pushing the encoder.
To load DMX user presets
1) Connect a USB-C flash drive to the SkyPanel X.
2) Open Flash Drive Functions > Load Presets.
3) Select the desired list of DMX user presets from the list.
4) Push the encoder or OK to load the list into the device. All DMX user presets stored in the device will be overwritten.
5) Confirm the success message by pushing the encoder.
8.5.3 Fixture Settings
The device settings can be saved to a USB-C flash drive. They may be restored or uploaded to a different device.
To save device settings
1) Connect a USB-C flash drive to the SkyPanel X.
2) Open Flash Drive Functions > Save Settings.
3) All device settings are saved as one file in the root directory of the flash drive.
4) Confirm the success message by pushing the encoder.
To load device settings
1) Connect a USB-C flash drive to the SkyPanel X.
2) Open Flash Drive Functions > Load Settings.
3) Select the desired device settings from the list.
4) Push the encoder or OK to load the settings into the device. All settings stored in the device will be overwritten.
5) Confirm the success message by pushing the encoder.
8.5.4 System
For diagnosis purpose you might be asked to send the error and service log to the ARRI service.
The log files can be downloaded to a USB flash drive.
To save the log file
1) Connect a USB-C flash drive to the SkyPanel X.
2) Open Flash Drive Functions > Save Log-File.
3) The system log is saved as one file in the root directory of the flash drive.
4) Confirm the success message by pushing the encoder.
8.5.5 Firmware
The firmware of the SkyPanel X can be updated using the USB flash drive.
To update the firmware
1) Copy the firmware update file to the root directory of the USB flash drive.
2) Connect the USB-C flash drive to the SkyPanel X.
3) Open Flash Drive Functions > Update LiOS.
4) Select the firmware update file.
5) Follow the dialogue for updating the firmware.
8.6 Display Setup Menu
The menu Display Setup offers different options to set the appearance and behavior of the display.
The following options are available:
- Auto Adjust will automatically adjust the display brightness depending on the ambient light around the control panel.
- Display Backlight can be set to be always on or to automatically turn off 10 seconds after the last interaction.
- Display Brightness is available when Auto Adjust is set to Off. Set the display brightness with a quick button or the encoder. Press the encoder to confirm the setting.
- Screen Mode determines the color pattern of the display: Dark Mode is better for low light environments while Light Mode is better for bright environments. Auto Switch will automatically adjust the screen mode depending on the ambient light around the control panel.
- Display Orientation determines if
- the display content will automatically adjust its orientation based on the control panel orientation (Automatic), or if
- the display content will stay normal in relation to the control panel orientation (Normal), or if
– the display content will stay in an upside-down orientation in relation to the control panel orientation (Upside Down). - Zoomed-in View enables or disables the zoomed-in view for value changes.
- Vibration enables or disables the vibration function to get haptic feedback to control the device easy and fast. Feedback is available in lists like CCT range and gels, or in case of error.
The sub menus close upon your selection or automatically after some seconds.
8.7 Fixture Info Menu
The fixture information menu shows all device information in one menu. The following information is available:
| Information Description | |
| Status Ready (green dot): Device ready, no errors | |
| Data No activity | |
| Power Mains power: Powered by AC power source | |
| Errors No error, or | Error list |
| Light Engine Power Consumption Recent light engine power consumption in [W] | |
| Temperatures Shows the recent temperature of: | The CPU, theLight engines, theLED driver, and theMainboardin [°C] or [°F]. |
| Relative Humidity Level Shows the internal relative humidity level in[%RH] | |
| Light Engine Hours Working Hours of the light engines (not resettable) | |
| System Hours Working hours of the device (not resettable) | |
| Fixture Firmware Version Firmware version used by the device | |
| Fixture Serial Number Serial number of the device | |
| Control Panel Firmware Version Firmware version | used by the control panel |
| IP Address IP address of the device | |
| Art-Net Universe Art-Net universe the device is set to. | |
| DMX Mode | Recent DMX mode |
| DMX Address | Recent DMX Address of the device |
| Loss Behavior | Setting of the DMX loss behavior |
| CRMX Link | CRMX Link state: Linked or Unlinked |
| RDM | RDM state: On or Off |
| DMX/RDM Gateway | Gateway state: On or Off |
8.8 Fixture Settings Menu
The fixture settings menu offers some general options:
Language: Set the menu language.
Live view: With Live View On every gel or source are presented while scrolling through. Live View Off requires a short press on the encoder to present the selected gel or source.
Factory Reset: Performs a factory reset. Please confirm the factory reset, which will also reset favorites and settings.
9 Control Panel: User Menu
9.1 User Buttons
You can assign specific features to the five user buttons on the control panel. You can assign each user button two features. The assigned feature is called up with a short or long press of the user button.
Press User long to show the assignment of the user buttons at the bottom of the display in any menu. Press User again to hide the assignment.
To program the user buttons
1) Open User > User buttons.
2) Rotate and press the encoder to select one of 10 user buttons.
3) Select the desired category and the feature with the encoder. The selection screen closes automatically upon your selection.
4) Clear clears the selected user button.
5) Clear all clears all user buttons.
9.2 DMX User Presets
DMX user presets takes a snapshot of the current DMX settings to store them as one of 10 DMX user presets.
The following settings are stored in a DMX user preset:
- DMX address
- DMX mode
- Footprint
- CRMX state
• Art-Net / sACN state - Art-Net / sACN merge mode state
- Art-Net universe
- sACN universe
- DMX / RDM gateway state
- DMX loss behavior
• DMX frame filter / valid filter state - DMX mode specification
- RDM state
To save a DMX user preset
1) Open User > DMX User Presets.
2) Select one DMX user preset with the encoder.
3) Press Store Preset to store the settings in the selected preset.
View Details calls up a screen to name the DMX user preset or display all settings stored. Export saves all DMX user presets to a USB-C flash drive. Empty Preset clears the selected DMX user preset.
To activate a DMX user preset
1) Open User > DMX User Presets.
2) Select the DMX user preset with the encoder. Press the encoder to activate the DMX user preset.

NOTICE
Deactivation of Host / Client Mode when loading a DMX user preset.
If Host / Client Mode was active, loading a DMX user preset disables the Host / Client mode as the user expects the new settings.
9.3 Array Setup
About Device Arrays
Two or three SkyPanel X may be grouped into an X22 or X23 array and controlled using a single control panel or DMX profile. We recommend to use the multi yoke to create a mechanically reliable array. The multi yoke is available as an accessory.
In an array the two or three devices must be connected via RJ45 network cables. The firmware detects the devices around using runtime calculations when calculating the device order. The devices are referred as Top, Middle and Bottom device.
It is possible to mix arrays and individual devices in one control network.
In an ethernet network every SkyPanel X searches the network for other SkyPanel X and saves them in an internal list to let them be added to an array. The list updates using events in the network.
In a daisy chain topology the devices are sorted by the order of the cabling. The user needs to daisy chain the devices in a defined way:
1) Connect the network cable to LAN 2 of the first device on the data line,
2) Connect the network cable to LAN 1 of the next device on the data line,
3) Continue connecting LAN 2 of a device with LAN 1 of the next device until your done.
In an array the
1) Top device connects via the LAN 2 connector to the
2) Middle device LAN 1 connector. The middle device connects via LAN 2 connector to the
3) Bottom device LAN 1 connector.
In a network with star topology the device list is sorted by the order of the cabling in each segment.

NOTICE
Order of cabling in an ethernet network
The user decides which device is the first device in a segment via the cabling through the LAN ports. We recommend to use LAN 1 as input and LAN 2 as output to get a good result. The system can handle other cabling as well. In that case the sorting direction of the devices is backwards or mixed up.
Devices in an array work in an own network configuration independently from the current network settings of all SkyPanel X in the network. Devices in an array are controlled in a special way:
The top device acts as a server for all communication and services for itself, the middle and bottom device. The devices in an array are treated as one single device.
When controlled via a
- Control panel and web page: The control panel / webpage of the top device is active, the control panels / web pages of the middle and bottom device are redirected to the top control panel / web page,
- DMX, Art-Net and sACN: Only the top device reacts,
- RDM: The RDM UID from the top device is taken,
- CRMX Module / Bluetooth: Only active on top device.

NOTICE
Control Delay between Devices
Devices in an array shall act synchronously when controlled as one device. A maximum delay between devices of 10 msec. (equals camera 25 frames / sec / 180 shutter / 2) is allowed.
The devices in an array check regularly if the array is consistent. If the top device can't detect a middle or bottom device, or if a middle or bottom device can't detect a top device, they continue acting as single devices.
Manual Device Array Setup
1) Open User > Array Setup. The screen shows an overview of all available devices (individual and array) with number, name, array name and unique array ID.
2) Rotate the encoder to scroll through the list.
3) Use a quick button or press the encoder to
Rename a device: Choose a name from the list or choose your own name,
Add to Array: Add the device to an automatically generated or new created array. Choose the position (Top [top], second [middle], third [bottom]), or
Cancel the setup process.
4) Repeat the procedure until all devices are set up.
Remove does remove the selected device from an array.
Refresh does refresh the screen.
10 DMX Control Modes
Legacy CCT & RGBW Mode
The legacy CCT & RGBW modes behave as the CCT & RGBW DMX modes (modes 1 and 6) of the classic SkyPanel soft light.
Control channels are available for:
- Intensity,
• Color temperature, - Green / magenta point,
- Cross fade to color,
- Intensities RGBW,
- Fan control, and
- Effects,
- Strobe rate
• Control (DMX presets).
Please find more information in the SkyPanel X DMX Protocol Specification which is available for free download here.
Ultimate Modes
The ultimate modes provide a control channel to call up the color modes
- RGB & CCT,
• HSI & CCT, - XY coordinates, and
- RAW RGBACL (not calibrated).
The options:
- Lighting Effect,
- Gel selection,
- Dimming curve selection,
- Strobe duration,
- Strobe rate,
- Strobe and zone macros,
- Fan mode, and
- DMX preset activation
are available via separate control channels.
Please find more information in the SkyPanel X DMX Protocol Specification which is available for free download here.
Multi Zone Modes
The multi zone modes split up each light engine virtually in two zones.
- One device with four light engines splits up in 8 zones (8 Zone Mode RGB or CCT & RGB or CCT & RGBACL),
- Two devices set up in an array split up in 16 zones (16 Zone Mode RGB),
- Three devices set up in an array split up in 24 zones (24 Zone Mode RGB).
In an array the zones are numbered as shown below (seen from the front).
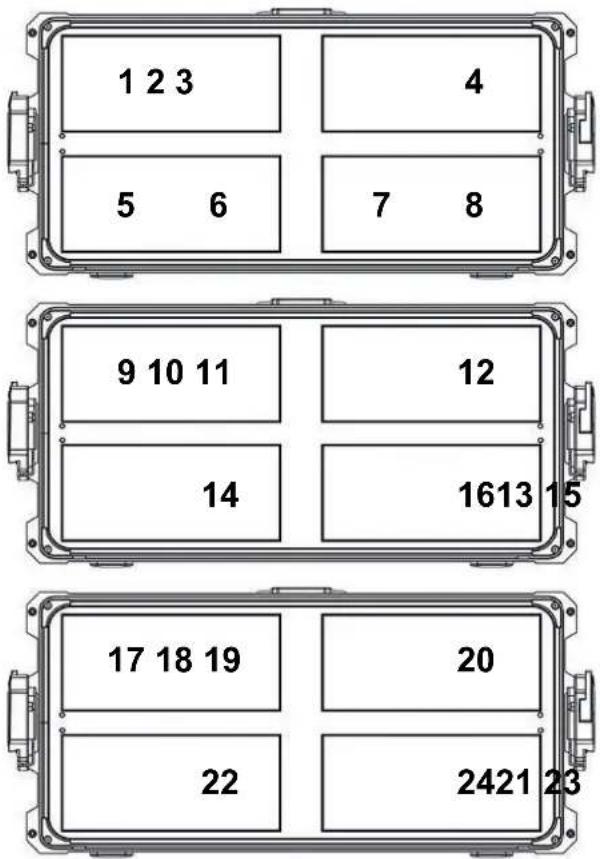
8 Zone Mode RGB
The 8 zone mode RGB controls one device. It provides control of intensity, color temperature, green / magenta point and RGB intensities for each zone.
16 Zone Mode RGB
The 16 zone mode RGB controls two devices in an array. It provides the same features as the 8 zone mode RGB for 16 zones.
24 Zone Mode RGB
The 24 zone mode RGB controls three devices in an array. It provides the same features as the 8 zone mode RGB and the 16 zone mode RGB for 24 zones.
8 Zone Mode CCT & RGB
The 8 zone mode CCT & RGB controls one device. It provides control of master intensity, green / magenta point and dimmer, color temperature, RGB intensities and cross fade from white to color for each zone.
8 Zone Mode CCT & RGBACL
The 8 zone mode CCT & RGBACL controls one device. It provides control of master intensity, green / magenta point and dimmer, color temperature, RGBACL intensities and cross fade from white to color for each zone.
Additional control channels like fan control, effect selection, light strobe, strobe macros and a control channel to activate DMX presets are present for all multi zone modes. These settings are global for all zones.
11 Software Tools and Firmware
ARRI Lighting Service Manager ALSM
Please find information about the features and the functionality of the ALSM ARRI Lighting Service Manager in the user manual for the ALSM ARRI Lighting Service Manager. You can download it from the ALSM website free of charge.
Firmware
Please find the latest firmware in the download area of the LiOS website for free download.

NOTICE
Check regularly on the ARRI SkyPanel X website if a new firmware version is available for the SkyPanel X. For best performance we strongly recommend to use the device with the latest firmware available.
Web Portal
The SkyPanel X provides a web portal accessible via http, when connected to a network. Type in the IP address of the device in your web browser to open the web portal and control nearly every function of the device. The web portal can also be found by using a Bonjour service to discover the device and open the web portal without needing to know the IP address.

NOTICE
Always use the latest version of your web browser. Earlier versions might not be compatible to the web portal of the SkyPanel X.
Avoid access to the web portal during shots or a show. The data exchange with the web portal can lead to delayed reaction time to changes in the control signal or internal calculation routines and to unexpected reactions of the device.
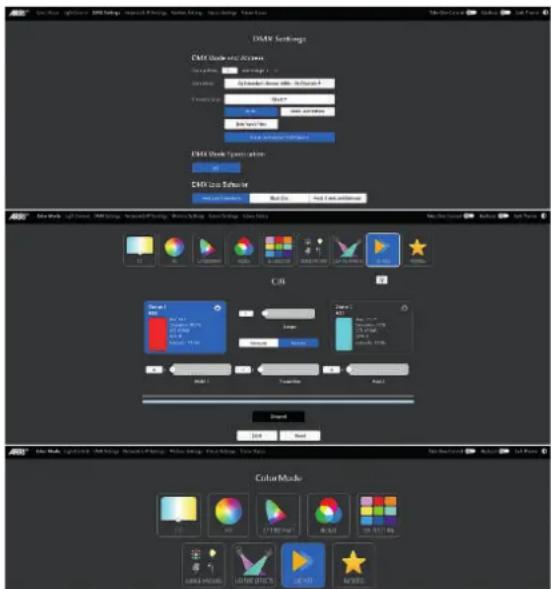
12 Control Panel: Menu Structure
Open the menus Mode, Menu and User with the respective buttons. Turn and push the encoder to select items or set values. Use the user / quick buttons to set values, where applicable. Back closes a menu.
| Level 1 Level 2 Level 3 Level 4 Explanation | ||||
| Mode CCT Intensity Set the intensity. | ||||
| CCT Set the color temperature. | ||||
| G/M Set the green-magenta point. | ||||
| ECC Calls up the extended color | ||||
| control. | ||||
| HSI Intensity Set the intensity. | ||||
| Hue Set the hue. | ||||
| Saturation Set the saturation. | ||||
| ECC Calls up the extended color | ||||
| More CCT Set the color temperature. | ||||
| G/M | ||||
| Set the green-magenta point. | ||||
| X,Y Coordinates | ||||
| Intensity Set the intensity. | ||||
| X value | ||||
| Y value | ||||
| Gamut | ||||
| Level 1 Level 2 Level 3 Level | 4 Explanation | |||
| Mode Source | Matching | Intensity Set the intensity. | ||
| Category Incandescent Set the light source characteristic | ||||
| Source Set the type of light. | ||||
| ECC Calls up the extended color | control. | |||
| Effect Candle ... | Welding Select a lighting effect and | set the effect parameters. | ||
| Cue Status 1 Set | scene 1. | |||
| Hold 1 Set holding time scene 1. | ||||
| Status 2 Set scene 2. | ||||
| Hold 2 Set holding time scene 2. | ||||
| Trans. Time Transition time between | scene 1 and scene 2. | |||
| Loop# | Number of loops (1 to infinity). | |||
| Bounce | Toggle Bounce. | |||
| Reset | Reset to start. | |||
| Start Start cue transition. | ||||
| Favorites | F.1 ... F.246 | Call up favorite # | ||
| Del. Favorite | Delete selected favorite | |||
| Menu | Light Control | Host/Client Mode | On / Off | Toggles Host / Client mode. |
| Operational Mode | High CRI Vari Fan | Set the operational mode. | ||
| High Output | ||||
| Standard | ||||
| ALEXA ALEV 4Vari Fan | ||||
| ALEXA ALEV 4High Output | ||||
| ALEXA ALEV 4Standard | ||||
| ALEXA ALEV 3Vari Fan | ||||
| ALEXA ALEV 3High Output | ||||
| ALEXA ALEV 3Standard | ||||
| Dimming Curve | Exponential | Set the dimming curve. | ||
| Logarithmic | ||||
| Linear | ||||
| "S" Curve | ||||
| Tungsten Mode | On/Off | Toggles Tungsten mode. | ||
| Cue Transition Type | Direct | Set the cue transition type(the path in the CIE diagram when fading between two colors). | ||
| Through Black | ||||
| Through White | ||||
| Over White Point | ||||
| Under White Point | ||||
| Level 1 Level 2 Level 3 Level 4 Explanation | ||||
| Menu Light | Control High Speed | ed Mode On/Off Toggles | High Speed Mode. | |
| RGBACL Color Space | Direct/Calibrated Set the RGBACL color space. | |||
| DMX DMX Address ... DMX Preset Activation Confirmation | Set and view the DMX related options. | |||
| Network Settings | Connection ... MAC Address Set and view network related options. | |||
| Wireless CRMX | ... Bluetooth Code Set and view wireless related options. | |||
| Flash Drive Functions | Save Values ... Firmware Flash Drive related options. | |||
| Display Auto Adjust ... Vibration Display related options. | ||||
| Fixture Info | Status ... DMX/RDM Gateway View device status information. | |||
| Fixture settings | Language | Set menu language. | ||
| Live View | On/Off Toggles the | Live View. | ||
| Factory Reset | Perform a factory reset. | |||
| Factory Reset | ||||
| User | User Buttons | User Button 1 ... User Button 10 | Assign or clear user button functions. | |
| DMX User Preset | Store Preset | DMX user preset related options. | ||
| View Details | ||||
| Export | ||||
| Empty Preset | ||||
| Array Setup | Add to Array | Array related options. | ||
| Rename | ||||
| Refresh | ||||
| Remove | ||||
13 Error Codes
When the device detects a warning, it enters the degraded mode:
- A warning message appears on the control panel,
- All menu functions are still available,
- Operation continues as in normal operation mode,
• Light output continues, - The device switches back to normal operating mode as soon as the causing fault(s) disappeared.
- If no display is connected, the status LED indicates the type of warning that caused the degraded mode.
When the device detects an error, it enters the fail safe mode:
- An error message appears on the control panel,
• Light output is stopped, - If the power supply of the controller is disturbed, the fixture may switch off, otherwise the main controller is kept alive and an error message is shown on the display.
- If no display is connected, the status LED indicates that the device is in degraded mode. (red status light).
| Code Error or Warning | Error or Warning Message Remedy | |
| E.001 E | File system not found Restart the device. If error | persists, contact a certified ARRI service center or ARRI service. |
| E.002 W | Config files missing. Default values are applied | Perform a reset by pressing the reset button (5 s). If warning persists, contact a certified ARRI service center or ARRI service. |
| E.003 E | LED supply voltage not detected Restart the device. If error | errors, contact a certified ARRI service center or ARRI service. |
| E.004 E | LED driver not found | |
| E.005 E | Light engine not found | |
| E.006 E | LED channel fault | |
| E.007 E | Calibration fault | |
| E.008 W | Light engine temperature high Reduce intensity level to avoid malfunction or failure due to high temperature. Avoid mounting or setup conditions that might block the airflow. | |
| E.009 W | LED driver temperature high | |
| E.010 W | Mainboard temperature high | |
| E.011 E | PSU temperature critical Turn off the device or set intensity to 0 % via control panel or DMX to start cool down process. Restart or increase intensity after a few minutes. | |
| E.012 W | NTC temperature sensor deviation Reduce intensity level to avoid malfunction or failure due to high temperature. If problem persists, contact a certified ARRI service center or ARRI service. | |
| E.013 W | Fan speed issue Turn off the device and clean the fans. If problem persists, contact a certified ARRI service center or ARRI service. | |
| E.014 W DC input voltage low DC input voltage too low. | Increase voltage or switch to mains power supply. | |
| E.015 W Flash drive | power supply not detected Restart the device. If warning persists, contact a certified ARRI service center or ARRI service. | |
| E.016 W Flash drive | not found Remove the USB flash drive, wait | some seconds and reconnect it. If the problem persists, format to FAT or try a different USB flash drive. |
| E.017 W Flash drive | read/write not possible | |
| E.018 W Factory default values not found Perform a reset by pressing the reset button (5 s). If warning persists, contact a certified ARRI service center or ARRI service. | ||
| E.019 W DMX signal lost Check DMX network and cables | or enable DMX termination.Manual control via control panel is still possible. | |
| E.020 W DMX data collision External gateway or host (Host / Client mode) detected. Device stops acting as gateway or host. | ||
| E.021 E PSU communication lost Restart the device. If error | persists, contact a certified ARRI service center or ARRI service. | |
| E.022 W LiOS update failed Repeat firmware update | procedure. If warning persists, contact a certified ARRI service center or ARRI service. | |
| E.024 W Fan power supply not detected Restart device. If warning persists, contact a certified ARRI service center or ARRI service. | ||
| E.029 W Sensor missing Please contact a certified ARRI | service center or ARRI service. | |
| E.032 W DC input voltage high DC input voltage too high.Decrease voltage or switch to mains power supply. | ||
| E.034 W CPU temperature high Reduce intensity level to avoid malfunction or failure due to high temperature. Avoid mounting or setup conditions that might block the airflow. | ||
| E.037 E LED driver error Restart device. If error persists, contact a certified ARRI service center or ARRI service. | ||
| E.038 W High system workload Wait some seconds. | ||
| E.039 E LED driver watchdog elapsed! | ||
| E.040 W Received DMX data frame too short Ensure that the used DMX controller supports sending 512 channels. Select a lower DMX start address or change to a mode with a smaller footprint. Deactivate the DMX valid filter. | ||
| Code Error or Warning | Error or Warning Message Remedy | ||
| E.042 W | RTC - Clock | not set correctly Contact certified ARRI service center for battery change. Log files may show incorrect time and date. | |
| E.043 W | CRMX module not found Restart device. If warning or error persists, contact a certified ARRI service center or ARRI service. | ||
| E.044 E | System error | ||
| E.051 W | System watchdog elapsed | ||
| E.053 W | Dim to zero Dim to zero or clear error state to enable light output. | ||
| E.054 E | DMX mode incompatible The current selected DMX mode is incompatible to the current device array setup. Please choose a compatible DMX mode. | ||
| E.055 W | Humidity sensor missing Restart device. If warning persists, contact a certified ARRI service center or ARRI service. | ||
| E.056 W | Take over control active Take over control active. DMX is blocked therefore. Deactivate "Take Over Control" in the bluetooth app or webpage or clear the warning in the errors list. Alternatively restart the device. | ||
| E.057 W | CP temperature high Control panel temperature high. The control panel back light is switched off 10 s after each user interaction. | ||
| E.058 W | / E Array warning / error A device in the array has a warning / an error. You can try to clear the warning. To analyze the problem, dissolve the array and check all devices separately. | ||
| E.059 W | NTC temperature sensor deviation Reduce intensity level to avoid malfunction or failure due to high temperature. Avoid mounting or setup conditions that might block the airflow. | ||
| -- | W | Communication error (Message only in CP) | Reconnect control panel and/or restart device. If error persists, contact a certified ARRI service center or ARRI service. |
| HTTP-Error | W HTTP-Error (not for CP; only for direct access via any other http client like curl) | Check physical network connection for bad connection and/or network settings. | |
Notes
SKY PANEL®
- Disclaimer
- Imprint
- For Further Assistance
- About this document
- About this Product
- Features
- Light Field
- Even Light Field
- Vibrant Colors, Full Spectrum Lighting
- Cool Light Beam
- Weatherproof
- Multi Unit Control
- Properties
- Accessory Holder
- Yoke
- Tilt-Lock
- Control
- Control Panel
- Control Options
- Status LED
- Product Layout
- Illustration 1: Back View
- Overview of Control Panel Control Modes
- CCT
- HSI
- X,Y Coordinates
- RGBACL
- Gel Selection
- Source Matching
- Effects
- Cue
- Favorites
- Overview of DMX Control Modes
- Legacy CCT & RGBW Mode
- Ultimate Modes
- Ultimate (8 bit resolution) and Extended Ultimate (16 bit resolution)
- Extended Bi Ultimate (16 bit resolution)
- Multi Zone Modes
- Control Panel: Properties and Use of the Control Modes
- To Set the Intensity in all Control Modes
- Menu Operation
- Control Panel: Mode Menu
- CCT
- HSI
- X,Y Coordinates
- RGBACL
- Gel Selection
- Source Matching
- Effect
- DANGER
- Risk of injury or death through epileptic seizure triggered by a strobe effect.
- Cue
- Favorites
- Control Panel: Main Menu
- Light Control Menu
- Host / Client Mode
- NOTICE
- Operational Mode
- Dimming Curve
- Linear S-curve Exponential Logarithmic
- Tungsten Mode
- Cue Transition Type
- High Speed Mode
- RGBACL Color Space
- DMX Menu
- Priorities
- DMX Address
- DMX Mode
- DMX Loss Behavior
- DMX Transition Type
- DMX Termination
- DMX RDM
- DMX / RDM Gateway
- Valid Filter
- DMX Preset Activation Confirmation
- Network Settings Menu
- Network Mode
- Connection
- IP Address
- Network Mode
- Subnet Mask
- Art-Net / sACN
- Art-Net Universe
- Art-Net Net Sub Uni
- sACN Universe
- Art-Net / sACN Merge Mode
- Gateway Address
- Bonjour
- PTP
- DNS 1 / DNS 2
- Timeserver
- Logserver
- MAC Address
- Wireless Menu
- CRMX
- CRMX Link
- Bluetooth
- Flash Drive Functions Menu
- Favorites
- To load favorites
- DMX User Presets
- To save DMX user presets
- To load DMX user presets
- Fixture Settings
- To save device settings
- To load device settings
- System
- To save the log file
- Firmware
- To update the firmware
- Display Setup Menu
- Fixture Info Menu
- Fixture Settings Menu
- Control Panel: User Menu
- User Buttons
- DMX User Presets
- Deactivation of Host / Client Mode when loading a DMX user preset.
- Array Setup
- About Device Arrays
- Order of cabling in an ethernet network
- Control Delay between Devices
- Manual Device Array Setup
- DMX Control Modes
- Zone Mode RGB
- Zone Mode RGB
- Zone Mode RGB
- Zone Mode CCT & RGB
- Zone Mode CCT & RGBACL
- Software Tools and Firmware
- ARRI Lighting Service Manager ALSM
- Firmware
- Web Portal
- Control Panel: Menu Structure
- Error Codes
- Notes
- SKY PANEL®
Brand : ARRI
Model : SkyPanel X22
Category : Lighting