
imagePRESS C10010VP - Règle CANON - Free user manual and instructions
Find the device manual for free imagePRESS C10010VP CANON in PDF.


| Product Type | Digital Color Press |
| Brand | Canon |
| Model | imagePRESS C10010VP |
| Print Technology | Electrophotographic (Laser) |
| Maximum Print Speed | 100 pages per minute (A4) |
| Maximum Paper Size | 330.2 x 487.7 mm (SRA3) |
| Dimensions (W x D x H) | Approximately 1800 x 1000 x 1500 mm |
| Weight | Approximately 2000 kg |
| Power Requirements | 220-240 V, 50/60 Hz, Max 6 kW |
| Power Consumption (Max) | 6000 W |
| Typical Power Consumption (Average) | Approximately 2500 W |
| Print Resolution | 1200 x 1200 dpi |
| Supported Paper Media | Plain, recycled, coated, glossy, heavy paper, envelopes, labels |
| Paper Capacity (Standard) | 5500 sheets (from four paper drawers) |
| Duplex Printing | Automatic (standard on all stocks) |
| Finishing Options | Staple, saddle stitch, punching, folding, trimming, booklet making |
| Maintenance Tasks | Regular cleaning of rollers, replace toner cartridges, periodic drum replacement |
| Safety Certifications | CE, UL, CSA, FCC Class A |
| Spare Parts Availability | Authorized Canon service partners |
| Repairability | Serviceable by certified technicians; user-replaceable units: toner, drum, fuser |
| General Information | High-volume production color press for demanding commercial print environments |
Frequently Asked Questions - imagePRESS C10010VP CANON
User questions about imagePRESS C10010VP CANON
0 question about this device. Answer the ones you know or ask your own.
Ask a new question about this device
Download the instructions for your Règle in PDF format for free! Find your manual imagePRESS C10010VP - CANON and take your electronic device back in hand. On this page are published all the documents necessary for the use of your device. imagePRESS C10010VP by CANON.
USER MANUAL imagePRESS C10010VP CANON
Parts and Their Functions .... 5
Configuring the Automatic Adjustment Settings 7
Shading Correction 12
Clearing Paper Jams 13
Maintenance 20
Cleaning the Scanning Glass 21
Main Specifications 24
Third Party Software 27
Read This First
Read This First 2
Read This First
7JWC-000
Please read this manual with the printer User's Guide. This manual describes the functions and maintenance of the Sensing Unit.
■ Viewing This Manual
The icons used in this manual represent the same meanings as those in the printer User's Guide.
■ Setting Display of This manual
You can change the text size in this manual and switch to a screen layout suitable for the machine that displays this manual.
Trademarks
Safari and macOS are trademarks of Apple Inc.
iOS is a trademark or registered trademark of Cisco in the U.S. and other countries and is used under license.
Google Chrome and Android are trademarks of Google LCC.
All other trademarks are the property of their respective owners.
All brand names and product names appearing on this manual are registered trademarks or trademarks of their respective owners.
Sensing Unit-A
Sensing Unit-A 4
Parts and Their Functions .... 5
Configuring the Automatic Adjustment Settings 7
Shading Correction 12
Clearing Paper Jams 13
Maintenance 20
Cleaning the Scanning Glass 21
Main Specifications 24
Sensing Unit-A
7JWC-002
With the Sensing Unit-A connected, the image position, colors, and other settings can be adjusted automatically. This document provides the names and functions of all the parts of Sensing Unit, describes each function, gives instructions for clearing paper jams, and lists the Sensing Unit specifications.
NOTE
- If you continue to experience any image defects on a particular type of paper after the settings have been adjusted automatically, fine-tune the settings manually.
- By using Media Librarian, you can adjust the secondary transfer voltage for the Sensing Unit.
Parts and Their Functions
7JWC-003
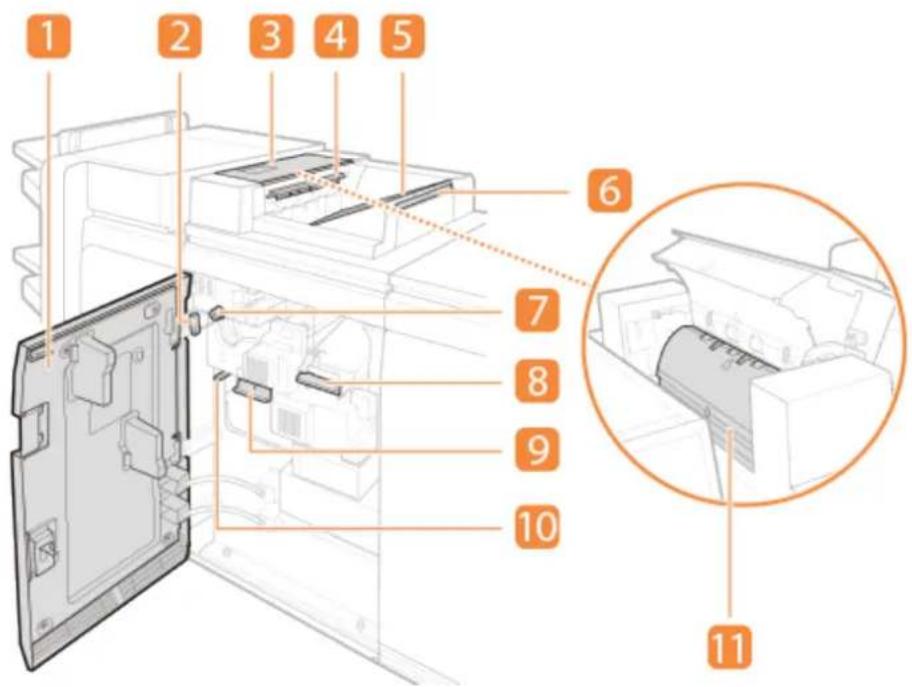
1 Front cover
Open this cover to clear a paper jam or carry out maintenance work.
2 V-B2 guide
Open this guide to clear a paper jam.
3 Paper output feed guide
Open this guide to clear a paper jam.
4 Output area
This is the outlet for printed paper sheets such as test pages for the Sensing Unit functions.
5 Output tray
This is the output tray for printed paper sheets.
NOTE:
- Using this output tray for printing final products is not recommended. Use it when printing test pages and similar materials.
6 Output tray extension
Pull this tray out when printing on large paper sheets.
7 V-B3 knob
When a paper jam occurs, turn this knob to move the paper.
8 V-A3 guide
Open this guide to clean the scanning glass or clear a paper jam.
9 V-A2 guide
Open this guide to clean the scanning glass or clear a paper jam.
10 V-A1 guide
Open this guide to clear a paper jam.
11 V-B1
Check this area when clearing a paper jam.
Configuring the Automatic Adjustment Settings
7JWC-004
The image position and color settings can be adjusted automatically during the printing process or in various intervals.
Periodic automatic adjustment of the image position (initial adjustment)(P. 8)
Automatic adjustment of the image position or colors for every Printing process(P. 10)
Automatic adjustment of the image position and colors during the printing process(P. 11)
■Automatic adjustment of the image position
This function allows you to print adjustment pages periodically during the printing process or print markers in the margin area and adjust the image position automatically. You can also print a test page to adjust the image position automatically when you start using new paper.

IMPORTANT
- In the following cases, you may not be able to adjust the image accurately enough by using the automatic adjustment function.
- When you use paper sheets that have not been properly cut
- When you feed paper or switch between paper decks during the printing process
- The Sensing Unit may not be able to detect markers on colored paper, translucent film, label paper, pre-punched paper, paper that has logos or patterns already printed on it (preprinted paper), or long sheets.
- The paper sheets in the paper deck may shrink or stretch due to changes in temperature and humidity. If you need to print a job with automatic adjustment of the image position, we recommend doing so as quickly as possible before the conditions for the initial adjustment change.
- When performing automatic adjustment by printing markers in the margin area, the markers may not be detected if the images are too close. Make sure you leave a gap that is about 1 mm (0.04") wide.
NOTE
- Before printing a job with automatic adjustment of the image position, we recommend carrying out Periodic automatic adjustment of the image position (initial adjustment)(P. 8).
• We recommend using a single paper deck for jobs with automatic adjustment. - When you perform the procedure for automatic adjustment of the image position with the custom paper type, the adjustment settings are saved after the job is printed.
■ Automatic color adjustment
This function allows you to print adjustment pages periodically during the printing process or print patches in the margin area and adjust the colors automatically.

IMPORTANT
- The Sensing Unit may not be able to detect patches on colored paper, translucent film, label paper, pre-punched paper, paper that has logos or patterns already printed on it (preprinted paper), or long sheets.
- You may not be able to adjust the colors with the automatic adjustment function if the label paper, pre-punched paper, paper that has logos or patterns already printed on it (preprinted paper), transparent paper, watermarked paper, long sheets, or any other types of paper sheets are dirty or if they emit large quantities of paper dust.
- The automatic color adjustment function may not effectively prevent color fluctuations. Use this function for continuous printing operations with the same type of media (same finish, same basis weight, and same size) and with the specified minimum amount of sheets.
- Adjustment by printing patches in the margin area: 500 sheets or more
- Adjustment by inserting adjustment pages: 1000 sheets or more
- When performing automatic adjustment by printing patches in the margin area, the patches may not be detected if the images are too close. Make sure you leave a gap that is about 1 mm (0.04") wide.
NOTE
- Before starting to print with the automatic color adjustment function, we recommend performing automatic gradation adjustment.
- When performing automatic color adjustment with new paper, we recommend printing a test page before printing the final product.
Periodic automatic adjustment of the image position (initial adjustment)
You can perform periodic automatic adjustment of the image position at any point during the printing process for the custom paper type.

IMPORTANT
- Do not use this function with paper that has logos or patterns already printed on it (preprinted paper) or if the paper sheets are dirty.
■ Performing automatic image position adjustment with custom paper type
1 Press (Settings/Registration).
2 Press [Preferences] ▶ [Paper Settings] [Paper Type Management Settings].
NOTE:
- Press (Status Monitor/Cancel) ▶ [Paper] to select the paper deck with the paper you want to adjust. Next, press [Paper Type Management Settings], and the [Paper Type Management Settings] window will appear with the corresponding paper selected.
3 Select the paper type you want to edit from the list, and then press [Details/Edit].
4 Press [Change] under [Adjust Image Position].
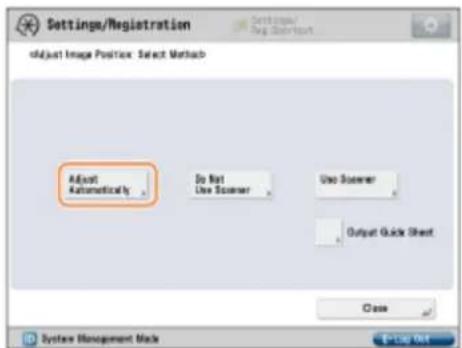
5 Press [Adjust Automatically].
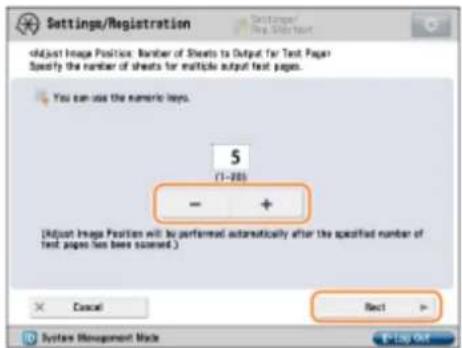
6 Set the number of test pages you want to print, and then press [Next].
NOTE:
- If you want to prioritize accuracy, we recommend setting the number of test pages to 10.
7 Select the location of the paper you want to adjust, and then press [Start Printing].
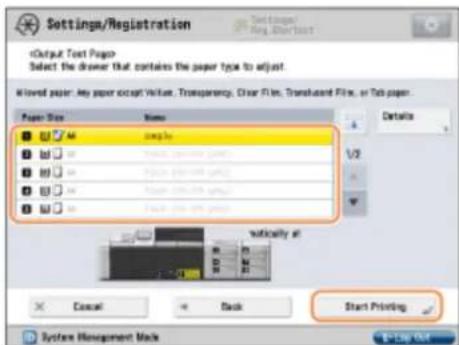
The test pages are printed, and the window shown in step 5 reappears on the screen after the adjustment procedure is completed.
Automatic adjustment of the image position or colors for every Printing process
If you start a job where an adjustment page is output every time a specific number of sheets are printed, automatic adjustment will be carried out with adjustment pages printed in the specified interval. For more information, refer to the manual for your drivers.

IMPORTANT
- Do not use this function with paper that has logos or patterns already printed on it (preprinted paper) or if the paper sheets are dirty.
- You need to add enough paper sheets to the paper deck to print the adjustment pages.
- If a paper jam occurs during a job with automatic adjustment, the adjustment pages may not be printed.
NOTE
• Automatic adjustment will not be carried out for any jobs you start by interrupting the job in progress.
- Such jobs may not start in the interruption time intervals you set. Keep in mind that the interval setting is merely an estimate.
- The interruption correction function reduces the fluctuations within jobs with large numbers of sheets. If you wish to prioritize accuracy by adjusting the interruption intervals, increase the interruption frequency. However, that will also require more adjustment pages and therefore decrease productivity.
- The adjustment may not be as effective for jobs where multiple types of paper are used simultaneously.
- When you start a job with automatic color adjustment, a standard test page is printed before the specified interruption interval in order to carry out the adjustment process.
■ Configuring the interval for automatic adjustment
1 Press (Settings/Registration).
2 Press [Preferences] ▶ [Paper Settings] [Paper Type Management Settings].
NOTE:
- Press (Status Monitor/Cancel) ▶ [Paper] to select the paper deck with the paper you want to adjust. Next, press [Paper Type Management Settings], and the [Paper Type Management Settings] window will appear with the corresponding paper selected.
3 Select the paper type you want to edit from the list, and then press [Details/Edit].
4 Press [Change] under [Adjstmnt Pg Interrupt Intrvl].
5 Set a value between 50 and 9999 sheets as the interruption interval for adjustment pages, and then press [OK].
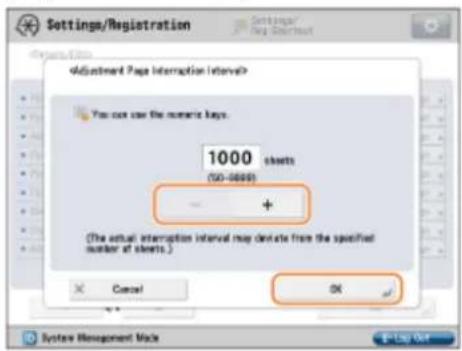
The settings are applied, and the [Details/Edit] window for the corresponding custom paper type reappears on the screen.
Automatic adjustment of the image position and colors during the printing process
If you start a job where adjustment patches or markers are printed in the paper margin area, automatic adjustment will be carried out during the printing process. For more information, refer to the manual for your drivers.

IMPORTANT
- Patches and markers will be printed over parts of your images. Do not use this function when printing with a bleed smaller than the following dimensions.
- Automatic adjustment of the image position: 9.21 mm (3/8") or more along the leading edge and 9.5 mm (3/8") or more along the horizontal length
- Automatic color adjustment: 8.5 mm (3/8") or more along the leading edge *
* Paper with 327.8 mm (12 7/8") or more along the leading edge requires a margin of 9.7 mm (3/8") or more.
• Automatic adjustment is carried out based on the characteristics of the printed paper scanned by the Sensing Unit. Therefore, if you switch to a different paper deck, add more paper to it, or make any other changes to the paper stack, the adjustment based on the characteristics of the new paper will not take effect immediately.
Shading Correction
7JWC-005
The Sensing Unit enables you to automatically correct the slightly uneven density that tends to occur in the halftone density area of a printed image.
Automatic shading correction
1 Press (Settings/Registration).
2 Press [Adjustment/Maintenance] ▶[Adjust Image Quality] [Correct Shading].
3 Press [Adjust Automatically].
4 Press [Start Correcting].
The test page is printed, and the [Correct Shading] window reappears on the screen after the adjustment procedure is completed.
NOTE
- If there is no paper available for printing test pages, a message reminding you to add more paper will appear on the screen. Add paper according to the on-screen instructions.
Clearing Paper Jams
7JWC-006
When a paper jam occurs, a message appears on the control panel. Follow the procedure described below to remove jammed paper.

CAUTION
- When all paper jams have been cleared, immediately remove your hands from the machine and optional equipment so that your clothing and hands do not get caught in the rollers.

IMPORTANT
Cautions when clearing paper jams
- When the paper gets torn, be sure to remove all of it so that no pieces remain.
Do not forcibly remove the jammed paper from the machine. Forcibly removing the paper may damage parts of the machine. If you cannot remove the paper, contact your local authorized Canon dealer.
For jobs where paper is fed to the next unit
• Jobs with automatic adjustment
• Regular jobs (without adjustment)
1 Open the front cover of the Sensing Unit-A.
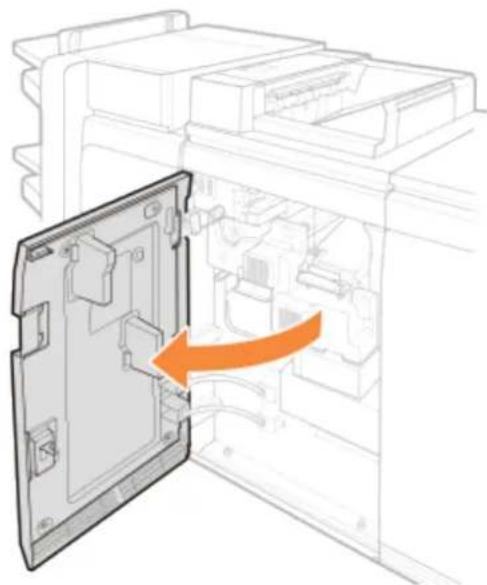
natural_image
Diagram of a device interior showing an open panel with a highlighted orange arrow indicating direction (no text or symbols present)2 Lower the handle of the V-A1 guide and open the guide.
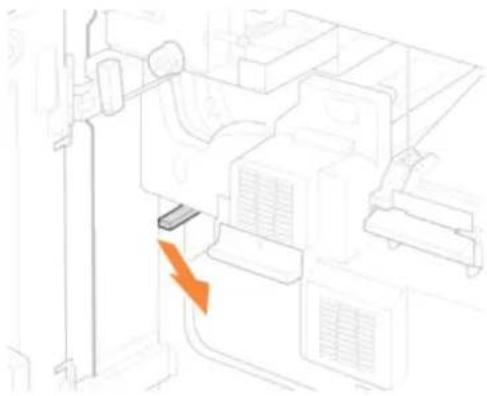
natural_image
Pure technical line drawing of a mechanical assembly without any text, numbers, or symbols3 Lower the handle of the V-A2 guide and open the guide.
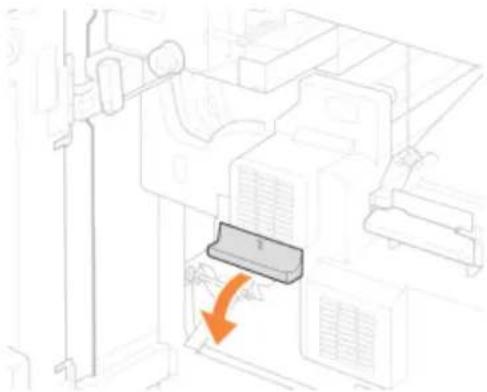
natural_image
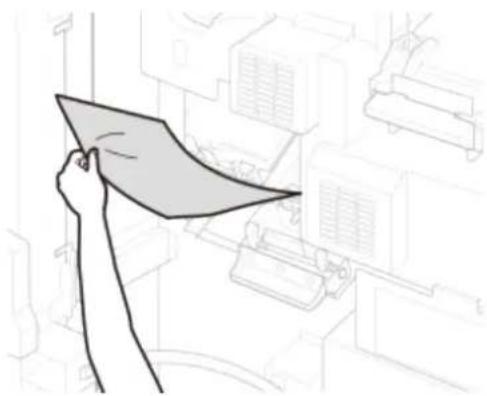
Technical line drawing of a mechanical component with an orange arrow indicating a directional change (no text or symbols present)4 Remove any paper left inside the V-A1 and V-A2 guides.
natural_image
Hand holding a sheet of paper over a wall, with other equipment in the background (no visible text or symbols)5 Raise the handle of the V-A2 guide and close the guide.
6 Raise the handle of the V-A1 guide and close the guide.
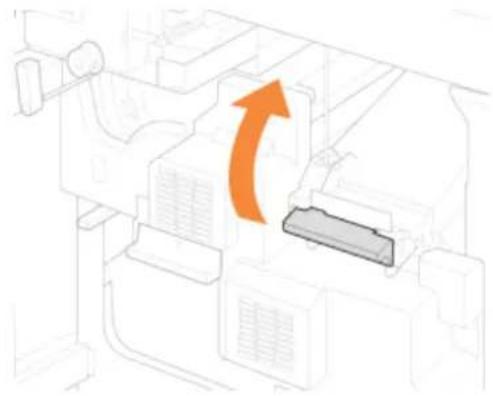
7 Raise the handle of the V-A3 guide and open the guide.
natural_image
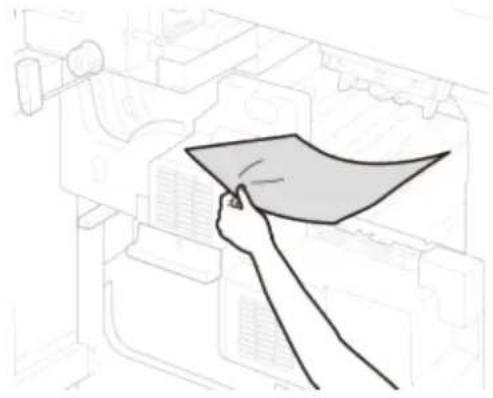
Diagram of a vehicle air conditioning unit with an orange arrow indicating clockwise motion (no text or symbols)8 Remove any jammed paper.
natural_image
Line drawing of a hand holding a folded paper over a wall (no text or symbols)9 Lower the handle of the V-A3 guide and close the guide.
10 Close the front cover of the Sensing Unit-A.
For jobs where paper is output to the output tray
• Jobs where automatic adjustment is performed by printing test pages
• Shading correction
• Adjustment of the secondary transfer voltage
NOTE
- For instructions related to formats smaller than B5, refer to ▶For jobs where paper is fed to the next unit(P. 13)
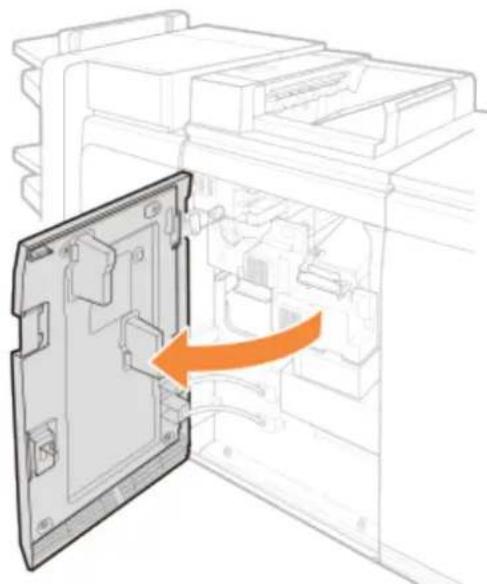
1 Open the front cover of the Sensing Unit-A.
natural_image
Diagram showing a device with an orange arrow pointing to a closed panel, no text or symbols present2 Lower the handle of the V-A2 guide and open the guide.
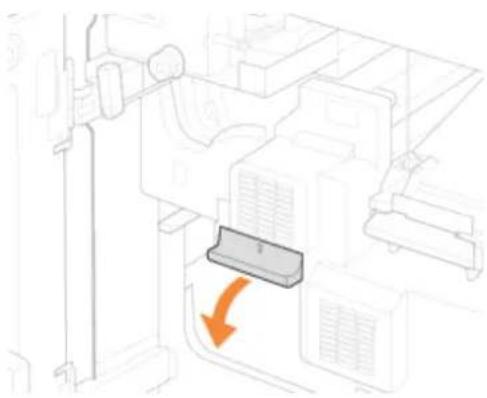
natural_image
Diagram of a mechanical or electrical component with an orange arrow indicating a directional change (no text or symbols present)3 Remove any jammed paper.
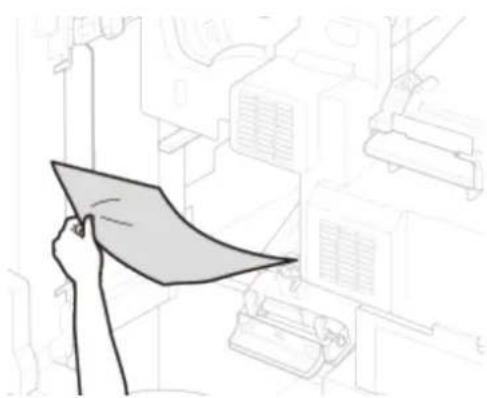
natural_image
Line drawing of a hand holding a paper with a magnified view of industrial equipment (no text or symbols)4 Raise the handle of the V-A2 guide and close the guide.
5 Raise the handle of the V-A3 guide and open the guide.
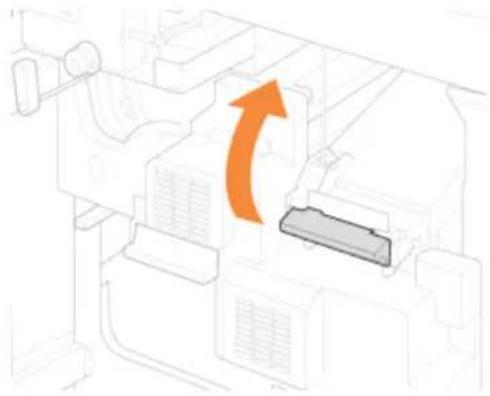
natural_image
Diagram of a vehicle air conditioning unit with an orange arrow indicating direction (no text or symbols)6 Remove any jammed paper.
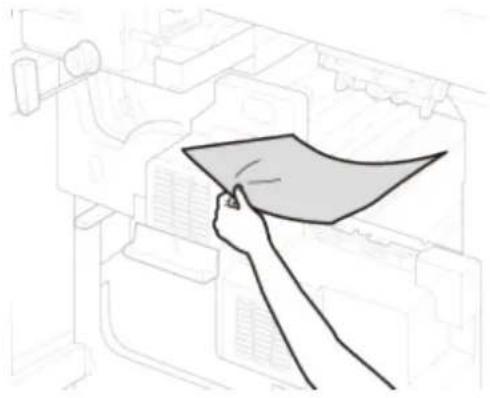
natural_image
Line drawing of a hand holding a folded paper over a wall, with no visible text or symbols7 Lower the handle of the V-A3 guide and close the guide.
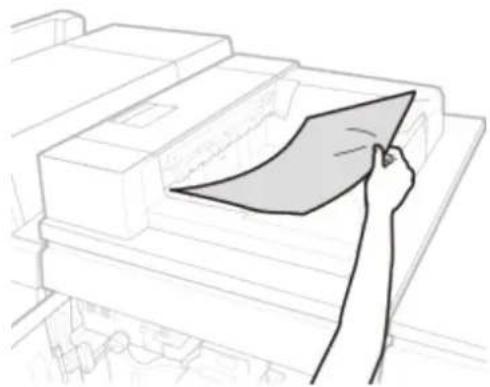
8 Remove any paper left in the output area.
natural_image
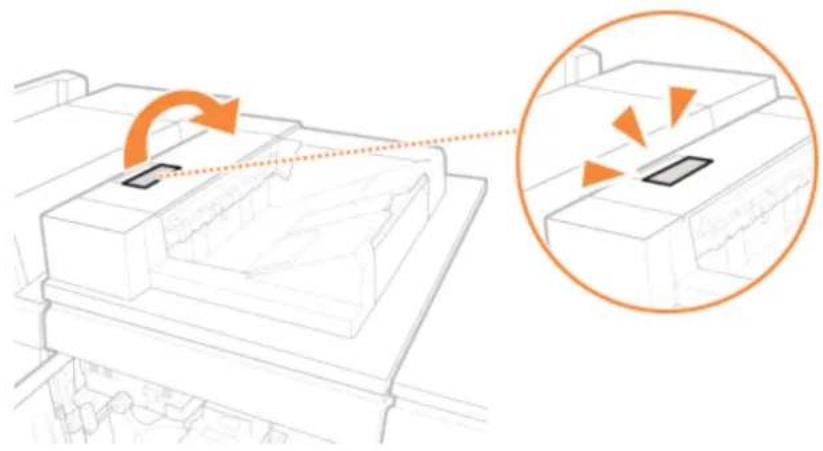
Line drawing of a hand holding a paper over stacked documents or files (no text or symbols visible)9 Pull the lever of the paper output feed guide to open the cover.
Sensing Unit-A
natural_image
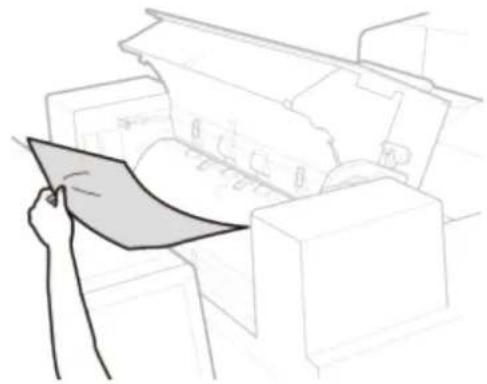
Technical line drawing of a mechanical assembly with an inset showing a close-up of a component (no text or symbols present)10 Remove any paper left inside V-B1.
natural_image
Line drawing of a hand holding a sheet of paper, with a computer monitor in the background (no text or symbols)11 Close the cover of the paper output feed guide.
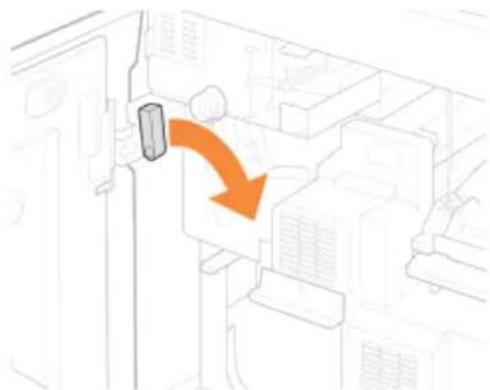
12 Push the lever of the V-B2 guide to the right and open the guide.
natural_image
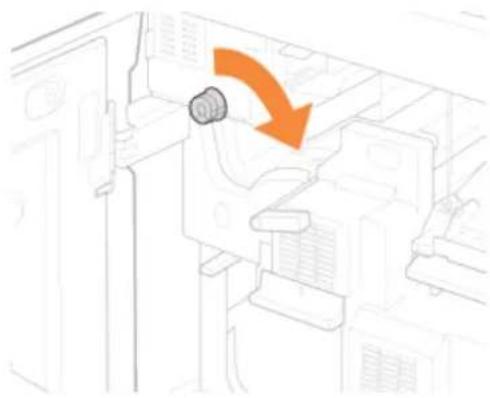
Diagram showing a device moving through a room with an orange arrow indicating direction (no text or symbols present)13 Turn the V-B3 knob to the right and move the paper into the guide.
natural_image
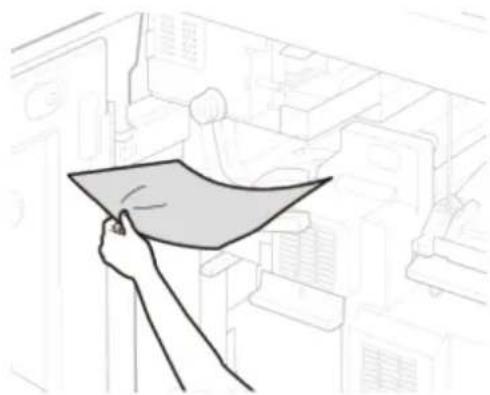
Line drawing of a refrigerator interior with an orange arrow indicating a directional change (no text or symbols)14 Remove the paper.
natural_image
Line drawing of a hand holding a flat sheet over a cityscape background (no text or symbols)15 Push the lever of the V-B2 guide to the left and close the guide.
16 Close the front cover of the Sensing Unit-A.
Maintenance
7JWC-007
For a smooth and safe user experience, we recommend cleaning the scanning glass periodically in order to prevent printing quality from dropping.
A dirty scanning glass may lead to errors.
Cleaning the Scanning Glass
7JWC-008
If the scanning glass becomes dirty, the scanning process cannot be performed correctly, which results in errors.
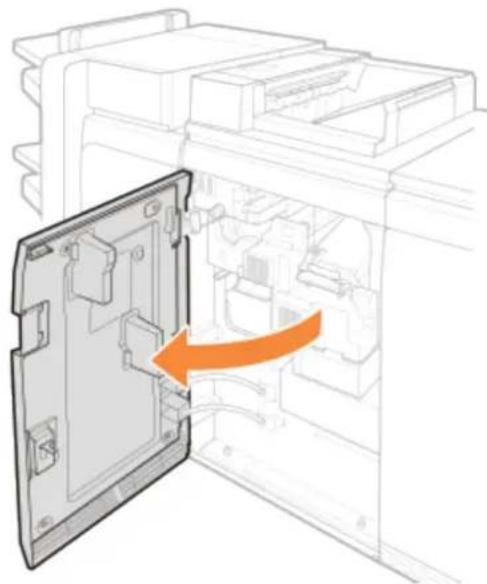
1 Open the front cover of the Sensing Unit-A.
natural_image
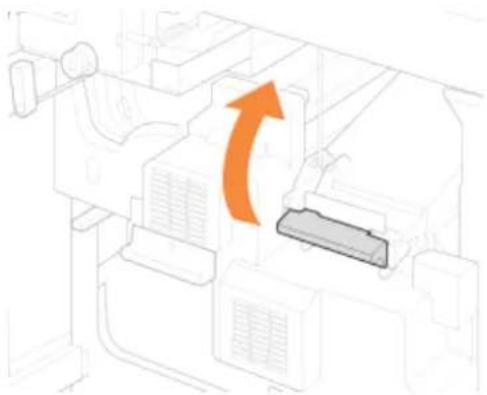
Diagram of an open refrigerator with a highlighted internal panel and orange arrow indicating direction (no text or symbols)2 Raise the handle of the V-A3 guide and open the guide.
natural_image
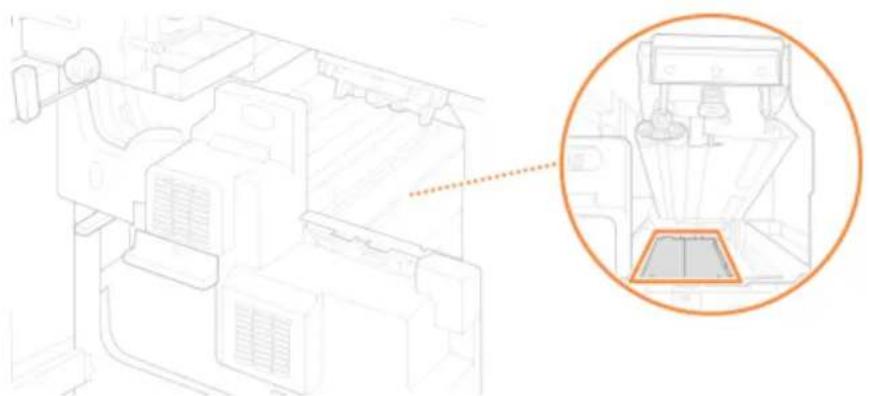
Diagram of a vehicle air conditioning unit with an orange arrow indicating rotation (no text or symbols)3 Clean the glass section.
- Use the supplied glass cleaning sheet to wipe the surface. If you cannot remove the dirt, soak a soft cloth in water, wring it out well, and use it to wipe the surface. Finally, wipe the surface with a dry soft cloth.
Sensing Unit-A
natural_image
Technical line drawing of a mechanical component with an inset close-up showing a 3D model (no text or symbols)• Proceed to the next step after the surface have got dry completely.
4 Lower the handle of the V-A3 guide and close the guide.
NOTE:
If you continue experiencing errors after cleaning the scanning sensor Contact your local authorized Canon dealer.
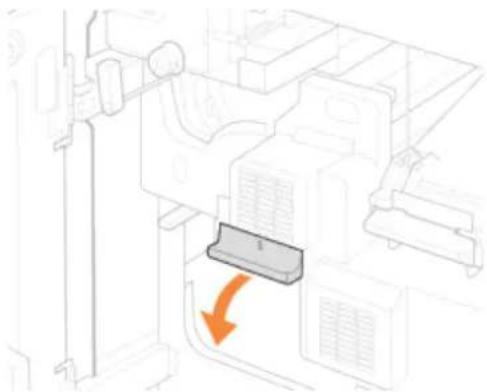
5 Lower the handle of the V-A2 guide and open the guide.
natural_image
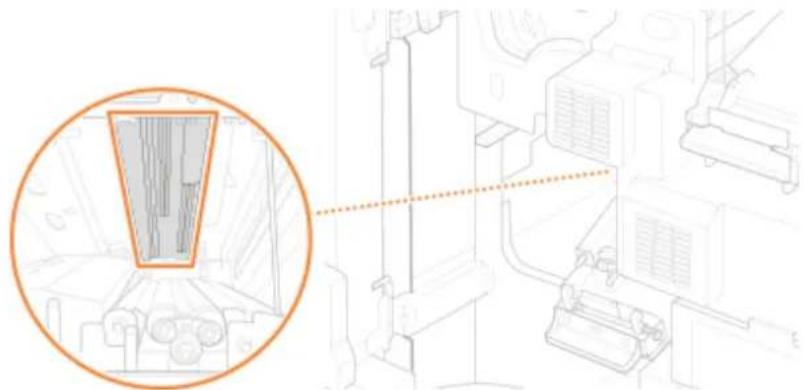
Diagram of a refrigerator interior with a highlighted storage unit and orange directional arrow (no text or symbols)6 Clean the glass section.
- Use the supplied glass cleaning sheet to wipe the surface. If you cannot remove the dirt, soak a soft cloth in water, wring it out well, and use it to wipe the surface. Finally, wipe the surface with a dry soft cloth.
natural_image
Technical line drawing of a mechanical assembly with an inset close-up showing internal components (no text or symbols)• Proceed to the next step after the surface have got dry completely.
7 Raise the handle of the V-A2 guide and close the guide.
NOTE:
If you continue experiencing errors after cleaning the scanning sensor Contact your local authorized Canon dealer.
8 Close the front cover of the Sensing Unit-A.
Main Specifications
7JWC-009
This section describes specifications for the Sensing Unit-A. These specifications are subject to change due to improvements for this machine and the future product releases. For the information on this machine, see the Cannon website (https://global.canon/).
| Adjustment Item Paper Type | Paper Size | ||
| Automatic adjustment of the image position | For periodic adjustmentThin, Plain, Recycled, Color*1,Heavy, Coated, Textured*2,Translucent Film*1, Label*3, Pre-Punched*4, Four postcard,Synthetic | Depends on the paper sizes compatible with the corresponding printer(Paper size that can be ejected to the sample tray: paper length (feeding direction) 182 mm (7 1/8") or over) | |
| For adjustment by printing markers over parts of user's imagesThin, Plain, Recycled, Color*1,Heavy, Coated, Textured*2,Translucent Film*1, Label*3 | Depends on the paper sizes compatible with the corresponding printer(Except long sheets that exceed 762 mm (30")) | ||
| For adjustment by inserting adjustment pagesThin, Plain, Recycled, Color*1,Heavy, Coated, Textured*2,Translucent Film*1, Label*3, Pre-Punched*4, Four postcard,Synthetic | Depends on the paper sizes compatible with the corresponding printer(Paper size that can be ejected to the sample tray: paper length (feeding direction) 182 mm (7 1/8") or over except long sheets that exceed 762 mm (30")) | ||
| Automatic color adjustment For adjustment patches over parts of user's imagesThin, Plain, Heavy, Coated | 182.0 mm x 182.0 mm to 330.2 mm x 487.7 mm (7 1/8" x 7 1/8" to 13" x 19 1/4")Long sheets:210.0 mm x 487.8 mm to 330.2 mm x 762.0 mm (8 1/4" x 19 1/4" to 13" x 30") | ||
| For adjustment by inserting adjustment pagesThin, Plain, Heavy, Coated | 182.0 mm x 182.0 mm to 330.2 mm x 487.7 mm (7 1/8" x 7 1/8" to 13" x 19 1/4")Long sheets:210.0 mm x 487.8 mm to 330.2 mm x 762.0 mm (8 1/4” x 19 1/4" to 13" x 30") | ||
| Shading correction | Thin, Plain, Heavy, Coated | SRA3, A3, 13" x 19", 12" x 18", 11" x 17", 8K | |
| Adjustment of the secondary transfer voltage | Thin, Plain, Recycled, Heavy,Coated, Textured, Label*5, Fourpostcard, Synthetic | 279.4 mm x 203.2 mm to 330.2 mm x 1,300 mm (11" x 8" to 13" x 51 1/4") | |
| No adjustment (through path) Depends on the paper used to the corresponding printer. | |||
*1 You may not be able to adjust accurately depending on the base color of the paper/film.
*2 You may not be able to adjust accurately if groove of the textured paper is deep.
*3 You may not be able to adjust accurately if the markers overlap the perforation part.
*4 You may not be able to adjust accurately if the markers overlap the pre-punched part.
*5 You may not be able to adjust accurately if the adjustment charts overlap the perforation part.
■ Machine Specifications
| Item Specifications | |
| Output tray Paper Size | Paper sizes compatible with the corresponding printer with a horizontal length of 182 mm (7 1/8") or morePaper TypeDepends on the paper used to the corresponding printer.Maximum number of sheetsCanon GF-C081: 250 sheetsOther paper types: Max. height of 27.5 mm (1 1/8")Long sheets (horizontal length between 762.1 mm and 1,300 mm (30" and 51 1/4")): 1 sheet |
| Power Source 100 V - 240 V AC, | 50/60 Hz, 2.5 A |
| Maximum Power Consumption | 500 W or less |
| Dimensions(W x D x H) | 515 mm (20 1/4") x 750 mm (29 1/2") x 1,228 mm (48 3/8") |
| Weight Approximately 100.5 kg | (221.6 lb) |
■System Requirements of the Manual
The manual works with the following web browsers. Use the manual with the script functions and cookies activated in the web browser.
Windows
• Internet Explorer 9 and later
- Microsoft Edge
- Firefox
- Firefox ESR
- Chromë*
macOS
Third Party Software
Third Party Software 27
Third Party Software
7JWC-00A
For information related to third-party software, click the following icon.
■ Third Party Software included in This Manual

This Font Software is licensed under the SIL Open Font License, Version 1.1.
This license is copied below, and is also available with a FAQ at: http://scripts.sil.org/OFL
SIL OPEN FONT LICENSE Version 1.1 - 26 February 2007
PREAMBLE
The goals of the Open Font License (OFL) are to stimulate worldwide development of collaborative font projects, to support the font creation efforts of academic and linguistic communities, and to provide a free and open framework in which fonts may be shared and improved in partnership with others.
The OFL allows the licensed fonts to be used, studied, modified and redistributed freely as long as they are not sold by themselves. The fonts, including any derivative works, can be bundled, embedded, redistributed and/or sold with any software provided that any reserved names are not used by derivative works. The fonts and derivatives, however, cannot be released under any other type of license. The requirement for fonts to remain under this license does not apply to any document created using the fonts or their derivatives.
DEFINITIONS
"Font Software" refers to the set of files released by the Copyright Holder(s) under this license and clearly marked as such. This may include source files, build scripts and documentation.
"Reserved Font Name" refers to any names specified as such after the copyright statement(s).
"Original Version" refers to the collection of Font Software components as distributed by the Copyright Holder(s).
"Modified Version" refers to any derivative made by adding to, deleting, or substituting -- in part or in whole -- any of the components of the Original Version, by changing formats or by porting the Font Software to a new environment.
"Author" refers to any designer, engineer, programmer, technical writer or other person who contributed to the Font Software.
PERMISSION & CONDITIONS
Permission is hereby granted, free of charge, to any person obtaining a copy of the Font Software, to use, study, copy, merge, embed, modify, redistribute, and sell modified and unmodified copies of the Font Software, subject to the following conditions:
1) Neither the Font Software nor any of its individual components, in Original or Modified Versions, may be sold by itself.
2) Original or Modified Versions of the Font Software may be bundled, redistributed and/or sold with any software, provided that each copy contains the above copyright notice and this license. These can be included either as stand-alone text files, human-readable headers or in the appropriate machine-readable metadata fields within text or binary files as long as those fields can be easily viewed by the user.
3) No Modified Version of the Font Software may use the Reserved Font Name(s) unless explicit written permission is granted by the corresponding Copyright Holder. This restriction only applies to the primary font name as presented to the users.
4) The name(s) of the Copyright Holder(s) or the Author(s) of the Font Software shall not be used to promote, endorse or advertise any Modified Version, except to acknowledge the contribution(s) of the Copyright Holder(s) and the Author(s) or with their explicit written permission.
5) The Font Software, modified or unmodified, in part or in whole, must be distributed entirely under this license, and must not be distributed under any other license. The requirement for fonts to remain under this license does not apply to any document created using the Font Software.
TERMINATION
This license becomes null and void if any of the above conditions are not met.
DISCLAIMER
THE FONT SOFTWARE IS PROVIDED "AS IS", WITHOUT WARRANTY OF ANY KIND, EXPRESS OR IMPLIED, INCLUDING BUT NOT LIMITED TO ANY WARRANTIES OF MERCHANTABILITY, FITNESS FOR A PARTICULAR PURPOSE AND NONINFRINGEMENT OF COPYRIGHT, PATENT, TRADEMARK, OR OTHER RIGHT. IN NO EVENT SHALL THE COPYRIGHT HOLDER BE LIABLE FOR ANY CLAIM, DAMAGES OR OTHER LIABILITY, INCLUDING ANY GENERAL, SPECIAL, INDIRECT, INCIDENTAL, OR CONSEQUENTIAL DAMAGES, WHETHER IN AN ACTION OF CONTRACT, TORT OR OTHERWISE, ARISING FROM, OUT OF THE USE OR INABILITY TO USE THE FONT SOFTWARE OR FROM OTHER DEALINGS IN THE FONT SOFTWARE.
- Third Party Software 27
- Read This First
- ■ Viewing This Manual
- ■ Setting Display of This manual
- Trademarks
- Sensing Unit-A
- Sensing Unit-A 4
- NOTE
- Parts and Their Functions
- Front cover
- V-B2 guide
- Paper output feed guide
- Output area
- Output tray
- NOTE:
- Output tray extension
- V-B3 knob
- V-A3 guide
- V-A2 guide
- V-A1 guide
- V-B1
- Configuring the Automatic Adjustment Settings
- ■Automatic adjustment of the image position
- IMPORTANT
- ■ Automatic color adjustment
- Periodic automatic adjustment of the image position (initial adjustment)
- Automatic adjustment of the image position or colors for every Printing process
- ■ Configuring the interval for automatic adjustment
- Automatic adjustment of the image position and colors during the printing process
- Shading Correction
- Automatic shading correction
- Clearing Paper Jams
- CAUTION
- Cautions when clearing paper jams
- For jobs where paper is fed to the next unit
- Open the front cover of the Sensing Unit-A.
- Lower the handle of the V-A1 guide and open the guide.
- Close the front cover of the Sensing Unit-A.
- For jobs where paper is output to the output tray
- Maintenance
- Cleaning the Scanning Glass
- Raise the handle of the V-A3 guide and open the guide.
- Clean the glass section.
- Lower the handle of the V-A3 guide and close the guide.
- Lower the handle of the V-A2 guide and open the guide.
- Clean the glass section.
- Main Specifications
- ■System Requirements of the Manual
- Windows
- macOS
- Third Party Software
- PREAMBLE
- DEFINITIONS
- PERMISSION & CONDITIONS
- TERMINATION
- DISCLAIMER
Brand : CANON
Model : imagePRESS C10010VP
Category : Règle