HZS-200 - Smoke detector Planet - Free user manual and instructions
Find the device manual for free HZS-200 Planet in PDF.


| Product Type | Photoelectric Smoke Detector with Z-Wave |
| Model | HZS-200 (US: HZS-200A, EU: HZS-200E) |
| Dimensions (Diameter x Height) | 120 mm x 48.7 mm |
| Weight | 144 g (gross weight) |
| Power Supply | CR123A 3V Lithium Battery (included) |
| Sensor Type | Photoelectric |
| Alarm Sound Level | 85 dB at 3 meters |
| Operating Temperature | 0°C to 49°C |
| Operating Humidity | 10% to 95% (non-condensing) |
| Z-Wave Frequency | 908.42 MHz (US) / 868.42 MHz (EU) |
| Wireless Range | Up to 30 meters in open space |
| Installation | Ceiling mount or wall mount (4-6 inches from ceiling) |
| LED Indicators | Red (standby, low battery); Yellow (tamper, error) |
| Compliance | CE, FCC Part 15 Class B |
| Battery Life | Estimated 2-3 years (depending on usage) |
| Maintenance | Test monthly; replace battery when low; clean dust periodically |
| Safety Features | Tamper switch, low battery warning, error detection |
| Repairability | Battery user-replaceable; no other serviceable parts |
| Package Contents | Smoke detector, bracket holder, CR123A battery, screw kit, quick installation guide |
Frequently Asked Questions - HZS-200 Planet
User questions about HZS-200 Planet
0 question about this device. Answer the ones you know or ask your own.
Ask a new question about this device
Download the instructions for your Smoke detector in PDF format for free! Find your manual HZS-200 - Planet and take your electronic device back in hand. On this page are published all the documents necessary for the use of your device. HZS-200 by Planet.
USER MANUAL HZS-200 Planet
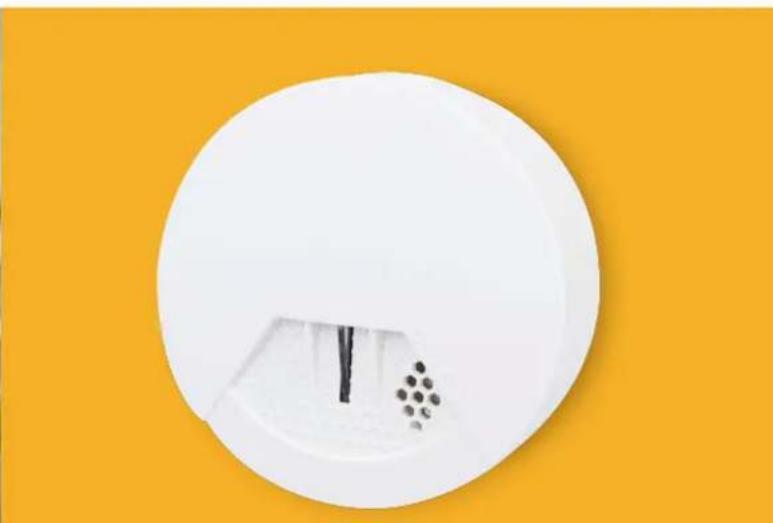
natural_image
White circular object with a small black rod inserted into a white cavity, against a solid orange background (no text or symbols)Copyright
Copyright © 2015 by PLANET Technology Corp. All rights reserved. No part of this publication may be reproduced, transmitted, transcribed, stored in a retrieval system, or translated into any language or computer language, in any form or by any means, electronic, mechanical, magnetic, optical, chemical, manual or otherwise, without the prior written permission of PLANET.
PLANET makes no representations or warranties, either expressed or implied, with respect to the contents hereof and specifically disclaims any warranties, merchantability or fitness for any particular purpose. Any software described in this manual is sold or licensed "as is". Should the programs prove defective following their purchase, the buyer (and not PLANET, its distributor, or its dealer) assumes the entire cost of all necessary servicing, repair, and any incidental or consequential damages resulting from any defect in the software. Further, PLANET reserves the right to revise this publication and to make changes from time to time in the contents hereof without obligation to notify any person of such revision or changes.
All brand and product names mentioned in this manual are trademarks and/or registered trademarks of their respective holders.
Federal Communication Commission Interference Statement
This equipment has been tested and found to comply with the limits for a Class B digital device, pursuant to Part 15 of FCC Rules. These limits are designed to provide reasonable protection against harmful interference in a residential installation. This equipment generates, uses, and can radiate radio frequency energy and, if not installed and used in accordance with the instructions, may cause harmful interference to radio communications. However, there is no guarantee that interference will not occur in a particular installation. If this equipment does cause harmful interference to radio or television reception, which can be determined by turning the equipment off and on, the user is encouraged to try to correct the interference by one or more of the following measures:
- Reorient or relocate the receiving antenna.
- Increase the separation between the equipment and receiver.
- Connect the equipment into an outlet on a circuit different from that to which the receiver is connected.
- Consult the dealer or an experienced radio technician for help.
FCC Caution
To assure continued compliance, use only shielded interface cables when connecting to computer or peripheral devices. Any changes or modifications not expressly approved by the party responsible for compliance could void the user's authority to operate the equipment.
This device complies with Part 15 of the FCC Rules. Operation is subject to the following two conditions: (1) This device may not cause harmful interference, and (2) this device must accept any interference received, including interference that may cause undesired operation.
Federal Communication Commission (FCC) Radiation Exposure Statement
This equipment complies with FCC radiation exposure set forth for an uncontrolled environment. In order to avoid the possibility of exceeding the FCC radio frequency exposure limits, human proximity to the antenna shall not be less than 20 cm (8 inches) during normal operation.
Safety
This equipment is designed with the utmost care for the safety of those who install and use it. However, special attention must be paid to the dangers of electric shock and static electricity when working with electrical equipment. All guidelines of this and of the computer manufacture must therefore be allowed at all times to ensure the safe use of the equipment.
CE Mark Warning
This is a Class B product. In a domestic environment, this product may cause radio interference, in which case the user may be required to take adequate measures.
WEEE Regulation
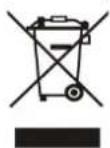
To avoid the potential effects on the environment and human health as a result of the presence of hazardous substances in electrical and electronic equipment, end users of electrical and electronic equipment should understand the meaning of the crossed-out wheeled bin symbol. Do not dispose of WEEE as unsorted municipal waste and have to collect such WEEE separately.
Revision
User's Manual of PLANET Z-Wave Ceiling-mount Smoke Detector
Model: HZS-200
Rev: 1.00 (October, 2015)
Part No. EM-HZS-200 Series_v1.0.doc
Table of Contents
Chapter 1. Product Introduction....5
1.1 Package Contents....5
1.2 Overview 5
1.3 Specifications....7
Chapter 2. Hardware Interface....8
Chapter 3. Z-Wave Device Setting....9
3.1 Configuring Z-Wave Device via Web 9
3.2 Configuring Z-Wave via Smart Phone....12
3.3 Configuring Z-Wave via HTS-1000P 17
Appendix A: Troubleshooting & Frequently Asked Questions....26
Chapter 1. Product Introduction
1.1 Package Contents
The package should contain the following:
- Smoke Detector x 1
- Quick Installation Guide x 1
● CR123A Lithium Battery x 1 - Bracket Holder x 1
- Screw Kit x 1

Note
If any of the above items are missing, please contact your seller immediately.
1.2 Overview
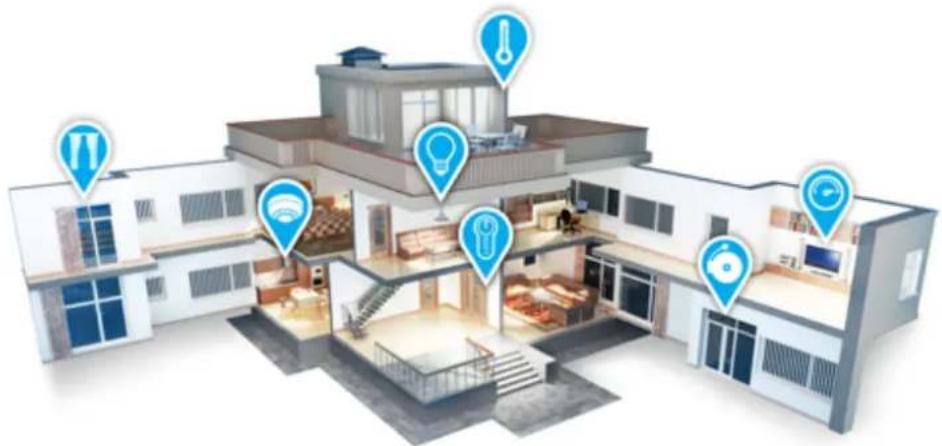
Home Automation and Smart Home Control
The HZS (Z-Wave Sensing Device) series of PLANET Home Automation product family, based on Z-Wave technology, provides the advanced security system that protects your home and family 24/7. Easy operation and flexible configuration are the attractive features of our system; the simple one-touch button lets you program your regular settings according to your preference and operation mode. Worked with PLANET HAC-1000 Z-Wave Home Automation Control Gateway, you get the all-round and reliable home security services that we offer. Our full range of product lines ensure that you get all the devices you need for your home security system.
natural_image
3D architectural rendering of a multi-story residential building with visible floor plans and kitchen appliances (no text or symbols)Vocal Smoke Alarm Horn
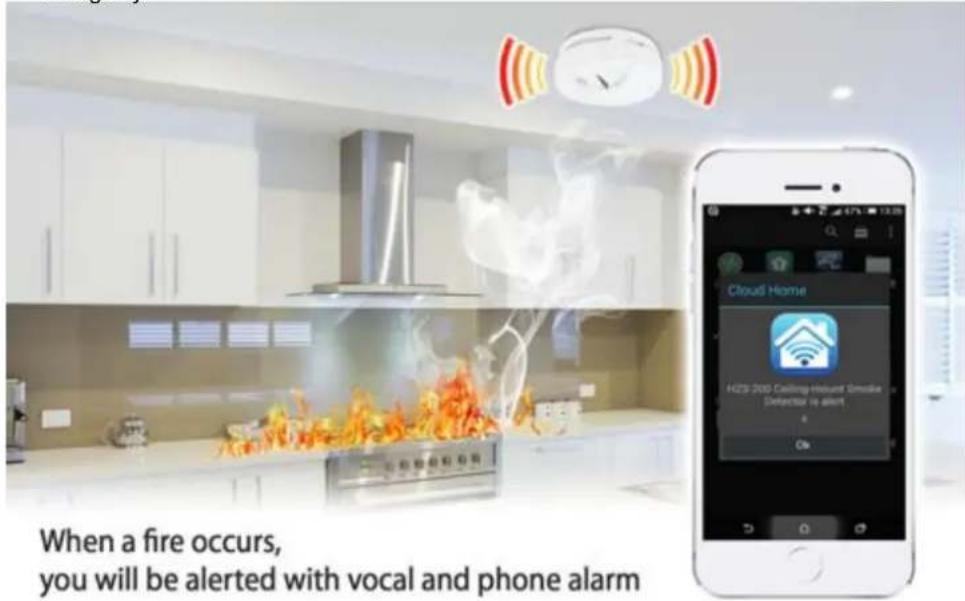
PLANET HZS-200 is a Photoelectric Smoke Detector whose alarm of 85dB will be triggered upon detection of smoke coming from a fire or other burning sources. The alarm signal is then picked up by PLANET HAC-1000 Control Gateway where you will be remotely alerted of the situation via mobile devices, such as smart phone and tablet. The quickness of the alert can certainly stop the situation from becoming worse, thereby protecting your home from the would-be tragedy.
Getting Started is as Easy as 1-2-3
- Via the Cloud Home App (including Home Automation Controller Pad and Control Gateway), press Inclusion/Exclusion to include/exclude Z-Wave device.
- On the Z-Wave device, press the Pair button to establish a connection with the control gateway.
- Users can enjoy and manage Z-Wave network right away.
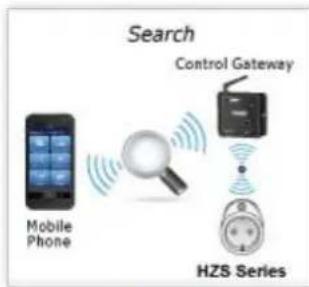
flowchart
graph LR
    A["Mobile Phone"] --> B["Search"]
    B --> C["Control Gateway"]
    C --> D["HZS Series"]
    style A fill:#f9f,stroke:#333
    style B fill:#ccf,stroke:#333
    style C fill:#cfc,stroke:#333
    style D fill:#fcc,stroke:#333
Step 1
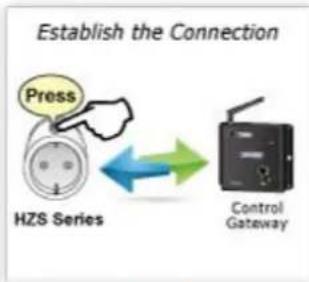
flowchart
graph LR
    A["Press"] --> B["HZS Series"]
    B --> C["Control Gateway"]
    C --> D["Output"]
Step 2
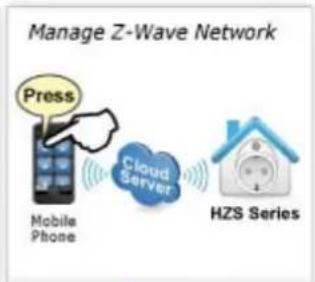
flowchart
graph LR
    A["Press"] --> B["Mobile Phone"]
    B --> C["Cloud Server"]
    C --> D["HZS Series"]
Step 3
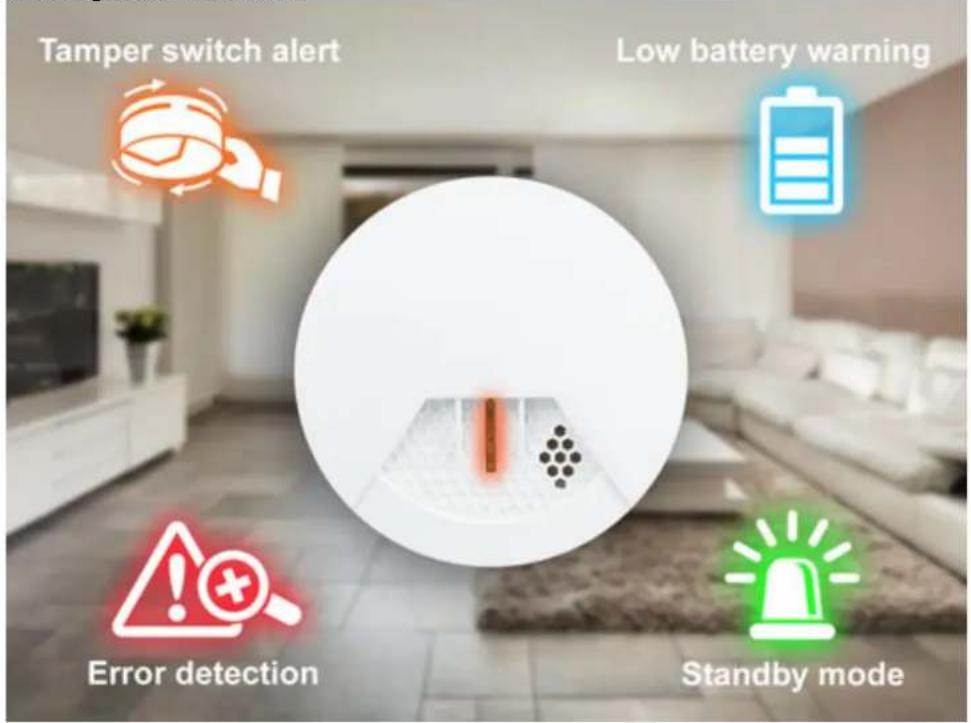
Easy Installation and Convenient Status Indicator
The HZS-200 can be easily installed by ceiling mounted or wall mounted. It also provides various LED light signals for you to conveniently recognize its different statuses directly, such as standby mode, tamper switch alert, low battery warning and error detection, without logging in to its configuration interface.
1.3 Specifications
| Product | HZS-200A | HZS-200E |
| Hardware and Network | ||
| Z-Wave Frequency | America: 908.42MHz Europe: 868.42MHz | |
| Sensor | Photoelectric | |
| Buzzing Sound Level | 85dB, 3m distance | |
| LED Indicators | Red: Standby mode, low battery warningYellow: Tamper switch alert, low battery warning, error detection | |
| Operating Range | Up to 30 meters in open space | |
| Installation | Wall mount, 4 to 6 inches from the ceiling suggestedCeiling mountIndoor use only | |
| General | ||
| Power Requirements | CR123A 3V | |
| Operating Temperature | 0 ~ 49 degrees C | |
| Operating Humidity | 10 ~ 95% (non-condensing) | |
| Weight | 144g | |
| Dimensions (Φ x L) | 120 x 48.7 mm | |
| Emission | CE, FCC | |
Chapter 2. Hardware Interface
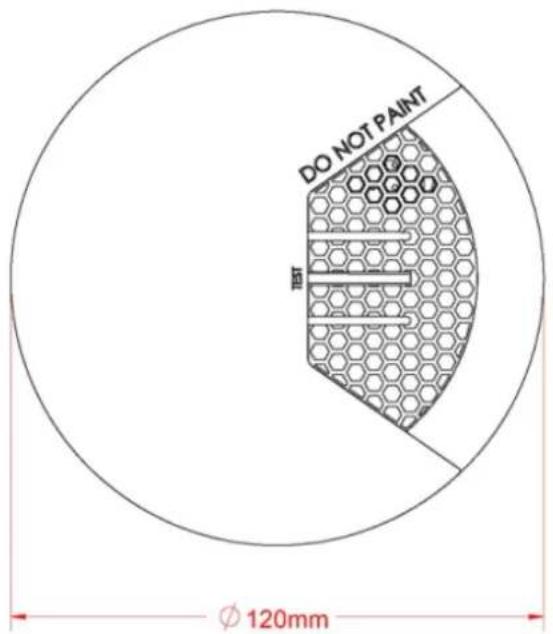
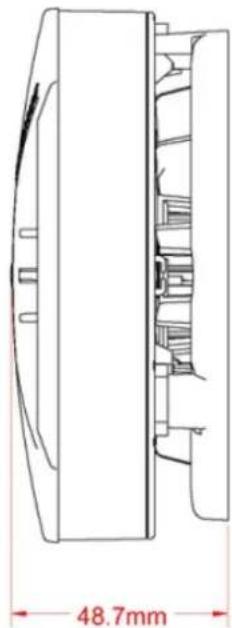
Model HZS-200E/HZS-200A
Dimensions (W x D x H) 120 x 48.7 mm
Weight 144g (gross weight)

ont Panel
LED/Test/Program switch
natural_image
Technical line drawing of a mechanical component with dimension标注 (48.7mm), no readable text or symbols present.| Interface Description | |
| LED | Red: Standby mode, low battery warningYellow: Tamper switch alert, low battery warning, error detection*For more details of indicator, refer to HZS-200 user manual. |
| Test | Set the Silence Feature and check whether this device got crash or ready. |
| Program switch | Press to include or exclude a Z-Wave network. |
Chapter 3. Z-Wave Device Setting
3.1 Configuring Z-Wave Device via HAC-1000
Please refer to the following steps to add Z-Wave device via HAC-1000 web.
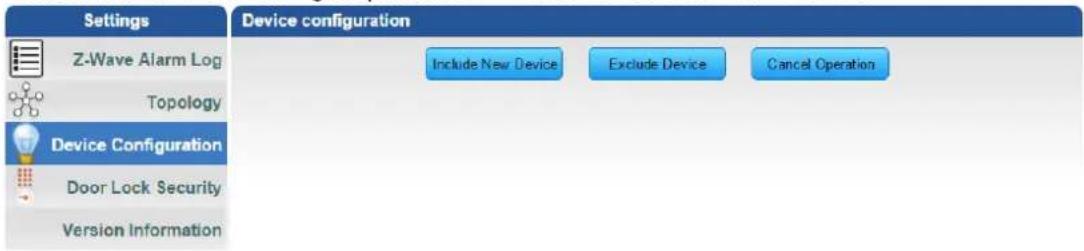
Step 1. Include a Z-Wave device via web.
a) Go to "Z-Wave" and click "Device Configuration".
b) Click" Include New Device" and the screen will appear with "Add Device: Waiting for a user action."
c) The distance between HZS-200 and HAC-1000 is suggested to be in one meter. Press the program switch of HZS-200 for 1 second at least to be included.
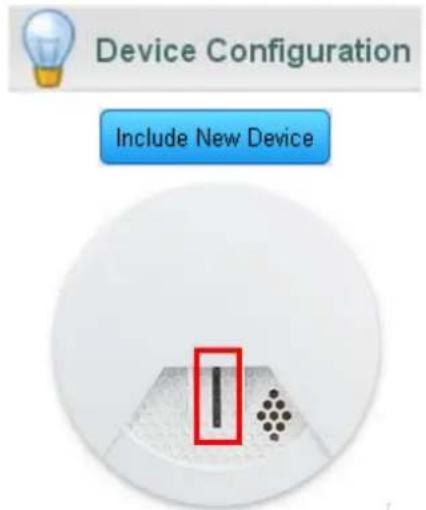
d) If your device has successfully been added, it will show "Add Device: Command has been completed successfully".
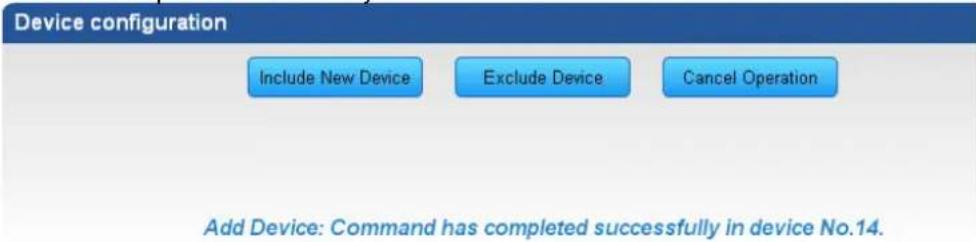

If the device didn't add successfully, please place the device next to the gateway and try again.
Step 2. Set up the location and room for Z-Wave device via HAC-1000 web.
a. Create rooms in your environment.
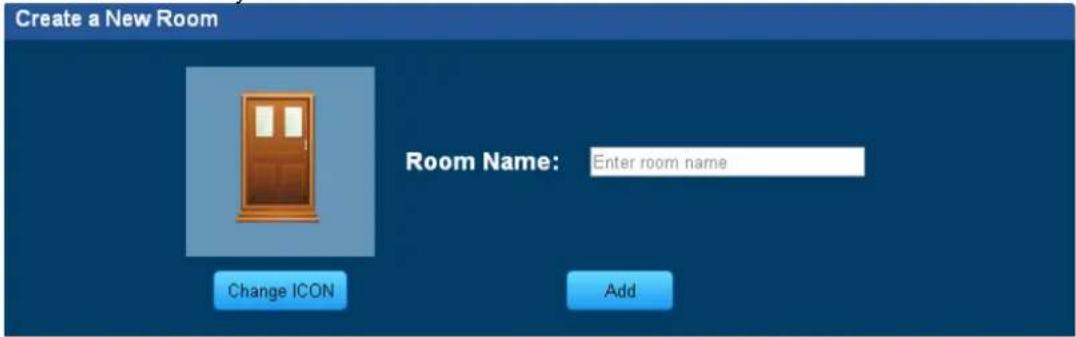
b. Edit device.
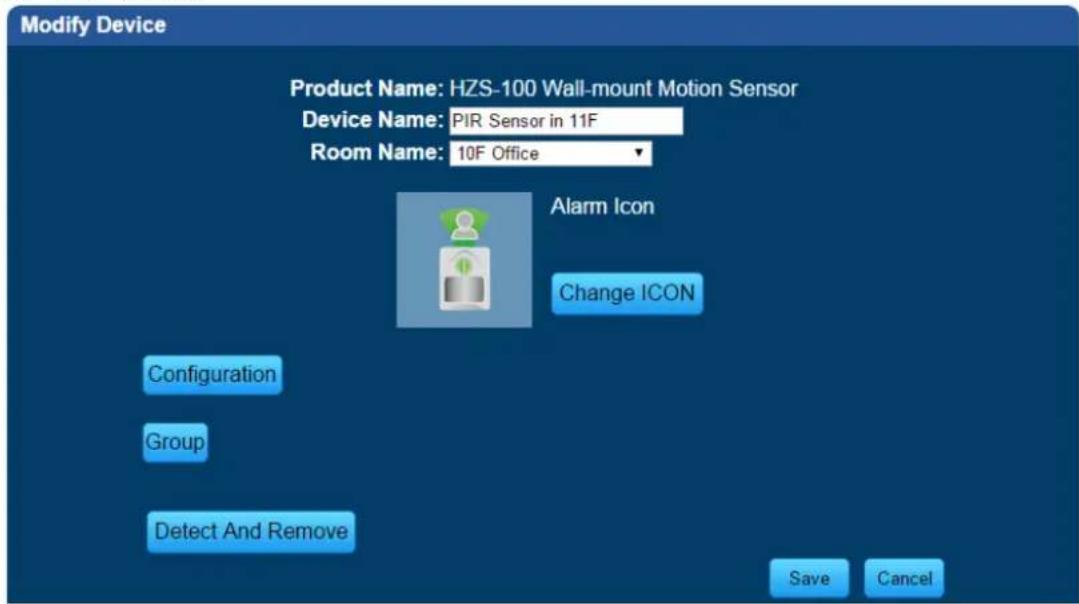
Step 3. Create a scene via web.
a. Click "Create Scene" and name new scene.

b. Select a device from this scene.
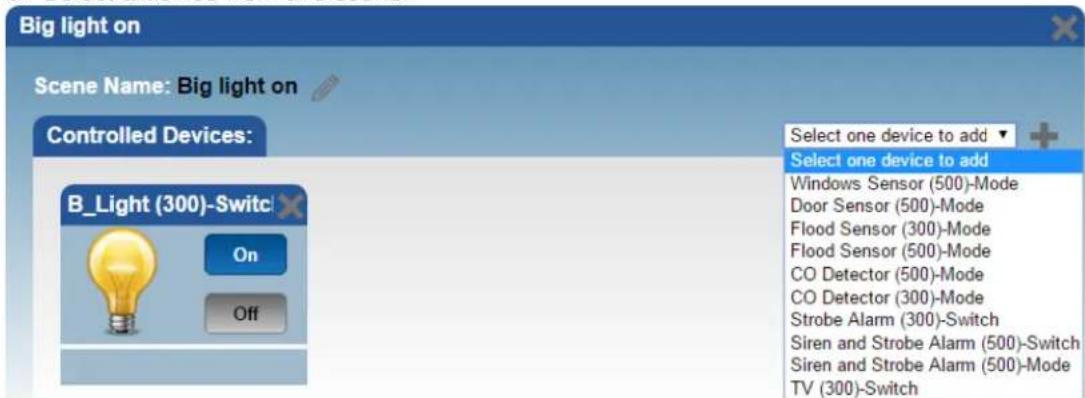
c. Select ON or OFF from this scene.
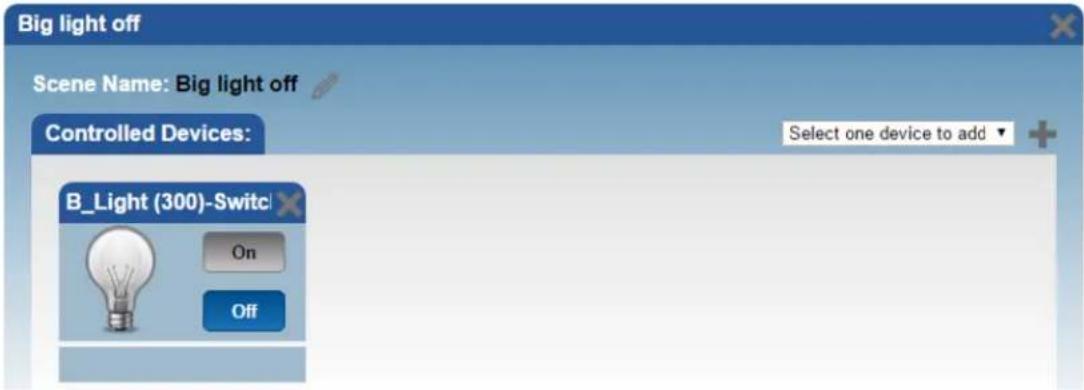
d. You can click "RUN" to run this scene.
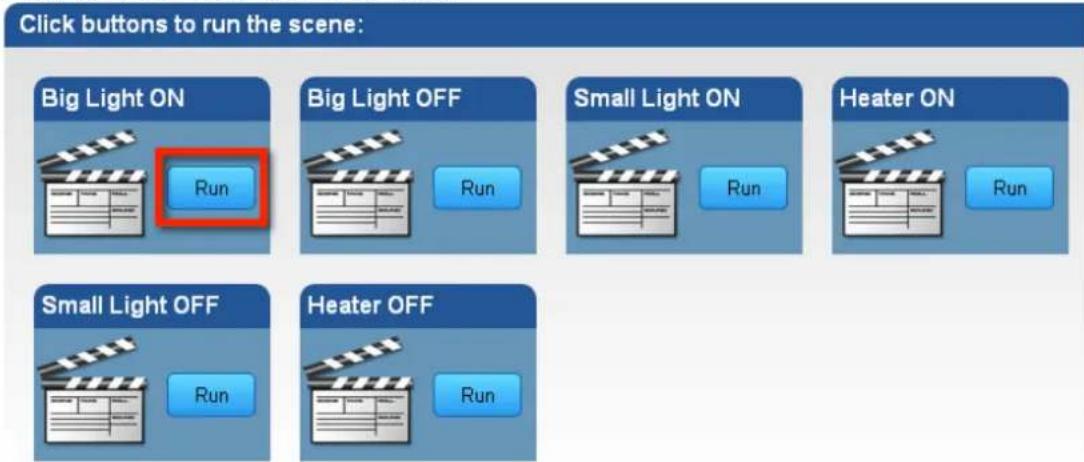
Step 4. Create trigger via web.
a. Click "Create a Trigger" and name new trigger.
b. Select a Z-Wave device for this trigger.
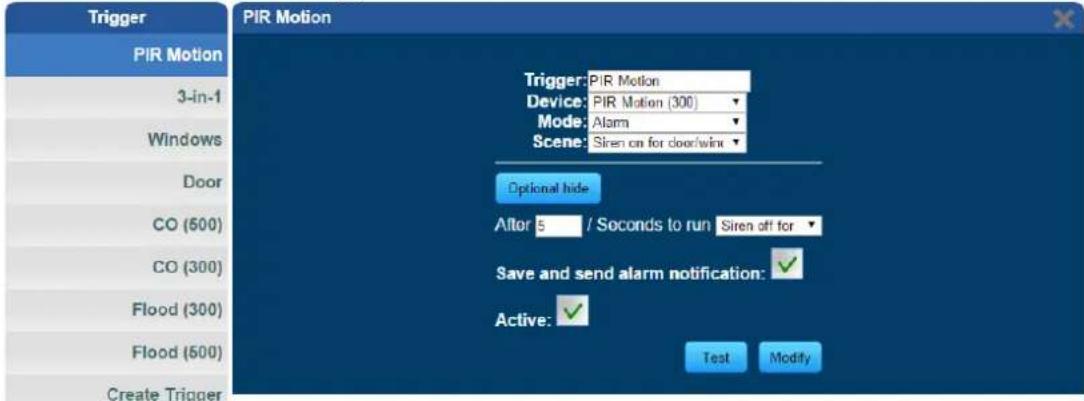
c. Select when it triggers, it will alarm or bypass.
d. Select when it triggers, it will run which scene.
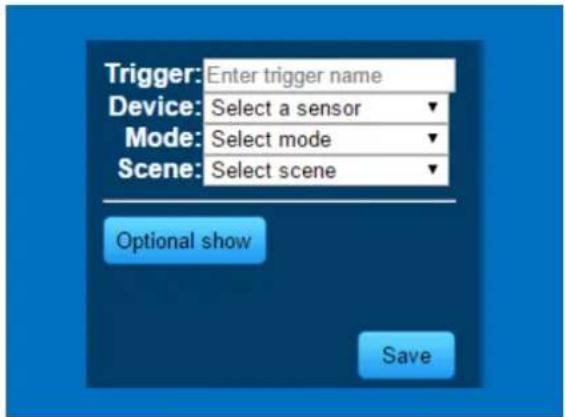
After entering the time selected for the scene to trigger, tick "Save and send alarm notification". Tick "Active" to enable this trigger.
3.2 Configuring Z-Wave via Smart Phone
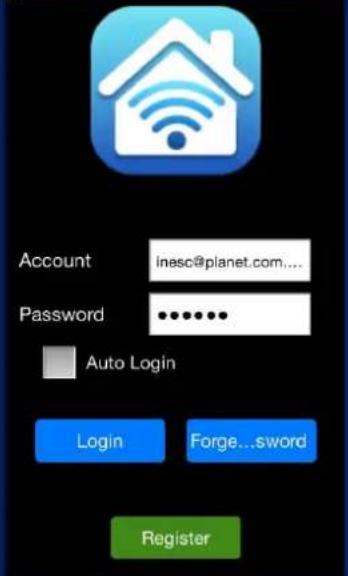
The HAC-1100 can be used on iOS and Android operating system. Cloud Home can be downloaded at Google Play store or app store.


Please refer to the following steps to install Cloud Home app and add Z-Wave device via smart phone.
Step 1. Include a Z-Wave device via smart phone (Android/iOS).
a. Register a user account.
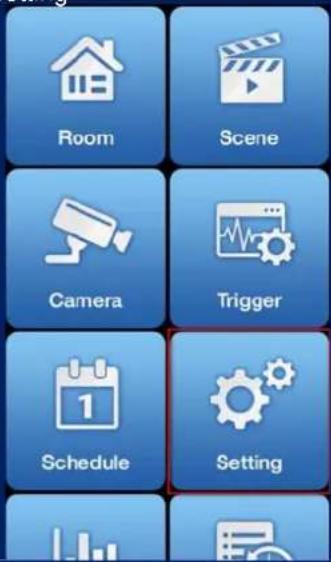
b. Setting
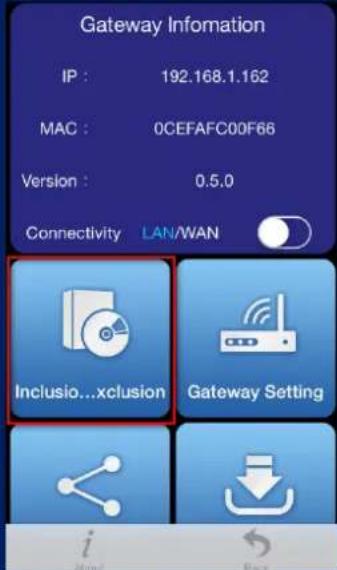
c. Inclusion/Exclusion
d. Click Inclusion to add device
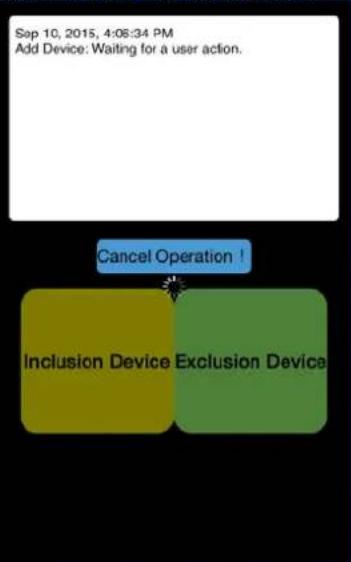
flowchart
graph TD
    A["Cancel Operation!"] --> B["Inclusion Device"]
    A --> C["Exclusion Device"]
e. e. The distance between HZS-200 and HAC-1000 is suggested to be one meter. Press the program switch of the HZS-200 at least for 1 second to be included.
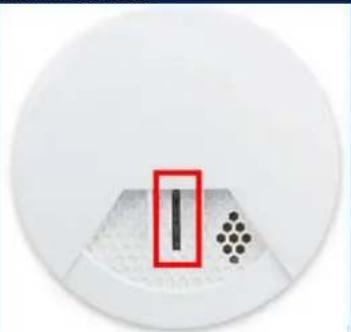
natural_image
Circular object with a red rectangle containing a black vertical line and a dot pattern on a textured base (no text or symbols)Step 2. Set up the location and room for Z-Wave device.
a. Create rooms in your environment.
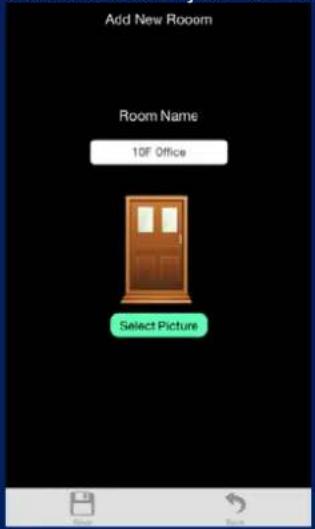
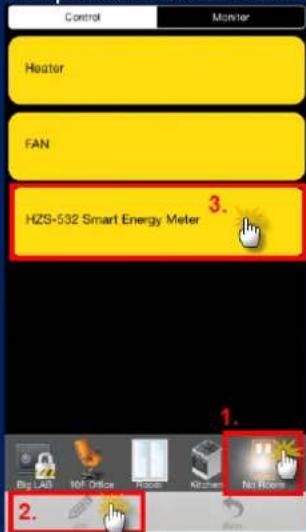
b. Click "No Room" to show the device. And place the new device in a room.
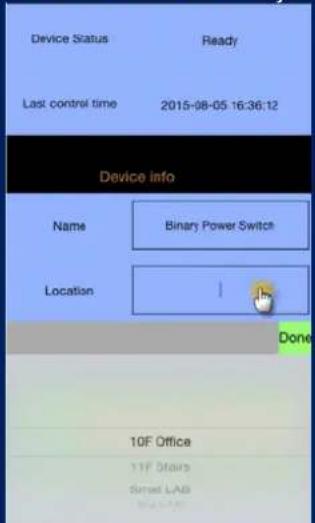
c. Select "Name" to name this device and select "Location" to place this device in the room that you created.
d. Select Picture for your Z-Wave device.
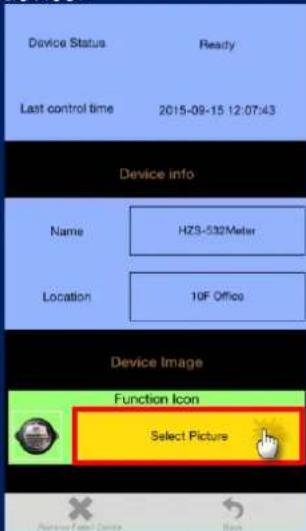
e. Click "Back" to save.
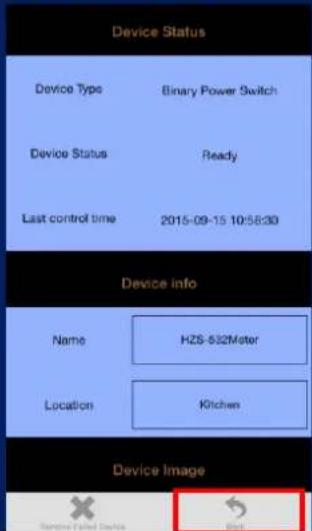
f. Done successfully.
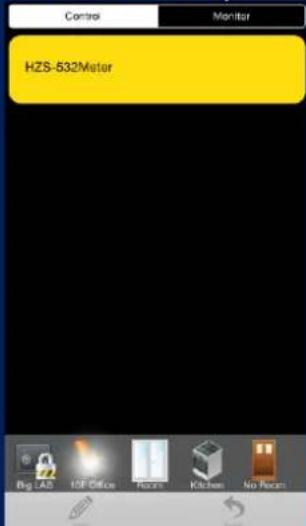
Step 3. Create a scene via smart phone.
a. Click "Add" and name a new scene.
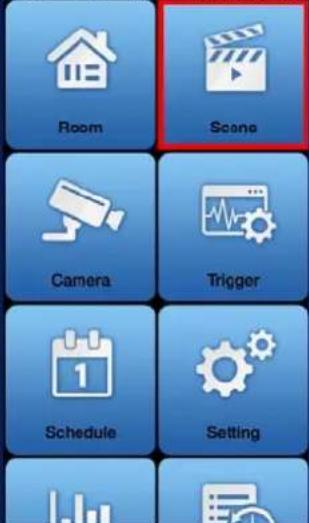
b. Click "Add" to add a Z-Wave device.
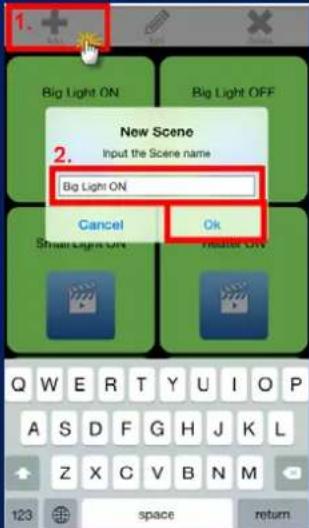
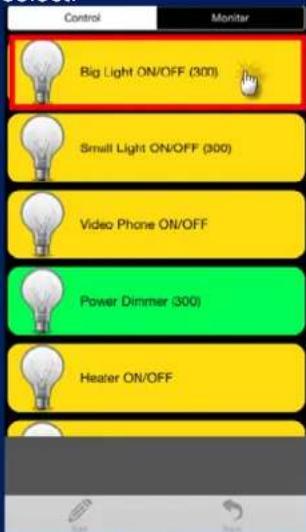
c. Select a Z-Wave device.
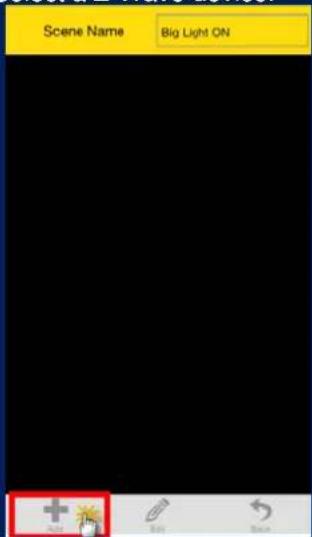
d. Click ON or OFF for the device you select.
e. Click "Back" to save.
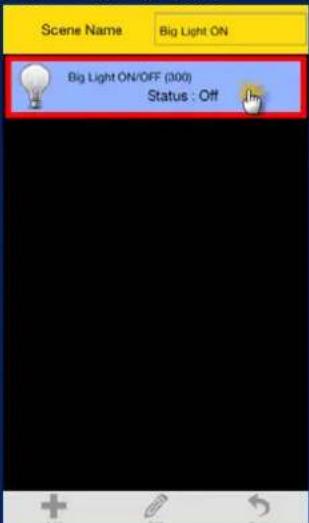
f. Done successfully.
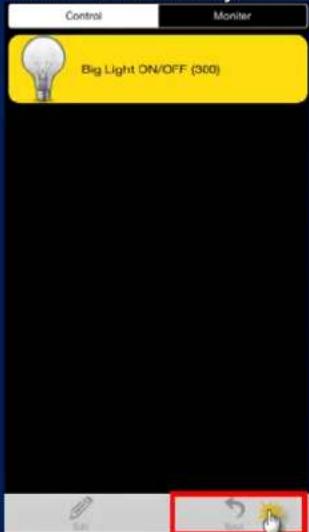
Step 4. Create Trigger via smart phone.
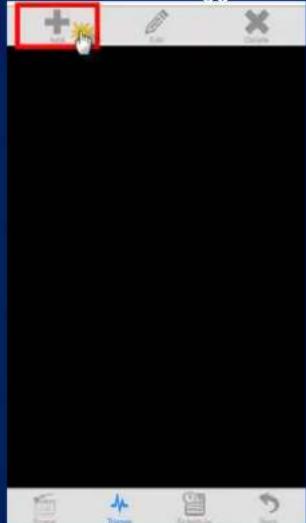
a. Click "Add".
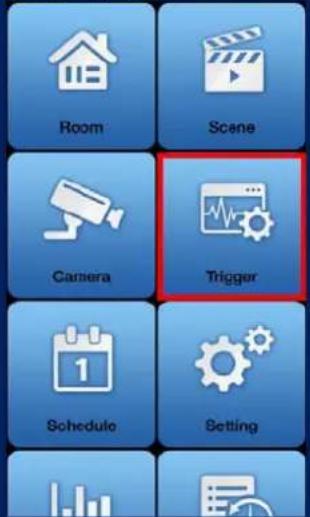
b. Name this new Trigger.
c. Select the Z-Wave device and click next.
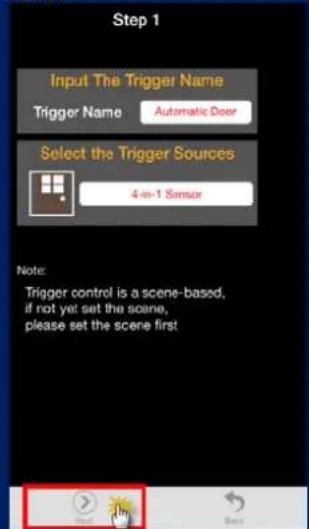
d. Select a mode for a Z-Wave device.
e. Select a scene.
f. Select the time for the trigger and which scene to run.
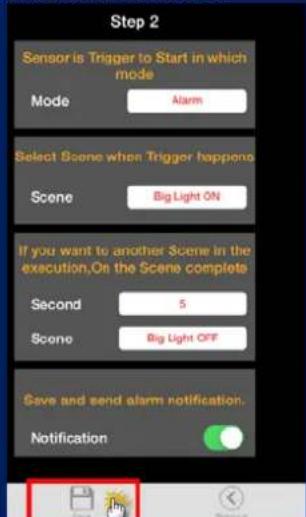
g. Done successfully.
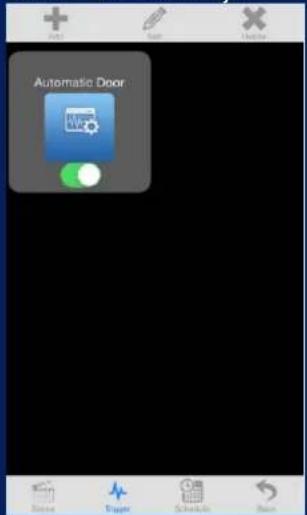
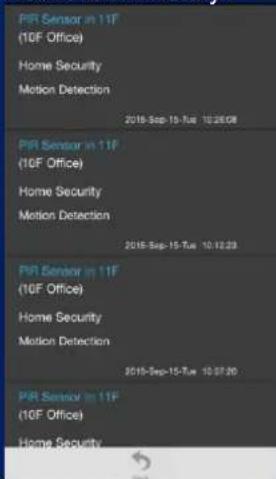
h. If you enable Save and send alarm notification, when it triggers, it will have a log. You can check this in Notification History.
3.3 Configuring Z-Wave via HTS-1000P
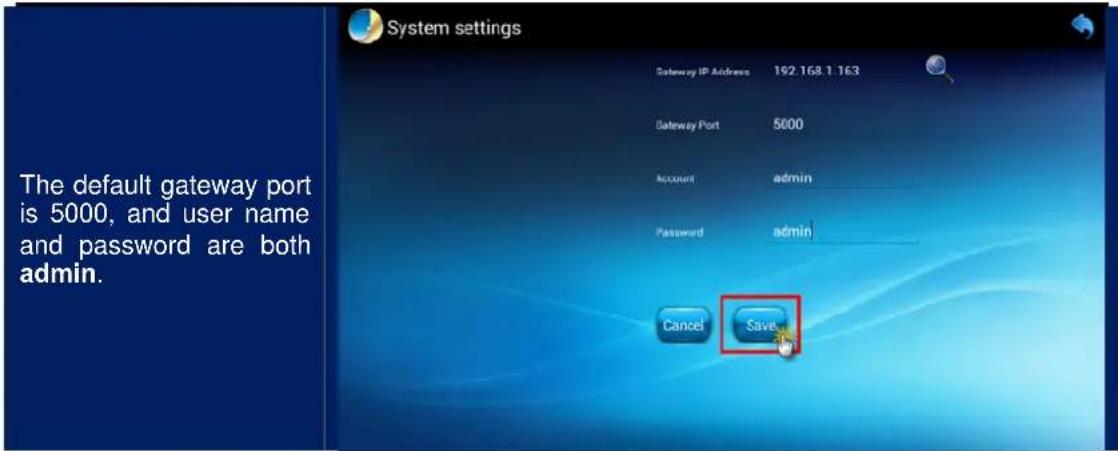
Step 1. Fill out the IP of control gateway to connect with gateway.
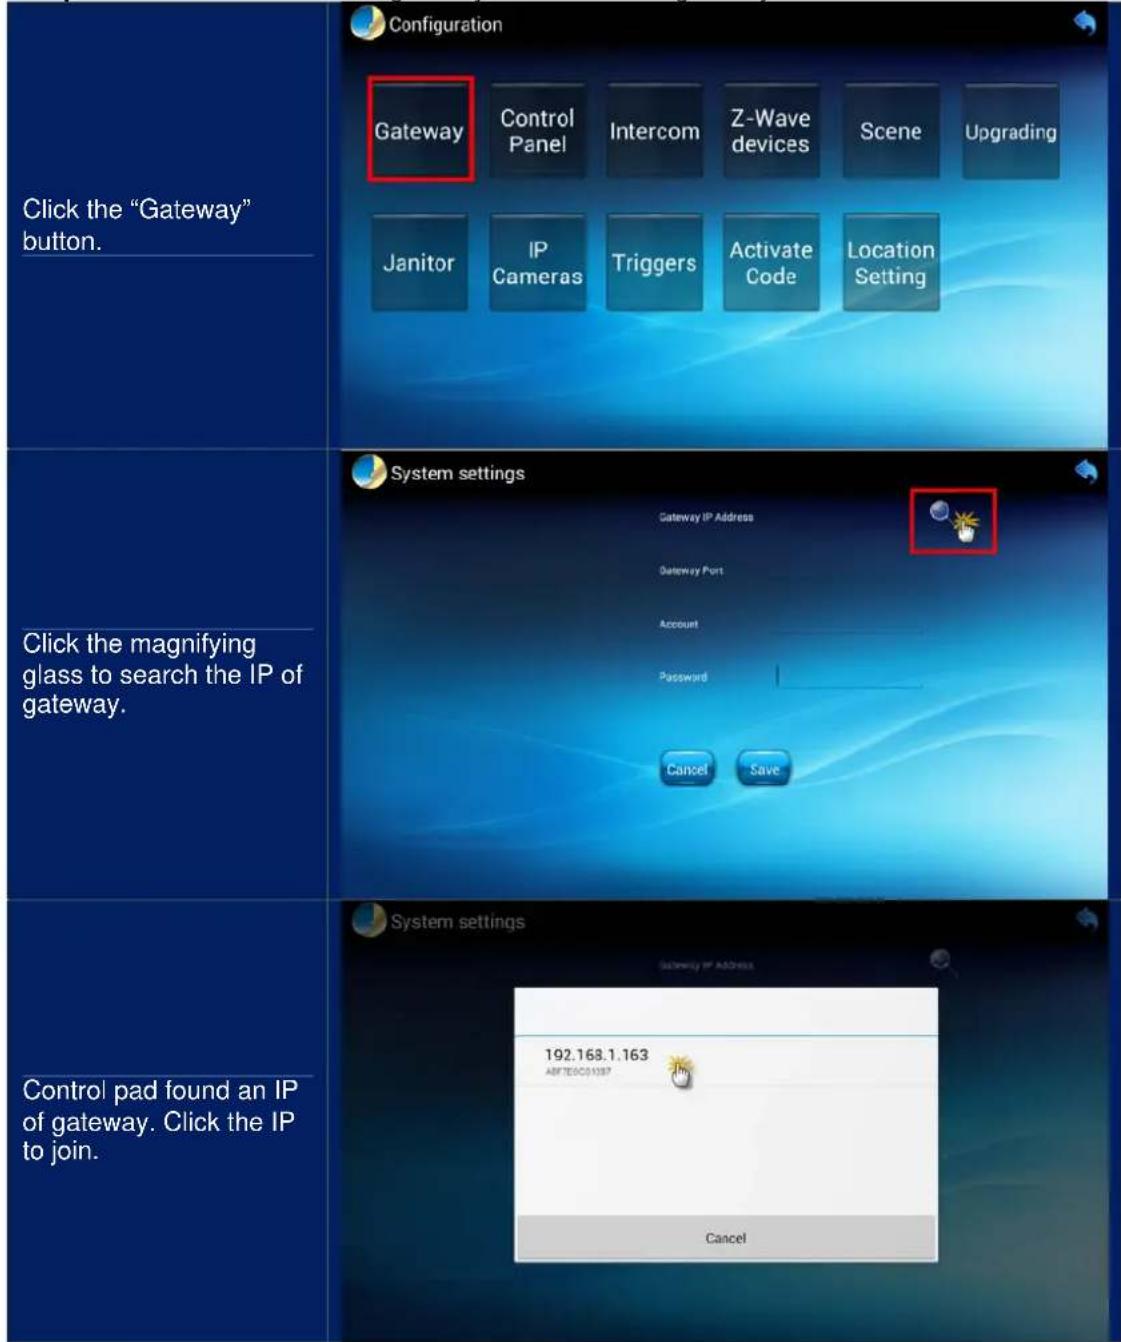
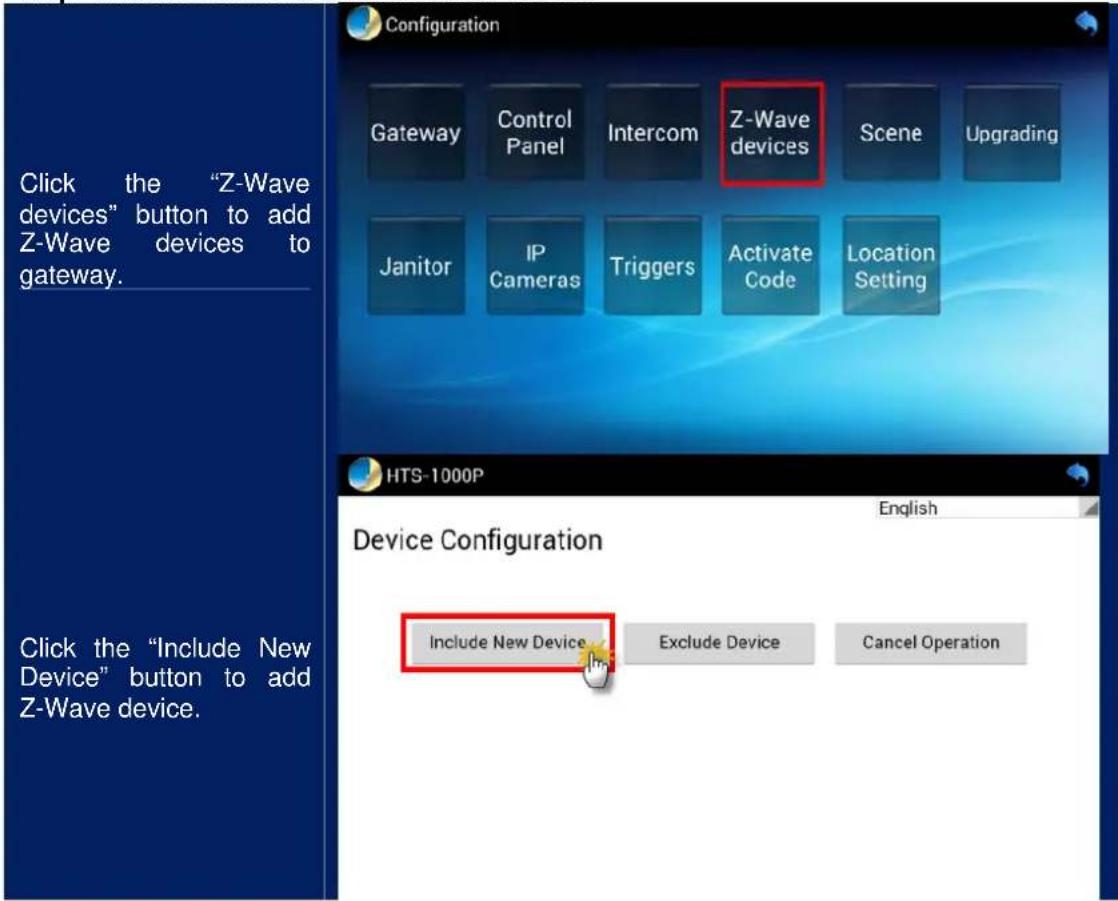
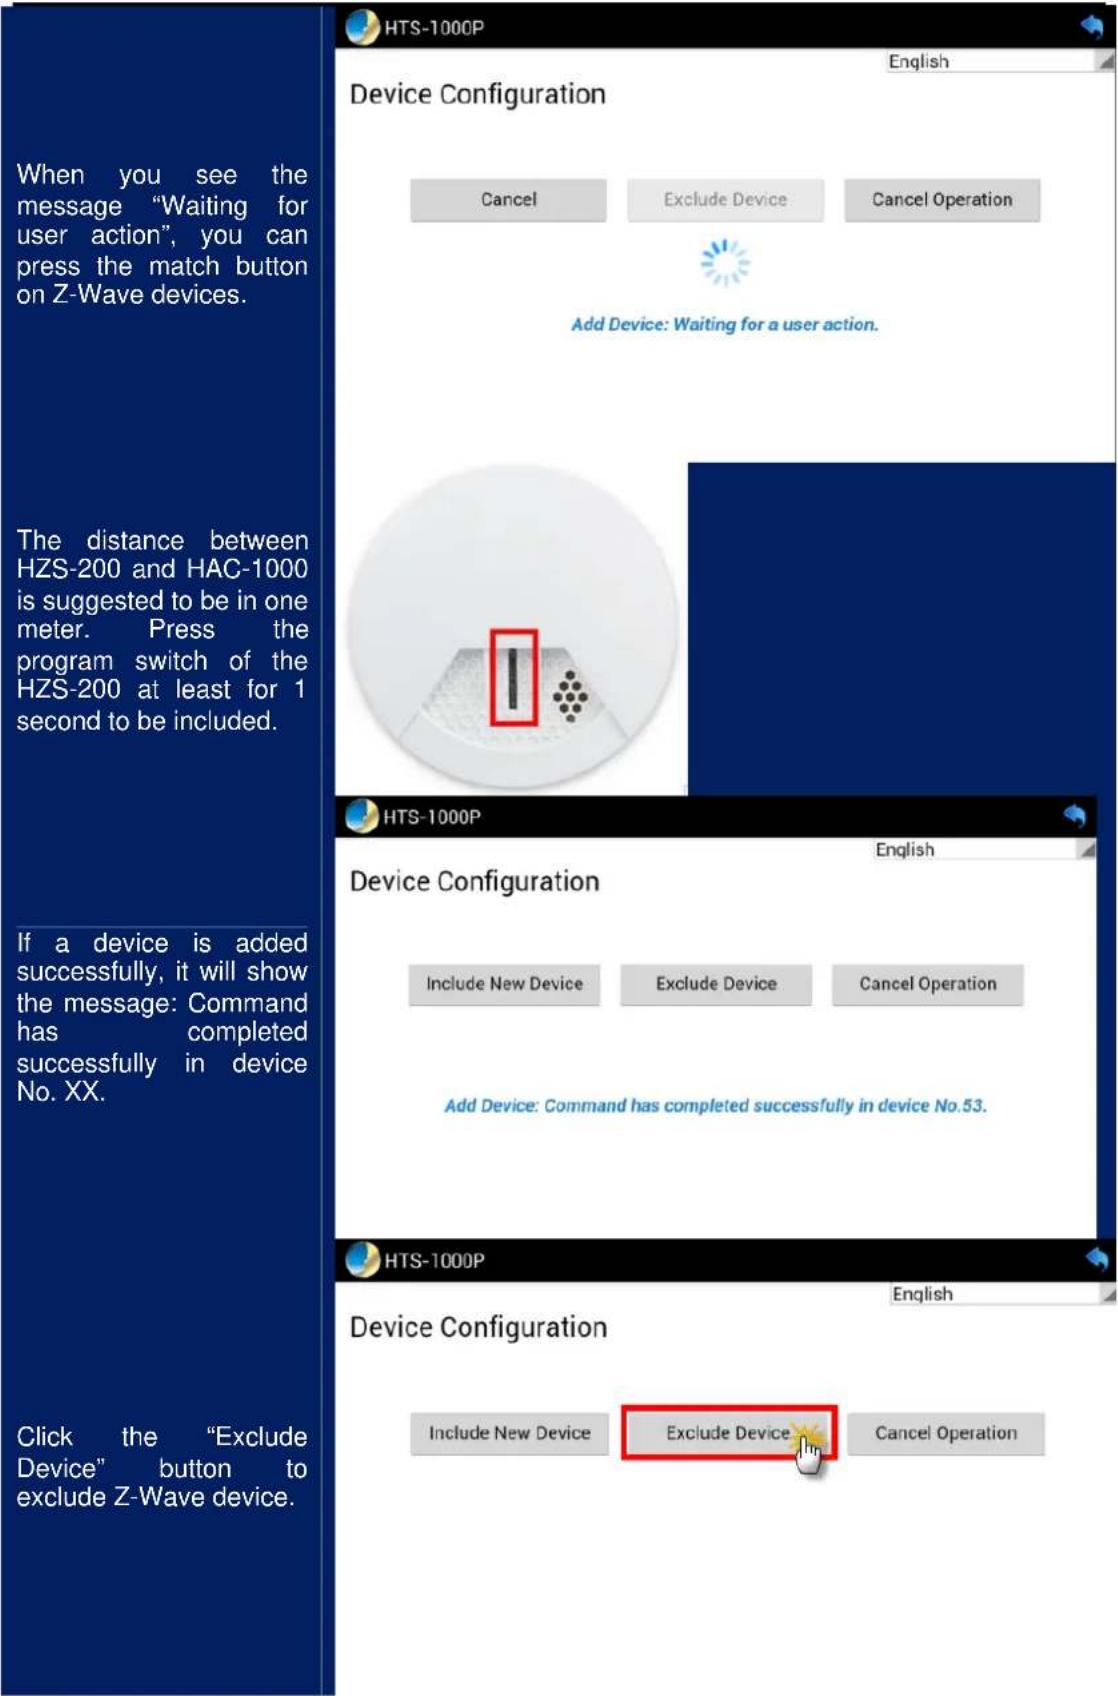
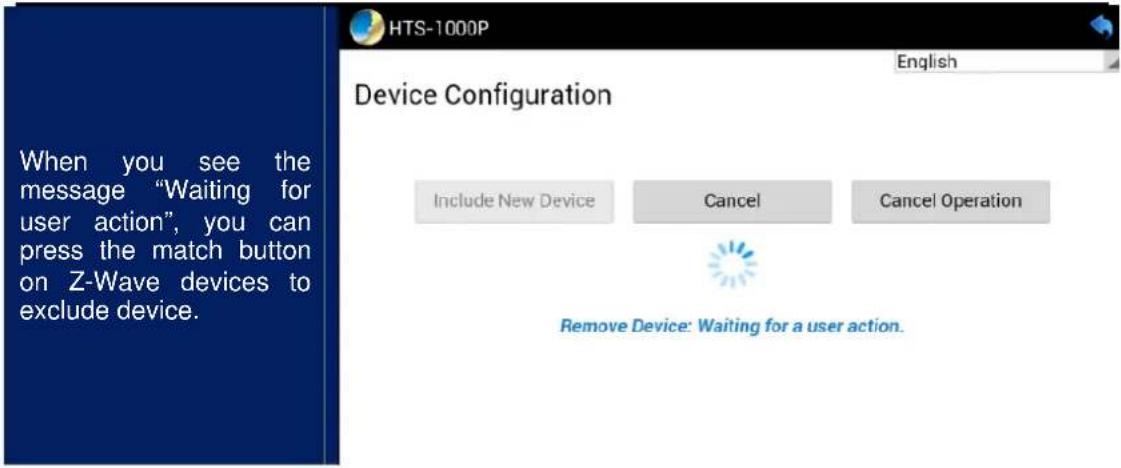
Step 2. Include a Z-Wave device via HTS-1000P.
Step 3. After including Z-Wave devices in gateway, you can create different scenes with this function. You can set scenes to control your devices in Scene mode.
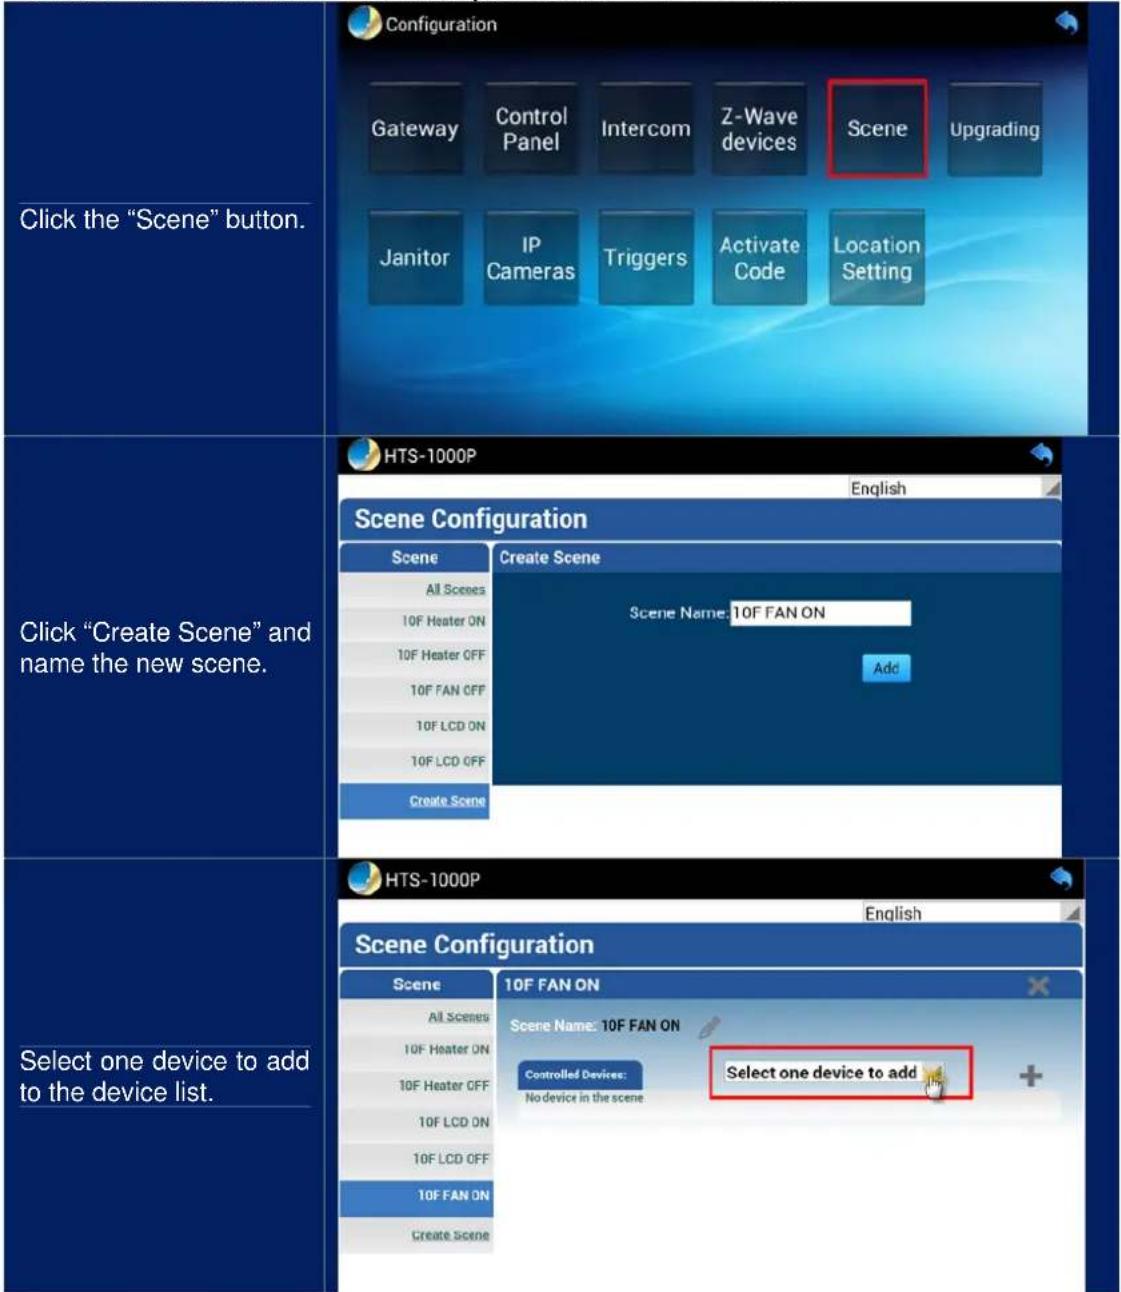
| Select one device. | 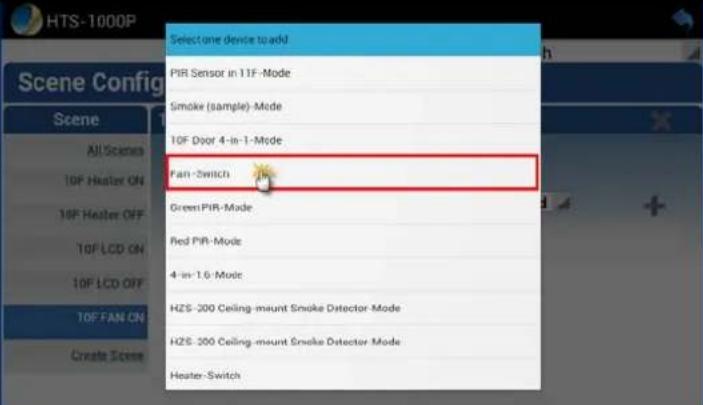 |
| Click the “Plus” button to add device. | 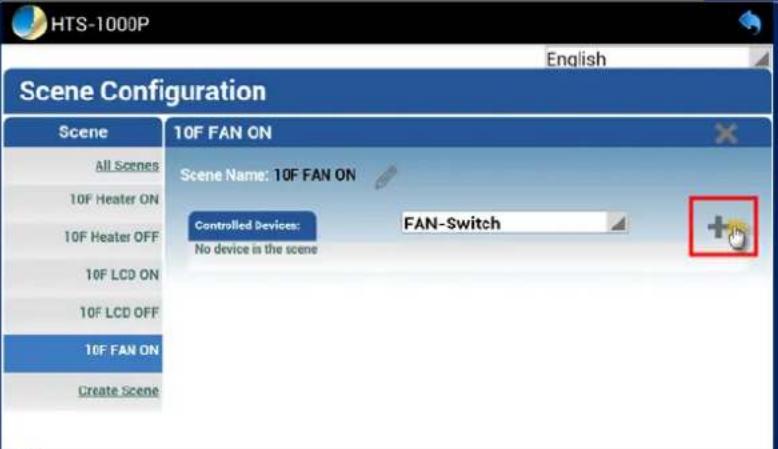 |
| Select the status of device (ON or OFF). | 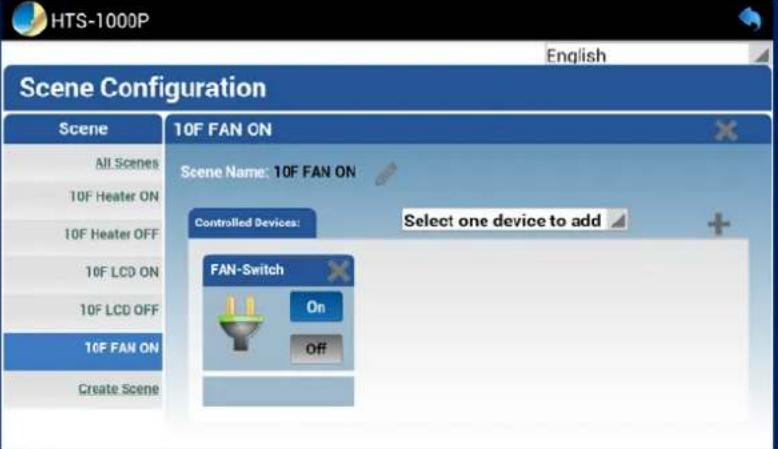 |
| Click “All Scenes” to check the scene. | 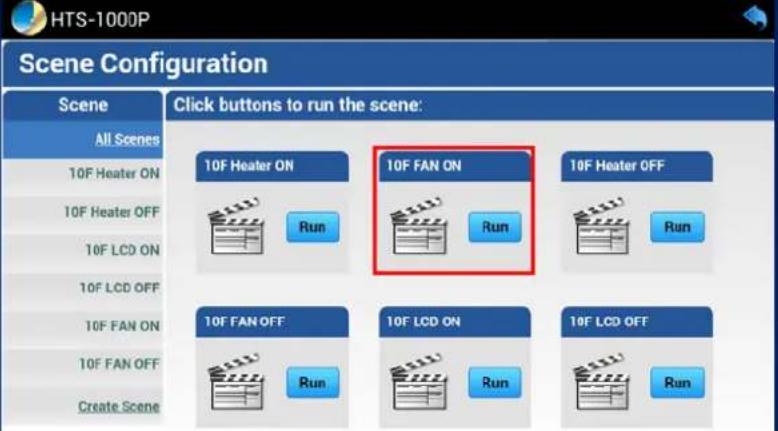 |
Step 4. In Trigger mode, the trigger time is set. An alarm notification is sent via sensor. If a sensor is not installed, this step can be skipped.
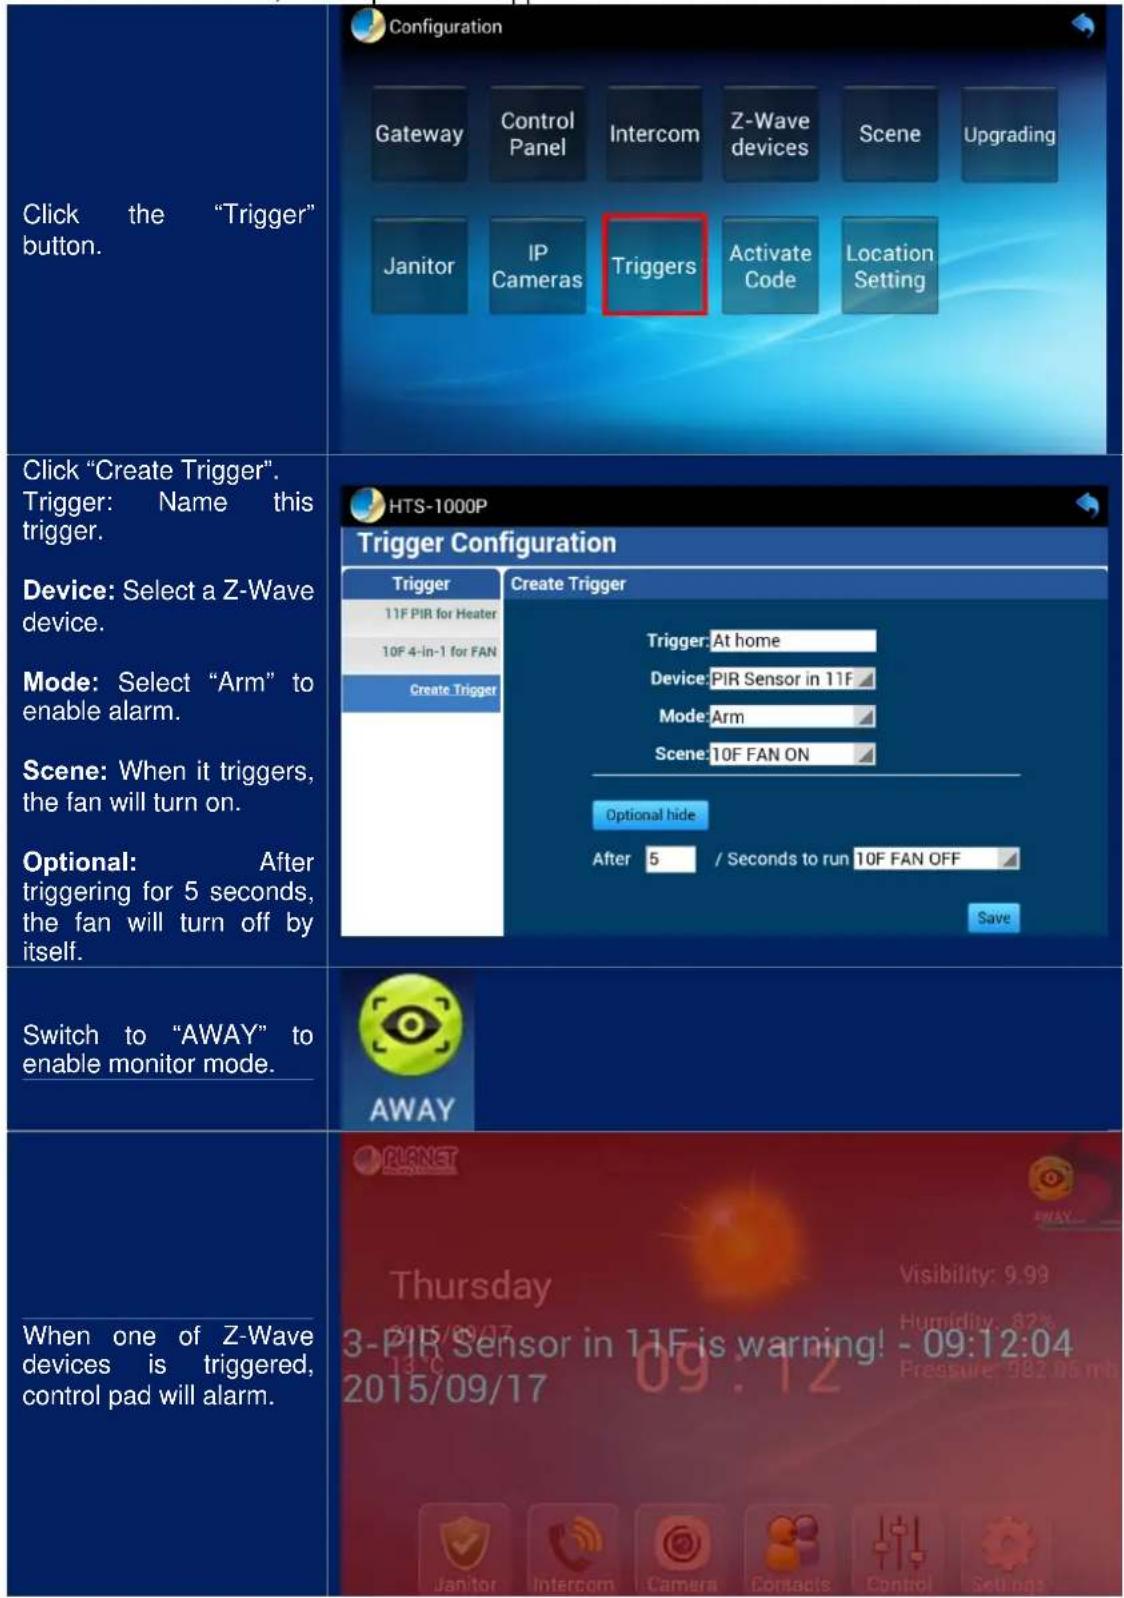
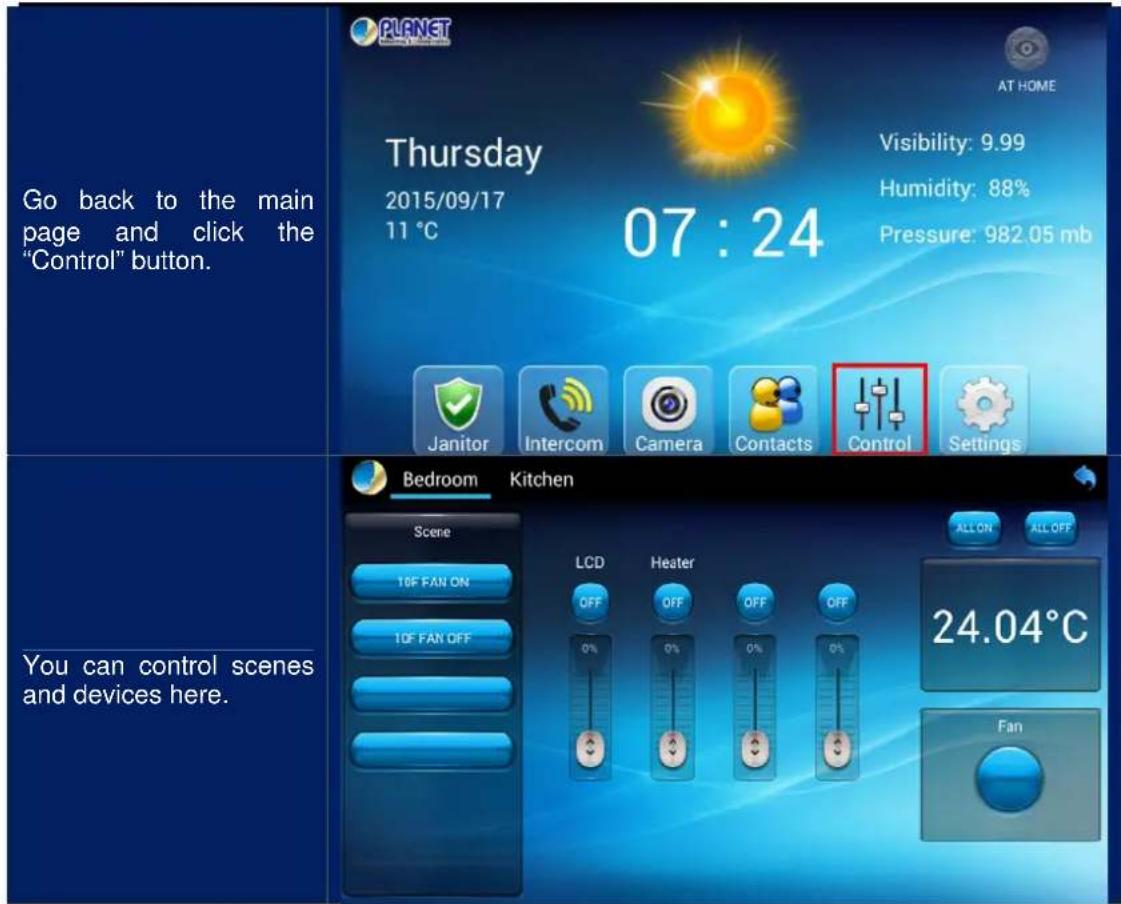
Step 5. After configuring this part, you can control Z-Wave devices and scenes via control pad.
| Click the “Control Panel” button. | 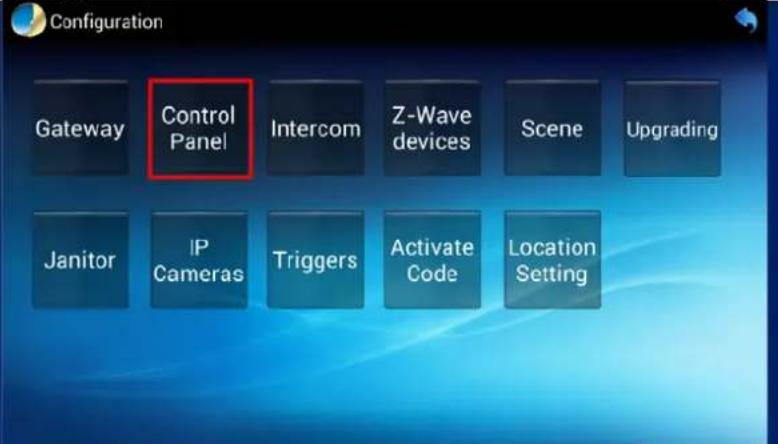 |
| Click the three-line button on the upper right corner and click “Add Panel”. | 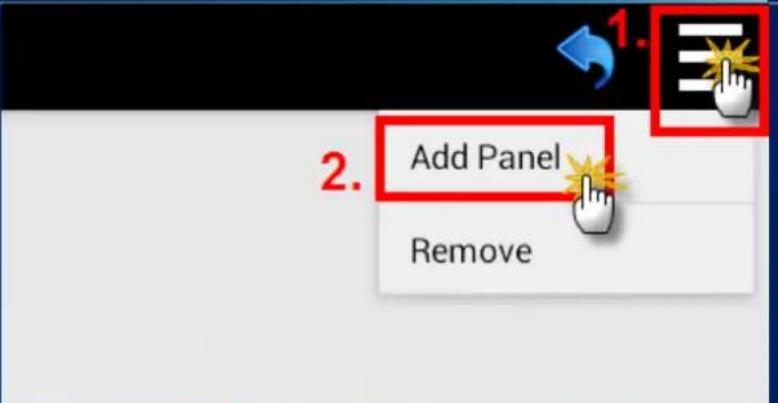 |
| There are two types of panel that you can choose from. | 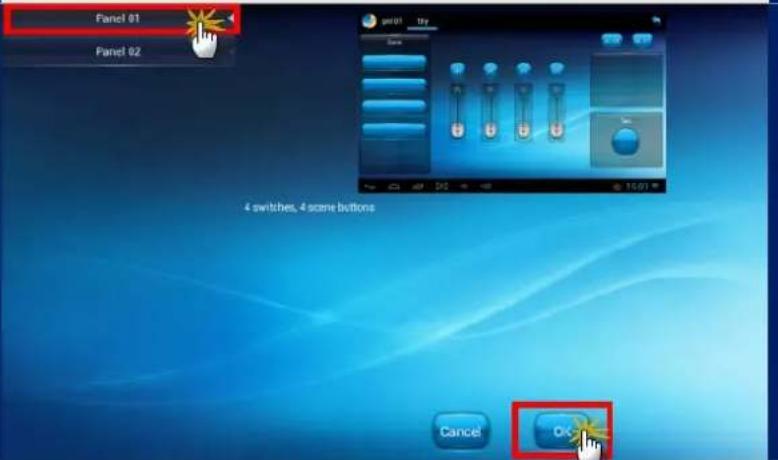 |
| Name the panel. | 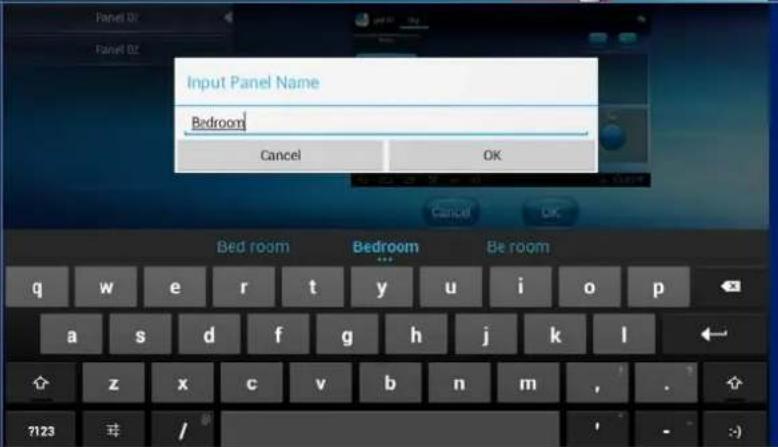 |
| Click and hold for two seconds to select the device or scene. | 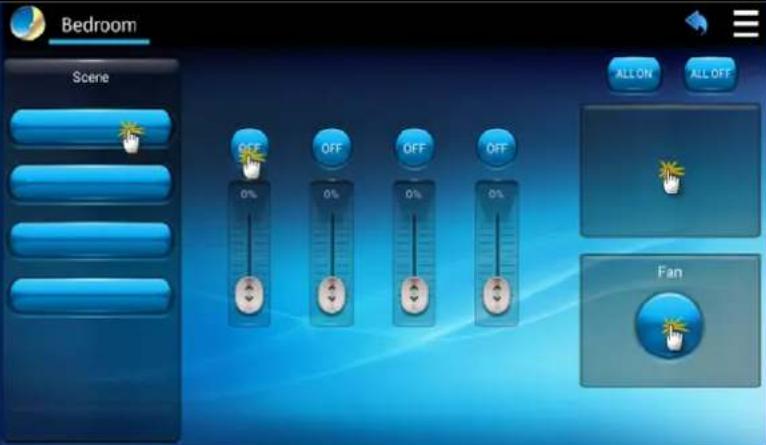 |
| Click on the Device field. | 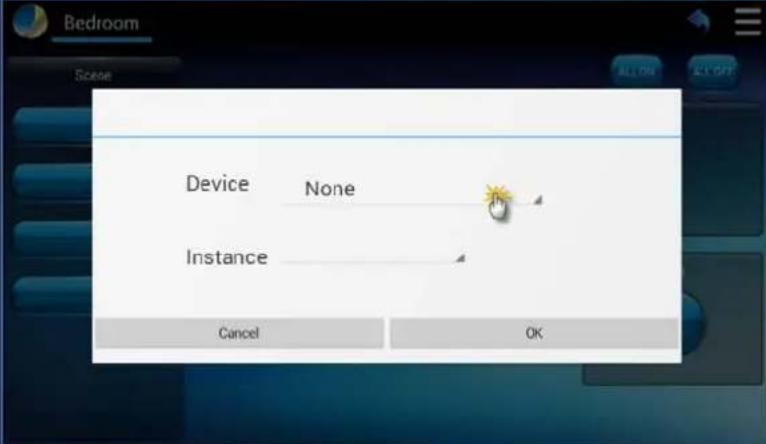 |
| Use a paper clip or pin to press the program button on the back of the sensor for 1 time to connect. | 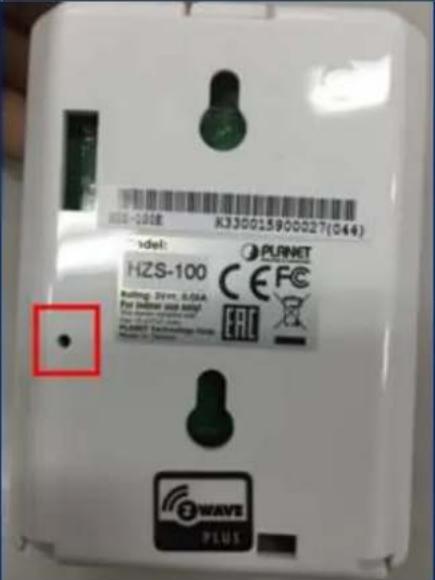 |
Appendix A: Troubleshooting & Frequently Asked Questions
| Features | |
| This difference between Z-Wave and ZigBee | The frequency is different between Z-Wave and ZigBee. ZigBee is 2.4GHz and Z-Wave is about 900MHz.The outdoor distance is different. ZigBee is 10~75 meters and Z-Wave is about 30 meters. |
| Z-Wave Device Installation | |
| How to reset the HZS-200 Series | HZS-200 will reset back to default value while excluding from the network. |
| Repeater Function | Only HZS-530 Series can extend the frequency range of Z-Wave.HZS-530 Series can act as a signal repeater to enhance the Z-Wave wireless communication range. For example, the HAC-1000 (Control gateway) is installed on the second floor to control over the HZS-300 (4-in-1 Sensor) on the first floor, but the Z-Wave frequency is weak. Thus, HZS-530 Series can be installed in between the second floor and the first floor to solve the problem. |
- Copyright
- Federal Communication Commission Interference Statement
- FCC Caution
- Federal Communication Commission (FCC) Radiation Exposure Statement
- Safety
- CE Mark Warning
- WEEE Regulation
- Revision
- Table of Contents
- Chapter 1. Product Introduction
- Package Contents
- Overview
- Home Automation and Smart Home Control
- Vocal Smoke Alarm Horn
- Getting Started is as Easy as 1-2-3
- Easy Installation and Convenient Status Indicator
- Specifications
- Chapter 2. Hardware Interface
- Chapter 3. Z-Wave Device Setting
- Configuring Z-Wave Device via HAC-1000
- Step 4. Create trigger via web.
- Configuring Z-Wave via Smart Phone
- Step 1. Include a Z-Wave device via smart phone (Android/iOS).
- Step 2. Set up the location and room for Z-Wave device.
- Step 3. Create a scene via smart phone.
- Step 4. Create Trigger via smart phone.
- Configuring Z-Wave via HTS-1000P
- Appendix A: Troubleshooting & Frequently Asked Questions
Brand : Planet
Model : HZS-200
Category : Smoke detector