
BT-PG 900 - Generator TAURUS - Free user manual and instructions
Find the device manual for free BT-PG 900 TAURUS in PDF.


| Product Type | Digital Inverter Generator |
| Model | BT-PG 900 |
| Brand | Taurus |
| Continuous Rated Power (240V) | 900 W |
| Maximum Power (240V, S2 2 min) | 1000 W |
| Rated Voltage | 1 x 240V~ / 1 x 12V DC |
| Rated Current | 4 A (240V) / 6 A (12V DC) |
| Frequency | 50 Hz |
| Engine Type | 4-stroke, air-cooled, single cylinder |
| Displacement | 52.6 cm³ |
| Max. Engine Power | 1.04 kW / 1.4 hp |
| Fuel | Unleaded petrol |
| Tank Capacity | 2.7 L |
| Engine Oil Capacity | approx. 0.25 L SAE 30 |
| Fuel Consumption at 2/3 Load | approx. 0.68 L/h |
| Weight | 13 kg |
| Sound Pressure Level | 74 dB(A) |
| Sound Power Level | 94 dB(A) |
| Protection Type | IP23 |
| Power Factor (cos φ) | 1 |
| Power Class | G1 |
| Max. Ambient Temperature | 40°C |
| Max. Altitude | 1000 m above sea level |
| Spark Plug | CR4HSB |
| Operating Modes | Continuous (S1) and Temporary (S2) |
Frequently Asked Questions - BT-PG 900 TAURUS
User questions about BT-PG 900 TAURUS
0 question about this device. Answer the ones you know or ask your own.
Ask a new question about this device
Download the instructions for your Generator in PDF format for free! Find your manual BT-PG 900 - TAURUS and take your electronic device back in hand. On this page are published all the documents necessary for the use of your device. BT-PG 900 by TAURUS.
USER MANUAL BT-PG 900 TAURUS
natural_image
Exterior view of a black AURUS gas generator with control panel and buttons (no readable text beyond branding)INSTRUCTION MANUAL
MODEL NUMBER BT-PG 900
AFTER SALES SUPPORT
TEL: 1300 922 271
EMAIL: service.australia@einhell.com
Digital Inverter Generator
What your 1 year warranty means
Great care has gone into the manufacture of this product and it should therefore provide you with years of good service when used properly. In the event of product failure within its intended use over the course of the first 1 year after the date of purchase, we will remedy the problem as quickly as possible once it has been brought to our attention. In the unlikely event of such an occurrence, or if you require any information about the product, please contact us via our after sales support services, details of which can be found in this manual and on the product itself.
There will be no returns accepted with products containing fuel.
Welcome Section
Congratulations on choosing to buy a TAURUS® product.
All products brought to you by TAURUS ^® are manufactured to the highest standards of performance and safety, and, as part of our philosophy of customer service and satisfaction, are backed by our comprehensive 1 Year Warranty.
We hope you will enjoy using your purchase for many years to come.
Table of Contents
- General safety instructions
- Layout and items supplied
- Proper use
- Technical data
- Before putting the machine into operation
- Operation
- Cleaning, maintenance and ordering spare parts
- Disposal and recycling
- Servicing petrol tools
- Troubleshooting
1
3
natural_image
Three types of screwdrivers with numbered labels (17, 18, 19) shown as vertical rods (no text or symbols on the car body)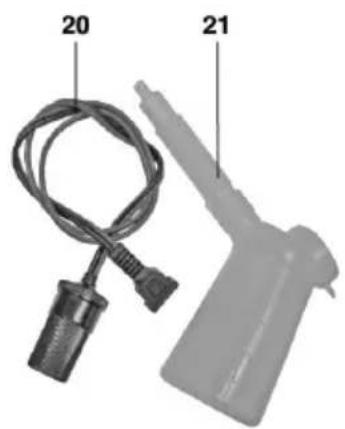
natural_image
Close-up of a medical device with labeled parts (20 and 21), no visible text or symbols on the main body.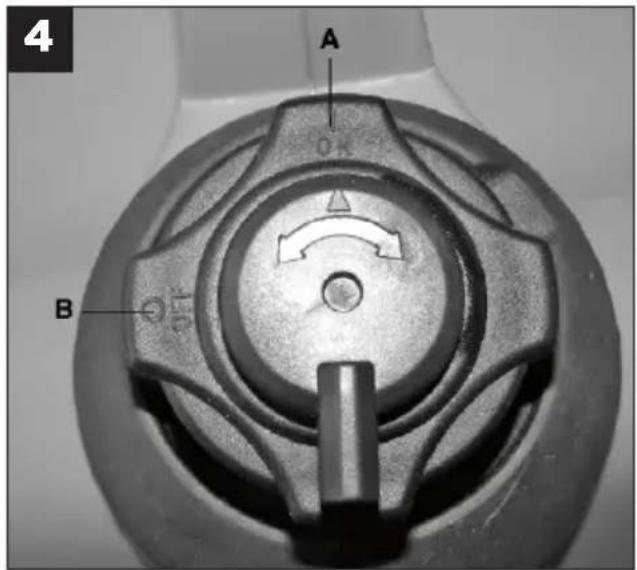
natural_image
Interior view of a car's internal components, showing engine, battery, and housing (no text or symbols visible)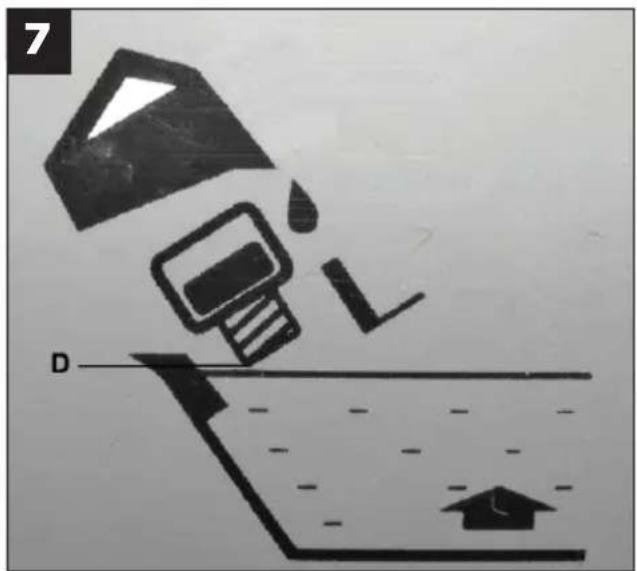
natural_image
Close-up of a hand inserting a plastic component into a container, labeled with number 6 (no text or symbols on the object itself)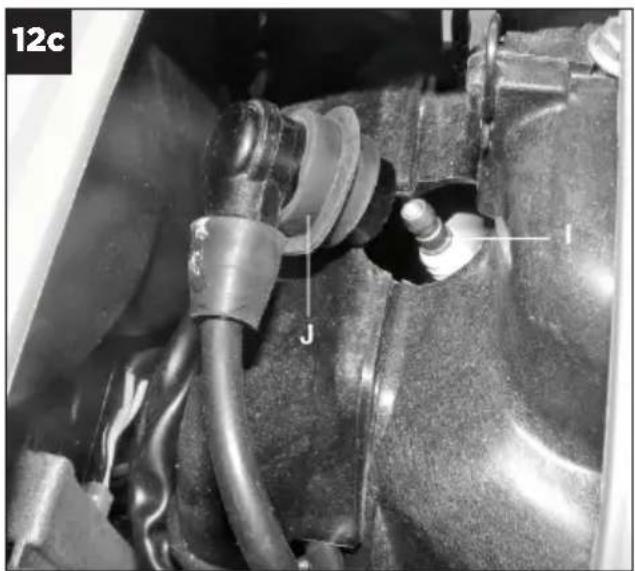
natural_image
Close-up of a mechanical component with labeled parts (J and I), no readable text or symbols beyond labels13

1

2

3

4
GENERAL SAFETY RULES
WARNING! Read all instructions Failure to follow all instructions listed below may result in electric shock, fire and/or serious injury. The term "power tool" in all of the warnings listed below refers to your mains-operated (corded) power tool or battery-operated (cordless) power tool.
SAVE THESE INSTRUCTIONS
- Work area
a. Keep work area clean and well lit. Cluttered and dark areas invite accidents.
b. Do not operate power tools in explosive atmospheres, such as in the presence of flammable liquids, gases or dust. Power tools create sparks which may ignite the dust or fumes.
c. Keep children and bystanders away while operating a power tool. Distractions can cause you to lose control. - Electrical safety
a. Power tools plugs must match the outlet. Never modify the plug in any way. Do not use any adapter plugs with earthed (grounded) power tool. Unmodified plugs and matching outlets will reduce risk of electric shock.
b. Avoid body contact with earthed or grounded surfaces such as pipes, radiators, ranges and
refrigerators. There is an increased risk of electric shock if your body is earthed or grounded.
c. Do not expose power tools to rain or wet conditions. Water entering a power tool will increase the risk of electric shock.
d. Do not abuse the cord. Never use the cord for carrying, pulling or unplugging the power tool. Keep cord away from heat, oil, sharp edges or moving parts. Damaged or entangled cords increase the risk of electric shock.
e. When operating a power tool outdoors, use an extension cord suitable for outdoor use. Use of a cord suitable for outdoor use reduces the risk of electric shock.
- Personal safety
a. Stay alert, watch what you are doing and use common sense when operating a power tool. Do not use a power tool while you are tired or under the influence of drugs, alcohol or medication. A moment of inattention while operating power tools may result in serious personal injury.
b. Use safety equipment. Always wear eye protection. Safety equipment such as dust mask, non-skid safety shoes, hard hat, or hearing protection used for appropriate conditions will reduce personal injuries.
c. Avoid accidental starting. Ensure the switch is in the off-position before plugging in. Carrying power tools with your finger on the switch or plugging in power tools that have the switch on invites accidents.
d. Remove any adjusting key or wrench before turning the power tool on. A wrench or a key left attached to rotating part of the power tool may result in personal injury.
e. Do not overreach. Keep proper footing and balance at all times. This enables better control of the power tool in unexpected situations.
f. Dress properly. Do not wear loose clothing or jewellery. Keep your hair, clothing and gloves away from moving parts. Loose clothes, jewellery or long hair can be caught in moving parts.
g. If devices are provided for the connection of dust extraction and collection facilities, ensure these are connected and properly used. Use of these devices can reduce dust-related hazards.
- Power tool use and cars
a. Do not force the power tool. Use the correct power tool for your application. The correct power tool will do the job better and safer at the rate for which it was designed.
b. Do not use the power tool if the switch does not turn it on and off. Any power tool that cannot be controlled with the switch is dangerous and must be repaired.
c. Disconnect the plug from the power source and/or the battery pack from the power tool before making any adjustments, changing accessories, or storing power tools. Such preventive safety measures reduce the risk of starting the power tool accidentally.
d. Store idle power tools out of the reach of children
and do not allow persons unfamiliar with the power tool or these instructions to operate the power tool. Power tools are dangerous in the hands of untrained users.
e. Maintain power tools. Check for misalignment or binding of moving parts, breakage of parts and any other condition that may affect the power tools operation. If damaged, have the power tool repaired before use. Many accidents are caused by poorly maintained power tools.
f. Keep cutting tools sharp and clean. Properly maintained cutting tools with sharp cutting edges are less likely to bind and are easier to control.
g. Use the power tool, accessories and tool bits etc. In accordance with these instructions and in the manner intended for the particular type of power tool, taking into account the working conditions and the work to be performed. Use of the power tool for operations different from those intended could result in a hazardous situation.
Important!
When using the equipment, a few safety precautions must be observed to avoid injuries and damage. Please read the complete operating instructions and safety regulations with due care. Keep this manual in a safe place, so that the information is available at all times. If you give the equipment to any other person, hand over these operating instructions and safety regulations as well. We cannot accept any liability for damage or accidents which arise due to a failure to follow these instructions and the safety instructions.
Explanation of the warning signs on the machine (Fig. 13)
- Important. Read the operating instructions.
- Important. Hot parts. Keep your distance.
- Important. Switch off the engine before refuelling.
- Important. Never operate in non-ventilated rooms.
1. General safety instructions
• No changes may be made to the generator.
- Only original parts may be used for maintenance and accessories.
- Important: Danger of poisoning, do not inhale emissions.
• Children are to be kept away from the generator.
- Important: Risk of burns. Do not touch the exhaust system or drive unit.
- Wear suitable ear protection when in the vicinity of the equipment.
- Important: Petrol and petrol fumes are highly combustible or explosive.
- Never operate the generator in non-ventilated rooms or in the vicinity of easily inflammable substances. When operating the generator in rooms with good ventilation, the exhaust gases must be channeled directly outdoors through an exhaust hose.
- Important: Toxic exhaust gases can escape despite the exhaust hose. Due to the fire hazard, never direct the exhaust hose towards inflammable materials.
- Risk of explosion: Never operate the generator in rooms with combustible materials.
- The speed preset by the manufacturer is not allowed to be changed. The generator or connected equipment may be damaged.
- Secure the generator against shifting and toppling during transport.
- Place the generator at least 1m away from buildings and the equipment connected to it.
- Place the generator in a secure, level position.
- Do not turn, tip or change the generators position while it is working.
• Always switch off the engine when transporting and refuelling the generator.
• Make sure that when you refuel the generator no fuel is spilt on the engine or exhaust pipe.
• Never operate the generator in rain or snow.
• Never touch the generator with wet hands. - Guard against electric danger. When working outdoors, use only extension cables that are approved for outdoor use and which are marked accordingly (H07RN..).
- The overall length of the extension cables used may not exceed 50 m for 1.5 mm ^2 and 100 m for 2.5 mm ^2 .
- No changes may be made to the settings of the motor or generator.
• Repairs and adjustment work may only be carried out by authorized trained personnel. - Do not refuel or empty the tank near open lights, fire or sparks. Do not smoke!
- Do not touch any mechanically driven or hot parts. Do not remove the safety guards.
- Do not expose the tools to damp or dust.
- Permissible ambient temperature - 10 to +40°C, max. altitude above sea level 1000 m, relative humidity: 90 % (non-condensing)
- The generator is driven by a combustion engine, which produces heat in the area of the exhaust (on the opposite side of the sockets) and the exhaust outlet. You should therefore keep clear of these surfaces because of risk of skin burns.
- The values quoted in the technical data for sound power level (LWA) and sound pressure level (LpA) are emission values and not necessarily reliable workplace values. As there is a correlation between emission and immission levels, the values are not a reliable basis for deciding on any additional precautions which may be needed. Factors influencing the actual user immission level include the properties of the work area, other sound sources etc., the number of machines and other processes in the vicinity, as well as the time span in which the operator is subjected to the noise. Also, the permitted immission level can vary from country to country. Nevertheless, with this information the user is able to make a better assessment of the dangers and risks involved.
- Never use a faulty or damaged electrical equipment (this also applies to extension cables and plug connections).
CAUTION!
Read all safety regulations and instructions.
Any errors made in following the safety regulations and instructions may result in an electric shock, fire and/or serious injury.
Keep all safety regulations and instructions in a safe place for future use.
Do not lose these safety instructions
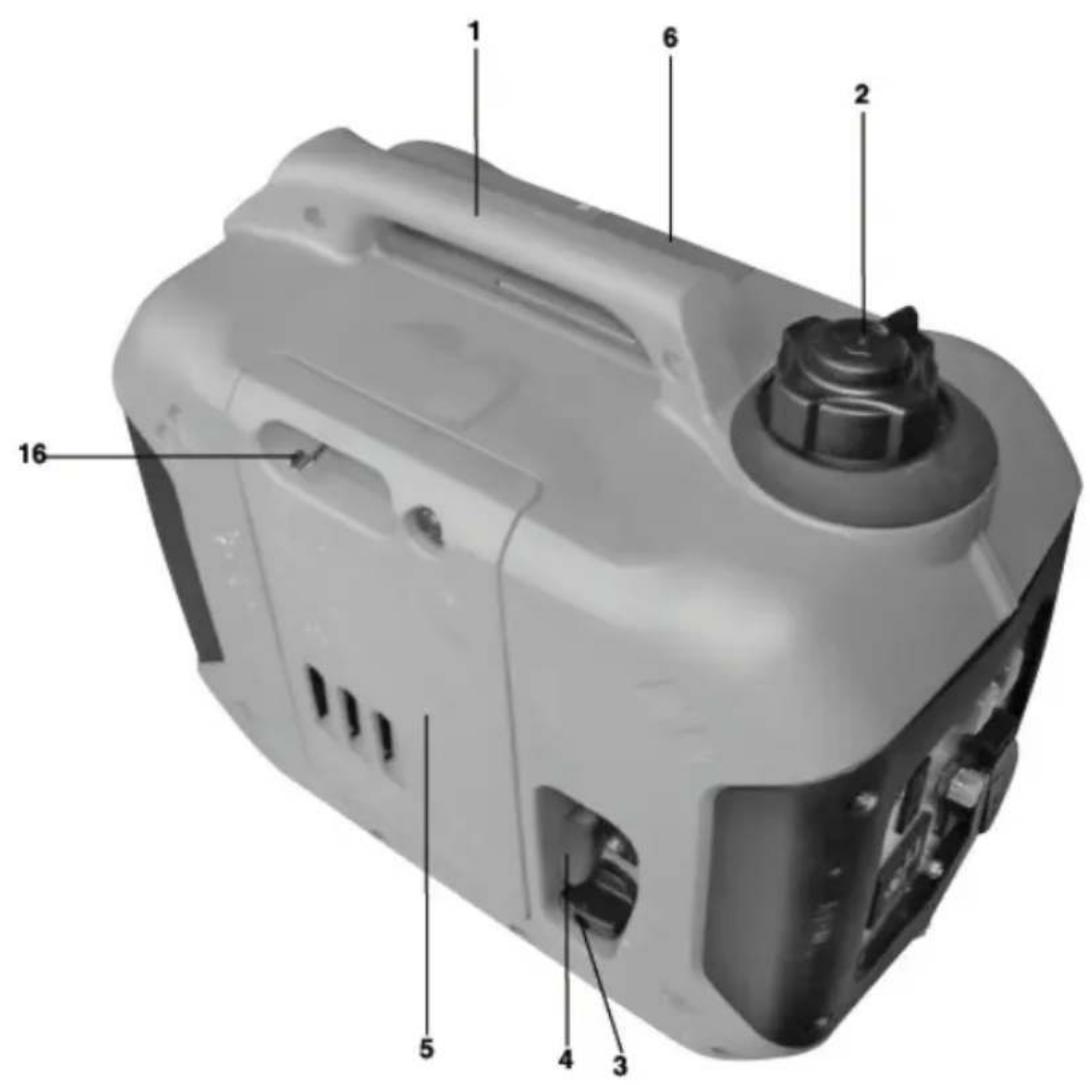
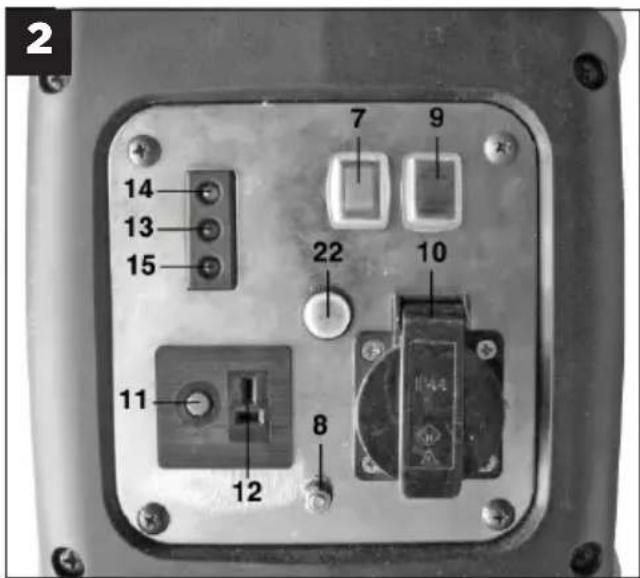
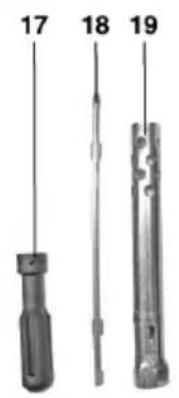
2. Layout and items supplied (Fig. 1-3)
- Carry handle
- Tank cover with ventilation
- Petrol cock
- Starter cord
- Motor cover
- Spark plug cover
- ON/OFF switch
- Earthing connection
- Economy switch
- 1 x 240V\~ socket
- 1 x 12V DC safety trip
- 1 x 12V DC connector
- Overload indicator
- Operating status indicator
- Oil warning indicator
- Choke lever
- Screwdriver handle
- Screwdriver insert
- Spark plug wrench
- Adapter cable with 12V socket
- Oil filler jug
- Overload switch
3. Proper use
The unit is designed for applications operated with a 240 V- and 12 V DC current source. Be sure to observe the restrictions in the safety instructions.
The machine is to be used only for its prescribed purpose. Any other use is deemed to be a case of misuse. The user / operator and not the manufacturer will be liable for any damage or injuries of any kind caused as a result of this.
Please note that our equipment has not been designed for use in commercial, trade or industrial applications. Our warranty will be voided if the machine is used in commercial, trade or industrial businesses or for equivalent purposes
4. Technical data
| Generator: Digital Inverter | |
| Protection type: IP23 | |
| Continuous rated power P_rated (S1)(240V): | 900 W |
| Maximum power P_max (S2 2 min)(240 V): | 1000 W |
| Rated voltage U_rated : 1 x 240V-/1 x 12 V d.c. | |
| Rated current I_rated : 4 A (240 V) / 6 A (12 V) | |
| Frequency F_rated : 50 Hz | |
| Drive engine design: 4-stroke, air-cooled | |
| Displacement: 52.6 cm | 3 |
| Max. power: 1.04 kW / 1.4 hp | |
| Fuel: Unleaded | |
| Tank capacity: 2.7 L | |
| Engine oil: approx 0.25 L | SAE 30 |
| Consumption at 2/3 load: approx. 0.68 l/h | |
| Weight: 13 kg | |
| Sound pressure level L_pA : 74 dB(A) | |
| Sound pressure level L_WA : 94 dB(A) | |
| Power factor cosφ: | 1 |
| Power class: | G1 |
| Max temperature: | 40°C |
| Max. altitude (above sea level): | 1000 m |
| Spark plug: | CR4HSB |
Operating mode S1 (continuous operation)
The machine can be continuously operated with the quoted power output.
Operating mode S2 (temporary operation)
The machine may be temporarily operated with the quoted power output. Afterwards the machine must be stopped for a while to prevent it from overheating.
5. Before putting the machine into operation
Remove the packaging material and check that all items have been supplied. Place the generator on a firm, flat surface near the consumer and ensure proper ventilation.
5.1 Electrical safety:
• Electric supply cables and connected equipment must be in perfect condition.
- The generator is to be operated only with equipment whose voltage specifications conform with the generator's output voltage.
- Never connect the generator to the power supply (socket-outlet).
- Keep the cable length to the consumer as short as possible.
5.2 Environmental protection
- Dispose of soiled maintenance material and operating materials at the appropriate collection point.
• Recycle packaging material, metal and plastics.
5.3 Connecting to earth
- The housing is allowed to be connected to earth in order to discharge static electricity. To do this, connect one end of a earthing cable to the earth connection on the generator (Fig. 2/Item 8) and the other end to an external earth (for example an earthing rod). Note: Cable and earthing rod are not supplied.
5.4 Topping up fuel
- Unscrew the tank cover (Fig. 1/Item 2) and add up to 2.7 liters of unleaded petrol using a filler neck.
- Ensure that you do not overfill the tank and spill petrol. (If you do spill, wipe up the excess amount and wait until the vapors have evaporated - danger of ignition.) Screw the tank cover back on.
5.5 Topping up oil
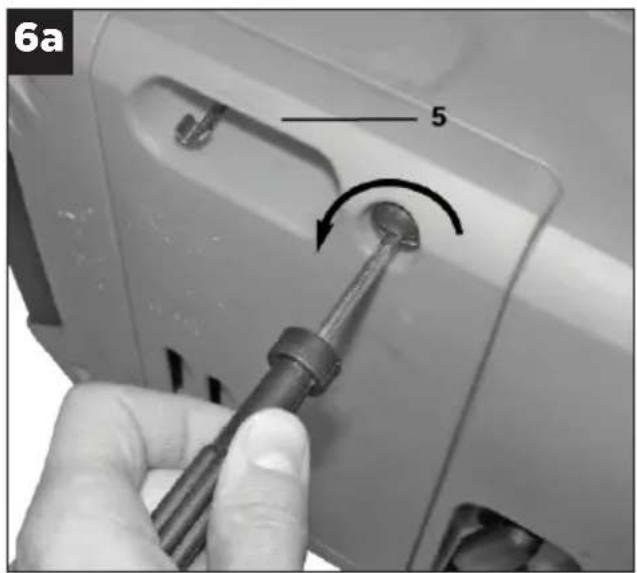
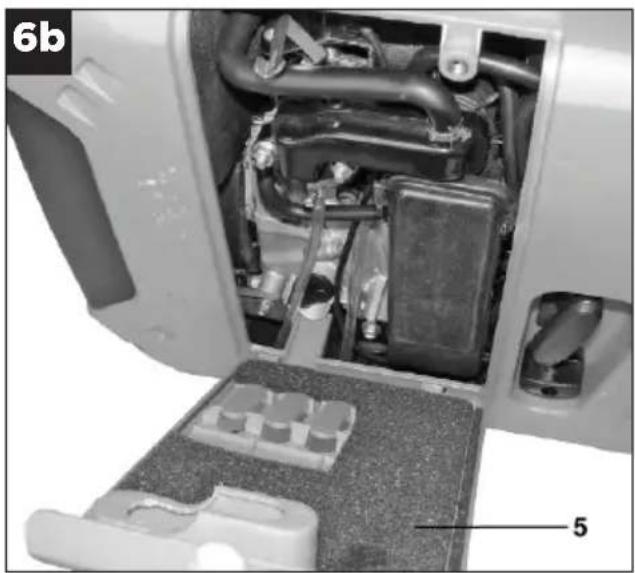
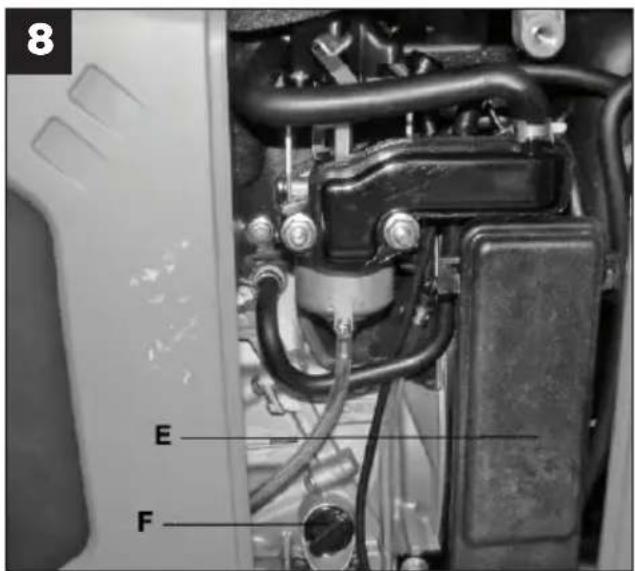
- Remove the engine cover (Figs. 6a - 6b/Item 5) using the screwdriver. Open the oil filler screw (Fig. 8/Item F) and add approximately 0.25 l of engine oil (SAE 30) using the supplied oil filler jug (Fig. 3/Item 21) or until the top fill mark on the oil dipstick (Fig. 7/Item D) is reached.
- Important! You must fill up with engine oil and fuel before you can start the engine.
6. Operation
- Check the fuel level and top it up if necessary.
• Make sure that the generator has sufficient ventilation.
• Make sure that the ignition cable is secured to the spark plug. - Inspect the immediate vicinity of the generator.
- Disconnect any electrical equipment which may already be connected to the generator.
6.1 Starting the engine
Important: Do not use any chemical starting agents such as highly volatile fuels or similar.
- Move the ventilation switch on the tank cover to the ON position (Fig. 4/Item A).
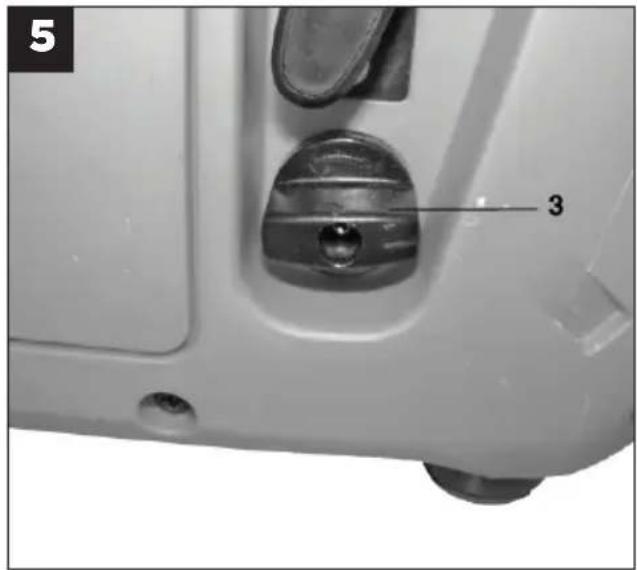
- Open the petrol cock (Fig. 5/Item 3) by turning it down.
- Move the ON/OFF switch (Fig. 2/Item 7) to the "I" position.
- Pull the choke lever (Fig. 1/Item 16) to the position "choke".
- Start the engine with the starter cord (Fig. 1/Item 4) by pulling the handle strongly. If the engine does not start, pull the handle again.
Important: Always pull the starter cable slowly until you feel the initial resistance before you then pull it quickly to start the engine. Do not allow the starter cable to whip back of its own accord.
- Push the choke lever (Fig. 1/Item 16) back approximately 15 to 30 seconds after the engine has started.
6.2 Economy mode
Economy switch (Fig. 2/Item 9) in the On "I" position:
The engine speed is regulated in accordance with minimum power requirements and the generator runs quietly and efficiently.
Economy switch (Fig. 2/Item 9) in the Off "O" position:
The generator runs at maximum speed.
6.3 Connecting consumers to the generator
- Connect the 240 V\~ devices to be powered to the socket (Fig. 2/Item 10). Important: This socket is allowed to be exposed to a continuous (S1) load of 900 W and temporarily (S2) for a maximum of 2 minutes to a load of 1,000 W.
- Connect the 12 V DC devices to be powered to the 12 V DC socket (Fig. 2/Item 12) using the adapter cable (Fig. 3/Item 20).
- Important: The 12 V socket is rated for 70 W.
- Important: The 12 V connector is allowed to be used only when the economy switch is in the "0" position.
- Do not connect the generator to the household mains system, since this may damage the generator.
Note: Some electrical appliances (power jigsaws, drills, etc.) may have a higher level of power consumption when used in difficult conditions.
6.4 Overload cut-out
240 V socket
• The status indicator (Fig. 2/Item 14) is lit green during normal operation.
- An overload has occurred if the status indicator light goes out and the overload indicator (Fig. 2/Item 13) flashes red.
- Switch off the generator (Fig. 2/Item 7).
- Press the overload switch (Fig. 2/Item 22).
Important: If an overload occurs, ensure that the power drawn does not exceed the generators maximum power output and that no defective devices are connected.
12 V connector
The 12 V DC connector (Fig. 2/Item 12) is automatically isolated from the power supply when overloaded. You can reset the connector by pressing the overload cut-out (Fig. 2/Item 11).
Important: Defective overload cut-outs must be replaced only by overload cut-outs of identical design and with the same performance data. If repairs are necessary, please contact your customer service center.
6.5 Switching off the engine
• Before you switch off the generator, allow it to run briefly with no consumers so that it can cool down.
- Move the ON/OFF switch (Fig. 2/Item 7) to the "0" position.
- Close the petrol cock (Fig. 1/Item 3).
- Move the ventilation switch on the tank cover to the OFF position (Fig. 4/Item B).
7. Cleaning, maintenance and ordering spare parts
Switch off the motor and pull the spark plug boot from the spark plug before doing any cleaning and maintenance work on the equipment.
Important: Switch off the machine immediately and contact your service station:
• In the event of unusual vibrations or noise
• If the engine appears to be overloaded or Misfires
7.1 Cleaning
- Keep all safety devices, air vents and the motor housing free of dirt and dust as far as possible.
- Wipe the equipment with a clean cloth or blow it with compressed air at low pressure.
• We recommend that you clean the device immediately each time you have finished using it. - Clean the equipment regularly with a moist cloth and some soft soap. Do not use cleaning agents or solvents; these could attack the plastic parts of the equipment. Ensure that no water can seep into the device.
7.2 Changing the oil and checking the oil level (before using the machine)
The motor oil is best changed when the motor is at working temperature. Also read chapter 9 page 11 in this manual.
- Keep a suitable, leak-tight receptacle within reach when performing an oil change.
- Remove the engine cover (Figs. 6a - 6b/Item 5).
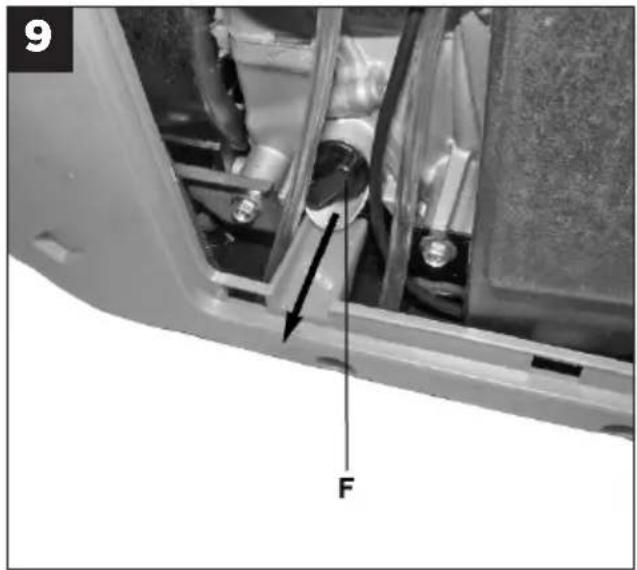
- Open the oil filler screw (Fig. 8-9/Item F).
- Drain the used oil into a suitable receptacle by tilting the generator.
- Add new engine oil (SAE 30) until the top fill mark on the oil dipstick (Fig. 7/Item D) is reached using the supplied oil filler jug (Fig. 3/Item 21).
- Dispose the used oil properly by taking it to a collection point. Most filling stations, repair garages, and recycling centers will accept used oil free of charge. Do not add antifreeze or transmission fluid to the used oil. Keep used oil out of the reach of children and away from sources of ignition.
7.3 Automatic oil cut-out
- The engine will not start if it does not have enough oil.
- If the engine is low on oil while it is running, the oil warning indicator (Fig. 2/Item 15) will light up red and the engine will stall. The oil indicator goes out when the engine has come to a complete stop.
- The engine oil must be topped up before the engine can be started again.
7.4 Air filter
Clean the air filter at regular intervals, and replace it if necessary. Also read chapter 9 page 11 in this manual.
- Remove the engine cover (Figs. 6a - 6b/Item 5).
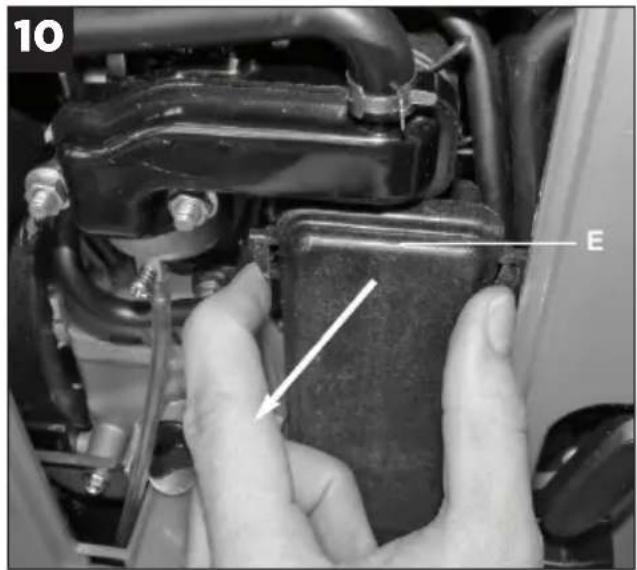
- Remove the air filter cover (Figs. 8 and 10/Item E).
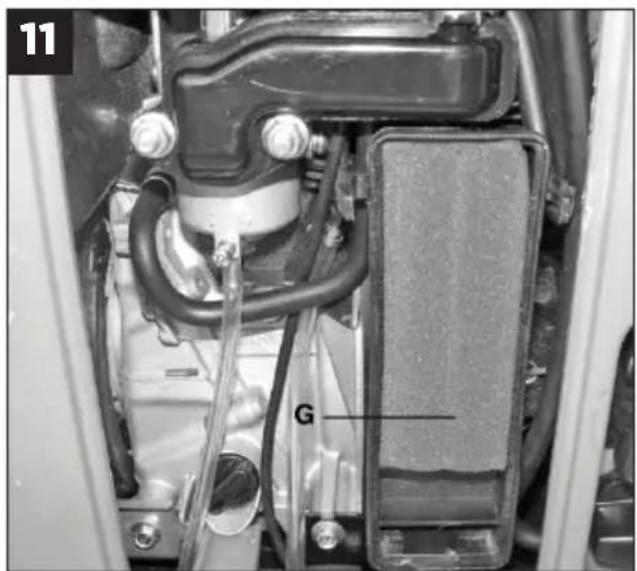
- Remove the air filter (Fig. 11/Item G).
- Clean the air filter by tapping it. In cases of stubborn dirt first clean with soapy water, then rinse with clear water and air-dry before reinserting. Important: Do not use abrasive cleaners or petrol to clean the air filter.
• Assemble in reverse order.
7.5 Spark plug
Check the spark plug for wear at regular intervals. Also read chapter 9 page 11 in this manual.
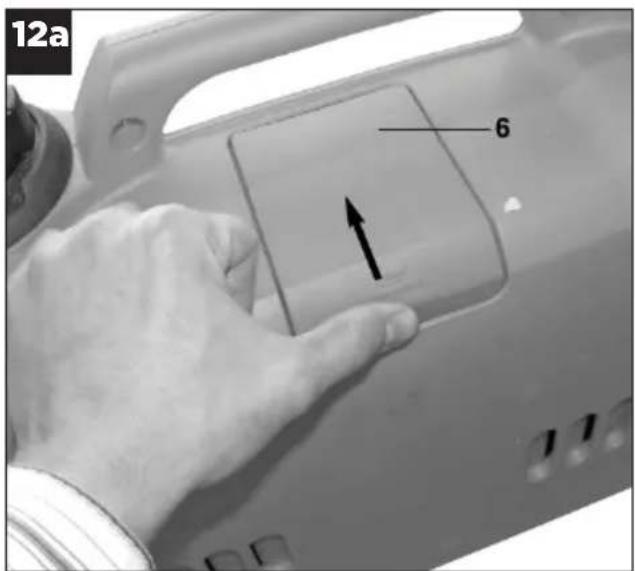
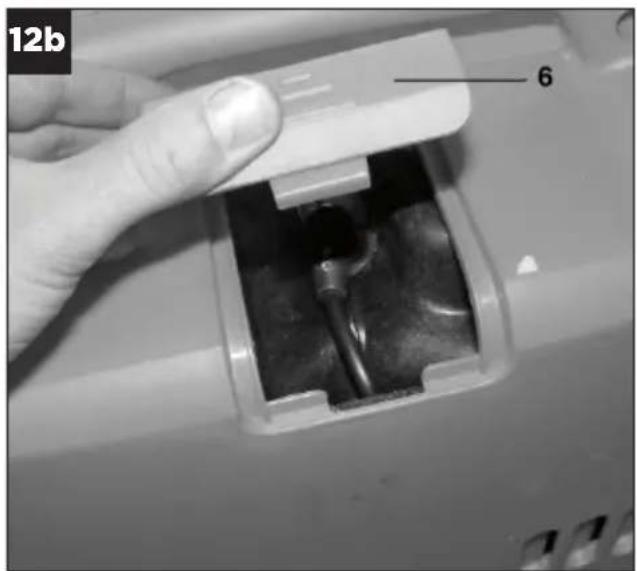
- Remove the spark plug cover (Figs. 12a - 12b/Item 6).
- Pull off the spark plug boot (Fig. 12c/Item I) by twisting it.
- Remove the spark plug (Fig. 12c/Item J) using the supplied spark plug wrench (Fig. 3/Item 19).
- Clean the spark plug with a copper wire brush or fit a new one.
• Assemble in reverse order.
7.6 Storage
- Empty the petrol tank using a petrol suction pump. Important: Do not empty the petrol tank in enclosed areas, near fire or when smoking. Petrol fumes can cause explosions and fire.
- Start the engine and run it until the tank and fuel line are completely empty and the engine stalls.
- Let the unit cool down.
- Remove the spark plug and pour approx. 20 ml of engine oil into the cylinder.
- Pull the starter handle slowly several times to coat the internal parts.
- Screw the spark plug back in.
- Store the unit in a well-ventilated, safe place.
7.7 Transport
-
Wait until the unit has cooled down.
-
Move the ventilation switch on the tank cover to the OFF position (Fig. 4/Item B). Important: Always transport the unit in the upright position (even when the tank breather hole is closed).
7.8 Ordering spare parts
- Please contact the After Sales Support on 1300 922 271 and quote the following data when ordering spare parts:
• Type of machine
• Article number of the machine
• Identification number of the machine
• Replacement part number of the part required
8. Disposal and recycling
The unit is supplied in packaging to prevent its being damaged in transit. This packaging is raw material and can therefore be reused or can be returned to the raw material system.
The unit and its accessories are made of various types of material, such as metal and plastic. Defective components must be disposed of as special waste. Ask your dealer or your local council.
9. Servicing petrol tools
Please adhere to the following maintenance periods in order to ensure a failure-free operation. Important! Fill in engine oil and fuel before starting up the generator for the first time.
| Before each use | After an operating period of 20 hours | After an operating period of 50 hours | After an operating period of 100 hours | After an operating period of 300 hours | |
| Check the engine oil | X | ||||
| Change the engine oil | first oil change then every 100 hours | X | |||
| Check the air filter | X | Whenever necessary | |||
| Clean the air filter | X | ||||
| Clean the petrol filter | X | ||||
| Visual inspection of the unit | X | ||||
| Clean the spark plug | Distance: 0.6mm, Replace if necessary | ||||
| Check and readjust the carburetor's throttle valve | X* | ||||
| Clean the cylinder head | X* | ||||
| Set the valve clearance | X* |
Important: The positions marked with "X*" should only be carried out by an authorized dealer.
10. Troubleshooting
| Fault Cause Remedy | ||
| Engine does not start Automatic oil out | out-out has not responded | Check oil level, top up engine oil |
| Spark plug fouled | Clean or replace spark plug (electrode spacing 0.6 mm) | |
| No fuel | Refuel / have the petrol cock checked | |
| Generator has too little or no voltage | Controller or capacitor defective | Contact your dealer |
| Overcurrent circuit-breaker has triggered | Actuate the circuit-breaker and reduce the consumers | |
| Air filter dirty | Clean or replace the filter |
TAURUS® is a registered trademark of ALDI Stores.
ALDI Guarantee
Specially made for ALDI Stores to our stringent quality specifications. If you are not entirely satisfied with this product, please return it to your nearest ALDI store within 60 days from the date of purchase for a full refund or replacement, or take advantage of our after sales support by calling the supplier's Customer Service Hotline.
ALDI STORES
1 SARGENTS ROAD
MINCHINBURY NSW 2770
AUSTRALIA
www.aldi.com.au
09/2011
- Digital Inverter Generator
- What your 1 year warranty means
- Welcome Section
- Table of Contents
- 13
- GENERAL SAFETY RULES
- SAVE THESE INSTRUCTIONS
- Important!
- Explanation of the warning signs on the machine (Fig. 13)
- General safety instructions
- CAUTION!
- Layout and items supplied (Fig. 1-3)
- Proper use
- Technical data
- Operating mode S1 (continuous operation)
- Operating mode S2 (temporary operation)
- Before putting the machine into operation
- Electrical safety:
- Environmental protection
- Connecting to earth
- Topping up fuel
- Topping up oil
- Operation
- Starting the engine
- Economy mode
- Connecting consumers to the generator
- Overload cut-out
- V socket
- V connector
- Switching off the engine
- Cleaning, maintenance and ordering spare parts
- Cleaning
- Changing the oil and checking the oil level (before using the machine)
- Automatic oil cut-out
- Air filter
- Spark plug
- Storage
- Transport
- Ordering spare parts
- Disposal and recycling
- Servicing petrol tools
- Troubleshooting
- ALDI Guarantee
Brand : TAURUS
Model : BT-PG 900
Category : Generator