smart:comp 2 - Audio software Sonible - Free user manual and instructions
Find the device manual for free smart:comp 2 Sonible in PDF.


| Product Type | Audio Plug-in (Compressor) |
| Supported Plugin Formats | VST (64-bit), VST3, AU, AAX |
| Operating Systems | Windows 10+ (64-bit), macOS 10.12+ |
| CPU Requirements | Intel Core i5 or Apple M1 |
| RAM Requirements | 4 GB |
| Graphics Requirements | OpenGL Version 3.2+ |
| Authorization Methods | Machine-based (2 computers) or iLok USB dongle (1st gen and iLok Cloud not supported) |
| AI Learning Profiles | Universal + instrument, bus, and mix profiles (e.g., Electric Guitar, Kick, Drums Bus, Keys, etc.) |
| Compression Types | Broadband, Spectral (up to 2000 bands), Spectral Ducking, Free-form Transfer Function |
| Time-Domain Controls | Threshold, Ratio, Attack, Release, Hold, Shape, Knee, Style (Clean to Dirty), Auto Release, Tempo Sync |
| Spectral Controls | Intensity, Color (brightness), Frequency Range, Spectral Link |
| Sidechain Features | External sidechain input, Spectral Ducking, Sidechain EQ (HP/LP, bell/shelf filters) |
| Channel Processing | Stereo, Mid/Side, Surround (5.1), Channel Link control |
| Input Riding | Automatic input gain offset with Speed and Intensity controls |
| Metering | Input/Output RMS & Peak, Gain Reduction, Level Histogram, Compression Grid |
| Make-Up Gain | Manual Out Gain, Auto Gain (smart after learning), Wet/Dry Mix |
| Additional Tools | Soft-clip limiter, Free-form Transfer Function templates (Balance, Expand Mid, Squeeze Mid, Parallel Comp, Noise Gate), States (8 per instance), Presets (.spr files) |
| Installation | Windows: Installer from ZIP; macOS: DMG with PKG; admin privileges required |
| Trial Version | Time-limited demo with full functionality; internet required during trial |
| Preset Folders | Windows: My Documents\Presets\sonible\smartComp2; macOS: ~/Library/Audio/Presets/sonible/smartComp2 |
| Manufacturer | sonible GmbH, Haydngasse 10/1, 8010 Graz, Austria |
Frequently Asked Questions - smart:comp 2 Sonible
User questions about smart:comp 2 Sonible
0 question about this device. Answer the ones you know or ask your own.
Ask a new question about this device
Download the instructions for your Audio software in PDF format for free! Find your manual smart:comp 2 - Sonible and take your electronic device back in hand. On this page are published all the documents necessary for the use of your device. smart:comp 2 by Sonible.
USER MANUAL smart:comp 2 Sonible
Welcome to smart:comp 2 3
Install 4
Authorization 5
User interface 6
Learning 7
Compression parameters 8
Attack and Release Shaper 9
Spectral Compression 10
Spectral Ducking 11
Free-form Transfer Function and Level Histogram 12
Free-form Transfer Function examples 13
Metering and gain controls 14
Input riding 15
Sidechain EQ 16
Mid/side processing 17
Surround processing 18
States and Presets 19
Settings and Licensing 20

natural_image
Abstract geometric logo design with stylized letter 'V' and angular shapes (no text or symbols)Welcome to smart:comp 2
smart:comp 2 combines a multi-dimensional compression approach with a wide range of sound-shaping options; this unique compressor uses intelligent processing and automatic parametrization to deliver precise and transparent results without compromising the integrity of the input signal.
smart:comp 2 is an exceptionally versatile go-to compressor: AI-powered algorithms and profiles for single tracks, busses and entire mixes drive the processing that will find well-balanced dynamics for any input signal. With sound-shaping options such as the Free-form Transfer Function and the Attack and Release Shaper, it has never been easier to achieve distinctive sounds.
The compressor's revolutionary spectral processing ensures a dynamic balance at all times with up to 2000 bands constantly working to enhance transparency and also drives smart:comp 2's remarkable ducking abilities. smart:comp 2 is also packed with features, such as mid/side processing and input level riding, that make compression workflows hassle-free. To ensure that users are able to keep track of each parameter's impact on the signal, smart:comp 2 is equipped with real-time monitoring elements, including: Instant Impact Prediction, compression mapping and an RMS level histogram.
Get started with smart:comp 2 and have fun unleashing your creativity!
Install
System requirements
| CPU | Intel Core i5Apple M1 |
| RAM | 4GB |
| Operating systems | Windows 10+ (64 bit)Mac OS 10.12+ |
| Graphics | OpenGL Version 3.2+ |

You will need admin privileges to successfully install the smart:comp 2 plug-in.
Windows
To start the installation process, extract the downloaded zip-file sonible_smartcomp2_win_x.x.x.zip onto your hard disk and run the installer.
The installer will now guide you through the necessary steps to install smart:comp 2 on your computer.
During installation, you can select which version(s) of smart:comp 2 you want installed. You can also select custom installation folders for the VST version or simply use the default folder suggested by the installer.
The VST3 and AAX versions of the plug-in will be automatically installed in their respective default folders.
Default folders:
VST3
C:\Program Files\Common Files\VST3\
VST
C:\Program Files\Common Files\VST\
AAX
C:\Program Files\Common Files\Avid\Audio\Plug-Ins
Mac OSX
To start the installation process, please open the disk image sonible_smartcomp2_osx_x.x.x.dmg. This will mount the image and open a finder window showing the content of the installation package.
To install smart:comp 2 on your system, run the installation file smartcomp2.pkg.
The installer will now guide you through the necessary steps to install smart:comp 2 on your computer. smart:comp 2 will automatically be installed in the default locations for audio plug-ins.
Default folders:
Audio Unit
/Library/Audic/Plug-Ins/Components/
VST
/Library/Audic/Plug-Ins/VST/
VST3
/Library/Audio/Plug-Ins/VST3/
AAX
/Library/Application Support/Avid/Audio/Plug-Ins/
Authorization
Licensing system
You can select between two licensing systems: machine-based or iLok (USB dongle).
By creating a user account on www.sonible.com and registering your products – if they are not already visible in your Dashboard, you can manage your plug-in activations.
Machine-based
Each license key allows you to install smart:comp 2 on two computers with unique system IDs. These system IDs are computed during license activation.
The same license can be used by multiple users, but each user has to individually unlock the full version of smart:comp 2 under their account.
In case a system-ID is changed (e.g. replacement of the hard drive), you can revoke/activate the plug-in next to the respective system-ID in the Dashboard of your sonible user account.
iLok
If you want to transfer one activation to your iLok, just make sure the plug-in is registered in your sonible user account. Click on the button „transfer to iLok“ next to the plug-in in your Dashboard and follow the instructions.
Note: 1st gen iLok dongles and the iLok Cloud are currently not supported.
Unlocking
If you purchased a license for smart:comp 2 online, you receive your license key via email.
Machine-based unlocking
When opening smart:comp 2 for the first time, a notification window will be displayed asking you to unlock smart:comp 2 with a valid license key.
Please make sure that your computer is connected to the internet before starting the registration process.
Enter your license key and click „register.“ The plug-in will now communicate with our server to check if the license is valid. If it is – enjoy! :)
iLok
If you transferred your license to an iLok, simply attach the iLok to your computer. The plug-in will then be automatically registered – enjoy!
If you don't receive the email within minutes please check your junk folder first before contacting our support (support@sonible.com).
Trial version
To run smart:comp 2 in demo-mode, simply click "try" and you will then be able to use smart:comp 2 for a couple of days without any limitations. (Please refer to our website to find out more about the current demo period of smart:comp 2)
When the demo period expires, you will need to purchase a full license in order to continue using the plug-in.
Internet connection requirements
sonible plug-ins only needs an internet connection during the trial period and for initial license activation. During the trial period, the plug-in needs to go online every time it is used. Once the license of your plug-in has successfully been activated, an internet connection is no longer needed.

My Licenses
XXXXX-XXXXX-XXXXX-XXXXX
Register license key
Need help?
Product
License Key
Type
Description
Status
Date
Action
smart:comp 2
Download
XXXX-XXXX-XXXX-XXXX
PC
XXXXXX
active
2000-00-00
revoke
not activated
transfer to iLok
User interface
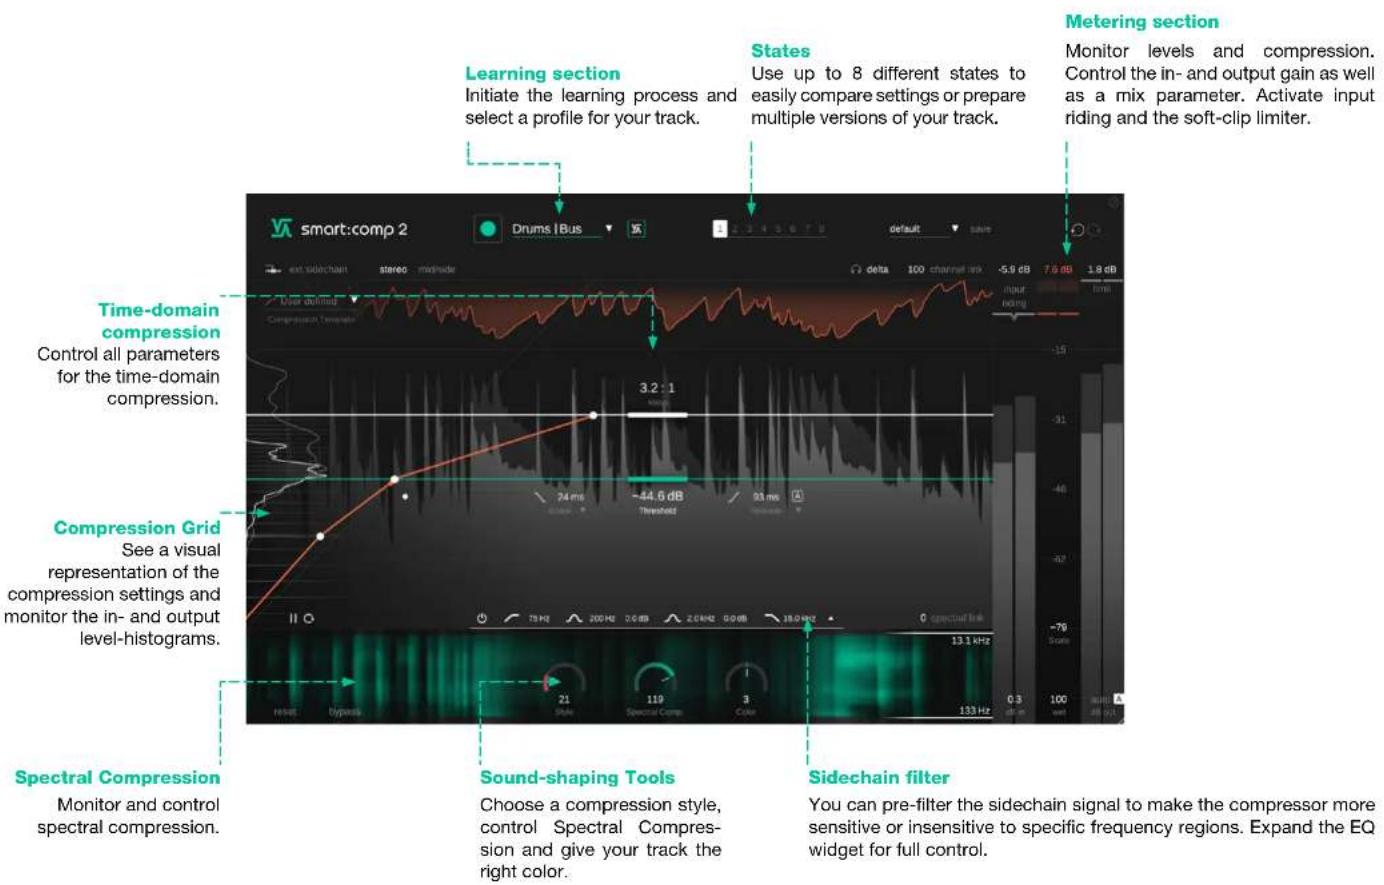
Learning
smart:comp 2 is equipped with a unique learning feature that finds the right parameters for well-balanced compression results.
During the learning process, smart:comp 2 analyzes the incoming audio signal and automatically computes compressor parameters that lead to a well-balanced and transparent compression.
A wide range of instrument, bus and mix profiles allow you to prime the plug-in for different signal types.

1. Select a profile
A profile calibrates the processing of smart:comp 2 to a specific sound source. You can always start the learning process with the "Universal" profile and switch to a more specific profile later.

2. Start the audio playback & initiate learning
smart:comp 2 needs incoming audio material for the learning process. While learning, a progress bar inside the profile dropdown indicates the progression of the process.
It is recommended to let smart:comp 2 learn from relatively loud sections of your track (e.g. the refrain). This gives the plug-in a good idea of the most critical dynamic section of the track.

3. Done!
When the learning process is finished, smart:comp 2 will automatically set compression parameters - ratio and threshold as well as attack and release.
Additionally, the Spectral Compression, Color control and input riding will be activated.

smart state
After making manual changes, return to smart:comp 2's recommended settings by pressing this button.
Compression parameters

Threshold
Threshold defines the level of the input signal at which the compression effect is engaged. It must be set below the maximum level of the input signal.

Ratio
Ratio determines how much compression is applied to any signal that goes over the threshold.

Attack
Attack defines the time it takes for the signal to become fully compressed after exceeding the threshold level.

Release
Release defines the time it takes for the signal to recover from its compressed state to its original non-compressed state.

Auto Release
If auto release is enabled, the release time adapts itself to the characteristics of the input signal. This adaptive release time ensures a smooth limiting process even when you go for more extreme gain settings.

Knee
Depending on the knee shape, smart:comp 2 commences gain reduction, after the signal has exceeded the threshold level, either gradually (soft knee) or rather abruptly (hard knee). The softer the knee, the slower the compression approaches the defined ratio as the signal level increases.

Style
The Style parameter determines the character of the compressor between "clean", a transparent, subtle sound, and "dirty", a tight, warm and punchy sound.

line
| Point | Value | |-------|-----------| | 1 | -44.6 dB | | 2 | -44.6 dB | | 3 | -44.6 dB | | 4 | -44.6 dB | | 5 | -44.6 dB | | 6 | -44.6 dB | | 7 | -44.6 dB |Attack and Release Shaper
For quick changes of the attack and release times, move the little attack and release icons (below the threshold) up and down. For detailed fine-tuning you can configure both visually in the Attack and Release Shaper which is especially great for sound design and for sculpting transients. Access it by clicking on the small arrows of the attack or release label.
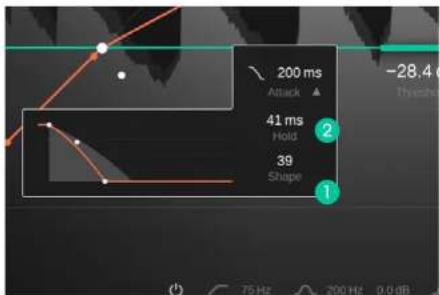

1 Attack shape
The attack shape defines how fast the signal will reach maximum compression during the attack time after exceeding the threshold level.
2 Attack hold
The attack hold defines the amount of time the compressor waits until the compression kicks in once the signal goes above the threshold.
3 Release shape
The release shape defines how fast the signal recovers from its compressed state during the release time.
4 Release hold
The release hold defines the amount of time the compressor waits until the signal starts to recover from its compressed state after falling below the threshold.
5 Tempo Sync
smart.comp 2 can sync your release time to the currently selected tempo inside your DAW.
Spectral Compression
By continuously analyzing the input signal across more than 2000 bands, smart:comp 2 acts like an intelligent, ultra-high-resolution multiband compressor that dynamically smoothes out tonal imbalances. It only applies compression where it's really needed and therefore ensures a consistent tonal as well as dynamic balance at all times. Spectral Compression aims to give a track the best possible definition and maximum transparency.
Spectral Compression will only be activated after smart:comp 2 learned from your signal.

1 Spectral Compression Display
See where smart:comp 2 is applying Spectral Compression in a spectrogram-like display. The more opaque an area is, the more compression has been applied.
2 Spectral Comp. control
Control the intensity of Spectral Compression. When set to 0, smart:comp 2 will act as an ordinary broadband compressor.
3 Color control
Change the sound – darker or brighter – of the Spectral Compression.
4 Frequency range
Control the frequency range where Spectral Compression is applied.
5 Spectral Link
Choose what happens to your signal outside of a chosen frequency range for Spectral compression. When set to 100, no compression will be applied. When set to 0, full broadband compression will be applied.
This setting will only have an impact when you set a limited frequency range.
Spectral Ducking
In external sidechain mode, the gain reduction is controlled by an external signal that is routed to the sidechain input of the plug-in - a technique called ducking.
smart:comp 2's Spectral Compression technology takes the regular broadband ducking approach one step further by only making space in your main signal where spectral clashes occur. Spectral Ducking allows for smooth merging of two signals, avoiding the pumping you might introduce with regular broadband ducking.


flowchart
graph TD
    A["kick drum"] --> B["external side chain"]
    C[" "] --> D["smart:comp 2bass line"]

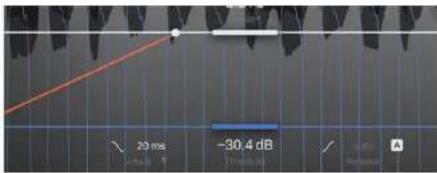
In your DAW, route the signal you want to create space for as an external sidechain to smart:comp 2.
Activate ext. sidechain in smart:comp 2. Some elements of the interface will turn blue.
The external sidechain that is now triggering the compression will be shown in the display of the time-domain compression.

1 Spectral Ducking display
See where Spectral Ducking is making space for your sidechain signal. The more opaque an area is, the more ducking has been applied.
2 Spectral Ducking control
Control the intensity of the Spectral Ducking. When set to 0, smart:comp 2 will apply regular broadband ducking.
Free-form Transfer Function and Level Histogram
smart:comp 2 lets you freely modify the compression transfer function and provides templates to achieve complex compression goals (e.g. boost of low level content while keeping the mid-level untouched) and for sound design (in more extreme settings).


1 Explore the possibilities with a library of templates.
2 Freely change any thumb on the Free-form Transfer Function to customize the level mapping.
3 Level Histogram
The RMS level histogram shows the distribution of levels in the input signal incl. input gain (light grey) and the compressed output signal excl. output gain (white). As you change your compression settings, these curves will update in real time.
4 Compression Grid
The compression grid is a visual representation of the level mapping currently set for the transfer function. It provides an intuitive overview of which levels are being compressed or expanded.
5 Pause/Reset
Resets or pauses the level measurements for the histogram. Use this feature if you're applying any major changes to your signal chain feeding into smart:comp 2.
Free-form Transfer Function examples

No Compression
In this setting, any given input level will be mapped to the same output level. This setting results in the signal being completely unchanged.
Note that the grid lines are all spaced equally.
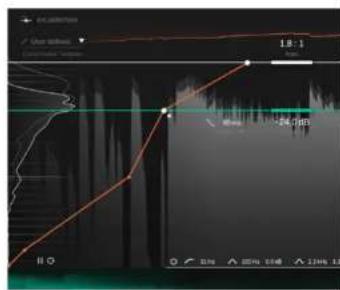
Expand Mid
Here we've chosen the 'Expand Mid' Template, changing how smart:comp 2 handles levels below the set threshold.
The loudest signal parts are being compressed (just as before), signals between the threshold and the second thumb are expanded and signals below the lower threshold are compressed again.
This mapping is also indicated by the spacings of the Compression Grid.

Regular downward compression
This is the transfer function for regular downward compression.
The grid lines are closer together above the threshold, indicating that the signal will be compressed in this area. Below the threshold, the signal remains unchanged.
Due to the release time, levels below the threshold will also be changed while the compressor is returning to zero-gain reduction after a peak.

Noise Gate
In this example, we've chosen the 'Noise Gate' Template. This adds a gate-like functionality, as very quiet signal parts are now being mapped to an output level of zero.
Metering and gain controls

bar_line
| Level | Value | |-------|-------| | 0 | -31 | | 1 | -46 | | 2 | -79 | | 3 | -31 | | 4 | -31 | | 5 | -31 | | 6 | -31 | | 7 | -31 | | 8 | -5.9 | | 9 | -79 | | Delta | -5.9 dB | | 100 channel link | -5.9 dB | | 7.6 dB | -5.9 dB | | 1.8 dB | -5.9 dB |1 Gain reduction meter with readout
The gain reduction meter displays the real-time negative gain applied by the compressor. The GR value (= gain reduction) above the meter shows the current maximum gain reduction for all channels.
2 Output meter with readout
The output meter shows the peak (background) and RMS value (foreground) for the output signal. The peak value shows the maximum observed peak value for all channels.
3 Input meter with readout
The input meter shows the peak and RMS values for the gained input signal. If input riding is activated (see next page), the applied gain offset is indicated by a green bar inside the meter.
4 In Gain
Set the input gain to reach a proper input level.
5 Out Gain (Make-up gain)
Set the output gain (make-up gain) to adjust the average overall level so that the signal fits your mix.
6 Auto Gain
Auto gain automatically sets the output gain (make-up gain) to compensate for the level reduction caused by compression. After finishing the learning process, the auto gain becomes a smart auto gain that ensures a good matching of input and output RMS levels.
7 Wet
Control the ratio of wet signal to dry signal. At 100% you'll only hear the wet (compressed) signal.
8 Channel link
Channel link controls the amount of linking between channels when working on stereo or multichannel signals. When set to 100, the maximum gain reduction value computed for any channel will be applied to all channels. By reducing the value, all channels will gradually be processed independently.
Unlinking channels can help if, for example, the left and right channel of a stereo signal carry signals with different characteristics. Be careful though, as processing channels individually may modify the stereo image due to the destruction of binaural cues.
9 Scale
Control the display range of the signal history, the meters and the Free-form Transfer Function between 24dB and 96dB.
Input riding
smart:comp 2's input riding makes sure that the level of the gained input signal remains within a certain range by adding a dynamic negative or positive offset to the input gain. Input riding allows to balance out level differences in different sections of the signal (e.g. loud or quiet sections). That way, the level of the processed signal will remain more or less constant.
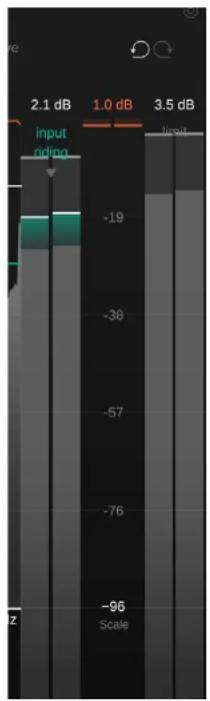
bar
| Category | Value | |---|---| | input riding | 2.1 dB | | -19 | -38 | | -57 | -76 | | -96 | -96 | | 1.0 dB | -3.5 dB | | 3.5 dB | -3.5 dB |Activate input riding by clicking on the label. You can see the influence the input riding has on your signal as a green bar inside the input meter.
You have to let smart:comp 2 learn your signal to activate input riding.

bar
| Category | Value | |---|---| | input riding | 2.1 dB | | Speed | 91 | | Intensity | 70 | | Scale | -96 |Click the arrow to expand the input riding widget and access additional control options.
Speed controls how quickly the gain adapts to changing input levels.
Intensity controls the maximum offset input riding will apply to the signal.
Sidechain EQ
The sidechain EQ allows you to pre-filter the compressor's sidechain signal (= the signal the compressor uses for computing the gain reduction). That way, it's easy to exaggerate (or reduce) the impact of certain frequency ranges on the compression.

1 Expand the sidechain EQ widget by clicking on the small arrow.
6 Click labels to type in precise values.
2 Enable/disable the sidechain EQ.
7 Listen to the filtered sidechain signal.
3 Set a high- or low pass filter.
4 Change gain and frequency of a filter by clicking and dragging; change its Q factor by scrolling and reset the filter by double clicking.
5 Change the filter type between bell, shelf and inactive.
Mid/side processing
smart:comp 2 fully supports mid/side processing, allowing different compression settings for the respective signals.

1 Change between stereo and mid/side mode.
2 Set individual threshold, ratio, attack and release parameters for each signal. Change between mid and side by clicking the respective label or the ratio thumb of the inactive transfer function.
3 In mid/side mode, the meters will show the level of the mid and side signal as well as the mid and side gain reduction and gain reduction history.
4 Set an individual input and output gain for the mid and side signal.
Surround processing
smart:comp 2 supports surround signal (5.1). You can apply the same processing settings to all channels or set distinct settings for the center and the side+rear channels.

1 Change between surround and center/side+rear mode
2 Set individual threshold, ratio, attack and release parameters for center and side+rear channels. Change between center and LSR (left, side + rear, right) signals by clicking the respective label or the ratio thumb of the inactive transfer function.
3 When working with a surround signal, individual meters will be shown for all channels.
4 Set an individual input and output gain for the center and side+rear channels.
5 Include or exclude the LFE channel in the compression processing.
States and Presets

1 States
You can use states to store multiple parameter settings. States allow for easy comparing between different settings (similar to the A/B feature of most plug-ins)
Working with states
- Each state is initially empty (default parameters settings of smart:comp 2).
- Select a state by clicking the respective state button.
- You can easily copy one state to another state via drag and drop. This may be useful if you want to compare different changes to a certain setting.
- To clear a state, hover over the number and click the trash can icon that will appear below.
2 Presets
A preset saves all parameter settings and can be accessed from all plug-in instances.
- To save your parameter settings as a preset, click "save" next to the preset drop-down.
- To load a saved preset, choose the respective preset name from the dropdown.
- To delete a preset or change its name, go to the preset folder in your local file explorer.
You can easily share your presets among different workstations. All presets are saved with the file extension ".spr" in the following folders:
Preset Folders
OSX: --/Library/Audio/Presets/sonible/smartComp2 Windows: My Documents\Presets\sonible\smartComp2
Settings and Licensing

To visit the settings page, click the cogwheel in the upper right corner.
Automatically set Input Gain after Learning
Enable to automatically set an input when learning is completed. This option helps to automatically increase the level of quiet input signals to a proper working level around -6dBFS.
Enable Auto Gain After Learning
Automatically activates the auto gain (automatic output gain) after learning. Auto gain automatically sets an output gain to compensate for the level reduction caused by compression.
Show tooltips
Enable/Disable tooltips on hover.
Use OpenGL
OpenGL might cause rendering issues on certain computer hardware. Use this option to disable OpenGL.
Share anonymous user data with sonible
Enable to share fully anonymous user data with sonible and help us improve smart:comp 2.
Plug-in Information
Here you can find the name and version of your plug-in. Start the welcome tour - a quick overview of the plug-in - features by click on "show tutorial".
License Information
This will display your license state and number (when not licensed via iLok)
Update notice
When a new version of the plug-in is available, you'll receive a notification here and it's also indicated by a little dot on the cogwheel in the main view of smart:comp 2. Click on the green text to download the latest version.

smart:comp 2
www.sonible.com/smartcomp2
sonible GmbH
Haydngasse 10/1
8010 Graz
Austria
phone: +43 316 912288
contact@sonible.com
All specifications are subject to change without notice.
©2022, sonible GmbH. All rights reserved.
Engineered & designed by sonible in Austria.
- Welcome to smart:comp 2
- Install
- Windows
- Default folders:
- VST3
- VST
- AAX
- Mac OSX
- Audio Unit
- Authorization
- Licensing system
- Machine-based
- iLok
- Unlocking
- Machine-based unlocking
- Trial version
- Internet connection requirements
- User interface
- Learning
- Select a profile
- Start the audio playback & initiate learning
- Done!
- smart state
- Compression parameters
- Threshold
- Ratio
- Attack
- Release
- Auto Release
- Knee
- Style
- Attack and Release Shaper
- Attack shape
- Attack hold
- Release shape
- Release hold
- Tempo Sync
- Spectral Compression
- Spectral Compression Display
- Spectral Comp. control
- Color control
- Frequency range
- Spectral Link
- Spectral Ducking
- Spectral Ducking display
- Spectral Ducking control
- Free-form Transfer Function and Level Histogram
- Free-form Transfer Function examples
- No Compression
- Expand Mid
- Regular downward compression
- Noise Gate
- Metering and gain controls
- Gain reduction meter with readout
- Output meter with readout
- Input meter with readout
- In Gain
- Out Gain (Make-up gain)
- Auto Gain
- Wet
- Channel link
- Scale
- Input riding
- Sidechain EQ
- Mid/side processing
- Surround processing
- States and Presets
- States
- Working with states
- Presets
- Preset Folders
- Settings and Licensing
- Automatically set Input Gain after Learning
- Enable Auto Gain After Learning
- Show tooltips
- Use OpenGL
- Share anonymous user data with sonible
- Plug-in Information
- License Information
- Update notice
- smart:comp 2
- sonible GmbH
Brand : Sonible
Model : smart:comp 2
Category : Audio software