
Transverse - Electronic musical instrument STEINBERG - Free user manual and instructions
Find the device manual for free Transverse STEINBERG in PDF.


| Product Type | Audio Interface |
| Brand | Steinberg |
| Model | Transverse |
| Dimensions (W x D x H) | 210 x 150 x 45 mm |
| Weight | 0.55 kg |
| Power Supply | USB bus powered or external 5V DC |
| Sample Rate | Up to 192 kHz |
| Bit Depth | 24-bit |
| Input Channels | 2 (combo XLR/TRS) |
| Output Channels | 2 (TRS) |
| Phantom Power | +48V switchable per channel |
| Headphone Output | 1 x 1/4" TRS stereo |
| MIDI I/O | No |
| USB Standard | USB 2.0, Type-C |
| Compatibility | Windows, macOS, iOS |
| Included Software | Cubase AI, Nuendo Live |
| Cleaning Instructions | Wipe with a soft dry cloth. Do not use solvents. |
| Safety Warnings | Do not expose to liquids or extreme temperatures. |
| Spare Parts Availability | Contact Steinberg support for replacements. |
| Repairability | Repairs should be carried out by qualified personnel. |
Frequently Asked Questions - Transverse STEINBERG
User questions about Transverse STEINBERG
0 question about this device. Answer the ones you know or ask your own.
Ask a new question about this device
Download the instructions for your Electronic musical instrument in PDF format for free! Find your manual Transverse - STEINBERG and take your electronic device back in hand. On this page are published all the documents necessary for the use of your device. Transverse by STEINBERG.
USER MANUAL Transverse STEINBERG
About 2
General Usage 2
1.1 - Main Page - General 3
1.2 - Main Page - Envelope Section 3
1.2.1 - Reverse Envelope 4
1.2.2 - ADSR Envelope 4
1.3 - Main Page - Settings & FX 5
2.1 - Custom Page - General 5
2.1.1 - Wave Display 5
2.1.2 - Main Settings 6
2.2 - Custom Page - Sample 6
2.3 - Custom Page - Grain 7
2.4 - Custom Page - Sync2End 7
3.1 - Mod & FX Page - General
3.2 - Mod & FX Page - Curves
3.2.1 - Setting Curve Shapes
3.3 - Mod & FX Page - LFOs & ENVs
3.3.1 - Modulation Rows 10
3.4 - Mod & FX Page - XY Pad 10
4.1 - Automation - Best Practice
4.1.1 - Solutions
11
11
About
The name Transverse is a portmanteau of transition and reverse. As the name implies Transverse is a Halion instrument that focuses on designing reverse sounds, sweeps, transitions, risers and rhythmic riffs for your projects. With the ubiquity of such sounds in modern music and sound design, having a focused tool that provides quick access to the most necessary parameters can greatly reduce the need for repetitive tasks and keep creative flow going.
This is achieved through sample based noise profiles, granular and subtractive synthesis, combined with built for purpose envelopes and modulation sources.
The workflow for designing such sounds can have many tedious or repetitive tasks such as:
• Finding adequate noise / sound sources
- Envelope pattern or sequence design
• Dealing with sync issues
• Multiple automation tracks for parameter motion
• Over complicated or deep modulation matrices
- Creating variations for reuse in a project
While using reverse snares and cymbals or synth white noise do work, issues of sound length, sync, gate sequences and variation in design always come into play. Transverse makes this easy to achieve, use and save for later recall or quick modification.
The layout logic behind Transverse was to create a rapid design environment to remedy the above mentioned situations by having controls spread across the UI where they will be most needed. Having controllers at you fingertips rather than having to dig through menus promotes the creative process and reduces time spent on technical issues.
With its 36 noise profiles in 3 banks, 2 of which also contain 24 predefined oscillators and 100 preset wave sources, combined with synced and rhythmic envelopes and XY modulation, creating such sounds can be done in seconds.
All synced modulation can be switched to time based for sound designs that accompany visuals. Even LFOs can be set in seconds rather than Hz, where long cycle LFOs can also double as envelopes.
General Usage
Transverse has 3 layers providing the noise sources, oscillators and samples to build sounds:
• Metallic Layer - Noise Profile x 12 / Custom Sample or Granular x 100
• Digital Layer - Noise Profile x 12 / Oscillator x 12
• Analogue Layer - Noise Profile x 12 / Oscillator x 12
Each layer's noise profile has been generated to reflect its name, and can also be treated as high, mid and low when building textures. This is just a guide though, but layer 2 and especially 3 do pitch down quite well for atonal drones.
The tonal oscillators on the Digital layer covers more standard sounds, whereas the Analogue layer caters for a grittier, sometimes more abstract sound. The Metallic layer also handles the custom sound sources. When Custom is activated, the noise selector for the Metallic layer is deactivated.
The Custom page provides a selection of wave presets which cover pitched to atonal textures and even short recordings of everyday items which can be used to enhance reverse designs or provide rhythmic beds if looped or played as a granular source. User samples can be dropped on the display.
Modulation is provided by 3 different sources:
• Curves Env - Quickly generate rhythmic or long multistage envelopes
- LFOs / Env - Envelopes tied to reverse length and LFOs in sync, Hz or seconds
• XY Pad - Central point to control parameters for intuitive performances and automation
When using the reverse envelope, modulation envelope lengths are also controlled via reverse length. When synced this updates with tempo and an entire reverse design's length can be changed with one knob.
Sync2End syncs samples to the end of a reverse design based on the sounds length. Great for syncing shorter samples to the end of long reverse builds.
Multiple outputs can be activated under the instrument's settings, provided that the Halion instance has more than one output activated.
Midl mode can also be set to monophonic under settings on the main page.
1.1 - Main Page - General

- Master Filter and Resonance : Filter on master bus which shapes tone independently from layer filters. If a desired tone has been achieved by using the layer filters, the master filter can be used for sweeps or extra tone shaping while leaving layer settings untouched.
Can be modulated by the XY Pad. - Key Follow: for layer filter and pitch parameters. Set in percent. Can be negative.
- Layer filter shape selection menu for filter shapes.
- Layer cutoff 10Hz - 22kHz.
- Layer resonance set in percent.
dvCompTools transverse
- Noise / oscillator selector : Depending on the selected source (layers 2 and 3), this will change the selection to one of 12 oscillators per layer or a noise profile.
- Source Selector: For layers 2 and 3, this will switch between the noise or oscillator sources. The oscillators for layer 2 focus on more straight forward sounds, whereas layer 3's oscillators lean more towards harder and abstract textures. (These are actual oscillators and not sample or wavetable based.)
Layer 1 selector is inactive if Custom is activated.
- Layer pitch settings. Ranged from +3 octaves to -3 octaves. This one knob control is set in semilones (±36) and cents.
- Stereo Image settings : Stereo Width controls the stereo image width on a per layer base. Stereo Spread pans layers 2 and 3 to the sides, while keeping layer 1 in the center.
These settings give you a quick way to manipulate the stereo image of your sound design. More detailed stereo work can be done if multiple outputs are used.
- Drive settings : Turn drive on and off for each layer and set the level as desired.
- Layer Levels : Set layer levels.
- On / Off : Mutes and turns layers On or Off. When the Digital and / or Analogue layers are switched to oscillator mode, a fair amount of CPU might be used with high polyphony count and longer Amp envelope releases.
This is due to the use of multi oscillators for some sources, which can layer up to 8 oscillators for each note on event.
1.2 - Main Page - Envelope Section
The 2 main states for the envelope is 'reverse' and 'ADSR'.
Envelopes can also be synced or run as timed / free. In the sync state there is only one envelope to set, whereas in the ADSR state, the AMP and MOD envelopes are separate. Filter and pitch are controlled by the mod envelope.
If the ADSR envelope is synced, the interface changes to show the multiples of the sync note for each envelope stage. Switching back to unsynced will keep the envelope stages on the synced lengths, but won't update when song tempo is changed.
Switching to a synced ADSR, will snap the envelope points to the closest sync time. The sync note is shared by the ADSR sync and reverse envelope and will be retained when switching states.
Envelope stages are limited to 30 seconds each so reverse and ADSR sync multipliers will be limited to keep envelope lengths within bounds.
1.2.1 - Reverse Envelope

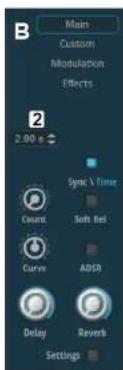
- Sync note : Select envelope sync resolution.
- Sync / Time : Switch from sync note to timed in seconds.
-
Soft Release: For some lower pitched, purer tones, the reverse envelope can cause clicks due to abrupt envelope level cuts. This softens the release by 8ms to remedy these artifacts.
-
Count : Length of the reverse envelope in multiples of the sync note.
- Curve : Reverse envelope's curve. Negative values cause a slow rise, with a quick end curve boost (exponential). Positive values create a quick initial curve with slow end rise (inverse exponential).
- ADSR switch.
1.2.2 - ADSR Envelope
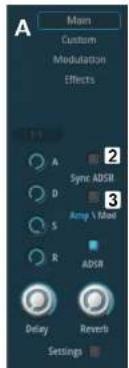

- Sync note : Resolution for sync point multipliers. Only available if sync ADSR is active.
- Sync ADSR : Syncs ADSR envelope.
- Amp \ Mod : Switches between amp and mod envelopes for ADSR envelope, ADSR or ADSR sync points will update to reflect the valid envelope settings.
1.3 - Main Page - Settings & FX
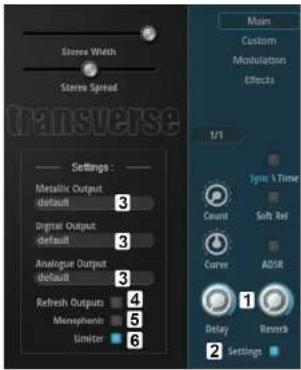
- Sends : Delay and reverb sends. Can be modulated by the XY Pad.
- Settings : Opens the settings box in the mixer section.
- Outputs: Select outputs for each of the 3 layers.
- Refresh Outputs : Outputs refresh when the settings window is opened or closed. If new Halion outputs are activated while the settings are displayed, click this to show the new outputs in the output selection menu.
- Monophonic : Makes all layers monophonic. Held notes are retriggered if the last pressed note is released.
- Limiter: The limiters are applied on a per layer basis to retain transparency. The combined output from the layers can still cause clipping as a result.
2.1 - Custom Page - General
The custom page is where you can select one of the built in presets as a sound source or drop your own sample on the display.
While the custom layer is active, the source selector for layer 1 on the main page is greyed out and inactive.
Sample, Grain and Sync2End settings are only available when appropriate parameters have been set or conditions are met.
The left and right arrows at the bottom of the page, next to the sample name, are used to cycle through the supplied preset samples.
2.1.1 - Wave Display
The bars to the left and right of the playback position bar are used to set sample start end end points. This also sets the loop points unless using crossfade, in which case an offset is created for the fade.
Ctrl Click on point selection bar to reset sample length.
Samples can be dropped from the DAW or OS browser on the sample display to load user samples.

2.1.2 - Main Settings
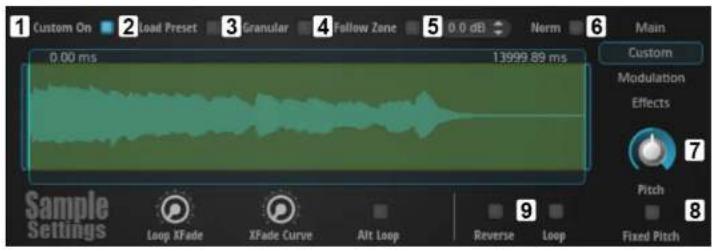
- Custom on : Turns custom layer on.
- Load Preset : Opens the preset file select box.
- Granular: Changes the custom layer from sample to granular.
- Follow Zone: If granular is active this will link the grain length to the zone pitch. The effect of this is most apparent when the pitch knob is changed, or strong pitch modulations are applied via an Ifo or envelope. With the zone pitch decoupled, a more formant like change in timbre is apparent.
- Sample Level: Sets the gain of the loaded sample.
- Normalize : Normalize selected sample's gain. Changes will be displayed in the sample level box. Sample gain reverts back to 0dB when a new sample is selected.
- Pitch : Sets the pitch. This control is linked to main page pitch for layer 1.
- Fixed Pitch: Ignores midi note pitch, but still keeps pitch control setting.
- Reverse & Loop : Reverses and / or loops the sample.

2.2 - Custom Page - Sample

- Loop XFade : Creates a crossfade for reduction in audible loop seams. Shortens the loop range to compensate for the crossfade region.
- Xfade Curve : Changes crossfade from linear to curved. When audible lowering of level is present in the crossfade, raising the curve can smooth things out. Good for continuous sounds such as pads.
- Alt Loop: Sets the loop to alternate direction between loop points.
- Stretch : Activate stretching for samples. Use with Sync2End to preserve length if pitch is modulated to maintain correct ending alignment.
- Frmnt K/F : Key follow for sample stretch formant.
- Formant: Manual formant setting.
- Speed : Set length of resulting sample stretch in percent.
2.3 - Custom Page - Grain
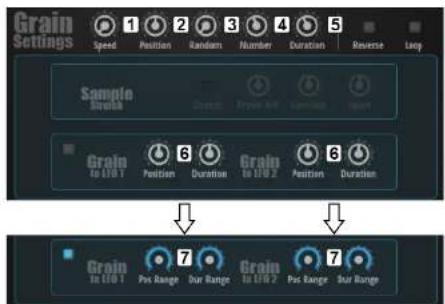
- Speed : Travel speed of playback head. Direction will reverse if Reverse is activated.
- Position : Initial position of grain play head
- Random : Randomizes grain positions. Good for atonal and abstract sounds.
- Number : Number of sample grains.
- Duration : Length of individual grains.
- Grain to LFO : Grain position and duration modulated by LFO 1 or LFO 2.
- Grain Ranges: In the event of a high LFO rate or long grain sample travel distance, sounds may lose pitch information or become gapped. Ranges can be used to limit travel distance or excessive duration modulation to regain pitch quality. It also avoids having to use excessively low controller values for finer adjustments in longer samples and becoming fidgety.
This can be done regardless of current automation, if present.

2.4 - Custom Page - Sync2End
The Sync2End function can sync a sample to the end of a reverse envelope. This can be helpful to strengthen the reverse effect of longer envelopes by adding an extra reverse sample from the presets, or a user sample, to make the reverse effect more apparent.
The sample length must be shorter than the reverse envelope, otherwise the sample will simply start playing immediately. Sample length can be adjusted with the vertical handles on the wave display playback position bar.

Certain conditions have to be met for this function to be active, otherwise the controls will be greyed out and unavailable :
- Loop set to off.
- Custom type must be a sample (not grain).
- ADSR set to off
- 'Custom On' must be active.
When active, the reverse envelope is removed for the custom sample. Sync2End therefore has its own fade settings, which are applied on a per sample basis. If the fade settings are not set, the sample will have an immediate, short attack st
- Sync2End : Activates sync if available.
- Fade Length: Sets the sample fade length as a percentage of total length.
- Fade Curve: Like main page, reverse curve, sets the fade response curve.
If a sample uses Syn2End and has pitch modulation applied via envelope or Ifo, the sample ending will almost certainly not line up with the reverse envelope as expected.
Pitch modulation causes sample length changes and Sample Stretch will have to be activated to compensate.
3.1 - Mod & FX Page - General
The top of the page contains a basic reverb and delay effect with the most pertinent settings available for adjustment.
At the bottom left of the page is the modulation source selector (Curves, LFO / Env or XY Pad).
At the bottom right, presets for the selected modulation source can be saved, loaded and deleted.
Clicking on the trashcan will open the preset menu. After selecting a user preset, you will be prompted whether deletion should be completed. Saving and loading user presets procedure is as expected.
3.2 - Mod & FX Page - Curves
The curves modulator is a 16 stage maximum envelope with various selectable shapes. Curves can be synced or run by time.

dvCompTools transverse
- Standard Mod Section : Handles modulation for amp, filter and pitch. Negative values reverses modulation direction.
- Grain Mod Section : Handles modulation for the position and duration parameters, if grain is activated on the custom page.
- Grain Ranges: Same as with the LFO grain ranges, this aims to temper modulation travel to achieve more pleasing results (if so desired). Setting lower ranges also allows you to use a wider field of settings on the Grain Mod controls and avoid fidgety situations.
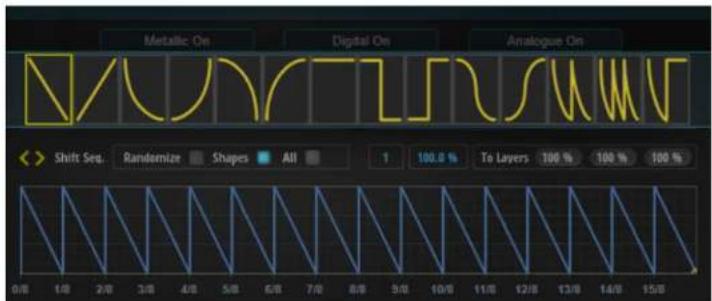
- Shift Seq.: Shifts the visible curves sequence left or right. If the segment count is below 16, segments outside the range will remain untouched.
- Randomize: Sets random shapes for the sequence. This affects all 16 steps, even if segment count is below 16
- Shapes : Opens the shapes selector.
- Segment Index and Level : for currently selected segment.
- To Layers : Adjusts the level of modulation sent to each layer. Negative values will reverse modulation direction.
- Seg Count : Set the total amount of sequence segments
- Sync : Tempo Syncs the sequence. Alternatively a timed envelope is produced.
- Triplet / Dotted : Set the sync note to triplet or dotted.
- Sync Note : Set the synced sequence segment resolution.
-
Snap: Snaps the segment levels to 12 steps. Normally the pitch modulation is distributed equally, either side of the zero point. With snap activated the modulation is shifted to have the original note as the bottom value.
Setting pitch modulation to 12 will therefore give you semitones for melody creation. The level readout above the envelope will reflect the current semitone. -
Soft : In the case of lower, purer tones the sharp corners of segment shapes can cause clicking. This softens sharp corners by 6ms to avoid clicks, if so desired. In certain cases clicks can add to the rhythmic nature of a sequence, giving a glitch feel to the beat.
-
Loop : Loop Curves envelope or play once.
3.2.1 - Setting Curve Shapes
With the shape selector open, segment shapes are set by clicking on a shape from the menu above the display and then clicking on a segment.
Click and drag to set multiple segments to a selected shape. Clicking on the 'AII' button will set all segments to the desired shape, but leave levels untouched. The 'AII' button affects all segments even beyond the current count.
Clicking on the 'Shapes' button or anywhere above the curves display and outside the selector will close the selector.
If curves sync is deactivated, the time determines the length of the entire sequence, not the individual segments.

3.3 - Mod & FX Page - LFOs & ENVs

- LFO 1 / LFO 2 : Change from LFO 1 to 2
- Sync / Free : Tempo sync or free LFO.
- Beat / Tempo : With Sync activated, beat will sync to song position while tempo will sync to tempo, but retrigger whenever a note is played.
- Hz / Seconds : While in free mode, the option is there to time an LFO cycle in seconds rather than Hz. This can be very handy while doing a non musical sound design where arbitrary visual cues determine a start and end point for a sound.
- Mono: Makes the current LFO monophonic and triggers on the first note on. The LFO will only retrigger once all notes are off and a new note on event is received.
This is good for rhythmic riff keyboard performances and sync stability when combined with a Curves envelope..
If an LFO rate is tied to an XY Pad slot, having tempo activated instead of beat, will prevent the interruption of an lfo cycle when the rate is being modulated.
3.3.1 - Modulation Rows
Each horizontal row on the LFO / Env page, represents the modulation sources for one of the three Transverse layers. All vertical controls from the top down, are thus a repeat of the previous ones.


- Filt Env / LFO Rate / Pitch Env : Ties the related parameter to an envelope for modulation. If the ADSR envelope is activated, these parameters are modulated by the Mod Envelope, otherwise only the reverse counter needs to be set for mod length.
- Rate : LFO rate in sync note / Hz or Seconds.
- Pitch / Filter / Amp : LFO modulation depth for the relevant destinations. Negative values reverses the modulation direction.

- LFO Waveform : Drop down menu to select the waveform for the related LFO
- Shape : Modifies the shape of the LFO. A visual representation will appear while hovering over the control.
- Phase : Phase adjusts the start point of the wave cycle at which the LFO is initially triggered.
The layer on / off switches on the modulation pages control the same parameters as the main page on / off switches, for easy access and convenience.
Setting the sync note to 1/4 and the amp parameter to a negative value, is a quick way to create a pumping effect for your noise textures to use over beats. Adding filters and LFO depth to XY Pad slots can create interesting performances with minimal effort.
3.4 - Mod & FX Page - XY Pad

- XY Slot : 8 slots for XY Destinations. Blue indicator shows which slot is selected. Yellow text shows a slot has a loaded destination.
- Destination : Menu to select XY destinations. A destination can only be used once, so it is removed from the list once activated, and returned when cleared.
- Clear / All : Clear an XY slot. Click ALL to clear all XY Slots in one go.
- Min / Max : Sets minimum and maximum values for modulation. Low and high values can be swapped to reverse modulation direction in relation to the XY puck.
- Response Curve : Selects a curve to determine how modulation will respond to the puck's motion. Selecting a squared response for instance, will flatten the initial response, causing the modulation to only become apparent when the puck has travelled longer distances.
- To Layers: Sets the extent to which the XY pad affects individual layers. Negative values will reverse the XY puck's effect for that layer.
- X/Y: Shows the current puck position. The puck position can also be set from these values.
Min and Max values are stored on a per destination parameter basis, whereas the response curve and 'To Layer' values are stored per XY Slot.
4.1 - Automation - Best Practice
Consideration should be given as to how automation is approached, depending on whether a parameter is tied to an XY Pad modulation slot.
If a parameter has been automated before being loaded into an XY slot, the current automation will likely clash with the XY Pad's operation. Alternatively it could create vast amounts of unwanted automation data if automation write is active in your DAW.
E.g. If all 8 XY slots are loaded with pre automated parameters that are applied on a per layer basis, 26 lanes of automation could be generated in one pass. (8 Slots x 3 Layers + (X and Y)), as opposed to just 2 automation tracks for the X and Y parameters of the pad.
4.1.1 - Solutions
- Do most automation via the XY Pad. Plan ahead and defer parameter automation until it is clear which parameters might be controlled by the XY Pad.
This way parameters can be swapped out in the XY slots and new parameters can immediately benefit from the recorded XY automation in your DAW. - Delete the current DAW automation tracks for XY destination parameters (e.g. filter, pitch, lfo depth etc.). This will avoid value clashes and rapid parameter jumps as there will be a conflict between values generated by the DAW automation and values coming from the XY pad.
- If extra automation is needed after the XY automation has been recorded, connect the valid parameter(s) to a Hallion quick control in relative mode. This will allow you to record a separate, dedicated Quick Control automation pass, the audible result of which will be a function of the original XY and newly created QC automation.
- ABOUT 2
- GENERAL USAGE 2
- ABOUT
- GENERAL USAGE
- 1.1 - MAIN PAGE - GENERAL
- 1.2 - MAIN PAGE - ENVELOPE SECTION
- 1.3 - MAIN PAGE - SETTINGS & FX
- 2.1 - CUSTOM PAGE - GENERAL
- 2.1.1 - WAVE DISPLAY
- 2.3 - CUSTOM PAGE - GRAIN
- 2.4 - CUSTOM PAGE - SYNC2END
- 3.1 - MOD & FX PAGE - GENERAL
- 3.2 - MOD & FX PAGE - CURVES
- DVCOMPTOOLS TRANSVERSE
- 3.2.1 - SETTING CURVE SHAPES
- 3.3.1 - MODULATION ROWS
- 4.1 - AUTOMATION - BEST PRACTICE
- 4.1.1 - SOLUTIONS
Brand : STEINBERG
Model : Transverse
Category : Electronic musical instrument