VL60 - Broom Tower - Free user manual and instructions
Find the device manual for free VL60 Tower in PDF.


| Product Type | Stick Vacuum Cleaner (NimbleVac) |
| Model | T527101 (VL60) |
| Brand | Tower |
| Power | 200 W |
| Battery Type | 14.8 V, 2200 mAh Rechargeable Lithium-Ion |
| Charging Time | 4 hours |
| Running Time (Low Speed) | 35 minutes |
| Running Time (High Speed) | 12 minutes |
| Dust Tank Capacity | 0.3 liters |
| Weight | Approx. 2.5 kg (5.5 lbs) |
| Dimensions (L x W x H) | Approx. 110 x 25 x 20 cm (43.3 x 9.8 x 7.9 in) |
| Main Floorhead | 2-in-1 Floorhead with LED lights |
| Accessories Included | 2-in-1 Nozzle, Upholstery Brush, Velvet Brush Roller |
| Wall Mountable | Yes, with included wall mounting kit |
| Speed Settings | 2 (Low and High) |
| Filtration | Washable filter (foam) |
| Safety Features | Motor thermal cut-out, automatic shutoff on overheating |
| Warranty | 1 year (extendable up to 2 years with registration) |
| Suitable For | Hard floors, low-pile carpets; not for long-fiber carpets |
| Handheld Mode | Yes, by detaching extension pole and floorhead |
Frequently Asked Questions - VL60 Tower
User questions about VL60 Tower
0 question about this device. Answer the ones you know or ask your own.
Ask a new question about this device
Download the instructions for your Broom in PDF format for free! Find your manual VL60 - Tower and take your electronic device back in hand. On this page are published all the documents necessary for the use of your device. VL60 by Tower.
USER MANUAL VL60 Tower
BUILT FOR BETTER SINCE 1912
T527101
VL60
NIMBLE VAC
natural_image
Black and white photo of a VAC vacuum cleaner with attached base (no visible text or symbols on the device body)
SAFETY AND INSTRUCTION MANUAL PLEASE READ CAREFULLY
*Subject to registering your Extended Guarantee online at www.towerhousewares.co.uk.
This box contains:
Instruction Manual
NimbleVac Vacuum Cleaner
Power adaptor
2-in-1 Nozzle
Upholstery Brush
Velvet Brush Roller
Wall Mounting Kit
4 x Screws
4x Wall Plugs
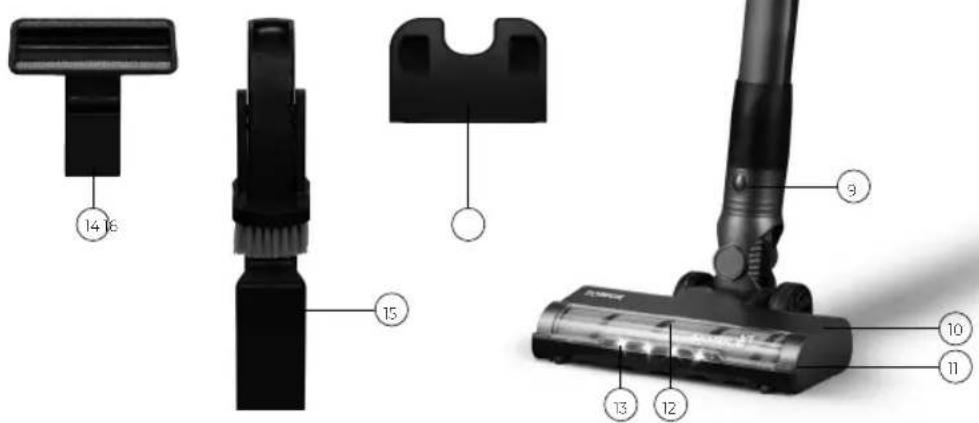
- Charging socket
- On/off switch
- Speed control switch
- Dust tank and filter
- Dust tank release button
- Dust tank opening button
- Extension pole release button
- Extension pole
- Floorhead release button
- Floorhead
- Roller brush release button
- Roller brush (underside of floorhead)
- Floorhead LED lights
- Upholstery brush
- 2 in 1 nozzle
- Wall mount
Technical Data:
Model: T527101
Input: 14.8V 2200mAh Rechargeable Battery
Product Power: 200W
Charging Time: 4 Hours
Running Time: 1 12 minutes at high speed, 35 minutes at low speed
Dust Tank Capacity: 0.3 litres
(Power adapters only)
Never open the power adapter, you risk getting an electric shock.
Only use the power adapter that is supplied with your product.
You must always connect the power adapter to the product before connecting to the mains power supply.
The power adapter must be used indoors only, and must not be subjected to damp conditions.
The power adapter does not have any user serviceable parts.
If in doubt, consult a qualified electrician who will be pleased to do this for you.
If you need to remove the plug – disconnect it from the mains – and then cut it off of the mains lead and immediately dispose of it in a safe manner. Never attempt to reuse the plug or insert it into a socket outlet as there is a danger of an electric shock.
WARNING:
Do not attempt to open any part of the power adaptor or plug.
DISPOSAL OF THE UNIT
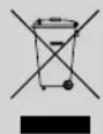
Appliances bearing the symbol shown here may not be disposed of in domestic rubbish. You are required to dispose of old electrical and electronic appliances like this separately.
Please visit www.recycle-more.co.uk or www.recyclenow.co.uk for access to information about the recycling of electrical items.
Please visit www.weeeireland.ie for access to information about the recycling of electrical items purchased in Ireland.
The WEEE directive, introduced in August 2006, states that all electrical items must be recycled, rather than taken to landfill.
Please arrange to take this appliance to your local Civic Amenity site for recycling, once it has reached the end of its life.
Important Safety Information:
Please read these notes carefully BEFORE using your Tower appliance
- Check that the voltage of the main circuit corresponds with the rating of the appliance before operating.
- If the supply cord or appliance is damaged, stop using the appliance immediately and seek advice from the manufacturer, its service agent or a similarly qualified person.
• DO NOT let the cord hang over the edge of a table or counter or let it come into contact with any hot surfaces.
• DO NOT place the appliance near a heat source. - The use of accessory attachments is not recommended by the appliance manufacturer apart from those supplied with this product.
• DO NOT pull the plug out by the cord as this may damage the plug and/or the cable. - Switch off and unplug before fitting or removing tools/ attachments, once
charged and before cleaning.
- Close supervision is necessary when any appliance is used by or near children.
• Children should not play with the appliance.
- This appliance can be used by children aged from 8 years and above and persons with reduced physical, sensory or mental capabilities or lack of experience and knowledge if they have been given supervision or instruction concerning use of the appliance in a safe way and understand the hazards involved.
• Cleaning and user maintenance should not be undertaken by children without supervision.
• Take care when any appliance is used near pets.
• Not suitable for carpets with long fibres as the bristles will damage the fibres.
- Keep the vacuum cleaner moving over the carpet surface at all times to avoid damaging the carpet fibres.
• DO NOT use this product for anything other than its intended use.
• DO NOT immerse cords, plugs or any part of the appliance in water or any other liquid.
• This appliance is for household use only.
• DO NOT use the appliance outdoors.
• DO NOT handle the appliance or plug with wet hands. - Keep hair, loose clothing, fingers and all body parts away from moving parts.
• DO NOT use to pick up hazardous or abrasive liquids (solvents, corrosive products, detergents, etc), flammable liquids such as alcohol, gasoline or use in an area where they might be present.
• DO NOT use the appliance without the dust container filter in place.
• DO NOT pick up anything that is burning or smoking such as cigarettes, matches or hot ashes.
• DO NOT vacuum any large, sharp, or broken objects, such as pieces of glass.
• DO NOT vacuum water or any other liquid.
- Use extra care when cleaning on stairs.
- This product is fitted with a thermal cut-out, which will activate if the motor overheats due to blocked air inlets. If the appliance cuts out, allow it to cool for 1 hour, then empty the dust container and clean all of the filters.
• In the unlikely event the appliance develops a fault, stop using it immediately and seek advice from the Customer Support Team.
Before First Use:
Read all instructions and safety information carefully before first use. Please retain this information for future reference.
- Remove the product from the box.
- Remove any packaging from the product. Check for any visible signs of damage to the appliance or adaptor.
- Please retain all packaging until you have checked and counted all the parts and the contents against the parts list.
- Dispose of the packaging in a responsible manner.
Wall-Mounting the Appliance:
This unit can be wall-mounted when not in use.
CAUTION! When drilling holes in the wall, take extreme care not to damage any concealed cables or pipes on the wall, as this could cause a hazard. If in doubt, seek out a qualified handyman to carry out the procedure.
- To wall-mount the appliance, begin by affixing the included wall mount to the wall. To do this, begin by choosing an adequate position and height, roughly one metre above the ground, and mark it on the wall with a pencil.
- Hold the wall bracket level to the marking and mark the position of the two screw holes through the bracket.
- Remove the wall bracket from the wall and drill two holes over the pencil markings with a 6mm masonry drill (not included).
- Once the two holes have been appropriately drilled, insert one of the included wall plugs into each hole. Ensure each wall plug is firmly secured into place before proceeding.
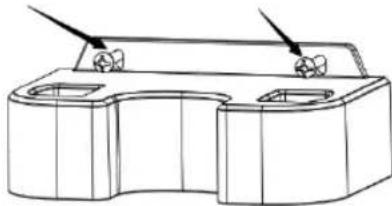
- When both wall plugs have been securely fitted, place the wall bracket over them and use the included screws to affix it to the wall, as shown in the figure below. Ensure the wall bracket is firmly secured into place before proceeding.
natural_image
Technical line drawing of a mechanical component with two ports and a base (no text or symbols)- Your appliance can now be wall-mounted.
Assembling the Unit for Floor Use
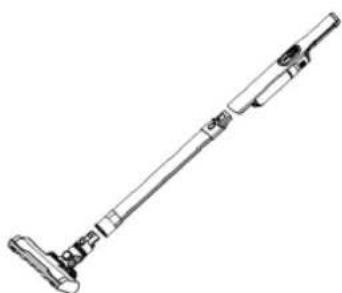
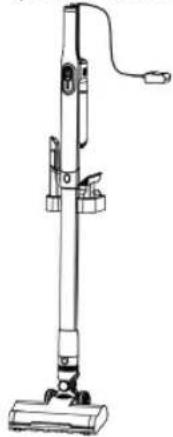
- To use the unit, start by assembling it. To do this, first attach the floorhead to the pole.
- To connect the floorhead to the pole, push it into the corresponding slot on the main body of the unit until it locks into place. Ensure the floorhead is securely attached to the unit before attempting to use the vacuum cleaner.
- Once the floorhead is attached to the pole, affix the pole to the main body of the vacuum cleaner by pushing it into the corresponding slot until it locks into place.
• Refer to the the illustration for reference on how to correctly assemble the unit.
natural_image
Line drawing of a handheld vacuum cleaner (no text or symbols)To remove the floorhead or extension pole, simply press the corresponding release button and pull each one out of its slot and away from the main body of the unit. Ensure the unit is turned off before attempting to detach the floorhead or extension pole.
Charging the Unit:
- To charge the unit, connect the included charging adaptor to the corresponding slot at the top of the unit and plug it into a compatible mains socket, ensuring the socket switch is in the On position. The unit will automatically begin to charge.
natural_image
Line drawing of a vacuum cleaner with handle and base (no text or symbols)- The three LED indicators on the unit's control panel will gradually light up as the unit charges. The vacuum is fully charged when all three indicators are lit up. When this occurs, unplug the unit from the mains and disconnect the power adaptor from it. The unit is now ready for normal use.
- Refer to the image below for guidance on the location of the LED battery indicators.
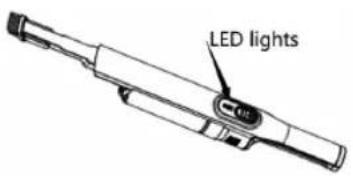
- While the unit is switched on, the LED indicators will gradually go out to show the remaining battery level. When the battery starts to run low, repeat the process above to fully charge the unit again.
Note: Charging time for this unit is about 4 hours.
Turning the Appliance On/Off:
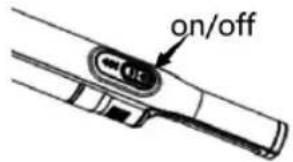
- Push the On/Off button located on the handle to turn the unit on.
- Press this button again while the unit is in operation to turn it off.
- Refer to the illustration for guidance on the location of the On/Off switch.
Speed Selection
This unit is equipped with a choice of two speeds.
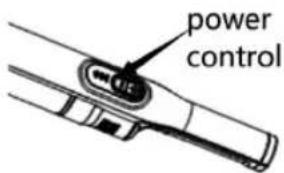
- Repeatedly press the Speed Selection button to cycle through and select between Low and High speed
- Refer to the illustration for guidance on the location of the Speed Selection switch.
Using the Floorhead:
This unit comes complete with a 2-in-1 floorhead, suitable for a wide variety of floors and surfaces.
-
To connect the floorhead to the vacuum cleaner, push it into the corresponding slot on the extension pole, then attach the pole onto the main body of the unit until it locks into place. Ensure the floorhead is securely attached to the unit before attempting to use the vacuum cleaner.
-
To remove the floorhead and extension pole and use the vacuum cleaner as a handheld cleaner, press the corresponding release button on the main body of the unit, then pull them firmly out and away from the main body of the unit. Ensure the unit is turned off before attempting to detach the floorhead or extension pole.
Note: The unit's accessories cannot be used in floor mode.
Using the Accessories:
This vacuum cleaner comes complete with a 2-in-1 nozzle, for vacuuming corners and cleaning delicate surfaces, an upholstery brush, ideal for sofas and car seats, and a brush roller.
-
To use the accessories, simply attach them to the slot at the front of the main body of the unit until it clicks into place.
-
To remove an accessory, simply pull it out of its slot and away from the main body of the unit.
Note: The brush roller/floorhead cannot be used in handheld mode.
Note: Keep the brush free of fibres, hairs, and other objects that could impede proper functioning. Always remove these types of objects when the brush picks them up.
Troubleshooting
| Problem Possible Solution | |
| The vacuum will not work Ensure the vacuum cleaner is fully charged.Check that there are no blockages to the dust tank or filter and remove as necessary.This appliance is equipped with a motor protective thermostat. If for some reason it overheats, the thermostat will automatically turn the suction motor off. Should this occur, allow it to cool for 1 hour, then empty the dust container and clean all of the filters. | |
| Vacuum will not pick-up or suction power is weak | The dust container may be full, or the filter may require cleaning. Empty the dust container and clean the filter.There may be blockages in the filter or dust tank. Check for blockages and clean the filter and dust tank.An attachment may have been installed which does not belong to the vacuum cleaner. Make sure that all the attachments belong to the model of vacuum cleaner that you are using. The use of accessory attachments other than those supplied by the manufacturer is not recommended. |
| Dust is escaping from the vacuum | The filter may be installed incorrectly, or the dust container may be full. Empty the dust container and reassemble the filter system. |
| There is a strange noise coming from the vacuum. | The airflow may be restricted or blocked. Check for blockages and clean the filter and pole.If the problem persists, contact the Customer Support team. |
Cleaning & Care
Note: Ensure the appliance is turned off and unplugged from the mains before emptying the dust tank.
Emptying the Dust Tank:
-
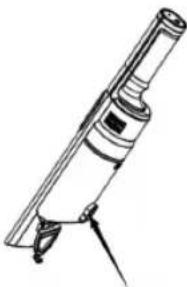
Hold the unit over a bin and press the dust tank opening button. Empty the contents of the dust tank. Once empty, push the cover back into place until there is an audible click.
-
Refer to the image below for guidance on the location of the dust tank.
natural_image
Line drawing of a telescope with tripod base (no text or symbols)Cleaning the Filter:
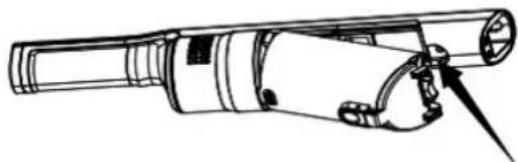
- Press the dust tank release button to detach the dust tank from the unit, as shown in the picture below.
natural_image
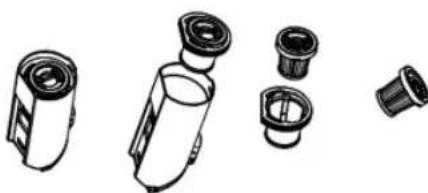
Technical line drawing of a mechanical device with no visible text or symbols- Remove the filter from the dust tank, and detach it from its housing, as shown in the picture below.
natural_image
Illustration of various mechanical components including a cylindrical device and multiple cylindrical parts (no text or symbols)-
Tap it lightly against a dustbin or sink to remove particles.
-
Wash the filter regularly to ensure maximum suction performance. Allow to dry thoroughly before replacing it into the unit.
-
Once the filter is thoroughly clean, carry out the above process in reverse order to reassemble the filter and reattach the dust tank to the unit.
Cleaning the Unit Body:
-
Before cleaning the unit body, ensure the unit is disconnected from the mains supply and not in operation.
-
Use a damp cloth to clean the unit body. Never use any abrasive cleaning materials or solvents, as these could cause damage to the surface of the unit.
WARNING! DO NOT allow any liquids into the unit, as this could cause damage to the electrical components and cause it to malfunction.
Note: Ensure the unit is thoroughly clean and the filter is completely dry before attempting to use or store it.
Cleaning the Roller Brush:
It is recommended that the roller brush be cleaned periodically, to remove hair, fluff and debris. To clean the brush bar, carry out the following steps:
- Press the roller brush release button on the side of the floorhead to unlock the roller brush.
- Remove the roller brush from the floorhead.
- Remove fluff, hairs and other dirt from the brush.
- Refit the brush bar onto the floorhead.
Clearing Blockages:
If the dust tank is overfilled, the filter is clogged up, or the vacuum picks up a larger piece of debris, the vacuum may become clogged.
Should this occur, carry out the following steps to unclog the vacuum:
- Check the dust tank and empty it if necessary.
- Check the filter for any debris and rinse it under running water if necessary, as detailed in the sections above.
- Detach any attachments from the unit and check for blockages.
Storing the Appliance:
- Store the appliance in the provided wall mounting bracket, ensuring it is firmly secured.
Notes


TOWER®
BUILT FOR BETTER SINCE 1912
thank you!
We hope you enjoy your appliance for many years
This product is guaranteed for 12 months from the date of original purchase. If any defect arises due to faulty materials of workmanship, the faulty products must be returned to the place of purchase. Refund or replacement is at the discretion of the retailer.
The Following Conditions Apply:
The product must be returned to the retailer with proof of purchase or a receipt. The product must be installed and used in accordance with the instructions contained in this instruction guide. It must be used only for domestic purposes. It does not cover wear and tear, damage, misuse or consumable parts. Tower has limited liability for incidental or consequential loss or damage. This guarantee is valid in the UK and Eire only.
The standard one year guarantee is only extended to the maximum available for each particular product upon registration of the product within 28 days of purchase. If you do not register the product with us within the 28 day period, your product is guaranteed for 1 year only.
To validate your extended warranty, please visit www.towerhousewares.co.uk and register with us online.
Please note that length of extended warranty offered is dependent on product type and that each qualifying product needs to be registered individually in order to extend its warranty past the standard 1 year.
Extended warranty is only valid with proof of purchase or receipt. Your warranty becomes void should you decide to use non Tower spare parts. Spare parts can be purchased from www.towerhousewares.co.uk
Should you have a problem with your appliance, or need any spare parts, please call our Customer Support Team on:
+44 (0) 333 220 6066

1023.VI
- VL60
- NIMBLE VAC
- This box contains:
- Technical Data:
- (Power adapters only)
- WARNING:
- DISPOSAL OF THE UNIT
- Important Safety Information:
- Before First Use:
- Wall-Mounting the Appliance:
- Assembling the Unit for Floor Use
- Charging the Unit:
- Turning the Appliance On/Off:
- Speed Selection
- Using the Floorhead:
- Using the Accessories:
- Cleaning & Care
- Emptying the Dust Tank:
- Cleaning the Filter:
- Cleaning the Unit Body:
- Cleaning the Roller Brush:
- Clearing Blockages:
- Storing the Appliance:
- TOWER®
- The Following Conditions Apply:
Brand : Tower
Model : VL60
Category : Broom