H2 - Video camera Rexing - Free user manual and instructions
Find the device manual for free H2 Rexing in PDF.


| Product Type | Trail Camera / Video Camera |
| Brand | Rexing |
| Model | H2 |
| Image Sensor | 8 MP CMOS |
| Photo Resolution | Up to 32 MP (6480 x 4860) |
| Video Resolution | Up to 4K (3840 x 2160) at 10 fps |
| IR Flash Range | 65 ft (20 m) |
| Detection Angle | 120° (main PIR) + side sensors |
| Trigger Time | 0.2 seconds |
| Trigger Interval | 5 seconds to 60 minutes (programmable) |
| Display | 2.4-inch TFT Color LCD |
| Memory Card Support | Micro SD up to 256 GB |
| Wireless Connectivity | Wi-Fi and Bluetooth (via GCamPro app) |
| Power Supply | 8 x AA batteries (alkaline or Ni-MH) or external 6V DC |
| Battery Life (Standby) | Up to 12 months (8 AA batteries) |
| Water Resistance | IP66 |
| Operating Temperature | -4°F to 140°F (-20°C to 60°C) |
| Dimensions | 5.3 x 3.5 x 3.0 inches (13.5 x 8.9 x 7.6 cm) |
| File Format | JPG (photos), AVI (videos) |
| Maintenance | Keep lens clean; wipe with soft cloth; avoid chemicals; do not disassemble. |
| Safety | Read safety warnings; do not use while driving; use approved accessories; avoid extreme temperatures. |
| Spare Parts & Repairability | Contact manufacturer for repairs; no user-serviceable parts. |
| General Information | FCC compliant; 1-year limited warranty. |
Frequently Asked Questions - H2 Rexing
User questions about H2 Rexing
0 question about this device. Answer the ones you know or ask your own.
Ask a new question about this device
Download the instructions for your Video camera in PDF format for free! Find your manual H2 - Rexing and take your electronic device back in hand. On this page are published all the documents necessary for the use of your device. H2 by Rexing.
USER MANUAL H2 Rexing
natural_image
Line drawing of a vintage camera with front and back views, showing no text or symbols
natural_image
Abstract geometric pattern with white rectangular outlines on a solid blue background (no text or symbols)TABLE OF CONTENTS
Introduction 4
HANDLING THE CAMERA
Camera Overview 7
Basic Operation 8
Installation 10
Camera Operation 11
Viewing/Deleting Photos/Videos 16
Wi-Fi Connect 19
TROUBLESHOOTING
Troubleshooting/FAQ 21
Camera Specifications 24
CUSTOMER PROTECTION
Customer Service 29
Warranty and Disclaimers 30
Introduction
With its highly sensitive 120^ Passive Infra-Red (PIR) sensor, the camera detects the sudden change in ambient temperature caused by moving game in a region of interest (ROI), triggers to take pictures/videos, so that you won't miss anything walking in front of your camera.
REXING®
natural_image
Four empty rectangular shapes arranged in a scattered pattern on a white background (no text or symbols)Introduction
Features
- Programmable 3, 5, 8, 12, or 16 Megapixel high-quality resolution.
• Infrared night vision LEDs for flash range as far as 65 feet. - In "Cam + Video" mode, the camera takes both pictures and videos at every trigger event.
- Impressively 0.2 second quick trigger time, preboot in 0.2 second.
- Unique side Prep Sensor design provides wider sensing angle and enhances cameras' response speed.
• In the Time-Lapse setting, the camera automatically and constantly takes pictures/videos at a specified internal. This is very useful when observing plants flowering, birds building nest, or when monitoring unattended properties such as parking lots. -
With the Timer setting "ON", the camera can be programmed to only work during a specific period every day. This feature can work together with the Time-Lapse feature.
-
Serial Number enables you to mark locations in the photos. This helps multi-camera users identify the location when reviewing the images.
- Ultra-low standby power consumption. Extremely long in-field life (in standby mode, up to 8 months with 8 × AA batteries).
• Built-in 2.4" TFT color display to review images and videos. - Date, time, temperature, and moon phase can be stamped in the pictures.
- Backpack-looking tree grabber makes mounting and aiming a snap.
- Perform in extreme temperatures from -4^ to 140^ .
- Compact size (5.3 x 3.5 x 3.0 inches). Well designed to deploy covertly.
- Lockable and password protected.
• IP66 water-resistant.
Application
- Trail camera for hunting
• Animal or event observation - Motion-triggered security camera, for home, office and community
- All other indoor/outdoor surveillance where invasion evidence needed
Operating the Camera
Camera Overview
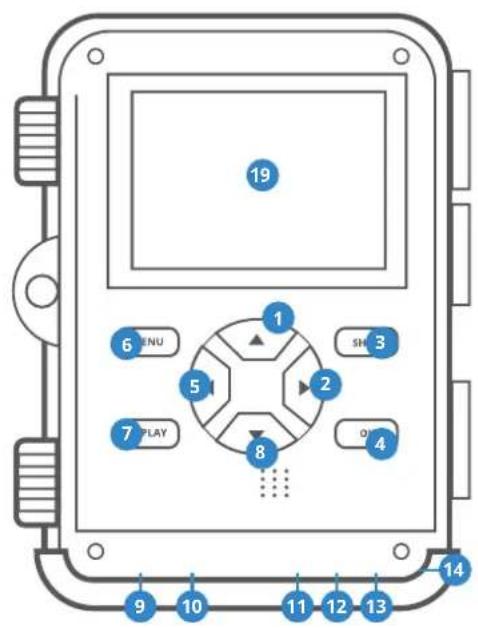
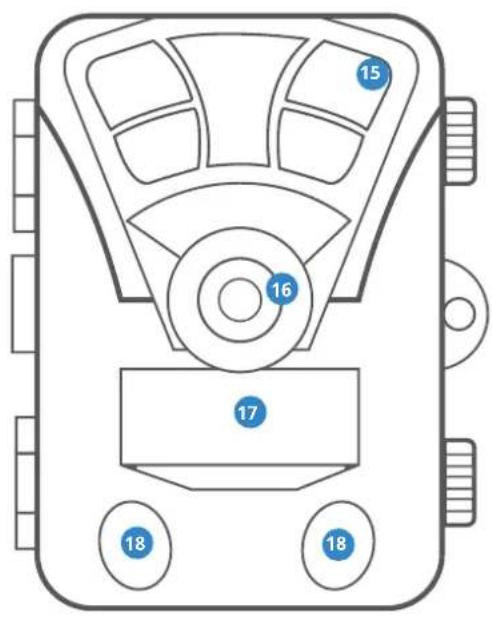
01 08 15UP Button DOWN Button Infrared LEDs
02 0916HT Button Memory Card Slot Lens
03 10H0T Button AV Port Front Motion Sensor
04 1018 Button USB Port Side Motion Sensor
05 12E19 Button OFF Display Screen
06 1B MENU Button TEST
07 1EPLAY Button ON
Basic Operations
101
Install batteries
natural_image
Diagram of three stacked batteries with positive charge indicators, placed on a rectangular base (no text or symbols)02
Insert a Micro SD Memory Card
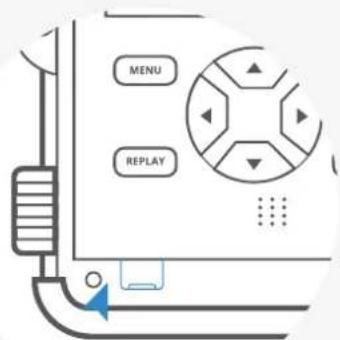
103
Switch to TEST Mode
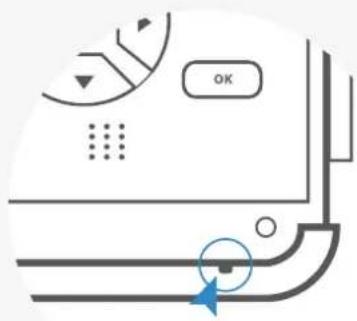
natural_image
Diagram of a device with control buttons and a blue arrow pointing to a button (no text or symbols present)04
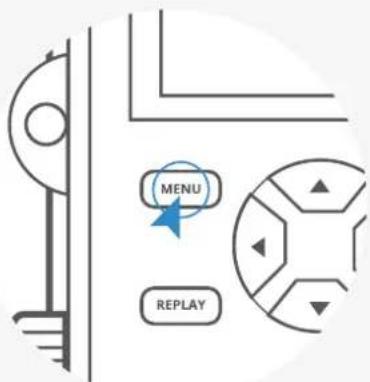
Press MENU to enter Settings
flowchart
graph TD
    A["Start"] --> B["Menu"]
    B --> C["RePLAY"]
Basic Operations

05
Format the Memory Card
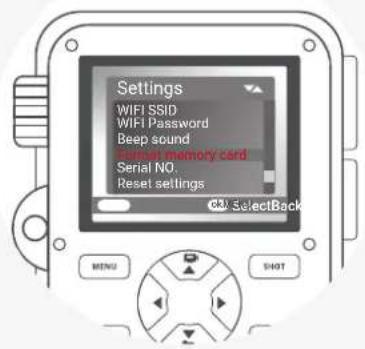

07
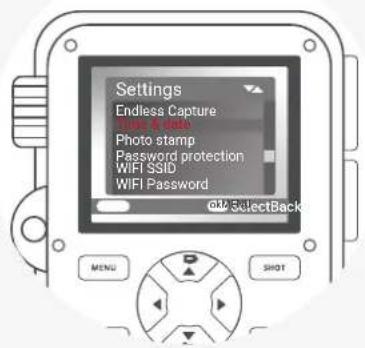
Set the Date & Time

06
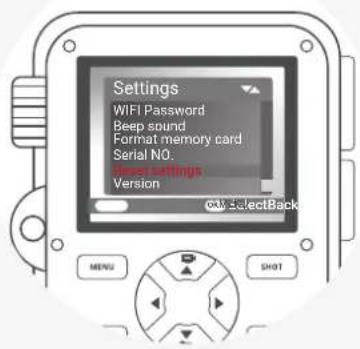
Reset to Factory Setting

08
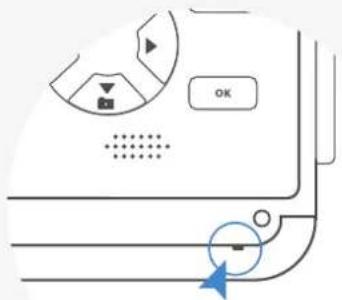
Switch to ON Mode (Test Device)
natural_image
Diagram of a device with control buttons and an arrow indicator (no readable text or symbols)Installation
Power Supply
Batteries Installation
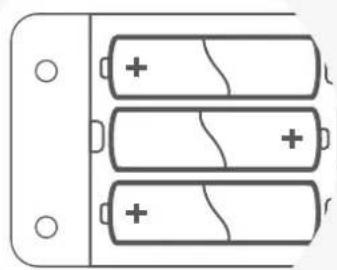
Open the camera by unlocking the latch firstly. The battery compartment is the right part of the camera. Open the battery cover and insert 8x1.5v LR6/AA batteries (or NI-MH rechargeable batteries) into the battery slots. Make sure to insert each battery with correct polarity (+ and - end against the long spring of each battery slot).
Note:
- NEVER INSTALL DIFFERENT TYPES OF BATTERIES or NEW AND OLD BATTERIES in the product at the same time.
• Anytime you load or unload batteries, make sure that the camera is OFF. If using external power source, do not remove internal batteries.
Using an External Power Source
Optionally, you can connect an external 6V DC power source with at least 1.5A to the port 'DC In' port at the bottom of the camera. The power connector is a 3.5x1.35 mm coaxial DC power plug with positive 'tip' (inside pin) polarity. Leave internal batteries in the camera during use.
Inserting the SD Card
The camera uses a Micro SD (Secure Digital) memory card to save photos (in jpg format) and/or videos (in .AVI format). SD and SDHC (High Capacity) cards up to a maximum 32GB capacity are supported.
Insert the SD card (with the camera's power switch in the OFF position) before beginning to operate the camera. Don't insert or remove the SD card when the power switch is in the ON position.
- Insert the SD card into the card slot. A "click" sound indicates that the card is installed successfully. If the wrong side of the card is facing up, you will not be able to insert it without trying to force it in. There is only one correct way to insert the SD cards.
• To take out the SD card, just gently push in the card (do not try to pull it out without pushing in first). The card is released from the slot and ready to be removed when you hear the "click" sound.
Note:
- Be sure the camera's power is switched OFF before inserting or removing SD cards or batteries.
- Camera will not operate without a memory card installed.
Camera Operation
Mode Switch
There are three basic operational modes:
- OFF mode: Power switch in the OFF position (LCD screen is off).
- ON mode: Power switch in the ON position (LCD screen is on).
- TEST mode: Power switch at TEST position.
OFF Mode
The OFF mode is the "safe" mode where all actions should occur (e.g., Replacing the SD card, batteries, or transporting the device).
ON Mode
In the ON mode, the camera will automatically take photos or videos when triggered by the PIR sensor's detection of activity in the area it covers. (according to its current parameter settings)
TEST Mode
In the TEST mode, you can check and change the settings of the camera with the help of its built-in LCD. These settings, found in the TEST Menu, let you change the photo or video resolution, interval between photos, switch the time imprint on, etc.
Change Setting in TEST Mode
The main purpose of the TEST mode is to allow you to change the settings of the camera's parameters so that your trail camera operates exactly the way you want it to.
- Press the UP key, then press SHOT to take a video for test.
- Press the DOWN key, then press SHOT to take photo for test.
- Pressing the MENU button, the setting menus will appear on the screen.
- Press the UP or DOWN key to scroll to the next or previous parameter.
- Press the RIGHT or LEFT key to change the setting.
- Press the OK button to save the new setting.
- Press the MENU button to exit the settings.
Modes
Photo: Capture photos with motion detection.
Video: Capture video clips with motion detection.
Photo + Video: Capture both photos and videos with motion detection.
Camera Operation
Photo Resolution
Set resolution for still photos. We recommend the resolution 8MP.
Options:
1MP - 1280x960
3MP - 2048×1536
5MP - 2592x1944
8MP - 3264x2448
12MP - 4000x3000
16MP - 4608x3456
20MP - 5200x3900
32MP - 6480x4860
Photo Series
Selects how many photos will be taken in sequence per trigger. In addition to single shot mode (1 photo), you can take "2 photos in series", "10 photos in series".
Video Resolution
Select video resolution.
Options:
3840x2160/10fps
2688x1520/20fps
1920x1080/30fps
1280x720/60fps
1280x720/30fps
720x480/30fps
640x480/30fpss
320x240/30fps
Video Length
Set the length of each video clip recorded and each time motion is detected (between 3-60 seconds or 1-2 minutes). The longer the recording time selected, the shorter the operating time.
Audio Recording (1-2 Minutes)
You can record sound while recording a video.
Shot Lag
Set the time period that the camera should wait before reacting to subsequent activation of the main sensor after the initial recording. During the selected interval, the camera will not record any images or videos. This prevents the memory card from being filled up with too many recordings of the same event. You can select between 5-60 seconds or 1-60 minutes.
Side Motion Sensors
The default setting is "On". The two side PIR sensors provide a wider sensing angle and enhance response time. However, you might have difficulty removing the interfering twigs in some situations or avoiding the sunlight. If so, you have the option to turn off the side sensors.
Sensitivity Motion Sensors
The sensitivity of the main motion sensor can be set here. For interior areas and environments with little interference, such as branches blowing in the wind, select "High". Select "Medium" for exterior areas and environments with a normal amount of interference, and select "Low" for environments with a high level of interference.
Please note that the temperature may also affect the sensitivity. The "High" setting is suitable for warm ambient temperatures, whereas "Low" should be selected for cold temperatures.
Camera Operation
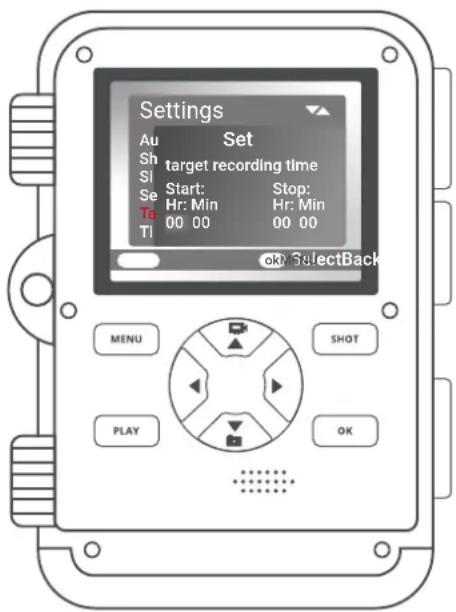
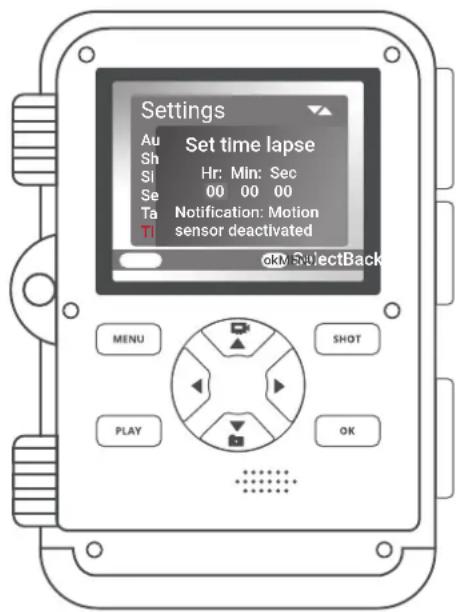
Target Recording Time
Select "On" if the camera should only be active during a specific time. You can then set the start and end time for the active phase in the screen menu that subsequently appears. The settings made here apply every day.
The camera will not record any images outside of the active phase.
Time Lapse
Time-lapse model disables the PIR sensor; instead, it takes photos or records video clip automatically at your choice of intervals. This has the advantage of scouting further distances that is out of the PIR sensor's range, such as big open areas (food plots, fields, etc.) or monitoring the flowering, sunrise, and sunset.
When you confirm "On" by clicking the OK button, you can then set the desired time interval using the menu that now appears.
Camera Operation
Languages
Here you can set English, German, Finnish, Swedish, Danish, French, Italian, Dutch, Spanish, Portuguese, Japanese, or Chinese as the menu language.
Time & Date
Here you can set the date format YYYY/MM/DD. DD/MM/YYYY or MMDD/YYYY), the time format (12/24 hrs), the time and date. Use LEFT and RIGHT keys to move to the next field. Use UP or DOWN keys to change the setting, pressing OK button to save.
Photo Stamp
Select ON to record the temperature, moon phase, date, and time on each photo (only for photos). Select OFF for no imprint.
Format Memory Card
Delete (erase) all files stored on a card to prepare it for reuse. Always format a card that has been previously used in other devices. Caution! Make sure you have downloaded and backed up any files you want to preserve first! Press OK to execute, press MENU to exit without formatting.
Password Protection
Select ON if you want to use a password to protect the camera from unwanted access, You can set a 4-digit combination. Once the code is set, the camera will prompt you to enter the correct code. The default password is 0000.
If you forget the number combination, proceed as follows to unlock the camera and to reset it to its factory default settings:
• Copy the file "FWDLJA.bin" from the supplier onto an empty memory card.
- Insert the memory card into the device while the operating mode selector switch is set to the OFF position.
- Keep the button pressed while moving the operating mode selector switch to the SET position. Keep the button pressed.
• After about 5 seconds the camera reset finished.
Serial No.
Select On if you want to use a serial number to rank the camera. You can set a 4-digit combination. This helps multi-camera users identify the location when reviewing the photos, since each camera will imprint its number on all photos it captures.
Camera Operation
Reset setting
Select Yes and press OK to restore all parameters to the original factory default settings.
Aligning The Camera
In TEST mode you can work out the optimum exposure angle and the range of the motion sensors.
During alignment, consider whether the use of the side motion sensors may be useful for attaining the desired observation results. You can activate/deactivate the side motion sensors using the above-described menu,
Align the camera as follows:
Fasten the camera to a tree or similar object at a height of 3-6 feet and align the camera in the desired direction. Then move slowly from one side of the target area to the other side. While doing this, monitor the motion display.
• If this lights up in blue, you have been detected by one of the activated side motion sensors. If it lights up in red, you have been detected by the front motion sensor. This way, you can work out the best alignment for the camera.
The motion display only lights up when the operating mode selector switch is in the SET position and one of the motion sensors has detected movement. During normal operation, there will be no LED display.
To ensure that the camera does not record unwanted recordings of relevant movements, it should not be set up in a sunny location or close to branches that can move in the wind. The recording angle of the sensors is about 100^ from corner to corner; and the recording field for photos and videos are around 89^ .
CAMERA IS READY TO USE - Switch to ON
AFTER CHANGING TO DESIRED SETTING and SIMPLY SLIDING SWITCHES TO ON POSITION, the camera is in active standby mode and will record media according to the switch settings.
Firstly, the motion indicator LED will blink red for about 15 seconds. Any motion is detected by the side PIR sensor; the camera will be active without trigger. As soon as the further motion is detected by the central PIR sensor within 5 minutes, the camera will take photos or videos. Otherwise, the unit will return to standby state.
natural_image
Three empty rectangular shapes arranged horizontally on a white background (no text or symbols)Viewing/Deleting Photos/Videos
Reviewing Images on the Camera LCD
- Put the power switch in TEST position.
- Press the REPLAY key to enter image review mode.
- Use the UP/DOWN keys to scroll through your photos or videos.
- A zoom feature is available for still photos: Use the SHOT/OK keys to zoom in or out. Press the REPLAY key at anytime to exit.
- Press the OK key to play or pause a video.
Activate Slide Show
This function can be used to play back the photos stored on the memory card automatically. Each photo is shown for about 2 seconds. To stop the slide show and keep the current image permanently on the screen, press the OK button.
Deleting Photos or Videos
- Put the power switch in TEST position.
- Press the REPLAY key to enter image review mode.
- Press the MENU key. You will see the first Delete screen.
- It'll let you selects the option to delete only the currently displayed photo/video, or all photos/videos.
- Press OK to Delete.
- Press MENU to cancel the operation without deleting any files.
Viewing/Deleting Photos/Videos
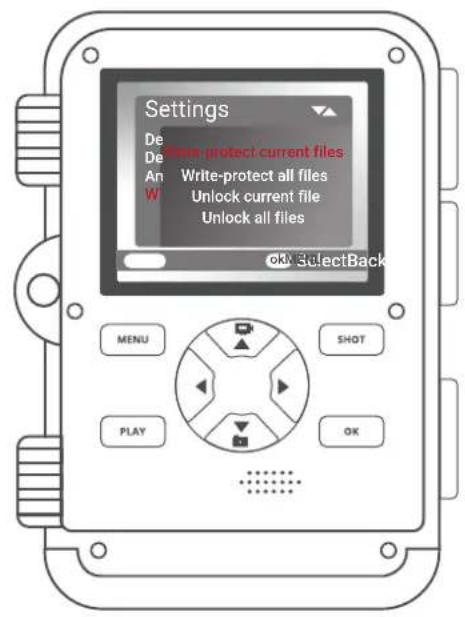
Write Protection
This function can be used to protect individual recordings or all saved recordings from accidental deletion.
- Select "Write-protect current to protect the currently selected recording from accidental deletion.
-
Select "Write-protect all" to protect all saved recordings from accidental deletion.
-
Select "Unlock current to"move the write protection for the currently selected recording.
- Select "Unlock all to press"ove the write protection for all saved recordings.
Viewing/Deleting Photos/Videos
Reviewing images Directly from the SD Card
This is the most popular method of viewing images. Removing the SD card and take it to your home or campsite to view the images by using an SD card reader connected to your computer (some computers and TVs have a built in SD card slot).
Reviewing Images by Connecting to a Computer
When using a PC (or Mac) to view photos (or video clips), first connect the device to the computer with the USB cable (supplied). It will be recognized as a "mass storage". You can view images and videos in the folder /DCIM/.
Reviewing Recordings on an External Monitor
A TV monitor can also be used to play back pictures (or videos) from the device, connect a TV to the camera using the supplied cable.
- Set the video input source of the TV to video.
- Put the power switch in TEST mode.
- Use REPLAY/UP/DOWN/OK/SHOT keys to view photos/videos.
Wi-Fi Connect
Connect to Wi-Fi
Step 1. Download and install the GCamPro app by scanning the QR code on the right, then turn on the Bluetooth and Wi-Fi functions on the mobile phone;
Step 2. Switch the power button of camera from "OFF" to "ON";
Step 3. After 15 seconds countdown, the camera enters the sleep working mode. (If the camera is already under the sleep working mode, please ignore steps 2 and step 3);
Step 4. Open the GCamPro app, press the "Add Camera" button, and allow GCamPro to use your Bluetooth by clicking "OK". Go ahead and click "+Add" to jump to the Bluetooth list.
Step 5. After you've turned the Wi-Fi on, go to your Wi-Fi network and find the Wi-Fi named "Trail Cam Pro*****" (if you cannot see this, please wait for about 10 seconds or refresh), then enter the initial password "12345678" to connect to the Wi-Fi.
Step 6. After the Wi-Fi connection is successful, please go back to the app. Users can operate the corresponding functions in the app.
Step 7. After you've completed the app operation, return to the main interface, click the Power off button in the upper right corner to shut down and exit the Wi-Fi connection, and the device will enter the sleep-hunting mode.

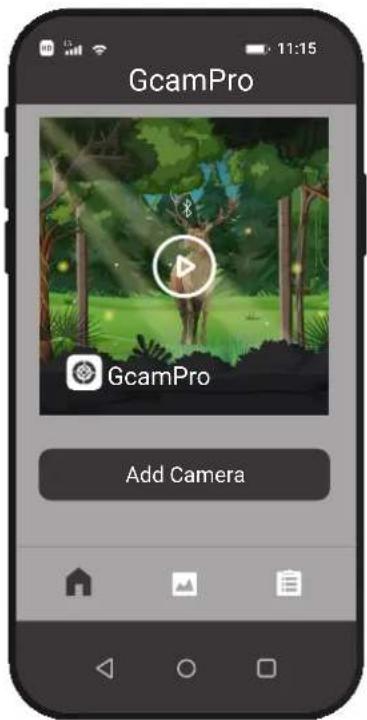
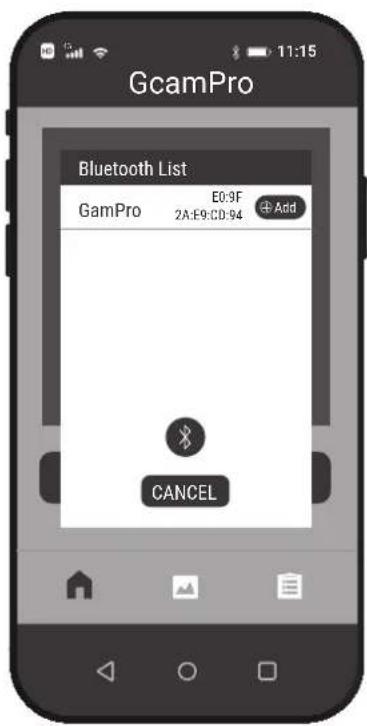
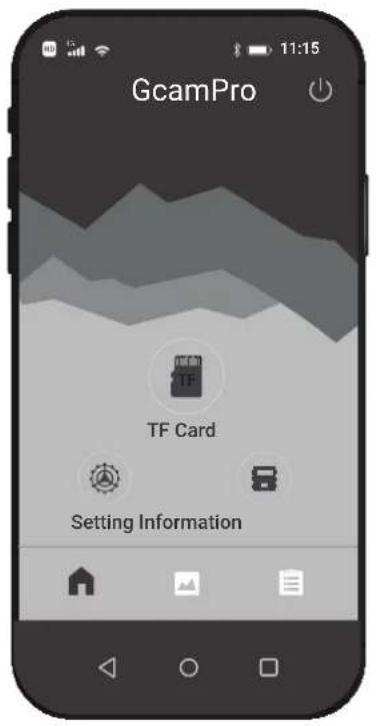
GCamPro App
Memory Card
Click the TF card button; the user will see the photo and video files stored in the TF card. Click the icon EDIT on the top right corner. You can then choose the pictures or videos to download, delete or share the files, and you can also select all.
Setting
Click Setting button, user will see the setup menu list of camera. Can set the parameters of camera on app.
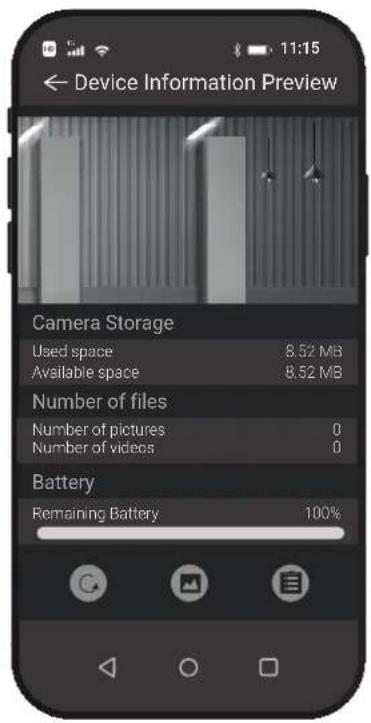
Information Review
Click the information review button; the user will see the interface shown below: Camera storage, Number of files, and Battery. Users also can see real-time images from the camera. Click the refresh icon; you can refresh image and can store the current image in your phone album. Click the Album button to view the photo and video of the memory card. Click on the image which you want to save to your phone. Click the icon EDIT on the top right corner, and then you can choose the pictures or videos to download, delete or share the files; you also can select all. Click the Setting button; the user will see the setup menu list of camera and can set the parameters of the camera on the app.
Phone Album
User can review the photo and video what have downloaded in the mobile device or a smartphone album. Can zoom in image, playback, choose, delete and share files.
Trouble Shooting
Troubleshooting/FAQ
Photos did not capture any subjects of interest
These are the result of placing the camera in an environment where there is motion associated with tree branches creating motion or an area where there is high heat in the foreground and any motion from wind. Setting a camera up over water is also a potential cause for this issue. To remedy this situation:
- Try moving the camera to an area that does not have any of these issues.
- If the camera continues to take images of no interest subject, try placing the camera in an inside environment and aiming at a location where there is no motion.
- If the camera continues to show issues, please contact our customer service.
Battery Life is Shorter Than Expected
- Battery life will varies with operating temperature and the number of images taken over time. Typically, the camera would be able to capture several thousand images before the batteries die.
- Check to make sure you have used new alkaline batteries or NI-MH rechargeable batteries.
- Make sure that the power switch is turned to the ON position and not in the TEST modes.
Camera won't take images
- Please make sure that the SD card is not full. If the card is full, the camera will stop taking images.
- Check the batteries to make sure that they are new batteries. You can choose to use 1.5V alkaline batteries or 1.2V NI-MH rechargeable batteries.
- Make sure that the camera power switch is in the ON position and not in the OFF or TEST modes.
- If the SD card has its write protect switch in the lock position, the camera will not take images.
- If you have used an SD card in another device before, you might want to try formatting the card before using it in the trail camera.
Camera Won't Power Up
- Make sure that you have installed at least a full set of 4 batteries in the correct position.
- Make sure that the batteries are installed correctly, observing proper polarity.
- After moving the switch from OFF to TEST or ON, make sure that the switch is correctly in position to ensure the proper mode.
- Do not move the switch directly from ON to TEST, always move the switch all the way down to OFF first, then back up to TEST.
Troubleshooting/FAQ
Still Photo and/or Video Quality Problems
1. Night photos or videos appear too dark
a. Check the battery indicator icon to see if battery power is full. The flash will stop operating near the end of the battery life.
b. You will get the best results when the subject is within the ideal flash range, no farther than 65FT.
c. Please note that when the Capture Number parameter is set higher than "1 Photo", or with very short interval settings, some images may appear darker than others due to the quick response and rapid re-triggering of the camera, allowing less time for the flash to fully recharge before firing again.
2. Daytime photos or videos appear too dark
Make sure that the camera is not aimed at the sun or other light sources during the day.
3. Night photos or videos appear too bright
Subjects may appear too bright at closer distances.
4. Daytime photos or videos appear too bright
Make sure that the camera is not aimed at the sun or other light sources during the day.
5. Photos with streaked subject
a. In some cases with low lighting conditions and fast moving subjects, the 32MP, 20MP, 16MP, or 12MP resolution settings may not perform as well as the 8MP setting.
b. If you have multiple images where fast moving subjects produce streaks on the photo, try the 8MP setting instead.
6. Short video clips-not recording the set length
a. Check to make sure that the SD card is not full.
b. Make sure that the camera has good batteries in it. Near the end of the battery life, the camera may choose to record shorter video clips to conserve power.
natural_image
Four empty rectangular shapes arranged horizontally on a white background (no text or symbols)Troubleshooting/FAQ
Date/Time Stamp not appearing on images
Make sure that the Time Stamp parameter is set to 'On'.
PIR Sensor LED Flashes/ Doesn't Flash
- When the camera is in the TEST mode, a special LED on the front of the camera will flash when it senses motion. This is for setup purposes only and will help the user aim the camera.
- During use, the LED will not flash when the camera takes an image. This is to help keep the camera hidden from game.
Camera won't retain settings and doesn't flash
Make sure that you have been saving the changes to any parameter settings that you made while in Setup mode, by pressing OK after changing the setting.
Moisture or Ants inside Camera
- To ensure humidity or rain is kept out of the camera, secure the DC In plug firmly in place.
- Ants can be attracted by low level electronic vibrations, and enter through any gaps between the exterior and interior of the camera. Make sure the DC In plug is securely attached.
Camera Specifications
| IMAGE SENSOR | 8MP CMOS sensor |
| PHOTO RESOLUTION | 1MP - 1280x960; 3MP - 2048x1536; 5MP - 2592x1944; 8MP - 3264x2448; 12MP - 4000x3000; 16MP - 4608x3456; 20MP - 5200x3900; 32MP - 6480x4860 |
| VIDEO RESOLUTION | 3840x2160/10fps; 2688x1520/20fps; 1920x1080/30fps 1280x720/60fps; 1280x720/30fps; 720x480/30fps; 640x480/30fps; 320x240/30fps |
| FILE FORMAT | JPG/AVI |
| LENS | f=3.3; F/NO=2.0; FOV=105;Auto IR filter |
| DISPLAY | 2.4" TFT LCD |
| EXTERNAL MEMORY | Micro SD card up to 256GB |
| INTERNAL MEMORY | 8Mx16 5D RAM |
| RANGE OF IR FLASH | 20m |
| TRIGGERING DISTANCE | 65ft/20m (Below 77°F/25°C at the Normal Level) |
Camera Specifications
| DETECTION ANGLE OF SENSORS | 120° |
| PIR SENSITIVITY | High/Normal/Low |
| TEMPERATURE COMPENSATION | Yes |
| PREP PIR SENSING ANGLE | On/Off;120° |
| TRIGGERING TIME | 0.5 Second(When using the 4G.5D card); 0.2 Second |
| TRIGGER INTERVAL | 5sec. - 60min, Programmable |
| SHOOTING NUMBERS | 1-3 |
| EFFECTIVENESS | Daytime: 1.5m-infinitive. Night time: 1.5m-20m |
| VIDEO LENGTH | 3sec-2Minutes.; Programmable |
| CAMERA+VIDEO | First take Picture then Video |
Camera Specifications
| TIME STAMP | On/Off; include serial no., temperature and moon phase |
| TIME LAPSE | On/Off; Time-Lapse Programmable |
| PERIODIC SHOT | Time Laps 1 Second ~ 24 Hours |
| PSASSWORD | 4-Digit Numbers (Default password 0000) |
| BUILD-IN MICROPHONE | Yes |
| BUILD IN SPEAKER | Yes |
| AUTO-DISTINGUISH IMAGES | Color images in daytime/black & white night images |
| AUTOMATIC SCREEN SAVER | In 2 min |
| TV-OUT | Yes |
| PC INTERFACE | Mini USB 2.0 |
Camera Specifications
| POWER SUPPLY | 8 x AA external 6V power supply, at least 2A |
| POWER ADAPTER | 6V /1.5A |
| BATTERY LIFE | More than 30K photos in daytime, and more than 12K photos in night |
| STANDBY TIME | Approx.12 months |
| SPRAY-WATER PROTECTED | IP66 |
| STORAGE TEMPERATURE | -4°F to 140°F |
| DIMENSIONS | 5.3" x 3.5" x 3" |
Customer Protection
Customer Service
FCC Statement
This equipment has been tested and found to comply with the limits for a Class B digital device, pursuant to part 15 of the FCC Rules. These limits are designed to provide reasonable protection against harmful interference in a residential installation. This equipment generates uses and can radiate radio frequency energy and, if not installed and used in accordance with the instructions, may cause harmful interference to radio communications. However, there is no guarantee that interference will not occur in a particular installation, if this equipment does cause harmful interference to radioed television reception, which can be determined by turning the equipment off and on, the user is encouraged to try to correct the interference by one or more of the following measures:
Reorient or relocate the receiving antenna. Increase the separation between the equipment and receiver.
Connect the equipment into an outlet on a circuit different from that to which the receiver is connected.
Consult the dealer or an experienced radio/TV technician for help.
FC CE
Warranty And Disclaimers
Warranty
Up to 1 YEAR LIMITED WARRANTY
Your product is warranted to be free of defects in materials and workmanship for 1 year after the date of purchase. This warranty does not cover damages caused by misuse, improper handling and installation. In the event warranty service is needed, please contact Rexing at care@rexingusa.com.
Disclaimers
We hare no representations or warranties, either expressed or implied, by or concerning any content of these written materials or software, or for damages resulting from the use of the information contained therein.
We reserve the right to alter the features and contents of this publication, hardware or software without obligation or advance notice.
Warranty does not extend to any accessories used with the camera.
We are not responsible if you use the trail camera for illegal purposes.
We shall not be obligated to perform preventative maintenance, installation, reinstallation, or maintenance. The illustrations in this manual are for instructional purposes only and may not represent actual product exactly.
Safety Guide
Warning
This device complies with Part 15 of the FCC Rules. Operation is subject to the following two conditions: (1) this device may not cause harmful interference, and (2) this device must accept any interference received, including interference that may cause undesired operation.
Changes or modifications not expressly approved by the party responsible for compliance could void the user's authority to operate the equipment.
NOTE
These limits are designed to provide reasonable protection against harmful interference in a residential installation. This equipment generates uses and can radiate radio frequency energy and, if not installed and used in accordance with the instructions, may cause harmful interference to radio communications. However, there is no guarantee that interference will not occur in a particular installation. If this equipment does cause harmful interference to radio or television reception, which can be determined by turning the equipment off and on, the user is encouraged to try to correct the interference by one or more of the following measures:
• Reorient or relocate the receiving antenna.
- Increase the separation between the equipment and receiver.
- Connect the equipment into an outlet on a circuit different from that to which the receiver is connected.
- Consult the dealer or an experienced radio/TV technician for help.
NOTE
This device and its antenna(s) must not be co-located or operation in conjunction with any other antenna or transmitter.
Information to Users
The users manual or instruction manual for an intentional or unintentional radiator shall caution the user that changes or modifications not expressly approved by the party responsible for compliance could void the user's authority to operate the equipment. In cases where the manual is provided only in a form other than paper, such as on a computer disk or over the Internet, the information required by this section may be included in the manual in that alternative form, provided the user can reasonably be expected to have the capability to access information in that form.
Safety Information
To prevent injury to yourself or others and damage to your device, read all safety information before using.

Warning
Failure to comply with safety warnings and regulations can result in serious injury or death.
Rexing dash cam is not intended to be touched, modified, or calibrated while operating a vehicle. Rexing is not responsible for any damages resulting from the user's misuse of the camera.
Do not use damaged power cords or plugs or loose electrical sockets. Fault connections can cause electric shock or fire.
Do not touch the car charger with wet hands or disconnect the charger by pulling the cord. Doing so may result in electrocution.
Do not use a bent or damaged car charger.
Doing so may cause electric shock or fire.
Do not use your device while it is charging or touch your device with wet hands. Doing so may cause electric shock.
Do not short-circuit the charger or the device. Doing so may cause electric shock or fire.
Use only manufacturer-approved chargers, accessories, and supplies.
- Using generic chargers may shorten the life of your device or cause the device to malfunction. They may also cause
- Use only the manufacturer-approved charger specifically designed for your device. Using an incompatible charger can cause serious personal injury or damage to your device.
- Rexing cannot be responsible for the user's safety when using accessories or supplies that are not approved by Rexing.
Do not drop the charger or device or subject them to impact.
Handle and dispose of the charger and device with care.
- Never crush or puncture the device.
- Never dispose of the device in a fire.
- Never place the device in or on heating devices, such as microwave ovens, stoves, or radiators. The device may explode if overheated. Follow all local regulations when disposing of a used device.
- Avoid exposing the device to high external pressure which can lead to an internal short circuit and overheating.
Protect the device and charger from damage.
- Avoid exposing your device to excessive cold or heat. Extreme temperatures can damage the device and reduce the charging capacity and life of your device.
- Do not allow children or animals to bite or chew the device. Doing so can result in fire of explosion, and small parts can be a choking hazard. If children use the device, make sure they use the device properly.
- Never use a damaged charger.

Caution
Failure to comply with safety precautions and regulations can result in property damage, serious injury or death.
Do not use your device near other electronic devices. Most electronic devices use radio frequency signals. Your device may interfere with other nearby electronic devices.
Do not use your device near other devices that emit radio signals, such as sound systems or radio towers. Radio signals from these may cause your device to malfunction.
Do not expose the device to heavy smoke or fumes. Doing so may damage the outside of the device or cause it to malfunction.
If you notice strange smells or sounds coming from your device, or if you see smoke or liquid leaking from the device, stop using the device immediately and take it to a Rexing Service Center. Failure to do so may result in fire or explosion.
For your own safety, do not operate the controls of this product while driving. The window mount is needed when using the recorder in a car. Make sure you place the device in a location where it won't obstruct the driver's view.
Always keep the camera lens clean, and ensure that the lens is not blocked by any object or placed near any reflective material. If the car's windshield is tinted with a dark coating, recording quality may be affected.
Do not store your device in excessively hot, cold, damp, or dry locations. Doing so may cause the screen to malfunction or result in damage to the device.
If your device becomes overheated, allow it to cool down before use. Prolonged exposure of skin to an overheated device may cause low-temperature burn symptoms, such as red spots or areas of darker pigmentation.
Install mobile devices and equipment with caution.
- Ensure that any mobile devices or related equipment installed in your vehicle are securely mounted.
- Avoid placing your device and accessories in or near an airbag deployment area. Improperly installed wired equipment can cause serious injury in a situation where airbags inflate rapidly.
Do not drop your device or subject your device to impact. If the device is bent, deformed or damaged, malfunction may occur.
Your device may wear out over time. Some parts and repairs are covered by the warranty within the validity period, but damage or deterioration related to the use of unapproved accessories is not.
Do not attempt to disassemble, repair, or modify your device.
- Any changes or modifications to your device can void your manufacturer's warranty.
Clean your device and charger by wiping with a towel or eraser. Do not use chemicals or detergents. Doing so can discolor or corrode the outside of the device and may result in electric shock or fire.
Do not distribute copyright-protected material. Doing so without the permission of the content owners may violate copyright laws. The manufacturer is not responsible or liable for any legal issues that result from the user's illegal use of copyrighted material.
Correct Disposal of This Product
(Applicable in countries with separate waste collection systems)
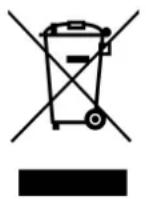
Waste Electrical & Electronic Equipment
This symbol, found on the device, accessories or accompanying literature, indicates that the product and its electronic accessories (e.g. charger, headset, USB cable) should not be disposed of with other household waste.
To prevent possible harm to the environment or human health from uncontrolled waste disposal, please separate these items from other types of waste and recycle them responsibly to promote the sustainable reuse of material resources.
Household users should contact either the retailer where they purchased this product or their local government office for information on where and how they can take these items for environmentally safe recycling.
Business users should contact their supplier and check the terms and conditions of the purchase contract. This product and its electronic accessories should not be mixed with other commercial wastes for disposal.
Disclaimer
Some content and services accessible through this device belong to third parties and are protected by copyright, patent, trademark and/or other intellectual property laws. Such content and services are provided solely for your personal non-commercial use.
You may not use any content or services in a manner that has not been authorized by the content owner or service provider. Without limiting the foregoing, unless expressly authorized by the applicable content owner or service provider, you may not modify, copy, republish, upload, post, transmit, translate, sell, create derivative works, exploit, or distribute in any manner or medium any content or services displayed through this device.
"THIRD PARTY CONTENT AND SERVICES ARE PROVIDED "AS IS." REXING DOES NOT WARRANT CONTENT OR SERVICES SO PROVIDED, EITHER EXPRESSLY OR IMPLIED, FOR ANY PURPOSE. REXING EXPRESSLY DISCLAIMS ANY IMPLIED WARRANTIES, INCLUDING BUT NOT LIMITED TO, WARRANTIES OF MERCHANTABILITY OR FITNESS FOR A PARTICULAR PURPOSE. REXING DOES NOT GUARANTEE THE ACCURACY, VALIDITY, TIMELINESS, LEGALITY, OR COMPLETENESS OF ANY CONTENT OR SERVICE MADE AVAILABLE THROUGH THIS DEVICE AND UNDER NO CIRCUMSTANCES, INCLUDING NEGLIGENCE, SHALL REXING BE LIABLE, WHETHER IN CONTRACT OR TORT, FOR ANY DIRECT, INDIRECT, INCIDENTAL, SPECIAL OR CONSEQUENTIAL DAMAGES, ATTORNEY FEES, EXPENSES, OR ANY OTHER DAMAGES ARISING OUT OF, OR IN CONNECTION WITH, ANY INFORMATION CONTAINED IN OR AS A RESULT OF THE USE OF ANY CONTENT OR SERVICE BY YOU OR ANY THIRD PARTY, EVEN IF ADVISED OF THE POSSIBILITY OF SUCH DAMAGES."
Third party services may be terminated or interrupted at any time, and Rexing makes no representation or warranty that any content or service will remain available for any period of time. Content and services are transmitted by third parties by means of networks and transmission facilities over which Rexing has no control. Without limiting the generality of this disclaimer, Rexing expressly disclaims any responsibility or liability for any interruption or suspension of any content or service made available through this device.
Rexing is neither responsible nor liable for customer service related to the content and services. Any question or request for service relating to the content or services should be made directly to the respective content and service providers.

natural_image
Abstract geometric pattern with white rectangular outlines on a solid blue background (no text or symbols)FCC ID: 2AWNU-H88XWIFI
This device complies with part 15 of the FCC Rules. Operation is subject to the following two conditions: (1) This device may not cause harmful interference, and (2) this device must accept any interference received, including interference that may cause undesired operation.
Changes or modifications not expressly approved by the party responsible for compliance could void the user's authority to operate this equipment.
REXING®
New York office address: 131 West 33rd St 11C, New York, NY 10001
Connecticut office address: 264 Quarry Rd unit d, Milford, CT 06460
- TABLE OF CONTENTS
- HANDLING THE CAMERA
- TROUBLESHOOTING
- CUSTOMER PROTECTION
- Introduction
- REXING®
- Features
- Application
- Operating the Camera
- Camera Overview
- Basic Operations
- 101
- 02
- 103
- 04
- 05
- 07
- 06
- 08
- Installation
- Power Supply
- Batteries Installation
- Note:
- Using an External Power Source
- Inserting the SD Card
- Camera Operation
- Mode Switch
- OFF Mode
- ON Mode
- TEST Mode
- Change Setting in TEST Mode
- Modes
- Photo Resolution
- Options:
- Photo Series
- Video Resolution
- Video Length
- Audio Recording (1-2 Minutes)
- Shot Lag
- Side Motion Sensors
- Sensitivity Motion Sensors
- Target Recording Time
- Time Lapse
- Languages
- Time & Date
- Photo Stamp
- Format Memory Card
- Password Protection
- Serial No.
- Reset setting
- Aligning The Camera
- Align the camera as follows:
- CAMERA IS READY TO USE - Switch to ON
- Viewing/Deleting Photos/Videos
- Reviewing Images on the Camera LCD
- Activate Slide Show
- Deleting Photos or Videos
- Write Protection
- Reviewing images Directly from the SD Card
- Reviewing Images by Connecting to a Computer
- Reviewing Recordings on an External Monitor
- Wi-Fi Connect
- Connect to Wi-Fi
- GCamPro App
- Memory Card
- Setting
- Information Review
- Phone Album
- Trouble Shooting
- Troubleshooting/FAQ
- Photos did not capture any subjects of interest
- Battery Life is Shorter Than Expected
- Camera won't take images
- Camera Won't Power Up
- Still Photo and/or Video Quality Problems
- Night photos or videos appear too dark
- Daytime photos or videos appear too dark
- Night photos or videos appear too bright
- Daytime photos or videos appear too bright
- Photos with streaked subject
- Short video clips-not recording the set length
- Date/Time Stamp not appearing on images
- PIR Sensor LED Flashes/ Doesn't Flash
- Camera won't retain settings and doesn't flash
- Moisture or Ants inside Camera
- Camera Specifications
- Customer Service
- FCC Statement
- Warranty And Disclaimers
- Warranty
- Up to 1 YEAR LIMITED WARRANTY
- Disclaimers
- Safety Guide
- Warning
- NOTE
- Information to Users
- Safety Information
- Use only manufacturer-approved chargers, accessories, and supplies.
- Do not drop the charger or device or subject them to impact.
- Protect the device and charger from damage.
- Caution
- Correct Disposal of This Product
- Disclaimer
- FCC ID: 2AWNU-H88XWIFI
Brand : Rexing
Model : H2
Category : Video camera