
Free 3000 - Lighting SILVA - Free user manual and instructions
Find the device manual for free Free 3000 SILVA in PDF.


| Product Type | Headlamp |
| Brand | Silva |
| Model | Free 3000 |
| Category | Lighting |
| Light Source | LED |
| Maximum Lumens | 3000 lm |
| Beam Distance | 150 m |
| Power Source | Rechargeable Li-ion battery |
| Battery Capacity | 2200 mAh |
| Charging Port | USB-C |
| Dimensions (L x W x H) | 70 x 40 x 35 mm |
| Weight | 120 g |
| Water Resistance | IPX4 (splash resistant) |
| Materials | High-strength plastic, aluminum |
| Lighting Modes | High, medium, low, strobe, red light |
| Maximum Runtime | 80 h (low), 2 h (high) |
| Special Features | Rechargeable, adjustable beam, red light mode, lock function, battery indicator |
| Maintenance | Clean with damp cloth; store in dry place |
| Safety Precautions | Do not look directly into the light; avoid heat sources |
| Spare Parts Availability | Contact manufacturer for spare parts |
| Recommended Use | Outdoor activities, camping, hiking, running |
Frequently Asked Questions - Free 3000 SILVA
User questions about Free 3000 SILVA
0 question about this device. Answer the ones you know or ask your own.
Ask a new question about this device
Download the instructions for your Lighting in PDF format for free! Find your manual Free 3000 - SILVA and take your electronic device back in hand. On this page are published all the documents necessary for the use of your device. Free 3000 by SILVA.
USER MANUAL Free 3000 SILVA
natural_image
Product photo of a black SLVA fitness tracker with headband and adjustable arms (no text or symbols visible)PRODUCT OVERVIEW
ONE LAMP FOR ALL YOUR ACTIVITIES
Silva Free is a lamp series with the possibility to create your ideal lamp according to your needs and your different activities. The series range includes 3 different lamp units, 4 batteries and several mount accessories. All parts are interchangeable, so you don't need to buy a new lamp for your different activities.
FREE TECHNOLOGY: LESS HASSLE - MORE COMFORT
Silva Free has the power cord integrated in the headband. You never need to bother with distracting cords ever again. Feeling free is now a more comfortable experience.
AIRFLOW TECHNOLOGY: LESS HEAT - MORE LIGHT
Cooling is essential for how well the lamp performs. The Free Airflow technology is designed together with experts within thermodynamics. The result is an optimized aluminum cooler together with a protective plastic case that provides maximum ventilation and cooling, even when standing still. This gives you great light regardless of the activity, even if the airflow or cooling conditions are not optimal.
MODULAR TECHNOLOGY: LESS COMPLEXITY – MORE FLEXIBILITY
All parts and accessories are interchangeable which means that you can complement or upgrade your lamp with a different battery, lamp unit or mount kit. The lamp unit and battery can easily be disconnected from the headband to instead be mounted on your helmet, your bike bar or frame.
BEFORE USE
CHARGE THE BATTERY
The battery needs to be charged before first use.
-
Remove the protective film from the battery connector before charging it the first time.
-
Disconnect the battery from any accessory (headband, extension cable, lamp unit).
-
Connect the battery to a USB-port (either from a computer, car or a USB charger/adapter) using the included USB-charge cable.
-
Connect the charger to the wall outlet.
-
On the battery, there are 5 LEDs showing battery status during charging:
- Green light (all 5 LEDs) = battery is fully charged
- Red light blinking = battery is charging
Approximated charge time (depending on input source): See Technical specifications.
Note! When the battery is fully charged the charger automatically switches to maintenance mode. Note! Never leave a battery unattended during charging.
Note! The battery can not be charged while connected to the accessories.
ADJUST THE HEADBAND
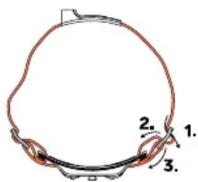
The headband is ergonomically shaped to give comfortable fit. Use the 2 buckle adjustments to fit it perfectly to your head. Adjustment is easiest when not wearing the headband on the head. To tighten: Pull the headband through the buckles following step 1,2,3 in the illustration. To loosen: follow the steps in reverse order.
ATTACH THE LAMP UNIT
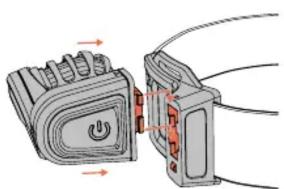
Align the white arrow on the lamp with the white arrow
on the headband front bracket. Attach the lamp unit by sliding the connector part into the snap-in socket of the headband. To detach - slide the lamp unit up and out of the socket.
ATTACH THE BATTERY
Make sure to remove the protective film from the battery connector.
Align the white arrow on the battery with the white arrow on headband rear bracket. Slide the battery connector socket onto the connector of the headband bracket. To detach - slide the battery up and off the connector.
natural_image
Diagram showing a power switch connected to a cable, with arrows indicating direction (no text or symbols present)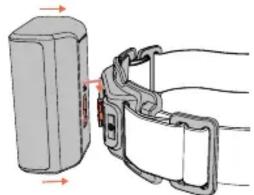
natural_image
Diagram showing a device being adjusted with arrows, no text or symbols presentNote! Read more under "Accessories and mount options" about alternative ways to mount the lamp and battery.
Note! Do not leave connected while not in use.
ACCESSORIES AND MOUNT OPTIONS
Free is designed for multiple activities and can easily be switched between the different mount accessories. The battery can also be carried in multiple ways by using the different battery accessories and cables. The included accessories vary between the different Free model kits. All accessories can be bought separately.
HEADBAND
The Free Headband has the power cord integrated in the textile for a smoother experience without distracting cords or tangled wires. The headband has silicone on the inside to prevent it from slipping. The double sided adjustment allows for a perfect fit and the foam padding on the front and back plate ensures good comfort. The headband is developed to be ergonomic and comfortable to wear even with a larger battery at the back of your head. The front and back connection interface is compatible all lamp units/batteries in the Free series.
A rear safety light is integrated in the back of the headband. Read more about how to operate the light under "Rear safety light".
TOP BAND
When having a medium or bigger sized battery attached to the rear bracket of the headband, or when wearing a beanie or if you need extra support during fast paced activities - the top band can be attached to the headband for extra stability.
EXTENSION CABLES 130/40 cm
The Free Extension cable is made from textile and is flat, soft and flexible. It gives you extra cable length - allowing you to place the battery where you want it. By carrying the battery in your pocket - you keep the weight on your head to a minimum but also increase the battery time by keeping the battery warm.
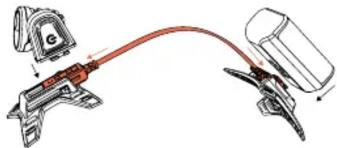
The extension cable transmits power from the battery but also works as a link for attaching the lamp and battery to the different accessories. Please note that the cable has a female side that fits the lamp units and a male side that fits the batteries. Align the white arrows on each part to connect. The extension cable also has a secondary interface that snaps into all the accessories.
natural_image
Technical illustration of a mechanical assembly with a red cable and component (no text or symbols)The cables are available in two adjustable lengths; 50-130 cm and 22-40 cm. Compatible with all lamp units, batteries and accessories in the Free series.
BAR MOUNT
The bar mount is designed to fit bars with a diameter of 31.8-35 mm. Attach the bar mount by placing it around the bar, screw the lever until it has the right tension and then snap the lever into position (no tools needed). The bar mount can be used either with or without the rubber inserts to better adapt to the specific bar diameter. Once the bar mount is attached to the bar - slide the female connector of the extension cable into the bar mount, pull the cable through the cable guide clip on the back of the bar mount and then snap the lamp into the socket of the extension cable. To release the extension cable from the bar mount - use the lever on the side of the bar mount.
The bar mount is compatible with all lamp units in the Free series.
Note! Learn about "Deactivated Flow Light" below to get the most out of the lamp when using the bar mount.
FRAME MOUNT
The battery sleeve lets you mount the battery to your bike frame or wherever you find suitable. It can be attached in various ways to fit most frames and configurations. The sleeve is made of neoprene and it has silicone friction prints on the inside to stay in place.
- Connect the battery to the extension cable before placing the battery in the frame mount.
-
Wrap the 2 small elastic straps around the battery.
-
Wrap the large strap of the frame mount around battery and the frame. Tighten the strap and make sure that it is locked into place with the Velcro closing.
The frame mount is compatible with all batteries in the Free series.
HELMET MOUNT KIT
Use the Free helmet mount kit to mount your Free lamp unit and battery onto your helmet. The kit includes:
- 1 x helmet bracket for the lamp unit (with male Velcro) - 1 x helmet bracket for the battery (with male Velcro)
- 2 x adhesive pad (with female Velcro) - 1 x extension cable (40 cm)
The helmet mount is soft and flexible and adapts to most helmet types.
The following procedure applies to both the lamp bracket (placed in the front of the helmet) and the battery bracket (placed in the back of the helmet).
-
Make sure that the Velcro part of the bracket is attached to the Velcro part of the adhesive pad.
-
Make sure that the surface of the helmet is clean and dry.
- Remove the protective film from the adhesive pad and firmly press the bracket in correct position onto the helmet. For optimal effect - you should leave the attachment in this state for at least 24 hours before using it.
Once the brackets are in place, the extension cable is slid into each of the brackets. Then the lamp unit/battery can be slid in and out of the snap socket of the extension cable with just a click. To release the extension cable from the bracket, use the small lever on the side.
The helmet mount kit is compatible with all lamp units and batteries in the Free series.
GoPro MOUNT KIT
Use the Free GoPro mount kit to mount your Free lamp unit onto a standard GoPro interface and to mount your battery onto your helmet.
The kit includes:
- 1 x GoPro adapter for the lamp unit
- 1 x helmet bracket for the battery (with male Velcro)
• 1 x adhesive pad (with female Velcro)
• 1 x extension cable (40 cm)
The adapter makes the interface of the Free series fit into the interface of a GoPro mount. The helmet mount is flexible and adapts to most helmet types.
-
Snap the GoPro adapter into a standard GoPro interface.
-
Once the adapter is in place - slide the female connector of the extension cable into the adapter.
-
Now the lamp unit can be slid in and out of the snap socket of the extension cable with just a click.
-
To release the extension cable from the adapter - use the small lever on the side.
For mounting the helmet bracket for the battery: read more under "Helmet mount kit".
Compatible with all lamp units/batteries in the Free series and standard GoPro camera mounts.
DURING USE
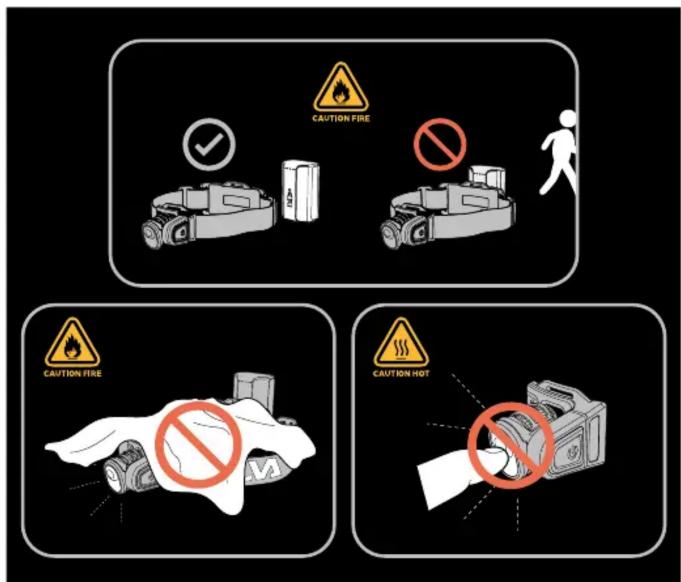
Note! Do not leave connected when unattended.
Note! Do not cover or place in a pocket/ bag while connected - risk of fire.
Note! Be careful when handling the lamp unit with bare hands since it gets very hot.
Do not touch the lens.
SILVA INTELLIGENT LIGHT
Intelligent Light optimizes the light pattern by the unique combination of a long reach spot light and a close flood light. With less head movements and a clear view of near as well as far obstacles, you gain the balance and confidence it takes to move fast and perform better.
SILVA FLOW LIGHT (FREE 2000 AND FREE 3000 MODELS)
Flow Light takes the optimization even further by providing seamless tuning of the light pattern for your favourite sport. Simply tilting the light downwards makes the beams wider to brighten up slower activities. When tilting the lamp upwards, the light reaches longer to provide perfect vision when you move fast.
Deactivated Flow Light
Flow Light deactivated means that the light distribution image remains unchanged even if the lamp is tilted up or down. This might be useful when the lamp is mounted on a helmet or a bike handlebar.
SWITCH THE LAMP ON
Note! Make sure to remove the protective film from the lens before switching the lamp on. Note! Before starting - read about Flow Light above.
On the side of the lamp body there is a push button which controls the light modes.
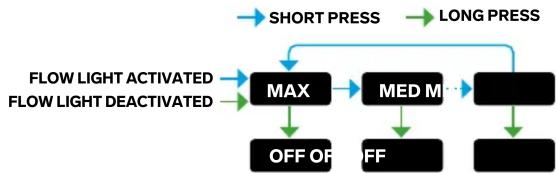
- To start the lamp with Flow Light activated: press the push button with a short press (<0.5 s)
- To start the lamp with Flow Light deactivated: press and hold the push button for 1 second.
- To cycle between the different brightness levels - use short presses (<0.5 s).
- To turn the lamp OFF; press and hold button for more than 1 second.
flowchart
graph TD
    A["SHORT PRESS"] --> B["MAX"]
    C["LONG PRESS"] --> B
    B --> D["MED MI"]
    D --> E["OFF OF"]
    D --> F["OFF"]
    E --> G["Output"]
    F --> G
REAR SAFETY LIGHT
Built into the rear bracket of the headband, there is an integrated rear red light for extra visibility and safety. The light is controlled by a push button located on the bracket.
- Use a short press (<0.5 s) to switch the rear light ON.
- Use short presses to cycle between constant red and flashing red light.
- To turn the light OFF; press and hold button for more than 1 second.
TEMPERATURE CONTROL
The temperature of the lamp body will increase during use and cooling is an essential part of how well the lamp performs. The temperature of the lamp is affected by the brightness level, ambient air temperature and airflow (speed).
The lamp unit is equipped with a temperature control sensor that prevents the lamp body from overheating by reducing the power to the LEDs.
Free airflow technology:
Keeping the LEDs cool will keep them running at higher lumen levels and to manage the heat. Free is designed with the Airflow system:
The electronics for the lamp is located in the lamp arm which gives a lot of space for the aluminum cooler in the lamp body. The integrated aluminum cooler has a lot of surface that will dissipate heat away from the LEDs. When performing high speed activities, such as running or biking, the Airflow system optimizes the natural airflow to get the temperature down. The cooler on the Free series is constructed to be efficient even at lower speeds where there is no airflow. The lamp body is covered in a plastic mesh for a comfortable touch without having to feel the heat of the cooler inside. The main gain with the optimal cooling is that you get more light output from a cooler lamp.
Why does the light dim down for no apparent reason?
If the cooling is not sufficient, for instance if used while standing still, indoors or in high temperatures, then the light will automatically be reduced until acceptable surface temperature on the lamp body is reached. This means that the lower the ambient temperature, the stronger the light output.
Note! The lamp can get very hot!
- Always make sure to disconnect the battery when the lamp is stored in a closed compartment such as in a bag, pocket or similar.
- Keep away from children.
- Make sure that the lamp does not come in contact with sensible of flammable materials.
- The front glass or heat sink must not be covered with dirt or other materials while the lamp is switched on.
- Never look directly into the lamp while switched on.
LOW BATTERY WARNING
During operation, there will be a low battery warning when 10% of the battery energy remains. This is indicated by the lamp flashing once. The lamp will automatically switch to power reserve mode after this.
POWER RESERVE
During operation, the lamp will go into reserve mode (80 lm) when 10% of the battery energy remains. The lamp will flash once before it goes into this mode.
It is not possible to switch to the higher brightness levels once the lamp has entered power reserve mode. The power reserve gives approximately 1 hour of light (depending on the lamp/battery combination).
BATTERY STATUS INDICATION
When the lamp is switched on - the LED indicators on the battery will show the current battery status for 4 seconds. To check battery status during use, the lamp needs to be switched OFF and then back ON again.
The LED indicators on the battery indicates the following:
- 5 green LEDs = Fully charged
• 4 green LEDs = 80% of the battery remains - 3 green LEDs = 60% of the battery remains
• 2 green LEDs = 40% of the battery remains - 1 green LED = 20% of the battery remains
• 1 red LED = 10% of the battery remains
To get as much power as possible out from your battery, keep it away from low temperatures during use.
AFTER USE
MAINTENANCE
To make sure you get maximum performance from your lamp, clean it regularly with a damp cloth. Make sure that there is no dirt in the heat sink or on the front glass. Textile details can be rinsed in warm water.
TECHNICAL SPECIFICATIONS
Lumen / Burn time / Light distance: See matrix below
Weight (lamp unit 1200 / 2000 / 3000): 31 g / 41 g / 61 g
Battery types: Li-ion 14.4 Wh / 2.0 Ah / 7.4 V / 116 g / 4 h charging
Li-ion 24.1 Wh / 3.35 Ah / 7.2 V / 149 g / 4.5 h charging
Li-ion 36 Wh / 5.0 Ah / 7.2 V / 202 g / 6 h charging
Li-ion 72 Wh / 10.0 Ah / 7.2 V / 367 g / 12 h charging
Water resistance: IPX5
Operative temperature range: -20 - (+)50°C
Storage temperature range: -30 - (+)60°C
PERFORMANCE DATA
Values are measured and specified according to the ANSI FL1 STANDARD.
Lumen and burn time values are measured for normal usage.
The burn time is affected by speed (airflow) and the ambient air temperature and may vary in different conditions. The burn time is therefore presented as a span between the lowest and highest value achieved in different conditions.
For more information on how different factors affect the burn time and light output; have a look at our headlamp guide at: www.silvasweden.com
| FREE 1200 | FREE 2000 | FREE 3000 | |
 | 2000 lm | 800 lm | 80 lm3-6 h | 7 h 30 mln - 15 h | 70 h180 m | 115 m | 45 m | 3000 lm | 1000 lm | 80 lm2-4 h | 6 h 30 mln - 13 h | 70 h215 m | 125 m | 45 m | |
 | 1200 lm | 500 lm | 80 lm2 h 15 mln - 4 h 30 mln | 6-12 h | 35 h150 m | 100 m | 45 m | 2000 lm | 800 lm | 80 lm1 h 30 mln - 3 h | 3 h 45 mln - 7 h 30 mln | 35 h180 m | 115 m | 45 m | 3000 lm | 1000 lm | 80 lm1-2 h | 3 h 15 mln - 6 h 30 mln | 35 h215 m | 125 m | 45 m |
 | 1200 lm | 500 lm | 80 lm1 h 30 mln - 3 h | 4-8 h | 25 h150 m | 100 m | 45 m | 2000 lm | 800 lm | 80 lm1-2 h | 2 h 30 mln - 5 h | 25 h180 m | 115 m | 45 m | 3000 lm | 1000 lm | 80 lm40 mln - 1 h 20 mln | 2-4 h | 25 h215 m | 125 m | 45 m |
 | 1200 lm | 500 lm | 80 lm1-2 h | 2 h 30 mln - 5 h | 15 h150 m | 100 m | 45 m |
ABOUT LI-ION BATTERIES
The battery should be stored in a dry environment within the temperature range of -30^ and +60^ .
If you would like to store your battery for a longer period (more than 30 days) the battery should not be fully charged. Recommended charge level for storing is 30%.
You can always charge a half full battery without damaging its characteristics.
Do not expose the battery for extreme temperatures which may cause fire or explosion. To get the most out of your battery - do not expose it to low temperatures during use.
Do not disassemble or mistreat the battery; risk for chemical burn. Keep away from children.
Do not submerge the batteries in water. Do not short circuit the contacts. Always disconnect the battery when the lamp is not in use.
PROTECTING THE ENVIRONMENT.
Lamp unit, batteries and packaging are recyclable. Please dispose these items at designated recycling stations.
WARRANTY
Silva warrants that, for a period of two (2) years, your Silva Product will be substantially free of defects in materials and workmanship under normal use. Silva's liability under this warranty is limited to repairing or replacing the product. This limited warranty extends only to the original purchaser.
If the Product proves defective during the Warranty Period, please contact the original place of purchase. Make sure to have your proof of purchase on hand when returning the product. Returns cannot be processed without the original proof of purchase. This warranty does not apply if the Product has been altered, not been installed, operated, repaired, or maintained in accordance with instructions supplied by Silva, or has been subjected to abnormal physical or electrical stress, misuse, negligence or accident. Neither does the warranty cover normal wear and tear. Silva is not responsible for any consequences, direct or indirect, or damage resultant from use of this product. In no event, will Silva's liability exceed the amount paid by you for the product. Some jurisdictions do not allow the exclusion or limitation of incidental or consequential damages, so the above limitation or exclusion may not apply to you. This Warranty is valid and may be processed only in the country of purchase.
For more information please visit www.silvaweden.com
- PRODUCT OVERVIEW
- ONE LAMP FOR ALL YOUR ACTIVITIES
- FREE TECHNOLOGY: LESS HASSLE - MORE COMFORT
- AIRFLOW TECHNOLOGY: LESS HEAT - MORE LIGHT
- MODULAR TECHNOLOGY: LESS COMPLEXITY – MORE FLEXIBILITY
- BEFORE USE
- CHARGE THE BATTERY
- ADJUST THE HEADBAND
- ATTACH THE LAMP UNIT
- ATTACH THE BATTERY
- ACCESSORIES AND MOUNT OPTIONS
- HEADBAND
- TOP BAND
- EXTENSION CABLES 130/40 cm
- BAR MOUNT
- FRAME MOUNT
- HELMET MOUNT KIT
- GoPro MOUNT KIT
- SILVA INTELLIGENT LIGHT
- SILVA FLOW LIGHT (FREE 2000 AND FREE 3000 MODELS)
- Deactivated Flow Light
- SWITCH THE LAMP ON
- REAR SAFETY LIGHT
- TEMPERATURE CONTROL
- Free airflow technology:
- Why does the light dim down for no apparent reason?
- Note! The lamp can get very hot!
- LOW BATTERY WARNING
- POWER RESERVE
- BATTERY STATUS INDICATION
- AFTER USE
- MAINTENANCE
- TECHNICAL SPECIFICATIONS
- PERFORMANCE DATA
- ABOUT LI-ION BATTERIES
- PROTECTING THE ENVIRONMENT.
- WARRANTY
Brand : SILVA
Model : Free 3000
Category : Lighting