
EMF69E - Oven Emilia - Free user manual and instructions
Find the device manual for free EMF69E Emilia in PDF.


| Product Type | Built-in Electric Oven |
| Brand | Emilia |
| Model | EMF69E |
| Power Supply | 240V ~ 50Hz |
| Power Consumption | 3200W |
| Fuse Rating | 16A |
| Oven Functions | Light, Grill, Fan Grill, Fan Forced, Air Fry, Defrost, Fan Assisted, Classic Bake, Pastry |
| Air Fryer | Yes (includes air fryer basket) |
| Number of Shelves | 2 racks, 5 shelf levels |
| Cleaning | Removable side racks, removable inner door glass |
| Oven Light | Halogen 25W, G9 cap |
| Safety Features | Cooling fan, automatic shut-off, child safety warnings |
| Installation | Built-in, must be installed by qualified person |
| Warranty | 24 months for domestic use |
| Dimensions (Approx.) | 595 x 595 x 560 mm (standard built-in) |
| Control Type | Electronic clock, rotary knobs |
| Display | LED indicator |
| Timer Functions | Minute minder, cooking duration, delayed start |
| Material | Stainless steel |
| Accessories Included | Grill tray, grill insert, air fryer basket, 2 oven shelves |
Frequently Asked Questions - EMF69E Emilia
User questions about EMF69E Emilia
0 question about this device. Answer the ones you know or ask your own.
Ask a new question about this device
Download the instructions for your Oven in PDF format for free! Find your manual EMF69E - Emilia and take your electronic device back in hand. On this page are published all the documents necessary for the use of your device. EMF69E by Emilia.
USER MANUAL EMF69E Emilia
User Manual & Installation Guide
natural_image
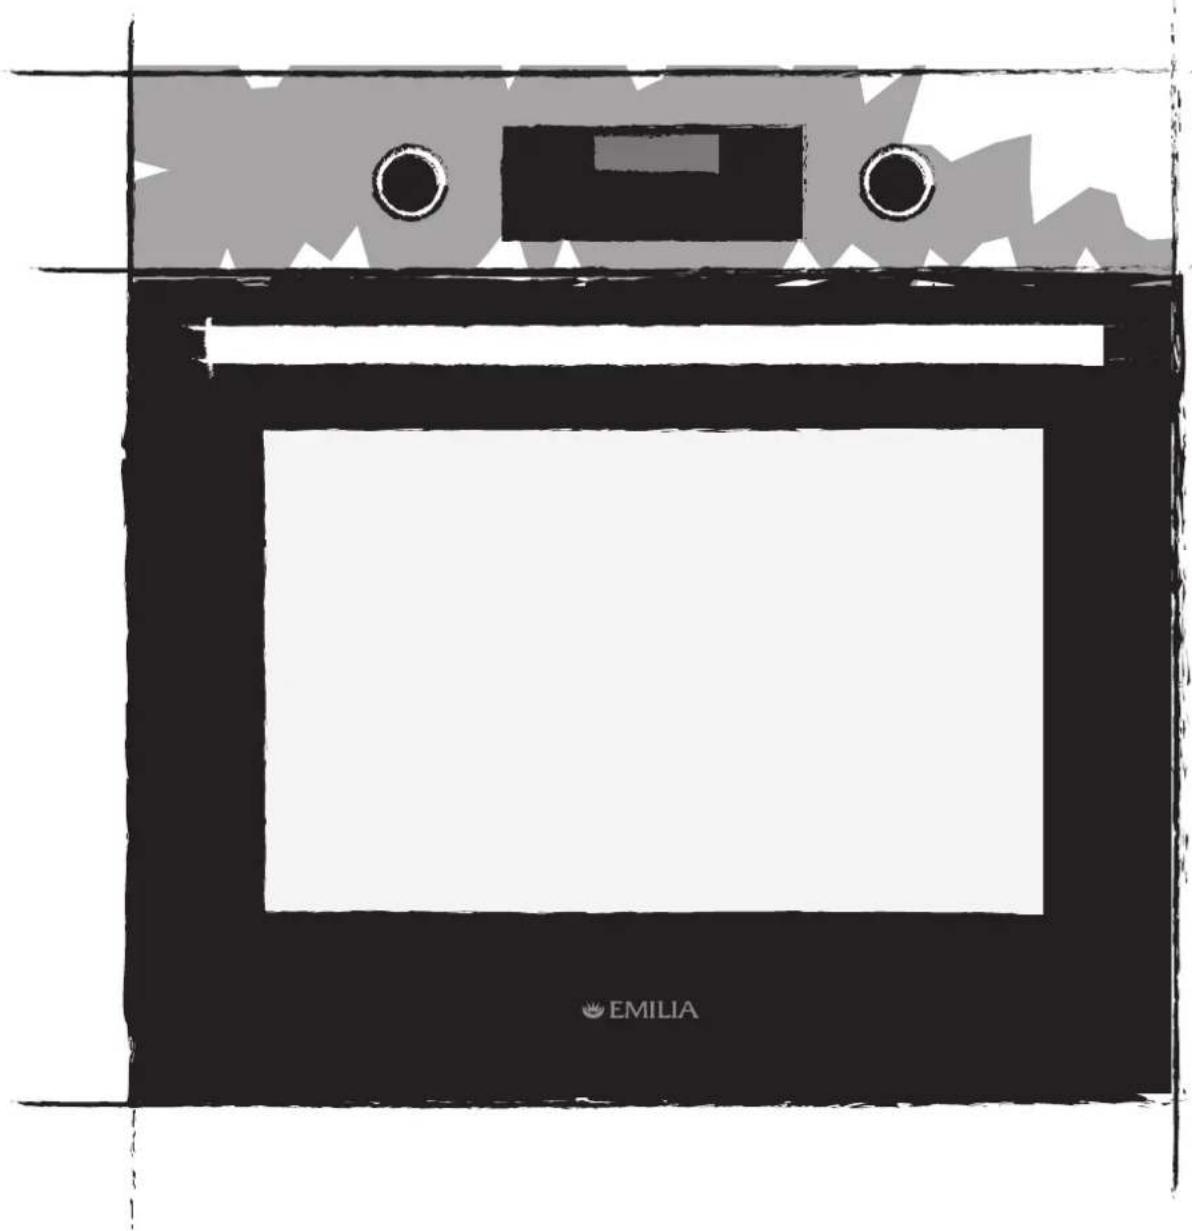
Illustration of a microwave oven with a blank space and two circular eyes, no text or symbols present.Built in Electric Ovens
Models: EMRENT65E, EMF69E, EMF65EN
TABLE OF CONTENTS
Introduction to your new oven....4
General warnings about first use....5
Included with your oven 6
Description of controls....7
Using your oven for the first time . 8
Guide to using your oven 9
Using the clock....10
Suggested shelf positions for cooking & cooking times 11
Oven operation notes 12
Oven maintenance 13
Cleaning the oven 14
Oven installation 15
Installing into kitchen cabinet....16
Product warranty 17-18
IMPORTANT:
This oven is for domestic applications. It is NOT suitable for commercial applications of any kind. Do not install the oven if there is any doubt.
This oven must be installed by a qualified & licensed installer in accordance with these instructions.
If you do not retain proof of correct installation your warranty will be voided. If your oven is found to be incorrectly installed you will be liable for all service costs. If a warranty call is made and the oven is found to be incorrectly installed you will be charged for the service call even if the oven is not repaired. We will not service an incorrectly installed oven.
IF THE APPLIANCE IS DAMAGED DO NOT INSTALL. CALL 1300 307 917 FOR ASSISTANCE
We know that the warnings in this manual are strongly worded but we want you to have a great experience with your new oven. The majority of service calls are due to incorrect installation or incorrect use of the oven. These ovens are carefully designed for use in Australian kitchens.
Dear Customer,
Thank you for purchasing one of our ovens. This manual has been written to assist you, and instruct you in the operation of your new oven. It will help you get the best performance and make full use of the oven's features.
The safety precautions and warnings are listed for your safety and the safety of others when operating this oven. Please keep this manual in a safe place for future reference.
Your oven has been designed for use in cooking of domestic (household) food. Any form of usage other than cooking food is considered dangerous and inappropriate. The manufacturer accepts no responsibility in the event of problems caused by improper use, incorrect use, or faulty installation.
A signed installation certificate indicating the installer's license number and details is required for warranty service. These ovens have been designed and constructed to meet the following standards:
AS/NZS 60335-1 General Requirements for Domestic electrical appliances
AS/NZS 60335-2-6 Particular Requirements for Domestic electrical cooking appliances
AS/NZS 1044 Electromagnetic Compatibility Requirements.
IMPORTANT
This oven is designed and intended for use in a domestic household application. It is not suitable for any non domestic application.
THIS OVEN SHOULD NOT BE USED IN A COMMERCIAL ENVIRONMENT.
The guarantee will be void if the oven is used within a non domestic environment. This includes semi commercial, commercial or communal applications such as clubs and schools.
PRODUCT IDENTIFICATION
The model number is located on a label on the inside of the oven door.
Please ensure you read the instruction manual before you call for service, or a full service fee could be applicable.
Record model and serial number here:
Model number:
Serial number: ....
Date and place of purchase: ....
NOTE:
The serial number is required when requesting service. This allows us to identify all of the components in your oven, the date of manufacture, and all technical details pertaining to your individual oven.
NOTE:
Surface temperatures for all components comply with the standards. Certain parts of a stainless steel oven can become very hot during and after use. On all models a cooling fan operates during the cooking cycle and continues to operate afterwards until the oven cools.
WARNING ABOUT CUPBOARD MATERIALS
SURROUNDING SURFACES - Where the appliance is built into a cabinet, the cabinet material must be capable of withstanding 70°C. If adjacent to vinyl wrapped surfaces, use installation kit from vinyl wrap supplier.
IMPORTANT
The oven is not intended for use by young children or infirmed persons unless they have been properly trained in the use of the oven.
- DO NOT spray aerosols in the vicinity of this oven while it is in operation.
- DO NOT allow young children to use the oven
- DO NOT touch surfaces when they are hot
- DO NOT store flammable materials in the oven
- DO keep the oven clean to avoid fires
WARNING - THIS OVEN IS NOT TO BE USED AS A SPACE HEATER.
If the oven fails to operate correctly, contact us on info@emiliaappliances.com.au and we shall respond promptly to your enquiry. Make sure you check through this manual first to be sure it is not something simple and easy to fix.
DO NOT ATTEMPT REPAIRS YOURSELF
DO NOT MODIFY THIS APPLIANCE
DO NOT INSTALL IF THE OVEN IS DAMAGED
THIS OVEN IS NOT FOR USE IN MARINE CRAFT
The oven is not intended for use by persons (including children) with reduced physical, sensory or mental capabilities, or lack of experience and knowledge, unless they have been given supervised or instruction concerning use of the oven by a responsible person for their safely.
Young children should be supervised to ensure that they do not play with the oven. During use the oven becomes hot. Care should be taken to avoid touching heating elements inside the oven.
WARNING:
Ensure the oven is switched off before replacing the lamp to avoid the possibility of electric shock.
WARNING:
Accessible parts will become hot when in use. To avoid burns young children should be kept away.
This oven is not intended to be operated by means of external timer or separate remote control system
DO NOT use a steam cleaner to clean the oven.
DO NOT use harsh abrasive cleaners or sharp metal scrapers to clean the oven glass door since they can scratch the surface, which may result in shattering of the glass
If the electrical supply is restricted, means of all-pole disconnection must be accessible and incorporated in the fixed wiring in accordance with the wiring rules.
This oven must not be installed behind a decorative door. The oven needs open space to allow the cooling system to function correctly. It is normal for air to exit at the front of the oven.
CAUTION:
The cooking process has to be supervised. A short term cooking process has to be supervised continuously. In particular pay close attention when grilling.
IMPORTANT
Remove all packing material and literature from the oven before use. A protective plastic film may be coated on the stainless steel both inside and on the outside of the oven. It must be removed before use. Clean the interior of the oven by wiping it down with soap and water.
First Use
Switch on the empty oven on maximum to eliminate grease residues from manufacturing. There may be a slight odour at this time. Run the oven on maximum for 1 hour. Open the kitchen windows at this time. If this odour lingers use the oven and the odour will dissipate within a short period of time.
Side racks
The oven is fitted with side wall guides for positioning trays and racks at different heights. They can be snapped out for cleaning. There are 5 different levels for the oven racks.
To increase base browning use a lower shelf level and to increase top browning raise the shelf position.
Alway place dishes centrally on the shelf to ensure even browning.
Oven shelves
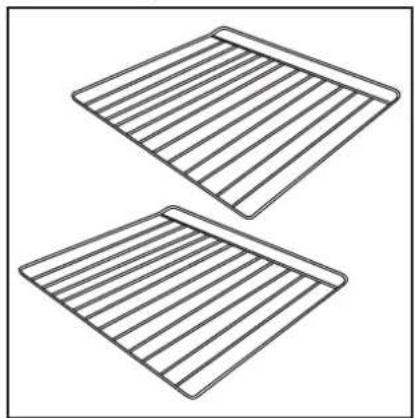
The oven comes with 2 racks (oven shelves) used to support containers for cooking food.
The shelves have been designed with safety stops. Slide the oven shelf towards you until it reaches the front stop. Then tilt it up at the front to clear the side supports and lift the shelf clear.
To install the shelf reverse the process.
If you are cooking on both shelves at the same time use a function that has fan operating to allow the hot air to circulate.
Grill tray and insert
The oven is supplied with a grill tray and rack insert. Use the grill insert to allow heat to flow around the item being cooked. Grilling is a relatively short cooking cycle and the function should not be considered for prolonged cooking cycles. If the grill over heats it will close down.
Grill on a middle level and raise the shelf to a higher level for more top heat.

natural_image
Two identical rectangular panels with parallel horizontal slats, no text or symbols present
natural_image
Line drawing of two stacked electronic devices with a grid pattern on top (no text or symbols)Air Fryer
Oven model EMF69E comes with an airfryer basket and an air fryer cooking function.
The air fryer basket cooks frozen food such as oven fries or fish fillets perfectly. Follow the normal directions on the packet and turn the selector knob to the air fryer function.
Rather than needing to turn the food while cooking just give the basket a shake part way through the cycle. Use the middle shelf and place the grill tray on the shelf below to catch crumbs. Experiment with other foods such as fresh vegetables, and try filling the grill tray with water to add steam.

natural_image
Line drawing of a rectangular mesh tray with two handles (no text or symbols)Control panel identification
Model EMRENT65E

Control panel identification
Model EMF65EN

Control panel identification
Model EMF69E

Cooking for the first time
Note: On model EMF69E - the clock must be set first
Remove the grill tray and any packing materials. Position the oven shelf where you want it to be.
- Select a cooking function - simply rotate the Function knob to the function you choose.
- Select the oven temperature - rotate the temperature knob to the temperature you desire.
When finished rotate both knobs back to off. Remember that the cooling fan will continue to run even when the cooking is finished.
Understanding your oven functions
Your oven has a number of cooking functions to choose from, depending on the model. Refer to the previous page to review what functions are on your oven.

Light
Select this function to illuminate the interior of the oven. This allows you to see into the oven when cleaning the oven or removing food after cooking. The light is halogen and it is a simple process to replace the light if needed and is detailed later in this manual

Grill
The top element operates. It is an infra red element which means it glows and is ideal for toasting, browning and general grilling. It operates with the door closed, recommended maximum cooking time is 30 minutes. Grill with the door closed - the grill will shut down if the oven over heats. Model EMF69E has double grill feature for faster cook.

Fan Grill
A fan operates while grilling which allows the heated air to circulate around the food being grilled. There is less requirement for turning the food and works very well on thicker cuts of meat. We recommend a temperature setting of 180C and number 3 shelf height. Grill with the door closed and note: The grill will shut down if the oven over heats.

Fan Forced
Air is forced through a circular element around the fan. This circulates the hot air around the oven cavity which allows for baking on more than one shelf. In some cases the food may need to be rotated and there may be some variation in browning. This is normal in fan forced cooking.

Air Fry (Model EMF69E)
This function is all about air movement and heat. The oven uses a top element and the rear element with the fan running to move the hot air rapidly through the cavity. The air fryer basket allows the hot air to circulate around the food from all angles speeding the cooking process and eliminating the need to rotate food.

Defrost
The fan circulates the ambient temperature air in the oven allowing you to efficiently defrost your food before cooking. The time to defrost is shortened significantly.

Fan assisted
Both the top and bottom element provide heat while the fan circulates the hot air evenly through the oven cavity. This function allows for cooking on 2 shelves at the same time. We don't recommend using the bottom shelf position on this function. The food on the highest position will cook faster so sometimes it may need to be swapped with the food on the lower shelf.

Classic Bake
The top and bottom elements provide heat at the same time. In this function the air inside the oven is stable so it makes this function ideal for baking something such as a souffle.

Pastry
Heat from the bottom of the oven work well when baking pastries or finishing the base on a pizza. Not normally a function to use right through the cook, usually for finishing off to be sure the base is cooked through.
The Cooling Fan Feature
Our ovens have a cooling fan that keeps all the exposed surfaces cool, protects your kitchen cabinets and reduces the amount of steam vapour in the oven. The cooling fan continues to run after the end of the cooking cycle. The fan will stop automatically once the residual heat in the oven has dissipated.
Dish Selection and Use
The colour, material and thickness of a baking dish affects the cooking time.
Aluminium, ceramic, glass and shiny dishes reduce cooking and base browning. By comparison dark coloured dishes and enamelled cast iron type heavy dishes increase cooking and base browning.
Remember - all ovens are different and your oven may perform differently to your previous oven.
Oven Shelves
Consider the shelf height for the item being cooked and the function selected
Pre-heating
For best results we recommend pre-heating the oven for 30 minutes to get it good and saturated with heat to the correct temperature except when grilling, as that function barely needs any pre-heating.
Condensation and steam
The oven has a fan inside the oven which circulates the air on fan assisted functions. It reduces cooking time and energy consumption by recirculating the hot steam in the cavity.
During cooking, steam may be produced and released when the door is opened which is completely normal. To reduce moisture build up in the oven pre heat prior to cooking and wipe the oven down after each use. Excessive moisture can damage the oven and cause leakage under the door.
Hints and tips
Your oven may bake or roast differently to the oven you had before. We work and test very hard to achieve optimal performance in our ovens but sometimes there is a degree of experimentation with temperature and shelf position to reach the performance levels you are used to. Cooking a simple 'packet' cake using exactly the instructions on the box can be a good start to understand the unique characteristics of your oven.
We also suggest using a lower temperature setting to start with and then work from there. When cooking on multiple shelves we suggest adding a bit more time to the cooking cycle.
Make sure your oven dishes fit into the oven before turning it on and allow about 40mm clearance to the side of the oven so that hot air can circulate freely while cooking.
Always remove unecessary trays from the oven when cooking. They affect the flow of air and the performance of the oven.
The benefit of cooking in an oven bag is that food tends not to dry out and the oven remains clean during cooking.
Warnings about care and cleaning - It is healthier and safer to keep the oven clean.
DON'T touch the elements inside the oven.
DON'T use strong detergents as they can leave spotting and corrosion marks.
DON'T use a steam cleaner as it can build up moisture in the oven and electrics.
DON'T use sharp implements as they can scratch the surfaces.
DON"T use abrasive cleaners, powder cleaners, steel wool or waxy cleaning agents.
DON'T use abrasive cleaners on the glass door as this can weaken the door glass and may lead to shattering.
DON'T let fats and oils build up in your oven. They are a fire hazard and can create smoke and nasty odours.
DON'T let the grill tray build up with fats and oils as they can flare up during the grill cycle
DONT use polyunsaturated oils in the oven. They leave a residue that is much harder to remove.
Model EMRENT65E Minute countdown timer
The timer is a minute countdown timer. Rotate the timer control knob to the desired time up to 60 minutes at which time a bell will ring. For very short time periods turn the knob past the time and then back to it to load the timer mechanism.
Model EMF69E/EMF65EN Electronic Clock Functions
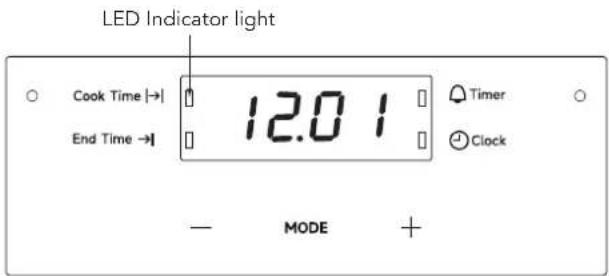
This model is fitted with an electronic clock that can be used to turn the oven off automatically.
After the oven has been installed and connected to power 12.00 will display and the LED indicator next to the clock symbol will flash. NOTE: The clock must be set before using the oven for the first time.
Setting the Time
- Press MODE until until the LED indicator flashes next to the clock symbol.
- To set the time of day press the + or - symbols while the clock LED is flashing.
- After 5 seconds from the last change the clock LED will disappear and the time will be set.
Changing the time of day
Press MODE until the clock LED starts flashing and use the + and - symbols to change the time of day. After 5 seconds the clock will be set to the new time.
NOTE: This clock uses a 24 hour display. Not AM and PM.
Setting the minute minder
- Press MODE until the Timer indicator LED begins flashing.
- Set the countdown time by using the + and - symbols while the Timer indicator LED is flashing.
- After 5 seconds from the last change, the Timer indicator LED will stop flashing, confirming the timer has been set. The countdown time remaining will appear on the display.
- Once the set time has elapsed, a beeper will sound for 2 minutes. The time indication "0.00" and a flashing Timer indicator LED will appear on the display.
- To stop the beeper, press + or - or MODE.
NOTE: This feature has no effect on oven operation. With the minder operating, the time of day is not displayed.
Setting the cooking duration
- Select the desired function and temperature. The oven indicator light will shine and the element will switch on.
- Press MODE until the Cook Time indicator LED begins flashing.
- Set the cooking duration by using the + or - symbols while the Cook Time indicator LED is flashing.
- After 5 seconds from the last change, the LED will stop flashing, and the time of day will be displayed.
- It is also possible to set the time of day for the oven to switch on and off.
For example, a cook time of 50 minutes to end at 6pm (1800):
Set rhe cooking duration as per above instruction and then set the cooking end time at 6pm (1800). Now the oven will switch on at 5.10pm (1710) and cook for 50 minutes.
NOTE: Account for the oven pre-heating time if necessary
To check or cancel settings
- To check your settings, press MODE until the indicator LED flashes next to the mode (cook time etc) that you want to display. After 5 seconds, the indicator LED will stop flashing and the time of day will be displayed.
- To cancel a setting, press MODE until the indicator LED flashes next to the setting to be cancelled. Press and hold - symbol until the setting is cleared and the counter is at zero.
At end of cooking
- When the set time has elapsed, the oven will turn off, the time will beep and Cook Time indicator LED will flash.
- Turn both the Function control knob and Temperature control to the off position.
- Press MODE or the + or - to stop the clock beeping.
| Dish Shelf Position 5 = top Temp Degrees C Time | |||||
| Cakes Static Fan | Oven Static Fan Oven | Minutes | |||
| Chocolate cake 3 3 180-190 180 35-40 | |||||
| Creme Caramel 3 3 130-150 130 30-35 | |||||
| Cup Cakes 3 2 3 190-200 180-190 18-20 (35 cakes) | |||||
| Fruit Cake 3 3 4 175-190 165-180 | 35-35 | ||||
| Jam Tarts | 3 2 3 185-200 | 185-200 | 40-50 | ||
| Nut Cake | 3 2 3 190-200 | 180-190 | 40-45 | ||
| Scones | 2 1 2 190-230 | 180-190 | 17 (35 scones) | ||
| Sponge Cake | 3 2 3 195-210 | 185 35-45 | |||
| Swiss Roll | 3 2 3 195-200 | 185-200 | 35-45 | ||
| Pastries | |||||
| Brioches | 3 2 3 190-200 | 180-190 | 25-30 | ||
| Cookies | 2 3 | 3 | 180 | 165 | 20 |
| Pastry | 3 2 3 220-240 | 190-220 | 18 | ||
| Puff Pastry | 3 2 3 230-250 | 200-230 | 10-15 | ||
| Pizza and Bread | |||||
| Bread | 3 | 3 215-230 2 | 5-230 | 40-50 | |
| Muffins | 3 | 2 205-220 185-200 | 25-35 | ||
| Pizza | 2 3 2 215-230 | 195-210 | 20-30 | ||
| Baked Pasta | |||||
| Lasagne | 2 2 3 185-200 | 165-180 | 30-40 | ||
| Macaroni | 2 2 3 225-240 | 200-205 | 35-45 | ||
| Pasta Bake 2 2 3 225-240 200-205 | 35-45 | ||||
| Vegetable bake 2 2 3 185-200 165-180 | 30-40 | ||||
| Baked in foil | 2 | 2 3 4 | 215-230 | 195-210 | 20-25 |
| Fillets or steak | 2 | 2 3 4 | 175-190 | 155-170 | 15-20 |
| Roast | 2 | 2 3 4 | 195-210 | 175-190 | 25-30 |
| Stewed fish | 2 | 2 3 4 | 180-190 | 165-180 | 15-20 |
| Roast Meats | |||||
| Beef 1kg | 3 | 2 3 4 | 220-250 | 200-220 | 50-60 |
| Lamb 1kg | 3 | 2 3 4 | 190-220 | 180-200 | 50-60 |
| Pork 1 kg | 3 | 2 3 4 | 190-220 | 180-200 | 60-80 |
| Veal 1 kg | 3 | 2 3 4 | 190-220 | 180-200 | 60-80 |
| Roast Poultry | |||||
| Chicken | 3 | 2 3 4 | 205-215 | 195-210 | 40 |
| Duck | 3 | 2 3 4 | 210-220 195-210 | 120-180 | |
| Goose | 3 | 2 3 4 | 210-220 195-210 | 120 | |
| Turkey | 3 | 2 3 4 | 215-230 | 195-210 | 220 |
| Roast Game | |||||
| Rabbit | 3 | 2 3 4 | 215-235 | 200-220 | 40 |
| Venison | 3 | 2 3 4 | 190-220 | 180-200 | 50-60 |
| Pheasant | 3 | 2 3 4 | 205-215 | 195-210 | 40-50 |
The cooking information provided is intended purely as a guideline. Modify them to suit you experience, eating habits and personal taste.
The times indicated in the table do not include preheating of the oven, which is always recommended. The times and temperature indicated refer to average quantities of food - meats = 1/1.5kg; dough for confectionary, pizza, bread = 0.5/0.8kg.
Information in brackets with regards to shelves indicates the shelf to use when cooking several dishes together. All ovens are different and experimentation and use of the various cooking functions will determine the most effective way to use the oven to suit your cooking style. When cooking on different shelves simultaneously put all containers in the centre of the shelves.
| Problem Cause | Solution | |
| Cooking Unevenly | Wrong location in ovenWrong size trayHeat variations in oven | Place food in the centre of the oven.Try alternativesRotate food during cooking |
| Burning on Top | Oven not preheatedOver sized baking tinsFood too close to the top of the oven | Wait for oven to reach temperature firstUse correct sized tinsPlace in the centre of the oven |
| Burning on Bottom | Temperature is set too highBaking tins to large or dark in colourFood too low in the ovenOven door being opened too oftenPoor heat distribution on the food | Reduce the temperature settingUse correct sized silver colour tinsPlace the food onto a wire rack in the pan to allow for heat to surround the food |
| Meat and potatoes notbrowning | Temperature set too highFood position too high in the oven | Reduce the cooking temperatureCook on a lower shelf height |
| Cakes have a hard split crustand seem over cooked | Cake tin is too deepCake tin is dark in colour | Change to a correct size tinChange to a silver colour tin |
| Cakes sunk in middle andseem under cooked | Temperature set too lowBaking time too shortDoor was opened too early | Increase the temperatureIncrease the cooking timeDo not open the door until late in the cycle |
| Pastry is too dry | Too long in the oven and the moisturehas dried out | Increase the cooking temperature by 10 degrees and reduce the cooking time |
| Cake is sticky on the outsidebut cooked well on the inside | Not cooked enough | Use less liquid in the mixCook at a lower temperatureIncrease the cooking time |
| When cooking on multipleshelves one shelf is morecooked than the other. | Multi shelf cooking affects the heattransfer through the oven | Use a slightly lower cooking temperatureRemove the food at different times in the cycleMake sure that the grill tray has been removed from the oven cavity. |
Oven Door Removal
If at some time you wish to remove the oven door follow these procedures. Do not force the door on or off as you may damage the hinges.
- Open the door fully flat.
- Rotate the 'stirrups' on each side. They lock the hinges open.
- Slowly close the door against the open stirrups and remove if from the oven.
To replace the door reverse the procedure and close the stirrups on each side.

natural_image
Technical line drawing of a mechanical clamp or bracket assembly (no text or symbols)
Cleaning inside the door
The inner glass is removable to allow you to clean inside the oven door.
- Open the door.
- Press on the tabs as shown below.
- The top cover will come away allowing you access to the sheets of glass inside the door.
TIP: If you take the glass out of the door be careful because the lighter weight of the door will make the hinges feel much stronger. Be sure to reassemble the glass exactly the same way it came out.

natural_image
Technical line drawing of a mechanical component with an arrow pointing to a corner detail (no text or symbols)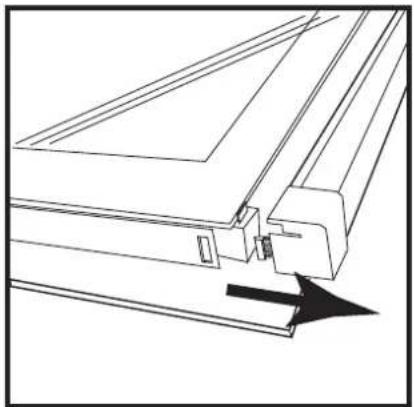
natural_image
Technical line drawing of a mechanical component with an arrow indicating direction (no text or symbols)Changing the oven light
WARNING: Before replacing the oven light make sure that the oven is disconnected from mains power and cooled down.
The oven light is a special halogen globe that can withstand high temperatures.
A replacement globe is available from authorised service agents or Glem Gas Australasia.
- Switch off the oven at the mains switch.
- Remove the glass cover by unscrewing it from the light socket.
- Remove the halogen globe by pulling it from the light socket and fit the replacement.
- Refit the glass cover and reconnect the oven to the power supply.
Halogen light characteristics
Voltage AC220V-240V
Wattage 25W
Cap G9

natural_image
Abstract circular diagram with curved arrows indicating rotational or cyclical motion (no text or symbols)
natural_image
Diagram of a medical device with a central shaft and cross symbol, showing directional arrow (no text or labels)NOTE: Over time the oven light can become quite tight in the holder making it need more effort to pull it out. Use a cloth to protect the globe and gently use pliers to provide good leverage to remove the globe being careful not to break the glass of the globe.
DO NOT touch the new light globe directly with your hands.
Do not use strong detergents to clean your oven. Many detergents or cleaning products will mark stainless steel. Oven cleaners are intended for cleaning the internal liner of the oven only and will possibly damage the inside of the door.
The oven and hob must be kept clean, as a build up of fat constitutes of a fire risk.
A really great tip is to wipe the oven down with something like a baby wipe each time you cook and the oven will rarely need a major clean.
Every 3 to 4 years your oven should be thoroughly checked by an authorised service technician.
Contact info@emiliaappliances.com.au for the service agent in your area
1. Cleaning of Stainless Steel:
In order that your oven retains its new appearance, care should be taken to protect the stainless steel finish. Never use gritty or abrasive sponges. We highly recommend stainless steel cleaners and protectors. Stubborn stains can be removed by soaking in hot water and stains can be prevented by using a clean cloth soaked in warm water before a spillage becomes cold or dries up. Acid materials like milks, vinegar, citrus juice can damage the most resistant surfaces. If a spill occurs wipe it up immediately.
2. Oven Spills:
Oven spills should be cleaned straight away. Leaving spills can also cause permanent damage to the enamel and make it extremely hard to remove later. A non-caustic oven cleaner is recommended such as non caustic "Mr. Muscle" to clean the oven. Do not use abrasive scourers, sponges or cleaning products. Wipe the oven out regularly while the oven is still warm using hot soapy water and a soft cloth or even a baby wipe. The removal of side shelves supports makes cleaning easier.
3. Knobs and Control Panel:
All knobs are removable. Clean behind the knobs and the control panel to prevent grease and grime build up that can cause jamming of the knobs/gas taps etc. The stainless steel panel should be cleaned with a damp cloth, do not use anything abrasive as it may damage the finish and remove the printed graphics.
4. Cleaning of Oven Door:
The outer glass should be cleaned with a specific glass and mirror cleaner. Soapy water will work to remove stains and but may leave streaks. Do not use abrasive or aggressive cleaners on aluminium door frame components, if in doubt contact info@emiliaappliances.com.au.
5. Cleaning all Other External Surfaces
The general rule is to use hot soapy water. To remove or prevent streaks finish cleaning with a clean cloth using just hot water.
6. Removal of Side Shelf Supports - All models:
The sides racks are removed by simply flexing the bottom rail off the support and unhooking at the top. To replace just reverse the procedure.
7.Grill Element/Top Element -
This element must never be sprayed with any detergents. A damp cloth and a bottle brush can be used to clean the roof of the oven and the element itself. Never soak the element and always dry it after cleaning as not doing so can lead to deterioration. It is important to clean this area regularly as fats spit up and stick to the ceiling and element while grilling and they may burn, smoke and give out unpleasant odours.
Electrical connection
MODELS EMRENT65/EMF65EN require min 16A fuse rating. Max power rating 2300W 9.6A
MODEL EMF69E requires min 16A fuse rating. Max power rating 3200W 15A
WARNING
To avoid any potential hazard, you must follow our instructions when you install your oven. Failure to install the oven correctly could invalidate any warranty or liability claims and lead to prosecution.
This oven must be installed by an authorised person according to all codes and regulations as stated in the local municipal building code and other relevant statutory regulations.
- Wiring connections must be in accordance with AS/ NZS 3000 Wiring Rules and any particular conditions of the local authority.
- Refer to data plate for rating information. The data plate is positioned inside the oven door.
- Disconnection in the fixed wiring must occur in accordance with the AS/NZS3000 wiring rules. Wiring should be protected against mechanical failure. Refer to AS/NZS3000. A means of disconnection with a contact separation of at least 3mm must be supplied in the fixed wiring.
- The electrical supply must be appropriate and 240V 50Hz.
- The fuse and electrical wiring of the home must support the load of the oven.
- The oven must be earthed. Connect the oven to a properly earthed and rated power socket, as appropriate. If a socket needs to be installed or relocated this must be done by an authorised licensed electrician.
- In New Zealand the oven must be connected to the supply by a supply cord fitted with the appropriately rated plug that is compatible with the socket outlet fitted to the final sub circuit in the fixed wiring that intended to supply the oven.
- The Flexible cord of the ovem must not be subject to direct heat and must be positioned after installation so its temperature does not exceed 75C.
- After electrical connection perform a test on the oven following the instructions of this manual. If the oven does not function disconnect it from the electrical supply and contact our service team.
Positioning the oven
The oven is designed to be a built in fixture. The dimensions must be as per the dimensions in the diagrams. When positioning the oven do not use the door as a lever to insert the oven into the fixture and do not place excessive pressure on an open door.
When installing the oven ensure that the supply cable does not kink.
The cabinet must be capable of withstanding a temperature 70C. Installation into low temperature tolerant cabinetry eg vinyl coated may result in of the low temperature coating by discolouring or bubbling. If the oven is to be installed adjacent to vinyl wrapped surfaces used the appropriate installation kit. The manufacturer does not accept responsibility for damage caused by installation into low temperature tolerant cabinets.
After installation, test and ensure the oven is operating correctly before handing it over to the customer.
- If a power point is fitted it must be accessible with the oven installed, as the plug must be accessible after installation.
• The oven needs to be mounted onto a level flat surface for the full width and depth of the oven. - The oven must not be installed behind a decorative door or in a recess where the cooling air may be compromised. This is an overheating risk.
• The oven must be fixed in position. - The oven comes with a cable attached that needs to be terminated or plugged in according to the correct electrical standards by an authorised electrician.
The oven is designed to be installed into standard 600mm wide cupboard that allows a flush fit with the surrounding cupboard fronts. DO NOT install the oven recessed from the cupboard front surfaces as steam from the oven may cause damage. Follow the measurements in the diagrams for correct installation details.
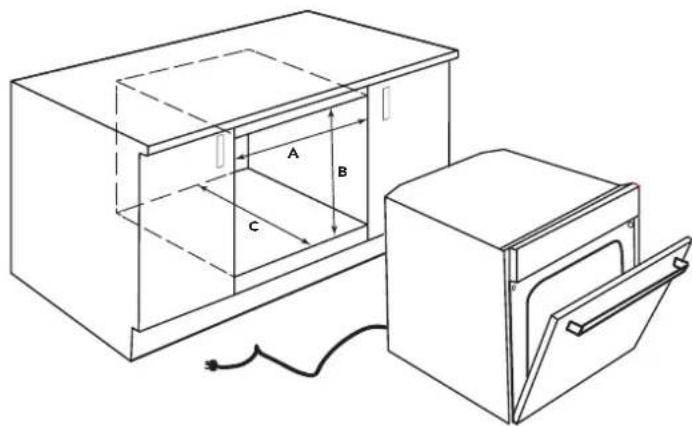
| Style ABC | |||
| Flush fit 600 600 581min | |||
| Proud fit 565 590 560 min |

FLUSH MOUNT PROUD MOUNT

Level the oven
Place a level as shown in the diagram to make sure that the oven is perfectly level.
This is important as an uneven installation may lead to leaks onto cupboard surfaces

Thank you for choosing an Emilia oven. The purchase of this appliance is an important investment in your home and so to protect your investment we urge you to complete the registration card attached, please return it immediately.
The benefits conferred by this warranty are in addition to all other conditions and warranties in respect of this product which the consumer may have under the Trade Practices Act 1874 of the Commonwealth of Australia and/or similar State or Territory Laws.
Our goods come with guarantees that cannot be excluded under the Australian Consumer Law. You are entitled to a replacement or refund for a major failure if the goods fail to be of acceptable quality. You are also entitled to have the goods repaired or replaced if the goods fail to be of acceptable quality and failure does not amount to a major failure.
Glem Gas Australasia Pty Ltd warrants, this appliance to be free from defects in workmanship and materials for a period of:
a) Where the appliance is intended to be used and is used for
DOMESTIC USE - 24 MONTHS FROM DATE OF DELIVERY TO THE ORIGINAL PURCHASER.
b) Where the appliance is intended to be used and is used for COMMERCIAL USE - NO WARRANTY APPLIES. THIS IS A DOMESTIC APPLIANCE ONLY.
Glem Gas Australasia Pty Ltd, during the period of warranty, will at its option, and subject to the terms and conditions stated below, repair or replace free of charge this appliance or any component part, which upon examination by Glem Australasia Pty. Ltd.. is found to be defective.
This Warranty shall not apply:
a) If the rating plate has been removed or the serial number or other details on it have been removed or rendered illegible.
b) If the appliance is connected to a voltage and power rating other than shown on rating plate.
c) If the appliance has been subjected to misuse, abuse accident or want of care.
d) If the appliance has been installed, operated or maintained contrary to the instructions supplied by Glem Gas Australasia Pty Ltd.
e) If any defect or failure is due to connection to an inadequate power supply.
f) If damage is caused by foreign objects in or on the appliance or by reason of its use for purposes other than that for which it was delivered.
g) If a repair has been made or attempted by the purchaser.
h) If you live more than 80 kilometres outside the service area of the Glem Gas Australasia service agents this warranty does not cover the cost of transport of the appliance for service or the service agent's travelling time. This cost has to be covered by the customer.
Light Globes
This warranty does not cover any glass damage or replacement of light bulbs.
Consequential Damage or Economic Loss
Glem Gas Australasia Pty Ltd accepts no liability pursuant to this Warranty for any cost or consequential damage or economic loss whether direct or indirect, to any person or property, arising from breakdown or failure of this appliance or any part thereof, and no responsibility is to be implied or accepted over and above the replacement value of the product.
Replacement Parts
Parts covered under warranty that need replacing i.e. seals, knobs and burner caps.
These can be posted to customer to put on at their discretion.
This Warranty is given by Glem Gas Australasia Pty Ltd and no other person or organisation is authorised to vary its provisions and conditions.
Complete this section and keep for your own record.
Appliance Type
Model No
Serial No
Purchased From
Date of purchase
Please complete the section below and return to:
Glem Gas Australasia Pty Ltd, P.O.Box 63 Blaxcell PO South Granville NSW 2142
or Scan/Photograph and email to info@emiliaappliances.com.au
Cooker Model number Serial number
Retailer name and address and date of purchase
Customer
name
and
address
Postcode
address
Tel. ____ number
Installer name
Installer signature
Installer License number
Installer compliance number
Installer telephone number
GLEM GAS AUSTRALASIA PTY. LTD.
Importers of Emilia Appliances
P.O.Box 63 Blaxcell PO South Granville NSW 2142
Phone: 1 300 307 917
Email info@emiliaappliances.com.au for service
www.emiliaappliances.com.au


- User Manual & Installation Guide
- Built in Electric Ovens
- TABLE OF CONTENTS
- IMPORTANT:
- IF THE APPLIANCE IS DAMAGED DO NOT INSTALL. CALL 1300 307 917 FOR ASSISTANCE
- IMPORTANT
- PRODUCT IDENTIFICATION
- NOTE:
- WARNING ABOUT CUPBOARD MATERIALS
- WARNING:
- CAUTION:
- First Use
- Side racks
- Oven shelves
- Grill tray and insert
- Air Fryer
- Light
- Grill
- Fan Grill
- Fan Forced
- Air Fry (Model EMF69E)
- Defrost
- Fan assisted
- Classic Bake
- Pastry
- The Cooling Fan Feature
- Dish Selection and Use
- Pre-heating
- Condensation and steam
- Hints and tips
- Model EMRENT65E Minute countdown timer
- Model EMF69E/EMF65EN Electronic Clock Functions
- Setting the Time
- Changing the time of day
- Setting the minute minder
- Setting the cooking duration
- To check or cancel settings
- At end of cooking
- Oven Door Removal
- Cleaning inside the door
- Changing the oven light
- Cleaning of Stainless Steel:
- Oven Spills:
- Knobs and Control Panel:
- Cleaning of Oven Door:
- Cleaning all Other External Surfaces
- Removal of Side Shelf Supports - All models:
- 7.Grill Element/Top Element -
- Electrical connection
- WARNING
- Positioning the oven
- Level the oven
- This Warranty shall not apply:
- Light Globes
- Consequential Damage or Economic Loss
- Replacement Parts
- Complete this section and keep for your own record.
Brand : Emilia
Model : EMF69E
Category : Oven