
MCK70YBFVM - Air purifier DAIKIN - Free user manual and instructions
Find the device manual for free MCK70YBFVM DAIKIN in PDF.


| Type | Humidifying Air Purifier |
| Model | MCK70YBFVM |
| Dimensions (H x W x D) | 600 x 395 x 287 mm |
| Weight | 12.5 kg (empty water tank) |
| Power Supply | 220-240 V ~ 50 Hz / 220-230 V ~ 60 Hz |
| Power Consumption (Air Purifying Turbo) | 66 W |
| Power Consumption (Humidifying Turbo) | 68 W |
| Operating Sound (Air Purifying Turbo) | 54 dB(A) |
| Operating Sound (Quiet) | 18 dB(A) |
| Airflow Rate (Turbo) | 420 m³/h |
| Airflow Rate (Quiet) | 60 m³/h |
| Humidification Rate (Turbo) | 650 mL/h |
| Coverage Area (Turbo) | 48 m² |
| Water Tank Capacity | Approx. 3.6 L |
| Filters | Pre-filter, Dust Collection Filter, Deodorising Filter, Humidifying Filter |
| Streamer Unit | Yes (Blue lamp indicator) |
| Active Plasma Ion | Yes (can be turned off) |
| Sensor Types | Dust/PM2.5, Odour, Temperature, Humidity |
| Modes | AUTO, AUTO FAN, ECONO, ANTI-POLLEN, MOIST, CIRCULATOR, GOOD SLEEP |
| Maintenance Interval Pre-filter | Every 2 weeks (vacuum/wash) |
| Maintenance Interval Humidifying Filter | Every week (soak), replace every ~10 years |
| Dust Collection Filter Life | About 10 years (replace) |
| Safety Features | Child proof lock, auto shut-off, overheating protection |
| Power Cord Length | 2 m |
| Country of Origin | China |
Frequently Asked Questions - MCK70YBFVM DAIKIN
User questions about MCK70YBFVM DAIKIN
0 question about this device. Answer the ones you know or ask your own.
Ask a new question about this device
Download the instructions for your Air purifier in PDF format for free! Find your manual MCK70YBFVM - DAIKIN and take your electronic device back in hand. On this page are published all the documents necessary for the use of your device. MCK70YBFVM by DAIKIN.
USER MANUAL MCK70YBFVM DAIKIN
Humidifying air purifier
Floor standing type
Humidifying Air Purifier OPERATION MANUAL
Model
MCK70YBFVM

STREAMER

natural_image
Line drawing of a portable air conditioner unit with front panel and side ports (no text or symbols)- Thank you for purchasing this humidifying air purifier.
- Please read the operation manual carefully and follow it for correct use.
- Please read the "Safety Precautions" section before use. ▶Page 2-4
- Please keep the operation manual in a safe place for later reference.
Read First
Safety Precautions 2
Precautions During Use 5
Names of Parts and Operations 6
Preparation Before Operation.... 11
Operation
When you want to let the unit decide the best operation mode 15
(AUTO operation)
Using Air Purifying Operation 16
Changing the Airflow Rate 16
Using Humidifying and Air Purifying Operation 17
Operating the Unit in a MODE 17
(AUTO FAN/ECONO/ANTI-POLLEN/MOIST/CIRCULATOR)
Operating in GOOD SLEEP MODE 20
Advanced Settings
Active Plasma Ion Output Settings 21
Streamer Output Settings 22
Dust/PM2.5 Sensor Sensitivity Setting 23
Notification Tone Setting 24
Settings of Modes within ECONO MODE 25
Maintenance
Maintenance Quick Reference Table 27
Humidifying Tray 29
Humidifying Filter Unit 30
Humidifying Filters Replace 31
Streamer Unit 32
Dust Collection Filter Replace 33
When Not Using the Unit for a Prolonged Period 33
Troubleshooting
FAQs 34
States of the HUM Monitor Lamp and Their Meanings.... 35
Troubleshooting 36
Separately Sold Parts.... 41
Specifications 42
Safety Precautions
■ Observe these precautions in order to prevent property damage or injury.
■The consequences of incorrect use are categorized as follows:
 WARNING CAUTION WARNING CAUTION |  |
| Failure to follow these instructions properly may result in personal injury or loss of life. | Failure to follow these instructions properly may result in property damage or personal injury, which may be serious depending on the circumstances. |
■Precautions to be observed are categorized using symbols:

Never attempt. Be sure to follow the instructions.

ARNING
Observe in order to prevent fire, electric shock or severe injury.
■Concerning the power supply plug and cord

- Do not unplug while the unit is in operation. (Fire due to overheating or electric shock may result)
- Do not plug in or unplug with wet hands. (An electric shock may result)
- Do not use in such a way that the ratings of the power socket or wiring appliances are exceeded or use a voltage outside of the range AC220-240V.
(Fire may result from overheating if the ratings of multi-socket power adapters, etc., are exceeded)
- Do not pull on the power supply cord when unplugging. (Overheating or fire may result from wire breakage)
- Do not perform actions that might break the power supply plug and cord.
—Such actions including damaging, modifying, forcibly bending, pulling, twisting, bundling up, placing heavy objects on the power supply plug or cord.
If the power supply plug or cord is damaged, it must be replaced by the manufacturer, its service agent, or a similar qualified person in order to avoid a hazard. (An electric shock, short circuiting or fire may result from use while damaged)

- Insert the power supply plug firmly all the way in.
-Do not use a damaged power supply plug or a loosely fitted power socket.
(Electric shock, short circuiting or fire due to overheating may result if the power supply plug is not firmly inserted)
- Periodically wipe dust off the power supply plug with a dry cloth.
-If the unit is not to be used for a prolonged period, unplug the power supply.
(Fire may be caused by defective insulation resulting from dust buildup with moisture, etc.)
- When performing maintenance, inspecting, moving the unit, or refilling the water tank, be sure to turn off and unplug the unit. (An electric shock or injury may result)
■Do not use in the following places

- Places where oil or flammable gases are used or may leak. (Fire or smoke may result from ignition or suction toward the unit, or injury may result from degradation or cracking of plastic)
- Places where there are corrosive gases or metal dust particles.
(Fire or smoke may result from ignition or suction toward the unit)
- Places where temperature and humidity levels are high or water may splash, such as a bathroom. (Fire or an electric shock may result from electrical leakage)
- Places accessible to small children. (An electric shock or injury may result)
- Places where the floor is unstable.
(Household items etc., may get wet, or a fire or an electric shock may result if the unit falls over)
Safety Precautions
WARNING
Observe in order to prevent fire, electric shock or severe injury.
■During use

- Do not use chlorinated or acidic detergents. (Injury may result from degradation or cracking of plastic, or harm may be caused to health from the production of toxic gases)
- Keep burning cigarettes or incense sticks away from the unit. (Fire or smoke may result from ignition or suction toward the unit)
- Do not attempt to disassemble, reconstruct or repair the unit yourself. (Fire, an electric shock or injury may result) For repairs, please contact the place of purchase.
- Do not insert fingers, sticks, or any other item, into the air inlets or air outlet. (An electric shock, injury or damage may result)
- Do not pour water onto the air outlet or the unit. (Fire or an electric shock may result)
- Do not use flammable substances (hair spray, insecticide, etc.) near the unit. Do not wipe the unit with benzine or thinner. (An electric shock, fire or cracking may result)
■Immediately turn off and unplug the unit if there are any signs of abnormality and malfunction

Examples of abnormality and malfunction
- The unit does not operate even if the switch is turned on.
- Current passes through the cord or fails to pass through if the cord is moved.
- There are abnormal sounds or vibrations during operation.
- The casing of the unit has become deformed or is abnormally hot.
- There is a burnt smell. (Malfunction, an electric shock, smoke, fire, etc., may result if the abnormality is not addressed and the unit continues to be used)
Contact the place of purchase.
CAUTION
Observe in order to prevent electrical leakage, injury or property damage.
During use

- Small children or immobile persons (due to illness or injury) should not operate the unit by themselves.
◆For EU, UK, Turkey:
This appliance can be used by children aged from 8 years and above and persons with reduced physical, sensory or mental capabilities or lack of experience and knowledge if they have been given supervision or instruction concerning use of the appliance in a safe way and understand the hazards involved.
Children shall not play with the appliance. Cleaning and user maintenance shall not be made by children without supervision.
◆For other regions:
This appliance is not intended for use by persons (including children) with reduced physical, sensory or mental capabilities, or lack of experience and knowledge, unless they have been given supervision or instruction concerning use of the appliance by a person responsible for their safety.
-Children should be supervised to ensure that they do not play with the appliance.
—Persons who are heavily intoxicated or have taken sleep medication should not operate the unit.
(An electric shock, injury or poor health may result)

AUTION
Observe in order to prevent electrical leakage, injury or property damage.

- Do not drink the water from the water tank. Do not give the water to animals or plants. (Harm may be caused to the animal or plant)
- Do not use combustion-based heating devices in places directly exposed to airflow from the air outlet.
(Carbon monoxide poisoning due to incomplete combustion of the combustion-based heating device may result)
- Do not use products that contain fine powder, such as cosmetics, near the unit.
(An electric shock or malfunction may result)
- Do not operate the unit when fumigating insecticide is in use.
—After using insecticide, be sure to sufficiently ventilate the room before operating the unit. (Harm may be caused to health from an outflow of accumulated chemical compounds from the outlet)
- Do not use the unit near a smoke detector.
-If the air coming out of the unit flows in the direction of the smoke detector, the response of the smoke detector may be delayed or it may fail to detect smoke.

- Frequently ventilate the room when using the unit together with combustion-based heating devices.
-Usage of this product is not a substitute for ventilation. (Potential cause of carbon monoxide poisoning)
This product cannot eliminate carbon monoxide.
- If the unit is placed within reach of a pet, be careful that the pet does not urinate on the unit or chew on the power supply cord. (Fire, an electric shock or injury may result)
- When using the humidifier, maintain the cleanliness of the water tank, humidifying tray, and humidifying filter unit at all times.
-Replace the water in the water tank with fresh tap water everyday.
–Discard any water remaining in the humidifying tray everyday.
-Periodically perform maintenance on internal components (humidifying tray, humidifying filter unit).
(Harm may be caused to health from the propagation of mould or bacteria in dirt and water scales)
Consult a medical professional if you experience any health abnormalities.
■Concerning the unit body

- Do not block the air inlets or air outlet with laundry, cloth, curtains, etc.
(Overheating or fire may result from poor circulation)
- Do not apply deodorising spray or other types of spray to the unit, or use near the unit. (Malfunction may result)
- Do not climb, sit or lean on the unit. (Injury may result from falling or toppling)
- Do not lay the unit horizontally. (An electric shock or malfunction may result from water leaking or spilling)
■When moving the unit

- Before moving the unit, turn off the power, and discard any water in the water tank and humidifying tray.
(Household items etc., may get wet, or an electric shock or electrical leakage may result from water leaking or spilling)
- When picking up the unit to move it, handle the unit with caution.
-Be sure to always hold the unit using the correct grip locations. Do not hold the unit using the grip on the water tank or humidifying tray. (Injury may result from the unit falling)

CKO001
Precautions During Use
Other considerations
Do not use this product for special purposes such as in the preservation of works of art, academic texts/materials, etc.
(Degradation of preserved items may result)
■ Do not excessively humidify the air. (Condensation and mould growth may result)
■ Do not use any of the following types of liquid. Warm water (40°C or above), aroma oil, chemical agents such as hypochlorous acid, unclean water, water containing aromatic substances or detergent, etc.
(Deformation of the unit or malfunction may result) Water from a water purifier, ionized alkaline water, mineral water, well-water etc.
(Propagation of mould or bacteria may result)
■ Be careful of freezing.
(Malfunction may result)
Discard any water in the water tank and humidifying tray if there is any risk of freezing.
■ When not using the Humidifying operation, discard any water in the water tank and humidifying tray. (Bad odours may result from the propagation of mould or bacteria in dirt and water scales)
■ Depending on the usage environment, shorten the maintenance period. When using in places with high foot traffic such as hotels and public facilities, shorten the pre-filter maintenance period.
(If the pre-filter becomes clogged and the unit continues to be used, malfunction may result)
Do not use in the following places
■ Positions from where out flowing air flows directly at a wall, furniture, curtains, etc.
(Staining or deformation may result)
■ On top of a thick carpet, bed cover or mattress The unit may tilt causing water to spill or the water level sensor may fail to work correctly.
■ Places exposed to direct sunlight (Discolouration may result)
■ Places exposed to outdoor air (e.g. near windows, etc.) or direct airflow from air conditioners, etc. Room humidity may not be detected and indicated correctly.
■ Positions near combustion-based heating devices or exposed to direct airflow from heating appliances (Room humidity may not be detected and indicated correctly or deformation may result)
■ Places where chemicals and pharmaceuticals are used such as hospitals, factories, laboratories, beauty salons, and photographic laboratories (Volatilized chemicals and solvents may degrade mechanical parts, cause water leaks and cause things to get wet, such as household items, etc.)
■ Places with high levels of electromagnetic waves such as near an electromagnetic cooker, speakers, etc.
The unit may not function correctly.
■ Places exposed to soot (conductive dust) released by candles, aromatic candles, etc.
The performance of the filters may be impaired, causing the room to become dirty due to the build-up of dust that is not captured.
■ Do not use cosmetics etc., containing silicone* near the unit.
* Hair care products (split ends coating agents, hair mousse, hair treatment agents etc.), cosmetics, antiperspirants, antistatic agents, waterproof sprays, lustering agents, glass cleaners, chemical wiping cloths, wax, etc.
- Insulators such as silicone may adhere to the needle of the streamer unit, and the streamer discharge may not be generated. If that happens, clean the streamer unit. Page 32
- The dust collection filter may become clogged up, resulting in loss of air purifying capacity.
■ Do not use an ultrasonic humidifier or similar appliance near the unit.
The dust collection filter may become clogged up, resulting in loss of air purifying capacity.
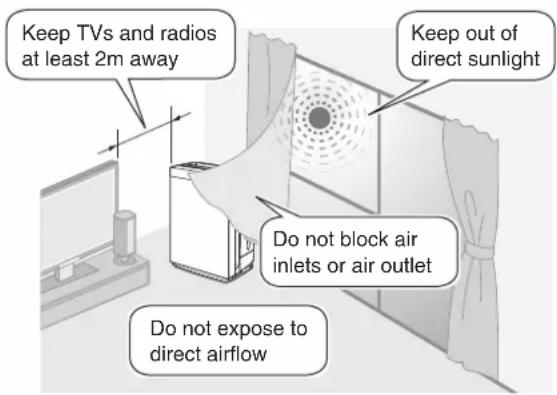
About streamer discharge and active plasma ions
In some cases the air outlet may emit a slight odour as trace amounts of ozone are generated. However, the amount is negligible and is not harmful to your health.
- This product cannot eliminate all of the toxic substances in tobacco smoke (carbon monoxide etc.)
- Odours cannot be completely removed if they are being constantly generated (building material odours, pet odours, etc.)
Names of Parts and Operations
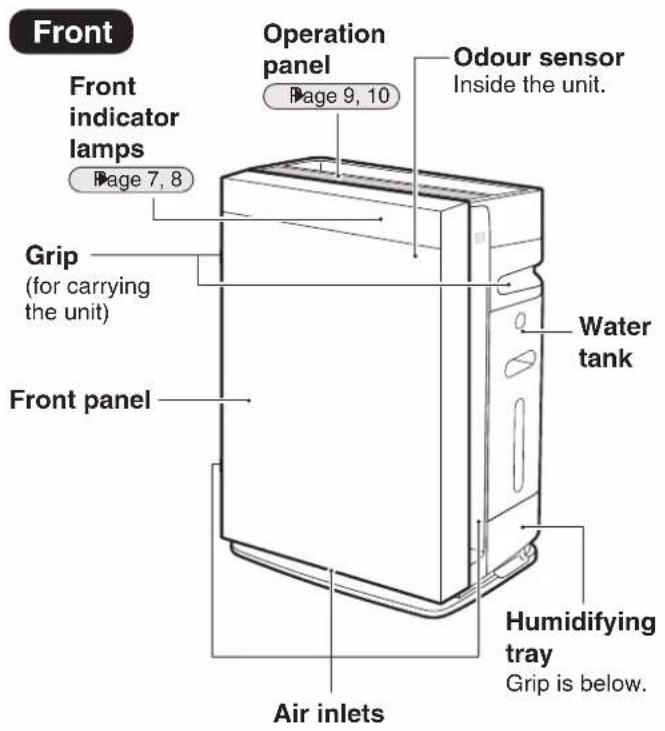

Inside unit
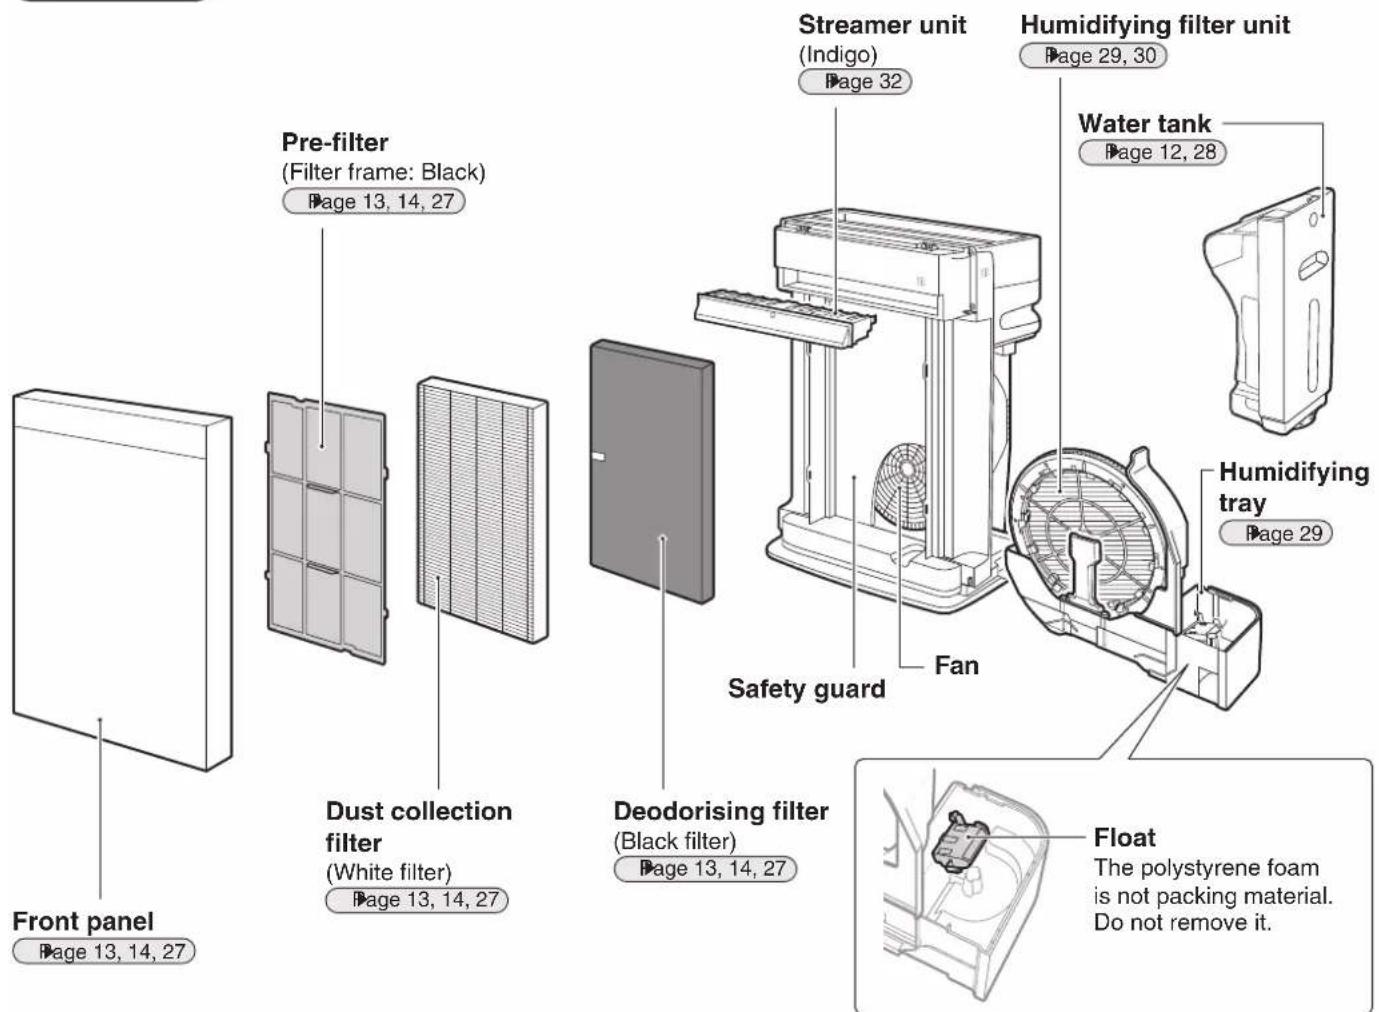
Names of Parts and Operations
Front indicator lamps
Dust sensor lamp/PM2.5 sensor lamp
Indicates the volume of ambient dust in 3 colours: blue, orange, red.
- Blue indicates that the air is clean.
- The dust/PM2.5 sensor can detect small (about 1.0-2.5μm) and large (about 2.5μm and above) dust particles. The PM2.5 lamp lights in response to small particles and the dust lamp lights in response to large dust particles.
Lamp colour
Blue range
Dust
Few Many
■ After operation is started, the lamp will light blue for about the first minute regardless of air impurity level.
If the responsiveness of the dust/PM2.5 sensor is poor, change the sensitivity setting of the sensor. Page 23
If the airflow rate setting is set to "Turbo", the responsiveness of the dust/PM2.5 sensor may be poor. The strong airflow causes dust to be drawn into the air inlets before it can be detected by the dust/PM2.5 sensor. This is normal (not a malfunction).
Dust/PM2.5 sensor detection range
| Detectable matter |
| house dust, tobacco smoke, pollen, mite droppings and remains, pet hairs, diesel particulate matter |
| Sometimes detectable |
| steam, oil smoke |
HUM monitor lamp (about ambient humidity) [blue]
Indicate room humidity within the range 20%-90%. (1% increments)
When the humidity level is below 20%, "20" is displayed. When the humidity level is above 90%, "90" is displayed.
- The lamp will light up even when only the Air purifying operation is active.
- [—] is displayed for about 30 seconds immediately after operation start regardless of the humidity.
- If there is a power failure, then power is restored and operation is started again, [—] is also displayed for about 30 seconds.
At times the humidity level indicated on the unit may differ from other hygrometers.
- This is because the flow of air causes temperature and humidity to vary throughout the room. Please consider the indications to be a rough estimate of ambient humidity.
When the HUM monitor lamp is blinking Page 35
Odour sensor lamp
Indicates the intensity of odours in 3 colours: blue, orange, red.
- Blue indicates that the air is clean.
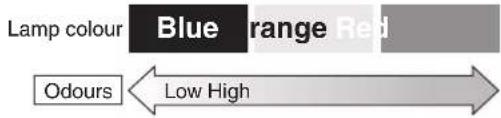
If operation is started immediately after the power supply plug is inserted, the lamp will light blue for about the first minute.
If odour intensity levels are unchanging, the sensor may not respond even if there is a strong odour in the air.
■ The following types of odours may not be detected: pet odours that do not include ammonia, garlic odours, etc.
As odour perception varies by person, in some cases an odour may be sensed even when the lamp is blue. If the odour bothers you, select a high airflow rate setting.
Page 16
The basic sensitivity of the odour sensor will be determined by odour levels in about the first minute after the power supply plug is inserted every time. Insert the power supply plug when the air is clean (odour-free).
Odour sensor detection range
| Detectable matter |
| tobacco odours, cooking odours, pet odours, toilet smells, waste smells, mould odour, sprays, alcohol |
| Sometimes detectable |
| sudden changes in temperature/humidity, steam, oil smoke, gas emitted from combustion-based heating devices |
![HUM monitor (%) TANK EMPTY STREAMER Streamer lamp [blue] Lights up when the streamer is active. Indicates that it is time to clean the streamer unit by blinking. Page 27, 28, 32](/content/2026/05/896938/images/361855166b4d89e7e1e4a1b3f40040dcb5f14a9ba1b558779851ffa0e37746e5.jpg)
Water supply lamp [red]
- When water in the water tank is depleted during humidifying operation a tone (3 long beeps) will sound, the lamp will light up, and humidifying operation will stop.
(Air purifying operation will continue with the HUM lamp lit up.)
• After lighting up, the water supply lamp may be on and off a few times, however, this is normal (not a malfunction). - Stop operation, unplug the power supply plug, and then fill the water tank with water. Page 12
• To stop the notification tone (3 long beeps) from sounding, change the setting. Page 24
Names of Parts and Operations
Operating panel
Child proof lock
Hold down to set.
BRIGHTNESS for about 2 seconds
(The same applies when you want to cancel.)
Child proof lock lamp [orange]
Lamp will be lit when the child proof lock is active. When lit up, operations will be restricted. When buttons are pressed, only a tone (3 short beeps) will sound, preventing misoperation by small children.
Note
If the unit is unplugged when child proof lock is active, child proof lock is turned off.
GOOD SLEEP button
Operation will be performed with a reduced airflow rate and indicator lamp brightness. Page 20
GOOD SLEEP MODE lamp [green]
Lamp will light up when in GOOD SLEEP MODE.
Page 20
HUM lamp [orange]
Lamp will light up when the humidifying operation is active.
![DAIKIN MCK70YBFVM - HUM lamp [orange] - 1](/content/2026/05/896938/images/9aef32e2d36deae687a22d48748fb0dc5832bde8655226fda7dc54d4c85b63a5.jpg)
(Push for 2 sec.)
BRIGHTNESS
GOOD SLEEP
![DAIKIN MCK70YBFVM - HUM lamp [orange] - 2](/content/2026/05/896938/images/21ee1a506cdd3fd2acc6485bd545d6d4bc96bca37486b8fac7ad1a2bf3f48f58.jpg)
HUM
![DAIKIN MCK70YBFVM - HUM lamp [orange] - 3](/content/2026/05/896938/images/ef1ed23cf6c1d5934f8f8e4bc7d0f361c2133cbd1a639c5ae9d2809d63143a00.jpg)
BRIGHTNESS button
During operation, each time you press the button, the brightness of the operation panel lamps and the front indicator lamps are changed at the same time.

flowchart
graph LR
    A["BRIGHT OFF DIM"] --> B[" "]
    B --> C[" "]
Use this function if the lamps bother you during sleep hours, etc.

natural_image
Pure technical line drawing of a mechanical component without any text, numbers, or symbolsOperating panel lamp

Does not turn off even when "OFF" is selected.
Front indicator panel
- Does not light up when "OFF" is selected.
- Even if "OFF" is selected, the lamps will light up or blink in the following cases.
Water supply lamp lights up If the water tank becomes empty during humidifying operation Streamer lamp blinks If it is time to perform maintenance on the streamer unit
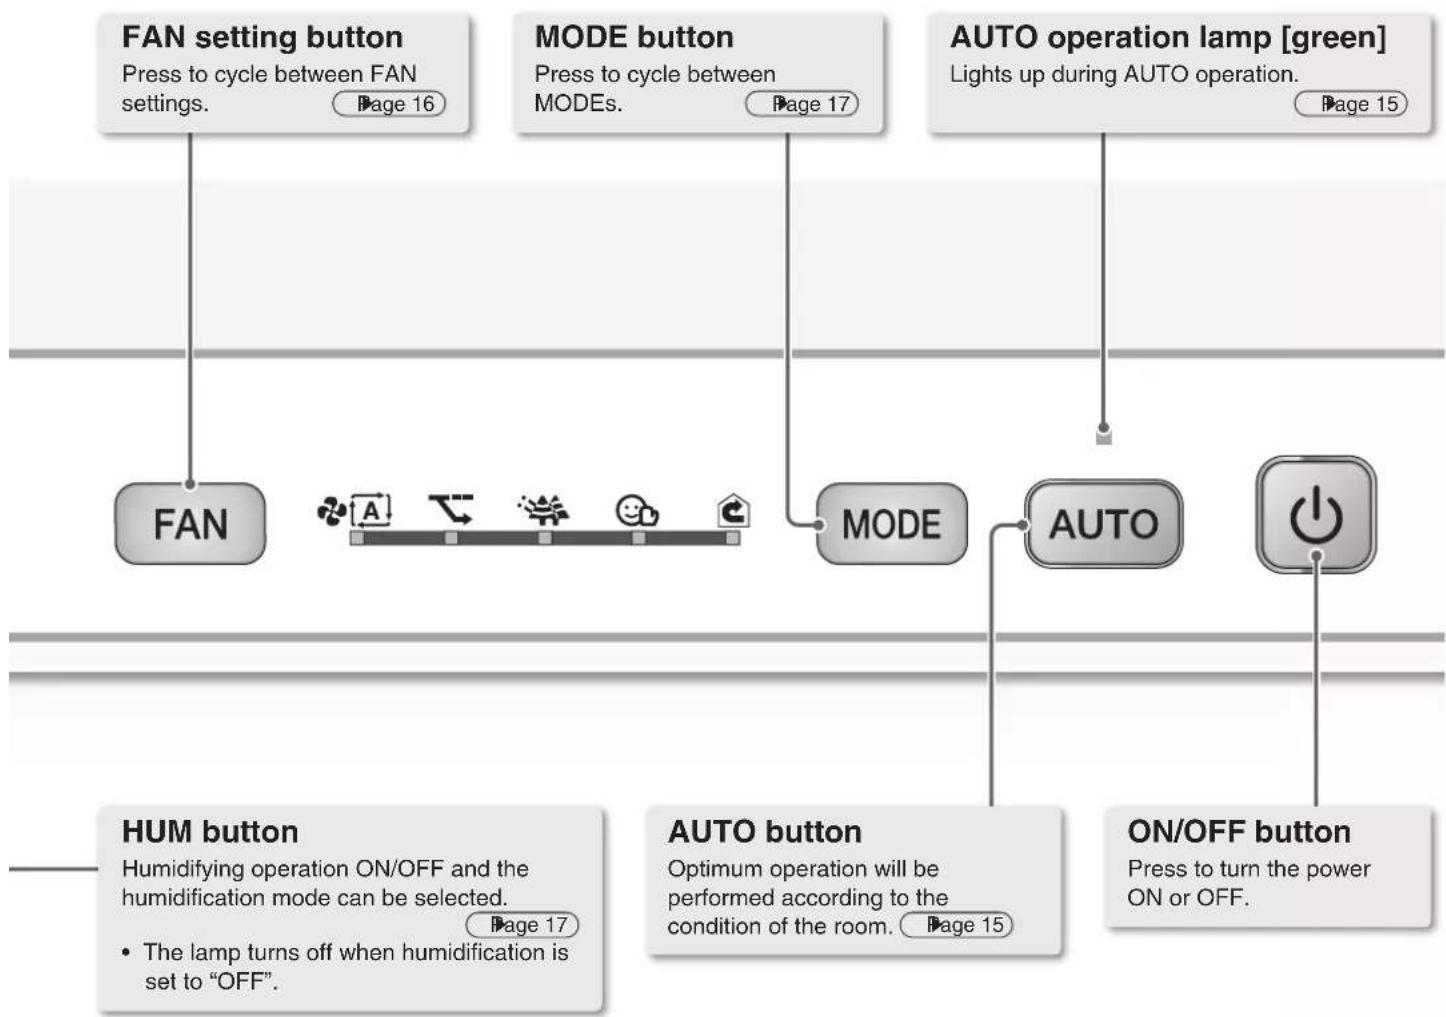
flowchart
graph TD
    A["FAN setting button\nPress to cycle between FAN settings."] --> B["FAN"]
    C["MODE button\nPress to cycle between MODEs."] --> D["MODE"]
    E["AUTO operation lamp [green"]\nLights up during AUTO operation.] --> F["AUTO"]
    G["HUM button\nHumidifying operation ON/OFF and the humidification mode can be selected."] --> H["Page 17"]
    I["AUTO button\nOptimum operation will be performed according to the condition of the room."] --> J["Page 15"]
    K["ON/OFF button\nPress to turn the power ON or OFF."] --> L["Power icon"]
    B --> M["Motor"]
    D --> N["Motor"]
    F --> O["Motor"]
    J --> P["Motor"]
About the airflow rate and humidification mode symbols
Symbol table *The size of the symbols varies in accordance with the airflow rate setting.
| Fan Humidification mode | |||||||
| Mark | |||||||
| Setting | Quiet | Low | Standard | Turbo | Low | Standard | High |
Preparation Before Operation
1 Checking accessories


Operation manual....1

Casters 4
Under the louvre
2 Installing
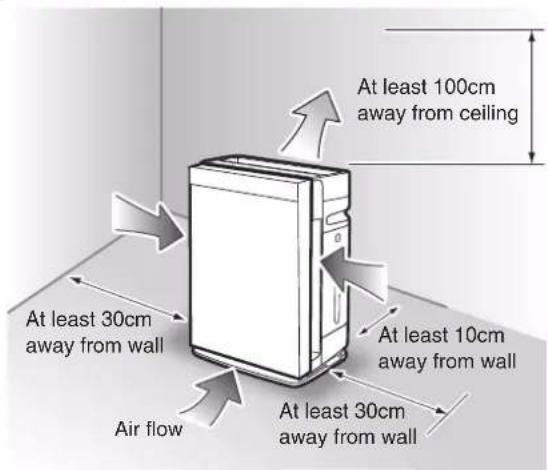
Attention
- To avoid staining of walls, position the unit in accordance with the positioning measurements in the illustration. However, note that since this unit draws in dirty air, certain types of wall may become stained even if the measurements are adhered to. In such cases, be sure to maintain sufficient distance between the unit and the wall.
- When used for a prolonged period in the same location, the floor and surrounding walls may become stained as air is drawn into air inlets near the base of the unit. Periodic cleaning is recommended.
Note
The airflow blows out slightly to the right, but this is not a defect.
Pointers for good positioning
- Choose a position from where airflow can reach all areas of the room.
- Place on a stable surface. If the unit is placed on an unstable surface, vibrations from the unit may be amplified.
- If interference from the power circuit inside the unit or cables causes disturbance of TV screen images or the emission of static noise from nearby radios or stereos, move the unit to at least 2m away from the device. Keep cordless phones and radio-controlled clocks away from the unit also.
3 Attaching the casters
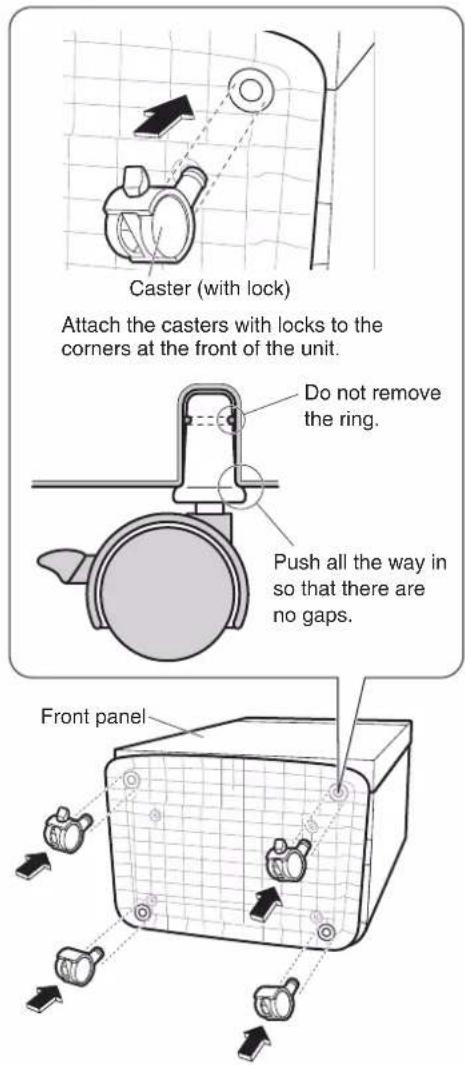
Attention
- When attaching the casters, lay the unit down so that the front panel faces upward.
The front panel may be scratched if faced downward. - Make sure to move the unit slowly as floor surfaces may be scratched depending on the flooring material.
- If attaching the caster after using the unit, discard the water in the water tank and humidifying tray.
4 Preparing the water tank (for Humidifying operation)
1. Take out the water tank and remove the cap.

2. Fill the water tank with tap water and close the cap.
Attention
Do not pour any of the following into the water tank.
- Warm water (40°C or above), aroma oil, chemical agents such as hypochlorous acid, unclean water, water containing aromatic substances or detergent, etc.
These may cause deformation of the unit or malfunction.
• Water from a water purifier, ionized alkaline water, mineral water, well-water etc.
These may lead to the propagation of mould or bacteria.
- Perform in a place where spilling water will not cause a problem.
- Clean the water tank by shaking a small amount of water inside before filling up the water tank with water.
- For maintenance procedures refer to Page 28.

Securely tighten the cap on the water tank. If not done, water leakage could result.
- The water tank will be heavy when filled with water. Hold the water tank firmly with both hands when carrying.
- Avoid touching the valve in the centre of the cap. Water in the water tank will leak.
• After tightening the cap, turn the water tank upside down (so that the cap faces downward) and check for any leaks.
![[Viewed from below] Do not touch the valve in centre of the cap Valve](/content/2026/05/896938/images/112ee3b2e6d60c016837f6cc09197e0c0fdc9656c85f3874c00d2aa3dd6c58dd.jpg)
3. Put the water tank in the unit.
- Hold the grip and fit the water tank into the humidifying tray.

Attention
As leaving any residual water in the humidifying tray will lead to bad odours and dirt build-up, be sure to discard any residual water in the humidifying tray each time the water tank is refilled. If there is a bad odour or dirt, refer to Page 29.
Preparation Before Operation
5 Attaching the deodorising filter
1. Remove the front panel.
- Push the protrusions (2 places on the left/right), pull toward you, and remove.
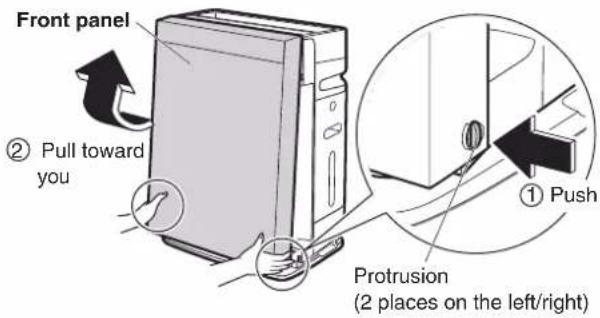
If the protrusion on the front panel is detached
- Please attach it using the illustration as a reference.
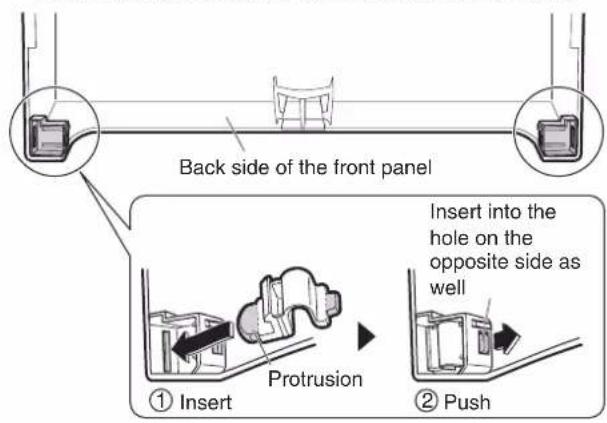
2. Peel off the fixing tape (4 places) and remove the cardboard.

3. Remove the pre-filter.
- While holding the tab in the centre, remove the hooks (4 places on the left/right) from the holes in the unit (4 places on the left/right).

4. Remove the dust collection filter.
- Put your finger into the notch at the bottom of the unit, then lift and remove the dust collection filter.
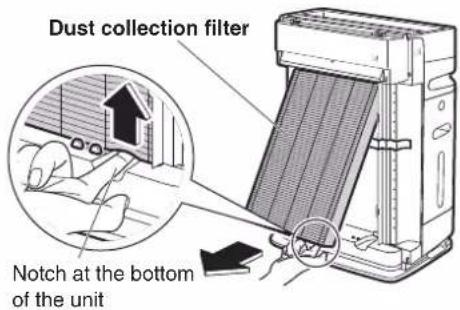
5. Peel off the fixing tape and remove the deodorising filter.
- Pull the upper part of the deodorising filter toward you, and remove it.

6. Remove the deodorising filter from the bag.
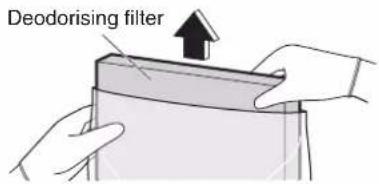
Wear gloves when working. (Dust from the deodorising filter may make your hands dirty.)
- Observe local waste separation rules when disposing of the tape, filter bag and desiccant.
7. Attach the deodorising filter.
- Attach the deodorising filter by first inserting the bottom part into the deodorising filter holders (2 places on the left/right).
(The deodorising filter has no special orientation, so installing it upside-down or backwards does not matter.) - When secured under the protrusions of the front safety guard, the deodorising filter may appear to be damaged, but the performance will not be affected.

8. Attach the dust collection filter.
- Please check that the deodorising filter is attached.
- Attach the dust collection filter by first inserting the bottom part fully behind the protrusions.

Dust collection filter
The dust collection filter has a special orientation.
Check the symbol on the upper part of the filter before attaching.
9. Attach the pre-filter.
- While flexing the pre-filter, insert the hooks (4 places on the left/right) into the holes in the unit (4 places on the left/right). (The pre-filter has no top-bottom orientation.)
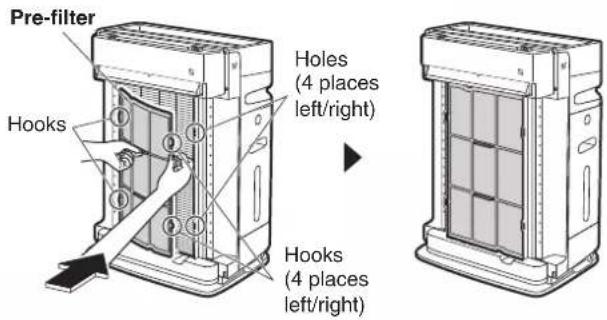
10. Attach the front panel.
- Hook the hooks at the top of the panel into the groove in the upper part of the unit (2 places), then close the panel.
Groove in the upper part of the unit (2 places left/right)

Attention
Be sure to operate with a pre-filter, dust collection filter, and deodorising filter attached. If the unit is operated without the filters attached, malfunction may result.
6 Inserting the power supply plug into the socket
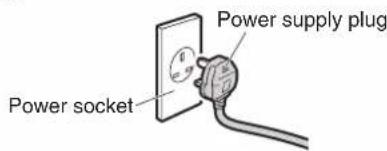
- The basic sensitivity of the odour sensor will be determined by odour levels in about the first minute after the power supply plug is inserted every time. Insert the power supply plug when the air is clean (odour-free).
Operation

WARNING
Do not turn off the unit by unplugging it from the power socket. (Fire due to overheating or electric shock may result)

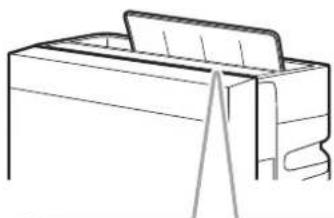
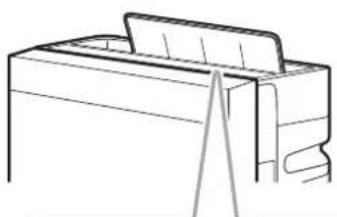
Please open the louvre by hand before operation.
(As the louvre is hand-operated, it will not close automatically at operation end.)
The louvre can adjust the airflow in 3 directions.
If you want to change the airflow direction


When you want to let the unit decide the best operation mode (AUTO operation)
Fill the water tank with water. Page 12
Attention
- Make sure that the humidifying filter unit is attached when using this operation.
- Change the water in the humidifying tray and water tank everyday.
- Be sure to use tap water for the water in the water tank.
1. Press
AUTO
- Optimum operation will be performed according to the condition of the room.
- The AUTO operation lamp (green) lights up.
- If AUTO is pressed during AUTO operation, the lamp corresponding to the current operation mode will blink for about 5 seconds.
| Operation mode MODE lamp HUM lamp ECONO MODE lamp | |||
| Air purifying operation | (AUTO FAN) | - | - |
| Humidifying operation | (AUTO FAN) | Either “(Low), (Standard), (th)” | - |
| Monitoring mode - | - | Blinking | |
About AUTO operation
The unit automatically switches between air purifying operation and humidifying operation based on the indoor temperature and humidity conditions.
- The airflow rate is adjusted automatically.
- If the humidity is high, air purifying operation will be carried out.
- If the air is clean and the set humidity has been reached (during humidifying operation), the mode automatically switches to monitoring mode after a while. Page 18
■ Room conditions and target humidity

bar
| Room temperature (°C) | Target humidity (%) | |---|---| | 1 | 60 | | 20 | 50 | | 30 | 40 |- Pressing ⏻ during operation will cause operation to stop.
Note
- Indoor temperature may fall when the Humidifying operation is running.
- Gurgling or splashing sounds may be generated when the Humidifying operation is running, however, this is normal (not a malfunction). ▶page 36
- If the set humidity is reached or the water supply lamp lights up during humidifying operation, humidifying operation will stop, but air purifying operation will continue.
Do not move the unit, or attach or remove parts to/from the unit while it is in operation. Water leakage, breakage or malfunction may result.
natural_image
Pure technical line drawing of a mechanical component or bracket (no text or symbols)
Using Air Purifying Operation
1. Press

- Press again to turn OFF.
- If AUTO operation was in progress last time, AUTO operation will be performed automatically. If you want to perform only air purifying operation, press FAN or MODE
- If humidifying operation was running previously, humidifying operation will start automatically. If you want to perform only air purifying operation, press HUM until the HUM lamp turns off.
Attention
When not performing humidifying operation, discard the water in the water tank and humidifying tray.
Changing the Airflow Rate
1. Press
FANing operation to change the airflow rate.
• Each press cycles between the FAN lamps [green]

flowchart
graph LR
    A["Start"] --> B["Standard"]
    B --> C["Turbo"]
    C --> D["Low"]

Quiet
A gentle breeze is emitted. Recommended for use during sleep hours.
As the deodorising capacity is reduced, it is recommended that the FAN setting be set to Standard or above if odour needs to be quickly eliminated from a room.

Turbo
The ambient air is quickly purified using a large airflow. Recommended for use while you are cleaning up a room.
Note
- At the time of purchase, the unit is set to carry out air purifying operation in AUTO FAN MODE.
- If the power supply plug is unplugged, or the unit is stopped and started again, the operation that was in progress last time will start again. (If the unit is stopped during GOOD SLEEP MODE and started again, the operation that was in progress before GOOD SLEEP MODE was selected will start again.)
• Operation settings cannot be performed for about 2 seconds immediately after the power supply plug is inserted.
Operation

Using Humidifying and Air Purifying Operation
Fill the water tank with water. Page 12
• Air purification is always performed with humidification (It is not possible to run the Humidifying operation exclusively.)
Attention
- Make sure that the humidifying filter unit is attached when using this operation.
- Change the water in the humidifying tray and water tank everyday.
- Be sure to use tap water for the water in the water tank.
- As leaving any residual water in the humidifying tray will lead to bad odours and dirt build-up, be sure to discard any residual water in the humidifying tray each time the water tank is refilled.
1. Press

2. Press HDM switch the humidification mode.
• Each press cycles between the HUM lamps (green).

flowchart
graph LR
    A["Start"] --> B["Step 1: High"]
    B --> C["Step 2: Low"]
    C --> D["Step 3: Standard"]
- Pressing during operation will cause operation to stop.

Low
Targets a humidity level of around 40%*.

Standard
Targets a humidity level of around 50%*.

High
Targets a humidity level of around 60%*.
Depending on room conditions such as indoor and outdoor temperatures and humidity levels, the target humidity level may be exceeded (or not reached).
Page 39
Operating the Unit in a MODE
Select a MODE specific to our needs.
Airflow is adjusted automatically when the unit is running in a MODE.
1. Press Modeling operation.
• Each press cycles between the MODE lamps [green].

flowchart
graph LR
    A["(AUTO FAN)"] --> B["(ECONO)"]
    B --> C["(ANTI-POLLEN)"]
    C --> D["(MOIST)"]
    D --> E["(CIRCULATOR)"]
Note
- Indoor temperature may fall when the Humidifying operation is running.
- Gurgling or splashing sounds may be generated when the Humidifying operation is running, however, this is normal (not a malfunction). Page 36
- If the set humidity is reached or the water supply lamp lights up during humidifying operation, humidifying operation will stop, but air purifying operation will continue.
- The humidifier is turned ON when MOIST MODE is selected.
- Even if you select a mode other than MOIST MODE, if the unit remains in MOIST MODE for about 3 seconds or more while you are cycling through the modes, Humidifying operation will be "ON".
- If HUM is pressed during AUTO operation or MOIST MODE, humidification will continue to be "ON" and AUTO FAN MODE will be set.
MODE Usage and Function
Automatic airflow rate adjustment
AUTO FAN
FAN setting (Quiet, Low, Standard, High*) is automatically adjusted according to the degree of air impurity and humidity (when the Humidifying operation is active).
Purifying capacity increases as airflow rate rises.
* The maximum airflow rate during AUTO FAN MODE is "High", which is less powerful than "Turbo".
- Press HUM to select the humidity level.
- Degree of air impurity corresponds to the volume of dust and the intensity of odours in the ambient air.
Saving energy
In Power saving mode within ECONO MODE, the FAN setting automatically switches between Quiet and Low only. Power consumption (*1) and operating sounds are reduced.
If the air is clean and the set humidity level has been achieved (when the Humidifying operation is active), after a short while, Monitoring mode automatically activates.
Recommended for use during sleep hours.
*1 By comparison to AUTO FAN MODE (about 12.6Wh), power consumption in ECONO MODE (about 6.7Wh) is about 5.9Wh lower. Test conditions: operation in 10m² area over 1 hour. Assuming 1 cigarette was smoked immediately after the unit was turned on.
ECONO
Power saving mode
FAN setting switches automatically between Quiet and Low.
If the air is clean and the set humidity level has been achieved, after a short while...

If the humidity level falls, or dust or odours are detected...
Monitoring mode
- The fan starts and stops periodically. Dust, odours, and the humidity level are monitored.
- The following functions are turned off, further reducing power consumption.
Streamer OFF OF Humidifying (*2)
Active plasma ion OFF
*2 The humidifier ON/OFF lamp remains lit up.
- As the FAN setting is limited to Quiet and Low, air purifying and humidifying capacity is reduced.
- As air is not drawn in when the fan has stopped, the dust/PM2.5 sensor, odour sensor, and humidity sensor reduce in sensitivity. To prevent this reduction in sensitivity, turn Monitoring mode OFF.
- FAN setting is adjusted automatically. Airflow cannot be adjusted manually.
- Press HUM to select the humidity level.
Reducing pollen levels
ANTI- POLLEN
A gentle air current is created by switching every 5 minutes between the FAN setting Standard and Low so that pollen can be drawn in and caught before it reaches the floor.
- Press HUM to select the humidity level.
Operation
MODE Usage and Function
Combating dry throat and skin
Humidity is automatically adjusted to be gentle on the throat and skin.
MOIST
- As humidity is kept relatively high, if the temperature difference between outdoors and indoors is large, condensation may result.
- FAN setting is adjusted automatically. Airflow cannot be adjusted manually.
- Humidification mode is set automatically. Humidification mode cannot be changed.
- If HUM is pressed when MOIST MODE is active, MOIST MODE stops and AUTO FAN MODE is activated.

bar
| Room temperature (°C) | Target humidity (%) | | --------------------- | ------------------- | | 302520 | 70% | | 302520 | 60% | | 302520 | 50% | | 302520 | 40% |CIRCULATOR
When you want to circulate the air in the room
The air in the room is kept clean and local variations in temperature are suppressed. It is even more effective if the unit is installed opposite an air conditioner.
The airflow rate is "High" for about 30 minutes after operation start, in order to circulate the air in the room.
After that, any temperature change around the unit is detected, and the airflow rate is automatically adjusted.
(There is no temperature adjustment function.)
- If the indoor temperature is low, the airflow rate may not be "High". (To suppress any feelings of coldness caused by air currents)
natural_image
Line drawing of a mechanical component with a triangular support (no text or symbols)
Operating in GOOD SLEEP MODE
If using together with humidifying operation, fill the water tank with water. Page 12
Attention
- Be sure to attach the humidifying filter unit before operating.
- Change the water in the humidifying tray and water tank everyday.
- Be sure to use tap water for the water in the water tank.
- As leaving any residual water in the humidifying tray will lead to bad odours and dirt build-up, be sure to discard any residual water in the humidifying tray each time the water tank is refilled.
1. Press
GOOD SLEEP
• The GOOD SLEEP MODE lamp (green) lights up.
• The humidity can be changed with HUM.
- When you want to cancel, press FAN , .MODE then change the airflow rate/mode.
About GOOD SLEEP MODE
Operation is performed with a reduced airflow rate and indicator lamp brightness, which makes this mode suitable for when you are sleeping or taking a nap, etc.
- The airflow rate is adjusted automatically between 3 levels, “♣ (Quiet)”, “♣ (Low)” and “♣ (Standard)”.
- The indicator lamp brightness is set to "OFF".
- Streamer discharge stops. (Quietness is prioritized. Deodorising performance is reduced.)
- If the water tank becomes empty, the water supply lamp lights up, but a tone does not sound.
- If BRIGHTNESS is pressed during operation in GOOD SLEEP MODE, the brightness of the indicator lamps cycles between "DIM" and "OFF".
• After 8 hours pass, the unit will return to the operation mode that it was in before GOOD SLEEP MODE.
- Pressing ⏻ during operation will cause operation to stop.
Note
- Indoor temperature may fall when the Humidifying operation is running.
- Gurgling or splashing sounds may be generated when the Humidifying operation is running, however, this is normal (not a malfunction). Page 36
- If the set humidity is reached or the water supply lamp lights up during humidifying operation, humidifying operation will stop, but air purifying operation will continue.
Advanced Settings
Operating panel
Active Plasma Ion Output Settings
If the smell of ozone bothers you
Active plasma ion generation operation can be turned "OFF". (Setting at the time of purchase: ON)
Settings are remembered even if the unit is unplugged.
- If the odour of ozone continues to bother you even after output has been set to OFF, set streamer output to Low. Page 22
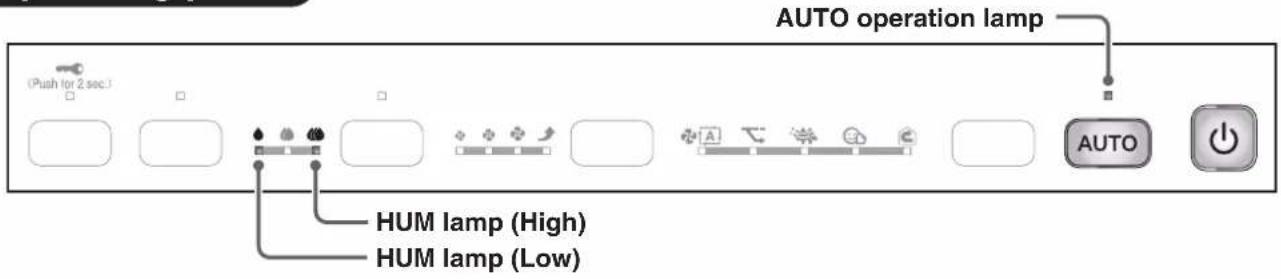
- Hold down ⏻ for about 5 seconds and when a short beep sounds, press AUTO while pressing ⏻.
(Setting can be performed either during operation or while operation is stopped.)
- When a short beep sounds, release and . AUTO
- The AUTO operation lamp (green) blinks for about 5 seconds and then lights up.
- One of the HUM lamps “♠ (Low)/(High)”, will blink for about 5 seconds and then the lamp corresponding to the current setting will light up.
| Current setting | HUM lamp (Low) | HUM lamp (High) |
| ON OFF Lit up | ||
| OFF Lit up | OFF | |
- Press to change the output settings.
- Each press cycles between active plasma ion generation operation "ON" and "OFF". (The AUTO operation lamp (green) will remain lit up.)
- If the lamp does not change, unplug the unit, wait at least 5 seconds, then re-insert the power supply plug and repeat the above procedure from the beginning.
-
Press After selecting the new setting.
-
A short beep sounds and the AUTO operation lamp (green) will blink.
- The HUM lamp “ (Low)/ (high)” blinks depending on the setting.
| Operation setting | HUM lamp (Low) | HUM lamp (High) |
| ON OFF Blinking | ||
| OFF Blinking OFF | ||
- While the lamp is blinking, unplug the power supply plug, wait at least 5 seconds, and then insert the power supply plug again. Setting is now complete.
- If this procedure is not performed, the unit will not return to regular operation mode.
Note
Settings are remembered even if the unit is unplugged.
Operating panel

Streamer Output Settings
If the hissing sound generated by the streamer discharge or the odour of ozone bothers you
Streamer output can be set to "Low". (Settings at time of purchase: Normal)
It is recommended that the streamer be set to "Normal" as deodorising capacity is reduced when set to "Low".
- Hold down ⏻ for about 5 seconds and when a short beep sounds, press BRIGHTNESS ※※ while pressing ⏻.
(Setting can be performed either during operation or while operation is stopped.)
- When a short beep sounds, release
- The MODE ANTI-POLLEN lamp blinks for about 5 seconds and then lights up.
- One of the FAN lamps “♣ (Quiet)/♣ Standard)” will blink for about 5 seconds and then the lamp corresponding to the current setting will light up.
| Current setting | FAN lamp ❖ (Quiet) | FAN lamp ❖ (Standard) |
| Normal OFF | Lit up | |
| Low Lit up | OFF |
- Press to change the output settings.
• Each press cycles between "Normal" and "Low" streamer output. (The MODE ANTI-POLLEN lamp will remain lit up.)
- If the lamp does not change, unplug the unit, wait at least 5 seconds, then re-insert the power supply plug and repeat the above procedure from the beginning.
If the streamer output is set to "Low"
| Setting Streamer | ||
| FAN | Quiet, Low OFF | |
| Standard, Turbo | ON | |
| MODE | AUTO FAN, ANTI-POLLEN, MOIST, CIRCULATOR | Depends on airflow rate |
| ECONO | OFF | |
-
Press after selecting the new setting.
-
A short beep sounds and the MODE ANTI-POLLEN lamp will blink.
- The FAN lamp “♣ (Quiet)/♣ Standard)” blinks depending on the setting.
| Output setting | FAN lamp♣ (Quiet) | FAN lamp♣ (Standard) |
| Normal OFF | Blinking | |
| Low | Blinking | OFF |
- While the lamp is blinking, unplug the power supply plug, wait at least 5 seconds, and then insert the power supply plug again. Setting is now complete.
- If this procedure is not performed, the unit will not return to regular operation mode.
Note
Advanced Settings
Operating panel

Dust/PM2.5 Sensor Sensitivity Setting
When the sensitivity of the dust/PM2.5 sensor does not meet your preferences
The sensitivity setting of the dust/PM2.5 sensor can be changed. (Setting at time of purchase: Normal)
- Hold down ⏻ for about 5 seconds and when a short beep sounds, press FAN while pressing ⏻.
(Setting can be performed either during operation or while operation is stopped.)
- When a short beep sounds, release and . FAN
- One of the FAN lamps “♣ (Low)/♣ (Standard)/♦ (Turbo)” will blink for about 5 seconds and then the lamp corresponding to the currently set sensitivity will light up.
- Press to change the sensitivity setting.
• Each press cycles between the FAN lamps allowing you to change the sensitivity.
To set sensitivity High ▶ Select the FAN lamp (Turbo).
To set sensitivity Low ▶ Select the FAN lamp ^◆ (Low).

- Setting is indicated using the FAN lamps. If the FAN lamps do not change, unplug the unit, wait at least 5 seconds, then re-insert the power supply plug and repeat the above procedure from the beginning.
- Press After selecting the new setting.
- A short beep sounds and the new setting will blink.
- While the lamp is blinking, unplug the power supply plug, wait at least 5 seconds, and then insert the power supply plug again. Setting is now complete.
- If this procedure is not performed, the unit will not return to regular operation mode.
Note
Operating panel

Notification Tone Setting
If the tone emitted when the water supply lamp lights up bothers you
You can mute the notification tone (3 long beeps), so the tone does not sound. (The error notification alarm cannot be turned off.)
1. Hold down HUM for about 3 seconds with the power supply plug inserted and the unit turned off.
• Each time HJ Held down for about 3 seconds, the setting switches between ON and OFF.
[When the setting is changed to OFF]
A short beep sounds and the HUM lamp 🔒 (Standard) blinks for about 5 seconds.

[When the setting is changed to ON]
A short beep sounds and the HUM lamp (Standard) lights up for about 5 seconds.
- Settings are remembered even if the unit is unplugged.
Advanced Settings
Operating panel

Settings of Modes within ECONO MODE
If you wish to set ECONO MODE and AUTO operation monitoring mode to "OFF"
You can set ECONO MODE and AUTO operation monitoring mode to "OFF". (Setting at time of purchase: ON) If you are concerned about the sensitivity of the dust/PM2.5 sensor, odour sensor, or humidity sensor, set to "OFF".
- Hold down ⏻ for about 5 seconds and when a short beep sounds, press MODE while pressing ⏻.
(Setting can be performed either during operation or while operation is stopped.)
- When a short beep sounds, release and . MODE
- The HUM lamp “♠ (Low)” and ECONO MODE lamp blinks for about 5 seconds and then lights up. The ECONO MODE lamp will light up or blink depending on the setting status.
- Press to change the setting.
- Each press turns the ECONO MODE lamp ON or OFF. (The HUM lamp “ (Low)” will remain lit up.)
To turn Monitoring mode ON ▶ Turn on the ECONO MODE lamp.

To turn Monitoring mode OFF ▶ Turn off the ECONO MODE lamp.

- Setting is indicated using the ECONO MODE lamp. If the ECONO MODE lamp does not change, unplug the unit, wait at least 5 seconds, then re-insert the power supply plug and repeat the above procedure from the beginning.
- Press Member selecting the new setting.
- A short beep sounds and the HUM lamp “♠ (Low)” will blink. When monitoring mode is turned ON, the ECONO MODE lamp also blinks.
- While the lamp is blinking, unplug the power supply plug, wait at least 5 seconds, and then insert the power supply plug again. Setting is now complete.
- If this procedure is not performed, the unit will not return to regular operation mode.
Note
- This page is blank to make the next chapter easier for users to read, as well as to satisfy typesetting constraints.
Maintenance Quick Reference Table
For how to remove/attach the front panel, pre-filter, dust collection filter, deodorising filter, and water tank, refer to "Preparation Before Operation". Page 12-14
For other parts, refer to the page associated with the part.
1

natural_image
Simple line drawing of a rectangular block with no text or symbols

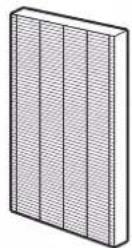

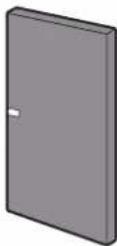
1
Front panel/unit

natural_image
Illustration of a hand cleaning a server rack (no text or symbols)When dirt becomes an issue
Wipe
- Wipe up dirt with a soft damp cloth.
- When dirt buildup is severe, wipe up the dirt with a cloth which has been moistened with kitchen-use neutral detergent.
- Do not use a hard brush etc. (Damage may result)
2
Pre-filter

natural_image
Illustration of a mobile air conditioner unit next to a solar panel array (no text or symbols)About every 2 weeks
Vacuum clean
Wash/Rinse
- After removing any dust using a vacuum cleaner, remove and wash the filter with water, then leave in the shade until completely dry.
- If dirt buildup is severe, clean with a soft brush or kitchen-use neutral detergent and thoroughly rinse off the detergent, then leave in the shade until completely dry.
3
Dust Collection Filter

About every 10 years
Replace
Do not use water
Do not vacuum clean
- Do not use a vacuum cleaner or use water when cleaning. (If the filter is damaged or holes are opened etc., dust will pass through the filter and capacity for dust collection will be reduced.)
4
Deodorising Filter

natural_image
Illustration of a hand using a tool to apply material to a rectangular block (no text or symbols)Wear gloves when working. (Dust from the deodorising filter may make your hands dirty.)
When odour or dirt becomes an issue
Vacuum clean
Do not use water
- Remove, then vacuum away dust using a vacuum cleaner. (Installation Page 13, 14)
- If odour becomes an issue, leave the part in a shaded, breezy area. (about 1 day)
- Do not scrub the surface.
- Do not use water when cleaning. (If water is used, the part will lose its shape and become unusable.) Page 34
5
Streamer Unit

natural_image
Line drawing of a sink with a small object above it (no text or symbols)If the streamer lamp blinks
Soak
Wipe
- Do not use petrol, benzine, thinner, polishing compound, paraffin, alcohol, etc. (An electric shock, fire or cracking may result)
-
Do not wash the main unit with water. (An electric shock, fire or malfunction/breakage may result)
-
Observe in order to prevent discolouration or deformation.
- If detergent is used, be sure to wipe it up thoroughly so none remains.
- If warm water is used, make sure that it is 40^ or less.
- Do not leave parts to dry in direct sunlight.
- Do not dry parts using a dryer.
- Do not apply fire to parts.
- If using a vacuum cleaner, be sure not to apply force to or hit the part. (Damage may result)
- Do not apply deodorising spray or other types of spray to the unit, or use near the unit. (Malfunction may result)

6
Air intake for sensor, lens for dust/PM2.5 sensor

_ens for dust/PM2.5 sensor
When dust has built up Vacuum clean
- Vacuum off any dust that has adhered to the air intake for dust/PM2.5 sensor using the vacuum cleaner crevice tool or similar.
① Remove the front panel and the cover for the air intake for dust/PM2.5 sensor.
② The lens is difficult to see even when illuminated with a light. However, even if you can't see it, you can still clean it by lightly rubbing with a dry cotton bud along the left side of the inside.
Lens (internal part) Use the vacuum cleaner crevice tool or similar to remove any dust that has built up around the lens.
③ Place the cover on securely. (Malfunction may result if the cover is off)
About every 3 months Wipe
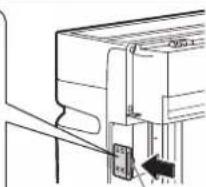
Hook
Push the hook and
pull toward you.
7
Humidifying Tray
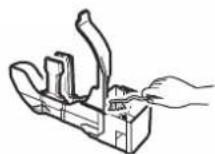
About every 3 days or when odour or dirt becomes an issue
Wash/Rinse
8
Humidifying Filter Unit

About every 1 week or when odour or dirt becomes an issue
Soak
Each season or when water scales (white and brown) are hard to remove
Soak in citric acid or lemon juice
About every 10 years
Replace
9
Water Tank
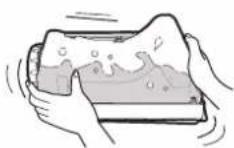
[Inside the water tank] Every time the water tank is refilled
Wash/Rinse
- Clean the water tank by filling it with a small amount of water, closing the cap, and shaking.
- When dirt is hard to remove, clean with a soft brush or diluted kitchen-use neutral detergent and thoroughly rinse off the detergent.

[ Exterior of water tank ] When dirt on the exterior of the water tank becomes an issue
Wipe
- Wipe up dirt with a soft damp cloth.
- When dirt buildup is severe, wipe up the dirt with a cloth which has been moistened with kitchen-use neutral detergent.
Maintenance
Removing the humidifying tray and humidifying filter unit
1. Take out the water tank from the main unit.
Page 12
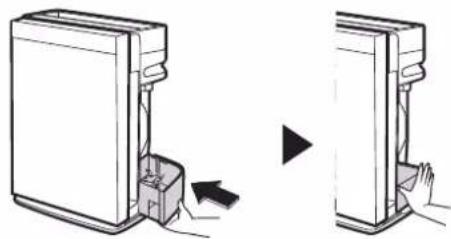
2. Remove the humidifying tray and then remove the humidifying filter unit from the tray.

- Hold the base of the humidifying tray, lift up slightly and pull out.
- Pull out the tray gently, because if there is any water inside, the water surface may ripple and it may spill out.
- When carrying, hold the base of the humidifying tray.
Attaching the humidifying tray and humidifying filter unit
1. Attach the humidifying tray and humidifying filter unit.
① Attach the humidifying filter unit to the tray.

- Attach the humidifying filter unit in the orientation shown in the illustration. If attached in the opposite orientation, it may become impossible to remove the humidifying tray, the humidification performance may deteriorate, or abnormal noise may occur.
② Fully push in the humidifying tray to the main unit.
natural_image
Diagram showing two steps of a device opening, with one being inserted and the other holding a handle (no text or symbols present)Attention
After installing the humidifying tray to the main unit, do not forcibly rotate the humidifying filter unit. Malfunction may result.
2. Put the water tank in. Page 12
Humidifying Tray Wash/Rinse
About every 3 days or when odour or dirt becomes an issue
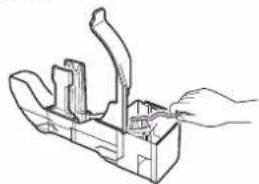
Clean with water.
natural_image
Line drawing of a mechanical component with a hand operating it (no text or symbols)- Use a soft cloth or brush to clean hard-to-reach places.
- For areas with water scales, remove the water scales with a soft cloth or brush soaked in lukewarm or room temperature water in which citric acid has been dissolved.
When removing water scales, be careful not to get the silver ion cartridge wet.
Finally, rinse with water. - Citric acid may be purchased at a pharmacy, drug store or super market.
Note
Depending on water quality and the usage environment, water in the humidifying tray may become discoloured due to water scales etc. Clean it also in such cases.
Attention

Silver ion cartridge
- Do not remove.
- Do not clean with citric acid or baking soda. Loss of the capacity for slime-resistance will result.
If the float detaches from the tray
① Place the float protrusion onto the tray protrusion
② Insert the axle on the float protrusion side into the hole of the tray
③ Insert the axle into the hole of the tray
- Fill the tray with water and check that the float rises to the water surface.
• After checking, be sure to discard the water, then attach the humidification tray to the unit.

Protrusion on tray

Sectional view
When dirty, the humidifying tray and humidifying filter may emit bad odours. Be sure to clean them periodically.
Humidifying Filter Unit Soak
About every 1 week or when odour or dirt becomes an issue
Clean by soaking in lukewarm (about 40^ C or less) or room temperature water.

When odours or dirt are hard to remove
Soak in lukewarm (about 40^ C or less) or room temperature water mixed with kitchen-use neutral detergent or baking soda for about 30 to 60 minutes, then rinse.
Usage quantity:
The quantity indicated in the directions on the detergent

Usage quantity:
2 tablespoons of baking soda in 1L of water

- Baking soda may be purchased at a pharmacy, drug store or super market.
Each season or when water scales (white and brown) are hard to remove
Soak in lukewarm (about 40^ C or less) or room temperature water mixed with citric acid or lemon juice for about 2 hours, then rinse.
Usage quantity:
2 tablespoons of citric acid in 3L of water
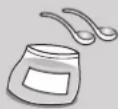
If dirt buildup is an issue, extend the soaking time.
• Citric acid may be purchased at a pharmacy, drug store or super market.
Usage quantity:
1/4 cup of lemon juice per 3 cups of water
- Bottled 100% lemon juice can be used. Use only 100% lemon juice with no pulp (strain juice if necessary).
- If you squeeze a lemon, make sure there are no pieces of peel or pips.
If water scales are not removed and the unit continues to be operated, reduced humidifying capacity and water leakage may result.
Each season, clean using citric acid or lemon juice.
Precautions when cleaning humidifying filter unit
- Do not apply force when cleaning the humidifying filter. (Deformation may result)
- Clean by scrubbing gently with a soft sponge.
-
Do not use a brush or scrub forcibly.
-
To prevent bad odours and discolouration, be sure to thoroughly rinse off the parts with clean water.
(Even if discolouration results, it is not a problem for use.)
Attention
- The parts can be used even if still wet after cleaning.
- If not to be used for a prolonged period, leave the parts in a shaded area to dry off thoroughly, then attach.
- Dirt buildup varies by the usage environment of the humidifying filter.
It is recommended that you clean the parts if you notice an odour from the air outlet or a reduction in humidifying capacity (water usage rate).
Humidifying Filters Replace
Replace about every 10 years\*
About part replacement timing
- Replacement timing depends on usage patterns and the location of the unit. Standard replacement time is about 10 years assuming that the filters are used 8 hours per day, 6 months per year, and are cleaned periodically. Replace the humidifying filters if dirt/stains cannot be removed or there is a reduction in humidifying capacity (water usage rate).
1. Remove the humidifying filter.

About the water scoop
- If the frame (upper half) is impacted, the water scoop on the back side may detach. Humidification performance will deteriorate if the unit is operated with the water scoop detached.
- Attach in accordance with the illustration.

2. Attach the new humidifying filter to the frame (lower half). (Both humidifying filters have a front and back.)
- Align the protrusions (12 places) on frame with the holes in filter. (Water leakage may result if not correctly attached.)
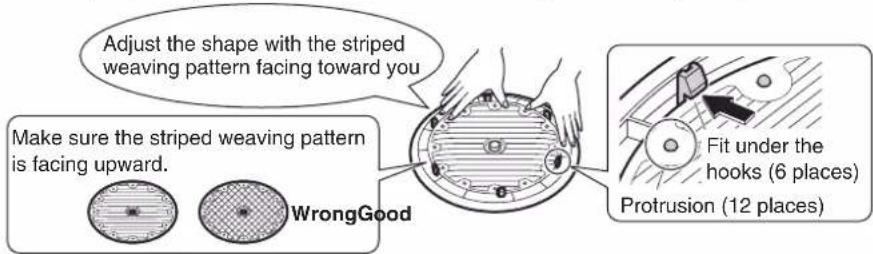
3. Attach the frame (upper half) and axle.
① Engage the hooks (6 places) on the frame.
② Insert the axle and turn it to the right while pushing until a catching sound is heard.
About purchasing and disposal
• Refer to "Separately Sold Parts". Page 41
Streamer Unit Soak Wipe
If the streamer lamp blinks (if stains are an issue, they can be removed even if the streamer lamp is not blinking.)
- Remove the power supply plug.
- Remove the front panel. Page 13
- Remove the streamer unit.
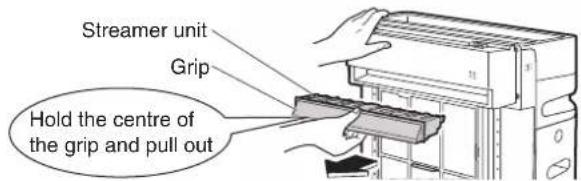
-
Soak in lukewarm or room temperature water. (About 1 hour)
-
Carry out this procedure in a place where splashing water will not cause trouble, such as a bathroom or kitchen sink.
- If dirt buildup is severe, leave the part soaking in lukewarm or room temperature water mixed with kitchen-use neutral detergent.
- Observe the quantities indicated in the directions/warnings on the kitchen-use neutral detergent when using detergent.
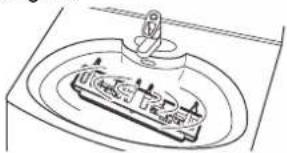
natural_image
Simple line drawing of a plate with a small object above it, no text or symbols present.- Remove dirt with a cloth, soft brush or cotton bud.
- ⚠️ CAUTION
When wiping or scrubbing, use rubber gloves. (Your hands may be cut by metal parts or the streamer unit needle)
- Carry out this procedure after soaking and before drying.
- Make sure that no fuzz or fibres from the cloth remain. (Malfunction may result)
- Do not use powder detergent or alkaline or acidic detergent. Do not scrub with a hard scrubbing brush. (Deformation, damage, and rusting of metal parts may result)
- Do not remove the screws. (Malfunction may result)
- Use a cotton bud or a soft cloth to clean the inner plastic and metal parts.

Use rubber gloves
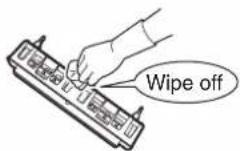

- ⚠️ CAUTION
Do not wipe the needles forcefully. (Deformation/ damage of the needles and reduced performance may result)
- If there is dirt on the needle, soak a soft object such as a cotton bud in water or kitchen-use neutral detergent and wipe off the dirt lightly.

-
Rinse with water and dry in the shade in a well-ventilated area. (About 1 day)
-
If detergent remains, the streamer lamp may blink even after cleaning, so rinse thoroughly with water.
- The plastic parts may suffer discolouration or deformation if exposed to direct sunlight.
- If even a small amount of water remains, the streamer lamp may blink even after cleaning, so dry well in the shade.

natural_image
Diagram showing a faucet spraying water into a control panel, with no visible text or symbols- Attach the streamer unit.

- Attach the front panel. Page 14
Note
If the unit is operated without the streamer unit attached, there is no problem in terms of safety, but the performance will deteriorate.
Attach the streamer unit before use.
Dust Collection Filter Replace
Replace about every 10 years
About part replacement timing
-
Replacement timing depends on usage patterns and the location of the unit.
Standard replacement time is about 10 years assuming that the unit is used daily in a home where 5 cigarettes are smoked a day. (Calculation in accordance with testing method of Japan Electrical Manufacturers' Association JEM1467 standard)
If the impurity content of the ambient air is high, the filter will need more frequent replacement.
Replace the dust collection filter if the filter is failing to perform. -
Remove the power supply plug.
-
Remove the front panel and pre-filter.
Page 13
- Remove the dust collection filter.
- Put your finger into the notch at the bottom of the unit, then lift and remove the dust collection filter.

4. Install a new dust collection filter.
- Please check that the deodorising filter is attached.
- Attach the dust collection filter by first inserting the bottom part fully behind the protrusions.
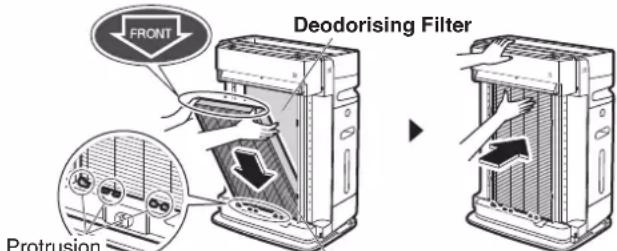
Dust collection filter
The dust collection filter has a special orientation.
Check the symbol on the upper part of the filter before attaching.
5. Attach the pre-filter and front panel.
Page 14
About purchasing and disposal
- Refer to "Separately Sold Parts". Page 41
When Not Using the Unit for a Prolonged Period
-
Unplug the power supply.
-
Discard any residual water in the water tank and humidifying tray and then clean the parts. Page 28, 29
-
Leave internal parts in a shaded area to dry off.
- In particular, parts cleaned with water should be completely dry. (Mould may result from remaining moisture)
- Cover the air outlet and other openings with a plastic bag or similar to prevent dust entry, and store the unit upright in a dry place.
(Malfunction/breakage may result from storing the unit upside down or horizontally)
When not using the Humidifying Operation (during the off-season, etc.)
-
Unplug the power supply.
-
Discard any residual water in the water tank and humidifying tray and then clean the parts. Page 28, 29
-
Leave internal parts in a shaded area to dry off.
- In particular, parts cleaned with water should be completely dry. (Mould may result from remaining moisture)
If you want to perform air purifying operation only, insert the power supply plug into the power socket and operate.
Q: The dust/PM2.5 sensor seems to have poor sensitivity...
A: Perform periodic cleaning of the dust/PM2.5 sensor as dirt on its lens can lead to poor sensitivity. Page 28
In addition, the response time of the dust/PM2.5 sensor depends on room size.
Make adjustments in accordance with the procedure for setting dust/PM2.5 sensor sensitivity.
Page 23
If the FAN setting is set to “Turbo), the responsiveness of the dust/PM2.5 sensor may be poor.
The strong airflow causes dust to be drawn into the air inlet before it can be detected by the dust/PM2.5 sensor. This is normal (not a malfunction).
Q: Can the deodorising filter be cleaned with water? Or should it be replaced?
A: It cannot be cleaned with water.
(If water is used, the part will lose its shape and become unusable.)
If you have inadvertently washed it with water, contact the place of purchase.
Remove from the unit and vacuum off dust with a vacuum cleaner. Also, It is not necessary to replace it.
If odour becomes an issue, leave the part in a shaded, breezy area. (about 1 day) Page 27
Q: Can the dust collection filter be cleaned?
A: No. Do not attempt to clean it with a vacuum cleaner or water.
(Reduced performance of the dust collection filter may result)
Replace it if dirt buildup is severe.
Q: The dust collection filter easily turns black...
A: The blackening does not affect dust collection performance. However, it can be replaced if it is an issue.
Q: No steam is visible during the Humidifying operation...
A: No steam is visible because humidification is carried out by passing air through the humidifying filter and vaporizing, rather than by boiling water.
Q: Air emitted during the Humidifying operation feels cool...
A: Emitted air is a little lower in temperature than the air drawn-in because heat in the air is consumed when the water contained in the humidifying filter is vaporized.
Q: Humidification is in progress but ambient humidity is not rising...
A: It may be difficult to raise the humidity depending on room size and conditions.
Set the humidification mode to “(High)” and increase the FAN setting before use.
Dirt buildup on the humidifying filter can cause reduced performance. Perform periodic cleaning/maintenance. Page 30, 31
Q: Can I use the unit even if the streamer lamp is blinking?
A: For safety, the supply of electricity to the streamer unit will be stopped, resulting in reduced performance.
Clean the streamer unit, then begin using after the streamer lamp stops blinking. Page 32

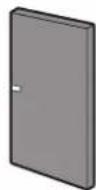
Deodorising Filter

Dust collection filter
tenance. Page 30, 31
Front indicator lamp

STREAMER
Q: Is it not necessary to replace the silver ion cartridge attached to the humidifying tray?
A: The silver ion cartridge has a service life of 10 years.
Silver ion cartridge
Provides capacity for slime-resistance.

natural_image
Technical line drawing of a mechanical fan or fan assembly (no text or symbols visible)States of the HUM Monitor Lamp and Their Meanings
If the HUM monitor lamp blinks and an error code appears, unplug the power supply plug, wait at least 5 seconds, and then reinsert the power supply plug and operate. If an error code still appears, respond as indicated below.
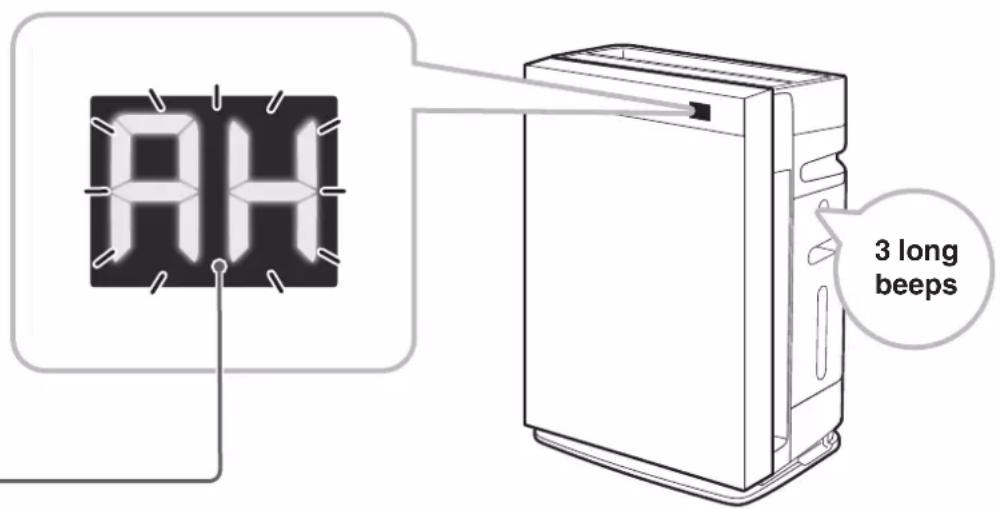
Error code Cause/Solution
 | An electrical component is faulty.→ Contact the place of purchase. | ||
 | The temperature sensor is malfunctioning.→ Contact the place of purchase. | ||
 | The humidity sensor is malfunctioning.→ Contact the place of purchase. | ||
 | An electrical component is faulty.→ Contact the place of purchase. | ||
| Is the deodorising filter still in the bag? | ■ If not in the bagAn electrical component is faulty.→ Contact the place of purchase. | ||
| ■ If in the bag→ Remove the power supply plug from the power socket, then remove the filter from the bag. Finally, re-attach the filter and start operation again. | |||
| Are the front panel, pre-filter, dust collection filter, humidifying filter unit, humidifying tray, and water tank attached?These lamps may blink if the unit is operated without a part attached. | ■ If all the parts are attachedAn electrical component is faulty.→ Contact the place of purchase. | ||
| ■ If one or more parts are not attachedUnplug the power supply, re-attach the parts and then turn the unit on again. | |||
| Is there a buildup of dust on the pre-filter? | ■ If there is no dust buildupAn electrical component is faulty.→ Contact the place of purchase. | ||
| ■ If there is dust buildupUnplug the power supply, clean the pre-filter and then turn the unit on again. Page 27 | |||
| Is the air outlet blocked? | ■ If the air outlet is not blockedAn electrical component is faulty.→ Contact the place of purchase. | ||
| ■ If the air outlet is blockedRemove any obstacles blocking the air outlet and then turn the unit on again. | |||
Troubleshooting
■ Before making an inquiry or a request for repair, please check the following.
If the problem persists, contact the place of purchase.
In the event of malfunction during operation
If the indicator lamps light up abnormally, or become inoperable, due to a lightning strike etc., unplug the power supply, wait at least 5 seconds then re-insert the power supply plug and turn the unit on again.

Not a problem
This case is not a problem.

Check
Please check again before requesting repairs.
■ Sounds can be heard
| Phenomenon Check points | |
| Catching sound during Humidifying operation | ✓ A catching sound may be generated when the Humidifying operation starts/ stops. |
| Gurgling sound during Humidifying operation | ✓ A gurgling sound may be generated when water is supplied from the water tank to the humidifying tray. |
| Sizzling or rumbling sounds during Humidifying operation | ✓ These sounds are generated when the humidifying filter unit rotates during the Humidifying operation.If the sounds are an issue, move the unit to a different location. |
| Creaking sound during Humidifying operation | ? Is the humidifying tray or humidifying filter unit dirty?→ A sound may be generated when there is a buildup of water scales on the humidifying tray or humidifying filter unit. Clean these parts.Page 29, 30 |
| Splashing sound during Humidifying operation | ✓ This is the sound of water splashing onto the humidifying filter. |
| Hissing sound during operation | ✓ A hissing sound is generated when there is streamer discharge during streamer operation. The sound may lessen or change in tone depending on the operating conditions, however, this does not indicate a defect.If the sounds are an issue, move the unit to a different location. |
| Snapping/buzzing sound during operation | ? Is the streamer unit securely installed?→ Insert the streamer unit as far as it will page 32Is there any dust, etc. on the streamer unit?→ Clean Page 32 |
| Whistling and fluttering sound during operation | ? Is there a buildup of dust on the pre-filter?→ Clean this page 27Is the dust collection filter clogged up?→ Depending on usage conditions, the dust collection filter may become clogged up, shortening its service life. Page 5Replace the dust collection filter. Page 33Has the deodorising filter been removed from the bag?→ Remove it from the bag and re-attach it proper page 13, 14 |
| Operating sound is loud • Is the dust collection filter properly attached?→ If it is not properly attached, operating sounds may become louder. Page 14 | |
Troubleshooting
■ Indicator lamps
| Phenomenon Check points | |
| The water supply lamp turns on and off repeatedly | Even after the water supply lamp has turned on, depending on the FAN setting, water in the humidifying tray may ripple and move the float causing the water supply lamp to turn on and off repeatedly.(This is because the on/off status of the water supply lamp is dependent on float position.)→ Stop operation of the unit and unplug the power supply, then fill the water tank with water. Page 12 |
| Front indicator lamps do not light up | Is indicator lamp brightness set to OFF?→ If indicator lamp brightness is set to “OFF”, the front display lamps do not light up. Page 9Is the unit operating in GOOD SLEEP MODE?→ If operating in GOOD SLEEP MODE, the indicator lamp brightness is set to “OFF” or “DIM”. |
| The odour sensor lamp blinks | Is the deodorising filter attached?→ Attach the deodorising filterPage 14 |
| The streamer lamp blinks even though the streamer unit was cleaned | Did you clean it after unplugging the power supply plug?→ Unplug the unit, wait at least 5 seconds, and then reinsert the power supply plug.Is the streamer unit securely attached?→ Insert the streamer unit as far as it will page 32Is there any water, detergent, or cloth fibres left on the streamer unit from when it was cleaned?→ After cleaning, rinse thoroughly with water so that no detergent or cloth fibres remain, then dry completely. |
| The dust/PM2.5 sensor lamp remains orange or red | Is there a buildup of dust in or around the air intake for the dust/PM2.5 sensor?→ Vacuum off any dust from the air intake using a cleanpage 28Is the cover detached from the air intake for the dust/PM2.5 sensor?→ Securely attach the coverpage 28Is the lens for the dust/PM2.5 sensor dirty?→ Wipe off dirt from the lens using a dry cotton bud or similar page 28 |
| The water supply lamp remains on even though water was added | Is the humidifying tray securely attached?→ Push it into the unit page 29Is the float inside the humidifying tray stuck?Is the float inside the humidifying tray properly attached?→ Attach the float properly and check that it moves smoothpage 29 |
Indicator lamps
| Phenomenon Check points | |
| There is an odour but the odour sensor lamp remains blue | Did an odour already exist around the time you inserted the power supply plug?→ The basic sensitivity of the odour sensor will be determined by odour levels in about the first minute after the power supply plug is inserted every time. Page 8To adjust the basic sensitivity of the odour sensor, unplug the power supply when the air is clean (odour-free), wait at least 5 seconds, then re-insert the power supply plug and turn the unit on again. |
| Sometimes the streamer lamp does not light up | Is streamer output set to Low?→ If it is set to Low, the length of time the streamer operates will be shorter than when streamer output is set to “Normal”. Page 22Is the unit operating in ECONO MODE?→ The streamer lamp does not light up when the unit is in Monitoring mode. Page 18 |
Air purifying function
| Phenomenon Check points | |
| Air purifying capacity is reduced | Is the unit surrounded by obstacles, or positioned in a place where airflow cannot reach?Choose a position that is obstacle-free and from where airflow can reach all areas of the room.Is the louvre closed?Open the louvrePage 15Is the pre-filter or dust collection filter dirty?Clean the pre-filter (replacement of the dust collection filter may also be necessary).Page 27 |
| The air outlet is emitting an odour | Is the deodorising filter, humidifying filter or humidifying tray dirty?Clean these partPage 27-30Discard any residual water in the humidifying tray each time you refill the water tank.When using the Air purifying operation only, discard any water in the water tank and humidifying tray.In some cases the air outlet may emit a slight odour as trace amounts of ozone are generated. However, the amount is negligible and is not harmful to your health.Is the room filled with odours due to cooking or several people smoking together etc?The odour will gradually fade as the unit operates.Have you moved the unit from another room?The unit may emit the odour of the room in which it was used previously.Let the unit run a while longer.Is there anything in the room that is emitting an odour continuously?(Paint, new furniture, wallpaper, sprays, cosmetics, chemicals)As continuously emitted odour cannot be completely eliminated, you should ventilate the room at the same time or run the unit in a well-ventilated room for a short while.Do not apply deodorising spray or other types of spray to the unit, or use near the unit. |
Troubleshooting
■ Humidifying function
| Phenomenon Check points | |
| Humidification does not occur even though the water tank contains water (the humidifying filter does not rotate)The water in the water tank is not being used up | Since this unit achieves humidification through vaporisation, the water is used up slowly when ambient humidity is high or the temperature is low.The Humidifying operation stops when room humidity reaches the target humidity set for the Humidifying operation. Page 17 |
| Is the HUM lamp lit?If the lamp is not lit, pre###Is the humidifying filter unit properly attached? Page 29Are there any water scales or dirt on the humidifying filter?Water scales or dirt buildup on the humidifying filter can cause reduced performance.Dirt buildup on the humidifying filter varies according to water quality and may result in reduced performance.Clean the humidifying filter unit. Page 29Is the water supply lamp lit?If it is lit, the humidifying tray is not properly attached.Re-attach the humidifying tray. Page 29Is the odour sensor lamp blinking?If it is blinking, the deodorising filter is not properly attached.If the deodorising filter is not properly attached, the airflow rate will decrease and humidification performance will drop. Re-attach the deodorising filter. Page 14 | |
| Ambient humidity does not rise | When indoor or outdoor humidity is low, the walls and floor of the room are dry, or the room has poor insulation against drafts, the target humidity may not be readily achieved. |
| Are you using the unit in a room with an area larger than applicable?Is the target humidity set to (Low) or (standard)?Is the FAN setting set to (Quiet) or (Low)?Set the humidification mode to “(High)” and increase the airflow rate setting before use. Page 16, 17 | |
| The humidity level indicated on the unit differs from other hygrometers | This is because the flow of air causes temperature and humidity to vary throughout the room.Please consider the indications to be a rough estimate of ambient humidity. |
| The HUM monitor lamp always indicates a high humidity level | Is the unit positioned next to a window or in a location exposed to cold wind?There is a possibility that only the air surrounding the unit is of high humidity. Try moving the unit to a different location. |
| North facing rooms or rooms close to wet areas, such as the bathroom, become humid easily, so these rooms tend to have a higher humidity.Immediately after operation, the HUM monitor lamp may indicate a level of humidity which is higher than the actual current humidity, depending on the condition of the air inside the unit.Continue operation for about 1 hour and check again. | |
| Room humidity is high but Humidifying operation does not stop | When indoor or outdoor humidity is high, the walls and floor of the room are moist, or the room has good insulation against drafts, the target humidity may be exceeded.Air purification is always performed with the Humidifying operation. When the humidity set for the Humidifying operation is reached, the Humidifying operation stops but the Air purifying operation continues. |
| Is the unit exposed to direct sunlight or warm air from a heating appliance?Move the unit to a location without such direct exposure. | |
■ Humidifying function
| Phenomenon Check points | |
| Water in the water tank is decreasing even though Humidifying operation is not running | Even when only the Air purifying operation is running, if there is water in the water tank, the water may decrease due to spontaneous evaporation caused by air currents and result in slight air humidification.When using the Air purifying operation only, discard any water in the water tank and humidifying tray. |
| Water splashes out from the air outlet | Are the pre-filter, dust collection filter, and humidifying filter attached properly?→ Attach them properpage 14, 29, 31When you removed the humidifying filter from the frame and replaced it, did you shape the new filter properly before attaching it?Is the humidifying filter attached in the incorrect orientation, with the striped weaving pattern facing downward when viewed from above?(The striped weaving pattern should be facing upward when viewed from above.)→ Attach them properpage 31 |
Other
| Phenomenon Check points | |
| The fan stops midway through unit operation | During ECONO MODE or AUTO operation, when monitoring mode is entered, the fan turns on and off repeatedly. Page 18 |
| Are you operating the unit with the front panel, pre-filter, dust collection filter, humidifying filter unit, humidifying tray, or water tank removed?The fan is configured to stop in order to protect electrical components if a part is not properly attached.→ If a part is not attached, unplug the unit and attach all the parts before turning the unit on again. | |
| There is a burnt mark on the metal part of the streamer unit | This is a mark left from the streamer discharge, it does not indicate a defect. |
| The sound of streamer discharge can no longer be heard | Is the needle tip of the streamer unit dirty?→ Clean Page 32Is streamer output set to Low? Page 22 |
| There is water spilled on the floor • Have you tilted the unit?→ If you tilt the unit, water may spill out.Before moving the unit, turn off the power and discard any water in the water tank and humidifying tray.Is the cap for the water tank properly and securely tightened?→ If the cap is loose or has been tightened in a tilted fashion, water may leak. Tighten it securely before use.Is there a large buildup of water scales on the humidifying filter?→ Water leakage may result from water scale buildup. Clean or replace it.Page 29-31 | |
| There is interference on our TV screen | Is the TV or radio positioned within 2m of the unit, or is an indoor antenna positioned near the unit?Are the power supply cord or antenna cable of the TV or radio routed near the unit?→ Keep the unit as far as possible from the TV, radio or antenna. |
| The airflow is blowing slightly to the right | Due to the structure of the unit, the airflow blows out slightly to the right. |
| Just inserting the power supply plug causes operation to start | Did you disconnect the power supply plug during a power failure or when a sudden voltage fluctuation occurred? Or did you stop the unit by disconnecting the power supply plug during the last operation?→ The auto-restart function automatically resumes operation. |
Separately Sold Parts
Contact the place of purchase.
| Replacement partDust collection filter (1 piece)Model: KAFP085A4E | Replacement partHumidifying filters (without frame)Model: KNME043B4E |
 Replace about every 10 years.Catches dust and pollen. Replace about every 10 years.Catches dust and pollen. |  Replace about every 10 years.Humidify air by vaporizing water during the Humidifying operation. Replace about every 10 years.Humidify air by vaporizing water during the Humidifying operation. |
- Failure to maintain parts properly may result in:
- Reduced air purifying capacity
- Reduced deodorising capacity
- Emission of odours
- Observe local waste separation rules when disposing of the dust collection filter (made of polyester and polypropylene) and the humidifying filters (made of polyester).
■ Disposal requirements
- Units are marked with the following symbol:

This means that electrical and electronic products may not be mixed with unsorted household waste. Do NOT try to dismantle the system yourself: the dismantling of the system, treatment of the refrigerant, of oil and of other parts must be done by an authorized installer and must comply with applicable legislation.
Units must be treated at a specialized treatment facility for reuse, recycling and recovery. By ensuring this product is disposed of correctly, you will help to prevent potential negative consequences for the environment and human health. For more information, contact your installer or local authority.
Specifications
| Model name MCK70 | YBFVM | |||||||
| Power supply Single | phase 50Hz 220-240V / 60Hz 220-230V | |||||||
| Operation mode | Air Purifying | Humidifying and Air Purifying (at indoor temp.: 20°C, indoor humidity: 30%) | ||||||
| Turbo | Standard | Low | Quiet | Turbo | Standard | Low | Quiet | |
| Power consumption (W) 6 | 6 16 10 8 68 | 18 12 11 | ||||||
| Operating sound (dB) 54 | 37 27 18 54 | 37 27 23 | ||||||
| Airflow rate (m3/h) 420 | 210 132 60 | 420 210 132 | 102 | |||||
| Humidifying rate (mL/h) | - *1 | 650 *2 | ||||||
| Coverage area (m2) | 48 *3 | - | ||||||
| External dimensions (mm) | 600(H)× 395(W)× 287(D) | |||||||
| Weight (kg) | 12.5 (when the water tank is empty) | |||||||
| Water tank volume (L) | About 3.6 | |||||||
| Power supply cord length (m) | 2 | |||||||
Made in China
- These specification values are applicable to both 50Hz 220–240V and 60Hz 220–230V.
- Even when the power is off, about 1W of power is consumed to run the microcomputer.
- This appliance is designed to be used in residential or commercial areas.
- A-weighted emission sound pressure level is below 70 dB(A).
*1. When there is water in the water tank, the water level may fall and ambient humidity may rise slightly.
*2. Humidifying rate was calculated in accordance with JEM1426. (when FAN setting is "Turbo")
*3. Coverage area was calculated in accordance with JEM1467. (when FAN setting is "Turbo")
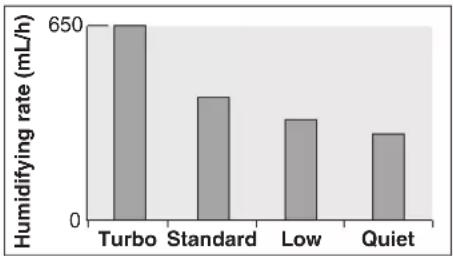
bar
| Category | Humidifying rate (mL/h) | |---|---| | Turbo | 650 | | Standard | 400 | | Low | 300 | | Quiet | 250 |DAIKIN INDUSTRIES, LTD.
Head office:
Umeda Center Bldg., 2-4-12, Nakazaki-Nishi,
Kita-ku, Osaka, 530-8323 Japan
Tokyo office:
JR Shinagawa East Bldg., 2-18-1, Konan,
Minato-ku, Tokyo, 108-0075 Japan
https://www.daikin.com
The bar code is a manufacturing code.
DAIKIN EUROPE N.V.
The two-dimensional bar code is a manufacturing code.
3P648733-1A M20B262A (2107)HT
- Humidifying air purifier
- Humidifying Air Purifier OPERATION MANUAL
- Read First
- Operation
- Advanced Settings
- Maintenance
- Troubleshooting
- Safety Precautions
- ARNING
- Observe in order to prevent fire, electric shock or severe injury.
- WARNING
- ■During use
- ■Immediately turn off and unplug the unit if there are any signs of abnormality and malfunction
- Examples of abnormality and malfunction
- CAUTION
- Observe in order to prevent electrical leakage, injury or property damage.
- During use
- AUTION
- ■Concerning the unit body
- ■When moving the unit
- Precautions During Use
- Other considerations
- Do not use in the following places
- Names of Parts and Operations
- Front indicator lamps
- Dust sensor lamp/PM2.5 sensor lamp
- HUM monitor lamp (about ambient humidity) [blue]
- Odour sensor lamp
- Water supply lamp [red]
- Operating panel
- Child proof lock
- Child proof lock lamp [orange]
- Note
- GOOD SLEEP button
- GOOD SLEEP MODE lamp [green]
- HUM lamp [orange]
- BRIGHTNESS button
- Front indicator panel
- About the airflow rate and humidification mode symbols
- Preparation Before Operation
- Checking accessories
- Installing
- Attention
- Pointers for good positioning
- Attaching the casters
- Preparing the water tank (for Humidifying operation)
- Take out the water tank and remove the cap.
- Fill the water tank with tap water and close the cap.
- Put the water tank in the unit.
- Attaching the deodorising filter
- Remove the front panel.
- If the protrusion on the front panel is detached
- Peel off the fixing tape (4 places) and remove the cardboard.
- Remove the pre-filter.
- Remove the dust collection filter.
- Peel off the fixing tape and remove the deodorising filter.
- Remove the deodorising filter from the bag.
- Attach the deodorising filter.
- Attach the dust collection filter.
- Attach the pre-filter.
- Attach the front panel.
- Inserting the power supply plug into the socket
- When you want to let the unit decide the best operation mode (AUTO operation)
- Press
- AUTO
- About AUTO operation
- Using Air Purifying Operation
- Changing the Airflow Rate
- Using Humidifying and Air Purifying Operation
- Press HDM switch the humidification mode.
- Operating the Unit in a MODE
- Press Modeling operation.
- MODE Usage and Function
- Automatic airflow rate adjustment
- AUTO FAN
- Saving energy
- ECONO
- Power saving mode
- Monitoring mode
- Reducing pollen levels
- ANTI- POLLEN
- Combating dry throat and skin
- MOIST
- CIRCULATOR
- When you want to circulate the air in the room
- Operating in GOOD SLEEP MODE
- GOOD SLEEP
- About GOOD SLEEP MODE
- Active Plasma Ion Output Settings
- If the smell of ozone bothers you
- Streamer Output Settings
- Dust/PM2.5 Sensor Sensitivity Setting
- When the sensitivity of the dust/PM2.5 sensor does not meet your preferences
- Notification Tone Setting
- If the tone emitted when the water supply lamp lights up bothers you
- Hold down HUM for about 3 seconds with the power supply plug inserted and the unit turned off.
- Settings of Modes within ECONO MODE
- If you wish to set ECONO MODE and AUTO operation monitoring mode to "OFF"
- Maintenance Quick Reference Table
- Wipe
- Vacuum clean
- Wash/Rinse
- Do not use water
- Do not vacuum clean
- When odour or dirt becomes an issue
- If the streamer lamp blinks
- Soak
- When dust has built up Vacuum clean
- Soak in citric acid or lemon juice
- Removing the humidifying tray and humidifying filter unit
- Take out the water tank from the main unit.
- Remove the humidifying tray and then remove the humidifying filter unit from the tray.
- Attaching the humidifying tray and humidifying filter unit
- Attach the humidifying tray and humidifying filter unit.
- Put the water tank in. Page 12
- Humidifying Tray Wash/Rinse
- If the float detaches from the tray
- Humidifying Filter Unit Soak
- When odours or dirt are hard to remove
- Each season or when water scales (white and brown) are hard to remove
- Precautions when cleaning humidifying filter unit
- Humidifying Filters Replace
- Replace about every 10 years\*
- About part replacement timing
- Remove the humidifying filter.
- About the water scoop
- Attach the new humidifying filter to the frame (lower half). (Both humidifying filters have a front and back.)
- Attach the frame (upper half) and axle.
- About purchasing and disposal
- Streamer Unit Soak Wipe
- - ⚠️ CAUTION
- Dust Collection Filter Replace
- Replace about every 10 years
- Install a new dust collection filter.
- Attach the pre-filter and front panel.
- When Not Using the Unit for a Prolonged Period
- When not using the Humidifying Operation (during the off-season, etc.)
- Q: The dust/PM2.5 sensor seems to have poor sensitivity...
- Q: Can the deodorising filter be cleaned with water? Or should it be replaced?
- Q: Can the dust collection filter be cleaned?
- Q: The dust collection filter easily turns black...
- Q: No steam is visible during the Humidifying operation...
- Q: Air emitted during the Humidifying operation feels cool...
- Q: Humidification is in progress but ambient humidity is not rising...
- Q: Can I use the unit even if the streamer lamp is blinking?
- Q: Is it not necessary to replace the silver ion cartridge attached to the humidifying tray?
- States of the HUM Monitor Lamp and Their Meanings
- Not a problem
- Check
- Separately Sold Parts
- Contact the place of purchase.
- ■ Disposal requirements
- Specifications
- DAIKIN INDUSTRIES, LTD.
- DAIKIN EUROPE N.V.
Brand : DAIKIN
Model : MCK70YBFVM
Category : Air purifier