FS-MINI - Uncategorized AJA - Free user manual and instructions
Find the device manual for free FS-MINI AJA in PDF.


| Product Type | Mini-Converter Frame Synchronizer |
| Dimensions (W x D x H) | 5.8 x 3.1 x 1.0 in (147.32 x 78.74 x 25.4 mm) |
| Weight | 0.7 lb (0.3 kg) |
| Power Requirement | +5 VDC regulated, 9 Watts (power supply included) |
| Video Input | 1x 3G-SDI BNC (SMPTE-259/292/424, Level A) |
| Video Output | 1x 3G-SDI BNC, 1x HDMI Type A |
| Audio Input | 16-channel embedded SDI (24-bit, 48 kHz) |
| Audio Output | 16-channel SDI embedded, 2/8-channel HDMI, 2x RCA analog (-10 dBV) |
| Reference Input | 1x BNC (blackburst or tri-level sync, 75 ohms) |
| Video Processing | 10-bit; frame sync, up/down/cross conversion, 3:2 pulldown |
| Supported Video Formats | 3G-SDI, HD (1080p/1080i/720p), SD (525i/625i) |
| Latency | Nominal 1 frame delay |
| Loss of Input Handling | Freeze, Black, or Mute with adjustable delay |
| Control Methods | DIP switches (local) or USB with Mini-Config software (remote) |
| Software Compatibility | Windows and Mac (AJA Mini-Config) |
| Operating Temperature | 0 to 40°C (32 to 104°F) |
| Storage Temperature | -40 to 60°C (-40 to 140°F) |
| Humidity | 10-90% non-condensing |
| Warranty | 5 years limited hardware warranty |
| Cleaning Instructions | Use only a dry cloth |
| Safety | Do not use near water; do not block vents; refer servicing to qualified personnel |
| Repairability | No user-serviceable parts; opening voids warranty |
Frequently Asked Questions - FS-MINI AJA
User questions about FS-MINI AJA
0 question about this device. Answer the ones you know or ask your own.
Ask a new question about this device
Download the instructions for your Uncategorized in PDF format for free! Find your manual FS-MINI - AJA and take your electronic device back in hand. On this page are published all the documents necessary for the use of your device. FS-MINI by AJA.
USER MANUAL FS-MINI AJA
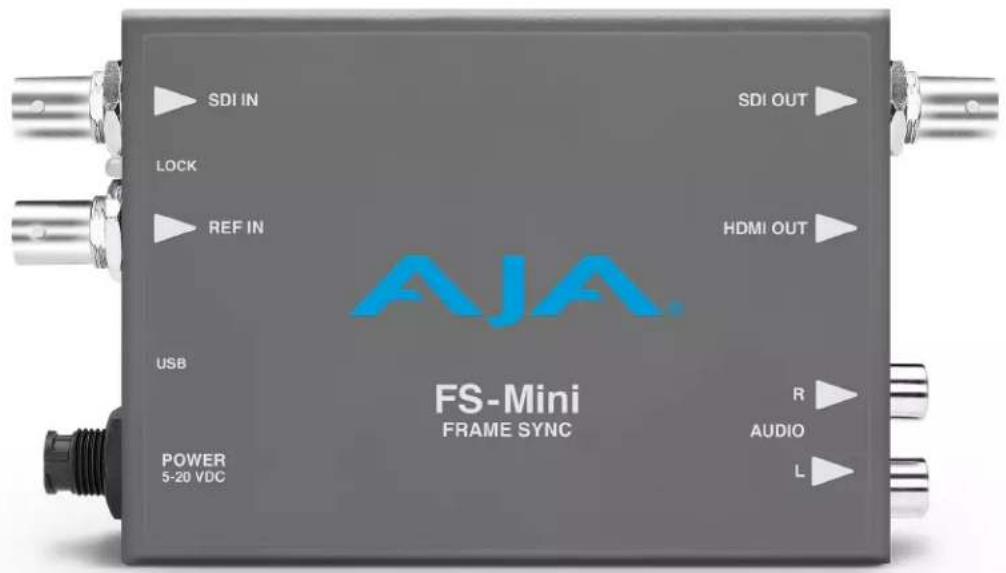
FS-Mini Mini-Converter
Frame Synchronizer
Installation and Operation Guide
Trademarks
AJA^® and Because it matters. are registered trademarks of AJA Video Systems, Inc. for use with most AJA products. AJA^TM is a trademark of AJA Video Systems, Inc. for use with recorder, router, software and camera products. Because it matters. is a trademark of AJA Video Systems, Inc. for use with camera products.
Corvid Ultra ^® , Io ^® , Ki Pro ^® , KONA ^® , KUMO ^® , ROI ^® and T-Tap ^® are registered trademarks of AJA Video Systems, Inc.
AJA Control Room™, KiStor™, Science of the Beautiful™, TruScale™, V2Analog™ and V2Digital™ are trademarks of AJA Video Systems, Inc.
All other trademarks are the property of their respective owners.
Copyright
Copyright © 2023 AJA Video Systems, Inc. All rights reserved. All information in this manual is subject to change without notice. No part of the document may be reproduced or transmitted in any form, or by any means, electronic or mechanical, including photocopying or recording, without the express written permission of AJA Video Systems, Inc.
Contacting AJA Technical Support or Sales
Please have all pertinent information at hand prior to contacting AJA support or sales.
Support Telephone: +1.530.271.3190
Support Website: https://www.aja.com/support/contact
Support Email: support@aja.com
Sales Email: sales@aja.com
Shipping Address: AJA Video Systems
180 Litton Drive
Grass Valley, CA 95945, USA
Contents
Notices 2
Trademarks 2
Copyright 2
Contacting AJA Technical Support or Sales 2
Chapter 1 – Introduction .....4
Overview. 4
Features....4
Block Diagram 5
I/O Connections 6
Lock LED Status Indicators 6
Frame Sync Mode Example 6
Setup 6
Procedure. 6
Conversion Mode Discussion and Examples 7
Upconvert Mode 7
Downconvert Mode 8
SD Aspect Ratio Convert 10
Installation 11
User Controls 11
Using DIP Switches to Control the FS-Mini 11
DIP Switch Settings. 12
DIP Switches 4 & 5 (FMT0, FMT1) 12
Chapter 2 – Operation....13
USB Control and Setup—Using AJA Mini-Config 13
Acquiring Mini-Config. 13
Installing Mini-Config 13
Running Mini-Config. 15
Tabbed Screens 17
Video Tab Screen. 18
HDMI Tab Screen. 21
Audio Tab Screen 22
Update Tab Screen. 23
Info Tab Screen 24
Appendix A – Specifications ..... 26
FS-Mini Tech Specs 26
Appendix B – Safety and Compliance ..... 30
Warranty and Liability Information....38
Index. 39
Chapter 1 – Introduction
Overview
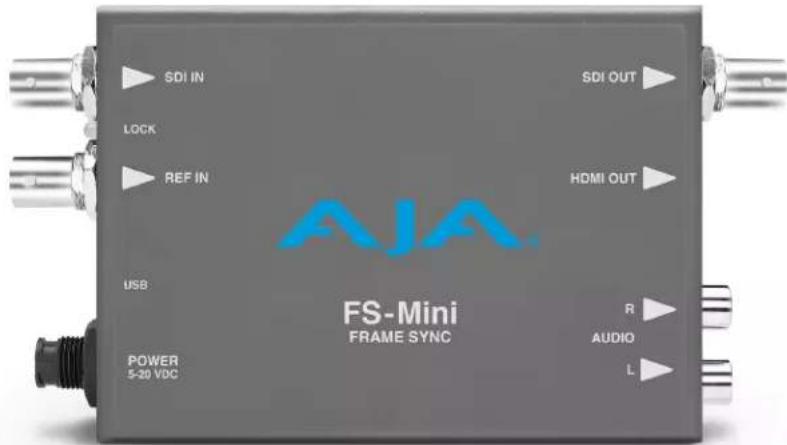
The FS-Mini is a broadcast quality utility frame sync that packs the production-proven functionality and all of the reliability of AJA's leading FS frame sync technology into a portable Mini-Converter supporting frame synchronization of untimed 3G-SDI, HD, and SD video signals at an affordable price.
FS-Mini allows users to synchronize and convert a wide range of video formats to their house standard with a 3G-SDI input and output, HDMI output, and a 2-channel RCA style audio output. The FS-Mini also provides high quality up, down, cross-conversion.
The device also features a reference input that can be used to lock to a local reference. It can be simply controlled via local DIP switches or USB and AJA's Mini-Config application.
Features
- Utility frame sync function, times input signals to an external reference
• Supports bi-level and tri-level references
• High quality 10-bit video processing - Low latency processing, nominal video delay of 1 frame
• Synchronizes 3G, HD and SD video formats
• Simultaneous SDI and HDMI outputs - Loss of input management: Freeze, Black, or Mute
• 16-channel embedded SDI audio I/O
• 8-channel HDMI output audio
• 2-channel RCA-style analog outputs at -10dBV (nominal)
• Utility frame rate conversion
• Supports 3:2 pulldown - Up, down, cross conversion between 3G, HD and SD video formats
-
AFD input detection, down-convert control
-
Configure via DIP switch or USB port and supplied AJA Mini-Config software on PC/Mac
- Uses 5-20 VDC power (DWP-U-R1 universal power supply included)
- Five year warranty
NOTE: FS-Mini converts 3G-SDI Level A formats only. It does not input or output 3G-SDI Level B.
NOTE: FS-Mini passes-through embedded audio ancillary data only. It does not pass through other types of embedded ancillary data.
Video Formats
The FS-Mini provides utility frame rate conversion within the same frame rate family as the input frame rate. If a reference is provided, it must be in the same frame rate hierarchy as the input video (e.g., 23.98/29.97/59.94, 25/25, or 24/30/60).
Block Diagram
Figure 1. FS-Mini Mini-Converter, Simplified Block Diagram
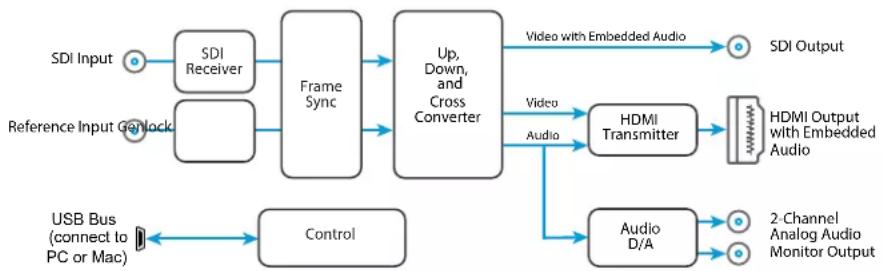
flowchart
graph LR
    A["SDI Input"] --> B["SDI Receiver"]
    C["Reference Input Genlock"] --> D["Frame Sync"]
    B --> D
    D --> E["Up, Down, and Cross Converter"]
    E --> F["Video with Embedded Audio"]
    F --> G["SDI Output"]
    E --> H["Video"]
    H --> I["HDMI Transmitter"]
    I --> J["HDMI Output with Embedded Audio"]
    I --> K["Audio D/A"]
    K --> L["2-Channel Analog Audio Monitor Output"]
    M["USB Bus (connect to PC or Mac)"] --> N["Control"]
    N --> M
Figure 2. FS-Mini Mini-Converter
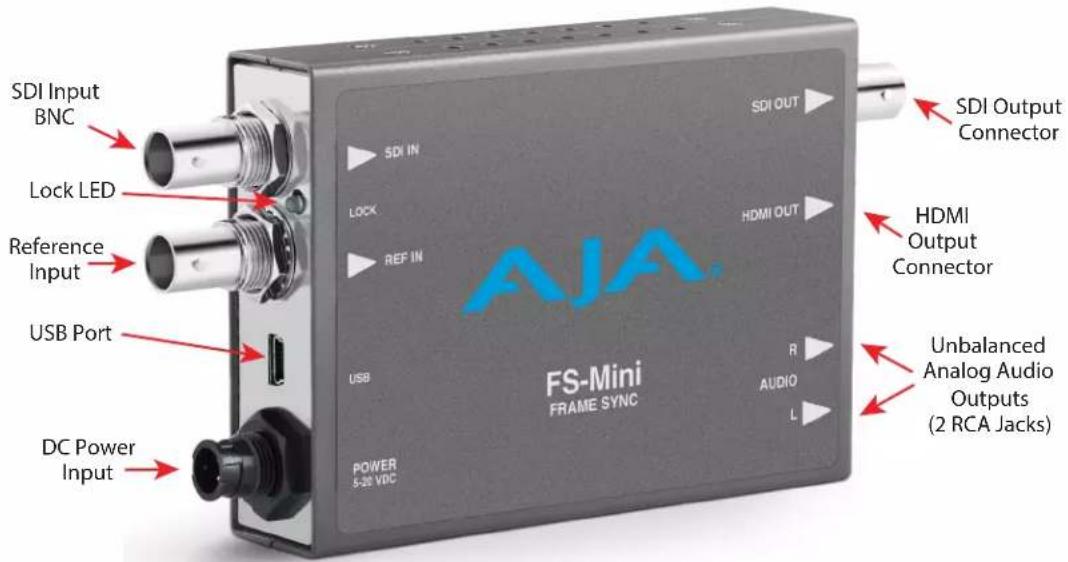
Lock LED Status Indicators
- Off = No signal / no valid input
- Green = SD-SDI
- Red = HD-SDI
- Amber = 3G-SDI
Frame Sync Mode Example
The following section provides an example of how to set up the FS-Mini to ensure the frame sync function is working correctly.
Setup
Ensure the FS-Mini is completely disconnected from video, audio, USB, and power.
Procedure
- Connect the FS-Mini to your Mac or PC using the control USB cord.
- Connect the FS-Mini to its power cord and a power source.
- Launch the AJA Mini-Config application. By default the FS-Mini is configured to operate genlocked to an external reference signal. The Ref In BNC connector image on AJA Mini-Config indicates "No Ref" and the Genlock control indicates "Free Run."
- Connect the appropriate sync reference signal to the FS-Mini Ref In BNC.
-
The Ref In BNC connector image on AJA Mini-Config shows the signal type.
-
The Genlock control will indicate "Reference," indicating that the FS-Mini is genlocked to an external reference signal.
-
However, because the FS-Mini is still not receiving a compatible video input, "No Video" will be reported for the SDI In BNC image on AJA Mini-Config.
-
Connect a 1080p59.94 SDI video source to the FS-Mini SDI In BNC. AJA MiniConfig will report 1080p59.94 next to the SDI In BNC image.
-
From the Video tab, set the Output Format to 1080p (high).
-
Confirm that AJA Mini-Config shows that the SDI Out BNC is reporting the correct signal (in this example, 1080p59.94).
This workflow confirms that the FS-Mini powers up successfully and that the SDI video output is synchronized with the Reference Input.
Conversion Mode Discussion and Examples
Upconvert Mode
The FS-Mini allows you to select the type of Upconversion performed on an SD source input. This mode is in effect only when the input is SD (525i or 625i) and the selected output format is HD (720p, 1080i, or 1080p).
Figure 3. Upconvert Mode Examples
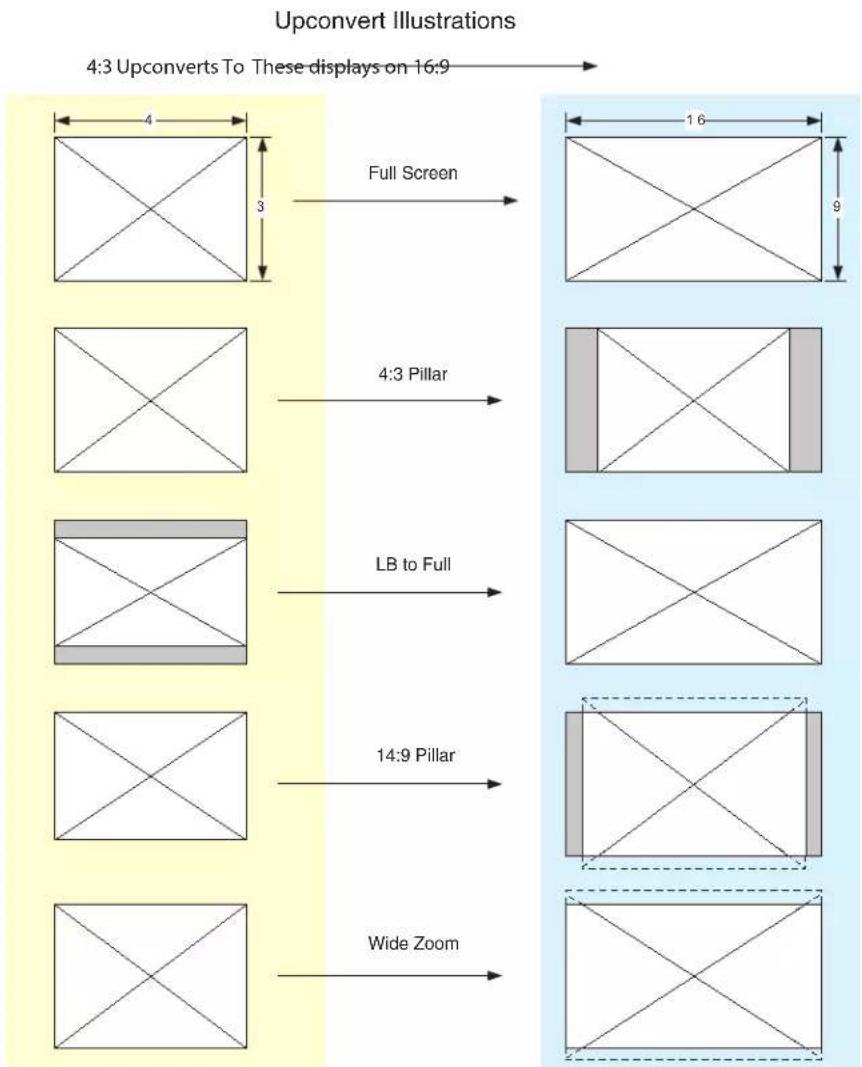
flowchart
graph LR
    A["4:3 Upconverts To These displays on 16:9"] --> B["Full Screen"]
    B --> C["4:3 Pillar"]
    C --> D["LB to Full"]
    D --> E["14:9 Pillar"]
    E --> F["Wide Zoom"]
Selection Description
- Full Screen – 4x3 image is stretched horizontally to fill a 16x9 frame.
- 4x3 Pillar – 4x3 image at center screen with black sidebars.
- LB to Full – 4x3 letterboxed image is scaled to fit horizontally in a 16x9 frame. Black bars top and bottom are cropped off.
- 14x9 Pillar (default) – 4x3 image is scaled to create a 14x9 image with black sidebars and slightly cropping top and bottom of original image.
- Wide Zoom – A combination of scaling and stretching is used to fit to a 16x9 frame. Slight cropping of top and bottom and a small aspect ratio change.
Downconvert Mode
This mode determines the type of Downconversion performed on the selected HD source input. See the following Downconvert Illustrations for Downconversion examples. This mode is in effect only when the input is HD (720p, 1080i, or 1080p) and the selected output format is SD (525i or 625i).
Figure 4. Downconvert Mode Example
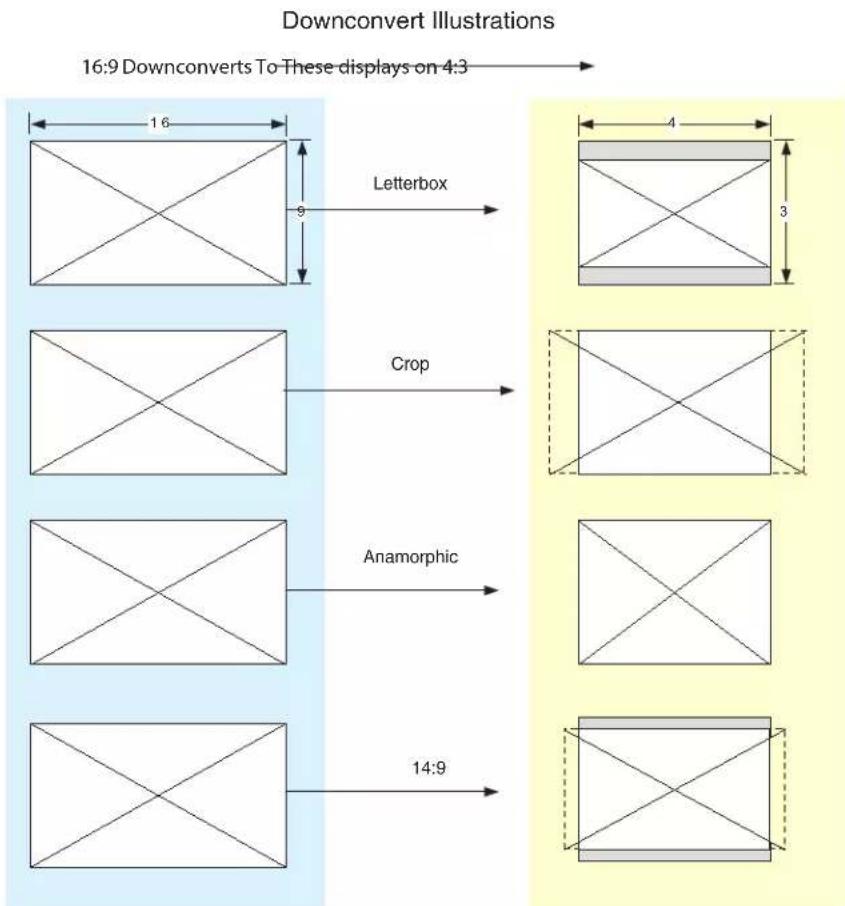
Selection Description
- Letterbox – Image is reduced with black top and bottom added to image area, with the aspect ratio preserved.
- Crop (default) – Image is cropped to fit new screen size.
- Anamorphic – HD image is converted to full-screen SD with a 16x9 aspect ratio (anamorphic).
- 14:9 – Image is reduced slightly with aspect ratio preserved. Black is added top and bottom, and the left and right sides are cropped.
- Auto AFD – Automatically selects the best Downconvert mode based on the input video's Active Format Description (AFD) code.
Active Format Description (AFD) codes are carried in the vertical ancillary (VANC) portion of HD SDI video signals, specified in SMPTE 2016 as follows: "AFD information is intended to guide DTV receivers and/or intermediate professional video equipment regarding the display of video of one aspect ratio on a display of another aspect ratio."
In the FS-Mini Downconverter, the AFD code on the video input can be used to guide the Downconverter in choosing which mode to use to best display the important content of the 16:9 HD input video on the 4:3 SD output. For example, if the input AFD code is 10 (Full Frame), it means that the input video has important picture information throughout the full 16:9 frame, so the Downconverter should use Letterbox mode to be sure none of the content is cropped off. An AFD code of 9 (Pillarbox) says that the input video only has
content within the center 4:3 area of the picture (usually because it originally came from an Upconverted SD signal) so the Downconverter Crop mode would be the best choice. There are 16 possible HD AFD codes, of which 8 are in common use. The FS-Mini does not process or use SD AFD codes.
SD Aspect Ratio Convert
This mode selects the type of SD-to-SD Aspect Ratio Conversion (ARC) performed on an incoming selected SD source. This mode is in effect only when the input and output are both SD (525i or 625i). (In Europe 16:9 anamorphic video is also known as "wide screen" video.)
Figure 5. SD Aspect Ratio Conversion Examples
SD Aspect Ratio Conversion Illustrations
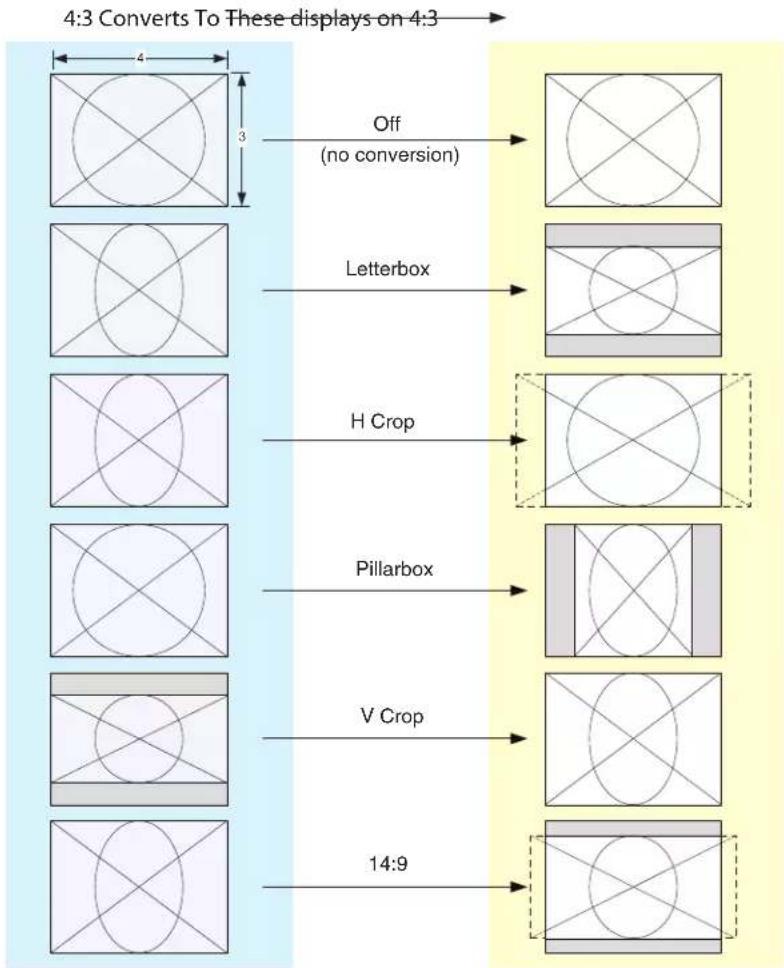
flowchart
graph LR
    A["4:3 Converts To These displays on 4:3"] --> B["Off (no conversion)"]
    B --> C["Letterbox"]
    C --> D["H Crop"]
    D --> E["Pillarbox"]
    E --> F["V Crop"]
    F --> G["14:9"]
Selection Descriptions
- Off-Turns aspect ratio conversion Off.
- Letterbox–Converts 16:9 Anamorphic video to Letterbox video.
- H Crop–Converts 16:9 Anamorphic video to 4:3 Standard video (crops left and right edges of video).
- Pillarbox–Converts 4:3 Standard video to 16:9 Anamorphic video.
• V Crop-Converts Letterbox video to 16:9 Anamorphic video.
• 14:9–Converts 16:9 Anamorphic video to 14:9 Cropped video.
Typically, FS-Mini installation consists of the following steps:
- Ensure the converter is disconnected from power.
- Connect video equipment to the converter BNCs and HDMI connector.
- Connect audio equipment to RCA connectors (optional)
- Apply power to the converter (AJA power supply included).
- The converter will now run using the default factory settings. If you wish to alter the factory settings, you'll need to:
• Install the AJA Mini-Config software on your computer - Attach the converter via USB
- Make your changes using Mini-Config setup screens
- This process is detailed in "Chapter 2 Operation" on page 13.
- Alternatively, you can use the external DIP switches to alter the factory settings (see "Using DIP Switches to Control the FS-Mini" on page 11).
User Controls
The FS-Mini can be used right out of the box for many applications, since it is designed to recognize inputs and perform standard actions automatically. However, you can also manually configure the FS-Mini using either of two methods:
- Mini-Config software application supplied for PCs and Macs
- DIP switches accessible via a cutout on the back of the FS-Mini case
One of the DIP switches is a "Local/Remote" switch. When in the "Local" mode, the remaining DIP switches support a subset of the user controls. When in the "Remote" mode, the normal Mini-Converter non-volatile registers control the unit (as last set).
Refer to "Chapter 2 Operation" on page 13 for information about controlling the FS-Mini with Mini-Config. Instructions for DIP switch settings are presented below.
Using DIP Switches to Control the FS-Mini
Figure 6. DIP Switches
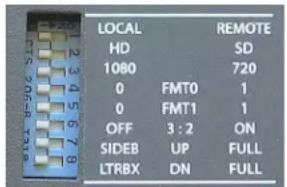
In addition to the Mini-Config application, you can also control the unit via an 8-switch DIP, accessible through a cut-out in the bottom of the unit.
The default positions are shown in Figure 6. The default settings result in an output of 1080i29.97 with NTSC related inputs and 1080i25 with PAL related inputs.
The compliance label, found on the back of the FS-Mini, lists the DIP switch settings.
NOTE: HDMI monitors may not support all frame rates or "PsF" formats.
DIP Switch Settings
The functions of the DIP switches and what they control are described in the following tables.
Table 1. DIP Switch Setting Descriptions
| SWITCH FUNCTION DIP Set LEFT (default) DIP Set RIGHT | |||
| 1 Control | Selects LOCAL (DIP), and | blocks Mini-Config control.When in “Local” mode, the remaining DIP switches will support a subset of the user controls. | Selects REMOTE (Mini-Config), and disables DIP switches 2-8.When in “Remote” mode, the normal Mini-Config non-volatile registers (as last set), control the unit. |
| 2 HD/SD | Selects HD output mode. Selects SD output mode. | ||
| 3 1080/720 | (HD mode only) Selects 1080 output. Selects 720 output. | ||
| 4 & 5 | Alternate HD formats. These two | DIP switches (FMT0, FMT1) act together to select alternate HD output formats. Zero (0) is Left position, one (1) is Right position.See Table 2 below for setting information. | |
| 6 3:2 | Conversion (23.98/24 inputs only) | 3:2 conversion is OFF.A 23.98/24 fps input results in a 23.98/24 fps output. | 3:2 conversion is ON.A 23.98/24 fps input results in either a 29.97/30 or 59.94/60 fps output. |
| 7 | Up Conversion | Sets upconversion to Sidebar (SIDEB). | Sets upconversion to Full screen (FULL). |
| 8 Down | Conversion Sets downconversion to Letterbox (LTRBX). | Sets downconversion to Full screen (FULL). | |
DIP Switches 4 & 5 (FMT0, FMT1)
DIP switches 4 and 5 together select alternate HD formats. Switches 1 and 2 can also affect the HD output format. In the table below an X indicates a "Don't Care" setting.
Table 2. Output Formats for DIP Switch 2,3,4, & 5 Settings
| SW2 HD/SD | SW3 1080/720 | SW 4 FMT0 | SW 5 FMT1 | Output |
| Left | Left Left Left | 1080i 25 | /29.97/30 | |
| Left | Left | Left | Right | 1080PsF23.98/24/25/29.97/30 |
| Left | Left | Right | Left | 1080p 50/59.94/60 |
| Left | Left | Right | Right | 1080p23.98/24/25/29.97/30 |
| Left | Right | X | Left | 720p 50/59.94/60 |
| Left | Right | X | Right | 720p23.98/24/25/29.97/30 |
| Right | X | X | X | 525i/625i |
USB Control and Setup—Using AJA Mini-Config
Your AJA Mini-Converter can be used right out of the box for some applications since it is designed to recognize inputs and perform standard actions automatically by default. However, to use its full capability, you must use AJA's Mini-Config software application for PCs and Macs. This same application can be used to update to new Mini-Converter software released by AJA.
Acquiring Mini-Config
AJA's Mini-Config application is available for download from the AJA website.
To download the latest Mini-Config package, which includes the Mini-Config application, Mini-Converter firmware, and documentation, go to:
https://www.aja.com/products/mini-config-software
Select either the Windows or Mac icon to download the desired version.
Mini-Converter Documentation
Included with the Mini-Config package is a complete set of documentation for all Mini-Converters supported by Mini-Config. A .PDF of the Installation and Operation Guide for the currently connected Mini-Converter can be accessed from the Mini-Config UI via the Help/Manual drop-down menu.
Documentation for all AJA Mini-Converters that use Mini-Config can also be accessed directly in the Mini-Config download package Documentation folder, and via the Documentation icon available on the Mac installer.
Documentation (and firmware) included with the Mini-Config application are the versions available at the time of distribution. However, Mini-Converter software, firmware and documentation are updated regularly, so newer versions may exist.
To download the latest documentation for an individual Mini-Converter, go to:
https://www.aja.com/family/mini-converters
and navigate to the Support web page of that Mini-Converter.
Installing Mini-Config
PC Installation
NOTE: If you have an older version of Mini-Config software installed on your PC, AJA recommends uninstalling the older version before installing the current version.
To install Mini-Config on a Windows PC:
- Download the application from the AJA website (select the Windows icon on the Mini-Config Support web page).
- Open the AJA_MiniConfig.zip file
- Double-click on the Minilnstaller.msi file.
- A Setup Wizard will guide you through the installation.
Figure 7. Mini-Config PC Setup Wizard
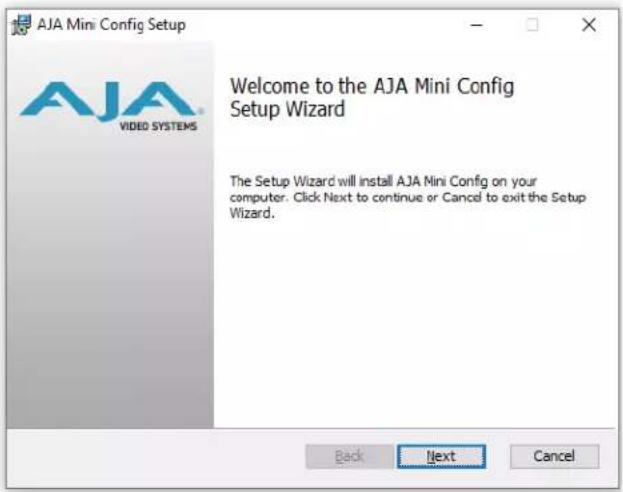
- Click Next to begin. Answer the questions in the subsequent dialogues. When finished, an AJA Mini-Config shortcut will be installed on the desktop, and you will be able to locate the Mini-Config application in the AJA folder in the Programs listing.
NOTE: If the same version of the Mini-Config application already exists on the PC, a different Setup Wizard appears.
Figure 8. Mini-Config Setup Wizard, Reinstallation
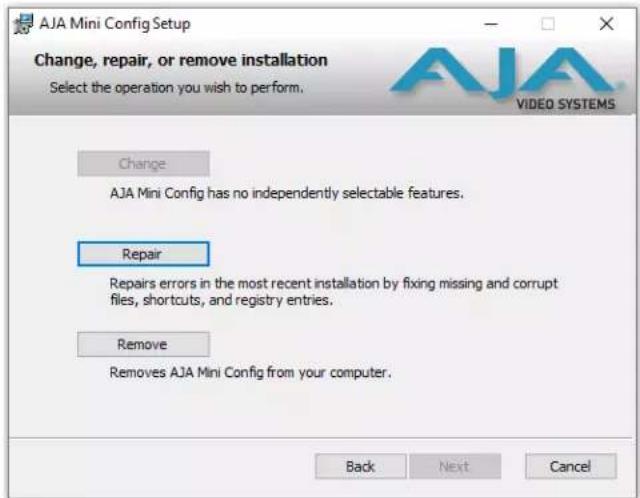
With this screen you can Repair (reinstall) or Remove (uninstall) Mini-Config on the PC.
Mac Installation
To install the application on a Mac:
NOTE: Intel and Apple Silicon (M1/M2) based CPUs are supported for use with AJA MiniConfig software.
- Download the application from the AJA website (select the Apple icon on the Mini-Config Support web page).
- Open the AJA_MiniConfig folder.
-
Double-click on the AJAMiniConfig.dmg file.
-
Answer the prompt and a utility program will be launched.
Figure 9. Mini-Config Mac Installer
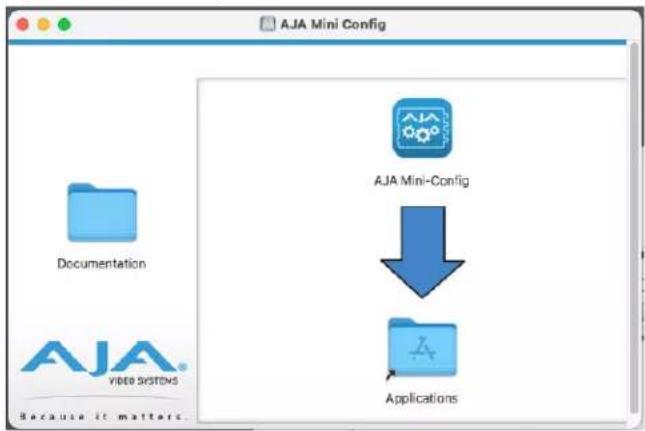
- To complete the installation drag the MiniConfig.app icon to the Applications folder.
Running Mini-Config
Connect the Mini-Converter to the PC or Mac via the supplied USB cable. Connect the external power supply (supplied) to the Mini-Converter.
PC Startup
To run Mini-Config on a PC, double-click on the AJA Mini-Config icon on your desktop, or open the AJA folder in the program list and click on the AJA Mini-Config application located inside the Mini-Config folder.
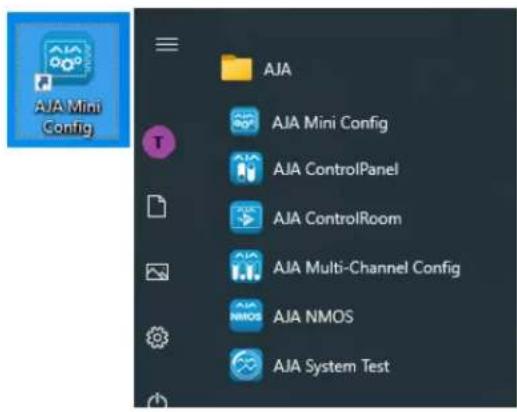
Mac Startup
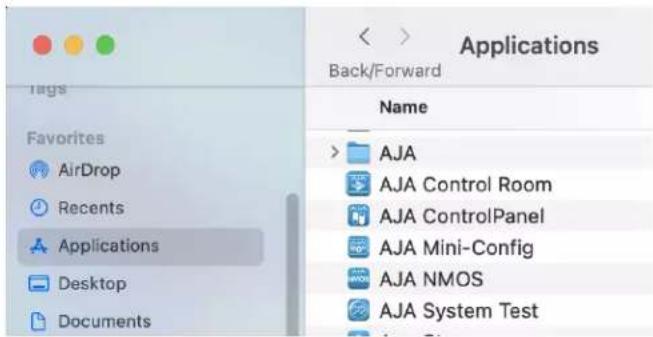
To run Mini-Config on a Mac, open the Applications folder and locate the AJA Mini-Config application. Double-click the application to launch it.
Saving Setups
A File drop down menu on the Mini-Config application bar (similar for Mac and PC) allows you to save the current state of the Mini-Converter to a preset file for later recall.
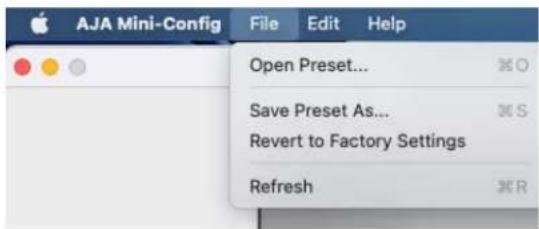
Using this feature you can set up the converter for different applications, storing each configuration (Save Preset As...) with a unique name for easy recall (Open Preset...).
A Revert to Factory Settings menu item similarly allows you to change the settings back to AJA's factory defaults.
Operating Mini-Config
The Mini-Config application provides a graphic interface for viewing settings and updating software. It consists of an information area at the top that shows the available Mini-Converters attached to the computer via USB, with a graphical rendering of the selected Mini-Converter showing all the connectors and their current state.
Colored text next to the connectors indicates the signal type and what the MiniConverter is doing:
- Blue text indicates the values automatically selected
- Black text indicates values that you have manually selected
- Red text indicates the Mini-Converter is not detecting a signal, or cannot operate with the current user settings.
NOTE: Even if no output device is detected, the SDI connector text still shows the signal it is outputting.
NOTE: Configuration settings in red will change based on the attached output device as well as input signals. For improved accuracy and reliability, you should configure the Mini-Converter only when the target output device is attached and input signals are supplied at the inputs.
Screens are virtually the same on both PC and Mac, with subtle differences that reflect the general look of the platform environment.
Figure 10. Example Mini-Config Screen
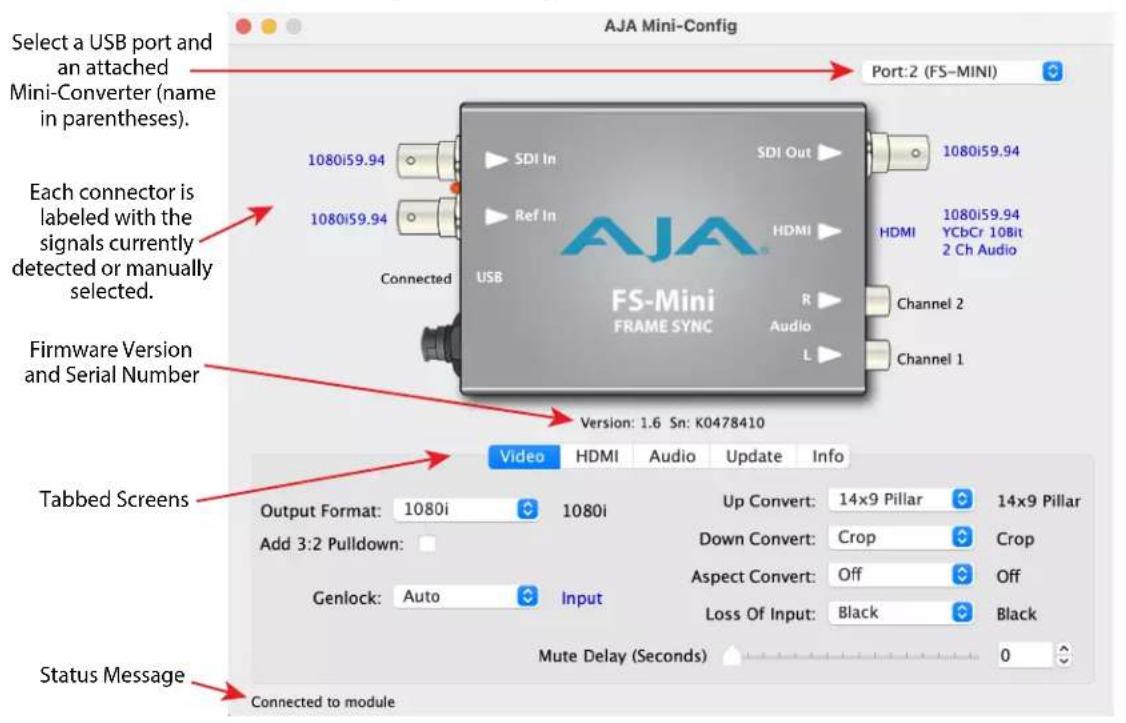
Selecting a Mini-Converter with the pulldown menu causes this application to connect to the selected converter. The graphic of Mini-Converter and text below it provides:
- Type of converter
- Firmware version
- Serial number of the unit.
A status field at the bottom of the screen shows if your application is connected and communicating with the Mini-Converter.
When configuring the Mini-Converter, select it from the top pulldown, view the current settings and change any values. Making a change communicates that new value to the Mini-Converter's non-volatile memory.
Tabbed Screens
The Tabs delineate control screens with groups of controls for each type of task to be performed.
The controls for the actual configuration parameters are specific to each MiniConverter type. When you Click on any of the tab buttons, the pane below the tabs will change to match your tab selection. Any changes you make are immediately applied and will be saved, overwriting previous settings.
Video Tab Screen
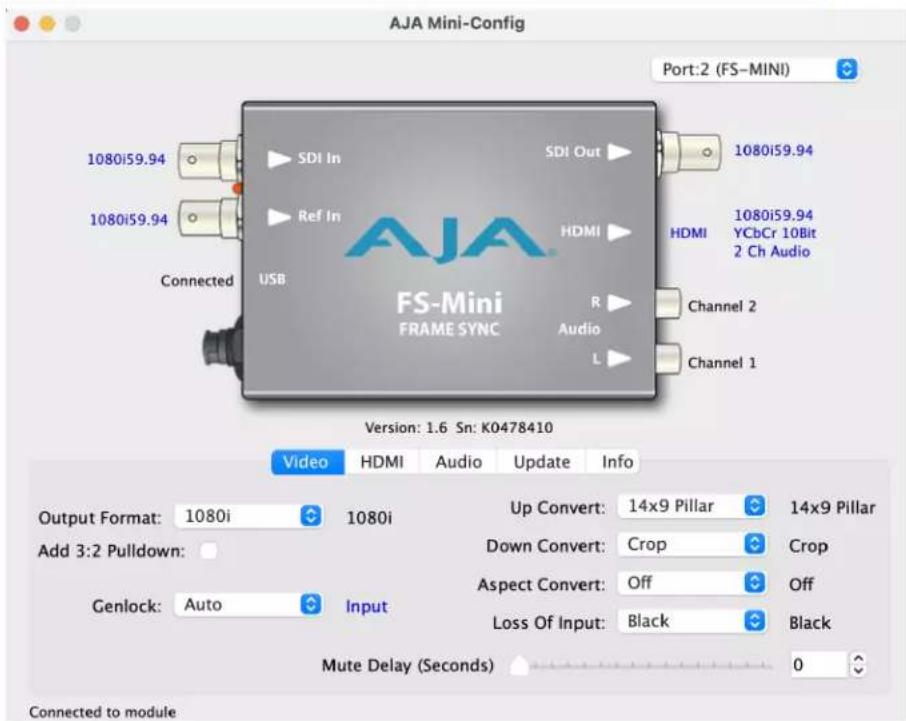
The Video Screen is where you can configure FS-Mini video inputs and outputs.
Output Format
Determines the FS-Mini output video format. These are the format choices:
- Follow INPUT: The output video format will match the format of the incoming video.
- Follow REF: The output video format will match the format of the current Reference input.
- SD: The output video format will be 525i29.97 or 625i25 (for 25 or 50 fps video.
- 720p: - The output video format will be 720p59.94 (for 23.98, 29.97, or 59.94 fps video inputs), 720p60 (for 24, 30, or 60 fps video inputs), or 720p50 (for 25 or 50 fps video inputs).
- 1080i: The output video format will be 1080i29.97 (for 23.98, 29.97, or 59.94 fps video inputs), 1080i30 (for 24, 30, or 60 fps video inputs), or 1080i25 (for 25 or 50 fps video inputs).
- 1080PsF: The output video format will be 1080PsF23.98 (for 23.98 fps video inputs), 1080PsF24 (for 24 fps video inputs), 1080PsF25 (for 25 or 50 fps video inputs), 1080PsF29.97 (for 29.97 or 59.94 video inputs), or 1080PsF30 (for 30 or 60 fps video inputs).
- 1080p (low): The output video format will be 1080p23.98 (for 23.98 fps video inputs), 1080p24 (for 24 fps video inputs), 1080p25 (for 25 or 50 fps video inputs), 1080p29.97 (for 29.97 or 59.94 video inputs), or 1080p30 (for 30 or 60 fps video inputs).
- 1080p (high): The output video format will be 1080p50 (for 25 or 50 fps video inputs), 1080p59.94 (for 23.98, 29.97 or 59.94 video inputs), or 1080p60 (for 24, 30 or 60 fps video inputs).
NOTE: FS-Mini converts 3G-A formats only. It does not input or output 3G-B.
Add 3:2 Pulldown
When the Add 3:2 Pull down box is checked, 23.98 fps and 24 fps video inputs are converted to 29.97 fps and 30 fps, respectively, by adding 3:2 pull down before conversion. Note that this selection is only used when the FS-Mini module is in Remote mode (DIP switch #1). In Local mode, 3:2 pull down addition is determined by DIP switch #6.
Genlock
Determines the timing reference for the FS-Mini video output. The selected reference is displayed to the right of the Genlock pull-down. These are the choices:
- Auto (default): Auto uses the reference input if present, or locks to the SDI input if no reference is present or if the reference is present but is not compatible.
- Lock to Input: Always locks to the SDI input.
- Lock to Reference: Always locks to the Reference input – if the supplied reference is not compatible, reverts to Free Run.
• Free Run: Always operates in Free Run mode.
Up Convert
Determines the mode when converting from SD input video to an HD output video format. This selection is only used when the FS-Mini module is in Remote mode (DIP switch #1). In Local mode, the up convert mode is determined by DIP switch #7. These are the choices:
- 4x3 Pillar: Produces 4x3 image at center screen with black sidebars.
- 14x9 Pillar (default): Produces 14x9 image, zoomed slightly to fill a 14x9 image with black sidebars.
• Full Screen: Produces anamorphic full screen display. - LB to Full Image: Produces image zoomed to fit the full screen (letterbox).
- Wide Zoom: Produces an image sized to fit a 16x9 screen using a combination of zoom and stretch. (This can introduce a small aspect ratio change.)
Down Convert
Determines the mode when converting from HD input video to an SD output video format. Note that this selection is only used when the FS-Mini module is in Remote mode (DIP switch #1). In Local mode, the upconvert mode is determined by DIP switch #8. These are the choices:
- Crop (default): Image is cropped to fit new screen size.
- Anamorphic: HD image is converted to full-screen SD with a 16x9 aspect ratio (anamorphic).
- 14x9: Image is reduced slightly with aspect ratio preserved. Black is added top and bottom, and the left and right sides are cropped.
- Auto AFD: Automatically selects the best Downconvert mode based on the input video's Active Format Description (AFD) code. If the input video is not carrying an AFD VANC code, the Downconverter defaults to crop.
- Letterbox: Image is reduced with black top and bottom added to image area, with the aspect ratio preserved.
Aspect Convert
Determines the mode when converting from SD input video to an SD output video format. There is no DIP switch equivalent for this control. The setting is saved in nonvolatile memory in the module and used for all subsequent operation. These are the choices:
- Off (default): The input image is copied to the output with no scaling.
- Letterbox: The input frame is scaled vertically to a 16x9 "letterboxed" size (anamorphic to letterbox conversion).
- H Crop: The input frame is scaled horizontally to 16x9, then center-cropped (anamorphic to center crop conversion).
- Pillarbox: The input frame is scaled horizontally to make a pillarbox output (4x3 to anamorphic conversion).
- V Crop: The input frame is scaled vertically to make a vertically cropped output (letterbox to anamorphic conversion).
- 14x9: The input frame is scaled horizontally and vertically as a compromise between H Crop and Letterbox (anamorphic to 14x9 conversion).
Loss of Input
Determines what action is taken when input video is lost. Choose from:
- Black (default): The output goes to black.
- Freeze: The output freezes on the last good frame.
- Mute: No signal is output. A time delay to when the switch to mute occurs can be adjusted with the Mute Delay control.
Mute Delay
If Mute is selected above, you can set a time delay (0-15 seconds) for how long before the switch to no signal occurs. The FS-Mini output will be Black until the timer expires, then it switches to Mute.
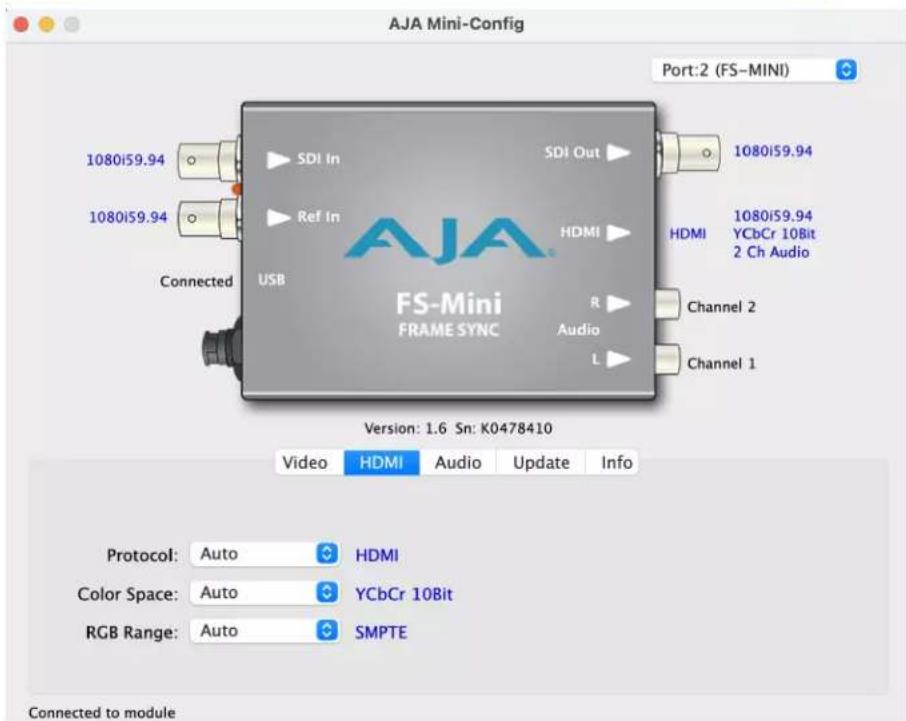
Provides user selection of the HDMI output modes. There is no DIP switch equivalent for these controls. The setting is saved in nonvolatile memory in the module and used for all subsequent operation.
NOTE: The HDMI video output always mirrors the SDI video output, both in content and output format selection. Click on the Output tab to view and make changes to the FS-Mini output settings.
NOTE: When the output format is set to 1080PsF23.98 or 1080PsF24 the HDMI output is disabled since HDMI does not have a corresponding supported format.
Protocol
Selects whether the HDMI output uses DVI or HDMI protocols for sending video to the destination device. These are the choices:
- Auto: Automatically selects the output protocol based on getting the attached HDMI device's EDID information. This is the recommended setting. The selected protocol is shown to the right of the popup control.
- HDMI: Uses HDMI protocols regardless of the attached device's EDID.
- DVI: Uses DVI protocols regardless of the attached device's EDID. Because DVI protocols do not support audio or HDMI InfoFrame ancillary data, select this mode only if you know that the attached device requires it.
Color Space
Selects the HDMI output color space and depth. These are the choices:
- Auto: Automatically selects the mode based on getting the attached HDMI device's EDID information. This is the recommended setting. The selected mode is shown to the right of the pull-down control.
- RGB 8Bit: Uses 8-bit RGB mode regardless of the attached device's EDID.
- RGB 10Bit: Uses 10-bit RGB mode regardless of the attached device's EDID.
- YCbCr 10Bit: Uses 10-bit YCbCr mode regardless of the attached device's EDID.
RGB Range
Selects the output Video Color Range only when the output is RGB. Choose from:
- Auto: Automatically selects the mode based on the attached HDMI device's EDID information. This is the recommended setting. The selected mode is shown to the right of the popup control.
- SMPTE: Scales the output video level to 8-bit range 16 - 235 (10-bit 64 - 940) regardless of the attached device's EDID.
- Full Range: Scales the output video level to 8-bit range 0 - 255 (10-bit 0 - 1023) regardless of the attached device's EDID.
Audio Tab Screen
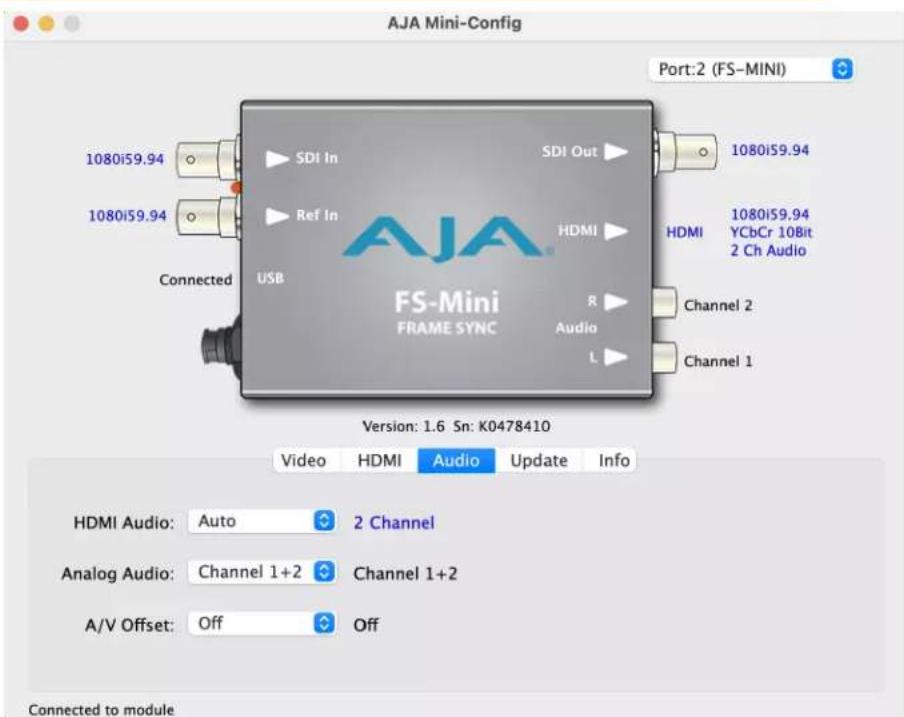
The Audio Screen is where you can configure FS-Mini HDMI and analog (RCA-style) audio output channels. Pull down menu settings are described following the screen graphic. There is no DIP switch equivalent for these controls. The setting is saved in nonvolatile memory in the module and used for all subsequent operation.
NOTE: The SDI embedded output audio is a channel-for-channel copy of the input SDI embedded audio. There are no user controls.
HDMI Audio
Selects how many SDI channels are passed to the HDMI connector and which channel pairs are selected. These are the choices:
- Auto: The FS-Mini automatically selects the audio output configuration based on communicating with the attached HDMI device. The resulting mode is displayed to the right of the popup control.
- 2 Channel: Outputs a pair of channels from the SDI stream to two channels on the HDMI output connector. The selected audio pair is determined by the Analog Audio setting (below).
- 8 Channel: Outputs SDI channels 1 through 8 to the HDMI output connector.
Analog Audio
Selects the channel pair that will be output to the Analog RCA connectors (L/R) and the HDMI audio output (when HDMI Audio is in 2-channel mode). These are the choices:
• Channel 1+2, Channel 3+4, Channel 5+6, Channel 7+8, Channel 9+10, Channel 11+12, Channel 13+14, Channel 15+16
A/V Offset
Selects how embedded audio delay is managed. These are the choices:
- Off (default): Embedded audio can be advanced by up to one video frame.
- On: Embedded audio can be delayed by up to one video frame.
NOTE: Recommended usage is the control should be On when the source is not locked to a reference and turned Off otherwise.
Update Tab Screen
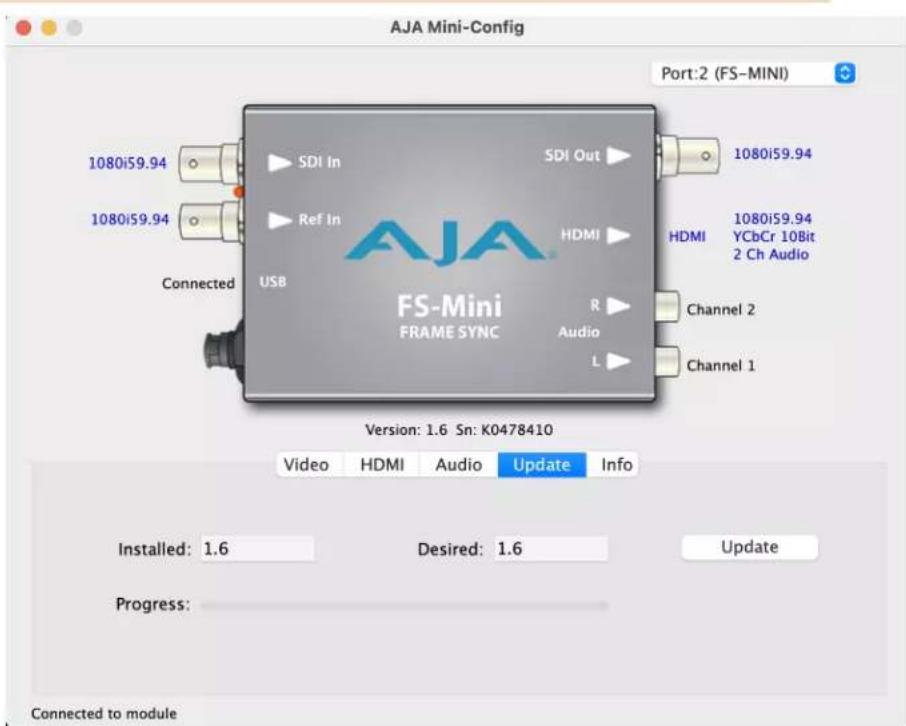
Use this Update tab screen to view the software version currently installed on the converter or install new software.
NOTE: When discussing Mini-Converters, "Firmware" is software that will be stored in the Mini-Converter's non-volatile memory and used when it is powered up. This is something different than the Mini-Config application software. The version numbers shown in the Update screen refer only to the firmware.
Installed
This field shows the version of the firmware currently installed inside the MiniConverter.
Desired
This field shows the version of firmware embedded in the Mini-Config application which you can install into the Mini-Converter by clicking the Update button.
Update
This button initiates a software update operation loading the "Desired" version of firmware into the Mini-Converter's non-volatile memory.
Progress
This indicator bar shows the progress of firmware installation.
See "Acquiring Mini-Config" on page 13 and "Installing Mini-Config" on page 13 for more information.
Info Tab Screen
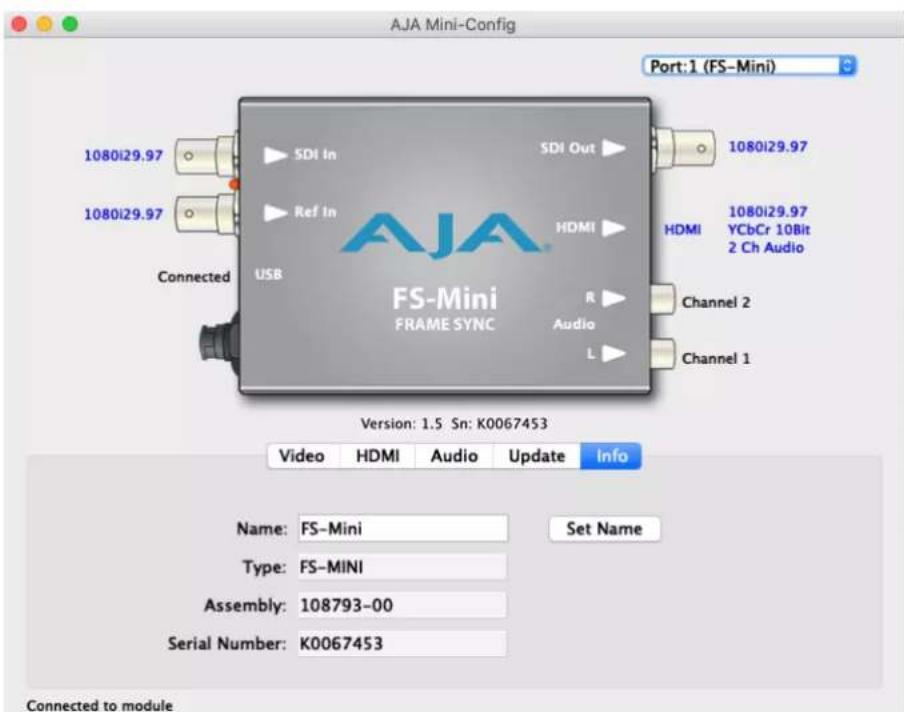
This screen provides basic information about the Mini-Converter. This information is mostly useful when calling AJA Support for service or technical support.
Name
This field allows you to give your Mini-Converter a name. This can be useful if you have several Mini-Converters attached to a Mac/PC via USB so you can distinguish between them easily (especially if they're the same model).
Type
This is the factory set model name of the Mini-Converter.
Assembly
This is the factory assembly number.
NOTE: Some newly manufactured Mini-Converters may not be backwards compatible with older firmware and Mini-Config versions. It is highly recommended that you update the firmware to avoid any potential issues. Please check the current Release Notes to confirm that the Assembly number is compatible with any older firmware or Mini-Config versions.
Serial Number
This is the factory set unique serial number of your Mini-Converter. If you ever call AJA Support for service, you may be asked for this number.
Appendix A – Specifications
FS-Mini Tech Specs
Utility frame sync
Aligns and times input video to reference
Video Formats
• (HD) 1920 x 1080p
• (HD) 1920 x 1080PsF
• (HD) 1920 x 1080i
• (HD) 1280 x 720p
• (SD) 625i
• (SD) 525i
- YCbCr, 4:2:2, 10-bit
Video Input Digital
• 1x 3G-SDI input, 1x BNC
• 3G/HD/SD, SMPTE-259/292/424
• Single Link 3G-SDI Level A, SMPTE-425-1
• (HD) 1920 x 1080p 23.98, 24, 25, 29.97, 30, 50, 59.94, 60
• (HD) 1920 x 1080PsF 23.98, 24, 25, 29.97, 30
• (HD) 1920 x 1080i 50, 59.94, 60
• (HD) 1280 x 720p 50, 59.94, 60
• (SD) 625i 50
• (SD) 525i 59.94
Video Output Digital
• 1x 3G-SDI outputs, 1x BNC
• 3G/HD/SD, SMPTE-259/292/424
• Single Link 3G-SDI Level A, SMPTE-425-1
• (HD) 1080p 23.98 (for 23.98 video inputs)
• (HD) 1080p 24 (for 24 video inputs)
• (HD) 1080p 25 (for 50 video inputs)
• (HD) 1080p 29.97 (for 59.94 video inputs)
• (HD) 1080p 30 (for 60 video inputs)
• (HD) 1080p 50 (for 50 video inputs)
• (HD) 1080p 59.94 (for 23.98, 59.94 video inputs)
• (HD) 1080p 60 (for 24, 30 or 60 video inputs)
• (HD) 1080PsF 23.98 (for 23.98 video inputs)
• (HD) 1080PsF 24 (for 24 video inputs)
• (HD) 1080PsF 25 (for 50 video inputs)
• (HD) 1080PsF 29.97 (for 59.94 video inputs)
• (HD) 1080PsF 30 (for 30 or 60 video inputs)
• (HD) 1080i 59.94 (for 23.98, or 59.94 video inputs)
• (HD) 1080i 60 (for 24, 30, or 60 video inputs)
• (HD) 1080i 50 (for 25 or 50 video inputs)
• (HD) 720p 50 (for 50 video inputs)
• (HD) 720p 59.94 (for 23.98, 59.94 video inputs)
• (HD) 720p 60 (for 24, 30, or 60 video inputs)
• (SD) 625i 50 (for 25 or 50 fps video inputs)
• (SD) 525i 59.94 (for 23.98 or 59.94 video inputs)
Monitor Output Digital
• 1x HDMI standard type A connector
• HD/SD
• Color space, YCbCr or RGB
- Bit depth, 8 or 10
- RGB Range, SMPTE or Full Range
Video Processing
• Frame rate conversion/film cadence removal/insertion (3:2)
- Loss of input management: Freeze, Black, or Mute
- AFD input detection, down-convert control
- Nominal video delay HD/SD, 1 frame
Up-Conversion
- Hardware 10-bit
- 4x3 Pillar: results in a 4x3 image at center screen with black sidebars
- 14x9 Pillar: results in a 4x3 image zoomed slightly to fill a 14x9 image with black side bars
- Full Screen: results in a 4x3 image stretched horizontally to fill in a 16x9 screen
- Letterbox to Full: results in image zoomed to fill fullscreen
- Wide Zoom: results in a combination of zoom and horizontal stretch to fill a 16x9 screen; this setting will introduce a small aspect ratio change
Down-Conversion
- Hardware 10-bit
- Crop: image is cropped to fit new screen size
- Anamorphic: HD image is converted to full-screen SD with a 16x9 aspect ratio
- 14x9: image is reduced slightly with aspect ratio preserved, black is added top and bottom, and the left and right sides are cropped
- Auto AFD: automatically selects the best down-convert mode based on the input video's Active Format Description (AFD) code
- Letterbox: image is reduced with black top and bottom added to image area with the aspect ratio preserved
Cross-Conversion
- Hardware 10-bit
• •1080i to 720p
• ·720p to 1080i - .720p to 1080PsF
Aspect Ratio Conversion for SD to SD
- Letterbox: transforms SD anamorphic material to a letterboxed image
- H Crop: produces a horizontally stretched effect on the image; transforms anamorphic SD to full frame
- SD Pillarbox: produces an image in the center of the screen with black borders on the left and right sides and an anamorphized image in the center
• V Crop: transforms SD letterbox material to an anamorphic image
• 14x9: anamorphic to 14x9 conversion
Audio Input Digital
- 48 kHz sample rate
- 1x SDI embedded input
• 16-channels, 24-bit (20-bit SD), SMPTE-272/299
Audio Output Digital
- 48 kHz sample rate
- 1x SDI embedded output
• 16-channels, 24-bit (20-bit SD), SMPTE-272/299
Audio I/O
• 16-channel embedded SDI audio input
• 16-channel embedded SDI audio output
• 2 or 8-channel HDMI audio output
• 2x RCA style analog outputs at -10 dBu (nominal)
Ancillary Data
• Supports pass-through of PCM embedded audio
- Supports pass-through of non-PCM audio when source is in time with the selected ref (SDI In or Ext Ref). Non-PCM audio is not supported during frame sync operation.
- All other ANC data is not passed
Reference Input
- External, 1x BNC
- Blackburst or tri-level sync
- 75-ohms terminating
Genlock
- Lock to External Reference
- Lock to SDI input
- Free run
HDCP
- The FS-Mini does not encode the HDMI output with HDCP encryption. By definition, HD-SDI inputs to the FS-Mini are unencrypted. The HDMI specification requires HDMI monitors to support unencrypted inputs.
User Interface
- USB port used with supplied cable and Mini-Config software application to configure device via PC or Mac
- External DIP switches
Size (w x d x h)
- 5.8" x 3.1" x 1.0" (147.32 x 78.74 x 25.4 mm)
Weight
• 0.7 lb (0.3 kg)
Power
• +5VDC Regulated, 9 Watts, Power Supply Required (included with purchase)
Environment
- Safe Operating Temperature: 0 to 40 C (32 to 104 F)
- Safe Storage Temperature (Power OFF): -40 to 60 C (-40 to 140 F)
- Operating Relative Humidity: 10-90% noncondensing
- Operating Altitude: <3,000 meters (<10,000 feet)
Appendix B – Safety and Compliance
Federal Communications Commission (FCC) Compliance Notices
Class A Interference Statement
This equipment has been tested and found to comply with the limits for a Class A digital device, pursuant to Part 15, Subpart B of the FCC Rules. These limits are designed to provide reasonable protection against harmful interference in a residential installation. This equipment generates, uses, and can radiate radio frequency energy and, if not installed and used in accordance with the instructions, may cause harmful interference to radio communications. However, there is no guarantee that interference will not occur in a particular installation. If this equipment does cause harmful interference to radio or television reception, which can be determined by turning the equipment off and on, the user is encouraged to try to correct the interference by one or more of the following measures:
- Reorient or relocate the receiving antenna.
- Increase the separation between the equipment and receiver.
- Connect the equipment into an outlet on a circuit different from that to which the receiver is connected.
- Consult the dealer or an experienced radio/TV technician for help.
FCC Caution
This device complies with Part 15 of the FCC Rules. Operation is subject to the following two conditions: (1) This device may not cause harmful interference, and (2) this device must accept any interference received, including interference that may cause undesired operation.
Canadian ICES Statement
Canadian Department of Communications Radio Interference Regulations
This digital apparatus does not exceed the Class A limits for radio-noise emissions from a digital apparatus as set out in the Radio Interference Regulations of the Canadian Department of Communications. This Class A digital apparatus complies with Canadian ICES-003.
European Union, European Free Trade Association (EFTA) and United Kingdom Regulatory Compliance
This equipment may be operated in the countries that comprise the member countries of the European Union, European Free Trade Association and the United Kingdom. These countries, listed in the following paragraph, are referred to as The European Community throughout this document:
AUSTRIA, BELGIUM, BULGARIA, CROATIA, CZECH REPUBLIC, DENMARK, ESTONIA, FINLAND, FRANCE, GERMANY, GREECE, HUNGARY, ICELAND, IRELAND, ITALY, LATVIA, LIECHTENSTEIN, LITHUANIA, LUXEMBOURG, MALTA, NETHERLANDS, NORWAY, POLAND, PORTUGAL, REPUBLIC OF CYPRUS, ROMANIA, SLOVAK REPUBLIC, SLOVENIA, SPAIN, SWEDEN, SWITZERLAND, UNITED KINGDOM
Marking by these symbols indicates compliance with the Essential Requirements of the EMC Directive of the European Union 2014/30/EU.


This equipment meets the following conformance standards:
Safety
EN 62368-1: 2014 + A11 (T-Mark License)
IEC 62368-1: 2014 (CB Scheme Certificate)
Emissions
EN 55032: 2012, CISPR 32: 2015
EN 61000-3-2: 2014, EN 61000-3-3: 2013
Immunity
EN 55035: 2017 + A11: 2020, EN 61000-4-2: 2009, EN 61000-4-3: 2006 + A1: 2008 +
A2: 2010, EN 61000-4-4: 2012, EN 61000-4-5: 2014/A1: 2017, EN 61000-4-6: 2014,
EN 61000-4-8: 2010, EN 61000-4-11: 2020
Environments: E2, E3 and E4
The product is also licensed for additional country specific standards as required for the International Marketplace.

Warning! This is a Class A product. In a domestic environment, this product may cause radio interference, in which case, the user may be required to take appropriate measures.
This symbol on the product or its packaging indicates that this product must not be disposed of with your other household waste. Instead, it is your responsibility to dispose of your waste equipment by handing it over to a designated collection point for the recycling of waste electrical and electronic equipment. The separate collection and recycling of your waste equipment at the time of disposal will help conserve natural resources and ensure that it is recycled in a manner that protects human health and the environment. For more information about where you can drop off your waste for recycling, please contact your local authority, or where you purchased your product.
Taiwan Compliance Statement
警告使用者:
This is a Class A product based on the standard of the Bureau of Standards, Metrology and Inspection (BSMI) CNS 13438, Class A. In a domestic environment this product may cause radio interference in which case the user may be required to take adequate measures.
Japan Compliance Statement
This is a Class A product based on the standard of the VCCI Council (VCCI-32: 2016). If this equipment is used in a domestic environment, radio interference may occur, in which case, the user may be required to take corrective actions.
Translated Warning and Caution Messages
The following caution statements, warning conventions, and warning messages apply to this product and manual.

Warning Symbol

Caution Symbol
Before Operation Please Read These Instructions

Warning! Read and follow all warning notices and instructions marked on the product or included in the documentation.
Warning! Do not use this device near water and clean only with a dry cloth.
Warning! Do not block any ventilation openings. Install in accordance with the manufacturer's instructions.
Warning! Do not install near any heat sources such as radiators, heat registers, stoves, or other apparatus (including amplifiers) that produce heat.
Warning! Do not defeat the safety purpose of the polarized or grounding-type plug. A polarized plug has two blades with one wider than the other. A grounding type plug has two blades and a third grounding prong. The wide blade or the third prong are provided for your safety. If the provided plug does not fit into your outlet, consult an electrician for replacement of the obsolete outlet.
Warning! Since the Mains plug is used as the disconnection for the device, it must remain readily accessible and operable.
Warning! Protect the power cord from being walked on or pinched particularly at plugs, convenience receptacles, and the point where they exit from the device.
Warning! Unplug this device during lightning storms or when unused for long periods of time.
Warning! Refer all servicing to qualified service personnel. Servicing is required when the device has been damaged in any way, such as power-supply cord or plug is damaged, liquid has been spilled or objects have fallen into the device, the device has been exposed to rain or moisture, does not operate normally, or has been dropped.
Warning! Do not open the chassis. There are no user-serviceable parts inside. Opening the chassis will void the warranty unless performed by an AJA service center or licensed facility.
Warning! Disconnect the external AC power supply line cord(s) from the mains power before moving the unit.
Warning! Only use attachments and accessories specified and/or sold by the manufacturer.
Warranty and Liability Information
Limited Warranty on Hardware
AJA Video Systems, Inc. (AJA Video) warrants that the hardware product, not including software components, will be free from defects in materials and workmanship for a period of five years from the date of purchase. AJA Video provides a separate software warranty as part of the license agreement applicable to software components.
If the Customer brings a valid claim under this limited warranty for a hardware product (hereafter, a "product") during the applicable warranty period, AJA Video will, at its sole option and as the Customer's sole remedy for breach of the above warranty, provide one of the following remedies:
- Repair or facilitate the repair the product within a reasonable period of time, free of charge for parts and labor.
- Replace the product with a direct replacement or with a product that performs substantially the same function as the original product.
- Issue a refund of the original purchase price less depreciation to be determined based on the age of the product at the time remedy is sought under this limited warranty.
To obtain service under this warranty, the Customer must notify AJA Video of the defect before expiration of the warranty period and make suitable arrangements for the performance of service by contacting AJA Video support through the channels set forth on the support contacts web page at https://www.aja.com/support. Except as stated, the Customer shall bear all shipping, packing, insurance and other costs, excluding parts and labor, to effectuate repair. Customer shall pack and ship the defective product to a service center designated by AJA Video, with shipping charges prepaid. AJA Video shall pay to return the product to Customer, but only if to a location within the country in which the AJA Video service center is located. SOME JURISDICTIONS DO NOT ALLOW THE EXCLUSION OF IMPLIED WARRANTIES OR LIMITATIONS ON APPLICABLE STATUTORY RIGHTS OF A CONSUMER, SO SOME OR ALL OF THE TERMS OF THIS PARAGRAPH MAY NOT APPLY TO YOU.
Limitation of Liability
Under no circumstances shall AJA video BE LIABLE IN ANY WAY FOR ANY LOST, CORRUPTED OR DESTROYED DATA, FOOTAGE OR WORK, OR FOR ANY OTHER INDIRECT, SPECIAL, INCIDENTAL OR CONSEQUENTIAL DAMAGES OR LOST PROFITS, OR FOR ANY THIRD PARTY CLAIM, IN CONNECTION WITH THE PRODUCT, WHETHER RESULTING FROM DEFECTS IN THE PRODUCT, SOFTWARE OR HARDWARE FAILURE, OR ANY OTHER CAUSE WHATSOEVER, EVEN IF AJA VIDEO HAS BEEN ADVISED OF THE POSSIBILITY OF SUCH DAMAGES. AJA VIDEO'S LIABILITY IN CONNECTION WITH THE PRODUCT SHALL UNDER NO CIRCUMSTANCES EXCEED THE PURCHASE PRICE PAID FOR THE PRODUCT. The foregoing limitations apply even if any remedy set forth in this LIMITED WARRANTY fails of its essential purpose. SOME JURISDICTIONS DO NOT ALLOW THE LIMITATION OF LIABILITY FOR PERSONAL INJURY, OR OF INCIDENTAL OR CONSEQUENTIAL DAMAGES, SO SOME OR ALL OF THE TERMS OF THIS PARAGRAPH MAY NOT APPLY TO YOU.
Governing Law and Language; Your Rights
This limited warranty is the only warranty provided by AJA Video on the hardware product. It supersedes all prior or contemporaneous understandings regarding such subject matter. No amendment to or modification of this warranty will be binding unless in writing and signed by AJA Video. The laws of the State of California, USA will govern this warranty and any dispute arising from it. Any translation of this Agreement is intended for convenience and to meet local requirements and in the event of a dispute between the English and any non-English versions, the English version of this warranty will govern. This limited warranty gives you specific legal rights and you may have other rights that vary from jurisdiction to jurisdiction, some of which are noted above.
Index
A
Add 3:2 Pulldown 19
AJA Support 2
Analog Audio 23
Aspect Convert 20
Assembly 24
Audio Tab Screen 22
Mute Delay 20
N
Name 24
O
Output Format 18
Overview 4
B
Block Diagram 5
P
Protocol 21
C
Color Space 21
Conversion Mode Discussion 7
R
RGB Range 22
D
DIP Switch Control 11
DIP Switch Settings 12
Documentation
Downloading 13
Mini-Converter 13
Down Convert 19
Downconvert Mode 8
S
Saving Setups 16
SD Aspect Ratio Convert 10
Serial Number 25
Software Version 23
T
Type 24
F
Features 4
Firmware Version 23
U
Up Convert 19
Upconvert Mode 7
Update 24
Update Tab Screen 23
User Controls 11
G
Genlock 19
V
Video Tab Screen 18
H
HDMI Audio 22
HDMI Tab Screen 21
|
Info Tab Screen 24
Installation 11
I/O Connection 6
L
Loss of Input 20
M
Mini-Config
Installation on Mac 14
Installation on PC 13
Operation 16
Screen Description 17
Startup on Mac 15
Startup on PC 15
Mini-Config Screen
Info Tab Screen 24
Update Tab Screen 23
Mini-Converter Documentation 13
- FS-Mini Mini-Converter
- Installation and Operation Guide
- Trademarks
- Copyright
- Contacting AJA Technical Support or Sales
- Contents
- Notices 2
- Chapter 1 – Introduction .....4
- Chapter 2 – Operation....13
- Appendix A – Specifications ..... 26
- Appendix B – Safety and Compliance ..... 30
- Warranty and Liability Information....38
- Index. 39
- Chapter 1 – Introduction
- Overview
- Features
- Video Formats
- Block Diagram
- Lock LED Status Indicators
- Frame Sync Mode Example
- Setup
- Procedure
- Conversion Mode Discussion and Examples
- Upconvert Mode
- Selection Description
- Downconvert Mode
- SD Aspect Ratio Convert
- Selection Descriptions
- User Controls
- Using DIP Switches to Control the FS-Mini
- DIP Switch Settings
- DIP Switches 4 & 5 (FMT0, FMT1)
- USB Control and Setup—Using AJA Mini-Config
- Acquiring Mini-Config
- Mini-Converter Documentation
- Installing Mini-Config
- PC Installation
- Mac Installation
- Running Mini-Config
- PC Startup
- Mac Startup
- Saving Setups
- Operating Mini-Config
- Tabbed Screens
- Video Tab Screen
- Output Format
- Add 3:2 Pulldown
- Genlock
- Up Convert
- Down Convert
- Aspect Convert
- Loss of Input
- Mute Delay
- Protocol
- Color Space
- RGB Range
- Audio Tab Screen
- HDMI Audio
- Analog Audio
- A/V Offset
- Update Tab Screen
- Installed
- Desired
- Update
- Progress
- Info Tab Screen
- Name
- Type
- Assembly
- Appendix A – Specifications
- FS-Mini Tech Specs
- Video Input Digital
- Video Output Digital
- Monitor Output Digital
- Video Processing
- Up-Conversion
- Down-Conversion
- Cross-Conversion
- Aspect Ratio Conversion for SD to SD
- Audio Input Digital
- Audio Output Digital
- Audio I/O
- Ancillary Data
- Reference Input
- HDCP
- User Interface
- Size (w x d x h)
- Weight
- Power
- Environment
- Appendix B – Safety and Compliance
- Federal Communications Commission (FCC) Compliance Notices
- Class A Interference Statement
- FCC Caution
- Canadian ICES Statement
- European Union, European Free Trade Association (EFTA) and United Kingdom Regulatory Compliance
- Taiwan Compliance Statement
- 警告使用者:
- Japan Compliance Statement
- Translated Warning and Caution Messages
- Before Operation Please Read These Instructions
- Warranty and Liability Information
- Limited Warranty on Hardware
- Limitation of Liability
- Governing Law and Language; Your Rights
- Index
- A
- N
- O
- B
- P
- C
- R
- D
- S
- T
- F
- U
- G
- V
- H
- |
- L
- M
Brand : AJA
Model : FS-MINI
Category : Uncategorized