
MC80ZBFVM - Air purifier DAIKIN - Free user manual and instructions
Find the device manual for free MC80ZBFVM DAIKIN in PDF.


| Product Type | Air Purifier |
| Brand | Daikin |
| Model | MC80ZBFVM |
| Dimensions (W x H x D) | 395 x 200 x 495 mm |
| Weight | 8.2 kg |
| Power Supply | 220-240 V, 50/60 Hz |
| Power Consumption | 55 W (max) |
| Fan Speeds | 3 speeds (Low, Medium, High) |
| Airflow Rate (CADR) | 210 m³/h (Dust), 190 m³/h (Pollen), 200 m³/h (Smoke) |
| Coverage Area | Up to 30 m² |
| Filtration System | Pre-filter, HEPA H13, Activated Carbon |
| HEPA Filter Type | True HEPA H13 |
| Filter Replacement Indicator | Yes |
| Noise Level | 22 - 48 dB(A) |
| Operating Modes | Auto, Sleep, Turbo, Manual |
| Timer | 1, 2, 4, 8 hours |
| Air Quality Sensor | PM2.5 and dust sensor |
| Display | LED with real-time PM2.5 reading |
| Child Lock | Yes |
| Remote Control | Yes (included) |
| Energy Efficiency | Energy Star certified |
| Filter Life | HEPA: approx. 2 years; Carbon: approx. 1 year |
| Maintenance | Clean pre-filter every 2 weeks; replace HEPA and carbon filters as indicated |
| Safety Features | Overheat protection, auto shut-off when front cover opened |
| Spare Parts Available | Yes (filters, remote, sensors) |
| Warranty | 2 years (parts and labor) |
Frequently Asked Questions - MC80ZBFVM DAIKIN
User questions about MC80ZBFVM DAIKIN
0 question about this device. Answer the ones you know or ask your own.
Ask a new question about this device
Download the instructions for your Air purifier in PDF format for free! Find your manual MC80ZBFVM - DAIKIN and take your electronic device back in hand. On this page are published all the documents necessary for the use of your device. MC80ZBFVM by DAIKIN.
USER MANUAL MC80ZBFVM DAIKIN
natural_image
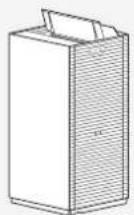
Line drawing of a rectangular industrial cabinet or storage unit with a lid and side panel (no text or symbols)- Thank you for purchasing this air purifier.
- Please read the operation manual carefully and follow it for correct use.
- Please read the "Safety Precautions" section before use. ▶ Page 3-5
Please keep the operation manual in a safe place for later reference.

For Internal Use only 3P690982-3A
Contents
Read First
Safety Precautions 3
Usage Precautions 6
Names of Parts and Operations 7
Preparation Before Operation.... 13
Operating the Air Purifier via Smartphone.... 15
Operation
Using the Air Purifying Operation 18
Changing the Airflow rate 19
Operating MODEs 19
AUTO FAN / ECONO / ANTI-POLLEN / CIRCULATOR
Advanced Settings
Streamer Output Settings.... 21
Active Plasma Ion Output 23
PM2.5 Sensor Sensitivity.... 23
Monitoring mode within AUTO Operation and ECONO MODE... 25
Airflow Rate Range for AUTO FAN MODE 25
Maintenance
Quick Guide for Maintenance 27
Dust Collection Filter Replace 29
Streamer Unit Replace 30
When Not Using the Unit for a Prolonged Period 31
Troubleshooting
State of the AIR MONITOR indicator and Their Meanings... 32
FAQs.... 33
Troubleshooting 34
Specifications 38
Separately Sold Parts 39
Safety Precautions
■Observe these precautions in order to prevent property damage or injury.
■The consequences of incorrect use are categorised as follows:
 WARNING CAUTION WARNING CAUTION | [VSY6] |
| Failure to follow these instructions properly may result in personal injury or loss of life. | Failure to follow these instructions properly may result in personal injury and property damage. |
■Precautions to be observed are categorised using symbols:

Never attempt. Be sure to follow the instructions.

ARNING
Observe in order to prevent fire, electric shock or severe injury.
■Concerning the power supply plug and cord

- Do not unplug while the unit is in operation. (This may result in fire and electric shock due to heating)
- Do not plug in or unplug with wet hands. (This may result in electric shock)
- Do not use in such a way that the ratings of the power socket or wiring appliances are exceeded or use a voltage outside of the range AC220-240V.
(Fire may result from overheating if the ratings of multi-socket power adaptor, etc., are exceeded)
- Do not pull on the power supply cord when unplugging. (Overheating or fire may result from wire breakage)
- Do not subject to acts that might damage them.
Such actions include damaging, modifying, forcibly bending, pulling, twisting, bundling up, placing heavy objects on the power supply plug or cord, etc. If the power supply plug or cord is damaged, it must be replaced by the manufacturer, its service agent, or a similar qualified person in order to avoid a hazard.
(An electric shock, short circuiting, or fire may result from use while damaged)


- Insert the power supply plug firmly all the way in.
Do not use a damaged power supply plug or a loosely fitted power socket.
(Electric shock, short circuiting or fire due to overheating may result if the power supply plug is not firmly inserted)
- Periodically wipe dust off the power supply plug with a dry cloth.
If the unit is not to be used for a prolonged period, unplug the power supply.
(Fire may be caused by defective insulation resulting from dust buildup with moisture, etc.)
- When performing maintenance, inspecting or moving the unit, be sure to turn off and unplug the unit.
(An electric shock or injury may result)

■Do not use in the following places

- Places where oil or flammable gases are used or may leak. (Fire or smoke may result from ignition or suction toward the unit, or injury may result from degradation or cracking of plastic)
- Places where there are corrosive gases or metal dust particles.
(Fire or smoke may result from ignition or suction toward the unit)
- Places where temperature and humidity levels are high or water may scatter, such as a bathroom. (Fire or an electric shock may result from electrical leakage)
- Places accessible to small children. (An electric shock or injury may result)
WARNING
Observe in order to prevent fire, electric shock or severe injury.
During use

- Do not use chlorinated or acidic detergents. (Injury may result from degradation or cracking of plastic, or harm may be caused to health from the production of toxic gases)
- Keep burning cigarettes or incense sticks away from the unit.
(Fire or smoke may result from ignition or suction toward the unit)
- Do not attempt to disassemble, reconstruct or repair the unit yourself.
(Fire, an electric shock or injury may result) For repairs, please contact the place of purchase.
- Do not insert fingers, sticks, or any other item, into the air inlets or air outlet.
(An electric shock, injury or damage may result)


- Do not pour water onto the air outlet or the unit. (Fire or an electric shock may result)
- Do not use flammable substances (hair spray, insecticide, etc.) near the unit.
Do not wipe the unit with benzine or thinner. (An electric shock, fire or cracking may result)
Immediately turn off and unplug the unit if there are any signs of abnormality or damage. Examples of abnormality and malfunction

- The unit does not operate even if the switch is turned on.
- Current passes through the cord only sometimes if the cord is moved.
- There are abnormal sounds or vibrations during operation.
- The casing of the unit has deformed or is abnormally hot.
- There is a burnt smell. (Malfunction, an electric shock, smoke, fire, etc., may result if the abnormality is not addressed and the unit continues to be used) Contact the place of purchase.
■Concerning unit body

- Do not block air inlet and air outlet with laundry, cloth, curtain etc.. (Air circulation get worse which may cause overheat or fire.
- Do not spray with deodorants etc or use it near unit (This may damage the unit)
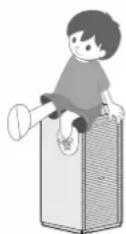
Do not sit or lean on the top of the unit body
(This may result from falling or toppling.)
Safety Precautions
CAUTION
Observe in order to prevent electrical leakage, injury or property damage.
■When moving the unit

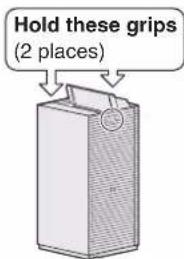
- When picking up the unit to move it, handle the unit with caution.
(Be sure to always holds the unit using the correct grip.)
During use

- Small children or immobile persons (due to illness or injury) should not operate the unit by themselves.
◆For EU, UK, Turkey:
This appliance can be used by children aged from 8 years and above and persons with reduced physical, sensory or mental capabilities or lack of experience and knowledge if they have been given supervision or instruction concerning use of the appliance in a safe way and understand the hazards involved.
Children shall not play with the appliance. Cleaning and user maintenance shall not be made by children without supervision.
◆ For other regions:
This appliance is not intended for use by persons (including children) with reduced physical, sensory or mental capabilities, or lack of experience and knowledge, unless they have been given supervision or instruction concerning use of the appliance by a person responsible for their safety.
- Children should be supervised to ensure that they do not play with the appliance.
- Persons who are heavily intoxicated or have taken sleep medication should not operate the unit.
(An electric shock, injury or poor health may result)
- Do not use combustion-based heating devices in places directly exposed to airflow from the air outlet.
(Carbon monoxide poisoning due to incomplete combustion of the combustion-based heating device may result)
- Do not use products that contain fine powder, such as cosmetics, near the unit. (May result in electric shock or damage)
- Do not operate the unit when fumigating insecticide is in use.
- After using insecticide, be sure to sufficiently ventilate the room before operating the unit.
(Harm may be caused to health from an outflow of accumulated chemical compounds from the outlet)
- Do not use the unit near a smoke detector.
- If the air coming out of the unit flows in the direction of the smoke detector, the response of the smoke detector may be delayed or it may fail to detect smoke.

- This unit contains radio equipment; the minimum separation distance between the radiating part of the equipment and the user is 30cm.
- Frequently ventilate the room when using the unit together with combustion-based heating devices.
– Usage of this product is not a substitute for ventilation. (Potential cause of carbon monoxide poisoning)
This product cannot eliminate carbon monoxide.
- If the unit is placed within reach of a pet, be careful that the pet does not urinate on the unit or bite on the power supply cord.
(Fire, an electric shock or injury may result)

natural_image
Simple line drawing of a refrigerator, a window, and a box connected by lines (no text or symbols)Precautions when using the unit
■ Do not use for special uses such as preservation of artworks or academic works.
(Degradation of preserved items may result)
■ Shorten the maintenance period depending on use environment.
In case the unit is used at areas where a lot of people go in and out such as hotel or public facilities, please shorten the maintenance period for pre filter. (May result in damage if prefilter is used while it is clogged)
Do not use in the following places
■ Positions from where out flowing air flows directly at a wall, furniture, curtains, etc.
(Staining or deformation may results)
■ Do not expose to direct sunlight.
(May cause discolouration)
■ Do not position near combustion-based heating and other high temperature devices.
(Discolouration/deformation due to overheating may result)
■ Do not expose to high levels of electromagnetic waves such as near an electromagnetic cooker, speakers, etc.
The unit may not function correctly.
■ Do not expose to direct hot air from heating appliances or near combustion appliances.
(The unit may not be able to indicate correct humidity and may be deformed)
■ Do not expose to places where chemicals and pharmaceuticals are used such as hospitals, factories, laboratories, beauty salons, and photographic laboratories.
(Volatilised chemicals and solvents may degrade mechanical parts and lead to malfunction)
■ Do not expose to soot (conductive dust) released by candles, aromatic candles, etc.
The performance of the filters may be impaired, causing the room to become dirty due to the build-up of dust that is not captured.
- Do not use cosmetics etc., containing silicone* near the unit.
* Hair care products (split ends coating agents, hair mousse, hair treatment agents etc.), cosmetics, antiperspirants, antistatic agents, waterproof sprays, lustering agents, glass cleaners, chemical wiping cloths, wax, etc.
- If an insulator such as silicone adheres to the needle of the Streamer unit, the Streamer discharge may not be generated.
- The dust collection filter may become clogged up resulting in reduced air purifying capacity.
■ Do not use an ultrasonic humidifier or similar appliance near the unit.
The dust collection filter may become clogged up resulting in reduced air purifying capacity

This unit is not intended for use at high altitudes (above 2000m).
About Streamer discharge and Active Plasma Ion
In some cases the air outlet may emit a slight odour as trace amounts of ozone are generated. However, the amount is negligible and is not harmful to your health.
- This product cannot eliminate the toxic substances in tobacco smoke (carbon monoxide etc.)
- Odours cannot be completely removed if they are being constantly generated (building material odours, pet odours, etc.)
Names of Parts and Operations

CAUTION
Be sure to always hold the unit using the correct grip. (Injury may result from the unit falling)
Front

Back
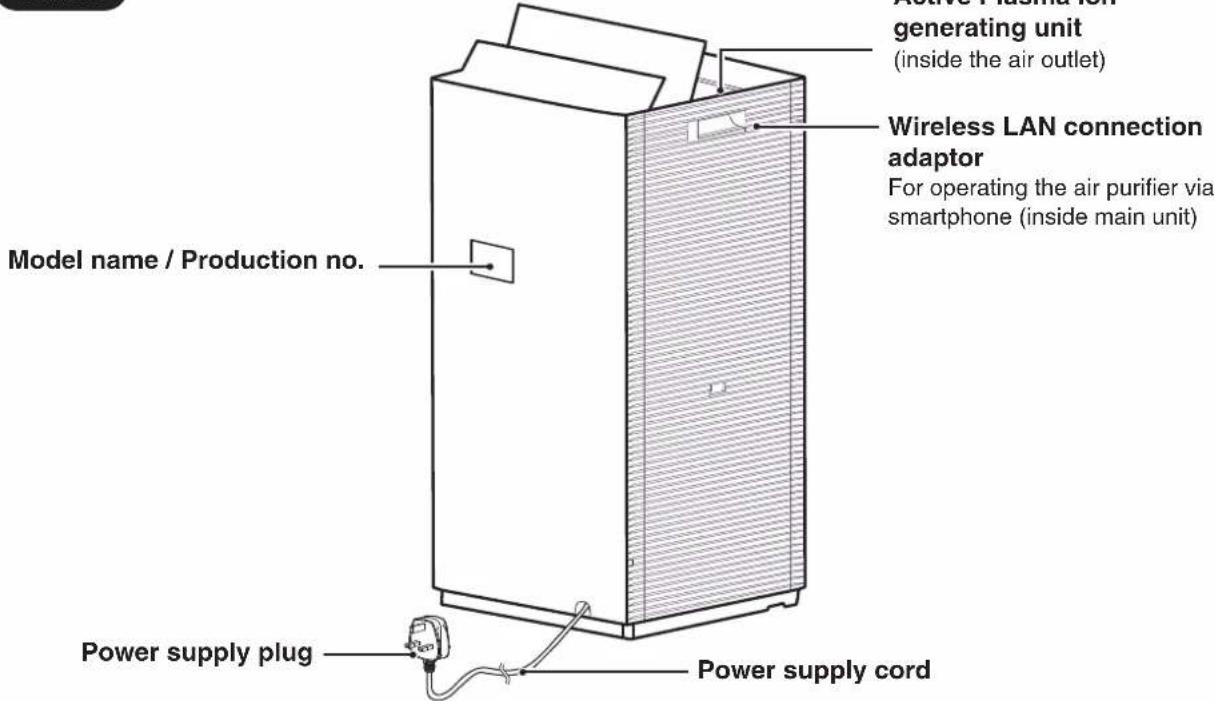
Main Removable Parts
Attention
To prevent malfunction, be sure to only operate the unit with all parts attached.

Names of Parts and Operations
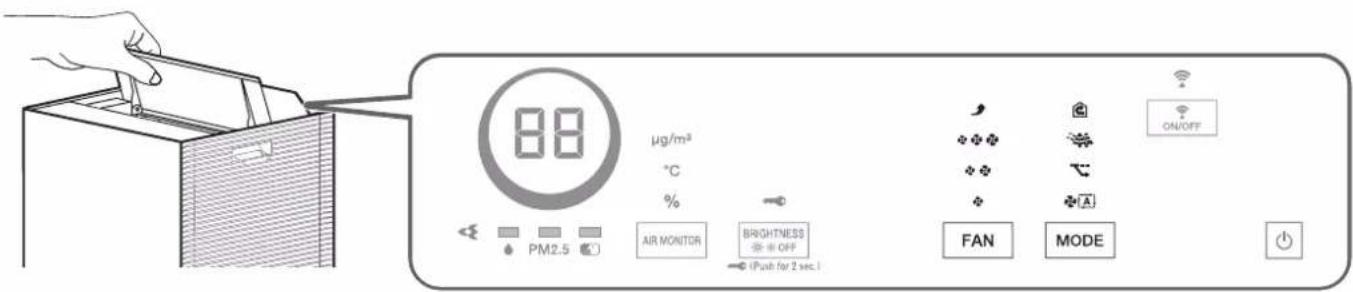
Operating/Indicator Panel
Operations and operating status will be notified by tones.
• Operation starts...... 2 quick beeps
- Settings change.... 1 short beep
• Operation stops .... 1 long beep
- When cannot be used...... 3 shorts beeps
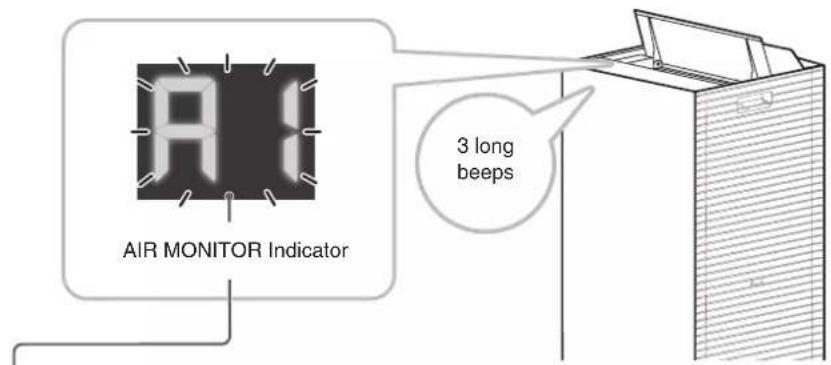
- Notification.... 3 long beeps
Streamer lamp [blue]
Lamp lights up depending on Streamer operation condition.
▶ Page 21 and 22
If the Streamer lamp blinks. ▶ Page 30
Daikin eye
Displays the condition of the air selected with AIR MONITOR in 3 colours: Blue, Orange, Red.
- if “ g/m ^3n ” is selected Lights up in the same colour as the PM2.5 sensor lamp.
- if “°C” is selected Lights up in the colours displayed below, according to the current indoor temperature.
Lamp colour
Red Orange
Red
Indoor temperature (°C)
≤ 10 11-17 18-28 29-35 ≥ 38
- if “%” is selected Lights up in the same colour as the humidity sensor lamp.
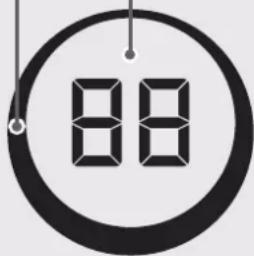
μg/m³
°C
%
[Non-Text]
AIR MONITOR
BRIGHTNESS OFF
(Push for 2 sec.)
Humidity sensor lamp
Indicates the level of humidity in 3 colours: Blue, Orange, Red
Lamp colour
Indoor humidity (%)

- After operation is started, the lamp will light blue for about the first 30 seconds regardless of humidity level.
PM2.5 sensor lamp
Indicates the volume of ambient dust by 3 lamp colours: Blue, Orange, Red
- Blue indicates clean air.
Lamp colour
PM2.5 concentration ( g/m ^3 )

- After operation is started, the lamp will light blue for the first minute (approx.) regardless of volume of dust.
- If the responsiveness of the PM2.5 sensor is poor, change the sensitivity of the sensor. ▶Page 23, 24
- The responsiveness of the PM2.5 sensor may be poor during FAN setting Turbo or when airflow is high in AUTO FAN MODE. The strong airflow causes dust to be drawn into the air inlets before it can be detected by the PM2.5 sensor. This is normal (not malfunction).
PM2.5 sensor detection range
| Detectable matter |
| house dust, tobacco smoke, pollen, mite droppings and remains, pet hairs, diesel particulate matter |
| Sometimes detectable |
| steam, oil smoke |
AIR MONITOR indicator [white] (estimate values)
Indicates what setting is selected with to display. (Settings at time of purchase: g / m
• μg/m ^3 (PM2.5 concentration)
Displays the concentration of PM2.5 in the room in the range of 0 to 99 g / m^3 . (Steps of 1 g / m^3 ) If the concentration exceeds 99 g / m^3 , "HI" is displayed.
- [--] is displayed for about 1 minute immediately after operation start regardless of the PM2.5 concentration.
• °C (current indoor temperature)
Displays the current room temperature in the range of 0°C to 39°C. (Steps of 1°C)
When the temperature is below 0°C, "0" is displayed. When the temperature is above 39°C, "39" is displayed.
- [--] is displayed for about 30 seconds immediately after operation start regardless of the indoor temperature.
• % (current indoor humidity)
Displays the room humidity in the range of 20% to 90%. (Steps of 1%)
When the humidity level is below 20%, "20" is displayed. When the humidity level is above 90%, "90" is displayed.
- [--] is displayed for about 30 seconds immediately after operation start regardless of the indoor humidity.
The display on the unit may differ from that of the other hygrometers or thermometers.
- This is because the humidity, temperature and volume of PM2.5 become uneven even in the same room due to the flow of air. Please use the Air monitor indicator as a rough estimate.
States of the AIR MONITOR indicator and their meanings
▶ Page 32
Odour sensor lamp
Indicates the intensity of odours in 3 colours: Blue, Orange and Red.
- Blue indicates that the air is clean.
Lamp colour
Odours
Blue
range

Low High
- After operation is started, the lamp will light blue for the first minute (approx.) regardless of odour level.
- If odour intensity levels are unchanging, the sensor may not respond even if there is a strong odour in the air.
- The sensor may not respond to some odours such as pet odours (excluding ammonia), garlic odour, etc.
- As odour perception varies by person, in some cases an odour may be sensed even when the lamp is Blue. If the odour bothers you, switch to manual airflow rate, and select a high airflow rate. ▶Page 19
The basic sensitivity of the odour sensor will be determined by odour levels in the first minute (approx.) after the power supply plug is inserted. Insert the power supply plug when the air is clean (odour-free).
Odour sensor detection range
| Detectable matter |
| tobacco odours, cooking odours, pet odours, toilet smells, waste smells, mould odours, sprays, alcohol |
| Sometimes detectable |
| sudden changes in temperature/humidity, steam, oil smoke, gas emitted from combustion-based heating devices |
Names of Parts and Operations
Operating/Indicator Panel
AIR MONITOR setting lamps [white]
Indicate the AIR MONITOR setting.
- g / m^3 (PM2.5 concentration)
• °C (current indoor temperature)
• % (current indoor humidity)
Child Proof Lock
Child Proof Lock is active when BRIGHTNESS is pressed for about 2 seconds.
(Deactivate by pressing BRIGHTNESS for 2 seconds)
Child Proof Lock lamp [white]
Lamp will be lit when the Child Proof Lock is active. When lamp lights up, operations will be restricted. When buttons are pressed, a tone (3 short beeps) will sound, preventing misoperation by small children.
Note
- If the unit is unplugged when Child Proof Lock is active, Child Proof Lock will turn off.


μg/m³
°C
%
AIR MONITOR
(Push for 2 sec.)
AIR MONITOR button
Allows you to change the item you want to monitor in the air. (PM2.5, temperature, or humidity)
BRIGHTNESS button
During operation, each press cycles through operating panel lamp brightness levels.
Please use if lamp brightness is a concern when sleeping.
- The following lamps do not turn off even though brightness is set to OFF. [MODE lamp, FAN lamp, Child Proof Lock lamp, Communication lamp]


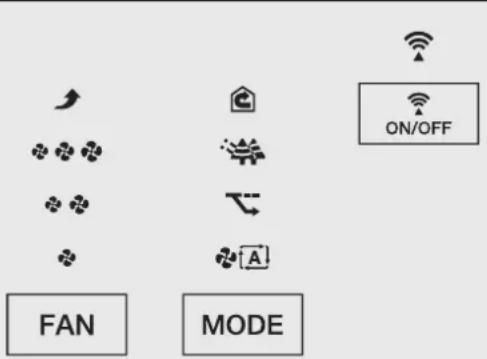
flowchart
graph TD
    A["FAN lamps [white"]
Indicates the active FAN setting.
(4 levels: Quiet, Low, Standard, Turbo)] --> B["MODE lamps [white"]
    B --> C["MODE in operation.<br>(AUTO FAN, ECONO, ANTI-POLLEN, CIRCULATOR)"]
    B --> D["ON/OFF"]
    D --> E["Communication lamp, Communication ON/OFF button"]
    E --> F["FAN"]
    E --> G["MODE"]
    E --> H["ON/OFF button"]
    H --> I["MODE button"]
    I --> J["FAN setting button"]
    I --> K["Press to cycle between FAN settings. ▶Page 19"]
    style A fill:#f9f,stroke:#333
    style B fill:#ccf,stroke:#333
    style C fill:#cfc,stroke:#333
    style D fill:#fcc,stroke:#333
    style E fill:#ffc,stroke:#333
    style F fill:#fcf,stroke:#333
    style G fill:#cff,stroke:#333
    style H fill:#ffc,stroke:#333
    style I fill:#cfc,stroke:#333
    style J fill:#fcc,stroke:#333
    style K fill:#ffc,stroke:#333
Preparation Before Operation
1 Checking Accessories
Attach to the unit before operation.

2 Positioning The Unit
Before setting up, remove the fixing tape on the bottom which is securing the power supply cord, then take out the power supply cord. Remove the fixing tape on the pre-filter (front) as well.
![Pre-filter (front) Tape [blue] Power supply cord](/content/2026/05/896824/images/caf2451b7753693092493ef3251c977f70c2873d907cde2b155d919d0b7109ab.jpg)

Pointers for good positioning
- Choose a position from which airflow can reach all areas of the room.
- Place on a stable surface. If the unit is placed on an unstable surface, vibrations from the unit may be amplified.
- If interference from the power circuit inside the unit or cables causes disturbance on your TV screen images or the emission of static noise from nearby radios or stereos, move the unit to at least 2m away from the device.
Keep cordless phones and radio-controlled clocks away from the unit also.
- This unit contains radio equipment; the minimum separation distance between the radiating part of the equipment and the user is 30 cm.
Attention
- To avoid staining of walls, position the unit in accordance with the positioning measurements in the illustration. However, please note that since this unit draws in dirty air, certain types of wall may be stained even if the measurements are adhered to. In such cases, make sure to maintain sufficient distance between the unit and the wall.
- When used for a long period of time in the same location, the floor and surrounding walls may get stained as air is drawn into air inlets near the base of the unit. It is recommended to clean the unit periodically.
- Place the unit on a flat surface.
※ Please leave some distance from the wall to ensure power supply cord does not bend forcibly. (risk of damage and overheat)
3 Attaching the Deodorising Filter
1. Remove the service cover.
① Firmly hold the service cover grip and slowly pull it towards your direction while pressing the lever.
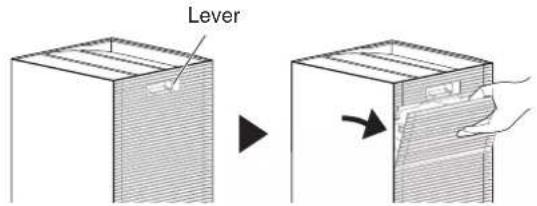
2. Remove filter fixing unit.
① Move the fixing switch on filter fixing unit to side to unlock.

② Lift up the grip on the top of the filter fixing unit and pull out towards your direction.
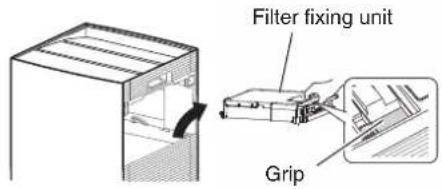
③ Remove fixing tape on the filter fixing unit.
3. Remove the deodorising filter from the bag.
- Filter has no front and back.
Please wear gloves when handling the filter.
(To prevent dust from the deodorising filter from making your hand dirty.)

- Observe local waste separation regulations when disposing of the deodorising filter bag and desiccant.
4. Attach the deodorising filter.
Insert the short side of the filter into the main unit above the dust collection filter.
![Short sides of the filter Deodorising filter [With the deodorising filter installed] Gap on the left and right Deodorising filter](/content/2026/05/896824/images/57587b01ce24d6b9095a15479429d1ff073313cbe2c9303d6bbff0cc47ccc4ef.jpg)
Dust from the deodorising filter may turn the dust collection filter black, but it does not affect dust collection performance.
5. Attach the filter fixing unit.
Attach the filter fixing unit and move the fixing switch to 🔒 side to lock it.

Attention
- Make sure to lock the filter fixing unit. If it is unlocked and the unit is operated, performance drop or abnormal noise may occur.
6. Attach the service cover.
- When starting operation, if a notification tone sounds and the odour sensor lamp blinks, the deodorising filter and the filter fixing unit are not properly installed.
- Re-install the deodorising filter and the filter fixing unit.

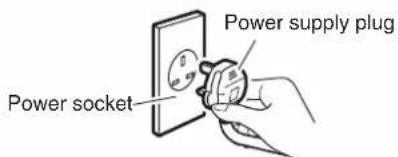
4 Inserting the Power Supply Plug into the Socket
- The basic sensitivity of the odour sensor will be determined by odour levels in the first minute (approx.) after the power supply plug is inserted every time.
Insert the power supply plug when the air is clean (odour-free).
Operating the air purifier via smartphone
When you want to operate the air purifier via smartphone
By connecting your smartphone to the air purifier via wireless LAN, you can operate the air purifier from your smartphone via the Internet. (Setting at time of purchase: OFF)
| Wireless LAN connection adaptor specifications: Supported standards IEEE802.11b/g/n (2.4GHz only), Channels 1 to 13CHUse with the following network environments (wireless LAN routers)Encryption method: WPA-PSK (AES), WPA2-PSK (AES)IP configuration method: DHCP or a fixed IP addressCommunication standard: IPv4(HTTP proxy is not supported) |
Precautions During Use of Wireless LAN
Because wireless LAN uses radio waves to send and receive data, there is a risk of eavesdropping and unauthorized access.
When using wireless LAN, be sure to fully understand the dangers, and secure the product's wireless LAN connection adaptor so that others cannot connect to it. This means keeping your wireless LAN router SSID/KEY, app login ID, and password secret from others. ▶Page 8
If someone who is unauthorized gains access to and operates this product, turn off the wireless LAN connection adaptor using the communication ON/OFF button. ▶Page 12, 17
■ Please be aware in advance that we will not be liable for any damages that arise if you use this product without taking security measures.
■ Using near other wireless LAN equipment or microwave ovens may affect wireless LAN communication.
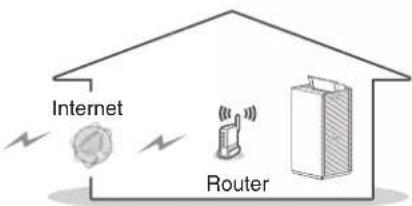
This product cannot be directly connected to the communication line of a telecommunications carrier (Internet provider, etc.).
When connecting to the Internet, be sure to connect via a router, etc.
- ⚠️ WARNING
If the air purifier is located in a place which may be used by people with cardiac pacemakers, do not turn on the wireless LAN connection adaptor with the communication ON/OFF button. (It may affect the operation of pacemakers or other devices, causing trouble.)
■ Do not turn on the wireless LAN connection adaptor near people with cardiac pacemakers or defibrillators. (If it is too close, radio waves may affect the operation of the pacemaker or other devices)
Do not turn on the wireless LAN connection adaptor near automatic control devices such as automatic doors. (Accidents may result due to device malfunction)
For detailed specifications, installation instructions, setting methods, FAQ, declaration of conformity and the latest version of this manual, visit http://www.onlinecontroller.daikineurope.com.
- i INFORMATION
• Daikin Malaysia Sdn. Bhd. declares that the radio equipment type inside of this unit is in compliance with Directive 2014/53/EU.
- This unit is considered as combined equipment according to the definition of Directive 2014/53/EU.
Basic parameters of Wireless LAN connection adaptor
| What Value | |
| Frequency range 2400 MHz~2483.5 MHz | |
| Radio protocol IEEE 802.11b/g/n | |
| Radio frequency channel 13ch | |
| Output power 13 dBm | |
| Effective radiated power 15 dBm (11b) / 14 dBm (11g) / 14 dBm (11n) | |
| Power supply DC 14 V / 100 mA | |
Preparation Before Connection
The customer is responsible for providing:
- Smartphone or tablet with minimum supported version of Android or iOS, specified on app.daikineurope.com.
- Internet line and communication device, such as a modem, router, etc.
- Wireless LAN access point
• Installed free ONECTA app
Note: If needed, the SSID (Service Set Identifier) and the KEY (password) are located on the unit.
flowchart
graph TD
    A["Internet"] --> B["Router"]
    B --> C["Server"]
    style A fill:#f9f,stroke:#333
    style B fill:#ccf,stroke:#333
    style C fill:#cfc,stroke:#333

WARNING
When operating the air purifier from outside the home, it is not possible to check the condition of the air purifier, its surroundings, people in the room, etc., so be sure to adequately check the safety in advance before using it. Depending on the circumstances, people may be killed or seriously injured, or property damage may result.
■ Check the following in advance (while at home)
- Make sure that the power supply plug is firmly inserted all the way to the base.
There should be no dust buildup on the power supply plug. (Heating, ignition, and fire may result due to poor contact and defective insulation) - Make sure that there are no existing schedule timer reservations set by another person.
(May cause poor physical condition due to unexpected start or stop of operation. May cause adverse effects to plants and animals) - Make sure there are no problems with the air purifier. Make sure that changes in airflow will not adversely affect people in the room. (Make sure there are no objects that can fly away)
(Airflow may cause objects to fall, resulting in fire, injury or stains on household items)
■ Check the following before and while operating the air purifier from outside the home
- If you know that there are people at home, let them know that you will start or stop operation remotely. (If someone is at home standing on a stool or ladder, they may be surprised at the sudden start or stop of operation, and may fall off the stool or ladder. Also, bad physical condition may be caused by sudden changes in the indoor environment)
- Operation of the air purifier can be started and stopped by pressing the buttons on the air purifier itself, even when it is being operated from outside the home.
- Do not operate the air purifier remotely if there are people in the room who cannot operate it by themselves, such as small children, people with disabilities, elderly people, etc.
- Frequently check the settings and operating conditions. Bad physical condition and adverse effects to plants and animals may be caused by sudden changes in the indoor environment. If an error occurs with the air purifier, stop operation immediately and contact the place of purchase.
Check again via the operation screen to make sure that operation is stopped.
Connection settings
1 Check if router has WPS built-in
2
If router has built-in WPS
Connect air purifier to network
① Press ON/OFF to activate the wireless LAN connection adaptor.
② Press and hold ON/OFF for about 5 seconds and, once the Communication lamp on the unit flashes orange, press the WPS button* on the router within 2 minutes.
- How to operate the WPS button varies by router. For details, refer to the manual supplied with the router.
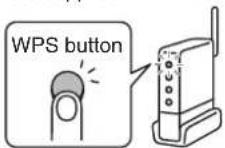
* If using an automatic connection function other than WPS, refer to the manual attached to the router when operating the automatic connection button.
Setting is complete once the Communication lamp on the unit lights green.
- The lamp may light red before turning green, until the connection between the wireless LAN connection adaptor and the router is complete, depending on the communication environment; however, this is not a malfunction.
If the Communication lamp on the unit lights orange, repeat steps ① to ②.
If connection continues to fail, follow the steps in
If router does not have built-in WPS
▶Page 17
③ Connect your smartphone and router via Wi-Fi.
- Open "Wi-Fi" in settings on the smartphone to check that your smartphone is connected to the SSID of the router in use.
④ Launch the app and establish settings.
- Open the installed app "ONECTA" and operate in accordance with the on-screen guidance.
⑤ Operate the air purifier.
- You can now operate the air purifier using your smartphone at home or on the go.
Operating the air purifier via smartphone
2
If router does not have built-in WPS
Connect the Air Purifier to the Network
Follow the steps below even if you are choosing to not use WPS.
① Press

to activate the wireless LAN connection adaptor.
② Launch the app and follow the guidance to connect the air purifier and router.
- SSID and KEY are required for connection. (A sticker with the SSID and KEY can be found in the location shown in the illustration on the right.)

natural_image
Illustration of a white cabinet with a mesh cover and a separate side panel (no text or symbols)Location of SSID and KEY
For detailed specifications, installation instructions, setting methods, FAQ, declaration of conformity and the latest version of this manual, visit app.daikineurope.com.

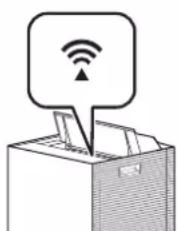
Communication lamp status
Lights up or blinks according to the wireless LAN communication status, as shown below.
natural_image
Illustration of a file box with a speech bubble containing Wi-Fi symbol (no text or labels)| Lit up | Green Wireless LAN connection adaptor is connecting to router | |
| Orange | • Wireless LAN connection adaptor and router connection not set• Wireless LAN connection adaptor is connecting to router (immediately after turning communication ON) | |
| Red Wireless LAN connection adaptor cannot connect to the Internet | ||
| Unlit Wireless LAN connection adaptor function is OFF | ||
If the unit (air purifier) can't be found with the app
- Perform connection settings again.
- Move the router closer to the air purifier.
If you want to turn the wireless LAN connection adaptor function OFF
Press the

■ If you want to turn the adaptor function "ON", press

again.
If necessary
If you want to reset the wireless LAN connection adaptor to factory default settings
- If you want to redo the settings, etc., the wireless LAN connection adaptor can be reset to the factory default settings from the time of purchase.
If you reset to factory default settings, network settings will be erased, as well as historical data such as the number of sensor responses. - If disposing of the unit or transferring it to a new user, reset it to factory default settings in order to erase the internal data.
① Press
to turn on the Communication lamp.
② Press and hold

and
MODE
at the same time for about 5 seconds while the unit is stopped.
- A short beep sounds, and the Communication lamp [orange] and the AUTO FAN MODE lamp [white] blink for about 20 seconds.
- When reset to factory default settings is completed, a long beep sounds and all lamps turn off.
- If, after step ②, the Communication lamp lights up and only the AUTO FAN MODE lamp turns off, repeat steps ① and ②.
Operation
- ⚠️ WARNING
Do not turn off the unit by unplugging it from the power socket. (Fire due to overheating or electric shock may result)

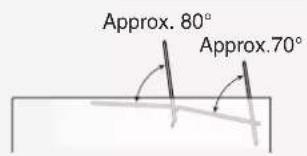
Open the louvres manually before operation. (After operation is stopped, louvres are not closed automatically because it is hand-operated)
If you want to change airflow direction Adjust the louvres to your desired position. Louvres can be adjusted to 4 positions.
Using the Air Purifying Operation (turning operation ON/OFF)
Cleans the air in the room.
Press

- Press again to turn OFF.
Attention
Do not move the unit, or attach or remove parts to/from the unit while it is in operation. Breakage or malfunctioning may result.
Note
- At the time of purchase, the unit is set to Air Purifying Operation, AUTO FAN MODE.
- When the unit is unplugged or turned OFF, it will operate with the settings last used the next time it is turned ON.
- Operation settings cannot be changed for about 2 seconds immediately after the power supply plug is inserted.
Operation
Warning
Do not turn off the unit by removing the power supply plug during operation. (Fire due to overheating or electric shock may result) Do not operate with deodorising filter unit, dust collection filter and other components removed. (breakage or malfunction may result)
Changing the Airflow Rate
Select the desired FAN setting.
Press
FAN
• Each press cycles between the FAN lamps [white].

About FAN settings

Quiet
A gentle breeze is emitted. Recommended to use this during sleep hours. To quickly eliminate odours from a room, it is recommended that the FAN setting be set to Standard or above otherwise deodorising capacity is reduced.

Turbo
The ambient air is quickly purified using a large airflow. Recommended for use while you are cleaning up a room.
Operating MODEs
Select a MODE specific to your needs. Airflow is adjusted automatically when the unit is running in a MODE.
Press | MODE during operation.
• Each press cycles between the MODE lamps [white]

flowchart
graph LR
    A["AUTO FAN"] --> B(ECONO) --> C(ANTI-POLLEN) --> D(CIRCULATOR)
MODE Usage and Function
| AUTO FAN | Automatic airflow rate adjustmentFAN setting (Quiet, Low, Standard, High) is automatically adjusted according to the degree of air impurity.Purifying capacity increases as airflow rate rises.If operating sound is a concern, airflow rate can be changed. (▶Page 25, 26)※ Maximum airflow rate during AUTO FAN MODE is High, which is lower than Turbo.Degree of air impurity corresponds to the volume of dust and the intensity of the odours in the ambient air. |
| ECONO | Saving energyIn power saving mode within ECONO MODE, the FAN setting automatically switches between Quiet and Low only. Power consumption (1) and operating sounds are minimised.If the air is clean, after about 5 minutes, Monitoring mode automatically activates.Recommended for use during sleep hours.※1 By comparison to AUTO FAN MODE (approx. 20.8Wh), power consumption in ECONO MODE (approx. 10.1Wh) is approx. 10.7Wh lower.Test condition case in Malaysia: Operation in 12.4m^2 room over 1 hour. Assuming 1 cigarette was smoked immediately after the unit was turned on.Power saving modeIf the air is clean, after about 5 minutes...If dust or odours are detected...Monitoring modeThe fan starts and stops periodically. Dust and odours are monitored.The following functions are turned OFF to further reduce power consumption.Streamer OFFActive Plasma Ion OFFAs the FAN setting is limited to Quiet and Low, air purifying capacity is reduced.Since the air in the room is not drawn in while the fan is stopped, the sensitivity of the PM2.5 sensor and odour sensor will decrease. To prevent this reduction in sensitivity, turn Monitoring mode OFF.▶Page 25, 26 |
| ANTI-POLLEN | Reducing pollen levelsA gentle air current is created by switching between the FAN setting between Standard and Low every 5 minutes so that pollen can be drawn in and caught before it reaches the floor. |
| CIRCULATOR | When you want to circulate the air in the roomThe air in the room is kept clean and local variations in temperature are suppressed. It is even more effective if the unit is installed opposite an air conditioner.The airflow rate is High for about 30 minutes after operation start, in order to circulate the air in the room.After that, temperature change around the unit is monitored and FAN setting is automatically adjusted.(There is no temperature adjustment function)If the indoor temperature is low, FAN setting may not be set to High.(To reduce chills caused by airflow) |
Changing the setting
Function 1
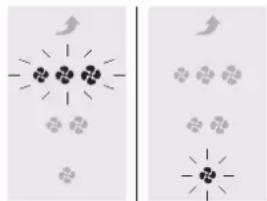
Streamer output settings (Normal/Low)
Setting at time of purchase: Normal
If the hissing sound generated by Streamer discharge or the smell of ozone bothers you, set it to Low.
- It is recommended that the Streamer output be set to Normal as deodorising capacity is reduced when set to Low
Can be performed either during operation or while operation is stopped.
Press ☐ for about 5 seconds
and when a short beep sounds,
press BRIGHTNESS OFF while continuing to
hold down ☐.
Release both BRIGHTNESS OFF and
when a short beep sounds.
ANTI-POLLEN MODE lamp will light up after blinking.
Blinking -Lit up
According to the current setting, the FAN lamp will turn from blinking to lit up.
natural_image
Two side-by-side diagrams showing abstract patterns with star-like and flower-like shapes, no text or symbols present.Normal Low
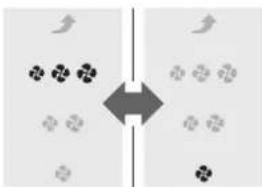
Press ⏻ to change the setting\*
Each press cycles between Normal and Low.
flowchart
graph TD
    A["Start"] --> B{Decision}
    B -->|Yes| C["Process 1"]
    B -->|No| D["Process 2"]
    C --> E["Output 1"]
    D --> F["Output 2"]
Normal Low
■ Streamer operation condition
| FAN/MODE setting | Streamer output setting | |
| Normal Low | ||
| FAN | Turbo | ON |
| Standard | ON-OFF* | |
| Quiet, Low | ON-OFF* OFF | |
| MODE | AUTO FAN, ANTI-POLLEN, CIRCULATOR | ON-OFF* |
| ECONO | ON-OFF* OFF | |
* The Streamer operation status ON-OFF means that the Streamer turns ON and OFF automatically depending on the degree of air impurity and FAN setting.
About the Streamer lamp
When the setting condition of Streamer is ON-OFF or ON, it is always lit up. (However, it is unlit during Monitoring mode).
It is unlit when the setting condition of Streamer is OFF.
Press

A short beep sounds with the ANTI-POLLEN MODE lamp blinking while the FAN lamp blinks according to the new setting.

Blinking
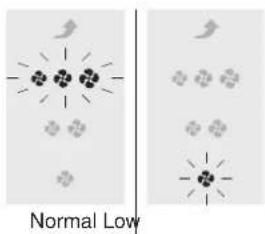
While the lamp is blinking, unplug the power supply plug, wait at least 5 seconds, and then insert the power supply plug again.
Setting is now complete.

- If this procedure is not performed, the unit will not return to the regular operation mode.
- Settings are remembered even if the unit is unplugged.
Changing the setting
| Function 1 | ||
| Active Plasma Ion output (ON/OFF)Setting at time of purchase: ONIf the odour of ozone bothers you, set Active Plasma Ion output to OFF.If turned off, Active Plasma Ion is not discharged but dust and odour can be removed.If the odour of ozone continues to bother you even after output has been set to OFF, set Streamer output to Low. | Can be performed either during operation or while operation is stopped.Hold down for about 5 seconds and when a short beep sounds, press AIR MONITOR while continuing to hold downRelease both AIR MONITOR andwhen a short beep sounds. | CIRCULATOR MODE lamp will light up after blinking. Blinking -Lit upAccording to the current setting, the FAN lamp will turn from blinking to lit up. Blinking -Lit upAccording to the current setting, the FAN lamp will turn from blinking to lit up. Normal Low Normal Low |
| PM2.5 sensor sensitivity (Low/Normal/High)Setting at time of purchase: NormalPM2.5 sensor sensitivity can be set to Low, Normal, High.Low means sensor is less responsive and High means the sensor is more responsive. | Can be performed either during operation or while operation is stopped.Press for about 5 seconds and when a short beep sounds, pressFAN while continuing to hold downRelease both FAN andwhen a short beep sounds. | A short beep sounds and the FAN lamp will turn from blinking to lit up according to the current setting. Low Normal High Low Normal High |
Press to change the setting*Each press cycles between ON and OFF. | Press AIR MONITORA short beep sounds with the CIRCULATOR MODE lamp blinks while the FAN lamp blinks according to the new setting. Blinking Blinking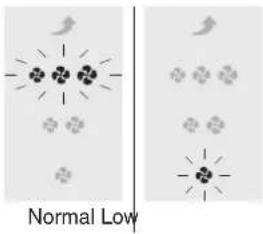 | While the lamp is blinking, unplug the power supply plug, wait at least 5 seconds, and then insert the power supply plug again.Setting is now complete.upply plugPower socket | |
Press to change the setting*Each press cycles between Low, Normal, High. | Press FANA short beep sounds and the FAN lamp blinks according to the new setting. | If this procedure is not performed, the unit will not return to the regular operation mode.Settings are remembered even if the unit is unplugged. |
* If the lamps do not change even after the settings were changed, unplug the unit, wait at least 5 seconds, then re-insert the power supply plug and repeat the above procedure from the beginning.
Changing the setting
| Function 1 | ||
| Monitoring mode within AUTO Operation and ECONO MODE (ON/OFF)Setting at the time of purchase: ONThe sensitivity of the sensors decrease while the fan is stopped during Monitoring mode.If you do not want the sensitivity of the sensors to be decreased, set to OFF.When set to OFF, Monitoring mode will not be performed. | Can be performed either during operation or while operation is stopped.Press ⏻ for about 5 seconds and when a short beep sounds, pressMODEwhile continuing to hold down ⏻Release both ⏻ and MODEwhen a short beep sounds. | The FAN lamp (Quiet) blinks, then lights up.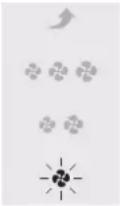 Blinking ⋮it upAccording to the current setting, the ECONO MODE lamp will be displayed as follows. Blinking ⋮it upAccording to the current setting, the ECONO MODE lamp will be displayed as follows.  Blir Blir |
| Airflow rate range for AUTO FAN MODE (4 Levels/3 Levels)Setting at the time of purchase: 4 LevelsIf operating sound is a concern during AUTO FAN MODE, switch from 4 Levels to 3 Levels.Airflow rate range4 Levels: Quiet, Low, Standard, High3 Levels: Quiet, Low, Standard | Can be performed either during operation or while operation is stopped.PressMODEfor about 5 seconds and when a short beep sounds, pressBRIGHTNESS※*OFFwhile continuing to hold downMODE. Release bothBRIGHTNESS※*OFFandMODEwhen a short beep sounds. | AUTO FAN MODE lamp will light up after blinking.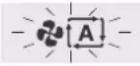 Blinking ⋮it upFAN lamp (Standard) will display the current setting. Blinking ⋮it upFAN lamp (Standard) will display the current setting.  Unlit4 LevelsBlinking →Lit up3 Levels Unlit4 LevelsBlinking →Lit up3 Levels |
Pressto change the setting*Each press cycles between ON and OFF.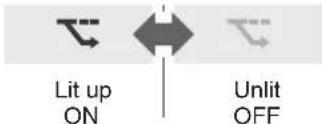 | PressMODEA short beep sounds, the FAN lamp (Quiet) blinks, and the ECONO MODE lamp changes to the following display according to the setting. Blinking Blinking 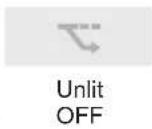 | While the lamp is blinking, unplug the power supply plug, wait at least 5 seconds, and then insert the power supply plug again.Setting is now complete.Power supply plugPower socket↓If this procedure is not performed, the unit will not return to the regular operation mode.Settings are remembered even if the unit is unplugged. | |
PressMODEto change the setting*The airflow rate switches between 4 Levels and 3 Levels with each press.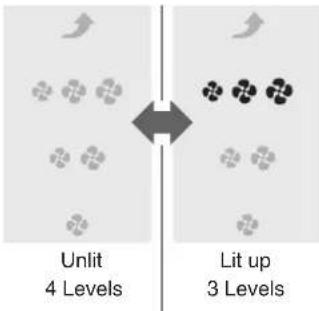 | PressBRIGHTNESS※*OFFA short beep sounds, AUTO FAN MODE lamp blinks, and the FAN lamp changes as below according to the new setting. Blinking Blinking 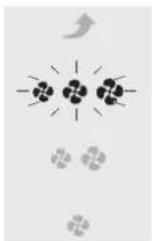 Unlit 4 Levels Lit up 3 Levels Unlit 4 Levels Lit up 3 Levels |
* If the lamps do not change even after the settings were changed, unplug the unit, wait at least 5 seconds, then re-insert the power supply plug and repeat the above procedure from the beginning.
Quick Guide for Maintenance
Please refer to respective page for the method to install or remove each part during maintenance.
Unit
When dirt becomes an issue
Wipe
- Wipe up dirt with a soft damp cloth.
- If dirt buildup is severe, wet a cloth with kitchen-use neutral detergent and wipe up the dirt.
- Do not use a hard brush, etc. (Damage may result)
PM2.5 Sensor
When dust builds up
Vacuum clean
① Remove the pre-filter (right side).
② Vacuum off any dust using a vacuum cleaner crevice tool or similar.
About every 3 months Wipe
① Remove pre-filter (right side) and the cover of the air intake for the sensor.
② Remove the hook and pull towards you.
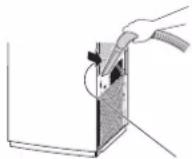
Air intake for sensor

natural_image
Pure technical line drawing of a mechanical assembly without any text, numbers, or symbols③ Lens (2 places)
- Vacuum off any dust around the area using a vacuum cleaner crevice tool or similar.
- Clean the lenses with a wet baby cotton bud softly and then remove the water with a dry baby cotton bud.
- Do not use alcohol for cleaning.
④ After cleaning, be sure to attach the cover securely. (Malfunction may result)
Pre-filter (Front / Left side / Right side)
About every 2 weeks
Vacuum clean
Wash with water

natural_image
Illustration showing a hand pressing down on a wall-mounted device and a close-up of a textured surface (no text or symbols)• After removing any dust using a vacuum cleaner, remove and wash the filter with water, then dry thoroughly in the shade.
- Use a soft brush to clean the spaces between the grids.
Attention
- Do not use a cotton bud or hard scrubbing brush.
(Partial damage to the filter may result) - Do not apply too much force. (Partial damage to the filter and scratching may result)
- If dirt buildup is severe, leave the part soaking in lukewarm or room temperature water mixed with kitchen-use neutral detergent, then thoroughly rinse so that no detergent remains and leave in the shade until completely dry.
Method to remove
Hold the indentation of the pre-filter and pull it towards you to remove it.

① Place your finger on the top centre side of the pre-filter and push down to remove the hook.
② Pull it towards you to remove.

Method to attach

Push all the way and insert the centre hook upward to attach into the unit.


WARNING
- Do not use gasoline, benzine, thinner, polishing compound, paraffin, alcohol, etc. (Cracking, electric shock, and ignition of fire may result)
- Do not wash the unit with water. (Electric shock and fire or malfunctioning may result)
Filter Fixing Unit ▶Page 14

When dirt becomes an issue
Vacuum clean
- Remove, then vacuum away dust using a vacuum cleaner.
Deodorising Filter For method to attach/remove, refer ▶Page 14

When dirt becomes an issue
Vacuum clean
When odour becomes an issue
Leave in a breezy, shaded area
Cannot be washed with water
- Remove the deodorising filter from the unit, then vacuum away dust using a vacuum cleaner.
- If odour becomes an issue, leave the part in a shaded area exposed to the breeze. (approx. 1 day)
- Do not rub the surface.
- Do not wash with water.
(If you wash it with water, the filter will lose its shape and can no longer be used)
Sometimes, the surface looks white but there is no issue for deodorising performance and operation. Wear gloves to prevent dust from the deodorising filter making your hands dirty.
natural_image
Illustration of a hand using a tool to apply paint on a square base (no text or symbols)Dust Collection Filter For method to attach / remove, refer to ▶ Page 29
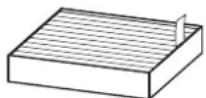
When dirt becomes an issue
Vacuum clean
Cannot be washed with water
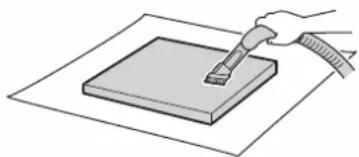
If you lay down newspaper etc., the surroundings will not get dirty

- Lightly vacuum the dust on the surface that doesn't have the tag. Be careful as the filter is easily damaged
In case filter is damaged or holes are opened on the surface, dust collecting performance decreases because dust passes though filter.
About every 10 years
Replace
▶ Page 29
Attention
- Make sure that the dust collection filter, deodorising filter and filter fixing unit are attached to the unit when the unit is operating. If these parts are not attached when the unit is operated, breakage/malfunctioning may result.
- Follow the advice below to prevent discolouration or deformation.
- If detergent was used, be sure to wipe it up thoroughly so none remains.
- If hot water is used, make sure that it is 40^ or less.
- Do not leave parts to dry in direct sunlight.
- Do not dry parts using a hairdryer.
- Do not expose to fire.
- When using a vacuum cleaner, make sure to not apply force to or knock the part. (Damage may result)
- Do not spray deodorants etc on unit and do not use sprays near the unit. (May cause malfunction)
- This air purifier is a product that collects dust and odour substances of the entire room. If the unit is used in an environment with strong odours such as cigarette smoke, cosmetics or pharmaceuticals, odours will attach on the filter and for a few months or few weeks, odours may be re-emitted. It is recommended to use the unit together with room ventilation for environments with strong odours.
(odour takes a longer time to be eliminated compared to dust)
Dust Collection Filter Replace
Attention
Be sure to operate with the dust collection filter, deodorising filter and filter fixing unit attached. If the unit is operated without the filters attached, malfunction may result.
Replace in about 10 years
Replacement period
- Replacement timing depends on usage patterns and the location of the unit.
- Standard replacement time is about 10 years assuming that the unit is used daily in a home where 5 cigarettes are smoked a day. (calculation in accordance with testing method of Japan Electrical Manufacturers' Association JEM1467 standard)
- If the impurity content of the ambient air is high, the filter will need more frequent replacement.
- Replace the dust collection filter if the filter is failing to perform.
Purchase and disposal
-
Please refer to [Separately Sold Parts].
-
Remove the service cover. ▶ Page 14
- Remove the filter fixing unit. ▶ Page 14
- Remove the deodorising filter.
Hold the side of the filter to remove.

- Remove the dust collection filter.
① Pull the filter tag upwards.
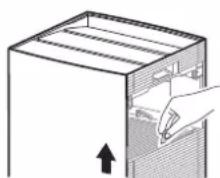
natural_image
Diagram of a box with a hand inserting a paper into it, showing an upward arrow (no text or symbols present)② Hold the bottom part of dust collection filter and lift it out.
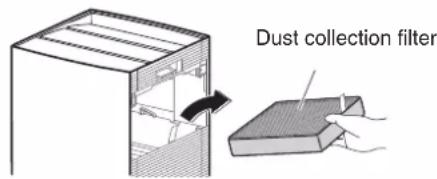
- Attach the new dust collection filter.
- Pay attention to the orientation while installing a new dust collection filter.

- Attach the deodorising filter. ▶Page 14
- Attach the filter fixing unit. ▶ Page 14
- Attach the service cover. ▶ Page 14
Streamer Unit
Replace
Do not soak or wash

natural_image
Technical line drawing of two rectangular electronic components with internal compartments (no text or symbols)If the Streamer lamp blinks
Replacement timing
Estimated lifespan is about 10 years in the case where unit is operated for 24 hours everyday using AUTO FAN MODE at a house where 5 cigarettes are burned everyday. However, depending on the location where the unit is used (places where oils are present, or dust and humidity is abundant, or sprays and chemical agents are used, etc.), replacement timing may become shorter. ▶Page 3-6
Both units must be replaced simultaneously
Contact the place of purchase.
-
Remove the pre-filter on the left side viewing from the front of the main unit. ▶Page 27
-
Remove the Streamer unit cover.
Place your finger on the hook and pull it towards you.

Streamer unit cover (black)
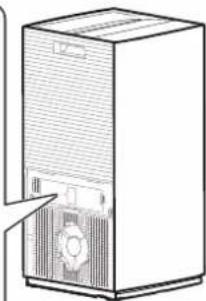
natural_image
Line drawing of a portable electronic device with a fan and control panel (no text or symbols)Left side view of the unit
- Remove the Streamer units.
① Remove both Streamer units.
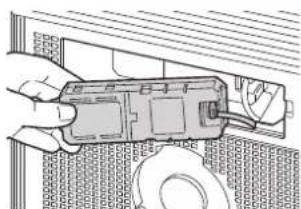
natural_image
Hand holding a small electronic device with a cable, partially installed on a textured surface (no text or symbols visible)② Remove the connectors of the Streamer units.

- Push the hook on the connector.
- Pull it out while pushing the hook.
The lock will not release unless the hook is pushed.
(Breakage may result from forcibly pulling)
- Attach the new Streamer units.
① Pay attention to the direction of the hook on the connector, make sure it is facing to the right, and fully insert the connector. The connectors need not be inserted in any particular order.

② Attach both Streamer units.
Match the Streamer unit holes to the protrusions.

- Attach the Streamer unit cover.

- Ensure you don't pinch the connector cord. - If the Streamer unit cover is not properly attached, the safety switch will engage, and the unit cannot operate.
-
Attach the pre-filter. ▶Page 27
-
Insert the power supply plug while pressing FAN on the unit, and wait until a short beep sounds.
- The Streamer lamp will turn off. - If you release FAN and attempt operation before the short beep sounds, the Streamer lamp will blink again. - If you perform this step and the Streamer lamp still blinks, please check that the connector is properly inserted.
When Not Using the Unit for a Prolonged Period
- Unplug the power supply.
- Clean the parts. ▶Page 28, 29
- In particular, parts cleaned with water should be completely dry. (Mould may result from remaining moisture)
- Cover the air outlet and other openings with a plastic bag or similar to prevent dust entry, and store the unit upright in a dry place.
(Malfunction/breakage may result from storing the unit upside down or horizontally)
State of the AIR MONITOR indicator and Their Meanings
In case the AIR MONITOR indicator blinks and an error code appears, unplug the power supply plug, wait at least 5 seconds, then insert the power supply plug again and operate the unit. If an error code still appears, please refer to the procedures below:
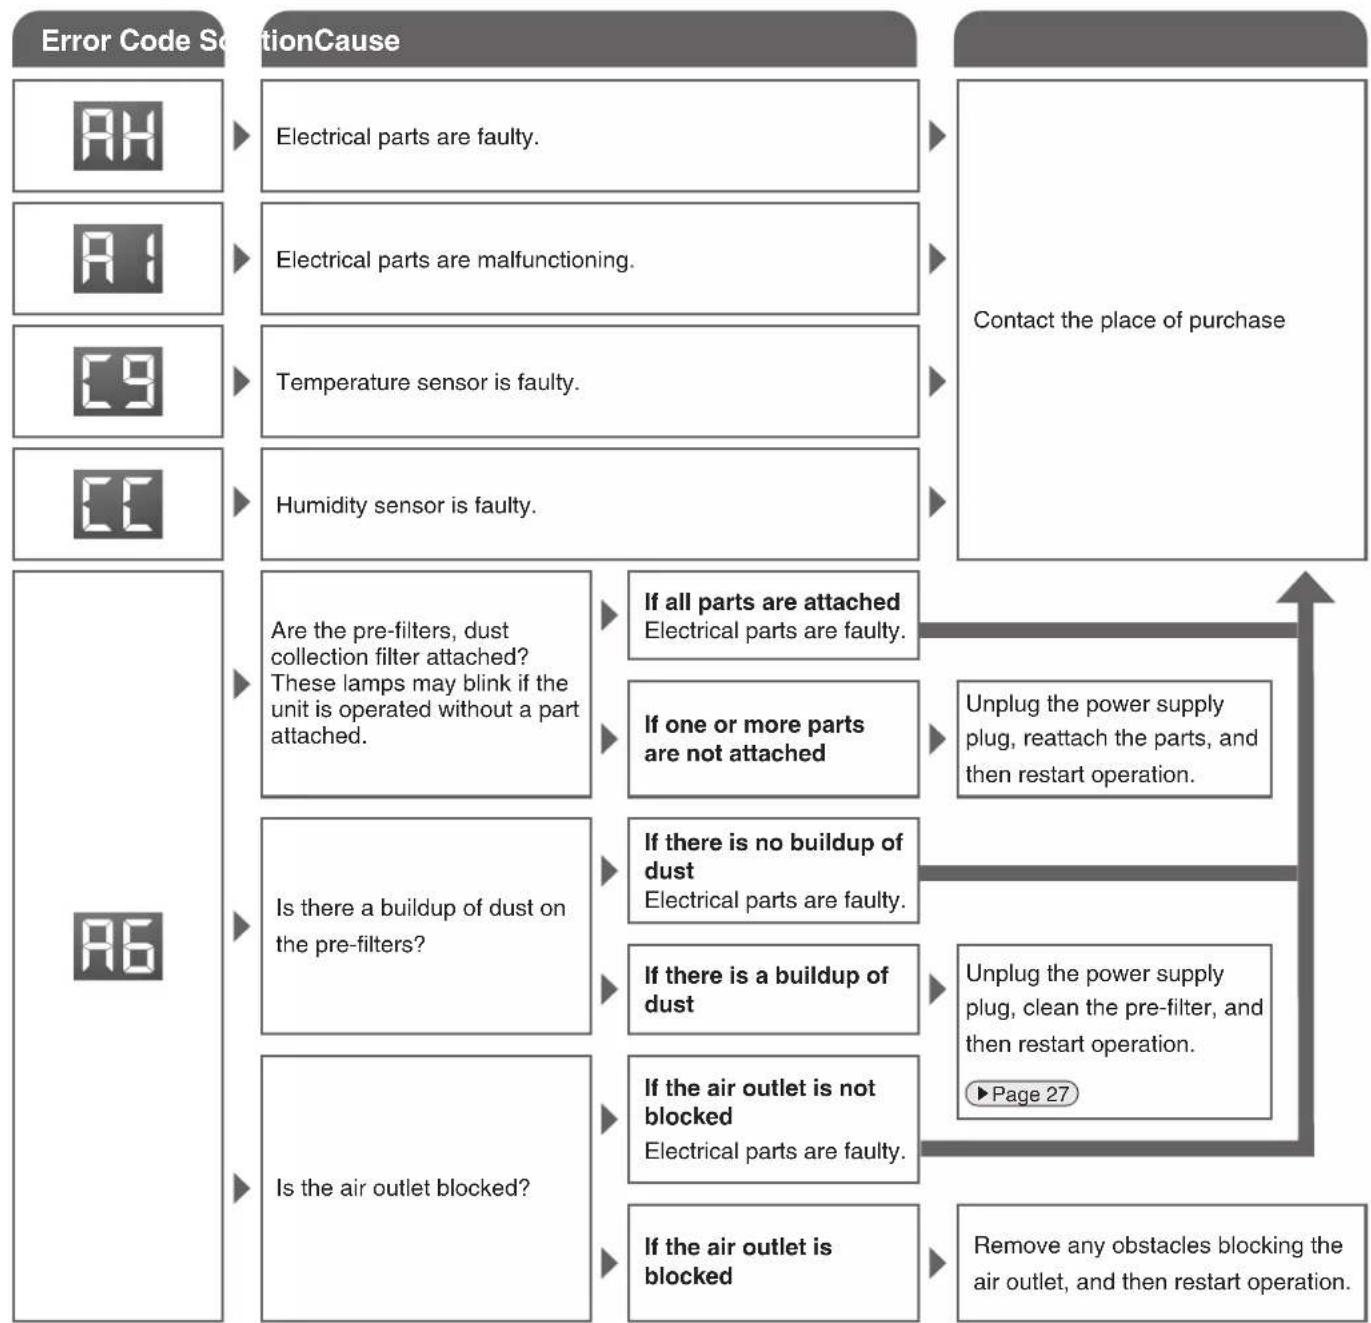
flowchart
graph TD
    A["Error Code Solution Cause"] --> B["Electrical parts are faulty."]
    A --> C["Electrical parts are malfunctioning."]
    A --> D["Temperature sensor is faulty."]
    A --> E["Humidity sensor is faulty."]
    F["Contact the place of purchase"] --> G["Unplug the power supply plug, reattach the parts, and then restart operation."]
    H["Are the pre-filters, dust collection filter attached? These lamps may blink if the unit is operated without a part attached."] --> I["If all parts are attached Electrical parts are faulty."]
    H --> J["If one or more parts are not attached"]
    H --> K["Is there a buildup of dust on the pre-filters?"]
    H --> L["Is the air outlet blocked?"]
    M["If there is no buildup of dust Electrical parts are faulty."] --> N["If there is a buildup of dust"]
    M --> O["If the air outlet is not blocked Electrical parts are faulty."]
    P["If the air outlet is blocked"] --> Q["Remove any obstacles blocking the air outlet, and then restart operation."]
Please check the following before contacting the place of purchase.
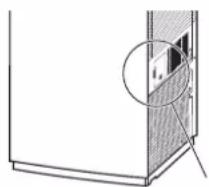
Q: The value displayed as the PM2.5 concentration is always low and seems unresponsive, or the sensitivity of the PM2.5 sensor seems to be poor...
A: Perform periodic cleaning of the PM2.5 sensor as dirt on its lens can lead to poor sensitivity. ▶Page 27
In addition, the response time of the PM2.5 sensor depends on the room size. Make adjustments in accordance with the procedure for setting PM2.5 sensor sensitivity. ▶Page 23, 24
The responsiveness of the PM2.5 sensor may be poor during FAN setting Turbo or when airflow is High in AUTO FAN MODE.
The strong airflow causes dust to be drawn into the air inlet before it can be detected by the PM2.5 sensor. This is normal (not a malfunction).
natural_image
Diagram of a door frame with a magnified inset showing internal structure (no text or symbols)PM2.5 sensor
Q: Can the dust collection filter be cleaned with water?
A: No. Do not attempt to clean it with water.
(Reduced performance of the dust collection filter may result)
Replace it or vacuum away dust with a vacuum cleaner if dirt buildup is severe.
▶Page 28, 29
In some cases, odour is stuck to the dust collection filter depending on the location where the unit is used. If the odour becomes severe, replace the filter, or vacuum away dust with a vacuum cleaner. ▶Page 28, 29

Q: Dust collection filter easily turns black...
A: The blackening does not affect dust collection performance.
However, it can be replaced if it is an issue. ▶ Page 29
Can the deodorising filter be cleaned with water? Or should it be replaced?
A: It cannot be cleaned with water.
(If water is used, the part will lose its shape and become unusable)
If you have inadvertently washed it with water, contact the place of purchase.
Remove the deodorising filter from the unit and vacuum off dust with a vacuum cleaner.
It is not necessary to replace the filter.
In some cases, odour is stuck to the deodorising filter depending on the location where the unit is used.
If odour becomes an issue, leave the part in a shaded, breezy area.
(approx. 1 day) ▶ Page 28

Q: Is continuous operation possible?
A: It can be operated continuously.
Stop operation regularly and clean it.
Troubleshooting
■ Before making an inquiry or a request for repair, please check the following.
If the problem persists, contact the place of purchase.
■ In the event of malfunction during operation
If the indicator lamps light up, or become inoperable, due to a lightning strike etc., remove the power supply plug, wait at least 5 seconds then re-insert the power supply plug and turn the unit ON again.

Not a problem
This case is not a problem.

Check
Please check again before requesting repairs.
■ Unit does not respond
| Phenomenon Check points | |
| Unit will not operate • Is the | Streamer unit cover attached?If it is not attached, the safety switch will engage, and the unit cannot operate.→ Install the Streamer unit cover properly and attempt operation again. ▶Page 30 |
■ Sounds can be heard
| Phenomenon Check points | |
| Hissing sound during operation | A hissing sound is generated when there is Streamer discharge during Streamer operation.Depending on usage, the sound may lessen or change to a crackling, whirring or guzzling sound. However, this is normal.If the sounds are an issue, try moving the unit to a different location.You can also set the Streamer output to Low. ▶Page 21, 22 |
| Whistling and fluttering sound during operation | Is there a buildup of dust on the pre-filter?→ Clean this part. ▶Page 27Is the dust collection filter clogged up?→ Please perform maintenance. ▶Page 28Depending on usage conditions, the dust collection filter may become clogged up, shortening its service life. ▶Page 6If the problem persists even after cleaning, replace the dust collection filter. ▶Page 29 |
| Operating sound is loud | Is the dust collection filter properly attached?→ If it is not properly attached, operating sounds may become louder. ▶Page 29 |
■ Indicator lamps
| Phenomenon Check points | |
| Odour sensor lamp blinks• | Is the deodorising filter attached?→ Attach the deodorising filter. ▶Page 14 |
| Communication lamp remains red | ? Is the router turned off?→ Please turn the router on.Are you using a different router from before?→ Perform connection settings again with the new router. ▶Page 16 - 17Is the router connected to a network?→ Check the network connection. |
| √ The signal between the router and the unit may be weak.→ Move the router nearer to the unit. ▶Page 16 - 17 | |
| The Communication lamp blinks red | √ An electrical component may be malfunctioning.→ Press to turn off the Communication lamp, then turn it on again.If the Communication lamp blinks again after about 3 minutes, an electrical component is malfunctioning.Contact the place of purchase. |
Troubleshooting
| Phenomenon Check points | |
| Indicator lamps do not light up | Is the indicator lamp brightness set to OFF?To turn the lamps on, please set the indication lamp brightness to BRIGHT or DIM. ▶Page 11 |
| PM2.5 sensor lamp remains orange or red | Is there a buildup of dust in or around the air intake of the PM2.5 sensor or the surrounding area?Vacuum off any dust from the air intake using a vacuum cleaner. ▶Page 27Is the cover detached from the air intake for the PM2.5 sensor?Securely attach the cover. ▶Page 27Is the lens for the PM2.5 sensor dirty?Wipe off dirt from the lens using a dry cotton bud or similar. ▶Page 27Is any of the pre-filter dirty?Clean these parts. ▶Page 27 |
| The PM2.5 sensor lamp is always blue and does not changeThe PM2.5 concentration value displayed with the AIR MONITOR indicator is always “--”, and Daikin eye remains blue and does not change. | If the displayed value remains “--” even after you set the AIR MONITOR indicator to display the concentration of PM2.5, the PM2.5 sensor may be defective.Contact the place of purchase. |
| There is an odour but the odour sensor lamp remains blue | Did an odour already exist around the time you inserted the power supply plug?The basic sensitivity of the odour sensor will be determined by odour levels in the first minute (approx.) after the power supply plug is inserted every time. ▶Page 10To adjust the basic sensitivity of the odour sensor, unplug the power supply when the air is clean (odour-free), wait at least 5 seconds, then re-insert the power supply plug and turn the unit on again. This process adjusts the reference odour level that determines the sensitivity of the odour sensor. |
| The Streamer lamp blinks • Please replace the Streamer units. ▶Page 30→ Contact the place of purchase. | |
| Sometimes the Streamer lamp does not light up | Depending on the degree of air impurity, Streamer operation may turn OFF. ▶Page 22The Streamer lamp turns off when Streamer operation is OFF. |
| Is Streamer output set to Low?If it is set to Low, the length of time the Streamer operates will be shorter than when Streamer output is set to Normal. ▶Page 21, 22Is the unit operating in ECONO MODE?The Streamer lamp does not light up when the unit is in Monitoring mode during ECONO MODE. ▶Page 25, 26 | |
| The Streamer lamp blinks even though the Streamer unit has been replaced | After replacement, was the power supply plug inserted while pressing FAN setting button on the unit? ▶Page 30Is the Streamer unit's connector properly installed?[In case of improper installation]Unplug the power supply, re-attach the connector, and attempt operation again. ▶Page 30[In case of proper installation]An electrical part is faulty.→ Contact the place of purchase. |
■ Air purifying function
| Phenomenon Check points | |
| Air purifying capacity is reduced | Is the unit surrounded by obstacles, or positioned in a place where airflow cannot reach?Choose a position that is obstacle-free and from where airflow can reach all areas of the room.Are the louvres closed?Please open the louvres. ▶Page 18Any of the pre-filter dirty?Clean these parts. ▶Page 27Is the dust collection filter dirty?Clean this part. ▶Page 28 |
| The air outlet is emitting an odour | An air purifier collects dust and odours from the entire room.In case the air purifier is used in an environment where there are strong odours or the odours are generated continuously, there are cases where odours are attached to the filters and the unit, and will be emitted for weeks or months. |
| Is there anything in the room that constantly produces odours?(Paint, new furniture, wallpaper, aerosols, cosmetics, medicine, aromatic substances, aroma oils, cigarettes, roasted meat, etc.)As continuously emitted odours cannot be completely eliminated, you should ventilate the room at the same time or run the unit in a well-ventilated room until the odour disappears.Is the room temporarily filled with strong odours due to something such as many people smoking or cooking?The odour will gradually decrease as the unit operates.Have you moved the unit from another room?Odour from the room the unit was previously in may still be present.Keep operating until the odour disappears.Are odours coming from the deodorising filter or dust collection filter?Please conduct maintenance on each part. ▶Page 28, 29In some cases the air outlet may emit a slight odour as trace amounts of ozone are generated during Streamer discharge or Active Plasma Ion discharge. However, the amount is negligible and is not harmful to your health.If an odour is emitted when using the unit for the first time, set the FAN setting to Turbo and operate until the odour disappears. ▶Page 19 | |
| No air is being emitted | Is the air outlet or an air inlet blocked?If they are not blocked, an electrical part is faulty.→ Contact the place of purchase. |
| Airflow rate cannot be adjusted • Is the odour sensor lamp blinking? | Is the unit positioned next to a window or in a location exposed to cold wind?There is a possibility that only the air surrounding the unit is of high humidity.Try moving the unit to a different location. |
| The AIR MONITOR indicator always indicates a high humidity level when the humidity display is selected |
Troubleshooting
| The values of humidity and temperature indicated on the unit differ from other hygrometers and thermometers | The display on the unit may differ from that of the other hygrometers or thermometers.This is because the humidity and temperature become uneven even in the same room due to the flow of air.Please use the AIR MONITOR indicator as a rough estimate. |
■ Wireless LAN connection
| Phenomenon Check points | |
| The unit (air purifier) can't be found with the app | Perform connection settings again ▶Page 16,17Move the router closer to the air purifier. |
| Cannot operate the unit with smartphone even though the Communication lamp is lit green. | Check the internet connection of your router. |
Other
| Phenomenon Check points | |
| The unit turns on and off on its own. | Is someone else operating the unit with a smartphone?Did you set the schedule timer using “ONECTA”?If is pressed on the unit, the Communication lamp will turn off,and operation via smartphone and the schedule timer will be disabled. |
| The fan stops midway through unit operation | When the unit switches to Monitoring mode during operation in ECONO MODE, the fan turns on and off repeatedly. ▶Page 20 |
| Are the pre-filters, filter fixing unit, and dust collection filter attached before the unit is operated?The fan is configured to stop in order to protect electrical components if a part is not properly attached.→ If a part is not attached, unplug the unit and attach all the parts before turning the unit on again. | |
| The sound of Streamer discharge can no longer be heard | Depending on the degree of air impurity, Streamer operation may turn OFF.▶Page 22 |
| Is Streamer output set to Low? ▶Page 21, 22 | |
| There is interference on our TV screenNoise is generated on the radio | Is the TV or radio positioned within 2m of the unit, or is an indoor antenna positioned near the unit?Are the power supply cord or antenna cable of the TV or radio routed near the unit?→ Keep the unit as far as possible from the TV, radio or antenna. |
| Just inserting the power supply plug causes operation to start | Did you disconnect the power supply plug during a power failure or when a sudden voltage fluctuation occurred? Or did you stop the unit by disconnecting the power supply plug during the last operation?→ The auto-restart function automatically resumes operation. |
Specifications
| Model name MC80ZBFVM | ||||
| Power supply Single phase 50Hz 220-240V / 60Hz 220-230V | ||||
| Operation mode | Air Purifying | |||
| Turbo Standard Low Quiet | ||||
| Power consumption (W) 80 16 11 | 9 | |||
| Operating sound (dB) 55 34 25 | 19 | |||
| Airflow rate (m3/h) 480 210 132 | 84 | |||
| Coverage area (m2) | 62*1124*2 | |||
| CADR (m3/h) | 480*3 | |||
| External dimensions (mm) 630(H)×315(W)×315(D) | ||||
| Weight (kg) 9.8 | ||||
| Power supply cord length (m) | 2.0 | |||
- These specification values are applicable to both 50Hz 220–240V and 60Hz 220–230V.
- Even when the power is off, approx. 1W (*4) of power is consumed to run the microcomputer.
- This appliance is designed to be used in residential or commercial areas.
- A-weighted emission sound pressure level is below 70 dB (A).
*1. Coverage area was calculated in accordance with JEM1467. (when FAN setting is Turbo)
*2. Coverage area was calculated in accordance with NRCC-54013 standard using cigarette smoke CADR that was tested according to JEM1467. (when FAN setting is Turbo)
*3. CADR value was tested accordance to JEM 1467 Appendix C. (when FAN setting is Turbo)
*4. If the wireless LAN connection adaptor function is OFF.
Separately sold parts
| Replacement PartDust collection filter(1 unit)Part no: BAFT501A | Caster(4 units)Part no: KKS080B41 |
 Replace in about 10 yearsCatches dust and pollen. Replace in about 10 yearsCatches dust and pollen. | 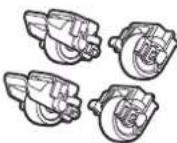 Installation location is changed manually. Installation location is changed manually. |
- Failure to maintain part properly may result in:
- Reduced air purifying capacity
- Reduced deodorising capacity
-
Emission of odours
-
Please refer to the installation manual sold with the caster wheels for its installation
- Please install / remove the separately sold parts with the unit unplugged
- Observe local waste separation rules when disposing of the dust collection filter (made of polyester and polypropylene).
■ Disposal requirements

Your product is marked with this symbol. This symbol means that electrical and electronic products shall not be mixed with unsorted household waste.
Do NOT try to dismantle the system yourself: the dismantling of the system must be done by an authorized installer and must comply with applicable legislation.
Disposal of this product must be done in accordance with relevant local and national legislation.
Units must be treated at a specialised treatment facility for re-use, recycling and recovery.
By ensuring correct disposal, you will help to prevent potential negative consequences for the environment and human health.
Please contact the installer or local authority for more information.
- In the event that there is any conflict in the interpretation of this manual and any translation of the same in any language, the English version of this manual shall prevail.
- The manufacturer reserves the right to revise any of the specification and design contain herein at any time without prior notification.
- All images are for illustration purposes only.
DAIKIN MALAYSIA SDN. BHD.
Lot 60334, Persiaran Bukit Rahman Putra 3, Taman Perindustrian Bukit Rahman Putra, 47000 Sungai Buloh, Selangor Darul Ehsan, Malaysia.
DAIKIN EUROPE N.V.
- Contents
- Read First
- Operation
- Advanced Settings
- Maintenance
- Troubleshooting
- Safety Precautions
- ARNING
- Observe in order to prevent fire, electric shock or severe injury.
- WARNING
- During use
- Immediately turn off and unplug the unit if there are any signs of abnormality or damage. Examples of abnormality and malfunction
- ■Concerning unit body
- CAUTION
- ■When moving the unit
- Precautions when using the unit
- Do not use in the following places
- About Streamer discharge and Active Plasma Ion
- Names of Parts and Operations
- Main Removable Parts
- Attention
- Operating/Indicator Panel
- Operations and operating status will be notified by tones.
- Streamer lamp [blue]
- Daikin eye
- Humidity sensor lamp
- PM2.5 sensor lamp
- AIR MONITOR indicator [white] (estimate values)
- The display on the unit may differ from that of the other hygrometers or thermometers.
- Odour sensor lamp
- AIR MONITOR setting lamps [white]
- Child Proof Lock
- Child Proof Lock lamp [white]
- Note
- AIR MONITOR button
- BRIGHTNESS button
- Preparation Before Operation
- Checking Accessories
- Positioning The Unit
- Pointers for good positioning
- Attaching the Deodorising Filter
- Remove the service cover.
- Remove filter fixing unit.
- Remove the deodorising filter from the bag.
- Attach the deodorising filter.
- Attach the filter fixing unit.
- Attach the service cover.
- Inserting the Power Supply Plug into the Socket
- Operating the air purifier via smartphone
- When you want to operate the air purifier via smartphone
- Precautions During Use of Wireless LAN
- - ⚠️ WARNING
- - i INFORMATION
- Preparation Before Connection
- The customer is responsible for providing:
- ■ Check the following in advance (while at home)
- ■ Check the following before and while operating the air purifier from outside the home
- Connection settings
- Check if router has WPS built-in
- 2
- If router has built-in WPS
- Connect air purifier to network
- If router does not have built-in WPS
- Connect the Air Purifier to the Network
- Communication lamp status
- If the unit (air purifier) can't be found with the app
- If you want to turn the wireless LAN connection adaptor function OFF
- If necessary
- If you want to reset the wireless LAN connection adaptor to factory default settings
- Using the Air Purifying Operation (turning operation ON/OFF)
- Changing the Airflow Rate
- Operating MODEs
- Changing the setting
- Function 1
- Streamer output settings (Normal/Low)
- Press ⏻ to change the setting\*
- About the Streamer lamp
- Press
- Quick Guide for Maintenance
- Unit
- When dirt becomes an issue
- Wipe
- PM2.5 Sensor
- When dust builds up
- Vacuum clean
- About every 3 months Wipe
- Pre-filter (Front / Left side / Right side)
- About every 2 weeks
- Wash with water
- Method to remove
- Method to attach
- Filter Fixing Unit ▶Page 14
- Deodorising Filter For method to attach/remove, refer ▶Page 14
- Dust Collection Filter For method to attach / remove, refer to ▶ Page 29
- Dust Collection Filter Replace
- Replace in about 10 years
- Replacement period
- Purchase and disposal
- Streamer Unit
- Replace
- Do not soak or wash
- If the Streamer lamp blinks
- Replacement timing
- When Not Using the Unit for a Prolonged Period
- State of the AIR MONITOR indicator and Their Meanings
- Q: The value displayed as the PM2.5 concentration is always low and seems unresponsive, or the sensitivity of the PM2.5 sensor seems to be poor...
- Q: Can the dust collection filter be cleaned with water?
- A: No. Do not attempt to clean it with water.
- Q: Dust collection filter easily turns black...
- Can the deodorising filter be cleaned with water? Or should it be replaced?
- A: It cannot be cleaned with water.
- Q: Is continuous operation possible?
- Not a problem
- Check
- ■ Unit does not respond
- ■ Sounds can be heard
- ■ Indicator lamps
- ■ Wireless LAN connection
- Other
- Specifications
- Separately sold parts
- ■ Disposal requirements
- DAIKIN MALAYSIA SDN. BHD.
- DAIKIN EUROPE N.V.
Brand : DAIKIN
Model : MC80ZBFVM
Category : Air purifier