PRO-SD300B - Lighting GVM - Free user manual and instructions
Find the device manual for free PRO-SD300B GVM in PDF.


| Product Type | Bi-Color LED Video Light |
| Model | PRO-SD300B |
| Brand | GVM |
| Power Output | 300W |
| Color Temperature Range | 3200K - 5600K |
| Brightness Adjustment | 10% - 100% stepless dimming |
| CRI / TLCI | ≥96 / ≥97 |
| Number of LEDs | 672 |
| Beam Angle | 120° |
| Cooling System | Silent cooling fan |
| Control Methods | On-board, 2.4G remote, DMX512 |
| Power Supply | AC 100-240V, 50/60Hz (V-lock battery plate optional) |
| Dimensions (with yoke) | 35 x 25 x 15 cm |
| Net Weight | 2.8 kg |
| Included Accessories | Light, yoke, power cable, remote control, carrying bag |
| Mounting | Standard 5/8" baby pin (umbrella mount) |
| Special Effects | Flash, pulse, storm, TV, candle, fire |
| Maintenance & Cleaning | Wipe with dry cloth; avoid solvents |
| Safety | Overheat protection; IP20 |
| Spare Parts / Reparability | Replacement LED modules and power supply available via GVM service |
| General Information | Professional video light for studio and location shooting |
Frequently Asked Questions - PRO-SD300B GVM
User questions about PRO-SD300B GVM
0 question about this device. Answer the ones you know or ask your own.
Ask a new question about this device
Download the instructions for your Lighting in PDF format for free! Find your manual PRO-SD300B - GVM and take your electronic device back in hand. On this page are published all the documents necessary for the use of your device. PRO-SD300B by GVM.
USER MANUAL PRO-SD300B GVM
natural_image
Line drawing of a GVM megaphone with lens and handle (no text or symbols on body)GVM®
Great Video Maker
GVM-PRO-SD200B
GVM-PRO-SD300B
CONTENTS
Important Safety Instructions Page 1\~2
Product introduction Page 3
Warning Page 3
Use and save Page 4
Disclaimers Page 4
GVM-PRO-SD200B product parameter Page 5
GVM-PRO-SD300B product parameter Page 6
Product structure diagram --Page 7
Installation method Page 8\~10
Description of product control keys --Page 11
Function introduction & instructions for use---- Page 12\~13
APP control Page 14\~15
Simple faults and troubleshooting --Page 16
Packing list Page 17
Precautions Page 17
Product Warranty Page 18\~19
IMPORTANT SAFETY INSTRUCTIONS
First and foremost: this product is a professional lighting and staging equipment and should be used by a professional lighting technician or under the guidance of a professional. When using this product, you must always follow cautions below:
- Read the product manual carefully before use.
- This product is only suitable to use in a temperature range of -20^ to 45^ .
- Do not place the equipment near flammable and volatile solvents such as alcohol and gasoline.
- Before storing the device, make sure it has cooled down completely. When being stored, unplug the power cord from the device. The equipment should be stored in its carrying case or in a well-ventilated and dry place.
- This lighting fixture is not for general illumination and should not be used as such. Individuals with eye injuries or sensitivity should avoid using this lighting fixture.
- This is a professional light and children are prohibited from using it. Parents or guardians must closely supervise children when they are near the equipment to prevent personal injury caused by colliding with or misusing the equipment.
- Before using the equipment, please remove the protective cover.
- When the lighting fixture is on, it is forbidden to stare directly at the light source under any circumstances. High-intensity lighting should only be used under the guidance of a professional lighting technician. Avoid staying in a high-intensity light environment for a long time. If feeling any discomfort, please immediately turn off the lighting fixture, and seek for medical attention.
- When the lighting fixture is on, use it carefully and avoid contacting high-temperature components such as LED light sources to prevent being burnt.
- Do not use a damaged equipment or equipment accessories. Wait for a professional repairman to inspect and repair it before it is confirmed that the equipment can function normally.
- If the light source is damaged or deformed due to heat, please stop using it and contact the manufacturer, service agents or qualified repairman promptly to replace the light source to avoid accidents.
- If the product is cracked due to falling, squeezing or strong impact during use, please stop use it to avoid being electrically shocked by touching internal electronic components.
- Do not disassemble the product by yourself. If the product malfunctions, it must be checked and repaired by the manufacturer or authorized repair personnel.
-
Before cleaning and maintenance, be sure to unplug the power supply To unplug never pull on the cable but always pull the plug itself. This device shall only operate with earthed power outlets or emergency power generators.
-
When cleaning the device, do not wipe it with a wet cloth. Use a dry and soft cloth to wipe off the dirt.
- If an extension cord is required, it needs to have the necessary capacity o power the respective unit. Using an extension cord with a lower current capacity the devices need may cause overheating.
- For some products with long power cords, please place the power cords properly and avoid its contact with overheated surfaces that may damage or trip personnel. Please use original power cords of our manufactory. The damage caused by using non-original power cords is not covered by our repair service.
- Do not use product accessories that are not recommended by our brand to avoid fire, electric shock, or personal injury.
- Some products use batteries for power supply. Do not use any batteries, power sources, or accessories that are not specified in the user manual. Please keep batteries and other accessories out of reach of children and infants. If a child or infant swallows a battery or accessory, seek medical attention immediately. If the battery leaks, changes color, deforms, smokes, or emits an odor, remove it immediately. Be careful not to get burned during the removal. A continued use of such batteries may cause a fire, electric shock, or skin burns. Do not use any deformed or modified batteries. Do not disassemble or modify this product or the battery. Do not heat the battery or solder it. Do not let the battery come into contact with fire or water, or subject it to strong external force. Do not insert the battery's positive and negative ends incorrectly, or mix use old and new batteries or different types of batteries.
- For some products with built-in lithium batteries, please use a dedicated charger for charging, and follow the correct operating instructions within the prescribed voltage and temperature range.
- The warranty last for one year. Consumables like batteries, adapters, power cords, and other accessories are not covered by the warranty.
- The one-year warranty will be invalidated if the equipment is found to have been repaired privately. The related repair costs will be charged.
- Equipment malfunctions caused by non-standard operations are not covered by the warranty.
- The safety instructions are based on our factory's strict testing. If there are any changes in the equipment's design and specifications, we reserve the right not to notify. Customers can visit our official website to check the latest digital version of the instructions and learn about the newest product information.
Keep these instructions!
PRODUCT INTRODUCTION
Thank you for purchasing our "GVM-PRO-SD200B/GVM-PRO-SD300B", this product is designed for senior photography enthusiasts, The product is suitable for live broadcast / outdoor / film shooting / studio photography, It can also be used for YouTube video shooting.
- It has high-definition COB beads, which help to restore and enrich the color of objects, providing you with natural and vivid shooting effects.
- APP control, lights can be controlled through your iOS and Android smart mobile device connection; support Bluetooth Mesh networking, you can group control with GVM brand devices that support Mesh networking.
- With standard DMX interface, DMX control mode of low precision 8bit and high precision 16bit can be realized.
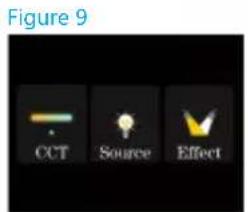
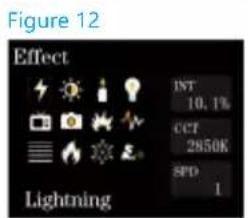
- 3 lighting modes, CCT mode, light source matching mode, light effect mode. CCT mode: white light mode, can adjust the light intensity and color temperature. Light source matching mode: this mode provides 12 different styles of light source types to choose from, when you need a specific light source, can save a lot of adjustment time. Light Effect Mode: This mode provides 12 light effects: Lightning, CCT Loop, Candle, Bad Bulb, TV, Paparazzi, Explosion, Pulsing, Strobe, Fire, Fireworks, Welding.
We firmly believe that the correct use of this product would be of great help for your shooting work. Before using the product, we strongly recommend that you read the following user guide carefully.

WARNING:
High-power LED lights are strictly prohibited from being directly viewed or shining into other people's eyes.
Do not unplug the power cord or connecting wires while the light is on to avoid personal injury.
Do not cover the heat dissipation port when the lamp is in operation.
Keep children away from touching or using this light.
As a professional lighting equipment, please make sure to operate it correctly according to the user manual.
USE AND SAVE
Do not place the product in high humidity, strong electromagnetic field, high temperature environment, or under direct sunlight. If the product is not to be used for a long time, disconnect the power supply.
Clean: Please unplug the power before cleaning. And use a damp cloth instead of any detergent or soluble liquid, so as not to damage the surface layer.
Power supply: Ensure that the power supply is within the scope of use, a too high or too low voltage power will affect its performance will affect the work.
Maintenance: If there is a malfunction or performance degradation, please do not open the shell package by yourself, so as not to damage the machine and lose the warranty. In the case of a malfunction, please feel free to contact us, and we will do our best to solve the problem.
Accessories: Please use the accessories provided by the manufacturer or approved accessory products in order to give full play to the best performance.
Warranty: Do not modify the product, otherwise the warranty will be lost.
DISCLAIMERS
- Before using this product, please read the text carefully to ensure that the correct operation of the product to be carried out. Fail to follow or not following the instructions and warnings in this document may damage the product or other surrounding items, or even cause harm to you and others around you.
- While using this product, you are deemed to have carefully read the disclaimer and warning, understand and agree all the terms and contents of this statement, and promise to take full responsibility for the use of this product and the possible consequences.
- Design and specifications are subject to change without notice.
GVM-PRO-SD200B PRODUCT PARAMETER
Brand: GVM
Product name: Photography lights
Product Type: Photography fill light
◆ Function/Features: A variety of light effect mode, high-display finger light beads
- Control mode: APP Bluetooth MESH network control, Wireless remote control, Light body manipulation and control, DMX
◆ Number of lamp beads: 1 (COB lamp beads)
Power: 200W
- Color rendering index: ≥ 97
- Color temperature: 2700\~6800K
- Brightness: Bare light 5890 lux/1m;
Plus standard cover 28700 lux/1m
Product size (mm): 292×130×134
Product net weight: 2.7 KG
Power supply: DC power
Voltage: AC100V\~240V
DC power supply: 32V7A
Product material: Aluminum alloy
- Heat dissipation: Heat sink + fan
Light adjustment mode: Infinitely adjustable
Origin of goods: Huizhou, China
GVM-PRO-SD300B PRODUCT PARAMETER
Brand: GVM
Product name: Photography lights
Product Type: Photography fill light
◆ Function/Features: A variety of light effect mode, high-display finger light beads
- Control mode: APP Bluetooth MESH network control, Wireless remote control, Light body manipulation and control, DMX
◆ Number of lamp beads: 1 (COB lamp beads)
Power: 300W
- Color rendering index: ≥ 97
- Color temperature: 2700\~6800K
- Brightness: Bare light 11800 lux/1m; Plus standard cover 44500 lux/1m
Product size (mm): 292×130×134
Product net weight: 2.7 KG
Power supply: DC power
Voltage: AC100V\~240V
DC power supply: 60V5A
Product material: Aluminum alloy
- Heat dissipation: Heat sink + fan
Light adjustment mode: Infinitely adjustable
Origin of goods: Huizhou, China
PRODUCT STRUCTURE DIAGRAM
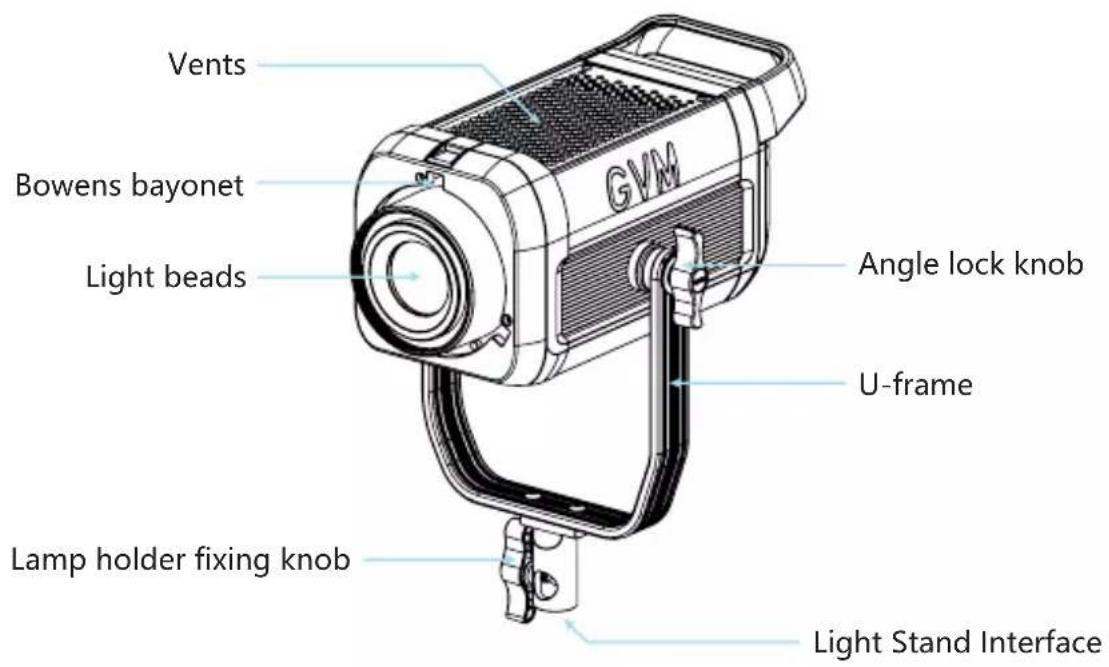
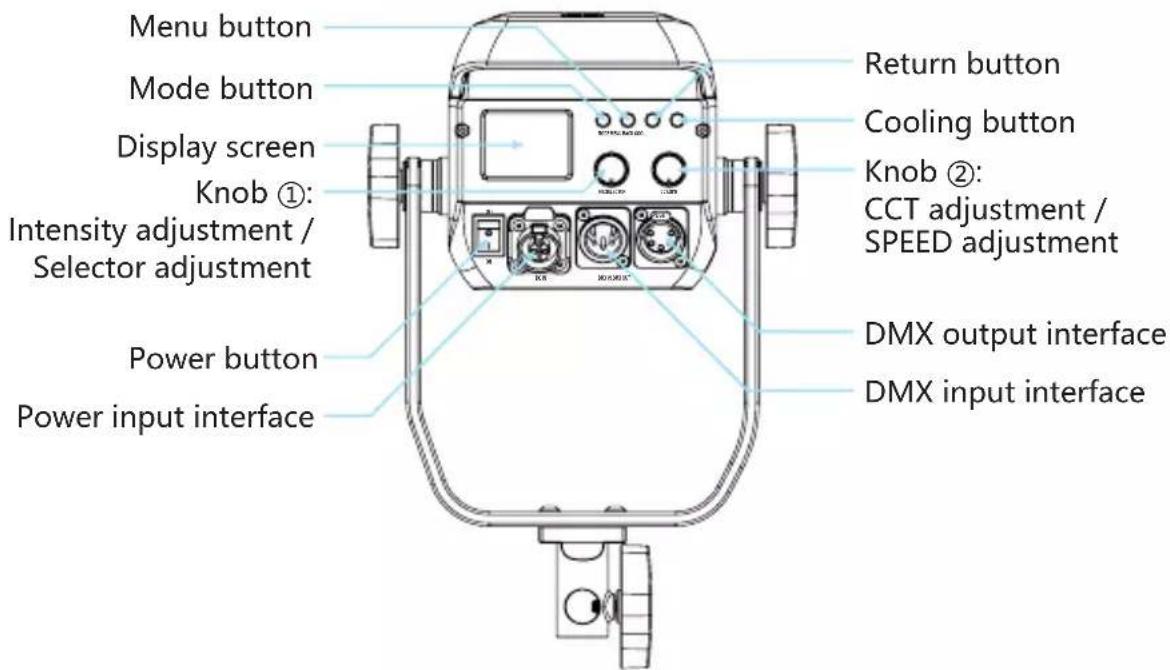
INSTALLATION METHOD
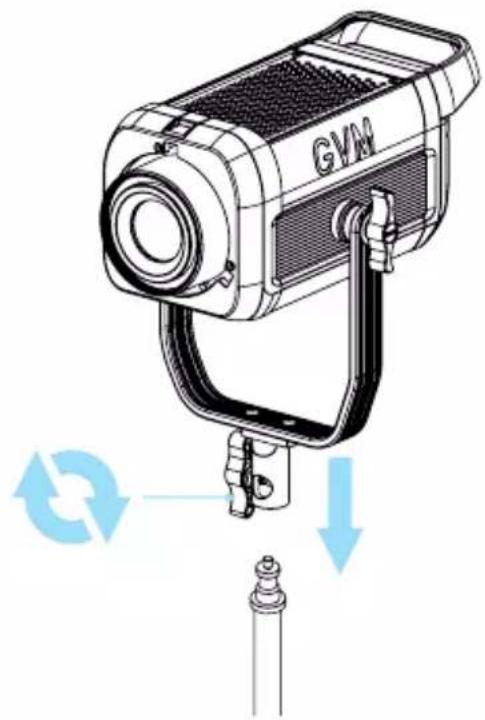
1 Loosen the light stand fixing knob, install the light to the light stand as shown below, then tighten the light stand fixing knob.
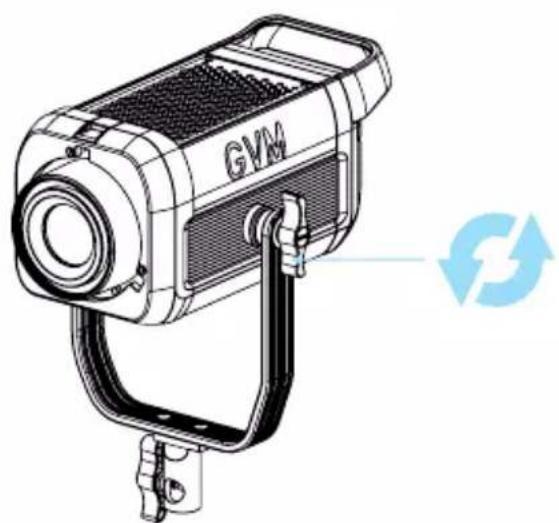
2 Loosen the angle locking handle, adjust the angle of the spotlight, then turn the angle locking handle tightly.
natural_image
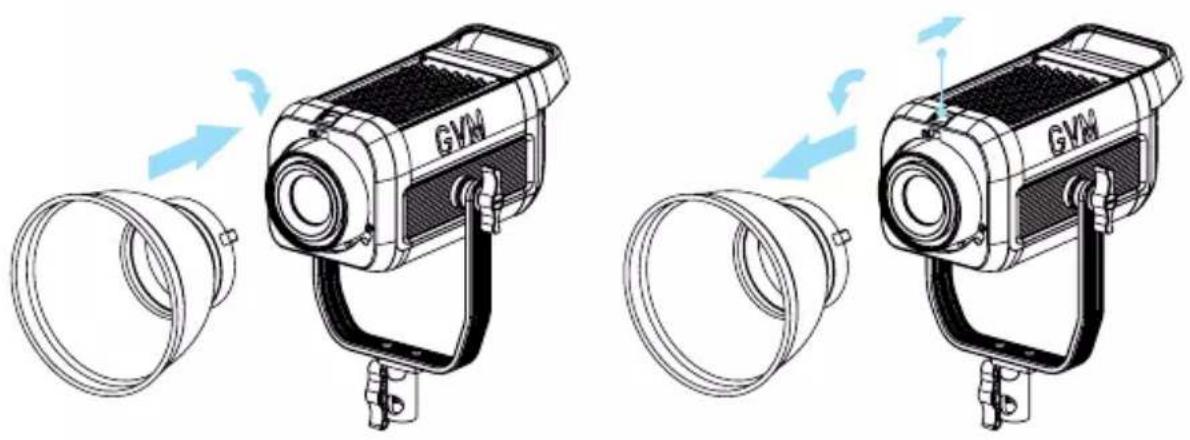
Technical line drawing of a GVM camera with attached bracket and circular arrow symbol (no text or labels)3 Insert the standard cover into the corresponding Bowens bayonet socket of the light, then turn it clockwise gently. To remove the cover on the light, pull it outward and rotate it counterclockwise.
natural_image
Illustration of two GVA lighting equipment setups with blue arrows indicating motion, showing lens and cable assembly (no text or symbols)Install Uninstall
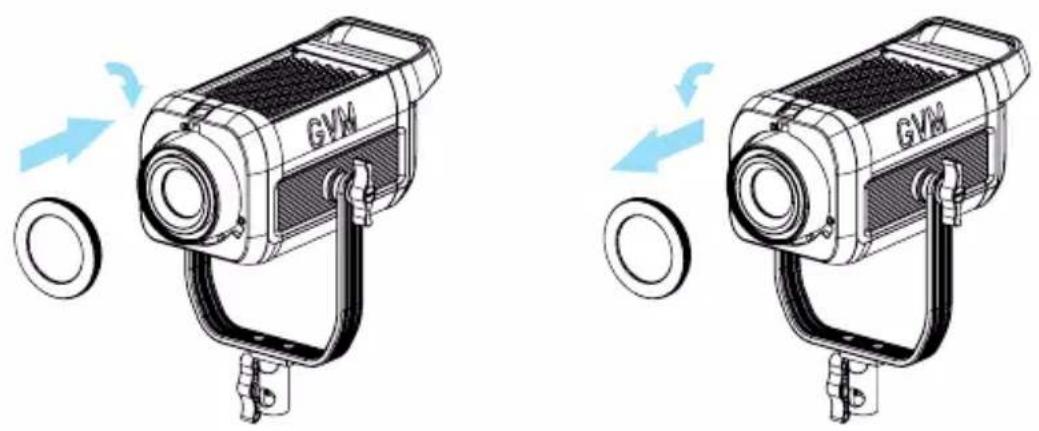
4 Install the light mixing mirror:
Screw the light mixing mirror into the socket clockwise to install it and do the opposite to uninstall.
natural_image
Two technical illustrations of a GVM device with attached metal brackets and circular components, shown in side-by-side views (no text or symbols present)Install Uninstall
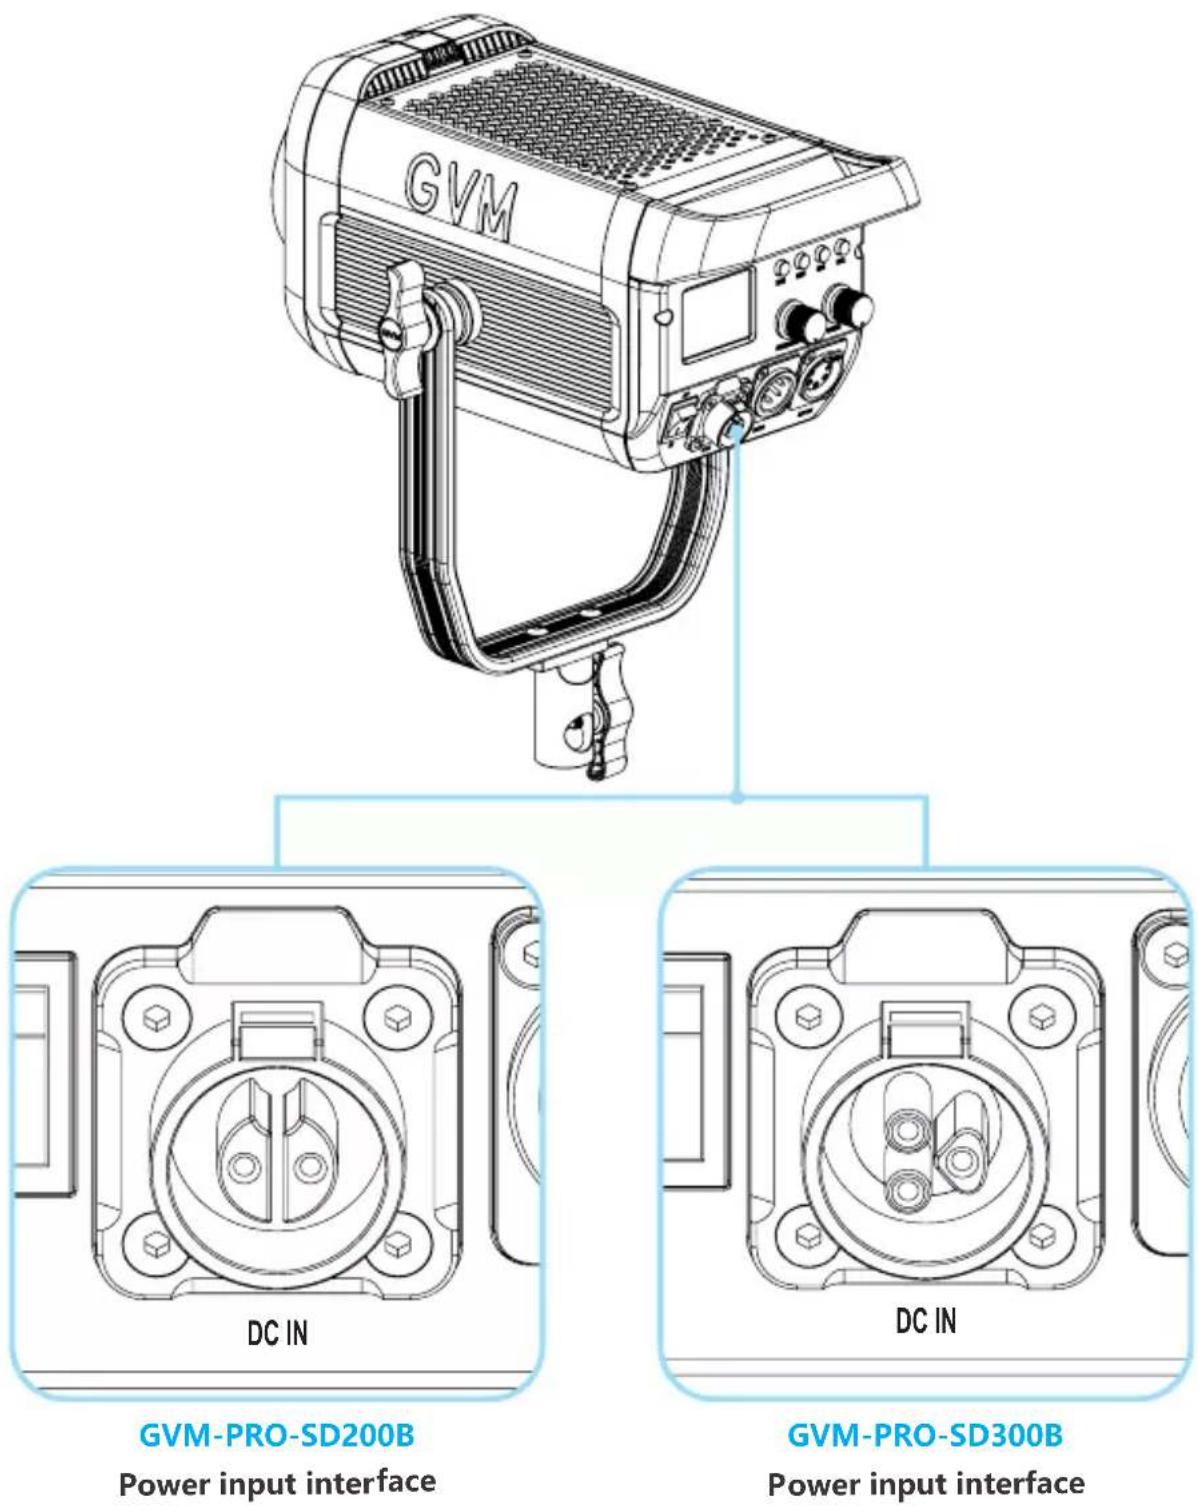
5 Connect the power cord to the power supply.
DESCRIPTION OF PRODUCT CONTROL KEYS
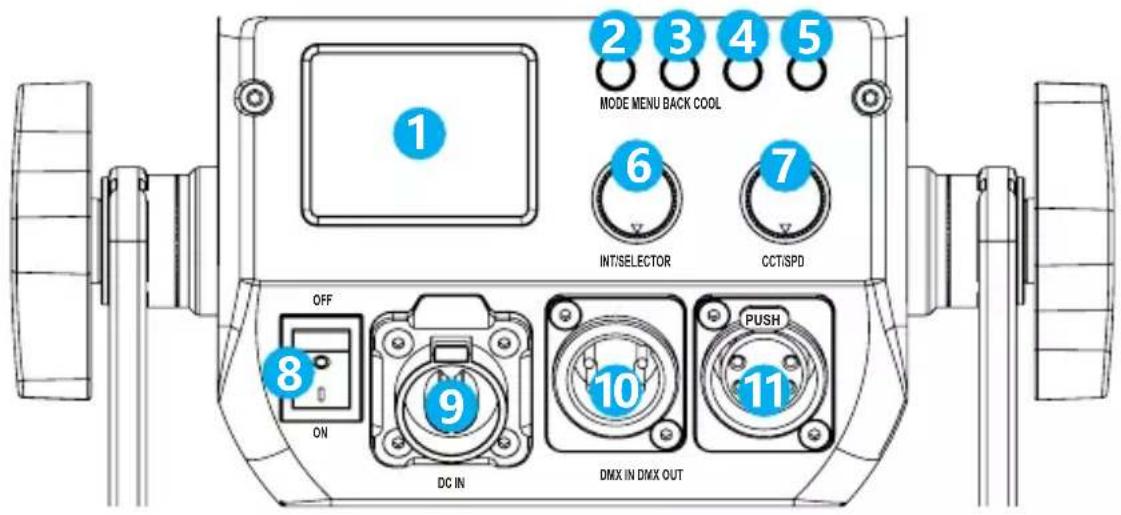
1 Display: Display current settings, modes and parameters.
2 Mode key: light mode switch button.
3 Menu key: press this key to enter the settings menu.
4 Return key: Press this key to return to the previous level menu.
5 Cooling key: start a large air volume cooling until the temperature is reduced to a touchable temperature.
6 Knob ①: INT/SELECTOR multi-functional coding knob, by pressing or rotating can be "Select/Brightness" adjustment.
7 Knob ②: CCT/SPEED adjustment, by rotating it, you can make the adjustment of color temperature and light effect change rate.
8 Power ON/OFF button.
9 Power input interface: connect to power supply.
10 DMX input interface: connected to the DMX controller.
11 DMX output interface: connect to the DMX controller.
FUNCTION INTRODUCTION & INSTRUCTIONS FOR USE
① Menu key (MENU):
Press the MENU button to enter the menu setting screen → Rotate [Knob 1] to select the item → Press [Knob 1] to enter the item setting screen → Set the parameters of the item by pressing or rotating [Knob 1] → Press [BACK] to go up the menu.
DMX SETTINGS (Figure 1):
Set the DMX parameters, [address (001-512)] and configure the mode [(8bit/16bit)].
DIM CURVE (Figure 2):
Set the dimming curve, [ linear / logarithmic / exponential / S curve ].
WL SETTINGS (Figure 3):
RF channel settings, RF switch, Bluetooth switch, Bluetooth reset.
STUDIO (Figure 4):
Set the studio mode and non-studio mode. Studio mode: power off and turn the light back on, restore the lighting mode and parameters before the power failure. Non-Studio mode: power off and turn the light back on, restore. Factory set the default lighting mode and parameters.
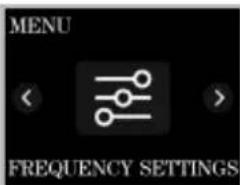
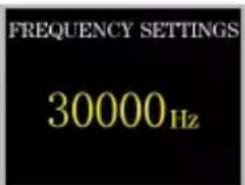
FREQUENCY SETTINGS (Figure5):
Set the dimming frequency.
Figure 1
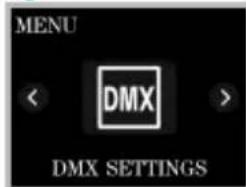
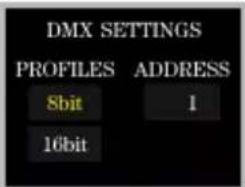
Figure 2
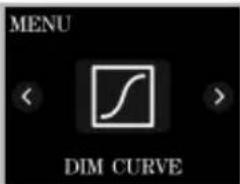
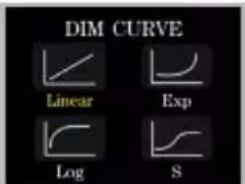
Figure 3
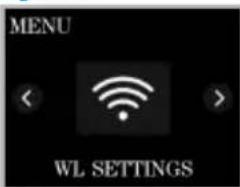
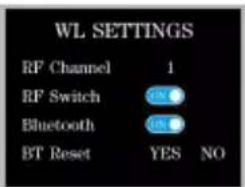
Figure 4
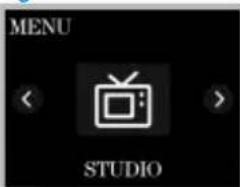
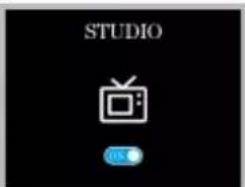
Figure 5
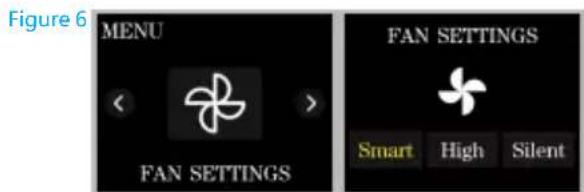
FAN SETTINGS (Figure 6): Set the cooling fan mode.
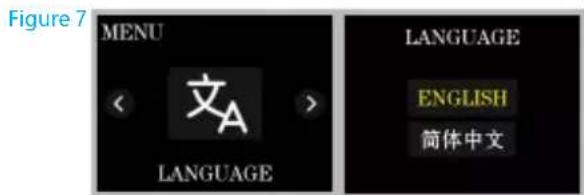
LANGUAGE (Figure 7): Set the system language.
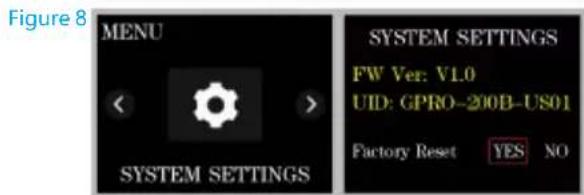
SYSTEM SETTINGS (Figure8): View system information and restore Factory Settings.
② Mode key (MODE) :
Press MODE button ,enter the main page of mode selection (Figure 9) → rotate [knob 1] to select the mode → press [knob 1] to enter the corresponding mode interface → set the parameter of the item by pressing or rotating [knob 1] → press [BACK] to go up one level.
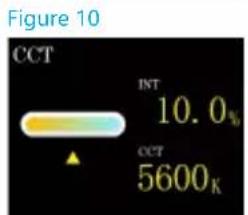
CCT mode (Figure 10):
Adjust the brightness by turning knob 1, and adjust the color temperature by turning knob 2.
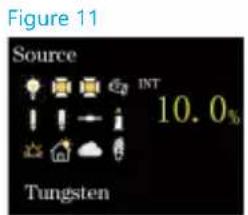
Source mode (Figure 11):
Rotate and press SELECTOR briefly to select Source mode, you can choose the desired light source effect.
Effect mode (Figure 12):
Rotate and short press SELECTOR key to select FX mode, you can choose a variety of light effects: Lightning, CCT Loop, Candle, Bad Bulb, TV, Paparazzi, Explosion, Pulsing, Strobe, Fire, Fireworks, Welding.
APP CONTROL
APP download method
(Scan the QR code on the back of the manual to download the APP)
Android version : Official website QR code, Google Play, Huawei Store, etc.
iOS version : App Store
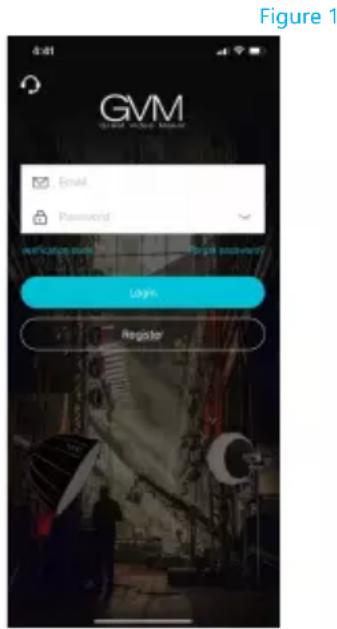
Register Account
Register and sign in with your email address; (Figure 1)
There may be a delay in sending the verification code, and the delivery speed depends on the email server you are using;
Some email servers may recognize our verification emails as advertising Please check your blocked email inbox.
Adding Devices
Adding Devices
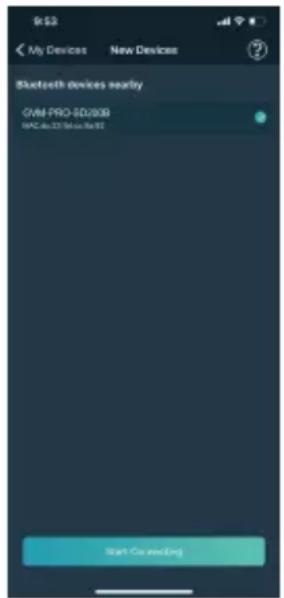
- Before adding devices, please make sure you have turned the Bluetooth and network data function of your phone, and reset the Bluetooth of your lighting device.
- Click the "Add Device" button on the "My Devices" page to find the nearby Bluetooth lighting devices that have been opened, and select the device to be connected to the network connection. (Figure 2)
Figure 2
Equipment management
- After successfully adding your lighting device, your device will be displayed in the "My Devices" list; (Figure 3)
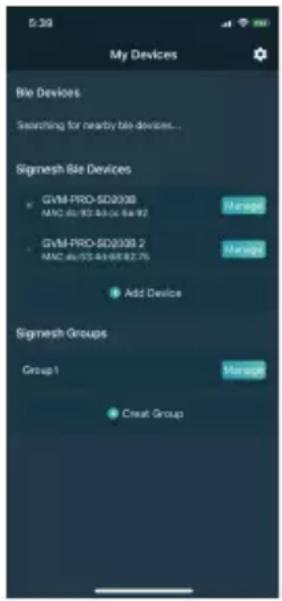
Figure 3
- Click the device bar to enter the device control. (Figure 4)
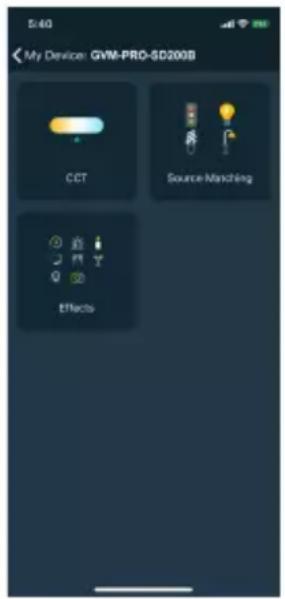
Figure 4
SIMPLE FAULTS AND TROUBLESHOOTING
| Phenomenon | Check the product Troubleshooting | |
| The switch indicator does not light up. | 1Whether the connection between the lamp and the power supply is normal. | Make sure the adapter is well contacted with the power plug. |
| 2When using a lithium battery to supply power, make sure that the battery does not have "low battery" protection. | Use the product after charging the battery. | |
| After the APP enters to add a device, the Bluetooth of the device cannot be searched. | Check whether the device is normally turned on and whether it has been bound by another person's connection. | Normal steps:1The mobile phone turns on the Bluetooth and network data functions, and the Android system needs to turn on the location permission;2Reset the device Bluetooth. |
| The APP fails to connect to the network configuration of the device. | Check whether the device is turned on normally and whether it has been bound by another person's connection; check whether the Bluetooth and network conditions of the mobile phone are good. | After resetting the device's Bluetooth and restarting the App, try to connect again. |
| The device cannot be searched after being removed from the APP. | Whether to remove the device when the device is offline or when the network condition is not good. | After resetting the device's Bluetooth, search and add the device again. |
| The device in the APP cannot be clicked to enter the control. | Check whether the device is online (displays a small green dot); if it is offline, follow the steps for network connection failure to check. | Restart the device, wait for 5 seconds, and it can be controlled when it is displayed as online; reset the device's Bluetooth, and add the device to the device list again. |
PACKING LIST
| Name | Quantity | Notes |
| Photography Light | 1 | |
| Snoot | 1 | |
| Power Cable | 1 | |
| AC Power | 1 | |
| AC Power Fixed Strap | 1 | |
| Carrying Case | 1 | |
| Spotlight protective cover | 1 | |
| Magic cable tie | 3 | |
| Light Mixing Mirror | 1 | |
| Instructions | 1 |
PRECAUTIONS
- The product is not waterproof, it needs to be protected against wet conditions, condensation, dripping and splashing water, air humidity.
- The product is not anti-corrosion, don't let the product come into contact with any corrosive liquid.
- When the product is in use, ensure that the product is placed firmly to prevent it from falling and being damaged.
- When the product is not in use for a long time, please turn off the power of the product to save energy consumption.
PRODUCT WARRANTY
Dear user, this warranty card is an important proof for applying for warranty service. Please cooperate with the salesperson to fill it out and keep it properly. Thank you!
| Product Information | Model Number Product Barcode |
Name Contact Number
| User |
| Information |
Mailing Address
Name
Contact Number
| SellerInformation |
Mailing Address
Sales Date
Remarks
Note: this form should be confirmed by the salesperson's stamp.
Applicable Products
This document applies to the products listed in the relevant "Product Warranty Information" (see instructions below). Other products or components that do not fall within this scope (such as promotional products, gift items, and other components added after factory) are not covered by this warranty promise.
Warranty Period
The corresponding warranty period for products and components shall be executed according to the relevant "Product Warranty Information". The warranty period starts from the first day of purchase of the product, and the date of registration on the warranty card at the time of purchase shall prevail.
How to Obtain Warranty Service
You can directly contact the product salesperson or authorized service agency, or call GVM's after-sales service hotline to contact us and have our service personnel arrange service for you. When applying for warranty service, you should provide a valid warranty card as a warranty certificate to be eligible for warranty service. If you cannot provide a valid warranty card, we may also provide you with warranty service under the circumstance that our products or components are confirmed to be within the warranty scope, but this is not our obligation.
Cases where warranty does not apply:
If the product meets the following conditions, the warranty and service under this document will not apply:
- The product or parts have exceeded the corresponding warranty period;
- Malfunctions or damages caused by incorrect or improper use, maintenance, or storage, such as improper handling, use for purposes other than the reasonable expectations of the product, incorrect insertion or removal of external devices, falling or crushing due to external force, or exposure to inappropriate temperature, solvents, acids, alkalis, water immersion, or damp environments;
- Malfunctions or damages caused by unauthorized installation, repair, modification, addition, or disassembly by institutions or personnel not authorized by GVM;
- Modifications, changes, or removals of the original identification information of the product or its parts.
- Lack of valid warranty card;
- Malfunctions or damages caused by the use of unauthorized, non-standard or non-publicly released software;
- Malfunctions or damages caused by force majeure or accidents;
- Other malfunctions or damages not caused by quality issues of the product itself. In such cases, you should seek solutions from the relevant responsible parties, and GVM will not be held liable. Malfunctions or damages caused by components, accessories, or software not covered by the warranty or beyond the warranty scope that render the product unable to function properly are not covered by the warranty. Fading, wear, and consumption that are normal during the product usage process are not covered by the warranty.
Product Warranty and Service Support Information
The product warranty period and service types are implemented according to the following "Product Warranty Information" for each product category, component, and optional equipment:
| Product Category | Optional | Maintenance Period(Month) | Warranty Service Type |
| Component | Circuit Board 12 Month Customer service repair | ||
| Other | Imaging lens, softbox, adapter, power cord, battery Handle, light stand, battery holder, battery, Fresnel lens, grid, belt, etc. Consumable or electrically sensitive parts are not covered by the warranty. | None No Warranty |
封底




FacebookGVM Official website Download APP
- CONTENTS
- IMPORTANT SAFETY INSTRUCTIONS
- Keep these instructions!
- PRODUCT INTRODUCTION
- WARNING:
- USE AND SAVE
- DISCLAIMERS
- GVM-PRO-SD200B PRODUCT PARAMETER
- GVM-PRO-SD300B PRODUCT PARAMETER
- PRODUCT STRUCTURE DIAGRAM
- INSTALLATION METHOD
- DESCRIPTION OF PRODUCT CONTROL KEYS
- FUNCTION INTRODUCTION & INSTRUCTIONS FOR USE
- ① Menu key (MENU):
- DMX SETTINGS (Figure 1):
- DIM CURVE (Figure 2):
- WL SETTINGS (Figure 3):
- STUDIO (Figure 4):
- FREQUENCY SETTINGS (Figure5):
- ② Mode key (MODE) :
- CCT mode (Figure 10):
- Source mode (Figure 11):
- Effect mode (Figure 12):
- APP CONTROL
- APP download method
- Register Account
- Adding Devices
- Equipment management
- SIMPLE FAULTS AND TROUBLESHOOTING
- PRECAUTIONS
- PRODUCT WARRANTY
- Applicable Products
- Warranty Period
- How to Obtain Warranty Service
- Cases where warranty does not apply:
- Product Warranty and Service Support Information
- 封底
Brand : GVM
Model : PRO-SD300B
Category : Lighting