HE60DOMW - Cooker Haden - Free user manual and instructions
Find the device manual for free HE60DOMW Haden in PDF.


| Product Type | Free-standing Electric Cooker |
| Brand | Haden |
| Model | HE60DOMW |
| Energy Efficiency Class (Oven) | A |
| Oven Volume (Main Cavity) | 60 L |
| Hob Type | Radiant (Ceramic) |
| Number of Cooking Zones | 4 |
| Zone Diameters | 14.5 cm (2 zones), 18 cm (2 zones) |
| Zone Power Ratings | 1200 W (small), 1700 W (large) |
| Total Power Rating | 9132 W |
| Voltage / Frequency | 220-240 V ~ 50 Hz |
| Oven Functions | Conventional, Fan Forced, Grill, Turbo |
| Timer | Electronic timer with automatic cooking and buzzer |
| Safety Features | Safety chain to prevent tipping, residual heat indicators |
| Cleaning | Enamel oven interior, removable door, ceramic hob cleaner recommended |
| Guarantee | 24 months (domestic use) |
Frequently Asked Questions - HE60DOMW Haden
User questions about HE60DOMW Haden
0 question about this device. Answer the ones you know or ask your own.
Ask a new question about this device
Download the instructions for your Cooker in PDF format for free! Find your manual HE60DOMW - Haden and take your electronic device back in hand. On this page are published all the documents necessary for the use of your device. HE60DOMW by Haden.
USER MANUAL HE60DOMW Haden
•Repair of the appliance due to the effects of a lack of cleaning such as dirt, mould, grease, spillages and odours or due to the effects of limescale.
•Any blockages to pump or filter in washing machines and dish washers.
- Punctured evaporators and lack of cleaning (e.g.. blocked gas jets)
•Any parts which are fitted to the product which are not original manufacturer's parts
•Operation at incorrect voltage.
• No Fault Found.
- Scratches and chips to ceramic hob glass surface resulting in the use of inappropriate cooking utensils.
- Noise, vibration or steam resulting in the operation of the appliance. This includes steam from washer, dryer, dishwasher and ovens, running of oven fans, drain pumps. - Being used in a non-domestic environment, second hand, or those used by several people in communal areas. A service charge could be made if a fault is not a mechanical or electrical manufacturing fault.
Disclaimer
•The manufacturer will not be held responsible for any damages resulting from inappropriate usage of the appliance.
- The Guarantee is valid in the United Kingdom and the Republic of Ireland only. - The Guarantee is non-transferable and only relates to the original purchaser of this appliance.
- Where deemed necessary by Haden for an appliance to be exchanged within the guarantee period, the new appliance will be covered by the original guarantee period and will not be subject to a new guarantee.
- Haden reserve the right to inspect the appliance before exchange/replacement can take place.
- Haden disclaims any liability for consequential loss or damage. - This Guarantee does not in any way diminish your statutory or legal rights.
Manufacturer
HADEN
Sabichi Homewares Limited
Sabichi House
5 Wandsworth Road,
Perivale
Middlesex
UB6 7JD
Service Hotline: 01759 487830
Email: admin@hadenwarranty.co.uk
To request a service call Tel. 01759 487830
Free Standing Electrical Cookers and Ceramic Cookers
HE60DOMW HE60DOMK
HE60DOPW HE60DOPK
HE50DOMW
To request a service call Tel. 01759 487830
CE
HADEN
CONTENTS
General warranty conditions
Installation
Operation
Maintenance and cleaning
Technical specifications
Attention
- Read carefully the user's manual before use and installation of the appliance.
- Keep the user's manual for future use.
- This appliance is not designed for industrial or laboratory use. Use this appliance only for its intended use.
THESE INSTRUCTIONS MUST BE FOLLOWED:
Remove all internal and external packing materials from the appliance and check for transportation damage.
In case of damage, do not operate the appliance and contact your authorised service provider.
Keep children away from all packaging, which may cause danger.
Prior to installation, ensure that the main voltage conditions and the adjustment of the appliance are compatible.
This appliance must not be used to heat a room.
This appliance must be installed and connected in accordance with current installation regulations.
Particular attention should be given to the relevant requirements regarding ventilation.
The use of cooking appliances results in the production of heat and moisture in the room in which it is installed.
Ensure that the kitchen is well ventilated: keep natural ventilation holes open or install a mechanical ventilation device (mechanical extractor hood).
Prolonged intensive use of the appliance may call for additional ventilation, for example opening of a window, or increasing the level of mechanical ventilation where present.
This appliance is not intended for use by people (including children) with reduced physical, sensory or mental capabilities, or lack of experience and knowledge, unless it is under supervision or having been given instructions concerning the use of the appliance by a person responsible for their safety.
Children should be supervised to ensure that they do not play with the appliance.
In the case that the power cable must be replaced, the replacement must be made ONLY by, an authorised service person.
Installation work must be performed in accordance with national wiring standards, by authorised service personnel ONLY.
To request a service call Tel. 01759 487830
HADEN
Product Guarantee information:
Your Haden product is covered by Guarantee for 24 months from the date of the original purchase. Please ensure you register your product and keep your receipt (proof of purchase) and serial number in a safe place.
You can register your Haden product by calling 01759 487830
What is covered?
- Electrical and mechanical faults deriving from faulty materials defective components or a manufacturing defect.
•Replacement functional parts.
•Labour costs of an approved Haden engineer.
Your Haden Guarantee covers domestic use at residential addresses and is subject to the following conditions.
Guarantee exclusions:
•Transit / delivery damage or cold weather damage.
•Incorrect installation:
Please ensure that your Haden appliance has been correctly and safely connected to mains supplied electricity, gas and water and drainage as appropriate and in accordance with the instruction manual. Gas appliances must be properly installed by a qualified Gas Safe (or BORD GAIS) installer. LPG conversions will be covered only if a copy of the necessary certification is provided at the time of registration by a qualified Gas Safe (or BORD GAIS) installer. We recommend that all electric cooking products, washing machines and dishwashers are installed by a qualified plumber / electrical appliance installer.
•Repair of, or interference with, the product by any person not authorised by the manufacturer to carry out service.
- Improper use or abuse.
•Accidental damage.
•Reversal of door or door handles on cooling appliances.
•Repair of replacement of any cosmetic or consumable parts such as bulbs, plugs, fuses, cables, filters and attachments, control knobs, flaps, container lids, handles, glass and wire shelves, rubber hoses, plastic door shelves and any accessories for example Oven baking trays and shelves. These include any parts which have become worn, discoloured or damaged, including damage by incorrect use or cleaning.
To request a service call Tel. 01759 487830
HADEN
Regulation (EU) 65/2 14
| Model | HESOOMW | HE60DOMWHE60DOMKHE60DOPWHE60DOPK | |
| Construction | FREESTANDING | FREESTANDING | |
| Number of cavities | Nbr. | 1 | 1 |
| Energy efficiency index cavity I | EEI | 91 | 90 |
| Energy efficiency class cavity I | A | A | |
| Energy consumption conventional heating, cavity I | kWh/cycle | - | - |
| Energy consumption fan forced heating, cavity I | kWh/cycle | 0,69 | 0,72 |
| Heat source cavity I | Electric | Electric | |
| Volume cavity I | 51 | 60 | |
| Energy efficiency index cavity II | EEI | 85 | 62 |
| Energy efficiency class cavity II | A | A | |
| Energy consumption conventional heating, cavity II | kWh/cycle | 0,54 | 0,61 |
| Energy consumption fan forced heating, cavity II | kWh/cycle | - | - |
| Heat source cavity II | Electric | Electric | |
| Volume cavity II | 23 | 30 |
A+++ (most efficient) to D (least efficient) Regulation (EU) 66/2014
| Model | HE60DOMWHE60DOMKHE60DOPWHE60DOPKHE50DOMW | |
| Type of hob | RADIAN | |
| Number of cooking zones | Nbr. | 4 |
| ∅ Heating zone I | cm | 14,5 |
| ∅ Heating zone II | cm | 18 |
| ∅ Heating zone III | cm | 14,5 |
| ∅ Heating zone IV | cm | 18 |
| Energy consumption heating zone I per kg | % | 133 |
| Energy consumption heating zone II per kg | % | 150 |
| Energy consumption heating zone III per kg | % | 137 |
| Energy consumption heating zone IV per kg | % | 150 |
| Energy consumption for the hob per kg | % | 142,5 |
To request a service call Tel. 01759 487830
HADEN
INSTALLATION
- Product can only be installed and connected in accordance with the statutory installation rules.
- This appliance must be installed level surface to prevent spillage.
• Install the appliance in a position where the oven door can be opened freely. - Do not install the product next to refrigerators or freezers. The heat emitted by the product will increase the energy consumption of cooling appliances.
• Carry the product with at least two persons.
- Product must be placed directly on the floor. It must not be placed onto a base or a pedestal.
- Do not use the door and/or handle to carry or move the product. The door, handle or hinges get damaged
• Install the appliance away from inflammable materials.
- Make sure that the main voltage matches the details on the rating plate.
- Before connecting this appliance ensure that all knobs are set to the "O" position. Ensure that, there is nothing inside the oven then, leave the oven door open and set the thermostat to the "maximum" temperature level and oven selector knob to the "upper/lower" position for 10 minutes.
- Switch off the oven and leave it to cool down.
• The same procedure is required for the Grill leaving the door open.
- Set the knob to the "Grill" position and operate for 10 minutes.
• Switch off the grill and leave it to cool down.
When you use the appliance for the first time a temporary smell and form of smoke will occur, this is due to the protective grease on the heating elements, This is normal.
Following the first use of the appliance, the smell will go away as the elements will be free from the protective grease layer. During this operation, ensure that the room is well ventilated.
- Once you are sure that your cooker is totally cooled down, clean the cooker by wiping it with a damp cloth or sponge.
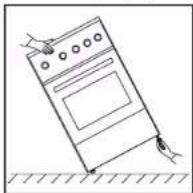
Get two people to work together to stabilise the cooker on uneven floors.
One person tilts the cooker whilst the other adjusts the screw-in feet. Adjust these feet until the cooker is level and stable.
To request a service call Tel. 01759 487830
HADEN
ELECTRICAL CONNECTION
Connect the product to a grounded outlet/line protected by a fuse of suitable capacity as stated in the "technical specifications" table. Have the grounding installation made by a qualified electrician while using the product with or without a transformer. Our company shall not be liable for any damages that will arise due to using the product without a grounding installation in accordance with the local regulations.
DANGER: The product must be connected to the mains supply only by an authorised and qualified person. The product's warranty person starts only after correct installation. Manufacturer shall not be held responsible for damages arising from procedures carrier or by unauthorised persons.
DANGER The power cable must not be clamped, bent or trapped or come into contact with hot parts of the product.
A damaged power cable must be replaced by a qualified electrician. Otherwise, there is risk of electric shock, short circuit or fire!
The mains supply data must correspond to the data specified on the type label of the product. The rating plate is either seen when the door or the lower cower is opened or it is located at the rear wall of the unit depending on the unit type. Power cable of your product must comply with the values in "Technical specifications" table.
DANGER Before starting any work on the electrical installation, disconnect the product from the mains supply. There is the risk of electric shock!
Connecting the power cable
- If a power cable is not supplies together with your product, a power cable that you would select from the table in accordance with the electrical installation at your home must be connected to your product by following the instructions in cable diagram. This product must only be installed by a qualified electrician eg local electricity company or NICEIC registered contractor to a suitable double -pole control unit with a minimum contact clearance of 3mm in all poles and with a minimum rating pleas consider technical data table, which should be fitted adjacent to (but not above)the cooker in accordance with IEE regulations. Failure to observe this instruction may result in operational problems and invalidation of the product warranty.
DANGER Additional protection by a residual current circuit breaker is recommended.
2.Open the terminal block cover with a screwdriver.
-
Insert the power cable through the cable clamp below the terminal and secure it to the main body with the integrated screw on cable clamping component.
-
Connect the cables according to the supplied diagram.
-
After completing the wire connections, close the terminal block cover.
-
Route the power cable so that it will not contact the product and get squeezed between the product and the wall
To request a service call Tel. 01759 487830
HADEN
CAUTION:
ENSURE THAT THE APPLIANCE IS DISCONNECTED FROM THE POWER SUPPLY (SWITCHED OFF), BEFORE CLEANING OR REPLACING THE OVEN LAMP, TO AVOID THE POSSIBILITY OF ELECTRIC SHOCK.
The oven door is also removable for easy cleaning.
First open the oven door completely, flip up the hinge catch on the hook of both sides of the door. Grasp the door with both hands, raise a little and pull it backwards.
Following cleaning or maintenance, do not forget to re-do the hinge catches after placing the oven door back to its housing.
To extend the economical life of your appliance, take regular care and always keep the oven door open until the oven gets completely dry.
Any spillage should be removed from the lid before opening and hob surface and should be allowed to cool before closing the lid.
Particularly, pay attention not to pour water on the appliance during operation, and always avoid contact with acid or alkaline containing substances, such as vinegar, lemon, juice, salt etc. if this occurs, wipe and clean immediately paying attention to the hot parts of the appliance
GENERAL WARRANTY CONDITIONS:
This appliance is under warranty covering only the replacement of the defective parts and free of charge repair during the period of the warranty. Please keep your receipt to resent to our Authorised Service Provider before a repair can be booked.
The connection and installation of the appliance can only be carried out by authorised service personnel.
This appliance must be grounded.
Problems arising due to improper installation are not covered by the warranty. Unauthorised repair or modification of the appliance invalidates the warranty.
Information concerning disposal
Disposal of packaging
The packaging protects your appliance from damage during transit. All utilised materials are environmentally safe and recyclable. Please help us by disposing of the packaging in an environmentally friendly manner. Please ask your dealer or enquire at your local authority about current means of disposal.
Disposal of your old appliance

Old appliances are not worthless rubbish! Valuable raw materials can be reclaimed by recycling old appliances. This appliance is identified according to the European guideline 2012/19/EU on waste electrical and electronic equipment-WEEE The directive specifies the framework for an EU-wide valid return and re-use of old appliances. Compliant with WEEE Regulations.
To request a service call Tel. 01759 487830
HADEN
OPERATION and FUNCTIONS of ELECTRIC HOBS
- Only use pots and pans for electrical stoves with a flawless, even bottom and an appropriate diameter (heat-proof glass, crockery or china can also be used). You can also use Pyrex especially for this purpose. If the bottom of the pot is uneven or too small, energy will be wasted, and the maximum heat cannot be achieved.
• The cooking surface and the bottom of the pot must always be clean and dry. Do not use any cooking pots consisting of plastic, china, enamel or aluminium foil.
- If any object made of plastic, aluminium foil, sugar or dishes containing sugar, should inadvertently happen to melt on the hot ceramic hob, remove from the cooking zone immediately and carefully use scraper to clean the hob.
- Pyrex can be used only when it is adjoined perfectly to the size of ceramic hob. If not Pyrex can be broken due to high temperature.
- For cleaning, it is imperative that NO SCRATCH-PRODUCING sponges, scouring powders or chemically aggressive cleaning agents like cleansing sprays or stain removers are used.
- Do not scratch the glass plate and or hot plates with pointed or sharp objects.
• The heating zones are regulated through the control knobs on the control panel of the appliance, which enables varying the heat from just keeping warm to the maximum temperature. In order to obtain maximum efficiency and cooking economy, choose the convenient hot plate or heating zone for the size of your cooking pans and do not forget to switch back to position "O" when cooking is completed!
- Turn the appliance off in time, so you can save energy.
* Special instructions for Glass plates (vitro ceramic hobs);
- Never scratch the glass plates with pointed and or sharp objects!
• The glass plates can be broken, in the case of a falling object, landing on the surface!
- The residual heat indicators on the front part of the cooking surface point to there still being a risk of burning but also to residual heat, which can be used for keeping dishes warm.
- Special products (cleaning paste) for cleaning of glass plates (ceramic hobs) can be found on the market.
Maintenance and cleaning
- Disconnect the appliance from the mains power before maintenance and cleaning.
- Please wait until the appliance completely cools down.
• The appliance must only be cleaned with a damp cloth or sponge. - Never use abrasive powder.
- Do not use harsh abrasive cleaners or sharp metal scrapers to clean the oven door glass, as they can scratch the surface, which may result in shattering of the glass.
• Steam cleaners must not to be used for cleaning or any other purposes.
• The enamelled parts can be cleaned with soapy water and a soft clean cloth.
• In order to prevent damage do not scrape dirt off the control panel with sharp tools that may scratch and cause damage.
HADEN
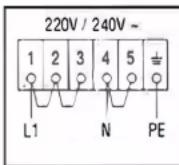
Connection
The specification and type of power cord to be used with this appliance must be according to current UK installation regulations.
Your installer will advise and/or supply this.
IMPORTANT SAFETY ADVICE:
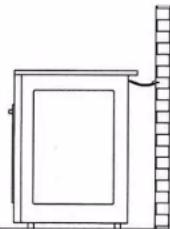
This cooker comes with a safety chain which must be fitted securely to a wall in order to avoid the risk of tipping. Please use the fixing kit provided. This can be found inside the oven.
The manufacturer will accept no responsibility whatsoever for injury or damage if the safety chain is not fitted.
natural_image
Simple line drawing of a door frame with a wall and side railing (no text or symbols)ATTENTION
- Do not place your cooking utensils (baking tin, baking pan, drip tray etc.) or aluminum foil at the bottom of the oven. This can cause damage to the enamel surface of the oven due to high temperature.
- During use the appliance becomes hot. Care should be taken to avoid touching the heating elements inside the oven.
- Warning: Accessible parts may become hot during use. Young children should be kept away, your oven can be used as a grill with the door open.
- Cleaning: The oven must be switched off before removing the guard, after cleaning the guard must bereplaced in accordance with the instructions.
- Lamp for illumination: Warning ensure that the appliance is switched off before replacing and/or cleaning the lamp to avoid the possibility of electric shock.
- This appliance must be installed using suitable mains cable in accordance with british standards.
- Concerning the models with a storage drawer; The internal bottom surface of the storage drawer gets too hot to touch when in use. Please be careful, these surfaces can get hot!
To request a service call Tel. 01759 487830
To request a service call Tel. 01759 487830
HADEN
CONTROL PANEL
HE60DOMW-HE60DOMK-HE50DOMW

HE60DOPW HE60DOPK

The oven heat is adjustable between min. and max. by means of the thermostat control knob.
The signal lamp will indicate the operation of the heaters. Upon reaching the desired temperature level, the signal lamp will turn off. The thermostat will maintain the temperature level inside the oven, during the cooking process.
Before cooking, it is advised to pre-heat the oven for five minutes. The inner lamp of the oven comes on when the oven control knob is used to select a function.
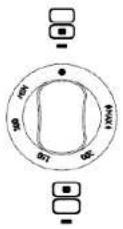
How to operate the main oven
- Set the oven timer to the desired cooking time.
- Set the Function knob to the desired temperature.
Oven heats up to the adjusted temperature and maintains it.
During heating, temperature lamp stays on.
Switching off the electric oven - Switch the oven timer to off position.
- Turn the Function knob to Off position
Grill oven can be used both as a grill and a baking oven.
Switch on the top oven operates the oven when the oven door is closed, and the grill when the oven door is opened.
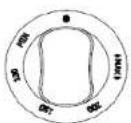
How to operate the top oven
Turning on the oven (Upper and lower Heater)
This function is for cooking both with the upper and lower
heater at thesame time
Oven is operated with Function knob. Oven is turned off when
the Function knob is in off position.
1. Close the oven door.
2 Set the oven temperature.
Temperature light will turn of when the set temperature is
attained.
Turning off the oven
- Turn the Function knob to off position
To request a service call Tel. 01759 487830
HADEN
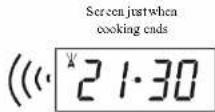
When automatic cooking is completed, a buzzer alarm is heard and will sound, if not stopped, for 7 minutes.
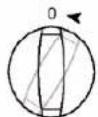
1) Switch OFF
th e oven
2) Res et the
timet
Note: Your oven will be
inoperative until you reset
In the example shown, cooking time has been programmed first; the ready time was calculated automatically and was edited by us. It is also possible first to program the ready time. In that case, the cooking time will be calculated automatically and should be edited thereafter.
IN CASE OF MAINS POWER LOSS
Your oven will be inoperative for security reasons. At that time, the clock will appear as a flashing 0:00 together with the 'A' symbol. Any cooking program in progress will also be cancelled. The clock will appear 0:00, it should be corrected. Firstly, enter manual mode and adjust the clock using + or - buttons.
Note: In case of short duration mains power loss, system will be conserved itself.
Note: If you will not use your oven right now, be sure that that it is in OFF position.
FLASHING 'A' SHOWS THAT THE OWEN IS INOPERATIVE AND YOU SHOULD ENTER MANUAL MODE IN ORDER TO RETURN NORMAL WORKING CONDITIONS.
You may adjust the hearing buzzer tone of the timer.
1) Pressing - button, you can hear the current buzzer tone.
2) Releasing and pressing again – button will switch to the next tone. (3 Different tones available)
3) The buzzer tone will be set to the last adjusted tone.
Note: As factory setting, the buzzer volume is set to the high tone. In case of a long power loss, the set buzzer tone will be this one.
To request a service call Tel. 01759 487830
HADEN

Now, you have programmed your oven to cook the food for 2 hours and 15 minutes. Please do not forget the function and/or the temperature knobs of your oven to appropriate positions.

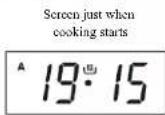
4) After a few seconds, the screen will indicate that cooking has
started and show the current time of
Note: You may cancel the automatic cooking mode any time by entering manual mode.
In the example above, cooking immediately started after giving in the cooking period. By the pressing 3 times 'F' button, you can see and adjust the ready time. In the example below, the ready time will be set at 21:30.
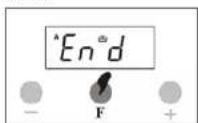
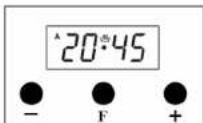
1) Press 'F' button 3 times. The screen will display 'End' and ready time which is 18:30+2.15=20:45 respectively.
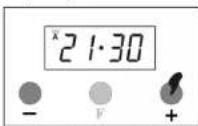
2) Set it to the desired time by using + or buttons mode.
3) In a few seconds, screen switches to clock
We now have programmed our oven to get the food ready at 21:30. Since the cooking time was preprogrammed as 2 hours and 15 minutes, your oven will start cooking at 19:15, so that the food is ready at 21:30.
To request a service call Tel. 01759 487830
HADEN
How to operate the top grill
Switching on the grill
Grill is operated with Function knob. Grill is turned off when the Function knob is in Off position.
-
Open the oven / grill door
-
Set the temperature to "max" and if required, perform a preheating for about 5 minitue
- Then, select the desired grillin temperature.
Thermostat (temperature) light turns on.
Turning off the oven
- Turn the function knob to off position
Grill
When the grill function is used, open the door of the oven and attach the heat deflection panel (supplied with the oven) to the door of the oven.
This way, you will avoid possible damage to the control panel and also prevent overheating of the control knobs. Hence, the door of the oven will stay slightly open during grilling process. By choosing the Grill position, the double power heater will operate.
You will receive that charcoal cooked taste, while grilling meat, chicken or fish.
It is advised to pre-heat the Grill for 5 to 10 minutes.
To prevent sticking, place the meat, chicken or fish on an oiled grid and place it on the upper shelf of the oven, while placing another tray on the lower shelf of the oven to collect any dripping fats or oil.
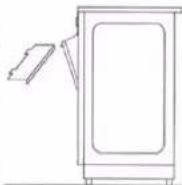
Grill guard, should be used When grilling! et oven door partially open and insert grill guard!
| Model | HE60DOMW HE60DOMK | HE60DOPW HE60DOPK | HE50DOMW |
| Voltage | 220-240 V | 220-240 V | 220-240 V |
| Frequency | 50 Hz | 50 Hz | 50 Hz |
| Power | 9132 W | 9132 W | 9132 W |
| ø145 mm plate | 1200 W | 1200 W | 1200 W |
| ø145 mm plate | 1200 W | 1200 W | 1200 W |
| ø180 mm plate | 1700 W | 1700 W | 1700 W |
| ø180 mm plate | 1700 W | 1700 W | 1700 W |
| Upper Heater | 800 W | 800 W | 800 W |
| Lower Heater | 1000 W | 1000 W | 1000 W |
| Grill Heater | 800+1000 W | 800+1000 W | 800+1000 W |
| Turbo Heater | 1500 W | 1500 W | 1500 W |
| Motor | + | + | + |
| Lamp | + | + | + |
| Timer | - | + | - |
To request a service call Tel. 01759 487830
HADEN
HE60DOPW HE60DOPK - Timer Controls
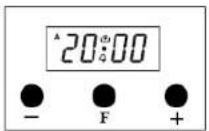
This electronic timer, enables you to get the food ready to serve at the desired time. The only thing to be done is to program the cooking time and ready time. It can also be used as an alarm clock, where you just give in the amount of time after which it should remind you by a buzzer tone.
POWER UP
On power up, clock (0:00) and 'A' is flashing on the screen. The timer cannot be programmed and the clock has to be adjusted. In order to program the timer, you have to enter first the manual mode.
MANUAL MODE
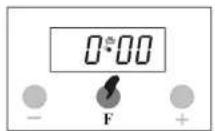
1) Press 'F' button in order to enter enter manual mode.
ur
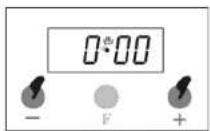
2) Press - and - buttons simultaneously in order to manual mode.
TIME OF DAY ADJUSTMENT
This adjustment can only made when no cooking program is in progress. First, press buttons + and simultaneously. Then adjust the clock forward direction using 1 button and reverse direction using - button. Long presses of those buttons will result in fast changes.
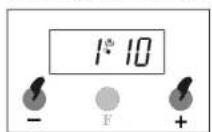
1) Press + and - simultaneously.
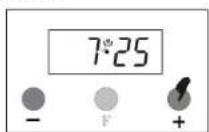
2) Using + or - buttons adjust time of the day.
To request a service call Tel. 01759 487830
HADEN
Note: Unless the + or - buttons are pushed along 5 seconds, time of the adjustment mode will be end up automatically. If you want to finish time of the adjustment mode rapidly, you should press + and - buttons simultaneously.
ADJUSTING THE BUZZER ALARM
With this feature, you can program after how much elapsed time you should be warned by a buzzer
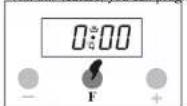
1) Select adjusting the buzzer alarm pressing 'F' buton once.
4 icon will flash.
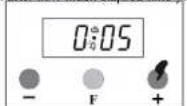
2) Give in the period of time with the 1 or - buttons.
Ex: 5 min.
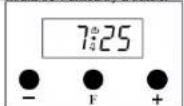
3) A few seconds later, the screen will return to displaying the current time of the day.
CANCELLING THE BUZZER SOUND
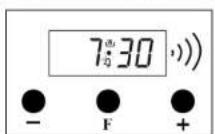
1) Buzzer will sound after the programmed amount of time.
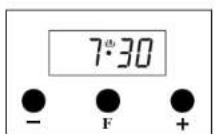
2) Press any button to cancel sound
AUTOMATIC COOKING PROGRAM
If you want to start cooking immediately, you just have to give in the cooking time.
Example: We placed our food into the oven and want it to be cooked for 2 hours 15 minutes.
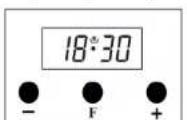
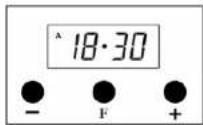
1) Current time is 18:30
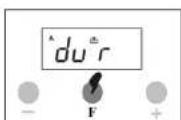
2) Switch to 'T' button 2 times to enter cooking adjustment mode.
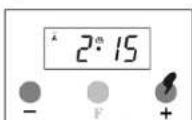
3) Adjust the cooking time using the - and - buttons.
To request a service call Tel. 01759 487830
- HADEN
- CONTENTS
- Attention
- THESE INSTRUCTIONS MUST BE FOLLOWED:
- Product Guarantee information:
- What is covered?
- Guarantee exclusions:
- INSTALLATION
- ELECTRICAL CONNECTION
- Connecting the power cable
- CAUTION:
- GENERAL WARRANTY CONDITIONS:
- Information concerning disposal
- Disposal of packaging
- Disposal of your old appliance
- OPERATION and FUNCTIONS of ELECTRIC HOBS
- Maintenance and cleaning
- Connection
- IMPORTANT SAFETY ADVICE:
- CONTROL PANEL
- HE60DOMW-HE60DOMK-HE50DOMW
- HE60DOPW HE60DOPK
- How to operate the main oven
- How to operate the top oven
- To request a service call Tel. 01759 487830
- IN CASE OF MAINS POWER LOSS
- How to operate the top grill
- Grill
- POWER UP
- TIME OF DAY ADJUSTMENT
- ADJUSTING THE BUZZER ALARM
- AUTOMATIC COOKING PROGRAM
Brand : Haden
Model : HE60DOMW
Category : Cooker