
TC936 - Kitchen appliance Stirling - Free user manual and instructions
Find the device manual for free TC936 Stirling in PDF.


| Product Type | Thermo Cooker |
| Brand | Stirling |
| Model | TC936 |
| Dimensions (H x L x D) with lid and measuring cup | 320 x 340 x 260 mm (approx.) |
| Weight (with all accessories) | 7.2 kg (approx.) |
| Rated Voltage | 220–240 V ~, 50–60 Hz |
| Rated Power (Mixer) | 700 W |
| Rated Power (Heating) | 1000 W |
| Maximum Power | 1200 W |
| Jug Capacity (Max processing) | 2.0 L |
| Jug Capacity (Max heating) | 1.5 L |
| Jug Capacity (Max milk heating) | 0.5 L |
| Scale Maximum Weight | 5 kg |
| Speed Levels | 1–10 (forward), -1 to -3 (reverse) |
| Temperature Range | 37°C – 120°C |
| Timer Range | 1 second – 60 minutes |
| Automatic Programs | 10 (Sauté, Emulsify, Stir, Puree, Mill, Mix, Knead, Steam, Smoothie, Crush Ice) |
| Display Type | LCD with temperature, speed, time, weight indicators |
| Accessories Included | Steamer set (lid, tray, bowl, basket), stirring attachment (butterfly), spatula, protective blade jacket, measuring cup, jug lid, quick start guide, cookbook |
| Safety Features | Overheat protection, automatic speed reduction at high temperatures, lid lock, blade guard, hot surface warning |
| Cleaning | Jug and accessories dishwasher safe; blade hand wash only; motor base wipe with damp cloth |
| Warranty | 3 years |
| Spare Parts Available | Blade, butterfly, jug, jug lid, measuring cup, protective blade jacket, spatula, steamer basket, steamer bowl, steamer tray, steamer lid |
| After Sales Support (Australia) | 1300 112 534 or tempo.org/support |
Frequently Asked Questions - TC936 Stirling
User questions about TC936 Stirling
0 question about this device. Answer the ones you know or ask your own.
Ask a new question about this device
Download the instructions for your Kitchen appliance in PDF format for free! Find your manual TC936 - Stirling and take your electronic device back in hand. On this page are published all the documents necessary for the use of your device. TC936 by Stirling.
USER MANUAL TC936 Stirling
Thermo Cooker
Model Number TC936
INSTRUCTION MANUAL
Welcome
Congratulations on choosing to buy a STIRLING ® product.
All products brought to you by STIRLING ® are manufactured to the highest standards of performance and safety and, as part of our philosophy of customer service and satisfaction, are backed by our comprehensive 3 Year Warranty. We hope you will enjoy using your purchase for many years to come.
Contents
02 Welcome
04 Warranty Details
05 General Safety Instructions
09 Product Overview
14 Getting Started
15 Parts Assembly and Removal
19 Instructions
31 FAQs and Error Messages
32 Other Useful Information
35 Repair and Refurbished Goods or Parts Notice


STIRLING®
Thermo Cooker
Warranty Details
REGISTER YOUR PURCHASE AT www.aldi.com.au/en/about-aldi/product-registration/ TO KEEP UP-TO-DATE WITH IMPORTANT PRODUCT INFORMATION
The product is guaranteed to be free from defects in workmanship and parts for a period of 36 months from the date of purchase. Defects that occur within this warranty period, under normal use and care, will be repaired, replaced or refunded at our discretion. The benefits conferred by this warranty are in addition to all rights and remedies in respect of the product that the consumer has under the Competition and Consumer Act 2010 and similar state and territory laws.
Our goods come with guarantees that cannot be excluded under the Australian Consumer Law. You are entitled to a replacement or refund for a major failure and to compensation for any other reasonably foreseeable loss or damage. You are also entitled to have the goods repaired or replaced if the goods fail to be of acceptable quality and the failure does not amount to a major failure.

General Safety Instructions
IMPORTANT SAFETY INSTRUCTIONS
READ CAREFULLY AND KEEP FOR FUTURE REFERENCE
Read this manual thoroughly before first use, even if you are familiar with this type of product. The safety precautions enclosed herein reduce the risk of fire, electric shock and injury when correctly adhered to. Keep the manual in a safe place for future reference, along with the completed warranty card, purchase receipt and packaging carton. If applicable, pass these instructions on to the next owner of the appliance.
Always follow basic safety precautions and accident prevention measures when using an electrical appliance, including the following:
Electrical safety and cord handling
- Correct voltage: Make sure your local outlet voltage and circuit frequency correspond to the voltage indicated on the appliance rating label. If it does not match, do not use the appliance and contact our after sales support centre.
- Do not immerse: To protect against electric shock, do not immerse the cord, plug or the whole appliance in water or other liquid. Only clean these parts with a damp cloth; never wash the outer housing in or under running water. If the appliance is accidentally immersed, or liquid is spilled into the controls, immediately unplug the appliance, dry it and have it checked by qualified service personnel.
- Moisture: Ensure your hands are dry before handling the plug or switching on.
- Protect the power cord: Unwind the power cord fully before use. Do not kink, bend, strain or damage the cord and protect it from sharp edges and heat. Do not let the cord hang over the edge of a table or benchtop; do not let it touch hot surfaces. Do not place anything on top of the cord. Do not wrap it around the appliance, and never pull the cord to lift up, carry or unplug the appliance.
- No extension cord: Do not use this appliance with an extension cord.
- Damaged power cord: Check the power supply cord regularly for visible damage. A damaged cord must be replaced by the manufacturer, its authorised service centres or similarly qualified personnel in order to avoid any hazards.
- Do not use when damaged: Do not pick up or operate an appliance with a damaged cord or plug, or after the appliance malfunctions or has been dropped or damaged in any manner. In case of damage, contact our after sales support centre for advice.
- Connection: Before connection, ensure all controls are set to OFF and the appliance is properly assembled. Then insert the electrical plug into the wall outlet and switch on the power at the outlet.
General Safety Instructions (Cont.)
- Disconnection: Before attaching/removing any accessories and after use, wait until the blades have stopped moving. Then switch off the power at the wall outlet and remove the plug from the outlet. Grip the plug when disconnecting, do not pull the cord.
- After use: Disconnect the appliance straight after use, before attaching/removing parts and before cleaning. Wait until the appliance has cooled completely before cleaning, maintenance or moving the appliance.
- RCD: Unless your home is already fitted with a residual current device (safety switch), we recommend installing an RCD with a rated residual operating current not exceeding 30 mA, to provide additional safety protection when using electrical appliances. See your electrician for professional advice.
- Winding the cord: If winding the power cord, avoid tight bends as this could damage the cord.
Usage conditions and restrictions
- Domestic use only: This appliance is intended for private household use only. It is not suitable for commercial, industrial or trade use.
- Intended use: Do not use the appliance for anything other than its intended use, and only use it as described in this manual. Do not use it in moving vehicles or boats. Do not operate it without food in the jug.
- Misuse may cause injury and/or damage. We accept no responsibility for any eventual injury or damage caused by improper or faulty use or noncompliance with these instructions.
- Indoor use: Do not use the appliance outdoors or in areas of high humidity.
- Accessories: Only use this appliance with the accessories supplied. Using accessory attachments from other brands may cause injury and damage.
- No external timer: This appliance is not intended to be operated by means of an external timer or separate remote control system.
- Usage restriction: The appliance is not intended for use by persons (including children) with reduced physical, sensory or mental capabilities, or lack of experience and knowledge, unless they have been given supervision or instruction concerning use of the appliance by a person responsible for their safety.
- Children: This appliance is not recommended for use by children. Supervise children to ensure they do not play with the appliance.
- Unattended: Never leave this appliance unattended during use. Always disconnect it from the power supply after use.
- Clean: Before first use, thoroughly clean all parts of the appliance that will come into contact with food according to the cleaning instructions in the 'Other Useful Information' chapter of this manual. Dry thoroughly.
General Safety Instructions (Cont.)
- Assembly: Only operate the unit when all parts are properly assembled. Improper assembly may result in fire, electric shock, injury and/or damage.
- Work surface: Always place the appliance on a level, stable and heat resistant work surface during operation. Do not place it on, in or near a hot gas or electric burner, heated oven, hotplate or other heat source. Do not place it near the edge of a bench or table. Do not place it on a sink drain board.
- Flammable items: Do not use the appliance near flammable objects such as drapes or curtains. Do not cover the appliance with anything but the lid. Do not place anything on top of the lid.
- Capacity: Do not fill the jug right to the top. The maximum jug capacity for food processing without heat is 2 L. The maximum capacity for food processing with the heat function is 1.5 L (or 0.5L when heating milk). Do not fill past the appropriate markings inside the jug.
- Heating food and pulse/speed function: Never use the pulse button or abruptly increase the speed when the temperature is (or has been set) to more than 60°C. When processing hot food (above 60°C), do not touch the measuring cup or press the pulse button.
CAUTION: HOT!

Do not touch hot surfaces! The hot surface marking inside the jug indicates that the jug surfaces will be high during use and retain heat for some time after the machine has been switched off. Do not touch hot surfaces with bare hands. Take care to avoid scalding. Use handles, knobs and oven mitts.
- Hot liquids: Be careful if pouring hot liquid into the jug as it can be ejected out of the appliance due to sudden steaming.
- Hot steam/water: When processing with heat and opening the lid or removing the measuring cup, take due care to avoid scalding from escaping hot steam or hot water.
- Moving the appliance: Exercise caution when moving the appliance containing hot oil or other hot liquids. Do not move it during cooking.
CAUTION: SHARP!
- The blades are very sharp! Take care when handling the blades, only touch them by the upper part.
- Do not touch moving parts! Only use the jug with the lid properly fitted. Keep hands, hair, clothing and utensils away from the blades and out of the jug during operation to reduce the risk of severe injury or damage. A scraper may be used, if required, but only when the blades have stopped moving.
General Safety Instructions (Cont.)
- Take care when emptying or cleaning the jug! The blades are very sharp, handle with care to avoid injury.
- Do not use with empty bowl! Never operate the appliance in the cooking mode with the bowl empty.
Maximum operation times and maximum/minimum quantities
- 40 seconds maximum operation time when processing hard foods such as coffee beans or nuts – rest the appliance for at least 10 minutes before the next operation.
- 0.4 kg (400 g) maximum dough quantity – do not use ingredients weighing more than 0.4 kg (400 g) when kneading dough.
- 5 kg maximum weight for the scales – do not place ingredients weighing more than 5kg on the electronic scales.
- 2.0 L maximum jug capacity – do not fill food and liquid past the top marking in the jug for processing.
- 1.5 L maximum heating capacity – do not fill past the "hot" marking in the jug for heating (and processing) food and liquid.
- 0.5 L maximum capacity when heating milk – do not fill past the lowest marking in the jug when heating milk.
- 0.5 L minimum quantity of water required when steaming food. This quantity is sufficient for steaming food for 30 minutes.
Automatic speed level and temperature adjustments
The machine will automatically adjust the speed level, or stop operation, to protect the motor in the below circumstances:
- 10 minutes maximum operation time when processing food – the machine will stop operation after 10 minutes if only the speed is set.
- 30 minutes maximum operation time when processing and heating food – the machine will stop operation after 30 minutes if both the speed and temperature are set.
- Maximum processing speed level 8 when heating food to 60°C or above – for example, when a temperature of 100°C and speed level 10 are set, the machine will operate at level 10 until the food reaches a temperature of 60°C and then reduce the speed to level 8.
- 139°C maximum temperature when using the heat function without water (liquid) – the machine will then cut off heating.
Product Overview
Scope of delivery
Angled front view (Fig. 1)

(A) Thermo cooker
1 Measuring cup (lid closure)
2 Jug lid
3 Jug (with blade inside)
4 Jug handle
5 Electronic scales
6 LCD display
7 Control panel
8 Adjustment knob
9 Main appliance base
10 Jug release button
11 Slip-resistant feet
12 Power cord connection
13 Power ON/OFF switch
Rear view (Fig. 2)

Please turn over the page for an illustration of the accessories.
Product Overview (Cont.)
Accessories (Fig. 3)
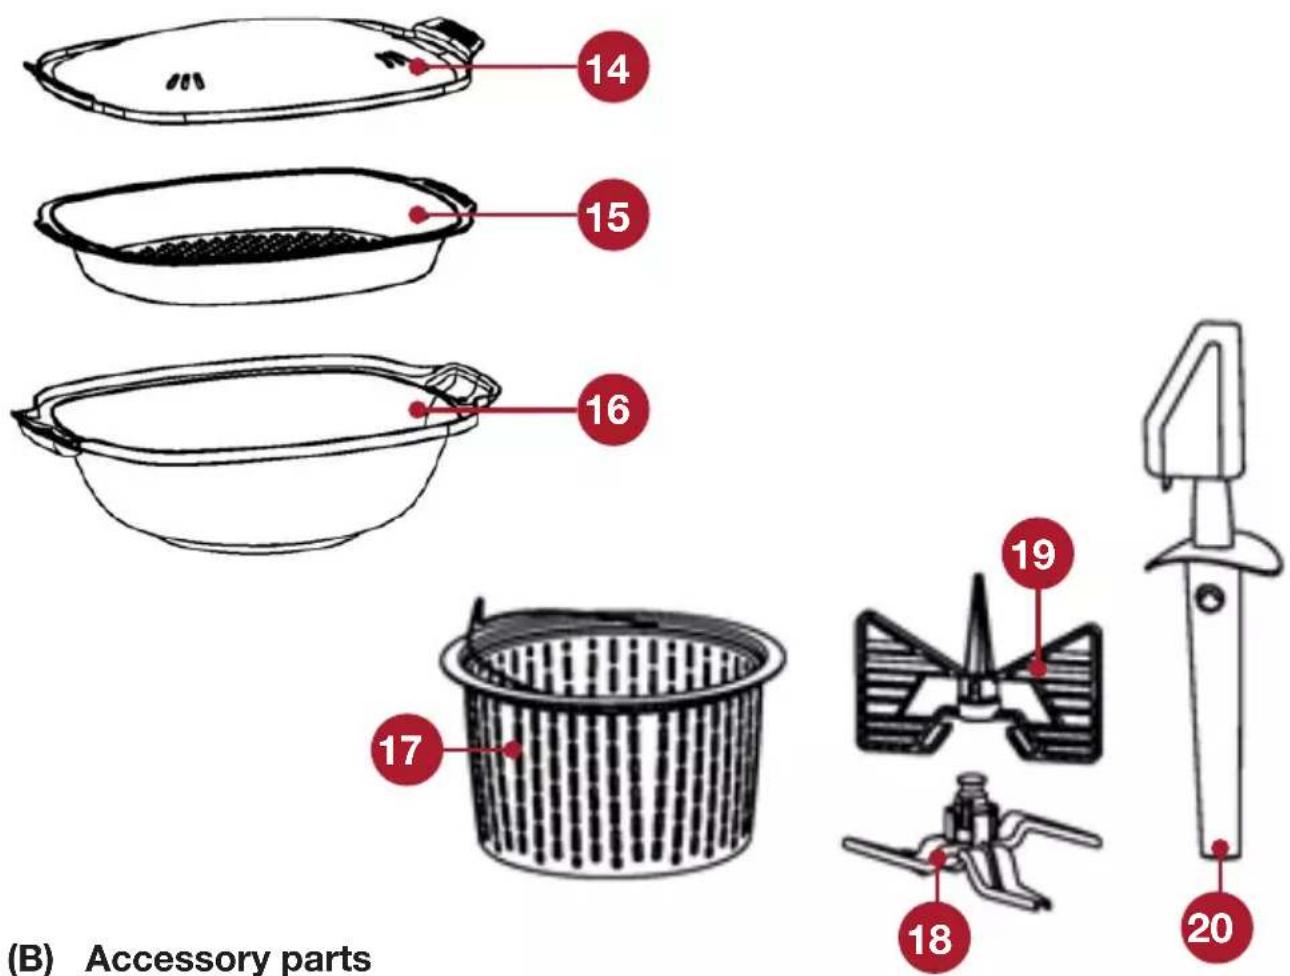
(B) Accessory parts
14 Steamer lid
15 Steamer tray
16 Steamer bowl
17 Steamer basket
18 Protective blade jacket
19 Stirring attachment (butterfly)
20 Spatula
(C) Documentation (not shown)
Instruction manual
Quick start guide
Cookbook
Warranty card
NOTE: Due to continued product improvement, images and illustrations in this manual may vary slightly from the product purchased. All images in this manual are for reference purposes only. Parts are not necessarily pictured to scale.
Product Overview (Cont.)
Inside jug markings (Fig. 4)

2.0 L: Maximum jug capacity.
Do not fill food and liquid past this line for processing.
1.5 L: Maximum capacity for heating food. Do not fill past this line for heating (and processing) food and liquid.
The hot surface marking indicates that the jug can get hot during use and retain heat for some time after the machine has been switched off.
CAUTION: Do not touch hot surfaces with bare hands. Take care to avoid scalding.
0.5 L: Minimum amount of water required when steaming food.
0.5 L: Maximum capacity when heating milk.
Product Overview (Cont.)
Digital display indicators (Fig. 5)
A Temperature indicator [°C]
Range: 37° C -- 40° C -- 50° C -- 60° C -- 70° C -- 80° C -- 90° C -- 100° C -- 110° C -- 120° C
B Heating indicator bar (flickers when the heating function is in use)
C Time indicator [min:sec]
D Speed level indicator [1 to 10, -1 to -3] or number of automatic program
E Speed indicator bar (flickers when the motor is working)
F Weight indicator [g]

Product Overview (Cont.)
Control panel buttons
1 SPEED button: Press to select a speed. When the speed icon is flashing, turn the ADJUSTMENT knob [+/-] to the desired speed (range 1 to 10, plus reverse speeds -1 to -3).
2 TEMP button: Press to select the cooking temperature. When the temperature icon is flashing, turn the ADJUSTMENT knob [+/-] to the desired temperature (range 37°C to 120°C)
3 PULSE button: Press and hold for a few seconds for an extra burst of power.
CAUTION: Do not use this button when heating the food to more than 60° C.
4 Working status indicator: Illuminates when functions are set and flashes when the machine is working
5 ADJUSTMENT knob: Turn to the right to increase or to the left to decrease the temperature, time or speed.
6 TIME button: Press to select the timer function. When the time icon is flashing, turn the ADJUSTMENT knob [+/-] to set the desired time (range 1 second to 60 minutes).
- From 1-30 seconds, the time is adjusted in 1 second steps.
- From 30 seconds onwards, the time is adjusted in 10 second steps.
7 RESET button: Press and hold for 3 seconds to clear all former setting data.
8 WEIGHT / AUTO button:
Press the WEIGHT button and when the weight indicator displays, place the food to be weighed on the scales (max. 5kg).
Press and hold the RESET button for the TARE function.
Press and hold the AUTO button for 2 seconds, then use the adjustment knob to select an automatic program.
9 START/PAUSE button: Press to start or pause the mixing/cooking process.
NOTE: The display screen will enter standby status 2 minutes after the work is finished. Press any button to awaken the screen.
Getting Started
Unpacking
- This product has been packaged to protect it against transportation damage. Unpack the appliance and lay out the separate components.
- IMPORTANT: Before you discard any packaging, make sure that you have unpacked all the parts listed on pages 9 to 10. If anything is missing, please contact our after sales support centre.
- Keep the original packaging carton and materials in a safe place. It will help prevent any damage if the product needs to be transported in the future, and you can use it to store the appliance when it is not in use. In the event that the packaging materials are to be disposed of, please recycle them where possible.
- Plastic wrapping can be a suffocation hazard for babies and young children, so ensure all packaging materials are out of their reach and disposed of safely.
- Inspect all parts of the appliance for visual damage. Unwind the power cord to its full length and inspect the cord and plug for damage. Do not use the appliance if any part of the appliance is damaged or is not working properly. In case of damage, contact our after sales support centre for advice.
- Read this manual to familiarise yourself with all the parts and operating principles of the thermo cooker. Pay particular attention to the safety instructions on the previous pages.
- Wash all parts that may come into contact with food in warm, soapy water. Rinse and dry thoroughly.
- Wipe the inside and outside of the appliance with a damp sponge and then with a clean, dry cloth.
Parts Assembly and Removal
Installing / removing the lid
- Fitting the sealing ring: The lid is equipped with an airproof sealing ring, which you may remove for cleaning. Before reuse, always check and ensure you have refitted the ring, as pictured (Fig. 6).

- Installing the lid: Place the lid on top of the jug, aligning the arrow on the handle with the open lock icon on the lid (Fig. 7). Then press down firmly and turn the lid clockwise to lock until the arrow on the handle is aligned with the closed lock icon (Fig. 8: A, B) and the lip with the front of the jug (Fig. 9: D).

- Installing the measuring cup: Use the supplied measuring cup to cover the pouring hole in the lid. Turn it clockwise to secure it in place and anticlockwise to remove it.
- Removing the lid: To remove the lid, push it firmly in anticlockwise direction until the handle is aligned with the open lock icon. Then push up the lid and remove it from the jug.
Parts Assembly and Removal (Cont.)
Installing / removing the jug
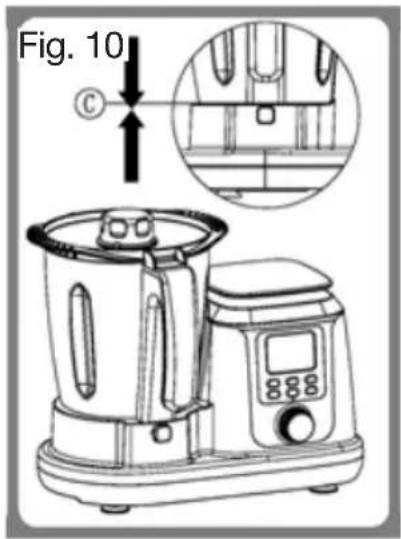
- Installing the jug: Place the jug in its space on the base of the appliance. The handle must be at the front, aligned with the jug release button. Push it firmly down until it clicks into place (Fig. 10).
NOTE: If at first it will not click into place, press the jug release button (C) while pushing down the jug.
- Removing the jug: Press the jug release button while lifting the jug off the base.
Installing / removing the blade assembly
The blade assembly at the bottom of the jug may be removed for cleaning.
CAUTION!
• The blade is very sharp, handle it with utmost care!
- Only hold the blade by the upper part.
- The sealing ring must be fitted on the blade. Without this sealing ring the food to be processed or heated may leak out and damage the appliance.
- Please use the protective blade jacket when assembling or disassembling the blade to prevent injury.
• Installing the sealing ring: Before installing the blade assembly, make sure the sealing ring is properly in place (Fig. 11).
- Installing the blade: Holding the blade assembly by the upper part only, push it carefully through the opening in the bottom of the jug (Fig. 12), aligning the small protrusions (A) with the recesses (B) in the edge of the opening (Fig. 13).
Fig. 11 Fig. 12 Fig. 13


Parts Assembly and Removal (Cont.)
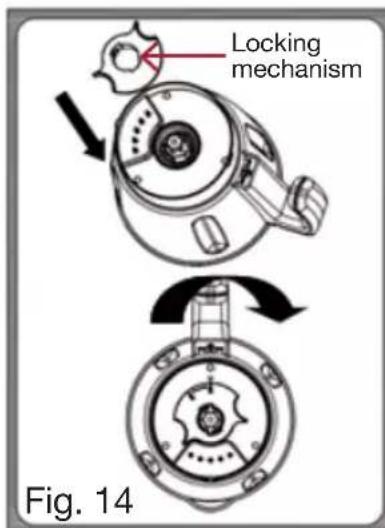
- Locking the blade in place: Still holding the blade by the upper part, carefully turn over the jug. To secure the blade, turn the locking mechanism at the underside of the jug (Fig. 14) in anticlockwise direction so the closed lock icon is aligned with the arrow (Fig. 15). When the blade is securely attached, turn over the jug, ready for use (Fig. 16).
- Removing the blade: Before removing the blade from the jug, take the jug off the base of the appliance. With one hand, hold the blade carefully by the upper part and with the other hand, carefully turn the locking mechanism at the underside of the jug in clockwise direction to release the blade assembly from the jug.
![graph TD A["Top Circle"] --> B["Downward Arrow"] B --> C["Left Arrow"] C --> D["Right Arrow"] D --> E["Bottom Circle"] style A fill:#f9f,stroke:#333 style E fill:#bbf,stroke:#333](/content/2026/05/895644/images/71889984ef2a622d2096a0a1124773a5b9c83d5f176e7d8eb8a8c7f83aea8f8d.jpg)

Parts Assembly and Removal (Cont.)
Installing / removing the stirring attachment (butterfly)
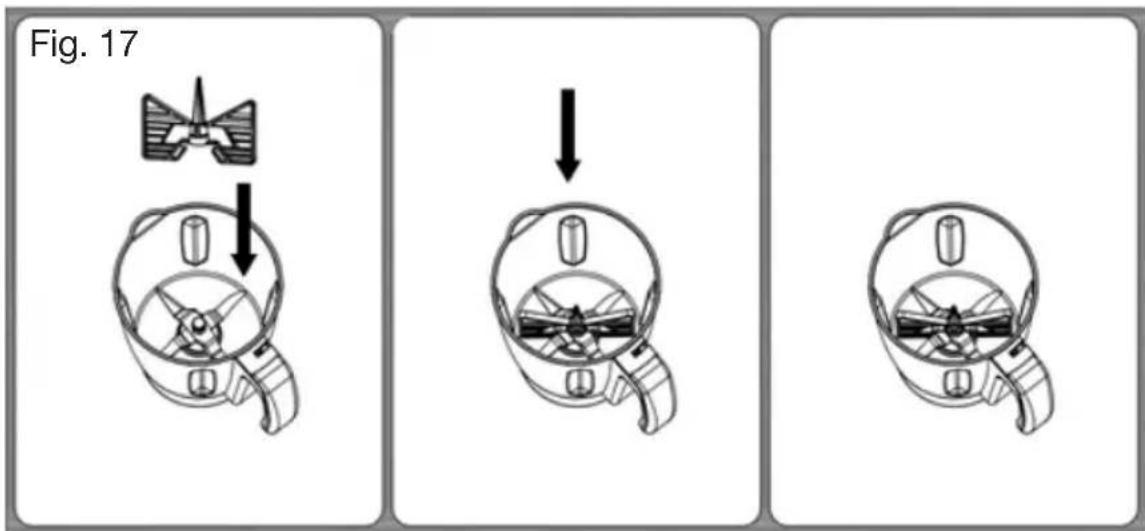
- Installing the butterfly: Hold the butterfly by the top part and place it on the upper part of the blade, pushing down until it clicks securely into place (Fig. 17).
- Removing the butterfly: Hold the top part of the butterfly and pull it off the blade while rotating it gently in both directions.
Using the electronic scales
- Plug the machine into an appropriate electrical outlet and switch on the power to the outlet.
- Set the ON/OFF switch at the back of the machine to the ON position [I]. The LCD shows the current room temperature and [00:00].
- Press the WEIGHT button and when the weight icon is displayed, place the food to be weighed on the scale's glass plate. The food weight will be displayed in grams on the LCD.
Instructions
Introduction
Congratulations on your purchase of the Stirling® Thermo Cooker, a versatile kitchen appliance designed to take all the hard work out of your food preparation. Use it to mix ingredients for dough-making, puree baby food or emulsify fruit and vegetables for nutritious smoothies. You can also use it to steam food or combine the mixing and heating functions and create all your favourite dishes with little fuss.
The Stirling ® Thermo Cooker features 10 automatic programs, which make some of the most common tasks even easier: just select the program and leave the rest to the machine. There are automatic programs for sautéing, emulsifying, stirring, pureeing, milling, mixing, kneading, steaming, whipping up smoothies and crushing ice. Usage descriptions for these programs, and a table with their parameters, are provided on the following pages.
For manual operation of the Stirling ® Thermo Cooker, please refer to the general usage instructions for each task, which are provided after the auto programs section in the 'Instructions' chapter. Please read through these instructions before you start with a particular food preparation task.
For parts assembly and removal instructions, please refer to the relevant sections in the preceding chapter.
And for cooking inspiration and specific recipes, browse through the separate cookbook for the thermo cooker, which is also supplied in the box.
Instructions (Cont.)
Automatic programs
| Program Number | Program Name | Time (min:sec) | Speed | Temperature (°C) |
| 1 Sauté | 6:00 1 100 | |||
| 2 Emulsify | 2:00 4 0 | |||
| 3 Stir | 5:00 -1 0 | |||
| 4 Puree | 1:00 10 0 | |||
| 5 Mill | 0:10 10 0 | |||
| 6 Mix | 0:15 6 0 | |||
| 7 Knead | 2:00 -3 0 | |||
| 8 Steam | 10:00 3 100 | |||
| 9 | Smoothie | 1:00 9 0 | ||
| 10 Crush | Ice 0:20 8 0 |
1 Press and hold the WEIGHT button for 2 seconds to select the Sauté program. The display will show [0], turn the adjustment knob to [1], then press the knob to confirm. The program will start immediately, and the display will show the speed [1], temperature [100°C] and time [06:00], counting down.
2 Press and hold the WEIGHT button for 2 seconds to select the Emulsify program. The display will show [0], turn the adjustment knob to [2], then press the knob to confirm. The program will start immediately, and the display will show the speed [4], temperature [room temperature, no heating] and time [02:00], counting down.
3 Press and hold the WEIGHT button for 2 seconds to select the Stir program. The display will show [0], turn the adjustment knob to [3], then press the knob to confirm. The program will start immediately, and the display will show the speed [-1], temperature [room temperature, no heating] and time [05:00], counting down.
Instructions (Cont.)
4 Press and hold the WEIGHT button for 2 seconds to select the Puree program. The display will show [0], turn the adjustment knob to [4], then press the knob to confirm. The program will start immediately, and the display will show the speed [10], temperature [room temperature, no heating] and time [01:00], counting down.
5 Press and hold the WEIGHT button for 2 seconds to select the Mill program. The display will show [0], turn the adjustment knob to [5], then press the knob to confirm. The program will start immediately, and the display will show the speed [10], temperature [room temperature, no heating] and time [00:10], counting down.
6 Press and hold the WEIGHT button for 2 seconds to select the Mix program. The display will show [0], turn the adjustment knob to [6], then press the knob to confirm. The program will start immediately, and the display will show the speed [6], temperature [room temperature, no heating] and time [00:15], counting down.
7 Press and hold the WEIGHT button for 2 seconds to select the Knead program. The display will show [0], turn the adjustment knob to [7], then press the knob to confirm. The program will start immediately, and the display will show the speed [-3], temperature [room temperature, no heating] and time [02:00], counting down.
8 Press and hold the WEIGHT button for 2 seconds to select the Steam program. The display will show [0], turn the adjustment knob to [8], then press the knob to confirm. The program will start immediately, and the display will show the speed [4], temperature [100°C] and time [10:00], counting down.
9 Press and hold the WEIGHT button for 2 seconds to select the Smoothie program. The display will show [0], turn the adjustment knob to [9], then press the knob to confirm. The program will start immediately, and the display will show the speed [9], temperature [room temperature, no heating] and time [01:00], counting down.
10 Press and hold the WEIGHT button for 2 seconds to select the Crush Ice program. The display will show [0], turn the adjustment knob to [10], then press the knob to confirm. The program will start immediately, and the display will show the speed [8], temperature [room temperature, no heating] and time [00:20], counting down.
Instructions (Cont.)
Mixing food
To cut and chop your food, please follow the steps below.
- Install the blade on the bottom of the jug, and then install the jug on the base of the main appliance.
- Put the food to be mixed in the jug.
- Cover the jug with the lid, turning it firmly until it is locked in position.
- Put the measuring cup on the jug lid and turn it in clockwise direction to lock in place.
- Plug in the appliance and switch it on using the POWER switch at the back of the appliance.
- Set the required time (max. 1 hour) and select the speed (1 - 10, -1 - -3). If you select the speed more than 6 (including 6), the setting time should be less than half an hour.
- Press the START/PAUSE button. The appliance will start working and the timer starts counting down (or up, if you skip the timer setting).
- Five seconds before the end of the set time, the appliance will emit a beep sound to alert you that the program is about to finish.
- At the end of the operation, the LCD backlight will start flashing and the machine will start beeping every 20 seconds for approximately 1 minute. After another minute, the LCD backlight will stop flashing, and the screen will turn off after another minute.
- After use, switch off and unplug the appliance.
- Remove the jug from the jug socket on the base; take off the jug lid.
- With a suitable utensil, remove the processed food carefully from the jug.
CAUTION!
- The blade is very sharp, handle it with care! Only hold it by the upper part.
- Do not remove the processed food with your hands.
- When processing hard foods such as coffee beans or nuts, do not operate the appliance for more than 40 seconds, and rest the appliance for at least 10 minutes before the next operation.
Instructions (Cont.)
Making dough
To prepare dough or batter for cakes, biscuits or pancakes, please follow the steps below. For part installation and removal instructions, please refer to the relevant sections in the preceding chapter.
- Install the blade on the bottom of the jug, and then install the jug on the base of the main appliance.
- Put the dough ingredients in the jug.
- Cover the jug with the lid, turning it firmly until it is locked in position.
- Put the measuring cup on the jug lid and turn it in clockwise direction to lock in place.
- Plug in the appliance and switch it on using the POWER switch at the back of the appliance.
- Set the required time and select the speed (1 - 4 or -3) according to your recipe.
- Press the START/PAUSE button. The appliance will start working and the timer starts counting down (or up, if you skip the timer setting).
- Five seconds before the end of the set time, the appliance will emit a beep sound to alert you that the program is about to finish.
- At the end of the operation, the LCD backlight will start flashing and the machine will start beeping every 20 seconds for approximately 1 minute. After another minute, the LCD backlight will stop flashing, and the screen will turn off after another minute.
- After use, switch off and unplug the appliance.
- Remove the jug from the jug socket on the base; take off the jug lid.
- With a suitable utensil, remove the prepared dough carefully from the jug.
CAUTION!
- The blade is very sharp, handle it with care! Only hold it by the upper part.
- Do not remove the dough with your hands.
- The maximum dough you can knead in the appliance is 0.4 kg (400 g). Do not use the appliance for dough weighing more than 0.4 kg (400 g).
Instructions (Cont.)
Using the butterfly
The butterfly will help you achieve the best results while whipping cream, beating mayonnaise or whisking egg whites. To prepare such food, please follow the steps below. For part installation and removal instructions, please refer to the relevant sections in the preceding chapter.
- Install the blade on the bottom of the jug, then install the butterfly stirring attachment.
- Install the jug on the base of the main appliance.
- Put the food you want to whisk in the jug.
- Cover the jug with the lid, turning it firmly until it is locked in position.
- Put the measuring cup on the jug lid and turn it in clockwise direction to lock in place.
- Plug in the appliance and switch it on using the POWER switch at the back of the appliance.
- Set the required time and select the speed (1 – 10) according to your recipe. NOTE: For egg whites, set the speed to 4 and the time to 2 – 3 minutes.
- Press the START/PAUSE button. The appliance will start working and the timer starts counting down (or up, if you skip the timer setting).
- Five seconds before the end of the set time, the appliance will emit a beep sound to alert you that the program is about to finish.
- At the end of the operation, the LCD backlight will start flashing and the machine will start beeping every 20 seconds for approximately 1 minute. After another minute, the LCD backlight will stop flashing, and the screen will turn off after another minute.
- After use, switch off and unplug the appliance.
- Remove the jug from the jug socket on the base; take off the jug lid.
- With a suitable utensil, remove the processed food carefully from the jug.
CAUTION!
- The blade is very sharp, handle it with care! Only hold it by the upper part.
- Only plug in the appliance after you have securely installed the blade and the butterfly stirring attachment.
- Do not add ingredients that might damage or block the butterfly when the blade is in motion and the butterfly is fitted.
Instructions (Cont.)
Using the reverse function
The appliance is equipped with a reverse function, where the blades turn in the opposite direction, gently stirring food without chopping it. To use the reverse function, follow the steps below.
- Install the blade on the bottom of the jug, and then install the jug on the base of the main appliance.
- Put the ingredients to be mixed/stirred in the jug.
- Cover the jug with the lid, turning it firmly until it is locked in position.
- Put the measuring cup on the lid and turn it clockwise to lock in place.
- Plug in the appliance and switch it on using the POWER switch at the back.
-
Set the required time.
-
Select the speed (-1 to -3) according to your recipe.
-
Speed -1: continuous operation as with speed 1, but in reverse mode.
- Speed -2: continuous operation as with speed 2, but in reverse mode.
-
Speed -3: operation with the same speed as speed 4, but 10 seconds in reverse -> 1–2 seconds pause -> 10 seconds forward -> 1–2 seconds pause -> 10 seconds in reverse, and so on until the end of the set time.
-
Press the START/PAUSE button. The appliance will start working and the timer starts counting down (or up, if you skip the timer setting).
-
Five seconds before the end of the set time, the appliance will emit a beep sound to alert you that the program is about to finish.
-
At the end of the operation, the LCD backlight will start flashing and the machine will start beeping every 20 seconds for approximately 1 minute. After another minute, the LCD backlight will stop flashing, and the screen will turn off after another minute.
-
After use, switch off and unplug the appliance.
-
Remove the jug from the jug socket on the base; take off the jug lid.
-
With a suitable utensil, remove the mixed food carefully from the jug, taking care not to injure yourself on the sharp blade.
Heating food
With the processing and heating function used together, the appliance can be used to cook food such as risotto, marmalade, vegetable soup, baby food, etc. To cook such food, please follow the steps on the next page. For part installation and removal instructions, please refer to the relevant sections in the preceding chapter.
Instructions (Cont.)
- Install the blade on the bottom of the jug, and then install the jug on the base of the main appliance.
- Put the food to be cooked in the jug.
- Cover the jug with the lid, turning it firmly until it is locked in position.
- Put the measuring cup on the lid and turn it clockwise to lock in place.
- Plug in the appliance and switch it on using the POWER switch at the back.
- Set the required time (less than 1 hour).
- Set the required temperature (37°C to 120°C).
CAUTION: The set temperature must be higher than that of the food in the jug. - Select the speed (1 - 10) according to your recipe.
NOTE: When a temperature of 100° C and speed level 10 are set, the machine will operate at level 10 until the food reaches a temperature of 60° C and then reduce the speed to level 8. - Press the START/PAUSE button. The appliance will start working and the timer starts counting down (or up, if you skip the timer setting).
- Five seconds before the end of the set time, the appliance will emit a beep sound to alert you that the program is about to finish.
- At the end of the operation, the LCD backlight will start flashing. The machine will start beeping every 20 seconds for about 1 minute. After another minute, the LCD backlight will stop flashing, and the screen will turn off after another minute.
- If you want to heat your food for a few more minutes, set the speed back to [0] and then reset the time, temperature and speed. The appliance will then continue working when you press the START/PAUSE button.
- After use, switch off and unplug the appliance.
- Remove the jug from the jug socket on the base; take off the jug lid.
- With a suitable utensil, remove the cooked food carefully from the jug, taking care not to injure yourself on the sharp blade or the hot food.
CAUTION!
- When using the heat function, do not fill food and liquid ingredients past the 1.5L marking, otherwise it will boil over.
- If you heat food more than 80° C in high speed (6-7), the cooking cycle should be less than half an hour and have a cooling interval of 30 minutes.
- When using milk, do not heat more than 500 mL milk.
- Do not touch the metal parts of the jug while it is hot; only hold it by the handle.
- Never heat up the jug when it is empty.
Instructions (Cont.)
Using the small steamer basket
The appliance comes with two types of steamer: a small steamer basket you can use inside the jug and a larger steamer assembly that needs to be fitted on top of the jug. When steaming small amounts of vegetables, rice, grains or other suitable produce, use the smaller steamer basket following the steps below. For part installation and removal instructions, please refer to the relevant sections in the preceding chapter.
-
Install the blade on the bottom of the jug, and then install the jug on the base of the main appliance.
-
Add between 0.5 L and 1.5 L of water for steaming into the jug. IMPORTANT: The minimum amount of water required is 0.5 L . This amount is sufficient for steaming food for 30 minutes.
-
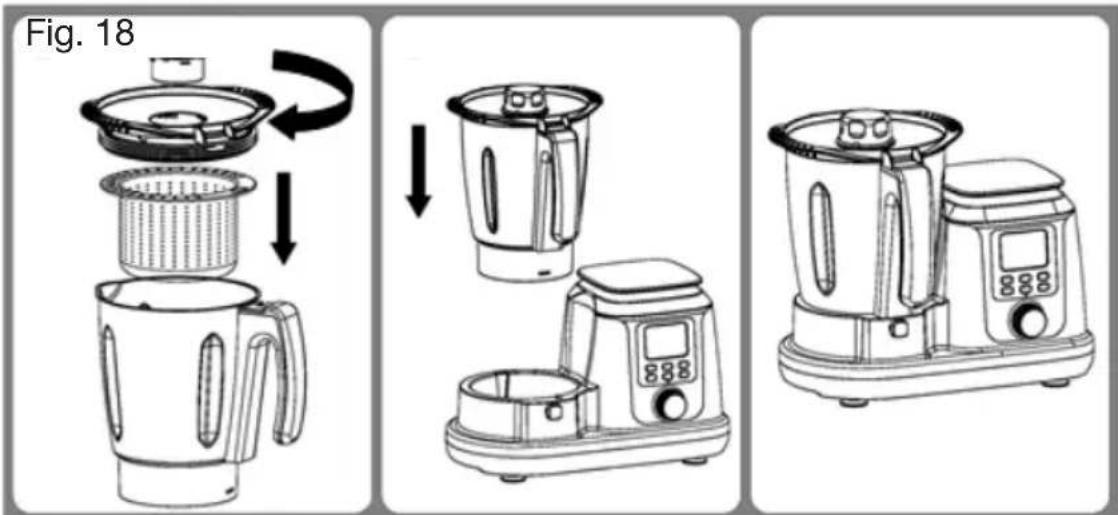
Put the food to be steamed into the small steamer basket. (For a pictorial representation of the jug assembly with the steamer basket, please refer to Fig. 18.)
-
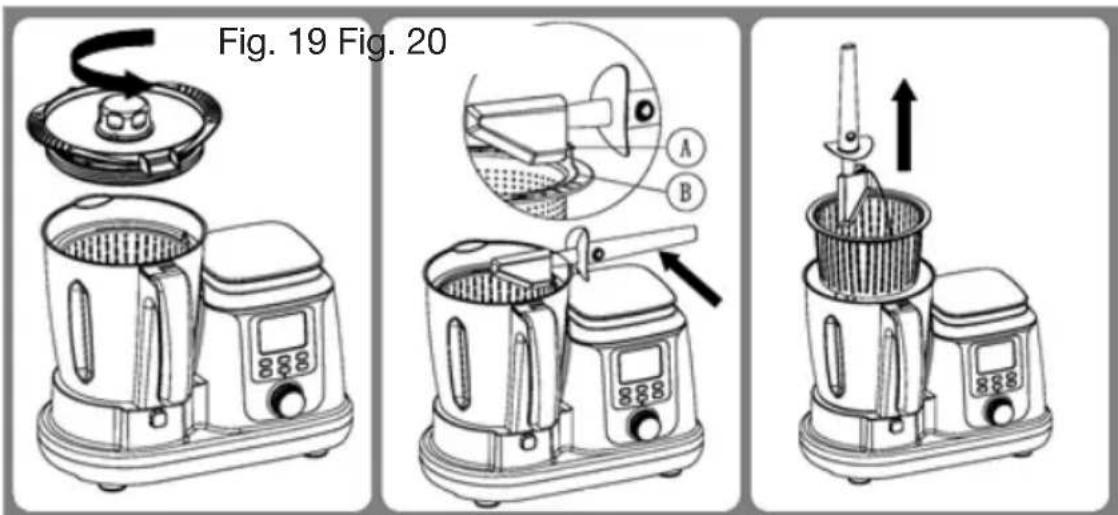
Cover the jug with the lid, turning it firmly until it is locked in position. Put the measuring cup on the jug lid and turn it in clockwise direction to lock in place (Fig. 19).
-
Plug in the appliance and switch it on using the POWER switch at the back of the appliance.
-
Set the required time (less than 1 hour).
-
Set the required temperature to 100° C . CAUTION: The set temperature must be higher than the temperature of the food in the jug.
-
Select speed 1.
Instructions (Cont.)
- Press the START/PAUSE button. The appliance will start working and the timer starts counting down (or up, if you skip the timer setting).
- Five seconds before the end of the set time, the appliance will emit a beep sound to alert you that the program is about to finish.
- If you want to steam the food for a few more minutes, reset the time, temperature and speed, then press the START/PAUSE button and the appliance starts working again.
- At the end of the operation, the LCD backlight will start flashing and the machine will start beeping every 20 seconds for approximately 1 minute. After another minute, the LCD backlight will stop flashing, and the screen will turn off after another minute.
- After use, switch off and unplug the appliance.
- Remove the jug from the jug socket on the base; take off the jug lid.
- The steamer is hot, so take care when you remove it from the jug so that you do not burn your skin. You can use the hook (A) on the scraper blade to grip the handle of the steamer basket (B) and remove the basket without touching any hot parts (Fig. 20). Then take the steamed food out of the steamer basket using an appropriate utensil.
CAUTION!
- Handle with care! Hot steam and hot condensed water: danger of scalding!
- Never use the steamer without lid on the jug. If the lid is not fitted properly, the steam will escape and the food inside the steamer will not cook properly.
- Steaming food for 30 minutes requires approximately 500 mL of water. For every additional 15 minutes steaming time, add an extra 250 mL of water, making sure not to surpass 1.5 L.
Instructions (Cont.)
Using the steamer assembly
The larger steamer assembly is suitable for steaming larger amounts of vegetables, fish, meat or other suitable produce. The steamer assembly consists of three parts: a bowl, tray and lid. You always need the bowl and lid; the tray may be added if you want to steam different types of food, for example, vegetables in the bowl and fish on the tray on top.
When steaming food using the larger steamer assembly, follow the steps below. For part installation and removal instructions, please refer to the relevant sections in the preceding chapter.
-
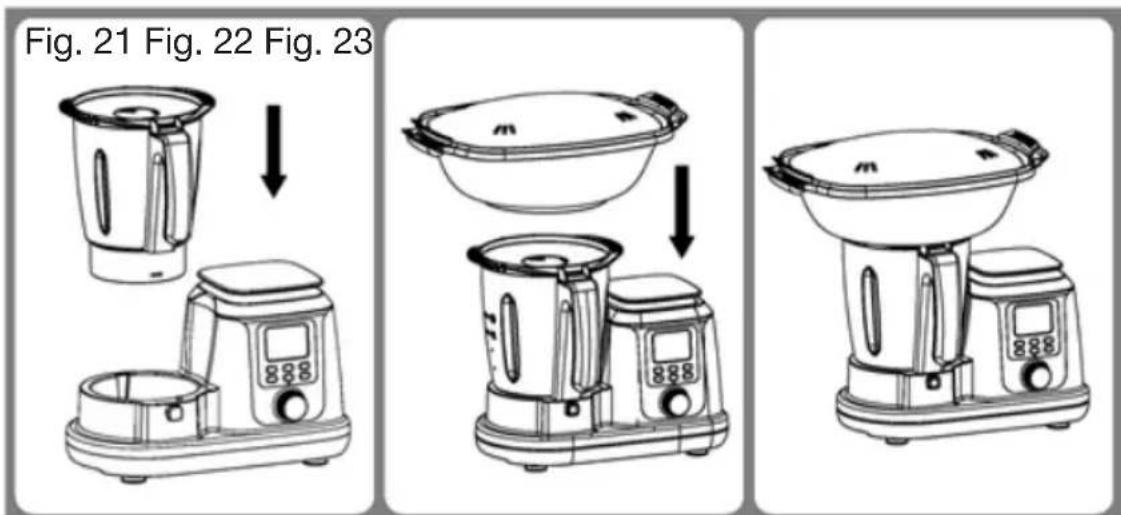
Install the blade on the bottom of the jug, and then install the jug on the base of the main appliance (Fig. 21).
-
Add between 0.5 L and 1.5 L of water for steaming into the jug. IMPORTANT: The minimum amount of water required is 0.5 L . This amount is sufficient for steaming food for 30 minutes.
-
Cover the jug with the lid, turning it firmly until it is locked in position. Do NOT add the measuring cup.
-
Place the steamer bowl on top of the jug lid (Fig. 22).
-
Put your food in the steamer bowl and then place the steamer lid on top to cover. Alternatively, if using two steaming levels, place some food in the bowl, add the steamer tray, place more food on the tray, and then place the lid on top to cover (Fig. 23).
-
Plug in the appliance and switch it on using the POWER switch at the back of the appliance.
-
Set the required time (less than 1 hour).
Instructions (Cont.)
- Set the temperature to 100° C.
CAUTION: The set temperature must be higher than the temperature of the food in the steamer. - Select speed 1.
- Press the START/PAUSE button. The appliance will start working and the timer starts counting down (or up, if you skip the timer setting).
- Five seconds before the end of the set time, the appliance will emit a beep sound to alert you that the program is about to finish.
- If you want to steam the food for a few more minutes, reset the time, temperature and speed, then press the START/PAUSE button and the appliance starts working again.
- At the end of the operation, the LCD backlight will start flashing and the machine will start beeping every 20 seconds for approximately 1 minute. After another minute, the LCD backlight will stop flashing, and the screen will turn off after another minute.
- After use, switch off and unplug the appliance.
- Lift the steamer assembly off the jug, holding it carefully by the handles.
CAUTION: Hot steam may escape and/or hot water may drop off the steamer surfaces. Handle with care to avoid scalding.
-
Remove the steamer lid. With a suitable utensil, remove the steamed food carefully from the steamer bowl (and/or tray).
-
Remove the jug from the jug socket on the base; take off the jug lid.
CAUTION!
- Handle with care. Hot steam and hot condensed water: danger of scalding!
- Never use the steamer assembly without lid. If the lid is not fitted properly, the steam will escape and the food inside the steamer will not cook properly.
- Steaming food for 30 minutes requires approximately 500 mL of water. For every additional 15 minutes steaming time, add an extra 250 mL of water, making sure not to surpass 1.5 L.
FAQs and Error Messages
| Problem Possible | cause Solution | |
| The display screen is not working when pressing buttons. | Tripped fuse or circuit breaker activated. | Reset/replace the fuse/circuit breaker. |
| Electrical outlet is not working. | Ensure power is switched on at the outlet. Check your wall outlet with another appliance. | |
| The blade does not rotate. | The appliance is incorrectly assembled. | Make sure all parts of the appliance are properly assembled – see the 'Parts Assembly and Removal' chapter for instructions. |
| The display screen shows error code E02. | The sensor cannot connect or is broken. | The appliance has failed and needs to be serviced. Call our after sales support centre for advice. |
| The display screen shows error code E03. | The bowl lid was installed incorrectly. | Please refer to page 15 for lid installation instructions. |
| The display screen shows error code E04. | A component in the appliance has failed. | Call our after sales support centre for advice. |
Other Useful Information
Care and cleaning
CAUTION!
- Disconnect before cleaning: Before cleaning any part of the appliance, make sure it is unplugged from the power supply and has cooled down completely.
- Do not immerse: Never immerse the motor housing in water or other liquid, wash it in a dishwasher or under running water. The appliance housing must only be wiped with a well wrung out, damp cloth.
- What NOT to use for cleaning: Do not use alkaline, harsh chemical or alcohol based cleansers for cleaning any part of the appliance. Do not use abrasive cleaners, scouring pads or hard brushes. Never use metal or pointed/sharp objects for cleaning as this may damage functional parts or affect the safety of the appliance.
To ensure good food hygiene, clean all parts of the appliance that have come into contact with food after every use.
- Before you start cleaning the appliance, make sure to switch off and unplug the appliance and let the appliance cool down.
- Blade: When the jug has cooled down, remove the blade from the jug. CAUTION: The blade is very sharp! Handle it with care! Only hold it by the upper part.
Clean the blade carefully in hot, soapy water. Make sure to remove any food residues from around the sealing ring. Rinse and dry carefully. We recommend you lubricate the blade occasionally with some vegetable oil. - Jug: Clean the inside and outside of the jug with hot, soapy water. Rinse and dry well. The jug may also be washed in a dishwasher. After cleaning and before reuse, check and ensure that the underside of the jug and the contact pins at the bottom of the jug clean and dry.
- Stubborn stains: To help you remove stubborn food residues, you may add some hot, soapy water in the jug and run the appliance at speed 1 for a few seconds to loosen and remove food residues from the blade and interior jug surfaces.
- Accessories: Wash the accessories in hot, soapy water, rinse and dry thoroughly. All accessories may also be washed in a dishwasher.
Other Useful Information (Cont.)
Storage
Before packing the thermo cooker away for storage, ensure it is unplugged from the power supply and has completely cooled down and is clean and dry. To protect it from dust, store the appliance and all its accessories in the original carton in a clean and dry place, out of children's reach.
Service, repair and spare parts
The appliance has no user-serviceable parts contained within. Do not attempt to repair, disassemble or modify the appliance. Only the blade will benefit from occasional lubrication. If the appliance requires repair or service, please contact our after sales support centre for advice.
Our after sales support centre stocks the following spare parts for the appliance. To purchase a part, call the centre on 1300 112 534 or access support online via. tempo.org/support.
Blade
Butterfly (stirring) attachment
Jug
Jug lid
Measuring cup (jug lid closure)
Protective blade jacket
Spatula
Steamer basket (small)
Steamer bowl (large)
Steamer tray (large)
Steamer lid (large)
IMPORTANT!
Trying to repair the appliance yourself, undertaking incorrect repairs or making modifications will expose you to considerable danger and will void the warranty.
Other Useful Information (Cont.)
Technical specifications
| Model TC936 | |
| Rated power input | Mixer: 700 W |
| Heating: 1000 W | |
| Max.: 1200 W | |
| Voltage and frequency 220–240 V ~, 50–60 Hz | |
| Capacity 3.5 L | |
| Dimensions (with lid and measuring cup, without steamer attachment) | 320 (H) x 340 (L) x 260 (D) mm (approx.) |
| Weight (with all accessories) 7.2 kg (approx.) | |
Compliance
This product has been fully tested and meets all requirements as set out by standards AS/NZS 60335.1, 60335.2.14 and 60335.2.15.

The RCM Mark (Regulatory Compliance Mark) indicates that the product complies with the relevant guidelines of the ACMA as well as corresponding government requirements for the safety of electrical devices.
Responsible disposal


Packaging materials are recyclable. Please dispose of them responsibly for recycling.
At the end of its working life, do not throw this appliance out with your household waste. Electrical and electronic products contain substances that can have a detrimental effect on the environment and human health if disposed of inappropriately. Observe any local regulations regarding the disposal of electrical consumer goods and dispose of it appropriately for recycling.
Contact your local authorities for advice on recycling facilities in your area. Or find recycling scheme services listed on Planet Ark's website at www.recyclingnearyou.com.au, or call Planet Ark on 1300 733 712.


STIRLING®
Thermo Cooker
Repair and Refurbished Goods or Parts Notice
Unfortunately, from time to time, faulty products are manufactured which need to be returned to the supplier for repair.
Please be aware that if your product is capable of retaining user-generated data (such as files stored on a computer hard drive, telephone numbers stored on a mobile telephone, songs stored on a portable media player, games saved on a games console or files stored on a USB memory stick) during the process of repair, some or all of your stored data may be lost. We recommend you save this data elsewhere prior to sending the product for repair.
You should also be aware that rather than repairing goods, we may replace them with refurbished goods of the same type or use refurbished parts in the repair process.
Please be assured though, refurbished parts or replacements are only used where they meet ALDI's stringent quality specifications.
If at any time you feel your repair is being handled unsatisfactorily, you may escalate your complaint. Please telephone us on 1300 112 534 or write to us at:
Tempo (Aust) Pty Ltd (ABN 70 106 100 252)
PO BOX 132, Frenchs Forest NSW 1640, Australia
Web Support: tempo.org/support
Tempo Help Desk: 1300 112 534 (Aust)
(Operating Hours: Mon–Sat 09:00 am to 06:00 pm AEST)


Please read the manual
It will help you get the
best out of your product.
Still have questions?
Call after sales support
1300 112 534
Or visit www.tempo.org
Warranty returns
Should you for any reason need to return this product for a warranty claim, make sure to include all accessories with the product.
Product does not work?
If you encounter problems with this product, or if it fails to perform to your expectations, make sure to contact our After Sales Support Centre on 1300 112 534 for advice.
For an electronic copy of this manual, please contact our after sales support centre.
Instruction Manual Revision Index
Version No Issue Date Description
V1.5 9 December 2020 Original (2021) release
V2.0 18 November 2021 2022 release
V2.1 7 December 2021 Minor update, page 11
- THERMO COOKER
- INSTRUCTION MANUAL
- WELCOME
- CONTENTS
- STIRLING®
- WARRANTY DETAILS
- GENERAL SAFETY INSTRUCTIONS
- IMPORTANT SAFETY INSTRUCTIONS
- READ CAREFULLY AND KEEP FOR FUTURE REFERENCE
- ALWAYS FOLLOW BASIC SAFETY PRECAUTIONS AND ACCIDENT PREVENTION MEASURES WHEN USING AN ELECTRICAL APPLIANCE, INCLUDING THE FOLLOWING
- ELECTRICAL SAFETY AND CORD HANDLING
- GENERAL SAFETY INSTRUCTIONS (CONT.)
- USAGE CONDITIONS AND RESTRICTIONS
- CAUTION: HOT
- CAUTION: SHARP
- MAXIMUM OPERATION TIMES AND MAXIMUM/MINIMUM QUANTITIES
- AUTOMATIC SPEED LEVEL AND TEMPERATURE ADJUSTMENTS
- PRODUCT OVERVIEW
- SCOPE OF DELIVERY
- PRODUCT OVERVIEW (CONT.)
- ACCESSORY PARTS
- DOCUMENTATION (NOT SHOWN)
- DIGITAL DISPLAY INDICATORS (FIG. 5)
- CONTROL PANEL BUTTONS
- GETTING STARTED
- UNPACKING
- PARTS ASSEMBLY AND REMOVAL
- INSTALLING / REMOVING THE LID
- PARTS ASSEMBLY AND REMOVAL (CONT.)
- INSTALLING / REMOVING THE JUG
- INSTALLING / REMOVING THE BLADE ASSEMBLY
- CAUTION
- INSTALLING / REMOVING THE STIRRING ATTACHMENT (BUTTERFLY)
- USING THE ELECTRONIC SCALES
- INSTRUCTIONS
- INTRODUCTION
- INSTRUCTIONS (CONT.)
- MIXING FOOD
- MAKING DOUGH
- USING THE BUTTERFLY
- USING THE REVERSE FUNCTION
- HEATING FOOD
- USING THE SMALL STEAMER BASKET
- USING THE STEAMER ASSEMBLY
- FAQS AND ERROR MESSAGES
- OTHER USEFUL INFORMATION
- CARE AND CLEANING
- OTHER USEFUL INFORMATION (CONT.)
- STORAGE
- SERVICE, REPAIR AND SPARE PARTS
- IMPORTANT
- COMPLIANCE
- RESPONSIBLE DISPOSAL
- REPAIR AND REFURBISHED GOODS OR PARTS NOTICE
- PLEASE READ THE MANUAL
- STILL HAVE QUESTIONS
- WARRANTY RETURNS
- PRODUCT DOES NOT WORK
- INSTRUCTION MANUAL REVISION INDEX
Brand : Stirling
Model : TC936
Category : Kitchen appliance