
Alegra 49TY87 - Television METZ - Free user manual and instructions
Find the device manual for free Alegra 49TY87 METZ in PDF.


| Product Type | LED Television |
| Screen Size | 49 inches (123 cm) |
| Resolution | 1920 x 1080 (Full HD) |
| Refresh Rate | 60 Hz |
| Tuner | DVB-T/T2/C/S/S2 |
| Smart TV | No (Basic model) |
| Audio Output | 2 x 8 W |
| Connectivity | 2 x HDMI, 1 x USB, 1 x SCART, 1 x CI slot |
| Power Consumption | 75 W (typical), 0.5 W (standby) |
| Energy Class | A+ |
| Dimensions (without stand) | 109.5 x 64.2 x 8.1 cm |
| Dimensions (with stand) | 109.5 x 70.1 x 24.5 cm |
| Weight (without stand) | 10.5 kg |
| Weight (with stand) | 11.2 kg |
| Wall Mount Standard | VESA 200 x 200 mm |
| Clean Screen | Use a soft, dry cloth. Avoid harsh chemicals. |
| Spare Parts Availability | Remote control, stand, power cord available |
| Safety Features | CE certified, automatic power off, child lock |
| Operating Temperature | 5°C to 35°C |
Frequently Asked Questions - Alegra 49TY87 METZ
User questions about Alegra 49TY87 METZ
0 question about this device. Answer the ones you know or ask your own.
Ask a new question about this device
Download the instructions for your Television in PDF format for free! Find your manual Alegra 49TY87 - METZ and take your electronic device back in hand. On this page are published all the documents necessary for the use of your device. Alegra 49TY87 by METZ.
USER MANUAL Alegra 49TY87 METZ
Operating instruction
for TV sets with the type designation „TY”

natural_image
Modern flat-screen TV with black screen and silver stand (no visible text or symbols)21/36/04
www.metz-ce.de
Dear Customer,
thank you very much for choosing a Metz product.
We have created menu navigation in this TV set that provides you with an easy- to-understand user interface.
You can access the help menu during all modes of operation in order to make adjustments to your settings.
But before switching on for the first time, you should at any rate read chapters 1 to 5 and 9 of the user's guide.
In the box
• TV set
- Remote control + two AAA batteries
- Power cord
- Operating instructions
- Product datasheet
- Energylabel
- Unit base
Operating instructions for the following LCD TV sets:
see accompanying productdatasheet.
Explanation

Hint, note

Beware of health risks!
SIMPLIFIED EU DECLARATION OF CONFORMITY
The simplified EU declaration of conformity referred to in Article 10(9) shall be provided as follows:
Hereby, Metz Consumer Electronics GmbH declares that the radio equipment type [designation of type of radio equipment] is in compliance with Directive 2014/53/EU. The full text of the EU declaration of conformity is available at the following internet address:
https://metz-ce.de/en/support/downloads/declaration-of-conformity/#support-nav.
This product contains free software distributed under the GNU General Public License (GPL) and/or the GNU Lesser General Public License (LGPL). You may redistribute and / or publish it under the terms of the GNU General Public License and/or the GNU Lesser General Public License, as published by the Free Software Foundation, either according to version 2 of the license, or (depending on your option) any later version.
This programme is distributed in the hope that it will be useful, but WITHOUT ANY WARRANTY, especially without the implied warranty of MERCHANTABILITY or FITNESS FOR A PARTICULAR PURPOSE. Details can be found in the GNU General Public License (GPL) and the GNU Lesser General Public License (LGPL).
You can obtain the software from the Metz Consumer Electronics GmbH customer service (support-CE@metz.de or by writing to Ohmstraße 55, D-90513 Zirndorf, Germany). You can download the GNU General Public License (GPL) and the GNU Lesser General Public License (LGPL) from http://www.gnu.org/licenses/.
1 Proper use....6
2 Installation instructions....6
3 Safety instructions....7
4 Connecting, switching on and off....9
5 The remote control....11
5.1 Remote control (RM18)....12
5.2 Remote control (RM19) 14
6 Setting the language/country ..... 16
7 Help (Guide)....17
8 Menu control....18
9 Channel search .... 19
9.1 Setting the reception type....19
9.2 TV standard for analogue channels 20
9.2.1 Analogue TV channel search ..... 21
9.2.2 Colour standard for analogue channels ..... 22
9.3 DVB-T (T2), antenna supply 23
9.3.1 DVB-T(T2) channel search, automatic....24
9.3.2 DVB-T(T2) channel search, manual 25
9.4 DVB-C channel search, automatic....26
9.4.1 DVB-C channel search, manual 27
9.5 Setting the SAT system, antenna system ..... 28
9.5.1 Setting up the sat system, Unicable (EN50607), JESS (EN50607) 29
9.5.2 Setting the sat system, LNB supply voltage ..... 30
9.5.3 Set SAT system, DiSEqC system ..... 31
9.5.4 Set SAT system, selecting a satellite 32
9.6 SAT channel search, automatic....33
9.6.1 Automatic search 33
9.6.2 SAT channel search, manual 34
10 List of TV Stations .... 35
11 Edit favourite list .... 36
11.1 Moving channels within a list 37
11.2 Delete channel....37
11.3 Import/export channel list 38
12 Programme selection and information 39
12.1 Programme selection....39
12.2 Programme selection using the TV station list. . . . . . . . . . . . 39
12.3 Programme information (... on now) 40
13 Everyday handling....41
13.1 Changing picture settings 41
13.2 Volume settings 41
13.3 Changing the sound settings 41
13.4 Virtual keyboard....41
13.5 Search function 42
13.5.1 Search function in the TV channel lists ..... 42
13.5.2 EPG search function 43
13.5.3 Keyword search in video text 43
13.6 Status display 44
13.7 On-screen display 46
14 Time settings....48
14.1 Setting the sleep timer 48
14.2 Setting the automatic on and off times 49
14.3 Setting the Time and Date....50
14.4 Recording control (setting lead and delay times) ..... 51
15 Subtitles .... 52
15.1 Select language 53
16 Picture settings....54
16.1 Profile adjustment settings....54
16.2 Setting your own profile 55
16.2.1 Select profile....55
16.2.2 Assigning a selected profile 57
16.2.2.1 HDR picture profiles 58
16.2.3 Setting zoom/automatic zoom/panorama/
image position/overscan....59
16.2.4 MPEG noise reduction 60
16.2.5 Noise reduction 61
16.2.6 Colour impression 62
16.3 Picture settings for program 63
16.3.1 Adjusting the signal for a programme....64
16.4 PIP - Picture in picture 65
16.4.1 Split Screen - Progr.1 next to Progr.2 with Teletext.....66
16.4.2 Displaying the screen of an AV device 66
17 Sound settings 67
17.1 General sound settings 67
17.1.1 Volume 67
17.1.2 Equalizer 68
17.1.3 Automatic volume adjustment....69
17.1.4 Sound adjustment....70
17.1.5 Headphone volume 71
17.1.6 Bluetooth®....72
17.1.6.2 Bluetooth® playback via partner device „headphones“. 72
17.1.7 Speech intelligibility generally 74
17.2 Sound settings for program....75
17.2.1 Volume correction 75
17.2.2 Sound settings for programme position 76
17.3 Program mute....77
17.3.1 Two-channel selection 77
17.4 Audio/language selection....78
17.4.1 Audio-Description....78
17.5 Analogue output 79
17.6 Digital output 80
17.7 Switching the loudspeaker on/off 82
17.7.1 Selecting the sound output 83
17.8 Connecting headphones 85
17.9 Sound 1, Sound 2....85
18 Video text....86
18.1 Calling up video text 86
18.1.1 Double font size 86
18.2 Video text comfort functions....86
18.2.1 Structure 86
18.2.2 Cursor on (cursor page selection) 86
18.2.3 Search by keyword 86
18.2.4 Large TV screen / Small TV screen 87
18.2.5 Reveal hidden text 87
18.2.6 Setting markers for a video text page 87
18.2.7 Select next video text page marker 87
18.2.8 Video text, delete markers....87
19 Radio mode....88
19.1 DVB radio 88
19.2 Internet radio 89
20 The F-button. 90
20.1 Programming the web app function .....91
21 Start Up 92
21.1 Initial program position....92
21.2 Start-up screen....93
21.3 Switch-on behaviour....94
21.4 Quick start 95
21.5 Speakers....96
22 Parental control....97
22.1 Blocking selected channels 97
22.2 Configuring Parental Control (Basic Settings) ..... 98
22.3 Activate parental control 99
22.3.1 Activating Parental Control using the function overview . . . 99
22.3.2 Activating Parental Control using the function button ..... 99
22.3.3 Switching off Parental Control 100
23 AV devices....101
23.1 AV Connecting AV units 101
23.2 Registering AV devices 103
23.2.1 Connecting UHD/4k playback devices 104
23.3 HDMI CEC function....105
23.4 HDMI ARC function 105
23.5 Selecting signal source (AV devices) 106
24 EPG (Electronic Programme Guide) 107
24.1 Collecting EPG data 108
24.2 Exclusion of one or more channels from the EPG ..... 109
24.3 Sort EPG list by ...(Only possible in list view)....110
24.4 EPG-Selecting a programme 110
24.5 EPG: Sending reminder for a programme....111
24.6 Further options, Search....111
24.7 EPG view....111
25 Metz Media System 112
25.1 Network (LAN or WLAN) 113
25.1.1 Network configuration - automatic LAN or WLAN configuration. 113
25.1.2 Setting the LAN or WLAN network configurations manually....114
25.1.3 Setup WLAN 114
25.1.4 Testing the network connection ..... 114
25.1.5 Media Server....115
25.2 Hybrid broadcast broadband TV (HbbTV)....117
25.2.1 Accessing HbbTV 118
25.2.2 Exiting HbbTV 118
25.3 Call media library....118
25.3 Internet Timer....119
26 Internet-Portal Smart TV* 122
27 Opening the Media Player....124
27.1 Using the media player....124
27.1.1 Photos – photo overview ..... 124
27.1.2 Start show....125
27.2 Music....125
27.2.1 Slideshow with music 125
27.3 Videos 126
27.4 Data formats 126
28 Digital-/USB recording to hard disk....127
28.1 Hard disk instructions....127
28.2 Activating your TV for USB recording 128
28.3 Format external hard disk....130
28.4 Settings for the internal/external hard disk.....131
28.4.1 PVR Timer or Recording Defaults 132
28.4.2 Basic settings for series recordings ..... 133
28.4.3 Series timer recording using EPG 133
28.5 Delayed television viewing (Time shift) 134
28.5.1 Saving time shift buffer as recording....135
28.6 Recording a broadcast....136
28.6.1 Direct recording of a program ..... 136
28.6.2 Configuring a programme as a series timer ..... 136
28.6.3 EPG: Recording a programme (single or series) ..... 137
28.6.4 Accurate Recording (Accurate Rec) 138
28.7 Recording plan (Overview of programmed recording timers) 139
29 The Recordings archive....140
29.1 Playing programs from the Recordings archive ..... 140
29.2 Pause playback, Rewind, Fast-Forward ..... 140
29.3 Edit recording (marking / cutting) ..... 141
29.4 Deleting programs from the Recordings archive ..... 142
29.5 Slow motion....143
29.6 Delete protections....143
29.6.1 Activating deletion protection.... 143
29.6.2 Désactiver le protégé ..... 143
29.7 Parental control 144
29.8 Continuous playback....144
29.8.1 Activating endless playback 144
29.8.2 Deactivating endless playback 144
29.9 Change file name....145
29.10 Creating a new folder....145
30 The "File Manager"....146
31 Software update....147
31.1 Software update using the Metz homepage ..... 148
31.2 Software update over the Internet 149
32 Inserting / removing a CI/CI+ module ..... 150
33 Range of functions ..... 151
34 Operating more than one TV in a single room ..... 152
35 Glossary....153
36 Cleaning the device....156
39 Technical data 156
40 Special instructions for TV sets with OLED technology ..... 156
37 Problem, Possible causes, Remedy....157
38 Technical data....159
39 Special instructions for TV sets with OLED technology.....160
40 Taking back old appliances....161
40.1 Deleting personal data or restoring factory settings ..... 161
1 Proper use
This TV set is exclusively designed for the reception and playback of picture and sound signals.
The TV set is designed for dry rooms (living rooms and offices).
The room climate should be in a range from +5°C to +35°C with a maximum of 75% air humidity.
The TV set may not be used in rooms with higher air humidity (e.g. bathroom, sauna, etc.).
The TV set must not be used in rooms with a high concentration of dust (e.g. a workshop).
If, as an exception, you operate the TV set outdoors, then please make sure it is protected against moisture (rain, water spray, dew).
2 Installation instructions
- Make sure no bright light or sunshine falls on the screen. This can lead to reflections that impair the brilliance of the picture.
- The most favourable viewing distance is three times the screen diagonal, in sets with
- 32" screen approx. 2,4 m - 43
" screen approx. 3,3 m
- 48-50" screen approx. 3,7 m - 55
" screen approx. 4,2 m-
- 65" screen approx. 5,0 m
This distance can also be reduced by one half for HDTV.
- Antenna connecting cables and other components between the permanently installed antenna-/broadband plug and the radio receiver (e.g. TV set, video recorder) must comply with the Euro standard EN 60966-2-4.
- To connect the antenna and HDMI, you should use cables with good quality HF shielding to ensure effective contact with the connection ports. Shielding of >85 dB is required for the antenna connection cable.
- If unauthorised cables and components are used, the operating permit of the radio receiver lapses.
- Use only Metz device stands to set up the TV set on a horizontal, non-slip surface.
- Use only Metz feet to place the TV set on a horizontal, stable and non-slip surface.
- The TV set must not protrude over the edge of the surface.
- Heavy smoking in the vicinity of the LCD TV set can lead to nicotine and soot deposits behind the front panel glass and as a result to an impairment of the picture quality. Such deposits can only be removed by an expert. In extreme cases this can lead to permanent damage of the panel, making replacement of the panel necessary. Cleaning or replacement of the panel is not covered by the guarantee.
⚠️ If you want to mount the TV on the wall, we recommend using a Metz wall mount. If you decide a commercial wall mount solution, we ask to be noted that the connection must be executed properly. Due to the device the use of a Metz adapter plate may be required. The wall mount should only be performed by qualified persons. When using a third-party-solution we wish to emphasize that we have to exclude warranty, if the unit should be damaged caused by Installing the Wall Mount.
⚠ The TV set should not be mounted on the ceiling.
To prevent injuries, the TV set must be fastened safely to the floor / wall in accordance with the installation instructions.
Set up the TV set on a firm, level and stable base!
Do not place the TV set on high furniture without anchoring both the furniture and the TV set to a suitable support.
No other materials (e.g. table runners etc.) may be placed between the TV set and the furniture.
To prevent injury, the TV must be securely fixed to the floor/wall in accordance with the installation instructions.
Educate children about the dangers of climbing on furniture to reach the TV set and its controls at.
In unfavourable cases of direct sunlight, the heat generated on the rear panel of the unit can be so great that it causes damage.
When laying the power cord make sure there are no objects resting on it and that no-one can trip over it!
⚠️ Never use cleaning solution on the screen surface! If any cleaning solution penetrates beneath the screen's lower frame, it will result in irreparable damage to the components.
3 Safety instructions
Your set is designed for operation in dry rooms. If, as an exception, you operate the TV set outdoors, then please make sure that it is protected against moisture (rain, water spray, dew).
Do not expose TV set to dripping or splashes (e.g. rain)!
⚠️ Unplug electrical equipment before cleaning!
Do not hold the remote control directly in front of your eyes and press a key! Infrared light!
The TV set may only be run with a power voltage of 230-240V\~50Hz.
For maintenance and repair work the mains plug or the device plug-and-socket of the power cable of the TV set – in the meaning of the applicable standard – are to be regarded as the means for disconnection from the mains and kept in working order.
Candles and other open flames must be kept away from this product at all times to prevent fire spreading.
The unit may only be opened and repaired by a qualified specialist.
Please contact your authorised dealer if any repairs are necessary.
Bluetooth® devices work with shortwave radio signals. These can interfere with other electronic or medical devices in certain cases.
Radio waves can interfere with pacemakers and other medical devices. Maintain a distance of at least 20 cm!
RISK OF FATAL INJURIES!
- A cold device may only be turned on in a cold room once any condensation on the screen has evaporated.
- TV sets require adequate cooling. The openings at the back may not be covered by curtains, etc.
The ventilation slits on the bottom of the set must remain freely accessible, since this is how the device draws in cool air. - Make sure there is an adequate cooling air flow if you put your device into a built-in cabinet.
- Do not set up/suspend your device directly next to or above a heater; this could impair the device cooling.
- No burning candles or vessels with liquid may be placed on or above the TV set.
Hot wax and liquids that get into the interior of the device destroy the electric components of your TV set. In these cases the electrical safety of the device can no longer be guaranteed. - Thunder storms are a danger for electrical devices. If lightning hits the power cable or antenna, the device can be damaged, even if it is switched off. During thunder storms disconnect the mains plug and antenna plug from the socket or the TV set.
- No rechargeable batteries may be inserted in the battery compartment of the remote control. Only two LR03/AM4/AAA 1.5 V micro batteries may be used.
-
This TV set is exclusively designed for the reception and playback of picture and sound signals.
-
Do not display still pictures, logos, 4:3 formats with margins, etc for a long period. There is a risk that these still pictures could lead to markings on the screen.
- Soot and dust deposits can accumulate behind the front panel glass of the LCD TV set without a visible source of soot being present. These soot and dust deposits are also known as “fogging” or “magic dust”. There are scattered instances of this phenomenon, but especially during the warm-up period and after renovation work or in new constructions. Various factors are mentioned as the cause, see too the reports on the Internet. In such cases cleaning or replacement of the panel is excluded from the guarantee, since it does not involve a set defect, but rather an external influence.
- The screen surface should only be cleaned with a soft, dry cleaning cloth (e.g. microfibre cloth).
- To remove stubborn dirt or smears, it is possible to clean the screen with a slightly damp, soft cloth. Also see Chap. 29.

4 Connecting, switching on and off
Power connection
Connect the TV set to the wall socket with the accompanying power cord.
Switching on for the first time
Switch on the TV set with the mains switch on the set.
After a short waiting time, the Metz logo or a user-defined start-up picture (see Chapter 21.2) appears on the screen.
The LED display lights up green for the "On" state.
When the TV set is switched on for the first time, the "Installation Wizard" appears. It guides you through the settings that you have to make to start-up the TV set if the settings have not been done by the dealer.
This includes the language, country, reception type and so on.
After about 10 seconds the TV set switches automatically to program position 1 or the preset initial program position, see Chap. 21.1.
If no other command is received from the remote control, a message will appear after approx. 10 minutes asking for one of the remote control keys to be pressed.
Unless a button is pressed on the remote control, the TV will switch to stand-by mode after 10 minutes.
natural_image
Close-up of a shelf with two illuminated cylindrical components and a blurred silhouette of a person (no visible text or symbols)Antenna connection (back of unit on the bottom)
Connect the TV to the antenna box with an antenna cable.
Reception type DVB-C, DVB-T/T2 and analogue TV
the settings for the DVB-T antenna are described in Chapter 9.3.

natural_image
Close-up of two white plastic clips with black and white shapes, no visible text or symbolsReception type DVB-S and DVB-S2
when using a "normal" satellite antenna with two antenna feeder lines.
The settings for the satellite antenna are described in Chapter 9.5.
Recommended usage.

natural_image
Close-up of a mechanical component with two cylindrical ports and a white tool inserted (no visible text or symbols)Reception type DVB-S and DVB-S2
When using a standard satellite system with an antenna feeder line. Tandem setting in Chapter 9.5:
The same is true when using a "single cable" or a "Unicable" satellite system.
The settings for the satellite antenna are described in Chapter 9.5.
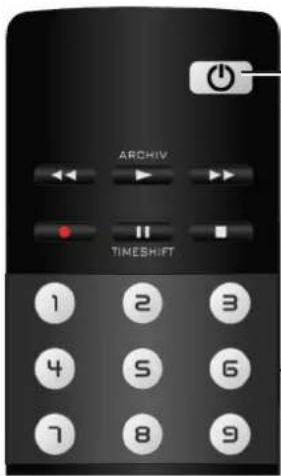
On / Off
Select programme

natural_image
Interior view of a battery pack with two batteries and one battery, showing no visible text or symbols.Switching on from stand-by mode
Use the numeric keys of the remote control to select any program.
Program position 1 is selected with the key ☑ if programmed, there is a switch to the initial program position, see Chapter 21.1.
Switching off with the remote control
Press the remote control key
The TV switches to stand-by mode and the LED display lights up.
When the LED indicator is blue, the TV set is still collecting data for the electronic programme guide or an EPG recording is in progress.
Switching off with the power switch
If the red LED display is illuminated or "EPG" appears in the display, the TV set is still gathering data for the electronic program guide.
5 The remote control
The remote control conveys commands to the TV set via infrared light. The remote control must always be directed at the TV set. Other infrared controlled devices or systems (e.g. infrared headphones) within its range could be destroyed.
Direct sunlight on the TV set may lead to disruptions, because the TV set is unable to recognise the infrared signals of the remote control. To enable the TV set to be controlled by the remote control, it cannot be switched off with the power switch.
No rechargeable batteries may be inserted in the battery compartment of the remote control!
Only two LR03/AM4/AAA 1.5 V micro batteries may be used.

The batteries that are used must not be exposed to excessive heat such as sunshine, fire or the like!

Only with integrated or external connected hard disk
5.1 Remote control (RM18)
| ON, at program position 1 or at the programmed initial program position (Chapter 21.1) | |
| OFF, enter stand-by setting | |
| When set to Play: Rewind When set to time shift: Skip backwards -20 seconds | |
| Open archive / in archive: Play | |
| When set to Play: Fast forward When set to time shift: Skip forwards one minute | |
| Start direct recording / EPG direct recording | |
| In TV mode: Start time shift | |
| In TV mode: Freeze frame, if "Timeshift" has been switched off in the function overview | |
| When set to Play: Still picture/Pause When set to Play: press and hold: slow motion | |
| Stop (when set to Play: Return to archive / when set to time shift: Switch to "Live") | |
| Select internal and external signal source (AV devices) | |
| Select HbbTV. | |
| Call up picture settings | |
| Call up sound settings | |
| Display date, time info on program. When set to time shift: Display playback position | |
| F | Open "Functions" (function keys) |
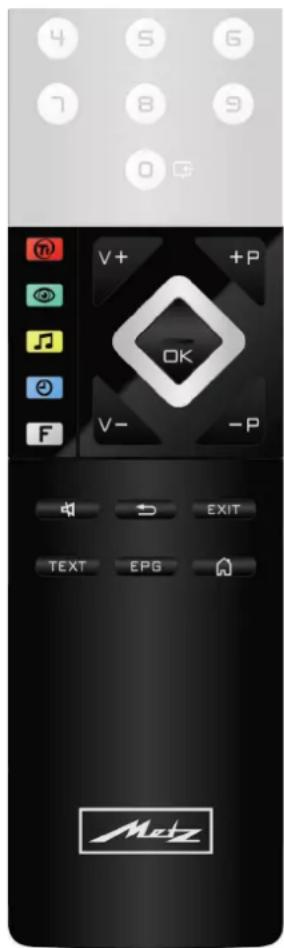

Select list of TV stations
V+ Volume +
+P Progr. +
V-Volume -
-P
Progr. -

Cursor control key/Change value
OK
Confirmation key
In the menu: Save

Mute/sound stop

Back to last program
In the menu: Go back

Leave Menu/Settings

Call up video text

Call up the electronic program guide

Open "Functional overview" menu

5.2 Remote control (RM19)

ON, at program position 1 or at the programmed initial program position (Chapter 21.1)
OFF, enter stand-by setting

When set to Play: Rewind
When set to time shift: Skip backwards -20 seconds

Open archive / in archive: Play
When set to Play: Fast forward
When set to time shift: Skip forwards one minute

Start direct recording / EPG direct recording
In TV mode: Start time shift
In TV mode: Freeze frame, if "Timeshift" has been switched off in the function overview
When set to Play: Still picture/Pause
When set to Play: press and hold: slow motion

Stop (when set to Play: Return to archive / when set to time shift: Switch to "Live")
Select internal and external signal source (AV devices)

Show picture in picture

Open the menu

Function keys

⑦ Select HbbTV
Call up picture settings
Call up sound settings
Display date, time info on program. When set to time shift: Display playback position
Open Smart TV internet portal
OK Select list of TV stations
V+ Volume +
+P Progr. +
V-Volume -
-P Progr. -
Cursor control key/Change value
OK Confirmation key In the menu: Save
Mute/sound stop
Back to last program In the menu: Go back
EXIT Leave Menu/Settings
TEXT Call up video text
EPG Call up the electronic program guide
Open "Functional overview" menu
#

OK

OK

EXIT
6 Setting the language/country
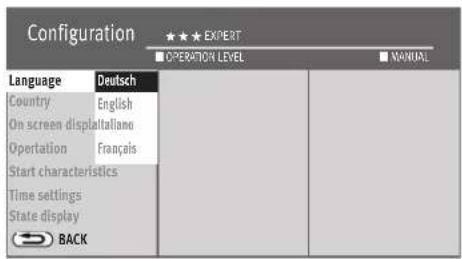
Language selection in the menu
You can select the language under "Configuration".
All texts in the menus and in the Help (information) will be shown in the chosen language.
Setting the country
The setup location or country (e.g. Germany) must be entered after setup. This assigns the device its basic settings (e.g. channel raster, sequence of channel filing, etc).
Setting the language/country:
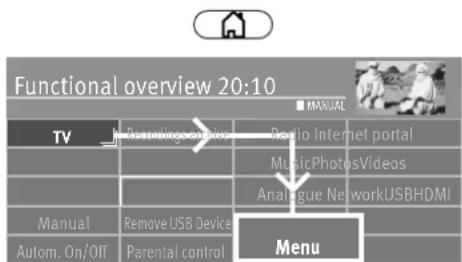
- Press button to open the "Functional overview".
- Select "Menu" with the cursor and press the button.
- Select "Configuration" with the cursor and press the button.
- Select "Language" or "Country" with the cursor in the context menu and press the OK button.
- Select your desired language or country with the cursor.
- Press the button to confirm your selection.
- Press the button to exit the menu.
#


7 Help (Guide)
In designing the TV set we took care to configure it in a way that would make it fun for you as a user to get to know the device in the easiest, most convenient manner possible.
The Help Guide can answer many of the questions you might encounter once you have set up and switched on your TV.
Just press the blue button when the menu is displayed. The table of contents for the "Guide" appears on the screen. The "Guide" can also be programmed as a function button.
The "Guide" menu or help
You can select the point you are interested in the table of contents or key word index with the cursor control key.
Move cursor to the right or down, browse the index forwards ...
Move cursor to the left or up, browse the index backwards ...
... then press the key, that you can read the explanatory text.
All underlined words, whether in the table of contents, key word index or explanatory text can be selected with the cursor. After pressing the key, the explanation is displayed.
You can browse the pages consulted backwards with the yellow button and forwards with the green button.

8 Menu control
See all the options available on your TV set in the "Functional overview".
Press the button to access the Functional overview.
Once you have opened the Functional overview, you can select the individual functions using the cursor.
Confirm your choice by pressing the button.
To change your TV settings, select "Menu" in the Functional overview and open it with the OK button.
MRNU
| Menu 20:10 | |||
| ■ MANUAL | |||
| Picture | Sound | Network | AV devices |
| TV station list | Radio station list | ||
| Recordings/EPG | Parental control | Subtitle | Service |
| Configuration | |||
| Satellite | Cable | Terrestrial | Analog-TV |
Use the MENU button on the silver remote control to open the menu.
Select the menu item that you would like to change and press the button.
Change the parameters for the selected menu item with the cursor buttons and confirm by pressing the button.
The 📁 shows the values set at the factory.
To go back one level, always press the ↻ button.
Exit the menu with the EXIT button.
9 Channel search
9.1 Setting the reception type
This TV set is equipped for up to four different reception types:
Analog-TV: The broadcasting technology that has existed for decades and which in the meantime can only be received via cable.
DVB-T(T2): The digital broadcasting technology that can be received via the up to now customary house antenna or room antenna (depending on reception conditions). Ask your local TV dealer about this, or find out more at "www.ueberall-tv.de".
DVB-C: The digital broadcasting technology that can be received via a cable connection. Ask your local cable provider.
DVB-S(2): The digital broadcasting technology that can be received via a satellite. Ask your local TV dealer about this, or find out more at „www.lyngsat.com/europe.html“
Set the reception type that you have set up.
Setting reception type:
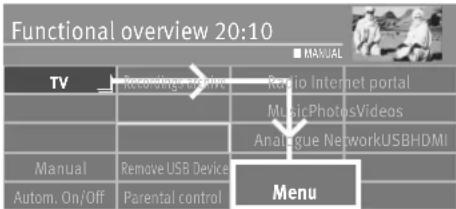
- Press button to open the "Functional overview".
- Select "Menu" with the cursor and press the button.


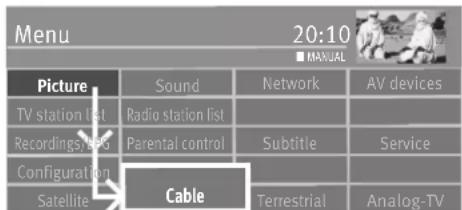

- Select the window with the cursor for the desired receiving mode, e.g. "Cable" and press the OK button.
If they are available, it is possible to configure several types of reception.
#
OK
9.2 TV standard for analogue channels
There are various TV standards worldwide for pictures and sound. If the TV standard is set incorrectly, the sound reproduction is disrupted. In the case of the TV standard “L” the picture is also broadcast according to a different standard, as a result of which the TV standard must be selected before the channel search.
The B/G TV standard is set at the factory.
Setting the TV standard:
- Press button to open the "Functional overview".
- Select "Menu" with the cursor and press the button.
- Select "Analog-TV" with the cursor and press the button.
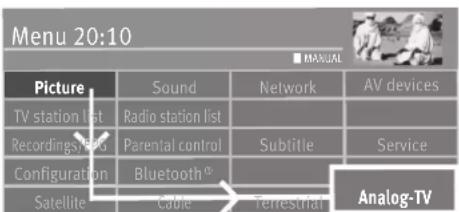
OK


EXIT
- Select "Search settings" or "TV-standard" with the cursor in the context menu and press the OK button.
- Select the desired TV standard in the context menu with the cursor and press the OK button.

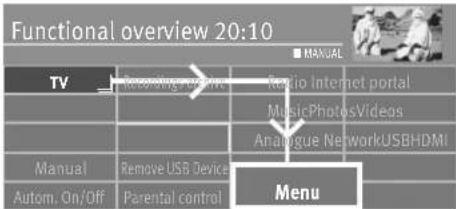
flowchart
graph TD
    A["TV"] --> B["Recording network"]
    B --> C["Radio Internet portal"]
    C --> D["MusicPhotosVideos"]
    D --> E["Analogue NetworkUSBHDMI"]
    F["Manual"] --> G["Remove USB Device"]
    G --> H["Menu"]
    I["Autom. On/Off"] --> J["Parental control"]
9.2.1 Analogue TV channel search
The entire reception range is automatically searched during the channel search. The channels found are filed in the station list, which is presented at the end of search process. You can move or delete channels that are found if you are not satisfied with the order. See Chapter "11 Edit favourite list".
Carrying out a channel search:
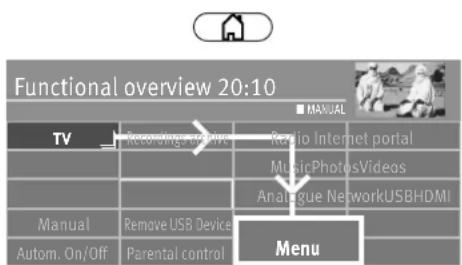
- Press button to open the "Functional overview".
- Select "Menu" with the cursor and press the button.
- Select "Analog-TV" with the cursor and press the button.
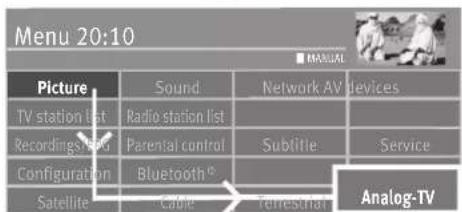


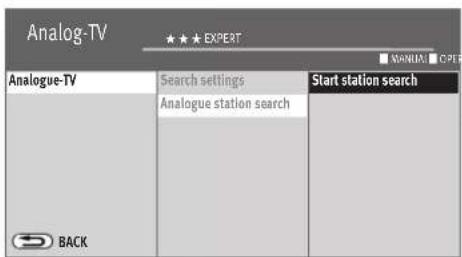

- Select "Analogue station search" with the cursor in the context menu and press the OK button.
- Press the button and start the program search.
Once your channel search is complete the results are shown in a list of TV stations.
9.2.2 Colour standard for analogue channels
The colour standard is set to "Automatic" at the factory. Normally the TV set recognises the colour standard automatically.
If this automatic function in rare instances does not produce a satisfactory result, the colour standard can also be set manually for each program position.
Setting the colour standard:
- Press button to open the "Functional overview".
- Select "Menu" with the cursor and press the button.
- The "Picture" window is highlighted in red — press the button and open the context menu.
- Select "Pict.set.,prog.posn." with the cursor in the context menu and press the OK button.
- Select "Picture format" with the cursor in the context menu and press the button.
- Select colour standard from the context menu with the cursor and press the button.
- Press the button to exit the menu.
#

OK

OK
9.3 DVB-T (T2), antenna supply
If an active antenna is used for the DVB-T(T2) reception, an antenna supply can be set.
On: Antenna supply is constantly switched on. This setting must be selected if the TV set is supplied by only one active antenna.
Switched: The antenna supply is only active if a DVB-T(T2) program position has been selected (e.g. selection of a change-over relay with simultaneous use of DVB-T antenna & broadband cable).
Off: Setting with passive antenna or joint antenna systems.
Setting the antenna supply:
- Press button to open the "Functional overview".
- Select "Menu" with the cursor and press the button.
- Select "DVB-T" with the cursor and press the button.
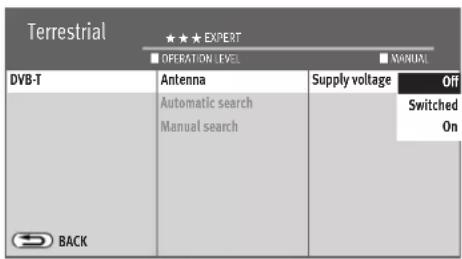

EXIT
- Select "Antenna" and "Supply voltage" with the cursor in the context menu and press the button.
- Select the desired antenna source with the cursor and press the button.
- Press the button to exit the menu.



EXIT
9.3.1 DVB-T(T2) channel search, automatic
The reception range is searched for TV channels and radio channels in the automatic channel search. The channels found are stored in a TV station list and radio station list. You can move or delete channels that are found if you are not satisfied with the order. See Chapter "11 Edit favourite list".
Carrying out an automatic search:
- Press button to open the "Functional overview".
- Select "Menu" with the cursor and press the button.
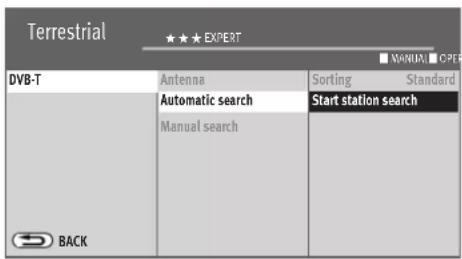
- Select "DVB-T" with the cursor and press the button.
- Select "Automatic search" and "Start station search" with the cursor in the context menu and press the Hikon.
- Select "Free-to air programmes" or "All programmes" from the context menu with the cursor and press the button to start the channel search .
Once your channel search is complete the results are shown in a list of TV stations.
9.3.2 DVB-T(T2) channel search, manual
During the manual channel search the channel or frequency of the program to be set must be known.
Carrying out a manual search:
- Press button to open the "Functional overview".
- Select "Menu" with the cursor and press the button.

- Select "DVB-T" with the cursor and press the button.
- Select "Manual search" with the cursor in the context menu and press the button.
- Select the channel number or frequency with the cursor in the context menu and press the OK button.

- Enter the channel or frequency using the numeric keys and press the button.
- After entering the channel information, select "Start station search" with the cursor in the context menu and press the button.
- Select "Free-to air programmes" or "All programmes" from the context menu with the cursor and press the button to start the channel search .
Once your channel search is complete the results are shown in a list of TV stations.


9.4 DVB-C channel search, automatic
The reception range is searched for TV channels and radio channels in the automatic channel search. The channels found are stored in a TV channel and radio station list. See Chapter 21 for DVB radio mode. You can move or delete channels that are found if you are not satisfied with the order. See Chapter "11 Edit favourite list".
Carrying out an automatic search:
- Press button to open the "Functional overview".
- Select "Menu" with the cursor and press the button.
- Select "DVB-C" with the cursor and press the button.


| Cable | ★★★ EXPERT | |
| OPERATION LEVEL | ■ MANUAL | |
| DVB-C | Automatic search | Method Channel search |
| Manual search | Symbol rate 1 6900 | |
| General settings | Symbol rate 2 ---- | |
| Symbol rate 3 ---- | ||
| Sorting Standard | ||
| Start station search | ||
- Select "Automatic search" and "Start station search" with the cursor in the context menu and press the button. The symbol rates are preset for general cable networks. If you need other values, you will receive them from your cable network provider, or you must request them. - Select "Free-to air programmes" or "All programmes" from the context menu with the cursor and press the button to start the channel search.
Once your channel search is complete the results are shown in a list of TV stations.


9.4.1 DVB-C channel search, manual
During the manual channel search the channel or frequency of the channel to be set must be known.
Carrying out a manual search:
- Press button to open the "Functional overview".
- Select "Menu" with the cursor and press the button.
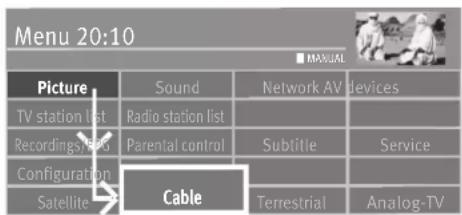
- Select "DVB-C" with the cursor and press the button.


- Select "Manual search" with the cursor in the context menu and press the button.
- Select "Channel" or "Special channel" with the cursor in the context menu and enter the desired channel using the numeric keys.
If additional data of a programme is known, then select the corresponding menu items "Modulation" and "Symbol rate" and change the setting using the cursor keys or with the numeric keys. - Select "Start station search" with the cursor in the context menu and press the OK button.
- Select "Free-to air programmes" or "All programmes" from the context menu with the cursor and press the button to start the channel search.
Once your channel search is complete the results are shown in a list of TV stations.

9.5 Setting the SAT system, antenna system
The TV set must be configured for the SAT antenna system in the "DVB-S" menu. Please ensure that the antenna connection is correct (Chap. 4.1)
Antenna system
Twin SAT
In the “2 cable” setting, the DVB-S receiver in the TV set is supplied 2 independent antenna lines in the TV set.
Single cable (single cable distribution SDC)
With the "Single cable" setting, the DVB-S receivers have one feed line. The channel selection is preset according to the structural conditions of the satellite system. No antenna control signals can be sent over the feed line.
JESS (EN50607), Unicable (EN50494)
The antenna system with a channel router feeds one cable and is designed to receive the full channel selection. For this purpose, each receiver is assigned one specific frequency in the satellite frequency range (950-2150 MHz). The channel router has multiple fixed frequencies (SCR-Freq.) saved in a frequency bank, the SCR number and the SCR frequency must match; see the instruction manual for the channel router.
Tandem (for connections with just one satellite antenna cable)
In the "Tandem" setting, the two DVB-S receivers, which are connected to the SAT bridge cable, are supplied by one feed line There are limitations on recordings (PVR recording) and PIP. It is only possible to combine stations on the same level (H/V).
#


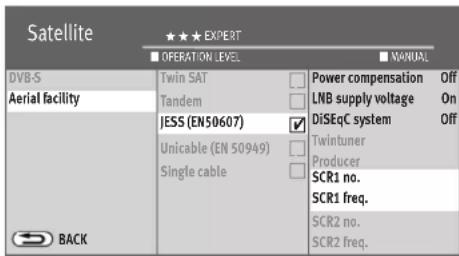

9.5.1 Setting up the sat system, Unicable (EN50607), JESS (EN50607)
(Jultec JESS, Inverto Unicable II, Kahtrein STCD2, DUR line -Unicable II, Fuba-Unicable II / connect to SAT in1)
Each DVB-S receiver must be assigned a subscriber number (SCR no.) and the associated subscriber frequency (SCR freq.) from the frequency bank (see channel router or its user's guide).
Each subscriber number and subscriber frequency may only be assigned once.
The DVB-S receiver in the TV set requests the data for the desired channel from the channel router.
Setting the SCR no. and SCR freq.:
- Press button to open the "Functional overview".
- Select "Menu" with the cursor and press the button.
- Select "DVB-S" with the cursor and press the button.
- Select "Aerial facility" and "Unicable (EN50607)" or „JESS (EN50607)" with the cursor in the context menu and press the London.
- Select "SCR1 no." or "SCR1 freq." with the cursor in the context menu and press the OK button. Enter the required data with the numeric keys.
- Press the button and confirm the data you have entered.
- Press the button to exit the menu.

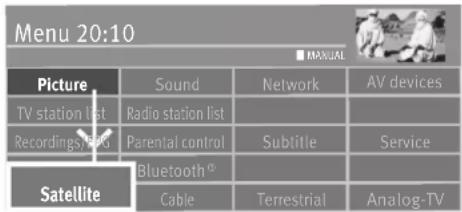


9.5.2 Setting the sat system, LNB supply voltage
The settings of the sat. antenna system must be reported to the TV set in the "DVB-S" menu.
The settings must be configured in the order shown in the right column:
LNB supply,
DiSEqC system ...etc.
LNB supply voltage
The LNB supply voltages are permanently set for selection of the polarisation (horizontal H = 18V, vertical V = 14V). Normally, you do not need to carry out any change.
If the correct voltage supply of the LNB is no longer guaranteed as a result of a long antenna cable, the supply voltage can be increased by 1V with the line compensation.
If changes are necessary, please take the following setting steps into consideration.
Changing the settings:
- Press button to open the "Functional overview".
- Select "Menu" with the cursor and press the button.
-
Select "DVB-S" with the cursor and press the button.
-
Select "Aerial facility" and "LNB supply voltage" with the cursor in the context menu and press the Hilton.
- Select LNBsupply in the context menu, choose on or off with the cursor and press the OK button.
If the TV set is connected to a 'single-cable SAT system', the LNB supply voltage must always be set to 'Off'.


EXIT
9.5.3 Set SAT system, DiSEqC system
With “DiSEqC” digital management of the satellite system via the existing antenna cable is possible and is a prerequisite for the reception of more than two satellites (e.g. Astra, Eutelsat, Hotbird).
Management of the satellite system without “DiSEqC” is no longer possible from three satellites (e.g. ASTRA 19.2°, Eutelsat 16°, Hotbird 13°).
Switching DiSEqC system on, -off:
- Press button to open the "Functional overview".
- Select "Menu" with the cursor and press the button.
- Select "DVB-S" with the cursor and press the button.
- Select "Aerial facility" and "DiSEqC system" with the cursor in the context menu and press the OK button.
- Turn on the "DiSEqC system" in the context menu using the cursor and press the OK button if DiSEqC components are integrated into your SAT antenna system.
- Press the button to exit the menu.


9.5.4 Set SAT system, selecting a satellite
Up to four satellites can be set in the "DVB-S" menu if "DiSEqC" is switched on.
The LNB frequency serves as toggle switch for the frequency band (high band - low band). The standard factory settings are low band 9.75 GHz and high band 10.60 GHz.
Setting additional satellites:
- Press button to open the "Functional overview".
- Select "Menu" with the cursor and press the button.
- Select "DVB-S" with the cursor and press the button.
- Select the desired satellite in the context menu with the cursor and press the button. If your satellite system is equipped to receive signals from two satellites, then you also have to configure the second satellite.
- Press the button to exit the menu.
- Select "Low band" or "High band" with the cursor. The settings depend on the components used of the satellite system. Please consult the data sheet or sticker of the LNB(s) used for the settings required.
- Confirm the settings by pressing the button.
- Close "Menu" by pressing the button.
#

OK

OK
| Satellite | ★★★ EXPERT | |
| OPERATION LEVEL | MANUAL | |
| DVB-S | Astra 19,2° | Satellite Astra 19,2° |
| Aerial facility | Hot Bird 13° | Method Fast search (NIT) |
| Automatic search | Sorting Standard | |
| Manual search | Start station search | |
| BACK | ||

EXIT
9.6 SAT channel search, automatic
9.6.1 Automatic search
The reception range is searched for TV channels and radio channels in the automatic channel search. The channels found are stored in a TV station list and radio station list. You can move or delete channels that are found if you are not satisfied with the order. See Chapter "11 Edit favourite list".
The search only works properly if the LNB frequencies have been correctly set and saved.
Carrying out an automatic search:
- Press button to open the "Functional overview".
-
Select "Menu" with the cursor and press the button.
-
Select "DVB-S" with the cursor and press the button.
- Select "Automatic search" with the cursor in the context menu and press the button.
- Select the desired satellite in the context menu with the cursor and press the button.
- Select "Start station search" with the cursor in the context menu and press the button.
- Select "Free-to air programmes" or "All programmes" from the context menu with the cursor and press the button to start the channel search.
The "Method" menu item should be set to channel search (factory setting). If the station search does not find all the stations, change the Method setting to "Precision search".
Once your channel search is complete the results are shown in a list of TV stations.

9.6.2 SAT channel search, manual
During the manual channel search the frequency, symbol rate and polarisation of the channel to be set must be known. Find out about the channel data e.g. at "www.lyngsat.de".
Carrying out a manual search:
- Press button to open the "Functional overview".
- Select "Menu" with the cursor and press the button.

- Select "DVB-S" with the cursor and press the button.
- Select "Manual search" with the cursor in the context menu and press the button.
- Select the desired satellite in the context menu with the cursor and press the button.
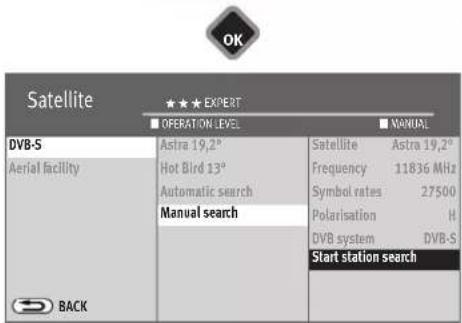
- Use the cursor key in the context menu under "Frequency", "Symbol rates", "Polarization" and "DVB-System" to set the values corresponding to the station to be searched for.
For the HD-SAT station search, the information for the DVB system (for example DVB-S2) must also be entered.
- Select "Start station search" with the cursor in the context menu and press the OK button.
- Select "Free-to air programmes" or "All programmes" from the context menu with the cursor and press the obiton to start the channel search .
Once your channel search is complete the results are shown in a list of TV stations.

10 List of TV Stations

Once you have completed the channel search, the results are presented in a list (All TV channels) and then saved as a list of favourites as "TV List 1".
Under "Details", you can make the following changes/additions:
- Include channel in EPG yes/no (also see 24.2)
- Block channel (parental control settings) yes/no (also see 22.2)
- Delete or move channel (see Chap. 11.2)
- Search station name (see Chap. 13.5.1)
under "Details"
- Signalquality
- Image correction for colour intensity and signal contrast
- Volume correction (see Chap. 17.2.1)
- Search name

The TV station list can be opened while the TV is in use by pressing the OKton.
You can, if needed, create up to eight further TV/radio channel lists (see Chap. 11).
These additional channel lists can be customised to meet the personal preferences of the users (only sports channels, documentaries, news, etc.)
#




11 Edit favourite list
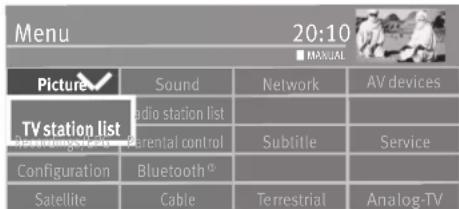
You can edit the list on the left yourself ("TV List 1" or "Radio List 1") by moving or deleting stations.
The list on the right shows all stations found and cannot be changed.

- Press button to open the "Functional overview".
- Select "Menu" with the cursor and press the button.
- Select "TV station list" with the cursor and press the button.
- Press the red button, use the cursor buttons to select "Add list" and press the button.
- Enter a new name for the list using the displayed on-screen keyboard and confirm it by pressing the green 📂.
- TV channels to be imported into the new list should be marked in the "All TV channels" list on the right.
Block selection
- Use the cursor to go to the first programme position of the desired time slot and select it with OK
- Use the cursor to go to the last programme position of the desired time slot and select it with OK.
-
Change to the middle selection column using the cursor, select "Mark block", and press the OK button.
-
Use the cursor buttons to change to the middle selection column.
- Select "Add" with the cursor buttons and press the button. The marked channels are moved to the new list.
- You can switch between the lists using the yellow button and the red button.
If a Favourites list is displayed on the left-hand side, the stations contained in the Favourites list are marked with an asterisk ★ in the "All TV stations" table.
11.1 Moving channels within a list
It is generally only possible to move channels in the lists on the left.
- Press the red button and select a favourites list with the cursor buttons.
- Press the button to open the selected favourites list.
- Use the cursor to select the channel you would like to move.
- Press the button and highlight the channel.
- Change to the middle selection column using the cursor, select "Shift", and press the OK button.
Use the cursor buttons to select the position at which the channel is to be added. Press the button on to move the channel to this new position.
Alternatively, change to the middle selection column using the cursor, select "Insert here", and press the Hilton.
It is also possible to move several channels at once to the channel list. To do this, refer to "Marking a block" on the previous page.
11.2 Delete channel
It is generally only possible to delete channels in the lists on the left.
- Press the red button and select a favourites list with the cursor buttons.
- Press the red button to open the selected favourites list.
- Use the cursor to select the channel you would like to delete.
- Taste drücken und den Sender markieren.
- Use the cursor to change to the middle selection column.
- Use the cursor to select "Remove entries" and press the button.
It is also possible to delete several channels from the channel list at the same time. See "Selecting a block" on the previous page.

11.3 Import/export channel list
The channel list can be transferred from one Metz TV set to another using a USB stick.
Export channel list
- Insert USB stick.
- Press button to open the "Functional overview".
- Select "Menu" with the cursor and press the button.
- Select "TV station list" with the cursor and press the button.
- You can switch between the lists using the yellow button and the red button.
- Use the cursor buttons to switch to the middle selection column, select "Export station lists", and press the button. The file manager opens.
- On TV sets with an internal hard disk, press the red key and open the destination directory selection..
- Select the desired target directory with the cursor key.
- Press the cursor key > and select "Export station lists" and confirm with the button OK
- Press the button to exit the menu.
- Use the cursor to select "Remove USB device" and press the button.
- Remove the USB stick and insert it into another Metz TV set.
Import channel list
- Press button to open the "Functional overview".
- Select "Filemanager" with the cursor and press the button.
- Select the USB stick with the red button and press.
- Use the cursor to select the file "station list..." and press OK
- Use the cursor buttons to switch to the middle selection column, select "Import", and press the button.
The channel list is imported into the Metz TV set.

12 Programme selection and information
12.1 Programme selection
The TV set can administer a maximum of 10000 TV and 3000 radio programme positions. These programme positions can be selected with the numeric keys, P+/P− or using the TV station list.
When selecting via the numeric keys, the first numeric keys pressed indicates the fourth position after the decimal point. If fewer than 1000 program positions exist, the entry automatically moves to the third position after the decimal point. If fewer than 10 program positions exist, the entry automatically moves to the first position after the decimal point. After pressing a numeric key, you have a time window of three seconds to press additional numeric keys. The program can be changed immediately by pressing the
12.2 Programme selection using the TV station list
In TV or Radio mode, press the button to display the channel list.
- Press the red button and use the cursor buttons to select the desired channel list if favourites lists have been created.
- Use the cursor to select programmes from in the table that appears. Use the P+/P− button to jump to the next or previous 10 programmes.
Press the button to display the AV programme positions. You can display the program selected with the key - Pressing the yellow button displays all HD channels stored in the station list.
- Pressing the red button will display all of the lists.
Search station name
- Press the green button to open a virtual keyboard. You can enter the name of the channel you would like to find here.
- Press the green button or Confirm
- Use the cursor to select "Cancel" or "Delete" and press the button.

12.3 Programme information (... on now)
A pane appears at the bottom of the screen after switching to a new programme position or pressing the blue ☑. The pane shows the following information:
- programme place number, audio mode (stereo/mono), programme start and end time, progress bar, channel, channel name, date and time of day, time and name of next programme.

This overlay may not work when the HbbTV feature is turned on because the HbbTV application on the broadcaster uses the colored buttons for HbbTV.
To hide the information press the button or the blu button or wait about six seconds.


13 Everyday handling
13.1 Changing picture settings
The picture settings can be accessed via the green key. The settings box with the individual functions (see picture) appears on the key left of the screen.
Select and adjust the desired function using the cursor.
13.2 Volume settings
Use the V+/V- key to change the volume.
13.3 Changing the sound settings
The sound settings can be accessed via the yellow key.
The settings window appears on the screen with the individual functions.
Select and adjust the desired function using the cursor.
13.4 Virtual keyboard
A virtual keyboard appears for some applications. If you want to change the keyboard layout, choose the symbol on the virtual keyboard, press, and select the language with the cursor.
Press the Button (for black remote controls) or the, or F3F2J1 buttons (for silver remote controls), you can programme and recall a number of functions (Chap. 20). These programmed functions are then Quick Access. The programmed functions can be triggered immediately as a quick setting.
The factory settings are marked with a "ʌŋs".


The TV offers a variety of search functions, which can be formulated using a virtual keyboard.
13.5.1 Search function in the TV channel lists
(see chap. 10)
When the TV channel lists are displayed, a virtual keyboard can be opened.
The cursor key can be used to enter a channel name or the first letter of the channel name. The TV channel list is re-sorted based on the entry.
Opening the Search function:
- Press the OK button.
- Press the green button to open a virtual keyboard,, or
open the TV channel list menu (Favourites list); to do this - Press the button to open the "Function Overview".
- Select "Menu" with the cursor and press the button.
-
Select "Search name" with the cursor and press the button drücken.
-
Select "TV channel list" with the cursor in the context menu and press the button
- Enter the desired channel name on the virtual keyboard. The selection is displayed, sorted based on the entry.
- Press the green button or Select the "Apply" field with the cursor and press; the channel or channel selection is displayed and the first channel is shown in red.
- Select the desired channel with the cursor and press the button.
EPG
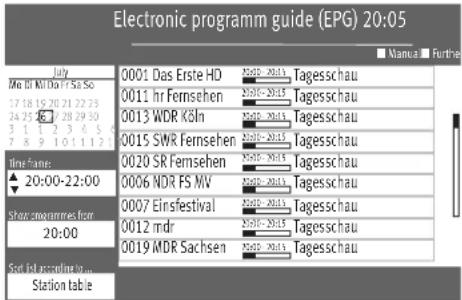
- Press the button to open the EPG.
- Press the green button and open "Further options".
- "Search" is selected.
- Press the OK
-
Enter the desired channel name on the virtual keyboard.
-
Set the "in title", "in info" or "anywhere" with the cursor and press the button.
- Press the green button; the channel and its programme selection are displayed.


13.5.3 Keyword search in video text
It is possible to search videotext by keyword.
- Press the button to open the comfort functions.
- Set the "Search for keyword" with the cursor and press the button.
- Use the cursor button to enter the keyword, e.g. "FORMULA 1", on the virtual keyboard.
- Use the cursor button to select the field "Whole word" or "Word part" and press the OK button.
Press the obiton to initiate the videotext keyword search. While the search is running, a circle rotates in the videotext header. The number of pages found on which the keyword occurs is shown to the right of the circle. - Use the P+/P- buttons to select the pages.
- Press the button to exit search mode.

13.6 Status display
Depending on the equipment, some TV sets offer a status display in which various overlays can be shown.
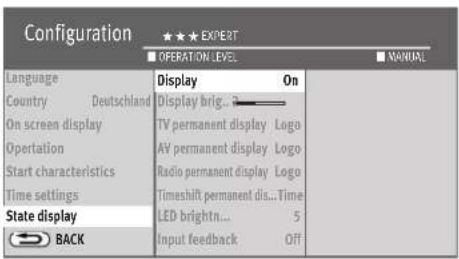
Display
In principle, the status display can be switched on or off.
Display brightness
When the status display is switched on, the display brightness can be adjusted in 5 steps.
TV, AV and radio permanent display
The display can be set to show either the "time" or the "logo".
Timeshift permanent display
With the "Time" setting, the time offset to live TV operation is displayed in timeshift mode. With the setting "Symbol", the status display in the top left-hand corner:
- in timeshift recording mode TS II is displayed, - during timeshift playback TS▶ is displayed.
LED brightness
If the input feedback is switched on, a blue light dot appears in the middle of the status display with each keystroke on the remote control as feedback.
Input feedback
If "On" is selected, the blue LED of the TV set flashes briefly for feedback when a key on the remote control is pressed. If "Off" is selected, no feedback is given by the blue LED of the TV set.
#

Set state display
- Press button to open the "Functional overview".
- Select "Menu" with the cursor and press the button.
- Select "Configuration" with the cursor and press the button.
- Use the cursor key to select "Status display" in the context menu and press the key.
- Use the cursor key to select the desired menu items and press the key. Make your desired settings here.
- Press the button to exit the menu.

OK

OK

EXIT
13.7 On-screen display
The screen display can be configured according to your own wishes and needs.
Color
The colour of the on-screen menus can be designed differently.
- Standard: The on-screen menu is highlighted in light colours.
- Dark: The on-screen menu is highlighted in dark colours.
- Auto: The on-screen menu is highlighted in light or dark colours, depending on the brightness of the room.
Program information
- At programme switch:
The fade-in duration of the programme information can be configured for 2, 4 or 6 seconds or can be switched off completely. - Additional info symbols:
In addition to the programme information, info icons can be switched on in a vertical bar on the left. - HDMI video signal details:
Additional format details can be displayed for HDMI sources.
Volume visible
The insertion of the volume adjustment when pressing the V+/V-keys can optionally be switched off.
- With bar and value:
When using HDMI-ARC, a display without bar and value is recommended. An alternative display variant can therefore be selected as an option.
CEC key forwarding
If a CEC device (e.g. BD player) is connected via an HDMI socket which is to be controlled with the Metz remote control, then button presses which are forwarded to the CEC device are indicated in the top left corner by a briefly displayed HDMI socket symbol. This optical feedback can be switched off.
#

Set screen display
- Press button to open the "Functional overview".
- Select "Menu" with the cursor and press the button.
- Select "Configuration" with the cursor and press the button.
- Use the cursor key to select "On screen display" in the context menu and press the OK key.
- Use the cursor key to select the desired menu items and press the key. Make your desired settings here.
- Press the button to exit the menu.
OK

OK


EXIT
#
OK
14 Time settings
14.1 Setting the sleep timer
The sleep timer switches the TV set off after a period you set (15 min steps).
Setting the sleep timer:
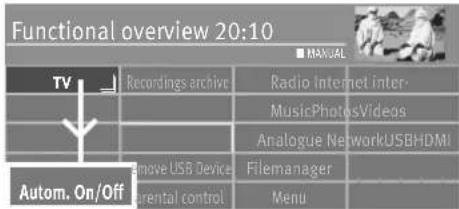
- Press button to open the "Functional overview".
- Select "Autom. On/Off" with the cursor and press the button.


- Select "Sleep timer" with the cursor in the context menu and press the button.
ngs ar- - If 15 minutes are enough, click on the box and press the button. OK

OK
- For a longer duration, select the box and press the button to increase the sleep timer in 15 minute increments.
- For a shorter duration, select the 1.5x mind press the button to increase the sleep timer in 15 minute increments.
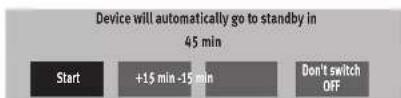
- Once you have set the time, select and press the button. OK Once the set time has expired, the TV switches to stand-by mode.
#




14.2 Setting the automatic on and off times
The TV can be programmed to switch on or off at specific times.
The switch-on time switches on the TV set automatically at a time you set.
The switch-off time switches off the TV set automatically at a time you set.
Setting switch-on time, switch-off time:
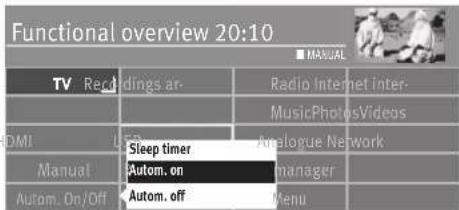
- Press button to open the "Functional overview".
- Select "Autom. On/Off" with the cursor and press the button.
- Select "Autom. On" or "Autom. Off" with the cursor in the context menu and press the OK button. The button is marked in red.
- Select Using of Clayorsor buttons in the context menu and press the button.
- Enter the desired time using the number keypad and confirm Suppliesing the OK button.
- Select using the cursor buttons in the context menu and press the button. OK Use the cursor buttons to select the days on which the TV should be timed to switch on and press the button. Finally, select and confirm by pressing the button. OK
- Press the OK to confirm the box. The switch on/switch off time is confirmed by the tick mark
- Press the button to exit the menu.
When the time of the "Switch-on time" is reached, the TV set is switched on from the stand-by mode (red LED on). The automatic switching on must be activated with any key of the remote control, otherwise the TV set switches back to stand-by mode after about 10 minutes. After automatic switch on message is displayed, you must press the key. This ensures that the TV set does not remain switched on when you are not at home

14.3 Setting the Time and Date
Normally, the TV set will determine the current date and time from the Teletext signals of the currently selected station.
If this is not the case, or if an incorrect date or time is displayed, you can set the date and time manually.
In almost all cases, you will not need to do this. Even the changeover between winter time and summer time is executed automatically.

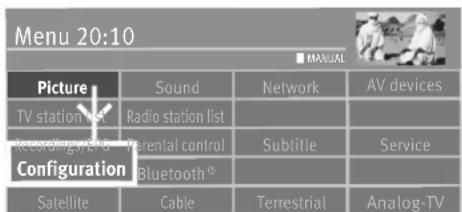
Setting the time and date manually:
- Press button to open the "Functional overview".
- Select "Menu" with the cursor and press the button.
- Select "Configuration" with the cursor and press the button.
- Select "Time settings" with the cursor in the context menu and press the button.
- Select the desired menu item with the cursor and press the button.
- Use the numeric keys to enter the time or date and confirm using the button.
- Press the button to exit the menu.
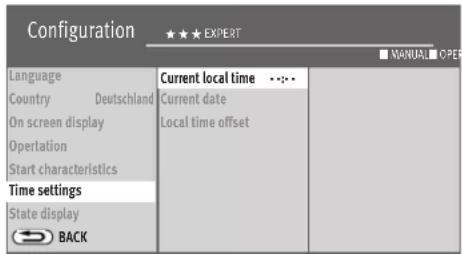
The local time offset is the difference between the local time where the TV set is installed and Greenwich Mean Time (GMT). The TV set normally detects this time offset and also the additional changeover to summer time. If the local time is not correct, verify your country settings.
The time needs to be set manually only if it is not detected automatically.

EXIT


14.4 Recording control (setting lead and delay times)
You can set the lead and delay times for a recording under "Recordings/EPG" in the menu.
Example: You want to record a TV programme on the internal hard disk or, via USB recording, on an external hard disk (also see Annex B) and you programme the recording timer with the EPG. According to the EPG (electronic programme guide, also see Chapter 25), the starting time for the recording is 21:10, and the end time is 21:35. To account for any delays in the programme, you set the lead and overrun times to five minutes each. That means that your recording begins at 21:05 (5 minutes lead time) and ends at 21:40 (5 minutes overrun time).
When using an external AV device (e.g. video recorder, hard disk recorder, etc.) the timer data given in the example must also be used for the AV device.
Setting the lead time and overrun time:
- Press button to open the "Functional overview".
- Select "Menu" with the cursor and press the button.
- Select "Recordings/EPG" with the cursor and press the button.
- Select "Lead time" with the cursor in the context menu and press the button.
- Select the desired time (1 min - 60 min) and press the button.
- Select "Overrun time" with the cursor in the context menu and press the button.
- Select the desired time (1 min - 60 min) and press the button.
- Press the bEXITon to exit the menu.
#

OK
15 Subtitles
People with a hearing impairment can make use of the subtitles function. By default, the "Subtitles" function has to be activated first of all via the menu.
Switch subtitles on or off in general:
- Press button to open the "Functional overview".
- Select "Menu" with the cursor and press the button.
- Select "Subtitle" with the cursor and press the button.
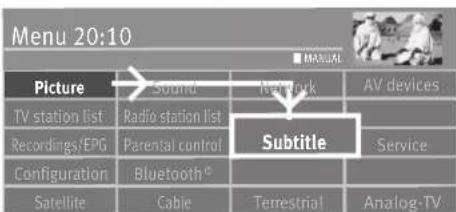
OK
- Use the cursor to select "on" or "off" and press the button.
When "Subtitle on" is set, subtitles are displayed whenever they are provided by the broadcasting channel. - Select "Select language" with the cursor in the context menu and press the button.
- Set the desired language with the cursor and press the button.
- Press the button to exit the menu.
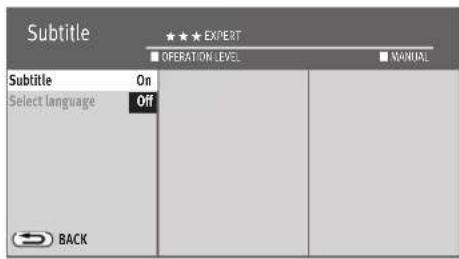

EXIT
Temporarily displaying subtitles
When "Subtitle off" is set, it is possible to temporarily display the subtitles.
To do this, programme the "Subtitle" function on the button (only for black remote controls) or the , or buttons (only for silver remote controls; see section 20).
- Press the button or the , or buttons, then use the numeric button to select the field which is assigned the "Subtitle" function.
The subtitles are displayed until you change the channel.
#
OK
15.1 Select language
You can select the language to show subtitles from a list.
- Press button to open the "Functional overview".
- Select "Menu" with the cursor and press the button.
- Select "Subtitle" with the cursor and press the button.
- Use the cursor to select "Select language" and press the button.
- Use the cursor to select "Preferred", "Alternative 1" or "Alternative 2" and press the OK button.
- Press and choose the language you want with the cursor.

OK


EXIT
- Press the button.
- Press the button to exit the menu.
#
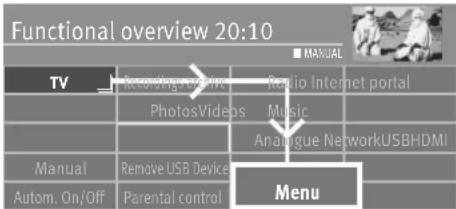
OK
| Menu 20:10 | |||
| Picture | Sound | Network | AV devices |
| TV station list | Radio station list | ||
| Recordings/EPG | Parential control | Subtitle | Service |
| Configuration | Bluetooth ^a | ||
| Satellite | Cable | Terrestrial | Analog-TV |
OK
| Picture ★★★ EXPERT | ||
| ■ MANUAL ▪ OPER | ||
| General Programme position Profile adjustment for BACK | Eco Television Sport Gaming PC monitor Cinema Photo Users | Bright, basic 70% Brightness 400% Colour intens. 60% Picture shar... 4 Control Ambilight+picture cont. Sensor sens.. 5 Colour impression harmoniously Colour accentuation Light Dyn. contrast Auto Dynamic black level Yes Noise reduction Automatic MPEG noise reduction Medium Motion compens. noxle Medium Gemma 2,2 Extended Colour Ganut Auto Load factory settings |
16 Picture settings
16.1 Profile adjustment settings
They make it possible to always produce the best picture reproduction quality for different types of broadcasts or the playback of different video sources.
The "Eco" profile represents a good compromise for all types of broadcasts and is set at the factory. The various picture profiles are set at the factory, but the settings can be overwritten.
To achieve the maximum picture reproduction quality in individual cases, it makes sense to assign the appropriate profile to a special application.
As a technically experienced person, you also have the option of adjusting each individual profile yourself as well as creating your own additional profile according to your own taste.
Select profile adjustment:
- Press button to open the "Functional overview".
- Select "Menu" with the cursor and press the button.
- Select "Picture" with the cursor and press the button.
- Select "Profile adjustment" using the cursor button in the context menu and press the OK button.
- Set the desired setting with the cursor and press the button.
- Press the button to exit the menu.
Extended colour Gamut: The number of colours that our panel can display is greater than the range usually supplied by the station or input device. Only the HDR signal sources use this extended colour space. This feature gives customers more intense, albeit sometimes non-standard, colours.
Gamma affects the image's grey gradation but not the white or the black. A higher gamma makes the medium shades of grey darker and makes images easier to see in a darker viewing environment while a lower gamma is more suited to lighter settings.

16.2 Setting your own profile
16.2.1 Select profile
Various picture profiles can be set in the menu item "Profile adjustment".
Eco-Mode
The "Eco" setting represents a good compromise between energy consumption and picture quality. In addition, the TV set switches to stand-by mode if no key has been pressed for 4 hours.
Demo
The "Demo" setting is optimised for screening rooms, but this is associated with higher energy consumption. Demo mode is not designed for continuous operation and is therefore limited to 30 minutes.
Preferred setting for the TV set
The setting "Television" with the control "Room and picture content dependent" is recommended, as this allows the unit to adapt optimally to the ambient light conditions and the playback situation.
The energy consumption depends on the lighting situation at the installation site and may be higher than in eco mode.
Set picture profile:
- Press button to open the "Functional overview".
- Select "Menu" with the cursor and press the button.
- Select "Picture" with the cursor and press the button.
- Select "Profile adjustment" using the cursor button in the context menu and press the OK button.
- Set the desired setting with the cursor and press the Hikon.
- Select the desired picture profile using the cursor and press the button.
- Use the cursor key to change the setting and press the key.
#


EXIT
With the setting "Eco", "TV", "Sport", "Games", "Cinema" and "User", the control modes described under a) and b) can be set additionally.
a) Off:
Brightness is set to maximum (maximum power consumption).
b) Ambient light-dependant:
The brightness is governed by the room light and always provides the same picture appearance regardless of changes in room lighting.
c) Depending on picture (not applicable for OLED devices):
The brightness is governed by the picture content. In the case of dark picture content, the brightness is reduced to increase contrast.
d) Manual:
The brightness is set to a fixed value in the menu.
e) Ambilight+picture content (not applicable for OLED devices):
Combination of b) Ambient light-dependent and c) picture content dependent The level control indicates the level of brightness currently in operation.
The brightness of the screen is automatically adjusted, depending on the power option set. The brightness of the screen has influences the device's power consumption.
- Save the power option set by pressing the button.
- Press the button to exit the menu.
Sensor sensitivity
The sensor sensitivity for the ambient light sensor can be set depending on the light source and the resulting lighting conditions.

16.2.2 Assigning a selected profile
The image profiles that were previously set can now be generally assigned to all or individual programme positions.
Profile settings:
- Press button to open the "Functional overview".
- Select "Menu" with the cursor and press the button.
| Menu 20:10 | |||
| Picture | Sound | Network AV devices | |
| TV station list | Radio station list | ||
| Recordings/EPG | Parental control | Subtitle | Service |
| Configuration | Bluetooth® | ||
| Satellite | Cable | Terrestrial | Analog-TV |
- Select "Picture" with the cursor and press the button.
- Select "Picture" with the cursor and press the button.
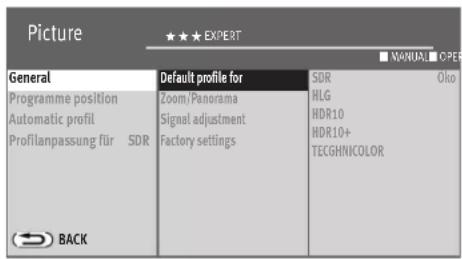
- Select "General" or "Programm position" with the cursor in the context menu and press the OK button.
- Set the desired setting with the cursor and press the button.
- Press the button to exit the menu.
An image profile can be changed temporarily during a broadcast by pressing the green image profile button.

EXIT


16.2.2.1 HDR picture profiles
The HDR picture profiles HLG, HDR, HDR10, HDR10+, Dolby Vision and TECHNICOLOR depend on the equipment of the TV set (see product data sheet) and the source or input signal.
Dolby Vision
The Dolby Vision logo appears on the screen when the corresponding source or input signal is present.
Technicolor®
Technicolor® technology allows you to enjoy more vibrant colours.
Devices with Advanced HDR by Technicolor technology allow you to experience the widest range of content - from libraries of blockbuster movies and games, to live sports and TV shows - in vivid "HDR".
Advanced HDR by Technicolor® is a designation and trademark
Metz Technicolor function
A "quasi Technicolor" function can be set in TV mode.
- Press the green button. The context menu opens.
- Select "Picture profile" with the cursor key.
- Select "Technicolor HDR" with the cursor key.
Dolby, Dolby Vision, Dolby Audio, and the double-D symbol are trademarks of Dolby Laboratories Licensing Corporation. Manufactured under license from Dolby Laboratories. Confidential unpublished works. Copyright © 1992–2020 Dolby Laboratories. All rights reserved.
#

OK
16.2.3 Setting zoom/automatic zoom/panorama/image position/overscan
The image settings (zoom, image position vertical, automatic zoom, overscan, and panorama; see Terms for definitions) can be globally applied to all programmes and saved.
Setting zoom/panorama/overscan mode:
- Press button to open the "Functional overview".
- Select "Menu" with the cursor and press the button.
- Select "Picture" with the cursor and press the button.
| Menu 20:10 | |||
| Picture | Sound | Network AV | devices |
| TV station list | Radio station list | ||
| Recordings/EPG | Parental control | Subtitle | Service |
| Configuration | Bluetooth® | ||
| Satellite | Cable | Terrestrial | Analog-TV |
OK
| Picture | ★★★ EXPERT | |
| OPERATION LEVEL | MANUAL | |
| General | Default profile for | Zoom value 0 |
| Programme position | Zoom/Panorama | Panorama |
| Automatic profil | Signal adjustment | Picture pos.,vert. 0% |
| Profilanpassung für SDR | Factory settings | Pan. mode Non-linear Automatic zoom On(AV max.2) |
| Overscan Off | ||
| BACK | ||

EXIT
- Select "Zoom/Panorama" with the cursor in the context menu and press the button.
- Select the desired parameter with the cursor and press the button.
- Change the desired parameter with the cursor and press the button.
- Press the button to exit the menu.
The functions "Panorama" and "Zoom" can also be combined with each other.
#

OK

OK
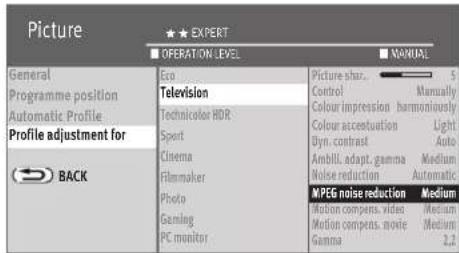

EXIT
16.2.4 MPEG noise reduction
System related digital picture errors can occur in TV programs that were produced digitally. These picture defects can appear as a rectangular pattern (formation of tiny blocks) in moving areas.
These picture faults can be reduced using MPEG noise reduction.
The rectangular pattern (formation of tiny blocks) can be corrected in the “MPEG noise reduction” menu item.
Setting MPEG noise reduction:
- Press button to open the "Functional overview".
- Select "Menu" with the cursor and press the button.
- Select "Picture" with the cursor and press the button.
- Select "Profile adjustment" with the cursor and press the button.
- Select the desired picture profile using the cursor and press the OKton.
- Select "MPEG noise reduction" with the cursor in the context menu and press the OK button.
- Choose the desired setting "Light", "Medium", "Strong", or "Off" and press the OK button.
- Press the button to exit the menu.
#
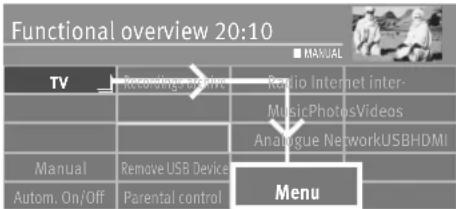
OK
| Menu 20:10 | |||
| Picture | Sound | Network AV | devices |
| TV station list | Radio station list | ||
| Recordings/EPG | Parental control | Subtitle | Service |
| Configuration | Bluetooth® | ||
| Satellite | Cable | Terrestrial | Analog-TV |
OK
| Picture ★★ EXPERT | ||
| OPERATION LEVEL | NANUAL | |
| General Programme position Picture profile adjustment BACK | Eco Television Technicolor HDR Sport Cinema Filmmaker Photo Gaming PC monitor | Energy setup Presentation Control Ambilight+picture cont. Sensor sens.. 5 Colour impression harmoniously Colour accentuation Light Dyn. contrast Auto Dynamic black level Yes Noise reduction Automatic MPEG noise reduction Medium Motion compens. movie Medium Gamma 2,2 |

EXIT
16.2.5 Noise reduction
Faults can occur in the event of unfavourable reception conditions, an antenna signal that is not strong enough or in very old films. To compensate for a “noisy” picture, noise reduction can be enabled.
Setting the noise reduction:
- Press button to open the "Functional overview".
- Select "Menu" with the cursor and press the button.
- Select "Picture" with the cursor and press the button.
- Select "Profile adjustment" with the cursor and press the button.
- Select the desired Profile using the cursor and press the button.
- Select "Noise reduction" with the cursor in the context menu and press the button.
- Choose the desired setting "Light", "Medium", "Strong", "Automatic" or "Off" and press the OK button.
- Press the button to exit the menu.
#

OK
16.2.6 Colour impression
The colour impression can be set to five different values, depending on the personal impression. New findings are constantly being made on the influence of blue light components. Blue light keeps us awake and helps us to concentrate, which hinders melatonin release and can result in sleep problems in many people.
Setting the colour impression to a lower colour temperature is recommended. This has the best effect in the setting "Night mode".
Setting the colour impression:
- Press button to open the "Functional overview".
- Select "Menu" with the cursor and press the button.
- Select "Picture" with the cursor and press the button.
- Select "Picture profile adjustment" with the cursor and press the button.
- Select the desired picture profile using the cursor and press the button.

OK


EXIT
- Select "Colour impression" with the cursor in the context menu and press the button.
- Choose the desired setting "Cold", "Harmoniously", "Warm", "Low blue light" or "Auto" and press the 🔊.
- Press the button to exit the menu.
#


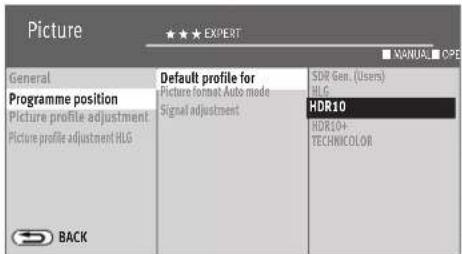

16.3 Picture settings for program
If the general settings for individual programme positions do no produce a satisfactory result, it is possible to configure custom settings for "Pict.set.,prog.posn." for nearly all "General". This custom setting applies only to the selected programme position and overrides the general settings.
Divergent picture settings for this program position:
- Select the program position whose picture settings you wish to adapt.
- Press button to open the "Functional overview".
- Select "Menu" with the cursor and press the button.
-
Select "Picture" with the cursor and press the button.
-
Select "Programme position" with the cursor in the context menu and press the OK button.
- Select the desired parameter with the cursor and press the button.
- Change the desired parameter with the cursor and press the button.
- Press the button to exit the menu.

16.3.1 Adjusting the signal for a programme
The settings in the "Signal adjustment" menu are optimised for the picture settings and should not be changed. If the settings in the "Signal-contr..." menus are changed, this will usually lead to a deterioration in picture quality.
It is recommended that changes only be made if an AV device (such as a video recorder) is connected and does not generate a satisfactory image.
Setting signal adjustment:
- Press button to open the "Functional overview".
- Select "Menu" with the cursor and press the button.
| Picture | Sound | Network | AV devices |
| TV station list | Radio station list | ||
| Recordings/EPG | Parental control | Subtitle | Service |
| Configuration | Bluetooth ^a | ||
| Satellite | Cable | Terrestrial | Analog-TV |
- Select "Picture" with the cursor and press the button.


- Select "Programme position" with the cursor in the context menu and press the OK button.
- Select "Signal adjustment" with the cursor in the context menu and press the button.
- Select "Signal-contr..." with the cursor in the context menu and press the button.
- Set the desired setting with the cursor and press the button.
- Press the button to exit the menu.

EXIT

16.4 PIP - Picture in picture
In the case of TV sets with two receivers (only in the case of corresponding equipment or retrofitting), it is possible to display a DVB program and to open a window to show a different analogue program or DVB program from the second receiver or from the AV program position.
Picture-in-Picture mode is not available for UHD content.
To be able to call up the function with the black remote control, you must first configure the PIP function for a box with the Button (e.g. 6, see Chap. 20).
Accessing Picture-in-Picture (PIP):
- Press the button (only on silver remote controls).
Press the Button and the corresponding number button (only on black remote controls).
EA small window will appear.
Depending on the receivers installed and the antenna connection used, it is possible:
- To select another programme with the numeric buttons, with the +P -P buttons or the OK button.
- If the picture content from an AV device connected to the TV set is to be displayed - Press the button.
- Use the cursor to select the AV device and press the button.
- Activate (red) or deactivate (grey) the PIP image with the red button.
- Use the cursor to move the inactive PIP image. The last position set is saved.
- Press to alternate the PIP images.
• To close the PIP, press the button.
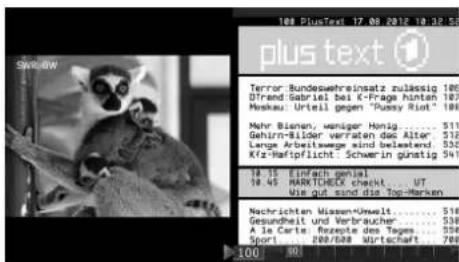
16.4.1 Split Screen - Progr.1 next to Progr.2 with Teletext
If you have a TV set with two receivers, (only for Topas, Solea pro, Primus) you can display a DVB station and open a window to show a different DVB station or an analogue station from the second receiver or from the AV programme position.
You can switch to teletext in the right window of the current station.
- Press the button twice (only on silver remote controls).
Press the button and the corresponding number button twice (only on black remote controls).
The last-viewed TV programme is shown on the left side. The right window is active and shows the last-viewed TV programme. Depending on the built-in reception types for your antenna connection, you can select a new programme using the number keys, the +P /-P buttons, or using the button.
- Press the bTEN. The video text for the programme appears in the right window. The video text control works as described in Chapter 18.
- Press the button to close the video text.
- Press to alternate the PIP images.
• To close the PIP, press the button.
16.4.2 Displaying the screen of an AV device
- Press the button twice (only on silver remote controls).
Press the button and the corresponding number button twice (only on black remote controls). - Press the button.
- Use the cursor to select the desired AV device and press the button.
- Use the cursor <> to activate or deactivate the right window.
- Press to alternate the images.
- Press button twice. You can now assign a TV programme slot to the window.
• To close the PIP, press the button.
#


17 Sound settings
17.1 General sound settings
17.1.1 Volume
The volume can be set globally for all programmes.
If the changed settings are not satisfactory, they can be set back to the factory settings.
- Press button to open the "Functional overview".
- Select "Menu" with the cursor and press the button.
- Select "Sound" with the cursor and press the button.
- Select "Factory settings" with the cursor in the context menu and press the button.
Setting the volume:
- Press button to open the "Functional overview".
- Select "Menu" with the cursor and press the button.
-
Select "Sound" with the cursor and press the button.
-
Select the "Speakers" and the desired setting with the cursor in the context menu and press the OKton.
- Set the desired value with the cursor and press the OK button.
- Press the button to exit the menu.
#

OK
17.1.2 Equalizer
Sound frequencies can be individually adjusted to your personal tastes in the "Equalizer" menu.
Setting the equalizer:
- Press button to open the "Functional overview".
- Select "Menu" with the cursor and press the button.
- Select "Sound" with the cursor and press the button.

OK
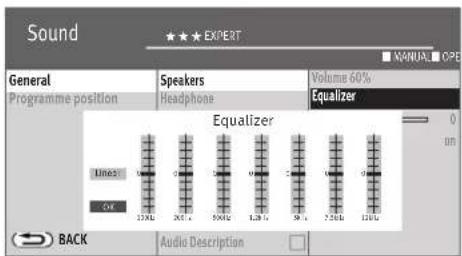

- Select "Speakers" with the cursor in the context menu and press the button.
- Use the cursor to select "Equalizer" and press the button.
- Use the cursor to select and change individual sliders.
- Select with the cursor, press the button and save the settings.
- Press the button to exit the menu.


17.1.3 Automatic volume adjustment
Various broadcasting channels broadcast advertising louder than the actual program. To avoid having to reach for the remote control during the many advertising breaks, you can switch on the automatic volume adjustment.
Consequently, volume differences can on the whole be balanced with volume adjustment switched on. The setting chosen here applies to all program positions.
Calling up volume adjustment:
- Press button to open the "Functional overview".
- Select "Menu" with the cursor and press the button.
- Select "Sound" with the cursor and press the button.
- Select "Speakers" and "Automatic volume control" with the cursor in the context menu and press the Hilton.
- Select "On" or "Off" with the cursor and press the button.
- Press the button to exit the menu.
The "Automatic volume control" in the menu "Sound settings, general" does not cancel the "Volume corr." in the menu "Programme position ...".

17.1.4 Sound adjustment
The sound playback can be changed with this menu item.
The following sound adjustment can be set:
Normal: sound playback in normal mode (Stereo or Mono).
MetzSound: virtual output increase and improved spatial playback.
MetzSurround: virtual surround sound. The efficiency of this effect is dependent on the source signal. By exploiting the characteristics of the human ear, the device attempts to generate a spatial audio impression by influencing the sound signal.
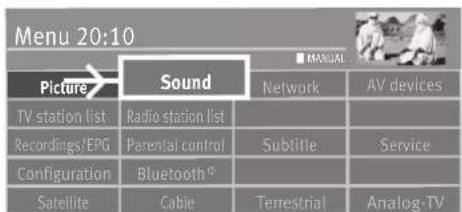
Calling up sound adjustment:
- Press button to open the "Functional overview".
- Select "Menu" with the cursor and press the button.
- Select "Sound" with the cursor and press the button.

- Select "Tone adaption" with the cursor in the context menu and press the button.
- Use the cursor to select "normal", "MetzSound" or "MetzSurround" and press the OK button.

EXIT
- Press the button to exit the menu.

17.1.5 Headphone volume
The headphone volume can be set to a basic volume.
The device loudspeakers are not affected by this setting.
Calling up headphone volume:
- Press button to open the "Functional overview".
- Select "Menu" with the cursor and press the button.
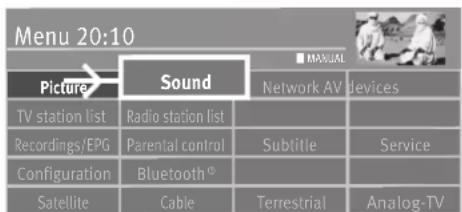
- Select "Sound" with the cursor and press the button.


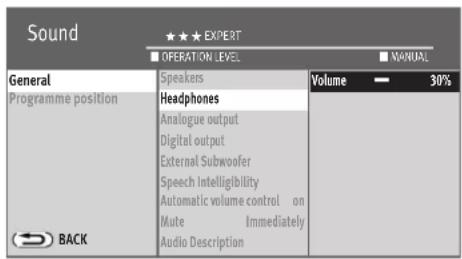
- Select "Headphones" and "Volume" with the cursor in the context menu and press the OK button.
- Set the headphone volume with the cursor and press the button.
- Press the button to exit the menu.
The headphone volume can be opened by pressing the yellow button and adjusted using the cursor.


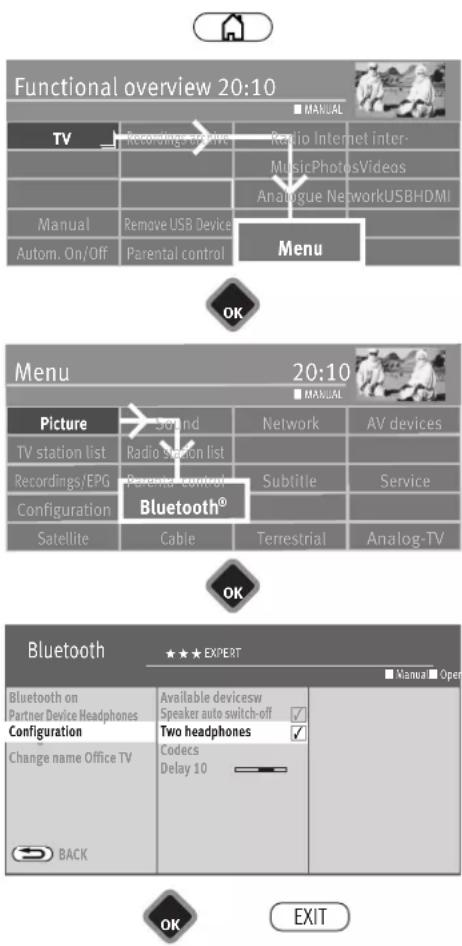
17.1.6 Bluetooth®
The Bluetooth ^® function (only for devices equipped with this function) enables wireless communication between your TV set and a Bluetooth ^® audio device.
Bluetooth® basic settings
- Press button to open the "Functional overview".
- Select "Menu" with the cursor and press the button.
- Select "Bluetooth®" with the cursor and press the button.
- Select "Bluetooth® on" with the cursor in the context menu and press the button.
- Select "Partner device" with the cursor in the context menu and press the button.
- Select the desired partner unit with the cursor key and press the button.
17.1.6.2 Bluetooth® playback via partner device „headphones“
In this setting, the TV sound can also be heard over Bluetooth®-headphones/loudspeakers. For optimum sound quality, the headphone volume setting in the menu should be at least 50%.
- Select "Partner device" with the cursor in the context menu and press the button.
- Select "Headphones" with the cursor in the context menu and press the button.
- Select "Configuration" with the cursor in the context menu and press the button.
- Select "Available devices" with the cursor in the context menu and press the button.
The first time you connect the device (consult its user manual) it appears as "unpaired". Devices that have been connected before appear as "not connected". - Use the cursor to select the device that you would like to connect and press the OK button.
If a partner device cannot be paired, change the "Codecs".
If two headphones are used, the selection "Two headphones" should be activated.

Bluetooth®

- Press the button to exit the menu. After a few seconds, you should hear the TV sound over the headphones/loudspeakers. If a mobile Bluetooth® device is outside of the range of your TV set, the connection is interrupted and must be re-established.
Bluetooth ^® audio playback using the TV set
- Select "Partner device" with the cursor in the context menu and press the button.
- Select "smartphone/tablet" with the cursor in the context menu and press the OK button.
- Press the button to exit the menu.
17.1.6.3 Unpairing/disconnecting
- Select "Partner device" with the cursor in the context menu and press the button.
- Use the cursor to select a Partner device that has the status "Connected" or "not connected" and press the LOKton.
- When "Disable connection" is marked, press the button to disconnect.
or
- Press the OK button, select "Unpair all devices" with the cursor, and press the button. Existing connections are disconnected and the list of the previously connected devices is deleted.
In addition to the visible devices, the list contains the 8 previously connected devices.
17.1.7 Speech intelligibility generally
In the menu "Tone Setting", the speech intelligibility can be adapted to your personal needs.
The tone setting can be set to "Auto. mode", "normal" or "Speech".
In the "Language" settings, the bass can be switched on or off.
The setting "Normal" is recommended for music playback.
When set to "Auto. mode" a dynamic modulation is made of the speech intelligibility by evaluating the signal during the broadcast.
Selecting Speech intelligibility:
- Press button to open the "Functional overview".
- Select "Menu" with the cursor and press the button.
- Select "Sound" with the cursor and press the button.
- Select "Speech intelligibility" with the cursor in the context menu and press the OK button.
- Set the "Mode" or "Effect level" with the cursor and press the button.
- Set the desired mode or value with the cursor and press the Hikton.


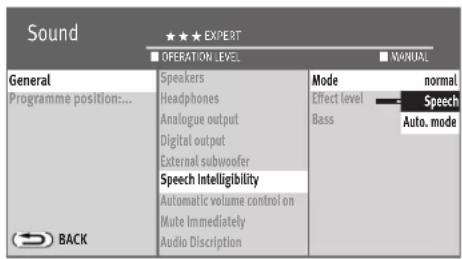


- Press the button to exit the menu.
#
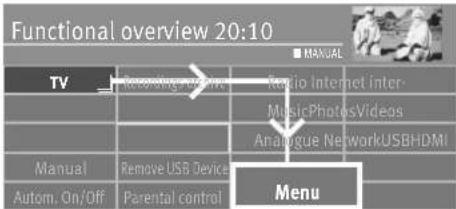

17.2 Sound settings for program
17.2.1 Volume correction
Broadcasting channels broadcast at different volumes. This volume difference can be adjusted through a correction of the volume setting. The adjustment is also retained when calling up the default values.
Setting volume correction:
- Press button to open the "Functional overview".
- Select "Menu" with the cursor and press the button.
- Select "Sound" with the cursor and press the button.


- Select "Programme position" with the cursor in the context menu and press the OK button.
- Press the button, set the desired value with the cursor, and press the button
- Press the button to exit the menu.


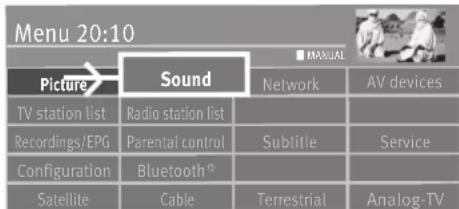


17.2.2 Sound settings for programme position
The sound setting, as it was made in Section 17.1.7 for all programs can be changed here for a single program location. On presets that offer a mixed program, that speech and music share in mixed form, we recommend the "Auto. mode" setting.
It is recommended to use the "Language" setting for programme positions that normally broadcast language programmes (such as news), for instance N-TV, etc. The effect strength for the language emphasis can be adjusted in 10 increments for the "Language" setting.
The “Auto. mode” setting dynamically adjusts speech intelligibility by analysing the signal while a programme is being broadcast.
The setting "normal" is recommended for music playback.
Setting tone:
- Press button to open the "Functional overview".
- Select "Menu" with the cursor and press the button.
-
Select "Sound" with the cursor and press the button.
-
Select "Programme position" and "Spech intelligibi..." with the cursor in the context menu and press the button.
- Set the desired setting with the cursor and press the button.
- Press the button to exit the menu.
#

OK

OK


EXIT
17.3 Program mute
In the menu "Sound settings, general" volume reduction (sound stop two-stage) can be set. The activated mute function means the volume in the TV mode can be reduced in two stages with the mute key
Program mute:
- Press button to open the "Functional overview".
-
Select "Menu" with the cursor and press the button.
-
Select "Sound" with the cursor and press the button.
- Select "Mute" with the cursor in the context menu and press the button.
- Select "two-stage" with the cursor and press the button.
- Press the button to exit the menu.
In normal TV mode press the key mite
- once – the volume is reduced by 12 points.
- once more within the next five seconds – the volume is reduced to "00".
- Press the mute key again and the volume is returned to the normal value.
17.3.1 Two-channel selection
In the "Sound settings, general" menu you can select Channel 1 or Channel in the "Preset value" context menu for analog stations.
17.4 Audio/language selection
Various programs are broadcast with several audio channels (e.g. multilingual or Dolby digital).
If a multilingual channel like this is selected, this is shown with a logo in the information box at the lower left of the screen.
Use the cursor to see the list of available languages.
Open menu:
- Press the yellow button.
The yellow button may not work when the HbbTV function is switched on because the broadcaster's HbbTV application uses the coloured buttons for HbbTV.
Dolby Audio
- Select "Audio track" with the cursor.
- One of the languages offered can be set with the cursor control key.
Symbol in black:
Other audio options e.g. dd = "Dolby digital" are available, but none of the additional sound options offered are selected.
AD
Symbol in white:
Digital sound selected.
17.4.1 Audio-Description
During films for the blind, the scenes are described in the dialogue intervals.
Setting Audio Description:
- Press button to open the "Functional overview".
- Select "Menu" with the cursor and press the button.
- Select "Sound" with the cursor and press the button.
- Select "Audio Description" with the cursor and press the button.
- Press the button to exit the menu.
Dolby, Dolby Audio, and the double-D symbol are trademarks of Dolby Laboratories Licensing Corporation. Manufactured under license from Dolby Laboratories. Confidential unpublished works. Copyright © 1992–2020 Dolby Laboratories. All rights reserved.

17.5 Analogue output
It is possible to connect an AV device to the TV using the audio outputs (see page 101, 102) located on the back of the TV.
Analogue sound can be transmitted from the AV device using a 3.5mm stereo headphone jack.
The "Analogue Output" menu need only be configured if the TV uses the AUDIO OUT port (3.5mm stereo jack) to the AV device, such as HiFi receiver, wireless headphones, surround decoder, etc.
The "Analogue output" menu and "Sound settings, general" are interconnected. This interconnection is described on pages 83 - 84.

Analogue output settings:
- Press button to open the "Functional overview".
- Select "Menu" with the cursor and press the button.
- Select "Sound" with the cursor and press the button.
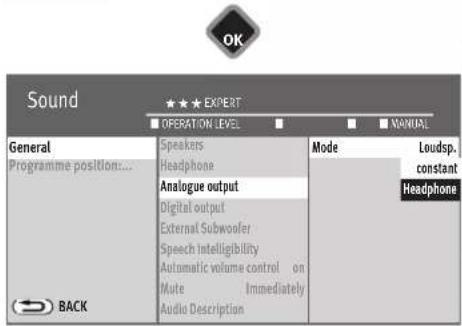
- Select "Analogue output" with the cursor in the context menu and press the button.
- Press the button and use the cursor to select the desired parameters (Loudspaeker, constant, Headphone). Then press the button.
- Select „Output level“ with the cursor in the context menu and press the button.
- Set the desired setting with the cursor and press the Hikon.
- Press the bEXIT to exit the menu.

EXIT

17.6 Digital output
It is possible to connect an AV device to the TV using the audio outputs (see page 96,97) located on the back of the TV.
Digital sound can be transmitted from the AV device using a optical audio cable connection ("Toslink" at stores specialising in accessories).
The "Digital Output" menu need only be configured if the TV uses the AUDIO OUT DIGITAL port to the AV device, such as HiFi receiver, wireless headphones, surround decoder, etc.
Dolby Digital :
The sound received via ARC or SPDIF is output in Dolby Digital format. Regardless of the supported formats that a connected device may signal via CEC. However, sound received in MPEG (DTV) or PCM format is output as PCM.
Bypass:
The received sound is output in the format in which it is delivered, regardless of the supported formats that a connected device may signal via CEC.
The following applies: MPEG / PCM is output as PCM, AAC / HE-AAC as Dolby Digital. If ARC is not active, Dolby DigitalPlus is output as Dolby Digital via SPDIF.
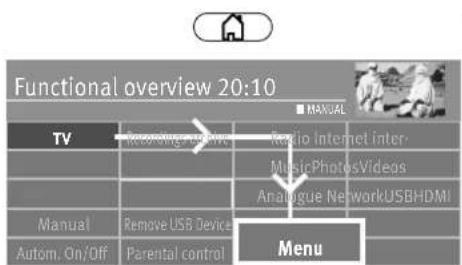
Digital output settings:
- Press button to open the "Functional overview".
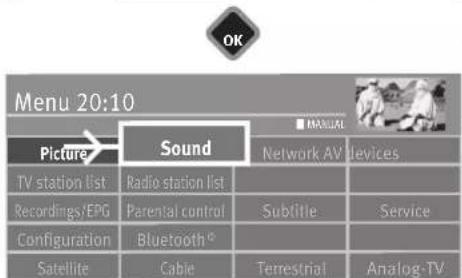
- Select "Menu" with the cursor and press the button.
- Select "Sound" with the cursor and press the button.
- Select "Digital output" with the cursor in the context menu and press the button.
-
Press the ☐Kon, use the cursor buttons to select the desired menu item (home cinema, stereo, user-defined) and press the ☐Kon. The following settings can be adjusted under the menu item "Format":
-
Auto: The audio signal is output in the same format in which it is received. In Auto mode, it is still possible to adjust the damping to compensate for the quieter Dolby signals.
- PCM: The audio signal is output in PCM format, even if a different format is received.
- Press the button to exit the menu.

#
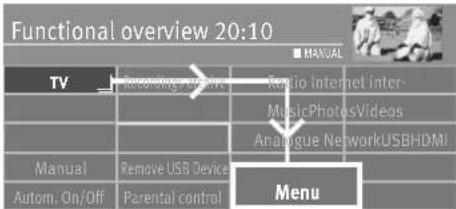
OK

OK


EXIT
17.7 Switching the loudspeaker on/off
Settings in the "Analogue output" and "Sound settings, general" menu items are only necessary if the TV set is connected to AV devices, for example hi-fi receivers, radio headphones, surround decoders etc.
The "Analogue output" and "Sound settings, general" menu items are linked together.
The link is described on pages 83-84.
Hi-fi output settings
- Press button to open the "Functional overview".
- Select "Menu" with the cursor and press the button.
-
Select "Sound" with the cursor and press the button.
-
Select "Speakers" with the cursor in the context menu and press the button.
- In the right-hand column, select the "Loudspeaker" menu and press the OK button.
- Select "Speakers on" or "Speakers off" with the cursor and press the OK button.
- Press the button to exit the menu.


17.7.1 Selecting the sound output
The following settings for sound output are pos:
a) "constant" mode and loudspeaker "on"
The volume level on the "AUDIO OUT port" on the back of the TV remains set to "constant" in the %-value in the menu.
Sound output also occurs via the speakers of the TV set.
The volume of the TV set speakers can be changed with the V + / V- key of the remote control.
L) "co.istant" mode and loudspeaker "off"
The volume level on the "AUDIO OUT port" on the back of the TV remains set to "constant" in the %-value in the menu.
There is no sound output via the speakers of the TV set.
The symbol for the mute setting does not appear on the screen.
The volume cannot be changed with the V+/V- key of the remote control.
c) "Loudsp." mode and loudspeaker "on"
The volume level on the "AUDIO OUT port" on the back of the TV can be adjusted.
Sound output also occurs via the speakers of the TV set.
The volume of the TV set loudspeakers and the volume level on the "AUDIO OUT port" can be changed with the V+/V- buttons on the remote control
d) "Loudsp." mode and loudspeaker "off"
The volume level on the "AUDIO OUT port" on the back of the TV can be adjusted.
There is no sound output via the speakers of the TV set.
The symbol for the mute setting does not appear on the screen.
The volume on the "AUDIO OUT port" can be changed with the V + / V- buttons on the remote control.
e) "Headphone" mode and loudspeaker "on"
The volume level on the "AUDIO OUT port" on the back of the TV can be adjusted. Sound output also occurs via the speakers of the TV set The volume of the TV set speakers can be changed with the V+/V- buttons on the remote control. Change the volume level on the "AUDIO OUT port":
- press the yellow key
The yellow button may not work when the HbbTV function is switched on because the broadcaster's HbbTV application uses the coloured buttons for HbbTV.
- Select "Headph. Vol." with the cursor control key.
- Use the cursor to change the volume.
The headphone output on the front or side will also be changed.
f) "Headphone" mode and loudspeaker "off"
The volume level on the "AUDIO OUT port" on the back of the TV can be adjusted.
There is no sound output via the speakers of the TV set.
The symbol for the mute setting does not appear on the screen. The volume of the TV set speakers can be changed with the V+/V- buttons on the remote control.
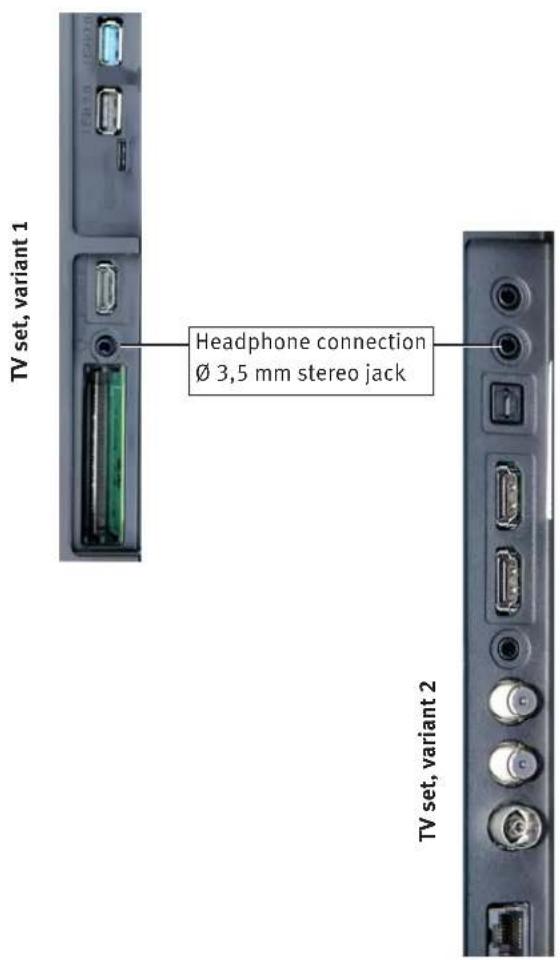
17.8 Connecting headphones
The headphone jack is located on the side.
Wireless headphones can also be connected to the "AUDIO OUT port" on the back of the TV.
The sound settings for the radio headphones should then be set as described in Cap. 17.1.6.2.
We recommend headphones with impedance that is not less than 32 Ω. For headphones with less impedance (approx. 8 Ω), the dynamic range is smaller.
Setting the volume too high when using headphones or earphones can result in damage to the ears - including the complete loss of hearing.
17.9 Sound 1, Sound 2
In dual channel programs, you can switch from Sound 1 to Sound 2
- Press the yellow key.
The yellow button may not work when the HbbTV function is switched on because the broadcaster's HbbTV application uses the coloured buttons for HbbTV.
- Select "Audio track" with the cursor.
- Use the cursor to make desired changes to the sound settings.
18 Video text
Video text is another free information service of the broadcasting channels. There are different ways of browsing in this electronic newspaper.
18.1 Calling up video text
- Press the key! The video text will appear.
The next video text pages can be shown in increasing order with the cursor.
If particular pages are to be selected, enter the page number with the numeric keys. If video text sub-pages are available, the page numbers are shown as white. You can browse through these video text pages using the left/right cursor keys.
18.1.1 Double font size
You can change the font size of the video text using the yellow button.
- The first time you press the yellow button, the upper half of the text page increases.
- Pressing the yellow button a second time switches on the lower half of the text page.
- Pressing the yellow button a third time switches to full page view.
18.2 Video text comfort functions
Press the ☐kton when the video text appears to display the comfort functions. You can select the functions with the cursor. Pressing the ☐kton will open the selected comfort function.
18.2.1 Structure
- Press the button to open the comfort functions.
- Select "Structure" with the cursor and press the EKton. The grouping appears on the left side of the screen regardless of the channel's video text editing. Use the cursor to display the next video text pages. The selected video text page is displayed automatically.
- Press the button to go back to the normal video text view.
18.2.2 Cursor on (cursor page selection)
- Press the button to open the comfort functions.
- Select "Cursor on" with the cursor and press the Dkton. By pressing the Dkton the page is stopped and the cursor appears next to the first three-digit page number. Use the cursor to highlight the currently displayed page.
This function makes sense for content pages (e.g. page 100, 200, etc.) in order to select particular headlines. Once the desired page number is highlighted, press the ☐tion to display the page.
18.2.3 Search by keyword
It is possible to search video text by keyword.
- Press the button to open the comfort functions.
- Select "Search for keyword" with the cursor and press the OK button.
- Use the cursor to write the keyword, e.g. "Formula 1", on the keyboard that appears.
- Use the cursor to select the field "Whole word" or "Partial word" and press the button.
Press the 📄Ktion to initiate the video text keyword search. A spinning circle in the video text headline indicates that the search is in progress. The number of pages found on which the keyword occurs is shown to the right of the circle.
- Use the P+/P- keys to select the pages.
- Press the button to exit search mode.
18.2.4 Large TV screen / Small TV screen
When video text is displayed, the current programme appears in a small screen to the left. This moving image can be enlarged or shrunk.
- Press the button to open the comfort functions.
- Select "Large TV picture" with the cursor and press the OK button.
Resetting the function:
- Press the button to open the comfort functions.
- Select "Small TV picture" with the cursor and press the OK button.
18.2.5 Reveal hidden text
- Press the button to open the comfort functions.
- Select "Reveal hidden text" and press the button.
This function will cause hidden text such as VPS times to appear.
18.2.6 Setting markers for a video text page
As a video text reader, you will want to read particular pages repeatedly, e.g. stock market, news, weather, etc.
You can set markers according to your personal selection to find these pages quickly.
Call up the page that is to be provided with a marker.
- Press the button to open the comfort functions.
- Select "Marked page" with the cursor and press the button.

A maximum of 10 markers can be used for a single programme position.
18.2.7 Select next video text page marker
In the opened video text the video text pages provided with markers can be browsed in sequence with the green button.
- Press the button to open the comfort functions.
- Select "Next marked page" with the cursor and press the OK button.
18.2.8 Video text, delete markers
Call up video text page whose marker is to be deleted.
- Press the button to open the comfort functions.
- Select "Delete bookmark" with the cursor and press the OK button.
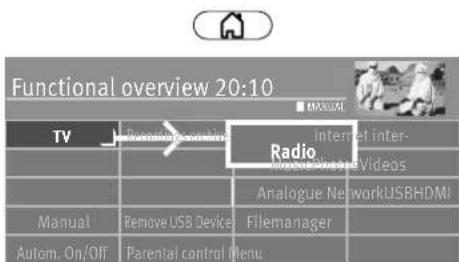
OK
19 Radio mode
- Press button to open the "Functional overview".
- Select "Radio" with the cursor and press the button.
- Use the cursor to select "DVB" or "Internet" and press the button.
19.1 DVB radio
During the channel search (see Chapter 9.3, 9.4, 9.6), DVB radio stations are searched automatically and saved at the radio level in a station list.
Use the button to open the station list in DVB radio mode. Select a radio station using the cursor keys and press the button.
After about 30 seconds, the screen automatically turns dark. Any button pressed on the remote control switches the screen back on.
Back to the TV programme
- Press the button.
- Select "TV" with the cursor and press the button.
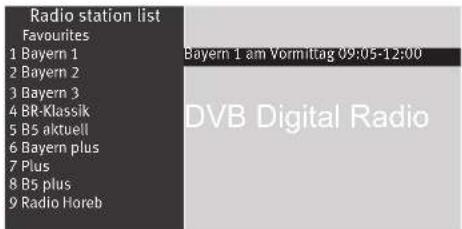
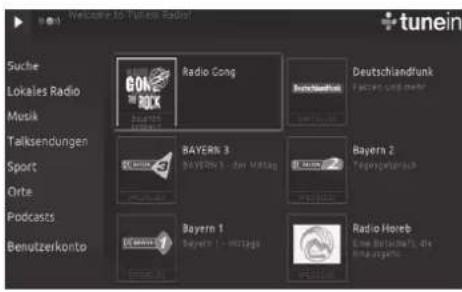
If your TV set is connected to the Internet with a network bus (LAN/WLAN), you can listen to radio over the Internet.
With the "Tuneln Radio" option, you can access more than 40,000 radio stations using your TV set. "Tuneln Radio" also plays podcasts, has a search function, and provides information using radio stations from the surrounding area (local radio).
You can find your station of choice by using the Tuneln radio search.
The user can perform the search, for example, by using a keyword such as the station name, category or genre.
Call up Internet radio (tunein)
- Press button to open the "Functional overview".
- Select "Radio" with the cursor and press the button.
- Select "Internet portal" with the cursor and press the button.
- Select the desired tile with the cursor key and press the button.
- Select the desired tile with the cursor key and press the button.
- Press the key and activate the selection.
Back to the TV programme
- Press the EXIT button.
- Use the cursor key to select the "TV" tile and press the button.
The different menu items can be selected with the cursor control button. Open the menu item with the button.
Example of a local radio in your catchment area
Select the menu item "Local Radio" using the cursor and press the button. All the radio stations around your location (in Nuremberg for example) will be shown.
For additional information or if you want to change the location, you can find out more at the TuneIn website: http://tunein.com/support/get-started/
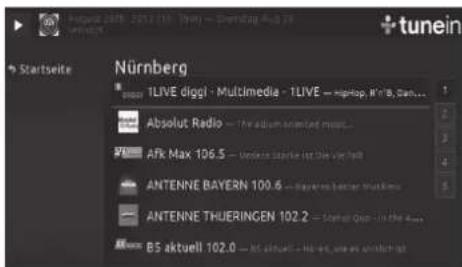

20 The F-button
The F-button (only on black remote controls) or the buttons F1, F2, or F3 (only on silver remote controls) on the remote control can be programmed for different functions in connection with the numeric keys 0-9. The programmed function is then built into the menu and can be triggered immediately as a quick setting.
Programming function
- Press the button or the buttons
An overview opens on the screen
F1, F2 or F3. - Select the slot with the cursor (in example 6) that should be used.
- Press the OK button and open the selection list.
- Use the cursor to make your selection and press the OK button. The selection will be transferred to the overview.
Executing a function
- Press the button or the buttons F1, F2 or F3 and then the numeric key for the function you would like to execute.
Setting a favourite function
It is possible to configure preferred functions in the overview. These preferred functions are marked with a diamond symbol and can be executed by pressing the F button for a long time or by pressing the buttons F1, F2 or F3.
- Press the button F or the buttons F1, F2 or F3. An overview opens on the screen.
- Use the cursor to choose the position that should be marked "Preferred".
- Press the green button to open the context menu.
- Select "Preferred" with the cursor and press the OK button.
Executing a favourite function
- To execute the favourite function, press and hold the button F or the buttons F1, F2 or F3 until the function appears on the screen.

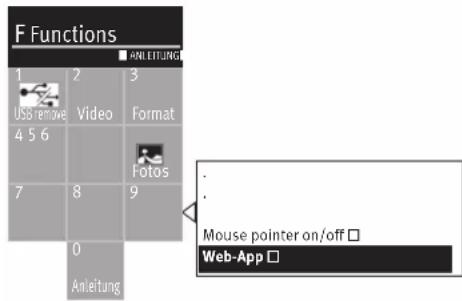
Moving a function
It is possible to move a favourite function to another position in the function key selection overview.
- Press the button or the buttons F1 F2 F3, or . An overview opens on the screen.
- Use the cursor to select the position you would like to move.
- Press the green button to open the context menu.
- Use the cursor to select "Shift" and press the button.
- Select the new position with the cursor and press the button.
Removing a function
- Press the button or the buttons F1 F2 F3, or . An overview opens on the screen.
- Use the cursor to select the position you would like to remove.
- Press the green button to open the context menu.
- Use the cursor to select "Remove" and press the button.
20.1 Programming the web app function
- Press the button or the F1 F2 F3 , buttons. An overview opens on the screen.
- Select the slot with the cursor (in example 9) that should be used.
- Press the button and open the selection list.
- Select "Web App" ^14) with the cursor and press the icon. The selection is opened.
- Select the "YouTube" function with the cursor and press the button. The selection will be transferred to the overview.
14) The web apps are provided by a web service and can only be selected if connected to the Internet..
#

OK
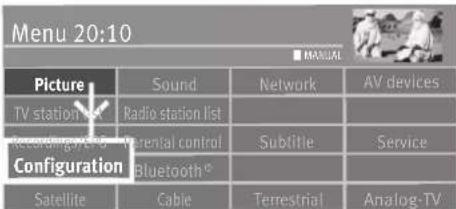
OK
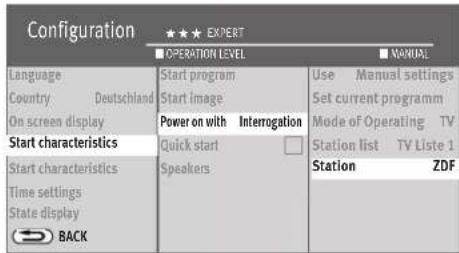

EXIT
21 Start Up
21.1 Initial program position
In this TV set, you can set different start-up programme position modes:
a) Switch-on mode: When you press the button, the TV set starts with the mode set here (TV, radio or AV).
b) Switch-off programme position: When you press the button, the TV set starts with the programme position which was active before it was switched off.
c) Manual settings: When you press the button, the TV set starts with the parameters set here: operating mode, channel list, channel position, programme position. Translated with www.DeepL.com/Translator (free version)
Initial program position settings
- Press button to open the "Functional overview".
- Select "Menu" with the cursor and press the button.
- Select "Configuration" with the cursor and press the button.
- Select "Start characteristics" with the cursor and press the button.
- Use the cursor key to select the desired menu items and press the button. Make your desired settings here.
- Press the button to exit the menu.

21.2 Start-up screen
When the TV set is switched on, the factory logo displayed. However, you can also display a personal start-up picture.
Set start image
- Insert a USB stick with the personal picture into a USB socket.
- Press button to open the "Functional overview".
- Select the "Photos" tile with the cursor key and press the button.
- Press the button and open the contents of the USB file.
- Select the desired picture with the cursor key and press the button. The selected image is displayed.
- Press the button and select the menu line "Set as start picture" with the cursor button.
- Press the button.
The selected image is set as the start image
- Press the button to exit the menu.
Reset start image
- Press button to open the "Functional overview".
- Select "Menu" with the cursor and press the button.
- Select "Configuration" with the cursor and press the button.
- Select "Start characteristics" with the cursor in the context menu and press the OK button.
- Select "Start picture" in the context menu with the cursor key and press the button.
- Use the cursor key to select "Set Metz Classic Logo" or "Set Metz Panorama" in the context menu and press the button.
- Press the button to exit the menu.
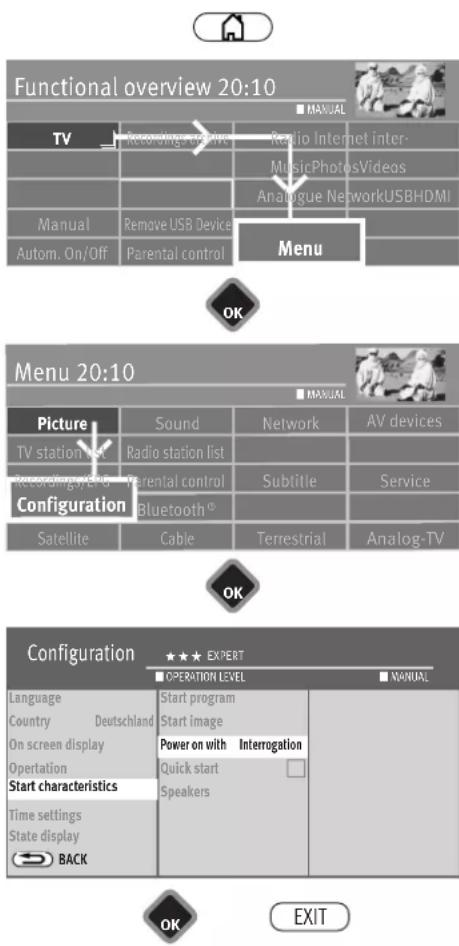
21.3 Switch-on behaviour
The switch-on behaviour can take place in 3 different modes. After switching on with the mains switch on the TV set or after a power failure during operation, the switch-on behaviour takes place according to the set mode.
With Interrogation
After switching on, the TV set will start up and the set start programme position will be displayed. If no key on the remote control is pressed within the next 10 minutes, the message "Please press a key, otherwise the set will switch to standby to save energy! If you acknowledge this display by pressing the button or any other key, the TV set remains switched on.
If you do not acknowledge this display by pressing a key, the TV set switches to stand-by mode after a further 10 minutes.
Continuous on
After switching on, the TV set is booted up and the set start programme position is displayed. The TV set remains permanently switched on, even if it switches on again automatically after a power failure.
Standby
After switching on, the TV set remains in stand-by mode.
Switch on stop behaviour
- Press button to open the "Functional overview".
- Select "Menu" with the cursor and press the button.
- Select "Configuration" with the cursor and press the button.
- Select "Start characteristics" with the cursor in the context menu and press the OK button.
- Use the cursor key to select "Switch on with" in the context menu and press the OK button.
- Set the desired selection with the cursor key and press the button.
#

OK

OK
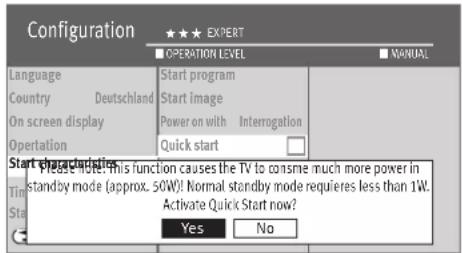

21.4 Quick start
The device starts up faster from standby mode if this function is activated.
However, this will also significantly increase power consumption during standby.
Switch on quick-start
- Press button to open the "Functional overview".
- Select "Menu" with the cursor and press the button.
- Select "Configuration" with the cursor and press the button.
- Select "Start characteristics" with the cursor in the context menu and press the OK button.
- Select "Quick start" with the cursor in the context menu and press the button.
- Use the cursor to select or and press the button.
- Press the button to exit the menu.
#

OK
21.5 Speakers
Here you can set the volume which is called up after the TV set is switched on.
Adjusting the speakers
- Press button to open the "Functional overview".
- Select "Menu" with the cursor and press the button.
- Select "Configuration" with the cursor and press the button.
- Select "Start characteristics" with the cursor in the context menu and press the OK button.
- Select "Speakers" with the cursor and press the button.
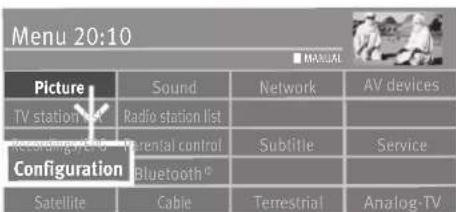
OK
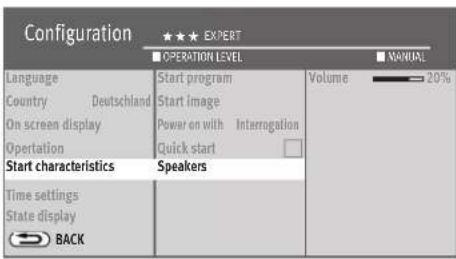

EXIT
- Press the button and use the cursor key to set the desired volume.
- Press the button to exit the menu.

22 Parental control
You can configure Parental Control settings to
- lock the TV set in general.
- to lock the TV set for a defined period of time.
- block selected channels.
- block selected channels for a defined period of time.
The adjusted settings are saved and can be activated using a function button (see Chap. 20).

22.1 Blocking selected channels
To block selected channels, you must select them in the "TV Channel List".

- Press button to open the "Functional overview".
- Select "Menu" with the cursor and press the button.
- Select "TV station list" with the cursor and press the button.
- Choose the channel in the "TV List 1" that you would like to block and press the OK button.
Block selection
- Use the cursor to go to the first programme position of the desired time slot and select it with OK
- Use the cursor to go to the last programme position of the desired time slot and select it with OK.
- Change to the middle selection column using the cursor, select "Mark block", and press the OK button.
- Use the cursor to change to the middle selection column, select "Parental Control on/off", and press the OKtion.


#
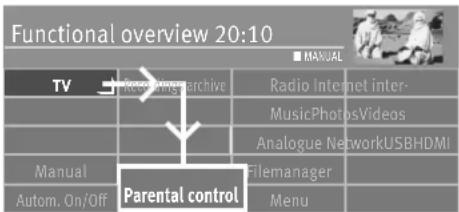
OK
22.2 Configuring Parental Control (Basic Settings)
- Press button to open the "Functional overview".
- Select "Menu" with the cursor and press the button.
- Select "Parental control" with the cursor and press the button.
- If desired, use the cursor to select "Start viewing time" and "End viewing time" and press the OK button.
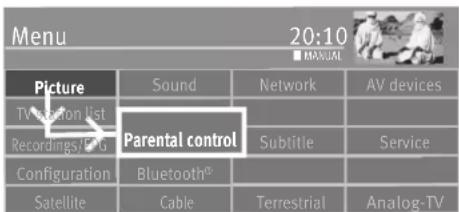
OK
- Use the cursor to select "- -:- -", enter a time with the numeric keys, and then save with the OK button. If you want to lock the entire TV set without setting specific times, then do not enter a time for "TV Start" and "TV End".
- Select "Code" with the cursor, press the button, and enter your 4-digit personal code with the numeric keys. Make a note of the code number!
- Use the cursor to select "Activation" and press the button.
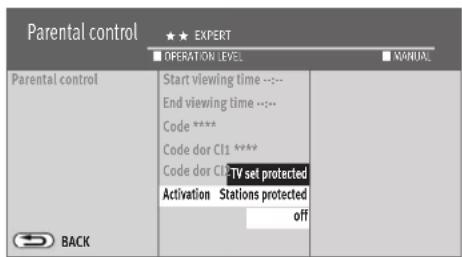
- Select "TV set protected" or "Stations protected" with the cursor and press the OK button.
"TV set protected" means that the entire TV set is locked according to the basic settings that you have configured.
"Stations protected" means that the channels that are marked in the "TV station list" are blocked according to the basic settings that you have configured.
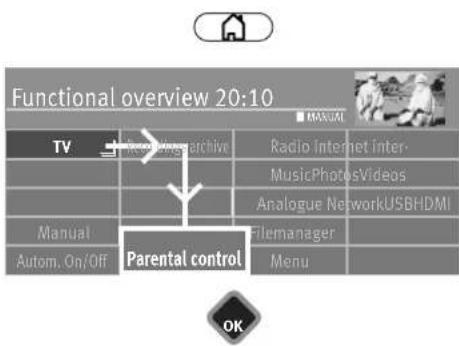
22.3 Activate parental control
22.3.1 Activating Parental Control using the function overview
- Press button to open the "Functional overview".
- Select "Parental control" with the cursor and press the button.
- Select "Code" with the cursor, press the button, and enter your 4-digit personal code with the numeric keys. Make a note of the code number!
- Save the setting with the button.
22.3.2 Activating Parental Control using the function button
Programme the Button (for black remote controls) or the F1 F2 F3 or buttons (for silver remote controls) on the remote control using the "Parental control" function; see Chap. 20.
- Press the Button or the F1 F2 F3, or buttons. An overview opens on the screen.
- Use the cursor to select the memory slot that is assigned to the function "Parental control".
- The Parental Control window will appear on the screen.
- Press the button and active the code entry.
- Enter your personal, four-digit code using the number keys. The previously configured basic setting is activated.
#

OK
22.3.3 Switching off Parental Control
If Parental Control is active, then the code must be entered in the menu every time the TV set is switched on or operated.
Switch off the Parental Control
- Press button to open the "Functional overview".
- Select "Menu" with the cursor and press the button.
- Enter a 4-digit personal code using the number keys.
- Select "Parental control" with the cursor and press the button.
- Use the cursor to select "on" or "off" and press the button.
- Press the button to exit the menu.

EXIT
23 AV devices
23.1 AV Connecting AV units
AV devices (audio/video) are additional devices which emit picture and/or sound signals (e.g. video recorders, DVD players, DVD recorders, PCs, decoders, etc) and can be connected to a TV device. All customary AV devices are listed in the menu "AV devices".
View: TV set, variant 1
HDMI®
3) See glossary for an explana-
When connecting HDMI devices, high-quality cables with suitably effective shielding must be used.


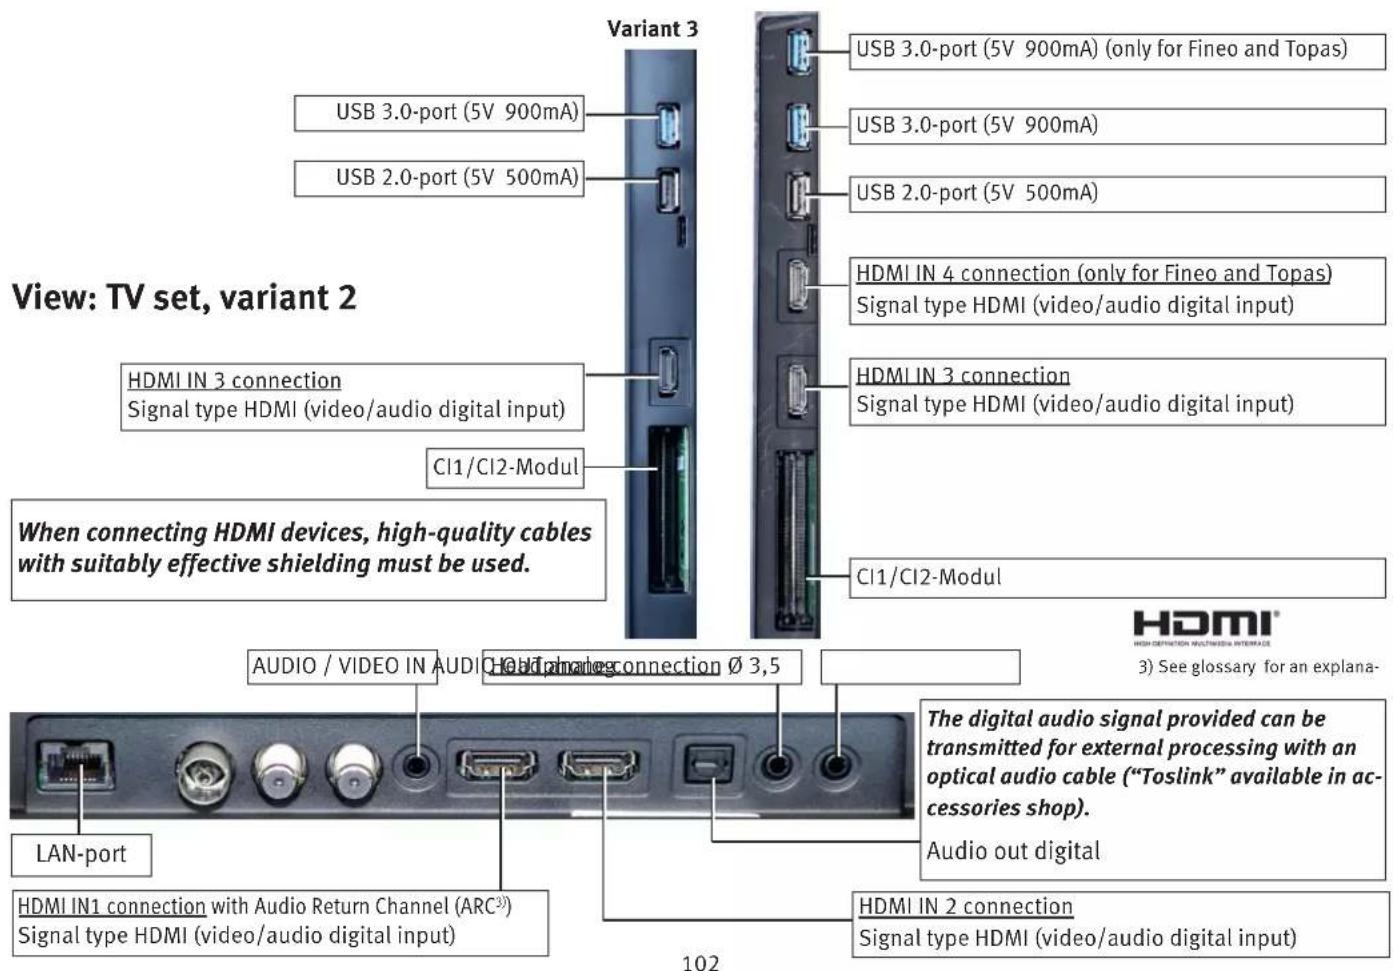
#
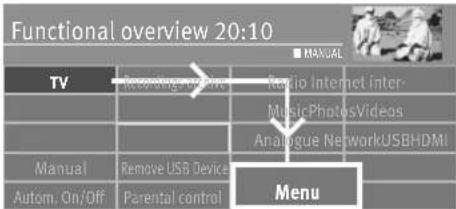
OK
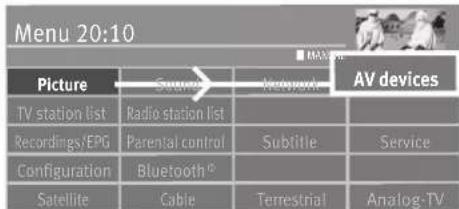
OK


EXIT
23.2 Registering AV devices
- Press button to open the "Functional overview".
- Select "Menu" with the cursor and press the button.
- Select "AV devices" with the cursor and press the Button.
- Use the cursor to select the port(s) from the context menu to which you would like to connect an AV unit and press the OKton.
For HDMI ports:
Unit type: "Standard" for DVD players, DVD recorders, etc.
Unit type: "PC/Games" for game consoles
Unit type: "PC/Games" for connecting a computer
- Set the desired setting with the cursor and press the button.
When connecting a UHD/4k playback device, the options 'Resolution optimised for' and 'UHD' must be set in the context menu; see 23.2.1. - Press the button to exit the menu.
#

OK
23.2.1 Connecting UHD/4k playback devices
- Press button to open the "Functional overview".
- Select "Menu" with the cursor and press the button.

OK
- Select 'AV devices' with the cursor key and press the button. - Use the cursor to select the port (in the example HDMI ^1 ) from the context menu to which you would like to connect a UHD/4k unit and press the button.


- Use the cursor to select "Resolution optimized for" and press the button.
- Use the cursor to select "UHD" and press the button.
- Press the button to exit the menu.

23.3 HDMI CEC function
With Consumer Electronics Control (CEC), you can use the Metz remote control to operate the basic functions of any connected AV devices. To enable CEC, the AV device must support the HDMI CEC functions and be connected to the TV set over an HDMI cable. The general purpose of the CEC function is to simplify cabling while providing integrated control.
CEC settings

- Press button to open the "Functional overview".
- Select "Menu" with the cursor and press the button.
- Select "AV devices" with the cursor and press the button.
- Select "HDMI socket" with the cursor in the context menu and press the button.
- Use the cursor to select "CEC-settings" and press the button.
- Use the cursor to select "HDMI CEC" and press the button.
- Use the cursor to select "on" and press the button.
- Press the button to exit the menu.

23.4 HDMI ARC function
Once the CEC function has been switched on, an audio return channel (= ARC) can be activated or deactivated on the HDMI cable. If "HDMI ARC on" has been selected, the audio return channel will be activated automatically when the TV set is switched on, if a CEC and ARC-capable AV receiver / HiFi amplifier has been connected to the HDMI-socket "IN1 (ARC)". This will then reproduce the sound of the TV set.
The "ARC Function" is only available for AV devices that are directly connected to the TV set.


23.5 Selecting signal source (AV devices)
To start playback from an AV device, you must select the connection socket.
| TV | Recordings archive | DVB radio | |
| Internet internet | Network | Internet Radio | |
| HOMI | USB | ||
| EURO | Cinch AV | Cinch audio |
- Press the button.
- Use the cursor to select the box for the connection socket and press the button.
Back to the TV programme.
- Press the button.
- Select "TV" with the cursor and press the button.
OK
EPG

24 EPG (Electronic Programme Guide)
EPG (Electronic Program Guide) is an electronic program guide for many TV and radio programs.
DVB-SI data are transmitted in the TV signal (DVB-S, DVB-C, or DVB-T).
DVB-SI (Digital Video Broadcasting-Service Information) is a service provided by different broadcasters. Each channel digitally broadcasts programme data for each programme they broadcast.
EPG Settings
- Press the button to open the EPG.
- Press the green button, select "Settings" with the cursor and press the button.
- Select "EPG" with the cursor in the context menu and press the button.
- Use the cursor to select "On" or "Off" and press the button.
- If "on" has been selected, set "EPG Data for ..." with the cursor and press the OK button.
- Use the cursor to select "TV", "TV (short*)" or, if a radio station is shown in the electronic programme guide, "TV & Radio", "TV & Radio (short*)" and press the London.
- Press the button to exit the menu.
EPG channel
In various countries, such as Switzerland, there is a central information channel that supplies all EPG data.
No cable provider in Germany currently offers an EPG channel. Ask your cable network provider about this.
* Some channels provide film descriptions. If you select "short", this information will not be displayed.
24.1 Collecting EPG data
EPG data is broadcast by each channel for its program contents. Information will therefore vary accordingly. Switch your TV to stand-by mode so that EPG data can be compiled or alternatively updated.
The blue LEDs will be illuminated when EPG data is being compiled.

After switching on the TV set or if a recording timer has been programmed, the collection of data is interrupted until a switch back occurs to stand-by mode or the recording timer is terminated.
Please note
The unit's TV station list shows all known channels and provides information on them in the programme guide, unless you have made a different selection in the favourite station list (see next page).

New TV stations are not automatically added to the EPG station list after another station search. You will have to do this manually.
The collection process will be halted or stopped if:
- the TV set is switched off using the power switch.
- a recording is programmed in the "Recordings/EPG" menu.
- a “timer recording” is running or will begin in an hour.

Do not switch the TV set off during the collection process.

24.2 Exclusion of one or more channels from the EPG
- Press button to open the "Functional overview".
- Select "Menu" with the cursor and press the button.
- Select "TV station list" with the cursor and press the button.
- Use the cursor to select the programme positions in the station list that are to be removed from the EPG list and mark them with OK
- Use the cursor to go to the first programme position of the desired time slot and select it with OK
- Use the cursor to go to the last programme position of the desired time slot and select it with OK.
- Change to the middle selection column using the cursor, select "Mark block", and press the OK button.
- Change to the middle selection column using the cursor, select "EPG On/Off", and press the OK button.
- The selected channel is no longer available for EPG programming and the symbol disappears.
- Press the button to exit the menu.
Block selection
The channel can be put back into the EPG list by repeating the procedure.
EPG

24.3 Sort EPG list by ...(Only possible in list view)
When the complete data is available, the EPG TV guide appears after pressing the "EPG" key and shows the program that is currently running in that program position.
The list can be sorted by "Station list", "Selected station", and "Start time".
Do not switch the TV set off during the collection process. Give it a chance to collect all EPG data at least one time.
Sorting the list
- Press the button to open the EPG.
- Select "Sort list according to ..." with the cursor in the context menu and press the OK button.
- Select the desired function "Station list", "Selected station" or "Start time" with the cursor and press the OK.
- Press the button to exit the menu.

24.4 EPG-Selecting a programme
Note: This function can only be used if the show is in the future.
- Press the button to open the EPG.
- Select the desired channel with the cursor in the context menu and press the button.
- Select "Switch to" with the cursor in the context menu and press the button.
EPG

24.5 EPG: Sending reminder for a programme
Note: This function can only be used if the show is in the future.
- Press the button to open the EPG.
- Select an upcoming programme with the cursor in the context menu and press the OK button.
- Select "Reminder" with the cursor in the context menu and press the button.
- The programme is marked in the list with an alarm symbol. About 1 minute before the start time, the text "Coming next ..." will appear.
- Select "Switch to this programme" from the context menu and press the button to confirm.
24.6 Further options, Search
With the search option, you can search for keywords in the title, in the info and everywhere.
24.7 EPG view
The EPG display can be shown in list or grid view.
Setting the EPG view in the menu
- Press button to open the "Functional overview".
- Select "Menu" with the cursor and press the button.
- Use the cursor to select the tile "Recordings/EPG" and press the button.
- Use the cursor to select "EPG settings" and press the button.
- Select "View" with the cursor and press the button.
- Select "List view" or "Grid view" with the cursor key and press the button.
Changing the EPG view when the programme guide is open
- Press the yellow button and switch the view.
25 Metz Media System
Metz turns your TV into a multimedia centre.
The integrated Metz Media System allows you to play videos or music and display photos on your TV – it simply “retrieves” the digital data from your PC, your network attached storage (NAS) or your digital camera, for example.
You can set up your own multimedia network at home and control this simply and conveniently using your Metz remote control.
But that's not all, as your Metz Media System also allows you to access numerous online services using HbbTV, a new platform for providing additional services via TV sets. You can obtain further information on the TV channel you are currently viewing via a Internet connection – or watch missed programs via the media library of the respective channel.
The Media Player enables you to play films, photos and music files from various components in your home network, such as a PC, notebook or network attached storage (NAS), on your TV set.
HbbTV 15) 16) 17)
HbbTV (Hybrid broadcast broadband TV) is a new industry
standard for connecting TVs with the Internet. The broadcasting companies transmit a digital data stream together with their TV programs, which also includes a web address.
Once the logo appears, a connection can be established between the TV set and the HbbTV Service of the channel by clicking the red key.
Up-to-date program information can then be displayed, for example, or programs that have been missed can be retrieved via the TV media library.
The broadcasting channels are exclusively responsible for the availability, look and button assignment of the applications.
Metz assumes no guarantee for the functionality!
16) Recommended: at least a 5000 kbit/s DSL connection.
17) HbbTV availability is dependent on the channel and is therefore not offered in all countries.
18) This product is protected by certain intellectual property rights of Microsoft. Use or distribution of such technology outside of this product is prohibited without a license from Microsoft.
#

OK

OK
| Network | ★★★ Expert | |
| ■ MANUAL OPERATI | ||
| Network operation | preferred connection LAN | DHCP on |
| Services | Setup WLAN | IP address off |
| Network settings | DNS-server | |
| Test network connectivity | Subnet mask | |
| Gateway | ||
| MAC-Adresse | ||
| BACK | ||

EXIT
Requirements: The TV set is connected to your router via the LAN port and a network cable.
- Press button to open the "Functional overview".
- Select "Menu" with the cursor and press the button.
- Select "Network" with the cursor and press the button.
- Select "Connection" with the cursor in the context menu and press the button.
- Select "LAN" or "WLAN" with the cursor in the context menu and press the button.
- Select "Network settings" with the cursor in the context menu and press the button.
- Select "DHCP" with the cursor in the context menu and press the button.
- Use the cursor to select "on" and press the button.
- Press the button to exit the menu.
Parameters like DNS server, IP address, subnet mask and gateway are identified automatically and entered.

25.1.2 Setting the LAN or WLAN network configurations manually
- Select "DHCP" with the cursor in the context menu and press the button.
- Use the cursor to select "off" and press the button.
Parameters like DNS server, IP address, subnet mask and gateway are identified automatically and entered.
If the menu item "preferred connection" has an "LAN" or "WLAN" next to it, the TV set will log on automatically each time it is switched on using the power switch.

25.1.3 Setup WLAN
- Select "Setup WLAN" with the cursor in the context menu and press the button.
- Use the cursor to select the desired wireless network and press the button.
- Enter the WLAN password on the virtual keyboard.
- Use the cursor to select "Confirm" and press the xxx button to save the password you entered.
- Press the button to exit the menu.
25.1.4 Testing the network connection
Once a connection has been established successfully, the cursor is located next to "Network settings".
- Use the cursor to select the "Test network connectivity" menu item.
- Press the button.
The connection test is carried out.
If the message “Connection test successful!” appears, press the key to test the transmission speed of your DSL connection. The transmission speed should be at least 5000 kbit/s, in order to ensure images can be displayed smoothly, for example, when you view a program via the media library.
- Press the button twice and exit the "Functional overview".
The TV is now connected to the Internet and can, for example, make use of the new HbbTV, Internet Radio, Internet portal and Internet Timer television services.
#

OK
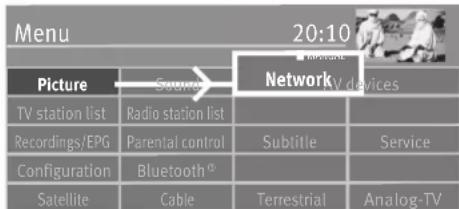
OK
| Network | ★★★ Expert | |
| ■ MANUAL OPERATI | ||
| Configuration | Allow MetzControl✓ | Active On |
| Local Services | Allow Mediaplayer✓ | Standby time 15 min |
| Privacy | Wake-on-LAN✓ | Reload archive |
| Internet services | Thumbnails Server low | |
| Media Server | ||
| Wake on Lan devices | ||
| Change name Office TV | ||
| BACK | ||

EXIT
25.1.5 Media Server
Only for devices with internal or external hard disks
The Media Server establishes an internal network between several devices (TV sets, smartphones, etc.).
To transmit a programme currently being broadcast to another device with a time delay, you must first configure preset values.
Configuring preset values
- Press button to open the "Functional overview".
- Select "Menu" with the cursor and press the button.
- Select "Network" with the cursor and press the button.
- Select "Local Services" with the cursor in the context menu and press the button.
- Select "Server" with the cursor in the context menu and press the button.
- Press the button and select "Media Server on" with the cursor.
- Use the cursor to select "Standby time" and press the OK button.
- Use the cursor to enter the desired time and press the Dikton. The "Standby time" is the time during which the server is still available in the network after it has been switched off.
- Select "Device network name" with the cursor in the context menu and press the OK button.
- Press the button and enter the name of the device or select it from the list.
- Press the button to exit the menu.
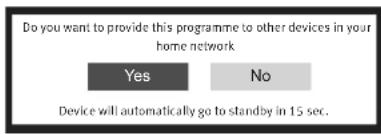
Make programme available
Stop a programme with the button and wait until the time shift window disappears.
Switch the device to standby mode with the button.
Answer "Yes" to the notice "Do you want to provide this programme to other devices in your home network".
You can now open the programme on another device connected to the home network.

OK
Call up a programme
- Press button to open the "Functional overview".
-
Select "Recordings archive" with the cursor and press the button.
-
Use the cursor to select "Drive" and press the button.
- Use the cursor to select "Network" and press the button.
- Use the cursor to select "Metz TV Server" and press the button.
- Use the cursor to select "MultiRoomTV" and press the button.
- Use the cursor to select the recorded programme and press the button.
- Use the cursor to select "Play" and press the button.

If you would like to watch the programme with your smartphone or tablet, please consult the user manual for your device.
If no data is selected within the preset server standby time, the Media Server turns itself off.

#

OK
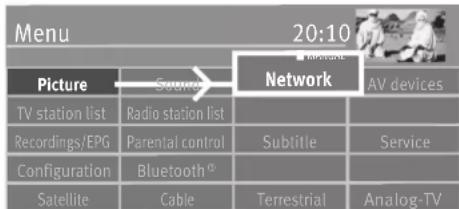
OK
| Network | ★★★ Expert | |
| ■ MANUAL ■ OPERATI | ||
| Configuration | HbbTV | Activate Always |
| Local Services | Internet timer | Display automatically Manual |
| Privacy | Software update | |
| Internet services | Tast connection | |
| BACK | ||

EXIT
25.2 Hybrid broadcast broadband TV (HbbTV)
HbbTV is not available in all countries.
Broadcasting channels that provide HbbTV services can be recognised by the „logo in the bottom left-hand corner of the screen as part of the programme information.
The programme information is displayed after pressing the blue Button; see also Chapter 12.3.
HbbTV – set start-up properties
- Press button to open the "Functional overview".
- Select "Menu" with the cursor and press the button.
- Select "Network" with the cursor and press the button.
- Select "Services" with the cursor in the context menu and press the button.
- Select "HbbTV" with the cursor in the context menu and press the button.
- Press the button and select "Activate always" with the cursor. To activate the "Start applications" of the channel:
- Press the button and select "automatic overlay, yes" with the cursor.
If you select the "manual" setting, the "Start Application" is not loaded until the red button is pressed, and only then does data flow via the Internet. The symbol was white before, now it is red. Press the red button again.
- Press the button to confirm your selection.
- Press the button to exit the menu.
If the Automatic Display bothers you, then select "No" under "Display automatically".
During playback from the media server, the 📖go is displayed at the upper left of the screen. Some of the remote control buttons can then be used for HbbTV functions. If you wish to change the picture format or the sound functions during HbbTV operation, you must programme these features in advance using the function button (only on black remote controls) or the , or buttons F3F2F1 (only on silver remote controls); see Chapter 20. HbbTV is not available during PVR playback or when the time shift function is being used.
25.2.1 Accessing HbbTV
- Switch to a channel that offers HbbTV.
- Press the red key ⓝ . Once a connection has been established to the HbbTV Service of the channel in question, the 📞go moves to the upper left-hand corner of the screen. The Functional overview appears. The HbbTV service will appear.
- HbbTV menu control is subject to the control of the respective stations. Different buttons are used for operation of the HbbTV applications.
The views and control options within the HbbTV menus are dependent on the respective provider and can therefore differ from channel to channel.
- Press the key to confirm your selected settings. It may take some time, after pressing a key, before the TV set displays the selected settings.
25.2.2 Exiting HbbTV
- HbbTV can be exited by pressing the red key or the key. EXIT
25.3 Call media library
The HbbTV function must be activated.
- Switch to a channel that offers HbbTV.
- Press teh red button.
- In the selection that appears, use the cursor keys to select the media library and press the button.
- In the open media library, select the desired programme with the cursor keys.
- Press the button and open the selection.
A playback or a contribution from the media library cannot be recorded for copyright reasons.
#
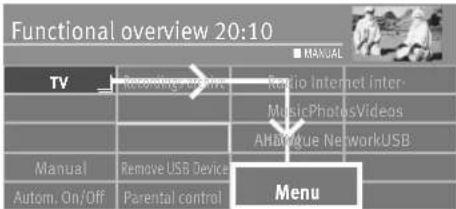
OK

OK
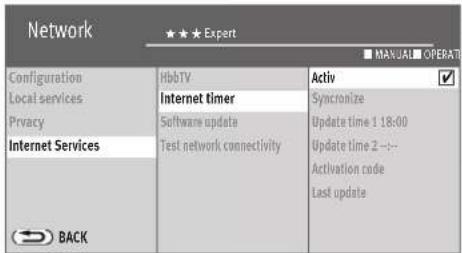

EXIT
25.3 Internet Timer
Use the "Internet Timer" to programme a show for the timed recording with your smartphone, PC or tablet.
Activating the Internet Timer
- Press the button to open the "Function Overview".
- Select "Menu" with the cursor and press the Eikon.
-
Select "Network" with the cursor and press the button.
-
Select "Internet Services" with the cursor in the context menu and press the button.
- Select "Internet Timer" with the cursor in the context menu and press the button..
- Press the OK button; the tick √ appears and the function is activated.
- Press the button to exit the menu.
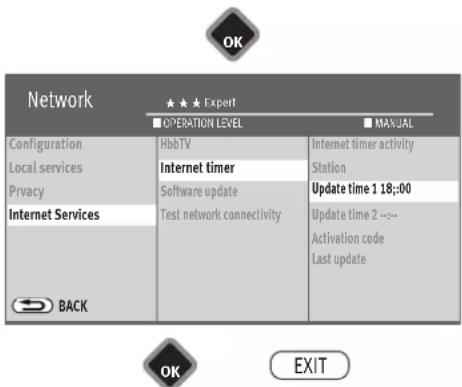
Setting the update time
- Select "Update time" with the cursor in the context menu and press the button. The "Update time 1/2" describes the times at which the TV set searches for newly set timer(s).
- Use the numeric keys to enter a time and press the button.
Setting the activation code
- Select "Activation code" with the cursor in the context menu and press the button.
- Read the QR code with your smartphone or enter the "activation code" manually on the website "https://record.metz.de".
- In the user interface, create a new user by entering an e-mail address and a personal password.
The e-mail address and password will be requested again every time you want to log in! To create a user, you must agree to the data privacy statement*.
Please note: To create a user, you must agree to the data privacy statement\*. Internet access is not possible without consent.
After successfully logging in, you can configure the timer via the user interface.
Note: Do not switch off the TV set with the power switch. The configured timers are only transmitted to the set "Update times" on the TV set when the device is on or in stand-by mode.
*The data privacy statement can also be displayed on the TV set by selecting "Data privacy statement" under "Function Overview - Menu - Network - Internet Services".

Cookies
A cookie is a text file that the visited website places on the viewer's device via the browser. Cookies are either sent from the web server to the browser or generated by a script (e.g. JavaScript) on the website. The user sends the cookie information back to the server each time he visits the page at a later time.
Delete cookies
- Press the button to open the "Function Overview".
- Select "Menu" with the cursor and press the icon.
- Select "Network" with the cursor and press the icon.

Automatically delete cookies
- Select "Data protection" with the cursor in the context menu and press the button.
- Select "Cookies" with the cursor in the context menu and press the button.
- Press the button, select "Automatically delete Yes" with the cursor. Then press the button.
Manually delete cookies
- Select "Data protection" with the cursor in the context menu and press the button.
- Select "Cookies" with the cursor in the context menu and press the button.
- Press the button; the tick appears and the function is activated.
- Press the button to exit the menu.
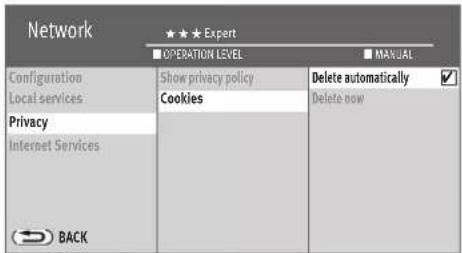

The Internet portal of the Smart TV is a constantly changing platform on the Internet for interactive TV applications. With an integrated web browser, you can open Internet pages directly.


Open Internet Portal
- Press the button to open the "Function Overview".
- Select "Internet portal" with the cursor and press the hikon.
When visiting the Internet portal for the first time:
- Select the desired language with the cursor key and press the button.
- Read the general terms of use carefully.
- Use the cursor to select the GTC (General Terms and Conditions) and press the OK button to accept.
Adjust browser
- Select "All Apps" in the left grey column with the cursor.
- Change to the right selection with the cursor key.
- Press the cursor > several times until the "Smart TV Browser" appears in the selection.
- Use the cursor to select "Smart TV Browser" and press the green key 📋 to install the browser app.
Call up interactive TV applications
- Use the cursor in the left grey column to select the desired choice (films, music, games ...) and press the button.
- Use the cursor to switch to the right-hand selection, select the desired app and .... press the button to open the app.
... press the green button install the app.
The installed apps can be displayed in the left column under "My Apps".
Call installed apps
- In the opened Internet portal, select "My Apps" with the cursor.
- Use the cursor key to switch to the right-hand selection and select the desired app..
- Press the OK button to open the app.
- Press the button to close the app
- Press the button to exit the "Interactive TV application" or the "Internet Portal".

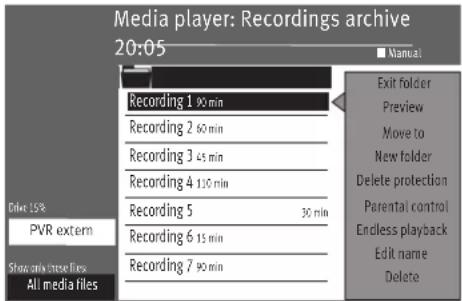
27 Opening the Media Player
The Media Player enables you to play videos, photos and music files from various components in your home network, such as a PC, notebook or network attached storage (NAS), on your TV set.
- Press the 📋 on to open the "Recordings archive".
or
- Press button to open the "Functional overview".
- Select "Videos", "Photos" or "Music" with the cursor and press the button.
or
- Programme the "Media Player" with the button or the buttons (see chap. 20).
27.1 Using the media player
Operation of the Media Player can vary depending on the media files (audio/photo/video). In the opened Media Player, use the cursor to select the source (e.g. "USB device") and press the . OK. Continue navigating with the cursor and the . OK
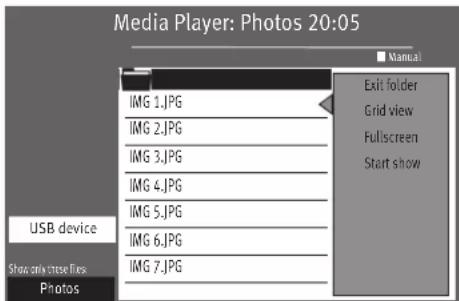
27.1.1 Photos – photo overview
- In the opened Media Player, select an image from the Image Overview.
- Select "Grid View" with the cursor and press the Eikon. In grid view, use the cursor to select the images.
- Press the yellow button and use the cursor to select one of the following function: "Fullscreen", "Start show" or "List View" and then press the button.
- Press the button to return to the previous view.

27.1.2 Start show
- In the opened Media Player, select an image from the Image Ove.
- If an image is shown in "Full-size Format", press the button.
- Select the function with the cursor (e.g. Start Slideshow) and press the button.
In the "Start show" mode, the following functions are available: - return to grid view
- manual navigation
- Display photo for 3-60 sec.
- Start show (infinite)
- Rotate
- Press the button to return to the previous view.

27.2 Music
- Select a song from the music overview in the opened media player.
- Use the cursor to select "Play" in the selection column and press the button. The piece of music will be played.
- Use the cursor in the selection column to select various functions. Press the button once or multiple time to execute this function.
27.2.1 Slideshow with music
It is possible to configure a slideshow with music. To do this, your music and photos must be saved in the same folder.
To start the slideshow, always select the music file first and then select the photo file and then start.

27.3 Videos
- Select a video from the video overview in the opened media player and press the OK button. The video will begin to play.
- Use the cursor in the selection column to select various functions. Press the button to execute the function.
27.4 Data formats
The following file formats are supported:
Photo: .jpg; .png
Audio: .mp3; .mp4; .aac; .ac3; .m4a; .wma;
Video:
| Container formats Video | Codec Audio Codec | Common file extensions | |
| MPEG-TS (.ts, .mts, .m2ts);MPEG-PS (.mpg, .mpeg,.vob); MPEG-4 (.mp4,.m4v); Quicktime (.mov);Matroska (.mkv); MP3 (.mp3); 3gp (.3gp); AVI (.avi); ASF (.wmv, .wma,.asf); FLV (.flv, .f4v) | H.262 (MPEG-2 Part 2);H.264 (AVC, MPEG-4 Part 10); H.265 (HEVC); Xvid (MPEG-4 Part 2); Windows Media Video 9 | MPEG-1; MPEG-2 Part 3,MP3 (MPEGAudio Layer III);AAC (MPEG-2 Part 7,MPEG-4 Part 3, HE-AAC);AC3 (Dolby Digital); PCM;Windows Media Audio 9;Windows Media Audio 10 | .3gp |
| .avi | |||
| .wmv, .asf | |||
| .flv, f4v, | |||
| .mov | |||
| .mkv | |||
| .mp4, m4v | |||
| .mts, .ts, .tsp, .mpg, .mpg2; .mpeg | |||
| .vob |
The file extension alone generally says nothing about whether the file is playable. Codecs that do not support the media system can be used in a container. For example, an AVI file encoded with DivX.
28 Digital-/USB recording to hard disk

Various TV sets are equipped with an internal hard disk at the factory.
An external hard disk, which is not included in the scope of delivery of the TV set, can be connected to a USB socket on all TV sets.
PVR (Personal Video Recording) makes it possible to record TV or radio programmes to an external hard disk or suitable USB storage device using the USB port (USB recording).
For PVR recordings to an external hard disk that is connected to the USB port, record and playback functions are possible simultaneously. While a programme is being recorded, you have the possibility of playing back an already-recorded programme at the same time.
An EPG (Electronic Programme Guide) is available for recording TV programmes with your PVR.
External hard disks allow for a large number of recordings, which can be managed using a Recordings archive. You can equip the recordings with a deletion protection. Parental control can be set for each
individual recording.

We recommend using external hard disks as USB storage devices.
Memory sticks can only be used to a limited extent. There are two reasons for this: First, they must have sufficient storage capacity for recording programmes (min. 8 GB). Second, they must have minimum read and write speeds.
28.1 Hard disk instructions
Hard disk drive
A hard disk drive is very sensitive. The hard disk may fail if it is used improperly or in an unsuitable environment. Indications of this are if the playback is unexpectedly blocked and noticeable mosaics appear in the picture, among other things.
If the hard disk drive fails, playback of recordings is impossible. In such a case, please contact your specialist dealer.
Important recordings on the hard disk
The hard disk is not intended to serve as a permanent memory for your recordings. Data and/or recordings that are important to the user should also be backed up on an external storage medium, a DVD for example.
METZ cannot assume any liability for recorded material that is lost or damaged as a result of a malfunction or disruption of the hard disk, whether directly or indirectly.
Installation and handling
- Do not subject the TV set to shocks or vibrations, especially if the TV set is in operation.
- Place the TV set on an even, stable surface that is free of vibrations.
- Do not cover or block the cooling vents or other ventilation openings on external hard disk devices or the TV set.
-
Do not set up the TV set in places where it can get very hot or moist or where the TV set is exposed to rapid temperature changes.
-
Do not transport the TV set while it is switched on and also not directly after switching it off.
- The hard-disk recorder must be shut down before switching off the LCD TV set. To do this, press the OFF button on the remote control and wait until the "Please wait!" display fades or the blue LED lights up. The TV set can now be switched off using the power button on the set.
Notes regarding external hard disks
To be able to connect an external hard disk to devices that do not have a built-in hard disk, you must first enable the recording function (see 28.2).
Connect the external hard disk to the TV set via USB socket. Before an external hard disk can be used, it must be formatted as described in Chapter 26.2.
28.2 Activating your TV for USB recording
This is only necessary for TV sets with an external hard-disk recorder.
You can connect an external hard drive to your TV set and use it to record programmes and for the time shift function.
We call it "USB recording". You can set up this extremely useful function very easily yourself. All you have to do is visit the Metz homepage, note down the release code and enter it in your set. This service is free of charge and does not require registration. Your specialist dealer will be happy to do it for you if you have no Internet access.
Your Metz TV set has a specific 20-digit "request key". Using this code you can request the 7-digit "activation key" from the Metz homepage at www.metz-ce.de.


- Connect your external hard drive to the USB port on your TV set.
- Press button to open the "Functional overview".
- Select "Menu" with the cursor and press the button
- Select "Record/EPG" with the cursor and press the Hikon.
The "Record/EPG" menu will appear.. - Select "Storage device" with the cursor in the context menu and press the K button twice.
- Go to the menu item "Release USB recording?" with the cursor control button and press the button.
The "Release the USB recording" window appears
- Note your TV set's" request key, which you will need to release the USB recording function.
Releasing the TV set
- Go to the Metz homepage at www.metz-ce.de and open the "TV" product page
- The following text will appear on the right margin of the lower third of the screen:
USB-Recording
Here you can get the activation key for the activation of a TV set.
Clicking on the text opens the release page.
-
Now enter the 20-digit "request key" and click 📂 with the mouse. If your input is correct, you will now see a 7-digit "activation key. An error message will appear if the input is incorrect.
-
Enter this "activation key" on your TV set.
-
If your input is correct, confirmation that USB recording is active will appear.
#

OK

OK
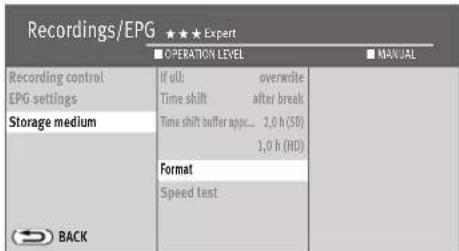
28.3 Format external hard disk
An external hard disk up to a capacity of 1 terabyte is certainly suitable and must be formatted as the "Primary partition" in "NFTS".
If the external hard disk is "FAT32" formatet, you will be asked to have it formatet by the TV set.

If the external hard disk is not recognised, please verify the partitioning of your PC! This must be a PRIMARY partition, not Extended. Once you have connected the external hard disk, you have to format the TV set (in NTFS).
Format hard disk on the TV set:
- Press button to open the "Functional overview".
- Select "Menu" with the cursor and press the button.
- Select "Recordings/EPG" with the cursor and press the button.
- Select "Storage medium" with the cursor in the context menu and press the button.
- Select "format" with the cursor in the context menu and press the button.
- Select "Format" with the cursor in the context menu and press the button. The hard disk is formatted. The information window is displayed during the formatting. During this time, do not turn off the TV using with the power switch
Please note: When you format an hard disk, all data it contains is erased!
#

OK

OK

28.4 Settings for the internal/external hard disk
A variety of settings can be selected for the internal/external hard-disk recorder in this menu:
If the HDD is full ...
If the hard disk is full, depending on the settings, either no recording will be saved or the oldest recording saved that does not have deletion protection will be overwritten.
Time shift (delayed viewing)
Time shift mode runs permanently or is started by pressing the key(pause). It can also be switched off.
Speed test
If you want to use a USB memory stick for USB recording, we recommend carrying out a speed test first of all. The colour displayed in the test bar let you know whether your USB stick is suitable for USB recording.
Red : speed of the media is not suitable.
Yellow: media only suitable to a limited extent due to its speed, e.g. not suitable for HD programmes.
Green : speed of the media is suitable.
Formatting (only for use with external USB storage media)
The external USB storage device should be configured and formatted for PVR.
Any data stored on the storage media will be deleted.
To adjust settings for external hard disk:
- Press button to open the "Functional overview".
- Select "Menu" with the cursor and press the button.
- Select "Recordings/EPG" with the cursor and press the button.
- Select "Storage medium" with the cursor in the context menu and press the button.
- Select the desired function in the shortcut menu with the cursor and press the OK button.
- Use the cursor in the context menu to select the desired function.
- Press the button to exit the menu.

28.4.1 PVR Timer or Recording Defaults
You can configure general settings to the PVR timers.
Priority: The timer priority can be set to "Low" or "High". A timer with high priority will be considered before a timer with low priority.
Parental control: It is possible to programme parental controls for the timer recording(s). To ensure that parental controls are effective, they must be switched on (see chap 22).
Deletion protection: A timer recording can be programmed with deletion protection.
Setting the PVR timer basic settings:
- Press button to open the "Functional overview".
- Select "Menu" with the cursor and press the button.
- Select "Recordings/EPG" with the cursor and press the button.
- Select "PVR timer" with the cursor in the context menu and press the button.
- Select "Priority" with the cursor in the context menu and press the button.
- Use the cursor to assign the desired priority to your selection and press the OK button.
- If desired, use the cursor to select "Parental controls" and "Delete protection".
- Press the button to exit the menu.

28.4.2 Basic settings for series recordings
Series times can be assigned general settings.
Priority: The timer priority can be set to "Low" or "High". A timer with high priority will be considered before a timer with low priority.
Example: series timer is set with "High" priority and a PVR timer with "Low" priority is set for nearly the same time. The programme with the series timer will be recorded and the programme with the PVR timer will not be recorded.
28.4.3 Series timer recording using EPG
Series that have the same name and start at nearly the same time can be recorded automatically.
The time window for the beginning of the broadcast can be set with a time tolerance.
Configuring basic settings for a series timer:
- Press button to open the "Functional overview".
- Select "Menu" with the cursor and press the button.
- Select "Recordings/EPG" with the cursor and press the button.
- Select "Series recordings" with the cursor in the context menu and press the button.
- Select "Time tolerance" or "Priority" with the cursor in the context menu and press the OK button.
- Use the cursor to select the desired time tolerance or alternatively priority and press the OK button.
- Press the button to exit the menu.
28.5 Delayed television viewing (Time shift)
If the TV device does not have an internal hard drive, this is only possible if it has an external hard drive connected via USB port.
The TV set stores the recordings in temporary digital storage (time shift buffer).
The temporary digital storage is sufficient for recording approx. 130-300 min (SD) and 70-120 min (HD=HDTV programs). This information only represents approximate values, which can vary
depending on the volume of data in the recording. When using an internal or external mass storage device (hard disk), the recording duration is much longer.
- Pause the program with the key


The program is recorded in the temporary storage.
The name of the "paused" program appears in the upper left corner of the screen. The green key can be used to reveal the status display, which gives you information about the current position in time shift mode. To the left of the bar display, you can see the total time for the time shift mode of the programme recorded. The current position "behind LIVE" is displayed beneath the bar (in the example -02:17).
Parking program
During pause mode, you can also change to a different program position12), to watch the news for example. Then, in addition to the name of the program, a symbol P appears as a sign that the program is "parked".
When the news is over, you can press the key again to continue the previously paused program without having missed anything. The time shift bar fills in with colour in accordance with the length of the pause. Everything that is broadcast prior to the time displayed is not recorded.

Record start/stop
| .... | Stop recording |
| .... | Stop recording |
| ... | ... |
| Stop timeshift | Live |
| Start direct recording | Start direct recording |
| Cancel |
- Press the Key again to continue watching the paused and recorded program
- Press the blue button to open the status display.
- Press the 📁 on or seven ➕imes briefly to skip ahead in playback by +1 minute or to rewind by -20 second increments.
- Press and hold the button to double the speed of these functions. Repeat this to rewind or forward the recording at up to 32x normal speed.
The time since the program was “paused” (in the example the program was paused 10:15 min. ago) is shown on the left next to the bar display. The time that the replay lags behind the live broadcast is shown below the bar display (03:25 min in the example).
In pause mode the program can be forwarded or rewound in 10% increments.
If you want to return to the current status of the program ("Live") from time shift mode, then press the blu key I—you want to return to the current status of the program ("Live") from time shift mode, then press the 📄 for the "LIVE picture" of the current program.
If the TV set is in standby mode or switched off, the recording will be lost Alternatively, you can also create a regular recording from the recording stored in the time shift buffer.

28.5.1 Saving time shift buffer as recording
This function is only available if a hard disk recorder is installed in the TV set.
Let us assume you are in time shift mode and are watching a current programme, which has already filled at least 13 minutes of the time shift buffer. Now you wish to save the partially recorded programme.
- Press the button.
- Use the cursor to select and press the button.
- Use the cursor to select OK (in press the button)
OK
OK
The TV set changes to "Archive Playback Mode" and records the broadcast in the background.

This programme is to be recorded: 10:42:15


This programme is to be recorded: 10:42:15
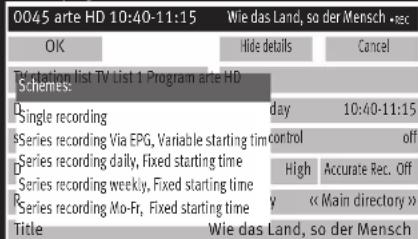

28.6 Recording a broadcast
28.6.1 Direct recording of a program
If you want to record a program that is already running, you program a direct recording. This direct recording programming ensures that the program running is prepared for recording.
Program direct recording:
- Press the button (record) to open the recording window.
- Use the cursor to select Show detail the button. OK
- Select Reporting device, press the button, and adjust the recording device if necessary. The default setting for the recording device is usually "PVR ...".
- Press the button to initiate the recording device.
- Select with the cursor and press the button OK
Other parameters (deletion protection, parental controls, and priority) can be changed, like the recording device.
28.6.2 Configuring a programme as a series timer
- Press the function (record) to open the recording window.
- Use the cursor to select and press the button. OK
- Select writing device, press the button, and adjust the recording device if necessary. The default setting for the recording device is usually "PVR ...".
- Press the button to initiate the recording device.
- Use the cursor to select and press the button. OK
- Select the type of recording with the cursor. "Series timer (EPG" are series with different broadcast times. "Series timer daily", "Series timer weekly", and "Series timer Mo-Fr" are for series that have the same daily broadcast time.
Other parameters (deletion protection, parental controls, and priority) can be changed, like the recording device.
EPG

This programme is to be recorded: 10:42:15

28.6.3 EPG: Recording a programme (single or series)
- Press the button to open the EPG.
- Select an upcoming programme with the cursor in the context menu and press the button.
- Select with the cursor in the context menu and press the button.
- Select Show Details or in the context menu and press the button.
-
Select the recording device in the context menu and press the button.
• In the detail menu, it is possible to: -
select the type of recording (single, series).
- configure parental control settings.
- prevent accidental deletion (only for "PVR internal" or "PVR external").
- set a "Priority".
- select a folder on the hard disk.
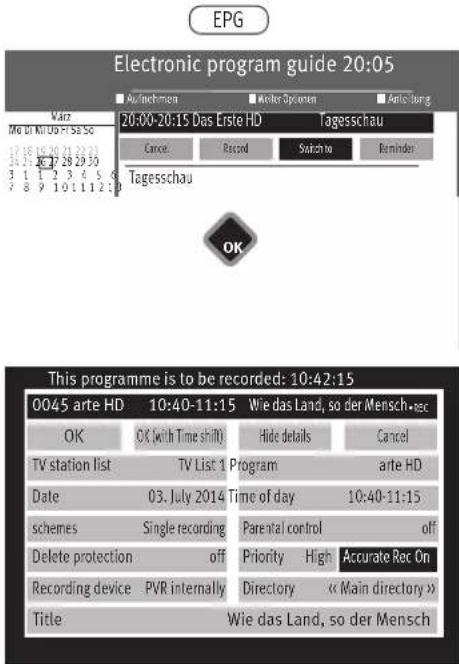

28.6.4 Accurate Recording (Accurate Rec)
The "Accurate Recording" function replaces the timer functions that users of analogue TVs will be familiar with, enabling precise timed recordings on digital recording devices (such as hard disks and digital recorders) without the need to set the timer a few minutes before and after the programme. The recording starts automatically at the start of the programme and ends just a few seconds after it finishes.
This function is currently only supported by the public-law broadcasters ARD, ZDF, ORF and SRG.
- Press the button to open the EPG (electronic programme guide).
- Select the desired programme using the cursor buttons in the context menu and press the OK button.
- Select using the cursor buttons in the context menu and press the button.
- Select using the cursor buttons and press the button. OK
- Select "On" using the cursor buttons and press the button.
- Select using the cursor buttons and press the button OK

Other settings (deletion protection, parental controls, and priority) can be changed, like the recording device.
#

OK
28.7 Recording plan (Overview of programmed recording timers)
- Press button to open the "Functional overview". The "TV" window is selected.
- Press the button.
- Use the cursor to select "Record timer" and press the button.

OK
- Use the cursor to select "Schemes" and press the LKton. - Select "Single recording" or "Series recording" with the cursor and press the LKton. Depending on your selection, the appropriate overview opens in the recording planning window.

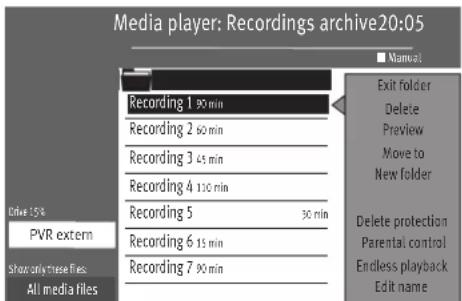
29 The Recordings archive
The Recordings archive is only available if the TV set has a built-in internal hard disk or when an external hard disk is connected.
29.1 Playing programs from the Recordings archive
- Press the 📄 on to open the "Recordings archive".
- Select the desired recording with the cursor control key.
- Press the key and play the selected recording.
If the recording has already been opened the following message appears:
- Select "Playback from the beginning" or "Playback from last position" with the cursor.
- Press the button. Playback begins.
Playback can be paused with the button. Playback is paused. The archive opens.
29.2 Pause playback, Rewind, Fast-Forward
- Playback can be paused with the playback. The recording pauses on a freeze frame. To resume playback, press the playback again.
- While paused, press the 📄 on or seven 📄 times briefly to fast-forward or rewind in 10% increments.
- During playback, press the 📄 on or seven 📋 times briefly to skip ahead in playback by +1 minute or to rewind by -20 second increments.
- During playback, press and hold the 📄 on or to do 📋 the rewind or fast-forward speed. Repeat this to 📋 and or fast- 📋 hard up to 32x normal speed.
- Press the button or the button ▶ stop fast-forwarding or rewinding.
29.3 Edit recording (marking / cutting)
Marking
▼ markers can for example be set in a recording in order to mark important or interesting spots. Marked spots can then be selected with the ▶▶▶▶ reached specifically in pause mode.
Cutting
A recording can be provided with out marks. In this way you can exclude parts of the recording so that only the most interesting scenes can be seen.
Edit recording
- Press the blue button in playback mode. The status display appears.
- Press the red button and set a cut mark.
- Move to the desired spot that is to be marked or cut with the ▶Button
- At the desired spot
- press the green button and set a marker..
A cut always consists of a starting and ending cut point.
Then go to the end of the scene and press the red button again.
The area between the two cut symbols changes to red.
This area is automatically skipped during the replay mode.
- If you want to move to the marked spots during playback, then first press the button.
- With the button, you can move specifically to the set markers or cut marks.
Then press the button; the replay will start as of the marker or after the cut.
Recordings that have cuts and markers can be freed of them once again.
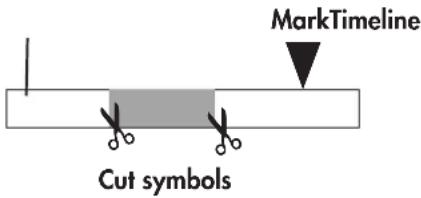
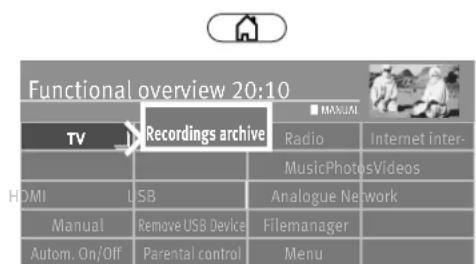
OK


EXIT
Removing cuts and markers
- Pause the replay with the button.
- Press the blue button and call up the editing mode. The editing symbols are shown.
- Use the button move to the desired markers or cut marks. A marker that you selected changes colour from white to green.. A cut mark you selected changes colour from white to red.
- To delete a selected marking ▼, press the green button.
- To delete a cut mark, press the red button.
- Playback can be continued by pressing the 📄n.
- The status display can be hidden with the button.
29.4 Deleting programs from the Recordings archive
- Press button to open the "Functional overview".
- Select "Recordings archive" with the cursor and press the button.
- Select the desired recording with the cursor.
- Select "Delete" with the cursor and press the button. The following notice appears to confirm that you would like to delete the recording.
- Select "OK" with the cursor and press the Hikon.
- Press the button to exit the menu.


29.5 Slow motion
- During playback hold down the key to approx. two seconds to enable slow-motion.
- Use the key or the key to stop slow-motion and return to normal replay mode.
29.6 Delete protections
Delete protection prevents recordings from being automatically overwritten when the hard disk is full. Delete-protected files can only be deleted manually after the delete protection has been deactivated.
29.6.1 Activating deletion protection
- Press button to open the "Functional overview".
- Select "Recordings archive" with the cursor and press the button.
- Select the recording with the cursor that you would like to protect against deletion.
- Use the cursor to select "Protected" and press the button.
The "symbol is displayed in the upper left of the screen.
- Press the button to exit the menu.
- Press button to open the "Functional overview".
- Select "Recordings archive" with the cursor and press the button.
- Use the cursor to select the recording that is protected ("appears").
- Use the cursor to select "Protected" and press the button.
The "symbol is displayed in the upper left of the screen.
- Press the button to exit the menu.
29.7 Parental control
The Parental control function is set in much the same way as delete protection. If you activate the childlock for a recording, the system will not play back the recording until the viewer has provided the 4-digit code that you entered when you activated the childlock.


29.8 Continuous playback
With this function you can continually have a recording continually repeated.
29.8.1 Activating endless playback
- Press button to open the "Functional overview".
- Select "Recordings archive" with the cursor and press the button.
- To loop playback, select the desired recording with the cursor.
- Use the cursor to select "Endless playback" and press the button.
The setting "Endless playback" will remain active even if you start watching other TV programmes in the archive.

29.8.2 Deactivating endless playback
- Press button to open the "Functional overview".
- Select "Recordings archive" with the cursor and press the button.
- To loop playback, select the desired recording with the cursor.
- Use the cursor to select "Endless playback" and press the button.

EXIT
29.9 Change file name
If you do not like the name of a TV program you recorded, you can change the name.
- Press button to open the "Functional overview".

- Select "Recordings archive" with the cursor and press the button.
- Select the recording using the cursor key whose name is to be changed.
- Use the cursor to select "Edit name" and press the OK. On the keyboard that appears, delete the name and enter a new one.


29.10 Creating a new folder
You can create folders to archive your recorded broadcasts.
- Press button to open the "Functional overview".
- Select "Recordings archive" with the cursor and press the button.
- Use the cursor to select "New folder" and press the button.
- Enter the file name on the keyboard that appears.
- Use the cursor to select the entry field and press the button. OK

EXIT
#

30 The "File Manager"
With the "File Manager" you can manage and process data (pictures, videos, music ...) on a USB storage device and the built-in hard disk, similar to a file manager on a PC.
Call "File Manager"
- Press button to open the "Functional overview".
- Select "Filemanager" with the cursor and press the button.
OK

- Select the source medium with the red button and press the button.
- Select the target medium with the green button and press the button.
- Use the cursor to mark the file that you would like to copy, move, or delete.
- Change to the grey middle selection column using the cursor; select, for instance, "Copy", "Shift" or "Delete"; and press the button.
Copying larger files can take a long time and can be done in standby mode. In this case, the screen is turned off and the device switches off automatically once copying has been completed.

31 Software update
Updates to the firmware will be provided at irregular intervals on the Metz homepage.
There are two ways to update your TV set:
a) over the Internet if your TV is connected to the network
b) by downloading the update from the Metz homepage onto a USB stick.
First of all, you should check the firmware version of your TV set.
- Press button to open the "Functional overview".
- Select "Menu" with the cursor and press the button.
- Select "Service" with the cursor and press the button.


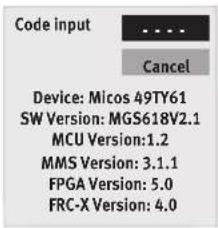
The "Code input" window appears:
Write down the software version.

31.1 Software update using the Metz homepage
You can obtain the required software from: www.metz.de, under the "Television" heading.
- Start your PC and go to the homepage www.metz-ce.de, section "Support" - "Downloads" - "Download area" - "Software".
- Click on "Select product family". The device overview opens.
- Select your TV set by means of the set family or the set designation and press the press the OK button. The "Downloads" window opens. Confirm the line "Notes acknowledged and accepted".
- Select the cell "Continue to download" with the cursor.
Check via the version and date whether a more recent version of the software is offered.
If the firmware on the homepage is newer, click Download and accept the terms and conditions of use. Download the new software onto your PC, unzip the ZIP file and copy the unzipped file, which ends with "*.pUSB" to a USB stick. When you select the "Software Update" function, the connection is established automatically.
- Plug your USB stick into your device's USB port.
- Press button to open the "Functional overview".
- Select "Filemanager" with the cursor and press the button.
- Select the "USB device" with the red button and press the OK button.
- Use the cursor to select the file and press the button.
- Press the button to confirm when asked "Do you want to update the software?".
#

OK
31.2 Software update over the Internet
If your TV set is connected to the Internet, a software update can be conducted directly over the Internet.
- Press button to open the "Functional overview".
- Select "Menu" with the cursor and press the button.
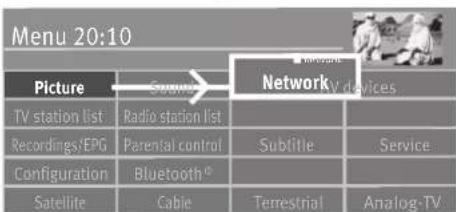
OK
- Select "Network" with the cursor and press the button.
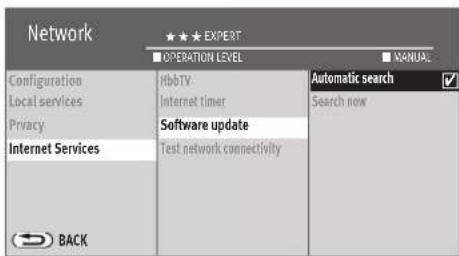

EXIT
- Select "Internet services" with the cursor in the context menu and press the button.
- Select "Software-Update" with the cursor in the context menu and press the button.
- Select "Automatic search" with the cursor in the context menu and press the button.
- Press the button to exit the menu.
32 Inserting / removing a CI/CI+ module
The TV set has a port for a CI/CI+ module (card-reader for SmartCards or encryption cards).
Insert CI module as shown in the pictures in one of the slots as far as possible.
The TV set is now ready to decode the encoded channels.

33 Range of functions
The TV set provides a range of functions to assist you in finding your way around the TV set's versatile applications and features.
The range of functions can be set using the coloured buttons on the remote control.
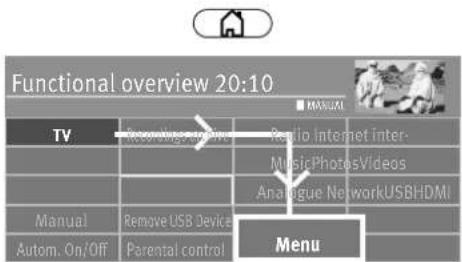
Setting the range of functions
- Press button to open the "Functional overview".
- Select "Menu" with the cursor and press the button.
- Use the cursor to select a menu item and press the button.
- Press the yellow key repeatedly and set SIMPLE, COMFORT or EXPERT.
- Press the button to exit the menu.


#
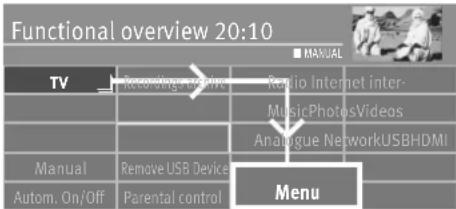
OK
34 Operating more than one TV in a single room
If more than one TV needs to be operated within range of the remote control or in the same room, the remote control can be linked to a particular TV set. This means that the linked remote control will only affect a single TV set; the other TV sets will not respond to the commands of that remote control.
Linking a remote control to a TV set
- Press button to open the "Functional overview".
- Select "Menu" with the cursor and press the button.

OK
- Select "Configuration" with the cursor and press the button.


- Select "Operating" with the cursor in the context menu and press the button.
- Select "Remote control" with the cursor in the context menu and press the button.
- Select "Remote control" with the cursor in the context menu and press the button.
- Select "Operate with: this control" with the cursor in the context menu and press the OK button.
- Press the button to confirm your selection.
- Press the button to exit the menu.
35 Glossary
ARC (audio return channel)
An audio return channel has been implemented in the HDMI 1.4 version to reduce the cabling effort between various HDMI components.
The audio return channel is always useful if a TV set integrated in a home cinema system has a built-in digital tuner, DVD or Blu-ray player or another source of digital-/sound material.
The ARC function can establish an “audio return channel” via the HDMI cable to the AV device. In other words, the same cable that is normally responsible for transporting data from the AV device to the TV set in this case transfers audio data in the opposite direction. The audio return channel makes the audio cable (Toslink) previously required in addition to the HDMI cable superfluous.
The audio return channel supports all formats, which can also be transmitted via conventional TV SPDIF connection - among others, these are Dolby Digital, DTS and PCM audio. However, formats that cannot be transmitted via S/PDIF, e.g. all HD audio formats, are not supported by the audio return channel.
Motion compensation
“Motion compensation, film” improves the picture display for black and white or cinema films. Motion becomes smoother and a more three-dimensional picture appearance results.
Vertical picture position
In the case of some wide screen films subtitles are broadcast in the lower black strip. To ensure these subtitles remain visible when enlarged, you can move the picture upwards.
Picture profile
Eco: Compromise for all applications.
Sports: Setting for sports channels or sports programs.
Television: Setting for normal TV operation.
Games: Preferred setting for recordings from game consoles.
PC Monitor: Preferred setting for recordings from a connected PC.
User: Your self-configured picture profile.
Code
The settings for parental control are secured with a four-digit numerical code, which you can set. Make a note of the code number entered. If you have forgotten the code number, consult your specialist dealer.
DHCP
The Dynamic Host Configuration Protocol permits assignment of the network configuration to clients by a server.
A client is a computer program that establishes contact with another computer program on a server, in order to make use of its services
DHCP enables computers to be connected automatically to an existing network, without the need for any manual configuration.
The client must simply be configured to retrieve an IP address automatically. When a computer connected to the network is started, it can automatically retrieve an IP address, the subnet mask, the default gateway and also DNS server and, if in use, WINS server details from a DHCP server.
Dyn. contrast
The "Dynamic contrast" setting facilitates an automatic increase in picture contrast in the event of a low level of picture contrast.
Fine search
During the channel search with a stipulated symbol rate, the channels are synchronised at the centre of the channel. If this setting does not lead to a satisfactory result, fine tuning can then be set. The search operation takes considerably longer with the fine search set.
Gateway
A gateway is a network transition used in telecommunications, for example in next Generation networks and in IP telephony.
These gateways convert digital voice, audio or image information from one network format to another. Transcoding of data may also occur in this connection.
Brightness
Brightness (indication in %) is the basic value which is set according to the ambient light in the room where the TV is used. The basic setting should be made in a dark room in a way that black picture content is still black.
HD
HD (high definition) or Full HD refers to a display resolution. HD represents a resolution of 1920 x 1080 pixels with an aspect ratio of 16:9.
Image sticking
Images that remain unchanged for a long time (several hours), such as still pictures, result in “image sticking”, i.e. lasting shadow formation. Such images should be avoided if at all possible. This effect is not permanent and disappears again after a short time.
IP-Adress
Images that remain unchanged for a long time (several hours), such as still pictures, result in “image sticking”, i.e. lasting shadow formation. Such images should be avoided if at all possible. This effect is not permanent and disappears again after a short time.
Volume correction
Broadcasting channels broadcast at different volumes. These volume differences can be automatically adjusted between channels.
Panorama
“Normal” programs in 4:3 format can be adjusted to the 16:9 format of the picture screen with the panorama function. The picture width is widened here to fill the screen.
Noise reduction
Setting option to improve picture quality of optically noisy “snow pictures” in the event of unfavourable reception conditions. Depending on the degree of disturbance, different correction options are provided, which can be set individually for each program position.
Subnet
The term subnet is used to define an individual portion (sub-network) of an Internet Protocol (IP) network.
Symbol rate (baud rate)
The symbol or baud rate describes the data volume that is transmitted per second. The time required for the search function increases in proportion to the symbol rate.
Station search
1 Freely receivable channels, all non-encrypted channels are sought.
2 All channels, all non-encrypted and encrypted channels are sought. If a CA module and smart card are inserted, the corresponding encrypted channels are released.
Automatic zoom
The active automatic zoom permits showing programs in wide screen format (e.g. programs in 16:9 format) as far as possible in a format filling manner on the screen.
If this function remains switched off, these film formats are not automatically adjusted.
UHD (Ultra High Definition)
UHD is four times the HD resolution. UHD refers to the display resolution. UHD represents a resolution of 3840 x 2160 or 8,847,360 pixels with an aspect ratio of 16:9.
4k
4K is used by digital cinemas (DCI) and generally represents a resolution of up to 4096 x 2160 pixels. This is an aspect ratio that is a little more than 17:9; images are "cropped", meaning that pixels are cut off from the edges, to achieve the now-typical 21:9 aspect ratio. Given that a TV has an aspect ratio of 16:9, a 4K TV has a resolution of 3840 x 2160 pixels.
36 Cleaning the device

Switch off the device with the power switch before cleaning!

Improper handling and cleaning can cause irreparable damage to the screen. Consequently, pay attention to the rules on handling and caring for the device.
- Handle the screen surface very carefully and gently.
- Avoid any mechanical stress to the screen surface by knocking, shocks, pressure, scratching, scraping, etc, since this can lead to damage.
- Avoid contact with pointed, sharp or hard objects.
- The screen surface must be preserved against dirt.
Care and cleaning:
- Switch off and unplug the device before cleaning.
• Take care that water or other liquids never gets into the device, since these can cause damage to the device. - Cleaning of the screen surface must occur with a soft, dry cleaning cloth (e.g. microfibre cloth).
- If significant soiling nevertheless occurs, the screen surface can be cleaned with a slightly moist, soft cloth.
A special TFT cleaning solution (commercially available at specialised dealers) is the perfect cleaning solution.
Never use cleaning solution on the screen surface! If any cleaning solution penetrates beneath the screen's lower frame, it will result in irreparable damage to the components.
Unplug the set immediately if foreign bodies like water, other liquids, metal parts, etc get into the screen.
Never attempt to touch the inside of the set with any objects or with your hands. Danger of electric shock or accident.


37 Problem, Possible causes, Remedy
| Problem Possible cause | Remedy | |
| TV set does not respond to remote control | No direct line of sight contact between remote control and TV set.Direct sunlight shining on infrared window of TV set.Remote control batteries flat.TV set switched off with the power switch.Processor fault | Establish sight contact.Avoid sunlight exposure.Replace batteries.Switch on the TV set with the power switch.Switch the TV set on and off with the power switch |
| After switching on, the message “Code entry” appears on the screen. | Perental control was programmed and all programs have been blocked. | Enter the code number with which you programmed parental control.Switch off child lock (chap. 22.3.3) |
| The TV set was switched off using the Cutton, but the blue light diode is still on. | EPG data of the electronic program guide are being collected.A recording is running | None; once the data has been collected in full the TV set will switch off automatically none, when the recording is finished, the TV set switches to standby mode and the LED indicator lights up red. |
| No sound is output on the TV speakers | In the "Sound" menu under "Sound Settings, general", "Speaker off" is selected. | In the "Sound" menu under "Sound Settings, general", "Speaker on" is selected. |
| No EPG data available or only certain data | The TV set was unable to collect any data, because it was switched off with the power switch on the TV set. | Switch TV set to stand-by mode only with the key the remote control.(see Chapter 24.1 Collect EPG data) |
| No channel reception.Channel or frequency change by the broadcasters. | The reception data of a channel have been changed by the channel provider. | Find out more e.g. at “www.lyngsat.de” for DVB-S“www.ueberall-tv.de” for DVB-Te.g. “www.kabeldeutschland.de” for DBV-Con the changed data of the channel.Carry out a manual channel search with the new reception data of the channel, on this see Ch.9.3.2, 9.4.1 and 9.6.1.The channels found will be added to the end of the station table |
| One channel displays picture faults (stripes or formation of tiny blocks) | The signal quality is poor. | Reception, especially for DVB-S, is disrupted by a bad weather front at the reception location or at the broadcasting station. This can also occur with the Cable which is supplied via DVB-S to the cable network. |
38 Technical data
Mains voltage: .....230 -240 V \~ 50 Hz
Antenna input: .....75 Ohm
Channel coverage: ..DVB-T, DVB-C, analogue 48-862MHz DVB-S/S2 950-2150MHz
Operating temperature range: +5°C bis +35°C bei 75 % air humidity Energy consumption values see separate data sheet
HDMI
3840x2160p 60 Hz 3840x2160p 50 Hz
3840x2160p 30 Hz 3840x2160p 25 Hz
3840x2160p 24 Hz
1920x1080p 60 Hz 1920x1080p 50 Hz
1920x1080p 30 Hz 1920x1080p 25 Hz
1920x1080p 24 Hz
1280x720p 60 Hz 1280x720p 50 Hz
720x576p 50 Hz
720x480p 60 Hz
640x480p 60 Hz
HDMI 1, HDMI 2, HDMI 3, (HDMI 4)
1920x1080p 60 Hz 1920x1080p 50 Hz
1920x1080i 60 Hz 1920x1080i 50 Hz
1920x1080p 30 Hz 1920x1080p 25 Hz
1920x1080p 24 Hz
1280x720p 60 Hz 1280x720p 50 Hz
720x576p 50 Hz
720x480p 60 Hz
720(1440)x576i 60 Hz 720(1440)x576i 50 Hz
720(1440)x480i 60 Hz
640x480p 60 Hz
1680x1050p 60 Hz
1440x900p 60 Hz
1440x1050p 60 Hz
1360x768p 60 Hz
1280x1024p 60 Hz
1280x800p 60 Hz
1024x768p 60 Hz
800x600p 60 Hz
HDMI Audio: Linear PCM Stereo 32kHz/44.1kHz/48kHz
DIGITAL AUDIO OUT SPDIF (Linear PCM Stereo or
Dolby Digital, depending on source)
AUDIO OUT Analogue Stereo (Line-OUT)
Haedphone OUT: Headphone impedance ≥ 32 Ohm
WLAN
2,4 G and Bluetooth:2400 .. 2483,5 MHz
WLAN 5 G: 5150 .. 5350 MHz
Transmitting power: < 20 dBm
39 Special instructions for TV sets with OLED technology
"OLED twin R" televisions are equipped with OLED screen technology.
The source of the OLED technology's advantages in picture quality is the fact that OLED at subpixel level is an individually controllable self-luminous technology. The more differentiated screen control is, the more negative the effect of motionless pictures or sections of pictures upon degradation is. Consequently, these should, if possible, either be avoided or be subject to a time limit.
In normal TV operation, the device has various internal mechanisms which prevent damage to the image quality. However, the prescribed automatic calibration cycles must be performed in standby mode for this purpose.
To ensure that your OLED TV always delivers a first-class image, you should pay attention to the following points:
- Avoid still images over longer time periods.
- Avoid picture content with a still image character (e.g. a static outer frame containing a moving image) over long periods.
- After four hours of operation, the device starts an "RS compensation cycle" as soon as the set is switched to standby mode. "Calibration" will appear in the text display. The TV screen will remain dark. This process can take a few minutes and removes residual stress in the OLED panel control.
If this process is prevented or interrupted, the following will appear at a later time:
After four hours of use, your Metz OLED device will be calibrated for optimal image display at the earliest opportunity. For this to happen, the device must be in standby mode. Because the device was last switched off with the power switch, it was not possible to run the calibration.
Please switch the device to standby with the remote control. The display will then be calibrated.
Once only the red LED is illuminated, the device can be turned off with the power switch. If you do not switch off to standby mode, the calibration will be performed automatically at the next start.
If this process is prevented or interrupted, mandatory calibration will occur at a later time, which cannot be cancelled.
The following will appear on the screen.
You did not use standby mode the last time the device was switched off. As a result, the device is now being automatically calibrated. This operation cannot be interrupted with the remote control.
Please do not switch off the device with the power switch.
Once only the red LED is illuminated, can the TV can be returned to operation.
- After around 600 hours of operation, JB compensation will be performed as soon as the device is put in standby mode. "Calibration" will appear in the text display. The TV screen will remain dark. During the last few minutes of JB compensation, a thin white line will be visible, travelling from top to bottom. This involves irregularly degraded subpixels being recorded and compensated for. This process lasts about 70 minutes and removes residual voltage in the OLED panel control.
- First switch off the TV set using the power switch when only the red standby LED is illuminated.
40 Taking back old appliances
When you buy a new TV set, you can return your old TV set to your local electronics store. Ask your dealer about this.
40.1 Deleting personal data or restoring factory settings
To prevent third parties from accessing your personal data, we recommend that you initialise the set to the factory settings.
To restore the factory settings
- Press button to open the "Functional overview".
- Select "Menu" with the cursor and press the button.
- Select "Configuration" with the cursor and press the button.
- Select "Operation" with the cursor and press the button.
- Select "Factory settings" with the cursor and press the OK button.
- Press the key and confirm "Initialise".
- Press the key and accept the selection "Yes". The TV set is reset to the factory settings.

Your Metz product was developed and manufactured with high-quality materials and components which can be recycled and/or re-used.

This symbol indicates that electrical and electronic equipment must be disposed of separately from normal garbage at the end of its operational lifetime.
Please dispose of this product by bringing it to your local collection point or recycling centre for such equipment. This will help to protect the environment in which we all live.
Battery Disposal
Do not dispose of batteries with domestic rubbish! Please return spent batteries to collecting points should they exist in your country.
Please only return fully discharged batteries. Normally, batteries are fully discharged if the device they power
- switches itself off and indicates "batteries spent"
• they no longer function flawlessly after prolonged use.
To prevent short circuits, please cover the battery poles with adhesive tape strips.
These symbols can be found on batteries containing harmful substances:

Pb = the battery contains lead
Cd = the battery contains cadmium
Hg = the battery contains mercury
Li = the battery contains lithium
Errors excepted. Subject to changes!
- Operating instruction
- Dear Customer,
- In the box
- Operating instructions for the following LCD TV sets:
- Explanation
- SIMPLIFIED EU DECLARATION OF CONFORMITY
- Proper use
- Installation instructions
- Safety instructions
- RISK OF FATAL INJURIES!
- Connecting, switching on and off
- Antenna connection (back of unit on the bottom)
- Reception type DVB-C, DVB-T/T2 and analogue TV
- Reception type DVB-S and DVB-S2
- Switching on from stand-by mode
- Switching off with the remote control
- Switching off with the power switch
- The remote control
- No rechargeable batteries may be inserted in the battery compartment of the remote control!
- Remote control (RM18)
- Remote control (RM19)
- #
- OK
- EXIT
- Setting the language/country
- Language selection in the menu
- Setting the country
- Setting the language/country:
- Help (Guide)
- The "Guide" menu or help
- Menu control
- MRNU
- Channel search
- Setting the reception type
- Setting reception type:
- TV standard for analogue channels
- Setting the TV standard:
- Analogue TV channel search
- Carrying out a channel search:
- Colour standard for analogue channels
- Setting the colour standard:
- DVB-T (T2), antenna supply
- Setting the antenna supply:
- DVB-T(T2) channel search, automatic
- Carrying out an automatic search:
- DVB-T(T2) channel search, manual
- Carrying out a manual search:
- DVB-C channel search, automatic
- DVB-C channel search, manual
- Setting the SAT system, antenna system
- Antenna system
- Twin SAT
- Single cable (single cable distribution SDC)
- JESS (EN50607), Unicable (EN50494)
- Setting up the sat system, Unicable (EN50607), JESS (EN50607)
- Setting the SCR no. and SCR freq.:
- Setting the sat system, LNB supply voltage
- LNB supply voltage
- Changing the settings:
- Set SAT system, DiSEqC system
- Switching DiSEqC system on, -off:
- Set SAT system, selecting a satellite
- Setting additional satellites:
- SAT channel search, automatic
- Automatic search
- SAT channel search, manual
- For the HD-SAT station search, the information for the DVB system (for example DVB-S2) must also be entered.
- List of TV Stations
- Edit favourite list
- Block selection
- Moving channels within a list
- Delete channel
- Import/export channel list
- Export channel list
- Import channel list
- Programme selection and information
- Programme selection
- Programme selection using the TV station list
- Search station name
- Programme information (... on now)
- Everyday handling
- Changing picture settings
- Volume settings
- Changing the sound settings
- Virtual keyboard
- Search function in the TV channel lists
- Opening the Search function:
- Keyword search in video text
- Status display
- Display
- Display brightness
- TV, AV and radio permanent display
- Timeshift permanent display
- LED brightness
- Input feedback
- Set state display
- On-screen display
- Color
- Program information
- Volume visible
- CEC key forwarding
- Set screen display
- Time settings
- Setting the sleep timer
- Setting the sleep timer:
- Setting the automatic on and off times
- Setting switch-on time, switch-off time:
- Setting the Time and Date
- Setting the time and date manually:
- Recording control (setting lead and delay times)
- Setting the lead time and overrun time:
- Subtitles
- Switch subtitles on or off in general:
- Temporarily displaying subtitles
- Select language
- Picture settings
- Profile adjustment settings
- Select profile adjustment:
- Setting your own profile
- Select profile
- Eco-Mode
- Demo
- Preferred setting for the TV set
- Set picture profile:
- a) Off:
- b) Ambient light-dependant:
- c) Depending on picture (not applicable for OLED devices):
- d) Manual:
- e) Ambilight+picture content (not applicable for OLED devices):
- Sensor sensitivity
- Assigning a selected profile
- Profile settings:
- HDR picture profiles
- Dolby Vision
- Technicolor®
- Metz Technicolor function
- Setting zoom/automatic zoom/panorama/image position/overscan
- Setting zoom/panorama/overscan mode:
- MPEG noise reduction
- Setting MPEG noise reduction:
- Noise reduction
- Setting the noise reduction:
- Colour impression
- Setting the colour impression:
- Picture settings for program
- Divergent picture settings for this program position:
- Adjusting the signal for a programme
- Setting signal adjustment:
- PIP - Picture in picture
- Picture-in-Picture mode is not available for UHD content.
- Accessing Picture-in-Picture (PIP):
- Split Screen - Progr.1 next to Progr.2 with Teletext
- Displaying the screen of an AV device
- Sound settings
- General sound settings
- Volume
- Setting the volume:
- Equalizer
- Setting the equalizer:
- Automatic volume adjustment
- Calling up volume adjustment:
- Sound adjustment
- Calling up sound adjustment:
- Headphone volume
- Calling up headphone volume:
- Bluetooth®
- Bluetooth® basic settings
- Bluetooth® playback via partner device „headphones“
- Bluetooth ® audio playback using the TV set
- Unpairing/disconnecting
- Speech intelligibility generally
- Selecting Speech intelligibility:
- Sound settings for program
- Volume correction
- Setting volume correction:
- Sound settings for programme position
- Setting tone:
- Program mute
- Program mute:
- Two-channel selection
- Audio/language selection
- Open menu:
- Dolby Audio
- Symbol in black:
- AD
- Symbol in white:
- Audio-Description
- Setting Audio Description:
- Analogue output
- Analogue output settings:
- Digital output
- Dolby Digital :
- Bypass:
- Digital output settings:
- Switching the loudspeaker on/off
- Hi-fi output settings
- Selecting the sound output
- Connecting headphones
- Sound 1, Sound 2
- Video text
- Calling up video text
- Double font size
- Video text comfort functions
- Structure
- Cursor on (cursor page selection)
- Search by keyword
- Large TV screen / Small TV screen
- Reveal hidden text
- Setting markers for a video text page
- Select next video text page marker
- Video text, delete markers
- Radio mode
- DVB radio
- Call up Internet radio (tunein)
- Example of a local radio in your catchment area
- The F-button
- Programming function
- Executing a function
- Setting a favourite function
- Executing a favourite function
- Moving a function
- Removing a function
- Programming the web app function
- Start Up
- Initial program position
- Initial program position settings
- Start-up screen
- Set start image
- Reset start image
- Switch-on behaviour
- With Interrogation
- Continuous on
- Standby
- Switch on stop behaviour
- Quick start
- Switch on quick-start
- Speakers
- Adjusting the speakers
- Parental control
- Blocking selected channels
- Configuring Parental Control (Basic Settings)
- Activate parental control
- Activating Parental Control using the function overview
- Activating Parental Control using the function button
- Switching off Parental Control
- Switch off the Parental Control
- AV devices
- AV Connecting AV units
- View: TV set, variant 1
- Registering AV devices
- Connecting UHD/4k playback devices
- HDMI CEC function
- CEC settings
- HDMI ARC function
- Selecting signal source (AV devices)
- EPG (Electronic Programme Guide)
- EPG Settings
- EPG channel
- Collecting EPG data
- Please note
- Exclusion of one or more channels from the EPG
- Sort EPG list by ...(Only possible in list view)
- Sorting the list
- EPG-Selecting a programme
- EPG: Sending reminder for a programme
- Further options, Search
- EPG view
- Setting the EPG view in the menu
- Metz Media System
- HbbTV 15) 16) 17)
- Setting the LAN or WLAN network configurations manually
- Setup WLAN
- Testing the network connection
- The connection test is carried out.
- Media Server
- Only for devices with internal or external hard disks
- Configuring preset values
- Make programme available
- Call up a programme
- Hybrid broadcast broadband TV (HbbTV)
- Accessing HbbTV
- Exiting HbbTV
- Call media library
- Internet Timer
- Activating the Internet Timer
- Setting the update time
- Setting the activation code
- Please note: To create a user, you must agree to the data privacy statement\*. Internet access is not possible without consent.
- Cookies
- Delete cookies
- Automatically delete cookies
- Manually delete cookies
- Open Internet Portal
- When visiting the Internet portal for the first time:
- Adjust browser
- Call up interactive TV applications
- Call installed apps
- Opening the Media Player
- Using the media player
- Photos – photo overview
- Start show
- Music
- Slideshow with music
- Videos
- Data formats
- Digital-/USB recording to hard disk
- We recommend using external hard disks as USB storage devices.
- Hard disk instructions
- Hard disk drive
- Important recordings on the hard disk
- Installation and handling
- Notes regarding external hard disks
- Activating your TV for USB recording
- Releasing the TV set
- Format external hard disk
- Format hard disk on the TV set:
- Settings for the internal/external hard disk
- Speed test
- To adjust settings for external hard disk:
- PVR Timer or Recording Defaults
- Setting the PVR timer basic settings:
- Basic settings for series recordings
- Series timer recording using EPG
- Configuring basic settings for a series timer:
- Delayed television viewing (Time shift)
- Parking program
- Saving time shift buffer as recording
- Recording a broadcast
- Direct recording of a program
- Program direct recording:
- Configuring a programme as a series timer
- EPG: Recording a programme (single or series)
- Accurate Recording (Accurate Rec)
- Recording plan (Overview of programmed recording timers)
- The Recordings archive
- Playing programs from the Recordings archive
- Pause playback, Rewind, Fast-Forward
- Edit recording (marking / cutting)
- Marking
- Cutting
- Edit recording
- Removing cuts and markers
- Deleting programs from the Recordings archive
- Slow motion
- Delete protections
- Activating deletion protection
- Parental control
- Continuous playback
- Activating endless playback
- Deactivating endless playback
- Change file name
- Creating a new folder
- The "File Manager"
- Call "File Manager"
- Software update
- Software update using the Metz homepage
- Software update over the Internet
- Inserting / removing a CI/CI+ module
- Range of functions
- Setting the range of functions
- Operating more than one TV in a single room
- Linking a remote control to a TV set
- Glossary
- ARC (audio return channel)
- Motion compensation
- Vertical picture position
- Picture profile
- Code
- DHCP
- Dyn. contrast
- Fine search
- Gateway
- Brightness
- HD
- Image sticking
- IP-Adress
- Volume correction
- Panorama
- Noise reduction
- Subnet
- Symbol rate (baud rate)
- Station search
- Automatic zoom
- UHD (Ultra High Definition)
- 4k
- Cleaning the device
- Care and cleaning:
- Technical data
- HDMI
- HDMI 1, HDMI 2, HDMI 3, (HDMI 4)
- DIGITAL AUDIO OUT SPDIF (Linear PCM Stereo or
- WLAN
- Special instructions for TV sets with OLED technology
- Taking back old appliances
- Deleting personal data or restoring factory settings
- To restore the factory settings
- Battery Disposal
- Errors excepted. Subject to changes!
Brand : METZ
Model : Alegra 49TY87
Category : Television