
CTWG15CD - Thermostat CORBERO - Free user manual and instructions
Find the device manual for free CTWG15CD CORBERO in PDF.


| Product Type | Electric Storage Water Heater (Thermostat Controlled) |
| Model | CTWG15CD |
| Rated Capacity | 15 L |
| Net Weight (anhydrous) | 8 kg |
| Product Dimensions (A x B x C) | 380 x 380 x 325 mm |
| Rated Power | 1500 W |
| Rated Voltage | 220-240 V~ / 50-60 Hz |
| Rated Pressure | 0.75 MPa |
| Waterproofing Grade | IPX4 |
| Setting Temperature Range | 30 to 80 °C |
| Safety Valve Rated Pressure | 0.8 MPa |
| Heating Method | Electric heating element |
| Smart Mode | Yes - learns usage patterns and preheats |
| Antifreeze Function | Automatic heating when T ≤ 5 °C, stops at 10 °C |
| Fault Code Display | E2 (dry burning), E3 (sensor fault), E4 (over-temperature) |
| Power-off Memory | Yes - saves settings and mode |
| Installation | Wall-mounted, minimum 4x weight capacity, require professional installation |
| Inlet/Outlet Connection | G 1/2 (blue inlet, red outlet) |
| Included Accessories | Bracket, safety valve, sealing gasket, drain pipe, plastic expansion tubes, screws |
| Maintenance | Descaling every 1 month, check magnesium anode yearly |
| Safe Service Life | 8 years |
| Warranty | 36 months from January 1, 2022 (conditions apply) |
Frequently Asked Questions - CTWG15CD CORBERO
User questions about CTWG15CD CORBERO
0 question about this device. Answer the ones you know or ask your own.
Ask a new question about this device
Download the instructions for your Thermostat in PDF format for free! Find your manual CTWG15CD - CORBERO and take your electronic device back in hand. On this page are published all the documents necessary for the use of your device. CTWG15CD by CORBERO.
USER MANUAL CTWG15CD CORBERO
Thank you for choosing our product.
Please read this manual carefully before installing and using this product.
natural_image
White portable water heater with digital display showing 42° angle and brand 'Corbera' (no text or symbols on device body)Corberó
CTWG15CD / CTWG30CD
Thank you for choosing our product.
Please read this manual carefully before installing and using this product.
Name of Each Part of Water Heater
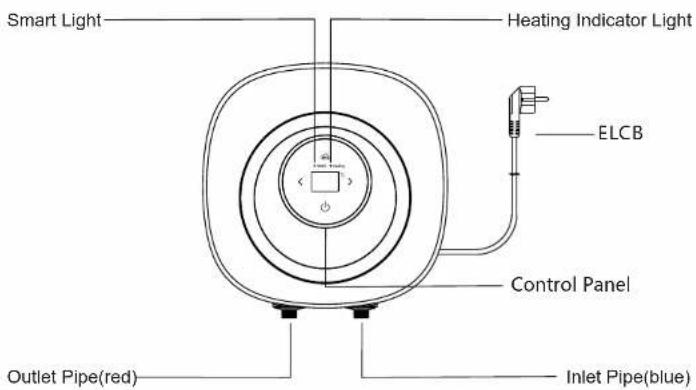
Installation Precautions

● The wall for mounting the appliance shall be able to withstand at least fourfold of the total mass of the appliance when filled with water. Take reliable reinforcement measures when necessary.
● Appliance should be installed as close as possible to frequent water points to reduce heat loss from pipelines.
- Adequate space must be left around the appliance to facilitate future maintenance. When the appliance is installed above the ceiling, the ceiling shall be provided with a movable plate and a maintenance window for removing and installing the appliance.
● Safety drainage measures such as floor drains must be in place to prevent leakage of appliances from causing damage to other facilities.
- It must be installed indoors and where the temperature of the link is above 0°C, so as not to cause ice to break the water pipe of the tank.
● There should be no inflammable or explosive objects around the installation appliance.
- Do not reverse connection of inlet and outlet water pipes. Sealing gaskets should be installed at the interface of inlet and outlet water pipes, and the rotating force should be appropriate during installation.
● A safety valve (a pressure relief device) shall be installed at the inlet of the appliance through which water may flow out of the relief valve drain pipe. The outlet of the relief valve shall be maintained in contact with the atmosphere. The drain pipe should be securely fixed at the outlet of the relief valve.
● The attachments provided by our company must be used.
- Sockets providing power to appliances must be reliably grounded. Do not install power sockets in places that may be damp or wet.
● The installation must be performed by professional installation personnel.
Packing List
| Name | Quantity | Name | Quantity |
| ■ Water Heater | 1 | ■ Bracket | 1 |
| ■ Manual | 1 | ■ Sealing Gasket | 1 |
| ■ Safety Valve | 1 | ■ Plastic Expansion Tube | 2 |
| ■ Water Drain Pipe | 1 | ||
| ■ Fastening Screw | 2 |
Corberō

CERTIFICATE OF GUARANTEE
The presentation of the purchase invoice accompanied by this guarantee certificate is essential.
Covered Risks.
This appliance is guaranteed against any malfunction, provided that it is intended for domestic use, proceeding to its repair within the warranty period and only by the authorized SAT network.
Our Corberd appliances have the manufacturer's legal warranty that covers any breakdown or defect for 36 months, from the invoice date of January 1, 2022. If necessary, we take care of any possible incident whenever it is due to a defective component or manufacturing fault. Warranty Exceptions
Warranty Exceptions
- That the date of the certificate does not coincide with the date of sale of the original invoice.
• Faults produced by blow, by fall or any other cause of force majeure.
• If the device has been manipulated by unauthorized personnel. - Faults produced or derived as a consequence of improper use, installation defects, or modifications to the device that alter its operation.
- Start-up, maintenance, cleaning, components subject to wear, lamps, aesthetic parts,
oxidation, plastics, rubbers, housings and crystals. - Microwave ovens (with the exception of built-in ones) and tabletop ovens in the event of any incident of
operation, they must be taken to the nearest technical service by the customer. They are not collected or repaired at home.
Electric thermos guarantee. 3-year warranty including travel and labor costs that correspond to the repair of the product, having to have maintenance once every 12 months. Especially if you have installed a gas appliance, keep in mind as the owner of the installation, the obligation to carry out a complete review of the equipment, according to Royal Decree 238 / 2013, of April 5. RITE IT3, M. Lo thermos electrical and boilers that include hot water storage tanks, for the benefit of the Guarantee to apply, it is mandatory that the magnesium anode is operational and that it performs the protection function adequately. For this, it is recommended that the anode be checked bismually by the Official Service and is renewed when necessary Periodicity that must be annual in those areas with critical waters (CaCO3 content greater than 200mg/L , that is, from 20Hf of hardness) Deposits without the correct state of the protection anode are not covered by the warranty regardless of the type of tank or product, all heating or DHW overpressure valves must be channeled to avoid damage and in the house due to water discharges. The product warranty does not cover damages caused by not channealing the water spilled by this valve.
"THESE EXCEPTIONS VOID THE WARRANTY, THE REPAIR BEING CHARGED TO THE CUSTOMER"
Period covered in devices according to the law of guarantees in the sale of consumer goods Current law is "RD 7/2021"
Official Technical Service: 911 08 08 08
Hours of operation Monday to Friday from 9h00 a 19h00, Telephone contact_ 511 08 08 06 Contact email _info@corbero.es web _www.corbero.es
Official Technical Service Address. Vidal i Ribes 8-10 08950 Esplugues de Llobregat Barcelona
Substituir o ânodo de magnésio
Methods of Installation
● Equipment installation
① After the installation position of the appliance is determined, drill two holes with a spacing of 62mm and a diameter of φ10mm in the horizontal direction of the wall according to the size as shown in the following figure, and the hole depth shall not be less than 70mm. Insert two plastic expansion tubes into the hole, and secure the host mounting plate with fastening screws.
② Align the two hanging holes on the back of the appliance with the two hooks of the hanging plate and pull down with force to make the hanging holes hang into the hook. Water Heater
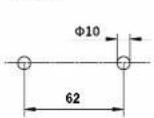
Install the wall hole
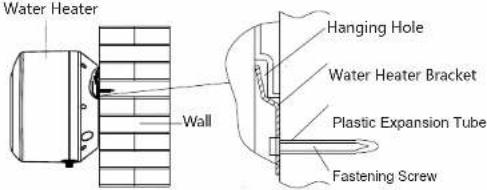
(Take the above sink water heater installation diagram as an example)
⚠ Warning: The appliance must be hung securely to prevent personal injury and property damage from falling.
- Tube Connection
The specification of inlet and outlet water interface of this appliance is GI/2. Connect pipes according to the following figure.
① Connect the gasketed safety valve attached to the inlet port of the appliance with the arrow pointing in the direction of flow.
② Insert the drain pipe into the bottom of the safety valve outlet, the other end of the continuous downward to the safe drainage (such as into the floor drain), the drain pipe should be unobstructed installation, and the safety valve outlet is connected with the atmosphere.
③ When the water inlet pressure is more than 0.55 MPa, an additional safety valve should be added on the water inlet pipe.
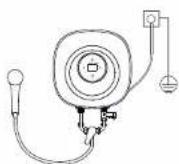
● Multiple Outlet Connection
If the user wants to implement a multi-pipe supply system, please refer to the method shown on the drawing for connection.
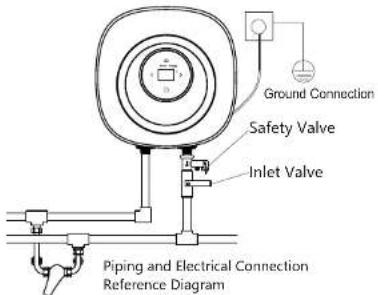
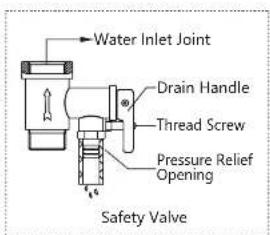
The rated pressure of safety valve is 0.8MPa. When the pressure of the pipeline system exceeds its rated pressure, the safety valve will automatically drain and relieve pressure, and water flow out of the outlet is a normal phenomenon.
- The drain pipe connected to the pressure relief device (safety valve) must be installed in a continuous downward direction in a frost-free environment. (Lead the other end continuously downward to a safe drain (such as into a floor drain) to prevent hot water from flowing out).
The blue is the water inlet, and the red is the water outlet.
- If the hot water pipe is too long, it should be insulated to reduce heat loss.
- When setting a power socket, determine the installation position according to the actual length of the cable.
●Test Run
① After all installation is completed, open all valves in the pipeline, then open the hot water tap, fill the appliance with water and close the hot water tap. Check whether the pipes are leaking. If so, reconnect the pipes.
② Unscrew the stop screw at the handle of the safety valve, pull the handle of the safety valve, and check whether the water discharge of the safety valve is smooth (continuous water outlet means normal).
③ After confirming normal operation, switch on the power and run the appliance according to the operation method section. Power off and disconnect when all is well.
● The pressure relief temperature of the safety valve may cause scalding.
- Scalding may occur if the temperature is set to more than 50°C. It must be mixed with cold water before use.
● The appliance uses 220-240V\~/50-60Hz power supply.
● Do not pull or plug the power cord with wet hands.
- Do not close the water inlet valve, and do not turn on the power supply when the appliance is not filled with water, so as not to damage the appliance.
● The safe service life is 8 years. When the product is still used after the safe service life, it may cause fire or injury due to the deterioration of quality as years of disrepair.
● Do not allow children to operate the appliance to avoid accidental injury.

- Please confirm the actual water temperature before use to avoid too low or too high water temperature.
● Turn the thermostat to the lowest temperature before unplugging the power cord. - Periodically pull the safety valve handle to check whether the relief valve drain is unblocked. If not, please contact us.
- In cold areas, when the appliance is not used for a long time in winter, the water should be emptied to prevent the appliance from freezing and damage.
- When the appliance is installed under the sink, check frequently whether the sink is leaking to avoid danger to the appliance.

Method of Usage
● Water Injection
When the water heater use at the first time or used again after outage for a long time, should inject water. Open all valves in pipeline, and then turn on the hot water tap. When the water continuously flow, it replies that water heater have been filled with water. Turn off the hot water tap, kept cold water pipe valve opening, make sure that cold water could automatically add after hot water usage. And make appliance has always been filled with water.
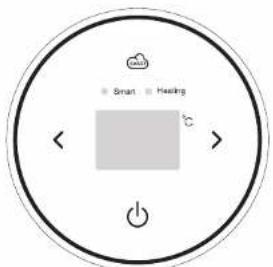
Schematic diagram of the control panel
● Description of Usage
(1) " ⏻" key: Repeatedly operate this key and the system will enter power-on-wait.
(2) “ 🔊” key: repeatedly operate this key to enter and exit the "Smart" mode in the power-on state.
(3) “<” key and “>” key: in the power-on state, touch this key to adjust the set temperature. One time increases or decreases 5 (ie 30-35-40-45...80-30), long press is invalid. “<” for Decrease, “>” means increase.
(4) After the power is turned on, the actual temperature of the display (constantly bright)/set water temperature (flashing), when setting the appointment time (flashing display). A fault code is displayed when a fault occurs.
(5) "Smart" light: In the "Smart" working mode, it flashes during the statistical data period, and is always on after the statistical data is completed.
(6) "Heating" light: the light is on in normal heating state, flashes at 1Hz in antifreeze heating in shutdown state, and goes out in non-heating state.
2. Function description:
a. Immediate heating: in the power-on state, the water heater directly heats, when the water heater reaches the set temperature, it stops heating and enters the heat preservation state. After that, if the water temperature drops below the set temperature by 8 degrees, it will be reheated, and so on. The heating light is on when heating.
b. "Smart "mode: In this working mode, the system analyzes, processes and memorizes the user's water usage habits for a week, and then the system will heat in advance according to the memorized water usage time.
c. Antifreeze: After the system is powered on (regardless of whether it is turned on or not), as long as T ≤ 5^ , the electric heating tube will automatically start to enter the heating state, and when T = 10^ , it will automatically exit the antifreeze heating state.
d. Power-off memory: When the system is powered off, all parameters and working modes are saved. After the power is restored, the parameters before power-off are still entered into the real-time working mode.
e. Fault code display: When the system self-check fails, the two-digit digital tube flashes to display the corresponding fault code. Among them: the dry burning fault is E2, the sensor fault is E3, and the over-temperature fault is E4.
Identify and Deal with Common Faults
Aviso

Identify and Deal with Common Faults
If water heater broke down during normal use, please immediately cut off the power, check according to the following content.
| fault phenomenon | cause of issue | Approach |
| no water | 1Whether there is no water outside or the water pressure is too low2Whether the water inlet and outlet shut-off valve is open3Whether the pipeline is blocked | 1Whether there is no water outside or the water pressure is too low2Whether the water inlet and outlet shut-off valve is open3Whether the pipeline is blocked |
| The water is not hot(no display on the display) | 1Power failure or the power switch is in the off position2Internal circuit failure | 1Check the power supply line2Contact the maintenance department |
| The water is not hot(Display works normally) | 1The heating temperature is sat too low2The heating time is too short-103Mixing valve failure4Internal circuit failure | 1Increase the heating temperature2Continue heating3Replace the mixing valve4Contact the maintenance department |
| Display shows code "E2" | The water heater is powered on without water, and dry burning occurs | Turn off the power, fill the water heater with water first, and then turn on the power |
| Display shows code "E3" | Damaged sensor | Contact the maintenance department |
| Display shows code "E4" | Thermal cut-out fault | Contact the maintenance department |
| The water is suddenly cold and suddenly hot | Unstable water pressure outside | When the water pressure is normal |
| Drip from safety valve drain | Normal phenomenon | Connect to drain and lead to safe drain |
| The discharge port of the safety valve continues to flow water | Water pressure too high | Install a pressure limiting valve on the water inlet line |

Aviso

- Use dry cloth or wet cloth to dip a little of neutral cleaner to wipe water heater surface, do not use gasoline or other solvents, mustn't spray water.
Descaling
- According to the local water quality condition, when water heater using a certain time (usually 1 months), need to remove dirty scale: first turn off the water heater, close the inlet valve, separate the connection between inlet and outlet, empty inner tank water. After descaling, reinstall the inner tank connection between inlet and outlet.
Draining
- With long-term outage or maintenance, first cut off the power supply, turn off the inlet water valve, separate the connection between the inlet and outlet water pipe, empty it by upside down, and reinstall the connection between the inner tank and the connection between inlet and outlet water pipe. When using again, the inner tank must be filled with water before connecting the power supply.
Product Specifications and Dimensions
Instalação

Replace Magnesium Anode
● The magnesium anode is to prevent corrosion in the inner tank, which is a consumptive part. After installation, need to check once a year. If the magnesium anode is about to run out or has been run out, should be replaced immediately with the same specifications of the magnesium anode, to ensure the service life of the water heater.

● Pull out the power cord before maintaining.
● Non-professional maintenance personnel disassembly, maintenance and modification of water heater shall be strictly forbidden.
● The safety valve (pressure relief devices) need to regular take action, to remove calcium carbonate sedimentary and prove that it is not blocked. If blocked, please repair in time.
- Drainage must be within the container under the water temperature below 40 °C, avoid scald.

Product Specifications
| Model Parameter | CTWG15CD | CTWG30CD |
| Rated Capacity | 15L | 28L |
| Net Weight(anhydrous condition) | 8kg 11.2kg | |
| Rated Power | 1500W | |
| Product Size(AxBxCmm) | 380x380x325mm 440x440x390mm | |
| Rated Voltage | 220-240V~ / 50-60Hz | |
| Rated Pressure | 0.75MPa | |
| Waterproofing Grade | IPX4 | |
| Setting Temperature Range | 30 to 80°C | |

- Corberó
- Name of Each Part of Water Heater
- Installation Precautions
- Corberō
- CERTIFICATE OF GUARANTEE
- Covered Risks.
- Warranty Exceptions
- "THESE EXCEPTIONS VOID THE WARRANTY, THE REPAIR BEING CHARGED TO THE CUSTOMER"
- Official Technical Service: 911 08 08 08
- Substituir o ânodo de magnésio
- Methods of Installation
- ● Multiple Outlet Connection
- ●Test Run
- Method of Usage
- ● Water Injection
- ● Description of Usage
- Function description:
- Identify and Deal with Common Faults
- Aviso
- Descaling
- Draining
- Product Specifications and Dimensions
- Instalação
- Replace Magnesium Anode
- Product Specifications
Brand : CORBERO
Model : CTWG15CD
Category : Thermostat