
Lite LPH75-ST470-B - Whiteboards and Accessories Dahua Technology - Free user manual and instructions
Find the device manual for free Lite LPH75-ST470-B Dahua Technology in PDF.


| Product Type | Smart Interactive Whiteboard |
| Brand | Dahua Technology |
| Model | Lite LPH75-ST470-B |
| Screen Size | 75-inch (1707.5 x 1049.8 mm) |
| Dimensions (W x H x D) | 1707.5 x 1049.8 x 25.0 mm (67.23 x 41.33 x 0.98 inches) |
| VESA Mount Pattern | 600 x 400 mm |
| Weight (Approx.) | 55 kg (121.3 lb) |
| Power Supply | 100-240 VAC, 50/60 Hz |
| Power Consumption | Not specified |
| Display Resolution | 4K UHD (3840 x 2160) |
| Touch Technology | Infrared touch (supports stylus pen and fingers) |
| Supported Operating Systems | Android (built-in) and Windows (via computer module) |
| Main Functions | Electronic whiteboard, screen sharing (wireless), file management, annotation, welcome page, embedded apps |
| Ports (Front) | USB 3.0 x2, Type-C (multifunction), TOUCH, HDMI IN, MIC IN |
| Ports (Side Rear) | DP IN, TOUCH x2, HDMI IN/HDMI IN (R), HDMI OUT, HDMI IN eARC, RJ-45 IN/OUT, Micro USB, USB 3.0, Type-C |
| Ports (Bottom Rear) | AUDIO IN, AUDIO OUT, TOUCH, VGA IN, RS-232, SPDIF OUT |
| Stylus Pens Included | 2 pens (stored magnetically at bottom) |
| Storage Temperature | -20°C to +60°C (-4°F to +140°F) |
| Operating Temperature | 0°C to 40°C (32°F to 104°F) |
| Storage Humidity | 10%–90% RH |
| Safety | Class I electrical appliance, requires protective earthing; high voltage inside; do not disassemble |
| Maintenance | Power off before cleaning; use clean soft cloth or lens cloth; avoid liquid cleaners |
| Parts and Repairability | Installation and maintenance by qualified professionals only; standard power adapter required; contact customer service for parts |
| General | Supports up to 16 hours continuous operation; altitude below 5000 m; for indoor use only |
Frequently Asked Questions - Lite LPH75-ST470-B Dahua Technology
User questions about Lite LPH75-ST470-B Dahua Technology
0 question about this device. Answer the ones you know or ask your own.
Ask a new question about this device
Download the instructions for your Whiteboards and Accessories in PDF format for free! Find your manual Lite LPH75-ST470-B - Dahua Technology and take your electronic device back in hand. On this page are published all the documents necessary for the use of your device. Lite LPH75-ST470-B by Dahua Technology.
USER MANUAL Lite LPH75-ST470-B Dahua Technology
Smart Interactive Whiteboard
User's Manual

natural_image
Abstract geometric composition with gray and red shapes (no text or symbols)Foreword
General
This manual introduces the functions and operations of the smart interactive whiteboard (hereinafter referred to as "the whiteboard"). Read carefully before using the whiteboard, and keep the manual safe for future reference.
Safety Instructions
The following signal words might appear in the manual.
| Signal Words Meaning | |
 WARNING WARNING | Indicates a medium or low potential hazard which, if not avoided, could result in slight or moderate injury. |
 CAUTION CAUTION | Indicates a potential risk which, if not avoided, could result in property damage, data loss, reductions in performance, or unpredictable results. |
| [0Y64] NOTE | Provides additional information as a supplement to the text. |
Revision History
| Version | Revision Content | Release Time |
| V1.0.2 | Updated port description. | February 2023 |
| V1.0.1 | Updated important safeguard and warnings. | January 2023 |
| V1.0.0 | First release. | November 2022 |
Privacy Protection Notice
As the device user or data controller, you might collect the personal data of others such as their face, fingerprints, and license plate number. You need to be in compliance with your local privacy protection laws and regulations to protect the legitimate rights and interests of other people by implementing measures which include but are not limited: Providing clear and visible identification to inform people of the existence of the surveillance area and provide required contact information.
About the Manual
- The manual is for reference only. Slight differences might be found between the manual and the product.
- We are not liable for losses incurred due to operating the product in ways that are not in compliance with the manual.
- The manual will be updated according to the latest laws and regulations of related jurisdictions. For detailed information, see the paper user's manual, use our CD-ROM, scan the QR code or visit our official website. The manual is for reference only. Slight differences might be found between the electronic version and the paper version.
- All designs and software are subject to change without prior written notice. Product updates might result in some differences appearing between the actual product and the manual. Please contact customer service for the latest program and supplementary documentation.
- There might be errors in the print or deviations in the description of the functions, operations and technical data. If there is any doubt or dispute, we reserve the right of final explanation.
- Upgrade the reader software or try other mainstream reader software if the manual (in PDF format) cannot be opened.
- All trademarks, registered trademarks and company names in the manual are properties of their respective owners.
- Please visit our website, contact the supplier or customer service if any problems occur while using the device.
- If there is any uncertainty or controversy, we reserve the right of final explanation.
Important Safeguards and Warnings
This section introduces content covering the proper handling of the whiteboard, hazard prevention, and prevention of property damage. Read carefully before using the whiteboard, and comply with the guidelines when using it.
Storage Requirements

- Stably put the whiteboard onto a support platform that is strong enough to prevent the whiteboard from falling.
- Do not place the whiteboard in a place exposed to sunlight or near heat sources.
- Store the whiteboard under allowed humidity (10%–90% (RH)) and temperature ( -20 ^ to +60 ^ , or -4 ^ to +140 ^ ) conditions.
Installation Requirements

- Use the wall mount bracket with yellow labels on it. Installation and maintenance must be performed by qualified professionals.
- Do not install the whiteboard in a place exposed to sunlight or near heat sources.
- Keep the whiteboard away from dampness, dust, and soot.
• Install the whiteboard on a stable surface to prevent it from falling. - Install the whiteboard in a well-ventilated place, and do not block its ventilation.
- The power supply must conform to the requirements of ES1 in IEC 62368-1 standard and be no higher than PS2. Please note that the power supply requirements are subject to the device label.
- The whiteboard is a class I electrical appliance. Make sure that the power supply of the whiteboard is connected to a power socket with protective earthing.
- The appliance coupler is a disconnection device. Keep it at a convenient angle when using it.
- Only applicable for use in altitudes below 5,000 meters.
Operation Requirements

WARNING
- High voltage inside the whiteboard. Do not disassemble the whiteboard without a qualified professional present to avoid the risk of being exposed to danger.
- Improper use of the battery might result in a fire or explosion.
- Replace unwanted batteries with new batteries of the same type and model.
- Use the standard power adapter. We will assume no responsibility for any problems caused by the use of a nonstandard power adapter.
- Use the power cords that are recommended for the region and conform to the rated power specifications.
-
Make sure all cables are connected correctly before plugging the whiteboard into the power. Do not overload the power socket or pull the power code. Otherwise, it might cause fire or electric shock.
-
Do not ingest battery. Chemical Burn Hazard. This product contains a coin cell battery. If the coin cell battery is swallowed, it can cause severe internal burns in just 2 hours and can lead to death.
- Keep new and used batteries away from children. If the battery compartment does not close securely, stop using the product and keep it away from children.
- If you think batteries might have been swallowed or places inside any part of the body, seek immediate medical attention.
!
- The whiteboard can run continuously for up to 16 hours each day. Please do not keep it running for longer than this time, otherwise the life of the screen will be affected.
- Do not drop or splash liquid onto the whiteboard, and make sure that there is no object filled with liquid on the whiteboard to prevent liquid from flowing into it.
- Operate the whiteboard within the rated range of power input and output.
- Do not disassemble the whiteboard without professional instruction.
- Use the whiteboard under allowed humidity (10%–90% (RH)) and temperature (0 °C to 40 °C, or 32 °F to 104 °F) conditions.
- The whiteboard is a class I electrical appliance. Make sure that the power supply of the whiteboard is connected to a power socket with protective earthing.
- The appliance coupler is a disconnection device. Keep it at a convenient angle when using it.
Maintenance Requirements
!
- Power off the whiteboard before maintenance. Do not use the liquid cleaner or spray cleaner when cleaning the whiteboard.
- Use the clean and soft cloth or use the special lens wiping cloth when cleaning the surface of display screen. Do not use the wet cloth to clean the display screen. Otherwise, it may do harm to the screen.
Table of Contents
Foreword ....
Important Safeguards and Warnings....III
1 Overview....1
1.1 Introduction ...... 1
1.2 Packing List....1
1.3 Structure 1
1.3.1 Appearance .... 1
1.3.2 Dimensions .... 3
1.3.2.1 Dimensions (65-inch)....3
1.3.2.2 Dimensions (75-inch)......4
1.3.2.3 Dimensions (86-inch)......5
1.3.3 Ports 5
1.3.4 Buttons....8
2 Startup and Wakeup....9
2.1 Turning on the Whiteboard....9
2.2 Turning off Screen....10
3 Basic Operations....11
3.1 Quick Operations....11
3.1.1 Bringing up the Navigation Bar....11
3.1.2 Bringing up the Assistive Touch....11
3.1.3 Common Tools....12
3.2 Electronic Whiteboard ....17
3.3 File Management....20
3.4 Screen Sharing 21
3.5 Welcome Page....21
3.6 System Settings....22
3.6.1 Configuring Network and Bluetooth Connection....22
3.6.2 Configuring General Settings....23
3.6.3 Configuring Advanced Parameters ......24
3.6.4 Configuring System Parameters ......26
4 Shutdown....28
5 System Update....29
5.1 Online Update ......29
5.2 Update through USB....29
6 FAQ....30
Appendix 1 Touch Operation....31
Appendix 2 Cybersecurity Recommendations ....32
1 Overview
1.1 Introduction
The smart interactive whiteboard is an integrated multimedia device, which integrates large HD screen, computer, electronic whiteboard, audio amplifier, application, and central control system. The whiteboard supports the following functions and features:
- 4K HD LCD display.
- Switch between Android and Windows systems (for Windows, you need to install a computer module).
• One-tap projection of devices such as mobile phones and tablets.
• Electronic whiteboard. - Various software such as Microsoft Office and audio and video players.
1.2 Packing List
Check whether there is any obvious damage on the packing box. Unpack the box and check whether the components are complete according to the packing list.
Table 1-1 Packing list
| Name | Quantity | Name | Quantity |
| Smart interactive whiteboard | 1 | Power cord | 1 |
| Stylus pen 2 HDMI cable 1 | |||
| Wall mount bracket (installed on the whiteboard already) | 1 Quick start guide 1 | ||
| Accessory package | 1 | Remote control | 1 |
| Legal and Regulatory Information | 1 — — |
1.3 Structure
1.3.1 Appearance
The following figure is for reference only. Slight difference might be found between the figure and the actual device.
Figure 1-1 Appearance
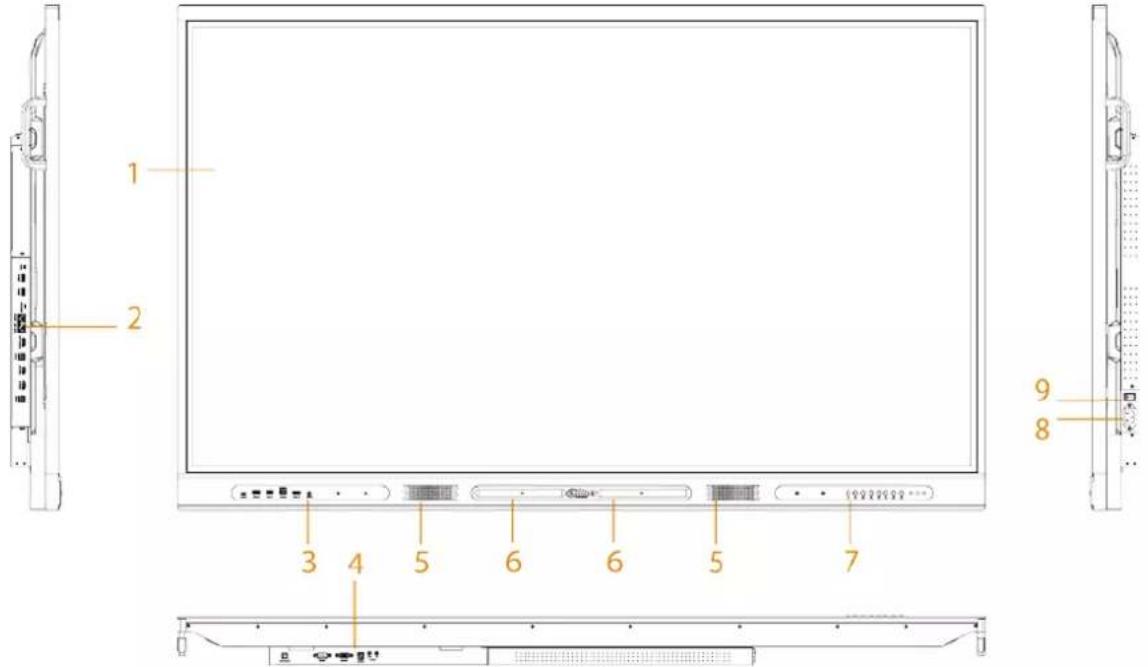
Table 1-2 Appearance description
| No. Description | |
| 1 LCD. | |
| 2 | Ports on the side of the rear panel. For details, see Table 1-4. |
| 3 | Ports on the front panel. For details, see Table 1-3. |
| 4 | Ports on the bottom of the rear panel. For details, see Table 1-5. |
| 5 Speaker holes. | |
| 6 Magnetic stylus pen attach area. | |
| 7 Buttons on the front panel. For details, see Table 1-6. | |
| 8 | Power input port. Inputs 100–240 VAC power. After connecting to power supply, press the rocker switch to turn on the whiteboard. After connecting to power supply, press the rocker switch to turn on the whiteboard. |
| 9 | Power switch. Turn on or turn off the power supply of the whiteboard. |
1.3.2 Dimensions
1.3.2.1 Dimensions (65-inch)
Figure 1-2 Dimensions (mm [inch])
![924.5 [36.40] 1485.2 [58.47] 25.0 [0.98] 93.2 [3.67] 112.5 [4.43] 122.3 [4.81]](/content/2026/05/893211/images/c8b7359ba0d89797813f27d81ca89bb697237f7a5df044f1ba9d3f59c22b0f31.jpg)
![550.0 [21.65] 500.0 [19.69] 448.0 [17.64] 346.0 [13.62] 244.0 [9.61] 142.0 [5.59] 400.0 [15.75] 227.8 [8.97] 180.0 [7.09] 358.5 [14.11]](/content/2026/05/893211/images/69d6e5ea641710fbe73aa607795c3e28f71d25152de889ebc5fb5b85104a73d7.jpg)
1.3.2.2 Dimensions (75-inch)
Figure 1-3 Dimensions (mm [inch])
![25.0 [0.98] 1049.8 [41.33] 1707.5 [67.23] 760.0 [29.92] 600.0 [23.62] 556.0 [21.89] 352.0 [13.86] 148.0 [5.83] 400.0 [15.75] 268.0 [10.55] 179.0 [7.05] 429.0 [16.89]](/content/2026/05/893211/images/c5a095e3ab582e13ba1d56a71edab9ec65c6ccbd47757a1675a0242d4a9c6b8c.jpg)
1.3.2.3 Dimensions (86-inch)
Figure 1-4 Dimensions (mm [inch])
![1953.2 [76.90] 1187.9 [46.77] 92.8 [3.66]](/content/2026/05/893211/images/f6b64d4bfae40261b7d9a915c44b91bc2b8e75c60db11ebbfa8bd52dcb3dac99.jpg)
![800.0 [31.50] 760.0 [29.92] 556.0 [21.89] 352.0 [13.86] 148.0 [5.83] 400.0 [15.75] 253.2 [9.97] 179.0 [7.05] 414.2 [16.31]](/content/2026/05/893211/images/6b94309d9a4e11fe639d821f88f5687661718fa00f88c683a095918628aba2a3.jpg)
1.3.3 Ports
Figure 1-5 Ports on the front panel
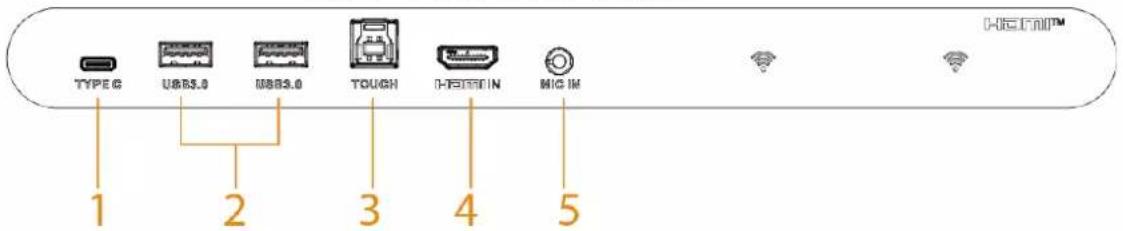
Table 1-3 Front panel ports
| No. | Port Description | |
| 1 | Type C | Multi-function Type C port. It can be used for signal input and touch control |
| 2 | USB 3.0 | Connects to USB devices such as mobile hard disk, USB flash drive, USB keyboard, USB mouse. It is applicable to Android system and computer module.After you connect the whiteboard with your computer through the HDMI IN port and TOUCH port on the front panel, insert a USB device to the USB 3.0 port and then the USB device will be read and found on your computer. |
| 3 | TOUCH | Transmits touch signals. The port only works with the HDMI IN port next to it.After you connect your computer with the HDMI IN port, connect the TOUCH port to the USB port of the computer and then you can control the computer through touch operations on the whiteboard. |
| 4 | HDMI IN | Inputs uncompressed HD video signals and multichannel audio signals from the external HDMI signal source. |
| 5 | MIC IN | Audio input port.Only MIC devices with line out port are supported. |
Figure 1-6 Ports on the side of the rear panel (1)
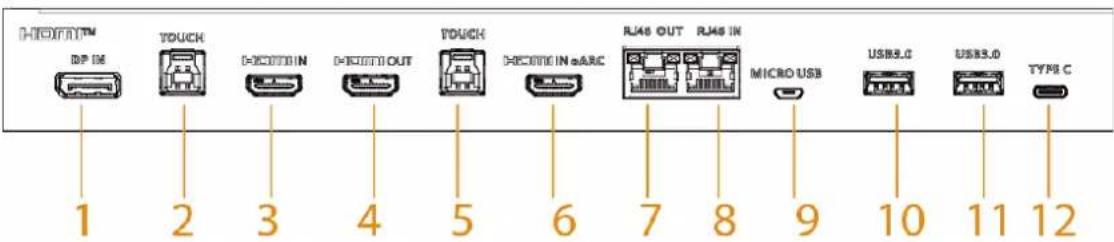
Figure 1-7 Ports on the side of the rear panel (2)
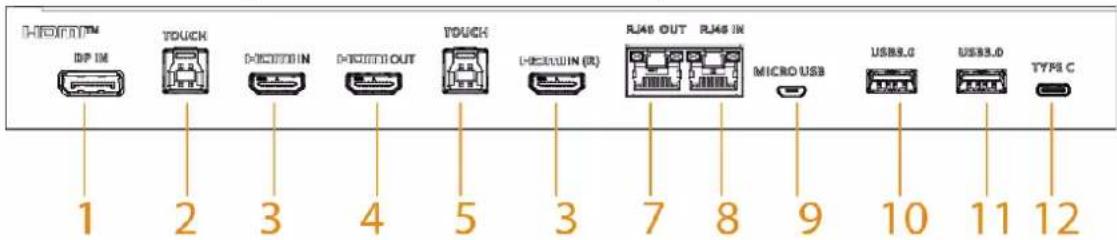
Table 1-4 Description of ports on the side of the rear panel
| No. Port | Description | |
| 1 DP IN | HD digital signal input port, which can be connected to computer and family theater. This port is only available on select models. This port is only available on select models. | |
| 2 TOUCH | Transmits touch signals. The port only works with the HDMI IN or DP IN port next to it.After you connect your computer with the whiteboard through the HDMI IN or DP IN port, connect the TOUCH port to the USB port of the computer and then you can control the computer through touch operations on the whiteboard. | |
| 3 | HDMIIN/HDMI IN (R) | Inputs uncompressed HD video signals and multichannel audio signals from the external HDMI signal source.[IMAGE]HDMI IN (R) port is only available on select models. |
| 4 HDMI OUT | HD audio and video signal output port. Transmits uncompressed HD video and multichannel audio data. | |
| 5 TOUCH | Transmits touch signals. The port only works with the HDMI IN eARC or HDMI IN (R) port next to it.After you connect your computer with the whiteboard through the HDMI IN eARC or HDMI IN (R) port, connect the TOUCH port to the USB port of the computer and then you can control the computer through touch operations on the whiteboard. | |
| 6 HDMI IN eARC | HDMI input port that supports enhanced audio return channel (eARC). Inputs video and audio signals from the external HDMI signal source.[IMAGE]To use the eARC function, you need to connect to devices that supports eARC.This port is only available on select models. | |
| 7 RJ-45 OUT | Network output port. Connects to other devices so that the whiteboard can share network like a router. | |
| 8 RJ-45 IN | Network input port. Connects to the network cable to access network. | |
| 9 | Micro USB | Only applicable to Android system. Uses for system debugging. |
| 10 USB 3.0 | Connects to USB devices such as mobile hard disk, USB flash drive, USB keyboard, and USB mouse. It is applicable to Android system and computer module. | |
| 11 Type C | Multi-function Type C port. It can be used for signal input, and touch control. | |
Figure 1-8 Ports on the bottom of the rear panel

Table 1-5 Description of ports on the bottom of the rear panel
| No. | Port Description | |
| 1 | AUDIO IN | Audio input port. Works with VGA IN port. |
| 2 | AUDIO OUT | Audio output port. Connects to earphones or speakers. |
| 3 | TOUCH | Transmits touch signals. The port only works with the VGA IN port next to it.After you connect your computer with the whiteboard through the VGA IN port, connect the TOUCH port to the USB port of the computer and then you can control the computer through touch operations on the whiteboard. |
| 4 | VGA IN | Video input port. Connects to computers, set-top boxes, and other video devices with VGA output ports. |
| 5 | RS-232 | Transmits data between devices. Can connect to central control devices with RS-232 port. |
| 6 | SPDIF OUT | Sony/Philips Digital Interface. Outputs audio to earphones or speakers. |
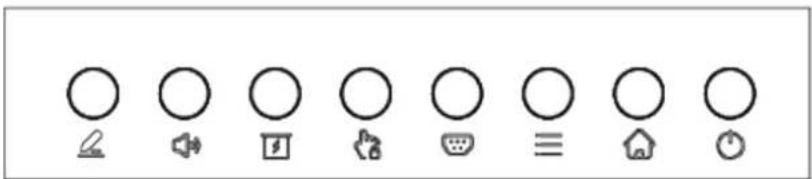
1.3.4 Buttons
Figure 1-9 Buttons
natural_image
Row of nine simple circular icons with no text or symbols, arranged horizontally (no text or labels)Table 1-6 Description of buttons
| Button Description | |
 | Enter comment mode. |
 Adjust volume. Adjust volume. | |
| [5YAS] Enter curtain mode. | |
| [350T] | Press the button to enable the touch lock. |
 | When the touch lock is enabled, the touchscreen is not available. Press the power button 3 times to unlock the touch lock. |
 | |
| [5203] Select signal sources. | |
 | Open or close the navigation bar. |
 | Go back to the home screen. |
 Power button. Power button. | Turn on or turn off the screen. |
2 Startup and Wakeup
2.1 Turning on the Whiteboard
Prerequisites
- Before starting the whiteboard, check whether the input voltage is correct against the power supply requirements.
- To ensure the stable work of the whiteboard and the external devices connected to the whiteboard and to prolong the service life, we recommend you refer to the national related standard to use the power source that provides stable voltage with less interference from ripples.
Procedure
Step 1 Connect the power cord.
Step 2 Press the "I" end of the rocker switch next to the power cord.
Step 3 Press the power button on the right panel to turn on the screen. After startup, the system displays the home screen by default.
Figure 2-1 Home screen
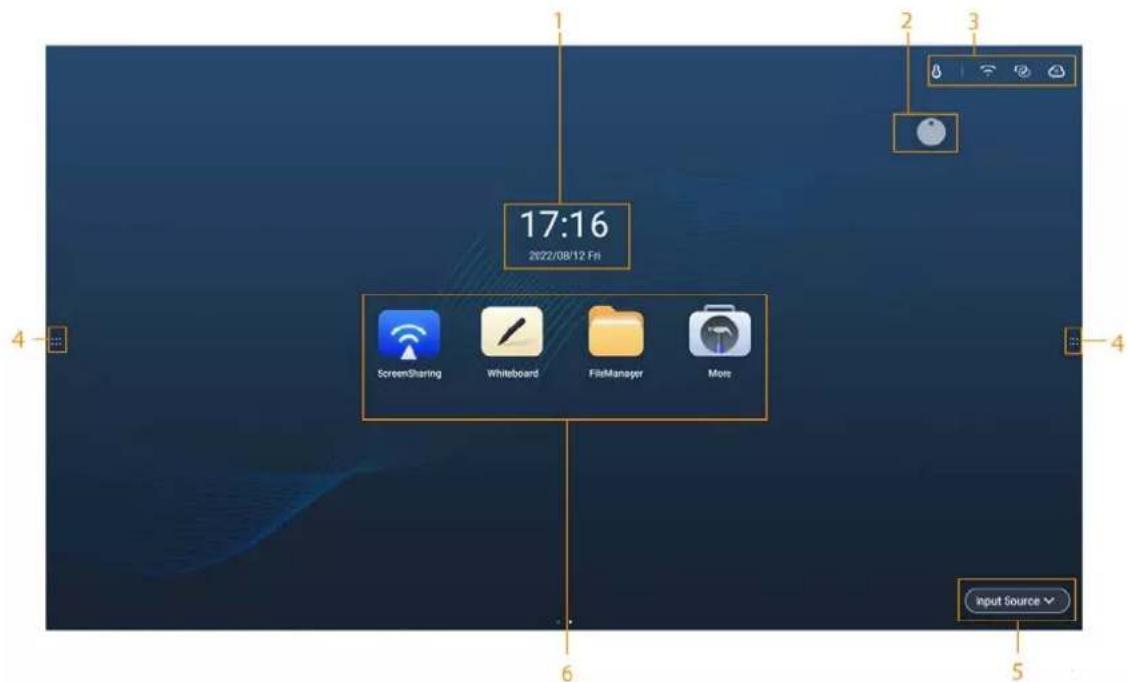
Table 2-1 Home screen description
| No. Description | |
| 1 Displays date, time and the day of the week. | |
| 2 | Assistive touch. Tap the icon to quickly use functions as electronic whiteboard, annotation, and file management. See "3.1.2 Bringing up the Assistive Touch" for details. |
| 3 | Device status bar. Displays different status information. Tap each icon to view details. |
| 4 | Tap [K6w8] to bring up the navigation bar. For details, see "3.1.1 Bringing up the Navigation Bar" for details. |
| 5 Input source. Supports input sources such as Windows, HDMI, and Type C. | |
| 6 | Function area. Tap a function icon to go to the corresponding operation screen.[IMAGE]For a third-party app, you can tap and hold the corresponding icon to uninstall the app. The apps that come with the system cannot be uninstalled in such way. |
2.2 Turning off Screen
When the screen is on, press the power button once to turn off the screen.
To wake up the whiteboard, you can:
After the screen has been off for 3 seconds, you can wake up the whiteboard in either of the following ways:
- Press the power button again.
- Touch the screen.

In the Windows system, if you have set a screen lock password, you need to enter the right password to wake up the whiteboard.
3 Basic Operations
The whiteboard can act as a computer or electronic whiteboard. This chapter introduces the basic operations of those functions. We recommend using the stylus pen to interact with the screen. For details on touch control, see "Appendix 1 Touch Operation".
3.1 Quick Operations
You can use the navigation bar or assistive touch to quickly use basic functions.
3.1.1 Bringing up the Navigation Bar
Tap ☐ on the left and right sides of the home screen to bring up the navigation bar.
Figure 3-1 Navigation bar

natural_image
Vertical toolbar with icons including house, document, and refresh symbol (no text or labels)Table 3-1 Description of navigation bar
| Icon Description | |
| Display or hide the navigation bar. | |
| Go back to the previous screen. | |
| Go back to the home screen. | |
| Tap the icon to display common tools such as annotation, screen sharing, and camera. For details, see "3.1.3 Common Tools". | |
| Displays the apps that are running in the background. You can close the background apps one by one or in batches. | |
3.1.2 Bringing up the Assistive Touch
Tap 📄 on the home screen to bring up the compass menu. For details, see "3.6.2 Configuring General Settings".
Figure 3-2 Assistive touch
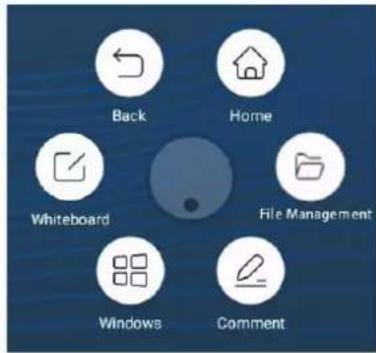
Table 3-2 Description of assistive touch
| Icon Description | |
| [2818] Go back to the home screen. | |
| [0507] Go back to the previous screen. | |
 | Go to the electronic whiteboard screen. For details, see "3.2 Electronic Whiteboard". |
| [ASAX] | After you insert the computer module, tap the icon to switch to the Windows system. |
| [684H] | Turn on the annotation mode.Tap ▲ to select the type of pen and the size of the brush.Tap to clear content.Tap to clear unwanted content.Tap , circle unwanted content, and then erase the selected content.Tap = to clear all content on the screen.Tap Save, and then select the path to save your annotations.Tap Exit to exit the annotation screen. |
| [CWX2] Manage files. | |
3.1.3 Common Tools
Procedure
Step 1 Tap ☐ on the left and right sides of the home screen to display the navigation bar.
Step 2 Tap to display the common tools.
Figure 3-3 Common tools
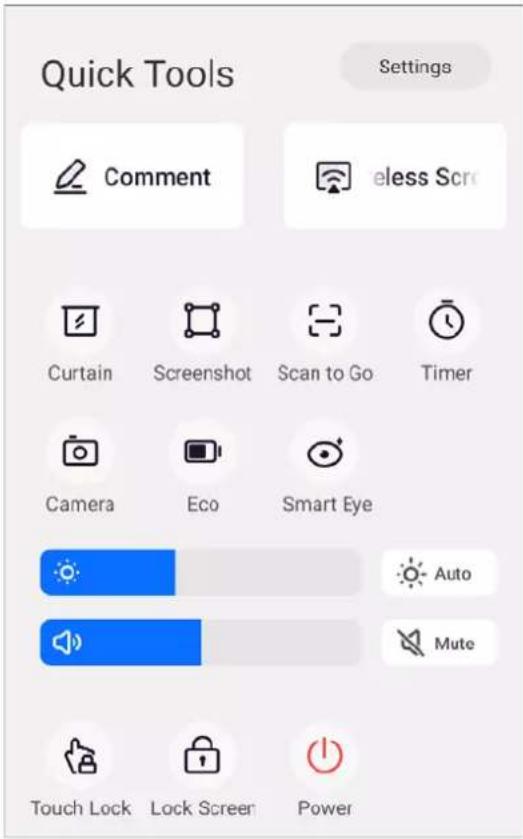
Table 3-3 Description of common tools
| Section Function Description | ||
| Quick tools | Settings | Go to the Settings screen. For details, see "3.6 System Settings". |
| Comment | Turn on the annotation mode.Tap to select the type of pen and the size of the brush.Tap to clear content.Tap to clear unwanted content.Tap , circle unwanted content, and then erase the selected content.Tap = to clear all content on the screen.Tap Save, and then select the path to save your annotations.Tap Exit to exit the annotation screen. | |
| Wireless Screen Sharing | Tap the icon to use the wireless screen sharing function. You can transfer content to the whiteboard through the computer or phone. For details, see the corresponding user's manual. | |
| Curtain | Tap the icon to enable the curtain mode. You can highlight the corresponding area as needed. | |
| Screenshot | Tap the icon, and then the middle area is selected by default. You can drag the four corners of the square to customize the area size.Tap ,andthen you can import the screenshot to the whiteboard with one tap.Tapto capture the full screen.Tap/ [IMAGE] to choose the shape of the screenshot.Tapto cancel the screenshot.Tap√, and then the screenshot named year - month - day - hour - minute - second.jpg will be saved to the screenshot folder.Scan to Go | |
| Timer | ||
| Camera | ||
| Eco | ||
| Smart Eye Care | ||
| Brightness | ||
| Volume | ||
| Touch Lock | ||
| Lock Screen | ||
| Power | ||
| Update notification bar | —After you enable update through the cloud platform and connect the whiteboard to a WAN network, the system will pop up an update prompt window when a newer version is pushed from the platform. If you select to update later, the message that prompts you to update the system appears in the update notification bar.When the update package is downloaded, the system prompts you to install the package. If you select to install later, the message that prompts you to install the package appears in the update notification bar. When there is no newer version available, the update notification bar is hidden. When there is no newer version available, the update notification bar is hidden. | |
3.2 Electronic Whiteboard
Tap Whiteboard on the home screen to open the whiteboard software. You can write or draw pictures on the screen.
Figure 3-4 Electronic whiteboard
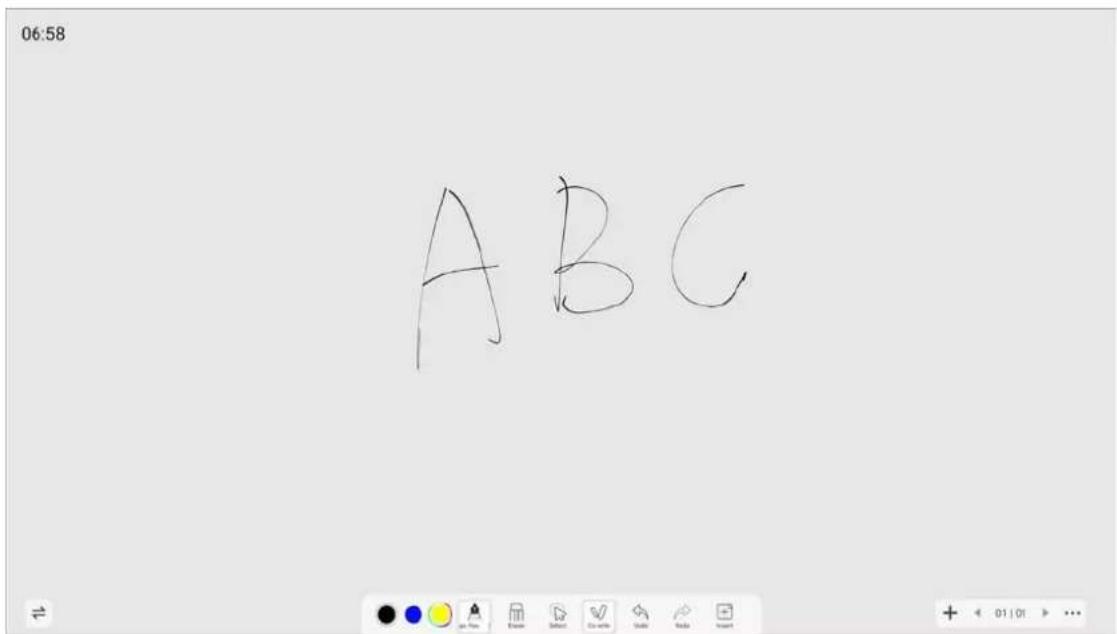
Table 3-4 Description of whiteboard icons
| Icon Description | |
| Adjust the location of the whiteboard tool bar. | |
| or customize the color of the pen. | |
| Select the type of pen and the size of the brush.: Only pen. By default, the color of the brush is black with 0 transparency.: Mark pen. By default, the color of the brush is yellow with 40% transparency.: Fountain pen. By default, the color of the brush is black with 0 transparency.: Smart text. The handwritten content is recognized and transformed to the standard font with the color and thickness the same as the oily pen.Smart text is only available for simplified Chinese, traditional Chinese, and English. When you write in other languages, the content cannot be recognized and transformed.: Smart graphics. The hand-drawn graphics are recognized and transformed to standard graphics with the color and thickness the same as the oily pen. The system can recognize lines, arrows, circles, quadrilaterals, pentagrams, and more.: Laser pen. The written content appears with a trail and disappears in 1 second. The color can be green, red, and pink. | |
| Erase content.Tap to clear unwanted content.Tap , circle unwanted content, and then erase the selected content.Tap to clear all content on the screen.You cannot erase graphics or tables directly.You can press your palm on the screen and then move your hand over the words and graphics to erase them. | |
| Select | Select content on the screen to zoom in, zoom out, move or rotate. |
| Co-write | Switch between zoom mode and co-write mode.Zoom mode: Only supports one-point writing. You can zoom in and zoom out the canvas.Co-write mode: Supports 10 pens writing simultaneously. You cannot zoom in or zoom out the canvas. |
| Undo | Undo the previous action. You can undo up to 10 actions. |
| Redo | Redo the action that has been undone. You can redo up to 10 actions. |
| Insert | Video online: You can search the online video, and then display the video on the whiteboard.Image online: You can search the online image, and then insert it.Image: You can insert images in the bmp, png, jpg, jpeg or gif format. Up to 10 images in total can be inserted.Graphic: Select a type of graphic that you want to insert.Table: The default table layout is 3 × 3 . The table supports up to 12 columns and 12 rows. Video online and Image online are available on select models. Video online and Image online are available on select models. |
| + Add a whiteboard page. You can add up to 50 pages. | |
| ◄ 01 | 01 ► | Tap 01 | 01 to preview the saved file list. Tap the file to edit. When you have created several files, tap◄ or ► to switch to the previous file and the next file. You can browse the thumbnail of the switch page. |
| ... | Tap the icon, and then you can perform the following operations.New: Create a new whiteboard file. Remember to save your content before creating a new file, or else you will lose all your changes.Open: Open the saved writing file. Only the whiteboard file format can be opened. After you tapOpen, the system will jump to the whiteboard file column on file management screen.Change Background: You can use a local background template or custom template. The custom template only supports images in bmp, png, jpg and jpeg formats. The image size is limited to 5 MB. The recommended image ratio is 16:9.Save: Save the file. The default name of the file is year-month-day-hour-minute-second. You can customize the file name. The file format can be wbh (source file format), pdf, and png. The source file format is used by default.Save as: Save as a new file. The default file name is year-month-day-hour-minute-second. The file format can be wbh (source file format), pdf, and png. The source file format is used by default.Scan to Go: Download the written whiteboard file.Exit: Exit the whiteboard app.[6X6K]Remember to save your modifications before exiting, or you will lose all your changes. The custom template only supports images in bmp, png, jpg and jpeg formats. The image size is limited to 5 MB. The recommended image ratio is 16:9.Save: Save the file. The default name of the file is year-month-day-hour-minute-second. You can customize the file name. The file format can be wbh (source file format), pdf, and png. The source file format is used by default.Save as: Save as a new file. The default file name is year-month-day-hour-minute-second. The file format can be wbh (source file format), pdf, and png. The source file format is used by default.Scan to Go: Download the written whiteboard file.Exit: Exit the whiteboard app.[6X6K]Remember to save your modifications before exiting, or you will lose all your changes. |
3.3 File Management
Manage local files and files on the USB drive.
Tap File Manager on the home screen to view the whiteboard files, images, documents and more.

- Tap and hold a file or folder to select the file or folder.
- Double-tap a file or folder to open the file or folder.
Figure 3-5 File management
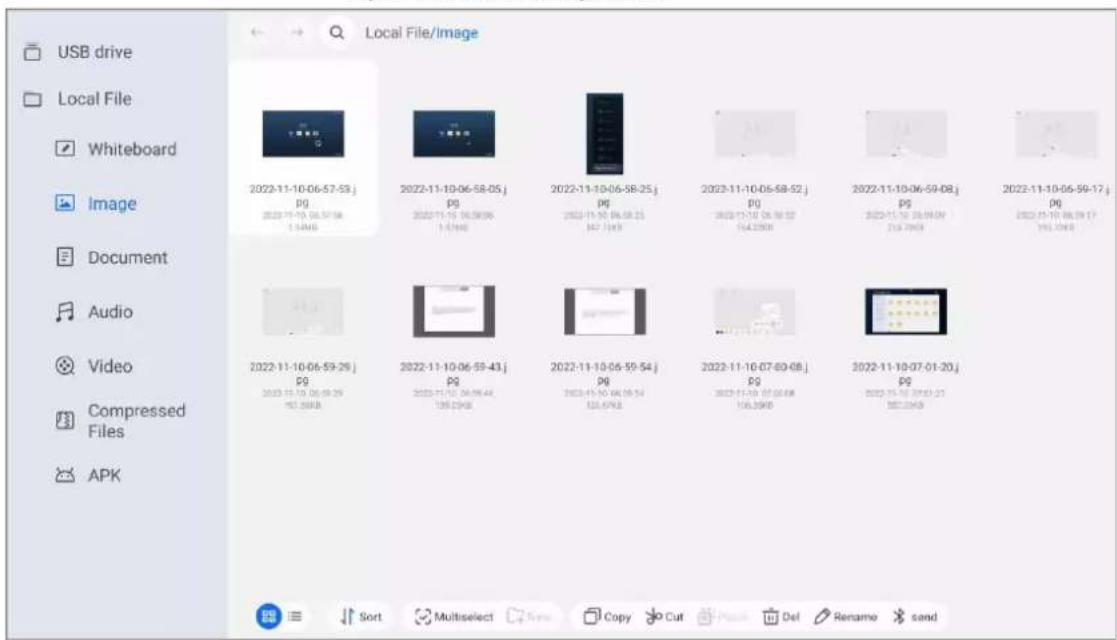
Table 3-5 File management icons
| Icon Description | |
| ← / View local files | on the previous or next screen. |
| Q | Enter file names to search for. |
| ≡/ Display files in thumbnail or list format. | |
| Sort | Sort files in the ascending or descending order by name, size and time. |
| Multi-select | You can select multiple files or all the files. |
| New Create a new folder. | |
| Copy | Select a file or folder, tap Copy or Cut, and then tap Paste to paste the file or folder. |
| Cut | |
| Paste | |
| Delete Delete files or folders. | |
| Rename | Rename the files and folders. You cannot change the suffix of the file name. |
| Send | Send the selected information through Bluetooth. |
3.4 Screen Sharing
You can remotely control the whiteboard on the phone, computer, or tablet, and project the content to the whiteboard screen. For details, see the corresponding user's manual.
3.5 Welcome Page
Prerequisites
Import the media such as images and audio files used to create the welcome page.
Procedure
Step 1 Select More > Welcome Page on the home screen of the Android system.
Step 2 Tap Setting on the lower-right corner to configure the welcome page.
Figure 3-6 Configure the welcome page
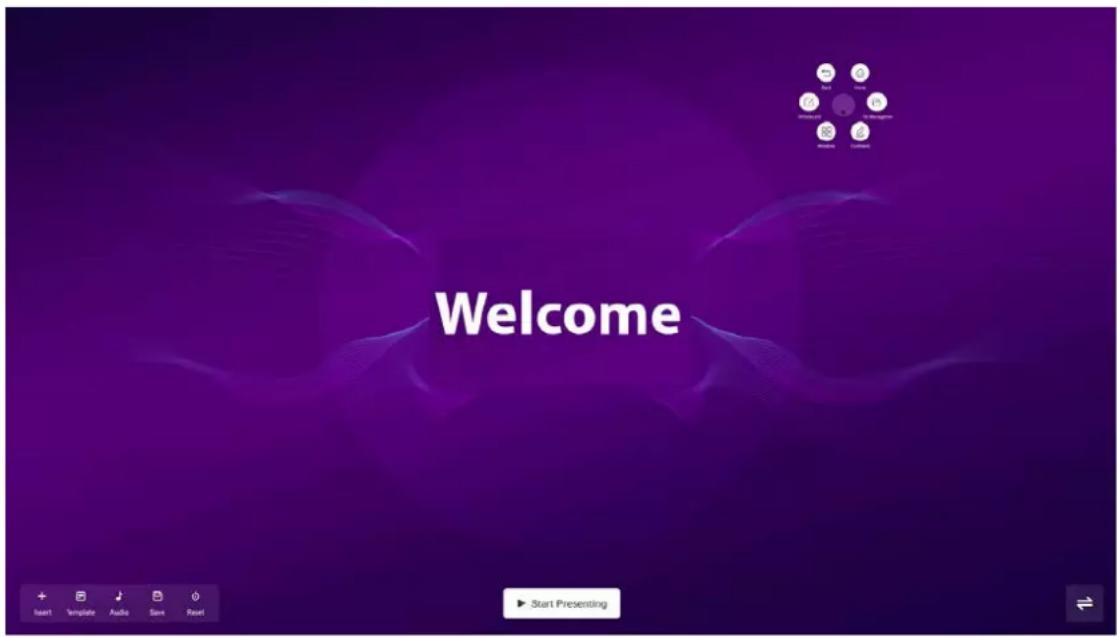
Table 3-6 Icon description
| Icon Description | |
| Change the position of the toolbar. | |
| Insert Insert a background image or other images and text. | |
| Template | You can use local background template or custom template. |
| Audio Insert audio. | |
| Save Save your configurations. | |
| Restart | Restore the welcome page to the default template. |
| Start Presenting | Show the presentation effect of the welcome page. |
Step 3 Tap Save. You can swipe left on the home screen to view the welcome page.
3.6 System Settings
Configure network settings, general and advanced settings, and other system settings.
3.6.1 Configuring Network and Bluetooth Connection
On the home screen, tap More > Settings to configure the network and Bluetooth settings.

You can enable wireless network or wired network. Wireless network and wired network cannot be enabled at the same time. The whiteboard itself can also act as a hotspot to share network connection with other devices.
Figure 3-7 Network
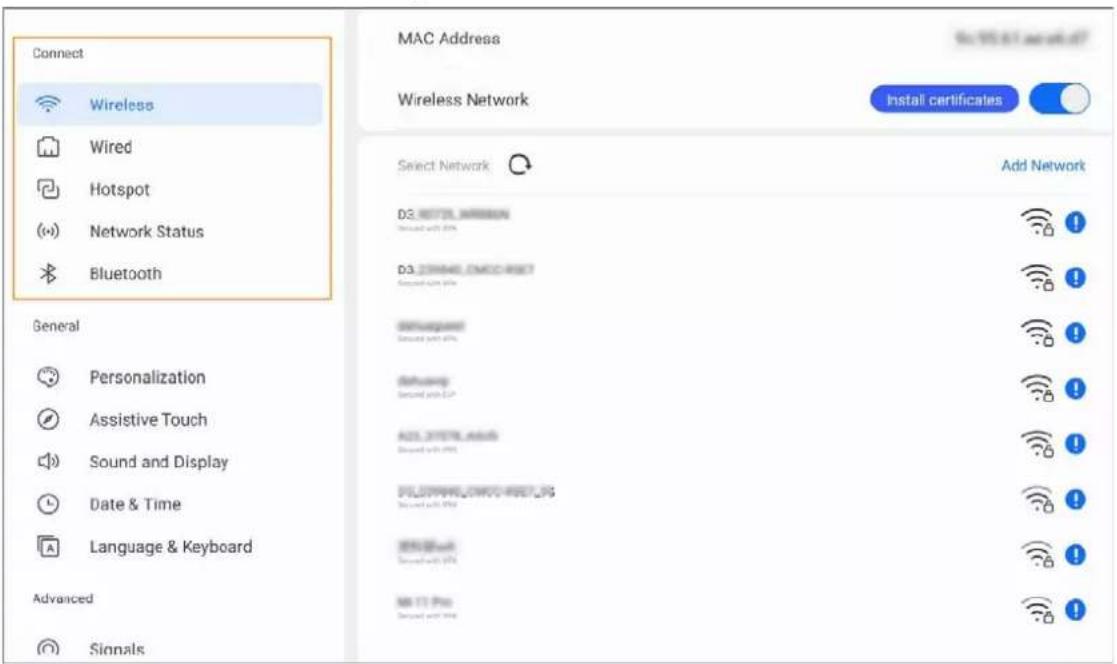
Table 3-7 Network parameters
| Parameter Description | |
| Wireless | Enable Wireless Network, and then the whiteboard can connect to an available Wi-Fi network in the area. To add a wireless network, tap Add Network, enter the SSID network name and password, and then configure advanced settings as needed.We recommend you select a secure authentication method to connect to a wireless network. |
| Wired | Configure wired network connection parameters.DHCP: When there is a DHCP server on the network, you can enable Wired, and then the whiteboard gets a dynamic IP address automatically.Static: Set IP address, subnet mask, default gateway and DNS manually for the whiteboard. |
| Hotspot | Enable Hotspot, configure the network SSID and then enter the password. You can view hotspot name, hotspot password, encryption method, frequency band and other information. |
| Network Status | Displays information such as the current network connection mode, IP address, default gateway, subnet mask, and DNS. |
| Bluetooth | Enable Bluetooth, and then the whiteboard can connect to an available Bluetooth in the area. Supports to connect wireless audio equipment, keyboards and more. |
3.6.2 Configuring General Settings
On the home screen, tap More> Settings to configure the general settings.
Figure 3-8 General settings
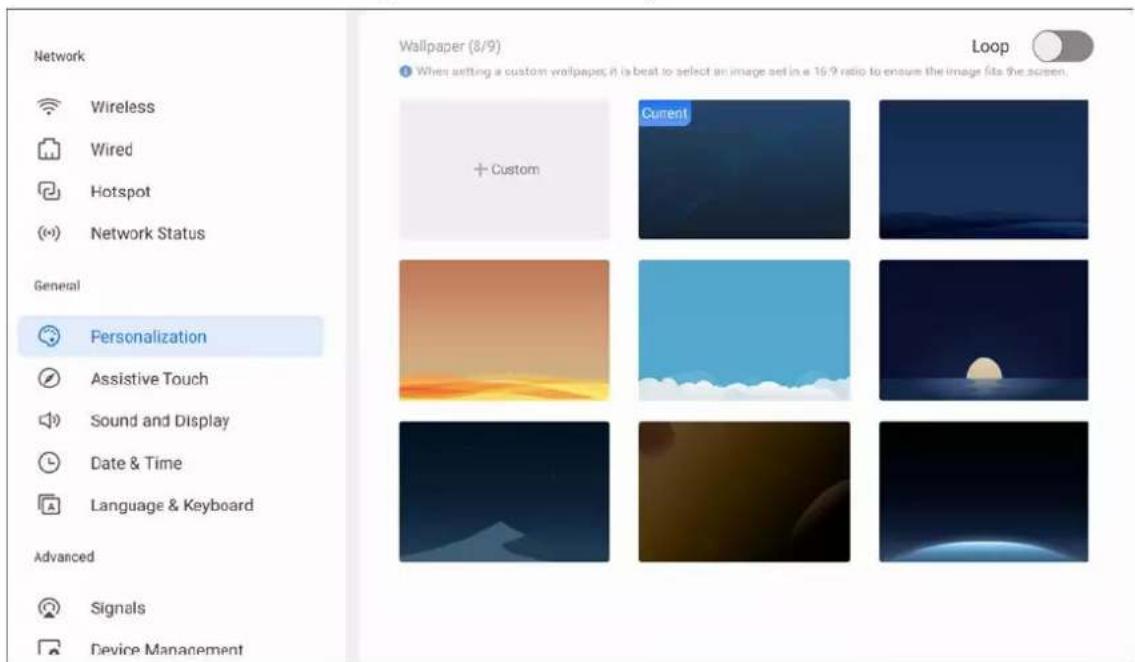
Table 3-8 General settings description
| Parameter Description | |
| Personalization | Set the background image, and you can enable Loop to play the selected background images in turn and customize the boot screen.The system provides 8 wallpapers by default.You can also customize and upload wallpapers. The recommended image ratio is 16:9. |
| Assistive Touch | Select or customize when the assistive touch is automatically hidden away, and the manner in which it is hidden (small circle or disappear).After you enable the assistive touch, double-tap with two fingers to bring it up. |
| Sound and Display | Adjust the level of volume. If the volume is 0, a mute sign will be displayed at the lower-left corner of the screen.Sound effect: You can selectStandard, Music, MeetingandTheater.System sound prompt: You can use the default audio or external audio. You can add up to 10 external audio files with each file smaller than 500 KB.Brightness can be adjusted manually in the range of 1–100 or automatically according to the ambient brightness. |
| Date & Time | Set the date and time automatically or manually. You can configure the format of the time, date and time zone.WithAuto Sync Timeenabled, the system time is synchronized with the server time. When it is disabled, you need to manually set the date and time. |
| Language & Keyboard | Select the system language and the input method. |
3.6.3 Configuring Advanced Parameters
On the home screen, tap More > Settings to configure the advanced parameters.
Figure 3-9 Advanced parameters
| ✓ Assistive Touch | Default Startup Channel | Android > |
| ✓ Sound and Display | Startup Apps | None > |
| ✓ Date & Time | Signal Detected | Auto Redirect > |
| ✓ Language & Keyboard | ||
| Advanced | Customize Channel Name | |
| ✓ Signals | Android | Android |
| VGA | VGA | |
| Windows | Windows | |
| Type-C | Type-C | |
| HDMI | HDMI | |
| HDMI(R) | HDMI(R) | |
| Type-C(F) | Type-C(F) | |
| HDMI(F) | HDMI(F) |
Table 3-9 Description of advanced parameters
| Parameter Description | |
| Signals | Default Startup Channel: Select the channel to be enabled at startup.Fixed channel: Access a fixed channel after startup.Memory channel: Access the channel of the last startup.Startup Application: Select an application that is on the whiteboard to be opened every time the system starts.Signal Detected:Auto Redirect: Connect to the signal source and automatically redirect to the corresponding channel.Pop-up Window: When a signal source is connected, a pop-up window appears asking whether to jump to the connected source channel.Customize Channel Name: Customize the channel name. After the name is modified, the corresponding channel name of the whole system will be modified synchronously. |
| Device Management | View information on the camera, microphone, and speaker.Enable Mic Boost, you can increase the volume of the microphone.HDMI OUT: The function is available after the whiteboard is connected to a monitor through the HDMI OUT port. After you enable HDMI OUT, the whiteboard outputs signals at the maximum resolution of the monitor by default. You can select different resolutions depending on the capacity of the monitor.Pick-up Pen Detection: After you enable the function, when you pick up a stylus pen from the pen attaching area at the bottom of the whiteboard, the system pops up a window and prompts you to open electronic whiteboard or enter annotation mode.The system does no give pick-up pen prompt during the setup wizard and update.Pick-up Pen Detection is available on select models.RS-232 Control: With RS-232 Control enabled, you can connect the whiteboard to the RS-232 transparent debugging serial port for data transmission between devices.IR Frame Version: Tap Update to update the version of the IR frame. |
3.6.4 Configuring System Parameters
On the home screen, tap More > Settings to configure the system parameters.
Figure 3-10 System parameters
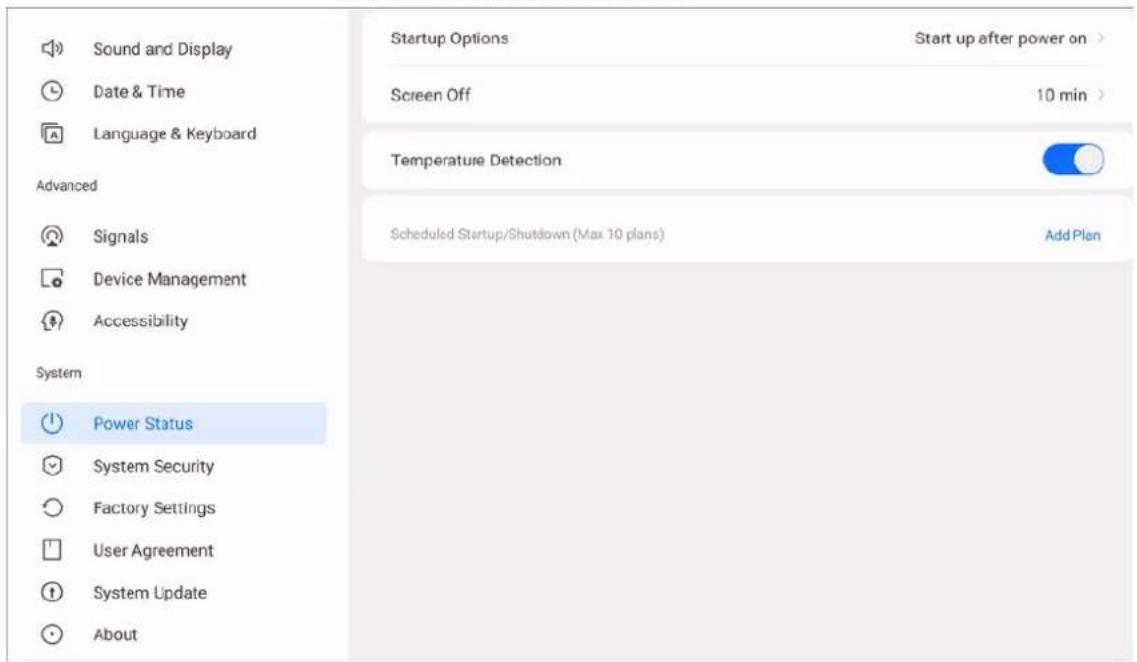
Table 3-10 System parameter description
| Parameter Description | |
| Power Status | Set the startup and shutdown functions of the whiteboard. Startup Options: Select standby after power on or startup after power on (default). Screen Off: Offers always on and no operation after 1 min, 5 min and 10 min. It also has custom configuration from 1 to 60 min and shut down after 10 minutes without operation. Temperature Detection: After you enable the function, appears on the upper-right corner of the home screen. When the temperature of CPU is higher than 80 °C, the icon becomes orange. When the CPU temperature is higher than 90 °C, the icon becomes red. Scheduled Startup/Shutdown (Max. 10 plans): Tap Add Plan to set when to automatically power on and off the system. Tap delete the plan. |
| System Security | Pin: After enabling Pin, you can unlock the whiteboard with digital password.Unlock Pattern: After enabling Unlock Pattern, you can unlock the whiteboard by drawing a pattern.Fingerprint: After enabling Fingerprint, you can unlock the whiteboard with your registered fingerprint.Lock Screen: Tap Lock screen, and then select a screen lock option, including no operation after 1 min, 5 min and 10 min, and custom configuration.Touch Lock: After enabling touch lock, you cannot use touch control on the screen. Press the power button 3 times in 2 seconds to unlock the touch lock.USB Permission: If this function is enabled, the system does not detect the access of USB devices.The system does not support the simultaneous use of pattern password and digital password.The password cannot be retrieved. Keep your password safe. If you forgot the password, contact out customer support.Fingerprint is available on select models. |
| Factory Settings | Tap FACTORY SETTINGS, and all your operation records and saved content will be deleted. The whiteboard will also be restored to its factory settings. |
| User Agreement | View the privacy policy, software license agreement, and open source agreement. |
| System Update | View the current system version. When the whiteboard is connected to a network, tap CHECK FOR UPDATES to check whether there is a new version available. |
| About | View MAC address, device serial number, device name (can be edited), running memory, storage space, resolution, system version, Android version, and security baseline version.The device name can consist of up to 31 characters and contain letters, numbers, and special characters (-@). |
4 Shutdown
After the whiteboard is turned on, press and hold the power button for 5 s, and then the system will prompt you whether to shut down the whiteboard. Tap OK to shut down the whiteboard.

The whiteboard provides power-off protection to the computer module. After you shut down the whiteboard, the computer module will shut down a little while afterwards.
5 System Update
You can update the system online or through USB.

Please be advised that downgrading to a lower version will make the whiteboard vulnerable to security attacks.
5.1 Online Update
After the whiteboard is registered to the cloud management platform, the platform can send the update package to the whiteboard.
Prerequisites
Make sure the whiteboard is connected to the network.
- Make sure that the whiteboard is connected to the network.
- Make sure that you have enabled OTA platform in More > Settings > System Update.
Procedure
Step 1 On the home screen, select More > Settings > System Upgrade.
Step 2 Tap CHECK FOR UPDATES.
Step 3 When the system detects that a newer version available, tap Download to download the update package.
Step 4 After the package is downloaded, you can select to install the package immediately. After it updates, the whiteboard restarts automatically.
5.2 Update through USB
You can upload update.zip file into a USB flash drive and then use the update file to update the system.
Prerequisites
Get the update package from the technical support.
Procedure
Step 1 Change the name of the update package to update.zip, and then save the file to the root directory of the USB flash drive.
Step 2 With whiteboard turned on, plug the USB flash drive into the USB port of the whiteboard.

Update the system with a USB flash drive in the FAT 32 format. Otherwise, update might fail.
Step 3 When the system prompts whether to update immediately, tap Upgrade. The update begins. After it updates, the whiteboard restarts automatically.
6 FAQ
1. The whiteboard shuts down automatically.
- Check whether you have enabled the sleep function. You can refer to the regular computer troubleshooting procedure.
- Check the channel of the input source. If there is no signal, the whiteboard will shut down automatically.
- Check whether the power supply is stable.
2. The indicator light is off.
- Check whether the power supply is normal.
- Check whether the rocker switch of the whiteboard is turned on.
3. Missing or abnormal colors.
If the whiteboard is connected to a computer, check whether the HDMI cable is intact and correctly connected.
4. The image is not displayed in full screen or part of the image is outside the screen.
- Check whether the resolution is 16:9.
- If the whiteboard is connected to an external computer, unplug the HDMI cable and then plug it back in.
5. The whiteboard displays images but has no sound.
- Adjust the volume.
- If the whiteboard is connected to a computer, check whether the audio cable is correctly connected.
6. Touch response is poor and the location that responds is not accurate.
- Check whether other objects such as paper or your sleeves are in contact with the screen.
- Check whether the resolution is 16:9.
7. Touch control is not working.
If the whiteboard is connected to a computer, check whether the TOUCH port of the whiteboard is correctly connected to the USB port of the computer.
8. After you connect the computer with the whiteboard through the Type C port on the front panel, unable to control the computer through touch operations on the whiteboard.
- Change another Type C cable.
- Use the TOUCH port on the rear panel.
Appendix 1 Touch Operation
You can use the stylus pen or directly use your fingers to operate the device screen.

This section uses operation with stylus pen as an example.
Appendix Table 1-1 Touch operations
| Operation Description | |
| Tap | Tap the screen once with the stylus pen. |
| Double-tap | Tap the screen twice with the stylus pen (The time gap between the taps is around 0.5 s). |
| Context menu | Slightly touch the screen for 1 to 2 seconds with the stylus pen. Lift the stylus pen when there is a circle on the screen, and then the context menu is displayed. |
| Drag | Hold the icon that needs to be dragged with the stylus pen and then move the stylus pen to the target place. Lift the stylus pen to drop the item. |
| Slide | Hold the screen (such as the slider that is used for the web browser) that you want to slide with the stylus pen, and then slide the stylus pen toward the direction you want. Lift the stylus pen to release the screen. |
| Zoom | Use the stylus pen to press and hold the window (such as the web pages and images), and then use another stylus pen to drag the window to zoom in and zoom out. |
Appendix 2 Cybersecurity Recommendations
Cybersecurity is more than just a buzzword: it's something that pertains to every device that is connected to the internet. IP video surveillance is not immune to cyber risks, but taking basic steps toward protecting and strengthening networks and networked appliances will make them less susceptible to attacks. Below are some tips and recommendations from Dahua on how to create a more secured security system.
Mandatory actions to be taken for basic device network security:
1. Use Strong Passwords
Please refer to the following suggestions to set passwords:
- The length should not be less than 8 characters.
- Include at least two types of characters; character types include upper and lower case letters, numbers and symbols.
- Do not contain the account name or the account name in reverse order.
- Do not use continuous characters, such as 123, abc, etc.
- Do not use overlapped characters, such as 111, aaa, etc.
2. Update Firmware and Client Software in Time
- According to the standard procedure in Tech-industry, we recommend to keep your device (such as NVR, DVR, IP camera, etc.) firmware up-to-date to ensure the system is equipped with the latest security patches and fixes. When the device is connected to the public network, it is recommended to enable the "auto-check for updates" function to obtain timely information of firmware updates released by the manufacturer.
- We suggest that you download and use the latest version of client software.
"Nice to have" recommendations to improve your device network security:
1. Physical Protection
We suggest that you perform physical protection to device, especially storage devices. For example, place the device in a special computer room and cabinet, and implement well-done access control permission and key management to prevent unauthorized personnel from carrying out physical contacts such as damaging hardware, unauthorized connection of removable device (such as USB flash disk, serial port), etc.
2. Change Passwords Regularly
We suggest that you change passwords regularly to reduce the risk of being guessed or cracked.
3. Set and Update Passwords Reset Information Timely
The device supports password reset function. Please set up related information for password reset in time, including the end user's mailbox and password protection questions. If the information changes, please modify it in time. When setting password protection questions, it is suggested not to use those that can be easily guessed.
4. Enable Account Lock
The account lock feature is enabled by default, and we recommend you to keep it on to guarantee the account security. If an attacker attempts to log in with the wrong password several times, the corresponding account and the source IP address will be locked.
5. Change Default HTTP and Other Service Ports
We suggest you to change default HTTP and other service ports into any set of numbers between
1024–65535, reducing the risk of outsiders being able to guess which ports you are using.
6. Enable HTTPS
We suggest you to enable HTTPS, so that you visit Web service through a secure communication channel.
7. MAC Address Binding
We recommend you to bind the IP and MAC address of the gateway to the device, thus reducing the risk of ARP spoofing.
8. Assign Accounts and Privileges Reasonably
According to business and management requirements, reasonably add users and assign a minimum set of permissions to them.
9. Disable Unnecessary Services and Choose Secure Modes
If not needed, it is recommended to turn off some services such as SNMP, SMTP, UPnP, etc., to reduce risks.
If necessary, it is highly recommended that you use safe modes, including but not limited to the following services:
- SNMP: Choose SNMP v3, and set up strong encryption passwords and authentication passwords.
- SMTP: Choose TLS to access mailbox server.
- FTP: Choose SFTP, and set up strong passwords.
- AP hotspot: Choose WPA2-PSK encryption mode, and set up strong passwords.
10. Audio and Video Encrypted Transmission
If your audio and video data contents are very important or sensitive, we recommend that you use encrypted transmission function, to reduce the risk of audio and video data being stolen during transmission.
Reminder: encrypted transmission will cause some loss in transmission efficiency.
11. Secure Auditing
- Check online users: we suggest that you check online users regularly to see if the device is logged in without authorization.
- Check device log: By viewing the logs, you can know the IP addresses that were used to log in to your devices and their key operations.
12. Network Log
Due to the limited storage capacity of the device, the stored log is limited. If you need to save the log for a long time, it is recommended that you enable the network log function to ensure that the critical logs are synchronized to the network log server for tracing.
13. Construct a Safe Network Environment
In order to better ensure the safety of device and reduce potential cyber risks, we recommend:
- Disable the port mapping function of the router to avoid direct access to the intranet devices from external network.
- The network should be partitioned and isolated according to the actual network needs. If there are no communication requirements between two sub networks, it is suggested to use VLAN, network GAP and other technologies to partition the network, so as to achieve the network isolation effect.
- Establish the 802.1x access authentication system to reduce the risk of unauthorized access to private networks.
- Enable IP/MAC address filtering function to limit the range of hosts allowed to access the
device.
More information
Please visit Dahua official website security emergency response center for security announcements and the latest security recommendations.
ENABLING A SAFER SOCIETY AND SMARTER LIVING

- Smart Interactive Whiteboard
- Foreword
- General
- Safety Instructions
- Revision History
- Privacy Protection Notice
- About the Manual
- Important Safeguards and Warnings
- Storage Requirements
- Installation Requirements
- Operation Requirements
- WARNING
- !
- Maintenance Requirements
- Table of Contents
- Foreword ....
- Important Safeguards and Warnings....III
- Overview....1
- Startup and Wakeup....9
- Basic Operations....11
- Shutdown....28
- System Update....29
- FAQ....30
- Overview
- Introduction
- Packing List
- Structure
- Appearance
- Dimensions
- Dimensions (65-inch)
- Dimensions (75-inch)
- Dimensions (86-inch)
- Ports
- Buttons
- Startup and Wakeup
- Turning on the Whiteboard
- Prerequisites
- Procedure
- Turning off Screen
- Basic Operations
- Quick Operations
- Bringing up the Navigation Bar
- Bringing up the Assistive Touch
- Common Tools
- Electronic Whiteboard
- File Management
- Screen Sharing
- Welcome Page
- System Settings
- Configuring Network and Bluetooth Connection
- Configuring General Settings
- Configuring Advanced Parameters
- Configuring System Parameters
- Shutdown
- System Update
- Online Update
- Update through USB
- FAQ
- The whiteboard shuts down automatically.
- The indicator light is off.
- Missing or abnormal colors.
- The image is not displayed in full screen or part of the image is outside the screen.
- The whiteboard displays images but has no sound.
- Touch response is poor and the location that responds is not accurate.
- Touch control is not working.
- After you connect the computer with the whiteboard through the Type C port on the front panel, unable to control the computer through touch operations on the whiteboard.
- Appendix 1 Touch Operation
- Appendix 2 Cybersecurity Recommendations
- Mandatory actions to be taken for basic device network security:
- Use Strong Passwords
- Update Firmware and Client Software in Time
- "Nice to have" recommendations to improve your device network security:
- Physical Protection
- Change Passwords Regularly
- Set and Update Passwords Reset Information Timely
- Enable Account Lock
- Change Default HTTP and Other Service Ports
- Enable HTTPS
- MAC Address Binding
- Assign Accounts and Privileges Reasonably
- Disable Unnecessary Services and Choose Secure Modes
- Audio and Video Encrypted Transmission
- Secure Auditing
- Network Log
- Construct a Safe Network Environment
- More information
- ENABLING A SAFER SOCIETY AND SMARTER LIVING
Brand : Dahua Technology
Model : Lite LPH75-ST470-B
Category : Whiteboards and Accessories