
Ram 10 - Mobile Phone Plum - Free user manual and instructions
Find the device manual for free Ram 10 Plum in PDF.


| Product Type | Mobile Phone (Feature Phone) |
| Brand | Plum |
| Model | Ram 10 |
| SIM Card Type | Dual Nano SIM |
| Memory Card Slot | MicroSD (up to 32GB recommended) |
| Display | 2.4-inch TFT (estimated) |
| Battery | Removable, 1800 mAh (typical) |
| Camera | Rear VGA camera |
| Connectivity | Bluetooth, MicroUSB, FM Radio |
| Rugged Rating | IP67/68 (waterproof up to 1m for 20 minutes) |
| SOS Button | Long press OK key to send SOS alert |
| Flashlight | Built-in, activated by long press 0 key |
| Operating System | Proprietary (MTK based) |
| Languages | English, French, Spanish, Portuguese |
| Network Compatibility | AT&T, T-Mobile; not compatible with Verizon, Sprint, Boost |
| Sensors | None (basic feature phone) |
| Safety Certifications | FCC Part 15, SAR compliant (1.0 cm body worn) |
| Maintenance | Rinse with fresh water after exposure to saltwater, dust, or dirt |
Frequently Asked Questions - Ram 10 Plum
User questions about Ram 10 Plum
0 question about this device. Answer the ones you know or ask your own.
Ask a new question about this device
Download the instructions for your Mobile Phone in PDF format for free! Find your manual Ram 10 - Plum and take your electronic device back in hand. On this page are published all the documents necessary for the use of your device. Ram 10 by Plum.
USER MANUAL Ram 10 Plum
Safety Precautions....4
Plum Rugged Device Quick Start Guide...... 6
Phone Description....7
Getting started....9
Installing the SIM and the Micro SD .carol
Charging the Battery...... 10
Setting up the APN data....11
Making Phone call....12
Contacts....13
To add the new Contact.... 13
To Setup the Speed Dial.... 13
Call Logs....14
Message.... 14
Write Message (SMS)....14
Write Message (MMS)...... 15
My files....16
Audio....16
Multimedia....16
Pictures....16
Camera....17
Video.... 18
FM Radio.... 18
Recorder.... 19
SOS.... 19
Setting.... 20
Phone Settings.... 20
Blacklist.... 21
Display....21
Security....22
Connections.... 22
Sounds and Volume...... 23
For changing ringtone....23
Tools.... 24
Calendar....24
Alarm....24
Calculator.... 24
Flashlight 25
BT....25
Internet.... 25
Warning....26
Notice
The phone is factory unlocked and compatible with AT&T, T-mobile and all major prepaid service provider EXPECT Verizon, Sprint and Boost
If you still need help, please contact us by phone or email. Most issues are resolved quickly by contacting our tech support based in Miami Florida during business hours.
You can also search for FAQ on our website https://www.plum-mobile.com/support/
You can also watch helpful videos of how to setup your device videos on our YouTube channel
https://www.youtube.com/user/plumsupport/videos
Contact us - support@plum-mobile.com
Tech Support - 305.640.1835
Email is the fastest way of contacting us
Safety Precautions
Read these simple guidelines before using.
Not following them may be dangerous or illegal.
Aircraft
Switch off in aircraft and follow any restrictions. Wireless devices can cause interference in aircraft.
Vehicles
Never use your device while driving. Place it in a safe place.
Position your device within easy reach. Be able to access your device without removing your eyes from the road.
Electronic devices
In some circumstances your device may cause interference with other devices.
Potentially explosive environments
Switch off your device when in any area with a potentially explosive atmosphere, and obey all signs and instructions. Sparks in such areas could cause an explosion or fire resulting in bodily injury or even death.
Pacemakers and other medical devices
Pacemaker manufacturers recommend that a minimum separation of 8 inches be maintained between a wireless device and a pacemaker to avoid potential interference with the pacemaker.
Operation of any radio transmitting equipment,
including wireless phones may interference with the functionality of inadequately protected medical devices. Consult a physician or the manufacturer of the medical device to determine if they are adequately shielded from external RF energy or if you have any questions.
Switch off your device in health care facilities when any regulations posted in these areas instruct you to do so.
Operating environment
When connecting to other device, read its user guide for detailed safety instructions. Do not connect incompatible products.
Do not place your device in the air bag deployment area.
Use the device only in its normal operating positions as explained in the product documentation.
Always switch off your device when its use is prohibited or when it may cause interference and danger.
Areas with posted regulations
Switch off your device when any regulations posted in these areas instruct you to do so.
Plum Rugged Device Quick Start Guide
-
Only use approved PLUM chargers, cables & accessories.
-
Ensure the USB Port Flap is correctly sealed to protect from water& moisture.
-
Ensure that the rubber seal inside the battery door is placed correctly. Improper use can cause damage to the device.
-
IP-67/68 Certified devices are water proof in depths of 1 meter or less and can be submerged for up to 20 minutes.
-
Rinse the device with fresh water after submission in salt water, dirt, dust, etc.
-
Rugged devices are designed to withstand falls from up to 1 meter in height.
Plum Mobile& authorized service centers are responsible for determining warranty status, misuse or abuse
Phone Description

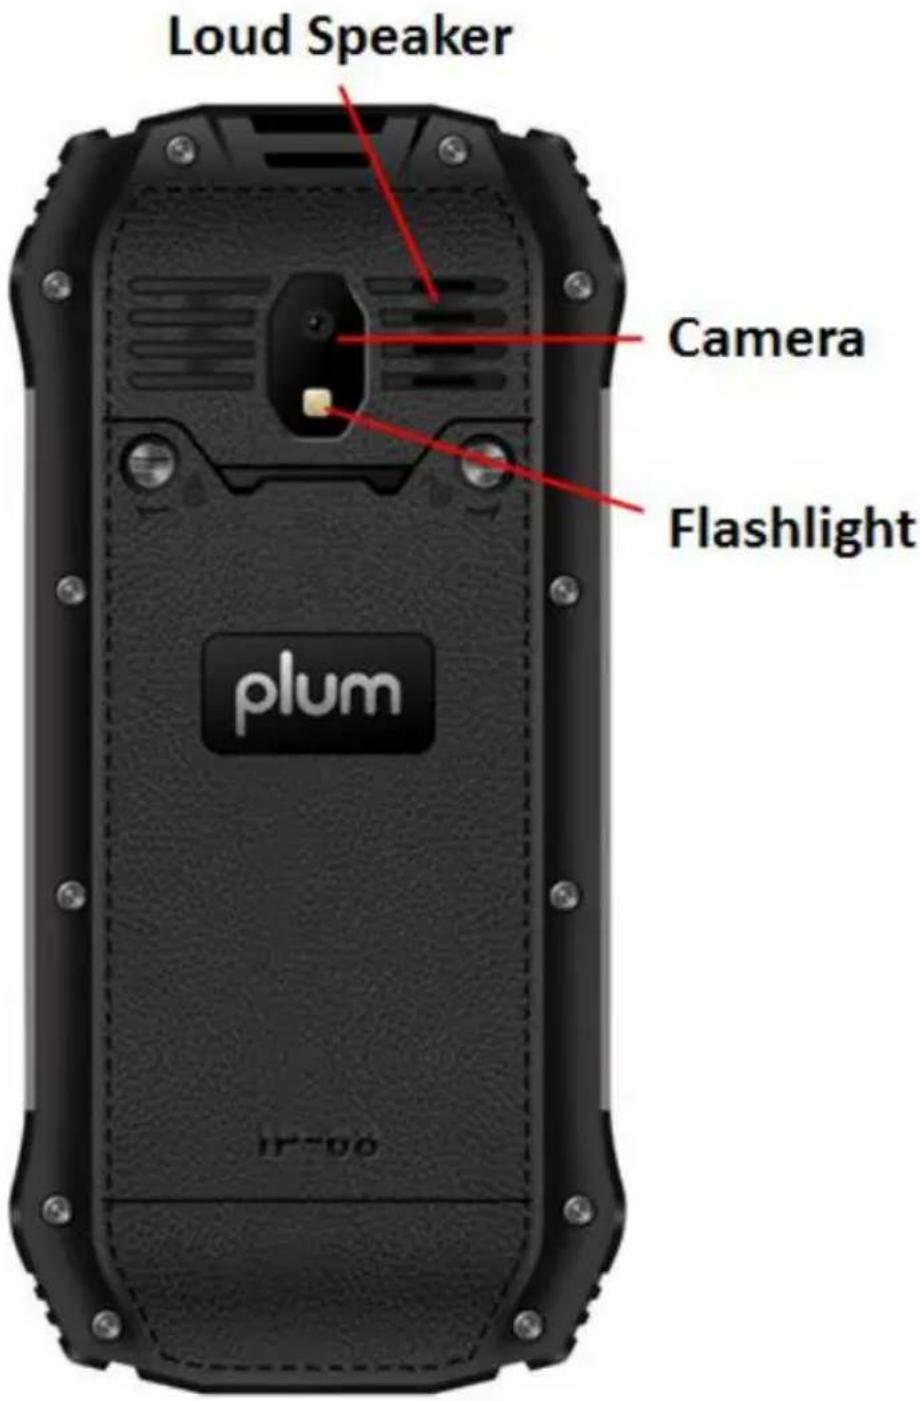
Please visit our website for User Manual
www.plum-mobile.com
Getting started
Installing the SIM and the Micro SD card
To insert the SIM card and Micro SD card, please make sure your phone is Power off, the remove the cover, battery and other external power connection.
To loose the screws of the battery cover, please use the coin or tools to rotate the screw of the battery cover counterclockwise
Tight the screws of the battery cover back when the SIM/ SD card are inserted
To insert the SIM card

-
Slide the Metal Left(SIM1) or Right(SIM2) to unlock the tray.
-
Lift up the cover and insert the Nano SIM
-
Put down the metal cover then slide it to t opposite side to lock the Card tray
To insert the memory card (Micro SD),
-
Slide the Metal to the left to unlock the tra
-
Lift up the cover and insert the memory card.
-
Put down the metal cover then slide it right to lock the Card tray

Charging the Battery
You can charge the device with a travel adapter or by connecting the device to a PC with a US cable.
Charge for 12 hours before the first using is recommended.
Warning : Please use original charger and battery. Unapproved accessories and Battery can cause explode or damage your device.
Setting up the APN data
You have to setup a usable APN before you access to the internet, contact to your network provider if you don't know these information
Go to: Settings→ Connections→ Network account→ Options→ New connection and input the correct information as the sample below:
| Name | CMHK_MMS |
| APN | CMHK |
| Proxy | Blank |
| Port | Blank |
| User Name | Blank |
| Password | Blank |
| Server | Blank |
| MMS Proxy | 172.31.31.36 |
| MMS Port | 8080 |
| MMSC (Homepage) | http://mms.hk.chinam obile.com/mms |
Then press Save to save the APN setting
You may also press Options→ Search and choose the preloaded APN
Making Phone call
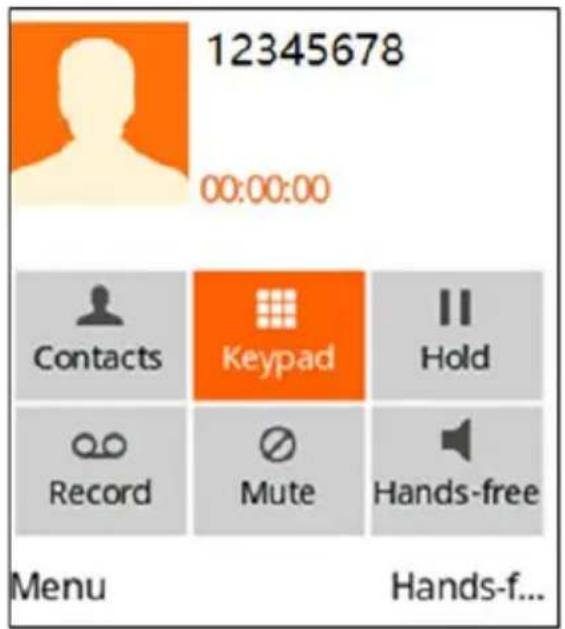
You may make the phone call by choosing the contact inside the Contacts or dial the number directly.
During the Phone call, you may proceed with the function by pressing the button in keypad as below:

Contacts
You can check or edit all the contacts which stored in the phone and SIM cards
To add the new Contact
You may type the phone number directly inside the dial interface, then press “Options”→ “Add to contacts”
To search the contact, you may input the text or number in the lower bar.
You may press the “*” for symbol and “#” to switch the input method

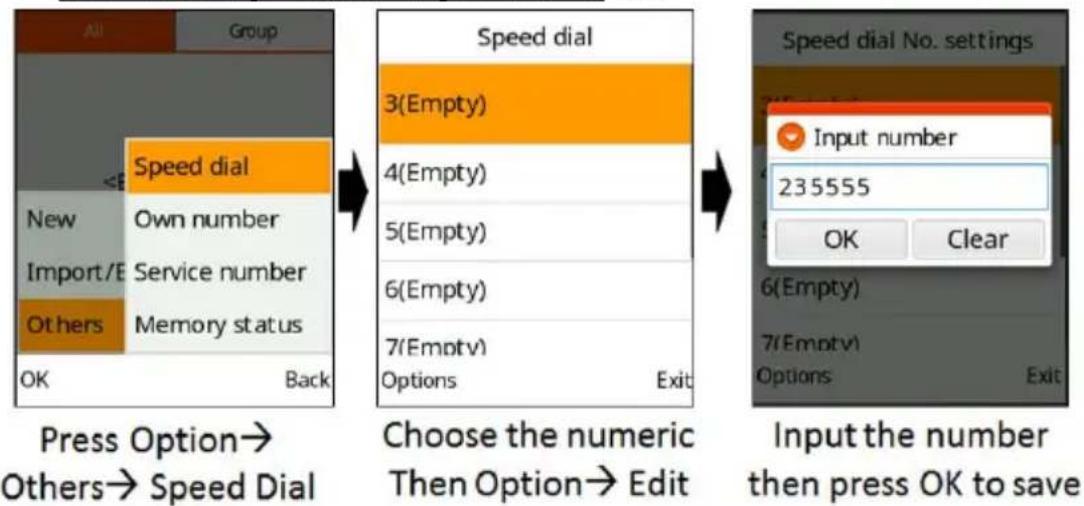
To Setup the Speed Dial
flowchart
graph LR
    A["Press Option"] --> B["Speed dial"]
    B --> C["New"]
    B --> D["Import/E"]
    B --> E["Others"]
    B --> F["Back"]
    G["Choose the numeric Then Option"] --> H["Speed dial No. settings"]
    H --> I["Input number 235555"]
    H --> J["OK Clear"]
    H --> K["Options Exit"]
Now you may long press the related key to proceed the Speed Dial
Call Logs
You can view all the phone call record in this interface.
Advanced settings (Press Options)
You can manage the functions as below:
Add to blacklist
The phone number you select will be blocked, which mean that number cannot call or message you anymore
To manage the blacklist, Please go to Setting→ Security→Blacklist
Write Message
Switch to the Message interface, the phone number selected will become the recipient
Message
You can send or view the received messages inside this interface
Write Message (SMS)
You may send SMS message by following the instruction below:
- Go to Messages
- Press "Write Message"
- Input the recipient/ number at the upper ba
- Type the text inside the lower bar
(Press Key # to switch the input method)
- Press Send after your message is typed
Write Message (MMS)
You may send MMS message by following the instruction below:
- Go to Messages
- Press "Write Message"
- Input the recipient or number directly at the upper bar
- Press "Options"→ "Add"
To add the attachment shown as below:
Picture: Choose the image stored inside the ph
Take photo: Take a photo for MMS usage
Audio: Choose the audio stored inside the phone
Record: Record an audio for MMS usage
Video: Choose the video stored inside the phor
Shoot Video: Record a Video for MMS usage
- Press "Option"→ "Send" to send the MMS
Note:
To change the MMS APN Setting, go to Message→Setting→MMS→MMS account and choose the correct APN
My files
You can access the Phone memory/ SD card inside this interface.
Inside “Option”, you can choose to open, search or copy the selected file.
Audio
Use this function to play or set the audio file the ringtone, the keys will have the function below:

Multimedia
Pictures
You can view, share or edit the images inside the device through this function.
To set the image you want as the wallpaper, press Options→Set as→Wallpaper
Camera
You can capture pictures or videos by this function. The key will have the function below:

Also you may press the key below for further functions:

To switch Camera/ DV Mode
To adjust the resolution
Setup delay timer

Setup Continuous capture
Video
Use this function to play or share the video fil the keys will have the function below:

Use the Left/ Right key to rewind/ Fast-forward
Also you may press:
To enable/ Disable Fullscreen

To adjust the brightness
FM Radio
This phone supports FM radio, you can use it directly or plug in the earphone for better sound quality. During FM radio, the Arrow key will have the function below:
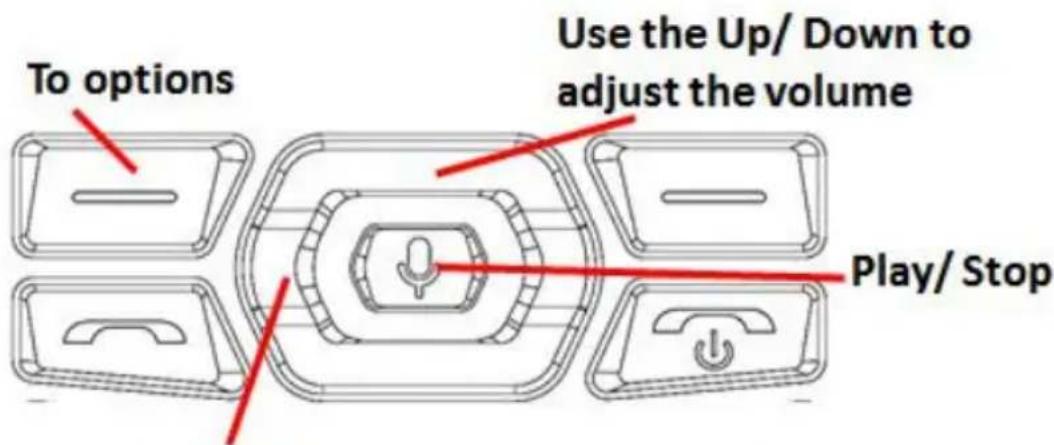
Use the Left/ Right key to adjust the channel
Inside Options, you can have the following features as below:
Auto search and save
The device will search for the available FM station automatically
Channel List
You may save the specific channel to the list
Save
Save the channel you are listening to the Channel list
Record
To start the recording
Recorder
Use this function you may record the audio files. You may change the file format and storage location inside the option interface.
SOS
You can setup the SOS number and Message in this interface.
Long Press the OK Key to activated SOS Mode
Inside the SOS interface, you may adjust the setting as below:
SOS number list
You may enter the phone number inside this interface
The phone will dial and send the SOS message to the number inside this list when you activat the SOS mode
SOS message settings
The message which stored here will be send when the SOS Mode is activated
SOS settings
SOS: To enable/ disable SOS mode Once the mode is enable, Long press the OK Key to activated SOS Mode
SOS Ring Alert
During SOS Mode, the SOS alert will play loudly when this option is selected
Settings
Phone Settings
Time & date
Set time and date, format and Auto update time
Language settings
The phone supports with English, French, Spanish and Portuguese.
Shortcut settings
Customize the shortcut functions of the Up, Down, Left and Right direction keys. In the standby interface, you can press a direction key to directly enter the function menu.
Auto Power on/off
set the schedule power on/off time.
Restore factory setting
Use this function to restore factory settings.
The initial password is 1234.
Blacklist
Go to Setting→ Security→ Blacklist
You may input the phone number into the list, or you can select the phone number inside the call logs (Options→ Add to blacklist)
The phone number stored here cannot call or send message to you anymore
Display
Customize the display setting in this interface
Wallpaper setting
To change the wallpaper

Go to Settings→ Display→ Wallpaper Settings
You may choose one of these for the wallpaper
Static wallpaper: Using the system default images
More pictures: Using the image inside the phone
Security
This function provides you with related settings about safety use.
PIN
The PIN (Personal identification number, 4 to 8 digits) code prevents your SIM card from being used by unauthorized people.
Modify PIN
In general, the PIN is supplied with SIM card by the network operator. If PIN check is enabled, you need to input the PIN each time when you power on your mobile phone. The SIM card will be locked if you input wrong PIN code for three times.
Phone locked
Password will be needed when you power on your mobile phone
Modify the cellphone password
To change the phone password in this interface The default password is 1234
Connections
Network accounts
You can edit the APN data for the inserted SIN
Data Service
To enable/ disable the data service
VoLTE
To enable/ disable the VoLTE service
Sounds and Volume
There are some profiles which is available inside your phone, they are: General, Silent, Meeting and Outdoor
Long Press the # key to switch the phone into Normal/ Silent/ Meeting mode
You can edit the alert type, ring type, ringtone ring volume or set the button's volume or the message tone accordingly.
For changing ringtone

flowchart
graph LR
    A["Sounds and Volume"] --> B["Settings"]
    B --> C["Choose Ring settings"]
    C --> D["Ring settings"]
    D --> E["Choose the Call ring"]
You may choose one of these for the ringtone
Fixed ringtone: Using the system default rington
More ringtones: Using the audio inside the ph
Tools
Calendar
Once you enter this menu, there is a monthly-view calendar for you to keep track of important appointments, etc.
View schedules
View the select date and you can add the schedule in this interface.
All schedules
You can view all the events you scheduled
Go to date
Jump to the appointed date quickly when you input a date to search.
Clear All
Clear all the schedule
Alarm
You may setup the alarm inside this interface. For each alarm, you may set up the specific ringtone and the message.
Calculator
This phone supports function of calculator.
Using the navigation key as the Add, subtract, multiply and divide and the OK key to proceed the calculation
Flashlight
Switch on/off the Flashlight here.
In addition, when in the idle screen, you can long press the 0 key to turn on/off the flashlight.
BT
You may connect the phone with other BT devices after you enable this function
BT visibility
Other users can find your phone after this function is on.
Paired Devices
You may connect the saved BT device inside this interface
Internet
In this menu, you can access to internet, enter the URL and you can start to browse the web.
Inside Options, you can have the following features as below:
Navigation: To refresh/ stop the website loading
Save: To save the current webpage as bookmark/ homepage
Send connection: Send the current webpage's URL via SMS
Setting: to adjust the setting of the Internet
Warning
Any Changes or modifications not expressly approved by the party responsible for compliance could void the user's authority to operate the equipment.
This device complies with part 15 of the FCC Rules. Operation is subject to the following two conditions: (1) This device may not cause harmful interference, and (2) this device must accept any interference received, including interference that may cause undesired operation.
Note: This equipment has been tested and found to comply with the limits for a Class B digital device, pursuant to part 15 of the FCC Rules. These limits are designed to provide reasonable protection against harmful interference in a residential installation. This equipment generates, uses and can radiate radio frequency energy and, if not installed and used in accordance with the instructions, may cause harmful interference to radio communications.
However, there is no guarantee that interference will not occur in a particular installation.
If this equipment does cause harmful interference to radio or television reception, which can be determined by turning the equipment off and on, the user is encouraged to try to correct the interference by one or more of the following measures:
—Reorient or relocate the receiving antenna.
—Increase the separation between the
equipment and receiver.
—Connect the equipment into an outlet on a
circuit different from that to which the receiver is connected.
—Consult the dealer or an experienced radio/TV technician for help.
SAR tests are conducted using standard operating positions accepted by the FCC with the phone transmitting at its highest certified power level in all tested frequency bands, although the SAR is determined at the highest certified power level, the actual SAR level of the phone while operating can be well below the maximum value, in general, the closer you are to a wireless base station antenna, the lower the power output.
Before a new model phone is available for sale to the public, it must be tested and certified to the FCC that it does not exceed the exposure limit established by the FCC, Tests for each phone are performed in positions and locations (e.g. at the ear and worn on the body) as required by the FCC.
For body worn operation, this model phone has been tested and meets the FCC RF exposure guidelines when used with an accessory designated for this product or when used with an accessory that contains no metal and that positions the handset a minimum of 1.0 cm from the body.
Non-compliance with the above restrictions may result in violation of RF exposure guidelines.

www.plum-mobile.com

- Notice
- Safety Precautions
- Aircraft
- Vehicles
- Electronic devices
- Potentially explosive environments
- Pacemakers and other medical devices
- Operating environment
- Areas with posted regulations
- Plum Rugged Device Quick Start Guide
- Getting started
- To insert the memory card (Micro SD),
- Charging the Battery
- Setting up the APN data
- You may also press Options→ Search and choose the preloaded APN
- Making Phone call
- Contacts
- To add the new Contact
- Call Logs
- Add to blacklist
- Write Message
- Message
- Write Message (SMS)
- Write Message (MMS)
- Note:
- My files
- Audio
- Multimedia
- Pictures
- Camera
- Video
- FM Radio
- Auto search and save
- Channel List
- Save
- Record
- Recorder
- SOS
- SOS number list
- SOS message settings
- SOS settings
- SOS Ring Alert
- Settings
- Time & date
- Language settings
- Shortcut settings
- Auto Power on/off
- Restore factory setting
- Blacklist
- Display
- Wallpaper setting
- Security
- PIN
- Modify PIN
- Phone locked
- Modify the cellphone password
- Connections
- Network accounts
- Data Service
- VoLTE
- Sounds and Volume
- Tools
- Calendar
- View schedules
- All schedules
- Go to date
- Clear All
- Alarm
- Calculator
- Flashlight
- BT
- BT visibility
- Paired Devices
- Internet
- Warning
Brand : Plum
Model : Ram 10
Category : Mobile Phone